1
CBC (EUROPE) Ltd.
Telecamere Megapixel e Software di Videosorveglianza MP100 MANUALE UTENTE Rev 5.0.4
Il software è fornito su base AS-IS-BASIS. CBC declina ogni responsabilità per quanto
riguarda il software, incluse tutte le garanzie implicite di commerciabilità e idoneità.
In nessun caso CBC potrà essere ritenuta responsabile per danni diretti, indiretti,
conseguenti o risultanti o da perdita di dati o di profitti a seguito dell’utilizzo o in
connessione con l'uso o le prestazioni di questo software.
1
MANUALE UTENTE
Capitolo 1. Introduzione
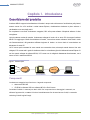
Descrizione del prodotto
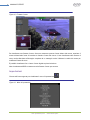
Il software MP100 supporta la visualizzazione full-motion in tempo reale multi-camera e l’archiviazione policy-based,
accesso remoto live e file archiviati
tramite Internet Explorer, visualizzazione simultanea a pieno schermo e
visualizzazione con zoom degli archivi.
Per completare la sua linea di telecamere megapixel, CBC offre questo software full-optional software di video
sorveglianza.
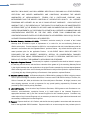
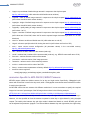
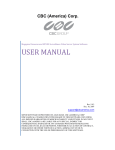
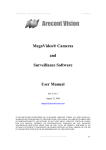
Un tipico sistema consiste di massimo 16 telecamere collegate in locale e di un server PC che esegue il software
MP100. Per raggiungere il livello di archiviazione full motion, il server deve essere collocato a livello locale in modo
che l'interconnessione LAN garantisca sufficiente larghezza di banda e un breve ritardo di comunicazione tra
telecamere e il server PC.
Un PC remoto potrà connettersi al server tramite una connessione lenta, ad esempio tramite Internet. Una volta
collegato, il PC remoto sarà in grado di visualizzare video live e visualizzare gli archivi utilizzando Internet Explorer. Si
noti che quando collegato al software MP100, il PC remoto non si collegherà direttamente alle telecamere, ma al
server su cui è in esecuzione MP100.
Figura 1. Sistema tipico
LAN
Internet
Server MP100
Componenti
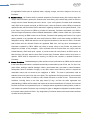
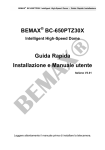
Le telecamere megapixel sono fornite con i seguenti componenti:
•
telecamera CBC MP
•
CD-ROM o chiavetta USB con software MP100 e file di licenza
Controllare l’imballo e i contenuti per danni visibili. Se i componenti sono danneggiati o mancanti, non
utilizzare l'apparecchio, contattare il fornitore immediatamente. Se doveste ritornare l'unità, è necessario
restituire gli imballi originali integri.
CBC (EUROPE) Ltd.
www.cbceurope.it
2
MANUALE UTENTE
Requisiti di Sistema
Consigliamo di dedicare un PC alla visualizzazione e registrazione delle telecamere. Le specifiche di sistema
sono da intendersi come minime.
Standard performance
24FPS a piena risoluzione di telecamera MP2:
•
OS: Windows XP Pro, Vista, Windows 2003 server, o Windows 2008 server
•
CPU: Core 2 Duo 2Ghz
•
RAM: 1 GB
•
Scheda video: NVIDIA, 128 MB RAM
•
Scheda di rete: 100 base-T, 2 schede di rete – una per la connessione alle telecamere ed una per la
connessione remota
Si possono utilizzare PC con specifiche inferiori qualora si desideri archiviare le immagini ma non
visualizzarle localmente.
Scegliere la dimensione degli HDD di registrazione in base ai tempi di archiviazione necessari alle dimensioni
delle immagini (circa 200Kbytes/immagine).
Per esempio, due HDD da 400GB potranno contenere circa 6 giorni di archiviazione per 8 telecamere
registrate ad 1 immagine per secondo.
Apparati di rete
Utilizzare switch o router di rete 100 Mbps con gestione di collisioni e conflitti. L’utilizzo di hub può causare
instabilità del sistema. Modelli suggeriti:
•
Sistemi GE EtherNav
•
Netgear ProSafe 8PT 100Base-TX Switch with PoE #FS108PNA, 10/100Base-TX w/4 PoE 100Base-TX,
•
Netgear ProSafe 24+2 Gigabit Switch with POE #FS726TP, 2 Gigabit output w/12 PoE, 100Base-TX,
•
Netgear ProSafe 24+4 Gigabit Switch with POE # FS728TP, 4 Gigabit output w/24 PoE, 100Base-TX,
•
Netgear ProSafe 24 Gigabit Switch with POE # GS724TP, 24 Gigabit output w/24 PoE, 100Base-TX,
•
D-Link Web Smart #DES-1316 (POE Switch/Hub) 10/100Base-TX, 8 PoE ports and 8 non-PoE
ports,True IEEE 802.3af,
•
TRENDnet #TPE-S88 (POE Switch/Hub) 10/100Base-TX 8 PoE ports and 8 non-PoE ports, True IEEE
802.3af,
•
PowerDsine #PD-6001/AC (PoE Single port hub) 10/100Base-TX, Single Midspan POE port, True IEEE
802.3af,
CBC (EUROPE) Ltd.
www.cbceurope.it
MANUALE UTENTE
3
Telecamere
Introduzione
Le camere MP1A, MP2AI, MP3A, MP3-DN, MP5A, MP8D e MP8P sono telecamere IP a risoluzione
megapixel in grado di trasmettere immagini non rumorose ed in tempo reale.
•
MP1: risoluzione 1.3-megapixel - 1280 x 1024 @30FPS. Supporta iride automatico DC.
•
MP2A: risoluzione 2-megapixel - 1600 x 1200 @24FPS. Supporta iride automatico DC.
•
MP3A: risoluzione 3-megapixel - 2048 x 1536. La telecamera MP3A è utilizzata tipicamente a risoluzione
1920 x 1200 @20 FPS. Supporta iride automatico DC.
•
MP3-DN: (doppio sensore), camera day-night a risoluzione 3-megapixel - 2048x153 @20FPS (colori) o
1.3-megapixel - 1280x1024 @30FPS (Bianco e nero). La sensibilità minima in modalità notte è di 0.01
lux.
•
MP5A: risoluzione 5-megapixel -
2592 x 1944.
La telecamera MP5A è utilizzata tipicamente a
risoluzione 2560 x 1600 @ 15FPS. Supporta iride automatico DC.
•
MP8D: 4 sensori 2-megapixel per un totale di 8-megapixel @ 22FPS che forniscono una visone a 360°.
•
MP8P: 4 sensori 2-megapixel per un totale di 8-megapixel @ 22FPS che forniscono una visone a 180°.
Tutte le telecamere sono dotate di connettore LAN e possono fornire immagini video con un’occupazione di
banda Massimo di 55 Mbps. Le immagini sono trasmesse via rete con compressione Motion JPEG
utilizzando il protocollo TFTP.
Funzionalità di rurre le telecamere:
•
Esposizione elettronica automatica (AE)e controllo del guadagno (AGC)
•
Compensazione automatica del controluce
•
Bilanciamento del bianco automatico (multi-matrix)
•
Controllo anti-flicker a 50 o 60Hz
•
Controllo Pan/Tilt elettronico su zoom digitale
•
Saturazione, luminosità, gamma, definizione programmabili
•
Trasmissione simultanea dell’immagine completa e di quella in zoom digitale
•
Rotazione elettronica dell’immagine di 180°
•
Motion Detector (ad eccezione di MP8D / MP8P)
•
Controllo iride automatico (solo modelli AI)
Connettori
Tutte le telecamere sono dotate dei seguenti connettori:
•
Connettore per reti LAN per cavi UTP o STP @100 Base-T. Il connettore LAN supporta connessioni
Power-over-Ethernet (PoE)
•
Connettori per alimentazione 12Vcc-48Vcc
•
Connettore per controllo iride automatico DC (solo modelli AI)
CBC (EUROPE) Ltd.
www.cbceurope.it
4
MANUALE UTENTE
Alimentazione
•
Fornire la tensione di alimentazione(12Vcc-48Vcc) attraverso il connettore di alimentazione posto sul
retro della telecamera. Si consoglia l’utilizzo di alimentatori switching a basso rumore.
Oppure:
•
Fornire l’alimentazione attraverso il cavo di rete (48Vcc) attraverso uno switch PoE. Le telecamere
sono conformi allo standard IEEE 802.saf.
L’assorbimento può variare a seconda della modalità di utilizzo. Il massimo assorbimento viene raggiunto
quando si trasmettono immagini a massima risoluzione ed al massimo frame-rate. L’assorbimento massimo
dei modelli è:
•
MP1AI, MP2AI, & MP3AI: 4 Watt
•
MP3-DN: 4.5 Watt
•
MP5AI: 5 Watt
•
MP8D: 6 Watt
•
MP8P: 8 Watt.
Installazione
Tutte le telecamere MP sono costituite da case in alluminio non sigillati. La temperature ambientale di utilizzo
deve rispettare il range di funzionamento 0°C ~50°C; le telecamere devono essere installate in ambienti
interni od in custodie per videosorveglianza appropriate.
Il fissaggio della telecamera alla staffa/custodia deve essere effettuato con vite ¼” x 20. Assicurarsi di
utilizzare viti sufficientemente corte da non entrare in contatto con l’elettronica interna della telecamera.
Le telecamere devono essere installate da personale specializzato seguendo le normative di riferimento. Le
staffe/custodie adottate dovranno poter supportare il peso della telecamera e dell’ottica..
Cablaggio di rete
Si raccomanda l’utilizzo di cavi Categoria 5e o superiore. Si raccomanda di eseguire il cablaggio ad arte
secondo le normative e gli standard vigenti..
Ottiche
Le telecamere MP possono essere utilizzate con ottiche 1/2” o 2/3” megapixel. La telecamera MP3-DN
necessita di due obiettivi ad iride manuale con diametro esterno massimo di <38mm, mentre le telecamere
MP8D vengono fornite con ottiche pre-installate.
Ottiche manuali
Si consiglia l’utilizzo di ottiche computar megapixel ad iride manuale disponibili nelle seguenti lunghezze
focali (si noti che tutte le ottiche a passo C necessitano un distanziale di 5mm):
•
computar MLM-3XMP (3X macro zoom), formato=2/3”
•
computar H0514-MP (5mm), formato=1/2”
CBC (EUROPE) Ltd.
www.cbceurope.it
5
MANUALE UTENTE
•
computar M0814-MP (8mm), formato=2/3”
•
computar M1214-MP (12mm), formato=2/3”
•
computar M1614-MP (16mm), formato=2/3”
•
computar M2514-MP (25mm), formato=2/3”
•
computar M5018-MP (50mm), formato=2/3”
•
computar H2Z0414C-MP (4mm - 8mm), formato=1/2”
•
computar H3Z4512-CS (4.5mm – 12.5mm), formato=1/2”
•
computar M3Z1228C-MP (12mm - 36mm), formato=2/3”
Utilizzo di ottiche ad iride manuale
Si consiglia l’utilizzo di ottiche computar megapixel ad iride a disponibili nelle seguenti lunghezze focali (si
noti che tutte le ottiche a passo C necessitano un distanziale di 5mm):
•
a risoluzione megapixel
•
con F.stop il più basso possibile
Si raccomanda di chiudere l’iride il meno possibile compatibilmente con l’illuminazione disponibile sulla scena
ripresa..
Ottiche ad iride automatico
Per le sole telecamere che supportano il controllo dell’iride automatico, si consiglia l’utilizzo di ottiche
computar megapixel ad iride automatico (si noti che tutte le ottiche a passo C necessitano un distanziale di
5mm):
•
computar HG2Z0414FC-MP 4mm-8mm, formato=1/2”
Utilizzo di ottiche ad iride automatico
Per utilizzare ottiche ad iride automatico DC:
1) avvitare l’ottica sulla telecamera
2) collegare il cavo quadri polare alla telecamera nell’apposito connettore
3) alimentare la telecamera.
La telecamera rileverà automaticamente le presenza dell’ottica ad iride automatico e, se l’illuminazione è
sufficiente, la camera inizierà a regolare l’iride entro 30 secondi
Accesso alle telecamere MP
Le telecamere possono essere visualizzate attraverso il software MP100 o tramite Internet Explorer tramite
richieste HTTP.
Servizi di rete supportati
Tutte le telecamere MP supportano i protocolli TFTP e HTTP; il protocollo TFTP garantisce le migliori
prestazioni ed è utilizzabile attraverso le SDK disponibili per Windows o per Linux o attraverso il software
MP100.
CBC (EUROPE) Ltd.
www.cbceurope.it
6
MANUALE UTENTE
Capitolo 2. Software di Video Sorveglianza
Installazione del Software
Per installare il software MP100:
1. Registrarsi su Windows XP/Vista con un account amministratore.
2. Aprire il Pannello di controllo e selezionare la voce Installazione applicazioni per rimuovere vecchie
versione del software.
3. Eseguire il file Setup.exe e seguire le istruzioni per completare l’installazione.
4. Se si utilizza Windows Vista, gli utenti devono aprire la cartella di installazione, aprire “My Computer \
C:\\Programmi\CBC America\LocalMachine.
Cliccare con il tasto destro del mouse il file “LocalMachine.exe”, scegliere la voce “Proprietà ->
Compatibilità -> Livello dei Privilegi” ed abilitare l’esecuzione del programma come amministratore.
Il programma di installazione creerà automaticamente un’icona sullo schermo per l’apertura del software.
Configurazione del Firewall
Al primo avvio del software, il firewall dovrebbe avvisare che l’applicativo sta utilizzando dispositivi di rete. E’
necessario aprire l’utilizzo della rete a due applicativi del software MP100:
•
AVInstaller.exe/CameraInstaller: programma utile a ricercare ed installare le camere.
•
LocalMachine.exe: programma per la visualizzazione/registrazione delle immagini.
Entrambi i software sono memorizzati nella cartella CBC America contenuta in Programmi.
Alcuni esempi:
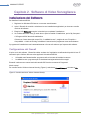
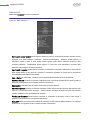
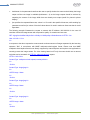
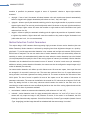
Per vecchie versioni di Norton Internet Security (Figura 2), selezionare Permetti Sempre e cliccare su Ok.
Figura 2. Vecchia versione di Norton Internet Security
CBC (EUROPE) Ltd.
www.cbceurope.it
7
MANUALE UTENTE
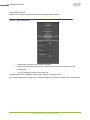
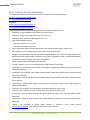
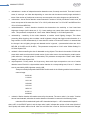
Per la nuova versione di Norton Internet Security (Figura 3), selezionare Impostazioni->Firewall Personale e
selezionare Disattiva.
Figura 3. Nuova versione di Norton Internet Security
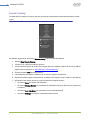
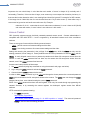
Per McAfee Personal Firewall (Figura 4), cliccare su Garantisci Accesso.
Figura 4. McAfee Personal Firewall Plus
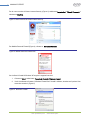
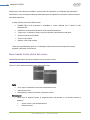
Se si utilizza il firewall di Windows XP seguire le seguenti istruzioni:
1. Cliccare su Start e selezionare Pannello di Controllo>Windows firewall.
2. Verrà visualizzata la finestra di Windows Firewall. Se il firewall è abilitato, desezionare l’opzione: Non
consentire eccezioni (Figura 5).
Figura 5. Windows Firewall
CBC (EUROPE) Ltd.
www.cbceurope.it
8
MANUALE UTENTE
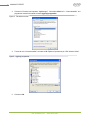
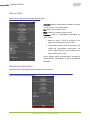
3. Cliccare su Eccezioni ed impostare “AppManager”, “CameraLocalMachine” e “CameraInstaller” tra I
programme consentiti cliccando sul tasto Aggiungi programma.
Figura 6. Tab delle eccezioni
4. Trovare la voce “Camera Installer”e cliccare su Ok. Ripetere l’operazione per “CBC America Video”.
Figura7. Aggiungi programma
5. Cliccare su Ok.
CBC (EUROPE) Ltd.
www.cbceurope.it
9
MANUALE UTENTE
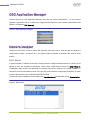
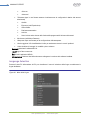
CBC Application Manager
Cliccare sull’icona di “CBC Application Manager” due volte per avviare l’applicazione. La voce Camera
Upgrade è disponibile solo se il software per l’aggiornamento firmware viene installato manualmente nella
cartella “C:\Programmi\CBC America\”.
Figura 8. CBC Application manager
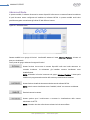
Camera Installer
Consente la rilevazione di tutte le camere MP disponibili sulla rete locale in modo da poterne eseguire la
configurazione iniziale I ex.Indirizzo IP) e da poterle rendere accessibili al software CBC America Video
System.
Basic Mode
In questa modalità, il software rileva tutte le camere presenti ed assigna automaticamente un indirizzo IP ad
ognuna di esse. Per installare le telecamere, l’utente dovrà semplicemente cliccare su Install Cameras.
L’installazione delle camere sarà terminata solo quando tutte verrano elencate con risultato “Installed”. È
necessario cliccare su Save/Exit prima di uscire per poter memorizzare le configurazioni eseguite e per poter
accedere alle telecamere del visualizzatore/REGISTRATORE.
Le lista delle camere installate è memorizzata nel file LocalMachine.ini ed aesportata nel file CameraList.txt.
Figure 9. Basic mode
CBC (EUROPE) Ltd.
www.cbceurope.it
10
MANUALE UTENTE
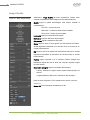
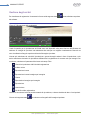
Advanced Mode
In questa modalità, il software rileva tutte le camere disponibili sulla rete me consente all’utente la selezione
di quali dovranno essere configurate ed installate nel software MP100. In questa modalità sarà inoltre
possibile assegnare manualmente gli indirizzi IP alle differenti camere.
Figura 10. Advanced mode
Questa modalità ha un gruppo di funzioni visualizzabili attraverso il tasto Advanced Features ; cliccare sul
tasto per visualizzarle.
Fanno parte del gruppo advanced le seguenti funzioni:
Questa funzione ricerca tutte le camere disponibili nella rete locale attraverso un
comando broadcast.. Le telecamere già installate verranno visualizzate come
Installed/locked.
NOTA: utilizzando le funzioni contenute nel gruppo Advanced Features, l’utente potrà
modiifcare la programmazione anche delle camere preventivamente installate.
Questa funzione installa le telecamere selezionate nel software MP100.
NOTA: tutte le camere visualizzate come “Installed, locked” non saranno considerate.
Deseleziona tutte le camere.
Questa opzione apre il web-browser e consente la visualizzazione delle camere
selezionate via HTTP.
NOTA: cliccando due volte sulla colonna selected avrà lo stesso effetto.
CBC (EUROPE) Ltd.
www.cbceurope.it
11
MANUALE UTENTE
Questa opzione apre una finestra di dialogo avanzata che consente l’impostazione
dell’indirizzo IP e di un testo descrittivo per la camera selezionata.
NOTA: un doppio click nella sezione IP address o Description ha lo stesso effetto.
Questa opzione apre una finestra di dialogo avanzata che consente di aggiungere
telecamere manualmente. Questa funzione deve essere utilizzata su installazioni
distribuite su più subnet mask non raggiungibili da messaggi broadcast.
Utilizzare
questa funzione solo se si dispone degli indirizzi IP e MAC di tutte le camere.
Questa
opzione
salva
le
configurazioni
eseguite
nel
file
“LocalMachine.ini”
consentendone l’uso all’applicativo CBC America Video System.
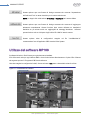
Utilizzo del software MP100
Il software richiede un file di licenza per ogni telecamera installata.
Il file di licenza è unico per ogni indirizzo MAC e viene fornito insieme alla telecamera. Copiare il file di licenza
nel seguente percors C:\Programmi\CBC America\license.
Una volta eseguite le configurazioni iniziali, cliccare sul tasto Run posto a destra della scritta Live View.
Figura 11. Visualizzazione di default
CBC (EUROPE) Ltd.
www.cbceurope.it
12
MANUALE UTENTE
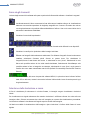
Barra degli strumenti
La barra degli strumenti è localizzata nella parte superiore della finestra del software e visualizza le seguenti
icone:
visualizza/nasconde l’albero contenente la lista delle camere installate utile per la visualizzazione
attraverso una comoida operazione di drag&drop eseguibile con il mouse. Cliccando due volte su
una singola telecamera è possibile abilitarne/disabilitarne l’utilizzo. Una crocie rossa indica che la
telecamera è attualmente disabilitata.
Visualizza il menu delle impoistazioni.
Attiva la visualizzazione a pieno schermo..
Selezionare la visualizzazione multischermo desiderata cliccando sulle differenti icone disponibili.
Visualizza i controlli per la riproduzione delle immagini archiviate.
Effettua una fotografie della telecamera selezionata. Per effettuare fotografie di tutte le telecamere
installate,
selezionare
Cameras
quindi
cliccare
su
questa
icona.
Per
visualizzare
le
fotografie,cliccare il tasto destro del mouse e selezionare la voce “photo”. Selezioando la voce
Salva sarà possibile salvare le foto nella cartella desiderata, Selezionando Salva/Stampa sarà
possibile salvare la foto ed eseguirne una stampa; selezionando la voce Scorri, verrà aperta la
cartella dove sono state memorizzate tutte le foto (default: Documenti\My Pictures\CBC America
Photos\).
Visualizza l’utilizzo del server da parte del software MP100; le prime due barre indicano l’utilizzo
della CPU e della rete, mentre le successive indicano l’utilizzo delle risorse di rete da parte di ogni
singola telecamera.
Selezione della risoluzione e zoom
Al fine di visualizzare più telecamere in un’unica finestra, le immagini vengono visualizzate a risoluzioni
ridotte.
Per visualizzare una singola telecamera alla massima risoluzione è sufficiente cliccare due volte sulla sua
immagine video. Cliccare nuovamente due volte sull immagine per tornare alla visualizzazione precedente.
La risoluzione utilizzata è visualizzata nell’angolo superiore sinistro dell’immagine.
Un’ulteriore modalità di visualizzazione dell’immagine a piena risoluzione è l’utilizzo delle finestre di zoom
digitale:
CBC (EUROPE) Ltd.
www.cbceurope.it
13
MANUALE UTENTE
Figura 12. Finestre di zoom
Per visualizzare una finestra di zoom, cliccare e mantenere premuto il tasto sinistro del mouse, trascinare il
mouse evidenziando l’area di interesse e rilasciare il tasto del mouse. L’area visualizzata nella finestra di
zoom verrà evidenziata sull’immagine completa da un rettangolo verde. Utilizzare la rotella del mouse per
modificare il fattore di zoom.
È possiblie visualizzare fino a 4 aree di zoom digitale a piena risoluzione.
Nota: la telecamera MP8D consente una sola finestra di zoom per sensore.
Impostazioni
Cliccare sull’icone seguente per visualizzare il menu di impostazione
Figura 13. Menu di impostazioni
CBC (EUROPE) Ltd.
www.cbceurope.it
..
14
MANUALE UTENTE
Selezionare uno dei menu principali visualizzati per iniziarne la programmazione. I menu si differenzieranno a
seconda dei modelli di telecamera utilizzati (per esempio il parametro Day/Night è disponibile solo per le
camere MP3-DN).
Nota: selezionando “Reset generale” tutte le programmazioni verranno riportate ai valori di dafault.
La finestra posta in basso al menu di impostazione visualizza il numero della telecamera a cui i parametri
visualizzati fanno riferimento; modificare il valore numerico per selezionare altre telecamere.
Figura 14. Visualizzazione della camera selezionata
Esposizione
Figura 15. Esposizione
Selezionare il menu Esposizione dal menu Impostazionietting per impostare i parametri di esposizione:
•
Illuminazione regola il bilanciamento del bianco; lselezionare “Automatic” per abilitare l’auto
regolazione della camera.
Luce regola la funzionalità di esposizione in base alla frequenza dell’illuminatore utilizzato (Europa
(50 Hz) oppure US/Giappone (60 Hz)).
Modalità Bassa Illuminazione regola il funzionamento della camera in condizione di illuminazione
precaria:
a.
High Speed abilita tempi brevi di esposizione consentendo una parametrizzazione da 1 a 10 ms,
al massimo frame rate. Questa opzione minimizza il trascinamento dell’immagine su movimento
ma riduce la sensibilità delle camere.
CBC (EUROPE) Ltd.
www.cbceurope.it
15
MANUALE UTENTE
b.
Velocità abilita tempo di esposizione non inferiore a 10 ms a meno di scarsa illuminazione. In
caso di necessità il tempo di esposizione viene aumentato fino ad un massimo di 80 ms.
c.
Bilanciato abilita tempo di esposizione non inferiore a 20 ms a meno di scarsa illuminazione. In
caso di necessità il tempo di esposizione viene aumentato fino ad un massimo di 80 ms.
d.
Quality abilita tempo di esposizione non inferiore a 40 ms a meno di scarsa illuminazione. In
caso di necessità il tempo di esposizione viene aumentato fino ad un massimo di 200 ms.
L’effetto di trascinamento su movimento può diventare importante.
e.
Moon Light abilita tempo di esposizione lungo fino ad un massimo di 500 ms.
Auto Esposizione Acceso/Spento è un’opzione che abilita/disabilita l’esposizione automatica della
camera al variare delle condizioni di illuminazione.
Single Capture – leggere attentamente il capitolo successivo.
Single Capture
Questa modalità di funzionamento è adatta a tutte le applicazioni che necessitano una singola immagine al
momento dell’attivazione di un contatto remoto. Per esempio, dovendo analizzare il numero di targa di una
autovettura, sarà possibile chiudere il contatto ausiliaro della telecamera per ricevere un’immagine definita ed
ad alta risoluzione.
Selezionando questa opzione, la telecamera cessa di inviare immagini video fino al momento di attivazione
dell’allarme di ingresso. Il server collegato continua a contattare la telecamera fino a che non verifica la
presenza di immagini. In caso di evento d’allarme la telecamera risponde al server con l’immagine dell’instate
di attivazione dell’allarme. In caso di non allarme, la telecamera invia immagini vuote a richiesta del server.
Questo tipo di applicazione è adatta a condizioni di illuminazione scarsa per cui si utilizzi un flash. Quando il
livello di illuminazione è sufficiente, la camera commuta automaticamente alla modalità High Speed per 1 ~2
ms senza attivare il flash.
L’utilizzo della funzione prevede il collegamento del fash al connettore output della camera. È necessario
eseguire una calibrazione del Falsh cliccando su “Calibrate Flash”. La calibrazione dure circa 13 secondi( per
13 attivazioni del flash). Per verificare la corretta taratura del sistema, è possiblile cliccare sul tasto Check
“Check Calibration”. Cliccando il tasto, il software visualizza un risultato numerico; se il risultato è compreso
tra 768 ~ 6144, la calibrazione è da considerarsi ottimizzata. Una regolazione errata dell’iride può degradare
la funzionalità della camera. Tipicamente chiudere l’iride, corrisponde ad una peggiore calibratura del flash.
Le operazioni di calibrazione possono richiedere parecchi interventi di regolazione dell’iride.
NOTA: eseguita la calibrazione, la telecamera non invierà più immagini a meno che l’ingresso d’allarme non
venga attivato. Selezionando “Add timestamp to photos”, l’orario di esecuzione della fotografia verrà
sovraimposto al segnale video. Al riavvio del software, le configurazioni specifiche di ogni telecamera
verranno caricati dal file “userinfo.txt”; editando manualmente questo file, l’utente potrà aggiungere commenti
alle immagini catturate.
CBC (EUROPE) Ltd.
www.cbceurope.it
16
MANUALE UTENTE
Image Quality
Figura 16. Menu Image Quality
Selezionare
Image Quality dal menu Impostazioni. Questo menu
consente l’impostazione dell’immagine ricevuta dalle telecamere:
Qualità regola la qualità dell’immagine nelle diverse modalità di
visualizzazione:
“Full View” : a pieno schermo.
“Multi View” : multivisione delle camere installate.
“Zoom View” : finestre di zoom digitale.
Luminosità regola la luminosità dell’immagine.
Definizione regola la definizone dell’immagine.
Saturazione regola la saturazione del colore.
Rosso regola la tinta di rosso agendo sul bilanciamento del bianco.
Questa regolazione necessita di un intervallo di 20~30 secondi per un
corretto funzionamento.
Blu regola la tinta di blu agendo sul bilanciamento del bianco. Questa
regolazione necessita di un intervallo di 20~30 secondi per un corretto
funzionamento.
Periodo regola l’intervallo a cui il computer richiede immagini alla
telecamera adjusts the rate at which the computer requests images
from the camera.
Dimensioni immagine regola le coordinate dell’immagine:
Left/Top: definiscono l’angolo sinistro superiore dell’immagine sul
sensore
Larghezza/Altezza: defisicono le dimensioni delle immaginiNota: funzione collegata a “Don’t update sensor window” nel menu
Advanced.
Rotate 180 ruota l’immagine verticalmente di 180°
CBC (EUROPE) Ltd.
www.cbceurope.it
17
MANUALE UTENTE
Archivio
Selezionare Archivio dal menu Impostazioni.
Filtro:
Figura 17. Menu Archivio
Salva tutti I quadri abilita la registrazione di tutti i
fotogrammi inviati dalla camera.
Salva
tutti
e
segna
Movimento
abilita
la
registrazione di tutte le immagini inviate dalla
telecamera evidenziando quelle relative ad un
evento di motion detection.
Salva solo il Movimento abilita la registrazione delle
immagini relative ad eventi di movimento rilevati dal
rilevatore di movimento della camera e disabilita la
registrazione
dopo
un
intervallo
di
tempo
speicificato nel parametro Continue after motion
detected. (Tempo /fps)
Frequency definiscela frequenza del numero di frame
per secondo registrati.
Continue after motion detected definisce il tempo di
registrazione a seguito di evento di allarme di motion.
Nota: se un nuovo evento di motion è rilevato durente il
tempo di registrazione post-allarme, la frequenza di
registrazione viene riaggiornata al valore riportato nel
campo Frequency.
Motion Detection
Il rilevamento del movimento avviene tramite analisi della variazione della luminosità pixel-by-pixel delle
immagini inter-frame. Il sistema MP supporta due tipi di motion detector.
•
Il motion detector del software processa le immagini che riceve dalle telecamere mentre il motion
detector residente nelle telecamere effettua l’analisi prima di inviare le immagini riducendo il carico
della rete e della CPU del server.
•
Il motion detector è attivato dal menu Archivio solo quando una delle voci “Salva tutti e segna
Movimento” o “Salva solo il Movimento” è selezionata. Lo stato del motion detector è visualizzato
nella parte inferiore destra della finestra di impostazione dello stesso.
•
Il rilevamento viene eseguito indipendentemente nelle aree selezionate. La griglia più grande
selezionabile su una telecamera ha dimensioni 8x8. La dimensione della griglia è impostata dal
parametro “Zone size) e può essere evidenziata attraverso “X” o “[]”. Le croci rosse indicano l’area
non utilizzata dal motion.
CBC (EUROPE) Ltd.
www.cbceurope.it
18
MANUALE UTENTE
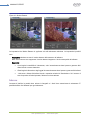
Figura 18. Motion Detector
Le impostazioni del Motion Detector si applicano solo alla telecamera seleziona. Le impostazioni possibili
sono:
Detected by seleziona se usare il motion detector della camera o del software.
Nota: alcune camere non supportano il motion detector integrato e si dovrà usare quello del software.
Sensitività:
•
Level regola la sensibilità di rilevamento; valori eccessivamente bassi possono generare falsi
allarmi dovuti a rumore elettronico.
•
Detail regola la dimensione degli oggetti da eccessivamente bassi possono generare falsi allarmi.
•
Limit serve a limitare falsi allarmi dovuti a repentine variazioni di illuminazione. Se il numero di
zone è superiore al limite impostato, l’allarme non viene attivato.
Salva su
Consente di definire la cartella dove salvare le fotografie e i dischi dove memorizzare le telecamere. È
possibile definire disci differenti per ogni telecamera.
CBC (EUROPE) Ltd.
www.cbceurope.it
19
MANUALE UTENTE
Advanced
Selezionare Advanced dal menu Impostazioni:
Figura 19. Menu Advanced
Don’t update sensor window questa opzione determina come le modifiche all’immagine debbano essere
applicate: se a livello software o hardware
(sensore dell’immagine).
Abilitando questa opzione, si
eviteranno conflitti in caso di utinti multipli poiché ognuno potrà definire differenti dimensioni delle
immagini trasmesse.
Disabilitatndo questa opzione, il frame rate verrà ottimizzato a seconda della
dimensione di immagine richiesta al momento.
Use DirectX if possible questa opzione consnete di visualizzare le immagini utilizzando le risorse fisiche
della scheda grafica e non attrverso il software. È necessario impostare in DirectX size la dimensione
dell’immagine gestita dalle DirectX stesse.
Auto – Startup se selezionata, il software verrà caricato automaticamente all’avvio del sistema.
RealTime if folded consente di impostare il Massimo livello di priorità al software MP100 anche quando la
finestra di visualizzazione è minimizzata sulla barra di WIndows.
Show motion evidenziale parti di imagine interessate dal motion detector.
Use double packets consente di utilizzare pacchetti di 2904 byte invece dei pacchetti standard da 1450
byte per la trasmissione delle immagini. Questa opzione aumenta la banda occupata ma potrebbe
causare instabilità in rete eccessivamente utilizzate.
Warning on disconnect questa opzione consnete di visualizzare un’immagine rossa in caso venga a
mancare la connessione con una specifica telecamera.
Static ARP abilita una connessione tstatica tra indirizzo IP e MAC address della telecamera. La relazione
dinamica non è supportata da alcuni modelli obsoleti di telecamera.
CBC (EUROPE) Ltd.
www.cbceurope.it
20
MANUALE UTENTE
Autentificazione
Questo menu è utilizzato per garantire l’accesso al software tramite password:
Figura 20. Menu Autentifitzone
“Administrator” garantisce pieno accesso al sistema.
“Viewer” grants garantisce accesso alle registrazioni ed al videin tempo reale ma non alle
configurazioni.
“Live only” garantisce accesso al solo video live.
La gestione degli utenti è effettuato tramite il tasto “Aggiungi” in basso a sinistra.
Se sono stati programmati più utenti, sarà necessario digitare ID e password dell’utente all’avvio del software.
CBC (EUROPE) Ltd.
www.cbceurope.it
21
MANUALE UTENTE
Remote Viewing
Il sofwtae MP100 è dotato di un server web che consente la visualizzazione remota delle telecamere e degli
archivi.
Figura 22. Menu Remote viewing
Per abilitare questo server selezionare Remote viewing fnel menu delle Impostazioni:
1.
Abilitare Allow Remote Viewing.
2.
Cliccare su Si o APllica per attivare l’opzione
3.
Avviare Internet Explorer da un’altro PC collegato alla rete e digitare l’indirizzo IP del server MP100
seguito dal testo /guix.htm: es. http://200.168.1.102:4250/guix.htm
4.
Cliccare sul tasto Invio della tastiera del PC.
5.
Internet Explorer richiederà l’installazione di un ActiveX; eseguire l’installazione.
6.
Utilizzare l’interfaccia grafica disponibile per visualizzare le immagini in tempo reale o in riproduzione.
7.
Utilizzando il tasto destro del mouse si potrà accesere alle seguenti funzioni:
Cliccare su Save per salvare delle fotografie.
Cliccare su Manage Servers per visualizzare le impostazioni del server MP100 e per consentirne
la modifica.
Cliccare su Auto Hide Menu per nascondere il menu automaticamente.
Cliccare su Settings per eseguire l’impostazione della camera.
CBC (EUROPE) Ltd.
www.cbceurope.it
22
MANUALE UTENTE
Giorno/Notte
Questo menu si applica alle sole telecmaere MP3-DN:
Figura 23. Menu Giorno/Notte
Automatic abilità la commutazione manuale tra sensore
a colori e bianco e nero della camera..
Day abilita il solo sensore a colori.
Night abilita il solo sensore in bianco e nero.
Threshold regola la commutazione automatica tra
giorno e notte:
• Switch At regola il livello di luminosità a cui
eseguire la commutazione giorno->notte.
• Toggle Guard regola il livello di luminosità a cui
eseguir ela commutazione notte->giorno. Un
valore Toggle Guard pari a 0% coincide con un
valore Switch At pari a 100%.
NOTA: Questa doppia programmazione consnete di
evitare continue commutazioni in caso di illuminazioni
intermedie.
Diaframma automatico
Questa funzione regola l’apertura dell’iride automatico dell’obiettivo.
Figura 24. Menu Diaframma Automatico
CBC (EUROPE) Ltd.
www.cbceurope.it
23
MANUALE UTENTE
Selezionare la voce Attivato per abilitare il controllo dell’iride automatico; se si disabilita l’iride automatico
dsell’obiettivo, esso verrà aperto totalmente dalla telecamera che regolerà la lumisonità sul sensore tramite il
solo shutter elettronico.
Lo stato dell’iride può avere 6 differenti stati:
•
DISABILITATO: l’iride automatico è disabilitato o l’ottica utilizzata non è dotata di iride
automatico DC.
•
Valutazione: la telecamera sta tarando l’iride automatico dell’ottica.
•
Troppo scuro. L’immagine è troppo scura per utilizzare l’iride automatico dell’ottica.
•
Chiusura: l’iride si sta chiudendo.
•
Chiuso: l’iride è chiuso.
•
Apertura: l’iride si sta aprendo.
L’iride verrà completamente aperto se il il Guadasgno elettronico della camera supererà la soglia
impostata nella barra di scorrimento.
Menu tramite il tasto destro del mouse
L’utilizzo del tasto destro del mouse visualizza una nuova serie di menu:
Figura 25. Menu addizionali tramite il tasto destroy del mouse.
FOTO:
•
Scorri apre la cartella dove sono state memorizzate le foto.
•
Salva salva una foto
•
Salva/Stampa: consente di salvare e stampare una foto.
Configurazioni:
•
Varie: (apre le seguenti finestre di programmazione già descritte in una finestra esterna al
software)
•
Access Control (vedi Autentificazione).
•
Remote Viewing.
CBC (EUROPE) Ltd.
www.cbceurope.it
24
MANUALE UTENTE
•
•
Salva su.
•
Advanced.
Telecmara (apre in una finestra esterna al software tutte le configurazioni relative alla camera
selezionata)
•
Qualità
•
Exposure (vedi Esposizione).
•
Giorno/Notte.
•
Diaframma automatico
•
Archivio.
•
Sono incluse anche alcune delle funzionalità programmabili dal menu Advanced
•
Movimento (vedi Motion Detector).
•
Stampante apre una finestra per la configurazione della stampante.
•
Scarico aggiorna il file LocalMachine.ini utile per assistenze remote in caso di problemi.
•
Video visualizza le immagini in modalità a pieno schermo.
Nascondi minimizza il software MP100.
Log off logs off the current user.
Esci chiude l’applicativo MP100.
Informazioni su visulizza I dati delle telecamere collegate e la versione del software installata.
Language Selection
Premere il tasto F2 della tastiera del PC per visualizzare il menu di selezione della lingua e selezionare la
lingua desiderata.
Figura 26. Menu delle Lingue
CBC (EUROPE) Ltd.
www.cbceurope.it
25
MANUALE UTENTE
Gestione degli archivi
Per visualizzare le registrazioni è necessario cliccare sulla seguente icona
posta sulla barra superiore
del software.
Figura 27. Riproduzione delle registrazioni
I tasti di controllo per la riproduzione dei filmati sono resi disponibili nella parte inferiore della finestra del
software. Si consiglia di riprodurre una telecamera alla volta per una migliore visualizzazione. Data ed ora
sono visualizzati nell’angolo superiore sinistro dell’immagine riprodotta.
L’utente può selezionare la velocità di riproduzione e quante immagini saltare in fase di riproduzione e può
anche selezionare risoluzioni di riproduzione differenti.Se la registrazione è avvenuta solo per immagini con
movimento, selezionare il parametro Movimento nel campo Filtro.
Riavvia la riproduzione dall’inizio della registrazione
Indietro veloce
Riproduzione inversa
Riproduzione inversa immagine per immagine
Pausa.
Riproduzione immagine per immagine
Riproduzione.
Avanti veloce
Va alla fine della registrazione.
La barra di scorrimento indica la posizione attuale di riproduzione; a destra visualizza la data e l’ora riprodotti.
Cliccare sul seguente tasto
per salvare una fotografia dell’immagine riprodotta.
CBC (EUROPE) Ltd.
www.cbceurope.it
26
MANUALE UTENTE
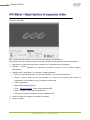
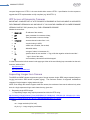
AVI Maker – Esportazione di sequenze video
Figura 28. AVI Maker
NOTA: Assicurarsi che l’archivio non sia vuoto prima di eseguire un’esportazione.
Per esportare una sequenza video operare come segue (alcune versioni potrebbero essere semplificate):
1. selezionare in Load Archive drop-down la camera che si intende esportare (Telecamera).
2. Utilizzare i controlli Date/Time per selezionare l’intervallo di tempo di cui si intende eseguire
l’esportazione.
3. UtilizzareVideo Configurazioni per impostare I seguenti parametri:
•
Seleziona regola la dimensione del frame AVI esportato (100% massima risoluzione).
•
Periodo
regola il frame rate del file esportato; se il valure non corrisponde alla velocità di
registrazione, il file esportato non verrà riprodotto in tempo reale.
•
Video Compression:
Motion JPEG (Qualità originale)
“XviD – http://www.xvid.org” codec raccomandato da CBC.
“MSVC - standard” Codec standard di Microsoft.
“Codec List” consente la selezione dei codec installati sul PC.
4. Cliccare su Make AVI e digitare il nome del file esportato.
5. Cliccare su Salva .
CBC (EUROPE) Ltd.
www.cbceurope.it
27
MANUALE UTENTE
Firmware Loader – Aggiornamento delle telecamere
Tutte le telecamere possono essere aggiornate tramite il softwarer apposito caricando il file relativo alla
camera da aggiornare. Non utilizzare file di modelli diversi o non distribuiti da CBC.
NOTA: UTILIZZARE IL SOFTWARE PER L’AGGIORNAMENTO DOPO AVER INSTALLATO LE
TELECAMERE TRAMITE “CAMERA INSTALLER”.
Per aggiornare una telecamera:
1. Cliccare su “Find Cameras”.
•
Per aggiornare il firmware, cliccare “Upgrade Firmware” e selezionare il file di aggiornamento. Il
nome del file inizia con “fwupdate”, ed ha estensione .txt. ASSICURARSI CHE IL MODELLO
DELLA TELECAMERA SIA CONTENUTO NEL NOME DEL FILE. FILE DI ALTRE
TELECAMERE POTREBBERO DAnNEGGIARE LA STESSA
•
Attendere il termine dell’aggiornamento senza sconnettersi o spegnere la telecamera.
•
Per aggiornare l’hardware, cliccare su “Upgrade Hardware” e selezionare il file di aggiornamento.
Il nome del file inizia con “hwupdate”, ed ha estensione .txt. ASSICURARSI CHE IL MODELLO
DELLA TELECAMERA SIA CONTENUTO NEL NOME DEL FILE. FILE DI ALTRE
TELECAMERE POTREBBERO DAnNEGGIARE LA STESSA.
•
Attendere il termine dell’aggiornamento senza sconnettersi o spegnere la telecamere.
IMPORTANTE: SPEGNERE LA TELECAMERA DURANTE UN AGGIORNAMENTO POTREBBE
DANNEGGIARLA DEFINITIVAMENTE.
CBC (EUROPE) Ltd.
www.cbceurope.it
28
MANUALE UTENTE
Capitolo 3 Troubleshooting
1. Che tipo di compressione usano le telecamere MP?
MJPEG - Motion JPEG.
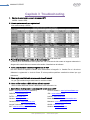
2. Quanto spazio necessita una registrazione?
Ecco alcuni esempi a 22FPS:
3. Perché ho problemi quando installo più di una telecamera?
Se utilizzi più di una telecamere devi copiare tutti i file di licenza che hai trovato nel supporto elettronico in
allegato nella cartella licence contenuta nella cartella di installazione del software.
4. Come posso cambiare la cartella di registrazione dei file?
Nel menu Salva Su imposta la cartella dove memorizzare le fotografie in Cartella Foto e I drive dove
effettuare le registrazioni in Archivio Drivers. È inoltre possible specificare cartelle drive diversi per ogni
telecamera.
5. Posso aggiornare tutte le mie camere con lo stesso firmwrare?
No, per ogni modello bisogna selezionare la versione corretta.
6. Come verifico versione e MAC Address delle mie camere?
Clicca col tasto destro del mouse e seleziona la voce Informazioni su.
/. Quali software di altri produttori sono compatibili cone le camere MP?
Bosch – www.boschsecurity.com(DiBos 8)
IP Vision Software – www.ipvisionsoftware.com
D3DATA – www.d3data.com
JDS – www.softsite32.com
DVTEL – www.dvtel.com
LuxRiot – www.luxriot.com
Genetec – www.genetec.com
March Networks – www.marchnetworks.com
General Electric – www.gesecurity.com
Milestone – www.milestonesys.com
Integral Technologies - www.integral.com
ONSSI – www.onssi.com
ISN – www.isnsecurity.com
Quadrox – www.quadrox.com
CBC (EUROPE) Ltd.
www.cbceurope.it
29
MANUALE UTENTE
Verint - www.verint.com (Smart Site/NDVR
Geutebruck - www.geutebruck.com
products)
Honeywell – www.Honeywell.com (Fusion
Soon to be NVR Partners:
products)
Tereo – www.tereo.com
JVC – www.jvc.com
Artec – www.artec.de
TridentTek – www.tridenttek.com
8. Quando è necessario utilizzare la funzione di iride automatico?
L’utilizzo di ottiche ad iride automatico è consigliato solo per installazioni in esecuzione da esterno. In ogni
caso adottare solo ottiche megapixel. Un ottica megapixel ad iride manuale è comunque preferibile ad una
ad iride automatico ma non megapixel
9. Come si disabilita l’avvio automatico del software?
Selezionare il menu Advanced e desezionare la voce Auto-Startup.
10. Qual’è la distanza massima tra PC e telecamera?
La massima distanza di tratta supportata dallo standard Ethernet 100Base-T è 100m.
11. Si possono installare zoom e PTZ?
Gli zoom motorizzati non sono supportati dalle camere MP.
12. Come si accede alla telecamere da remoto tramite webbrowser?
È sufficiente digitare l’indirizzo IP della stessa.
13. Posso usare Mozilla?
La telecamera è compatibile con Mozilla. Il software MP100 necessita Internet Explorer per le
connessioni da remoto..
14. è possibile eseguire una registrazione ad anello?
Si, Il software gestisce un anello che va in sovrascrittura su uno spazio di 15GB. Per modificare questa
impostazione è possibile aprire il file C:\Programmi\CBC America\LocalMachine.ini ed in particolare
modificando il campo [storage].
15. Come si raggiunge da remoto il software MP100?
È sufficiente aprire Internet Explorer e digitare l’indirizzo IP del PC ove è installato il software seguito
dalla porta utilizzata (vedi menu Remote viewing) e dal testo /guix.htm:
HTTP://ip_address:port/guix.htm
16. Che sensibilità ha la camera MP3-DN in modalità notte?
In modalità notte la camera utilizza il sensore B/N @ 1.3 megapixel con una luminosità di 0.01 Lux.
17. Queste telecamere supportano il multicast?
No
18. Come si resetta la telecamera ai valori di fabbrica?
Digitare la seguente stringa:
http://ip_address/set?params=factory. Dome ip_address è l’indirizzo IP
della telecamera.
CBC (EUROPE) Ltd.
www.cbceurope.it
30
MANUALE UTENTE
CBC (EUROPE) Ltd.
www.cbceurope.it
31
MANUALE UTENTE
Chapter 4. Regulatory Compliance
FCC Compliance Statement
All MP cameras have been tested and found to comply with the limits for a Class A digital device, pursuant to
part 15 of the FCC Rules. These limits are designed to provide reasonable protection against harmful
interference when the equipment is operated in a commercial environment. This equipment generates, uses,
and can radiate radio frequency energy and, if not installed and used in accordance with the instruction
manual, may cause harmful interference to radio communications. Operation of this equipment in a residential
area is likely to cause harmful interference, in which case the user will be required to correct the interference
at his/her own expense.
Modifications not expressly approved by the manufacturer could void the user's authority to operate the
equipment under FCC rules.
1.
It is suggested that the user use shielded CAT6 cables to comply with FCC rules.
2.
It is suggested that the user use power-over-Ethernet supply
3.
To comply with FCC rules when using auto-iris with MP1, MP2 and MP5 it is also suggested using a
ferrite common mode choke Fair-Rite # 0444164281 with 1 ½ turns place on the auto-iris lens cable
three centimeters from the lens.
Terms and Conditions of Sale
1. Terms and Conditions. This sale is subject to the terms and conditions set forth below, which supersede
any and all terms and conditions set forth in any documents issued by Purchaser, including Purchaser’s
purchase order.
ANY ADDITIONAL, DIFFERENT OR CONFLICTING TERMS AND CONDITIONS
HEREBY ARE OBJECTED TO BY CBC (AMERICA), LLC (“CBCA”), AND SHALL BE OF NO FORCE
AND EFFECT. No waiver or amendment of these terms and conditions shall be binding on CBCA unless
made in writing expressly stating that it is such a waiver or amendment and signed by CBCA.
2. Limited Warranty. CBCA warrants to Purchaser (and only Purchaser) (the “Limited Warranty”), that: (a)
each Product shall be free from material defects in material and workmanship for a period of twelve (12)
months from the date of shipment (the “Warranty Period”); (b) during the Warranty Period, the Products
will materially conform with the specification in the applicable documentation; (c) all licensed programs
accompanying the Product (the “Licensed Programs”) will materially conform with applicable specifications.
Notwithstanding the preceding provisions, CBCA shall have no obligation or responsibility with respect to
any Product that (i) has been modified or altered without CBCA’s written authorization; (ii) has not been
used in accordance with applicable documentation; (iii) has been subjected to unusual stress, neglect,
misuse, abuse, improper storage, testing or connection; or unauthorized repair; or (iv) is no longer
covered under the Warranty Period. CBCA MAKE NO WARRANTIES OR CONDITIONS, EXPRESS,
IMPLIED, STATUTORY OR OTHERWISE, OTHER THAN THE EXPRESS LIMITED WARRANTIES
CBC (EUROPE) Ltd.
www.cbceurope.it
32
MANUALE UTENTE
MADE BY CBCA ABOVE, AND CBCA HEREBY SPECIFICALLY DISCLAIMS ALL OTHER EXPRESS,
STATUTORY AND
IMPLIED
WARRANTIES
MERCHANTABILITY,
OF
WARRANTIES
AND CONDITIONS, INCLUDING
FITNESS
FOR
A
PARTICULAR
IMPLIED
PURPOSE,
INFRINGEMENT AND THE IMPLIED CONDITION OF SATISFACTORY QUALITY.
PROGRAMS ARE LICENSED ON AN “AS IS” BASIS WITHOUT WARRANTY.
THE
NON-
ALL LICENSED
CBCA DOES NOT
WARRANT THAT (I) THE OPERATION OF THE PRODUCTS OR PARTS WILL BE UNINTERRUPTED
OR ERROR FREE; (II) THE PRODUCTS OR PARTS AND DOCUMENTATION WILL MEET THE END
USERS’ REQUIREMENTS; (III) THE PRODUCTS OR PARTS WILL OPERATE IN COMBINATIONS AND
CONFIGURATIONS SELECTED BY THE END USER; OTHER THAN COMBINATIONS AND
CONFIGURATIONS WITH PARTS OR OTHER PRODUCTS AUTHORIZED BY CBCA OR (IV) THAT ALL
LICENSED PROGRAM ERRORS WILL BE CORRECTED.
3. Exclusive Remedy; Limitation of Liability.
Purchaser’s exclusive remedy for a breach of the Limited
Warranty shall be limited to repair or replacement of, or refund for, the non-conforming Product (at
CBCA’s sole option). Product returned to CBCA for non-compliance with this Limited Warranty shall be
returned in accordance with the “Rejection/Return” provisions below. Any refund shall be equal to the
actual purchase price for the applicable Product.
IN NO EVENT SHALL CBCA BE LIABLE TO
PURCHASER FOR ANY INDIRECT, INCIDENTAL, SPECIAL OR CONSEQUENTIAL DAMAGES
RESULTING FROM CBCA’S PERFORMANCE OF FAILURE TO PERFORM, WHETHER DUE TO
BREACH OF CONTRACT OR WARRANTY, NEGLIGENCE OR OTHERWISE.
4. Repaired or Replaced Product. The warranty for repaired or replaced Product shall be limited in scope to
the warranty set forth above, and shall have a duration of the greater of (i) the remaining Warranty Period
in the original warranty that was applicable to the original Product, extended by the time elapsed between
CBCA receiving notice of the non-conformity and Purchaser's receipt of the repaired or replaced Product;
or (ii) ninety (90) days following delivery to Purchaser's of the repaired or replaced Product.
5. Shipment and Risk of Loss. All Products shipped by CBCA shall be packaged in CBCA’s shipping cartons
so as to prevent damage and shall be delivered to a common carrier FOB CBCA’s facility in Torrance, CA,
USA or Commack, NY, USA, at which time risk of loss shall pass to Purchaser. All freight, insurance, and
other shipping expenses, as well as expenses for any special packing requested by Purchaser and
provided by CBCA, shall be paid by Purchaser.
6. Licensed Programs. Upon the sale of any Product to Purchaser, CBCA grants to such Purchaser a nonexclusive, non-transferable, royalty-free license to (i) install copies of the Licensed Programs in
appropriate hardware; and (ii) use the Licensed Programs for their intended purpose. Purchaser may
make copies of any Licensed Programs only as necessary to exercise its rights authorized hereunder and
as necessary to backup the Licensed Programs.
7. Payment. Payment shall be in U.S. Dollars, and shall be due and payable in accordance with the terms set
forth on the applicable CBCA Quotation. Payment shall be in an amount equal to the purchase price for
CBC (EUROPE) Ltd.
www.cbceurope.it
33
MANUALE UTENTE
the applicable Product plus all applicable taxes, shipping charges, and other charges to be borne by
Purchaser.
8. Rejection/Return. All Products shall be deemed accepted by Purchaser twenty (20) business days after
receipt unless Purchaser rejects such Product within such twenty (20) business day period for failure to
comply with the Limited Warranty set forth in above. Upon such rejection, Purchaser shall immediately
notify CBCA of the rejection and shall, at CBCA’s option, return the Product or allow CBCA to inspect the
rejected Product and shall follow CBCA’s instructions regarding disposition of the rejected Product. Prior
to the return of any Product to CBCA as provided for hereunder, Purchaser shall obtain from CBCA’s
Technical Support Department a Return Material Authorization (“RMA”) number. Within ten (10) business
days after receiving an RMA number for the Product, Purchaser shall package the Product in its original
packing material or an equivalent and return such Product to CBCA or such other location as CBCA may
designate in writing. CBCA shall bear the cost of freight and insurance for the return to CBCA. Purchaser
shall enclose with the returned Product the applicable RMA form, and any other documentation or
information requested by CBCA. CBCA may refuse to accept returns of any Product not packed and
shipped as provided in this paragraph. Upon verification that the Product does not comply with the
Limited Warranty, CBCA shall repair, replace, or provide a refund for such Product, at CBCA’s option, no
later than thirty (30) days after the time CBCA receives from Purchaser written notice of such return or
rejection. CBCA shall be responsible for returning, at CBCA’s cost, repaired or replaced Products to
Purchaser.
9. General Provisions. Notwithstanding any other provision hereof, performance by CBCA shall be excused
to the extent that performance is rendered commercially unreasonable by acts of God, war, fire, flood, riot,
power failure, embargo, material shortages, strikes, governmental acts, man-made or natural disasters,
earthquakes, failure or limitation of supply, or any other reason where failure to perform is beyond the
reasonable control and not caused by the negligence of CBCA.
The time for performance shall be
extended for the time period lost due to the delay. This Agreement shall be governed by and construed
under the laws of the State of California, USA, without reference to conflict of laws. These terms and
conditions, including those on the face page hereof (if any), set forth the entire agreement and
understanding of CBCA and Purchaser with respect to the sale and distribution of Products, the Licensed
Products and Parts and supersede all prior or contemporaneous agreements relating thereto, written or
oral, between the parties. Purchaser may not assign its rights or delegate its obligations hereunder without
the express written consent of CBCA. Any assignment by Purchaser without such consent shall constitute
a breach hereof by Purchaser.
CBC (EUROPE) Ltd.
www.cbceurope.it
34
MANUALE UTENTE
Chapter 5.
HTTP Access
Non-Panoramic Cameras
This chapter describes the HTTP access of CBC (America) cameras MP1, MP2, MP3, MP3-DN, and MP5.
HTTP access of panoramic cameras MP8D and MP8P are described in the next chapter.
CBC (America) cameras support two protocols, TFTP and HTTP. TFTP protocol is recommended for
application scenarios where high quality video at full frame rate is preferred. The drawback (if any) is that the
implementation of TFTP protocols usually requires significant engineering efforts. Although CBC (America)
provides a manufacturer SDK which makes it easy and simple to interface MP cameras, there are still a
significant number of applications that do not favor the use of TFTP protocols. The reason for not using TFTP
protocol varies. For example, certain applications simply do not require full frame rate operation; some
applications are limited by the availability of time and/or software development resources.
CBC (America) cameras support access of MP cameras via HTTP protocol. The performance in terms of data
rate is comparable to other multi-megapixel products available on the market. This chapter explains the
usage of HTTP commands supported by CBC (America) cameras of model MP1, MP2, MP3, MP3-DN, &
MP5.
Camera Web Page
MP cameras can be accessed from IE browser via the on-camera web page. The web page allows changing
camera settings and to view live video by means of Java script stored in camera’s non-volatile memory. The
web page is accessed by typing in web-browser:
HTTP://ip_address or http://ip_address/index.html
In addition to the web page MP cameras also implement html video container that can be used for
incorporation of the camera URL into user’s own html page. Video container is accessed from:
http://ip_address/livevideo
To incorporate the video container in the user’s html page, the user should add the following line in the body
of the page:
<iframe
src="http://200.168.1.10/"width="800"height="600"marginheight="0"marginwidth="0"scrolling="no">
</iframe>
where parameters width and height specify the image size requested from the camera.
HTTP JPEG Image Request Format
IMPORTANT: COMPLETE SET OF HTTP REQUESTS DESCRIBED IN THIS DOCUMENT IS SUPPORTED
FOR FIRMWARE VERSIONS 61430 AND ABOVE. IF YOU HAVE MP CAMERA WITH LOWER FIRMWARE
VERSION CONTACT CBC (America) Corp. FOR A FIRMWARE UPGRADE.
The individual image can be requested from MP cameras by using the following HTTP request format:
CBC (EUROPE) Ltd.
www.cbceurope.it
MANUALE UTENTE
35
HTTP://ip_address/image?res=resolution_value&x0=X0&y0=Y0&x1=X1&y1=Y1&quality=quality_value&doubl
escan=doublescan_value&id=value
where
•
res can have value of either full or half and specifies whether camera should decimate the image by a
factor of 2 in each direction;
•
X0, Y0, X1, Y1 are the left, top, right and bottom coordinates of the requested image window,
respectively. These values can not exceed the size of the image sensor array for the specific camera;
•
quality is the compression quality of the jpeg image with the range from 1 to 20;
•
doublescan is the parameter that allows the user to specify whether the camera should delay the
image output until the new image is available (doublescan = 0) or the image request should be
serviced by outputting the content of the image buffer that was already once output (useful for
picture-in-picture display).
•
id is the optional field that is ignored by the camera but may be set by the user to a random value to
force some browsers to display the new image.
The following example illustrates the request to camera with IP address 192.168.0.36 for the new full
resolution 1600x1200 image with compression quality 12:
HTTP://192.168.0.36/image?res=full&x0=0&y0=0&x1=1600&y1=1200&quality=12&doublescan=0
The user also has the option of specifying default image parameters via parameter “set” requests and then
obtaining the image by using a simple request without additional parameters: HTTP://ip_address/img.jpg
The cameras also have built-in web page suitable for control of main camera parameters and for live display
of the images in IE, Opera and Mozilla web browsers. This script is accessed via the following HTTP request:
HTTP://ip_address or HTTP://ip_address/index.html
HTTP MJPEG Image Stream Request Format
Continuous sequence of JPEG images (MJPEG) separated by the boundary separator can be requested from
MP cameras by using the following GET method request format:
GET/mjpeg?res=resolution_value&x0=X0&y0=Y0&x1=X1&y1=Y1&quality=quality_value&doublescan=double
scan_value&fps=value&id=value
HTTP/1.1\r\n
Host: ip_address\r\n
\r\n
where
•
res can have value of either full or half and specifies whether camera should decimate the image by a
factor of 2 in each direction;
•
X0, Y0, X1, Y1 are the left, top, right and bottom coordinates of the requested image window,
respectively. These values can not exceed the size of the image sensor array for the specific camera;
•
quality is the compression quality of the jpeg image with the range from 1 to 20;
CBC (EUROPE) Ltd.
www.cbceurope.it
MANUALE UTENTE
36
•
doublescan is the parameter that allows the user to specify whether the camera should delay the image
output until the new image is available (doublescan = 0) or the image request should be serviced by
outputting the content of the image buffer that was already once output (useful for picture-in-picture
display).
•
fps specifies the requested frame rate; values 1 to 15 result in the specified frame rate, while omitting fps
parameter as well as fps values of 0 and all values above 16 result in maximum frame rate that is model
dependent.
The following example illustrates the request to camera with IP address 192.168.0.36 for the new full
resolution 1600x1200 image stream with compression quality 12 at maximum frame rate:
GET /mjpeg?res=half&x0=0&y0=0&x1=1600&y1=1200&quality=12&doublescan=0 HTTP/1.1\r\n
Host: 192.168.1.11\r\n
\r\n
In response to the above request the camera sends continuous stream of images separated by the boundary
separator “fbdr” in accordance with MIME multipart/x-mixed-replace format. Please note that MIME
multipart/x-mixed-replace format is not directly supported by Internet Explorer and requires user application to
correctly process the image stream. For video viewing based on IE only the users should use on-camera
script that can be accessed via HTTP://ip_address/index.html request.
HTTP/1.0 200 Ok\r\n
Content-Type: multipart/x-mixed-replace;boundary=fbdr\r\n
\r\n
--fbdr\r\n
Content-Type: image/jpeg\r\n
\r\n
<JPEG image 1 data>
\r\n
--fbdr\r\n
Content-Type: image/jpeg\r\n
\r\n
<JPEG image 2 data>
\r\n
--fbdr\r\n
...
Content-Type: image/jpeg\r\n
\r\n
<JPEG image n data>
\r\n
--fbdr\r\n
CBC (EUROPE) Ltd.
www.cbceurope.it
MANUALE UTENTE
37
Basic Camera Control Parameters
The camera parameters can be accessed via the HTTP requests of the following format:
HTTP://ip_address/set?parameter=value
HTTP://ip_address/get?parameter
Examples:
HTTP://192.168.0.36/set?brightness=15
HTTP://192.168.0.36/get?brightness
The following parameter requests are supported via HTTP protocol by MP cameras:
•
brightness – image brightness (valid values are from -50 to 50)
•
sharpness – image sharpening(valid values are from 0 to 4)
•
saturation – color saturation (valid values from 0 to 6)
•
color balance adjustment (tint)
o
blue (valid values from -10 to +10)
o
red (valid values from -10 to +10)
•
illum – illumination setting for auto white balance (valid values are auto, indoor, outdoor, mix)
•
freq – frequency of AC powered light sources (valid values are 50 and 60)
•
lowlight – low light mode of the camera, allows tradeoff between frame rate and image quality (valid
values are balance, speed, quality, highspeed, moonlight). If highspeed is used, an additional parameter
shortexposures can be set with valid values 1 through 10.
•
rotate – image rotation (valid values are 0 and 180)
•
autoexp – allows to turn on and off auto exposure (valid values are on and off)
•
expwndleft - left coordinate of user-defined auto-exposure measurement window (valid values should fall
within sensor window)
•
expwndtop - top coordinate of user-defined auto-exposure measurement window (valid values should fall
within sensor window)
•
expwndwidth - width of user-defined auto-exposure measurement window (valid values should fall within
sensor window)
•
expwndheight – height of user-defined auto-exposure measurement window (valid values should fall
within sensor window)
•
sensorleft - left coordinate of sensor window (valid values defined by sensor size)
•
sensortop - top coordinate of sensor window (valid values defined by sensor size)
•
sensorwidth - width of sensor window (valid values defined by sensor size; this value affects sensor
frame rate)
•
sensorheight - height of sensor window (valid values defined by sensor size; this value affects sensor
frame rate)
•
imgleft - left coordinate of default image returned in response to the
http://ip_address/img.jpg (valid values should fall within sensor window)
CBC (EUROPE) Ltd.
www.cbceurope.it
simple
request
MANUALE UTENTE
38
•
imgtop - top coordinate of default image returned in response to the simple request
http://ip_address/img.jpg (valid values should fall within sensor window)
•
imgwidth – width of default image returned in response to the simple request http://ip_address/img.jpg
(valid values should fall within sensor window)
•
imgheight - height of default image returned in response to the simple request http://ip_address/img.jpg
(valid values should fall within sensor window)
•
imgquality – quality setting of image returned in response to the simple request http://ip_address/img.jpg
(valid values 1 to 21)
•
imgres – resolution of default image returned in response to the simple request http://ip_address/img.jpg
(valid values are full and half, where half is used to request images decimated by a factor of 2 in both
directions)
•
auto-iris – allows to enable and disable auto-iris (valid values are on and off)
•
irisgain – allows to specify threshold for closing the auto-iris (valid values are from 8 to 255)
•
save – saves current camera configuration (all parameter values) in the non-volatile memory
http://ip_address/set?params=save
•
mac – retrieves the MAC address of the camera (read-only)
•
model – retrieves last 4 numbers of the camera model (read-only, e.g. MP2100 camera will return 2100)
•
fwversion – retrieves firmware version of the camera
•
procversion – retrieves version of the image processor
•
netversion – retrieves version of the network processor
•
revision – retrieves the revision code of the PCB
•
factory – restores camera parameters to factory defaults http://ip_address/set?params=factory
•
access to camera registers:
setreg?page=page_number®=register_number&val=register_value
arameters Specific to MP3-DN DAY/NIGHT Cameras
MP3-DN camera utilizes two distinct sensors for its day and night modes. Specifically, 3-Megapixel color
sensor with IR-cut filter is used in the day mode, while 1.3-Megapixel monochrome sensor without IR-cut filter
is used in the night mode.
As MP3-DN camera has two sensors with different resolutions it is most convenient to specify the required
image size in terms of percentages of the full image size as shown in the following example:
HTTP://200.168.1.10/image?res=full&x0=0%&y0=0%&x1=100%&y1=100%&quality=12&doublescan=0
By default, the camera automatically switches between day and night channels as illumination changes.
However, it is also possible to force the camera to operate in either day or night channel by using daynight
request. The switch point between day and night modes is determined based on overall AE/AGC gain and
can be adjusted via parameter nightgain. To avoid oscillations between day and night modes, the night-to-day
CBC (EUROPE) Ltd.
www.cbceurope.it
MANUALE UTENTE
39
transition is specified via parameter daygain in terms of “hysteresis” relative to day-to-night transition
threshold.
•
daynight – if set to “auto” the camera will select between color and monochrome channels automatically
based on daygain and nightgain thresholds (valid values are “auto”, “day” and “night”)
•
nightgain – allows to specify the automatic switching point for day-to-night transition in proportion to overall
exposure*gain value; The user may need to adjust this value if the lenses on day and night channels have
different f-stops; Higher values will cause the transition to night mode at lower illumination level (valid
values are from 0 to 18)
•
daygain – allows to specify the automatic switching point for night-to-day transition as “hysteresis” relative
to night-to-day transition; Higher values will cause the transition to day mode at higher illumination level
(valid values are 0 to 6, 0 is not recommended)
Motion Detection Control Parameters
The unique design of MP cameras allows supporting highly accurate 64-zone motion detection (also see
Motion Detection). Motion detection is achieved by analyzing inter-frame brightness changes on a pixel-bypixel basis. To provide accurate motion detection in low contrast and low light environments, EACH pixel of
EACH frame is analyzed. The user can set the size of motion detection zones (via mdzonesize), select the
sensitivity to motion (via mdlevelthreshold), select the zones where the motion detection has to be blocked
(via mdprivasymask) and specify the size of the moving objects of interest (via mddetail). Motion detection
information can be obtained from the camera in terms of “amount” of motion in each zone (via mdresult) In
addition to retrieving motion detection information, the camera can also be configured to output images only if
motion is detected (via mdmode).
On-camera motion detection unit utilizes up to 64 distinct zones. All zones are square, have equal size and
are arranged in 8 rows with 8 zones per row. The zones are numbered from 0 to 63, upper leftmost zone
having number 0 and lower rightmost zone having number 63. The zones are broken into sub-zones of size
32x32 pixels. The size of zones is specified in terms of the square root of the number of sub-zones via
parameter mdzonesize. The zones can be defined to be as small as 7x7 sub-zones to as large as 15x15 subzones. By setting the limit on how many sub-zones should contain the motion for the entire zone to be
considered to contain motion the user can effectively decide on the size of the moving objects that should be
detected. This is done via parameter mddetail.
•
motiondetect – enables on-camera motion detection (valid values are “on” and “off”)
•
mdmode – motion detection mode for mjpeg streams(valid values are “on” and “off”); if set to “on” the
camera will only output an image in the presence of motion; If the motion is not detected, the field
following the frame boundary separator --fbdr will be followed by Content-Type: text/plain (instead of usual
-Type: image/jpeg) and the image data will be substituted with the text message “no motion”
CBC (EUROPE) Ltd.
www.cbceurope.it
MANUALE UTENTE
40
•
mdtotalzones - number of independent motion detection zones; Currently must be 64. There are 8 rows of
zones, 8 zones per row. Note that depending on zone size and the camera model (image resolution in
terms of the number of pixels)some zones may not correspond to the active image area (valid value 64)
•
mdzonesize – size of motion detection zones measured in number of 32x32 pixel blocks in each zone; All
zones are squares of the same size from 7x7 to 15x15 (valid values are 7 to 15 for MP1 and MP2 and 8 to
15 for AV3100 and MP3-DN)
•
mdlevelthreshold – motion detection threshold that determines the sensitivity to local inter-frame
brightness changes (valid values are 2…31). Lower settings may cause false motion detection due to
noise. This parameter corresponds to “Level” under “Motion Settings” in AV Video System GUI.
•
mdsensitivity – sensitivity of the motion detection to sudden overall lighting changes. This allows
preventing false triggering due to sudden overall brightness change that triggers motion detection in a
large number of zones simultaneously. If more than this number of zones have motion it is assumed that
the change is due to lighting change and detected motion is ignored; (recommended values are 40 for
MP3-DN, 30 for MP2 and 20 for MP1). This parameter corresponds to “Limit” under “Motion Settings” in
AV Video System GUI.
•
mddetail – allows controlling the size of detectable moving objects. The value is the number of 32x32 subzones within each zone that should contain motion for the entire zone to be considered to contain motion.
(valid values are 1 through square of mdzonesize). This parameter corresponds to “Detail” under “Motion
Settings” in MP Video System GUI.
•
mdprivasymask – Privacy matrix. An 8-byte array, where each byte corresponds to one row of motion
detection zones. Each bit in a byte enables motion detection in a corresponding zone, if set to ‘1’. Leftmost
zone is controlled by MSB, rightmost zone by LSB.
Example: set?mdprivasymask=2a8f3d135b71ee04 results in the following enabled zones relative to
camera image:
01010100
11110001
10111100
11001000
11011010
10001110
01110111
00100000
•
mdresult – Motion detection information returned by the camera; The return value is “no motion” if motion
has not been detected, otherwise the motion detection information is returned in the following format:
mdresult=<SP><hexadecimal byte0><SP><hexadecimal byte1>...<SP><hexadecimal byte63>
where <SP> is the SPACE symbol, and the byte value, byteN, indicates the number of sub-zones (blocks of
32x32 pixels) with motion within zone N. Note: the sub-zone size is fixed to 32x32 and cannot be changed.
CBC (EUROPE) Ltd.
www.cbceurope.it
41
MANUALE UTENTE
Important: the user should keep in mind that the total number of zones is always 64 (8 vertically and 8
horizontally). Therefore, if the zone size is large, some zones may not correspond to the active pixel array. In
that case their motion detection value is not meaningful and should be ignored. For example, for MP1 camera:
if the image size is 1280x1024, then for zone size 8x8 there are 5 by 4 active zones (3 zones after every 5
zones must be ignored as well as all zones after zone 32). Example:
mdresult= 00 1A 01... means that in zone 0 motion was not detected, in zone 1 there are 26 (32x32)
sub-zones with motion, in zone 2 there is one sub-zone 1 with motion ….
Access Control
CBC (America) cameras support dual-level password-protected access control. Camera authentication is
compatible with RFC-2068 HTTP 1.1 and is supported by all standard browsers and video surveillance
software.
There are two types of users with the following reserved names:
admin – has full access to all camera settings and the video.
viewer – has viewing access to all current camera settings and the video.
Setting and removing the passwords is the privilege of the admin user, while the viewer can only use the
existing password, but not change it. Factory defaults erase all current passwords for both the admin and the
viewer. A newly shipped camera has no password protection and allows full anonymous access from the
network. In case the admin password has not been set, the camera has full anonymous access from the
network, even if the viewer password has been set.
Access control setup consists of three steps:
1. Set admin password (using http commands or using the camera’s web page, see below).
2. Log-in using the admin password and set the viewer password.
3. Communicate the viewer password to the users.
In order to delete viewer password, log-in as admin and change the viewer password to a reserved password
empty – this would restore the full anonymous access to the camera. The admin user can change the viewer
password at any time, even without knowing the current viewer password.
NOTE: if the admin password has been set and forgotten, it can only be erased through reprogramming the
camera’s firmware, or by accessing the camera registers via developers’ register access from MP100
software.
HTTP commands for password setting:
1. For admin passwords:
http://camera_IP/get?admin
http://camera_IP/set?admin=(a string of 1..8 ASCII symbols or “empty”)
empty is used to erase the existing password.
CBC (EUROPE) Ltd.
www.cbceurope.it
The reserved password
42
MANUALE UTENTE
2. For viewer passwords (Figure 30):
http://camera_IP/get?viewer
http://camera_IP/set?viewer=(a string of 1..8 ASCII symbols or “empty”) The reserved password
empty is used to erase the existing password.
Figure 30. Camera’s web page menu for setting the passwords
HTTP/1.1 vs. HTTP/1.0
CBC (America) cameras support both HTTP/1.0 and HTTP/1.1 protocols as defined by RFC-1945 and RFC2068, respectively. While HTTP/1.0 is simple, it limits the speed of image transmission for cases when the
user requests individual images rather than MJPEG stream. This is due to the fact that connection is closed
after the transmission of each image, forcing the client to incur round trip delay repeatedly. However,
HTTP/1.0 is supported by all HTTP implementations and can be used reliably, albeit with limited speed. By
default, CBC (America) cameras are configured to respond using HTTP/1.0 protocol regardless of the HTTP
version used by the client.
The users who desire faster full duplex communication and image delivery may request responses over
HTTP/1.1 protocol. To do so, the user should append parameter ver=HTTP/1.1 to the request string as
shown in the following example:
HTTP://192.168.0.36/image?res=full&x0=0&y0=0&x1=1600&y1=1200&quality=12&doublescan=0&ver=HTTP
/1.1
It is important to note that MP cameras implement “chunked” transfer encoding as defined by paragraph
14.40 of RFC-2068. While RFC-2068 requires that all HTTP/1.1 implementations support “chunked” encoding,
in reality many older implementations (Indy 9, WinHTTP 5.0, etc) are not fully compliant with the requirements
of the standard. As a result, if the HTTP/1.1 protocol is requested from a non-compliant implementation, the
chunks separators will remain in the data stream and the jpeg image will be corrupted. If the user receives
CBC (EUROPE) Ltd.
www.cbceurope.it
43
MANUALE UTENTE
corrupted images over HTTP/1.1 the user should either remove HTTP/1.1 specification from the request or
upgrade the HTTP implementation to fully compliant (e.g. WinHTTP 5.1)
HTTP Access of Panoramic Cameras
IMPORTANT: COMPLETE SET OF HTTP REQUESTS DESCRIBED IN THIS DOCUMENT IS SUPPORTED
FOR FIRMWARE VERSIONS 61621 AND ABOVE. IF YOU HAVE MP CAMERA WITH LOWER FIRMWARE
VERSION CONTACT CBC (America) Corp. FOR A FIRMWARE UPGRADE.
Notational conventions:
•
camera_ip
: IP address of the camera;
•
get
: get a parameter from camera via http;
•
set
: set a parameter on camera via http;
•
<channel>
: camera channel number from 1 to 4;
•
""
: a symbol string in ASCII;
•
|
: means one or another, but not both;
•
()
: allowable values;
•
..
: a range of values in increments of 1;
•
+/-
: positive values do not need the “+” sign, while the negative values do need the ““ sign in front of the value;
•
[]
: non-mandatory value which could be dropped.
In order to access the built-in camera’s web page type either of the two following http commands into the web
browsers’ address field:
http://camera_ip/
http://camera_ip/index.html
Requesting Images from Camera
The MP8D and MP8P camera supports two types of image requests: single JPEG image requests (image or
img.jpg) and motion JPEG stream requests (mjpeg). The maximum number of supported simultaneous
requests of single images or mjpeg streams is eight.
NOTE: Even though the camera supports multi-user access, the maximum frame rate is achieved only when
there is a single request arriving to each channel at any given time.
1.
Requesting single JPEG images
1.1 Requesting images using explicit parameter list within the HTTP string:
http://camera_ip/image[<channel>]?res=(half|full)&x0=(0..1600)&y0=(0..1200)&x1=(32..1600)&y1=(32..1200)
&quality=(1..21)&doublescan=(0|1)&[id=(0..99999999999999)]&[ssn=(0..65535)]
where:
res – image resolution (full or half);
x0,y0,x1,y1 – image cropping coordinates;
CBC (EUROPE) Ltd.
www.cbceurope.it
44
MANUALE UTENTE
quality – image quality, the inverse of image compression level;
doublescan –read mode (reserved for future use);
id – an arbitrary number used to control the web browser’s cache;
ssn – a unique HTTP session number which cancels out any earlier sent HTTP request with the same
number which got “hung”;
NOTE: an image request without <channel> parameter specified will cause the camera to transmit the
next available image from any of the currently enabled channels. The channel number of the transmitted
image could then be identified from the HTTP header Etag (see RFC-2068 HTTP 1.1):
ETag: Channel<channel> .
1.2 Requesting images using implicit parameter list (parameters are loaded on camera in advance using
separate http commands (see section B 16 below):
http://camera_ip/img.jpg?[id=(0..99999999999999)]&[ssn=(0..65535)]
where:
id – an arbitrary number used to control the web browser’s cache;
ssn – a unique HTTP session number which cancels out any earlier sent HTTP request with the same
number which got “hung”;
2. Requesting Motion JPEG image stream
http://camera_ip/mjpeg[<channel>]?res=(half|full)&x0=(0..1600)&y0=(0..1200)&x1=(32..1600)&y1=(32..1200)
&quality=(1..21)&doublescan=(0|1)&[fps=(0..15)]&[id=(0..99999999999999)]&[ssn=(0..65535)]
where:
res – image resolution (full or half);
x0,y0,x1,y1 – image cropping coordinates;
quality – image quality, the inverse of image compression level;
doublescan –read mode (reserved for future use);
fps – desired frame rate (frames per second);
id – an arbitrary number used to control the web browser’s cache;
ssn – a unique HTTP session number which cancels out any earlier sent HTTP request with the same
number which got “hung”;
NOTE: an mjpeg request without <channel> parameter specified will cause the camera to transmit next
available image from any of the currently enabled channels. The channel number of the transmited image
could then be identified from the HTTP header Etag (see RFC-2068 HTTP 1.1): ETag: Channel<channel> .
Getting and Setting Camera Parameters
NOTE: All commands listed below that allow parameter setting without explicitly specifying the channel
number apply to all four channels.
NOTE: Parameter setting is allowed only for the users with the admin access level (see below under Camera
Access Control).
CBC (EUROPE) Ltd.
www.cbceurope.it
45
MANUALE UTENTE
1. Enabling camera channels:
http://camera_ip/get?channelenable
http://camera_ip/set?channelenable=(1..15 as a 4-bit mask where each bit corresponds to one
camera channel, LSB is channel 1)
2. Image rotation:
http://camera_ip/get<channel>?rotate
http://camera_ip/set[<channel>]?rotate=(0|180)
3. Brightness:
http://camera_ip/get<channel>?brightness
http://camera_ip/set<channel>?brightness=(-50..+50)
4. Sharpness:
http://camera_ip/get<channel>?sharpness
http://camera_ip/set<channel>?sharpness=(0..4)
5. Saturation:
http://camera_ip/get<channel>?saturation
http://camera_ip/set<channel>?saturation=(0..6)
6. Blue balance:
http://camera_ip/get<channel>?blue
http://camera_ip/set<channel>?blue=(-10..+10)
7. Red balance:
http://camera_ip/get<channel>?red
http://camera_ip/set<channel>?red=(-10..+10)
8. Illumination:
http://camera_ip/get<channel>?illum
http://camera_ip/set<channel>?illum=("auto"|"indoor"|"outdoor"|"mix")
9. Mains frequency, Hz (for indoor lighting compensation):
http://camera_ip/get<channel>?freq
http://camera_ip/set<channel>?freq=(50|60)
10. Exposure mode (low light mode):
http://camera_ip/get<channel>?lowlight
http://camera_ip/set<channel>?lowlight=("highspeed"|"speed"|"balance"|"quality"|"moonlight")
11. Shutter time in highspeed exposure mode (in milliseconds):
http://camera_ip/get<channel>?shortexposures
http://camera_ip/set<channel>?shortexposures=(1..10)
12. Auto exposure control:
http://camera_ip/get<channel>?autoexp
http://camera_ip/set<channel>?autoexp=("on"|"off")
CBC (EUROPE) Ltd.
www.cbceurope.it
46
MANUALE UTENTE
13. Auto exposure mode:
http://camera_ip/get<channel>?exposure
http://camera_ip/set<channel>?exposure=("auto"|"on"|"off")
14. Exposure window:
http://camera_ip/get?expwndleft
http://camera_ip/set?expwndleft=(0..max of the corresponding sensor size)
http://camera_ip/get?expwndtop
http://camera_ip/set?expwndtop=(0..max of the corresponding sensor size)
http://camera_ip/get?expwndwidth
http://camera_ip/set?expwndwidth=(0..max of the corresponding sensor size)
http://camera_ip/get?expwndheight
http://camera_ip/set?expwndheight=(0..max of the corresponding sensor size)
15. Sensor cropping:
http://camera_ip/get?sensorleft
http://camera_ip/set?sensorleft=(0..max of the corresponding sensor size)
http://camera_ip/get?sensortop
http://camera_ip/set?sensortop=(0..max of the corresponding sensor size)
http://camera_ip/get?sensorwidth
http://camera_ip/set?sensorwidth=(0..max of the corresponding sensor size)
http://camera_ip/get??sensorheight
http://camera_ip/set?sensorheight=(0..max of the corresponding sensor size)
16. Image settings used as the implicit parameter list in img.jpg image requests:
http://camera_ip/get?imgleft
http://camera_ip/set?imgleft=(0..max of the corresponding sensor size)
http://camera_ip/get?imgtop
http://camera_ip/set?imgtop=(0..max of the corresponding sensor size)
http://camera_ip/get?imgwidth
http://camera_ip/set?imgwidth=(0..max of the corresponding sensor size)
http://camera_ip/get?imgheight
http://camera_ip/set?imgheight=(0..max of the corresponding sensor size)
http://camera_ip/get?imgquality
http://camera_ip/set?imgquality=(0..21)
http://camera_ip/get?imgres
http://camera_ip/set?imgres=("full"|"half")
17. Getting MAC number:
http://camera_ip/get?mac
CBC (EUROPE) Ltd.
www.cbceurope.it
47
MANUALE UTENTE
18. Getting camera model:
http://camera_ip/get?model
19. Getting firmware version:
http://camera_ip/get?fwversion
20. Getting image processor engine version:
http://camera_ip/get?procversion
21. Getting network processor version:
http://camera_ip/get?netversion
22. Getting PCB revision
http://camera_ip/get?revision
23. Store current settings into the flash memory:
http://camera_ip/set?params=save
24. Restore factory default settings:
http://camera_ip/set?params=factory
25. Custom mode settings:
http://camera_ip/get<channel>?kneepoint
http://camera_ip/set<channel>?kneepoint=(1..100)
http://camera_ip/get<channel>?analoggain
http://camera_ip/set<channel>?analoggain=(1..10)
http://camera_ip/get<channel>?maxkneegain
http://camera_ip/set<channel>?maxkneegain=(2..??)
http://camera_ip/get<channel>?maxexptime
http://camera_ip/set<channel>?maxexptime=(0..100)
http://camera_ip/get<channel>?maxdigitalgain
http://camera_ip/set<channel>?maxdigitalgain=(32..127)
26. Alternative receiving port of the camera’s web server:
http://camera_ip/get?webserverport
http://camera_ip/set?webserverport=(0..65535)
27. User password with admin level of access:
http://camera_ip/get?admin
http://camera_ip/set?admin=(text string of 1..8 ASCII symbols | “empty”)
NOTE: to erase the password use the reserved word “empty”.
28. User password with viewer level of access:
http://camera_ip/get?viewer
http://camera_ip/set?viewer=( text string of 1..8 ASCII symbols | “empty”)
NOTE: to erase the password use the reserved word “empty”.
CBC (EUROPE) Ltd.
www.cbceurope.it
48
MANUALE UTENTE
29. Camera’s register access:
http://camera_ip/getreg?page=(0..6)®=(0..255)
http://camera_ip/setreg?page=(0..6)®=(0..255)&value=(0..65535)
Access Control
CBC (America) cameras support dual-level password-protected access control. Camera authentication is
compatible with RFC-2068 HTTP 1.1 and is supported by all standard browsers and video surveillance
software.
There are two types of users with the following reserved names:
admin – has full access to all camera settings and the video.
viewer – has viewing access to all current camera settings and the video.
Setting and removing the passwords is the privilege of the admin user, while the viewer can only use the
existing password, but not change it. Factory defaults erase all current passwords for both the admin and the
viewer. A newly shipped camera has no password protection and allows full anonymous access from the
network. In case the admin password has not been set, the camera has full anonymous access from the
network, even if the viewer password has been set.
Access control setup consists of three steps:
1. Set admin password (using http commands or using the camera’s web page.
2. Log-in using the admin password and set the viewer password.
3. Convey the viewer password to the users.
In order to delete viewer password, log-in as admin and change the viewer password to a reserved password
empty – this would restore the full anonymous access to the camera. The admin user can change the viewer
password at any time, even without knowing the current viewer password.
NOTE: if the admin password has been set and forgotten, it can only be erased through reprogramming the
camera’s firmware, or by accessing the camera registers via developers’ register access from MP100
software.
Motion Detection
On-camera motion detection is currently not available on CBC (America) panoramic cameras. Future
releases will have this feature incorporated. Users who have interest in this feature please visit CBC (America)
website from time to time for latest updates and/or firmware upgrades.
CBC (EUROPE) Ltd.
www.cbceurope.it