1
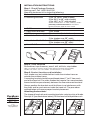
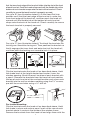
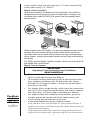
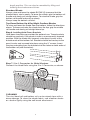
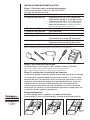
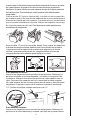
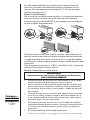
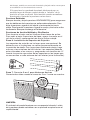
CordlessCellular
FabricShade
including Top-Down/Bottom-Up
& Day/Night Shades
owner's handbook
español página 9
2
INSTALLATION INSTRUCTIONS
Step 1. Check Package Contents
Missing part? Call 1-800-264-1190
Mounting hardware kit includes the following:
PartQuantity
a.Mounting Brackets
2 (for 18” to 36” wide shades)
3 (for 361/8” to 48” wide shades)
4 (for 481/8” to 72” wide shades)
Shades ordered over 72” wide, will be (2) shades joined by a Connector Device. The above bracket quantities apply for each shade.
b.11/8” Screws
c.Hold Down Brackets
d.3/8” Screws
e.Handle for Bottom Rail
f. Handle for Middle Rail
g.Head Rail Connector
2 per bracket
2 per shade
2 per bracket (for hold downs)
1
2 (for shades over 59” wide)
1 (for TDBU and Day/Night Shades)
2 (for shades over 59” wide)
1 for shades over 72” wide
[Note: one extra screw of each noted size is included for convenience]
Step 2. Tools Required
Screwdriver, tape measure, pencil, drill, drill bits, step ladder.
Note: use #6 plastic anchors for dry wall or plaster mounting (not included).
Drill Bits: for screws, use a 3/32" drill bit - for wall anchors, use 1/4" drill bit.
Cordless
Cellular
Fabric
Shade
Step 3. Bracket Location and Installation
Your shade may be installed either inside the window frame or
outside the window frame.
A mounting bracket should be positioned about 1” to 6” from each
end of the head rail. For wider shades that require 3 or more brackets,
these should be spaced evenly between the two outermost brackets.
Always position the brackets such that there is no interference with
the cords and/or mechanisms inside the head rail. The procedure
outlined below will assure proper bracket placement.
Attaching the brackets:
The shape of head rails and mounting brackets varies by style of shade.
For style ‘A’ [see illustrations below]: Lift the head rail into position such
Including
Top Down / Bottom-Up
& Day / Night Shades
3
that the inner front edge of the head rail slides into the slot at the front
of each bracket. Push the head rail upward until the flexible tab at the
bottom of each bracket snaps onto the back of the head rail. Check
carefully to assure that each bracket is properly secured.
For style ‘B’ [see illustration below]: Lift the Head Rail into
position such that the front edge of the bracket is under the
inner front edge of the head rail, and then push the head rail
upward until the flexible tab at the bottom of each bracket
snaps onto the back of the head rail. Check carefully to assure
that each bracket is properly secured.
For style ‘C’ [see illustration below]: To attach the brackets the
locking arm should be facing out. Then position the bracket so
that it engages the inner front and outer back of the head rail,
and then push the locking arm inward to lock it in place.
For Outside Mounting:
Clip the brackets onto the head rail as described above. Hold
the shade level at the height desired and center it over the
window opening. Mark the exact location of each bracket with
a pencil. Remove the brackets from the head rail and position
the top of each bracket at the marked location and screw each
bracket into the wall or window molding using the 11/8” screws,
pre-drill the screw holes using a 3/32” drill bit.
For Inside Mounting:
Clip the brackets onto the head rail as described above. Hold
the shade in place and make a pencil mark at the rear of each
bracket where it contacts the inside of the window frame.
Remove the brackets from the head rail and align them with the
4
marks. Attach each bracket using the 11/8” screws, pre-drill the
screw holes using a 3/32” drill bit.
Step 4. Attach Handle(s)
Attach the Handle to the bottom rail as illustrated. The handle is
designed to minimize contact with the shade fabric. Always raise
and lower the shade SLOWLY(!) to assure that the pleated fabric
stacks neatly.
TDBU
Double Cell &
Day/Night
Single Cell
Wider shades have (2) Handles – to precisely determine the correct
position for each handle, divide the total width of the shade by 4,
and then attach one handle that distance from each outside edge
of the shade – always grasp both handles when lifting and lowering
the shade.
For TDBU and Day/Night cordless shades, attach the 2nd handle to
the Middle Rail as illustrated.
Step 5. How to Operate
IMPORTANT
Operating & Care Instructions for Cell Shades
READ CAREFULLY
•
•
•
Cordless
Cellular
Fabric
Shade
Including
Top Down / Bottom-Up
& Day / Night Shades
•
•
Make sure that the Handles have been attached to the
rail(s) as described above (see Step 4)
To maintain optimal performance of the springs that make
your cordless shade function, lift and lower your shade
through its full range of motion – all the way up and down –
every day if possible.
For shades with a single handle, which must be centered on
the rail(s), lift or lower the shade slowly and evenly, keeping
the rail(s) level, until the shade is positioned as desired.
For wider shades with a double set of handles, grasp the
handles using both hands and lift the shade slowly and
evenly, being sure to keep the rail(s) level.
If you have trouble lifting your cordless shade:
If the shade is left in one position for a long period of time, it
might be necessary to lift and lower the shade several times to
restore normal function.
If the shade has been fully raised for a long period of time, it
might tend to spring-back (rebound) slightly from the desired
5
length position. This can also be remedied by lifting and
lowering the shade several times.
Standard Shade
Always raise and lower the shade SLOWLY(!) to assure that the
pleated fabric stacks neatly. To lower the shade: grip the bottom rail
handle and slowly pull straight down. To raise the shade, grip the
bottom rail handle and push up slowly.
Always keep the bottom rail level.
Top-Down Bottom-Up & Day/Night Cordless Shades
To raise and lower the shade from the bottom, follow the directions
above. To lower and raise the shade from the top: grip the middle
rail handle and slowly pull straight down/up.
Step 6. Installing Hold-Down Brackets
Hold down brackets are provided for optional use. These brackets
should be used only if the shade is to be in a permanently lowered
position. With the shade fully lowered, make pencil marks at the
outside ends of the bottom rail. Brackets should be lined up to the
pencil marks and screwed into place using the 3/8” screws. Insert
the pins protruding from the brackets into the holes on both ends of
the bottom rail (see illustration).
Step 7. 2-in-1 Connector for Wide Windows
Connect the Head Rails using the 2-in-1 Connector, as shown.
CLEANING
The vinyl head rail and bottom rail can be wiped clean with a
damp sponge. To clean the shade fabric, use a feather duster
or vacuum lightly using the soft brush attachment.
6
REPLACEMENT PARTS
In the event that replacement parts are ever needed, you may call:
1-800-264-1190
Please be sure to provide the following information, if possible:
• The complete model or catalog number of your product
• A description of the product
• A description of the part needed
LIMITED LIFETIME WARRANTY
Cordless
Cellular
Fabric
Shade
Including
Top Down / Bottom-Up
& Day / Night Shades
The enclosed product is warranted to the original residential retail
purchaser as long as the product remains in the original window.
Covered:
Lifetime: Entire product against manufacturing defects (i.e. a flaw in
the product design, materials, or workmanship that causes the product
to no longer function)
5 years: All fabric
Not Covered:
Normal Wear and Tear
Any product that fails due to: • abuse • exposure to salt air • improper
installation • accident • extraordinary use • improper operation •
alterations • improper cleaning • misapplication • damage from pests/
insects/pets • improper handling • misuse
Costs associated with: • product removal • transportation to and from
the retailer • brand label removal • product re-measure • incidental or
consequential damages • product reinstallation • shipping
In the event there are multiple blinds/shades in the same room, only the
defective blind/shade will be replaced.
To Report Shipping Damage: If damage occurred during shipping,
call place of purchase and report within 7 calendar days or else you
may be denied credit for your damaged product.
To Obtain Service: If you suspect this product has a manufacturing
defect in materials or workmanship: 1. Locate the sales receipt 2. Call
place of purchase. Any unauthorized returns will not be accepted.
Warranty Remedy: THIS SHALL BE YOUR SOLE REMEDY UNDER
THIS LIMITED WARRANTY.
If this product is found to have a manufacturing defect in materials or
workmanship, we will (at our discretion) do one of the following:
• repair the product • replace the product • refund the cost of the
product
Colors vary from lot to lot and may not exactly match sample swatch or
previous purchases.
Discontinued items or color selections will be replaced with the closest
equivalent current product.
YOUR RIGHTS UNDER STATE LAW:
This lifetime limited warranty gives you specific legal rights, and you
may have other rights, which vary from state to state. Some states
do not allow limitations on how long a warranty lasts, so the above
limitations may not apply to you. No agent, representative, dealer,
or unauthorized employee has the authority to increase or alter the
obligation of this warranty. This lifetime limited warranty supersedes
any previous versions.
PHASE II PRODUCTS, INC.
501 WEST BROADWAY, SUITE 1350
SAN DIEGO, CALIFORNIA 92101 • 1-800-264-1190
7
Persianasen
TejidoCelular
Inalámbricas
incluye Persianas Acción Múltiple
& Persianas Día/Noche
owner's handbook
INSTRUCCIONES DE INSTALACION
Paso 1. Cerciórese del contenido del paquete
Partes no incluidas? Llame al 1-800-264-1190
El juego de montaje incluye:
ParteCantidad
a.Soportes de Montaje
2 (persianas de 18” a 36” de ancho)
3 (persianas de 361/8” a 48” de ancho)
4 (persianas de 481/8” a 72” de ancho)
Persianas por encima de 72", serán (2) persianas
unidas por un conector. Cantidad de soportes
especificados aplica para cada persiana.
b.Tornillos de 11/8”
c.Soportes de Sujeción
d.Tornillos de 3/8”
e.Manija para riel inferior
f. Manija para Riel Medio
g.Conector de Rieles
2 por soporte
2 por persiana
2 por soporte (para sujeción)
1
2 (persianas de mas de 59” de ancho)
1 (persianas Acción Múltiple y Día/Noche)
2 (persianas de mas de 59” de ancho)
1 persianas de mas de 72” de ancho
[Nota: un tornillo extra de cada tamaño se incluye para su conveniencia.
Paso 2. Herramientas Requeridas
Destornillador, cinta métrica, lápiz, taladro, brocas, escalera.
Nota: Use tarugos #6 para paredes de plaster o yeso (no incluidos).
Brocas: para tornillos, una de 3/32" - para tarugos use una de 1/4".
Persianasen
TejidoCelular
Inalámbricas
Paso 3. Localización e Instalación de Soportes
La persiana puede instalarse dentro o fuera del marco de la ventana.
Un soporte de montaje deberá posicionarse entre 1" a 6" de cada
extremo del riel. Para persiana más anchas que requieren 3 o más
soportes, estos deberán espaciarse equidistantemente entre los
soportes de los extremos. Siempre posicione los soportes de
manera que no interfieran con los cordones y/o los mecanismos
dentro del riel superior. El procedimiento siguiente le asegurará una
instalación de los soportes apropiada.
Fijado de Soportes:
La forma de los rieles y soportes varia depende del estilo.
Para el estilo ‘A’ [mire las ilustraciones]: Levante el riel en posición de
Incluye
Acción Múltiple
& Dia/Noche
11
manera que el filo interior frontal se desliza dentro de la ranura al frente
de cada soporte. Empuje el riel hacia arriba hasta que la pestaña
flexible en la parte inferior de cada soporte encaja en la parte posterior
del riel principal. Cerciórese que cada soporte esta debidamente
asegurado.
Para el estilo ‘B’ [mire la ilustración]: Levante el riel en posición
de manera que el filo frontal del soporte de se encuentre bajo el
filo interior frontal del riel superior, y presione hacia arriba hasta
que la pestaña flexible en la parte inferior del soporte se encaja
en la parte posterior del riel. Cerciórese que cada soporte esta
debidamente asegurado.
Para el estilo ‘C’ [mire la ilustración abajo]: Para sujetar los soportes,
el brazo de aseguramiento deberá estar apuntando hacia afuera.
Luego posicione el soporte de manera que engancha el frente
interno y posterior externo del riel, luego presione el brazo de
aseguramiento hacia adentro para fijarlo en su sitio.
Para Montaje Exterior:
Abroche los soportes como se indicó anteriormente. Sostenga la
persiana nivelada a la altura deseada y céntrela en la apertura de
la ventana. Marque la localización exacta de cada soporte con un
lápiz. Remueva los soportes del riel y posicione la parte superior
de cada soporte en las marcas que acaba de hacer y atornille cada
soporte en la pared o marco de la ventana usando un tornillo de
11/8”. Perfore los hoyos usando una broca de 3/32”.
Para Montaje Interior:
Abroche los soportes como se indicó anteriormente. Sostenga la
persiana a la altura deseada y marque con lápiz en la parte trasera
12
de cada soporte donde hace contacto con la parte interior del
marco de la ventana. Remueva los soportes y alinéelos con las
marcas. Fije cada soporte con tornillos de 11/8”. Perfore los hoyos
usando una broca de 3/32”.
Paso 4. Fije la Manija(s)
Fije la manija al riel inferior como se ilustra. La manija esta diseñada
para minimizar el contacto con la tela de la persiana. Siempre
levante la persiana LENTAMENTE(!) para asegurar que los pliegues
de tela se apilan ordenadamente.
TDBU
Double Cell &
Day/Night
Single Cell
Persianas más anchas constan de (2) manijas - pare determinar la
posición correcta de cada uno, divida la longitud del ancho total en
4, luego acomode una manija a esa distancia y a cada lado desde
los extremos – siempre agarre ambas manijas cuando levante o baje
la persiana.
Para persianas inalámbricas TDBU y Día/Noche, fije la segunda
manija al Riel Medio como se ilustra.
Paso 5. Como Operar la Persiana
IMPORTANTE
Instrucciones de Operación y Cuidado de sus Persianas
LEA CUIDADOSAMENTE
•
•
Asegúrese que las Manijas han sido fijadas al riel (o rieles)
como se describió anteriormente. (Mire Paso 4)
Para mantener un desempeño optimo de los resortes que
hacen funcionar su persiana, levante y baje la persiana en
su totalidad hacia arriba y hacia abajo – todos los días de
ser posible
Para persianas con una manija, que deberá estar centrada
en el riel (o rieles), levante o baje la persiana despacio y a
nivel, manteniendo el riel (o rieles) derechos, hasta que la
persiana llega a la altura deseada
Para persianas más anchas con un set doble de manijas,
agárrelos usando ambas manos y levante la persiana lenta
y a nivel, cerciorándose que el riel (o rieles) se mantiene
derechos
Si tiene problemas levantando la persiana:
Si la persiana se deja en una sola posición durante un período largo
•
•
Persianasen
TejidoCelular
Inalámbricas
Incluye
Acción Múltiple
& Dia/Noche
•
13
de tiempo, podría ser necesario levantarla y bajarla varias veces para
re-establecer su funcionamiento normal.
Si la persiana ha quedado levantada totalmente por un
período largo de tiempo, podría tender a "rebotar" de la
posición en que se desea. Esto también puede remediarse
levantando y bajando la persiana varias veces.
Persiana Estándar
Siempre levante y baje la persiana LENTAMENTE(!) para asegurarse
que los dobleces de la persiana se apilan ordenadamente. Para
bajar la persiana: agarre el riel inferior y lentamente tire hacia
abajo. Para levantar la persiana: Agarre la manija y tire hacia arriba
lentamente. Siempre mantenga el riel derecho.
Persianas de Acción Múltiple y Día/Noche
Para levantar o bajar use las mismas direcciones de arriba.
Para subir o bajar la persiana del tope: agarre la manija en el
riel de la mitad y suavemente hale hacia arriba o abajo.
Paso 6. Instalación de Soportes de Sujeción
Los soportes de sujeción se incluyen para uso opcional. Se
deberán usar si la persiana va a estar permanentemente en
la posición de abajo. Con la persiana totalmente abajo, haga
marcas a los extremos del riel inferior. Los soportes deberán
estar alineados a las marcas y asegurados con tornillos de 3/8”.
Inserte las puntas que salen de los soportes en los hoyos que
se encuentran a cada extremo del riel inferior (mire ilustración).
Paso 7. Conector 2-en-1 para Ventanas Anchas
Conecte dos rieles usando el conector 2-en-1 como se muestra.
LIMPIEZA
El vinilo del riel puede limpiarse con una esponja húmeda. La tela
de la persiana puede sacudirse con un plumero o aspirarla con el
cepillo blando.
14
REPUESTOS
Si llegase a requerir de repuestos, por favor llame al: 1-800-264-1190
Asegúrese de proveer la siguiente información:
• Nombre y Modelo o Número del Producto en el Catálogo
• Descripción del Producto
• Descripción de la parte que se requiere
GARANTIA DE POR VIDA LIMITADA
Persianasen
TejidoCelular
Inalámbricas
Incluye
Acción Múltiple
& Dia/Noche
De por Vida: El producto entero cuando haya defectos de manufactura
(por ejemplo una falla en el diseño, materiales o mano de obra que cause
que el producto deje de funcionar.
5 Años: La tela
No Cubre: Deterioro normal. Cualquier producto que falla debido a:
• abuso • exposición a aire salado • instalación inapropiada • accidente
• uso extra-ordinario • operación inapropiada • alteraciones • limpieza
indebida • aplicación errónea • daño causado por insectos/mascotas/
pestes • manejo indebido • uso inapropiado
Costos asociados con:
• remoción del producto • transporte de o hacia almacén • remoción de
marca • medición del producto • daños accidentales o consecuenciales •
re-instalación del producto • envío
Para Reportar un Daño en el Envío
Si el daño se presento durante el envío, llame al almacén donde efectuó la
compra dentro de los 7 días calendario de lo contrario le será negado el
crédito por el producto dañado.
Para Obtener Servicio
Si usted sospecha que este producto de PhaseII tiene un defecto de
manufactura o materiales:
1. Localice recibo de compra 2. Llame al almacén donde realizo la compra
Cualquier retorno desautorizado no será aceptado.
Remedio de Garantía
ESTA SERA LA REPARACION DENTRO DE LA GARANTIA LIMITADA.
Si este producto llegase a tener un defecto de manufactura o defecto en
los materiales, nosotros, a nuestra entera discreción, haremos alguna de
las siguientes:
• reparar el producto • reemplazar el producto • devolver el costo del
producto
Colores
Los colores pueden variar dentro de loa lotes de producción y podrían no
emparejar con muestras o compras anteriores.
Los colores descontinuados o selecciones de colores serán reemplazados
con la muestra mas cercana. del producto equivalente.
SUS DERECHOS BAJO LA LEY DEL ESTADO
Esta garantía le da derechos legales específicos y usted podría tener otros
derechos, los cuales varían según el estado. Algunos estados no aceptan
limitaciones o tiempo de garantías, así que las anteriores limitaciones
podrían no aplicarle a usted.
Ni agente, ni representante, proveedor a empleado desautorizado tiene la
autoridad de incrementar o aumentar la obligación de esta garantía. Esta
garantía super-sede al cualquier versión anterior.
PHASE II PRODUCTS, INC.
501 WEST BROADWAY, SUITE 1350
SAN DIEGO, CALIFORNIA 92101 • 1-800-264-1190
15