1
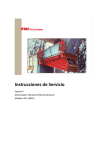
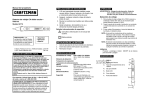
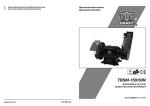
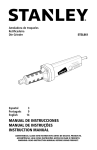
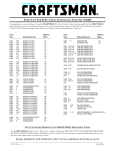
Operator’s Manual
®
TOOL STAND
Model No.
351.192104
CAUTION: Read and follow
all Safety Rules and Operating
Instructions before First Use
of this Product.
•
•
•
•
•
Safety
Assembly
Operation
Parts List
Español
Sears, Roebuck and Co., Hoffman Estates, IL 60179 U.S.A.
2666.00 Draft (03/08/99)
TABLE OF CONTENTS
Warranty. . . . . . . . . . . . . . . . . . . . . . 2
Operation . . . . . . . . . . . . . . . . . . . . . 3
Safety Rules . . . . . . . . . . . . . . . . . . . 2
Parts Illustration and List . . . . . . . . 4-5
Assembly . . . . . . . . . . . . . . . . . . . . . 2
Español . . . . . . . . . . . . . . . . . . . . . 6-7
WARRANTY
FULL ONE YEAR WARRANTY ON CRAFTSMAN TOOL STAND
If within one full year from the date of purchase, this Craftsman Tool Stand
fails due to a defect in material or workmanship, Sears will repair it free of
charge.
Warranty service is available by simply returning the stand to the nearest
Sears Store or Service Center throughout the United States.
This warranty gives you specific legal rights and you may have other rights
which vary from state to state.
Sears, Roebuck and Co., Dept. 817WA, Hoffman Estates, IL 60179
SAFETY RULES
• Know the tool stand and the power
tool. Read and understand operator’s manuals and other instructions
provided.
• Securely bolt tool stand to floor.
• Use only accessories designed for
your tool stand or power tool.
• Make sure power tools and accessories are securely clamped.
• Always check your set up. For example, rotate accessory by hand before
applying power.
• Keep your mind on your work. Be
alert.
• Dress properly. Do not wear jewelry,
gloves, or loose clothing.
• Wear a face shield or safety glasses.
• Never place hands in jeopardy.
ASSEMBLY
• Slide water pot (Key No. 5) into holder. Adjust pot holder height as
required.
• Secure base to floor to ensure maximum stability and safety. (Hardware
not included.)
Refer to Figure 2.
• Slide column into base (Key Nos. 2
and 3); secure by tightening hex
head bolts (Key No. 6) against column. Tighten hex nuts (Key No. 7)
against base to secure bolts.
• Slide water pot holder (Key No. 4)
over column. Tighten hex head bolt
and nut (Key Nos. 6 and 7) to
secure holder.
• Slide top (Key No. 1) over column
and secure with bolt and nut (Key
No. 6 and 7).
MOUNT GRINDER
• Use hex head bolts with flat washers, lock washers and hex nuts to
secure grinder to stand top.
(Hardware not included.)
2
OPERATION
DESCRIPTION
11″
The Sears Model 192104 Tool Stand is
constructed of heavy cast iron and
steel, and is designed for use with most
bench grinders. Cast iron top is provided with slots and holes for securely
mounting bench grinder. A water pot is
provided for quenching workpiece after
grinding.
10″
SPECIFICATIONS
31¾″
Shipping Weight . . . . . . . . . . . . 60 lbs
Column. . . . . . . . . . . . . 3½″ O.D. steel
DIMENSIONS
Refer to Figure 1.
Base width . . . . . . . . . . . . 14½ x 16¼″
Height . . . . . . . . . . . . . . . . . . . . 31¾″
Table size . . . . . . . . . . . . . . . 10 x 11″
16¼″
14½″
Figure 1 - Dimensions
3
Model 351.192104
Figure 2 - Replacement Parts Illustration for Tool Stand
1
7
6
5
6
7
4
2
3
7
6
4
REPLACEMENT PARTS LIST FOR TOOL STAND
KEY
NO.
PART NO.
DESCRIPTION
1
2
3
4
5
6
7
∆
4889.00
4886.00
4885.00
4887.00
4888.00
7186.00
STD841015
2666.00
Top
Column
Base
Water Pot Holder
Water Pot
10-1.5 x 30mm Socket Head Bolt
10-1.5mm Hex Nut*
Operator’s Manual
QTY.
Recommended Accessories
∆
Grinding Wheel Dresser
925282
* Standard hardware item available locally.
∆ Not Shown
5
1
1
1
1
1
5
5
1
PEDESTAL DE HERRAMIENTAS
Modelo No.
351.192104
PRECAUCION: Lea este manual y siga las Reglas de Seguridad
y las Instrucciones de Operación, antes de usar este producto por
la primera vez.
CONTENIDO
Inglés . . . . . . . . . . . . . . . . . . . . . . . . . . 2-3
Reglas de Seguridad . . . . . . . . . . . . . . . . 6
Ilustración y Lista de Partes . . . . . . . . . 4-5
Montaje . . . . . . . . . . . . . . . . . . . . . . . . . . 7
Garantía. . . . . . . . . . . . . . . . . . . . . . . . . . 6
Operación . . . . . . . . . . . . . . . . . . . . . . . . 7
GARANTIA
UN AÑO COMPLETO DE GARANTIA PARA EL PEDESTAL DE HERRAMIENTAS
CRAFTSMAN
Si dentro de un año a partir de la fecha de compra, este pedestal de herramientas
Craftsman falla debido a un defecto en el material o en la mano de obra, Sears lo
reparará gratis.
Para obtener este servicio de garantía, simplemente devuelva el pedestal de herramientas al centro de servicio más cercano de Sears, en los Estados Unidos.
Esta garantía le da derechos legales específicos y también puede tener otros derechos
que varían de un estado al otro.
Sears, Roebuck and Co., Dept. 817WA, Hoffman Estates, IL 60179
REGLAS DE SEGURIDAD
•
•
•
•
•
Conozca el pedestal de herramientas y
la herramienta mecánica. Lea y entienda
los manuales del operador y las otras
instrucciones que se proporcionan.
Aperne firmemente el pedestal de herramientas en el piso.
Use solamente accesorios diseñados
para su pedestal o para la herramienta
mecánica.
Asegúrese que la herramientas mecánica y los accesorios estén agarrados
firmemente.
•
•
•
•
6
Siempre revise su preparación. Por
ejemplo, haga rotar el accesorio manualmente antes de aplicar la energía.
Mantenga la mente en su trabajo. Esté
alerta.
Vístase adecuadamente. No use joyas,
guantes ni ropa suelta.
Use una protección para la cara o anteojos de seguridad.
Nunca ponga las manos en peligro.
MONTAJE
Refiérase a la Figura 2.
• Deslice la columna en la base (Clave
Nos. 2 y 3); asegúrela apretando los pernos de cabeza hexagonal Clave No. 6)
en contra de la columna. Apriete las
tuercas hexagonales (Clave No. 7) en
contra de la base para asegurar los
pernos.
• Deslice el sujetador del contenedor de agua (Clave. No. 4) sobre la
columna. Apriete el perno de cabeza
hexagonal y la tuerca (Clave Nos. 6 y 7)
para asegurar el sujetador.
• Deslice la parte superior (Clave No. 1)
sobre la columna y asegúrela con el
perno y la tuerca (Clave Nos. 6 y 7).
•
•
Deslice el contenedor de agua (Clave
No. 5) en el sujetador. Ajuste la altura
del sujetador de agua según sea
necesario.
Asegure la base al piso para lograr una
estabilidad y una seguridad máximas.
(Los artículos de ferretería no vienen
incluidos.)
MONTAJE DE LA ESMERILADORA
•
Use los pernos de cabeza hexagonal
con las arandelas planas, las arandelas
de seguridad y las tuercas hexagonales
para asegurar la esmeriladora a la parte
superior de la plataforma. (Los artículos
de ferretería no vienen incluidos.)
OPERACION
DESCRIPCION
El pedestal de herramientas Modelo 192101
Sears ha sido fabricado de acero y hierro
fundido de tipo pesado y ha sido diseñado
para usarse con la mayoría de las esmeriladoras de banco. La parte superior de hierro fundido viene con ranuras y agujeros
para montar la esmeriladora de banco en
forma segura. Se proporciona un contenedor de agua para sumergir la pieza
de trabajo después de esmerilar.
27,9 cm
25,4 cm
ESPECIFICACIONES
Peso de envío. . . . . . . . . . . . . . . . . 27,2 kg
Columna . . . . . . . . . Acero de 9 cm diá. ext.
80,5 cm
DIMENSIONES
Refiérase a la Figura 1.
Ancho de la base . . . . . . . . 36,8 x 41,3 cm
Altura. . . . . . . . . . . . . . . . . . . . . . . 80,5 cm
Tamaño de la mesa . . . . . . . . 25,4 x 28 cm
41,3 cm
36,8 cm
Figura 1 - Dimensiones
7
For the repair or replacement parts you need
delivered directly to your home
Call 7 am - 7 pm, 7 days a week
1-800-366-PART
(1-800-366-7278)
Para ordenar piezas con entrega a
domicillo – 1-800-659-7084
For major brand repair service
Call 24 hours a day, 7 days a week
1-800-4-REPAIR
(1-800-473-7247)
Para pedir servicio de reparación
1-800-659-7084
For the location of a Sears Parts and
Repair Center in your area
Call 24 hours a day, 7 days a week
1-800-488-1222
When requesting service or ordering
parts, always provide the following
information:
• Product Type
• Part Number
• Model Number
• Part Description