1
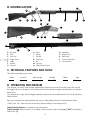
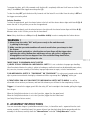
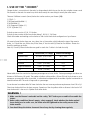
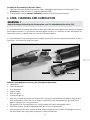
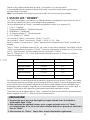
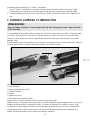
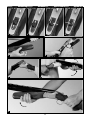
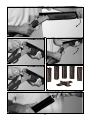
HATSAN
ARMS COMPANY
Instruction Manual
_ _____________________________________________________________________________________________________________
Manual De Instrucción
____________________________________________________________________________________________________
GB
ES
CONTENTS
Page
SAFETY MEASURES........................................................................................................................................3
NOMENCLATURE...........................................................................................................................................4
TECHNICAL FEATURES AND DATA.................................................................................................................4
OPERATING MECHANISM..............................................................................................................................4
GB
ASSEMBLY INSTRUCTIONS.............................................................................................................................5
LOADING & FIRING........................................................................................................................................6
UNLOADING..................................................................................................................................................7
DISASSEMBLY INSTRUCTIONS........................................................................................................................7
USE OF THE “CHOKES”..................................................................................................................................8
CARE, CLEANING AND LUBRICATION............................................................................................................9
ILLUSTRATIONS.......................................................................................................................................... 18-19
Congratulations and thank you for choosing OPTIMA over/under shotgun.
WARNING !
Read very carefully this instruction manual before handling this firearm. Incorrect handling may
result in serious injury or death to you or bystanders.
Always keep this manual with your firearm. Make sure you understand all the operation instructions, safety
procedures and warnings in this manual before you handle the firearm.
If you sell, lend or give the firearm to another, make sure this manual goes with it.
WARNING !
Always keep your finger outside the trigger guard and be sure that the safety is fully engaged
until you are ready to fire. The safety is fully engaged only when letter S (meaning Safe)
underneath the safety button is completely visible and it can be moved no further toward the
“ON” position.
A. SAFETY MEASURES:
1. Always point the firearm in a safe direction even though it may be unloaded. Do not point the gun at
anything you do not intend to shoot. Avoid all horseplay while handling a gun.
2. Keep your finger away from the trigger when operating any other part of the gun’s mechanism.
3. Keep the safety “ON” until you are actually ready to fire. Treat every gun with respect and caution.
4. Keep your fingers away from the muzzle. Never pull a gun toward you by the muzzle.
5. Be sure the barrel is clear of obstructions.
6. Keep your gun unloaded when not in use and never load your gun if you will not shoot.
7. Always aim at a safe target, taking care that it does not conceal any other object. Be sure of your target and
what lies beyond before you pull the trigger. Never shoot at sounds. To avoid ricochets, do not shoot at a flat
or hard surface or at water.
8. Store guns and ammunition separately, beyond the reach of children, better if under lock and key. Guns
should always be unloaded when stored.
9. Never carry a loaded gun inside a vehicle, house, camp, or public place. When transporting the gun keep the
gun “on safe” and unloaded. Never climb a tree or fence, or jump a ditch with a loaded gun.
10.Never rely on any one’s words that the gun is “on safe” or unloaded. Always check to see if the gun is “on
safe” and unloaded when getting it from another person or storage.
11.Avoid alcoholic beverages or drugs before or during shooting.
12.Always use eye & hearing protection and make sure bystanders are similarly protected.
13.Although the firearm itself does not contain any lead, it fires ammunition containing lead or lead compounds,
which are known to be dangerous for health. Take protective health measures when shooting or cleaning
guns. Avoid exposure to the lead while handling and wash your hands after contact. Proper air ventilation is
absolutely necessary when shooting indoors.
14.Any damage, malfunction, injury, or death resulting from the use of faulty, incorrect, non-standard,
remanufactured, hand loaded or reloaded ammunition is the sole responsibility of the user.
3
GB
B. NOMENCLATURE
M
L
K
N
A
B
C
D
E
F
G
N
H
J
M
F
G
A
C
B
D
E
S
T
O
P
GB
A.
B.
C.
D.
E.
F.
G.
R
H
H.
I.
J.
K.
L.
M.
N.
Butt Plate
Stock
Stock Grip
Trigger Guard
Trigger
Receiver
Fore-end
Barrel
Muzzle
Side Rib
Front Sight
Rib
Top Lever
Safety/Selector Button
O.
P.
R.
S.
T.
Monoblock
Hinge Pin Slot
Barrel Hook
Fore-end Steel Plate
Fore-end Latch
C. TECHNICAL FEATURES AND DATA:
Fill in below according to your firearm:
Model
...........
Serial No
Barrel Length
Chamber
Caliber
Type
.................
........................
76mm (3”)
………
O/U shotgun
D. OPERATING MECHANISM
Your shotgun is an over & under shotgun meaning there 2 barrels one on top of the other. Every time you pull
the trigger only one of the barrels is fired. When you fire the first barrel the trigger automatically set to the other
barrel to fire.
Your shotgun has a single selective trigger mechanism and you can choose which barrel to fire first by the Safety/
Selector button.
Before you assemble your firearm please make sure you understand the function of Safety/Selector button.
(“Right” and “Left” refer to the gun as seen by a shooter holding it in the firing position.)
Safety/Selector Button: It is located on top of the receiver.
Safety Function: When the letter S is not visible, it means that the safety is disengaged (“OFF”) and firearm is
ready to fire. (1)
4
I
To engage the safety, pull it fully rearwards until the letter S is completely visible and it will move no further. The
safety is now ON and the trigger cannot be pulled. (2)
To take the safety OFF, push the button fully forwards until the letter S is not visible. Now the safety is OFF and
the trigger can now be pulled.
Selector Function:
To select the upper barrel, push the selector button to the left until the selector button aligns with letter O (3). O
means the over. In this position you can fire the upper barrel.
To select the lower barrel, push the selector button to the right until the selector button aligns with letter U (4).
U means under. In this Position you can fire the lower barrel.
Note: Safety should be set to ON position (S should be visible) in order to manipulate the Selector button.
WARNING !
1) Always keep the safety “ON” until you are ready to fire and the muzzle
is pointing at the target.
2) Make sure that you understand how all controls work before you attempt to load
the firearm.
3) Keep the muzzle pointed in a safe direction and your finger off the trigger when
operating the safety. Malfunctions which may cause a gun to fire is engaged or
disengaged are rare but can happen. Even if an accidental firing should occur,
nobody will be hurt if you follow this rule.
THREE THINGS TO REMEMBER ABOUT SAFETIES
1) NEVER TOTALLY DEPEND ON A MECHANICAL SAFETY. It is not a substitute for proper gun handling.
Like all mechanical devices the safety is subject to breakage or malfunction and can be defeated by wear, abuse,
dirt, corrosion, incorrect assembly of the firearm, improper adjustment or repair, or lack of maintenance.
2) NO MECHANICAL SAFETY IS “CHILDPROOF” OR “FOOLPROOF”. No safety ever invented can be relied
upon to prevent an accidental shooting by a determined child or a grownup idiot “playing” with a gun.
3) TREAT EVERY GUN AS IF YOU EXPECT ITS MECHANICAL SAFETY NOT TO WORK. You will be
astounded at how cautious you become, and how little tolerance you will have for the complacency of others.
Trigger: It is located in the trigger guard. With the safety OFF and a cartridge in the chamber, pulling the trigger
fires the gun.
When the Safety/Selector button is set to the O position, trigger fires the upper barrel.
When the Safety/Selector button is set to the U position, trigger fires the lower barrel.
(see Safety/Selector Button section)
E. ASSEMBLY INSTRUCTIONS
Your new over/under shotgun is packed dismounted in its box, i.e. barrel/fore-end is separated from the stockreceiver assembly. To attach the barrel, first remove all parts from the plastic bags. Before proceeding with the
assembly of the firearm, carefully check the “Nomenclature” and read “Safety Measures” sections.
5
GB
WARNING !
Before assembling shotgun, check the barrel. Barrel and cartridge chamber must be clean and
there should be no obstructions in them.
Assemble the barrel as follows:
1. Take the barrel/fore-end assembly. Remove the fore-end from the barrel buy pulling the
fore-end latch down. (5)
2. Take the stock-receiver assembly. Rotate the top lever to the right until it locks in the open position. (6)
3. Take the barrel and insert the monoblock inside the receiver by aligning the hinge pins into the slots in the
monoblock. (7) Then swing the barrel upwards so that it sits correctly and locks into the receiver. (8)
You will hear a ‘click’ noise and see that the top lever comes into its center position when the barrel is correctly
locks into the receiver.
4. Take the fore-end and fit it under the barrel, and then swing it upwards until it sits and locks under the
barrel. (9)
Check if the fore-end latch sits flush with the fore-end to verify that you have assembled the shotgun properly. If
not please reverse the above process and repeat the assembly process.
F. LOADING & FIRING
WARNING !
GB
1) Always keep your fingers away from the trigger if you do not intend to fire.
2) Always check barrels to see that the firearm is not already loaded.
3) While you load the firearm, always point the barrel in a safe direction.
4) Always use the correct ammo size, which your firearm is chambered.
5) Always keep the safety “ON” while loading your firearm.
Load the firearm as follows:
1. Put the safety “ON” if it is disengaged. (2)
2. Take the assembled shotgun and rotate the top lever to the right and break the barrels downward. (10)
3. Make sure the muzzles look down and there is no obstruction in the barrels. Then take proper gauge
cartridges and insert them into the upper or lower barrels of your wish or into the both 2 barrels for 2 shots.
(11)
4. Swing up the barrel completely and lock it in the receiver. (12)
While doing this make sure you hear the ‘click’ noise when the barrel is closed, make sure barrel is locked
properly in the receiver and make sure the top lever returns to its center position.
If any of these do not happen this means your shotgun is not assembled correctly. In such a case immediately
unload your shotgun (see Unloading section) and disassemble it (see Disassembly section) and assemble your
shotgun again (see Assembly section).
WARNING !
FIREARM IS NOW LOADED AND READY TO BE FIRED
5) Here you can chose which barrel to fire first by means of the Safety/Selector button.
Take aim to a safe target, take the safety off and depress the trigger. The shotgun will fire the over or under
barrel which the Safety/Selector button is set to.
The second time you depress the trigger the other unfired barrel will fire.
6
WARNING !
Keep the safety “ON” and your finger outside the trigger guard until you are actually ready to
fire and aimed at your intended target.
It is the user’s sole responsibility to take necessary safety, protection and health measures
during firing.
G. UNLOADING
WARNING !
Keep your fingers off the trigger and keep the safety ON.
To unload the fired shells or unfired shells from the barrels, please follow below steps:
1. Point the firearm in a safe direction and engage the safety. (2)
2. Rotate the top lever to the right and break the barrels (10)
3. Using your fingers remove the fired or unfired shells. (13)
Now you can reload new shells if you are going to continue firing or you need to lower the hammers if you will
not fire any more.
Please follow below steps if you want to lower the hammers:
1. After unloading insert two empty shells into the 2 barrels and then close the barrel properly so it locks into
the receiver.
2. Point the muzzle in a safe direction, take off safety and pull the trigger to lower the first hammer belonging
to the over or under barrel.
3. Bring the Safety/Selector button to the position of the other barrel. O or U position depending on which
barrel is fired in the first shot. (3) or (4). Then pull the trigger to lower the second hammer.
4. Break the barrel (10) by rotating the top lever to the right. After breaking the barrel remove the empty
shells (13) and close the barrel properly so it locks in the receiver (8).
H. DISASSEMBLY INSTRUCTIONS
WARNING !
Before disassembling the firearm, always make sure that the firearm is not loaded; barrel is
pointed in a safe direction and safety “ON”.
Disassemble your shotgun as follows:
1. Remove the fore-end by pulling the fore-end latch. (5)
2. Rotate the top lever to the right.
3. Break the barrels all the way down and lift them to separate from the receiver.
4. Place the fore-end under the barrels.
With above process you will see that the top lever stays in its right locked position. To bring the top lever to its
center position, rotate & hold the top lever to the right and press the locking pin in the receiver. Then release the
top lever and it returns to its center position.
It is recommended to bring the top lever to its center position when you are not going to continue using your
shotgun.
NOTE: To reassemble the firearm, follow the steps in the Assembly section
7
GB
I. USE OF THE “CHOKES”
Shotgun choke is a constriction in the end of a shotgun barrel which focuses the shot into a tighter stream--much
like a nozzle on the end of a water hose, which does exactly the same thing for exactly the same reason.
There are 5 different screw-in (inner) chokes that can be used on your firearm. (14)
1) F (Full / )
2) IM (Improved Modified // )
3) M (Modified /// )
4) IC (Improved Cylinder //// )
5) CYL (Cylindert ///// )
3-choke system consists of F, M, CYL chokes.
5-choke system contains all the inner chokes being F, IM, M, IC, Cyl-Skeet.
Check the number and markings on the chokes to find out the inner choke configuration of your firearm.
All screw-in (inner) chokes have one, two, three, four or five notches, which indicate the type of the screw-in
choke, i.e. F choke has one, IM has two, M has three, IC has four and Cyl-Skeet has five notches. Please also
check the markings on chokes.
Note: M, IC and Cyl-Skeet choke tubes are good for steel shot. F choke is for lead shot only!
GB
Choke
Constriction (12 Gauge)
Pattern Percentage
Cylinder-Skeet
0-0.005” (0-0.12 mm)
40% - 53%
Improved Cylinder
0.010” (0.25 mm)
57%
Modified 0.020” (0.50 mm)
67%
Improved Modified
0.030” (0.75 mm)
73%
Full
0.040” (1.0 mm)
75%
Above table shows the constriction & pattern percentage versus inner chokes. Pattern percentages are taken at a
distance of 36.5 meters (40 yards). The number of pellets striking within a 76 mm (30 inch) circle, drawn so as to
encompass as many pellet holes as possible, is counted and compared with the number of pellets contained in an
identical unfired shell. The result is expressed as a percentage.
As can be seen from above table Full inner choke has the most accuracy and accuracy decreases from Full to CylSkeet inner choke which has the least accuracy. Expansion of the shot pellets within a distance is the least in Full
inner choke and it is the most in Cylinder-Skeet inner choke.
WARNING !
1. Make sure the firearm is unloaded and the safety “ON” before you assemble disassemble the
chokes.
2. Under safety conditions (barrels empty, safety engaged), check whether the choke worked
loose during use. In such a case, the choke must be tightened to the end by means of the
choke wrench.
3. You should keep the chokes clean and free of any dust by cleaning them regularly.
8
Assembly & disassembly of the inner chokes:
1. Take one of the inner chokes of your choice. Place it inside barrel and by means of choke wrench; screw
(clockwise) it to the end until it is completely tightened. (15)
2. To disassemble, unscrew (counter-clockwise) by means of choke wrench and remove it.
J. CARE, CLEANING AND LUBRICATION
WARNING !
Before cleaning or lubricating the firearm make sure it is unloaded and the safety ‘ON’.
It is recommended to disassemble the firearm to clean and to lubricate it when grease or dirt particles accumulate
and combustion residues. To have the best resistance against corrosion, it is necessary to clean and lubricate the
firearm after each use, especially after use in wet and saline environment.
It is recommended to firmly oil frequently the monoblock, barrel hook, fore-end steel plate and internal surface of
the receiver. Avoid excessive oiling of any part!
LUBRICATE
GB
LUBRICATE
LUBRICATE
LUBRICATE
Materials and equipment necessary for cleaning and lubrication;
• Cleaning rod
• Cotton bore patches
• Brass bore brush
• Powder solvent
• Small soft brush
• Good quality gun oil
• After use, to remove any powder and lead residue in the bore, scrub the barrel and chamber using the bore
brush with powder solvent. Then do not forget to swab the bore and the chamber with gun oiled cotton
patches to protect from rust and corrosion.
• Any powder on the firing wall, barrel, etc. can be cleaned with a brush and powder solvent.
• All external surfaces should be wiped down with light coat of rust preventative.
• Avoid using too much solvent for bore cleaning, since prolonged or excess contact can damage the finish of
the wood. Make sure to wipe away all the excess solvent and lubricant.
9
CONTENIDO:
MEDIDAS DE SEGURIDAD..............................................................................................................................11
NOMENCLATURA..........................................................................................................................................12
DATOS Y CARACTERÍSTICAS TÉCNICAS..........................................................................................................12
MECANISMOS DE OPERACIÓN.......................................................................................................................12
ES
INSTRUCCIONES DE ENSAMBLAJE.................................................................................................................13
CARGA Y DISPARO........................................................................................................................................14
DESCARGA....................................................................................................................................................15
INSTRUCCIONES DE DESENSAMBLAJE...........................................................................................................15
USO DE LOS “CHOKES”.................................................................................................................................16
CUIDADO LIMPIEZA Y LUBRICACIÓN.............................................................................................................17
ILUSTRACIONES.......................................................................................................................................... 18-19
Felicidades y Gracias por escoger la Escopeta Optima Superpuesta.
¡Precaución!
Lea cuidadosamente este manual de instrucciones antes de manipular el arma. La incorrecta
manipulación de la escopeta puede resultar en graves lesiones o muerte total para usted o las
personas cercanas a usted.
Siempre mantenga este manual con su arma. Asegúrese de entender todas las instrucciones de operación,
procedimientos de seguridad y precauciones que se citan en este manual antes de manipular el arma; si usted
vende, traspasa o regala el arma a alguien más, asegúrese de que el manual vaya con ella.
¡Precaución!
Siempre mantenga su dedo fuera del guardamonte y asegúrese de que el seguro esta puesto
por completo hasta que usted esté listo para disparar. El seguro se encuentra puesto cuando la
letra “S” (del Ingles Safe, Seguro) se encuentra completamente visible.
A. MEDIDAS DE SEGURIDAD:
1. Siempre apunte el arma en una posición segura, aún estando descargada. No apunte el arma a nada a lo que
no este dispuesto a disparar. Evite cualquier tipo de juego mientras manipula el arma.
2. Mantenga su dedo lejos del gatillo mientras manipula cualquier otro mecanismo del arma.
3. Mantenga el seguro puesto (en la posición de “ON”) hasta que esté listo para disparar. Trate cualquier arma
con respeto y precaución.
4. Mantenga sus dedos lejos de la boca del cañón. Nunca dirija la boca del cañón hacia usted.
5. Asegúrese de que el cañón está libre de obstrucciones.
6. Mantenga su arma descargada cuando no esté en uso y nunca la cargue si no la va disparar.
7. Siempre apunte hacia un blanco seguro asegurándose de que no oculta ningún otro objeto. Este consiente
siempre del blanco al que apunta y de lo que yace más allá de él antes de jalar el gatillo. Nunca dispare a
sonidos. Para evitar rebotes, nunca apunte a blancos planos, superficies duras o al agua.
8. Almacene armas y cartuchos por separado, lejos del alcance de los niños, y mejor aún si lo puede hacer bajo
llave. Las armas siempre deben estar descargadas mientras se almacenan.
9. Nunca porte un arma cargada dentro de un vehículo, casa, campo o lugar público. Cuando transporte el arma
hágalo con el seguro puesto y descargada. Nunca suba o trepe un árbol, una cerca, o salte a una zanja con el
arma cargada.
10.Nunca de por cierto cuando alguien le diga que un arma se encuentra descargada y con el seguro puesto.
Cuando entregue el arma a otra persona, siempre verifique que se encuentra descargada y con el seguro
puesto.
11.Evite las Bebidas alcohólicas o drogas antes o durante una sesión de disparo.
12.Siempre use protecciones en ojos y oídos y asegúrese de que las personas cercanas a usted las usan también.
13.Aunque el arma en si misma no contiene plomo en absoluto, la munición que dispara si contiene plomo
o componentes con plomo, los cuales se sabe son dañinos para la salud. Tome medidas preventivas de salud
cuando dispare o limpie las armas. Evite contacto con el plomo y en caso de que lo tenga lave sus manos
después del contacto. Ventilación adecuada es necesaria cuando dispare en interiores.
14.Cualquier daño, mal funcionamiento, lesión ó muerte total causada por el uso de cartuchos defectuosos,
incorrectos, no estándar, remanufacturados o recargados, es única responsabilidad de quien los utiliza.
11
ES
B. NOMENCLATURA
M
L
K
N
A
B
C
D
E
F
G
N
H
J
M
F
G
A
C
B
D
E
S
T
O
P
ES
R
A. Base de la Culata.
B. Culata.
C. Empuñadura de la culata.
D. Guardamonte.
E. Gatillo.
F. Recibidor.
G. Tercio o guardamano.
H. Cañón.
H
I. Boca del cañón.
J. Costilla lateral.
K. Mira delantera.
L. Costilla.
M.Palanca de liberación del
cañón.
N. Botón del Seguro y Selector de
Disparo.
O. Caja de mecanismos.
P. Ranura del perno de unión.
R. Gancho del cañón.
S. Chapa del tercio o
guardamano.
T. Cierre del tercio ó
guardamano.
C. DATOS Y CARACTERÍSTICAS TÉCNICAS:
Llene los espacios en blanco de acuerdo a su arma.
Modelo
No. De Serie
Longitud del cañón
Recamara
Calibre
Tipo
...........
.................
........................
76mm (3”)
………
Superpuestos
D. MECANISMOS DE OPERACIÓN
Su arma es una escopeta “superpuesta”, lo que quiere decir que tiene dos cañones, uno encima del otro. Cada
vez que jale el gatillo, solo uno de los cañones será disparado. Cuando usted disparó el primer cañón, el segundo
cañón automáticamente se prepara para disparar. Su escopeta tiene un mecanismo de un solo gatillo y usted
selecciona que cañón desea disparar primero mediante el botón del seguro y selector de disparo.
Antes de ensamblar el arma asegúrese de que entiende el funcionamiento del botón del seguro y selector de
disparo.
Nota: Cuando en este manual se refiera a “Izquierda” o “Derecha” se refiere al arma vista desde el tirador en
posición de disparo.
Botón del Seguro y Selector de Disparo
Esta localizado en la parte superior del recibidor.
Funcionamiento del seguro:
12
I
Cuando la letra “S” no está visible, significa que el seguro está desactivado (“OFF”) y el arma por lo tanto está
lista para disparar. (1)
Para activar el seguro, jale el botón hacia atrás, hasta que la letra “S” se encuentre completamente visible y no
pueda moverse más atrás. Ahora el seguro se encuentra activado (“ON”) y no se puede jalar del gatillo. (2)
Para desactivar el seguro (posición “OFF”) apriete el botón por completo hacia delante hasta que la letra “S”
no esté visible. Ahora el seguro está desactivado (posición “OFF”) y el gatillo puede ser jalado.
Selector de Disparo:
Para seleccionar el cañón superior, presione el Botón del Seguro y Selector de Disparo (Sefty/ selector Button)
hacia la izquierda hasta alinearlo con la letra “O” (del Inglés “Over”) (3), en está posición será posible
disparar el cañón superior.
Para seleccionar el cañón Inferior, presione el Botón del Seguro y Selector de Disparo (Sefty/ selector Button)
hacia la derecha hasta alinearlo con la letra “U” (del Inglés “Under”) (4), en está posición será posible
disparar el cañón inferior.
¡Precaución!
1)Siempre mantenga el seguro activado (“ON”) hasta que esté listo para disparar y el cañón
apunte en dirección al blanco.
2)Asegúrese de que entiende como funcionan todos los mecanismos de control antes de
intentar cargar el arma.
3)Mantenga la boca del cañón apuntando a una posición segura y su dedo fuera del gatillo
mientras opera el Botón del Seguro. Las averías que pueden causar que un arma se dispare sola
estando el seguro activado o desactivado son raras pero pueden ocurrir, por lo que aún cuando
esto pase nadie saldrá lastimado si usted siempre sigue esta regla.
TRES COSAS PARA RECORDAR ACERCA DE LOS SEGUROS
1. NUNCA DEPENDA POR COMPLETO DE UN SEGURO MECÁNICO. Un seguro no es un sustituto de la
correcta manipulación de un arma. Como cualquier dispositivo mecánico, un seguro puede averiarse o
funcionar incorrectamente debido al uso, abuso, suciedad, corrosión, ensamblaje incorrecto del arma, ajuste o
reparación incorrecta, o falta de mantenimiento.
2. NINGÚN SEGURO MECÁNICO ES A PRUEBA DE NIÑOS O TONTOS. Ningún seguro jamás inventado
es completamente confiable para prevenir el disparo accidental de determinado niño o adulto al jugar
imprudentemente con un arma.
3. TRATE CUALQUIER ARMA COMO SI EL SEGURO NO FUNCIONARA. Se asombrará de que tan
cauteloso puede volverse, y de la poca tolerancia que tendrá a la complacencia e imprudencia de otros.
Gatillo:
Está localizado dentro del guardamonte. Con el seguro desactivado y un cartucho en la recamara, al jalar el
gatillo se dispara el arma.
Cuando el Botón del Seguro y Selector de Disparo se encuentra en la posición “O” (del Inglés “Over”) el
gatillo dispara el cañón superior.
Cuando el Botón del Seguro y Selector de Disparo se encuentra en la posición “U” (del Inglés “Under”) el
gatillo dispara el cañón Inferior.
E. INSTRUCCIONES DE ENSAMBLAJE
Su nueva escopeta superpuesta se encuentra empacada desensamblada dentro de su caja. El cañón y el
guardamano, vienen separados de la culata y el recibidor. Para sujetar el cañón primero saque todas las partes
de las bolsas de plástico. Antes de proceder a ensamblar el arma, cuidadosamente lea la nomenclatura y las
secciones de medidas de seguridad de este manual.
13
ES
¡Precaución!
Antes de Ensamblar su escopeta verifique el cañón. La recamara y el cañón deberán estar
limpias y libres de cualquier obstrucción.
Ensamble el cañón de la siguiente manera:
1. Tome el grupo del cañón y el guardamano. Remueva el guardamano del cañón jalando el pestillo del
guardamano hacia abajo. (5)
2. Tome el grupo de la culata y el recibidor. Rote la palanca de liberación del cañón a la derecha hasta que se
asegure en la posición abierta. (6)
3. Tome el cañón e insértelo en la caja de mecanismos dentro del recibidor alineando los pernos de unión en la
ranura de la caja de mecanismos. (7) Después balancee el cañón hacia arriba hasta que se situé
correctamente y se asegure dentro del recibidor. (8)
Usted escuchará el ruido de un “click” y verá la palanca de liberación del cañón recorrerse a su posición
central cuando el cañón se asegura correctamente en el recibidor.
4. Tome el guardamano y situelo debajo del cañón, balancéelo hacía arriba hasta que se situé y asegure debajo
del cañón. (9)
Revise si el seguro del guardamano se alinea exactamente con el guardamano para verificar si la escopeta se
ha situado correctamente. Si no se ha realizado el proceso correctamente, regrese a través del procedimiento
anterior y repita el proceso de ensamblaje.
F. CARGA Y DISPARO
ES
¡PRECAUCIÓN!
1)Siempre mantenga sus dedos fuera del gatillo si no está dispuesto a disparar.
2)Siempre revise los cañones para verificar que la escopeta no está ya cargada.
3)Mientras carga el arma, siempre manténgala en una posición segura.
4)Siempre utilice el tamaño y calibre de munición adecuado para la recamara de su arma.
5)Siempre mantenga el seguro activado (posición “ON”) mientras carga el arma.
Cargue su arma de la manera siguiente:
1. Active el seguro (posición “ON”) si es que está desactivado. (2)
2. Tome la escopeta ensamblada y rote la Palanca de liberación del cañón hacia la derecha y quiebre los
cañones hacia abajo. (10)
3. Asegúrese que las bocas de los cañones apuntan hacia abajo y revise si no están obstruidos. Después, Tome
uno o dos cartuchos del calibre adecuado e insértelos en el cañón superior o inferior para un disparo o en
ambos para dos disparos. (11)
4. Balancee el cañón hacia arriba por completo, hasta asegurarlo en el receptor. (12)
Cuando realice esta operación, asegúrese de escuchar el ruido del “click” cuando el cañón se cierra, al mismo
tiempo asegúrese de que el cañón fue asegurado correctamente en el receptor y de que la Palanca de
liberación del cañón regrese a su posición central. Si cualquiera de estas cosas no sucede significa que su
escopeta no fue ensamblada correctamente, en cuyo caso deberá descargarla de inmediato (vea la sección
de descarga en este manual) y desensamblarla para después reensamblarla nuevamente. (vea la sección de ensamblaje).
¡PRECAUCIÓN!
SU ESCOPETA ESTÁ AHORA CARGADA Y LISTA PARA DISPARAR.
14
5. Aquí usted puede elegir cual cañón quiere disparar primero mediante el Botón del Seguro y Selector de
Disparo.
¡PRECAUCIÓN!
Mantenga el seguro activado (“ON” posición) y su dedo fuera del guardamonte hasta que este
realmente listo para disparar y este apuntando a su objetivo.
Es responsabilidad únicamente del usuario tomar las medidas de seguridad y protección
necesarias durante una cesión de disparo.
G. DESCARGA
¡PRECAUCIÓN!
Mantenga sus dedos fuera del gatillo y el seguro activado (“ON” posición).
Para descargar cartuchos disparados o sin disparar del cañón, por favor siga los siguientes pasos:
1. Apunte el arma en una dirección segura y active el seguro (2).
2. Rote la palanca de liberación del cañón hacia la derecha y quiebre los cañones (10)
3. Usando sus dedos remueva los cartuchos disparados o sin disparar. (13)
Ahora usted puede recargar con nuevos cartuchos si va a continuar disparando o en su caso necesita bajar los
martillos si ya no continuara disparando más.
Por favor siga los siguientes pasos si quiere bajar los martillos:
1. Después de descargar inserte dos cartuchos vacíos dentro de los dos cañones y después cierre el cañón
apropiadamente hasta que se aseguro en el recibidor.
2. Apunte el cañón en una dirección segura, desactive el seguro y jale el gatillo para bajar el primer martillo, ya
sea el superior o el inferior.
3. Mueva el Botón del Seguro y Selector de Disparo a la posición del otro cañón, dependiendo de cual haya
disparado primero ya se el superior o inferior. (3) ó (4). Después jale el gatillo para bajar el segundo martillo.
4. Quiebre los cañones (10) rotando la palanca de liberación del cañón hacia
la derecha. Después de haber quebrado los cañones remueva los cartuchos vacíos (13) y cierre los cañones
apropiadamente hasta que queden asegurados en el recibidor (8).
H. INSTRUCCIONES DE DESENSAMBLAJE
¡PRECAUCIÓN!
Antes de desensamblar el arma siempre asegúrese de que no esta cargada; el cañón se
encuentra apuntando hacia una posición segura y con el seguro activado (“ON” posición).
Para desensamblar su escopeta siga los pasos siguientes:
1. Remueva el guardamano mientras jala el seguro del guardamano (5).
2. Rote la palanca de liberación del cañón hacia la derecha.
3. Quiebre los cañones por completo hacia abajo y luego levántelos para sepáralos del recibidor.
4. Coloque el guardamano debajo de los cañones.
Con el proceso antes mencionado usted vera que la palanca de liberación del cañón se mantiene asegurada y
rotada hacia la derecha. Para regresar la palanca de liberación del cañón a su posición central, rote y mantenga
detenido hacia la derecha la palanca de liberación del cañón y presione el seguro de retenida en el recibidor.
15
ES
Después suelte la palanca de liberación del cañón y esta regresa así a su posición central.
Es recomendable regresar la palanca de liberación del cañón a su posición central cuando usted no vaya a
continuar usando su escopeta.
Nota: Para reensamblar el arma siga los pasos mencionados en las instrucciones de ensamblaje.
I.USO DE LOS “CHOKES”
Un “choke” de escopeta es una reducción al salida del cañón de la escopeta que sirve para enfocar el tiro en
una área mas reducida justo como lo hace la boquilla de una manguera.
Hay cinco diferente tipos de “chokes” atornillables que pueden ser usados en su escopeta (14):
1. F (Full / ) “Completo”
2. IM (Improved Modified // ) “Modificado Mejorado”
3. M (Modified /// ) “Modificado”
4. IC (Improved cylinder //// ) “Cilindro mejorado”
5. CYL ( Cylindert /////) “Cilindro”
Un sistema de 3 “Chokes” consiste en los “Chokes“ F, M y CYL.
Un sistema de 5 “Chokes” consiste en los “Chokes“ F, IM, M, IC y CYL - Skeet.
Revise los números y las marcas de los “Chokes” para encontrar la configuración del “Choke” instalado en su
escopeta.
Todos lo “Chokes” atornillables tienen una, dos, tres, cuatro, o cinco marcas diagonales, lo que indica el tipo de
“Choke” correspondiente por ejemplo: el “Choke” F tiene una; el IM tiene dos; el M tiene tres; el IC tiene cuatro
y el CYL - Skeet tiene cinco. Por favor también revise las marcas de los “Chokes”.
Nota: los “Chokes” M, IC y CYL – Skeet son buenos para municiones de acero. El “Choke” F es solo para
municiones de plomo.
ES
Choke
Ancho en milímetros
Expansión
Cylinder-Skeet
0-0.12 mm
40% - 53%
Improved Cylinder
0.25 mm
57%
Modified 0.5 mm
67%
Improved Modified
0.75 mm
73%
Full
1.0 mm
75%
En la tabla anterior se muestra el porcentaje de reducción y el patrón contra los diversos “Chokes” atornillables.
Los porcentajes del patrón son tomados a una distancia de 36.5m (40 Yardas). El numero de perdigones dentro
de un circuló de 76 cm. (30 Pulgadas) dibujado de modo que el compás abarque la mayor cantidad de hoyos
de perdigón posible es contado y comparado con el numero de perdigones contenidos en un cartucho igual sin
disparar. El resultado de dicha operación es precisamente el porcentaje expresado en la tabla.
Como puede verse en la tabla de arriba el “Choke” completo (Full) tiene la mayor precisión misma que decrece
desde el completo hasta el CYL – Skeet el cual tiene la menor precisión.
¡PRECAUCIÓN!
1.Asegúrese de que el arma esta descargada y el seguro activado antes de ensamblar o
desensamblar algún “Choke”
2.Bajo condiciones de seguridad (cañones vacíos y seguro activado) revise si el “Choke”
no se aflojó durante el uso, en caso de haberse aflojado debe de ser apretado por medio de la
llave de “Choke”.
3.Debe mantener los “Chokes” limpios libres de polvo limpiándolos regularmente.
16
Ensamblaje y desensamblaje de los “Chokes” atornillables:
1. Tome el “Choke” atornillable de su elección. Colóquelo dentro del cañón mediante la llave de “Choke”
atornillándolo en el sentido de las manecillas del reloj hasta que este completamente apretado. (15)
2. Para desensamblar, desatornille con la misma llave de “Choke” en sentido contrario de las manecillas del
reloj.
J. CUIDADO, LIMPIEZA Y LUBRICACIÓN.
¡PRECAUCIÓN!
Antes de limpiar o lubricar su arma asegúrese de que esta descargada y con el seguro activado
(“ON” posición).
Es recomendable desensamblar el arma para limpiarla o lubricarla cuando la grasa o el polvo se han acumulado
con residuos de la combustión. Para tener la mejor protección en contra de la corrosión, es necesario limpiar
y lubricar su arma después de cada uso, especialmente después de haber sido usada en agua o en un medio
ambiente salino.
Es recomendable aceitar uniformemente y con frecuencia la caja de mecanismos, el gancho del cañón, la base de
acero del guardamano y la superficie interna del recibidor. Evite aceitar en exceso.
LUBRICARLA
ES
LUBRICARLA
LUBRICARLA
LUBRICARLA
Materiales y equipos necesarios para limpiar y lubricar.
• Trapo de limpiar.
• Parches de algodón para cañón.
• Escobillon de cobre.
• Solvente.
• Cepillo chico suave.
• Aceite para armas de buena calidad.
Después de usar, remueva cualquier residuo de pólvora o plomo del cañón.
Cepille el cañón y la recamara con aceite para armas y parches de algodón para proteger del oxido y la corrosión.
Cualquier residuo de pólvora en la pared del cañón, etc. puede ser limpiado con un cepillo y solvente. Todas
las superficies externas deben ser frotadas con una capa ligera de agente anticorrosivo. Evite usar demasiado
solvente para limpiar el cañón ya que el exceso o el contacto prolongado pueden dañar los acabados de la
madera. Asegúrese de limpiar todos lo excesos de solvente y lubricante.
17
SAFETY OFF
SAFETY ON
OVER BARREL
UNDER BARREL
1
2
3
4
6
5
7
8
9
18
10
INSERT CARTRIDGES
11
12
REMOVE CARTRIDGES
13
14
15
19
HATSAN
ARMS COMPANY
Izmir - Ankara Karayolu 28. km. No. 289
35170, Kemalpasa Izmir - TURKEY
Tel: +90 (232) 878 91 00 • Fax: +90 (232) 878 91 02
www.hatsan.com.tr
[email protected]