1
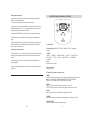
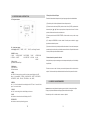
Panetera
Capacidad 900 grs.
PK-PA6301
INSTRUCCIONES DE SEGURIDAD / Español
Al usar el aparato, deben seguirse las instrucciones que se detallan a continuación:
1. Lea cuidadosamente estas instrucciones antes de usar el aparato.
2. No toque ninguna de las superficies calientes del aparato. Utilice paños o manoplas de horno!
La panetera queda a temperatura muy caliente después de la cocción.
3. Desconecte el cable del enchufe cuando no se utilice o limpie el aparato.
4. No sumerja el aparato en agua u otro líquido.
5. Supervise el aparato cuando haya niños alrededor!
6. Coloque el cable de conexión a resguardo de no tropezar con él. No utilizar el aparato si el cable está
roto, si éste tiene algún fallo, póngase en contacto con el Servicio Técnico Autorizado.
7. No toque ninguna parte, mientras el aparato esté funcionando.
8. No utilice otros accesorios, excepto los recomendados por el fabricante. De lo contrario causará
daños a personas o al aparato.
9. Este aparato es para uso doméstico; no lo utilice al aire libre.
10.No deje el cable principal cerca de otras superficies calientes; no conecte el aparato a través de
alargues eléctricos.
11. No coloque el aparato cerca de un horno u otras fuentes de calor.
12. La distancia entre el aparato y la pared debe ser mayor a 5 cm.
13. No toque la clavija del enchufe cuando lo desconecte.
14. Este aparato no está hecho para ser usado por personas (incluidos niños) con capacidades
mentales, sensoriales o físicas reducidas, o con falta de experiencia y conocimiento a menos que
hayan sido instruidos o supervisados acerca del uso del aparato por una persona responsable de su
seguridad.
15. Debe asegurarse que los niños no jueguen con el aparato.
16. El equipo no está destinado a usarse con un temporizador o un sistema de control remoto
separado.
2
19
5.3 Beeper function Description
2. INSTRUCCIONES DEL PANEL DE CONTROL:
In order to clear the function of buzzer sound time to time during the working times, here
added with a more detailed explanation.
1- Power on and reset, the buzzer promptly make a sound to remind.
2- Pressing the menu to select the button (MENU), burning color selection key (COLOR), or
pressing the adjustment button ( "▲", "▼"), each time pressed, Beeper one time. If keep on
pressing, the buzzer will sound a continuous short-Tips.
3- When proceed START/STOP menu, the buzzer will sound .one time in each pressing.
4- In JAM working, the buzzer will make 8 times ring to remind you to add jams when in
Dough.
5- After finishing bread maker, the buzzer will ring 10 times continuously, to remind you the
bread is cooked and in the state of heating preservation, after that the buzzer will ring 12
times, to remind you this state is over.
2.2 . Visualización
A. Visualizaciones del LCD: “MENÚ”, ”TIEMPO”, “TAMAÑO”, ”COLOR” y “Procedimiento
de Trabajo”
5.4 Heating preservation instruction:
In order to facilitate you to use, it can make you always have a delicious food or bread which
still maintain a certain temperature after the bread or the food is completed, but not taken
out timely.
The buzzer will ring once in every 10 minutes, to remind you6 the heating preservation
working is completed.
You can refer to the craftwork timetable to check if all the menu has the function of heating
preservation.
B. “MENÚ”:
1. BÁSICO / 2. FRANCÉS / 3. HARINA INTEGRAL / 4. DULCE / 5. SUPER RAPIDO
6. SIN GLUTEN / 7. TORTA / 8. MASA / 9. MASA DE PIZZA / 10. MERMELADA
11. COCCION
A.Color:
Claro, Medio, Oscuro y Rápido.
D. Ajustes de Tamaño:
0.45kg 0.68kg 0.9kg
2.3 Funciones de los Botones del Panel de Control
A. MENÚ
Pulse “MENU” para elegir entre diversas opciones, el menú seleccionado de mostrará en el visor LCD.
Menú 1—11 incluye: BÁSICO, FRANCÉS, HARINA INTEGRAL, DULCE, SUPER RAPIDO
SIN GLUTEN, TORTA, MASA, MASA DE PIZZA, MERMELADA, COCCIÓN
B.TIEMPO
Pulse “ “ o “ “para añadir o reducir el tiempo y se mostrará en el visor LCD.
Presione “ ” una vez para añadir 10 minutos, presione “ ” una vez para reducir 10 minutos.
C.COLOR
Pulse “Color” para seleccionar el color deseado y se mostrará en el visor LCD.
D. TAMAÑO
Pulse este botón para elegir el tamaño del pan y el tamaño elegido se mostrará en el visor LCD.
E. INICIAR/ DETENER
Pulse este botón para iniciar o detener el proceso de trabajo.
18
3
3. TABLA DE TIEMPO DE PROGRAMAS
Item
Color
Peso
Demora
Precalentar
Amasar 1
Reposar
Amasar 2
Elevar 1
Golpear
Elevar 2
1. Básico
Claro
Medio
Oscuro
Rápido
0.45 kg 0.68 kg 0.9 kg 0.45 kg 0.68 kg 0.9 kg 0.45 kg 0.68 kg 0.9 kg 0.45 kg 0.68 kg 0.9 kg
15:00 15:00 15:00 15:00 15:00 15:00 15:00 15:00 15:00 15:00 15:00 15:00
5 min
5 min
15 min
40 min
10 seg
24m
50s
Dar forma 15 seg
Elevar 3
49m
45s
Cocinar 55 min
Humedad 1 hr
Total
3:15
Frutas y
3:00
nueces
Item
Color
Peso
Demora
Precalentar
Amasar 1
Reposar
Amasar 2
Elevar 1
Golpear
Elevar 2
5.1 POWER-OFF STATE INSTRUCTION
5 min
5 min
15 min
40 min
10 seg
24m
50s
15 seg
49m
45s
60 min
1 hr
3:20
3:05
5 min
5 min
15 min
40 min
10 seg
24m
50s
15 seg
49m
45s
65 min
1 hr
3:25
3:10
5 min
5 min
15 min
40 min
10 seg
24m
50s
15 seg
49m
45s
55 min
1 hr
3:15
3:00
5 min
5 min
15 min
40 min
10 seg
24m
50s
15 seg
49m
45s
60 min
1 hr
3:20
3:05
5 min
5 min
15 min
40 min
10 seg
24m
50s
15 seg
49m
45s
65 min
1 hr
3:25
3:10
5 min
5 min
15 min
40 min
10 seg
24m
50s
15 seg
49m
45s
55 min
1 hr
3:15
3:00
5 min
5 min
15 min
40 min
10 seg
24m
50s
15 seg
49m
45s
60 min
1 hr
3:20
3:05
5 min
5 min
15 min
40 min
10 seg
24m
50s
15 seg
49m
45s
65 min
1 hr
3:25
3:10
5 min
5 min
15 min
15 min
10 seg
8m
50s
10 seg
29m
50s
55 min
1 hr
2:14
1:59
5 min
5 min
15 min
15 min
10 seg
8m
50s
10 seg
29m
50s
60 min
1 hr
2:19
2:04
5 min
5 min
15 min
15 min
10 seg
8m
50s
10 seg
29m
50s
65 min
1 hr
2:24
2:19
2. Francés
Claro
Medio
Oscuro
Rápido
0.45 kg 0.68 kg 0.9 kg 0.45 kg 0.68 kg 0.9 kg 0.45 kg 0.68 kg 0.9 kg 0.45 kg 0.68 kg 0.9 kg
15:00 15:00 15:00 15:00 15:00 15:00 15:00 15:00 15:00 15:00 15:00 15:00
5 min
5 min
17 min
39 min
10 seg
24m
50s
Dar forma 10 seg
Elevar 3
59m
45s
Cocinar 55 min
Humedad
1 hr
Total
3:32
Frutas y
3:15
nueces
5 min
5 min
17 min
39 min
10 seg
24m
50s
10 seg
59m
45s
57 min
1 hr
3:34
3:17
5 min
5 min
17 min
39 min
10 seg
24m
50s
10 seg
59m
45s
60 min
1 hr
3:37
3:20
5 min
5 min
17 min
39 min
10 seg
24m
50s
10 seg
59m
45s
55 min
1 hr
3:32
3:15
5 min
5 min
17 min
39 min
10 seg
24m
50s
10 seg
59m
45s
57 min
1 hr
3:34
3:17
5 min
5 min
17 min
39 min
10 seg
24m
50s
10 seg
59m
45s
60 min
1 hr
3:37
3:20
5 min
5 min
17 min
39 min
10 seg
24m
50s
10 seg
59m
45s
55 min
1 hr
3:32
3:15
5 min
5 min
17 min
39 min
10 seg
24m
50s
10 seg
59m
45s
57 min
1 hr
3:34
3:17
5 min
5 min
17 min
39 min
10 seg
24m
50s
10 seg
59m
45s
60 min
1 hr
3:37
3:20
5 min
5 min
17 min
30 min
10 seg
8m
50s
15 seg
30m
5 min
5 min
17 min
30 min
10 seg
8m
50s
15 seg
30m
5 min
5 min
17 min
30 min
10 seg
8m
50s
15 seg
30m
55 min 57 min 60 min
1 hr
1 hr
1 hr
2:37
2:39
2:42
2:20
2:22
2:25
Bread maker is with power off-state memory function; when the unit start work, if you shut off the
power or AC power by accident (it can be also known as power -off"), less than 7 minutes, repower can be able to restore the original working condition; but when re power on, the working
time may be changed, and different from the original set of working hours.
Actual working time = power-off time, + the original set of working time.
If power-off time is more than 15 minutes, the unit will not ensure to restore the original working
condition.
If the unit is in inactive condition, then the bread maker will be restored to the initial power on
state.
5.2. Over-temperature & Abnormal alarm and self-protection function instruction.
The Bread maker has function of estimating the initial to end conditions of the menu and the self
protection of abnormal condition, if you meet with the phenomenon of not understanding or
abnormal, you can refer to the bellowing instruction to determine, and then deal with it timely.11- Working condition determines function:
If your current working conditions are not suitable for the current menu function of initial
conditions required, for example:
when to choose Bread or Dough, the temperature in the bread oven is too high or too low, this
can not meet the requirements of bread produced by initial conditions, that is: the inside
temperature is below -10º C or higher than 50º C.
At this point, you start the bread machine to work, the unit will automatically stopped from
working, it displays "E00" or "E01" on LCD, also issued a continuous short ringing sound to
remind you.
When meeting such a case, please remove the bread bucket, put it in inside the machine until
the temperature in line with the working requirements, select the menu you need and working
hours, and start the bread machine to work.
If you still can not properly use the bread machine, there is possibly some defects inside the
machine, at this time, you can consult with the local dealer or send it to the nearby repairing shop
to repair.
2- Function determine:
The unit have the self determination function when in the abnormal condition, such as
Temperature sensor open circuit, short circuit etc.
When the machine temperature sensor open circuit after the power-on, the unit LCD
display”EEE”, at the same time the machine issues continuous ring sound to remind you.
When the machine temperature sensor is in short-circuit after the power-on, the unit LCD will
display “HHH”, at the same time, it issued continuous ringing sound to remind you.
You can send the machine to the dealer or the nearest Department of Maintenance Special
Service when you meet with this problem.
4
17
7- If needs to start work, press the button (TIMER) to adjust working times to the time required, the
calculation is as follows:
Working time = time to start menu + time.
8- Press button (START / STOP) 0.5S, start the unit to work, “∶
”begin to flashing”.
* If needs to stop the work, re-select the menu, you can again press start / stop button (START / STOP) 1
sec, stop working, then repeat the operation; Otherwise, please try not to touch panel during the unit
working.
9- when time run to the "0:00", the buzzer rang 10 voice as indication, and automatically enter the heating
preservation processes; “∶
”is still flashing (except DOUGH menu).
After finishing 1 hour heating preservation, the buzzer rang and indicate“∶
” Stop flashing at the same time
return to the initial state of the menu. If you do not want to heat in the half-way, please keep holding “STOP”
button 1 second, then Beeper indicate by a sound, the unit stop working, back to the menu of the initial
state.
When the bread is well done after hearing one buzzer sound, please wear gloves to take out the bread
buckets, gently vibrating bread or cake inside, then it will be poured out, please remove the shovel before
eating.
Item
Color
Peso
Demora
Precalentar
Amasar 1
Reposar
Amasar 2
Elevar 1
Golpear
Elevar 2
0.45 kg
15:00
30 min
5 min
5 min
15 min
49 min
10 seg
25m
50s
Dar forma 10 seg
Elevar 3
44m
50s
Cocinar 55 min
Humedad 1 hr
Total
3:50
Frutas y
3:05
nueces
Claro
0.68 kg
15:00
30 min
5 min
5 min
15 min
49 min
10 seg
25m
50s
10 seg
44m
50s
60 min
1 hr
3:55
3:10
0.9 kg
15:00
30 min
5 min
5 min
15 min
49 min
10 seg
25m
50s
10 seg
44m
50s
65 min
1 hr
4:00
3:15
0.45 kg
15:00
30 min
5 min
5 min
15 min
49 min
10 seg
25m
50s
10 seg
44m
50s
55 min
1 hr
3:50
3:05
Medio
0.68 kg
14:55
30 min
5 min
5 min
15 min
49 min
10 seg
25m
50s
10 seg
44m
50s
60 min
1 hr
3:55
3:10
3. Harina Integral
Oscuro
0.9 kg 0.45 kg 0.68 kg
15:00 15:00 14:55
30 min 30 min 30 min
5 min 5 min 5 min
5 min 5 min 5 min
15 min 15 min 15 min
49 min 49 min 49 min
10 seg 10 seg 10 seg
25m 25m 25m
50s
50s
50s
10 seg 10 seg 10 seg
44m 44m 44m
50s
50s
50s
65 min 55 min 60 min
1 hr
1 hr
1 hr
4:00 3:50 3:55
3:15 3:05 3:10
0.9 kg
15:00
30 min
5 min
5 min
15 min
49 min
10 seg
25m
50s
10 seg
44m
50s
65 min
1 hr
4:00
3:15
0.45 kg
15:00
5 min
5 min
5 min
15 min
24min
10 seg
10m
50s
10 seg
34m
50s
55 min
1 hr
2:35
2:15
Rápido
0.68 kg
14:55
5 min
5 min
5 min
15 min
24min
10 seg
10m
50s
10 seg
34m
50s
60 min
1 hr
2:40
2:20
0.9 kg
15:00
5 min
5 min
5 min
15 min
24min
10 seg
10m
50s
10 seg
34m
50s
65 min
1 hr
2:45
2:25
Before taking out the bread, pressing the start / stop button (START / STOP) 1 second, to stop the unit
working.
4.2 Dough function instructions:
This operation of this menu is very similar to bread functions above; do not add the salt, sugar, milk powder
and so on.
When the work is completed, 10 beeper sounds will ring to remind you
4.3 Baking function instruction:
This function can be used to baking the bread, the working time is 1 hour, and procedure is as below:
1- Put the bread bucket in to the oven and set it well.
2- To bunch the food pieces well which is brewage by the oven tools, place them well in the bread bucket,
and cover the top lid.
3- Press “Menu” to observe LCD display, choose Menu 10,- BAKE
4- Press START/STOP, to start up the baking function, the unit will start baking.
5- When work is completed, the time will run to "0:00", the buzzer will sounded ten times to remind you;
then bread maker will be into the heating preservation state; at this time you can press start / stop button
"START / STOP" to stop working, or the bread machine will automatically insulation.
6- During the working time, if found the food is ripe, you can also press button "START / STOP" to stop and
it will then return to the menu selection state.
Item
Color
Peso
Demora
Precalentar
Amasar 1
Reposar
Amasar 2
Elevar 1
Golpear
Elevar 2
Dar forma
Elevar 3
Cocinar
Humedad
Total
Frutas y
nueces
4. Dulce
Claro
Medio
Oscuro
0.45 kg 0.68 kg 0.9 kg 0.45 kg 0.68 kg 0.9 kg 0.45 kg 0.68 kg 0.9 kg
15:00 15:00 15:00 15:00 14:55
15:00 15:00 14:55
15:00
5 min
5 min
20 min
39 min
10 seg
25m
50s
5 seg
51m
55s
50 min
1 hr
3:17
2:57
5 min
5 min
20 min
39 min
10 seg
25m
50s
5 seg
51m
55s
55 min
1 hr
3:22
3:02
5 min
5 min
20 min
39 min
10 seg
25m
50s
5 seg
51m
55s
60 min
1 hr
4:27
3:07
5 min
5 min
20 min
39 min
10 seg
25m
50s
5 seg
51m
55s
50 min
1 hr
3:17
2:57
Note: Better to divide the food properly when baking the food. and even placed some distance apart, so it
will be evenly baked; the time may be not master well for first user, but it doe5 s not matter, you can bake
better next time.
16
5
5 min
5 min
20 min
39 min
10 seg
25m
50s
5 seg
51m
55s
55 min
1 hr
3:22
3:02
5 min
5 min
20 min
39 min
10 seg
25m
50s
5 seg
51m
55s
60 min
1 hr
4:27
3:07
5 min
5 min
20 min
39 min
10 seg
25m
50s
5 seg
51m
55s
50 min
1 hr
3:17
2:57
5 min
5 min
20 min
39 min
10 seg
25m
50s
5 seg
51m
55s
55 min
1 hr
3:22
3:02
5 min
5 min
20 min
39 min
10 seg
25m
50s
5 seg
51m
55s
60 min
1 hr
4:27
3:07
Ítem
Color
Peso
Demora
Precalentar
Amasar 1
Reposar
Amasar 2
Elevar 1
Golpear
Elevar 2
Dar forma
Elevar 3
Cocinar
Humedad
Total
Frutas y
nueces
5
Super
Rápido
6
Sin
Gluten
2.0 LB
N/A
N/A
N/A
0 min
5 min
0 min
12 min
0 min
0 min
0 min
0 min
60m
60 min
1 hr
2:17
2:10
20 min
3 min
9m
48 min
1 hr
1:20
N/A
7
Torta
8
Masa
N/A
N/A
9
Masa de
Pizza
N/A
N/A
N/A
3 min
5 min
5 min
20 min
60 min
4 min
75 min
22 min
1:22
N/A
10
11
Mermelada Cocción
N/A
N/A
N/A
N/A
N/A
3 min
5 min
27 min
60 min
10 min
50 min
1:30
N/A
1:30
N/A
1:05
N/A
60 min
1 hr
1:00
N/A
4. INSTRUCCIONES DE OPERACIÓN
4.1, Instrucciones para la elaboración de Pan
Lea la receta con atención y siga las siguientes instrucciones:
1. Coloque el molde en posición de la rotación del semicírculo.
2. Coloque los ingredientes descriptos en la receta, poner el agua, harina, huevos, y otros
ingredientes en el molde. Por favor, ponga la levadura al final colocándola en el centro de los
ingredientes. Si se utiliza la función “Super Rápido” es mejor ubicar la levadura encima de la
harina, para que la levadura no se mezcle con agua, sal, azúcar, de lo contrario, afectará a la
actividad de normal de la levadura.
3. Coloque el molde de pan dentro de la panetera, ajústelo bien y luego cierre la tapa superior.
4. Encienda el aparato, el visor LCD mostrará "MENU 1 TIEMPO 3:25", presione el botón
MENU y seleccione en el visor LCD el menú, 1-11 (BÁSICO, FRANCÉS, HARINA INTEGRAL,
DULCE, SUPER RAPIDO, SIN GLUTEN, TORTA, MASA, MASA DE PIZZA, MERMELADA,
COCCIÓN).
5. Luego de seleccionar el menú, elija el color deseado, si no se selecciona, se reconocerá
automáticamente como el “Medio”. Pulse el botón tamaño para elegir entre tamaños 2.0 y 3.0. Si
no es seleccionado se reconocerá automáticamente como el tamaño 3. Para que el aparato
comience el proceso de trabajo, presione el botón (TIEMPO) para ajustar el tiempo de trabajo.
La función tiempo se calcula de la siguiente manera:
Tiempo de trabajo = Tiempo del menú de inicio + tiempo
6
4. OPERATION INSTRUCTIONS
4.1, Bread Functional instructions
After refer to the recipe,the steps can be followed according to the bellowing directions:
1- Make the shovel Aim to the position of the rotation of the semicircle, then into the bread
bucket.
2- According to the bread recipe you need, put water, flour, eggs, and other materials in the
bucket; Please put the yeast
at last, and also place it in the middle of the material; if you use ”reducing time”, better put
the yeast on the top of the flour,
so that the yeast will not be mixed with water, salt, sugar, otherwise, it will affect the
activity of the normal play of the yeast.
3- Put the bread bucket into the bread oven, set it well; And then cover the top lid.
4- When in power, the LCD will display "MENU 1 TIMER 3:25", press the MENU button to
observe the LCD display, select menu, 1-11 (BASIC, FRENCH, WHOLE WHEAT,
SWEET, SUPER RAPID, GLUTEN FREE, CAKE, DOUGH, PIZZA, DOUGH , JAM,
BAKE) as your needed the menu functionality..
5- After selecting the menu, choose your needed color, if not select, it will be recognized as
the “Medium” automatically.
6- when selecting the size, used LOAF button, to choose between 2.0 size & 3.0 size. If not
selected, then it will be
recognized 3 size by the menu.
15
Presione el botón (INICIAR/ DETENER) 0.5S, para iniciar el trabajo de la unidad, “:” comenzará a
parpadear en la pantalla.
* Si necesita detener el proceso de trabajo, re-seleccionar el menú, puede presionar nuevamente el
botón INICIAR/ DETENER 1 seg, para detener el trabajo, luego repita la operación; De otra forma,
por favor trate de no tocar el panel de control durante el trabajo de la unidad.
Cuando el tiempo llegue a "0:00", el timbre sonará 10 veces indicando que ha terminado y
automáticamente entrará en el proceso de preservación del calor; “:” continuará parpadeando
(excepto en el menú MASA).
Luego de transcurrida 1 hora de conservación del calor, el timbre sonará e indicará “:” sin parpadear
en el mismo momento que vuelva a el estado inicial de menúes. Si no desea calentar en media forma,
por favor mantenga presionado el botón “DETENER” 1 segundo, luego el Beeper indicará con un
sonido, la unidad se detendrá y volverá al menú del estado inicial.
Cuando el pan termine de ser elaborado se escuchará un timbre, por favor utilice manoplas para
sacar los panes, suavemente.
Antes de sacar el pan, presione el botón INICIAR/ DETENER 1 segundo, para detener el
funcionamiento del aparato.
4.2 Instrucciones de la función Masa:
Esta función del menú es similar a la función del pan descripta anteriormente; agregue los
ingredientes de la misma manera.
Cuando el trabajo esté terminado, el timbre sonará 10 veces para avisarle.
4.3 Instrucciones de la función Cocción:
Esta función se utiliza para cocer el pan, el tiempo de trabajo es de 1 hora, y el procedimiento
es el siguiente:
(1) Coloque el molde de pan en el horno, ajústelo bien.
(2) Ubique las piezas de pan correctamente en el molde y la cierre la tapa superior del aparato.
(3) Presione “Menú” para observar el visualizador LCD, elija el Menú 10, -COCCIÓN.
(4) Presione INICIAR/ DETENER para comenzar la función de cocción, la unidad comenzará a
trabajar.
(5) Cuando finalice el trabajo, el tiempo indicará "0:00", el timbre sonará diez veces para recordarle,
a continuación, la máquina de pan estará en el estado de conservación de calor; en este momento
usted puede presionar INICIAR/ DETENER para detener el trabajo, de lo contrario el aparato seguirá
funcionará automáticamente.
(6) Durante el tiempo de trabajo, si observa que el alimento está listo, puede también presionar el
botón " INICIAR/ DETENER" para detener el trabajo y luego volverá al estado de selección de menú.
Nota: Es mejor poner cantidades justas de alimentos durante la cocción, e incluso colocarlos a cierta
distancia, por lo que serán uniformemente cocidos. Los ajustes para el tiempo de cocción son una
guía de referencia y Ud. podrá variarlos en la medida que vaya viendo los resultados y analizando
según sus preferencias.
14
7
5 INSTRUCCIONES DE LA FUNCIÓN ESPECIAL
3. PROGRAM TIME TABLE
5.1 Instrucciones del estado sin potencia
Este aparato de elaboración pan posee la función de memoria en el estado sin potencia; cuando la
unidad comience a trabajar, si desconecta totalmente la alimentación o haya un corte de energía
eléctrica durante menos de 7 minutos, la re-potencia puede ser capaz de restaurar las condiciones
seleccionadas para una función de trabajo, pero cuando se vuelva a conectar la alimentación, el
tiempo de trabajo puede ser cambiado y ser diferente al seleccionado para la operación de trabajo.
Tiempo de trabajo Actual = tiempo sin potencia, + el tiempo original ajustado de trabajo.
Si el tiempo de apagado sin potencia es más de 15 minutos, la unidad no podrá restaurar las
condiciones originales de trabajo.
Si la unidad se encuentra en estado inactivo, el aparato será restaurado al estado de potencia inicial.
5.2. Instrucciones para la función temperatura del horno y Alarma por anormalidad y
autoprotección
La panetera tiene una función estimativa de las condiciones de inicio y final del menú de
autoprotección en condiciones anormales. Lea atentamente las siguientes instrucciones para
determinar y entender como actúa esta función.
(1). Las condiciones de trabajo determinan la función: Si las condiciones de trabajo actuales no son
adecuadas para la función de menú establecidas, por ejemplo: cuando elija pan integral o masa, si
la temperatura en el horno de pan es demasiado alta o demasiado baja no puede cumplir los
requisitos del pan producido por las condiciones iniciales establecidas, esto es: la temperatura
interior está por debajo –10ºC o por arriba de 50ºC;
En este punto, usted da inicio al trabajo de la máquina, la unidad se detendrá automáticamente, se
mostrará en el LCD "E00" o "E01", también sonará un continuo pitido corto para recodarle.
Cuando se tope con un caso así, por favor quite el cubo de pan, colóquelo dentro de la máquina
hasta que la temperatura este en línea con los requerimientos de trabajo. Seleccione el menú
necesario y las horas de trabajo y luego pulse inicio para que la máquina comience el proceso.
Si después de esta operativa usted todavía no puede usar adecuadamente el aparato, es que puede
existir algún defecto en la máquina. En éste caso consulte con el distribuidor o envíe el aparato al
Servicio Técnico Autorizado para su revisión.
(2)Función determinar
La unidad tiene la función de determinación propia cuando la condición no sea la normal, como un
sensor de temperatura de circuito abierto, corto circuito, etc.
Cuando el sensor de temperatura de la máquina, esté en circuito abierto luego de tener potencia, el
LCD de la unidad mostrará ”EEE”, al mismo momento en que el aparato emite continuos sonidos
para avisarle.
Cuando el sensor de temperatura de la máquina, este en corto circuito luego de tener potencia, el
LCD de la unidad mostrará ”HHH”, al mismo momento en que el aparato emite continuos sonidos
para avisarle.
En éste caso consulte con el distribuidor o envíe el aparato al Servicio Técnico Autorizado para su
revisión.
8
13
5.3 Descripción de la función Beeper
2. CONTROL PANEL INSTRUCTION
El sonido del timbre durante el tiempo de trabajo, aquí se agregan explicaciones más detalladas.
2.1 Film layout as below
(1) Encendido y reinicio, el timbre rápidamente hará un sonido para recordar.
(2) Presione el menú a seleccionar (MENU), seleccione el color Oscuro (COLOR) o presionando los
botones de ajuste (“ “, “
“). Cada vez que se presionen, el beeper sonará una vez. Si continúa
pulsando, el timbre sonará con continuos sonidos cortos.
(3) Cuando proceda al menú INICIAR/ DETENER, el timbre sonará una vez por cada vez que
presione.
(4) En trabajo de MERMELADA, el timbre realizará 8 sonidos para recordarle de agregar
ingredientes cuando esté en proceso.
(5) Al terminar el ciclo de trabajo, la máquina emitirá sonidos durante 10 veces continuamente para
2.2 . Control panel display
A. LCD displays “MENU”、”TIMER”、 “SIZE” 、”COLOR”, , and “Working Procedure”
recordarle que el pan está cocido y en el estado de conservación de calor. Después el timbre sonará
12 veces para avisarle que éste estado ha terminado.
B. “MENU” including:
1. BASIC
3. WHOLE WHEAT
2. FRENCH 4. SWEET
5. SUPER PARID
6. GLUTEN FREE
7. CAKE
8. DOUGH
9. PIZZA DOUGH
10. JAM
11. BAKE
C. Color including:
Light, Medium, Dark and Rapid.
5.4 Instrucciones de la preservación del calor:
Usted puede hacer que el pan se mantenga a una cierta temperatura después que el ciclo de trabajo
haya finalizado.
D. Size Setting
1.5LB 2.0LB 2.5LB
2.3 Button instruction
El timbre suena una vez cada 10 minutos, para recordarle la preservación de calor dentro de la
máquina. Puede consultar si el procedimiento del menú tiene la función de preservación de calor.
A. MENU
Use “MENU” to choose each menu you like, the chosen menu will display on the LCD.
Menu 1—11 includes BASIC、FRENCH、WHOLE WHEAT、SWEET、SUPER RAPID、
GLUTEN FREE、CAKE、DOUGH、PIZZA DOUGH、JAM、BAKE。
B. TIMER 2
Use “▲” or “▼”to add or reduce the time and display on the LCD. Press “▲” once add 10mins,
press “▼” once reduce 10mins.
C. COLOR
Use “Color” to select the right color and will display on the screen.
D. LOAF
Use this button to choose the size and will display on the LCD.
6. LIMPIEZA Y MANTENIMIENTO
Importante: nunca sumerja la base del aparato en agua u otro líquido, ni lo meta en el lavavajillas.
La tapa y el recipiente antiadherente sin embargo sí pueden lavarse en el lavavajillas.
Recuerde dejar enfriar la unidad antes de comenzar a limpiarla.
E. START/STOP
Use this button to start or stop the working process.
12
9
Limpieza:
SAFETY INSTRUCTIONS / English
* En primer lugar desenchufe la unidad.
* Lave la tapa y los accesorios que haya utilizado siguiendo su método habitual de limpieza
(a mano o lavavajillas).
* Retire los restos de alimentos o líquidos del recipiente y déjelo enfriar. Si lo lava a mano, no use
estropajos metálicos.
* Puede limpiar la base con una esponja o bayeta húmeda, pero no use productos abrasivos.
When using the appliance, the instruction must be followed
1- Read carefully this specification before using this appliance.
2- Do not touch any of the appliance’s hot surfaces. Use oven cloths! The bread machine is
Mantenimiento:
* Asegúrese siempre de que el recipiente antiadherente esté bien seco antes de conectarlo a la
base de la panetera.
* Nunca vierta agua fría sobre el recipiente antiadherente cuando está caliente.
* No use estropajos metálicos, ya que dañarían la superficie antiadherente del recipiente.
* Nunca añada agua al aceite caliente.
very hot after baking.
3- Unplug the cord from socket when don’t use or clean the appliance.
4- Don’t immerse the appliance into water or other liquid.
5- Keep your eye on the appliance when children are around!
6- It is not allowed to put any part on the main cord; when users out, please remember
unplug the cord.
7- Don’t used the broken cord, if can’t ensure the quality of cord, contact with service
center.
8- Don’t touch any moving parts.
9- Don’t employ other parts except those recommended by the manufacturer. Otherwise it
will cause injury to person and
appliance.
10- This appliance is for household; don’t use it outdoor or other place.
11- Don’t keep main cord near the hot surface; don’t put any other tinder on the surface of
the appliance.
12- Don’t place the appliance around the furnace and other heating source.
13- The distance between the appliance and wall shall be more than 2 inch.
14- Don’t touch the pin of the plug when unplug it
10
11