1
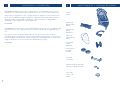
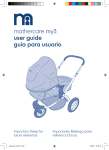
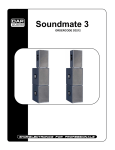
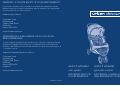
WARNING: A CHILD'S SAFETY IS YOUR RESPONSIBILITY
If you have a problem with this product or require any replacement parts,
please contact your nearest mothercare store or telephone the mothercare
customer care line on 08453 30 40 30
alternatively write to:
Customer care
Mothercare
Cherry Tree Road
Watford
Herts. WD24 6SH
www.mothercare.com
ADVERTENCIA: LA SEGURIDAD DE SU HIJO ES SU
RESPONSABILIDAD
Si tiene cualquier problema con este artículo, o necesita cualquier pieza de
recambio, le rogamos que se dirija a su establecimiento mothercare más
cercano, o por teléfono al servicio de atención al cliente de mothercare en el
+ 44 (0)1923 21 02 10
alternativamente puede escribir a:
Customer care
Mothercare
Cherry Tree Road
Watford
Herts. WD24 6SH
England
vesta 3 wheeler
vesta 3 wheeler
www.mothercare.com
user guide
guía del usuario
IMPORTANT. KEEP FOR
FUTURE REFERENCE
IMPORTANTE. GUÁRDELO
PARA REFERENCIA FUTURA
Made in China
1
introduction • introducción
IMPORTANT: Read these instructions carefully before use and keep them for future
reference. Your child's safety may be affected if you do not follow these instructions.
2
parts check list • cátalogo de piezas
chassis
chasis
This product is designed to carry a single child in an upright or recline position from
birth, up to a maximum weight of 15kg. Use original accessories and manufacturerapproved parts only. A basket is supplied to carry a maximum of 4.5kg (9.9lbs) of
shopping or other baby items evenly distributed.
BS 7409:1996
IMPORTANTE: Lea estas instrucciones detenidamente antes de usar, y guárdelas para
referencia futura. Si no sigue estas instrucciones puede afectar la seguridad de su
hijo.
Este artículo está concebido para llevar sólo a un niño, en posición sentada o
reclinada desde el nacimiento, hasta un peso máximo de 15kg. Use sólo accesorios y
piezas originales del fabricante. Lleva incluida una cesta para llevar un máximo de
4,5kg de compra u otros artículos del niño distribuidos por igual.
BS 7409:1996
parent tray
bandeja del
padre
bumper bar
barra
delantera
raincover
capota para
lluvia
front wheel
rueda
delantera
2 rear wheels
2 ruedas
traseras
rear axle
eje trasero
4 wheel retainers and caps
4 retenes y tapas de rueda
2 hub caps
2 cubos de
rueda
2
3
3
preparation for use • preparación para el uso
unfolding the stroller
1
desplegado de la silla
Release tab on the side of the stroller.
Lengüeta en el lateral de la silla para
desplegarla.
2
3
preparation for use • preparación para el uso
installing the rear wheels
1
instalación de las ruedas traseras
Place the parts on the axle in the
order shown. Push the wheel retainer
(red) on to the axle BEFORE attaching
the retainer cap (white). The wide end
of the retainer must face the wheel.
Attach the hubcap AFTER the retainer
cap has been installed.
Coloque las piezas en el eje por orden
como se indica. Apriete el retén en el
eje ANTES de montar la tapa blanca.
Ponga la tapa blanca DESPUES de
poner el retén en el eje. Instale el tapa
de la rueda después de instalar la
tapa blanca en el eje.
El extremo ancho del retén debe
indicar hacia la rueda.
Hold and lift the handlebar. The stroller
will click when completely open and
locked.
Sujete y levante el manillar. La silla se
abre y se bloquea completamente al
hacer clic.
4
5
3
preparation for use • preparación para el uso
3
preparation for use • preparación para el uso
installing the parent tray
2
Remove the packaging from the end
of the back legs. Position the rear axle
as shown. The brake pedals should
point towards you. Push both brackets
on until the plastic tabs click into the
slots in the legs.
1
Abra la capota. Introduzca el borde inferior de
la bandeja del padre en el marco encima de
la capota y ajuste los tubos del manillar.
Retire el empaquetado de los
extremos de las patas traseras.
Coloque el eje trasero según se indica.
Las palancas de freno indican hacia
usted. Empuje las dos abrazaderas o
hasta que las lengüetas de plástico
hagan clic en las ranuras sobre las
patas.
installing the front wheel
1
instalación de la rueda delantera
Slide the front wheel onto the leg, over
the two retaining pins. The wheel will
click when installed correctly.
Note: Pull firmly on each wheel to
ensure they are securely attached.
Introduzca la rueda delantera en la
pata sobre los dos pasadores de
seguridad. La rueda hará clic al
introducirla correctamente.
Nota: Tire firmemente sobre cada
conjunto de rueda para comprobar
que están bien sujetas.
6
Open the canopy. Slide the bottom edge of
the parent tray onto the frame above the
canopy and snap on to handlebar tubes.
Warning! Never carry hot liquids in the
parent tray. The tray should only be used for
carrying items weighing less than 0.9kg.
Note: Pull firmly on each bracket to
ensure that both are securely attached.
Nota: Tire firmemente sobre cada
abrazadera para comprobar que
están bien sujetas.
instalación de la bandeja del padre
¡Advertencia! No lleve nunca líquidos
calientes en la bandeja del padre. La
bandeja sólo se debe usar para llevar
artículos que pesen menos de 0,9kg.
attaching the bumper bar
1
instalación de la barra protectora
Guide the bumper tab into the slot on the
inside of the pushchair hinge. The outside
edge will click into place around the hinge.
Tug gently to ensure that the bumper is fitted
securely.
Warning! Always secure your child with a
harness. The bumper bar is not a restraint
device. DO NOT lift the pushchair by the
bumper bar.
Introduzca la lengüeta de la barra delantera
en la ranura dentro de la bisagra de la silla.
El borde externo se ajustará con un clic
alrededor de la bisagra.
Tire suavemente para comprobar que la
barra delantera está bien sujeta.
¡Advertencia! Sujete siempre al niño con el
arnés. La barra delantera no sirve para
sujetar. NO levante la silla por la barra
delantera.
7
3
preparation for use • preparación para el uso
3
preparation for use • preparación para el uso
before using this product, please note the following:
2
To remove the bumper bar, pull from
the outside edge and slide forward.
Para retirar la barra delantera, tire del
borde externo y saque hacia fuera.
WARNING: Check that the pram body or seat unit attachment devices are correctly
engaged before use.
WARNING: This product is not suitable for running or skating.
WARNING: Ensure that all the locking devices are engaged before use.
WARNING: Any load attached to the handle affects the stability of the
pram/pushchair.
adjusting the backrest
1
iajuste del respaldo
To recline the backrest, squeeze the
clasp together and pull along the cord.
Lower the seat back into the desired
position and release the clasp.
Para reclinar el respaldo, apriete el
automático y tire por el cordon. Baje el
respaldo a la posición deseada y
suelte el automático.
antes de usar este artículo, recuerde lo siguiente:
ADVERTENCIA: Compruebe que el coche o el asiento están correctamente
ajustados antes de usar.
ADVERTENCIA: Este artículo no está recomendado para correr ni patinar.
ADVERTENCIA: Compruebe que todos los cierres están ajustados antes de usar.
ADVERTENCIA: Cualquier carga que se ponga en el manillar afectará la
estabilidad del coche o silla de paseo.
8
9
in use • durante su utilización
3
securing your child
1
para sujetar al niño
2
2
1
2
1
2
To secure the harness, place the crotch
strap between the child’s legs and insert the
harness buckles (1) into the centre buckle
housing, making sure your child’s fingers are
clear. Adjust the strap adjusters (2) to get a
snug fit around your child.
4
in use • durante su utilización
using the brake
1
uso del freno
To lock the rear wheels push down on the
red levers on the rear wheels. Lift up lever to
unlock brake.
Warning! Always apply the brake when
parking the pushchair and do not forget to
check it is engaged.
WARNING: Always use the crotch strap in
combination with the waist belt.
Para cerrar las ruedas traseras apriete en
las palancas rojas sobre las ruedas
traseras. Levante la palanca para soltar el
freno.
Para sujetar el arnés, coloque la cinta de la
entrepierna entre las piernas del niño y
abroche las hebillas del arnés (1) en el
centro del soporte de la hebilla,
comprobando que no se cogen los dedos
del niño. Ajuste los sujeta correas (2) para
que se ajuste bien alrededor del niño.
Advertencia: Ponga siempre el freno cuando
esté parada la silla y no se olvide de
comprobar que está puesto.
ADVERTENCIA: Use siempre la correa de la
pernera junto con la correa de la cintura.
using the swivel lock
To release your child from the harness,
squeeze the buckle prongs, as shown.
2
D-rings are fitted (3) should you wish to attach
a separate harness complying with BS 6684 or
BS EN 13210.
3
3
Para sacar al niño del arnés, apriete las
pestañas de la hebilla en el lado superior e
inferior del centro como se indica.
1
uso del cierre giratorio
The swivel wheel should be locked for use
on uneven surfaces such as gravel, grass or
stones. To lock the swivel, press down on the
lever as shown. Lift up to unlock.
La rueda giratoria se debe cerrar para usar
sobre superficies desniveladas como
gravilla, hierba o piedras. Para bloquear el
giro, apriete sobre la palanca como se
indica. Levante para abrir.
Se han instalado anillas (3) en caso de que
desee ajustar un arnés adicional que cumpla
con la Norma Industrial BS 6684 o BS EN 13210.
10
11
4
in use • durante su utilización
using the canopy
1
uso de la capota
Push canopy out to open.
Pull to close.
5
folding the stroller
1
NOTE: For your convenience the canopy has
three positions.
Saque la capota para abrir.
NOTA: Para su comodidad la capota tiene
tres posiciones.
1
plegado de la silla
Slide the large button on the handle to the
left and squeeze. At the same time, pull the
grey trigger on the left side of the frame
towards you then tilt forward to fold. There
will be an audible click as the automatic
folding lock engages.
Deslice el botón grande sobre el manillar
hacia la izquierda y apriete. Al mismo
tiempo, tire del gatillo gris a la izquierda del
marco e incline hacia adelante para plegar.
Se oirá un clic al cerrar el cierre plegable
automático.
Tire para cerrar.
using the raincover
after use • después del uso
uso de la capota en la lluvia
The raincover is designed to fit over the front
of the stroller. It attaches to the frame and
around the leg brace using velcro tabs
where shown.
2
Push down to fold the stroller.
Apriete para plegar la silla.
La capota para lluvia está concebida para
ajustarse sobre la parte delantera de la silla.
Se ajusta sobre el marco con lengüetas de
velcro donde se indica.
3
Hook tab on the left of the handlebar onto
post on stroller frame tube.
Enganche la lengüeta en la parte izquierda
del manillar en la barra del tubo del marco
de la silla.
12
13
6
care of your product
This pushchair requires regular maintenance by you.
Regularly inspect the locking devices, brakes, harness assembly, catches, joints and
fixings to ensure they are secure and in full working order.
Brakes, wheels and tyres are subject to wear and should be replaced if necessary.
This can be arranged through your local mothercare store.
Wheels should be checked and cleaned regularly. Remove any mud or other
detritus that has collected as this may prevent the locking system from working
properly.
Should parts of your pushchair become stiff or difficult to operate, ensure that dirt is
not the cause. Then try a light application of a silicon based lubricant, ensuring that
the lubricant penetrates between the components, but do not overspray as this may
encourage the accumulation of dirt. Regular lubrication of moving parts will extend
the life of your pushchair and make opening and folding easier.
Plastic and metal parts may be sponged clean with warm water and mild
detergent.
Seat can be sponge cleaned using a mild detergent.
Allow to dry thoroughly before storing.
Never clean with abrasive, ammonia based, bleach based or spirit type cleaners.
After exposure to damp conditions, leave fully opened and in a warm environment.
Dry off with a soft cloth. Storing a damp pushchair will encourage mildew to form.
Store your pushchair in a dry safe place.
Your pushchair should be serviced and reconditioned before using it for a second
baby, or within 18 months, whichever is the sooner. This can be arranged by your
local mothercare store.
14
6
cuidado del producto
Esta silla necesita mantenimiento regular.
Revise con regularidad los dispositivos de cierre, frenos, montaje del arnés,
pestillos, juntas y accesorios para comprobar que están seguros y en perfecto
funcionamiento.
Los frenos, ruedas y neumáticos se desgastan y se deben cambiar en caso
necesario. Esto se puede hacer a través de su establecimiento local de
mothercare.
En caso de que alguna pieza de la silla se atasque o funcione con dificultad,
revise que no es a causa de basura. Después trate con una ligera aplicación de
lubricante en aerosol, como un lubricante con base de silicona, comprobando que
penetra entre las piezas, pero no ponga demasiado ya que puede acelerar la
acumulación de basura. La lubricación regular de las piezas móviles alargará la
vida de la silla y facilitará abrir y cerrar la silla
Las piezas de plástico y de metal se pueden lavar con una esponja y agua
templada con un detergente suave. Vea la etiqueta cosida.
El asiento se puede limpiar ligeramente con una esponja y agua templada con
detergente suave.
Deje secar bien antes de guardar.
No limpie nunca con limpiadores abrasivos, con base de amoniaco, lejía o alcohol.
Después de usar en condiciones húmedas, deje la silla totalmente abierta en un
lugar templado. Seque con un paño suave. Guardar la silla húmeda hará que se
produzca moho.
Guarde la silla en un lugar seco y seguro.
La silla se debe revisar y reacondicionar antes de usar para un segundo niño, o
antes de 18 meses, lo que suceda primero. Esto se puede hacer en su establecimiento local de mothercare.
15
7
safety notes
Do not allow your child to climb unassisted into the pushchair.
Apply the brake before putting your child into the pushchair.
Ensure your child wears a correctly fitted and adjusted harness at all times.
For extra safety, D-rings are provided for the attachment of a separate safety
harness approved to BS 6684 or BS EN 13210.
Ensure children are clear of moving parts before making adjustments. Overloading,
incorrect folding and the use of non-approved accessories may damage or break
this pushchair.
Do not use replacement parts or accessories, eg. child seats, bag hooks, raincovers
etc. other than those approved by mothercare. They may make the pushchair
unsafe.
Do not overload this pushchair with additional children, goods or accessories. Bags
and other items must not be hung from the handle.
Always apply the brakes when the pushchair is stationary.
Be careful when going up or down kerbs. Remove your child and fold the pushchair
when going up or down stairs or escalators.
Do not use your pushchair in a manner for which it is not designed.
Don’t let children play with or hang on the pushchair.
Hold on to your pushchair when close to moving road vehicles or trains.
Even with the brake on, the draught from the vehicle may move the pushchair.
If your pushchair is used by someone unfamiliar with it e.g. grandparents always
show them how it works.
Never leave your child unattended, even for the shortest time.
16
7
medidas de seguridad
No deje que el niño se suba sin ayuda a la silla.
Ponga el freno antes de poner al niño en la silla.
Compruebe que el niño lleva puesto y ajustado el arnés correctamente en todo
momento. Para más seguridad, se incluyen anillos D para otro arnés de
seguridad separado aprobado por la norma industrial BS EN 13210.
Compruebe que los niños no tocan las piezas móviles antes de hacer los ajustes.
La sobrecarga, plegado incorrecto y el uso de accesorios no aprobados pueden
dañar o romper la silla.
No deje nunca la cubierta o funda de los pies en el exterior, en una atmósfera
caliente o cerca de una fuente de calor ya que el niño se puede sobrecalentar.
No use otras piezas de repuesto ni accesorios, como sillas de niños, ganchos para
bolsas, cubiertas para la lluvia etc. más que las aprobadas por mothercare,
pueden afectar la seguridad de la silla.
No sobrecargue la silla con niños, mercancías o accesorios adicionales.
Las bolsas y otros artículos no se deben colgar del manillar. Dispone de una
cesta para llevar 4,5kg de artículos distribuidos de forma uniforme.
Ponga siempre los frenos cuando la silla esté estacionaria.
Tenga cuidado al subir y bajar de la cera. Retire al niño y pliegue la silla cuando
suba o baje por las escaleras o ascensor.
No use la silla de una forma para la que no está concebida.
No deje a los niños jugar o colgarse de la silla.
Sujete la silla cuando se encuentre cerca de vehículos de carretera o trenes en
movimiento. Incluso con el freno puesto, el impulso del vehículo puede mover la
silla.
Si la silla la usa alguien que no esté familiarizado con ella, como los abuelos,
enséñeles siempre como funciona.
No deje nunca al niño desatendido, incluso durante el tiempo más corto.
17
8
replacement parts
The replacement parts listed below are available for your product. In the event that
you require any of these parts, please contact your local mothercare store or contact
customer care on 08453 30 40 30. Other parts may be repairable by returning the
product to your nearest mothercare store.
Puede obtener las piezas de recambio indicadas al margen para su artículo. En caso
de que necesite cualquiera de estas piezas, diríjase a su comercio local de
mothercare o al servicio al cliente en el 08453 30 40 30. Otras piezas se pueden
reparar enviando el artículo a su comercio mothercare más cercano.
description
descripción
diagram
diagrama
front wheel
rueda delantera
rear axle
eje trasero
2x rear wheels
2 ruedas traseras
4x wheel retainers and caps
4 renetes y tapas de rueda
2x hub caps
2 cubos de rueda
parent tray
bandeja del padre
bumper bar
barra delantera
raincover
capota para lluvia
18
19