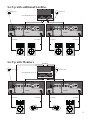
1
Soundmate 2
ORDERCODE D3211
Congratulations!
You have bought a great, innovative product from DAP Audio.
The DAP Audio Soundmate 2 brings excitement to any venue. Whether you want simple plug-&-play action
or a sophisticated show, this product provides the effect you need.
You can rely on DAP Audio, for more excellent audio products.
We design and manufacture professional audio equipment for the entertainment industry.
New products are being launched regularly. We work hard to keep you, our customer, satisfied.
For more information: [email protected]
You can get some of the best quality, best priced products on the market from DAP Audio.
So next time, turn to DAP Audio for more great audio equipment.
Always get the best -- with DAP Audio !
Thank you!
DAP Audio
DAP Audio Soundmate 2™ Product Guide
Warning..…...................................................................................…………………………………………..
Safety-instructions………………………………………………………………………………………….….
Operating Determinations…………………………………………………………………………………….
2
2
3
Description..…..............................................................................……….…………………………………
Features………………………………………………………………………………….………………….….
Overview…………………………………………………………………………………………………..……
4
4
4
Set Up and Operation.....................................................................……..…………………………………
5
Product Specifications.................................................................……………….…….………………….
6
Set Up Possibilities............................….......................................………..………….…….……………..
8
1
WARNING
CAUTION!
Keep this system away from rain and moisture!
FOR YOUR OWN SAFETY, PLEASE READ THIS USER MANUAL CAREFULLY
BEFORE YOUR INITIAL START-UP!
SAFETY INSTRUCTIONS
Every person involved with the installation, operation and maintenance of this system have to:
be qualified
follow the instructions of this manual
CAUTION! Be careful with your operations.
With a dangerous voltage you can suffer
a dangerous electric shock when touching the wires!
Before you initial start-up, please make sure that there is no damage caused by transportation. Should there
be any, consult your dealer and do not use the system.
To maintain perfect condition and to ensure a safe operation, it is absolutely necessary for the user to follow
the safety instructions and warning notes written in this manual.
Please consider that damages caused by manual modifications to the system are not subject to warranty.
This system contains no user-serviceable parts. Refer servicing to qualified technicians only.
IMPORTANT:
The manufacturer will not accept liability for any resulting damages caused by the non-observance of
this manual or any unauthorized modification to the system.
•
•
•
•
•
•
•
•
•
•
•
•
•
Never let the power-cord come into contact with other cables! Handle the power-cord and all
connections with the mains with particular caution!
Never remove warning or informative labels from the unit.
Never use anything to cover the ground contact.
Do not insert objects into air vents.
Do not connect this system to a dimmerpack.
Do not switch the system on and off in short intervals, as this would reduce the system’s life.
Only use system indoor, avoid contact with water or other liquids.
Avoid flames and do not put close to flammable liquids or gases.
Always disconnect power from the mains, when system is not used. Only handle the power-cord by
the plug. Never pull out the plug by tugging the power-cord.
Make sure that there is sufficient room on all sides of the system for air circulation.
Make sure that the available voltage is not higher than stated on the rear panel.
Make sure that the power-cord is never crimped or damaged. Check the system and the power-cord
from time to time.
If system is dropped or struck, disconnect mains power supply immediately. Have a qualified
engineer inspect for safety before operating.
2
•
•
If the system has been exposed to drastic temperature fluctuation (e.g. after transportation), do not
switch it on immediately. The arising condensation water might damage your system. Leave the
system switched off until it has reached room temperature.
Repairs, servicing and electric connection must be carried out by a qualified technician.
OPERATING DETERMINATIONS
This system is not designed for permanent operation. Consistent operation breaks will ensure that the
system will serve you for a long time without defects.
If this system is operated in any other way, than the one described in this manual, the product may suffer
damages and the warranty becomes void.
Any other operation may lead to dangers like short-circuit, burns, electric shock, etc.
You endanger your own safety and the safety of others!
Improper installation can cause serious damage to people and property !
3
Description of the device
Features
Soundmate 2 is a 2 way active satellitesystem with :
• 2 subwoofers 15” 300 watt
• 2 mid/high satellite speakers 10” 150 Watt.
• 2x 3 m Speakon - cable
• 2 adjustable speakerstands 740-1270mm
• 2 carrying bags for speakerstands and cables
• 2 rain / dustcovers
Overview
1
2
3
4
5
6
11
7
8
9 10
12
13
14
15
1
2
3
4
5
6
7
8
Switch Monitor / Satellite B
Signal Input Monitor
Signal Through
Signal Gain Monitor or Satellite B
Signal Input Main
Signal Through Main
Signal Gain Main
Ground lift
9
10
11
12
13
14
15
SUB Bass Level
Phase invert Switch
To Monitor or Satellite B (Speaker Output)
To Satellite A (Speaker Output)
IEC power connector
Power Switch
Fuse F6A
4
Set Up and Operation
The new SoundMate 2 is a further development of the immense popular Soundmate 1, which became a
much used system among entertainers and musicians. The SoundMate 2 has the same critical user-specs
as system 1, namely: compact, yet powerful, plug-and-play, roadproof and of course a neutral sound with an
extra bass-punch. One major addition is the extra, powered subwoofer which enables you the have a full
stereo active compact P.A.-system with two L-R satellites and two subwoofers. Each active subwoofer has a
top-output and an extra monitor-output for additional monitorspeakers.
The amplifier-section is build into each subwoofer and consists of 3 separate power-amplifiers. Further builtin are the crossovers, frequency response correction circuits, breaker circuitry.
It’s easy to set up; All you have to do is set up the system components, connect the signal-carrying cables
and power cords and you're ready to roll. The set comes with ALL necessary accessories: stands, cables
and even dust-/ raincovers!!!
Follow the directions below, as they pertain to your preferred operation mode.
Signal Input MAIN SATELLITE A/B (7+8)
This XLR socket serves as the input for the audio signal. There is also a parallel output for connecting
additional power amps. The input is equipped with a Gain knob so that you can adjust the power amp to the
level of the input signal to prevent distortion.
Signal Input MONITOR (2)
This XLR socket serves as the input for the audio signal. There is also a parallel output for connecting
additional power amps. The input is equipped with a Gain knob so that you can adjust the power amp to the
level of the input signal to prevent distortion
Switch MONITOR / SATELLITE B (1)
This switch lets you change the MONITOR section assignment from Monitor to Satellite mode. If the switch
is set to the position labeled SATELLITE B, the signal of SATELLITE A is automatically routed to the
MONITOR / SATELLITE B power amp section. The signal is processed in the same manner as for
SATELLITE A.
Speaker Output SATELLITE A (12)
Make sure that overall impedance is not below 4 Ω, otherwise the power amp could be damaged.
Speaker Output MONITOR / SATELLITE B (11)
The satellites can be used as Satellite or as Monitor depending on the status of the switch.
Make sure that overall impedance is not below 4 Ω, otherwise the power amp could be damaged.
Mains Socket (13)
Plug one end of the electric mains power cord into the IEC socket on the unit.
Then plug the other end of the cord into a proper electric power supply socket.
Make sure that the available voltage is not higher than stated on the rear panel.
Before plugging the unit in, always make sure that the power supply matches the product specification
voltage. Do not attempt to operate a 120V specification product on 230V power, or vice versa
Mains Switch (14)
Do not supply power before the whole system is set up and connected properly.
Ground Lift (8)
When this button is pressed, it separates the signal ground from the chassis ground, enabling you to
eliminate potential ground loops
5
Specifications
Inputs
Line IN MAIN Connector XLR plug female
Input design electronically balanced & floating
Inp. impedance 47 kΩ
Sensitivity 0 dB
Line IN MONITOR Connector XLR plug female
Input design electronically balanced & floating
Inp. impedance 47 kΩ
Sensitivity 0 dB
Outputs
Parallel Out MAIN Connector: XLR socket male
Parallel Out MONITOR Connector: XLR socket male
Satellite Out MAIN Connector: Speakon (pin 1+= +; pin 1--= --)
Satellite Out MONITOR Connector: Speakon (pin 1+= +; pin 1--= --)
Active Crossover
SATELLITE A/B Crossover freq. 130 Hz
Roll off 24 dB/ Octave
MONITOR Full range
Subsonic Filter: 20 Hz / 12 dB / Octave
Amplifiers
Power output Subwoofer 300 W / 8 Ω at 1% THD
Power output per Satellite 150 W / 4 Ω at 1% THD
Power output per Monitor 150 W / 4 Ω at 1% THD
Speakers
Subwoofer Specifications
Driver 1x 15"
Nominal impedance 8 Ω
Power handling nom. 300 W RMS
Power handling progr 600 W
Sensitivity 1W/1m axial 98dB (fullspace)
Max. Sound pressure 119dB at 3% harmonic distortion (fullspace/ 1m)
Dimensions 605 x 730 (810 incl. wheels) x 500 mm (WXDXH)
Weight 52 Kg
Satellites
Titanium Monitor Driver 2" with CD-Horn 60°x40°
1x 10" speaker
Nominal impedance 8 Ω
Power handling nom. 200 W RMS
Power handling progr. 400 W
Frequency response 100Hz - 18 kHz, ±3dB
Crossover frequency 3kHz (passive)
6
Sensitivity 1W/1m axial 98dB (fullspace)
Max. Sound pressure 119dB at 3% harmonic distortion (fullspace/ 1m)
Dimensions 300 x 280 x 500 mm (WXDXH)
Weight 12,2 Kg
Included
2x 3 m Speakon - cable
2 adjustable speakerstands 740-1270mm
2 carrying bags for speakerstands and cables
2 rain / dustcovers
7
There are 3 ways you can use the Soundmate system( see page 8-9):
•
STANDARD SET UP
•
SET UP with additional Satellites
•
SET UP with Monitors
Back side from the Soundmate 2
Ground
Lift
SUB Bass
On Off
On Off
Input
monitor
Through
To MONITOR or
SATELLITE B
Gain
monitor
or
satellite B
Input
Through
Phase
Invert
Gain
To SATELLITE A
MAIN
150 W
4Ω
150 W
4Ω
Soundmate 2
Standard Set Up
from MASTER OUT L/ R
Mainsignal to SATELLITE B
Mainsignal to SATELLITE B
Ground
Lift
On Off
Input
monitor
To MONITOR or
SATELLITE B
150 W
4Ω
Through
Gain
monitor
or
satellite B
Input
Through
SUB Bass
Ground
Lift
On Off
On Off
Gain
Input
monitor
To SATELLITE A
MAIN
Mainsignal to SATELLITE B
Phase
Invert
To MONITOR or
SATELLITE B
150 W
4Ω
150 W
4Ω
To satellite
Through
Gain
monitor
or
satellite B
Input
Through
SUB Bass
Phase
Invert
On Off
Gain
To SATELLITE A
MAIN
150 W
4Ω
To satellite
8
Set Up with additional Satellites
Switch up
Switch up
from MASTER OUT L/ R
Mainsignal to SATELLITE B
Mainsignal to SATELLITE B
Ground
Lift
SUB Bass
On Off
Input
monitor
Through
To MONITOR or
SATELLITE B
Gain
monitor
or
satellite B
Input
Through
Ground
Lift
On Off
On Off
Gain
Input
monitor
To SATELLITE A
MAIN
150 W
4Ω
Mainsignal to SATELLITE B
Phase
Invert
To MONITOR or
SATELLITE B
150 W
4Ω
Set Up with Monitors
Gain
monitor
or
satellite B
Input
Through
Phase
Invert
On Off
Gain
To SATELLITE A
MAIN
150 W
4Ω
To satellite
To satellite
Through
SUB Bass
150 W
4Ω
To satellite
To satellite
AUX OUT
Switch down
Switch down
from MASTER OUT L/ R
Mainsignal to SATELLITE B
On Off
Input
monitor
To MONITOR or
SATELLITE B
150 W
4Ω
To satellite
Through
Mainsignal to SATELLITE B
Mainsignal to SATELLITE B
Ground
Lift
Gain
monitor
or
satellite B
Input
Through
SUB Bass
Phase
Invert
Ground
Lift
On Off
On Off
Gain
Input
monitor
To SATELLITE A
MAIN
150 W
4Ω
To satellite
To MONITOR or
SATELLITE B
150 W
4Ω
To satellite
Through
Gain
monitor
or
satellite B
Input
Through
SUB Bass
Phase
Invert
On Off
Gain
To SATELLITE A
MAIN
150 W
4Ω
To satellite
9