1
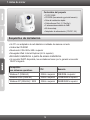
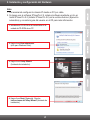
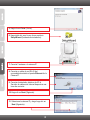
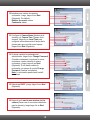
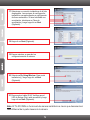
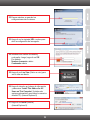
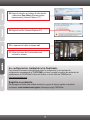
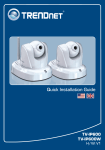
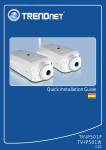
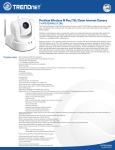
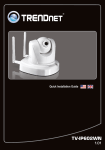
Guía de instalación rápida
TV-IP612WN
1.01
Table of Contents
Español
1. Antes de iniciar
2. Inslatación y configuración del Hardware
1
1
2
Troubleshooting
Wireless Tips
8
9
Version 08.26.2010
1. Antes de iniciar
Contenidos del paquete
TV-IP612WN
?
?
CD-ROM (herramienta y guía del usuario)
?
Guía de instalación rápida
?
Cable ethernet Cat. 5 (1.5m/5pi.)
?
2 antenas desmontable de 2dBi
?
Kit de montaje
?
Adaptador de alimentación (12V DC, 2A)
Requisitos de instalación
Un PC con adaptador de red alámbrico instalado de manera correcta
?
Unidad de CD-ROM
?
?
Resolución VGA: 800 x 600 o superior
?
Navegador Web: Internet Explorer (6.0 ó superior)
?
Enrutador inalámbrico o punto de acceso inalámbrico
?
Un servidor DHCP disponible, los enrutadores tienen por lo general un servidor
DHCP integrado
Compatible
con sistemas operativos
CPU
Windows 7 (32/64-bit)
1.3GHz o superior 1GB RAM o superior
Windows Vista (32/64-bit)
1.3GHz o superior 512MB RAM o superior
Windows XP (32/64-bit) / 2000
1.3GHz o superior 256MB RAM o superior
Memoria
1
2. Inslatación y configuración del Hardware
Nota:
1.Se recomienda configurar la cámara IP desde un PC por cable.
2.Si desea usar el software IPViewPro 2.0, instale el software mediante un clic en
Install IPView Pro 2.0 (Instalar IPView Pro 2.0) en la ventana Autorun (Ejecución
automática) y consulte la guía del usuario en el CD para más información.
1. Introduzca el CD-ROM de la herramienta en la
unidad de CD-ROM de su PC.
2. Haga clic en Run autorun.exe
(sólo para Windows Vista).
3. Haga clic en Setup Wizard.
(Asistente de instalación).
4. Haga clic en Next (Siguiente). Siga las
instrucciones del Setup Wizard (Asistente de
instalación).
2
5. Haga clic en Close (Cerrar).
6. Haga doble clic en el icono de su escritorio
SetupWizard (Asistente de instalación).
7. Conecte 2 antenas a la cámara IP.
8. Conecte un cable de red RJ-45 del
conmutador/enrutador al puerto Ethernet de la
Cámara IP.
9. Conecte el adaptador eléctrico de AC al
Servidor de cámara de Internet después a una
toma de corriente.
10. Haga clic en Next (Siguiente).
11. Seleccione la cámara IP y luego haga clic en
Next (Siguiente).
3
12. Introduzca su nombre de usuario y
contraseña. Luego, haga clic en Next
(Siguiente). Por defecto:
Nombre de usuario: admin
Contraseña: admin
13. Configure el Camera Name (Nombre de la
cámara) y el Camera Time (Tiempo de la
cámara). Haga clic en Local Time para
configurar automáticamente el tiempo de la
cámara para que coincida con el equipo.
Haga clic en Next (Siguiente).
14. Si desea cambiar la contraseña del
administrador, haga clic en Change Password
(Cambiar contrasena), introduzca la nueva
contrasena, vuelva a escribir la nueva
contrasena y luego haga clic en Next
(Siguiente). Si no desea cambiar la
contraseña, no marque la opción Change
Password (Cambiar contraseña)
Nota: La contraseña puede tener hasta 8
caracteres.
15. Seleccione DHCP y luego haga clic en Next
(Siguiente)
16. Haga clic en I want to use wireless for the
camera (Deseo usar la conexión inalámbrica
para la cámara) y luego haga clic en Next
(Siguiente).
4
17. Seleccione su conexión inalámbrica de la lista
desplegable. Las opciones de configuración
inalámbrica correspondientes se configurarán
de forma automática. Si tiene habilitada una
encriptación, introduzca su Clave de
encriptación y luego haga clic en Next
(Siguiente).
18. Haga clic en Next (Siguiente).
19. Espere mientras se guardan las
configuraciones de su cámara.
20. Seleccione By Using Wireless (Usar modo
inalámbrico) y luego haga clic en Next
(Siguiente).
21. Desconecte el cable RJ-45 Verifique que el
LED de Enlace (Rojo) esté encendido y luego
haga clic en Next (Siguiente).
Nota: El TV-IP612WN no funcionará de manera inalámbrica a menos que desconecte el
cable Ethernet de la parte trasera de la cámara.
5
22. Espere mientras se guardan las
configuraciones de su cámara.
23. Haga clic en la siguiente URL o enlace para
abrir la configuración del navegador.
24. Introduzca su nombre de usuario y
contraseña. Luego, haga clic en OK.
Por defecto:
Nombre de usuario: admin
Contraseña: admin
25. Haga clic en Live View (Visión en vivo) para
ver el video en directo.
26. Haga clic derecho en la barra de información
y seleccione “Install This Add-on for All
Users on This Computer” (Instalar este
equipo suplementario para todos los usuarios
de este PC). (Internet Explorer 8)
27. Haga clic en Install (instalar)
(Internet Explorer 8).
6
28. Haga clic derecho en la barra de información
y seleccione Run Add-on (Ejecutar equipo
suplementario) (Internet Explorer 6/7).
29. Haga clic en Run (Internet Explorer 6/7).
30. Le aparecerá el video en tiempo real.
31. Utilice los iconos de los comandos para
controlar la cámara.
Su configuración inalámbrica ha finalizado.
Para obtener información más detallada sobre la configuración y las opciones de
configuración avanzadas de la TV-IP612WN, por favor consulte la sección de resolución de
problemas en el CD-ROM de la Guía del Usuario, o el sitio Web de TRENDnet en
http://www.trendnet.com.
Registre su producto
Para asegurar los más altos niveles de servicio y apoyo al cliente, registre su producto
en línea en: www.trendnet.com/register Gracias por elegir TRENDnet.
7
Troubleshooting
1. I inserted the Utility CD-ROM into my computer's CD-ROM Drive but the installation menu
does not appear automatically. What should I do?
1. For Windows 7, if the installation menu does not appear automatically, click on the
Windows Icon on the bottom left hand corner of the screen,, click the “Search programs
and files” box, and type D:\autorun.exe, where “D” in “D:\autorun.exe” is the letter
assigned to your CD-ROM Drive, and then press the ENTER key on your keyboard .
2. For Windows Vista, if the installation menu does not appear automatically, click Start, click
the Start Search box, and type D:\autorun.exe where "D" in "D:\autorun.exe" is the letter
assigned to your CD-ROM Drive, and then press the ENTER key on your keyboard.
3. For Windows XP/2000, if the window does not appear automatically, click Start, click Run
and type D:\autorun.exe where “D” in “D:\autorun.exe” is the letter assigned to your
CD-ROM Drive, and then press the ENTER key on your keyboard.
2. Setup Wizard is unable to detect my camera. What should I do?
1. Verify that you have followed all the steps in Section 2: Hardware Installation.
2. Disable any software firewall programs such as ZoneAlarm or Norton Internet Security. If
you are using Windows 7, Vista or XP disable the built in firewall.
3. Click on Rescan.
4. Take a pin or paper clip. Then press on the Reset button on the back on the IP Camera
for 10 seconds, then let go.
3. I do not have a DHCP server or DHCP is disabled on my network and I am unable to
configure the TV-IP612WN. What should I do?
1. Go to the TCP/IP settings on your computer and assign a static IP address on your
computer's network adapter in the subnet of 192.168.10.x. Since the default IP address of
the TV-IP612WN is 192.168.10.30, do not assign a static IP address of 192.168.10.30 on
your computer's network adapter.
2. Open Internet Explorer and enter http://192.168.10.30 into the address bar.
4. The Image is blurry. How can I adjust the focus on the Internet camera?
If you have manual focus enabled in the IP camera's browser configuration, you can press
the plus or minus sign. Selecting auto focus will automatically adjust the focus on the IP
camera.
5. When I click on Live View the image does not load?
1. Make sure that you are using a browser that supports Active X.
2. Make sure that ActiveX is installed. See steps 20 to 23 in Section 2: Hardware
Installation and Configuration.
6. How do I connect the TV-IP612WN to my wireless router or access point?
Make sure that you configure the camera to have the same SSID, encryption mode and key
(if enabled). Follow the instructions in section 2 to configure the camera with the SSID and
encryption key.
8
7. After I successfully configured the TV-IP612W to match my wireless network settings, I
can not connect to the camera.
1. Verify that the wireless settings match your wireless network settings.
2. Verify in the wireless section of the browser configuration that the Enable option
is checked.
3. Make sure to disconnect the Ethernet cable from the camera and verify that the
LINK LED is blinking red.
8. I forgot my password. What should I do?
Take a pin or paperclip and press the reset button on the back of the unit for 15 seconds.
This will return settings back to factory defaults. Open up the SetupWizard program to find
out the IP address of the camera (see step 11 in Section 2: Hardware Installation and
Configuration. If you do not have a DHCP server on your network, the default IP address is
192.168.10.30. The default administrator ID and password is admin.
If you still encounter problems or have any questions regarding the TV-IP612WN, please contact
TRENDnet's Technical Support Department.
9
Wireless Tips
The following are some general wireless tips to help minimize the impact of interference within an
environment.
Assign your network a unique SSID
Do not use anything that would be identifying like “Smith Family Network”. Choose
something that you would easily identify when searching for available wireless networks.
Do not turn off the SSID broadcast
The SSID broadcast is intended to be on and turning it off can cause connectivity issues.
The preferred method of securing a wireless network is to choose a strong form of encryption
with a strong and varied encryption key.
Note: after setting up the SSID, encryption type and encryption key/passphrase, please
make a note of them for future reference. You will need this information to connect your
wireless computers to the wireless router/access point.
Change the channel
Most wireless access points and routers are defaulted to channel 6. If you have a site survey
tool that will display the channels you can plan your channel selection around neighboring
access points to minimize interference from them. If your site survey tool does not display
the channel try using channels 1 or 11.
If using 802.11n you should be securing the network with WPA2 security.
Note: Due to Wi-Fi certification considerations if you choose WEP, WPA or WPA2-TKIP
encryption this device may operate in legacy wireless mode (802.11b/g). You may not get
802.11n performance as these forms of encryption are not supported by the 802.11n
specification.
Please also make sure that the wireless hardware is not placed in any type of shelving or
enclosures.
Avoid stacking hardware on top of each other to prevent overheating issues. Maintain
enough free space around the hardware for good ventilation and airflow. There should also
be plenty of free space around the antennas to allow the wireless signal to propagate.
10
There are a number of other environmental factors that can impact the range of wireless devices.
1. Adjust your wireless devices so that the signal is traveling in a straight path, rather than at
an angle. The more material the signal has to pass through the more signal you will lose.
2. Keep the number of obstructions to a minimum. Each obstruction can reduce the range of
a wireless device. Position the wireless devices in a manner that will minimize the amount
of obstructions between them.
3.Building materials can have a large impact on your wireless signal. In an indoor
environment, try to position the wireless devices so that the signal passes through less
dense material such as dry wall. Dense materials like metal, solid wood, glass or even
furniture may block or degrade the signal.
4. Antenna orientation can also have a large impact on your wireless signal. Use the wireless
adapter's site survey tool to determine the best antenna orientation for your wireless
devices.
5. Interference from devices that produce RF (radio frequency) noise can also impact your
signal. Position your wireless devices away from anything that generates RF noise, such
as microwaves, HAM radios, Walkie-Talkies and baby monitors.
6. Any device operating on the 2.4GHz frequency will cause interference. Devices such as
2.4GHz cordless phones or other wireless remotes operating on the 2.4GHz frequency
can potentially drop the wireless signal. Although the phone may not be in use, the base
can still transmit wireless signal. Move the phone's base station as far away as possible
from your wireless devices.
If you are still experiencing low or no signal consider repositioning the wireless devices or
installing additional access points. The use of higher gain antennas may also provide the
necessary coverage depending on the environment.
11
Copyright ©2010. All Rights Reserved. TRENDnet.