1
V265
CDMA
START HERE >
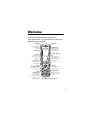
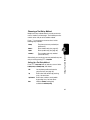
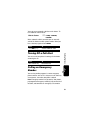
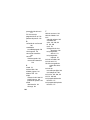
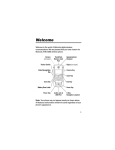
Welcome
Welcome to the world of Motorola digital wireless
communications! We are pleased that you have chosen the
Motorola V265 wireless phone.
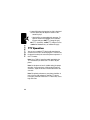
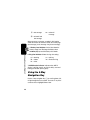
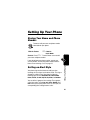
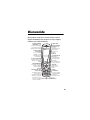
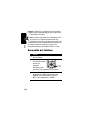
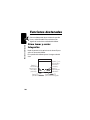
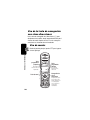
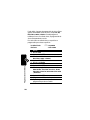
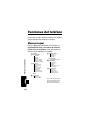
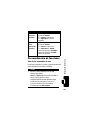
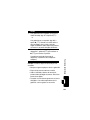
Menu Key
Left Soft Key
Perform
functions identified
by left display
prompt.
Right Soft Key
Perform functions
identified by right
display prompt.
Camera Key
Voice Recognition
Key
Activate speakerindependent voice
recognition. Record
voice records &
contacts.
Send Key
Make & answer
calls, view recently
dialed calls.
Volume Keys
Adjust earpiece &
ringer volume.
Smart/
Speakerphone Key
Select menu items,
set ring styles.
CLR Key
Clear entries, move
back through menus.
5-Way
Navigation Key
Scroll through
menus & lists, set
values. Press K key
in center to select
highlighted item.
Power/End Key
Turn phone on/off,
end phone calls, exit
menus.
Accessory Port
Microphone
1
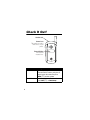
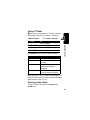
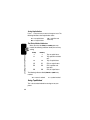
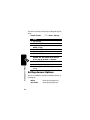
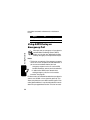
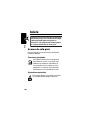
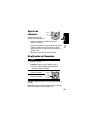
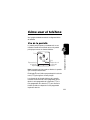
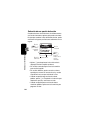
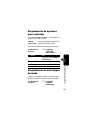
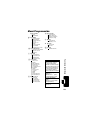
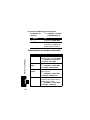
Check It Out!
Headset Jack
Camera Lens
Take photos to send to
others & use on your
phone.
External Display
View caller ID
& status icons.
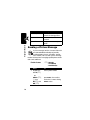
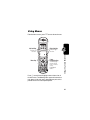
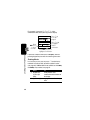
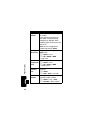
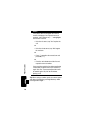
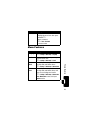
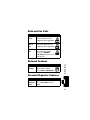
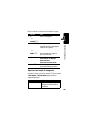
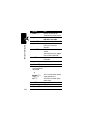
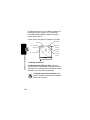
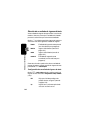
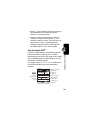
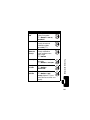
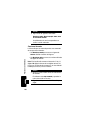
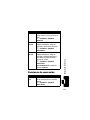
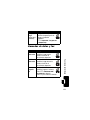
Feature
Take Photo
Send Photo
2
Description
Open the phone, press the camera key
f to activate the camera, point lens at
subject, press the camera key f or
CAPTURE (+) to take a photo.
Send the photo to a phone number
Press STORE (+) > Send In Message.
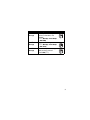
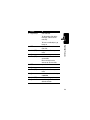
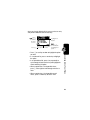
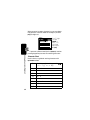
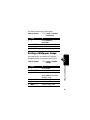
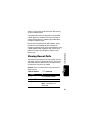
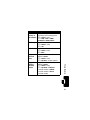
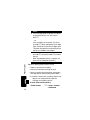
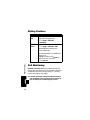
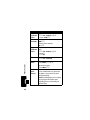
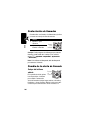
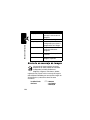
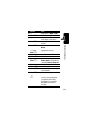
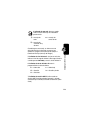
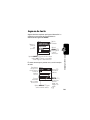
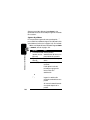
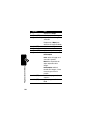
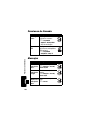
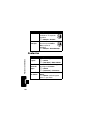
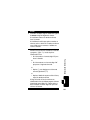
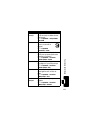
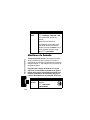
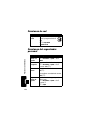
Feature
Send Picture
Message
Send Text
Message
Read Picture
Message
Description
Send a picture message with
pictures, animations, and
sounds:
M > Messaging > Create Message
> New PIX Msg
Send a text message:
M > Messaging > Create Message
> New TXT Msg
Read a new picture message
that you have received:
Press READ (+).
032380o
032380o
032380o
3
Motorola, Inc.
Consumer Advocacy Office
1307 East Algonquin Road
Schaumburg, IL 60196
www.motorola.com
1-800-331-6456 (United States)
1-888-390-6456 (TTY/TDD United States for hearing impaired)
1-800-461-4575 (Canada)
MOTOROLA and the Stylized M Logo are registered in the US Patent &
Trademark Office. All other product or service names are the property of their
respective owners.
© Motorola, Inc. 2004
The information contained in Motorola's user's guides is believed to be correct
at the time of printing. Motorola reserves the right to change or modify any
information or specifications without notice. The contents of Motorola’s user's
guides are provided “as is.” Except as required by applicable law, no warranties
of any kind, either express or implied, including, but not limited to, the implied
warranties of merchantability and fitness for a particular purpose, are made in
relation to the accuracy, reliability, or contents of this guide.
Manual number: 6809489A65-O
4
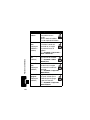
Contents
Getting Started . . . . . . . . . . . . . . . . . . . . . . . . . . . . . . . . . . 8
About This Guide . . . . . . . . . . . . . . . . . . . . . . . . . . . . . . . 8
Installing the Battery . . . . . . . . . . . . . . . . . . . . . . . . . . . . . 9
Battery Use. . . . . . . . . . . . . . . . . . . . . . . . . . . . . . . . . . . 10
Charging the Battery. . . . . . . . . . . . . . . . . . . . . . . . . . . . 11
Turning On Your Phone. . . . . . . . . . . . . . . . . . . . . . . . . . 12
Adjusting Volume . . . . . . . . . . . . . . . . . . . . . . . . . . . . . . 12
Making a Call . . . . . . . . . . . . . . . . . . . . . . . . . . . . . . . . . 13
Answering a Call. . . . . . . . . . . . . . . . . . . . . . . . . . . . . . . 14
Changing the Call Alert. . . . . . . . . . . . . . . . . . . . . . . . . . 14
Viewing Your Phone Number . . . . . . . . . . . . . . . . . . . . . 15
Highlight Features . . . . . . . . . . . . . . . . . . . . . . . . . . . . . . 16
Taking and Sending a Photo. . . . . . . . . . . . . . . . . . . . . . 16
Sending a Picture Message . . . . . . . . . . . . . . . . . . . . . . 18
Receiving a Picture Message . . . . . . . . . . . . . . . . . . . . . 21
TTY Operation . . . . . . . . . . . . . . . . . . . . . . . . . . . . . . . . 22
Learning to Use Your Phone . . . . . . . . . . . . . . . . . . . . . . 24
Using the Display . . . . . . . . . . . . . . . . . . . . . . . . . . . . . . 24
Using the 5-Way Navigation Key. . . . . . . . . . . . . . . . . . . 26
Using Menus. . . . . . . . . . . . . . . . . . . . . . . . . . . . . . . . . . 27
Entering Text. . . . . . . . . . . . . . . . . . . . . . . . . . . . . . . . . . 30
Using the Handsfree Speaker. . . . . . . . . . . . . . . . . . . . . 39
Using the External Display . . . . . . . . . . . . . . . . . . . . . . . 40
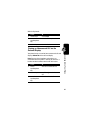
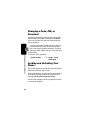
Changing a Code, PIN, or Password . . . . . . . . . . . . . . . 42
Locking and Unlocking Your Phone . . . . . . . . . . . . . . . . 42
If You Forget a Code, PIN, or Password . . . . . . . . . . . . . 44
5
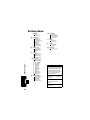
Setting Up Your Phone . . . . . . . . . . . . . . . . . . . . . . . . . .
Storing Your Name and Phone Number . . . . . . . . . . . .
Setting an Alert Style . . . . . . . . . . . . . . . . . . . . . . . . . .
Setting Answer Options. . . . . . . . . . . . . . . . . . . . . . . . .
Setting a Wallpaper Image . . . . . . . . . . . . . . . . . . . . . .
Setting a Screen Saver Image . . . . . . . . . . . . . . . . . . .
Setting Display Contrast . . . . . . . . . . . . . . . . . . . . . . . .
Adjusting the Backlight . . . . . . . . . . . . . . . . . . . . . . . . .
Hiding or Showing Location Information . . . . . . . . . . . .
Conserving Battery Power . . . . . . . . . . . . . . . . . . . . . .
Calling Features . . . . . . . . . . . . . . . . . . . . . . . . . . . . . . .
Changing the Active Line . . . . . . . . . . . . . . . . . . . . . . .
Redialing a Number . . . . . . . . . . . . . . . . . . . . . . . . . . .
Using Automatic Redial. . . . . . . . . . . . . . . . . . . . . . . . .
Turning Off a Call Alert . . . . . . . . . . . . . . . . . . . . . . . . .
Calling an Emergency Number . . . . . . . . . . . . . . . . . . .
Using AGPS During an Emergency Call . . . . . . . . . . . .
Viewing Recent Calls . . . . . . . . . . . . . . . . . . . . . . . . . .
Returning an Unanswered Call . . . . . . . . . . . . . . . . . . .
Using the Notepad . . . . . . . . . . . . . . . . . . . . . . . . . . . .
Attaching a Number . . . . . . . . . . . . . . . . . . . . . . . . . . .
Calling with Speed Dial . . . . . . . . . . . . . . . . . . . . . . . . .
Calling with 1-Touch Dial. . . . . . . . . . . . . . . . . . . . . . . .
Using Voicemail. . . . . . . . . . . . . . . . . . . . . . . . . . . . . . .
Phone Features. . . . . . . . . . . . . . . . . . . . . . . . . . . . . . . .
Main Menu . . . . . . . . . . . . . . . . . . . . . . . . . . . . . . . . . .
Calling Features . . . . . . . . . . . . . . . . . . . . . . . . . . . . . .
Messages . . . . . . . . . . . . . . . . . . . . . . . . . . . . . . . . . . .
Contacts . . . . . . . . . . . . . . . . . . . . . . . . . . . . . . . . . . . .
Personalizing Features . . . . . . . . . . . . . . . . . . . . . . . . .
Menu Features . . . . . . . . . . . . . . . . . . . . . . . . . . . . . . .
6
45
45
45
46
47
48
49
49
50
51
52
52
52
52
53
53
54
55
56
57
58
58
58
59
61
61
63
63
65
68
75
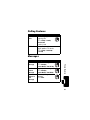
Dialing Features . . . . . . . . . . . . . . . . . . . . . . . . . . . . . . .
Call Monitoring . . . . . . . . . . . . . . . . . . . . . . . . . . . . . . . .
Handsfree Features . . . . . . . . . . . . . . . . . . . . . . . . . . . .
Data and Fax Calls . . . . . . . . . . . . . . . . . . . . . . . . . . . . .
Network Features . . . . . . . . . . . . . . . . . . . . . . . . . . . . . .
Personal Organizer Features . . . . . . . . . . . . . . . . . . . . .
Security. . . . . . . . . . . . . . . . . . . . . . . . . . . . . . . . . . . . . .
News and Entertainment . . . . . . . . . . . . . . . . . . . . . . . .
Specific Absorption Rate Data . . . . . . . . . . . . . . . . . . . .
Index . . . . . . . . . . . . . . . . . . . . . . . . . . . . . . . . . . . . . . . . .
76
76
77
79
79
79
81
81
83
85
7
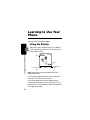
Getting Started
CAUTION: Before using the phone for the
Getting Started
first time, read the Important Safety and
Legal Information included in the
gray-edged pages at the back of this guide.
032259o
About This Guide
This guide describes the basic features of your Motorola
wireless phone.
Optional Features
032380o
This label identifies an optional network or
subscription-dependent feature that may not be
offered by all service providers in all geographical
areas. Contact your service provider for more
information.
Optional Accessories
This label identifies a feature that requires an
optional Motorola Original™ accessory.
8
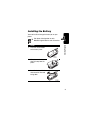
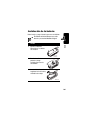
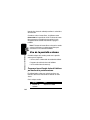
Installing the Battery
You must install and charge the battery to use your
phone.
Your phone is designed to use only
Motorola Original batteries and accessories.
Getting Started
Action
1 Press the release button
on the battery cover.
2 Slide the cover back,
then lift it away from the
phone.
3 Insert the battery with the
tabs toward the front and
facing down.
9
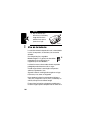
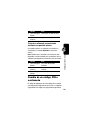
Getting Started
Action
4 Lower the battery cover
onto the phone, then slide
it forward until it clicks into
place.
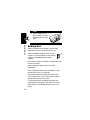
Battery Use
Battery life depends on the network, signal strength,
temperature, features, and accessories you use.
Always use Motorola Original™ batteries and
chargers. The warranty does not cover damage
caused by non-Motorola batteries and/or
chargers.
New batteries or batteries stored for a long time may take
more time to charge.
When charging your battery, keep it near room
temperature.
When storing your battery, keep it uncharged in a cool,
dark, dry place, such as a refrigerator.
Never expose batteries to temperatures below -10°C
(14°F) or above 45°C (113°F). Always take your phone
with you when you leave your vehicle.
It is normal for batteries to gradually wear down and
require longer charging times. If you notice a change in
your battery life, it is probably time to purchase a new
battery.
10
Contact your local recycling center for proper
battery disposal.
Warning: Never dispose of batteries in a fire because
they may explode.
Before using your phone, read the battery safety
information in the “Safety and General Information” section
included in this guide.
New batteries are shipped partially charged. Before you
can use your phone, you need to install and charge the
battery as described below. Some batteries perform best
after several full charge/discharge cycles.
Getting Started
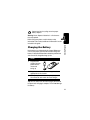
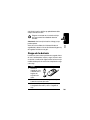
Charging the Battery
Action
1 Plug the travel
charger into your
phone with the
release tab
facing up.
2 Plug the other end of the travel charger into the
appropriate electrical outlet.
3 When your phone indicates Charge Complete, press
the release tab and remove the travel charger.
Tip: You can safely leave the travel charger connected to
the phone after charging is complete. This will not damage
the battery.
11
Note: When you charge the battery, the battery level
indicator in the upper right corner of the display shows how
much of the charging process is complete. At least
1 segment of the battery level indicator must be visible
to ensure full phone functionality while charging.
Getting Started
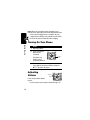
Turning On Your Phone
Action
1 Open your phone.
2 Press and hold the
power key for
3 seconds.
Power
Key
The phone may
require several
seconds to power on.
3 If necessary, enter your 4-digit unlock code (the
last 4 digits of your phone number) and press
OK (+) to unlock the phone.
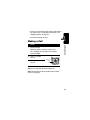
Adjusting
Volume
Volume
Keys
Press the up or down volume
keys to:
• increase or decrease earpiece volume during a call
12
• increase or decrease the ringer volume setting when
the home screen is visible (flip must be open—see
“Adjusting Volume” on page 12)
• turn off an incoming call alert
Making a Call
1 Dial the number.
Tip: If you make a mistake, press the clear
key C to delete the last digit. Press and hold
to clear all digits.
2 Press N to make
the call.
3 Press P to end
the call.
Getting Started
Action
Press to
send
call.
Tip: You can also close the flip to end the call.
Note: You must dial the phone number from the home
screen. See page 24.
13
Answering a Call
When you receive a call, your phone rings and/or
vibrates and displays an incoming call message.
Action
Getting Started
1 Press N to answer.
2 Press P to end the
call.
Press to
answer
call.
Tip: You can set the phone to answer calls when you open
the flip. (To activate, press M > Settings > In-Call Setup
> Answer Options > Open to Answer.)
Note: If the phone is locked, you must unlock it to answer
the call.
Changing the Call Alert
Phone Flip Open
Volume
In the home screen, press the
Keys
down volume key to switch to
lower call alert volume, then
switch to vibrate and, finally,
silent alert. Press the up volume key to cycle back from
silent alert to vibrate and then to the lowest alert
volume setting.
14
Phone Flip
Closed
Volume Keys
Smart/
Press the up or down
Speakerphone
volume key, then press
Key
the speakerphone key
to scroll through the alert styles: Loud, Soft, Vibrate, Vibe & Ring,
and Silent. The alert styles are shown on the external display.
Viewing Your Phone Number
Getting Started
After scrolling to the desired alert style, press the up or
down volume key to save the setting and return to the
home screen.
To view your phone number from the home screen,
press M #.
While you are on a call, press M > My Tel. Numbers.
15
Highlight Features
Highlight Features
You can do much more with your phone than make and
receive calls! This section describes some of your
phone’s highlights.
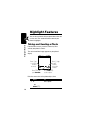
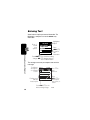
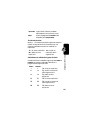
Taking and Sending a Photo
From the home screen, press the camera key f to
activate your phone’s camera.
The active viewfinder image appears on your phone’s
display.
(O
uyÉ
\
1/143
Msg
Press S up
to zoom in,
down to
zoom out.
BACK
Press M to
open Pictures Menu.
M
CAPTURE
Press S right
to lower
contrast,
left to add
contrast.
Press CAPTURE (-)
to take a photo.
Point the camera lens at the photo subject, then:
Press
1 f
or
CAPTURE (+)
16
To
take a photo
Press
2 STORE (+)
To
view storage options
If you choose to store the
photo, continue to step 3.
or
ERASE (-)
4 SELECT (+)
Highlight Features
3 S
delete the photo and return to
active viewfinder
scroll to Send in Message,
Send to PixPlace, Store Only,
Apply as Wallpaper, or
Apply as Screen Saver.
perform the storage option of
your choice
Pictures Menu Options
When the camera is active, press M to access the
Pictures Menu. The Pictures Menu can include the following
options:
Option
Go To Pictures
Auto-Timed Capture
Delete All
Pictures Setup
Description
View pictures and photos
stored on your phone.
Set a timer for the camera to
take a photo.
Delete all pictures.
Open the setup menu to
adjust picture settings.
17
Option
View Free Space
Adjust Contrast
Highlight Features
Capture Title
Description
See how much memory
remains for storing pictures.
Increase or decrease
contrast.
Assign a name to a captured
photo.
Sending a Picture Message
A picture message contains 1 or more slides with
text and embedded media objects (possibly
including photos, pictures, animations, sounds,
voice records). You can send a picture message
to other Verizon picture messaging-capable phones and to
other email addresses.
032380o
Find the Feature
Press
1 keypad keys,
then OK (+)
M > Messaging
> Create Message
> New PIX Messages
To
enter a phone number
or
CONTACTS (+),
S, then
ADD (+) and
DONE (-)
18
open Contacts, then scroll to
and select 1 or more existing
Contacts entries
Press
2 keypad keys
To
enter slide text
To add another slide to the
message, continue to the
next step.
4 SELECT (+)
5 S
6 SELECT (+)
7 M
8 S
9 SELECT (+)
10 S
11 SELECT (+)
12 S
Highlight Features
3 M
To insert a media object, go
to step 8.
open the PIX Menu to insert a
new slide
display a list of items you can
insert
scroll to New Page
insert a new slide after the
current slide
Return to step to enter
contents for the new slide.
open the PIX Menu
scroll to Insert
display a list of items you can
insert
scroll to Record, Sound, New Page
or Quick Text
select the file type
scroll through the files to the
desired selection
19
Highlight Features
Press
13 SELECT (+)
To
select and insert the file
14
15
16
17
Return to step 8 to add more
media files.
save all inserted files
scroll to Subject
select Subject
enter the subject
OK (+)
S
CHANGE (-)
keypad keys
or
18
19
20
21
22
23
QK.NOTE (+),
then S and
OK (+)
OK (+)
S
CHANGE (-)
S
SELECT (+)
S
24 SELECT (+)
25 BACK (-)
S, then
SELECT (+)
26 S
20
open the Quick Notes list,
then scroll to and select a
Quick Note as a subject
store the subject
scroll to Attachments
select Attachments
scroll to Picture or Sound
select the file type
scroll through the files to the
one you want
select and insert the file
return to the New PIX Message
screen
add more attachments
scroll to Priority
Press
27 CHANGE (+)
28 S, then
SELECT (+)
32 SEND (+)
or
M
send the message later, view
message details, save the
message in the drafts folder,
or cancel the message
Highlight Features
29 S
30 CHANGE (+)
31 ADD (+)
To
select Priority
scroll to and select Normal or
Urgent, then return to the New
PIX Message screen
scroll to Receipt
select Receipt
with Delivery Report highlighted,
select it
send the message
Receiving a Picture Message
032380o
When you receive a picture message, your phone
displays the X (message waiting) indicator and
a New Message notification, and sounds an alert.
Press
READ (+)
To
open the message
Picture messages that you receive can contain different
media objects:
• Photos, pictures, and animations are displayed as you
read the message.
21
Highlight Features
• A sound file begins playing when its slide is displayed.
Use the volume keys to adjust the volume as the
sound file plays.
• Attached files are appended to the message. To
open the attachment, highlight the file indicator/
filename and press VIEW (+) (image file type),
PLAY (+) (sound file), or OPEN (+) (vObject such as
a Contacts or datebook entry, or unknown file type).
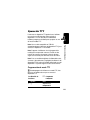
TTY Operation
You can use an optional TTY device with your phone to
send and receive calls. You must plug the TTY device into
the phone’s headset jack and set the phone to operate in 1
of 3 TTY modes.
Note: Use a TSB-121 compliant cable (provided by the
TTY manufacturer) to connect the TTY device to your
phone.
Note: Set the phone to level 4 (middle setting) for proper
operation. If you experience a high number of incorrect
characters, adjust the volume as needed to minimize the
error rate.
Note: For optimal performance, your phone should be at
least 12 inches (30 centimeters) from the TTY device.
Placing the phone too close to the TTY device may cause
high error rates.
22
Setting TTY Mode
ù When you set your phone to a TTY mode, it operates
in that mode whenever the TTY device is connected.
Find the Feature
Press
S
CHANGE (-)
S
SELECT (-)
To
scroll to TTY Setup
select TTY Setup
scroll to the TTY mode
select the TTY mode
The TTY Setup menu can include the following options:
Press
Voice
TTY
VCO
HCO
To
return to normal voice mode
transmit and receive TTY
characters
receive TTY characters but
transmit by speaking into
microphone
transmit TTY characters but
receive by listening to earpiece
Highlight Features
1
2
3
4
M > Settings > Initial Setup
When your phone is in a TTY mode, the international TTY
mode, the international TTY symbol, and the mode setting
display during an active TTY call.
Returning to Voice Mode
To return to normal voice mode, select Voice from the
TTY Setup menu.
23
Learning to Use Your
Phone
See page 1 for a basic phone diagram.
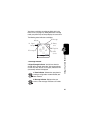
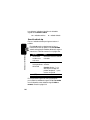
Using the Display
The home screen is displayed when you are not on a
call or using the menu. You must be in the home screen
to dial a phone number.
Learning to Use Your Phone
(O\
Date
ruyÉ
10/15/04
á
x
U 6:35am
Left Soft Key
Label
RECENT
CONTACTS
Clock
Right Soft Key
Label
Note: Your home screen may look different than the
display shown above.
The e (menu) indicator indicates that you can press the
menu key (M) to enter the main menu.
Labels at the bottom corners of the display show the
current soft key functions. Press the left soft key (-) or
right soft key (+) to perform the function indicated by the
left or right soft key label.
24
Your phone can display an analog or digital clock in the
home screen (see page 74). While powered on in analog
mode, your phone may not always display the correct time.
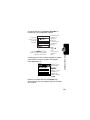
The following status indicators can display:
4. Message
3. Roam
2. Signal
Strength
1. Coverage
(O\
10/15/04
á
x
]
032419o
U 6:35am
5. Battery
Level
6. Ring Alert
7. AGPS
Service
CONTACTS
1. Coverage Indicator
2. Signal Strength Indicator Vertical bars show the
strength of the network connection. You cannot make or
receive calls when only the ! (no signal) indicator or )
(no transmit) indicator is displayed.
032380o
032380o
3. Roam Indicator Shows when your phone is
seeking or using another network outside your
home network.
Learning to Use Your Phone
RECENT
ruyÉ
4. Message Indicator Displays when you
receive a new message. Indicators can include:
25
r = text message
t = voicemail
message
s = voicemail and
text message
When you enter a message, a number in this location
shows the number of characters left on the current page
(text message), or the message size (picture message).
5. Battery Level Indicator Vertical bars show the
battery charge level. Recharge the battery when
Low Battery displays and the battery alert sounds.
Learning to Use Your Phone
6. Ring Alert Indicator Shows the ring alert setting.
y = loud ring
| = vibrate
{ = silent
z = soft ring
} = vibrate and ring
7. AGPS Service Indicator Indicates when AGPS
Service is off (icon is grey), on (icon is white), or on and
finding your location (icon is green).
Using the 5-Way
Navigation Key
Use the 5-way navigation key (S) to scroll up, down, left,
or right through the menu system. Press the K key in the
center to select a highlighted menu item.
26
Using Menus
From the home screen, press M to enter the main menu.
Recent Calls
Left Soft Key
Perform left
function.
SELECT
Right Soft Key
Perform right
function.
5-way
Navigation Key
Scroll through
menus & lists.
Press center to
select
highlighted
items.
Learning to Use Your Phone
Menu Key
EXIT
Press S to scroll to and highlight a menu feature icon in
the main menu. The following icons represent features that
may appear in the main menu, depending on your service
provider and service subscription options.
27
Menu
Icon Feature
Menu
Icon Feature
n
Contacts
s
U
Messaging
á
Mobile Web
h
Media Gallery
w
Settings
É
Tools
m
Phone Info
Recent Calls
Get It Now*
Learning to Use Your Phone
* Optional network/subscription dependent feature
Selecting a Menu Feature
This guide uses the following format to show you how to
select a menu feature, starting from the home screen.
Find the Feature
M > Recent Calls > Dialed
This example shows that from the home screen, you must
press M, scroll to and select Recent Calls from the main
menu, then scroll to and select Dialed. Press S to scroll,
and the left/right soft keys to select the functions listed in
the bottom left and right corners of the display.
Selecting a Feature Option
When you select certain features, your phone displays a
list of items or options that you can select. For example,
28
when you view the dialed calls list, you can select an entry
and perform additional tasks on that entry:
Press
BACK (-)
to return to
previous
screen.
(+49rÑyÉ
Dialed
10) John Smith
9) Lisa Owens
8) Adda Thomas
7) Jack Bradshaw
BACK
VIEW
032421o
Press (M) to open sub-menu.
Highlighted
Option
Press
VIEW (+)
to view details
of highlighted
option.
• Press S to scroll up or down to highlight the option
you want.
• In an alphabetized list, press a key repeatedly to
cycle through the letters on the key and highlight the
closest matching list option.
• When an option has a list of possible values,
press S left or right to scroll through and select a
value.
• When an option has a list of possible numeric
values, press a number key to set the value.
Learning to Use Your Phone
• In a numbered list, press a number key to highlight
the option.
29
Entering Text
Some features require you to enter information. The
following is a sample of a screen for Contacts entry
information.
yÉ
( 8
Press S
to view
more
options.
Entry Details
Name: John Smith
Category: General
No.: 2125551212
Type: Work
CHANGE
Learning to Use Your Phone
CANCEL
Press
CHANGE (+)
to enter or
edit
information.
Press CANCEL (-) to exit without making
changes. DONE (-) displays when you
enter or edit information.
The message center lets you compose and send text
messages.
For indicator
descriptions,
see following
section.
( O\
uyÉ
Ug Msg
Msg
Flashing cursor CANCEL
indicates
insertion point.
1/160
1/160
M
INSERT
Press CANCEL (-) to exit
without making changes.
30
Highlighted
Option
Press M to
open
sub-menu.
Press
INSERT (+) to
insert a quick
note, picture, or
sound.
Choosing a Text Entry Method
Multiple text entry methods make it easy for you to enter
names, numbers, and messages. The method you select
remains active until you select another method.
Press # in any text entry screen to select 1 of the
following entry methods:
Primary
Numeric
Symbol
Secondary
Alternatively, you can select a text entry method in any text
entry screen by pressing M > Entry Mode.
Setting Up a Text Entry Method
Press M > Entry Setup from any text entry screen. Select
Primary Setup or Secondary Setup, and choose:
iTAP
Tap
Tap Extended
None
Let the phone predict each word as
you press keys (see page 35).
Enter letters and numbers by pressing
a key 1 or more times.
Enter letters, numbers, and symbols
by pressing a key 1 or more times.
Hide the Secondary setting (only
available for Secondary Setup).
Learning to Use Your Phone
The primary text entry method (see
below to set).
Enter numbers only (see page 37).
Enter symbols only (see page 38).
The secondary text entry method
(see below to set).
31
Using Capitalization
Press 0 in any text entry screen to change text case. The
following indicators show capitalization status:
U= no capital letters
T= all capital letters
V= capitalize next
letter only
Text Entry Method Indicators
Learning to Use Your Phone
When you select the Primary or Secondary text entry
method, the following indicators identify the text entry
setting:
Primary
g
h
Secondary
m
q
f
j
k
l
p
n
i
o
Tap, no capital letters
Tap, capitalize next letter
only
Tap, all capital letters
iTAP, no capital letters
iTAP, capitalize next
letter only
iTAP, all capital letters
The following indicators identify Numeric or Symbol entry
method:
W = numeric method
[ = symbol method
Using Tap Method
This is the standard method for entering text on your
phone.
32
Regular Tap method cycles through the letters and
numbers of the key you press. Tap Extended method also
cycles through additional symbols as shown in the
“Character Chart” on page 34.
Press
1 a keypad key 1
or more times
2 keypad keys
To
select a letter, number, or
symbol
enter remaining characters
3 OK (+)
Tip: Press S right to accept
a word completion, or * to
insert a space.
store the text
When you enter text with Tap or Tap Extended method, the soft
key functions change.
( O\
Character
displays at
insertion point.
uyÉ
Ug Msg
T
CANCEL
1/159
M
Press CANCEL (-) to delete
character to left of insertion point.
After
2 seconds,
character is
accepted and
cursor moves to
next position.
Learning to Use Your Phone
In a text entry screen, you can press # to switch entry
methods. If Tap or Tap Extended is not available as the Primary
or Secondary entry method, see page 31.
OK
Press OK (+)
to accept and
store text.
33
When you enter 3 or more characters in a row, your phone
may guess the rest of the word. For example, if you enter
prog you might see:
( O\
uyÉ
Ug Msg
1/143
This is a prog ram
CANCEL
M
OK
Press S right
to accept
Program, or
press * to
reject it and
enter a space
after prog.
Learning to Use Your Phone
If you want a different word (such as progress), continue
pressing keypad keys to enter the remaining characters.
34
Character Chart
Use this chart as a guide for entering characters with
Tap Extended method.
1
.?!,@'-_:;()&“~10¿¡%£$¥
+ x * / \ [ ] = > < # §
2
a b c 2
3
d e f 3
4
g h i 4
5
j k l 5
6
m n o 6
7
p q r s 7
8
t u v 8
9
w x y z 9
0
change text case, for capital letters
*
enter a space (hold to enter a return)
#
change text entry method (hold for default)
Note: This chart may not reflect the exact character set
available on your phone. In a URL editor, 1 first shows
common characters for that editor.
Tap Method Text Entry Rules
• Press a keypad key repeatedly to cycle through its
characters.
• The first character of every sentence is capitalized.
If necessary, press S down to force the character to
lowercase before the cursor moves to the next
position.
• If you enter or edit information and do not want to save
the changes, press O to exit without saving.
Using iTAP® Method
iTAP® software provides a predictive text entry method that
lets you enter a word using 1 keypress per letter. This can
be faster than Tap method, because your phone combines
the key presses into common words.
Learning to Use Your Phone
• Press S left or right to move the flashing cursor to
the left or right in a text message.
35
For example, if you press 7 7 6 4, letter
combinations that match your key presses display:
( O\
uyÉ
1/143
Ug Msg
This is a prog ram
Learning to Use Your Phone
Press
CANCEL (+)
to delete
last letter.
36
prog proh proi
M
SELECT
CANCEL
Press S up
to accept
program.
Press S right
to highlight
another
combination.
Press SELECT (-) to lock
highlighted combination.
If you want a different word (such as Progress), continue
pressing keypad keys to enter the remaining characters.
Entering Words
In a text entry screen, you can press # to switch entry
methods. An indicator tells you which method is active
(see page 32). If iTAP method is not available as the Primary
or Secondary entry method, see page 31.
Press
1 keypad keys
(1 press per
letter)
2 S left or right
To
show possible letter
combinations at the bottom of
the display
highlight the combination you
want
Press
3 SELECT (+)
To
lock a highlighted
combination
You can press keypad keys to
add more letters to the end of
the combination.
or
*
enter the highlighted
combination when it spells a
word
A space is automatically
inserted after the word.
Using Numeric Method
In a text entry screen, press # to switch entry methods
until the W (numeric) indicator displays.
Press keypad keys to enter the numbers you want. When
you finish entering numbers, press # to switch to another
entry method.
Learning to Use Your Phone
If you enter a word your phone does not recognize, the
phone stores it to use as 1 of your word options. When you
fill memory space for unrecognized words, your phone
deletes the oldest words to add new words.
37
Using Symbol Method
In a text entry screen, press # to switch entry methods
until the [ (symbol) indicator displays.
Press
1 keypad keys
(1 press per
symbol)
2 S left or right
Learning to Use Your Phone
3 SELECT (+)
You can press keypad keys to
add more symbols to the end
of the combination.
or
*
enter the highlighted
combination
Symbol Chart
Use this chart as a guide for entering characters with
symbol method.
1
2
3
4
38
To
show possible symbol
combinations at the bottom of
the display
highlight the combination you
want
lock a highlighted
combination
.?!,@'-_:;()&“~10¿¡%£$¥
+ x * / \ [ ] = > < # §
@ _ \
/ : ;
" & '
5
6
7
8
9
0
*
#
( ) [ ] { }
¿ ¡ ~
< > =
$ £ ¥
# % *
+ - x * / \ = > < # §
enter a space (hold to enter a return)
change text entry method (hold for default)
Note: This chart may not reflect the exact character set
available on your phone. In a URL editor, 1 first
shows common characters for that editor.
Place the cursor to the right of the text you want to delete,
and then:
Action
Press C to delete 1 letter at a time.
Hold C to delete the entire message.
Using the Handsfree Speaker
Learning to Use Your Phone
Deleting Letters and Words
Note: You must open your phone’s flip to activate the
speakerphone.
When you activate your phone’s integrated handsfree
speaker, you can talk to the other party without holding the
phone to your ear.
39
Press and hold the
Volume
smart/speakerphone key
Keys
to turn the handsfree
Smart/
speaker on or off during a Speakerphone
call. A soft audio alert
Key
confirms activation/
deactivation.
Learning to Use Your Phone
When you turn on the handsfree speaker, your phone
displays Spkrphone On in the home screen. The handsfree
speaker remains on until you press the smart/
speakerphone key again or turn the phone off.
Note: The handsfree speaker is disabled when you
connect your phone to a handsfree car kit or headset
accessory.
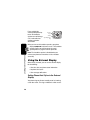
Using the External Display
When the flip is closed, you can use the external display
for the following:
• View time, date, and phone status information.
• Set phone alert styles.
• View message notifications.
Setting Phone Alert Style via the External
Display
Your phone rings or vibrates to notify you of an incoming
call or other event. This ring or vibration is called an alert.
40
With the flip closed:
Press
1 volume keys
2 smart/
speakerphone
key
3 volume keys
To
scroll to Style
select an alert style
return to the home screen
Viewing an Unanswered Call via the
External Display
Note: Because the microphone and earpiece are
unavailable when the phone is closed, you must use a
headset or other handsfree device with this feature.
Press
1 smart/
speakerphone
key
2 volume keys
3 smart/
speakerphone
key
To
view the received calls list
scroll through and select a
call
view the selected call
Learning to Use Your Phone
Your phone keeps a record of your unanswered calls and
displays X Missed Calls in the external display.
41
Changing a Code, PIN, or
Password
Your phone’s 4-digit unlock code is originally set to 1234,
and the 6-digit security code is originally set to 000000.
Your service provider may reset these codes before you
receive your phone.
Learning to Use Your Phone
If your service provider has not reset these codes, we
recommend that you change them to prevent others
from accessing your personal information. The unlock
code must contain 4 digits, and the security code must
contain 6 digits.
To change a code or password:
Find the Feature
M > Settings > Security
> New Passwords
Locking and Unlocking Your
Phone
You can lock your phone manually or set the phone to lock
automatically whenever you turn it off.
To use a locked phone, you must enter the unlock code. A
locked phone still rings or vibrates for incoming calls or
messages, but you must unlock it to answer.
You can make emergency calls on your phone even when
it is locked (see page 53).
42
Locking Your Phone Manually
Find the Feature
Press
1 keypad keys
2 OK (+)
M > Settings > Security
> Phone Lock > Lock Now
To
enter your unlock code
lock the phone
Unlocking Your Phone
Tip: Your phone’s unlock code is originally set to 1234.
Many service providers reset the unlock code to the
last 4 digits of your phone number.
Press
1 keypad keys
2 OK (+)
To
enter your unlock code
unlock your phone
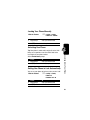
Setting Your Phone to Lock Automatically
You can set your phone to lock every time you turn it off:
Find the Feature
Press
1 keypad keys
2 OK (+)
M > Settings > Security
> Phone Lock
> Automatic Lock > On
Learning to Use Your Phone
At the Enter Unlock Code prompt:
To
enter your unlock code
activate automatic lock
43
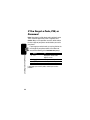
If You Forget a Code, PIN, or
Password
Note: Your phone’s 4-digit unlock code is originally set to
1234, and the 6-digit security code is originally set to
000000. Many service providers reset the unlock code to
the last 4 digits of your phone number before you receive
your phone.
Learning to Use Your Phone
If you forget your unlock code, try entering 1234 or the
last 4 digits of your phone number. If that does not
work, do the following at the Enter Unlock Code prompt:
44
Press
1 M
2 keypad keys
3 OK (+)
To
display the unlock code
bypass screen
enter your security code
submit your security code
If you forget your security code, contact your service
provider.
Setting Up Your Phone
Storing Your Name and Phone
Number
032380o
To store or edit your name and phone number
information on your phone:
Find the Feature
M > Phone Info
> My Tel. Number
Shortcut: Press M # from the home screen to edit
your name and phone number.
If you do not know your phone number, contact your
service provider. To view your phone number from the
home screen or during a call, see page 15.
Your phone rings and/or vibrates to notify you of an
incoming call or to signal certain other events. This ring or
vibration is called an alert. Your phone includes the
following types of alerts: Ring Volume, Calls, Inbox, Voicemail,
Alarms, Data Calls, Fax Calls, Ringer IDs, Key Volume, and Reminders.
You can define 5 groups of alert settings. These groups,
called alert styles, include Loud, Soft, Vibrate, Vibe&Ring, and
Silent. When you set your phone to use an alert style, the
corresponding alert settings become active.
Setting Up Your Phone
Setting an Alert Style
45
To select an alert style and specify its settings for specific
alerts:
Setting Up Your Phone
Find the Feature
46
M > Settings > Ring Styles
Action
1 Highlight Style.
2 Press CHANGE (+).
3 Highlight the desired alert style (Loud, Soft, Vibrate,
Vibe&Ring, or Silent).
4 Press SELECT (+).
5 Highlight style Detail.
6 Press CHANGE (+).
7 Highlight the setting you want to change:
Ring Volume, Calls, Inbox, Voicemail, Alarms, Data Calls,
Fax Calls, Ringer IDs, Key Volume, and Reminders.
8 Press CHANGE (+).
9 Set or modify the style as desired.
10 Repeat steps 7 - 9 for all settings you want to
change.
Setting Answer Options
You can use additional, alternative methods to answer an
incoming call.
Multi-key
Open To Answer
answer by pressing any key
answer by opening the flip
To activate or deactivate an answer option:
Find the Feature
Press
1 S
2 CHANGE (+)
3 S
4 SELECT (+)
M > Settings > In-Call Setup
> Answer Options
To
scroll to Multi-Key or
Open to Answer
select the option
scroll to On or Off
confirm the setting
Setting a Wallpaper Image
Set a photo, picture, or animation as a wallpaper
(background) image in your phone’s home screen.
Find the Feature
M > Settings > Personalize
> Wallpaper
To
scroll to Picture
2 CHANGE (+)
open the picture viewer
3 S up or down
scroll to a picture/animation
Scroll to (None) to turn off the
wallpaper image.
4 SELECT (+)
select the image
5 S
scroll to Layout
6 CHANGE (+)
adjust the image layout
Setting Up Your Phone
Press
1 S
47
Press
7 S
To
scroll to Center, Tile, or
Fit-to-screen
Center places the image in the
center of the display.
Tile fills the display with
adjacent copies of the image.
Fit-to-screen resizes the image,
if necessary, to fit the display.
8 SELECT (+)
confirm the layout setting
9 BACK (-)
save wallpaper settings
Setting a Screen Saver Image
Setting Up Your Phone
Set a photo, picture, or animation as a screen saver
image.
The screen saver image displays when the flip is open and
no activity is detected for a specified time period. The
image shrinks to fill the display, if necessary. An animation
repeats for 1 minute, then the first frame of the animation
displays.
Tip: Turn off the screen saver to extend battery life.
Find the Feature
Press
1 S
2 CHANGE (+)
48
M > Settings > Personalize
> Screen Saver
To
scroll to Picture
open the picture viewer
Press
3 S up or down
4
5
6
7
SELECT (+)
S
CHANGE (+)
S
8 SELECT (+)
9 BACK (-)
To
scroll to a picture/animation
Scroll to (None) to turn off the
screen saver image.
select the image
scroll to Delay
set the delay interval
scroll to the inactivity interval
that triggers the screen saver
confirm the delay setting
save screen saver settings
Setting Display Contrast
Find the Feature
M > Settings > Initial Setup
> Contrast
Set the amount of time that the display and keypad
backlights remain on, or turn off backlights to extend
battery life.
Find the Feature
M > Settings > Initial Setup
> Backlight
Setting Up Your Phone
Adjusting the Backlight
49
Hiding or Showing Location
Information
032380o
Your phone can use the automatic location
information (ALI) feature to tell the network where
you are physically located.
When ALI is set to Location On, your phone displays
the x (ALI on) indicator. Services may use your known
location to provide useful information (for example, driving
directions, or the location of the nearest bank). Your phone
prompts you when the network or a service asks for your
location. You can refuse at this point.
When ALI is set to 911 Only, your phone displays the u (ALI
off) indicator, and the phone does not send location
information unless you call the emergency phone
number (such as 911).
Setting Up Your Phone
Find the Feature
Press
1 S
2 SELECT (+)
M > Settings > Location
To
scroll to Location On or 911 Only
select the setting
Limitations of AGPS
Sometimes adequate signals from multiple satellites are
unavailable, usually because your AGPS phone’s antenna
cannot establish a view of a wide area of open sky. In
these cases, the AGPS feature will not work. Such
situations include, but are not limited to, the following:
• in underground locations
• inside of buildings, trains, or other covered vehicles
50
• under any other metal or concrete roof or structure
• between tall buildings or under dense tree cover
• near a powerful radio or television tower
• when your AGPS antenna is covered (for example, by
your hand or other object) or facing the ground
• when there are temperature extremes outside the
operating limits of the phone
Even where location information can be calculated in such
situations, it may take more time than usual, and your
location estimate may not be as accurate.
Even where adequate signals from multiple satellites are
available, your AGPS feature will provide only an
approximate location, often within 150 feet (45 meters)
but sometimes much farther from your actual location.
Conserving Battery Power
Some networks and phones include a battery save setting
to extend battery life. When this feature is activated, your
phone automatically turns off the keypad backlight when it
detects that enough ambient light is available.
Find the Feature
Setting Up Your Phone
The satellites used by your phone's AGPS feature are
controlled by the U.S. government and are subject to
changes implemented in accordance with the Department
of Defense AGPS user policy and the Federal Radio
Navigation Plan. These changes may affect the
performance of your phone's AGPS feature.
M > Settings > Initial Setup
> Battery Save
51
Calling Features
For basic instructions on how to make and answer calls,
see page 13.
Changing the Active Line
Calling Features
032380o
Change the active phone line to make and
receive calls from your other phone number.
Find the Feature
M > Phone Info > Active Line
Redialing a Number
Press
1 N
2 S
3 N
To
view the dialed calls list
scroll to the entry you want to call
redial the number
Using Automatic Redial
032380o
When you receive a busy signal, your phone
displays Call Failed, Number Busy.
With automatic redial, your phone automatically
redials the number for 4 minutes. When the call goes
through, your phone rings or vibrates 1 time, displays
Redial Successful, and then connects the call.
52
You must turn on automatic redial to use the feature. To
turn automatic redial on or off:
Find the Feature
M > Settings > Initial Setup
> Auto Redial
When automatic redial is turned off, you can manually
activate the feature to redial a phone number. When you
hear a fast busy signal and see Call Failed:
Press
N or RETRY (+)
To
activate automatic redial
You can turn off your phone’s incoming call alert before
answering the call.
Press
either volume key
To
turn off the alert
Calling Features
Turning Off a Call Alert
Calling an Emergency
Number
Your service provider programs 1 or more emergency
phone numbers, such as 911, that you can call under any
circumstances, even when your phone is locked.
Note: Emergency numbers vary by country. Your phone’s
preprogrammed emergency number(s) may not work in all
locations, and sometimes an emergency call cannot be
53
placed due to network, environmental, or interference
issues.
Press
1 keypad keys
2 N
To
dial the emergency number
call the emergency number
Using AGPS During an
Emergency Call
Calling Features
032380o
When you make an emergency call, your phone's
assisted-Global Positioning System (AGPS)
feature can calculate your approximate location
and help emergency service personnel find you.
Notes:
• This feature can work only if the emergency response
center can receive and process location information. If
you are concerned about whether your local
emergency response center can receive AGPS
location information, contact your local authorities.
• In order for the AGPS feature to work when
making emergency calls, the service must be
turned on. See page 50.
For best results, you should be located where your phone’s
antenna can establish a clear view of the open sky. This
allows your phone to access AGPS satellite signals. Even
under good conditions, it may take 30 seconds or more to
determine your approximate location. This time increases
54
and the accuracy of the results decreases with reduced
access to satellite signals.
If your phone does not have adequate access to AGPS
satellite signals, the location of the nearest cell tower in
contact with your phone is automatically provided to the
emergency response center.
Viewing Recent Calls
Your phone keeps lists of the calls you recently received
and dialed, even if the calls did not connect. The lists are
sorted from newest to oldest entries. The oldest entries
are deleted as new entries are added.
Calling Features
Because of the limitations of the AGPS feature, always
provide your best knowledge of your location to the
emergency response center, just as you would when using
a phone without AGPS capabilities. Also, remain on the
phone for as long as the emergency response center
instructs you.
Shortcut: Press N from the home screen to view the
dialed calls list.
Find the Feature
Press
1 S
2 SELECT (+)
3 S
M > Recent Calls
To
scroll to Received or Dialed
select the list
scroll to an entry
Note: < means the call
connected.
55
Press
4 N
To
call the entry’s number
or
VIEW (+)
view entry details
or
M
open the Last Calls Menu to
perform various operations
on the entry
Calling Features
The Last Calls Menu can include the following options:
Option
Store
Delete
Delete All
Send Message
Add Digits
Attach Number
Description
Create a Contacts entry with the
number in the No. field.
Delete the entry.
Delete all entries in the list.
Open a new text message with the
number in the To field.
Add digits after the number.
Attach a number from Contacts or
the recent calls lists.
Returning an Unanswered Call
Your phone keeps a record of your unanswered calls, and
displays:
• the T (missed call) indicator
56
• X Missed Calls, where X is the number of missed calls
Press
1 VIEW (+)
2 S
3 N
To
see the received calls list
select a call to return
make the call
Using the Notepad
Find the Feature
Press
N
M > Recent Calls > Notepad
To
call the number
or
M
Calling Features
The most recent set of digits that you enter are stored in
your phone’s notepad memory. This can be a phone
number that you called or a number that you entered but
did not call. To retrieve the number stored in the notepad:
open the Dialing Menu to attach
a number or insert a special
character
or
STORE (+)
create a Contacts entry with the
number in the No. field
57
Attaching a Number
While dialing (with digits visible in the display):
Press
M > Attach Number
To
attach a number from Contacts
or the recent calls list
Calling with Speed Dial
Calling Features
Each entry you store in Contacts is assigned a unique speed
dial number.
Tip: To see an entry’s speed dial number, press
M > Contacts, scroll to the entry, and press VIEW (+).
To speed dial a Contacts entry:
Press
1 keypad keys
2 #
3 N
To
enter the speed dial number
for the entry you want to call
submit the number
call the entry
Calling with 1-Touch Dial
To call Contacts entries 1 through 9, press and hold the
single-digit speed dial number for 1 second.
58
Using Voicemail
032380o
Voicemail messages that you receive are stored
on the network. To listen to your messages, you
must call your voicemail phone number.
Note: Your service provider may include additional
information about using this feature.
Listening to Voicemail Messages
Find the Feature
M > Messaging > VoiceMail
> CALL
Tip: Your service provider may also store your voicemail
phone number as Contacts entry number 1. If so, you can
press and hold 1 to call your voicemail number.
Calling Features
The phone calls your voicemail phone number. If no
voicemail number is stored, your phone prompts you to
store a number.
Receiving a Voicemail Message
When you receive a voicemail message, your phone
displays the & (voicemail message) indicator and a
New VoiceMail notification.
Press
CALL (+)
To
listen to the message
The phone calls your voicemail phone number. If no
voicemail number is stored, your phone prompts you to
store a number.
59
Storing Your Voicemail Number
If necessary, use the following procedure to store your
voicemail phone number on your phone. Usually, your
service provider has already done this for you.
Find the Feature
Calling Features
Press
1 keypad keys
2 OK (+)
60
M > Messaging
> Message Settings
> VoiceMail No.
To
enter your voicemail number
store the number
Phone Features
This section helps you locate features on your phone that
are not described in detail in this guide.
Main Menu
This is the standard main menu layout. Menu
organization and feature names may vary on your
phone. Not all features may be available on your phone.
n Contacts
h Media Gallery
• Camera
s Recent Calls
• Pictures
•
•
•
•
•
•
e
Received
Dialed
Notepad
Call Times
Data Times
Data Volumes
Settings
(see next page)
É Tools
•
•
•
•
•
Calculator
Datebook
Shortcuts
Voice Records
Alarm Clock
m Phone Info
•
•
•
•
My Tel. Number
Active Line
Battery Meter
Other Information
Get It Now*
á
Mobile Web
• Web Browser
• Web Sessions
Phone Features
Messaging
• Create Message
• Voicemail
• Inbox
• Outbox
• Quick Text
• Drafts
• Erase Messages
• Message Settings
• Sounds
w
* Your service provider may use a
different name for the Get It Now
feature. Get It Now is a network
dependent feature.
61
Settings Menu
Ring Styles
• Style
• Style Detail
l
Personalize
• Home Screen
• Main Menu
• Voice Dial Setup
• Color Style
• Greeting
• Wallpaper
• Screen Saver
• Sound Settings
U
In-Call Setup
• In-Call Timer
• Answer Options
• MSG Alert
u
Security
• Phone Lock
• Lock Application
• Restrict Calls
• New Passwords
J Car Settings
•
•
•
•
Auto Answer
Auto Handsfree
Power-off Delay
Charger Time
S
Headset
• Auto Answer
• Voice Dial
Ï
Location
• Location On
• 911 Only
L Connection
• Incoming Call
Z Initial Setup
Phone Features
•
•
•
•
•
•
•
•
•
•
•
•
•
•
j
Time and Date
SpeakerPhone
Auto PIN Dial
Auto Redial
Backlight
TTY Setup
Scroll
Language
Battery Save
Contrast
DTMF
Hyphenation
Master Reset
Master Clear
Network Options
• Current Network
• Analog Only
• Set Mode
• Service Tone
• Call Drop Tone
Shortcuts
Change ringer alert:
Open flip, press down volume
key to decrease volume, then
switch to vibrate alert, then
silent alert. Press up volume
key to reset ring alert and
increase volume.
Display my phone number:
Press M # (from home
screen).
Go to dialed calls list:
Press N (from home
screen).
Exit menu system:
Press O.
62
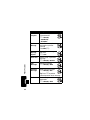
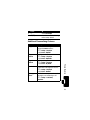
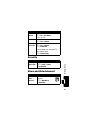
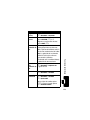
Calling Features
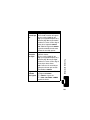
Feature
Restrict
Calls
TTY Calls
Description
Restrict outgoing or
incoming calls:
M > Settings > Security
> Restrict Calls
> unlock_code
Set up your phone for use
with an optional TTY device:
M > Settings > Initial Setup
> TTY Setup
032380o
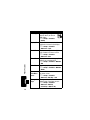
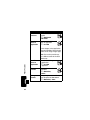
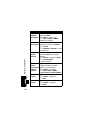
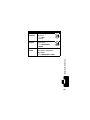
Messages
Description
Send a text message:
M > Messaging
> Create Message > New TXT Msg
Send
Picture
Message
Send a picture message:
M > Messaging
> Create Message > New PIX Msg
Insert
Objects In
Text
Message
While composing a text
message:
M > Insert
032380o
032380o
Phone Features
Feature
Send Text
Message
032380o
63
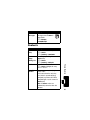
Phone Features
Feature
Use PIX
Template
Description
Open a PIX template with
preloaded media:
M > Messaging
> Create Message
> PIX Templates
Read
Message
Read a new text or picture
message that you have
received:
Press READ (+).
Store
Message
Objects
Go to a picture message
slide, then:
M > Store
032380o
Quick Text
Send or create a quick note
message:
M > Messaging > Quick Text
032380o
Sent
Messages
View sent messages:
M > Messaging > Outbox
Received
Messages
Read received messages:
M > Messaging > Inbox
032380o
032380o
032380o
Tip: Press M to perform
various operations on the message.
Drafts
64
032380o
View messages saved in
drafts folder:
M > Messaging > Drafts
032380o
Feature
Erase
Messages
Description
Delete all messages or only
messages from the Outbox or
drafts folder:
M > Messaging
> Cleanup Messages
032380o
Contacts
Feature
Create
Entry
Phone Features
Description
Create a new Contacts entry:
M > Contacts
M > [New Entry] > Phone Number
Create
Create a group mailing list as a
Group
Contacts entry:
Mailing List M > Contacts
M > [New Entry] > Mailing List
Dial Number Call a number stored in Contacts:
M > Contacts, highlight the entry,
press N to call
Voice Dial
Dial a Contacts entry by saying the
Number
entry’s name:
Press and release the voice key,
then (within 2 seconds of being
prompted) say “Name dial.” When
prompted again, say the name of a
Contacts entry.
Note: All Contacts entries are
automatically stored as voice dial
numbers.
65
Phone Features
Feature
Digit Dial
Number
66
Description
Dial a number by saying the digits in
the number:
Press and release the voice key,
then (within 2 seconds of being
prompted) say “Digit dial.” When
prompted again, say the number you
wish to call.
Note: You can use digit dial for
numbers not stored in Contacts.
Set Ringer
Assign a distinctive ringer alert to a
ID for Entry Contacts entry:
M > Contacts > entry
M > Edit > Ringer ID > CHANGE
> ringer name
Set
Set the category for a Contacts entry:
Category for M > Contacts > entry
Entry
M > Edit > Category > CHANGE
> category name
Sort
Set the order in which Contacts entries
Contacts
are listed:
List
M > Contacts
M > Setup > Sort by > sort order
Set Primary Set the primary number for a Contacts
Number
entry with multiple numbers:
M > Contacts > entry > SELECT
M > Set Primary > phone number
Feature
View
Primary or
All Numbers
Phone Features
Description
Set to view only primary numbers or
all numbers when viewing entries:
M > Contacts > entry
M > Setup > SELECT > CHANGE
> All Contacts or Primary Contacts
Edit Entry
Edit a Contacts entry:
M > Contacts > entry
M > Edit
Delete Entry Delete a Contacts entry:
M > Contacts > entry
M > Delete
Copy
Copy a Contacts entry to another
Contacts
location in Contacts:
Entry
M > Contacts > entry
M > Copy Entry > location number
Copy
Copy a Contacts entry to another
Multiple
location in Contacts:
Contacts
M > Contacts > entry
Entries
M > Copy Entries > From(start):
> location number > From(end):
> location number > To(start):
> location number
67
Personalizing Features
Using Voice Commands
You can place calls and access some menu options by
speaking commands to your phone:
Action
1 Press and release the voice button on the right
side of the phone.
Note: If Speakerphone is not already turned on and
you want to activate it, press the
smart/speakerphone key on the left side of your
phone. You can then speak the commands
aloud, and hear phone prompts played out loud.
Your phone displays Say a command.
Phone Features
2 Say 1 of the following commands:
Name Dial, Digit Dial, Camera, Voicemail, Redial, Received
Your phone opens the corresponding menu or
performs the corresponding action.
To Place Calls
Advanced Voice Dialing lets you use voice commands to
place a call:
• Use Name Dial to dial a Contacts entry by speaking the
name of the entry.
68
• Use Digit Dial to dial any number by speaking the digits
in the number.
Note: This feature recognizes only 7-digit, 10-digit, and
11-digit numbers. It will not dial 3-digit numbers such as
911. To make an emergency call, use the phone keypad to
dial and send the number.
Action
1 Press and release the voice button on the right
side of the phone.
Your phone displays Say a command and plays the
same prompt out loud.
2 Say “Name Dial” or “Digit Dial.”
3 When prompted, say the name of the Contacts
entry or speak the digits in the phone number.
If the phone recognizes the name or number, it
places the call.
Phone Features
If the phone asks you to repeat a name or
number, say it again. If the name or number is
not valid or not recognized, the phone does not
place the call.
69
Action
If the phone does not recognize the name or
number, it displays a list of up to 3 names or
numbers, asks, “Did you say ..., ” and highlights
the first item in the list.
• If the item is correct, say “Yes” to place the
call.
or
• If the item is not correct, say “No” to go to
the next item.
or
• Press S to scroll to the correct item and
press Yes (+).
Phone Features
or
• Press the voice button to exit the list and
repeat the name or number.
If you reach the end of the list without confirming
a listed item, the phone asks if you want to try
again. Say “Yes” if you want to speak the name
or number again. Say “No” to exit without
placing a call.
Tip: When saying a number, speak at a normal speed
and volume, pronouncing each digit distinctly. Avoid
pausing between digits.
70
To Adapt Advanced Voice Dialing to Your Voice
For most people, Advanced Voice Dialing works well
without any initial setup. However, if the phone is
frequently unable to recognize numbers correctly when
you use Advanced Voice Dialing, you may be able to
improve your results by adapting it to your voice.
Note: If the phone is used by several people, reset
Advanced Voice Dialing to its original setting before
proceeding. This ensures that you are not saving your
settings over someone else’s.
Adapting Advanced Voice Dialing to Your Voice
Find the Feature
M > Settings > Personalize
> Voice Dial Setup
Action
1 Scroll to Adapt Digits.
3 Press START (+).
4 When the phone prompts you to say the 1st digit
sequence, wait for the beep and then repeat the
digits in a normal tone of voice.
Phone Features
2 Press SELECT (+).
71
Action
5 If the recording sounds acceptable (no mistakes
or background noises), say “Yes” or press
YES (+).
or
If the recording is not acceptable, say “No” or
press NO (-). When prompted to say the digits
again, wait for the beep and say the digits again.
The phone will prompt you to repeat this process
with up to 12 additional sets of digits.
6 When the phone prompts, “More Adaptation?”,
press YES (+) to continue or NO (-) to end the
process.
Phone Features
When the adaptation process is complete, the
phone will say “Adaptation Complete.”)
Tip: When adapting Advanced Voice Dialing:
• Choose a quiet place for recording.
• Wait for the beep before you begin to speak.
• Speak at a normal speed and volume, pronouncing
each digit distinctly. Avoid pausing between digits.
• If you make a mistake while recording a sequence of
digits, or if an unexpected noise spoils the
recording, rerecord that sequence.
To Reset Advanced Voice Dialing
Find the Feature
72
M > Settings > Personalize
> Voice Dial Setup
Press
1 S
2 OK (+)
To
scroll to Reset Digits
reset Advanced Voice Dialing
to the factory default
Additional Personalizing Features
Feature
Ringer IDs
Ring
Volume
Keypad
Volume
Message
Alerts
Phone Features
Reminders
Description
Activate distinctive ringer alerts
assigned to Contacts entries:
M > Settings > Ring Styles
> Style Detail > Ringer IDs
Set ringer volume:
M > Settings > Ring Styles
> Style Detail > Ring Volume
Set keypad keypress volume:
M > Settings > Ring Styles
> Style Detail > Key Volume
Set reminder alerts for picture, text,
or voicemail messages you receive:
M > Settings > Ring Styles
> Style Detail > Reminders
Set whether or not you are alerted to
messages received during a call:
M > Settings > In-Call Setup
> MSG Alert
73
Feature
Greeting
Description
Change the greeting that
appears when you turn on
your phone:
M > Settings > Personalize
> Greeting
Display Text Set home screen text to be left
justified or centered in the display:
M > Settings > Personalize
> Home Screen > Layout
Clock View Display an analog clock or digital
time readout in the home screen:
M > Settings > Personalize
> Home Screen > Clock
Menu View
Display the main menu as graphic
icons or as a text-based list:
M > Settings > Personalize > Main Menu
> View
Main Menu Reorder your phone’s main menu:
M > Settings > Personalize > Main Menu
> Reorder
Show or
Show or hide menu feature icons in
Hide Menu
the home screen:
Icons
M > Settings > Personalize
> Home Screen > Home Keys > Icons
Change Soft Change soft key labels and menu
Keys
feature icons in the home screen:
M > Settings > Personalize
> Home Screen > Home Keys
> Left Soft Key or Right Soft Key
Phone Features
032380o
74
Feature
Shortcuts
Description
Create a shortcut to a menu item:
Highlight the menu item, then press
and hold M.
Select a shortcut:
M > Tools > Shortcuts
> shortcut name
Menu Features
Feature
Language
Scroll
Master
Clear
Phone Features
Master
Reset
Description
Set menu language:
M > Settings > Initial Setup > Language
Set the highlight bar to stop or wrap
around in menu lists:
M > Settings > Initial Setup > Scroll
Reset all options except unlock code,
security code, and lifetime timer:
M > Settings > Initial Setup > Master Reset
Reset all options except unlock code,
security code, and lifetime timer, and
clear all user settings and entries:
M > Settings > Initial Setup > Master Clear
Note: Master Clear erases all of your
Contacts entries.
75
Dialing Features
Feature
Auto PIN
Dial
DTMF
Tones
Description
Automatically dial an authenticating
PIN code for outgoing calls:
M > Settings > Initial Setup
> Auto PIN Dial
Activate DTMF tones:
M > Settings > Initial Setup > DTMF
Send DTMF tones during a call:
Press number keys.
Phone Features
Send stored numbers as DTMF tones
during a call:
Highlight a number in the Contacts or
recent calls lists, then press
M > Send Tones.
Call Monitoring
Network connection time is the elapsed time from the
moment you connect to your service provider's network to
the moment you end the call by pressing O. This time
includes busy signals and ringing.
The amount of network connection time you track on
your resettable timer may not equal the amount of
time for which you are billed by your service
76
provider. For billing information, please contact your
service provider directly.
Feature
Description
Call Times View call timers:
M > Recent Calls > Call Times
In-Call
Timer
Data
Times
Display time or cost
information during a call:
M > Settings > In-Call Setup
> In-Call Timer
View data call timers:
M > Recent Calls > Data Times
Data
Volumes
View data volume meters:
M > Recent Calls > Data Volumes
032380o
032380o
032380o
032380o
Note: The use of wireless devices and their accessories
may be prohibited or restricted in certain areas. Always
obey the laws and regulations on the use of these
products.
Feature
Accessory
Volume
Settings
(car kit or
headset)
Phone Features
Handsfree Features
Description
Adjust volume levels of car
kit accessory:
During an active call, press
your phone’s up or down
volume keys.
77
Feature
External
Speakerphone
Auto
Answer
(car kit or
headset)
Phone Features
Voice Dial
(headset)
Auto
Handsfree
(car kit)
Power-Off
Delay
(car kit)
Charger
Time
(car kit)
78
Description
Activate a connected
external speakerphone
during a call:
Press the speakerphone
button on the left side of the phone.
Automatically answer calls
when connected to a car kit
or headset:
M > Settings > Car Settings or
Headset > Auto Answer
Enable voice dial with
headset send/end key:
M > Settings > Headset
> Voice Dial
Automatically route calls to a
car kit when connected:
M > Settings > Car Settings
> Auto Handsfree
Set the phone to stay on for
a period of time after the
ignition is switched off:
M > Settings > Car Settings
> Power-off Delay
Charge your phone for a
period of time after the
ignition is switched off:
M > Settings > Car Settings
> Charger Time
Data and Fax Calls
Feature
Send Data
or Fax
Description
Connect your phone to the
device, then place the call
through the device application.
Receive
Data or
Fax
Connect your phone to the
device, then answer the call
through the device application.
Talk Then
Fax
Connect your phone to the
device, enter the number,
press M > Dialing Menu
> Talk Then Fax, then press N to
make the call.
Network Features
Description
View network information and
adjust network settings:
M > Settings > Network Options
032380o
Personal Organizer Features
Feature
Add
Datebook
Event
Phone Features
Feature
Network
Settings
Description
Add an event to the datebook:
M > Tools > Datebook > day K
> New
79
Feature
View
Datebook
Event
Event
Reminder
Copy
Datebook
Event
Set Alarm
Phone Features
Turn Off
Alarm
Create
Voice
Record
Description
View or edit event details:
M > Tools > Datebook > day K
> event > VIEW (+)
View event reminder:
VIEW (+)
Dismiss event reminder:
EXIT (-)
Copy a datebook event to date and/or
time:
M > Tools > Datebook > day K
> event K
M > Copy
Set an alarm:
M > Tools > Alarm Clock
Turn off alarm:
Press DISABLE (-) or O.
Set 8-minute delay:
Press SNOOZE (+).
Create a voice record:
Press and hold voice key, speak into
the phone, release voice key when
finished speaking.
Note: Recording phone calls is subject
to varying state and federal laws
regarding privacy and recording of
conversations.
80
Feature
Play Voice
Record
Calculator
Currency
Converter
Description
Play back a voice record:
M > Tools > Voice Records
> voice record
Calculate numbers:
M > Tools > Calculator
Convert currency:
M > Tools > Calculator
M > Exchange Rate
Enter exchange rate, press OK (+),
enter amount, press
M > Convert Currency.
Security
Description
Lock phone applications:
M > Settings > Security
> Lock Application
Phone Features
Feature
Lock
Application
News and Entertainment
Feature
Launch
MicroBrowser
Description
Start a micro-browser
session:
M > Mobile Web 2.0
> Web Browser
032380o
81
Feature
Web
Sessions
Download
Game or
Application
Description
Select or create a Web
session:
M > Mobile Web 2.0
> Web Sessions
Download a Get It Now
game or application:
M > Get It Now
032380o
032380o
Phone Features
Select category, select application,
select pricing option. Normal airtime
and/or carrier usage charges apply.
Launch
Game or
Application
Manage
Pictures
Manage
Sounds
82
Note: Your service provider may
use a different name for the Get It
Now feature.
Launch a Get It Now game
or application:
M > Get It Now
> application
Manage pictures and
animations:
M > Media Gallery
> Pictures
Manage ring tones, sounds that you
have composed or downloaded:
M > Media Gallery > Sounds
032380o
032380o
Specific Absorption Rate Data
The model wireless phone meets the government’s requirements for
exposure to radio waves.
Your wireless phone is a radio transmitter and receiver. It is designed and
manufactured not to exceed limits for exposure to radio frequency (RF)
energy set by the Federal Communications Commission (FCC) of the U.S.
Government and by the Canadian regulatory authorities. These limits are
part of comprehensive guidelines and establish permitted levels of RF
energy for the general population. The guidelines are based on standards
that were developed by independent scientific organizations through
periodic and thorough evaluation of scientific studies. The standards
include a substantial safety margin designed to assure the safety of all
persons, regardless of age or health.
The exposure standard for wireless mobile phones employs a unit of
measurement known as the Specific Absorption Rate, or SAR. The
SAR limit set by the FCC and by the Canadian regulatory authorities is
1.6 W/kg.1 Tests for SAR are conducted using standard operating
positions accepted by the FCC and by Industry Canada with the phone
transmitting at its highest certified power level in all tested frequency
bands. Although the SAR is determined at the highest certified power
level, the actual SAR level of the phone while operating can be well below
the maximum value. This is because the phone is designed to operate at
multiple power levels so as to use only the power required to reach the
network. In general, the closer you are to a wireless base station, the
lower the power output.
Before a phone model is available for sale to the public in the U.S. and
Canada, it must be tested and certified to the FCC and Industry Canada
that it does not exceed the limit established by each government for safe
exposure. The tests are performed in positions and locations (e.g., at the
ear and worn on the body) reported to the FCC and available for review by
Industry Canada. The highest SAR value for this model phone when
83
tested for use at the ear is 1.55 W/kg, and when worn on the body, as
described in this user guide, is 1.48 W/kg. (Body-worn measurements
differ among phone models, depending upon available accessories and
regulatory requirements).2
While there may be differences between the SAR levels of various phones
and at various positions, they all meet the governmental requirements for
safe exposure. Please note that improvements to this product model
could cause differences in the SAR value for later products; in all cases,
products are designed to be within the guidelines.
Additional information on Specific Absorption Rates (SAR) can be found
on the Cellular Telecommunications & Internet Association (CTIA)
Web site:
http://www.phonefacts.net
or the Canadian Wireless Telecommunications Association (CWTA)
Web site:
http://www.cwta.ca
1. In the United States and Canada, the SAR limit for mobile phones used by
the public is 1.6 watts/kg (W/kg) averaged over one gram of tissue. The
standard incorporates a substantial margin of safety to give additional
protection for the public and to account for any variations in measurements.
2. The SAR information includes the Motorola testing protocol, assessment
procedure, and measurement uncertainty range for this product.
84
Index
Numerics
B
1-touch dial
using 58
backlight 49
battery
charging 11
extending battery life 10,
48, 49, 51
installing 9
level indicator 26
browser. See micro-browser
A
accessories 8, 41, 63
Advanced Voice Dialing 68
AGPS service indicator 26
alarm clock 80
alert
defined 40, 45
downloading 64
setting 41, 45
turning off 13, 14, 53
ALI indicators 50
animation
downloading 64
screen saver 48
viewing 82
wallpaper 47
answering a call 14, 46
application, locking and
unlocking 81
automatic location
information
sending 50
automatic redial 52
C
calculator 81
call
adding digits after phone
number 56
Advanced Voice Dialing
68
alert, setting 41, 45
alert, turning off 13, 14,
53
answer options 46
answering 14
deleting 55
dialed calls list 55
dialing 13
emergency number 53
ending 13, 14
85
call (continued)
external speakerphone
78
handsfree speaker 39
making 13
received calls list 55
receiving 14
recent calls 55
storing 55
timers 77
unanswered call 41, 56
Call Failed, Number Busy
message 52
camera
taking a photo 2, 16
capitalization, changing 32
car kit 77
character chart 34
codes
changing 42
default 12, 42, 43, 44
forgetting 44
Contacts
1-touch dial 58
attaching 2 numbers 56,
58
deleting an entry 67
dialing a number 65
editing an entry 67
entry category 66
group mailing list 65
86
primary number, setting
66
ringer ID 66, 73
sorting entries 66
speed dial number 58
storing an entry 65
voice dialing 65
contrast, display 49
customizing the menu 74
D
data call 79
timers 77
volume meters 77
datebook 79, 80
deleting a call 55
dialed calls list 55
dialing a number 13
digit dialing 66
display
backlight 49
contrast 49
greeting 74
language 75
personalizing 74
distinctive ringer alert 73
drafts folder 21, 64
DTMF tones
activating 76
sending 76
E
I
earpiece volume 12
email
draft 21
emergency number 53
end key 13, 14
ending a call 13, 14
Enter Unlock Code
message 43, 44
external display 40
indicators
AGPS service 26
ALI 50
battery level 26
loud ring alert 26
message 25
message waiting 21
missed call 56
ring alert 26
roam 25
signal strength 25
silent alert 26
soft ring alert 26
text case 32
text entry method 26, 32
vibrate alert 26
vibrate and ring alert 26
voicemail message 26,
59
iTAP software 35
F
fax call 79
5-way navigation key 26
flip
external display 40
open to answer 14, 46
screen saver 48
G
greeting 74
H
handsfree speaker 39
handsfree use 77
headset
accessory, using 77
using with external
display 41
home screen 24
K
key
end 13, 14
5-way navigation 26
left soft key 24
menu 28
power 12
right soft key 24
send 13, 14, 55
87
key (continued)
volume control 12
keypad
answering calls 46
volume, setting 73
L
language, setting 75
left soft key
functions 24
location, sending to network
50
lock
application 81
phone 42
Low Battery message 26
M
making a call 13
master clear 75
master reset 75
menu
entering text 30
icons, converting to text
74
icons, showing or hiding
74
language, setting 75
lists 28
navigating 27
88
personalizing 74
rearranging features 74
scroll 75
using features 28
view, changing 74
wrap around 75
menu key 28
message
alerts 73
drafts 64
erase 65
outbox 64
picture message 63
PIX template 64
PIX, defined 18
quick text 64
reading 64
receiving 3
reminders, turning on/off
73
status 64
text 3, 63, 64
message indicator 25
message waiting indicator
21
micro-browser
browser setup 82
using 81
Web sessions 82
missed call indicator 56
Missed Calls message 41,
57
my telephone number 15,
45, 62
N
network settings 79
notepad 57
number
storing your number 45
viewing your number 15,
62
numbers, entering 37
O
open to answer 46
optional accessory, defined
8
optional feature, defined 8
outbox 64
P
passwords. See codes
phone
alert, setting 41, 45
alert, turning off 13, 14,
53
answer options 46
automatic location
information 50
clear stored information
75
codes 42
flip 14
keypad, answering calls
46
language, setting 75
location 50
locking 42
network settings 79
reset all options 75
security code 42
unlock code 42
unlocking 12, 42, 43, 44
phone number
adding digits after 56
attaching 2 numbers 56,
58
redialing 52
storing in Contacts 65
storing your number 45
viewing your number 15,
62
photo
downloading 64
sending 2, 16
taking 2, 16
picture
downloading 64
screen saver 48
89
picture (continued)
viewing 82
wallpaper 47
picture message
receiving 21
sending 18, 63
picture message. See
message
PIX. See message
power key 12
predictive text entry 35
primary text entry method
31
Q
quick text 64
R
received calls list 55
recent calls 55
redial
automatic redial 52
busy number 52
reminders
turning on/off 73
right soft key
functions 24
ring alert
setting 14, 41, 45
turning off 13, 14, 53
ring alert indicators 26
90
ring tone
downloading 64
managing 82
ringer ID
setting 66
turning on/off 73
ringer volume, setting 13,
73
roam indicator 25
S
screen saver 48
scroll, menu 75
secondary text entry
method 31
security code
changing 42
default 42
forgetting 44
send key 13, 14, 55
shortcuts 62, 75
signal strength indicator 25
silent alert indicator 26
silent alert, setting 41, 45
silent ring alert, setting 14
soft keys
functions 24
sound
downloading 64
managing 82
Speaker On message 40
speakerphone
automatic answer 78
speakerphone, external
activating 78
speed dial 58
standby time, increasing
48, 49
storing a call 55
symbol chart 38
symbols, entering 38
T
tap method text entry 32
telephone number
storing your number 45
viewing your number 15,
62
text 32
character chart 34
entering 30
entry method, selecting
31
entry method, setup 31
iTAP software predictive
text entry 35
numeric method 37
symbol chart 38
symbol method 38
tap method 32
text case indicator 32
text entry method
selecting 31
setup 31
text entry method indicator
26, 32
timers 77
travel charger 11
TTY device 63
U
unlock
application 81
phone 42
unlock code
bypassing 44
changing 42
default 12, 42, 43, 44
entering 12, 43
forgetting 44
V
vibrate alert
setting 41, 45
turning off 13, 14, 53
vObject, defined 22
voice dial 78
voice dialing 65
Advanced Voice Dialing
68
91
voice key
digit dialing 66
voice dialing 65
voice record 80
voicemail 59
voicemail message indicator
26, 59
volume
earpiece 12
keypad 73
ringer 13, 73
volume keys 12
W
wallpaper 47
Web pages 81
Web sessions 82
U.S. patent Re. 34,976
92
Bienvenido
¡Bienvenido al mundo de las comunicaciones celulares
digitales de Motorola! Nos complace que haya elegido el
teléfono celular V265 de Motorola.
Tecla programable
izquierda Ejecutar
funciones identificadas
por la instrucción a la
izquierda de la pantalla.
Tecla de cámara
Tecla enviar
Hacer y contestar
llamadas, ver las
llamadas hechas
recientemente.
Botones de volumen
Ajustar el volumen del
auricular y del timbre.
Tecla
inteligente/Altavoz
Seleccionar elementos
del menú; ajustar
estilos de timbre.
Tecla de
navegación de cinco
direcciones
Desplazarse por los
menús y listas;
programar valores de
funciones. Oprima la
tecla K en el centro
para seleccionar el Puerto de accesorios
elemento resaltado.
Tecla de menú
Tecla programable
derecha Ejecutar
funciones
identificadas por la
instrucción a la
derecha de la
pantalla.
Botón de
reconocimiento de
voz Activar el
reconocimiento de
voz independiente
del altavoz.
Hacer grabaciones
de voz y contactos.
Tecla CLR
Borrar ingresos,
volver por los
menús.
Tecla de
encendido/fin
Encender y apagar
el teléfono, finalizar
las llamadas
telefónicas, salir de
menús.
Micrófono
93
¡Pruébelo!
Conector para
audífonos
Cámara
Tomar fotografías a
otras personas y
usarlas en el teléfono.
Pantalla externa
Ver la identificación de
llamada y los iconos
de estado.
Función
Tomar
fotografías
Enviar
fotografía
94
Descripción
Abra el teléfono, oprima la tecla de la
cámara f para activar la cámara, apunte
el lente al objetivo, oprima la tecla de la
cámara f o CAPTURAR (+) para tomar
una fotografía.
Envíe la fotografía a un número de
fotografía
Oprima ALMACNR (+) > Enviar mensaje.
Función
Enviar
mensaje de
imagen
Enviar
mensaje de
texto
Lectura de
mensaje de
imagen
Descripción
Envía un mensaje de imagen
con imágenes, animaciones y
sonidos:
M > Mensajería > Crear msj
> Nuevo msj PIX
Envía un mensaje de texto:
M > Mensajería > Crear msj
> Nuevo msj texto
Leer un nuevo mensaje de
imagen recibido:
Oprima LEER (+).
95
Motorola, Inc.
Consumer Advocacy Office
1307 East Algonquin Road
Schaumburg, IL 60196
www.motorola.com
1-800-331-6456 (Estados Unidos)
1-888-390-6456 (TTY/TDD Estados Unidos para las personas
con problemas de audición)
1-800-461-4575 (Canadá))
MOTOROLA y el logotipo de la M estilizada están registrados en la Oficina de
patentes y marcas registradas de los Estados Unidos. Cualesquiera otros
nombres de productos o servicios pertenecen a sus propietarios respectivos.
© Motorola, Inc. 2004
La información contenida en las guías del usuario de Motorola se considera
correcta al momento de la impresión. Motorola se reserva el derecho de
cambiar o modificar cualquier información o especificación sin previo aviso.
El contenido de las guías del usuario de Motorola se proporciona “tal como
está”. Salvo que alguna ley vigente lo demande específicamente, no hay
garantías de ningún tipo, expresas o implícitas, lo que incluye, pero no se limita
a las garantías implícitas de comercialización y adecuación para un propósito
específico, en relación con la precisión, confiabilidad o contenido de esta guía.
Número de manual: 6809489A65-O
96
Contenido
Inicio . . . . . . . . . . . . . . . . . . . . . . . . . . . . . . . . . . . . . . . .
Acerca de esta guía . . . . . . . . . . . . . . . . . . . . . . . . . . .
Instalación de la batería . . . . . . . . . . . . . . . . . . . . . . . .
Uso de la batería . . . . . . . . . . . . . . . . . . . . . . . . . . . . .
Carga de la batería . . . . . . . . . . . . . . . . . . . . . . . . . . . .
Encendido del teléfono . . . . . . . . . . . . . . . . . . . . . . . . .
Ajuste de volumen . . . . . . . . . . . . . . . . . . . . . . . . . . . .
Realización de llamadas. . . . . . . . . . . . . . . . . . . . . . . .
Contestación de llamadas . . . . . . . . . . . . . . . . . . . . . .
Cambio de la alerta de llamada . . . . . . . . . . . . . . . . . .
Visualización de su número telefónico . . . . . . . . . . . . .
Funciones destacadas. . . . . . . . . . . . . . . . . . . . . . . . . .
Cómo tomar y enviar fotografías. . . . . . . . . . . . . . . . . .
Envío de un mensaje de imagen . . . . . . . . . . . . . . . . .
Recepción de un mensaje de imagen . . . . . . . . . . . . .
Operación TTY . . . . . . . . . . . . . . . . . . . . . . . . . . . . . . .
Cómo usar el teléfono . . . . . . . . . . . . . . . . . . . . . . . . . .
Uso de la pantalla . . . . . . . . . . . . . . . . . . . . . . . . . . . . .
Uso de la tecla de navegación con
cinco direcciones . . . . . . . . . . . . . . . . . . . . . . . . . . . . .
Uso de menús. . . . . . . . . . . . . . . . . . . . . . . . . . . . . . . .
Ingreso de texto . . . . . . . . . . . . . . . . . . . . . . . . . . . . . .
Uso del altavoz del manos libres . . . . . . . . . . . . . . . . .
Uso de la pantalla externa . . . . . . . . . . . . . . . . . . . . . .
Cambio de un código, PIN o contraseña . . . . . . . . . . .
Bloqueo y desbloqueo del teléfono. . . . . . . . . . . . . . . .
En caso de olvidar un código, PIN o contraseña . . . . . .
100
100
101
102
103
104
105
105
106
106
107
108
108
110
114
115
117
117
120
120
123
133
134
135
136
138
97
Programación del teléfono. . . . . . . . . . . . . . . . . . . . . .
Almacenamiento de su nombre y
número telefónico . . . . . . . . . . . . . . . . . . . . . . . . . . . .
Programación de un estilo de alerta . . . . . . . . . . . . . .
Programación de opciones para contestar . . . . . . . . .
Programación de una imagen de fondo . . . . . . . . . . .
Programación de una imagen
de protector de pantalla . . . . . . . . . . . . . . . . . . . . . . .
Programación de contraste de pantalla. . . . . . . . . . . .
Ajuste de la luz de fondo. . . . . . . . . . . . . . . . . . . . . . .
Ocultar o mostrar información de ubicación . . . . . . . .
Conservación de la carga de la batería . . . . . . . . . . .
Funciones de llamada . . . . . . . . . . . . . . . . . . . . . . . . .
Cambio de la línea activa . . . . . . . . . . . . . . . . . . . . . .
Remarcación de un número . . . . . . . . . . . . . . . . . . . .
Uso de remarcación automática . . . . . . . . . . . . . . . . .
Desactivación de una alerta de llamada . . . . . . . . . . .
Llamada a un número de emergencia . . . . . . . . . . . .
Uso de AGPS durante una llamada de
emergencia . . . . . . . . . . . . . . . . . . . . . . . . . . . . . . . . .
Visualización de llamadas recientes . . . . . . . . . . . . . .
Devolución de una llamada no contestada . . . . . . . . .
Uso de los apuntes . . . . . . . . . . . . . . . . . . . . . . . . . . .
Adición de un número . . . . . . . . . . . . . . . . . . . . . . . . .
Llamada con marcación rápida . . . . . . . . . . . . . . . . . .
Llamada con marcación con una sola tecla . . . . . . . .
Uso del correo de voz . . . . . . . . . . . . . . . . . . . . . . . . .
Funciones del teléfono. . . . . . . . . . . . . . . . . . . . . . . . .
Menú principal. . . . . . . . . . . . . . . . . . . . . . . . . . . . . . .
Funciones de llamada . . . . . . . . . . . . . . . . . . . . . . . . .
Mensajes. . . . . . . . . . . . . . . . . . . . . . . . . . . . . . . . . . .
98
139
139
139
141
141
143
144
144
145
147
148
148
148
148
149
150
150
152
153
154
154
155
155
155
158
158
160
160
Contactos . . . . . . . . . . . . . . . . . . . . . . . . . . . . . . . . . . .
Personalización de funciones . . . . . . . . . . . . . . . . . . . .
Funciones de menú . . . . . . . . . . . . . . . . . . . . . . . . . . .
Funciones de marcación. . . . . . . . . . . . . . . . . . . . . . . .
Monitoreo de llamada . . . . . . . . . . . . . . . . . . . . . . . . . .
Funciones del manos libres . . . . . . . . . . . . . . . . . . . . .
Llamadas de datos y fax. . . . . . . . . . . . . . . . . . . . . . . .
Funciones de red . . . . . . . . . . . . . . . . . . . . . . . . . . . . .
Funciones del organizador personal. . . . . . . . . . . . . . .
Seguridad . . . . . . . . . . . . . . . . . . . . . . . . . . . . . . . . . . .
Noticias y diversión. . . . . . . . . . . . . . . . . . . . . . . . . . . .
Datos de índice de absorción
específico para Estados Unidos . . . . . . . . . . . . . . . . . .
Índice . . . . . . . . . . . . . . . . . . . . . . . . . . . . . . . . . . . . . . . .
162
165
172
173
174
175
177
178
178
180
180
182
184
99
Inicio
Inicio
PRECAUCIÓN: antes de usar el teléfono
por primera vez, lea la Información legal
y de seguridad importante que se
incluye en las páginas de bordes grises
en la parte posterior de esta guía. 032259o
Acerca de esta guía
Esta guía describe las funciones básicas del teléfono
inalámbrico Motorola.
Funciones opcionales
Esta etiqueta identifica una función opcional
dependiente de la red o la suscripción, que
posiblemente no todos los proveedores de
servicio pueden ofrecer en todas las áreas
geográficas. Para obtener más información,
comuníquese con su proveedor de servicio.
Accesorios opcionales
Esta etiqueta identifica una función que requiere
un accesorio Motorola Original™ opcional.
100
Instalación de la batería
Debe instalar y cargar la batería para usar su teléfono.
El teléfono está diseñado para usar sólo
baterías y accesorios Motorola Original.
Acción
Inicio
1 Oprima el botón de
liberación en la cubierta
de la batería.
2 Deslice la cubierta
posterior y luego
levántela para sacarla
del teléfono.
3 Inserte la batería con las
lengüetas hacia el frente y
mirando hacia abajo.
101
Acción
Inicio
4 Baje la cubierta de la
batería hacia el teléfono y
luego deslícela hacia
adelante hasta que se
ajuste en su lugar.
Uso de la batería
La vida útil de la batería depende de la red, la intensidad de
la señal, la temperatura, las funciones y los accesorios
utilizados.
Use siempre baterías y cargadores
Motorola Original™. La garantía no cubre daños
provocados por el uso de baterías y/o
cargadores que no sean Motorola.
Las baterías nuevas o almacenadas durante un período
prolongado pueden demorarse más en cargar.
Cuando cargue la batería, manténgala a temperatura
ambiente o aproximada a ésta.
Si guarda la batería, manténgala descargada en un lugar
frío, oscuro y seco, como un refrigerador.
Nunca exponga las baterías a temperaturas inferiores a
-10°C (14°F) o superiores a 45°C (113°F). Cuando deje su
vehículo, siempre lleve el teléfono consigo.
Es normal que las baterías se desgasten gradualmente y
necesiten cargarse por más tiempo. Si nota un cambio en la
102
vida útil de la batería, significa que probablemente debe
comprar una batería nueva.
Póngase en contacto con el centro de reciclaje
local para conocer los métodos de desecho
correctos.
Advertencia: Jamás arroje las baterías al fuego, ya que
pueden explotar.
Inicio
Antes de usar su teléfono, lea la información sobre la
seguridad de la batería en la sección “Información general y
de seguridad” incluida en esta guía.
Carga de la batería
Las baterías nuevas vienen parcialmente cargadas. Antes
de usar el teléfono, debe instalar y cargar la batería como
se describe a continuación. Algunas baterías tienen mejor
rendimiento después de varios ciclos completos de carga
y descarga.
Acción
1 Conecte el
cargador de viaje
al teléfono con la
lengüeta de
sujeción hacia
arriba.
2 Conecte el otro extremo del cargador de viaje a
la toma de corriente adecuada.
3 Cuando el teléfono indique Carga completa, oprima
la lengüeta de liberación y retire el cargador de
viaje.
103
Inicio
Consejo: Puede dejar el cargador de viaje conectado al
teléfono con toda seguridad luego de que la carga finalice.
Esto no dañará la batería.
Nota: Cuando cargue la batería, el indicador de nivel
de la batería en el ángulo superior derecho de la
pantalla muestra qué parte del proceso de carga se ha
completado. Al menos un segmento del indicador de nivel
de la batería debe estar visible para asegurar una
funcionalidad completa del teléfono mientras se carga.
Encendido del teléfono
Acción
1 Abra el teléfono.
2 Mantenga oprimida
la tecla de encendido
durante tres
segundos.
Tecla de
encendido
El teléfono puede
necesitar varios segundos para encenderse.
3 Si fuera necesario, ingrese su código de
desbloqueo de 4 dígitos (los últimos cuatro
dígitos de su número telefónico) y oprima
OK (+) para desbloquear el teléfono.
104
Ajuste de
volumen
Oprima los botones de
volumen arriba o abajo para:
Botones
de
volumen
• aumentar o disminuir el volumen del auricular
durante una llamada
Inicio
• aumentar o disminuir el ajuste del volumen del timbre
cuando la pantalla de inicio está visible (la solapa
debe estar abierta—consulte “Ajuste de volumen” en
la página 105)
• desactivar la alerta de una llamada entrante
Realización de llamadas
Acción
1 Marque el número.
Consejo:Si comete un error, oprima la tecla C
para borrar el último dígito. Mantenga oprimida
para borrar todos los dígitos.
2 Oprima N para
realizar la llamada.
Oprimir
para
3 Oprima P para
enviar la
terminar la llamada.
llamada.
Consejo: También puede cerrar la solapa para finalizar la
llamada.
Nota: Debe marcar el número telefónico desde la pantalla
de inicio en reposo. Consulte la página 117.
105
Contestación de llamadas
Inicio
Cuando recibe una llamada, el teléfono timbra y/o vibra
y muestra un mensaje de llamada entrante.
Acción
1 Oprima N para
contestar.
2 Oprima P para
terminar la llamada.
Oprimir
para
contestar
Consejo: Puede programar el teléfono para que conteste
llamadas cuando usted abre la solapa. (Para activarla,
oprima M > Programación > Config en llamada > Opc para contestr
> Contesta al abrir).
Nota: Si el teléfono está bloqueado, debe desbloquearlo
para contestar la llamada.
Cambio de la alerta de llamada
Solapa del teléfono
abierta
Botones
de
volumen
En la pantalla de inicio, oprima
la tecla para bajar el volumen
para cambiar a volumen de
alerta de llamada más bajo; luego, cambiar a vibración y,
finalmente, a alerta silenciosa. Oprima la tecla para subir
el volumen para volver desde la alerta silenciosa a la
106
alerta de vibración y, luego, a la programación de volumen
de alerta más bajo.
Solapa del
teléfono cerrada
Botones de
volumen
Tecla
inteligente/
Altavoz
Inicio
Oprima la tecla para
subir o bajar el volumen
y luego oprima la tecla
de audífono para desplazarse por los estilos de alerta: Alto,
Bajo, Vibración, Vibr y timbre y Silencioso. Los estilos de alerta
aparecen en la pantalla externa.
Después de desplazarse al estilo de alerta deseado,
oprima la tecla para subir o bajar el volumen para guardar
la programación y volver a la pantalla inicial.
Visualización de su número
telefónico
Para ver su número de teléfono en la pantalla principal,
oprima M #.
Mientras esté en una llamada, oprima M > Mis núms de tel.
107
Funciones destacadas
Funciones destacadas
¡Con su teléfono puede hacer mucho más que sólo
hacer y recibir llamadas! Esta sección describe
algunas de las funciones resaltadas del teléfono.
Cómo tomar y enviar
fotografías
Desde la pantalla inicial, oprima la tecla cámara f para
activar la cámara del teléfono.
En la pantalla del teléfono aparece la imagen activa del
visor.
(O
\
uyÉ
1/143
Msg
Oprimir S
hacia arriba
para acerca y
hacia abajo
para alejar.
ATRÁS
M
CAPTURA
Oprimir S a la
derecha para
disminuir el
contraste y
hacia la
izquierda para
aumentarlo.
Oprimir M
Oprimir CAPTURAR (-)
para abrir el Menú de fotos. para tomar una fotografía.
108
Dirija la lente de la cámara hacia el objetivo y luego:
Oprima
1 f
Para
tomar una fotografía
o
CAPTURAR (+)
2 ALMACNR (+)
ver opciones de almacenamiento
o
BORRAR (-)
3 S
4 SELECR (+)
borrar la fotografía y regresar
para activar el visor
desplazarse a Enviar mensaje,
Enviar a PixPlace, Sólo almacenar,
Aplicar como fondo o
Aplicar como Protector de pantalla.
realizar la operación de
almacenamiento que prefiera
Funciones destacadas
Si decide almacenar la fotografía,
continúe con el paso 3.
Opciones del menú de imágenes
Cuando la cámara está activa, oprima M para acceder
al Menú imágenes. El Menú de imágenes puede incluir las
siguientes opciones:
Opción
Ir a imágenes
Descripción
Muestra las imágenes y
fotografías almacenadas en
el teléfono.
109
Opción
Toma programada
Funciones destacadas
Borrar todo
Config de imágenes
Ver espacio disponible
Ajustar contraste
Captura Título
Descripción
Establece un cronómetro
para que la cámara tome la
fotografía.
Borra todas las imágenes.
Abre el menú de
configuración para ajustar la
programación de la imagen.
Muestra cuánta memoria
queda para almacenar
imágenes.
Aumente o disminuya el
contraste.
Asigna un nombre a una
fotografía capturada.
Envío de un mensaje de imagen
Un mensaje de imagen contiene una o más
diapositivas con texto y objetos de multimedia
incorporados (incluidos, posiblemente,
fotografías, imágenes, animaciones, sonidos,
registros de voz). Puede enviar un mensaje de imagen a
otros teléfonos habilitados para mensajería de imagen de
Verizon Wireless y a otras direcciones de correo
electrónico.
Localización de
funciones
110
M > Mensajería
> Crear mensaje
> Nuevo msj PIX
Oprima
Para
1 teclas de teclado, ingresar un número de
luego OK (+)
teléfono
o
3 M
4 SELECR (+)
5 S
6 SELECR (+)
7 M
8 S
abrir los Contactos, luego,
desplazarse y seleccionar uno
o más ingresos de Contactos
existentes.
ingresar el texto de la
diapositiva
Para agregar otra diapositiva
al mensaje, continúe con el
siguiente paso.
Para insertar un objeto
multimedia, vaya al paso 8.
abrir el Menú PIX para insertar
una nueva diapositiva
mostrar una lista de los
elementos que puede insertar
desplazarse a Página nueva
insertar una diapositiva nueva
después de la actual
Funciones destacadas
CONTACTOS (+),
S, luego
AGREGAR (+) y
OK (-)
2 teclas
correspondientes
del teclado
Repita el paso para ingresar el
contenido de la nueva
diapositiva.
abrir el Menú PIX
desplazarse a Insertar
111
Oprima
9 SELECR (+)
10 S
Funciones destacadas
11 SELECR (+)
12 S
13 SELECR (+)
14 OK (+)
15 S
16 CAMBIAR (-)
17 teclas
correspondientes
del teclado
Para
mostrar una lista de los
elementos que puede insertar
desplazarse a Grabar, Sonido,
Página nueva o Texto rápido
seleccionar el tipo de archivo
desplazarse por los archivos
para hacer la elección
deseada.
seleccionar e insertar el
archivo
Vuelva al paso 8 para agregar
más archivos multimedia.
guardar todos los archivos
insertados.
desplazarse a Asunto
seleccionar Asunto
ingresar el asunto
o
NOTA RÁP (+),
luego S y
OK (+)
18 OK (+)
19 S
20 CAMBIAR (-)
112
abrir la lista de Notas rápidas,
luego, desplazarse y
seleccionar una Nota rápida
como sujeto
guardar el asunto
desplazarse a Anexos
seleccionar los Anexos
Oprima
21 S
22 SELECR (+)
23 S
24 SELECR (+)
S, luego
SELECR (+)
26 S
27 CAMBIAR (+)
28 S, luego
SELECR (+)
29 S
30 CAMBIAR (+)
31 AGREGAR (+)
32 ENVIAR (+)
agregar más anexos
desplazarse a Prioridad
seleccionar Prioridad
desplazarse y seleccionar
Normal o Urgente y luego volver a
la pantalla Nuevo con mensajes PIX
desplazarse a Recibo
seleccionar Recibo
con Reporte de envío resaltado,
seleccciónlalo
enviar el mensaje
Funciones destacadas
25 ATRÁS (-)
Para
desplazarse a Imagen o Sonido
seleccionar el tipo de archivo
desplazarse por los archivos
hasta llegar al que desea
seleccionar e insertar el
archivo
volver a la pantalla Nuevo PIX
Mensaje
o
M
enviar el mensaje después,
ver detalles del mensaje,
guardarlo en la carpeta de
borradores o cancelar el
mensaje
113
Recepción de un mensaje de
imagen
Funciones destacadas
Cuando recibe un mensaje o carta
multimedia, el teléfono muestra el indicador
X (mensaje en espera) y una notificación de
Mensaje nuevo y reproduce un tono de alerta.
Oprima
LEER (+)
Para
abrir el mensaje
Los mensajes multimedia que recibe pueden contener
distintos objetos multimedia:
• A medida que lee el mensaje, se muestran fotos,
imágenes y animaciones insertadas.
• Un archivo de sonido comienza a reproducirse
cuando aparece su diapositiva. Use las teclas de
volumen para ajustar el volumen mientras se
reproduce el archivo de sonido.
Nota: Es posible que una carta multimedia deba
resaltar un indicador incluido en el texto para
reproducir un archivo de sonido.
• Los archivos adjuntos están agregados al mensaje.
Para abrir el archivo adjunto, seleccione el indicador o
nombre del archivo y oprima VER (+) (tipo de archivo
de imagen), ESCUCHR (+) (archivo de sonido) o
ABRIR (+) (vObject como ingreso de Contactos o un
tipo de archivo desconocido).
114
Operación TTY
Puede usar un dispositivo TTY opcional con el teléfono
para enviar y recibir llamadas. Debe enchufar el
dispositivo TTY en el conector para audífono del
teléfono y programar el teléfono para que opere en uno
de los tres modos TTY.
Nota: Programe el teléfono en nivel 4 (programación
media) para una operación correcta. Si recibe un alto
número de caracteres incorrectos, ajuste el volumen
según sea necesario para minimizar la tasa de errores.
Nota: Para un rendimiento óptimo, el teléfono debe estar
al menos a 30 centímetros (12 pulgadas) de distancia del
dispositivo TTY. Si coloca el teléfono demasiado cerca del
dispositivo TTY, puede originar una alta tasa de errores.
Funciones destacadas
Nota: Use un cable compatible con TSB-121
(proporcionado por el fabricante del dispositivo TTY) para
conectar el dispositivo TTY al teléfono.
Programación de modo TTY
ù Cuando programa el teléfono en un modo TTY, éste
opera en ese modo cada vez que se conecta el
dispositivo TTY.
Localización de
funciones
M > Programación
> Config inicial
Oprima
1 S
Para
desplazarse a
Configuración TTY
115
Oprima
2 CAMBIAR (-)
3 S
4 SELECR (-)
Para
seleccionar Configuración TTY
desplazarse al modo TTY
seleccionar el modo TTY
Funciones destacadas
El menú Configuración TTY puede incluir las siguientes
opciones:
Oprima
Voz
TTY
VCO
HCO
Para
volver al modo normal de voz
transmitir y recibir caracteres
TTY
recibir caracteres TTY, pero
transmitir hablando al
micrófono
transmitir caracteres TTY,
pero recibir escuchando el
auricular
Cuando el teléfono está en un modo TTY, aparecen en
pantalla el modo internacional TTY, el símbolo
internacional TTY y la programación de modo durante una
llamada TTY activa.
Regreso al modo de voz
Para volver al modo normal de voz, seleccione Voz desde
el menú Configuración TTY.
116
Cómo usar el teléfono
Vea la página 93 donde encontrará un diagrama básico
del teléfono.
Uso de la pantalla
La pantalla principal aparece cuando no está en una
llamada ni usando el menú. Debe estar en la pantalla
principal para marcar un número telefónico.
(O\
ruyÉ
Fecha 10/15/04
Etiqueta de tecla
programable Reciente
izquierda
x
]
U6:35:00 am
Reloj
Etiqueta de tecla
CONTACTOS programable
derecha
Nota: Su pantalla de inicio puede ser distinta a la pantalla
que se muestra anteriormente.
Cómo usar el teléfono
á
El indicador e (menú) indica que puede oprimir la tecla de
menú (M) para ingresar al menú principal.
Las etiquetas de los ángulos inferiores de la pantalla
muestran las funciones de la tecla programable actual.
Oprima la tecla programable de la izquierda (-) o la
tecla programable de la derecha (+) para efectuar la
función que indica la etiqueta de la tecla programable
izquierda o derecha.
117
El teléfono puede mostrar un reloj digital o análogo en la
pantalla de inicio (vea la página 171). Cuando está
encendido en modo análogo, su teléfono no siempre
muestra la hora correcta.
Pueden aparecer los siguientes indicadores de estado:
4. Mensaje
3. Roam
2. Intensidad
de la señal
Cómo usar el teléfono
1. Cobertura
(O\
10/15/04
á
Reciente
ruyÉ
x
]
032419o
U6:35:00 am
5. Nivel de
batería
6. Alerta de
timbre
7. Servicio
AGPS
CONTACTOS
1. Indicador de cobertura
2. Indicador de intensidad de la señal Las barras
verticales indican la intensidad de la conexión de red. No
se puede hacer ni recibir llamadas cuando aparece sólo el
indicador ! (sin señal) o) (sin transmisión).
3. Indicador roam (usuario visitante) Indica
cuando el teléfono está buscando o usando otra
red fuera de la red local.
118
4. Indicador de mensaje Aparece cuando
recibe un nuevo mensaje. Los indicadores
pueden incluir:
r = mensaje de
texto
s = mensaje de
correo de voz y
de texto
t = mensaje de
correo de voz
Cuando ingresa un mensaje, un número en esta
ubicación muestra el número de caracteres que
quedan en la página actual (mensaje de texto) o el
tamaño del mensaje (mensaje de imagen).
6. Indicador de alerta de timbre Muestra la
programación de la alerta de timbre.
y = timbre alto
| = vibración
{ = silencioso
z = timbre bajo
} = vibración y timbre
Cómo usar el teléfono
5. Indicador de nivel de batería Las barras verticales
indican el nivel de carga de la batería. Recargue la batería
cuando aparezca Batería baja y suene la alerta de batería.
7. Indicador de servicio AGPS Indica cuando un
Servicio AGPS está desactivado (icono gris), activado
(icono blanco) o activado y buscando su ubicación (icono
verde).
119
Uso de la tecla de navegación
con cinco direcciones
Use la tecla de navegación de 5 direcciones (S) para
desplazarse hacia arriba, abajo, izquierda o derecha por el
sistema de menús. Oprima la tecla K en el centro para
seleccionar un elemento de menú resaltado.
Uso de menús
Cómo usar el teléfono
Desde la pantalla principal, oprima M para ingresar
al menú principal.
Llams recientes
Tecla
programable
izquierda
Ejecutar la
función de la
izquierda.
Tecla de menú
120
SALIR
SELECR
Tecla
programable
derecha
Ejecutar la
función de la
derecha.
Navegación de
cinco
direcciones
Desplazarse por
los menús y las
listas. Oprima en
el centro para
seleccionar los
elementos
resaltados.
Oprima S para desplazarse y resaltar un icono de
función del menú en el menú principal. Los siguientes
iconos representan funciones que pueden aparecer en el
menú principal, según el proveedor de servicio y las
opciones de suscripción al servicio.
Icono de
menú Función
Contactos
n
Mensajería
U
á
w
Acceso Web
m
Info del teléfono
Programación
Icono de
menú Función
Llams recientes
s
Ahora*
h
É
Galería de medios
Herramientas
Selección de una función del menú
Esta guía utiliza el siguiente formato para mostrarle cómo
seleccionar una función del menú, partiendo desde la
pantalla de inicio:
Localización de
funciones
Cómo usar el teléfono
* Función opcional que depende de la red y de la
suscripción
M > Llams recientes > Hechas
Este ejemplo muestra que, desde la pantalla de inicio,
debe oprimir M, desplazarse y seleccionar Llams recientes
desde el menú principal, luego desplazarse y seleccionar
Hechas. Oprima S para desplazarse y las teclas
programables izquierda/derecha para seleccionar las
funciones que aparecen en los extremos inferior izquierdo
y derecho de la pantalla.
121
Selección de una opción de función
Cuando selecciona ciertas funciones, el teléfono muestra
una lista de elementos u opciones que puede seleccionar.
Por ejemplo, cuando ve la lista de llamadas hechas, puede
seleccionar un ingreso y realizar tareas adicionales en ese
ingreso:
Oprimir
ATRÁS (-)
para volver a
la pantalla
anterior.
(+49rÑyÉ
Hechas
10) Juan Sánchez
9) Lisa Pérez
8) María Martínez
7) Jorge Barriga
Cómo usar el teléfono
ATRÁS
Opción
resaltada
VER
032421o
Oprimir (M) para abrir el
submenú.
Oprimir
VER (+)
para ver
detalles de la
opción
resaltada.
• Oprima S para desplazarse hacia arriba o hacia
abajo para resaltar la opción que desea.
• En una lista numerada, oprima una tecla numérica
para resaltar la opción.
• En una lista alfabética, oprima una tecla en forma
repetida para recorrer las letras de la tecla y resaltar
la opción más cercana que coincida de la lista.
• Cuando una opción tenga una lista de valores
posibles, oprima S a la izquierda o a la derecha para
desplazarse por ella y seleccionar un valor.
• Cuando una opción posea una lista de valores
numéricos posibles, oprima una tecla numérica para
programar el valor.
122
Ingreso de texto
Algunas funciones requieren que ingrese información. La
siguiente es una muestra de una pantalla de la
información del ingreso de Contactos.
( 8
Oprimir S
para ver
más
opciones.
yÉ
Detalles de ingreso
Nombre: Juan Sánchez
Categoría:General
Núm: 2125551212
Tipo: Oficina
CANCELAR
CAMBIAR
Opción
resaltada
Oprimir
CAMBIAR (+)
para ingresar
o editar
información.
El centro de mensajes le permite crear y enviar mensajes
de texto.
Para obtener ( O\
descripciones Ug Msj
de indicadores,
Msg
consulte la
siguiente
sección.
uyÉ
1/160
1/160
El cursor CANCELAR M INSERTAR
destellante
indica el punto
de inserción.
Oprima CANCELAR (-) para
salir sin realizar cambios.
Oprima M
para abrir el
submenú.
Cómo usar el teléfono
Oprimir CANCELAR (-) para salir sin realizar
cambios. OK (-) aparece en pantalla
cuando ingresa o edita información.
Oprima
INSERTAR (+)
para insertar
una nota
rápida, una
imagen o un
sonido.
123
Elección de un método de ingreso de texto
Varios métodos de ingreso de texto facilitan la escritura de
nombres, números y mensajes. El método seleccionado
permanece activo hasta que selecciona otro método.
Oprima # en cualquier pantalla de ingreso de texto para
seleccionar uno de los siguientes métodos de ingreso:
Primario
Numérico
Cómo usar el teléfono
Símbolo
Secundario
El método de ingreso de texto primario
(vea más adelante para programar).
Ingresar sólo números (consulte la
página 131).
Ingresar sólo símbolos (consulte la
página 131).
El método de ingreso de texto
secundario (vea más adelante para
programar).
Como otra alternativa, puede seleccionar un método de
ingreso de texto en cualquier pantalla de ingreso de texto
presionando M > Modo de ingreso.
Configuración de un método de ingreso de texto
Oprima M > Config de ingreso desde cualquier pantalla de
ingreso de texto. Seleccione Config primaria o Config secundaria
y elija:
iTAP
Tap
124
Deje que el teléfono prediga cada
palabra mientras la ingresa (consulte
la página 129).
Ingrese letras y números oprimiendo
una tecla una o más veces.
Tap extendido
Ningún
Ingrese letras, números y símbolos
oprimiendo una tecla una o más veces.
Ocultar la programación Secundaria (sólo
disponible para Config Secundaria).
Uso de mayúsculas
Oprima 0 en cualquier pantalla de ingreso de texto para
cambiar las mayúsculas o minúsculas del texto. Los
siguientes indicadores muestran el estado de las
mayúsculas:
Indicadores de método de ingreso de texto
Cuando selecciona el método de ingreso de texto Primario o
Secundario, los siguientes indicadores identifican la
programación de ingreso de texto:
Primario
g
h
Secundario
m
q
f
l
j
k
p
n
i
o
Tap, sin letras mayúsculas
Tap, escribir en mayúscula
sólo la siguiente letra
Tap, todas las letras
mayúsculas
iTAP, sin letras mayúsculas
iTAP, escribir en mayúscula
sólo la siguiente letra
iTAP, todas las letras
mayúsculas
Cómo usar el teléfono
U= sin letras mayúsculas V= escribir en
mayúscula solo la
T= todas las letras
siguiente letra
mayúsculas
125
Los siguientes indicadores identifican el método de
ingreso de texto Numérico o Símbolo:
W = método numérico
[ = método símbolo
Uso del método tap
Éste es el método estándar para ingresar texto en el
teléfono.
Cómo usar el teléfono
El método Tap regular se desplaza por las letras y
números de la tecla que oprime. El método Tap extendido
además se desplaza por símbolos adicionales, según se
muestra en el “Tabla de caracteres” en la página 128.
Oprima
1 una tecla del
teclado una o
más veces
2 teclas
correspondientes
del teclado
3 OK (+)
Para
seleccionar una letra, número
o símbolo
ingresar los caracteres
restantes
Consejo: Oprima S a la
derecha para aceptar una
palabra completa o * para
insertar un espacio.
almacenar el texto
En una pantalla de ingreso de texto, puede oprimir #
para cambiar los métodos de ingreso. Si Tap o Tap extendido
no está disponible como método de ingreso Primario o
Secundario, consulte la página 124.
126
Al ingresar texto con el método Tap o Tap extendido, las
funciones de la tecla programable cambian.
( O\
El carácter
aparece en el
punto de
inserción.
uyÉ
Ug Msj
T
1/159
CANCELAR M
Después de dos
segundos, el
carácter se
acepta y el
cursor se mueve
a la siguiente
posición.
OK
Oprima OK
(+)
para aceptar y
guardar el
texto.
Oprimir CANCELAR (-) para
borrar el carácter a la izquierda
del punto de inserción.
( O\
uyÉ
Ug Msj
1/143
Éste es un prog rama
CANCELAR M
OK
Oprimir S a la
derecha para
aceptar el
Programa, u
oprimir * para
rechazarlo e
ingresar un
espacio después
de prog.
Cómo usar el teléfono
Cuando ingresa 3 o más caracteres seguidos, el teléfono
puede adivinar el resto de la palabra. Por ejemplo, si
ingresa prog, podría ver:
Si desea una palabra diferente (como progreso) siga
oprimiendo las teclas del teclado para ingresar el resto de
los caracteres.
127
Tabla de caracteres
Use esta tabla como guía para ingresar caracteres con el
método Tap extendido.
Cómo usar el teléfono
1
2
3
4
5
6
7
8
9
0
*
#
.?!,@'-_:;()&“~10¿¡%£$¥
+ x * / \ [ ] = > < # §
a b c 2
d e f 3
g h i 4
j k l 5
m n o 6
p q r s 7
t u v 8
w x y z 9
cambiar los caracteres de texto por letras
mayúsculas
ingresar un espacio (mantener oprimido
para ingresar un retorno)
cambiar el método de ingreso de texto
(mantener oprimida para predeterminado)
Nota: Esta tabla puede no reflejar el conjunto exacto de
caracteres disponible en el teléfono. En un editor URL, 1
muestra primero los caracteres comunes para ese editor.
Reglas de ingreso de texto con método tap
• Oprima varias veces una tecla del teclado para
recorrer sus caracteres.
128
• Oprima S hacia la izquierda o derecha para mover el
cursor destellante hacia la izquierda o hacia la
derecha en un mensaje de texto.
• El primer carácter de cada oración se escribe con
mayúscula. Si fuese necesario, oprima S hacia
abajo para cambiar el carácter a minúscula antes de
que el cursor se mueva a la posición siguiente.
• Si ingresa o edita información y no desea guardar
los cambios, oprima O para salir sin guardar.
Uso del método iTAP®
Por ejemplo, si oprime 7 7 6 4, las combinaciones
de letras que coinciden con las teclas presionadas
muestran:
Oprima S hacia
arriba para
aceptar el
Éste es un prog rama
programa.
Oprima S a la
derecha para
prog proh proi
SELECR resaltar otra
CANCELAR M
combinación.
Oprima SELECR (-) para bloquear la
combinación resaltada.
( O\
Ug Msj
Oprima
CANCELAR
(+)
para borrar
la última
letra.
uyÉ
Cómo usar el teléfono
El software iTAP® proporciona un método de ingreso de
texto predictivo que le permite escribir una palabra
oprimiendo una tecla por letra. Éste puede ser más rápido
que el método Tap, porque su teléfono combina las teclas
presionadas en palabras comunes.
1/143
129
Si desea una palabra diferente (como Progreso), siga
oprimiendo las teclas del teclado para ingresar el resto de
los caracteres.
Ingreso de palabras
Cómo usar el teléfono
En una pantalla de ingreso de texto, puede oprimir #
para cambiar los métodos de ingreso. Un indicador le dice
qué método está activo (vea la página 125). Si el método
iTAP no está disponible como método de ingreso Primario
o Secundario, consulte la página 124.
Oprima
1 Teclas del teclado
(oprima una vez
por letra)
2 S izquierda o
derecha
3 SELECR (+)
Para
mostrar posibles
combinaciones de letras en la
parte inferior de la pantalla
resaltar la combinación que
desea
bloquear una combinación
resaltada
Puede oprimir teclas del
teclado para agregar más
letras al final de la
combinación.
o
*
ingresar la combinación
resaltada cuando deletrea una
palabra
Se insertará automáticamente
un espacio después de la
palabra.
130
Si ingresa una palabra que su teléfono no reconoce, éste
la guarda para utilizarla como una de sus opciones de
palabras. Cuando llena el espacio en memoria para
palabras no reconocidas, su teléfono borra las palabras
más antiguas para agregar nuevas palabras.
Uso del método numérico
En una pantalla de ingreso de texto, oprima # para
cambiar los métodos de ingreso hasta que vea el
indicador W (numérico).
Uso del método símbolo
En una pantalla de ingreso de texto, oprima # para
cambiar los métodos de ingreso hasta que vea el
indicador [ (símbolo).
Oprima
1 teclas del teclado
(oprima una vez
por símbolo)
2 S izquierda o
derecha
Para
mostrar posibles
combinaciones de símbolos
en la parte inferior de la
pantalla
resaltar la combinación que
desea
Cómo usar el teléfono
Oprima las teclas correspondientes del teclado para
ingresar los números que desea. Cuando termine de
ingresar números, oprima # para cambiar a otro método
de ingreso.
131
Oprima
3 SELECR (+)
Para
bloquear una combinación
resaltada
Puede oprimir teclas del
teclado para agregar más
símbolos al final de la
combinación.
o
*
ingresar la combinación
resaltada
Cómo usar el teléfono
Tabla de símbolos
Use esta tabla como guía para ingresar caracteres con el
método de símbolos.
1
2
3
4
5
6
7
8
9
0
132
.?!,@'-_:;()&“~10¿¡%£$¥
+ x * / \ [ ] = > < # §
@ _ \
/ : ;
" & '
( ) [ ] { }
¿ ¡ ~
< > =
$ £ ¥
# % *
+ - x * / \ = > < # §
*
#
ingresar un espacio (mantener oprimido
para ingresar un retorno)
cambiar el método de ingreso de texto
(mantener oprimida para predeterminado)
Nota: Esta tabla puede no reflejar el conjunto exacto de
caracteres disponible en el teléfono. En un editor URL, 1
muestra primero los caracteres comunes para ese editor.
Borrado de letras y palabras
Coloque el cursor a la derecha del texto que desee
borrar y luego:
Uso del altavoz del manos libres
Nota: Debe abrir la solapa del teléfono para activar el
altavoz.
Cómo usar el teléfono
Acción
Oprima C para borrar una letra a la vez.
Mantenga oprimido C para borrar el mensaje
completo.
Al activar el altavoz integrado del manos libres del teléfono,
podrá hablar con la otra persona sin sostener el teléfono
junto a la oreja.
Mantenga oprimida la
tecla inteligente/altavoz
para encender y apagar el
manos libres durante una
Botones
de
volumen
Tecla
inteligente/
Altavoz
133
llamada. Una alerta de audio baja confirma la activación o
desactivación.
Cuando se activa el manos libres, el teléfono muestra
Altavoz activado en la pantalla de inicio. El altavoz de manos
libres permanece activado hasta que oprima la tecla
inteligente/altavoz activado nuevamente o apague el
teléfono.
Nota: El altavoz del manos libres se desactiva cuando
conecta el teléfono a un equipo manos libres para
vehículo o a un accesorio de audífonos.
Cómo usar el teléfono
Uso de la pantalla externa
Cuando la solapa está cerrada, puede usar la pantalla
externa para lo siguiente:
• Ver hora, fecha e información de estado del teléfono.
• Programar los estilos de alerta del teléfono.
• Ver las notificaciones de mensaje.
Programar los estilos de alerta del teléfono
por medio de la pantalla externa.
El teléfono timbra o vibra para avisarle que tiene una
llamada u otro evento. Este timbre o vibración se llama
alerta.
Con la solapa cerrada:
Oprima
1 botones de
volumen
134
Para
desplazarse a Estilo
Oprima
Para
2 Tecla inteligente/ seleccionar un estilo de alerta
Altavoz
3 botones de
regresar a la pantalla de inicio
volumen
Vista de una llamada no contestada
mediante una pantalla externa
Su teléfono mantiene un registro de las llamadas no
contestadas y muestra X Llam perdidas en la pantalla
externa.
Oprima
1 Tecla inteligente/
Altavoz
2 botones de
volumen
3 Tecla inteligente/
Altavoz
Para
ver la lista de llamadas
recibidas
desplazarse y seleccionar una
llamada
ver la llamada seleccionada
Cómo usar el teléfono
Nota: Debido a que el micrófono y el auricular no están
disponibles cuando el teléfono está cerrado, debe usar un
audífono u otro dispositivo a manos libres con esta función.
Cambio de un código, PIN o
contraseña
El código de desbloqueo de cuatro dígitos de su teléfono
está programado originalmente como 1234 y el código de
seguridad de seis dígitos está programado originalmente
135
como 000000. Es posible que su proveedor de servicio
reprograme estos códigos antes de que usted reciba el
teléfono.
Si el proveedor de servicio no ha reprogramado estos
códigos, recomendamos cambiarlos para evitar que otros
puedan acceder a su información personal. El código de
desbloqueo debe contener cuatro dígitos y el código de
seguridad debe contener seis dígitos.
Para cambiar un código o contraseña:
Cómo usar el teléfono
Localización de
funciones
M > Programación > Seguridad
> Contraseñas nvas
Bloqueo y desbloqueo del
teléfono
Puede bloquear el teléfono manualmente o programarlo
para que se bloquee en forma automática cada vez que lo
apague.
Para usar un teléfono bloqueado, debe ingresar el código
de desbloqueo. Un teléfono bloqueado aún tendrá
activado el timbre o la vibración para llamadas o mensajes
entrantes, pero lo deberá desbloquear para contestar.
Puede hacer llamadas de emergencia con el teléfono, aun
cuando esté bloqueado (consulte la página 150).
Bloqueo manual del teléfono
Localización de
funciones
136
M > Programación > Seguridad
> Bloq de teléfono
> Bloquear ahora
Oprima
1 teclas
correspondientes
del teclado
2 OK (+)
Para
ingresar el código de
desbloqueo
bloquear el teléfono
Desbloqueo del teléfono
Consejo: El código de desbloqueo del teléfono está
programado originalmente en 1234. Muchos
proveedores de servicio reprograman el código de
desbloqueo con los últimos cuatro dígitos de su
número telefónico.
Oprima
1 teclas
correspondientes
del teclado
2 OK (+)
Para
ingresar el código de
desbloqueo
desbloquear el teléfono
Cómo usar el teléfono
En la instrucción Ingrese cód desbloq:
Programación del teléfono para que se
bloquee automáticamente
Puede programar el teléfono para que se bloquee cada
vez que lo apague:
Localización de
funciones
M > Programación > Seguridad
> Bloq de teléfono
> Bloqueo auto > Encendido
137
Oprima
1 teclas
correspondientes
del teclado
2 OK (+)
Para
ingresar el código de
desbloqueo
activar bloqueo automático
Cómo usar el teléfono
En caso de olvidar un código,
PIN o contraseña
Nota: El código de desbloqueo de cuatro dígitos de su
teléfono está programado originalmente como 1234 y
el código de seguridad de seis dígitos está
programado originalmente como 000000. Muchos
proveedores de servicio reinician el código de desbloqueo
en los últimos cuatro dígitos de su número telefónico antes
de que usted reciba el teléfono.
Si olvida el código de desbloqueo, intente con 1234 o los
últimos 4 dígitos de su número telefónico. Si eso no
funciona, haga lo siguiente en la instrucción Ingrese cód desbloq:
Oprima
1 M
Para
mostrar la pantalla de omisión
de código de desbloqueo
2 teclas
ingresar el código de
correspondientes seguridad
del teclado
3 OK (+)
enviar el código de seguridad
Si olvida su código de seguridad, póngase en contacto
con su proveedor de servicio.
138
Programación del
teléfono
Almacenamiento de su nombre
y número telefónico
Para guardar o editar su información de nombre
y número de teléfono en su teléfono:
Localización de
funciones
M > Info del teléfono
> Mis núms de tel
Atajo: Oprima M # en la pantalla de inicio para
editar el nombre y el número de teléfono.
Programación de un estilo de
alerta
El teléfono timbra o vibra para avisarle que tiene una
llamada o para indicar ciertos otros eventos. Este timbre o
vibración se llama alerta. El teléfono incluye los siguientes
tipos de alertas: Volumen de timbre, Llams, Buzón, Correo de voz,
Alarmas, Llams de datos, Llams de fax, Idens de timbre, Vol de teclado y
Recordatorios.
Programación del teléfono
Si no sabe su número de teléfono, póngase en contacto
con su proveedor de servicio. Para ver su número de
teléfono desde la pantalla de inicio o durante una llamada,
vea la página 107.
139
Puede definir 5 grupos de programación de alertas. Estos
grupos, denominados estilos de alerta, incluye Alto, Bajo,
Vibrar, Vibrar y timbrar y Silencioso. Cuando programa el
teléfono para usar un estilo de alerta, la programación de
alerta correspondiente se activa.
Para seleccionar un estilo de alerta y especificar su
programación para alertas específicas:
Localización de
funciones
Programación del teléfono
1
2
3
140
4
5
6
7
8
9
10
M > Programación
> Estilo de timbre
Acción
Resaltar Estilo.
Oprima CAMBIAR (+).
Resaltar el estilo de alerta deseado (Alto, Bajo,
Vibrar, Vibrar y timbrar o Silencioso).
Oprima SELECR (+)
Resaltar estilo Detalle.
Oprima CAMBIAR (+).
Resaltar la programación que desea cambiar:
Volumen de timbre, Llams, Buzón, Correo de voz, Alarmas,
Llams de datos, Llams de fax, Idens de timbre, Vol de teclado
y Recordatorios.
Oprima CAMBIAR (+).
Programar o modificar el estilo que desea.
Repita los pasos del 7 al 9 para toda la
programación que desea cambiar.
Programación de opciones
para contestar
Puede utilizar métodos adicionales y alternativos para
contestar una llamada entrante.
Multitecla
Contesta al abrir
contestar oprimiendo cualquier tecla
contestar abriendo la solapa
Para activar o desactivar una opción para contestar:
Localización de
funciones
Oprima
1 S
Para
desplazarse hasta la Multitecla
o Contesta al abrir
seleccionar la opción
desplazarse a Act o Des
confirmar la programación
Programación de una imagen
de fondo
Programe una fotografía, imagen o animación como
imagen de fondo en la pantalla de inicio del teléfono.
Localización de
funciones
M > Programación
> Personalizar
> Fondo de pantalla
Programación del teléfono
2 CAMBIAR (+)
3 S
4 SELECR (+)
M > Programación
> Config en llam
> Opc para contestr
141
Oprima
1 S
2 CAMBIAR (+)
3 S arriba o abajo
4
5
6
7
SELECR (+)
S
CAMBIAR (+)
S
Para
desplazarse a Imagen
abrir el proyector de imagen
desplazarse a una imagen/
animación
Desplazarse a (Ningún) para
desactivar la imagen de fondo.
seleccionar la imagen
desplazarse a Esquema
ajustar el esquema de imagen
desplazarse a Centrar, Mosaico o
Pantalla completa
Centrar coloca la imagen en el
centro de la pantalla.
Programación del teléfono
Mosaico llena la pantalla con
copias adyacentes de la
imagen.
142
8 SELECR (+)
9 ATRÁS (-)
Pantalla completa cambia el
tamaño de la imagen, si fuera
necesario, para llenar la
pantalla.
confirmar la programación de
esquema
guardar programación de
fondo
Programación de una imagen
de protector de pantalla
Programe una foto, imagen o animación como imagen de
protector de pantalla.
La imagen de protector de pantalla aparece cuando se
abre la solapa y no se detecta actividad durante cierto
tiempo. Si fuera necesario, la imagen se encoge para
ajustarse a la pantalla. La animación se repite durante un
minuto y luego aparece su primer marco.
Consejo: Desactive el protector de pantalla para
aumentar la vida útil de la batería.
Localización de
funciones
Oprima
M > Programación
> Personalizar
> Protector de pantalla
Para
desplazarse a Imagen
2 CAMBIAR (+)
abrir el proyector de imagen
3 S arriba o abajo desplazarse a una imagen/
animación
Desplazarse a (Ningún) para
desactivar la imagen de
protector de pantalla.
4 SELECR (+)
seleccionar la imagen
5 S
desplazarse a Retraso
Programación del teléfono
1 S
143
Oprima
Para
6 CAMBIAR (+)
programar el intervalo de
retraso
7 S
desplazarse al intervalo de
inactividad que activa el
protector de pantalla
8 SELECR (+)
confirmar la programación de
retraso
9 ATRÁS (-)
guardar programación de
protector de pantalla
Programación de contraste
de pantalla
Programación del teléfono
Localización de
funciones
144
M > Programación
> Config inicial
> Prog de contraste
Ajuste de la luz de fondo
Programe la cantidad de tiempo que permanece
encendida la luz de fondo de la pantalla y teclado o apagar
la luz de fondo para extender la vida útil de la batería.
Localización de
funciones
M > Programación
> Config inicial
> Luz de fondo
Ocultar o mostrar información
de ubicación
Su teléfono puede usar la función de información
de ubicación automática (ALI) para indicarle a la
red cuál es su ubicación física.
Cuando la función ALI se programa en
Ubicación activada, el teléfono muestra el indicador x (ALI
activada). Los servicios pueden usar su ubicación
conocida para proporcionar información útil (por ejemplo,
indicaciones viales o la ubicación del banco más cercano).
Cuando la red o el servicio soliciten su ubicación, el
teléfono se la pide. Puede negarse a dar esta información.
Cuando la función ALI esta programada en Sólo 911, el
teléfono muestra el indicador u (ALI desactivada) y no
envía información acerca de la ubicación, a menos que
llame al teléfono de emergencia (911, por ejemplo).
Oprima
1 S
2 SELECR (+)
M > Programación > Posición
Para
desplazarse a Posición Act o
Sólo 911
seleccionar la programación
Limitaciones de AGPS
A veces, no se cuenta con las señales adecuadas de
múltiples satélites, generalmente, porque la antena de su
teléfono AGPS no puede establecer una vista de un área
amplia de cielo abierto. En estos casos, la función AGPS
Programación del teléfono
Localización de
funciones
145
no funciona. Dichas situaciones incluyen, pero no se
limitan a las siguientes:
• en ubicaciones subterráneas
• dentro de edificios, trenes u otros vehículos cubiertos
• bajo cualquier otro techo o estructura de metal o
concreto
• entre edificios altos o bajo una cubierta densa de
árboles
• cerca de torres potentes de radio o televisión
• cuando su antena AGPS está cubierta (por ejemplo,
por la mano u otro objeto) o cuando está apuntando
hacia la tierra
Programación del teléfono
• cuando hay temperaturas extremas fuera de
límites abiertos del teléfono
146
Incluso cuando la información de la ubicación se
puede calcular en dichas situaciones, puede demorar
más tiempo de lo usual, y la estimación de su ubicación
puede no ser tan precisa.
Incluso cuando hay señales de múltiples satélites, la
función AGPS entrega sólo una ubicación aproximada, a
menudo, dentro de 150 pies (45 metros), pero a veces
mucho mayor con respecto a su ubicación real.
Los satélites utilizados por la función AGPS de su teléfono
están controlados por el gobierno de Estados Unidos y
están sujetos a los cambios implementados de acuerdo
con la política del usuario AGPS del Departamento de
Defensa y del Federal Radio Navigation Plan. Estos
cambios pueden afectar el rendimiento de la función
AGPS de su teléfono.
Conservación de la carga de la
batería
Algunas redes y teléfonos incluyen una programación de
ahorro de batería para prolongar la vida útil de la batería.
Cuando esta función se activa, su teléfono apaga
automáticamente la luz de fondo del teclado si detecta que
hay suficiente luz natural.
Localización de
funciones
M > Programación
> Config inicial > Ahorro bat
Programación del teléfono
147
Funciones de llamada
Para obtener instrucciones básicas sobre cómo realizar y
contestar llamadas, consulte la página 105.
Funciones de llamada
Cambio de la línea activa
Cambiar la línea de teléfono activa para realizar y
recibir llamadas desde su otro número de
teléfono.
M > Info de teléfono
> Línea activa
Localización de
funciones
Remarcación de un número
Oprima
Para
1 N
ver la lista de llamadas hechas
2 S
desplazarse al ingreso al que
desea llamar
3 N
remarcar el número
Uso de remarcación automática
Cuando recibe una señal de ocupado, su
teléfono muestra Llamada falló, Número ocupado.
Con el remarcado automático, su teléfono vuelve a
marcar automáticamente el número durante
cuatro minutos. Cuando se procesa la llamada, su
148
teléfono timbra o vibra una vez, muestra Remarcación exitosa y
luego conecta la llamada.
Debe activar el remarcado automático para usar esta
función. Para activar o desactivar el remarcado automático:
Localización de
funciones
M > Programación > Config inicial
> Remarcado auto
Oprima
N o REINTEN (+)
Para
activar la remarcación
automática
Desactivación de una alerta de
llamada
Funciones de llamada
Cuando esté desactivado el remarcado automático, puede
activar esta función manualmente para remarcar un
número de teléfono. Cuando escuche una señal de
ocupado rápida y vea Llamada falló:
Puede desactivar la alerta de llamada entrante de su
teléfono antes de contestar la llamada.
Oprima
Para
cualquiera de los
desactivar la alerta
botones de volumen
149
Llamada a un número de
emergencia
Funciones de llamada
Su proveedor de servicios programa uno o más números
de emergencia, como el 911, a los cuales usted puede
llamar en cualquier situación, incluso cuando su teléfono
está bloqueado.
Nota: Los números de emergencia varían según el país.
El o los números de emergencia programados en su
teléfono pueden no funcionar en todas las ubicaciones y, a
veces, una llamada de emergencia puede no cursarse
debido a problemas con la red, ambientales o de
interferencia.
Oprima
1 teclas
correspondientes
del teclado
2 N
Para
marcar el número de
emergencia
llamar al número de
emergencia
Uso de AGPS durante una
llamada de emergencia
Cuando realiza una llamada de emergencia, la
función Sistema de ubicación global asistido
(AGPS) del teléfono puede calcular su ubicación
aproximada y ayudar a que personal del servicio
de emergencia lo encuentre.
150
Notas:
• Esta función sólo funciona si el centro de respuesta a
emergencias puede recibir y procesar la información
de ubicación. Si le interesa saber si su centro de
respuesta a emergencias local puede recibir
información de ubicación AGPS, comuníquese con
las autoridades locales.
Para mejores resultados, se debe poner en un lugar en
que la antena del teléfono pueda establecer una vista
despejada del cielo abierto. Esto permite que el teléfono
acceda a las señales satelitales AGPS. Incluso bajo
buenas condiciones, puede demorar 30 segundos o más
para determinar su ubicación aproximada. Este tiempo
aumenta y la precisión de los resultados disminuye
cuando hay un acceso reducido a las señales satelitales.
Funciones de llamada
• Para que se active la función AGPS cuando realiza
llamadas de emergencia, se debe activar el servicio.
Consulte la página 145.
Si el teléfono no tiene acceso adecuado a las señales
satelitales AGPS, se entrega automáticamente la
ubicación de la torre de celulares más cercana, que
esté en contacto con su teléfono, al centro de
respuesta de emergencias.
Debido a las limitaciones de la función AGPS, entregue
siempre la información más completa de su ubicación al
centro de respuesta a emergencias, igual que lo haría si
usara un teléfono sin capacidades AGPS. Además,
permanezca al teléfono el tiempo necesario para que el
centro de respuesta a emergencia le de instrucciones.
151
Visualización de llamadas
recientes
Funciones de llamada
Su teléfono mantiene listas de las llamadas recientemente
recibidas y hechas, incluso si las llamadas no se
conectaron. Las listas se ordenan del ingreso más nuevo
al más antiguo. Los ingresos más antiguos se borran a
medida que se agregan ingresos nuevos.
Atajo: oprima N en la pantalla principal para ver la lista
de llamadas hechas.
Localización de
funciones
Oprima
1 S
M > Llams recientes
2 SELECR (+)
3 S
Para
desplazarse a Recibidas o
Hechas
seleccionar la lista
desplazarse a un ingreso
4 N
Nota: < significa que la
llamada se conectó.
llamar al número de ingreso
o
VER (+)
ver detalles de ingreso
o
M
152
abrir el Menú últ llams para
realizar diversas acciones en
el ingreso
El Menú últ llams puede incluir las siguientes opciones:
Opción
Almacenar
Borrar
Borrar todo
Enviar mensaje
Agregar dígitos
Devolución de una llamada no
contestada
Funciones de llamada
Agregar número
Descripción
Crear un ingreso de Contactos con el
número en el campo Núm.
Borra el ingreso.
Borra todos los ingresos en la lista.
Abrir un mensaje de texto nuevo
con el número en el campo A.
Agrega dígitos después del
número.
Agrega un número de Contactos o de
las listas de las últimas llamadas.
Su teléfono mantiene un registro de sus llamadas no
contestadas y muestra:
• el indicador T (llamada perdida)
• X Llams perdidas, donde X es el número de llamadas
perdidas
Oprima
1 VER (+)
2 S
3 N
Para
ver la lista de llamadas
recibidas
seleccionar una llamada para
devolverla
hacer la llamada
153
Uso de los apuntes
El juego de dígitos más recientes que ingresó se
almacena en la memoria de apuntes del teléfono. Este
puede ser un número de teléfono al que llamó o un
número que ingresó, pero al que no llamó. Para recuperar
el número almacenado en los apuntes:
Funciones de llamada
Localización de
funciones
Oprima
N
M > Llams recientes > Apuntes
Para
llamar al número
o
M
abrir el Menú de marcación para
agregar un número o insertar
un carácter especial
o
ALMACNR (+)
crear un ingreso de Contactos
con el número en el campo
Núm.
Adición de un número
Cuando marque (con dígitos visibles en la pantalla):
Oprima
M > Agregar número
154
Para
agregar un número de
Contactos o de las listas de
llamadas recientes
Llamada con marcación rápida
A cada ingreso que almacene en Contactos se le asigna un
número único de marcado rápido.
Consejo: Para ver el número de marcación rápida de un
ingreso, oprima M > Contactos, desplácese hasta el
ingreso y oprima VER (+).
Para llamar a un ingreso de Contactos mediante marcación
rápida:
Para
escribir el número de
marcación rápida para el
ingreso que desea llamar
enviar el número
llamar al ingreso
Llamada con marcación con
una sola tecla
Funciones de llamada
Oprima
1 teclas
correspondientes
del teclado
2 #
3 N
Para llamar a los ingresos 1 a 9 de Contactos, mantenga
oprimido el número de marcación rápida de un dígito
durante un segundo.
Uso del correo de voz
Los mensajes de correo de voz que recibe se
almacenan en la red. Para escuchar sus
mensajes, debe llamar al número telefónico del
correo de voz.
155
Nota: Su proveedor de servicio puede incluir información
adicional acerca de la utilización de esta función.
Reproducción de mensajes de correo de voz
Localización de
funciones
M > Mensajería > Correo de voz
> LLAMAR
Funciones de llamada
El teléfono llama a su número de correo de voz. Si no hay
un número de correo de voz almacenado, el teléfono le
solicita que guarde uno.
Consejo: Asimismo, su proveedor de servicio puede
almacenar su número de correo de voz como el número 1
de los ingresos de Contactos. De ser así, puede mantener
oprimido el 1 para llamar a su número de correo de voz.
Recepción de mensajes de correo de voz
Cuando recibe un mensaje de correo de voz, el teléfono
muestra el indicador & (mensaje de correo de voz) y una
notificación de Correo de voz nvo.
Oprima
LLAMAR (+)
Para
escuchar el mensaje
El teléfono llama a su número de correo de voz. Si no hay
un número de correo de voz almacenado, el teléfono le
solicita que guarde uno.
156
Almacenamiento de su número de correo
de voz
De ser necesario, utilice el siguiente procedimiento para
almacenar su número telefónico de correo de voz en su
teléfono. Por lo general, esto ya ha sido realizado por su
proveedor de servicio.
Localización de
funciones
Para
ingresar su número de correo
de voz
guardar el número
Funciones de llamada
Oprima
1 teclas
correspondientes
del teclado
2 OK (+)
M > Mensajería
> Prog de mensajes
> Núm de correo de voz.
157
Funciones del teléfono
Esta sección le ayuda a localizar funciones en su teléfono
que no están descritas en detalle en esta guía.
Menú principal
Funciones del teléfono
Ésta es la disposición estándar del menú principal. La
organización del menú y los nombres de funciones
pueden variar en su teléfono. Puede que no todas las
funciones estén disponibles en el teléfono.
n Contactos
h Galería de medios
• Cámara
s Llams recientes
• Imágenes
•
•
•
•
•
•
e
Recibidas
Hechas
Apuntes
Duración de llams
Tiempos de datos
Volúmenes de datos
Mensajería
• Crear mensaje
• Correo de voz
• Buzón
• Buzón de salida
• Texto rápido
• Borradores
• Borrar mensajes
• Prog de mensajes
• Sonidos
w
Programación
(vea la página siguiente)
É Herramientas
•
•
•
•
•
Calculadora
Agenda
Atajos
Grabaciones de voz
Despertador
m Info del teléfono
•
•
•
•
Mi tel tel
Línea activa
Medidor de bat
Otra información
Ahora*
á
Acceso Web
• Browser Web
• Sesiones Web
* Su proveedor de servicio puede
usar un nombre distinto para la
función Ahora. Ahora es una
función que depende de la red.
158
Menú Programación
Estilos de timbre
• Estilo
• Estilo Detalle
l
Personalizar
• Pantalla principal
• Menú principal
• Config de marcado
por voz
• Estilo de color
• Saludo
• Fondo de pantalla
• Prot. pantalla
• Programación de sonido
U
Config llam entrante
• Cronómetro llam entrante
• Opc para contestr
• Alerta msj
u
Seguridad
• Bloq de teléfono
• Bloq de funciones
• Restringir llams
• Contraseñas nvas
•
•
•
•
•
•
•
•
•
•
•
•
•
•
j
Hora y fecha
Altavoz
Marcar PIN auto
Remarcado auto
Luz de fondo
Configuración TTY
Desplazar
Idioma
Ahorro batería
Contraste
DTMF
Guión
Reinicio General
Borrado General
Opciones de red
• Red actual
• Sólo análogo
• Programar modo
• Tono de servicio
• Tono llam perdida
•
•
•
•
Contestar auto
Manos libres auto
Retraso al apagarse
Tiempo de carga
S
Audífono
• Contestar auto
• Marcado por voz
Ï
Ubicación
• Posición Act
• Sólo 911
L Conexión
• Llamada entrante
Atajos
Cambiar alerta de timbre:
Abra la solapa, oprima el
botón del volumen para
disminuir el volumen, cambie
a alerta de vibración y luego a
alerta silenciosa. Oprima el
botón para subir el volumen
para reiniciar la alerta de
timbre y aumentar el volumen.
Mostrar mi número
telefónico:
Oprima M # (en la
pantalla principal de inicio).
Funciones del teléfono
Z Config inicial
J Prog. para auto
Ir a la lista de llamadas
hechas:
Oprima N (en la pantalla
principal de inicio).
Salir del sistema de menús:
Oprima O.
159
Funciones de llamada
Función
Restringir
llams
Llamadas
TTY
Descripción
Restringe las llamadas
salientes o entrantes:
M > Programación
> Seguridad > Restringir llams
> Cód de desbloqueo
Configura su teléfono para
utilizarlo con un dispositivo
TTY opcional:
M > Programación
> Config inicial > Config TTY
Funciones del teléfono
Mensajes
Función
Enviar
mensaje de
texto
Descripción
Envía un mensaje de texto:
M > Mensajería > Crear msj
> Nuevo msj texto
Enviar
mensaje de
imagen
Envía un mensaje de
imagen:
M > Mensajería > Crear msj
> Nuevo msj PIX
Insertar
Al crear un mensaje de
objetos en el texto:
mensaje de M > Insertar
texto
160
Función
Descripción
Usar plantilla Abre una plantilla MMS con
MMS
medios precargados:
M > Mensajería > Crear msj
> Plantillas PIX
Leer mensaje Permite leer un nuevo
mensaje de texto o de
multimedia recibido:
Oprima LEER (+).
Almacenar
objetos de
mensaje
Vaya a una diapositiva de
mensaje multimedia o
resalte un objeto en una
carta y luego:
M > Almacenar
Mensajes
enviados
Ver mensajes enviados:
M > Mensajería
> Buzón de salida
Mensajes
recibidos
Lea mensajes recibidos:
M > Mensajería > Buzón
Funciones del teléfono
Texto rápido Envíe o cree un mensaje de
nota rápida:
M > Mensajería > Texto rápido
Consejo: Oprima M para
realizar diversas acciones en el
mensaje.
161
Función
Borradores
Descripción
Vea los mensajes
guardados en la carpeta de
borradores:
M > Mensajería > Borradores
Borrar
mensajes
Borra todos los mensajes o
sólo mensajes del Buzón de
salida o carpeta de
borradores:
M > Mensajería > Borrado de mensajes
Funciones del teléfono
Contactos
162
Función
Crear
ingreso
Descripción
Crea un nuevo ingreso de Contactos:
M > Contactos
M > [Nuevo ingreso] > Número telefónico
Crear lista de Crea una lista de correo de grupo
correo de
como ingreso de Contactos:
grupo
M > Contactos
M > [Ingreso nuevo] > Lista de correo
Marcación de Llamar a un número almacenado en
un número Contactos:
M > Contactos, resalte el ingreso,
oprima N para llamar
Función
Número de
marcado por
voz
Número de
marcación
por dígito
Descripción
Marque un ingreso de Contactos
pronunciando el nombre del ingreso:
Oprima y suelte el botón de voz,
luego (en 2 segundos después de la
indicación) diga “Marcar por nombre”.
Cuando se le vuelva a indicar, diga el
nombre de un ingreso de Contactos.
Nota: Puede usar la marcación por
dígitos para números que no están
almacenados en Contactos.
Programar ID Asigna una alerta de timbre distintivo
de timbre
a un ingreso de Contactos:
para ingreso M > Contactos > Ingreso de
M > Editar > Iden de timbre > CAMBIAR
> nombre de timbre
Funciones del teléfono
Nota: Todos los ingresos de Contactos
se guardan automáticamente como
números de marcación por voz.
Marque un número diciendo los
dígitos del número:
Oprima y suelte el botón de voz,
luego (en 2 segundos después de la
indicación) diga “Marcar por dígito”.
Cuando se le vuelva a indicar, diga el
número al que desea llamar.
163
Funciones del teléfono
Función
Programar
categoría
para ingreso
164
Descripción
Programa la categoría para un
ingreso de Contactos:
M> Contactos > Ingreso de
M > Editar > Categoría > CAMBIAR
> Nombre de categoría
Ordenar lista Programa el orden en que se
de contactos enumeran los ingresos de Contactos:
M > Contactos
M > Configuración > Ordenar por > orden
de clasificación
Programa
Programa el número primario para un
número
ingreso de Contactos con múltiples
primario
números:
M > Contactos > Ingreso de > SELECR
M > Programar primario
> número telefónico
Vista de
Programar para ver sólo números
número
primarios o todos los números
primario o de cuando se ven los ingresos:
todos los
M > Contactos > Ingreso de
números
M > Config > SELECR > CAMBIAR
> Todos los contactos o Contactos principales
Cambiar
Editar un ingreso de Contactos:
ingreso
M > Contactos > Ingreso de
M > Editar
Borrar
Borrar un ingreso de Contactos:
ingreso
M > Contactos > Ingreso de
M > Borrar
Función
Copiar un
ingreso de
contactos
Copia de
varios
ingresos de
contactos
Descripción
Copiar un ingreso de Contactos en otra
ubicación de Contactos:
M > Contactos > Ingreso de
M > Copiar Ingreso > número
de posición
Copiar un ingreso de Contactos en otra
ubicación de Contactos:
M > Contactos > Ingreso de
M > Copiar Ingresos > de(inicio):
> número de posición > de(término):
> número de posición > a(término):
> número de posición
Personalización de funciones
Puede hacer llamadas y acceder a algunas opciones del
menú, diciendo los comandos al teléfono:
Acción
1 Oprima y suelte el botón de voz del lado
derecho del teléfono.
Funciones del teléfono
Uso de los comandos de voz
Nota: Si el Altavoz todavía no está encendido y
desea activarlo, oprima la tecla
inteligente/altavoz del lado izquierdo Luego,
puede decir los comandos en voz alta y
escuchar las indicaciones del teléfono.
El teléfono muestra Diga un comando.
165
Acción
2 Diga uno de los siguientes comandos:
Marcación por nombre, Marcación por dígito, Cámera, Correo
de voz, Remarcado, Recibidos
Su teléfono abre el menú correspondiente o
realiza la acción adecuada.
Para hacer llamadas
La Marcación por voz avanzada permite usar comandos
de voz para hacer llamadas.
Funciones del teléfono
• Use Marcación por nombre para marcar un ingreso de
Contactos diciendo el nombre del ingreso.
• Use Marcación por dígito para marcar un número diciendo
los dígitos del número.
Nota: Esta función sólo reconoce números de 7, 10 y 11
dígitos. No digitará números de tres dígitos como el 911.
Para hacer una llamada de emergencia, use el teclado del
teléfono para marcar y enviar el número.
Acción
1 Oprima y suelte el botón de voz del lado derecho
del teléfono.
El teléfono muestra Diga un comando y reproduce la
misma instrucción en voz alta.
2 Diga “Marcación por nombre” o “Marcación por
dígito”.
166
Funciones del teléfono
Acción
3 Cuando se le indique, diga el nombre del ingreso
de Contactos o diga los dígitos del número.
Si el teléfono reconoce el nombre o número,
hace la llamada.
Si el teléfono le solicita que repita un nombre o
número, vuelva a decirlo. Si el nombre o número
no es válido o no se reconoce, el teléfono no
realiza la llamada.
Si el teléfono no reconoce el nombre o número,
muestra una lista de hasta 3 nombres o números
y pregunta, “¿Dijo ...”? y resalta el primer
elemento de la lista.
• Si el elemento es el correcto, diga “Sí” para
hacer la llamada.
o
• Si el elemento no es el correcto, diga “No”
para pasar al siguiente elemento.
o
• Oprima S para desplazarse al elemento
correcto y oprima Sí (+).
o
• Oprima el botón de voz para salir de la lista y
repetir el nombre o número.
Si llega al final de la lista sin confirmar un
elemento de la lista, el teléfono pregunta si desea
intentarlo de nuevo. Diga “Sí” si desea volver a
decir el nombre o número. Diga “No” para salir
sin hacer la llamada.
167
Consejo: Cuando diga un número, diga los números a
velocidad y volumen de voz normal, pronunciando cada
dígito claramente. Evite hacer pausas entre dígitos.
Para adaptar la marcación por voz avanzada a su
voz
Funciones del teléfono
Para la mayoría de la gente, la Marcación por voz
avanzada funciona bien sin programación inicial. Sin
embargo, si el teléfono, con frecuencia, no puede
reconocer los números correctamente cuando usa la
Marcación por voz avanzada, puede mejorar sus
resultados adaptándolo a su voz.
168
Nota: Si varias personas usan el teléfono, reinicie la
Marcación por voz avanzada a su programación original
antes de continuar. Esto asegura que no va a guardar su
programación sobre la de otra persona.
Adaptación de la marcación por voz avanzada a su voz
Localización de
funciones
1
2
3
4
M > Programación > Personalizar
> Config de marcado por voz
Acción
Desplazarse a Adaptar dígitos.
Oprima SELECR (+)
Oprima INICIAR (+).
Cuando el teléfono muestra la instrucción para
que diga la primera secuencia de dígitos, espere
el bip y luego repita los dígitos en tono de voz
normal.
Acción
5 Si la grabación suena aceptable (sin errores ni
ruidos de fondo), diga “Sí” u oprima SÍ (+).
o
Si la grabación no es aceptable, diga “No” u
oprima NO (-). Cuando se le solicite volver a
decir los dígitos, espere el bip y repita los
dígitos. El teléfono le pedirá repetir este proceso
con hasta 12 conjuntos de dígitos adicionales.
6 Cuando el teléfono le inidque, “¿Más
adaptación?”, oprima SÍ (+) para continuar o
NO (-) para terminar el proceso.
Consejo: Cuando se adapta la Marcación por voz
avanzada:
• Busque un lugar tranquilo para hacer la grabación.
• Espere el bip antes de comenzar a hablar.
• Hable a velocidad y volumen de voz normal,
pronunciando cada dígito claramente. Evite hacer
pausas entre dígitos.
Funciones del teléfono
Cuando haya terminado el proceso de
adaptación, el teléfono le dirá “Adaptación
completa”).
• Si comete un error mientras graba una secuencia
de dígitos o si un ruido inesperado arruina la
grabación, vuelva a grabar esa secuencia.
169
Para reiniciar la Marcación por voz avanzada
Localización de
funciones
M > Programación > Personalizar
> Config de marcado por voz
Oprima
1 S
2 OK (+)
Para
desplazarse a Reiniciar dígitos
reiniciar Marcación por voz
avanzada a la configuración
predeterminada de fábrica
Funciones del teléfono
Personalización de funciones adicionales
170
Función
Descripción
IDs de timbre Activa las alertas de timbre distintivo
asignadas a los ingresos de Contactos:
M > Programación > Estilos de timbre
> Estilo Detalle > Iden de timbre
Volumen de
Programa el volumen del timbre:
timbre
M > Programación > Estilos de timbre
> Estilo Detalle > Volumen de timbre
Volumen de
Programa el volumen del teclado al
teclado
oprimir las teclas:
M > Programación > Estilos de timbre
> Estilo Detalle > Volumen de tecla
Recordatorios Programa las alertas de recordatorios
de mensajes de imágenes, texto o
correo de voz que reciba:
M > Programación > Estilos de timbre
> Estilo Detalle > Recordatorios
Función
Alertas de
mensaje
Funciones del teléfono
Descripción
Programa si recibe o no una alerta
por los mensajes recibidos durante
una llamada:
M > Programación > Config en llamada
> Alerta SMG
Saludo
Cambie el saludo que
aparece al encender el
teléfono:
M > Programación
> Personalizar > Saludo
Mostrar texto Programa el texto de la pantalla
inicial para que quede justificada o
centrada en la pantalla.
M > Programación > Personalizar
> Pantalla principal> Esquema
Vista de reloj Muestra un reloj análogo o lectura de
hora digital en la pantalla principal:
M > Programación > Personalizar
> Pantalla principal> Reloj
Vista de menú Muestra el menú principal como
iconos gráficos con una lista de
texto:
M > Programación > Personalizar
> Menú principal > Vista
Menú
Reordena el menú principal de su
principal
teléfono:
M > Programación > Personalizar
> Menú principal > Reordenar
171
Funciones del teléfono
Función
Mostrar u
ocultar los
iconos del
menú
Descripción
Muestra u oculta los iconos de
funciones del menú en la pantalla
principal:
M > Programación > Personalizar
> Pantalla principal > Teclas > Iconos
Cambio de
Cambia las etiquetas de las teclas
teclas
variables e iconos de las funciones
programables del menú en la pantalla principal:
M > Programación > Personalizar
> Pantalla principal > Teclas
> Tecla programable izquierda o
Tecla programable derecha
Atajos
Crea un atajo para un elemento de
menú:
Resalte el elemento de menú, luego
mantenga oprimida M.
Seleccione un atajo:
M > Herramientas > Atajos > nombre
de atajo
Funciones de menú
Función
Idioma
172
Descripción
Programa idioma de menú:
M > Programación > Config inicial > Idioma
Función
Desplazar
Reinicio
General
Borrado
General
Nota: Borrado general borra todos los
ingresos de Contactos.
Funciones de marcación
Funciones del teléfono
Descripción
Programa la barra resaltada para
detener o dar un ciclo en las listas de
menú:
M > Programación > Config inicial
> Desplazarse
Reinicia todas las opciones excepto el
código de desbloqueo, código de
seguridad y cronómetro de duración:
M > Programación > Config inicial
> Reinicio General
Reiniciar todas las opciones, excepto
código de desbloqueo, código de
seguridad, cronómetro totalizador y
borrar todas las programaciones e
ingresos del usuario.
M > Programación > Config inicial
> Borrado general
Función
Descripción
Marcar PIN Marcación automática de un código
auto
PIN de autenticación para llamadas
salientes:
M > Programación > Config inicial
> Marcar PIN auto
173
Función
Tonos
DTMF
Descripción
Activa tonos DTMF:
M > Programación > Config inicial > DTMF
Envía tonos DTMF durante una
llamada:
Oprima las teclas numéricas.
Envía números almacenados como
tonos DTMF durante una llamada:
Resalte un número en Contactos o en la
lista de llamadas recientes, luego
oprima M > Enviar timbres.
Funciones del teléfono
Monitoreo de llamada
Tiempo de conexión de red es el tiempo transcurrido
desde el momento en que se conecta a la red de su
proveedor de servicio hasta el momento en que termina la
llamada al oprimir O. Este tiempo incluye las señales de
ocupado y de timbre.
Es posible que el tiempo de conexión a la red que
registra en su cronómetro reiniciable no sea igual al
tiempo que le factura su proveedor de servicio. Para
conocer la información de facturación, póngase en
contacto directamente con su proveedor de servicio.
Función
Duración
de llams
174
Descripción
Ve los cronómetros de
llamadas:
M > Llams recientes
> Duración de llams
Función
Cronómetro
llam
entrante
Descripción
Muestra información de hora
o costo durante una llamada:
M > Programación
> Config en llam > Cron llamada
Tiempos de Vea los cronómetros de
datos
llamadas de datos:
M > Llams recientes
> Tiempos de datos
Volúmenes Vea los medidores de
de datos
volumen de datos:
M > Llams recientes
> Volúmenes de datos
Nota: El uso de dispositivos inalámbricos y sus accesorios
puede estar prohibido o restringido en ciertas áreas.
Obedezca siempre las leyes y regulaciones sobre el uso
de estos productos.
Función
Programación
de volumen
de accesorio
(equipo para
automóvil o
audífono)
Descripción
Ajuste los niveles de
volumen del accesorio del
equipo para automóviles:
Durante una llamada activa,
oprima las teclas de volumen arriba
o abajo del teléfono.
Funciones del teléfono
Funciones del manos libres
175
Función
Altavoz
externo
Funciones del teléfono
Contestar
auto
(equipo para
automóvil o
audífono)
Marcado por
voz
(audífono)
Manos libres
auto
(equipo para
automóvil)
Retraso al
apagarse
(equipo para
automóvil)
176
Descripción
Active un altavoz externo
conectado durante una
llamada:
Oprima el botón del audífono
en el lado izquierdo del teléfono.
Conteste automáticamente
las llamadas cuando esté
conectado con un equipo
para automóvil o con un
audífono:
M > Programación > Prog. para auto o
Audífono > Contestar auto
Activa marcado por voz con
tecla enviar/fin del audífono:
M > Programación > Audífono
> Marcado por voz
Enruta automáticamente las
llamadas hacia un equipo
para automóvil cuando está
conectado:
M > Programación > Prog para auto
> Manos libres auto
Programa el teléfono para
que quede activado por un
período después de apagar
el motor del automóvil:
M > Programación > Prog para auto
> Retraso al apagarse
Función
Tiempo de
carga
(equipo para
automóvil)
Descripción
Cargue el teléfono por un
lapso de tiempo después de
apagar el motor del
automóvil:
M > Programación > Prog para auto
> Tiempo de carga
Llamadas de datos y fax
Funciones del teléfono
Función
Descripción
Enviar
Conecte el teléfono al
datos o fax dispositivo, luego haga la
llamada a través de la
aplicación del dispositivo.
Recibir
Conecte el teléfono al
datos o fax dispositivo, luego conteste la
llamada a través de la
aplicación del dispositivo.
Voz
Conecte el teléfono al
después
dispositivo, ingrese el número,
fax
oprima M > Menú de marcación
> Voz después fax, después
oprima N para realizar la llamada.
177
Funciones de red
Función
Descripción
Programación Vea la información de red y
de red
ajuste la programación de la
red:
M > Programación
> Opciones de red
Funciones del teléfono
Funciones del organizador
personal
178
Función
Agregar
evento a la
agenda
Ver evento
de agenda
Descripción
Agrega un evento a la agenda:
M > Herramientas > Agenda > día K
> Nuevo
Muestra o edita detalles de eventos:
M > Herramientas > Agenda > día K
> evento > VER (+)
Recordatorio Muestra recordatorio de evento:
evento
VER (+)
No considerar recordatorio de evento:
SALIR (-)
Copia de un Copia un evento de agenda para la
evento de
fecha y hora:
agenda
M > Herramientas > Agenda > día K
> evento K
M > Copiar
Función
Programar
alarma
Desactivar
alarma
Descripción
Programa una alarma:
M > Herramientas > Despertador
Desactiva la alarma:
Oprima DESACTIVAR (-) u O.
Programe un retraso de 8 minutos:
Oprima SNOOZE (+).
Crear una
Crea una grabación de voz:
grabación de Mantenga oprimida la tecla de voz,
voz
hable al parlante del teléfono, suelte la
tecla de voz cuando termine de hablar.
Funciones del teléfono
Nota: La grabación de las llamadas
telefónicas está sujeta a diversas
leyes estatales y federales
relacionadas con la confidencialidad y
la grabación de conversaciones.
Reproducir Reproduce una grabación de voz:
una
M > Herramientas > Registros de voz
grabación de > registro de voz
voz
Calculadora Calcula números:
M > Herramientas > Calculadora
Convertidor Convierte monedas:
de moneda M > Herramientas > Calculadora
M > Tipo de cambio
Ingrese el tipo de cambio, oprima
OK (+), ingrese el monto, oprima
M > Conversión de moneda.
179
Seguridad
Función
Bloqueo de
funciones
Descripción
Bloquea las funciones del teléfono:
M > Programación > Seguridad
> Bloq de funciones
Funciones del teléfono
Noticias y diversión
Función
Descripción
Iniciar
Inicia una sesión de
Microbrowser microbrowser:
M > Acceso Web 2.0
> Browser Web
Sesiones Web Selecciona o crea una
sesión Web:
M > Acceso Web 2.0
> Sesión Web
Descargar
Baja un juego o aplicación
juego o
con Ahora:
aplicación
M > Ahora
Seleccione categoría,
aplicación, opción de precio. Se
aplican los cargos por tiempo aire
normal y/o uso de carrier.
Nota: Su proveedor de servicio
puede usar un nombre distinto para
la función Ahora.
180
Función
Descripción
Iniciar juego o Inicia un juego o aplicación
aplicación
con Ahora:
M > Ahora
> función
Administrar Administra imágenes y
imágenes
animaciones:
M > Galería de medios
> Imágenes
Administrar Administra tonos de timbre, sonidos
sonidos
que usted ha compuesto o
descargado:
M > Galería de medios > Sonidos
Funciones del teléfono
181
Datos de índice de absorción
específico para Estados Unidos
El modelo de teléfono celular cumple con las exigencias del
gobierno para la exposición a ondas de radio.
Su teléfono celular es un transmisor y receptor de radio. Se ha diseñado
y fabricado para no exceder los límites para la exposición a la energía
de radiofrecuencia (RF) establecidos por la Federal Communications
Commission (FCC) el Gobierno de Estados Unidos y por por los
organismos reguladores de Canadá. Estos límites forman parte de
directrices globales y establecen los niveles permitidos de energía RF
para la población general. Las directrices se basan en estándares
preparados por organizaciones científicas independientes mediante la
evaluación periódica y exhaustiva de estudios científicos. Los estándares
incluyen un margen de seguridad considerable destinado a garantizar la
protección de todas las personas, independientemente de su edad
o salud.
El estándar de exposición para teléfonos celulares móviles emplea una
unidad de medición conocida como Índice de absorción específico o
SAR. El límite SAR establecido por la FCC y por los organismos
reguladores de Canadá es de 1,6 W/kg.1 Las pruebas de SAR se
realizan utilizando posiciones de operación estándar aceptadas por la
FCC y por Industry Canada en que el teléfono transmite con su nivel de
potencia certificado más alto en todas las bandas de frecuencia
probadas. Aunque el índice SAR se determina al nivel de potencia
certificado más alto, el nivel real de SAR del teléfono durante el
funcionamiento puede encontrarse muy por debajo del valor máximo.
Esto se debe a que el teléfono está diseñado para funcionar en niveles de
potencia múltiples, de modo que sólo usa la potencia necesaria para
conectarse con la red. En general, mientras más cerca se encuentre de
una estación base celular, menor será la potencia de salida.
182
Antes de que un modelo de teléfono esté disponible para la venta al
público de Estados Unidos y Canadá, debe ser probado y certificado ante
la FCC e Industry Canada para verificar que no exceda el límite
establecido por cada gobierno para la exposición segura. Las pruebas se
realizan en las posiciones y lugares (por ejemplo, en la oreja y en el
cuerpo) informados a la FCC y disponibles para la revisión por Industry
Canada. El valor de índice SAR más alto para este modelo de teléfono en
las pruebas para uso en la oreja es de 1,55 W/kg y cuando se usa en el
cuerpo, como se describe en esta guía del usuario, es de 1,48 W/kg (las
mediciones del teléfono usado en el cuerpo difieren según el modelo de
teléfono, dependiendo de los accesorios disponibles y de las exigencias
de regulación).2
Aunque puede haber diferencias entre los niveles de índice SAR de los
diferetes teléfonos y las distintas posiciones, todas cumplen con las
exigencias gubernamentales para exposición segura. Tenga en cuenta
que las mejoras a este modelo podrían ocasionar diferencias en el índice
SAR para los productos más nuevos, de todas maneras, los productos se
diseñan para que cumplan con las directrices.
Se puede encontrar información adicional sobre Índices de absorción
específicos (SAR) en el sitio Web de Cellular Telecommunications &
Internet Association (CTIA):
http://www.phonefacts.net
o en el sitio Web de Canadian Wireless Telecommunications Association
(CWTA):
http://www.cwta.ca
1. En Estados Unidos y Canadá, el límite de SAR para teléfonos celulares
usados por el público es de 1,6 W/kg promediados sobre un gramo de
tejido. El estándar incorpora un margen de seguridad significativo que
proporciona protección adicional al público y que considera cualquier
variación en las mediciones.
2. La información sobre SAR incluye el protocolo de prueba, el procedimiento
de evaluación y la escala de incertidumbre de medición de Motorola para
este producto.
183
Índice
Numéricos
1marcado con 1-tecla
uso 155
A
accesorio opcional,
definición 100
accesorios 100, 135, 160
agenda 178
alerta
definición 134, 139
desactivar 105, 106, 149
descarga 161
programación 134, 139
alerta de timbre
desactivar 105, 106, 149
programación 107, 134,
139
alerta de timbre distintiva
170
alerta de timbre silencioso,
programación 107
alerta de vibración
desactivar 105, 106, 149
programación 134, 139
alerta silenciosa,
programación 134,
139
184
almacenar una llamada 152
altavoz
contestación automática
176
altavoz del manos libres
133
altavoz, externo
activación 176
animación
descarga 161
fondo 141
protector de pantalla 143
visualización 181
apuntes 154
atajos 159, 172
audífono
accesorios, uso de 175
uso con pantalla externa
135
B
batería
carga 103
indicador de nivel 119
instalación 101
prolongación de la vida
útil de la batería
102, 143, 144, 147
bloquear
función 180
teléfono 136
borrado general 173
borrar una llamada 152
botones de volumen 105
browser Vea microbrowser
buzón de salida 161
C
calculadora 179
cámara
tomar una fotografía 94,
108
cargador de viaje 103
carpeta de borradores 113,
162
código de desbloqueo
cambio 135
ingreso 104, 137, 138
olvido 138
omisión 138
predeterminado 104,
136, 137, 138
código de seguridad
cambio 135
olvido 138
predeterminado 136
códigos
cambio 135
olvido 138
predeterminado 104,
136, 137, 138
Contactos
1marcado con 1-tecla
155
adición de 2 números
153, 154
almacenamiento de un
ingreso 162
borrado de un ingreso
164
categoría del ingreso 164
edición de un ingreso
164
ID de timbre 163, 170
lista de correos de grupo
162
marcación de un número
162
marcado por voz 163
número de marcación
rápida 155
número primario,
programación 164
orden de ingresos 164
contesta al abrir 141
contestación de llamadas
106, 141
contraseñas. Vea códigos
contraste, pantalla 144
185
correo de voz 155
cronómetros 174, 175
D
desbloquear
función 180
teléfono 136
despertador 179
desplazamiento, menú 173
dispositivo TTY 160
E
email
borrador 113
equipo para automóvil 175
F
finalización de llamadas
105, 106
fondo 141
fotografía
descarga 161
envío 94, 108
tomar 94, 108
función opcional, definición
100
función, bloquear y
desbloquear 180
G
grabación de voz 179
186
I
ID de timbre
encendido/apagado 170
programación 163
idioma, programación 172
imagen
descarga 161
fondo 141
protector de pantalla 143
visualización 181
indicador de alerta
silenciosa 119
indicador de carácter de
texto 125, 126
indicador de intensidad de
la señal 118
indicador de llamada
perdida 153
indicador de mensaje 119
indicador de mensaje de
correo de voz 119,
156
indicador de mensaje en
espera 114
Indicador de servicio AGPS
119
indicador del método de
ingreso de texto 119,
125, 126
indicador roam 118
indicadores
alerta de timbre 119
alerta de timbre alto 119
alerta de timbre bajo 119
alerta de timbre y
vibración 119
alerta de vibración 119
alerta silenciosa 119
ALI 145
carácter de texto 125,
126
intensidad de la señal
118
llamada perdida 153
mensaje 119
mensaje de correo de voz
119, 156
mensaje en espera 114
método de ingreso de
texto 119, 125,
126
nivel de batería 119
roam 118
Servicio AGPS 119
indicadores ALI 145
indicadores de alerta de
timbre 119
información de ubicación
automática
envío 145
ingreso de texto con método
tap 126
ingreso de texto predictivo
129
L
lista de llamadas hechas
152
lista de llamadas recibidas
152
llamada
agregar dígitos después
del número de
teléfono 153
alerta, desactivar 105,
106, 149
alerta, programación
134, 139
almacenamiento 152
altavoz del manos libres
133
altavoz externo 176
borrado 152
contestación 106
cronómetros 174, 175
finalización 105, 106
lista de llamadas hechas
152
lista de llamadas
recibidas 152
llamada no contestada
135, 153
187
llamada (siguiente)
llamadas recientes 152
marcación 105
Marcación por voz
avanzada 166
número de emergencia
150
opciones para contestar
141
realización de 105
recepción 106
llamada de datos 177
cronómetros 175
medidores de volumen
175
llamada de fax 177
llamadas recientes 152
luz de fondo 144
M
marcación de un número
105
marcación por dígito 163
Marcación por voz
avanzada 166
marcación rápida 155
marcado por voz 163, 176
Marcación por voz
avanzada 166
mayúsculas, cambio 125
188
mensaje
alertas 171
borradores 162
borrar 162
buzón de salida 161
estado 161
lectura 161
mensaje de imagen 160
PIX, definición 110
plantilla MMS 161
recepción 95
recordatorios, activado/
desactivado 170
texto 95, 160, 161
texto rápido 161
Mensaje Altavoz activado
134
mensaje Batería baja 119
mensaje de imagen
envío 110, 160
recepción 114
mensaje de imagen. Vea
mensaje
mensaje de llamadas
perdidas 135, 153
mensaje Ingrese código de
desbloqueo 137,
138
mensaje Llamada falló,
número ocupado
148
menú
cíclico 173
desplazarse 173
iconos, conversión a texto
171
iconos, mostrar u ocultar
172
idioma, programación
172
ingreso de texto 123
listas 122
navegación 120
personalización 171
reorganización de
funciones 171
uso de funciones 122
vista, cambio 171
método de ingreso de texto
configuración 124
selección 124
método de ingreso de texto
primario 124
método de ingreso de texto
secundario 124
mi número telefónico 107,
139, 159
micro-browser
configuración de browser
180
sesiones Web 180
uso 180
N
número
almacenamiento de su
número 139
visualización de su
número 107, 159
número de emergencia 150
número telefónico
adición de 2 números
153, 154
agregar dígitos después
153
almacenamiento de su
número 139
almacenamiento en
Contactos 162
remarcación 148
visualización de su
número 107, 159
números, ingreso 131
P
páginas Web 180
pantalla
contraste 144
idioma 172
luz de fondo 144
personalización 172
saludo 171
pantalla externa 134
pantalla principal 117
189
personalización del menú
171
PIX. Vea mensaje
programación de red 178
protector de pantalla 143
R
realización de una llamada
105
recordatorios
encendido/apagado 170
reinicio general 173
remarcación automática
148
remarcar
número ocupado 148
remarcación automática
148
S
saludo 171
sesiones Web 180
símbolos, ingreso 131
software iTAP 129
solapa
contesta al abrir 106, 141
pantalla externa 134
protector de pantalla 143
sonido
administración 181
descarga 161
190
T
tabla de caracteres 128
tabla de símbolos 132
tecla
control de volumen 105
encendido 104
enviar 105, 106, 152
fin 105, 106
menú 121
5navegación de cinco
direcciones 120
tecla programable
derecha 117
tecla programable
izquierda 117
tecla de encendido 104
tecla de menú 121
5tecla de navegación de
cuatro direcciones
120
tecla de voz
marcación por dígito 163
marcado por voz 163
tecla enviar 105, 106, 152
tecla fin 105, 106
tecla programable derecha
funciones 117
tecla programable izquierda
funciones 117
teclado
contestar llamadas 141
volumen, programación
170
teclas programables
funciones 117
teléfono
alerta, desactivar 105,
106, 149
alerta, programación
134, 139
bloqueo 136
borrar información
almacenada 173
código de desbloqueo
136
código de seguridad 136
códigos 135
desbloqueo 104, 136,
137, 138
idioma, programación
172
información de ubicación
automática 145
opciones para contestar
141
programación de red 178
reiniciar todas las
opciones 173
solapa 106
teclado, contestar
llamadas 141
ubicación 145
texto 125
ingreso 123
ingreso de texto
predictivo con
software iTAP 129
método de ingreso,
configuración 124
método de ingreso,
selección 124
método numérico 131
método símbolo 131
método tap 126
tabla de caracteres 128
tabla de símbolos 132
texto rápido 161
tiempo de espera, aumento
143, 144
tono de timbre
administración 181
descarga 161
tonos DTMF
activación 174
envío 174
U
ubicación, envío a la red
145
uso del manos libres 175
191
V
vObject, definición 114
volumen
auricular 105
teclado 170
timbre 105, 170
volumen de timbre,
programación 105,
170
volumen del auricular 105
Patente en EE.UU.
Re. 34,976
192
motorola.com