1
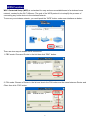
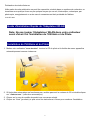
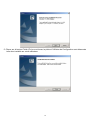
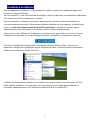
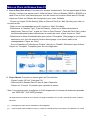
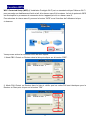
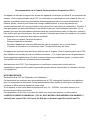
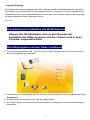
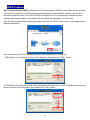
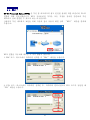
Wireless–N Client Adapter
Quick Installation Guide
Guide d'Installation Rapide
Kurzanleitung zur Installation
Guida Veloce per l’Istallazione
Guía de Instalación Rápida
빠른 설치 가이드
Version 2.2
Table of Contents
English
WLAN Adapter Quick installation Guide................................................................................................2
Utility and Driver Installation..................................................................................................................2
Hardware Installation ............................................................................................................................4
Wireless Network Setup........................................................................................................................5
WPS Function .......................................................................................................................................6
Français
Guide d'Installation Rapide de l'Adaptateur WLAN ...............................................................................9
Installation de l'Utilitaire et du Pilote......................................................................................................9
Installation du Matériel ........................................................................................................................ 11
Mise en Place du Réseau Sans Fil .....................................................................................................12
Fonction WPS .....................................................................................................................................13
Deutsch
Kurzanleitung zur Installation des WLAN-Adapters.............................................................................16
Das Hilfsprogramm und den Treiber installieren .................................................................................16
Hardware-Installation ..........................................................................................................................18
Das kabellose Netzwerk einrichten .....................................................................................................19
WPS-Funktion .....................................................................................................................................20
Italiano
Guida Veloce all’Istallazione di WLAN Adapter ...................................................................................23
Installazione di Utility e Driver .............................................................................................................23
Installazione dell’Hardware .................................................................................................................25
Installazione Rete Wireless .................................................................................................................26
Funzione WPS ....................................................................................................................................27
Español
Guía de Instalación Rápida del Adaptador WLAN...............................................................................30
Instalación de Herramientas y Controlador .........................................................................................30
Instalación del Hardware.....................................................................................................................32
Configuración de la Red Inalámbrica ..................................................................................................33
Función WPS ......................................................................................................................................34
한국어
WLAN 어댑터 빠른 설치 가이드.......................................................................................................37
유틸리티 및 드라이버 설치 ...............................................................................................................37
하드웨어 설치하기..............................................................................................................................39
무선 네트워크 설정............................................................................................................................40
WPS 기능...........................................................................................................................................41
1
Copyright statement
No part of this publication may be reproduced, stored in a retrieval system, or transmitted in any form
or by any means, whether electronic, mechanical, photocopying, recording, or otherwise without the
prior writing of the publisher.
JULY 2007
WLAN Adapter Quick installation Guide
Note: Do not insert the WLAN adapter in your computer
Utility and Driver Installation
1. Turn “On” your computer. Insert the Driver CD then wait for the Autorun prompt like below.
2. If Autorun does not work, please browse the CD content and double click the “ Autorun.exe ”.
3. Click the model name which you had bought.
4. Click “Next” and then follow the instructions on the screen to continue the installation.
2
5. Click the Finish button in this screen; both the driver and the Configuration Utility are installed on
your computer.
3
Hardware Installation
For PCMCIA or USB adapters, simply insert or connect the adapter after running the setup file.
For PCI cards, you must shut down the computer, plug the card in an available PCI slot, and restart the
operating system.
After the computer boots back up, it will detect the wireless card and then start the New Hardware
Found wizard. Respond to the prompts displayed by the wizard, and select the option, “Install the
software automatically (Recommended) ”; the operating system will find the driver automatically.
You can launch the Configuration Utility by clicking the left mouse button on the Configuration Utility
icon and selecting Advanced Configuration.
If the Configuration Utility icon is not displayed in the System Tray, you can restart the Configuration
Utility from the Start Menu by selecting Programs and Wireless Network Utility Configuration.
The Configuration Utility consists of window with four tabs: Link Information, AP List, Profile Setting,
and About. Please find information about these tabs in the User’s Guide (from the CD contents, select
Manual & QIG that shown with PDF format.)
4
Wireless Network Setup
1. Peer-to-Peer: Connects with other wireless client(s). This does not require Access Point. Please
make sure the “Network Name” (SSID or ESSID) and “Peer-to-Peer” channel are the same for
all clients in the same wireless network. Double click on the Configuration Utility icon to open the
utility.
- Click on “Profile Setting” tab and “Add” to create a new profile.
- Enter a name that the profile correspond, click “Next”.
- Select the “Network Type”, click on the drop-down arrow and select “Peer-to-Peer”, and then at
“Peer-to-Peer Channel”, use the up/down arrows to select the channel number, and then click
“Next”.
- Select the Authentication Mode to enable the “Encryption” if you have any security concern.
Once you enable the encryption function, then you should input the corresponding key. Click
“Next”.
- On IP Setting select “Enable” or “Disable” to make used of it. Click
“Complete” to finish the configuration.
2. Access Point: Connects to network via Access Point.
- Click “AP List” tab.
- Select the listed Wireless Network to Join.
- Click “Connect” to join the network.
* Note: You might need to configure a Profile before if the destination network had a “WEP KEY”
protected.
The equipment has been tested and found to comply with FCC and CE Rules.Operation is subject to the following
two conditions:
(1)
This device may not cause harmful interference.
(2)
This device must accept any interference received including interference that may cause undesired operation.
5
WPS Function
Wi-Fi Protected Setup (WPS) is a standard for easy and secure establishment of a wireless home
network, created by the Wi-Fi Alliance. The goal of the WPS protocol is to simplify the process of
connecting any home device to the wireless network.
To secure your wireless network, you could push the “WPS” button under user interface as below:
There are two ways to enable WPS connection:
1. PBC mode: Choose a Router in the list then click “PBC” button.
2. PIN mode: Choose a Router in the list and check the PIN codes are the same between Router and
Client then click “PIN” button.
6
Federal Communication Commission Interference Statement
This equipment has been tested and found to comply with the limits for a Class B digital device,
pursuant to Part 15 of the FCC Rules. These limits are designed to provide reasonable protection
against harmful interference in a residential installation. This equipment generates, uses and can
radiate radio frequency energy and, if not installed and used in accordance with the instructions, may
cause harmful interference to radio communications. However, there is no guarantee that interference
will not occur in a particular installation. If this equipment does cause harmful interference to radio or
television reception, which can be determined by turning the equipment off and on, the user is
encouraged to try to correct the interference by one of the following measures:
-
Reorient or relocate the receiving antenna.
Increase the separation between the equipment and receiver.
Connect the equipment into an outlet on a circuit different from that to which the receiver is
connected.
-
Consult the dealer or an experienced radio/TV technician for help.
This device complies with Part 15 of the FCC Rules. Operation is subject to the following two conditions:
(1) This device may not cause harmful interference, and (2) this device must accept any interference
received, including interference that may cause undesired operation.
FCC Caution: Any changes or modifications not expressly approved by the party responsible for
compliance could void the user's authority to operate this equipment.
IMPORTANT NOTE:
FCC Radiation Exposure Statement:
This equipment complies with FCC radiation exposure limits set forth for an uncontrolled environment.
This equipment should be installed and operated with minimum distance 20cm between the radiator &
your body.
This transmitter must not be co-located or operating in conjunction with any other antenna or
transmitter.
The WPCR-501/WPIR-501/WUBR-501 ( FCC ID: RYK- WPCR501,RYK-WPIR501,RYK-WUBR501 )
is limited in CH1~CH11 for 2.4 GHz by specified firmware controlled in U.S.A.
7
EC Declaration of Conformity
Name applicant:
SparkLAN Communications, Inc.
3F, No. 246, Sec. 1, Neihu Road, Neihu Chiu, Taipei, Taiwan, ROC 114
Hereby declares under sole responsibility that product
Brand name:
Sparklan
Product number:
WPIR-501 / WPCR-501 / WUBR-501
Product description:
Wireless-N PCI / CardBus / USB Adapter
To which this declaration relates complies with the requirements of the following standards:
EN 300 328
EN 301 489-1 V1.4.1
EN 301 489-17 V1.2.1
EN 60950-1 2001
This certifies that the designated product as described above complies with the directives described above
and carries the CE marking accordingly.
This declaration has been signed under responsibility of the manufacturer / importer.
Name manufacturer / importer:
Sparklan Communications
Date: July 31, 2007
Mike Chen
CEO
Product article code:
WPIR-501 / WPCR-501 / WUBR-501
Product description:
Wireless-N PCI / CardBus / USB Adapter
Product manufacturer / importer: Sparklan Communications, Inc.
Countries in which the product as described above may be used freely:
Austra, Belgium, Denmark, Finland, France, Germany, Greece, Iceland, Ireland, Italy, Luxembourg, Netherlands,
Norway, Portugal, Spain, Sweden, Switzerland, UK
Countries where usage of the product as described above is prohibited:
None.
Countries where usage of the product as described below is limited:
France: The use of other channels than the channels 10 through 13 is prohibited by law.
8
Déclaration de droits d'auteurs
Nulle partie de cette publication ne peut être reproduite, stockée dans un système de recherche, ou
transmise sous quelque forme ou par quelque moyen que ce soit, électronique, mécanique, par
photocopie, enregistrement ou autre sans le consentement écrit préalable de l'éditeur.
JUILLET 2007
Guide d'Installation Rapide de l'Adaptateur WLAN
Note: Ne pas insérer l'Adaptateur WLAN dans votre ordinateur
avant d'avoir fini l'installation de l'Utilitaire et du Pilote.
Installation de l'Utilitaire et du Pilote
1. Mettez votre ordinateur "sous tension". Insérez le CD du pilote et la fenêtre de menu apparaîtra
automatiquement comme ci-dessous.
2. Si l'exécution automatique ne fonctionne pas, veuillez parcourir le contenu du CD et double-cliquer
sur “ Autorun.exe ” (exécution automatique).
3. Cliquer sur le nom du modèle de produit que vous avez acheté.
4. Cliquer sur “Next” (prochain) et puis suivre les instructions à l'écran pour continuer l'installation.
9
5. Cliquer sur le bouton Finish (Fin) sur cet écran; le pilote et l'Utilitaire de Configuration sont désormais
tous deux installés sur votre ordinateur.
10
Installation du Matériel
Pour les adaptateurs PCMCIA ou USB, simplement insérer ou connecter l'adaptateur après avoir
exécuter le fichier d'installation.
Pour les cartes PCI, vous devez éteindre l'ordinateur, insérer la carte dans un emplacement disponible
PCI réservé à cet effet et redémarrer le système.
Une fois redémarré, l'ordinateur détectera la carte sans fil et activera le guide d'installation des
nouveaux matériels rencontrés. Répondre aux requêtes affichées par le programme, et sélectionner
l'option, “Install the software automatically (Recommended) ” (Installer le nouveau logiciel
automatiquement (Recommandé)); le système trouvera le pilote automatiquement.
Vous pouvez lancer l'Utilitaire de Configuration en faisant un clic gauche de la souris sur l'icône de
l'Utilitaire de Configuration et en sélectionnant Advanced Configuration (Configuration Avancée).
Si l'icône de l'Utilitaire de Configuration n'est pas affichée dans la Barre d'Etat, Vous pouvez
redémarrer l'Utilitaire de Configuration à partir du Menu Démarrer en sélectionnant Programmes et
Utilitaire de Configuration Réseau Sans Fil.
L'Utilitaire de Configuration consiste en une fenêtre avec quatre onglets: Link Information, AP List,
Profile Setting, and About. Vous trouverez les informations sur ces onglets dans le Manuel de
l'Utilisateur (disponible dans le CD, sélectionner Manuel & QIG en format PDF.)
11
Mise en Place du Réseau Sans Fil
1. Peer-to-Peer (Pair à Pair): Connecte avec d'autres clients sans fil. Ceci ne requiert pas de Point
d'Accès. Veuillez vous assurer que le “Network Name” (Nom du Réseau) (SSID ou ESSID) et le
canal “Peer-to-Peer” sont identiques pour tous les clients sur le même réseau sans fil. Double
cliquer sur l'icône de l'Utilitaire de Configuration pour ouvrir l'utilitaire.
- Cliquer sur l'onglet “Profile Setting” (Mise en Place du Profil) et “Add” (Ajouter) pour créer un
nouveau profile.
- Saisir un nom correspondant au profil, cliquer sur “Next” (Prochain).
- Sélectionner le “Network Type” (Type de Réseau), cliquer sur la flèche déroulante et
sélectionner “Peer-to-Peer”, et puis sur “Peer-to-Peer Channel” (Canal de Pair à Pair), utiliser
les flèches déroulantes pour sélectionner le numéro de canal, et puis cliquer sur “Next”.
- Sélectionner le Mode d'Authentification pour activer l'“Encryption” (Encryptage) si vous désirez
sécuriser le tout. Une fois activé la fonction d'encryptage, vous devriez saisir la clé
correspondante. Cliquer sur “Next”.
- Pour le Paramètre IP sélectionner “Enable” (Activer) ou “Disable” (Désactiver) pour l'utiliser.
Cliquer sur “Complete” 'Compléter) pour finir la configuration.
2. Point d'Accès: Connecte au réseau grâce au Point d'Accès.
- Cliquer l'onglet “AP List” (Liste des PA).
- Sélectionner le Réseau Sans Fil dans la liste à Rejoindre.
- Cliquer sur “Connect” (Connecter) pour rejoindre le réseau.
* Note: Vous pourriez avoir à configurer un Profil auparavant si le réseau de destination possède
une “WEP KEY” (CLE WEP) protégée.
Cet équipement a été testé et est conforme aux Règles d'Utilisation FCC et CE; il est sujet aux deux conditions
suivantes:
(1)
Cet appareil ne peut causer d'interférence dommageable.
(2)
Il doit accepter toute interférence reçue y compris une interférence pouvant causer une utilisation non voulue.
12
Fonction WPS
Wi-Fi Protected Setup (WPS) (L'Installation Protégée Wi-Fi) est un standard créé par l'Alliance Wi-Fi
pour permettre un établissement facile et sûr d'un réseau sans fil à la maison. Le but du protocole WPS
est de simplifier le processus de connexion de tout appareil privé à un réseau sans fil.
Pour sécuriser le réseau sans fil, pousser le bouton “WPS” sous l'interface de l'utilisateur tel que
ci-dessous:
Vous pouvez activer la connexion WPS de deux façons:
1. Mode PBC: Choisir un Routeur dans la liste puis cliquer sur le bouton “PBC”.
2. Mode PIN: Choisir un Routeur dans la liste et vérifier que les codes PIN sont identiques pour le
Routeur et Client puis cliquer sur le bouton “PIN”.
13
Recommandation de la Federal Communications Commission (FCC)
Cet appareil a été testé et respecte les limites des appareils numériques de classe B, conformément au
chapitre 15 de la réglementation de la FCC. La conformité aux spécifications de la classe B offre une
garantie acceptable contre les perturbations électromagnétiques dans les zones résidentielles. Ce
matériel génère, utilise et peut émettre de l'énergie radiofréquence. Il risque de parasiter les
communications radio s'il n'est pas installé conformément aux instructions du constructeur. Toutefois, il
n'est pas garanti que des perturbations n'interviendront pas pour une installation particulière. Si cet
appareil provoque des perturbations gênantes dans les communications radio ou télévision, mettez-le
hors tension puis sous tension pour vous en assurer. L'utilisateur peut tenter de remédier à cet incident
en appliquant une ou plusieurs des mesures suivantes:
Réorienter ou replacer l'antenne réceptrice.
Eloigner l'appareil du récepteur.
Brancher l'appareil sur une prise différente de celle du récepteur, sur un circuit distinct. .
Contacter le revendeur ou un technicien radio TV expérimenté pour de l'aide.
Cet appareil est conforme aux restrictions définies dans le chapitre 15 de la réglementation de la FCC.
Son utilisation est soumise aux deux conditions suivantes : (1) il ne peut pas causer de perturbations
électromagnétiques gênantes et (2) il doit accepter toutes les perturbations reçues, y compris celles
susceptibles d'occasionner un fonctionnement indésirable.
Avertissement de la FCC: Tout changement ou modification concernant la conformité non
expressément approuvé par la partie responsable pourrait enlever l'autorisation à l'utilisateur d'utiliser
cet équipement.
NOTE IMPORTANTE:
Déclaration de la FCC sur l'Exposition aux Radiations:
Cet équipement est conforme aux limites établies par la FCC concernant l'exposition aux radiations
pour un environnement incontrôlé. Cet équipement devrait être installé et utilisé avec une distance
minimum de 20cm entre le radiateur & votre corps.
Si cet appareil va être utilisé dans les fréquences de 5,15 ~ 5,25GHz, il est alors restreint à un
environnement intérieur seulement.
Ce transmetteur ne doit être co-localisé ou utilisé avec toute autre antenne ou transmetteur.
Le WPCR-501/WPIR-501/WUBR-501 ( FCC ID: RYK- WPCR501,RYK-WPIR501,RYK-WUBR501 )
est limité aux canaux CH1~CH11 pour 2,4 GHz par un firmware spécifié contrôlé aux E.U
14
Déclaration de Conformité CE
Nom de l'appliquant:
SparkLAN Communications, Inc.
3F, No. 246, Sec. 1, Neihu Road, Neihu Chiu, Taipei, Taiwan, ROC 114
Par la présente déclare sous sa propre responsabilité que le produit
Marque:
Sparklan
Numéro du produit:
WPIR-501 / WPCR-501 / WUBR-501
Description du produit:
Wireless-N PCI / CardBus / USB Adapter
Auquel cette déclaration s'applique est conforme avec les requêtes des standards suivants:
EN 300 328
EN 301 489-1 V1.4.1
EN 301 489-17 V1.2.1
EN 60950-1 2001
Ceci certifie que le produit désigné ci-dessus tel que décrit ci-dessus est conforme avec les directives
décrites ci-dessus et porte le marquage EC en accordance.
Cette déclaration a été signée sous la seule responsabilité du fabricant / importateur.
Non du fabricant / importateur:
Sparklan Communications
Date: 31 Juillet 2007
Mike Chen
CEO
Code article du produit:
WPIR-501 / WPCR-501 / WUBR-501
Description du produit:
Wireless-N PCI / CardBus / USB Adapter
Fabricant / importateur du produit: Sparklan Communications, Inc.
Pays dans lesquels le produit ci-dessus peut être utilisé librement:
Autriche, Belgique, Danemark, Finlande, France, Allemagne, Grèce, Islande, Irlande, Italie, Luxembourg,
Pays-Bas, Norvège, Portugal, Espagne, Suède, Suisse, GB
Pays dans lesquels le produit décrit ci-dessus est interdit:
Aucun.
Pays dans lesquels le produit décrit ci-dessous est limité:
France: L'utilisation d'autres canaux que ceux de 10 à 13 est interdite par la loi.
15
Copyright-Erklärung
Kein Auszug aus diesem Handbuch darf ohne vorherige schriftliche Genehmigung des Herstellers
vervielfältigt, in einem abrufbaren System gespeichert oder in irgendeiner Form mit irgendwelchen
Hilfsmitteln werden, seien dies elektronische, mechanische, mit Fotokopie, durch Aufzeichnen oder
auf sonst irgendeine Weise, übertragen werden.
JULI 2007
Kurzanleitung zur Installation des WLAN-Adapters
Hinweis: Der WLAN-Adapter darf vor dem Beenden der
Installation des Hilfsprogramms und des Treibers nicht in Ihren
Computer eingesetzt werden.
Das Hilfsprogramm und den Treiber installieren
1. Den Computer einschalten (“On”). Die CD mit dem Treiber einlegen und warten, bis der Autorun
wie unten abgebildet angezeigt wird.
2. Falls der Autorun nicht gestartet wird, durchsuchen Sie den Inhalt der CD und doppelklicken Sie auf
“Autorun.exe”.
3. Auf den Namen des Modells klicken, das Sie gekauft haben.
4. Auf “Weiter” klicken und die Anleitung auf dem Bildschirm befolgen, um den Installationsvorgang
fortzusetzen.
16
5. Auf diesem Bildschirm auf “Beenden” klicken. Der Treiber und das Hilfsprogramm sind nun in Ihrem
Computer installiert.
17
Hardware-Installation
Für die PCMCIA- oder USB-Karte diese Karte nach dem Ausführen der Konfigurationsdatei (Setup)
einfach einsetzen oder anschließen.
Für PCI-Karten muss der Computer heruntergefahren, die Karte muss direkt in eine verfügbare
PCI-Steckfassung eingesetzt und danach das Betriebssystem neugestartet werden.
Nachdem der Computer das Back-Up (Erstellen einer Reservekopie) gestartet hat, erkennt er die
kabellose Karte und startet danach den Installationsassistenten “Neue Hardware”. Beantworten Sie die
vom Installationsassistenten angezeigetn Aufforderungen und wählen Sie danach die Option “Die
Software automatisch installieren (empfohlen)”. Der Treiber wird dann vom Betriebssystem
automatisch gefunden.
Das Konfigurations-Hilfsprogramm kann gestartet werden, indem Sie mit der linken Maustaste auf das
Symbol dieses Konfigurations-Hilfsprogramm klicken und die Option “Erweiterte Konfiguration”
auswählen.
Falls das Symbol des Konfigurations-Hilfsprogramms nicht auf der System-Leiste erscheint, kann
dieses Konfigurations-Hilfsprogramm vom Start-Menü aus gestartet werden. Dazu “Programme” und
“Konfiguration des kabellosen Netzwerk-Hilfsprogramms” auswählen.
Das Konfigurations-Hilfsprogramm beinhaltet ein Fenster mit vier Karteien: Verbindungs-Infos,
AP-Liste, Profileinstellung und Infos über. Die Informationen über diese Karteien finden Sie im
Benutzerhandbuch (im Inhalt auf der CD wählen Sie Benutzeranleitung & QIG aus, die im PDF-Format
vorhanden sind und angezeigt werden.)
18
Das kabellose Netzwerk einrichten
1. Peer-zu-Peer: Zum Herstellen einer Verbindung mit einem anderen Clienten oder anderen
Clients. Dies erfordert keinen Access Point. Sicherstellen, dass der “Netzwerkname” (SSID oder
ESSID) und der “Peer-zu-Peer”-Kanal für alle Clienten im gleichen kabellosen Netzwerk
dieselben sind. Zum Starten des Hilfsprogramms auf das Symbol des
Konfigurations-Hilfsprogramms doppelklicken.
- Auf die “Profileinstellung”-Kartei und zum Erstellen eines neuen Profils auf “Hinzufügen”
klicken.
- Einen für das Profil passenden Namen eingeben und auf “Weiter” klicken.
- Den “Netzwerktyp” auswählen. Auf den Pfeil zum Aufklappen klicken und die Option
“Peer-zu-Peer-Kanal”. Mit den Auf-/Ab-Tasten die Kanalnummer auswählen und danach auf
“Weiter” klicken.
- Zum Aktivieren der “Verschlüsselung” den Authentifizierungs-Modus auswählen, falls Sie
hinsichtlich der Sicherheit Bedenken haben. Nach dem Aktivieren der Funktion zum
Verschlüsseln müssen Sie den entsprechenden Schlüssel eingeben. Auf “Weiter” klicken.
- Unter IP-Einstellung die Option “Aktivieren” oder “Deaktivieren” auswählen, um diese
anzuwenden. Zum Beenden der Konfiguration auf “Beenden” klicken.
2. Access Point: Für die Verbindung mit dem Netzwerk über den Access Point.
- Auf die “AP-Liste”-Kartei klicken.
- Zur Teilnahme das aufgelistete kabellose Netzwerk auswählen.
- Zum Herstellen einer Verbindung mit dem Netzwerk auf “Verbinden” klicken.
* Hinweis: Eventuell müssen Sie ein Profil konfigurieren, bevor das Zielnetzwerk einen
“WEP-SCHLÜSSEL” (“WEP KEY”) geschützt hat.
Dieses Gerät entspricht den Anforderungen in Teil 15 der FCC-Bestimmungen. Der Betrieb muß die folgenden
beiden Bedingungen erfüllen:
(1)
Dieses Gerät erzeugt keine schädlichen Störungen.
(2)
Dieses Gerät akzeptiert irgendwelche Störungen, auch solche, die einen unerwünschten Betrieb verursachen
können.
19
WPS-Funktion
Wi-Fi Protected Setup (WPS) (Geschützte Wi-Fi-Konfiguration (WPS)) ist eine Norm für die einfache
und sichere Herstellung und EInrichtung eines kabellosen Heimnetzwerkes, welches von der Wi-Fi
Alliance hergestellt wurde. Das Ziel des WPS-Protokolls ist es, den Vorgang zum Herstellen einer
Verbindung eines beliebigen Heimgerätes mit dem kabellosen Netzwerk zu erleichtern.
Zum Sichern des kabellosen Netzwerkes klicken SIe auf die “WPS”-Taste auf der unten abgebildeten
Benutzeroberfläche:
Zum Herstellen einer WPS-Verbindung stehen zwei Methoden zur Verfügung:
1. PBC-Modus: Einen Router auf der Liste auswählen und danach auf “PBC” klicken.
2. PIN-Modus: Einen Router auf der Liste auswählen und überprüfen, ob die PIN-Koden zwischen dem
Router und dem Client dieselben sind. Danach auf “PIN” klicken.
20
Erklärung des Bundesausschusses für das Fernmeldewesen
Die Prüfung dieses Geräts hat ergeben, dass die Grenzwerte für ein digitales Gerät der Klasse B,
gemäss Teil 15 der FCC-Bestimmungen, eingehalten werden. Diese Grenzwerte wurden festgelegt,
um einen angemessenen Schutz gegen Störungen bei der Installation in Wohnbereichen zu bieten.
Das Gerät erzeugt und nutzt Hochfrequenzenergie und kann diese abstrahlen. Dies kann zu Störungen
im Funkwellenempfang führen, wenn das Gerät nicht entsprechend der Anleitung installiert und genutzt
wird. Es gibt jedoch keine Garantie dafür, dass bei einer bestimmten Installation keine Störungen
auftreten. Kommt es durch das Gerät zu Störungen im Radio- oder Fernsehempfang, was sich durch
Ein- und Ausschalten des Geräts feststellen läßt, sollte der Benutzer versuchen, die Störung durch eine
oder mehrere der folgenden Maßnahmen zu beheben:
-
Die Empfangsantenne neu ausrichten oder versetzen.
Den Abstand zwischen Gerät und Empfänger vergrößern.
Das Gerät an einen Ausgang eines anderen Stromkreises anschließen, an dem der Empfänger
nicht angeschlossen ist.
-
Wenden Sie sich an den Händler oder an einen erfahrenen Rundfunk- und Fernsehtechniker.
Dieses Gerät entspricht den Anforderungen in Teil 15 der FCC-Bestimmungen. Der Betrieb muß die
folgenden beiden Bedingungen erfüllen: (1) Dieses Gerät verursacht keine schädlichen Störungen im
Funkwellenempfang, und (2) dieses Gerät akzeptiert sämtliche empfangene Störungen, einschließlich
derer, die zu einem unerwünschten Betrieb führen können.
Warnhinweis der FCC: Es wird darauf verwiesen, dass jegliche Abänderungen, die von der für die
Einhaltung der einschlägigen Bestimmungen verantwortlichen Stelle nicht ausdrücklich genehmigt
wurden, einen Entzug der Betriebserlaubnis für dieses Gerät zur Folge haben.
WICHTIGER HINWEIS:
Erklärung der FCC zur Aussetzung an Strahlungen:
Dieses Gerät entspricht den von der FCC festgelegten Grenzwerten für die Aussetzung an Strahlungen,
die für eine unkontrollierte Umgebung vorgeschrieben sind. Dieses Gerät muss in einem
Minimalabstand von 20 cm von Heizgeräten sowie Ihrem Körper aufgestellt, installiert und betrieben
werden.
Der Transmitter darf nicht zusammen mit einer anderen Antenne oder einem anderen Antenne
aufgestellt, instralliert und betrieben werden.
Der WPCR-501/WPIR-501/WUBR-501 (FCC ID: RYK- WPCR501, RYK-WPIR501, RYK-WUBR501 )
ist in CH1-CH11 für 2,4 GHz durch eine bestimmt angegebene Firmware, die in den USA
kontrolliert wird, limitiert.
21
EC-Übereinstimmungserklärung
Der Antragssteller:
SparkLAN Communications, Inc.
3F, No. 246, Sec. 1, Neihu Road, Neihu Chiu, Taipei, Taiwan, ROC 114
erklärt hiermit seine alleinige Verantwortung für das Produkt
Markenname:
Sparklan
Produktnummer:
WPIR-501 / WPCR-501 / WUBR-501
Produktbeschreibung:
Wireless-N PCI / CardBus / USB Adapter
wobei diese Erklärung die Anforderungen der folgenden Normen erfüllt:
EN 300 328
EN 301 489-1 V1.4.1
EN 301 489-17 V1.2.1
EN 60950-1 2001
Hiermit wird bestätigt, dass das genannte Produkt wie oben beschrieben den oben genannten Richtlinien
entspricht und daher entsprechend mit dem CE-Markenzeichen versehen ist.
Diese Erklärung wurde unter alleiniger Verantwortung des Herstellers/Importeurs unterzeichnet.
Mame des Herstellers/Importeurs:
Sparklan Communications
Datum: 31. Juli 2007
Mike Chen
CEO
Artikelkode des Produktes:
WPIR-501 / WPCR-501 / WUBR-501
Produktbeschreibung:
Wireless-N PCI / CardBus / USB Adapter
Hersteller/Importeur des Produktes: Sparklan Communications, Inc.
Länder, in denen das oben beschriebene Produkt uneingeschränkt benutzt werden kann:
Österreich, Belgien, Dänemark, Finnland, Frankreich, Deutschland, Griechenland, Island, Irland, Italien,
Luxemburg, Niederlande, Norwegen, Portugal, Spanien, Schweden, Schweiz, Großnritannien
Länder, in denen die Inbetriebnahme dieses Produktes verboten ist:
Keine.
Länder, in denen die Inbetriebnahme und Benutzung des Produktes eingeschränkt ist:
Frankreich: Die Benutzung der anderen Kanäle außer den Kanälen von 10 bis 13 sind gesetzlich verboten.
22
Dichiarazione del Copyright
Nessuna parte di questa pubblicazione potrà essere riprodotta, memorizzata in un sistema di
richiamo, o trasmessa in qualsiasi forma o con qualsiasi mezzo, elettronico, meccanico, fotocopiata,
registrata, o altro senza la previa autorizzazione scritta da parte dell’editore.
LUGLIO 2007
Guida Veloce all’Istallazione di WLAN Adapter
Nota: Non inserire il WLAN nel computer prima di aver
terminato di installare l’Utility e il Driver.
Installazione di Utility e Driver
1. Accendete (“On”) il computer. Inserite il CD del Driver e poi aspettate che esca fuori il sollecito di
Autoesecuzione come qui sotto.
2. Se Autoesecuzione non funziona, esplorate il contenuto del CD e cliccate due volte
“ Autorun.exe ”.
3. Cliccate il nome del modello che avete acquistato.
4. Cliccate “Avanti” e poi seguite le istruzioni sullo schermo per continuare l’installazione.
23
5. Cliccate il pulsante Finisci in questo schermo; ora il driver e l’Utility Configurazione sono installati nel
vostro computer.
24
Installazione dell’Hardware
Per gli adattatori PCMCIA o USB, basta solo che inserite o collegate l’adattatore dopo aver eseguito il
file dell’installazione.
Per le schede PCI, dovete spegnere il computer, inserire la scheda in uno slot PCI disponibile, e poi
riavviare il sistema operativo.
Dopo che il computer fa il boot del back up, riscontra la scheda wireless e poi avvia il mago di Trovato
Nuovo Hardware. Rispondete ai solleciti mostrati dal mago e selezionate l’opzione, “Installa il
software automaticamente (Consigliato) ”; il sistema operativo troverà il driver automaticamente.
Voi potete lanciare l’Utility Configurazione cliccando il pulsante sinistro del mouse sull’iconadell’Utility
Configurazione e selezionando Configurazione avanzata.
Se l’icona dell’Utility Configurazione non viene mostrata nel Vassoio del Sistema, potete riavviare
l’Utility Configurazione dal Menu Avvia selezionando Programmi e Configurazione Utility Rete
Wireless.
L’Utility Configurazione è fatta di una finestra con Quattro tabule: Informazioni Link, Elenco AP,
Impostazione Profilo e Informazioni. Trovate le informazioni su queste tabule nella Guida dell’Utente
(dal contenuto del CD selezionate Manuale e QIG quello mostrato nel formato PDF.)
25
Installazione Rete Wireless
1. Peer-to-Peer: Collega con altri clienti wireless. Questo non richiede Punto di Accesso.
Assicuratevi che il “Nome Rete” (SSID o ESSID) e canale “Peer-to-Peer” siano gli stessi per tutti
i clienti della stessa rete wireless. Cliccate due volte sull’icona dell’Utility Configurazione per
aprire l’utility.
- Cliccate sulla tabula “Impostazione Profilo” e “Aggiungi” per creare un nuovo profilo.
- Scrivete un nome a cui il profile corrisponde, cliccate “Avanti”.
- Selezionate il “Tipo di Rete”, cliccate sulla freccia drop-down e selezionate “Peer-to-Peer”, e
poi nel “Canale Peer-to-Peer”, usate le frecce su/giù per selezionare il numero del canale e
poi cliccate “Avanti”.
- Selezionate la Modalità di Autenticazione per abilitare la “Crittografia” se avete qualche
preoccupazione per la sicurezza. Quando attivate la funzione di crittografia, dovete input la
chiave corrispondente. Cliccate “Avanti”.
- Su Impostazione IP selezionate “Attiva” o “Disattiva” per farne uso. Cliccate
“Completa” per terminare la configurazione.
2. Punto di Accesso: Collega alla rete attraverso il Punto di Accesso.
- Cliccate la tabula “Elenco AP”.
- Selezionate la Rete Wireless elencata per unirvisi.
- Cliccate “Collega” per collegarvi alla rete.
* Nota: Potreste avere bisogno di configurare prima un Profilo, se la rete di destinazione aveva una
“CHIAVE WEP” protetta.
Quest’apparecchiatura è stata testata e trovata conforme ai regolamenti FCC e CE.La sua operazione è soggetta
alle due condizioni seguenti:
(1)
Questo dispositivo non deve causare un’interferenza dannosa.
(2)
Questo dispositivo deve accettare tutte le interferenze ricevute, comprese le interferenze che possono causare
un’operazione non desiderata.
26
Funzione WPS
L’Installazione Protetta Wi-Fi [Wi-Fi Protected Setup (WPS)] è uno standard per l’instaurazione
facile e sicura di una rete domestica wireless, create dalla Wi-Fi Alliance. Lo scopo del protocollo WPS
è di semplificare il procedimento di collegamento di qualsiasi dispositivo domestico con la rete wireless.
Per rendere sicura la vostra rete wireless, potete premere il pulsante “WPS” nella interfaccia utente
come sotto:
Ci sono due maniere di attivare il collegamento WPS:
1. Modalità PBC: Scegliete un Router nell’elenco e poi cliccate il pulsante “PBC”.
2. Modalità PIN: Scegliete un Router nell’elenco e controllate i codici PIN che siano gli stessi fra Router
e Cliente e poi cliccate il pulsante “PIN”.
27
Dichiarazione per l’Interferenza della Federal Communication Commission
Quest’apparecchiatura è stata testate e trovata conforme ai limiti per un dispositivo digitale di Classe B,
ai termini della Parte 15 dei Regolamenti FCC. Questi limiti sono stati previsto per fornire una
protezione ragionevole contro le interferenze dannose in un’installazione residenziale.
Quest’apparecchiatura genera, usa e può irradiare energia di radiofrequenze e, se non viene installato
e usato in modo conforme alle istruzioni, potrebbe causare interferenze dannose alle
telecomunicazioni. Tuttavia non è garantito che non possa capitare un’interferenza in una particolare
installazione. Se quest’apparecchiatura causasse un’interferenza dannosa alla ricezione
radiotelevisiva, cosa facilmente determinabile spegnendo e accendendo l’apparecchiatura, si consiglia
all’utente di cercare di correggere l’interferenza con uno dei seguenti rimedi:
-
Cambiare orientamento o cambiare posto all’antenna ricevente.
Aumentare la distanza di separazione fra l’apparecchiatura e il ricevitore.
Collegare l’apparecchiatura ad una presa su un circuito diverso da quello a cui è collegato il
ricevitore.
-
Consultare il negoziante o un tecnico esperto di radio/TV per averne aiuto.
Questo dispositivo è conforme alla Parte 15 dei Regolamenti FCC. La sua operazione è soggetta alle
due condizioni seguenti: (1) Questo dispositivo non deve causare un’interferenza dannosa, e (2)
questo dispositivo deve accettare qualsiasi interferenza ricevuta, comprese le interferenze che
possono causare un’operazione non desiderata.
Avvertenza FCC: Qualsiasi cambiamento o modifica non espressamente approvata dalla parte
responsabile per la conformità potrebbe invalidare l’autorizzazione dell’utente ad operare
quest’apparecchiatura.
NOTA IMPORTANTE:
Dichiarazione FCC per l’Esposizione alle Radiazioni:
Quest’apparecchiatura è conforme ai limiti FCC per l’esposizione alle radiazioni stability per un
ambiente non controllato. Quest’apparecchiatura ddeve essere installata e operata con una distanza
minima di 20cm fra il radiatore e la persona.
Questa trasmittente non deve essere posizionata nello stesso luogo di, od operare congiuntamente con
qualsiasi altra antenna o trasmittente.
La WPCR-501/WPIR-501/WUBR-501 ( FCC ID: RYK- WPCR501,RYK-WPIR501,RYK-WUBR501 ) è
limitata in CH1~CH11 per 2.4 GHz da firmware specificati controllati in U.S.A.
28
Dichiarazione di Conformità EC
Nome del Richiedente:
SparkLAN Communications, Inc.
3F, No. 246, Sec. 1, Neihu Road, Neihu Chiu, Taipei, Taiwan, ROC 114
Dichiara sotto la sua esclusiva responsabilità che il prodotto
Nome della marca:
Sparklan
Numero del prodotto:
WPIR-501 / WPCR-501 / WUBR-501
Descrizione del prodotto:
Wireless-N PCI / CardBus / USB Adapter
A cui si riferisce questa dichiarazione è conforme ai requisiti dei seguenti standard:
EN 300 328
EN 301 489-1 V1.4.1
EN 301 489-17 V1.2.1
EN 60950-1 2001
Questo certifica che il prodotto indicato come sopra descritto è conforme alle direttive sopra descritte e di
conseguenza porta il marchio CE.
Questa dichiarazione è stata firmata sotto la responsabilità del fabbricante / importatore.
Nome del fabbricante / importatore:
Sparklan Communications
Data: 31 Luglio 2007
Mike Chen
CEO
Codice di articolo del prodotto:
WPIR-501 / WPCR-501 / WUBR-501
Descrizione del prodotto:
Wireless-N PCI / CardBus / USB Adapter
Fabbricante / importatore del prodtto:
Sparklan Communications, Inc.
Paesi in cui il prodotto come descritto sopra può essere liberamente usato:
Austra, Belgio, Danimarca, Finlandia, Francia, Germania, Grecia, Islanda, Irlanda, Italia, Lussemburgo, Olanda,
Norvegia, Portogallo, Spagna, Svezia, Svizzera, Gran Bretagna
Paesi dove l’uso del prodotto come descritto sopra è proibito:
Nessuno.
Paesi dove l’uso del prodotto come descritto sopra è limitato:
Francia: L’uso di altri canali al di fuori dei canali fra 10 e 13 è proibito dalla legge.
29
Declaración de los derechos de autor
Ninguna parte de esta publicación puede ser reproducida, almacenada en un sistema de reproducción, o
transmitida en forma alguna o por alguna razón, tanto electrónica, mecánica, fotocopia, grabación, o de otra
manera sin el previo escrito del editor.
JULIO 2007
Guía de Instalación Rápida del Adaptador WLAN
Note: Do not insert the WLAN adapter in your computer until
you have finished installing the Utility and Driver.
Instalación de Herramientas y Controlador
1. Encienda su computadora. Inserte el Controlador del CD luego espere el aviso de Autorun como el de abajo.
2. Si el Autorun no funciona, navegue el contenido del CD y haga doble click en “Autorun.exe”.
3. Cliquee en el nombre del modelo que ha comprado.
4. Cliquee “Siguiente” y luego siga las instrucciones en la pantalla para continuar la instalación.
30
5. Cliquee el botón Finish en esta pantalla; el controlador y la Herramienta de Configuración están instalados en su
computadora.
31
Instalación del Hardware
Para los adaptadores PCMCIA o USB, simplemente inserte o conecte el adaptador después de correr el archivo de
configuración.
Para las tarjetas PCI, debe apagar la computadora, conectar la tarjeta en la ranura de PCI disponible, y reiniciar el
sistema operativo.
Después de que la computadora se reinicie, detectará la tarjeta inalámbrica y luego iniciará la aplicación de Nuevo
Hardware Encontrado. Responda al aviso mostrado por la aplicación, y seleccione la opción, “Instale
automáticamente el software (Recomendado)”; el sistema operativo encontrará el controlador automáticamente.
Puede activar la Herramienta de Configuración haciendo click en el botón izquierdo del ratón en el ícono de
Herramienta de Configuración y seleccionando Configuración Avanzada.
Si la Herramienta de Configuración no es mostrada en la Bandeja del Sistema, puede reiniciar la Herramienta de
Configuración desde el Menú de Inicio seleccionando Programas y Herramienta de Configuración de Red
Inalámbrica.
La Herramienta de Configuración consiste en una ventana con cuatro lengüetas: Información de Enlace, Lista AP,
Programación del Perfil, y Acerca de. Encuentre información acerca de estas lengüetas en la Guía del Usuario (de
los contenidos del CD, Seleccione Manual y QIG que se muestran en formato PDF.)
32
Configuración de la Red Inalámbrica
1. Punto a Punto: Se conecta con otros clientes inalámbricos. Esto no requiere un Punto de Acceso.
Asegúrese que el “Nombre de Red” (SSID o ESSID) y el canal “Punto a Punto” son los mismos para todos
los clientes en la misma red inalámbrica. Haga doble clic en el ícono de Herramienta de Configuración para
abrir la herramienta.
- Cliquee en la lengüeta “Profile Setting” (Configuración del Perfil) y en “Add” (Agregue) para crear un
nuevo perfil.
- Ingrese un nombre que corresponda al perfil, cliquee “Next” (Siguiente).
- Seleccione “Network Type” (Tipo de Red), cliquee en la flecha de desplazamiento hacia abajo y
seleccione “Peer-to-Peer” (Punto a Punto), y luego en “Peer-to-Peer Channel” (Canal Punto a Punto),
use las flechas de arriba/abajo para seleccionar el número de canal, y luego cliquee “Next” (Siguiente).
- Seleccione el Modo Autentificación para habilitar la “Encryption” (Encriptación) si tiene alguna
inquietud de seguridad. Una vez que habilite la función de encriptación, luego debería ingresar la clave
correspondiente. Cliquee “Next” (Siguiente).
- En la Configuración del IP seleccione (Enable) “Habilitar” o “Disable” (Deshabilitar) para hacer uso de
ello. Cliquee
“Complete” (Terminar) para finalizar la configuración.
2. Punto de Acceso: Conecta a la red vía Punto de Acceso.
- Cliquee la lengüeta “Lista AP”.
- Seleccione la Red Inalámbrica listada para Unirse.
- Cliquee “Connect” (Conectar) para unirse a la red.
* Nota: Puede necesitar configurar un Perfil antes si la red de destino tuvo una “WEP KEY” (CLAVE WEP)
protegida.
El equipo ha sido testeado y se encontró que cumple con las Reglas FCC y CE. La operación está sujeta a las siguientes dos
condiciones:
(1) Este dispositivo puede no causar interferencia dañina.
(2) Este dispositivo debe aceptar cualquier interferencia recibida incluyendo interferencia que pueda causar operación no deseada.
33
Función WPS
Configuración Protegida Wi-Fi (WPS) es un estándar para un fácil y seguro establecimiento de una red
inalámbrica casera, creada por Wi-Fi Alliance. La meta del protocolo WPS es simplificar el proceso de conexión
de cualquier dispositivo del hogar a la red inalámbrica.
Para asegurar su red inalámbrica, puede presionar el botón “WPS” en la interfase del usuario como se muestra
abajo:
Hay dos formas para habilitar la conexión WPS:
1. Modo PBC: Elija un Router en la lista y luego cliquee el botón “PBC”.
2. Modo PIN: Elija un Router en la lista y controle que los códigos PIN sean los mismos entre el Router y el Cliente
luego cliquee el botón “PIN”.
34
Declaración de Interferencia de la Comisión de Comunicación Federal
Este equipo ha sido testeado y se encontró que cumple con los límites para un dispositivo digital de Clase B,
consecuente con la Parte 15 de las Reglas FCC. Estos límites están diseñados para proveer una protección
razonable contra una interferencia dañina en una instalación residencial. Este equipo genera, usa y puede irradiar
energía de radio frecuencia y, si no es instalado y usado de acuerdo con las instrucciones, puede causar
interferencia dañina a radio comunicaciones. Sin embargo, no hay garantía de que una interferencia no ocurrirá
en una instalación particular. Si este equipo causa interferencia dañina a un receptor de radio o televisión, el cual
puede ser determinado prendiendo y apagando el equipo, el usuario es alentado a tratar de corregir la interferencia
por una o más de las siguientes medidas:
-
Reoriente o reubique la antena receptora.
Aumente la separación entre el equipo y el receptor.
Conecte el equipo a un tomacorriente en un circuito diferente del cual el receptor está conectado.
Consulte al comerciante o a un técnico experimentado en radio/ TV por ayuda.
Este dispositivo cumple con la Parte 15 de las Reglas FCC. El funcionamiento está sujeto a las siguientes dos
condiciones: (1) Este dispositivo puede no causar interferencia dañina, y (2) este dispositivo debe aceptar cualquier
interferencia recibida, incluyendo interferencia que pueda causar operación no deseada.
Precaución FCC: Cualquier cambio o modificaciones no expresamente aprobadas por la parte responsable por
conformidad puede anular la autoridad del usuario para operar este equipo.
NOTA IMPORTANTE:
Declaración de Exposición de Radiación FCC:
Este equipo cumple con los límites de exposición de radiación FCC establecido para un ambiente no controlado.
Este equipo debe ser instalado y operado con un mínimo de distancia de 20 cm entre el radiador y su cuerpo.
Este transmisor no debe ser colocado u operar en conjunto con alguna otra antena o transmisor.
El WPCR-501/WPIR-501/WUBR-501 ( FCC ID: RYK- WPCR501,RYK-WPIR501,RYK-WUBR501 ) es
limitado en CH1~CH11 para 2.4 GHz por un firmware específico controlado en E.E.U.U.
35
Declaración de Conformidad EC
Nombre del solicitante:
SparkLAN Communications, Inc.
3F, No. 246, Sec. 1, Neihu Road, Neihu Chiu, Taipei, Taiwan, ROC 114
Por este medio se declara bajo responsabilidad exclusiva que el producto
Nombre de la marca:
Sparklan
Número de Producto:
WPIR-501 / WPCR-501 / WUBR-501
Descripción del Producto:
Wireless-N PCI / CardBus / USB Adapter
Lo que a esta declaración se refiere cumple con los requerimientos de los siguientes estándares:
EN 300 328
EN 301 489-1 V1.4.1
EN 301 489-17 V1.2.1
EN 60950-1 2001
Esto certifica que el producto designado como se describe arriba cumple con las directivas descriptas
arriba y lleva la marca CE como corresponde.
Esta declaración ha sido firmada bajo responsabilidad por el fabricante/importador.
Nombre del fabricante/importador:
Sparklan Communications
Fecha: 31 de Julio, 2007
Mike Chen
CEO
Código de artículo de producto:
WPIR-501 / WPCR-501 / WUBR-501
Descripción del Producto:
Wireless-N PCI / CardBus / USB Adapter
Nombre del fabricante/importador: SparkLAN Communications, Inc.
Países en los cuales el producto como se describe arriba puede ser usado libremente:
Austria, Bélgica, Dinamarca, Finalndia, Francia, Alemania, Grecia, Islandia, Irlanda, Italia, Luxemburgo, Holanda,
Noruega, Portugal, España, Suecia, Suiza, Inglaterra
Países en los que el uso de este producto como se describe arriba está prohibido:
Ninguno.
Países en los que el uso de este producto como se describe arriba es limitado:
Francia: El uso de otros canales que los canales del 10 al 13 está prohibido por la ley.
36
저작권 성명
출판자의 서면 허락 없이 본 출판물의 어떠한 부분도 기계적, 전자적 혹은 사진복사 및 녹화
등과 같은 방법을 사용해 어떤 형태로던 재 제작되거나 검색 시스템에 저장되거나 혹은
전송되어서는 안된다.
2007. 7
WLAN 어댑터 빠른 설치 가이드
주의: 유틸리티 및 드라이버 설치를 마칠 때까지 WLAN 어댑터를 컴퓨터에 설치하지
마십시오.
유틸리티 및 드라이버 설치
1. 컴퓨터의 “전원”을 켜신 후, 드라이버 CD 를 넣으면 다음과 같은 화면이 자동 실행됩니다.
2. 자동실행 기능이 실행되지 않을 경우, CD 목록에서 “ Autorun.exe ”을 더블 클릭하십시오.
3. 구매하신 모델명을 클릭하십시오.
4. “Next” 누르면서 화면의 지시에 따라 설치 작업을 시작해 주십시오.
37
5. Finish 버튼을 누르면 드라이버와 구성 유틸리티 설치 작업이 끝나게 됩니다.
38
하드웨어 설치하기
PCMCIA 혹은 USB 어댑터을 설치하기 위해 설치 파일을 실행시킨 후 어댑터를 삽입 설치
하거나 연결 설치하 십시오.
PCI 카드 설치 시, 반드시 컴퓨터의 전원을 끄신 후 PCI 카드를 연결하고 컴퓨터의 전원을 켜
주십시오.
컴퓨터 시스템이 무선 카드를 발견했을 때 새 하드웨어 발견 마법사가 시작됩니다. 이어 마법사의
지시에 따라 설치 작업을 시작하며 “자동으로 소프트웨어 설치하기(권장함) ”를 선택하면
운영시스템이 자동으로 드라이버를 찾게 됩니다.
구성 유틸리티 아이콘을 클릭하여 구성 유틸리티를 실행시킨 후, 고급 환경설정을 선택해
주십시오.
만약 윈도우 작업 표시줄에 구성 유틸리티 아이콘이 나타나지 않는다면, 시작-프로그램- 무선
네트워크 어댑터를 통해 구성 유틸리티를 실행하실 수 있습니다.
구성 유틸리티의 목록창은 4개의 탭이 있습니다. : 링크 정보, AP 리스트, 정보 설정, 및 기타.
해당 탭들에 관한 자세한 내용은 사용자 가이드를 참조해 주십시오. (CD 목록의 Manual & QIG 을
선택하시면 PDF 파일이 있습니다.)
39
무선 네트워크 설정
1. Peer-to-Peer: 다른 무선 클라이언트(들)과 연결하기. 본 기능은 AP(Access Point)를
별로도 설정할 필요없이 “네트워크 명칭” (SSID 혹은 ESSID) 을 확정하면
“Peer-to-Peer” 채널이 동일한 무선 네트워크 상에 있는 모든 클라이언트들에게
연결됩니다. 구성 유틸리티 아이콘을 더블 클릭하여 유틸리티를 실행해 주십시오.
- “정보설정” 탭을 클린 하신 후, “추가하기”를 선택하여 새로운 프로필을 생성합니다.
- 명칭을 입력한 후 프로필과 일치되면 “다음” 버튼을 클릭합니다.
- “네트워크 유형”을 선택한 후, 드롭-다운 화살표를 클릭하여 “Peer-to-Peer”를
선택합니다. 이어서 “Peer-to-Peer Channel” 상에서 상/하 화살표를 이용하여 채널
번호를 선택한 후 “다음” 버튼을 클릭합니다.
- 보안 상의 문제가 있다면 “암호화” 기능이 가능한 인증 모드를 선택합니다. 암호화
기능을 사용하실 경우 반드시 대응되는 키를 입력하셔야 합니다. 계속해서 “다음” 버튼을
클릭합니다.
- IP 설정 상에서 “Enable” 혹은 “Disable” 중 하나를 선택하고 “Complete” 를 클릭하면
설정 작업이 완성됩니다.
2. Access Point: AP(Access Point)를 통해 연결하기.
- “AP List” 탭을 클릭합니다.
- 사용하시고자 하는 무선 네트워크를 선택합니다.
- “Connect” 를 클릭해 네트워크에 접속합니다.
* 주의: 연결하고자 하는 네트워크 상에 “WEP KEY” 가 설정되어 있다면, 반드시 프로필을
먼저 생성해야 합니다.
본 장치는 FCC 와 CE 규정을 준수합니다. 작동은 아래 두 가지 조건에 따라 달라질 수
있습니다.
(1) 본 장치는 유해한 간섭을 일으키지 않습니다.
(2) 본 장치는 원치않는 작동을 일으키는 간섭을 비롯하여 수신된 모든 간섭을 수신해야
합니다.
40
WPS 기능
Wi-Fi Protected Setup (WPS) 은 무선 홈 네트워크의 쉽고 안전한 설치를 위한 표준이며, Wi-Fi
연합에 의해 만들어졌습니다. WPS 프로토콜의 목적은 모든 가정용 장치를 간편하게 무선
네트워크 상에 연결할 수 있도록 하는 데 있습니다.
사용자의 무선 네트워크 보안을 위해 다음과 같이 사용자 화면 상의 “WPS” 버튼을 클릭해
주십시오.:
WPS 연결을 가능하게 해주는 두 가지 방법이 있습니다 :
1. PBC 모드: 리스트에서 라우터를 선택한 후 “PBC” 버튼을 누릅니다.
2. PIN 모드: 리스트에서 라우터를 선택한 후, 라우터와 클라이언트의 PIN 코드가 동일할 때
“PIN” 버튼을 누릅니다.
41
연방통신위원회 전파간섭 성명서
이 기기는 FCC 규정의 파트 15 에 따라 테스트되었으며 B 급 디지털 장치에 대한 제한과
호환됨이 증명되었습니다. 이러한 제한은 주거용 설치에서 위험한 간섭에 대해 합리적인 보호
수단을 제공하기 위해 디자인되었습니다. 이 장비는 무선 주파수 에너지를 생성하고 사용하며
무선 주파수 에너지를 방출할 수 있습니다. 지시 사항에 따라 설치하고 사용하지 않으면, 무선
통신에 유해한 간섭을 일으킬 수 있습니다. 그러나, 특정 설치에서 간섭이 발생하지 않는다는
보장은 없습니다. 기기를 끄거나 켜보는 방식으로 본 기기가 라디오나 TV 수신에 위험한 간섭을
발생하면 사용자는 다음과 같은 측정 방법으로 간섭을 해결할 수 있습니다.
수신 안테나의 방향이나 위치를 바꿉니다.
기기와 수신기를 멀리 배치합니다.
기기를 수신기가 연결된 콘센트와는 다른 콘센트에 연결합니다.
대리점 또는 라디오/TV 전문 기술자에게 문의합니다.
본 장치는 FCC 규정의 파트 15 조항을 준수합니다. 작동은 다음 두 조건에 따라 달라질 수
있습니다. (1) 이 장치는 유해한 간섭을 일으키지 않습니다. (2) 이 장치는 원치 않는 작동을
일으키는 간섭을 비롯하여 수신된 모든 간섭을 수신해야 합니다.
FCC 경고: 본 장치의 생산자의 명시적인 승인 없이 본 장치를 변경 또는 수정할 경우 본 장치를
작동할 권한을 상실할 수 있습니다.
중요한 경고:
FCC 방사선 노출 성명서:
본 장치는 통제할 수 없는 설치 환경으로 인해 의무적으로 FCC 방사선 노출 한계 규정을 따라야
합니다. 본 장치는 신체와 20cm 떨어진 거리에 설치되어야 합니다.
본 송신기는 기타 다른 안테나 혹은 송신기와 결합되어 사용되거나 동일한 위치에 놓고
사용해서는 안됩니다.
WPCR-501/WPIR-501/WUBR-501 ( FCC ID: RYK- WPCR501,RYK-WPIR501,RYK-WUBR501 )
은 U.S.A . 에서 특정된 펌웨어 관리 규정에 의해 CH1~CH11 (2.4 GHz)로 지정되었습니다.
42
EC표준 부합 신고서
신청자 성명:
SparkLAN Communications, Inc.
3F, No. 246, Sec. 1, Neihu Road, Neihu Chiu, Taipei, Taiwan, ROC 114
아래에 진술된 제품에 한하여
브랜드 명칭:
Sparklan
제품 번호:
WPIR-501 / WPCR-501 / WUBR-501
제품 내용:
Wireless-N PCI / CardBus / USB Adapter
아래와 같은 표준 조건을 적용하여 선언하였습니다.:
EN 300 328
EN 301 489-1 V1.4.1
EN 301 489-17 V1.2.1
EN 60950-1 2001
본 제품이 상술된 표준에서 기술한 기술적 내용에 부합되어 CE 마크를 부착할 수 있음을
인증합니다.
본 신고서는 제조업자/수입자의 책임 하에 서명되었습니다.
제조업자/수입자 명칭:
Sparklan Communications
Date: July 31, 2007
Mike Chen
CEO
제품 조항 코드:
WPIR-501 / WPCR-501 / WUBR-501
제품 설명:
Wireless-N PCI / CardBus / USB Adapter
제품 제조업자/수입자:
Sparklan Communications, Inc.
상술된 제품법이 적용되는 나라들:
오스트리아. 벨기에, 덴마크, 필란드. 프랑스, 독일, 그리이스, 아이스랜드, 아일랜드, 이탈리아,
룩셈부르크, 네덜란드, 노르웨이, 포르투갈, 스페인, 스웨덴, 스위스, UK
상술된 제품법이 금지되는나라들:
무.
상술된 제품법이 일부 제한되는 나라들:
프랑스: 기타 채널은 사용하되 채널 10 에서 13 까지는 법으로 금지되어 있습니다.
43