1
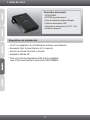
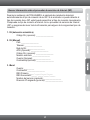
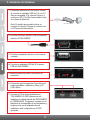
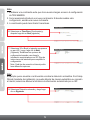
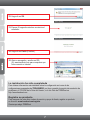
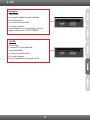
Guía de instalación rápida
TEW-656BRG
1.01
Table of Contents
Español
1. Antes de iniciar
2. Instalación del Hardware
3. Configuración del TEW-656BRG
4. LED
1
1
3
4
8
Troubleshooting
Wireless Tips
9
11
Version 04.05.2010
1. Antes de iniciar
Contenidos del paquete
ŸTEW-656BRG
ŸCD-ROM (guía del usuario)
ŸGuía de instalación rápida multilingüe
ŸCable de alimentación USB
ŸAdaptador de alimentación (5V DC, 1.2A)
ŸFunda de transporte
Requisitos de instalación
ŸUn PC con adaptador de red inalámbrica instalado correctamente
ŸNavegador Web: Internet Explorer (6.0 ó superior)
ŸServicio de Internet 3G válido y activado
ŸAdaptador USB de 3G*
* Para ver la lista de adaptadores USB de 3G compatibles,
vaya a http://www.trendnet.com/products/TEW-656BRG.
1
Buscar información sobre el proveedor de servicios de Internet (ISP)
Durante la instalación del TEW-656BRG, el asistente de instalación detectará
automáticamente el tipo de conexión de su ISP. Si el enrutador no puede detectar el
tipo de conexión de su ISP, usted puede especificar el tipo de conexión manualmente.
Compruebe su tipo de conexión a Internet con su proveedor de servicios de Internet
(ISP) y asegúrese de tener toda la información para alguno de los siguientes tipos de
conexión:
1. 3G (detección automática)
Código Pin (opcional): ________________
2. 3G (Manual)
Pais: ________________
Telecom: ________________
Red de 3G : ________________
APN (Opcional): ________________
Código Pin (opcional): ________________
Número marcado: ________________
Cuenta (Opcional): ________________
Contraseña(Opcional): ________________
3. iBurst
Cuenta : _________
Contraseña: ________________
DNS Primario:_____. _____._____._____
DNS Secundario:_____. _____._____._____
Nombre del servicio (opcional): ________________
Dirección IP asignada (opcional): ________________
2
2. Instalación del Hardware
1. Compruebe que tiene una conexión a Internet
al conectar el adaptador USB de 3 G a su PC
Abra su navegador (P.ej. Internet Explorer) y
escriba un URL (P.ej. http://www.trendnet.com)
en la barra de dirección.
Nota: Es posible que necesite activar su
conexión a Internet. Póngase en contacto con
su ISP para más información.
Internet
3G USB Adapter
2. Conecte el extremo del Mini-USB del adaptador
eléctrico al TEW-656BRG.
3. Conecte el adaptador eléctrico a una toma de
corriente.
4. Conecte su adaptador USB de 3G al puerto
USB del TEW-656BRG.
’
5. Mueva el switch de poder a la posición de
encendido.
6. Compruebe que las siguientes luces del panel
están encendidas: inalámbrico, (Blue) y 3G
(USB) (Blue).
7. Conecte su PC de forma inalámbrica al
TEW-656BRG. El SSID (Nombre de red
inalámbrica) predeterminado del TEW-656BRG
es TRENDnet656 Póngase en contacto con el
fabricante de su adaptador de red inalámbrico y
asegúrese de que el adaptador de red
inalámbrico está configurado en el SSID
apropiado.
3
3. Configuración del TEW-656BRG
Nota:
Reúna toda la información relacionada con su conexión a Internet antes de empezar. Si
es necesario, póngase en contacto con su proveedor de servicios de Internet (ISP).
1. Abra el navegador Web, introduzca
http://192.168.10.1 en la barra de direcciones,
luego pulse la tecla Enter (Intro)
2. Introduzca la contraseña del sistema, y luego
haga clic en LOGIN (Inicio).
Por defecto:
Contraseña del sistema: admin
3. Seleccione Wizard (Asistente de instalación) y
después haga clic en Enter (Intro)
4. Haga clic en Next (siguiente).
5. Introduzca la antigua contraseña (la contraseña
predeterminada es admin), introduzca la nueva
contraseña, reconfirme la nueva contraseña y
luego haga clic en Next (siguiente).
4
Nota:
1. Establecer una contraseña evita que otros usuarios tengan acceso a la configuración
de TEW-656BRG.
2. Se le recomienda introducir una nueva contraseña. Si decide cambiar esta
configuración, escriba una nueva contraseña.
3. La contraseña puede tener hasta 8 caracteres.
6. Seleccione su Time Zone (Zona horaria) y
después haga clic en Next (siguiente).
7. Seleccione 3G o iBurst (el ejemplo que aparece
es para 3G). Luego, haga clic en Next
(Siguiente). Establezca las opciones de
configuración tomando como base la
información suministrada por su ISP. Siga las
instrucciones del asistente para completar la
configuración.
Nota: Cada tipo de conexión a Internet podría
tener diferentes opciones.
Nota:
El ejemplo que se muestra a continuación es sobre la detección automática. Si el Setup
Wizard (Asistente de instalación) no puede detectar de manera automática su conexión
a Internet, seleccione Manual e introduzca la información suministrada por su ISP.
8. Seleccione Detección automatic y luego haga
clic en Siguiente.
5
9. Necesitará configurar lo siguiente:
Módulo inalámbrico Enable/Disable
(Activar/Desactivar) Debe seleccionar la
configuración predeterminada Enable (Activar).
El ID de red (SSID): El SSID es el nombre de la
red inalámbrica de su red inalámbrica (por
ejemplo, enrutador inalámbrico o punto de
acceso). Introduzca un único SSID. No utilice ‘
nada que pueda ser identificable como “Red de
la Familia Smith”. Elija algo que pueda
identificar con facilidad cuando busque una red
inalámbrica disponible
Canal: En la mayoría de los casos, la
configuración predeterminada está bien
Nota:
1. Para proteger su red de cualquier acceso no autorizado se le recomienda habilitar la
encriptación inalámbrica.
2. Los ejemplos que se muestran a continuación son para la seguridad WPA2-PSK. Si
selecciona WPA-PSK o WPA2-PSK, compruebe que sus adaptadores inalámbricos
son compatibles con WPA o WPA2. Si sus adaptadores inalámbricos no son
compatibles con WPA o WPA2, entonces seleccione WEP.
10. Seleccione el modo de autenticación deseado,
luego seleccione el tipo de encriptación
deseada e introduzca los caracteres de su
clave precompartida y después haga clic en
Next (Siguiente). Para WPA-PSK o
WPA2-PSK, la clave precompartida debe
tener entre 8 y 63 caracteres ASCII o 64
caracteres HEX. Asegúrese de copiar la clave
de encriptación.
11. Haga clic en Apply Settings
(Aplicar opciones de configuración)
6
12. Haga clic en OK.
13. Espere 40 segundos mientras se reinicia el
enrutador.
14. Haga clic en Finish (Finalizar).
15. Abra su navegador y escriba un URL
(Ej. www.trendnet.com) para comprobar que
tiene conexión a Internet.
La instalación ha sido completada
Para obtener información más detallada sobre la configuración así como de las
configuraciones avanzadas del TEW-656BRG, por favor consulte la sección de resolución de
problemas, el CD-ROM de la Guía del Usuario, o el sitio Web de TRENDnet en
http://www.trendnet.com.
Registre su producto
Para asegurar los más altos niveles de servicio y apoyo al cliente, registre su producto
en línea en: www.trendnet.com/register
Gracias por elegir TRENDnet
7
4. LED
Inalámbrico
Azul (Sólido):
La conexión inalámbrica está habilitada
Azul (intermitente):
la conexión tiene actividad
Si no está iluminado:
la red inalámbrica no está activada o no está
llegando alimentación al TEW-656BRG
3G(USB)
Azul (Sólido):
La conexión 3G está habilitada
Azul (intermitente):
la conexión tiene actividad
Si no está iluminado:
No se ha establecido la conexión de 3G
8
Troubleshooting
1. I typed http://192.168.10.1 in my Internet Browser's Address Bar, but an error message
says “The page cannot be displayed.” How can I get into the TEW-656BRG's web
configuration page?
1. Check your hardware settings again by following the instructions in Section 2.
2. Make sure the Wireless light is lit.
3. Enter http://192.168.10.1 into the browser instead. This is the default IP address of the
TEW-656BRG.
4. Make sure your network adapter's TCP/IP settings are set to Obtain an IP address
automatically (see the steps below).
5. Reset the TEW-656BRG. To reset the TEW-656BRG, press the WPS button for 20
seconds, then let go. Wait 30 seconds, and then type 192.168.10.1 into your browser.
Windows 7
1. Go into the Control Panel, Network and
Internet, click Network and Sharing Center,
click Change Adapter Settings and then
right-click the Local Area Connection icon and
then click Properties.
2. Click Internet Protocol Version 4 (TCP/IPv4)
and then click Properties. Then click on Obtain
an IP address automatically.
Windows Vista
1. Go into the Control Panel, click Network and
Internet, click Network and Sharing Center,
click Manage Network Connections and then
right-click the Local Area Connection icon and
then click Properties.
2. Click Internet Protocol Version 4(TCP/IPv4)
and then click Properties. Then click on Obtain
an IP address automatically.
9
Windows XP/2000
1. Go into the Control Panel, double-click the
Network Connections icon and then right-click
the Local Area Connection icon and then click
Properties.
2. Click Internet Protocol (TCP/IP) and then click
Properties. Then click on Obtain an IP
address automatically.
2. I am not sure what type of Internet Account Type I have for my Internet connection. How
do I find out?
Contact your Internet Service Provider's (ISP) support service for the correct information.
3. I went through the Wizard, but I can not get onto the Internet. What should I do?
1. Verify that you can get onto the Internet by connecting your 3G USB adapter directly to
your computer.
2. Contact your ISP and verify all the information that you have in regards to your Internet
connection settings is correct.
3. Verify that the 3G USB adapter is firmly connected to the USB port on the TEW-656BRG.
4. Power cycle the TEW-656BRG. Move the power switch to the off position. Wait 30
seconds, then move the power switch back to the on position.
4. I cannot make a wireless connection to the TEW-656BRG. What should I do?
1. Double check that the wireless LED on the TEW-656BRG is lit.
2. Power cycle the TEW-656BRG. Move the power switch to the off position. Wait 30
seconds, then move the power back to the on position.
3. Contact the manufacturer of your wireless network adapter and make sure the wireless
network adapter is configured with the proper SSID. The default SSID is
TRENDnet656.
4. Please refer to the Wireless tips section if you continue to have wireless connectivity
problems.
If you still encounter problems or have any questions regarding the TEW-656BRG, please contact
TRENDnet's Technical Support Department.
10
Wireless Tips
The following are some general wireless tips to help minimize the impact of interference within an
environment.
Assign your network a unique SSID
Do not use anything that would be identifying like “Smith Family Network”. Choose
something that you would easily identify when searching for available wireless networks.
Do not turn off the SSID broadcast
The SSID broadcast is intended to be on and turning it off can cause connectivity issues.
The preferred method of securing a wireless network is to choose a strong form of encryption
with a strong and varied encryption key.
Note: after setting up the SSID, encryption type and encryption key/passphrase, please
make a note of them for future reference. You will need this information to connect your
wireless computers to the wireless router/access point.
Change the channel
Most wireless access points and routers are defaulted to channel 6. If you have a site survey
tool that will display the channels you can plan your channel selection around neighboring
access points to minimize interference from them. If your site survey tool does not display
the channel try using channels 1 or 11.
Change the channel bandwidth
If you are using an 802.11n router or access point you can also make the following changes.
Change the channel bandwidth to 20/40MHz. This will provide the highest possible
performance using an 802.11n device. Also, if using 802.11n you should be securing the
network with WPA2 security.
Note: Due to Wi-Fi certification considerations if you choose WEP, WPA or WPA2-TKIP
encryption this device may operate in legacy wireless mode (802.11b/g). You may not get
802.11n performance as these forms of encryption are not supported by the 802.11n
specification.
Avoid stacking hardware on top of each other to prevent overheating issues
Maintain enough free space around the hardware for good ventilation and airflow. There
should also be plenty of free space around the antennas to allow the wireless signal to
propagate. Please also make sure that the wireless hardware is not placed in any type of
shelving or enclosures.
There are a number of other environmental factors that can impact the range of wireless
devices.
1. Adjust your wireless devices so that the signal is traveling in a straight path, rather than at
an angle. The more material the signal has to pass through the more signal you will lose.
11
2. Keep the number of obstructions to a minimum. Each obstruction can reduce the range of
a wireless device. Position the wireless devices in a manner that will minimize the amount
of obstructions between them.
3. Building materials can have a large impact on your wireless signal. In an indoor
environment, try to position the wireless devices so that the signal passes through less
dense material such as dry wall. Dense materials like metal, solid wood, glass or even
furniture may block or degrade the signal.
4. Antenna orientation can also have a large impact on your wireless signal. Use the wireless
adapter's site survey tool to determine the best antenna orientation for your wireless
devices.
5. Interference from devices that produce RF (radio frequency) noise can also impact your
signal. Position your wireless devices away from anything that generates RF noise, such
as microwaves, HAM radios, Walkie-Talkies and baby monitors.
6. Any device operating on the 2.4GHz frequency will cause interference. Devices such as
2.4GHz cordless phones or other wireless remotes operating on the 2.4GHz frequency
can potentially drop the wireless signal. Although the phone may not be in use, the base
can still transmit wireless signals. Move the phone's base station as far away as possible
from your wireless devices.
If you are still experiencing low or no signal consider repositioning the wireless devices or installing
additional access points. The use of higher gain antennas may also provide the necessary
coverage depending on the environment.
12
Copyright © 2011. All Rights Reserved. TRENDnet.