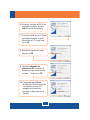
1
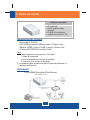
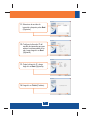
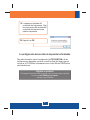
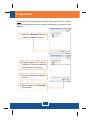
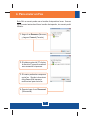
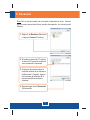
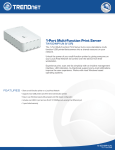
Quick Installation Guide
TE100-MP1UN
H/W: V1.0R
Table of Contents
Español ........................................................................................................................................................
1
1. Antes de iniciar ..................................................................................................................................
2. Cómo se instala ................................................................................................................................
3. Impresión ...........................................................................................................................................
4. Para enviar un Fax ............................................................................................................................
5. Escanear ............................................................................................................................................
1
2
7
8
9
Troubleshooting ...........................................................................................................................................
10
Version 09.16.08
1. Antes de iniciar
Contenidos del paquete
?
TE100-MP1UN
?
Guía de instalación rápida
multilingüe
CD-ROM de la herramienta
?
?
Adaptador de corriente (5V, 2A)
Requisitos del sistema
?
Una unidad de CD-ROM
?
CPU: 300Mhz o superior/ 800Mhz o superior (Windows Vista)
?
Memoria: 256MB o superior/ 512MB o superior (Window Vista)
?
Windows 2000/XP/2003 Server/Vista (32-bits)
Nota:
1. No haga lo siguiente a menos que así se le indique:
1. Instalar la herramienta
2. Conecte la impresora al servidor de impresión
3. Conecte el PC al servidor de impresión
2. La herramienta debe instalarse en cada PC para que pueda usar su
impresora multifuncional.
Aplicación
1-Port Multi-Function Print Server
(TE100-MP1UN)
Internet
Cable/DSL
Modem
4-Port Gigabit Firewall Router
(TWG-BRF114)
Multi-Functional
USB 2.0 Printer
Workstations with Fast Ethernet Adapter
(TE100-PCIWN)
1
Español
2. Cómo se instala
1. Instale los controladores de la
impresora en su PC. Luego apague
la impresora y desconecte la
impresora de su PC.
Nota: Por favor consulte el manual de su impresora para las instrucciones de
instalación.
2. Introduzca el CD-ROM del de la
herramienta en la unidad de
CD-ROM de su PC.
3. Haga clic en Run Autorun.exe
(sólo para Windows Vista).
4. Haga clic en Install Utility
(Instalar herramienta). Y haga clic
en Setup Wizard (Asistente de
configuración).
5. Conecte el USB de la impresora al
puerto USB del servidor de
impresión. Y haga clic en OK.
2
Español
6. Conecte el cable de red RJ-45 del
conmutador/enrutador al puerto
LAN del servidor de impresión.
7. Conecte un cable de red RJ-45 del
conmutador/enrutador al puerto
Ethernet de su PC y luego haga
clic en OK.
8. Encienda su impresora y luego
haga clic en OK.
9. Conecte el adaptador de
alimentación AC al servidor de
impresión y luego a una toma de
corriente. Y haga clic en OK.
10. Compruebe que el Status
(Estado) del LED esté encendido
y el indicador de error LED
apagado en el servidor de
impresión. Luego, haga clic en
Yes (Sí).
3
Español
11. Seleccione el servidor de
impresión y después pulse Next
(Siguiente).
12. Configure la dirección IP del
servidor de impresión para que
esté en la misma subred de su
red y luego haga clic en Next
(Siguiente).
13. Copie la dirección IP y luego
haga clic en Next (Siguiente).
14. Haga clic en Finish (Finalizar).
4
Español
15. Haga clic en Yes (Sí).
16. Haga clic en Next (Siguiente).
Siga las instrucciones del
InstallSheild Wizard (Asistente
de Instalación).
17. Haga clic en Finish (Finalizar).
18. Haga clic en Resource
(Recursos) y luego en Connect
(Conectar).
5
Español
19. Le aparece el asistente del
controlador de la impresora. Siga
las instrucciones del asistente del
controlador de impresora para
instalar la impresora.
20. Haga clic en OK.
La configuración del servidor de impresión ha finalizado.
Para más información sobre la configuración del TE100-MP1UN y de las
configuraciones avanzadas, por favor consulte la Guía del Usuario que se
incluye en el CD-ROM de la herramienta o en el sitio Web de TRENDnet en
www.trendnet.com.
Registre su producto
Para asegurar los más altos niveles de servicio y apoyo al cliente, registre su producto
en línea en: www.TRENDnet.com/register
Gracias por elegir TRENDnet
6
Español
3. Impresión
Nota: Sólo un usuario puede usar el servidor de impresión a la vez. Una vez
que el usuario termine de utilizar el servidor de impresión, otro usuario podrá
utilizarlo.
1. Haga clic en Resource (Recursos)
y luego en Connect (Conectar).
2. El estatus mostrará el PC cliente y
la dirección IP que esté usando en
esos momentos la impresora.
3. El usuario puede ahora empezar a
imprimir.
4. Después haga clic en Disconnect
(Desconectar).
7
Español
4. Para enviar un Fax
Nota: Sólo un usuario puede usar el servidor de impresión a la vez. Una vez
que el usuario termine de utilizar el servidor de impresión, otro usuario podrá
utilizarlo.
1. Haga clic en Resource (Recursos)
y luego en Connect (Conectar).
2. El estatus mostrará el PC cliente y
la dirección IP que esté usando en
esos momentos la impresora.
3. El usuario puede ahora empezar a
enviar fax. Siga las instrucciones
del software de la impresora
multifuncional para enviar fax.
4. Después haga clic en Disconnect
(Desconectar).
8
Español
5. Escanear
Nota: Sólo un usuario puede usar el servidor de impresión a la vez. Una vez
que el usuario termine de utilizar el servidor de impresión, otro usuario podrá
utilizarlo.
1. Haga clic en Resource (Recursos)
y luego en Connect (Conectar).
2. El estatus mostrará el PC cliente y
la dirección IP que esté usando en
esos momentos la impresora.
3. Coloque el documento sobre la
cama del escáner de la impresora
multifuncional. Después, siga las
instrucciones del software de la
impresora multifuncional para
escanear.
4. Después haga clic en Disconnect
(Desconectar).
9
Español
Troubleshooting
Q1. I inserted the Utility CD-ROM into my computer's CD-ROM Drive but the installation menu does not
appear automatically. What should I do?
A1. For Windows 2000/XP, if the window does not appear automatically, click Start, click Run, and type
D:\autorun.exe where "D" in "D:\autorun.exe" is the letter assigned to your CD-ROM Drive, and then
press the ENTER key on your keyboard. For Windows Vista, if the installation menu does not appear
automatically, click Start, click the Start Search box, and type D:\autorun.exe where "D" in
"D:\autorun.exe" is the letter assigned to your CD-ROM Drive, and then press the ENTER key on your
keyboard.
Q2. The setup wizard does not detect the Print Server and/or printer/storage device. What
should I do?
A2. First, double check your hardware connections; make sure that the Print Server and printer are
powered ON and are properly connected. Make sure the RJ-45 network cable is securely connected to
the Print Server and Switch/Router. Second, disable any software firewall programs such as ZoneAlarm
or Norton Internet Security. If your computer is running Windows XP or Vista, disable the built-in firewall.
Third, click Refresh. Fourth, power cycle the Print Server. Unplug the power to the Print Server, wait 15
seconds, then plug the Print Server back in.
Q3. The setup wizard does not detect my printer device. What should I do?
A3. First, make sure the printer is powered on and properly connected to the Print Server. Second,
connect the printer with another USB cable. Third, reset the print server. Take a pin or paperclip and
press the reset button on the print server for 15 seconds, then let go.
Q4. I am unable to print to my Print Server. What should I do?
A4. First, make sure you follow the exact steps for installing the Print Server in section 2 Second, make
sure to right click on the print server in the utility and click connect. If another user is using the print
server, you must wait until the user is finished using it. Third, if you are connected to the print server and
are idled for a couple of minutes, a warning message appears. If you do not respond within a minute, you
will be automatically disconnected from the print server. You must connect to the print server again.
Q5. I can print a test page, but I cannot print anything from Microsoft Word or other applications.
A5. Make sure to set the newly installed network printer as your default printer. Click Start and then click
Printers & Faxes, verify that your printer icon has a check on it.
Q6. I configured my Print Server to automatically receive an IP Address from a DHCP server, and now I
cannot go into the Print Server's web utility.
A6. Open the print server setup wizard (See 1. How to install) to locate your Print Server's IP
Address.
Q7. Is there a way to force a computer to give up ownership to the print server?
A7. If the user has been idled for 5 minutes, the user will be automatically disconnected. You can also
force a computer to give up ownership by unplugging the power to the print server and plug the power
back in.
If you still encounter problems or have any questions regarding the TE100-MP1UN, please refer to the User's
Guide included on the Utility CD-ROM or contact TRENDnet's Technical Support Department.
10
Certifications
This equipment has been tested and found to comply with FCC and CE Rules.
Operation is subject to the following two conditions:
(1) This device may not cause harmful interference.
(2) This device must accept any interference received. Including interference that may
cause undesired operation.
Waste electrical and electronic products must not
be disposed of with household waste. Please
recycle where facilities exist. Check with you Local
Authority or Retailer for recycling advice.
NOTE: THE MANUFACTURER IS NOT RESPONSIBLE FOR ANY RADIO OR TV
INTERFERENCE CAUSED BY UNAUTHORIZED MODIFICATIONS TO THIS
EQUIPMENT. SUCH MODIFICATIONS COULD VOID THE USER’S AUTHORITY TO
OPERATE THE EQUIPMENT.
ADVERTENCIA
En todos nuestros equipos se mencionan claramente las caracteristicas del adaptador de alimentacón
necesario para su funcionamiento. El uso de un adaptador distinto al mencionado puede producir
daños fisicos y/o daños al equipo conectado. El adaptador de alimentación debe operar con voltaje y
frecuencia de la energia electrica domiciliaria existente en el pais o zona de instalación.
Product Warranty Registration
Please take a moment to register your product online.
Go to TRENDnet’s website at http://www.trendnet.com/register
20675 Manhattan Place
Torrance, CA 90501
USA
Copyright ©2008. All Rights Reserved. TRENDnet.