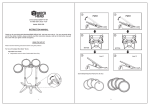
1
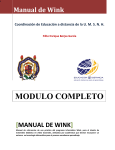
TIME AM PM
TO
TIME AM PM
DAY TO REFILL
ON
OFF
DAY TO REFILL
ON
OFF
Wall Mounting
1. Dispenser should be positioned at a minimum
height of 7’ (2.2m) for best results.
2. Position the Dispenser over a wall stud and secure
with supplied screws.
Montage sur le mur
1. Le dispensateur doit être positionné à une
hauteur de 7" (2.2 m) pour obtenir un
meilleur résultat.
2. Positionner le dispensateur sur l'appui du mur et
visser avec les vis fournies.
Montaje sobre la pared
1. El dispensador debe estar ubicado a una latura
mínima de 7" (2.2 m) para obtener un
mejor resultado.
2. Ubicar el dispensador sobre el montante de la
pared y atornillar con los tornillos provistos.
Refill Life at
Factory Settings:
15 Days* (Sprays every 7 minutes)
30 Days* (Sprays every 14 minutes)
60 Days* (Sprays every 28 minutes)
*Actual refill life will vary depending on all options chosen.
TIME AM PM
DAY TO REFILL
ON
OFF
Factory
Settings
Display
MODE
Mode A:
Neutralizing
Intensity
Setting
TIME AM PM
TIME AM PM
ADJUST
DAY TO REFILL
ON
OFF
ENTER
TIME AM PM
ADJUST
DAY TO REFILL
ON
OFF
ADJUST
DAY TO REFILL
ON
OFF
ENTER
ENTER
MODE
Step 2. Set Time Clock
• Press MODE to set the time.
• Press ADJUST to adjust clock by increments of 10 min.
• Press ENTER once real time is shown.
MODE
DAY TO REFILL
ON
OFF
TIME AM PM
ENTER
ADJUST
ENTER
DAY TO REFILL
ON
OFF
DAY TO REFILL
ON
OFF
DAY TO REFILL
ON
OFF
TIME AM PM
ADJUST
TIME AM PM
ADJUST
TIME AM PM
ENTER
ENTER
TIME AM PM
DAY TO REFILL
ON
OFF
ENTER
*Only change if you
want to use additional
program features.
TIME AM PM
TIME AM PM
ENTER
ADJUST
DAY TO REFILL
ON
OFF
DAY TO REFILL
ON
OFF
Set real-time clock
within 10 minutes.
ECTS
T DEF
AINS SHIP
D AGRKMAN
NTEE
ARA ND WO
U
G
A
Y
FULL PARTS
IN
W
ARRA
Remember to register for your
dispenser warranty on-line at:
http://www.technicalconcepts.com
Use of air neutralizers other than
TC™ refiils voids dispenser warranty.
*Mode C:
12 ON/12 OFF
Set Time to
Begin 12 HR
Operation
ADJUST
TIME AM PM
DAY TO REFILL
ON
OFF
DAY TO REFILL
ON
OFF
TIME AM PM
ENTER
DAY TO REFILL
ON
OFF
DAY TO REFILL
ON
OFF
DAY TO REFILL
ON
OFF
MODE
TIME AM PM
DAY TO REFILL
ON
OFF
TIME AM PM
ENTER
ADJUST
ENTER
DAY TO REFILL
ON
OFF
TIME AM PM
TIME AM PM
ADJUST
ENTER
TONE
DAY TO REFILL
ON
OFF
DAY TO REFILL
ON
OFF
MODE
TONE
ADJUST
ENTER
RESET
ENTER
MODE
Step 6. Refilling Dispenser
• Press the red RESET (J) button for up to 4 seconds. IMPORTANT: Do this every time a
refill is replaced. If reset button is pressed for 5 seconds, the dispenser will automatically
switch to “Demo” mode and revert to factory setting of 30 days.
• Insert refill and close cover. Do not stand directly in front of dispenser.
Step 7. Changing Batteries
• Dispenser will hold the display for 1 minute, allowing you to change the battery without
losing the setting. Battery life approximately 3 years.
• Visual battery monitor will flash when battery reaches last 30 days of life.
Remember this simple process:
1. Press
MODE
to scroll thru options
2. Press
ADJUST
to adjust choice in options
3. Press
ENTER
to enter choice into program
Repeat steps 1, 2 & 3 for each option available.
7'
2.2m
11170 SW 5th Street
Beaverton, Oregon 97005
☎ 1-800-440-5556
Fax: 1-503-643-8224
www.airdelights.com
LCD
AEROSOL
DISPENSER
STOCK #401219
Distributeur LCD en aérosol Microburst 3000
Dispensador LCD en aerosol Microburst 3000
TIME AM PM
ADJUST
Finished
Step 5. Select days of operation
• Press ADJUST to select if dispenser should be ON or OFF for the day shown on the display.
• Press ENTER to save setting.
NOTE: Dispenser operates a 5, 6 or 7 day cycle.
3000
TIME AM PM
TIME AM PM
ENTER
ENTER
TM/MD
MODE
*Mode D:
Set Actual Day
Choose up to
2 days off during
the week
ADJUST
DAY TO REFILL
ON
OFF
*Mode B:
Actual
Time Set
DAY TO REFILL
ON
OFF
DAY TO REFILL
ON
OFF
TIME AM PM
TIME AM PM
DAY TO REFILL
ON
OFF
DAY TO REFILL
ON
OFF
Step 4. Set the day of the week
• Press MODE to set the day of the week.
• Press ADJUST to scroll through days.
• Press ENTER once actual day is shown.
TIME AM PM
ENTER
ADJUST
Step 3. Select number of hours of operation
• Press ADJUST to choose 12 or 24 hour operation.
• Press ENTER to save selected setting.
• If you choose a 12 hour setting:
• Press ADJUST to set the start time of 12 hour period.
• Press ENTER once desired start time is shown.
• Display will show number of days in refill cycle.
MODE
TIME AM PM
TIME AM PM
YEAR
Y
TO
Odor Neutralizing
Intensity:
HI
ME
LO
Have Questions or Need Supplies?
Call Toll Free: 1-800-440-5556
or on the web:
www.airdelights.com
NT
Visual battery
Open dispenser cover by pressing keyless lock. (H)
Audio ON
Insert two “C” cell alkaline batteries. (I)
TIME AM PM
Medium level of
Turn dispenser ON by pressing ON/OFF button. (E)
dispensing, 24 hours,
Dispenser is factory set with AUDIO ON (dispenser DAY REFILL
ON
every day, with a
will function with audio signals reinforcing the
OFF
30 day refill cycle.
need to replace a refill and/or batteries). You may
deactivate the AUDIO by pressing the TONE button (D) (dispenser will function without
audio signals).
• The factory setting will be displayed on LCD display. (G)
If factory settings are satisfactory proceed to step 6. If you wish to change the
settings, follow Steps 1 - 5 below.
Lo = 28 minute spray interval
Step 1. Select Dispensing Level
• Press the MODE button (A) to select the level of dispensing. ME =14 minute spray interval
HI = 7 minute spray interval
• Press the ADJUST button (B) to
move between options: ME
(Medium), HI (High), Lo (Low)
MODE
TIME AM PM
• Press Enter (C) to save
ADJUST
ADJUST
ADJUST
selected setting.
DAY REFILL
ON
ENTER
ENTER
ENTER
OFF
• Display will show number
of days in refill cycle. (G)
•
•
•
•
INSTALLATION INSTRUCTIONS
TEN
Setting Flow Chart
Operation Instructions
If factory settings are satisfactory proceed to step 6. If you wish to change the
settings, follow Steps 1 - 5 below.
Lo = 28 minute spray interval
Step 1. Select Dispensing Level
• Press the MODE button (A) to select the level of dispensing. ME =14 minute spray interval
HI = 7 minute spray interval
• Press the ADJUST button (B) to
move between options: ME
(Medium), HI (High), Lo (Low)
MODE
TIME AM PM
• Press Enter (C) to save
ADJUST
ADJUST
ADJUST
selected setting.
DAY REFILL
ON
ENTER
ENTER
ENTER
OFF
• Display will show number
of days in refill cycle. (G)
TIME AM PM
TO
TIME AM PM
DAY TO REFILL
ON
OFF
DAY TO REFILL
ON
OFF
Wall Mounting
1. Dispenser should be positioned at a minimum
height of 7’ (2.2m) for best results.
2. Position the Dispenser over a wall stud and secure
with supplied screws.
Montage sur le mur
1. Le dispensateur doit être positionné à une
hauteur de 7" (2.2 m) pour obtenir un
meilleur résultat.
2. Positionner le dispensateur sur l'appui du mur et
visser avec les vis fournies.
Montaje sobre la pared
1. El dispensador debe estar ubicado a una latura
mínima de 7" (2.2 m) para obtener un
mejor resultado.
2. Ubicar el dispensador sobre el montante de la
pared y atornillar con los tornillos provistos.
Refill Life at
Factory Settings:
15 Days* (Sprays every 7 minutes)
30 Days* (Sprays every 14 minutes)
60 Days* (Sprays every 28 minutes)
*Actual refill life will vary depending on all options chosen.
TIME AM PM
DAY TO REFILL
ON
OFF
Factory
Settings
Display
MODE
Mode A:
Neutralizing
Intensity
Setting
TIME AM PM
TIME AM PM
ADJUST
DAY TO REFILL
ON
OFF
ENTER
TIME AM PM
ADJUST
DAY TO REFILL
ON
OFF
ADJUST
DAY TO REFILL
ON
OFF
ENTER
ENTER
MODE
Step 2. Set Time Clock
• Press MODE to set the time.
• Press ADJUST to adjust clock by increments of 10 min.
• Press ENTER once real time is shown.
MODE
DAY TO REFILL
ON
OFF
TIME AM PM
ENTER
ADJUST
ENTER
DAY TO REFILL
ON
OFF
DAY TO REFILL
ON
OFF
DAY TO REFILL
ON
OFF
TIME AM PM
ADJUST
TIME AM PM
ADJUST
TIME AM PM
ENTER
ENTER
TIME AM PM
DAY TO REFILL
ON
OFF
ENTER
*Only change if you
want to use additional
program features.
TIME AM PM
TIME AM PM
ENTER
ADJUST
DAY TO REFILL
ON
OFF
DAY TO REFILL
ON
OFF
Set real-time clock
within 10 minutes.
ECTS
T DEF
AINS SHIP
D AGRKMAN
NTEE
ARA ND WO
U
G
A
Y
FULL PARTS
IN
W
ARRA
Remember to register for your
dispenser warranty on-line at:
http://www.technicalconcepts.com
Use of air neutralizers other than
TC™ refiils voids dispenser warranty.
*Mode C:
12 ON/12 OFF
Set Time to
Begin 12 HR
Operation
ADJUST
TIME AM PM
DAY TO REFILL
ON
OFF
DAY TO REFILL
ON
OFF
TIME AM PM
ENTER
DAY TO REFILL
ON
OFF
DAY TO REFILL
ON
OFF
DAY TO REFILL
ON
OFF
MODE
TIME AM PM
DAY TO REFILL
ON
OFF
TIME AM PM
ENTER
ADJUST
ENTER
DAY TO REFILL
ON
OFF
TIME AM PM
TIME AM PM
ADJUST
ENTER
TONE
DAY TO REFILL
ON
OFF
DAY TO REFILL
ON
OFF
MODE
TONE
ADJUST
ENTER
RESET
ENTER
MODE
Step 6. Refilling Dispenser
• Press the red RESET (J) button for up to 4 seconds. IMPORTANT: Do this every time a
refill is replaced. If reset button is pressed for 5 seconds, the dispenser will automatically
switch to “Demo” mode and revert to factory setting of 30 days.
• Insert refill and close cover. Do not stand directly in front of dispenser.
Step 7. Changing Batteries
• Dispenser will hold the display for 1 minute, allowing you to change the battery without
losing the setting. Battery life approximately 3 years.
• Visual battery monitor will flash when battery reaches last 30 days of life.
Remember this simple process:
1. Press
MODE
to scroll thru options
2. Press
ADJUST
to adjust choice in options
3. Press
ENTER
to enter choice into program
Repeat steps 1, 2 & 3 for each option available.
7'
2.2m
2595 South West 198th Ave.
Aloha, Oregon 97006
☎ 1-800-440-5556
Fax: 1-503-643-8224
www.airdelights.com
LCD
AEROSOL
DISPENSER
STOCK #401219
Distributeur LCD en aérosol Microburst 3000
Dispensador LCD en aerosol Microburst 3000
TIME AM PM
ADJUST
Finished
Step 5. Select days of operation
• Press ADJUST to select if dispenser should be ON or OFF for the day shown on the display.
• Press ENTER to save setting.
NOTE: Dispenser operates a 5, 6 or 7 day cycle.
3000
TIME AM PM
TIME AM PM
ENTER
ENTER
TM/MD
MODE
*Mode D:
Set Actual Day
Choose up to
2 days off during
the week
ADJUST
DAY TO REFILL
ON
OFF
*Mode B:
Actual
Time Set
DAY TO REFILL
ON
OFF
DAY TO REFILL
ON
OFF
TIME AM PM
TIME AM PM
DAY TO REFILL
ON
OFF
DAY TO REFILL
ON
OFF
Step 4. Set the day of the week
• Press MODE to set the day of the week.
• Press ADJUST to scroll through days.
• Press ENTER once actual day is shown.
TIME AM PM
ENTER
ADJUST
Step 3. Select number of hours of operation
• Press ADJUST to choose 12 or 24 hour operation.
• Press ENTER to save selected setting.
• If you choose a 12 hour setting:
• Press ADJUST to set the start time of 12 hour period.
• Press ENTER once desired start time is shown.
• Display will show number of days in refill cycle.
MODE
TIME AM PM
TIME AM PM
YEAR
Y
TO
Odor Neutralizing
Intensity:
HI
ME
LO
Have Questions or Need Supplies?
Call Toll Free: 1-800-440-5556
or on the web:
www.airdelights.com
NT
Visual battery
Open dispenser cover by pressing keyless lock. (H)
Audio ON
Insert two “C” cell alkaline batteries. (I)
TIME AM PM
Medium level of
Turn dispenser ON by pressing ON/OFF button. (E)
dispensing, 24 hours,
Dispenser is factory set with AUDIO ON (dispenser DAY REFILL
ON
every day, with a
will function with audio signals reinforcing the
OFF
30 day refill cycle.
need to replace a refill and/or batteries). You may
deactivate the AUDIO by pressing the TONE button (D) (dispenser will function without
audio signals).
• The factory setting will be displayed on LCD display. (G)
•
•
•
•
INSTALLATION INSTRUCTIONS
TEN
Setting Flow Chart
Operation Instructions
Mode d'emploi
Modo de empleo
Visual battery
• Ouvrir le couvercle du distributeur en appuyant sur
la fermeture sans clé (H).
Audio ON
TIME AM PM
• Installer deux piles alcalines de format "C". (I).
Medium level of
• Tourner le distributeur sur ON en appuyant sur le
dispensing, 24 hours,
DAY REFILL
bouton ON/OFF. (E)
ON
every day, with a
OFF
• Le distributeur est réglé à la manufacture avec la
30 day refill cycle.
fonction AUDIO ON (le distributeur fonctionnera avec les
signaux sonores pour renforcer le besoin de remplacer la recharge de gel ou/et les piles). Vous pouvez
désactiver la fonction AUDIO en appuyant sur le bouton TONE (E) (le distributeur fonctionnera
sans les signaux sonores).
• Les réglages seront affichés sur l'affichage LED (G).
Visual battery
• Abrir la tapa del dispensador apretando la cerradura
sin llave. (H)
Audio ON
TIME AM PM
• Insertar dos pilas alcalinas "C". (I)
Medium level of
• Encender el dispensador apretando el botón ON/OFF. (E)
dispensing, 24 hours,
DAY
REFILL
• El dispensador viene de fábrica con el AUDIO ON (el
ON
every day, with a
OFF
dispensador va a funcionar con la señal de audio reforzando
30 day refill cycle.
la necesidad de reemplazar el repuesto de gel o las pilas).
Usted puede desactivar el AUDIO apretando el botón TONE (D) (el dispensador funcionará
sin la señal de audio).
• El ajuste de fábrica aparecerá en el indicador LCD. (G)
TO
D
E
G
A
TONE
MODE
ON/OFF
ADJUST
B
C
DAY TO REFILL
ENTER
J
RESET
Si les réglages en usine vous conviennent, passer à l'étape
6. Sinon, suivre les étapes 1 à 5 ci-dessous.
Lo = intervalle de jet de 28 minutes
Étape 1. Choisir le niveau de distribution
ME =intervalle de jet de 14 minutes
• Appuyer sur le bouton MODE (A) pour sélectionner le niveau
HI = intervalle de jet de 7 minutes
de distribution.
• Appuyer sur le bouton ADJUST (B) pour
se déplacer d'une option à l'autre
MODE
TIME AM PM
TIME AM PM
TIME AM PM
ME (Moyen), HI (Élevé), Lo (Bas).
ADJUST
ADJUST
ADJUST
• Appuyer sur ENTER (C) pour sauvegarder
DAY REFILL
DAY REFILL
DAY REFILL
ON
ON
les réglages sélectionnés.
ON
ENTER
ENTER
ENTER
OFF
OFF
OFF
PM
PM
• L'affichage indiquera le nombre de jours dans
le cycle de recharge. (G).
TO
Étape 2. Régler l'horloge
• Appuyer sur MODE pour régler l'heure.
• Appuyer sur ADJUST pour régler l'horloge en
augmentant de 10 minutes à la fois.
• Appuyer sur ENTER lorsque l'heure réelle est affichée.
H
TO
TO
MODE
TIME AM
TIME AM
ENTER
ADJUST
DAY TO REFILL
ON
OFF
DAY TO REFILL
ON
OFF
Étape 3. Sélectionner le nombre d'heures
de fonctionnement
• Appuyer sur ADJUST pour régler un fonctionnement
de 12 ou 24 heures.
• Appuyer sur ENTER pour sauvegarder le réglage sélectionné.
• Si vous choisissez un réglage de 12 heures:
• Appuyer sur ADJUST pour régler l'heure de départ de la
période de 12 heures.
• Appuyer sur ENTER lorsque l'heure de départ de la période de
12 heures est affichée.
• L'affichage indiquera le nombre de jours dans le cycle de recharge.
TIME AM PM
ADJUST
DAY TO REFILL
PM
ON
OFF
TIME AM
TIME AM PM
ENTER
DAY TO REFILL
ON
OFF
PM
ADJUST
TIME AM
ENTER
DAY TO REFILL
ON
OFF
DAY TO REFILL
ON
OFF
Étape 4. Régler le jour de la semaine
• Appuyer sur MODE pour régler le jour de la semaine.
• Appuyer sur ADJUST pour dérouler les jours.
• Appuyer sur ENTER lorsque le jour réel est affiché.
TO
Si los ajustes de fábrica son satisfactorios proceder a la etapa 6. Si usted desea cambiar los ajustes,
siga las etapas 1 a 5 a continuación.
Etapa 1. Seleccionar el nivel de dispensación
Lo = intervalo de vaporisación de 28 minutes
• Apretar el botoon MODE (A) para seleccionar el nivel
ME =intervalo de vaporisación de 14 minutes
de dispensación.
• Apretar el boton ADJUST (B) para moverse entre las opciones: HI = intervalo de vaporisación de 7 minutes
ME (medio), HI (alto), Lo (bajo).
• Apretar ENTER (C) para salvaguardar MODE TIME AM PM
TIME AM PM
TIME AM PM
el ajuste seleccionado.
ADJUST
ADJUST
ADJUST
• El indicador mostrará el numero de días
DAY REFILL
DAY REFILL
DAY REFILL
ON
ON
ON
en el ciclo de recarga. (G)
ENTER
ENTER
ENTER
OFF
OFF
OFF
TO
MODE
TIME AM PM
DAY TO REFILL
ON
OFF
TIME AM PM
ENTER
ADJUST
ENTER
DAY TO REFILL
ON
OFF
TIME AM PM
Etapa 2. Ajustar el reloj
• Apretar MODE para ajustar la hora.
• Apretar ADJUST para ajustar el reloj en incrementos de
10 minutos.
• Apretar ENTER una vez que aparece la hora correcta.
TIME AM PM
DAY TO REFILL
ON
OFF
F
MUST USE ALKALINE BATTERIES
UTILISER SEULEMENT DES PILES ALCALINES
USAR SOLAMENTE PILAS ALCALINAS
TIME AM PM
ENTER
ADJUST
ENTER
DAY TO REFILL
ON
OFF
TIME AM PM
ENTER
ADJUST
Etapa 4. Fijar el día de la semana
• Apretar MODE para fijar el día de la semana.
• Apretar ADJUST para seleccionar el dÌa de la semana.
• Apretar ENTER una vez que aparece el día correcto.
TIME AM PM
TIME AM
TIME AM
DAY TO REFILL
ON
OFF
DAY TO REFILL
ON
OFF
TIME AM PM
ADJUST
DAY TO REFILL
PM
ON
OFF
TIME AM
TIME AM PM
ENTER
Fin
Étape 5. Sélectionner les jours de fonctionnement
• Appuyer sur ADJUST pour choisir si le distributeur devrait être en position de fonctionnement ON ou
d'arrêet OFF pour le jour affiché sur l'affichage.
• Appuyer sur ENTER pour sauvegarder le réglage.
REMARQUE : Le distributeur fonctionne sur un cycle de 5, 6 ou 7 jours.
Étape 6. Recharge du distributeur
• Appuyer sur le bouton rouge RESET (J) pendant une durée de 4 secondes. IMPORTANT: Faire cela
chaque fois qu'une recharge est remplacée. Si vous appuyez sur le bouton de remise à zéro
pendant 5 secondes, le distributeur passera automatiquement au mode "Demo" et retournera au
réglage en usine de 30 jours.
• Placer la recharge et fermer le couvercle. Ne pas se tenir directement en face du distributeur.
Étape 7. Remplacement des piles
• Le distributeur maintiendra l'affichage pendant 1 minute pour vous donner le temps de changer les
piles sans perdre les réglages. Le durée d'utilisation des piles est d'environ 3 ans.
• Le voyant lumineux des piles clignotera lorsque les piles ont atteint les derniers 30 jours de
leur durée d'utilisation.
ENTER
DAY TO REFILL
ON
OFF
PM
ADJUST
TIME AM
ENTER
DAY TO REFILL
ON
OFF
DAY TO REFILL
ON
OFF
TIME AM PM
ADJUST
DAY TO REFILL
ON
OFF
DAY TO REFILL
ON
OFF
ENTER
ENTER
ADJUST
ENTER
PM
MODE
Etapa 3. Seleccionar el numero de horas de funcionamiento.
• Apretar ADJUST para elegir 12 o 24 horas de funcionamieneto.
• Apretar ENTER para salvaguardar el ajuste seleccionado.
• Si usted selecciona 12 horas:
• Apretar ADJUST para fijar la hora de comienzo del período
de 12 horas.
• Apretar ENTER una vez que la hora deseada de comienzo
aparece en el indicador.
• El dispensador mostrará el numero de días en el ciclo de recarga.
MODE
DAY TO REFILL
ON
OFF
TO
PM
DAY TO REFILL
ON
OFF
I
TO
Fin
Etapa 5. Seleccionar los días de funcionamiento
• Apretar ADJUST para seleccionar si el dispensador debe estar en ON u OFF para el día que
aparece en el indicador.
• Apretar ENTER para salvaguardar la selección.
NOTA: El dispensador funciona en ciclos de 5, 6 o 7 días.
Etapa 6. Recarga del dispensador
• Apretar el botón rojo RESET (J) durante 4 segundos. IMPORTANTE: Hacer esto cada vez que se cambie
la recarga. Si el botón RESET se aprieta por 5 segundos, el dispensador automáticamente cambiará a la
modalidad de "Demo" y retornará al ajuste de fábrica de 30 días.
• Insertar la recarga y cerrar la tapa. No pararse enfrente del dispensador.
Etapa 7. Cambio de pilas
• LEl dispensador mantendrá la indicación por 1 minuto, para permitirle el cambio de pilas sin perder los
ajustes. La pila dura aproximadamente 3 años.
• La imagen de la pila empezará a guiñar cuando a la pila le queden 30 días de vida.