1
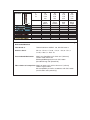
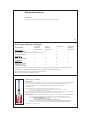
2012_06
Gebrauchsanweisung
Instruction for Use
Instrucciones de uso
E . H A H N E N K R AT T G M B H
Dentale Medizintechnik
Benzstraße 19
DE-75203 Königsbach-Stein
Fon 0049 (0)7232 / 3029 – 0
Fax 0049 (0)7232 / 3029 – 99
[email protected]
www.hahnenkratt.com
HAHNENKRATT.COM
Index deutsch
2
Seite
14
19
10
11
12
13
14
15
16
Produktübersicht
Werkstoffe
Gebrauchsanweisung: Indikationen
Desinfektion, Reinigung, Sterilisation
Präparation des Stiftbettes
Insertion des Wurzelstiftes Exatec
Insertion des Wurzelstiftes Exatec-S
Herstellen eines gegossenen Stiftaufbaus Exatec-G
Insertion des Wurzelstiftes Exatec, Cytec oder Contec
Index English
Page
Product range
Materials
Instruction of use: Indications of use
Disinfecting, cleaning, sterilising
Preparing the post anchorage
14
19
18
19
20
Inserting the Exatec root post
Inserting the Exatec-S root post
Producing a cast post with Exatec-G
Inserting the Exatec, Cytec or Contec root post
21
22
23
24
Index Español
Página
Contenido
Materiales
Mode empleo: Indicaciones
Desinfección, limpieza, esterilización
Preparación del lecho para el poste
Inserción del poste radicular Exatec
Inserción del poste radicular Exatec-S
Elaboración de una estructura de poste moldeada con Exatec-G
Inserción del poste radicular Exatec, Cytec o Contec
14
19
26
27
28
29
30
31
32
Symbole
34
3
4
Exatec
ø D1
6,6
8,0
9,7
D1
D2
D3
2,6
1,461
0,98
mm
2,7
1,559
0,98
mm
2,8
1,681
0,98
mm
weiß
white
blanco
gelb
yellow
amarillo
REF
42.001
42.002
L
ø D2
L
Universal
ø D3
Instrumente
11,4
3,0
1,803
0,98
mm
2,2
2,2
0,98
mm
blau
blue
azul
schwarz
black
negro
grün
green
verde
42.003
42.004
42.010
43.000
42.100
42.005
Module:
Exatec
42.311
42.312
42.313
42.314
45.511
45.512
45.513
45.514
42.731
42.732
42.733
42.734
42.311
42.312
42.313
42.314
Exatec-S
45.522
Exatec-G
42.720
42.750
5
6
Module:
Exatec carbon
42.411
42.412
42.413
42.415
Exatec blanco
42.611
42.612
42.613
42.615
øD1
L
D1
D2
20
1,2
0,6
mm
20
1,4
0,8
mm
20
1,8
1,0
mm
20
2,2
1,2
mm
Universal
weiß
white
blanco
gelb
yellow
amarillo
blau
blue
azul
schwarz
black
negro
L
Cytec
øD2
42.010
43.000
43.001
43.002
43.003
43.001-L /... 43.002-L /... 43.003-L /...
43.004
Cytec carbon
43.401
43.402
43.403
43.404
43.601
43.602
43.603
43.604
Cytec blanco
7
Contec
øD1
20
1,30
0,85
mm
20
1,50
0,95
mm
20
1,75
1,05
mm
20
2,00
1,20
mm
Universal
weiß
white
blanco
gelb
yellow
amarillo
blau
blue
azul
schwarz
black
negro
44.001
44.002
44.003
44.004
44.401
44.402
44.403
44.404
44.601
44.602
44.603
44.604
L
L
D1
D2
øD2
42.010
43.000
Contec carbon
Contec blanco
8
9
Werkstoffe/Materials
Titan Grade 5:
Ti6Al4V-US-Norm ASTM F 136, DIN ISO 5832-3
Stainless Steel:
Mn 2,0 - Ni 10,0 - P 0,06 - C 0,12 - S 0,35 - Si 1,0
Cr 19,0 - Mo 0,7 - Rest: Fe
Faserverbund-Werkstoffe:
Matrix aus Epoxidharz mit mind. 60% (Volumen)
Carbon- oder Glasfasern
Biokompatibilitätsgetestet nach ISO 10993
(Sensibilisierung und Zytotoxität)
Fibre reinforced composites: Matrix of epoxy resin with at least 60% (volume)
carbon or glass fibres.
Bio-compatibility tested in accordence with ISO 10993
(sensitisation and cytotoxicity)
Gebrauchsanweisung
Indikationen
Wurzelstifte dienen bei reduzierter Restzahnsubstanz zur Verankerung von Aufbauten.
10
11
Desinfektion, Reinigung, Sterilisation
X=anwendbar
Desinfektion:
Desinfektionslösung:
Kunststoff
Abdruck-/
Ausbrennstift
Titan-/
EdelstahlWurzelstifte
Instrumente
CarbonfiberGlasfiberWurzelstifte
X
X
X
X
X
X
X
–
X
–
X
X
X
X
–
X
X
X
X
X
–
X
X
–
Die vom Hersteller für das jeweilige Produkt empfohlen wird.
Thermodesinfektion
Reinigung:
Ultraschall
Alkohol, z.B. Ethanol
Sterilisation:
Autoklav
mind. 120°C/20 Min.
Heißluftsterilisator
180°C/mind. 10 Min.
Unsteril gelieferte Instrumente sind vor dem erstmaligen sowie nach jedem Gebrauch gemäß ››Herstellerinformation zur
Aufbereitung von resterilisierbaren Medizinprodukten gemäß EN ISO 17664‹‹ (anbei) aufzubereiten.
Die Wurzelstifte müssen vor ihrer Verwendung sterilisiert werden.
Die Wurzelstifte sind nicht zur Wiederverwendung.
Gebrauchsanweisung
1 Präparation des Stiftbettes
Ausgangssituation:
Der Zahn muß lege artis vorbehandelt sein und darf keine pathologischen Veränderungen aufweisen. Das Wurzelkanallumen
muß einen geradlinigen Verlauf haben und muß bis max. 2mm zum physiologischen Foramen aufbereitet sein.
• Bestimmung der Stiftgröße erfolgt durch Auflage der Meßschablone auf die Röntgenaufnahme.
• Kofferdam anlegen
• Eröffnung und Erweiterung des Wurzelkanals mit Handinstrumenten bis etwa ISO 80.
Eine möglichst weite Aufbereitung mit Handinstrumenten reduziert den Maschineneinsatz von Bohrern,
die eine u.U. Dentin-schädigende Hitze erzeugen können.
• Maschinelle Erweiterung mit dem Kanalerweiterer und bei Exatec anschließend mit dem Pilotbohrer. Die ausgewählte
Stiftlänge berücksichtigen und diese gegebenenfalls mit Gummiring am Bohrer markieren
• Kalibrierbohrung des Stiftbettes mit dem Kalibrierbohrer, so daß beim Exatec das Auflager für den Stiftkopf mindestens 2mm
tief im Dentin liegt.
• Der integrierte Stirnfräser garantiert, daß das Auflager zentrisch und rechtwinklig zur Kanalachse verläuft.
• Um Schädigungen des Dentins durch Hitzeentwicklungen zu vermeiden, sollen Bohrer im allgemeinen nur unter
• Wasser- oder Gelkühlung
• bei einer Drehzahl von 500-1000 U/min.
• unter möglichst geringem Druck „tupfend“ eingesetzt werden.
Die Instrumente in Intervallen kontrollieren. Bohrspäne entfernen und vom Abrieb reinigen. Bohrkanal spülen.
Um optimele Bohrleistungen zu erzielen, sollten die Instrumente nach etwa 15-mal. Einsatz ersetzt werden.
1
• Wurzelkanal reinigen und trocknen.
12
2 Insertion des Wurzelstiftes Exatec (passiv)
13
• Exatec Wurzelstift probeweise einsetzen und Bißlage kontrollieren.
• Gegebenenfalls erforderliche Stifthöhe markieren und extraoral mit einem feinkörnigen Silizium-Karbid Schleifkörper,
dünnem Hartmetallfräser oder Trennscheibe im Handstück kürzen.
• Wurzelkanal reinigen:
• Spülen mit z. B. 37% Phosphorsäure, NaOCl, H2O2
• Gegebenenfalls Smear entfernen und konditionieren
• Trocknen mit Papierspitzen, abschließend mit warmer Luft
!! Achtung: Eugenolhaltige provisorische Zemente vermeiden, bzw. restlos entfernen.NaOCl oder H2O2 sind bei
Verwendung von Composites nicht indiziert, da der naszierende Sauerstoff eine Sauerstoffinhibition der Aushärtung
des Composites auslösen kann.
2
• Exatec Wurzelstift reinigen (z.B. Alkohol, Orthoskavident C)
• Wurzelkanal mit dünnflüssigem Zement portionsweise mit dem Lentulo füllen, so daß keine Lufteinschlüsse entstehen.
Nur dünnflüssiger Zement kann durch die Abflußrillen des Stiftes ausreichend abfließen.
Als Befestigungsmittel eignen sich Phosphat- oder Glasionomer-Zemente und Composite. Materialien mit kleiner FüllstoffKorngröße sind zu bevorzugen. (z.B.: Ketac Cem Radiopaque, Korngröße: 0,1-1,2µm)
• Exatec Wurzelstift mit leichter Drehbewegung in das Stiftlager langsam eindrücken bis der Stiftkopf satt in der
Einspannstelle aufliegt.
• Befestigungsmittel aushärten lassen
• Überschüssiges Befestigungsmittel entfernen
• Den Stiftkopf entsprechend der Oklusionsverhältnisse mit Zylinderdiamanten unter Wasserkühlung anpassen.
Aufbau und abschließende Restauration gemäß der Gebrauchsinformation der zur Anwendung kommenden Produkte und Verfahren herstellen.
3 Insertion des Wurzelstiftes Exatec-S (aktiv, mit Gewinde)
• Exatec-S Stift auf den Schraubendreher montieren:
• Vorsichtsmaßnahme: Schraubendreher mit Sicherheitskettchen sichern (durch Bohrer ziehen)
• Schraubendreher auf den Stift aufsetzen
• Schraubendreher drehen bis Nuten einrasten
• Stift einschieben
• sicheren Sitz des Stiftes im Schraubendreher prüfen
• Exatec-S Wurzelstift probeweise eindrehen
Das selbstschneidende Gewinde schneidet sich hierbei in das Dentin ein. Durch den Konus greifen alle Gewindegänge
gleichzeitig und das Eindrehen ist mit einem vergleichsweise minimalen Drehmoment von 7,9±1,7 Ncm bei maximal 3
Umdrehungen möglich. Die Apikalwärtsbewegung des Stiftes wird durch das passgenaue Auflager exakt passgenau gestoppt.
• Wurzelkanal reinigen:
• Spülen mit z. B. 37% Phosphorsäure, NaOCl, H2O2
• Gegebenenfalls Smear entfernen und konditionieren
• Trocknen mit Papierspitzen, abschließend mit warmer Luft
!! Achtung: Eugenolhaltige provisorische Zemente vermeiden, bzw. restlos entfernen.NaOCl oder H2O2 sind bei
Verwendung von Composites nicht indiziert, da der naszierende Sauerstoff eine Sauerstoffinhibition der Aushärtung des
Composites auslösen kann.
• Exatec Wurzelstift reinigen, dabei Dentinspäne entfernen (z.B. Alkohol, Orhoskavident C, Natriumhypochlorid)
• Wurzelkanal mit dünnflüssigem Zement portionsweise mit dem Lentulo füllen, so daß keine Lufteinschlüsse entstehen. Nur
dünnflüssiger Zement kann durch die Abflußrillen des Stiftes ausreichend abfließen.
Als Befestigungsmittel eignen sich Phospat- oder Glasionomer-Zemente und Composite. Materialien mit kleiner FüllstoffKorngröße sind zu bevorzugen. (z.B. Ketac Cem Radiopaque, Korngröße: 0,1-1,2µm)
• Exatec-S Wurzelstift eindrehen:
3
mit einer kleinen Linksdrehung beginnen, damit der Stift in die vorgeschnittenen Gewindegänge einrastet,
dann rechtsdrehend den Wurzelstift einschrauben (maximal 3 Umdrehungen).
• Schraubendreher axial zum Stift abziehen, um eine Deformation der Krallen zu vermeiden.
• Befestigunsmittel aushärten lassen und überschüssiges Befestigungsmittel entfernen.
• Den Stiftkopf entsprechend der Oklusionsverhältnisse mit Zylinderdiamanten unter Wasserkühlung anpassen.
Aufbau und abschließende Restauration gemäß der Gebrauchsinformation der zur Anwendung kommenden Produkte und Verfahren herstellen.
4 Herstellen eines gegossenen Stiftaufbaus mit Exatec-G
Direkte Methode
4
• Ausbrennstift probeweise einsetzen. Bißlage kontrollieren
• Erforderliche Stifthöhe markieren und extraoral kürzen. Der Stift kann aus dem modellierten Stiftaufbau ca. 2mm
herausragen. Nach dem Modellieren kann der Aufbau inklusive des Stiftes einfach mit der Zange entfernt werden.
• Wurzelkanal und alle anderen Kontaktflächen hauchdünn isolieren (z.B. Öl)
• Ausbrennstift wieder einsetzen
• Stiftaufbau mit ausbrennbarem Kunststoff (z.B. Palavit G) modellieren. Bißlage kontrollieren.
• Modellierter Stiftaufbau mit Ausbrennstift entfernen und in das Dentallabor geben
• Provisorischen Exatec-G Wurzelstift setzen
• Zahn mit einer provisorischen Krone versorgen, dabei die Gebrauchsinformation der zur Anwendung
kommenden Produkte beachten
Indirekte Methode
•
•
•
•
•
Abdruckstift probeweise einsetzen. Bißlage kontrollieren
Erforderliche Stifthöhe markieren und extraoral kürzen
Dentin- und Schmelzkontaktflächen hauchdünn isolieren (z.B. Öl)
Abdruckstift setzen
Abdruck nach der gewünschten Methode herstellen. Die Verwendung von Kupferringen
oder ATR-Kappen ergibt genaueste Abdruckergebnisse
• Abdruck abnehmen und zusammen mit einem Ausbrennstift in das Dentallabor geben
• Provisorischen Exatec-G Wurzelstift setzen
• Zahn mit einer provisorischen Krone versorgen, dabei die Gebrauchsinformationen der zur Anwendung
kommenden Produkte beachten.
Das Dentallabor gießt einen Gußaufbau nach den üblichen Verfahren. Der Gußaufbau wird -nach Entfernen des
Provisoriums- wie üblich in das präparierte Stiftlager integriert.
14
15
Exatec
5 Insertion des Wurzelstiftes Exatec, Cytec oder Contec aus Carbonfiber oder Glasfiber
• Wurzelstift probeweise einsetzen und Bisslage kontrollieren
• Erforderliche Stifthöhe (Okklusionshöhe) markieren und extraoral mit einer feinen Diamantscheibe kürzen.
Dabei die Entwicklung von Staub vermeiden (scharf schneidende Instrumente verwenden, Stift anfeuchten)
!! Achtung: Niemals eine Zange zum Kürzen verwenden. Dieses würde die Struktur des Werkstoffes beschädigen.
Cytec
• Wurzelstift mit Alkohol reinigen und trocknen
Contec
5
• Wurzelkanal vorbereiten: Konditionierung des Dentins mit der Adhäsiv-Technik
!! Achtung: Eugenolhaltige provisorische Zemente vermeiden, bzw. restlos entfernen.
H2O2 oder NaOCl sind nicht indiziert, da der naszierende Sauerstoff eine Sauerstoffinhibition
der Aushärtung des Composites auslösen kann.
•
•
•
•
•
•
Adhäsiv-Technik zum Beispiel:
Konditionierung des Kanals und der Zahnoberfläche (z.B. 37 % Phosphorsäure)
Entfernung der Säure mit Wasserspray
Kanalspülung mit Alkohol (z.B. 70 %)
Kanaltrocknung mit Papierspitzen
Applikation des Primers und Aufsaugen des Überschusses mit Papierspitzen
Applikation des Bonders und Aufsaugen des Überschusses mit Papierspitzen
!! Achtung: Bonder nicht mit Licht polymerisieren.
Gebrauchsanweisungen der zur Anwendung kommenden Produkte und Verfahren beachten.
16
• Optional: Stift dünn mit dual-härtendem Bonder versehen, nicht mit Licht polymerisieren.
17
Alternativ: Stift dünn mit dual-härtendem Bonder versehen, hauchdünn ausblasen
Alternativ: und mit Licht polymerisieren.
z.B.: Optibond Solo Plus + Aktivator, Kerr; Clearfil Liner Bond 2 V, Kuraray;
z.B.: Excite DSC, Ivoclar Vivadent
• Wurzelkanal mit dünnflüssigem, dual-polymerisierendem, röntgensichtbarem Composite
und Lentulo füllen. Die Gebrauchsanweisung des Composite-Herstellers beachten.
z.B.: Bifix QM, VOCO GmbH; Panavia F, Kuraray; Rely X Unicem, 3M Espe; Variolink II, Ivoclar Vivadent
Dual Cement radiopaque, Ivoclar Vivadent
• Wurzelstift zügig mit Composite versehen und sofort mit leichter Drehbewegung in das Stiftlager langsam
einführen und in Position halten bis das Composite soweit ausgehärtet ist, dass Stift positioniert festsitzt.
• Überschüssiges Material gleichmäßig auf überstehenden Stift und Kavität verteilen und restliches, überflüssiges
Composite entfernen.
• Mit Polymerisationslampe ca. 40 sec aushärten (Gebrauchsanweisung des Composites beachten)
• Danach Stumpf zügig mit zähfließendem Composite aufbauen. Um den Aufbau zu formen - soweit notwendig - eine
durchsichtige Hülse (frasaco) oder Matrizenband (HAHNENKRATT) verwenden.
z.B.: Cavex Clearfild Core, Kuraray; Rebilda, Voco; Corepaste, Kerr
• Abschließende Feinkorrekturen mit Turbine und diamantbeschichtetem Schleifkörper unter Wasserkühlung vornehmen.
Gebrauchsanweisungen der zur Anwendung kommenden Produkte und Verfahren beachten.
Instruction of use
Indications for use
Rootposts are indicated to support coronal restoration in case of coronal insufficient residual tooth substance.
18
19
Disinfecting, cleaning, sterilising
X=applicable
Disinfection:
Disinfection solution:
Plastic
Impression
Casting post
Titanium
Stainless steel
root posts
Instruments
Carbon fibre
glass fibre
root posts
X
X
X
X
X
X
X
–
X
–
X
X
X
X
–
X
X
X
X
X
–
X
X
–
recommended by the manufacturer for the respective product.
Thermo-Disinfection
Cleaning:
Ultrasonic
Alcohol, e.g. ethanol
Sterilisation:
Autoclave
at least 120°C/20 Min.
Hot-air steriliser
180°C/at least 10 Min.
All non-sterile instruments must be sterilised before they are used for the first time. The instruments must be disinfected, cleaned
and sterilised after every use. Please see the ››Manufacturer's information for the reprocessing of resterilizable medical devices in
accordance with EN ISO 17664‹‹ (attached).
The root posts must be sterilised before they are used for the first time.
The root posts cannot be re-used.
1 Preparing the post anchorage
Initial situation: The tooth must be pre-treated lege artis and must not have any pahological modifications. The root canal
lumen must have a linear course and must be prepared up to no more than 2mm from the physiological foramen.
• Determining the post size This is done by placing the measuring template on the X-ray
• Apply cofferdam
• Open and extend the root canal with manual instruments up to about ISO 80.
Preparing the root canal as widely as possible with manual instruments reduces the use of machinery such as drills that
may possibly generate dentine-damaging heat.
• Extend mechanically by using the enlarging drill and with Exatec follow up with the pilot drill. Take the post length
selected into account and mark it with a rubber ring on the drill if necessary.
• Calibrate the post anchorage with the calibrating drill so that with the Exatec the bridge for the posthead is embedded
at least 2mm in the dentine.
The integrated face-cutter guarantees that the bridge is centred and at right angle to the canal axis.
To prevent the generation of heat damaging the dentine, drills should only be used under
• water cooling or gel cooling,
• at 500-1000 revolutions r.p.m.
• with as low a pressure as possible and a ‘dabbing’ motion.
Check the instruments at regular intervals during the drilling process.
Remove drilling shavings and clean of abrasions. Rinse drill channel.
The instruments should be replaced after being used about 15 times in order to achieve
optimal drilling performance and drilling results.
• Clean root canal and dry.
1
20
2 Inserting the Exatec root post (passive)
21
• Insert the Exatec root post on a trial basis and check the biting position.
• Mark the post height as and when required and shorten extraorally with a fine-grained silicon
carbide abrasive tool, thin carbide cutter or abrasive wheel in the handpiece
• Clean the root canal:
• Rinse with e. g. 37% phosphoric acid, NaOCl, H2O2
• If necessary remove smear and condition
• Dry with paper tips, finally with warm air
!! Attention: Do not use eugenol-containing temporary cements or remove it totally.
Do not use NaOCl or H2O2 when using composites, because polymerisation could be affected.
• Clean Exatec root post (e.g. alcohol, Orthoskavident C, sodium hypochloride)
2
• Fill root canal with low-viscosity cement composite in portions with the Lentulo so that no air bubbles form.
Only low-viscosity cement can drain off sufficiently through the post’s drainage grooves
Phosphate or glasionemer cements and composite are ideal fixing agents.
Materials with a small filling grain size are preferable (e.g. Ketac Cem Radiopaque, grain size: 0.1-1.2µm)
• Press Exatec root post slowly into the post anchorage, turning slightly, until the post-head is well
set in the supporting surface.
• Allow the fixing agent to set
• Remove superfluous fixing agent
• Adjust the posthead according to the occlusion circumstances with cylindrical diamonds under water cooling.
Manufacture the Post and final restoration in accordance with the Information on Use of the products
and processes being used.
3 Inserting the Exatec-S root post (actively, with thread)
• Fit Exatec-S post onto the screwdriver:
•
•
•
•
•
Precaution: Please ensure by drawing the protective through the hole that the screw driver is at safety.
Mount the screwdriver onto the post
Turn the screwdriver until the nuts lock in place
Insert post
Check that the post is securely fitted in the screwdriver
• Screw in the Exatec-S root post to test
The self-cutting thread cuts into the dentine. Due to the taper, all the threads grip at the same time and it is
possible to screw in with a comparatively minimal torque of 7.9±1.7Ncm with maximum 3 turns. The motion of
the post towards the apex is stopped at exactly the right position owing to the perfect-fit bridge.
• Clean the root canal:
• Rinse with e. g. 37% phosphoric acid, NaOCl, H2O2
• If necessary remove smear and condition
• Dry with paper tips, finally with warm air
!! Attention: Do not use eugenol-containing temporary cements or remove it totally.
Do not use NaOCl or H2O2 when using composites, because polymerisation could be affected.
• Clean Exatec root post, removing dentine shavings (e.g. alcohol, Orthoskavident C, sodium hypochloride)
• Fill root canal with low-viscosity cement composite in portions with the Lentulo so that no air bubbles form.
Only low-viscosity cement can drain off sufficiently through the post’s drainage grooves
Phosphate or glasionemer cements and composite are ideal fixing agents.
Materials with a small filling grain size are preferable (e.g. Ketac Cern Radiopaque, grain size: 0.1-1.2µm)
• Screw the Exatec-S root post in. Starting with a slight turn to the left, so that the post locks into place in
the pre-cut threads, then screw the root post in, turning to the right (no more than 3 turns).
3
• Pull off the screw driver axial to the post to avoid deformation of the claws.
• Allow the fixing agent to set and remove superfluous fixing agent.
• Adjust the posthead according to the occlusion circumstances with cylindrical diamonds under water cooling.
Manufacture final restoration in acc. with the Information on Use of the products and processes being used.
4 Producing a cast post with Exatec-G Direct method
Direct method
4
• Insert post to test. Check biting postition
• Mark requisite post height and shorten extraorally. The post may protrude some 2mm from the modelled post. After
modelling, the post including the post can be removed easily with pincers.
• Insulate root canal and all other contact surfaces with a very thin covering (e.g. of oil)
• Re-insert post
• Model post with castable plastic (e.g. Palavit G). Check biting position.
• Remove modelled post with post and despatch to the dental laboratory
• Insert temporary Exatec-G root post
• Apply temporary crown to tooth, following the Information on Use relating to the products being applied
Indirect method
•
•
•
•
•
•
•
•
Insert post to test. Check biting postition
Mark requisite post height and shorten extraorally
Insulate dentine and enamel contact surfaces with a very thin covering (e.g. of oil)
Insert post
Make up the cast by the desired method. Using copper rings or ATR caps produces the most precise post results.
Remove cast and despatch together with a post to the dental laboratory
Insert temporary Exatec-G root post
Apply temporary crown to tooth, following the Information on Use relating to the products being applied
The dental laboratory makes a post cast by the standard procedure. Once the temporary post is removed,
the post cast is integrated as usual into the prepared post bed.
22
23
Exatec
5 Inserting the Exatec, Cytec and Contec root post made of carbon fibre or glass fibre
• Insert the post to test and check the biting position.
• Mark the requisite post height (occlusion height) and shorten the post extraorally with a fine diamond wheel.
Avoid the creation of dust by using sharp instruments and moisten the post.
!!Attention: Never use a pincer, as this would destroy the fibre structure.
Cytec
• Clean the post with alcohol and dry it with warm air.
• Preparing the root canal: Condition the dentin by Adhesive Technique.
!!Attention: Do not use eugenol-containing temporary cements or remove it totally.
Do not use H2O2 or NaOCl because. polymerisation could be affected.
Contec
5
Adhesive Technique - for example:
• Condition the root canal and cavity (e.g. 37 % phosphoric acid)
• Remove the acid by rinsing with water
• Rinse the canal with alcohol (e.g. 70 %)
• Dry the canal with paper tips
• Apply the Primer and absorb the surplus with paper tips
• Apply the Bonder and absorb the surplus with paper tips
!!Attention: do not polymerise Bonder with light
Take care to the Instructions of Use of all products and processes being used.
24
• Optional: Apply dual-polymerising Bonder thin, do not polymerise with light.
Alternatively: Apply dual-polymerising Bonder, blow out very thin and polymerise with light.
e.g.: Optibond Solo Plus + Aktivator, Kerr; Clearfil Liner Bond 2 V, Kuraray;
e.g.: Excite DSC, Ivoclar Vivadent
• Apply low-viscosity, dual-polymerising, X-ray visible composite with lentulo to the
root canal in accordance with the corresponding Instructions on Use.
e.g.: Bifix QM, VOCO GmbH; Panavia F, Kuraray; Rely X Unicem, 3M Espe; Variolink II, Ivoclar Vivadent;
e.g.: Dual Cement radiopaque, Ivoclar Vivadent
• Apply composite quickly to the post and insert it immediately and slowly, by turning it slightly, into the root
canal and keep it in position until the composite is hardened to the extent that the post is firmly in position.
• Distribute surplus material evenly on the protruding post and cavity. Remove remaining surplus composite.
• Set for about 40 sec with a polymerisation lamp (Follow the Instructions of Use relating to the composite)
• Make the final restoration quickly by using a viscous Core Composite. For forming the restoration, you can use - if necessary a transparent plastic shell (frasaco) or a matrixband (HAHNENKRATT).
e.g.: Cavex Clearfild Core, Kuraray; Rebilda, Voco; Corepaste, Kerr
• Make final corrections under water cooling with a diamond-coated abrasive instrument.
Take care to the Instructions of Use of all products and processes being used.
25
Modo de empleo
Indicaciones
Las clavijas para la raiz están indicados para ayudar la restauración de la corona en caso de una falta
de sustancia residual del diente.
26
27
Desinfección, limpieza, esterilización
X=applicable
Desinfección:
solución de desinfección:
Plástico
Poste de impressión/
fundible
Postes radiculares
de titano/acero
inoxidable
Instrumentos
Postes radiculares
de fibra de carbon/
fibra der vidrio
X
X
X
X
X
X
X
–
X
–
X
X
X
X
–
X
X
X
X
X
–
X
X
–
recomendada por el fabricante para el respectivo producto
Termodesinfección
Limpieza:
Ultrasonido
Alcohol, p. ej. etanol
Esterilización:
Autoclave
min. 120°C/20 minutos
Esterilizador por
aire caliente
Todos los instrumentos non-ésteril se deben esterilizar antes de ser utilizados por la primera vez. Los instrumentos se deben
desinfectar, limpira y esterilizar después de cada uso. Mire ››Manufacturer's information for the reprocessing of resterilizable
medical devices in accordance with EN ISO 17664‹‹ (adjunto en inglés).
Los postes radiculares se deben eterilizar antes de ser utilizados por la primera vez.
Los postes radiculares no están previstos para una reutilización.
Modo de empleo
1 Preparación del lecho para el poste
Situación inicial:
El diente tiene que estar tratado previamente en lege artis y no deberá presentar ninguna alteración patológica. El lumen del
conducto radicular ha de tener un recorrido recto y tendrá que estar preparado como foramen fisiológico hasta máx. 2mm.
• Determinación del tamaño del poste Se determina colocando la plantilla de medición sobre la radiografia.
• Colocación de la estructura contención.
• Apertura y ampliación del conducto radicular con instrumentos manuales hasta aproximadamente ISO 80.
Una preparación lo más amplia posible con instrumentos manuales reduce la aplicación mecánica de taladradoras, las
cuales, bajo determinadas circunstancias, pueden generar un calor dañino a la dentina.
• Ampliación mecánica con el ensanchador de conducto radicular y, a continuación, con la fresa piloto en el caso de
Exatec. Tenga en cuenta el largo elegido del poste y, si es necesario, márquelo con el anillo de goma en la fresa.
La punta centradora no cortante sigue sólo a un lumen de conducto abierto. De ese modo se reduce el riesgo de una vía
falsa al mínimo.
• Taladrado de calibración del lecho para el poste con la fresa calibradora de tal modo que, en el caso de Exatec, el
soporte para la cabeza del poste se encuentre por lo menos a 2mm de profundidad en la dentina
1
• La fresadora frontal integrada garantiza que el soporte quede en el centro y perpendicularmente al eje del conducto.
• Para evitar daños de la dentina por el desarollo de calor, las taladradoras deberían ser utilizadas generalmente sólo con
• enfriamiento por agua o gel,
• a una velocidad de 500-1000 rpm
• y con una mínima presión tocando sólo lligeramente.
Controle los instrumentos en intervalos durante el proceso de taladrado. Elimine las virutas del taladrado y limpie de
restos abrasivos. Enjuague el canal taladrado.
Para obtener óptimos rendimientos y resultados de taladrado, se recomienda sustituir los instrumentos después de
haberlos utilizado unas 15 veces.
• Limpie y seque el conducto radicular.
28
2 Inserción del poste radicular Exatec (pasivo)
29
• Pruebe el poste radicular insertándolo y controle la posición oclusal.
• Dado el caso, marque la altura requerida del poste y acórtelo extraoralmente con una pieza de mano con un cuerpo
esmerilador de carburo de silicio de granulación fina, una fresadora delgada de metal duro o una muela tronzadora.
• Limpie el conducto radicular:
• Enjuague con Rinse p. ej. ácido de fósforo 37%, NaOCl, H2O2
• Si es necesario, elimine el frotis y acondicione
• Seque con puntas de papel y, luego, con aire tibio.
іAtención! Evita cementos provisorios con eugenol, o sea alime total,
NaOCl o H2O2 no puede aplicar con composites, ya que la polimerización está molestado negativa.
• Limpie el poste Exatec (p. ej. con alcohol, Orthoskavident C).
2
• Rellene el conducto radicular con cemento muy fluido en porciones con el Lentulo, de tal modo que no se originen
burbujas de aire. Sólo cemento muy fluido puede escurrirse suficientemente por las acanaladuras de salida del poste.
Como medios de fijación se utilizan idealmente cementos a base de fostafo o de ionómero vítreo y composites. Se deberán preferir materiales con una granulación pequeña de la materia de relleno (p. ej. Ketac Cem Radiopaque, tamaño del
grano: 0,1-1,2µm).
• Inserte lentamente el poste radicular Exatec en la base dando ligeros movimientos giratorios de vaivén, hasta que la
cabeza del poste descanse bien en el punto de sujeción.
• Deje que el medio de fijación se endurezca.
• Elimine el medio de fijación sobrante.
• Si es necesario, rebaje la cabeza del poste con la esmeriladora.
Elabore la estructura y la restauración definitiva conforme a las instrucciones de uso de los procuctos y
procedimientos que han de ser aplicados.
3 Inserción del poste radicular Exatec-S (aktivo, con rosca)
• Monte el poste Exatec-S en el destornillador:
• Medida preventia: Asegure el destornillador con una cadena de securidad (tirar por el agujero de perforación)
• Coloque el destornillador sobre el poste.
• Gire el destornillador hasta que la garganta encaje.
• Introduzca el poste.
• Compruebe el perfecto encaje del poste en el destornillador.
• Pruebo el poste radicular Exatec-S atornillándoloF
La rosca autocortante se abre paso en la dentina. Gracias al cono todos las espiras agarran simultáneamente, de tal modo
que es
posible atornillar el poste ejerciendo una leve presión de 7,9±1,7 Nm con un máximo de 3 vueltas.
El movimiento en dirección apical del poste se detiene con precisión por la base de ajuste exacto.
• Limpie el conducto radicular: • Enjuague con Rinse p. ej. ácido de fósforo 37%, NaOCl, H2O2
• Si es necesario, elimine el frotis y acondicione
• Seque con puntas de papel y, luego, con aire tibio
іAtención! Evita cementos provisorios con eugenol, o sea alime total,
NaOCl o H2O2 no puede aplicar con composites, ya que la polimerización está molestado negativa.
• Limpie el poste radicular Exatec, elimine al mismo tiempo las virutas de la dentina (p. ej. con alcohol,
Orhoskavident C, hipocloruro sódico).
• Rellene el alvéolo de cemento muy fluido en porciones con el Lentulo, de tal modo que no se originen burbujas de aire.
Sólo el cemento muy fluido puede escurrirse suficientemente por las acanaladuras de salida del poste.
Como medios de fijación se utilizan idealmente cementos a base de fostafo o de ionómero vítreo y composites. Se deberán
preferir materiales con una granulación pequeña de la materia de relleno (p. ej. Ketac Cem Radiopaque, tamaño del grano:
0,1-1,2µm).
• Atornille el poste radicular S:
3
empezando con un giro pequeño giro hacia la izquierda, para que el poste encaje en las espiras de la rosca,
gire entonces el poste radicular hacia la derecha (máximo 3 vueltas).
• Saca el destornillador axial al poste, a evitar una deformación de las garras.
• Deje que el medio de fijación se endurezca. Elimine el medio de fijación sobrante.
• Adapte la cabeza del poste según las condiciones de oclusión con diamantes cilíndricos enfiando con agua.
Elabore la estructura y la restauración definitiva conforme a las instrucciones de uso los productos y procedimientos
que han de ser aplicados.
4 Elaboración de una estructura de poste moldeada con Exatec-G
30
31
Método directo
• Inserte el poste fundible para probarlo. Controle la posición oclusal.
• Marque la altura necesaria del poste y acórtelo extraoralmente El poste puede sobresalir de la estructura modelada unos 2mm.
Después de haber modelado, se podrá quitar sencillamente la estructura incluyendo el poste con la ayuda de una pinza.
• Aísle el alvéolo y todas las otras superficies de contacto con una capa muy delgada (p. ej. de aceite)
• Inserte de nuevo el poste fundible.
• Modele la estructura del poste con un material sintético fundible (p. ej. Palavit G). Controle la posición oclusal.
• Retire la estructura modelada con el poste fundible y entréguela al laboratorio dental.
• Coloque el poste radicular provisorio Exatec-G.
• Coloque una corona provisoria al diente, observando la información para el uso de los productos que han de ser aplicados.
4
Método indirecto
•
•
•
•
•
Inserte el poste fundible para probarlo. Controle la posición oclusal.
Marque la altura necesaria del poste y acórtelo extraoralmente
Aísle las superficies de contacto de la dentina y del esmalte con una capa muy delgada (p. ej. de aceite)
Inserte el poste de impresión.
Elabore la impresión según el método deseado. El empleo de anillos de cobre o de tapas de ATR aporta los resultados de
impresión más exactos.
• Quite la impresión y entréguela al laboratorio dental junto con el poste fundible.
• Coloque el poste radicular provisorio Exatec-G.
• Coloque una corona provisoria al diente, observando la información para el uso de los productos que han de ser aplicados.
El laboratorio dental modea una estructura colada según los procedimientos corrientes. Después de extraer el
provisorio, la estructura moldeada se integrada como de costumbre en la base preparada para el poste.
Exatec
5 Inserción del poste radicular Exatec, Cytec y Contec de fibra de carbone o fibra de vidrio
• Pruebe el poste radicular insertándo y controle la posición oclusal.
• Marque la altura requerida del poste (altura de oclusión) y acórtelo extraoralmente con una muela adiamantada fina.
Al mismo tiempo evita la formación de polvo (usa instrumentos que cortan afilados, humedece el poste).
¡Atención! Nunca usa una tenaza para acortar.
• Limpie el poste radicular con alcohol y seque.
Cytec
• Prepara el conducto radicular: Acondicione el dentin, con la tecnología adhesiva.
¡Atención!
Contec
5
Evita cementos provisorios con eugenol, o sea alime total.
H2O2 o NaOCl no puede indicar ya que la polimerización está molestar negativa.
• Tecnología adhesiva - por ejemplo:
• Acondicione el conducto y el superficie del diente (p.ej. ácido de fósforo 37 %).
• Elimine el ácido con spray del agua
• Enjuage el conducto con alcohol (p.ej. 70 %)
• Seque con puntas de papel
• Aplicación del primer y absorbe del exedente con puntas de papel
• Aplicación del bonder y absorbe del exedente con puntas de papelF
¡Atención! No polimerize el bonder con luz.
Elabore la estructura y la restauración definitiva conforme a las instrucciones de uso de los product.
32
• Opcional: Provee el poste radicular fino con bonder polimerizimiento dual, no polimerizar con luz.
33
Alternativo: Provee el poste radicular fino con bonder polimerzimiento dual,
Alternativo: soplar finísimo y polimeriza con luz.
p.ej.: Optibond Solo Plus + Aktivator, Kerr; Clearfil Liner Bond 2 V, Kuraray; Excite DSC, Ivoclar Vivadent
• Aplique al conducto un compuesto muy fluido, de endurecimiento polimerizimiento dual, transparente a los rayos y el
Lentulo conforme a las instrucciones de uso del fabricante.
p.ej.: Bifix QM, VOCO GmbH; Panavia F, Kuraray; Rely X Unicem, 3M Espe; Variolink II, Ivoclar Vivadent;
Dual Cement radiopaque, Ivoclar Vivadent
• Aplique rápido al poste el comquesto y inserte inmediatamente el poste radicular en la base dando lentamente ligeros
movimientos giratorios de vaivén y manténgalo en posición hasta que el comquesto se haya endurecido de tal modo que
el poste permanezca en su posición.
• Distribuya uniformemente el material excedente sobre el poste sobresaliente y la cavidad, y elimine el resto del compuesto.
• Haga endurecer unos 40 seg. con una lámpara de polimerización. (Tenga en cuenta las instrucciones de uso del composite).
• Despúes construye rápido el muñon con compuesto viscoso. Para formar el construcción por lo que es necesario - usa una cápsula transparente (frasaco) o una banda matriz (HAHNENKRATT).
p.ej.: Cavex Clearfild Core, Kuraray; Rebilda, Voco; Corepaste, Kerr
• Practica correciónes finas con turbina y instrumento de adiamantada con agua.
Elabore la estructura y la restauración definitiva conforme a las instrucciones de uso de los productos.
Symbole
Nicht zur Wiederverwendung
Not for reuse
No reusable
Gebrauchsanweisung beachten
Please consider attached documents
Observar el modo de empleo
34