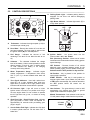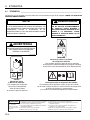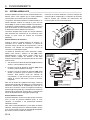
1
4140040-ES
Safety and Operation Manual
Manual de Seguridad y Funcionamiento
Cushman Turf Truckster
84043 – Motor diesel Perkins 403, transmisión manual
84044 – Motor diesel Perkins 403, transmisión manual, CE
898627 – Motor de gasolina Suzuki K6, transmisión manual
898628 – Motor de gasolina Suzuki K6, transmisión automática
i
CONTENTS
1
CONTENTS
1 . . . . . . . . . . . . . . . . . . . . . . . . . . . . . . . . . . CONTENTS
2 . . . . . . . . . . . . . . . . . . . . . . . . . . . . . . . . . . . . . SAFETY
2.1 Operating Safety .................................................. 3
2.2 Important Safety Notes ........................................ 3
3 . . . . . . . . . . . .VEHICLE IDENTIFICATION NUMBERS
3.1 Vehicle Identification Number .............................. 5
3.2 Engine Identification Numbers ............................. 5
4 . . . . . . . . . . . . . . . . . . . . . . . . . . . . . . . . . . . . DECALS
4.1 Decals.................................................................. 6
5 . . . . . . . . . . . . . . . . . . . . . . . . . . . . . . . . . . CONTROLS
5.1 Icons .................................................................... 7
5.2 Control Descriptions ............................................ 9
6 . . . . . . . . . . . . . . . . . . . . . . . . . . . . . . . . . OPERATION
6.1 Daily Inspection ................................................. 12
6.2 Interlock System ................................................ 12
6.3 Operating Procedures ....................................... 13
6.4 Starting .............................................................. 14
6.5 To Drive Vehicle ................................................ 15
6.6 Ground Speed ................................................... 16
6.7 Stopping and Parking the Vehicle ..................... 17
6.8 Tire Pressure ..................................................... 17
6.9 Hydraulic System ............................................... 18
6.10 Engine Overheat Procedure .............................. 19
6.11 Towing the Vehicle ............................................ 19
6.12 Hillside Operation .............................................. 20
6.13 Daily maintenance ............................................. 20
7 . . . . . . . . . . . . . . . . . . . . . . . . . . . . . . . . . . . . . NOTES
Proposition 65 Warning
Engine exhaust from this product
contains chemicals known to the State
of California to cause cancer, birth
defects, and other reproductive harm
© COPYRIGHT 2005, TEXTRON INC.
“All rights reserved, including the right to reproduce this book or portions thereof in any form”.
All information in this publication is based on information available at time of approval for printing. Jacobsen reserves
the right to make changes at any time without notice and without incurring any obligation.
LITHO IN U.S.A. 8-2005
GB-2
SAFETY
2
2.1
2
SAFETY
OPERATING SAFETY ______________________________________________________
! WARNING
EQUIPMENT OPERATED IMPROPERLY OR BY UNTRAINED PERSONNEL CAN BE DANGEROUS.
Familiarize yourself with the location and proper use of all controls. Inexperienced operator’s should receive
instruction from someone familiar with the equipment before being allowed to operate the machine.
1.
2.
3.
4.
5.
6.
Safety is dependent upon the awareness, concern and
prudence of those who operate or service the equipment. Never allow minors to operate any equipment.
It is your responsibility to read this manual and all
publications associated with this equipment (Parts &
Maintenance manual, engine manual, accessories and
attachments). If the operator can not read English it is
the owner’s responsibility to explain the material
contained in this manual to them.
Learn the proper use of the machine, the location and
purpose of all the controls and gauges before you
operate the equipment. Working with unfamiliar
equipment can lead to accidents.
Never allow anyone to operate or service the machine
or its attachments without proper training and
instructions; or while under the influence of alcohol or
drugs.
Wear all the necessary protective clothing and
personal safety devices to protect your head, eyes,
ears hands and feet. Operate the machine only in
daylight or in good artificial light.
Evaluate the terrain to determine what accessories and
attachments are needed to properly and safely perform
the job. Only use accessories and attachments
approved by Jacobsen.
12. Never disconnect or bypass any switch.
13. Do not change the engine governor setting or
overspeed the engine
14. Carbon monoxide in the exhaust fumes can be fatal
when inhaled. Never operate the engine without proper
ventilation or in an enclosed area.
15. Fuel is highly flammable, handle with care.
16. Keep the engine clean. Allow the engine to cool before
storing and always remove the ignition key.
17. Place transmission in neutral, depress clutch and
engage parking brake before starting the engine
(motor). Start the engine only when sitting in operator’s
seat, never while standing beside the unit.
18. Equipment must comply with the latest federal, state,
and local requirements when driven or transported on
public roads. Watch out for traffic when crossing or
operating on or near roads.
19. Local regulations may restrict the age of the operator.
20. Operate the machine up and down the face of the
slopes (vertically), not across the face (horizontally).
21. To prevent tipping or loss of control, do not start or
stop suddenly on slopes. Reduce speed when making
sharp turns. Use caution when changing directions.
7.
Stay alert for holes in the terrain and other hidden
hazards.
22. Always use the seat belt when operating vehicles
equipped with a ROPS.
8.
Inspect the area where the equipment will be used.
Pick up all the debris you can find before operating.
Beware of overhead obstructions (low tree limbs,
electrical wires, etc.) and also underground obstacles
(sprinklers, pipes, tree roots, etc.) Enter a new area
cautiously. Stay alert for hidden hazards.
Never use a seat belt when operating vehicle
without a ROPS.
9.
Never allow anyone near the machine while in
operation. The owner/operator can prevent and is
responsible for injuries inflicted to themselves, to
bystanders and damage to property.
23. Keep legs, arms and body inside the
compartment while the vehicle is in motion.
seating
24. Always shift transmission to Neutral (Manual
Transmission) or Park (Automatic Transmission) and
engage parking brake before leaving the vehicle.
10. Do not carry passengers. Keep bystanders and pets a
safe distance away.
11. Never operate equipment that is not in perfect working
order or is without decals, guards, shields or other
protective devices securely fastened in place.
GB-3
2
SAFETY
2.2
!
IMPORTANT SAFETY NOTES________________________________________________
This safety alert symbol is used to alert you to potential hazards.
DANGER - Indicates an imminently hazardous situation which, if not avoided, WILL result in death or serious injury.
WARNING - Indicates a potentially hazardous situation which, if not avoided, COULD result in death or serious
injury.
CAUTION - Indicates a potentially hazardous situation which, if not avoided, MAY result in minor or moderate injury
and property damage. It may also be used to alert against unsafe practices.
For pictorial clarity, some illustrations in this manual may show shields, guards or plates open or removed. Under no
circumstances should this equipment be operated without these devices securely fastened in place
! WARNING
The Interlock system on this vehicle prevents the vehicle from starting unless
the clutch pedal is depressed (Manual Transmission) or gear selector is in
Park (P) or Neutral (N) (Automatic Transmission).
NEVER operate vehicle unless the Interlock system is working.
! WARNING
1. Before leaving the operator’s position for any reason:
a.
b.
c.
d.
e.
f.
Remove foot from accelerator pedal.
Slow vehicle using service brake.
Depress clutch and shift transmission to neutral (Manual
Transmission) or park (Automatic Transmission).
Engage parking brake.
Stop engine and remove the ignition key.
One engine stops completely, shift manual transmission into First
Gear.
2. Keep hands, feet, and clothing away from moving parts. Wait for all
movement to stop before you clean, adjust or service the machine.
3. Keep the area of operation clear of all bystanders and pets.
4. Never carry passengers, unless a seat is provided for them.
By following all instructions in this manual, you will prolong the life of your machine and maintain its maximum
efficiency. Adjustments and maintenance should always be performed by a qualified technician.
If additional information or service is needed, contact your Authorized Jacobsen Dealer who is kept informed of the
latest methods to service this equipment and can provide prompt and efficient service. Use of other than original or
authorized Jacobsen parts and Accessories will void the warranty.
GB-4
VEHICLE IDENTIFICATION NUMBERS
3
3.1
3
VEHICLE IDENTIFICATION NUMBERS
VEHICLE IDENTIFICATION NUMBER __________________________________________
The Vehicle Identification Number (VIN), consisting of the
model number, date code and serial number are all
printed on the Nameplate/Identification Decal attached to
the cross member under the dash.
This vehicle may be covered
by one or more of the
following U.S. patents:
GOLF, TURF & SPECIALTY PRODUCTS
The serial number is also stamped on the cross member.
It is located to the left of the Nameplate/Identification
Decal.
NOTE: Reference to the Front, Rear, Left and Right sides
of the vehicle are always determined by the operator’s
seated position.
Record the Vehicle Identification information below for
easy reference.
Augusta Georgia, USA
1 800 241 5855
MODEL
84043
DATE CODE
M1903
LABEL # 75984G55
SERIAL # *2128855*
Lb/kg W Batt
Nom Power Hp/kw
Model Number: ______________________
Figure 3A
Always provide the Vehicle Identification Number of the
Date Code: _________________________
unit when ordering replacement parts or requesting service
information. Vehicle Identification Numbers must appear
Serial Number: _____________________
on all correspondence concerning this vehicle.
3.2
ENGINE IDENTIFICATION NUMBERS _________________________________________
The Truckster is equipped with either a Perkins 3
cylinder, diesel powered, liquid cooled, four cycle engine
or a Suzuki 3 cylinder, gas powered, liquid cooled, four
cylinder engine.
The Engine Serial Number for the Perkins engine is
stamped onto the engine block on the right side of the
engine near the alternator.
The Engine Serial Number for the Suzuki engine is
stamped onto the upper engine block on the right side of
the engine, under the engine mount and may be partially
hidden by the electrical harness. The serial number is
also hand printed on the fuel rail.
Engine Serial No.
Perkins Diesel
Record the Engine Serial Number below for easy
reference.
Figure 3B
Engine Serial Number: _________________________
Engine Serial No.
K6A Suzuki
GB-5
4
DECALS
4
DECALS
4.1
DECALS _________________________________________________________________
Familiarize yourself with the decals. They are critical to the safe operation of the machine. REPLACE DAMAGED
DECALS IMMEDIATELY.
NOTICE
THIS UNIT IS NOT A MOTOR VEHICLE WITHIN THE
DEFINITION OF THE NATIONAL TRAFFIC MOTOR
VEHICLE SAFETY ACT. IT IS NOT DESIGNED
OR MANUFACTURED FOR USE ON ROADS, STREETS
OR HIGHWAYS, NOR IS IT APPROPRIATE FOR
SUCH USE. IT IS NOT MEANT TO BE LICENSED
AS A MOTOR VEHICLE
! WARNING
PARKING BRAKES ARE NOT AUTOMATICALLY APPLIED. VEHICLE MAY
MOVE CAUSING PERSONAL INJURY
AND/OR PROPERTY DAMAGE. ALWAYS
APPLY HAND OR FOOT BRAKES
822819
821071
! WARNING
FAILURE TO HEED THESE
WARNINGS MAY RESULT IN
SERIOUS INJURY OR DEATH
Part of 845038
STOP
2702014
Operator’s Manual Warning
This decal informs the operator
to read the Operator’s manual
before attempting to start or
operate the vehicle.
009034880
Electric Cooling Fan Warning
This decal warns the operator that
the cooling fan may start at any time
even with the ignition key in the OFF
position.
840754
Radiator Coolant Warning
This decal warns the operator not to remove
the radiator cap when the engine is hot. Refer
to the Cooling System Section of the Parts &
Maintenance manual for proper safety and
operating instructions
1. Read and understand all labels and the Operator’s manual
8. Shift into neutral or park before starting engine.
2. Do not allow untrained personnel to operate this vehicle.
9. Only carry passengers in seats provided.
3. Do not modify this vehicle without manufacturer’s authorization. 10. When parking (Leaving) vehicle, follow all instructions in
4. Place loads forward of rear axle
Operator’s manual.
Failure to heed these
5. Top heavy loads can cause upsetting. Do not exceed payload 11. Avoid sudden starts, stops and sharp turns especially on slopes or
warnings may result in
capacity.
with heavy loads.
serious injury or death. 6. Do not operate if repairs are required.
12. Keep all labels and instructional literature legible and intact.
7. Keep all shields in place
13. Keep arms and legs within vehicle body.
WARNING
GB-6
CONTROLS
5
5.1
5
CONTROLS
ICONS ___________________________________________________________________
Read Manual
Hour Meter
Engine Throttle
High
Low
ACC
Ignition Switch
Off
ON
Start
STOP
Coolant
Temperature
Brake
Parking Service
Fuel
Governor Control
Throttle
Governor
!
Glow Plug
Turn Indicators
Left
Right
High Beam
Engine Oil Pressure
! WARNING
Never attempt to drive this vehicle unless you have read the Safety and Operation Manual
and know how to operate all controls correctly.
Familiarize yourself with the icons shown above and what they represent. Learn the
location and purpose of all the controls and gauges before operating this tractor.
GB-7
5
CONTROLS
A
B
C
D
E
F
G
H
J
K
L
M
N
P
R
S
T
Tachometer
Hour Meter
Fuel Gauge
Voltmeter
Temperature Gauge
Turn Signal Indicator
Oil Pressure Light
Glow Plug Light
Service Brake Fluid Light
Parking Brake Light
High Beam Indicator
Ignition Switch
Gear Selector
Accessory Power Plug
Hand Throttle
Governor Control
Light Switch
U
V
W
X
Y
Z
AA
AB
Y
Z
AB
AA
A
E
F
F
F
220
280
88 104
138
C
190
140
G
60
25
20
30
15
COOLANT
12
Side Panel Rotated 90 Degrees
For Clarity
40
5
10
K
35
10
14
45
0
50
14
x 100
16
E
H
Horn Button
Clutch Pedal
Service Brake Pedal
Accelerator Pedal
Differential Shift Cable
Parking Brake Lever
Remote Hydraulics Control
Hydraulic Lift Control
!
12
34
F
HOURS
L
0 0 0 0 0 0
J
D
B
STOP
C
P
M
S
R
U
X
T
W
V
N
N
P
R
N
D
2
L
Manual
Transmission
GB-8
Automatic
Transmission
CONTROLS
5.2
CONTROL DESCRIPTIONS __________________________________________________
F
F
220
280
88 104
138
C
190
140
G
60
25
20
COOLANT
30
15
35
5
45
10
12
10
14
K
50
14
x 100
E
!
L. High Beam Indicator - Indicates light switch (T) is
in high beam position.
40
0
16
K. Parking Brake Light - Indicates parking brake is
engaged. Do not drive unit without disengaging
parking brake.
A
E
F
H
5
12
OFF
ON
34
F
HOURS
L
ACC
0 0 0 0 0 0
STOP
START
J
D
B
C
Figure 5A
M
A. Tachometer - Indicates the engine speed (x 100) in
revolutions per minute (rpm).
B. Hour Meter - Records the number of hours the unit
has been operated. The hour meter is active when
the ignition switch (M) is in the ON position.
C. Fuel Gauge - Indicates the amount of fuel
remaining in the tank. Do not allow the tank to run
dry.
D. Voltmeter - The voltmeter indicates the voltage
level of the battery. Under normal operation it should
display between 12 and 18 volts. A reading below
12 volts indicates the battery is not charging
correctly and is being drained
E. Water Temperature Gauge - Indicates engine
coolant temperature. If temperature rises above
230° F (110° C), a buzzer located under dash will
sound.
F.
Turn Signal Indicators - Used with optional turn
signal kit. Left or right indicators flash when turn
signal lever is moved to left or right position. Both
indicators will flash when hazard button is pressed.
G. Oil Pressure Light - Light will come on when
ignition switch is turned to on position and will go
out once engine starts. Do not continue to operate
truck if light does not go out, or comes on during
operation.
H. Glow Plug Light - Diesel Engines Only, Indicates
glow plug timer is active. Timer will operate for
approximately 20 seconds while pre-heating glow
plugs in engine.
J. Service Brake Fluid Light - Indicates low fluid level
in master cylinder reservoir. Fill with clean DOT 3
brake fluid.
Figure 5B
M. Ignition Switch - The ignition switch has four
positions. ACC - OFF - ON - START.
ACC (Accessory) Position - Allows use of various
instruments and accessories without causing ignition
system damage.
OFF Position - Prevents function of all vehicle
electrical power operated features except for the
flasher (hazard), lights, and the radiator cooling fan.
Switch must be in OFF position for key removal.
ON Position - Key is placed in this position for
normal engine operation.
START Position - Hold key in start position to
engage engine starter. Upon release, key will return
to ON position automatically. Key must be returned to
the OFF position before the starter can be
reactivated.
N. Gear Selector - The gear selector is used to shift
transmission into desired gear. Refer to ground
speed decal to determine required gear.
Manual Transmission: Gear selector knob has the
“H” shift pattern design molded into the top surface.
“H” Shift
Pattern
13
24 R
Figure 5C
GB-9
5
CONTROLS
Automatic Transmission: Gear selector has six
positions, Park (P), Reverse (R), Neutral (N), Drive
(D), second (2) and Low (L). Engine will not start
unless selector is in Park (P) or Neutral (N).
Push in selector button when shifting from Park (P),
shifting into Neutral (N) or when shifting from Drive
(D) to second (2) or Low (L).
R. Hand Throttle - Used to set engine speed for remote
operations. Increasing hand throttle speed will depress
accelerator pedal.
Never attempt to drive the vehicle with the engine speed
controlled by hand throttle.
S. Governor Control - Used to lower pre-set governor
rpm limits for hand and foot throttle operation.
Push lever all the way up to use pre-set rpm limit.
Pull lever down as required to lower maximum rpm.
T.
Selector Button
P
R
N
D
2
L
Light Switch - The light switch is used to turn the
headlights and taillight on. The switch has three
positions, OFF, LOW BEAM, and HIGH BEAM.
Push switch up one detent for LOW BEAM or push
switch up two detents for HIGH BEAM.
U. Horn Button - The horn button is located to the left
of the steering wheel, below the dash panel.
Depress to sound horn. Horn will not sound when
the ignition switch is in the OFF position.
Figure 5D
P. Accessory Power Plug - Allows operation of
approved 12 Volt accessories and attachments. To
prevent excessive battery drain, only use 12 volt
outlet with engine running.
P
! CAUTION
The 12 Volt Accessory outlet circuit is protected by a
15 Amp fuse. Do not attempt to use attachment(s)
with a combined power rating greater than 180 Watts.
To prevent the risk or burns or fire do not replace 15
amp fuse with a higher amperage rating fuse.
X
W
V
R
S
Figure 5F
T
U
V. Clutch Pedal - Manual Transmission only: Used
to disengage the power output from engine to
transmission. This allows shifting of transmission
gears. Do not attempt to shift gears without fully
depressing clutch pedal.
The clutch pedal is equipped with an interlock switch.
This switch prevents the starter from operating
unless the clutch is disengaged (the clutch pedal is
depressed). See 6.2
Figure 5E
GB-10
CONTROLS
W. Service Brake Pedal - Depress the pedal to slow or
stop the vehicle.
5
If the brakes DO NOT stop the vehicle properly, the
brakes must be adjusted or repaired.
Z. Parking Brake Lever - The park brake lever is
located to the left side of the drivers seat. To
engage the brake, pull up on the lever until park
brake is applied.
X. Accelerator Pedal - Push pedal down to open
throttle (increase speed), release to return throttle to
idle position (decrease speed).
To release; while slightly pulling up on the handle,
push the button at the end of the lever and while
holding the button in, lower the lever to it's original
position.
Y. Differential Shift Cable - Used to shift differential
from LOW to HIGH speed range.
Y
Z
AA.Remote Hydraulics Control - Used to engage and
disengage remote hydraulic system. Push knob
down to use lift control system and disengage
remote hydraulics. Pull knob up to activate remote
hydraulics and disable lift control system.
AB.Lift Control System - Used to control hydraulic bed
lift. Push Remote hydraulics control knob (AA) to
activate hydraulic lift system.
AB
AA
Pull back on the lever to extend the cylinder (Raise
the dump box).
Push forward on the lever to retract the cylinder
(Lower the dump box).
Push forward and to the right to place lever in float
position.
Figure 5G
GB-11
6
6
OPERATION
OPERATION
6.1
DAILY INSPECTION________________________________________________________
! CAUTION
The daily inspection should be performed only when
the engine is off and all fluids are cold. Lower mowers
to the ground, engage the parking brake, Stop engine
and remove ignition key.
1. Perform a visual inspection of the entire unit, look for
signs of wear, loose hardware, and missing or
damaged components. Check for fuel or oil leaks to
ensure connections are tight and hoses and tubes
are in good condition.
6.2
2. Check the fuel supply, radiator coolant level,
crankcase oil and air cleaner indicator. All fluids
must be at the full level mark with engine cold.
3. Check tires for proper inflation.
4. Test the Interlock System.
Note: For more detailed maintenance information,
adjustments and maintenance/lube charts, see the
Parts & Maintenance manual.
INTERLOCK SYSTEM ______________________________________________________
1. The Interlock System prevents the engine from
starting unless the clutch pedal (Manual
Transmission) is depressed, or shift lever (Automatic
Transmission) is in Park (P) or Neutral (N).
! WARNING
Never operate equipment with the Interlock System
disconnected or malfunctioning. Do not disconnect or
bypass any switch.
Manual Transmission: Never turn the key to the
START position unless the clutch pedal is depressed
(pushed down) or the gear selector is in neutral. If the
vehicle is in any gear other than neutral, and the clutch
pedal is not depressed when the engine is started, the
vehicle may lurch forward or backward depending
which gear the vehicle is in. This lurching could cause
serious personal injury or death.
Automatic Transmission: Never turn the key to the
START position unless the gear selector is in Park (P)
or Neutral (N). If the vehicle is in any gear other than
Park (P) or Neutral (N) when the engine is started, the
vehicle may lurch forward or backward depending
which gear the vehicle is in. This lurching could cause
serious personal injury or death.
2. Perform each of the following two tests to insure the
Interlock System is functioning properly. Stop the
test and have the vehicle inspected and repaired if
truck fails either test.
GB-12
● the engine does not start in test 1;
● the engine does start during tests 2;
3. Performed actions described for each test. Shut
engine off between each test.
Manual Transmission:
Test 1: Represents normal starting procedure. The
clutch pedal is depressed. The engine should start.
Test 2: The engine must not start if the clutch pedal
is not depressed.
Automatic Transmission:
Test 1: Represents normal starting procedure. the
shift lever is in Park (P). The engine should start.
Test 2: The engine should start if the shift lever is in
Neutral (N).
Test 3: The engine must not start if the shift lever is
in Reverse (R).
Test 4: The engine must not start if the shift lever is
in Drive (D).
Test 5: The engine must not start if the shift lever is
in 2nd (2).
Test 6: The engine must not start if the shift lever is
in Low (L).
OPERATION
6.3
6
OPERATING PROCEDURES _________________________________________________
! WARNING
A Rollover Protection Structure (ROPS) for this truck is available as an optional accessory. Evaluate the terrain and
working conditions to determine if a ROPS is required. Seat belts must be worn whenever a ROPS is installed on
the tractor. Always keep seat belt snugly adjusted. DO NOT use seat belts on a tractor without a ROPS.
If a ROPS is installed and the vehicle is overturning, hold onto the steering wheel. Do not attempt to jump out or
leave the seat.
! CAUTION
To prevent injury, always wear safety glasses, leather work shoes or boots, a hard hat, and ear protection. Wear any
protective equipment recommended by the chemical manufacturer.
1. Under no circumstances should the engine be
started without the operator seated on the truck.
2. Do not operate truck or attachments with loose,
damaged or missing components. Whenever
possible spray when grass is dry.
3. Never remove or install the engine cover while the
engine is running. The engine cover is a machinery
guard and its removal exposes you to moving parts.
Keep hands, hair and clothing away from flywheel,
radiator cooling fan, alternator fan, engine belts,
pulleys and air intake.
! WARNING
Failure to latch the engine cover properly can result in
the engine cover tipping forward causing loss of
control of the vehicle and possible personal injury.
4. Study the area to determine the best and safest
operating procedure. Consider the type of terrain,
and condition of the surface. Each condition will
require certain adjustments or precautions.
7. Slow down and look in both directions when
crossing paths or roadways. Look out for traffic.
8. Stop and inspect the equipment for damage
immediately after striking an obstruction or if the
machine begins to vibrate abnormally. Have the
equipment repaired before resuming operation.
! WARNING
Before you clean, adjust, or repair this
equipment, always disengage hydraulic system,
engage parking brake, stop engine and remove
key from ignition switch to prevent injuries.
9. Slow down and use extra care on hillsides. Read
Section 6.12. Use caution when operating near drop
offs.
10. Look behind and down before backing up to be sure
the path is clear. Use care when approaching blind
corners, shrubs, tress or other objects that may
obscure vision.
5. Never direct discharge of material toward
bystanders, nor allow anyone near the machine
while in operation. The owner/operator is
responsible for injuries inflicted to bystanders and/or
damage to their property.
! CAUTION
Before operating, pick up all debris such as rocks,
toys and wire which can be thrown by the machine.
Enter a new area cautiously. Always operate at
speeds that allow you to have complete control of the
truck.
6. Always disengage hydraulic system when not in
use.
GB-13
6
OPERATION
6.4
STARTING _______________________________________________________________
IMPORTANT: Do not use starting assist fluids. Use of
such fluids in the air intake system may be potentially
explosive or cause a “Runaway” engine condition and
could result in serious engine damage.
G
Automatic Transmission: Sit in operator’s seat,
make sure the parking brake is engaged and
transmission is in Park (P).
F
F
220
280
88 104
138
C
190
140
60
25
20
30
15
COOLANT
1. Make sure fuel shut off valve is completely open.
2. Manual Transmission: Sit in operator’s seat, make
sure the parking brake is engaged and transmission
is in neutral.[See 5.2] Depress clutch pedal. [See
5.2 and 6.2]
A
E
F
40
5
12
14
10
H
45
0
16
K
35
10
50
14
x 100
12
E
!
34
F
L
HOURS
0 0 0 0 0 0
J
D
C
B
3. Turn ignition switch (M) to ON position.
a.
Engine Oil light (G) will come on and will stay on
until engine starts.
b.
Diesel Engine: Glow plug light (H) will come on
for up to 20 seconds.
c.
ON
ACC
STOP
START
Parking brake light (K) will be on when parking
brake is engaged.
4. Diesel Engine: The diesel engine uses glow plugs
to pre-heat the combustion chamber and makes
cold starting easier. When starting the vehicle for
the first time during the day, or when the engine has
cooled, you will need to energize the glow plugs to
start the engine. Energizing glow plugs is not
necessary when starting a warm engine. When glow
plug light (H) turns off, turn key (M) to START
position. Release as soon as engine starts. Do not
hold switch in the START position for more than 15
seconds. Make sure engine oil light (G) turns off.
Turn key (M) to START position. Release as soon as
engine starts. Do not hold switch in the START
position for more than 15 seconds. Make sure engine
oil light (G) turns off.
5. Allow the engine to become warm and properly
lubricated before operating at high RPM.
GB-14
OFF
M
Figure 6A
OPERATION
6.5
6
TO DRIVE VEHICLE ________________________________________________________
Read and follow all safety notes contained in this manual
when driving vehicle. Refer to Section 6.3 for general
operating instructions. When operating in reverse look
behind you to ensure you have a clear path.
Important: If this truck is driven on public roads, it must
comply with federal, state and local ordinances. Contact
local authorities for regulations and equipment
requirements.
! CAUTION
To prevent tipping or loss of control, travel at reduced
speed when making turns.
Manual Transmission:
1. Disengage remove hydraulic system and fully lower
the truck bed when driving to and from the area of
operation.
2. Apply service brake and disengage parking brake.
3. The gear selector has an "H" pattern as shown in
(there is also a shift-pattern design molded into the
top of the gear selector handle).
4. With the clutch pedal fully depressed, select the
appropriate gear (forward or reverse), release the
clutch pedal slowly while depressing the throttle
pedal. Refer to Section 6.6 for proper gear based
on desired engine rpm and ground speed. Always
start in 1st or second gear and shift into higher
gears as ground speed increases.
Do not drive faster than 5-6 mph (8 to 10 kph), or
drive long distances in reverse.
NOTE: As you release the clutch pedal you will notice
after the pedal has been partially released the vehicle will
begin to move. When the vehicle begins to move,
depress the throttle a little more and at the same time
keep releasing the clutch pedal. DO NOT drive with the
clutch pedal partially depressed.
5. When the vehicle gains enough speed, depress the
clutch pedal and shift to the next higher gear and so
on. When you shift gears remember that as you
push in the clutch you need to release the throttle
pedal. DO NOT push in the accelerator at the same
time you are pushing in the clutch while shifting to a
higher or a lower gear (downshifting).
6. You can down-shift from fourth to third and from
third to second and so on while the vehicle is
moving and the engine's speed is decreasing.
If the engine rpm and/or the vehicle speed are not
decreased sufficiently and you try to down shift, it is
possible to damage the transmission. DO NOT force
the gear selector to the next lower gear. Slow the
engine and vehicle speed until the gear selector can
be shifted properly.
NOTE: Only downshift if the vehicle is at a complete stop
or if the engine's speed is decreasing.
Remember, before shifting to any gear you have to
depress the clutch pedal before you shift to that
particular gear.
Automatic Transmission:
1. Disengage remote hydraulic system and fully lower
the truck bed when driving to and from the area of
operation.
2. Apply service brake and disengage parking brake.
! CAUTION
Vehicle engine speed should NEVER be faster than
idle speed when shifting from park or neutral into
Reverse (R), Drive (D), Second (2) or Low (L), as
sudden vehicle movement may occur.
3. Depress the button on shifter handle and select the
appropriate gear (forward or reverse). Refer to
Section 6.6 for proper gear based on desired
engine rpm and ground speed.
Do not drive faster than 5-6 mph (8 to 10 kph), or
drive long distances in reverse.
4. Release the service brake and slowly depress the
accelerator pedal to reach the desired speed.
NOTE: Accelerating the engine with the transmission in
gear (Reverse (R), Drive (D), Second (2) or Low (L))
while holding the vehicle with the service brake or
parking brake may cause transmission damage.
5. Bring the vehicle to a full and complete stop before
moving the gear selector lever to Park (P) or
shiftting from Drive (D) to Reverse (R) or shifting
from Reverse (R) to Drive (D).
6. When driving forward down a steep incline or long
grade, the transmission may be shifted to a lower
gear (Second (2) or Low (L)) to help slow the
vehicle. Excessive or prolonged use of brakes can
cause loss of braking efficiency or loss of braking
function due to overheating and can cause
premature brake wear.
GB-15
6
6.6
OPERATION
GROUND SPEED __________________________________________________________
Refer to figure 6B to determine desired ground speed
and engine RPM to select proper gear for operating the
vehicle.
The decals are applied to each of the appropriate turf
models and are shown below with correct model identity.
Please replace any decal which may become damaged
and/or hard to read. Shaded areas indicate
recommended speed settings.
The following charts show the vehicle’s ground speed in
relation to the engine’s RPM. Select the proper engine
RPM and ground speed combination for the accessory
equipment being used.
KPH
Suzuki
Gas AT
KPH
MPH
2
D
L
2
D
2.6
2.8
3.0
3.2
3.3
3.5
3.7
3.9
4.3
4.6
4.9
5.3
5.6
5.9
6.2
6.5
6.8
7.2
7.1
7.6
8.1
8.6
9.1
9.6
10.1
10.6
11.1
8.4
9.0
9.5
10.1
10.7
11.3
11.9
12.4
13.0
15.6
16.7
17.8
18.9
19.9
21.0
22.1
23.2
24.2
22.9
24.4
26.0
27.6
29.2
30.7
32.3
33.9
35.5
1
2
3
4
1
2
3
4
1.8
1.9
2.0
2.2
2.3
2.4
2.5
2.6
2.8
3.0
3.3
3.5
3.7
3.9
4.1
4.3
4.5
4.7
4.8
5.2
5.5
5.8
6.2
6.5
6.8
7.2
7.5
7.1
7.6
8.1
8.6
9.1
9.6
10.1
10.6
11.1
5.7
6.1
6.4
6.8
7.2
7.6
8.0
8.4
8.8
9.8
10.4
11.1
11.8
12.4
13.1
13.8
14.5
15.1
15.6
16.7
17.8
18.9
19.9
21.0
22.1
23.2
24.2
22.9
24.4
26.0
27.6
29.2
30.7
32.3
33.9
35.5
KPH
Suzuki
Gas MT
2900
3100
3300
3500
3700
3900
4100
4300
4500
MPH
L
2
D
L
2
D
1.6
1.7
1.9
2.0
2.1
2.2
2.3
2.4
2.5
2.9
3.1
3.3
3.5
3.7
3.9
4.1
4.3
4.5
4.4
4.7
5.0
5.3
5.7
6.0
6.3
6.6
6.9
5.2
5.6
5.9
6.3
6.7
7.0
7.4
7.7
8.1
9.7
10.4
11.0
11.7
12.4
13.1
13.7
14.4
15.1
14.2
15.2
16.2
17.1
18.1
19.1
20.1
21.1
22.0
RPM
1
2
3
4
1
2
3
4
1.1
1.2
1.3
1.3
1.4
1.5
1.6
1.6
1.7
1.9
2.0
2.2
2.3
2.4
2.5
2.7
2.8
2.9
3.0
3.2
3.4
3.6
3.8
4.0
4.2
4.4
4.7
4.4
4.7
5.0
5.3
5.7
6.0
6.3
6.6
6.9
3.5
3.8
4.0
4.2
4.5
4.7
5.0
5.2
5.5
6.1
6.5
6.9
7.3
7.7
8.2
8.6
9.0
9.4
9.7
10.4
11.0
11.7
12.4
13.1
13.7
14.4
15.1
14.2
15.2
16.2
17.1
18.1
19.1
20.1
21.1
22.0
KPH
KPH
Perkins
Diesel
RPM
L
MPH
2900
3100
3300
3500
3700
3900
4100
4300
4500
KPH
MPH
MPH
1
2
3
4
1
2
3
4
1.4
1.5
1.7
1.9
2.1
2.2
2.4
2.6
2.7
2.6
2.9
3.2
3.5
3.9
4.2
4.5
4.8
5.1
3.5
4.0
4.4
4.9
5.3
5.8
6.2
6.6
7.1
5.1
5.7
6.3
7.0
7.6
8.2
8.9
9.5
10.1
4.4
5.0
5.5
6.1
6.6
7.2
7.7
8.3
8.9
8.3
9.3
10.4
11.4
12.4
13.5
14.5
15.5
16.6
11.3
12.8
14.2
15.6
17.0
18.4
19.9
21.3
22.7
16.1
18.1
20.1
22.1
24.1
26.2
28.2
30.2
32.2
RPM
1600
1800
2000
2200
2400
2600
2800
3000
3200
MPH
1
2
3
4
1
2
3
4
0.9
1.0
1.1
1.2
1.3
1.4
1.5
1.6
1.7
1.6
1.8
2.0
2.2
2.4
2.6
2.8
3.0
3.2
2.2
2.5
2.8
3.0
3.3
3.6
3.9
4.1
4.4
3.2
3.5
3.9
4.3
4.7
5.1
5.5
5.9
6.3
2.8
3.1
3.4
3.8
4.1
4.5
4.8
5.2
5.5
5.2
5.8
6.4
7.1
7.7
8.4
9.0
9.7
10.3
7.1
7.9
8.8
9.7
10.6
11.5
12.3
13.2
14.1
10.0
11.3
12.5
13.8
15.0
16.3
17.5
18.8
20.0
Figure 6B
GB-16
OPERATION
6.7
6
STOPPING AND PARKING THE VEHICLE ______________________________________
Before you leave the operator’s seat, complete these
steps in the following order.
NOTE: When parking the vehicle on an incline, the front
wheels should be “curbed” whenever possible.
2. Move the gear selector lever to Park (P) position
and apply the parking brake remove your foot from
the brake pedal, turn the keyswitch to the OFF
position and remove the key to prevent
unauthorized use of the vehicle.
Manual Transmission:
1. Bring the vehicle to a complete stop and hold it in
position with the service brake while depressing the
clutch pedal (when bringing the vehicle to a stop,
apply the brakes until the vehicle has slowed, then
push the clutch in and apply the brakes until the
vehicle comes to a complete stop.)
2. After the vehicle has come to a complete stop, turn
the keyswitch to the OFF position while holding the
clutch and brake pedals down until the engine is
completely stopped. Apply the parking brake, place
the vehicle in first gear, remove your feet from the
pedals and remove the key to prevent unauthorized
use of the vehicle.
Uphill
Downhill
Automatic Transmission:
1. Remove foot from throttle pedal and bring the vehicle
to a complete stop and hold in position with the
service brake.
6.8
Vehicle parked with front wheels curbed
Figure 6C
TIRE PRESSURE __________________________________________________________
Keep tires properly inflated to prolong tire life. Check
inflation pressure while the tires are cool. Inspect tread
wear.
Lower pressure will help avoid leaving tire marks in soft
turf. Higher pressures may be required for heavier loads.
Rear tire pressure must be set at 28 psi (193 kPa) when
operating with a full load. Never exceed the maximum
pressure indicated on the tire.
Check the pressure with an accurate, low pressure tire
gauge. Due to the low volume of air needed, overinflation may be reached in a matter of two to three
seconds.
Keep tires inflated to:
Front - 20 psi - (138 kPa)
28 (193)
23 (159)
Rear 18 (124)
Tire
Pressure 13 (90)
psi
(kPa)
8 (55)
0
400
800
1200
1500
Load (Pounds)
Figure 6D
Rear - Varies, determined by load. (See Chart)
GB-17
6
6.9
OPERATION
HYDRAULIC SYSTEM ______________________________________________________
The hydraulic system on this vehicle is refered to as a
“live” system. This means the hydraulic pump operates
whenever the engine is running.
The operation of the hydraulic system is determined by
the selector valve. When the selector valve knob (AA) is
pushed down, the hydraulic lift system is active and the
remote hydraulics are disabled. When the selector valve
knob is pulled up, the remote hydraulics are active and
the hydraulic lift system is disabled.
To use a hydraulic accessory, connect accessory hose
(9) to hose (8) and accessory hose (10) to connector (7).
Refer to the instructions that come with the accessory
from proper operation
Y
Z
AB
AA
Refer to the decal on the hydraulic connector cover to
determine proper accessory connections. Always stop
the engine before changing hydraulic connections
Hydraulic Lift System:
When hydraulic lift system is active, the system is
controlled by the lift valve. The lift valve includes two
check valves and a relief valve. The check valves prevent
unwanted movement of the cylinder.
The lift valve has four positions, raise, neutral, lower and
float. The handle (AB) will automatically return to the
neutral position when released from the raise or lower
position. When in the float position, the handle must be
pushed forward and to the left before it will return to the
neutral position.
Figure 6E
TRUCKSTER
CYLINDER
MOTOR
DRIVEN
ACCESSORY
LIFT
VALVE
1 4
10 7
1. Pulling back on lift valve handle (AB) will extend the
cylinder, raising the truck bed.
8
2. Pushing forward on lift valve handle (AB) retracts
the cylinder, lowering the truck bed.
3. Pushing lift valve handle (AB) forward and to the
right will place the lift valve into the float position.
This position bypasses the check valves, which will
allow the accessory to follow the ground contour,
even in undulating terrain.
To use the truck bed cylinder, connect cylinder hose (4)
to coupler (1) and lift valve hose (2) to coupler (3). To use
an accessory cylinder, connect accessory cylinder hose
(5) to coupler (1), lift valve hose (2) to accessory cylinder
hose (6) and truck bed cylinder hose (4) to coupler (3).
Remote Hydraulic System:
The remote hydraulic system is used to operate
accessories such as the Hydraulic PTO, Core Harvestor,
Top Dresser or remote hydraulic powered hand tools.
To prevent overheating and/or damaging the hydraulic
system, always keep the remote hydraulic system
connected in a closed loop. Connect hose (8) to coupler
(7) when accessory is not connected.
GB-18
2
9
5
3
SELECTOR
VALVE
HYDRAULIC
TANK
FILTER
6
HYD
PUMP
PRESSURE
RETURN
SUCTION
PRESSURE & RETURN
ACCESSORY
CYLINDER
Figure 6F
OPERATION
6
6.10 ENGINE OVERHEAT PROCEDURE ___________________________________________
During vehicle operation, if the water temperature gauge
shows 230° F (110° C) or above, and/or the overheat
warning buzzer sounds, follow this procedure.
1. Stop the vehicle. DO NOT shut the engine off.
Place vehicle in neutral and engage the parking
brake.
2. Immediately disengage any accessories that are
operating.
3. Slow the engine speed to a fast idle.
4. Remove any dirt, chaff, debris, etc. from the radiator
intake screen located on the right side of the
vehicle.
! CAUTION
Temperature gauge needle should start to go down
approximately 30 seconds after the screen is cleaned. If
temperature does not go down, STOP the engine and
check the following.
1. Check to see if cooling fan is operating. Fan should
be turning with coolant above 180° F, even with
ignition switch in OFF position.
2. Check engine oil level.
3. Check for a leak in the cooling system. Do not open
radiator when hot. Check coolant levels after system
completely cools.
Failure to heed the overheat warning and properly
maintain the cooling system will cause permanent
engine damage.
Be careful when opening the engine access cover or
cleaning the intake screen. Metal surfaces near the
radiator and engine may be hot to the touch. Use a
brush or gloves to clean screen.
6.11 TOWING THE VEHICLE _____________________________________________________
! WARNING
To prevent injury or vehicle damage, the following
guidelines should always be followed.
• Never accelerate or stop suddenly when towing
a vehicle.
4. Slowly drive towing vehicle forward until tow-line is
pulled tight.
5. While towing, try to keep the tow light taught at all
times. Be careful going down inclines and turning
corners.
Tow Line Attachment
• Never change the direction of the vehicle
abruptly or make sharp turns on an incline when
towing a vehicle.
• Never tow the vehicle faster than 5 m.p.h. (8
km/h). Towing at excessive speed could cause
either vehicle to lose proper steering control
• Adjust your speed for weather and surface
conditions when towing (rain, snow, ice, hills,
etc.).
If for any reason the vehicle needs to be towed, follow the
procedures below.
1. If towing the vehicle with a tow-rope or chain, an
operator is required to steer the vehicle and to
control the brakes.
2. Attach a tow-roper only to the front vertical frame
member on either side of the vehicle.
3. Shift transmission to Neutral and release parking
brake.
A Front Bumper Accessory (Part No. 894778)
is available for use with the Truckster. If a
Front Bumper is mounted to your vehicle,
make sure to follow the instructions included
with the bumper for proper connection of the
chain or tow rope
Figure 6G
GB-19
6
OPERATION
6.12 HILLSIDE OPERATION _____________________________________________________
terrain or when the grass is wet. Wet grass reduces
traction and steering control.
! WARNING
To minimize the possibility of overturning, the safest
method for operating on hills and terraces is to travel
up and down the face of the slope (vertically), not
across the face (horizontally). Avoid unnecessary
turns, travel at reduced speeds, stay alert for hidden
hazards, and drop offs. Material moving inside the truck
bed can cause an unbalanced load that could tip the
vehicle. This is heavy equipment that could cause
serious injury or death to the operators and/or
bystanders if used improperly or overturned.
The truck has been designed for good traction and
stability under normal operating conditions; however, use
caution when operating on slopes, especially over rough
1. If the vehicle tends to slide or the tires begin to
“mark” the turf, angle truck into a less steep grade
until traction is regained or tire marking stops.
2. If vehicle continues to slide or mark the turf, the
grade is too steep for safe operation. Do not make
another attempt to climb, back down slowly.
3. When descending a steep slope, always lower
accessories to the ground to reduce the risk of
tractor overturning.
4. Correct tire pressure is essential for maximum
traction. [See 6.8]
5. Use caution when changing speeds and/or direction
on slopes. Material moving inside the truck bed can
cause an unbalanced load that could tip the vehicle.
6.13 DAILY MAINTENANCE _____________________________________________________
Important: For more detailed maintenance information,
adjustments and maintenance/lubrication charts, see the
Parts & Maintenance manual.
1. Park the truck on a flat, level surface. Engage
parking brake, stop the engine and remove key from
ignition switch.
2. Grease and lubricate all points if required. To
prevent fires, wash truck after each use.
a.
Use only fresh
equipment.
water
for
cleaning
your
Note: Use of salt water or effluent water has been
known to encourage rust and corrosion of metal parts
resulting in premature deterioration or failure.
Damage of this nature is not covered by the factory
warranty.
b.
Do not use high pressure spray.
c.
Do not spray water directly at the instrument
panel, or any electrical components.
d.
Do not spray water into the cooling air intake or
the engine air intake.
Note: Do not wash a hot or running engine. Use
compressed air to clean the engine and radiator fins.
3. Fill vehicle’s fuel tank at the end of each operating
day to within 1 in., (25 mm) below the filler neck.
Diesel Engine: Use clean, fresh #2 diesel fuel.
Minimum Cetane Rating 45.
GB-20
Gas Engine: Use clean fresh unleaded gasoline.
Minimum Octane rating 87.
4. Handle fuel with care - it is highly flammable. Use
an approved container, the spout must fit inside the
fuel filler neck. Avoid using cans and funnels to
transfer fuel.
a.
Never remove the fuel cap from the fuel tank, or
add fuel, when the engine is running or while the
engine is hot.
b.
Do not smoke when handling fuel. Never fill or
drain the tank indoors.
c.
Never overfill or allow the tank to become empty.
Do not spill fuel. Clean any spilled fuel
immediately.
d.
Never handle or store fuel containers near an
open flame or any device that may create sparks
and ignite the fuel or fuel vapors.
5. Store fuel according to local, state or federal
ordinances and recommendations from your fuel
supplier.
6. Check the engine oil at the start of each day, before
starting the engine. If the oil level is low, remove the
oil filler cap and add oil as required. Do not overfill.
NOTES
7
7
NOTES
GB-21
INDICE
1
1
2
2.1
2.2
3
3.1
3.2
4
4.1
5
5.1
5.2
INDICE
INDICE ................................................................. 2
SEGURIDAD ....................................................... 3
Manipulación segura............................................ 3
Avisos importantes sobre seguridad .................... 4
NUMEROS DE IDENTIFICACION
DEL VEHICULO .................................................. 5
Numero de identificación del vehículo ................. 5
Numeros de identificación del motor ................... 5
ETIQUETAS ........................................................ 6
Etiquetas .............................................................. 6
CONTROLES ...................................................... 7
Iconos .................................................................. 7
Descripción de los controles ................................ 9
6
6.1
6.2
6.3
6.4
6.5
6.6
6.7
6.8
6.9
6.10
FUNCIONAMIENTO .......................................... 12
Inspección diaria ................................................ 12
Sistema de interbloqueo .................................... 12
Procedimientos de funcionamiento ................... 13
Puesta en marcha ............................................. 14
Conducción del vehículo ................................... 15
Velocidad absoluta ............................................ 16
Parada y estacionamiento del vehículo ............. 17
Presion de los neumáticos ................................ 17
Sistema hidráulico ............................................. 18
Procedimiento de
sobrecalentamiento del motor ........................... 19
6.11 Remolcado del vehículo .................................... 19
6.12 Maniobras en pendientes .................................. 20
6.13 Mantenimiento diario ......................................... 20
7
NOTAS .............................................................. 21
Advertencia Proposición 65
El escape del motor de este producto contiene
productos químicos que, según el estado de
California, pueden producir cáncer, defectos de
nacimiento y otros daños reproductivos.
© COPYRIGHT 2005, TEXTRON INC.
“Todos los derechos reservados, incluyendo el derecho a reproducir este libro o partes del mismo de cualquier forma”.
Toda la información de esta publicación está basada en la información disponible en el momento de la aprobación para ir a
imprenta. Jacobsen se reserva el derecho a realizar cambios en cualquier momento sin aviso previo y sin incurrir en
ninguna obligación.
IMPRESO EN EE.UU. 8-2005
ES-2
SEGURIDAD
2
2
SEGURIDAD
2.1
MANIPULACION SEGURA___________________________________________________
! ADVERTENCIA
EL EQUIPO MANIPULADO INCORRECTAMENTE O POR PERSONAL NO CUALIFICADO PUEDE SER PELIGROSO.
Familiarícese con la ubicación y la correcta utilización de todos los mandos. Todo operador sin experiencia debe recibir
instrucciones de alguien que esté familiarizado con el equipo antes de que se le permita manipular la máquina.
1.
2.
3.
4.
5.
6.
La seguridad depende del grado de concienciación,
interés y prudencia de quienes utilicen o se encarguen
del servicio técnico del equipo. Nunca permitir que
menores de edad manejen ningún equipo.
Debe leer este manual y todas las publicaciones
relacionadas con el equipo (Manual de piezas y
mantenimiento, Manual del motor y accesorios). Si el
operario no sabe español, el propietario será
responsable de explicarle la información contenida en
este manual.
Aprender el manejo correcto de la máquina, la
ubicación y la finalidad de todos los controles e
instrumentos antes de manejar el equipo. Si se utiliza
el equipo sin conocerlo a fondo, pueden producirse
accidentes.
Nunca permitir que nadie utilice o repare la máquina o
sus implementos sin tener la capacitación y
conocimiento adecuados, o si está bajo la influencia
del alcohol o las drogas.
Llevar puesta toda la ropa de protección y dispositivos
de seguridad personal necesarios para protegerse la
cabeza, los ojos, los oídos, las manos y los pies.
Manejar la máquina solamente a la luz del día o con
buena iluminación artificial.
Inspeccione el terreno para determinar qué accesorios
y acoplamientos son necesarios para realizar el trabajo
de modo apropiado y seguro. Utilice accesorios y
acoplamientos aprobados por Jacobsen.
7.
Sea consciente de los posibles agujeros en el terreno
y otros peligros ocultos.
8.
Inspeccione el área donde va a utilizar el equipo.
Recoja toda la basura que encuentre. Estar atento a
las obstrucciones por encima de la cabeza (ramas de
árboles bajas, cables eléctricos, etc.) y también a los
obstáculos subterráneos (regadores, tubos, raíces de
árboles, etc.). Entrar a una zona nueva con cuidado.
Permanecer alerta por si existen riesgos ocultos.
9.
No permita acercarse a nadie con la máquina en
funcionamiento. El operador es responsable de las
lesiones causadas a las demás personas y/o los
daños a la propiedad.
10. No lleve pasajeros. Manténgase a una distancia
segura de peatones y animales.
11. Nunca manejar el equipo que no esté en perfectas
condiciones de trabajo o que no tenga las etiquetas,
protecciones, escudos, deflectores de descarga u
otros dispositivos de protección firmemente colocados
en su sitio.
12. No desconectar o pasar por alto (anular) ningún
interruptor.
13. No altere las consignas de regulación del motor ni lo
haga funcionar a velocidad excesiva.
14. El monóxido de carbono presente en los gases de
escape es fatal si se inhala. No encienda nunca el
motor si no hay una ventilación adecuada o si está en
un sitio cerrado.
15. Tratar el combustible con cuidado, es altamente
inflamable.
16. Mantenga limpio el motor. Deje que se enfríe antes de
almacenar la máquina y retire siempre la llave de
contacto.
17. Ponga la transmisión en punto muerto, pise el
embrague y ponga el freno de estacionamiento antes
de encender el motor. Arranque el motor sólo cuando
esté sentado en el asiento del operador, nunca
estando de pie al lado de la unidad.
18. Cuando se conduzca o transporte en vías públicas, el
equipo debe cumplir los requisitos locales y estatales
más recientes. Tenga cuidado con el tráfico al cruzar o
trabajar en o cerca de carreteras.
19. Las reglamentaciones locales podrán restringir la edad
del operador.
20. Maniobre la máquina por las pendientes en sentido
vertical, nunca horizontalmente.
21. Para evitar un vuelco o pérdida de control, no
arranque ni pare repentinamente en pendientes.
Reduzca la velocidad al realizar giros. Tenga cuidado
al cambiar de dirección.
22. Utilice siempre el cinturón de seguridad cuando
maniobre tractores equipados con un ROPS.
Nunca lo utilice si los tractores no disponen de un
ROPS.
23. Mantenga las piernas, brazos y el cuerpo dentro del
compartimiento del asiento mientras el vehículo esté
en movimiento.
24. Ponga siempre Punto muerto (transmisión manual) o
Estacionamiento (transmisión automática) y ponga el
freno de estacionamiento antes de abandonar el
vehículo.
ES-3
2
SEGURIDAD
2.2
!
AVISOS IMPORTANTES SOBRE SEGURIDAD __________________________________
Este símbolo de seguridad sirve para alertarle de posibles peligros.
PELIGRO - Indica una situación vigente que es potencialmente peligrosa y que, de no tomarse las medidas pertinentes,
OCASIONARA lesiones graves o accidentes mortales.
ADVERTENCIA - Indica una situación potencialmente peligrosa que, de no tomarse las medidas pertinentes, PODRIA
OCASIONAR lesiones graves o accidentes mortales.
PRECAUCION - Indica una situación potencialmente peligrosa que, de no tomarse las medidas pertinentes, PODRIA
LLEGAR A OCASIONAR pequeñas lesiones y desperfectos materiales. Puede además utilizarse para advertir contra las
prácticas laborales peligrosas.
Para una mayor claridad, algunas de las ilustraciones de este manual podrían mostrar protectores, dispositivos de
protección o chapas abiertas o retiradas. En ninguna circunstancia se debe manipular este equipo sin que estén dichos
dispositivos firmemente asegurados.
! ADVERTENCIA
El sistema de interbloqueo de este vehículo impide que el mismo arranque a
menos que esté pisado el pedal del embrague (transmisión manual) o el selector
de marcha esté en Estacionamiento (P) o en punto muerto (N) (transmisión
automática).
No operar la máquina NUNCA a menos que funcione el sistema de interbloqueo.
! ADVERTENCIA
1.
Antes de abandonar por cualquier motivo la posición del operador:
a.
b.
c.
d.
e.
f.
Quitar el pie del acelerador.
Frenar con el freno de servicio.
Pisar el embrague y poner la transmisión en punto muerto (transmisión
manual) o en estacionamiento (transmisión automática).
Poner el freno de estacionamiento.
Parar el motor y quitar la llave de encendido.
Cuando se pare el motor por completo, poner la transmisión manual en
primera marcha.
2.
Mantener las manos, los pies y la ropa lejos de las piezas en movimiento.
Esperar a que no haya ninguna pieza en movimiento antes de limpiar,
ajustar o reparar la máquina.
3.
Mantener a los peatones y animales alejados de la zona de operación.
4.
No llevar nunca pasajeros a menos que haya un asiento para ellos.
Si sigue todas las instrucciones de este manual, conseguirá prolongar la vida de su máquina y mantener su máxima eficacia.
Los ajustes y las tareas de mantenimiento deben ser realizadas siempre por un técnico cualificado.
Si necesita más información, póngase en contacto con su distribuidor Jacobsen quien le informará de los métodos de
mantenimiento más recientes y le proporcionará un servicio puntual y eficaz. El uso de piezas y accesorios no originales
o autorizadas de Jacobsen anularán la garantía.
ES-4
NUMEROS DE IDENTIFICACION DEL VEHICULO
3
3.1
NUMEROS DE IDENTIFICACION DEL VEHICULO
NUMERO DE IDENTIFICACION DEL VEHICULO _________________________________
El Número de identificación del vehículo (NIV), muestra el
número de modelo, el código de fecha y el número de serie
en la Placa de datos/Etiqueta de identificación que hay en el
travesaño bajo el tablero de instrumentos.
Este vehículo puede estar
cubierto por una o más de
las siguientes patentes
americanas:
GOLF, TURF & SPECIALTY PRODUCTS
El número de serie también aparece en el travesaño. Está
situado a la izquierda de la Placa de datos/Etiqueta de
identificación.
NOTA: La referencia a los lados Delantero, Trasero,
Izquierdo y Derecho siempre es mirando desde la posición
del operador.
Augusta Georgia, EE.UU.
1 800 241 5855
84043
MODELO
CODIGO FECHA M1903
NUMERO DE ETIQUETA 75984G55 Lb/kg W Batt
NUMERO DE SERIE *2128855* Potencia nominal CV/kw
Anote la información de identificación del vehículo debajo
para consultas rápidas.
Número de modelo: ______________________
Código de fecha: ________________________
Número de Serie: ________________________
3.2
3
Figura 3A
Cite siempre el número de identificación del vehículo
cuando pida piezas de repuesto o pida información sobre
reparaciones. El número de identificación del vehículo debe
aparecer en toda correspondencia relativa a este vehículo.
NUMEROS DE IDENTIFICACION DEL MOTOR __________________________________
El Truckster va equipado con motor Perkins de 3 cilindros
diesel, refrigerado por líquido y de cuatro tiempos o motor
Suzuki 3 cilindros de gasolina, refrigerado por líquido y de
cuatro tiempos.
El Número de serie del motor Perkins va acoplado al bloque
motor, a la derecha del motor y cerca del alternador.
El Número de serie del motor Suzuki va acoplado en el
bloque motor superior, a la derecha del motor, bajo el
bastidor del mismo y puede ser ocultado parcialmente por el
arnés eléctrico. El número de serie también esta impreso a
mano en el riel de combustible.
No. serie del motor
Perkins Diesel
Anote la información de serie del motor debajo para
consultas rápidas.
Figura 3B
Número de serie del motor: _______________________
No. Serie del motor
K6A Suzuki
Figura 3C
ES-5
4
ETIQUETAS
4
ETIQUETAS
4.1
ETIQUETAS ______________________________________________________________
Familiarícese con las etiquetas. Son esenciales para el funcionamiento seguro de la máquina. CAMBIE LAS ETIQUETAS
DAÑADAS INMEDIATAMENTE.
NOTA
! ADVERTENCIA
ESTA UNIDAD NO ES UN VEHICULO A MOTOR SEGUNA
EL ACTA DE SEGURIDAD DE VEHICULOS NACIONAL. NO
ESTA PREPARADO NI FABRICADO PARA SER USADO EN
CARRETERAS, CALLES O AUTOPISTAS, NI ES
APROPIADO PARA TAL USO. NO DEBE RECIBIR LICENCIA
COMO VEHICULO A MOTOR.
LOS FRENOS DE ESTAICONAMIENTO
NO SE APLICAN AUTOMATICAMENTE.
EL VEHICULO PUEDE MOVERSE Y
PROCOVAR HERDIAS PERSONALES Y/O
DAÑOS A LA PROPIEDAD. PONGA
SIEMPRE EL FRENO DE MANO O EL DE
ESTACIONAMIENTO.
821071
822819
! ADVERTENCIA
DE NO SEGUIR ESTAS ADVERTENCIAS
SE PUEDEN PROVOCAR GRAVES
HERIDAS O LA MUERTE
Part of 845038
009034880
Advertencia sobre el ventilador
de refrigeración eléctrico
Esta etiqueta advierte al operador que el ventilador
de refrigeración puede encenderse en cualquier momento,
incluso con la llave de encendido en OFF (Desconectado).
STOP
2702014
Advertencia sobre
el Manual del operador
Esta etiqueta pide al operador
leer el manual del operador
antes de intentar poner
en marcha u operar el vehículo.
ADVERTENCIA
De no seguir estas
advertencias se pueden
provocar graves heridas
o la muerte.
ES-6
840754
Advertencia sobre el refrigerante del radiador
Esta etiqueta pide al operador no quitar la tapa del radiador
con el motor caliente. Consultar la sección Sistema de refrigeración
en el Manual de piezas y mantenimiento
para recibir instrucciones de seguridad y funcionamiento.
1. Leer y comprender las etiquetas del manual del operador.
2. No dejar que personal no preparado maneje este vehículo.
3. No modificar el vehículo sin autorización del fabricante.
4. Colocar las cargas por delante del eje trasero.
5. Las cargas pesadas pueden desequilibrar. No exceder la
carga máxima permitida.
6. No operar el vehículo si hay que repararlo.
7. Mantener las protecciones en su lugar.
8. Poner el punto muerto o el freno de estacionamiento antes de encender el motor.
9. Llevar pasajeros en los asientos exclusivamente.
10. Al aparcar (abandonar) el vehículo, seguir las instrucciones del
manual del operador.
11. No arrancar, parar o girar bruscamente, especialmente en
pendientes o con cargas pesadas.
12. Mantener las etiquetas y las instrucciones legibles e intactas.
13. Mantener los brazos y las piernas dentro del vehículo.
CONTROLES
5
5
CONTROLES
5.1
ICONOS __________________________________________________________________
Leer el manual
Acelerador
Contador
horario
AltoBajo
Interruptor de encendido
ACC
OFF
ON
START
STOP
Temperatura del
refrigerante
Freno
Estacionam.
Combustible
Servicio
Control del regulador
AceleradorRegulador
!
Bujía
Intermitentes
Izquierdo
Derecho
Haz largo
Presión de aceite del
motor
! ADVERTENCIA
No conduzca la máquina a menos que haya leído el Manual de seguridad y funcionamiento
y sepa cómo utilizar los controles correctamente.
Familiarícese con los iconos mostrados arriba y con lo que representan. Aprenda la
ubicación y la función de todos los controles e indicadores antes de utilizar la máquina.
ES-7
5
CONTROLES
A
B
C
D
E
F
G
H
J
K
L
M
N
P
R
S
T
Tacómetro
Contador horario
Indicador de combustible
Voltímetro
Indicador de temperatura del agua
Indicadores de los intermitentes
Luz de presión de aceite
Luz de la bujía
Luz de líquido de freno de servicio
Luz de freno de estacionamiento
Indicador de haz largo
Interruptor de encendido
Selector de marcha
Enchufe para accesorios
Acelerador manual
Control del regulador
Interruptor de luces
60
15
K
35
Panel lateral girado 90 grados
para mayor claridad
40
5
14
45
0
50
14
x 100
16
E
H
AB
AA
30
10
12
Z
25
20
COOLANT
10
Y
F
F
220
280
88 104
C 138
190
140
G
Claxon
Embrague
Freno de servicio
Acelerador
Cable de desplazamiento del
diferencial
Z Palanca del freno de
estacionamiento
AA Control remoto del sistema
hidráulico
AB Sistema de control de subida
A
E
F
U
V
W
X
Y
!
12
34
F
HOURS
L
0 0 0 0 0 0
J
D
B
STOP
C
P
M
S
R
U
X
T
W
V
N
N
P
R
N
D
2
L
Transmisión
manual
ES-8
Transmisión
automática
CONTROLES
5.2
5
DESCRIPCION DE LOS CONTROLES _________________________________________
A
E
F
F
F
220
280
88 104
138
C
190
140
G
60
25
20
30
15
COOLANT
H
14
45
0
16
50
14
x 100
E
!
L. Indicador de haz largo – Indica que el interruptor
de luces (T) está en posición de haz largo.
40
5
12
10
K
35
10
K. Luz del freno de estacionamiento – Indica que
esta puesto el freno de estacionamiento. No
conduzca el vehículo sin quitar antes el freno de
estacionamiento.
12
34
F
HOURS
L
0 0 0 0 0 0
OFF
J
D
B
ON
ACC
C
Figura 5A
STOP
START
A. Tacómetro - Indica la velocidad del motor (x 100)
en revoluciones por minuto (rpm).
B. Contador horario – Registra el número de horas
de funcionamiento de la unidad. Está activo cuando
el interruptor de encendido (M) está en ON.
C. Indicador de combustible - Indica la cantidad de
combustible que queda en el depósito. No deje que
se vacíe el depósito.
D. Voltímetro - Indica el voltaje de la batería. Con un
funcionamiento normal, debería mostrar entre 12 y
18 voltios. Una lectura inferior a 12 voltios indica
que la batería no carga correctamente y se está
gastando.
E. Indicador de temperatura del agua - Indica la
temperatura del refrigerante del agua. Si la
temperatura supera los 110° C, sonará una alarma
situada bajo el panel de instrumentos.
F.
Indicadores de los intermitentes – Usados con el
juego opcional de intermitentes. Parpadean cuando
se mueve la palanca de los intermitentes a la
izquierda o la derecha. Ambos indicadores
parpadean cuando se pulsa el botón de peligro.
G. Luz de presión de aceite – Se ilumina cuando se
enciende el interruptor de encendido y se apagan
cuando arranca el motor. No siga operando el
vehículo si no se apaga la luz o si se enciende
durante su manejo.
H. Luz de la bujía – Sólo motores diesel, indica que
el temporizador de la bujía está activo. El
temporizador funcionará durante aproximadamente
20 segundos mientras precalienta las bujías del
motor.
J. Luz de líquido de freno de servicio – Indica el
nivel de líquido en el depósito del cilindro principal.
Llénelo con líquido de frenos DOT 3 nuevo.
M
Figura 5B
M. Interruptor de encendido – Tiene
posiciones. ACC - OFF - ON - START.
cuatro
Posición ACC (Accesorio) – Permite usar varios
instrumentos y accesorios sin causa daños al
sistema de encendido.
Posición ON (Desconectado) – Impide el
funcionamiento de los elementos eléctricos del
vehículo excepto para la luz de peligro, las luces y el
radiador de refrigeración del radiador. El interruptor
debe estar en posición OFF Para quitar la llave.
Posición ON (Conectado) – La llave se pone en
esta posición para el funcionamiento normal del
motor.
Posición START (Encendido) – Mantenga la llave
en esta posición para activar el motor de arranque.
Cuando la suelte, la llave volverá a la posición ON
automáticamente. La llave debe volver a la posición
OFF Antes de poder volver a activar el motor de
arranque.
N. Selector de marcha – Se utiliza para desplazar la
transmisión a la marcha deseada. Consulte la
etiqueta sobre velocidad para determinar la marcha
requerida.
Transmisión manual: El pomo selector de marchas
tiene un diseño en “H” moldeado en la parte superior.
ES-9
5
CONTROLES
Diseño
en “H”
13
24 R
R
S
Figura 5C
Transmisión automática: El selector de marcha
tiene seis posiciones: Estacionamiento (P), Marcha
atrás (R), Punto muerto (N), Transmisión (D),
segunda (2) y Bajo (L). El motor no arrancará a
menos que el selector esté en Estacionamiento (P) o
Punto muerto (N).
T
U
Empuje el botón selector al cambiar de
Estacionamiento (P), a Punto muerto (N) o al
cambiar de Transmisión (D) a Segunda (2) o Bajo
(L).
Figura 5E
R. Acelerador manual – Usado para ajustar la
velocidad del motor en operaciones remotas.
Aumentar la velocidad del acelerador manual hace
que se pise el pedal del acelerador.
Botón selector
P
R
N
D
2
L
No intente nunca conducir el vehículo con la
velocidad del motor controlada por el acelerador
manual.
S. Control del regulador – Usado para disminuir los
límites de revoluciones preajustados al usar el
acelerador manual o de pie.
Suba la palanca para usar el límite de revoluciones
preajustado. Baje la palanca lo necesario para bajar
las revoluciones máximas.
Figura 5D
P. Enchufe para accesorios – Permite utilizar
accesorios de 12 voltios. Para evitar un desgaste
excesivo de la batería, use sólo este enchufe con el
motor en funcionamiento.
! PRECAUCION
El circuito para accesorios de 12 voltios está
protegido por un fusible de 15 A. No intente usar
accesorios con una potencia superior a 180 vatios.
Para evitar quemaduras o incendios, no cambie el
fusible de 15 A por un fusible de más amperaje.
ES-10
T.
Interruptor de luces – Usado para encender los
faros delanteros y traseros. Tiene tres posiciones:
OFF, HAZ CORTO y HAZ LARGO. Suba el
interruptor un punto para HAZ CORTO o dos puntos
para HAZ LARGO.
U. Claxon – Situado a la izquierda del volante, debajo
del panel de Instrumentos. Apriételo para hacerlo
sonar. El claxon no sonará cuando el interruptor de
encendido esté en OFF.
CONTROLES
5
Y
Z
P
AB
AA
X
W
V
Figura 5G
Figura 5F
V. Embrague – Sólo transmisión manual: Usado
para desconectar la salida de potencia del motor a
la transmisión. Esto permite el cambio de marchas
de la transmisión. No intente cambiar de marcha sin
pisar el embrague a fondo.
El embrague va equipado con un interruptor de
interbloqueo. Este interruptor impide que se active el
motor de arranque a menos que se active el
embrague (pedal pisado). Ver 6.2.
W. Freno de servicio – Píselo para frenar o detener el
vehículo.
Si los frenos NO detienen el vehículo correctamente,
deberán ser ajustados o reparados.
X. Acelerador – Píselo para acelerar y suéltelo para
volver el acelerador a ralentí.
Y. Cable de desplazamiento del diferencial – Usado
para cambiar el diferencial de BAJO a ALTO.
Z. Palanca del freno de estacionamiento – Situada
a la izquierda del asiento del conductor. Para poner
el freno, suba la palanca.
Para soltarlo, empuje el botón del extreme de la
palanca tirando a la vez ligeramente del asa y baje la
palanca a su posición original manteniendo pulsado
el botón.
AA.Control remoto del sistema hidráulico – Usado
para activar y desactivar el sistema hidráulico. Baje
el botón para usar el sistema de control de subida y
desactivar el sistema hidráulico remoto. Súbalo para
activar el sistema hidráulico remoto y desactivar el
sistema de control de subida.
AB.Sistema de control de subida – Usado para
controlar la subida de la plataforma hidráulica.
Empuje el botón de control remoto del sistema
hidráulico (AA) para activar el sistema de subida
hidráulico.
Tire de la palanca para extender el cilindro (subir la
caja de residuos).
Empuje la palanca para retraer el cilindro (bajar la
caja de residuos).
Empuje la palanca hacia la derecha hasta su
posición de flotación.
ES-11
6
FUNCIONAMIENTO
6
FUNCIONAMIENTO
6.1
INSPECCION DIARIA_______________________________________________________
! PRECAUCION
El interruptor de encendido está situado en la parte
delantera del motor. El motor se enciende moviendo
la palanca hasta la posición ‘1’. Baje las unidades al
suelo, ponga el freno de estacionamiento, apague el
motor y quite la llave de encendido.
1. Realice una inspección visual de toda la unidad,
busque signos de desgaste, piezas sueltas y
componentes extraviados o dañados. Compruebe si
hay fugas de combustible o aceite y asegúrese de
que las conexiones estén bien apretadas, y que los
tubos y mangueras estén en buen estado.
6.2
2. Compruebe el suministro de combustible, el nivel
del refrigerante del radiador, el indicador de aceite
del cigüeñal y el indicador del limpiador de aire.
Con el motor en frío, todos los fluidos deben estar
en la marca de nivel lleno.
3. Compruebe el aire de los neumáticos.
4. Pruebe el sistema de interbloqueo.
Nota: Para conocer más detalles acerca de las
operaciones de mantenimiento, ajustes y cuadros de
mantenimiento y lubricación, consulte el Manual de
Piezas y Mantenimiento.
SISTEMA DE INTERBLOQUEO ______________________________________________
1. El sistema de interbloqueo impide que se encienda
el motor a menos que esté pisado el embrague
(transmisión manual) o que la palanca de
desplazamiento (transmisión automática) esté en
Estacionamiento (P) o Punto muerto (N).
! ADVERTENCIA
No opere nunca el equipo si el sistema de
interbloqueo está desconectado o funciona
incorrectamente. No desconecte ni derive ningún
interruptor.
Transmisión manual: No ponga nunca la llave
en ON a menos que esté pisado el embrague o el
selector de marchas esté en punto muerto. Si el
vehículo tiene metida alguna marcha y está
pisado el embrague al encender el motor, el
vehículo podría desplazarse hacia delante o
hacia atrás, dependiendo de la marcha que tenga
metida. Este desplazamiento podría provocar
graves heridas o la muerte.
Transmisión automática: No ponga nunca la
llave en ON a menos que el selector de marchas
esté en Estacionamiento (P) o Punto muerto (N).
Si el vehículo tiene metida alguna marcha distinta
de Estacionamiento (P) o Punto muerto (N) al
encender el motor, el vehículo podría desplazarse
hacia delante o hacia atrás, dependiendo de la
marcha que tenga metida. Este desplazamiento
podría provocar graves heridas o la muerte.
2. Realice las siguientes dos pruebas para cerciorarse
de que el sistema de interbloqueo funciona
ES-12
correctamente. Interrumpa la prueba y haga que
revisen y reparen el vehículo si éste no pasa
alguna prueba.
● el motor no arranca en la prueba 1;
● El motor sí arranca en la prueba 2;
3. Acciones realizadas descritas para cada prueba.
Apague el motor entre una prueba y otra.
Transmisión manual:
Prueba 1: Representa el procedimiento normal de
encendido. El embrague está pisado. El motor debe
arrancar.
Prueba 2: El motor no debe arrancar si el embrague
no está pisado.
Transmisión automática:
Prueba 1: Representa el procedimiento normal de
encendido. La palanca de desplazamiento está en
Estacionamiento (P). El motor debe arrancar.
Prueba 2: El motor debe arrancar si la palanca de
desplazamiento está en Punto muerto (N).
Prueba 3: El motor no debe arrancar si la palanca de
desplazamiento está en Marcha atrás (R).
Prueba 4: El motor no debe arrancar si la palanca de
desplazamiento está en Tracción (D).
Prueba 5: El motor no debe arrancar si la palanca de
desplazamiento está en segunda marcha (2).
Prueba 6: El motor no debe arrancar si la palanca de
desplazamiento está en Bajo (L).
FUNCIONAMIENTO
6.3
6
PROCEDIMIENTOS DE FUNCIONAMIENTO ____________________________________
! ADVERTENCIA
Disponemos de una estructura de protección antivuelco (ROPS) como accesorio opcional. Los cinturones de seguridad
se deberán llevar puestos siempre que se instale un ROPS en el tractor. Llevar siempre el cinturón bien ajustado. NO
usar los cinturones en un tractor sin un ROPS.
Si se ha instalado un ROPS y el tractor vuelca, agarrarse al volante. No tratar de saltar ni moverse del asiento.
! PRECAUCION
Lleve siempre gafas de seguridad, zapatos o botas de trabajo de cuero, un casco y protectores de oídos para no
lesionarse. Lleve el equipo protector recomendado por el fabricante químico.
1.
En ningún caso debe ponerse en marcha el motor sin
que el conductor esté sentado.
6.
Desactive siempre el sistema hidráulico cuando no lo
use.
2.
No poner en funcionamiento el tractor o los accesorios
con componentes sueltos, dañados o extraviados.
Siempre que sea posible, corte césped que esté seco.
7.
Frene y mire en ambas direcciones al crizar caminos o
carreteras. Vigile el paso de vehículos.
8.
3.
No quitar ni poner nunca la tapa del motor con éste en
funcionamiento. La tapa del motor es una protección
de la maquinaria y su retirada le expone a las piezas
en movimiento. Aleje las manos, el pelo y la ropa del
volante, el ventilador de refrigeración del radiador, el
ventilador del alternador, las correas del motor, las
poleas o la entrada de aire.
Pare e inspeccione el equipo para ver si ha sufrido
desperfectos justo después de haber chocado con
algún objeto o si la máquina comienza a vibrar de
forma anormal. Lleve el equipo a que lo reparen antes
de reiniciar su funcionamiento.
! ADVERTENCIA
Para evitar lesiones, antes de limpiar, ajustar o
reparar el equipo, desactive siempre el sistema
hidráulico, ponga el freno de estacionamiento, pare
el motor y retire la llave de encendido.
! ADVERTENCIA
Si no asegura correctamente la tapa del motor podría
hacer que ésta cayera y provocara una pérdida de
control del vehículo y heridas personales.
4.
5.
Estudiar el área para determinar el mejor y más
seguro procedimiento de operación. Tener en cuenta el
tipo de terreno y el estado de la superficie. Cada
condición necesitará ciertos ajustes y precauciones.
No descargar directamente el material hacia los
peatones, ni dejar que nadie se acerque a la máquina
mientras esté en funcionamiento. El propietario/
operario es responsable de las lesiones producidas a
los peatones y/o daño a su propiedad.
9.
Desacelere y despliegue mayor precaución al trabajar
en cuestas. Lea la sección 6.12. Sea prudente cuando
trabaje cerca de desprendimientos.
10. Mire atrás y al suelo antes de recular para asegurarse
de que el camino está libre. Tenga cuidado cuando se
aproxime a esquinas donde no llegan bien las
herramientas, arbustos, árboles u otros objetos que
pueden impedir la visión.
! PRECAUCION
Antes de trabajar, limpie la suciedad, piedras, juguetes y
cables que puedan ser arrojados por la máquina. Entre
en las zonas de trabajo con cuidado. Conduzca siempre
a velocidades que permitan tener un control total de la
máquina.
ES-13
6
FUNCIONAMIENTO
6.4
PUESTA EN MARCHA ______________________________________________________
IMPORTANTE: No utilice líquidos de ayuda de puesta en
marcha. La utilización de dichos líquidos en el sistema de
entrada de aire puede ser explosiva o provocar un estado
de embalamiento del motor y provocar graves daños en el
motor.
1.
Asegúrese de que la válvula de paso esté totalmente
abierta.
2.
Transmisión manual: Siéntese en el asiento del
operador, asegúrese de poner el freno de
estacionamiento y la transmisión en punto muerto [Ver
5.2]. Pise el embrague [Ver 5.2 y 6.2].
3.
G
60
4.
Se encenderá la luz de aceite del motor (G) y
permanecerá encendida hasta que se encienda le
motor.
b.
Motor diesel Se encenderá la luz de la bujía (H)
durante 20 segundos.
c.
Cuando ponga el freno de estacionamiento, la luz
del freno de estacionamiento (K) estará encendida.
Motor diesel: El motor diesel utiliza las bujías para
precalentar la cámara de combustión y hace más
sencillo el arranque en frío. Cuando encienda el
vehículo por primera vez durante el día, o cuando se
haya enfriado el motor, deberá energizar las bujías
para encender el motor. No es necesario que energice
las bujías cuando encienda un motor caliente. Cuando
se apague la luz de la bujía (H), ponga la llave (M) en
START. Suelte en cuanto arranque el motor. No
mantenga el interruptor en START más de 15
segundos. Asegúrese de que se apaga la luz de aceite
del motor (G).
Ponga la llave (M) en START. Suelte en cuanto
arranque el motor. No mantenga el interruptor en
START más de 15 segundos. Asegúrese de que se
apaga la luz de aceite del motor (G).
5.
Deje que el motor se caliente y lubrique
adecuadamente antes de operar a altas revoluciones.
ES-14
25
20
30
15
COOLANT
40
5
14
10
H
45
0
16
K
35
10
50
14
x 100
12
E
!
34
F
HOURS
L
0 0 0 0 0 0
J
D
Ponga el interruptor de encendido (M) en ON.
a.
F
F
220
280
88 104
138
C
190
140
12
Transmisión automática: Siéntese en el asiento del
operador, asegúrese de poner el freno de
estacionamiento y la transmisión en Estacionamiento
(P).
A
E
F
C
B
OFF
ON
ACC
STOP
START
M
Figura 6A
FUNCIONAMIENTO
6.5
CONDUCCION DEL VEHICULO ______________________________________________
Lea y siga las notas de seguridad de este manual cuando
conduzca el vehículo. Consulte la Sección 6.3 con
instrucciones generales de funcionamiento. Cuando
maniobre marcha atrás mire detrás de usted para
asegurarse de que el camino esté libre.
Importante: Si conduce este vehículo en carreteras
públicas, debe cumplir las leyes locales, regionales y
nacionales. Póngase en contacto con las autoridades
locales para que le informen de las disposiciones y
requisitos pertinentes.
Para evitar vuelcos o la pérdida de control, conduzca
despacio al girar.
Transmisión manual:
1.
Desactive el sistema hidráulico y baje completamente la
plataforma de carga al conducir desde y hacia la zona
de trabajo.
2.
Ponga el freno
estacionamiento.
3.
El selector de marchas tiene un diseño en H como se
muestra ( también hay uno grabado en el pomo).
4.
Con el embrague pisado a fondo, seleccione la
marcha apropiada (hacia delante o marcha atrás),
suelte el embrague lentamente a la vez que pisa el
acelerador. Consulte la Sección 6.6 para las marchas
adecuadas según las revoluciones del motor y la
velocidad. Comience siempre en primera marcha y
vaya cambiando a medida que aumente la velocidad.
de
servicio
y
quite
el
NOTA: Baje de marcha solo si el vehículo está totalmente
parado o si la velocidad del motor está disminuyendo.
Recuerde que antes de cambiar de marcha debe pisar
el embrague.
1.
Desactive el sistema hidráulico remoto y baje
completamente la plataforma de carga al conducir
desde y hacia la zona de trabajo.
2.
Ponga el freno
estacionamiento.
NOTA: Cuando suelte el embrague, notará que cuando
haya soltado el pedal parcialmente el vehículo comienza a
moverse. Cuando lo haga, pise el acelerador un poco más y
siga soltando el embrague. NO conduzca con el
embrague pisado parcialmente.
Cuando el vehículo alcance velocidad suficiente, pise
el embrague y vaya cambiando de marchas. Cuando
cambia de marchas, recuerde que cuando pisa el
embrague debe soltar el acelerador. NO pise el
acelerador al mismo tiempo que pisa el embrague al
cambiar de marcha.
Puede reducir de cuarta a tercera y de tercera a
segunda con el vehículo en movimiento cuando
disminuye la velocidad.
de
servicio
y
quite
el
de
! PRECAUCION
La velocidad del motor del vehículo no debe ser NUNCA
superior a la de ralentí al cambiar de estacionamiento o
punto muerto a Marcha atrás (R), Transmisión (D),
Segunda (2) o Baja (L), ya que podría producirse un
movimiento repentino del vehículo.
de
No conduzca a más de 8 - 10 km/h ni recorra distancias
largas marcha atrás.
6.
Si las revoluciones del motor y/o la velocidad del
vehículo no disminuyen lo suficiente e intenta reducir de
marcha, es posible que dañe la transmisión. NO fuerce
el selector de marchas hasta una marcha inferior. Frene
el motor y la velocidad del vehículo hasta que pueda
reducir apropiadamente.
Transmisión automática:
! PRECAUCION
5.
6
3.
Pulse el botón del asa de desplazamiento y seleccione
la marcha apropiada (hacia delante o marcha atrás).
Consulte la Sección 6.6 para las marchas adecuadas
según las revoluciones del motor y la velocidad.
No conduzca a más de 8 - 10 km/h ni recorra distancias
largas marcha atrás.
4.
Quite el freno de servicio y pise lentamente el
acelerador hasta alcanzar la velocidad deseada.
NOTA: Acelerar el motor con la transmisión activa [Marcha
atrás (R), Transmisión (D), Segunda (2) o Baja (L)] con el
freno de servicio o de estacionamiento puesto podría
provocar daños a la transmisión.
5.
Pare el vehículo por completo antes de cambiar el
selector de marcha a Estacionamiento (P) o al cambiar
de Transmisión (D) a Marcha atrás (R) o de Marcha
atrás (R) a Transmisión (D).
6.
Al bajar por una pendiente, se puede bajar la
transmisión a marchas inferiores [Segunda (2) o Baja
(L)] para ayudar a frenar al vehículo. Un uso excesivo
o prolongado de los frenos podría provocar una
pérdida de eficacia de la frenada por culpa de un
sobrecalentamiento
y
desgastar
los
frenos
prematuramente.
ES-15
6
6.6
FUNCIONAMIENTO
VELOCIDAD ABSOLUTA____________________________________________________
Consulte la Figura 6B para determinar la velocidad absoluta
y las revoluciones del motor deseadas para seleccionar la
marcha apropiada para operar el vehículo.
Las etiquetas son aplicables para los modelos
correspondientes y aparecen debajo con la identificación de
cada modelo. Cambie las etiquetas dañadas y/o difíciles de
leer. Las zonas sombreadas indican ajustes de velocidad
recomendados.
Los siguiente cuadros muestran la velocidad absoluta del
vehículo con respecto a las revoluciones del motor.
Seleccione las revoluciones apropiadas del motor y la
velocidad absoluta para los accesorios usados.
KM/H
Suzuki
Gas AT
KM/H
L
2
D
L
2
D
2,6
2,8
3,0
3,2
3,3
3,5
3,7
3,9
4,3
4,6
4,9
5,3
5,6
5,9
6,2
6,5
6,8
7,2
7,1
7,6
8,1
8,6
9,1
9,6
10,1
10,6
11,1
8,4
9,0
9,5
10,1
10,7
11,3
11,9
12,4
13,0
15,6
16,7
17,8
18,9
19,9
21,0
22,1
23,2
24,2
22,9
24,4
26,0
27,6
29,2
30,7
32,3
33,9
35,5
KM/H
Suzuki
Gas MT
RPM
2900
3100
3300
3500
3700
3900
4100
4300
4500
MPH
L
2
D
L
2
D
1,6
1,7
1,9
2,0
2,1
2,2
2,3
2,4
2,5
2,9
3,1
3,3
3,5
3,7
3,9
4,1
4,3
4,5
4,4
4,7
5,0
5,3
5,7
6,0
6,3
6,6
6,9
5,2
5,6
5,9
6,3
6,7
7,0
7,4
7,7
8,1
9,7
10,4
11,0
11,7
12,4
13,1
13,7
14,4
15,1
14,2
15,2
16,2
17,1
18,1
19,1
20,1
21,1
22,0
KM/H
MPH
1
2
3
4
1
2
3
4
1,8
1,9
2,0
2,2
2,3
2,4
2,5
2,6
2,8
3,0
3,3
3,5
3,7
3,9
4,1
4,3
4,5
4,7
4,8
5,2
5,5
5,8
6,2
6,5
6,8
7,2
7,5
7,1
7,6
8,1
8,6
9,1
9,6
10,1
10,6
11,1
5,7
6,1
6,4
6,8
7,2
7,6
8,0
8,4
8,8
9,8
10,4
11,1
11,8
12,4
13,1
13,8
14,5
15,1
15,6
16,7
17,8
18,9
19,9
21,0
22,1
23,2
24,2
22,9
24,4
26,0
27,6
29,2
30,7
32,3
33,9
35,5
KM/H
Perkins
Diesel
MPH
RPM
2900
3100
3300
3500
3700
3900
4100
4300
4500
MPH
1
2
3
4
1
2
3
4
1,1
1,2
1,3
1,3
1,4
1,5
1,6
1,6
1,7
1,9
2,0
2,2
2,3
2,4
2,5
2,7
2,8
2,9
3,0
3,2
3,4
3,6
3,8
4,0
4,2
4,4
4,7
4,4
4,7
5,0
5,3
5,7
6,0
6,3
6,6
6,9
3,5
3,8
4,0
4,2
4,5
4,7
5,0
5,2
5,5
6,1
6,5
6,9
7,3
7,7
8,2
8,6
9,0
9,4
9,7
10,4
11,0
11,7
12,4
13,1
13,7
14,4
15,1
14,2
15,2
16,2
17,1
18,1
19,1
20,1
21,1
22,0
KM/H
MPH
1
2
3
4
1
2
3
4
1,4
1,5
1,7
1,9
2,1
2,2
2,4
2,6
2,7
2,6
2,9
3,2
3,5
3,9
4,2
4,5
4,8
5,1
3,5
4,0
4,4
4,9
5,3
5,8
6,2
6,6
7,1
5,1
5,7
6,3
7,0
7,6
8,2
8,9
9,5
10,1
4,4
5,0
5,5
6,1
6,6
7,2
7,7
8,3
8,9
8,3
9,3
10,4
11,4
12,4
13,5
14,5
15,5
16,6
11,3
12,8
14,2
15,6
17,0
18,4
19,9
21,3
22,7
16,1
18,1
20,1
22,1
24,1
26,2
28,2
30,2
32,2
RPM
1600
1800
2000
2200
2400
2600
2800
3000
3200
MPH
1
2
3
4
1
2
3
4
0,9
1,0
1,1
1,2
1,3
1,4
1,5
1,6
1,7
1,6
1,8
2,0
2,2
2,4
2,6
2,8
3,0
3,2
2,2
2,5
2,8
3,0
3,3
3,6
3,9
4,1
4,4
3,2
3,5
3,9
4,3
4,7
5,1
5,5
5,9
6,3
2,8
3,1
3,4
3,8
4,1
4,5
4,8
5,2
5,5
5,2
5,8
6,4
7,1
7,7
8,4
9,0
9,7
10,3
7,1
7,9
8,8
9,7
10,6
11,5
12,3
13,2
14,1
10,0
11,3
12,5
13,8
15,0
16,3
17,5
18,8
20,0
Figura 6B
ES-16
FUNCIONAMIENTO
6.7
6
PARADA Y ESTACIONAMIENTO DEL VEHICULO ________________________________
Antes de abandonar el asiento del conductor, realice estos
pasos en el siguiente orden.
NOTA: Al aparcar en pendiente, las ruedas delanteras
deben estar giradas siempre que sea posible.
Transmisión manual:
1.
Pare el vehículo completamente y ponga el freno de
servicio al pisar el embrague (al parar el vehículo, pise
el freno hasta que se frene el vehículo, después pise el
embrague hasta que se detenga).
2.
Cuando el vehículo esté totalmente parado, ponga la
llave de encendido en OFF con el embrague y el freno
pisado hasta que el motor de apague. Ponga el freno
de estacionamiento, ponga la primera marcha, quite el
pie de los pedales y quite la llave de encendido para
evitar un uso no autorizado del vehículo.
2.
Ponga la palanca selectora de marchas en
Estacionamiento (P) y ponga el freno de
estacionamiento, quite el pie del pedal del freno,
ponga la llave de encendido en OFF y sáquela para
evitar un uso no autorizado del vehículo.
Subida
Transmisión automática:
1.
Quite el pie del acelerador, pare el vehículo y ponga el
freno de servicio.
Bajada
Vehículo aparcado con las ruedas delanteras gira
Figura 6C
6.8
PRESION DE LOS NEUMATICOS _____________________________________________
Mantenga los neumáticos correctamente inflados para
prolongar su vida útil. Compruebe la presión de inflado
cuando los neumáticos estén fríos. Inspeccione el desgaste
de la pisada.
Una presión inferior ayuda a no dejar marca en céspedes
cortos. Es posible que se necesiten presiones más altas
para cargas superiores. La presión de los neumáticos
traseros debe ser de 193 kPa al llevar la carga máxima. No
supere nunca la presión máxima indicada en el neumático.
Compruebe la presión con una galga para neumáticos de
baja presión y precisa. Debido al bajo volumen de aire
necesario, pueden inflarse excesivamente las ruedas en
cuestión de dos o tres segundos.
Mantenga las siguientes presiones:
Delante - 138 kPa
28 (193)
Presión 23 (159)
de los
neumáticos 18 (124)
delanteros
13 (90)
psi
(kPa)
8 (55)
0
400
800
1200
1500
Carga (Libras)
Figura 6D
Detrás - Varía dependiendo de la carga. (Ver cuadro).
ES-17
6
6.9
FUNCIONAMIENTO
SISTEMA HIDRAULICO _____________________________________________________
El sistema hidráulico de este vehículo es denominado como
sistema “activo”. Esto significa que la bomba hidráulica
opera siempre que el motor está en funcionamiento.
La operación del sistema hidráulico va determinada por la
válvula selectora. Cuando se empuja el pomo de esta
válvula (AA), se activa el sistema hidráulico de elevación y
se desactiva el sistema hidráulico remoto. Cuando sube el
pomo de la válvula, se activa el sistema hidráulico remoto y
se desactiva el sistema hidráulico de elevación.
Consulte la etiqueta sobre la tapa del conector hidráulico
para determinar las conexiones de los accesorios. Pare
siempre el motor antes de cambiar las conexiones
hidráulicas.
Para usar un accesorio hidráulico, conecte el manguito del
accesorio (9) al manguito (8) y el manguito del accesorio
(10) al conector (7). Consulte las instrucciones del
accesorio para conocer su funcionamiento.
Y
Z
AB
AA
Sistema hidráulico de elevación:
Cuando se active el sistema hidráulico de elevación,
controlado por la válvula de elevación. La válvula
elevación incluye dos válvulas de comprobación y una
liberación. Las válvulas de comprobación impiden
movimiento no deseado del cilindro.
es
de
de
un
La válvula de elevación tiene cuatro posiciones: subida,
bajada, punto muerto y flotación. El asa (AB) vuelve
automáticamente a punto muerto cuando vuelve de la
posición subida o bajada. En flotación, el asa debe
empujarse hacia delante y la izquierda antes de que vuelva
a punto muerto.
1.
Tirar del asa de la válvula de elevación (AB) extiende el
cilindro y sube la plataforma de carga.
2.
Empujar el asa de la válvula de elevación (AB) retrae
el cilindro y baja la plataforma de carga.
3.
Empujar el asa de la válvula de elevación (AB) hacia
delante y la derecha pone la válvula en posición de
flotación. Esta posición anula las válvulas de
comprobación, lo que permite que el accesorios se
adapte al contorno del terreno, incluso en terrenos
irregulares.
Para usar el cilindro de la plataforma de carga, conecte el
manguito del cilindro (4) al acoplador (1) y el manguito de la
válvula de elevación (2) al acoplador (3). Para usar el
cilindro de un accesorio, conecte el manguito del cilindro del
accesorio (5) al acoplador (1), el manguito de la válvula de
elevación (2) al cilindro del accesorio (6) y el manguito del
cilindro de la plataforma de carga (4) al acoplador (3).
Sistema hidráulico remoto:
El sistema hidráulico remoto se usa para operar accesorios
como la toma de potencia hidráulica (PTO), el Core
Harvester, el recebador o las herramientas eléctricas
hidráulicas remotas.
Para evitar el sobrecalentamiento y/o los daños al sistema
hidráulico, mantenga siempre el sistema hidráulico remoto
en un circuito cerrado. Conecte el manguito (8) al acoplador
(7) cuando no esté conectado el accesorio.
ES-18
Figura 6E
CILINDRO
TRUCKSTER
ACCESORIO
ACTIVADO
POR MOTOR
VALVULA DE
ELEVACION
10 7
1 4
2
9
8
5
3
6
VALVULA
SELECTORA
DEPOSITO
HIDRAULICO
BOMBA
HIDRAULICA
FILTRO
PRESION
RETORNO
SUCCION
PRESION Y RETORNO
CILINDRO DEL
ACCESORIO
Figura 6F
FUNCIONAMIENTO
6
6.10 PROCEDIMIENTO DE SOBRECALENTAMIENTO DEL MOTOR _____________________
Durante el funcionamiento del vehículo, si el indicador de
temperatura del agua muestra 110° C o más y/o suena la
alarma de advertencia de sobrecalentamiento, realice el
siguiente procedimiento.
La aguja del indicador de temperatura debe comenzar a
bajar aproximadamente 30 segundos después de haber
limpiado la pantalla. Si no lo hace, APAGUE el motor y
compruebe lo siguiente:
1.
Pare el vehículo. NO apague el motor. Ponga punto
muerto y el freno de estacionamiento.
1.
2.
Apague los accesorios que estén funcionando.
Compruebe si funciona el ventilador de refrigeración. El
ventilador debe girar con refrigerante por encima de
180° C, incluso con el interruptor de encendido en OFF.
3.
Ponga el motor a ralentí.
2.
Revise nivel de aceite del motor.
4.
Quite la suciedad de la pantalla de entrada del
radiador, situada a la derecha del vehículo.
3.
Compruebe si hay fugas en el sistema de
refrigeración. No abra el radiador cuando esté caliente.
Compruebe los niveles de refrigerante cuando se
enfríe el sistema.
! PRECAUCION
De no hacer caso a la advertencia de
sobrecalentamiento y no mantener el sistema de
refrigeración se podría dañar el motor.
Tenga cuidado al abrir la tapa del motor o limpiar la
pantalla de entrada. Es posible que las superficies
metálicas cerca del radiador y el motor estén calientes.
Use un cepillo o guantes para limpiar la pantalla.
6.11 REMOLCADO DEL VEHICULO _______________________________________________
5.
! ADVERTENCIA
Para evitar heridas o daños al vehículo, siga siempre las
siguiente pautas:
Durante el remolcado, intente llevar la luz de
remolcado encendida en todo momento. Tenga
cuidado al bajar pendientes y doblar esquinas.
Acoplamiento de la
línea de remolcado
• No acelere ni pare nunca repentinamente al remolcar
un vehículo.
• No cambie nunca la dirección del vehículo ni haga
giros abruptamente o en pendientes al remolcar un
vehículo.
• No remolque nunca un vehículo a más de 8 km/h.
Demasiada velocidad podría provocar una pérdida de
control de cualquiera de los dos vehículos.
• Ajuste la velocidad según la meteorología y las
condiciones del terreno (lluvia, nieve, hielo,
pendientes, etc.) al remolcar un vehículo.
Si por cualquier razón un vehículo debe ser remolcado,
haga lo siguiente:
1.
Si el remolcado se realice con una soga de remolcado o
una cadena, un operador debe dirigir el vehículo y
controlar los frenos.
2.
Acople la soga de remolcado solo al bastidor delantero
vertical de cualquier lado del vehículo.
3.
Ponga punto muerto
estacionamiento.
4.
Conduzca lentamente el vehículo que va a ser
remolcado hasta que la soga de remolcado esté
tensada.
y
quite
el
freno
de
Existe un accesorio para el parachoques delantero
(N/P 894778) para usarlo con el Truckster. Si tiene
parachoques delanteros en el vehículo, asegúrese
de seguir las instrucciones del mismo para conocer
cómo conectar correctamente la cadena o la soga
de remolcado.
Figura 6G
ES-19
6
FUNCIONAMIENTO
6.12 MANIOBRAS EN PENDIENTES ______________________________________________
1.
Si el vehículo tiende a resbalar o los neumáticos
«marcan» el césped, coloque el vehículo en una
pendiente menos empinada hasta que se vuelva a
recuperar la tracción o los neumáticos dejen de marcar
el césped.
2.
Si el vehículo sigue resbalando o marcando el césped,
la pendiente es demasiado empinada y no se puede
maniobrar la máquina con seguridad. No vuelva a
intentar escalar, descienda despacio.
3.
Cuando descienda una pendiente empinada, baje
siempre los accesorios al suelo para que el riesgo de
vuelco del vehículo sea menor.
4.
Para conseguir la máxima tracción la presión de los
neumáticos debe ser la correcta. [Ver 6.8].
5.
Tenga cuidado al cambiar de velocidad y/o dirección
en pendientes. El movimiento material dentro de la
plataforma de carga del vehículo puede provocar un
desequilibrio que podría hacer volcar el vehículo.
! ADVERTENCIA
Para evitar vuelcos, el método más seguro para trabajar
en pendientes y desniveles es conducir en sentido
vertical, nunca horizontalmente. Evite los giros
innecesarios, conduzca despacio y esté alerta de
posibles peligros y caídas. El movimiento material dentro
de la plataforma de carga del vehículo puede provocar
un desequilibrio que podría hacer volcar el vehículo.
Este es equipo pesado que podría provocar graves
heridas o la muerte a los operadores y/o peatones si se
usa de modo incorrecto.
El vehículo está diseñado para ofrecer una buena tracción y
estabilidad en condiciones normales. No obstante, hay que
cuidar al trabajar en pendientes, especialmente cuando la
arena o el césped están mojados. El terreno mojado reduce
la tracción y el control de la dirección.
6.13 MANTENIMIENTO DIARIO___________________________________________________
Importante: Para conocer más detalles acerca de las
operaciones de mantenimiento, ajustes y cuadros de
mantenimiento y lubricación, consulte el Manual de Piezas
y Mantenimiento.
1.
Aparque el tractor en una superficie llana y lisa. Ponga
el freno de estacionamiento, pare el motor y retire la
llave de contacto.
2.
Engrase y lubrique los puntos si es necesario. Lave la
máquina después de cada uso para evitar incendios.
a.
Motor de gasolina: Utilice gasolina sin plomo limpia y
nueva. Tasa mínima de octano 87.
4.
Utilice agua fría para limpiar el equipo.
NOTA: Se sabe que la utilización de agua marina o
aguas residuales acelera la oxidación y la corrosión de
las piezas metálicas, dando lugar a un deterioro o fallo
prematuro. Los desperfectos de esta naturaleza no
están cubiertos por la garantía de fábrica.
b.
No utilice sprays de alta presión.
c.
No rocíe agua directamente en el panel de mandos
ni en ningún componente eléctrico.
d.
No rocíe agua en la entrada de aire
refrigeración o en la entrada de aire del motor.
de
NOTA: Nunca lave el motor mientras esté caliente o
funcionando. Utilice aire comprimido para limpiar las
aletas del motor y el radiador.
3.
Llene el depósito de combustible al final de cada
operación diaria hasta 25 mm por debajo del cuello del
tubo de llenado.
Motor diesel: Utilice combustible diesel nº 2 limpio y
nuevo. Tasa mínima de cetano 45.
ES-20
Manipule el combustible con cuidado, es altamente
inflamable. Utilice un contenedor adecuado de modo
que la espita quepa en el cuello del tubo de llenado de
combustible. Evite la utilización de latas y embudos
para transferir el combustible.
a.
Nunca retire el tapón del depósito de combustible,
o añada combustible, con el motor en marcha o
caliente.
b.
No fume cuando manipule combustible. Nunca
llene o drene el depósito en espacios cerrados.
c.
Nunca llene en exceso o permita que el depósito se
vacíe completamente. No derrame combustible.
Limpie cualquier derrame inmediatamente.
d.
Nunca manipule o almacene contenedores con
combustible cerca de llamas o de ningún
dispositivo que pudiera lanzar chispas y hacer
prender el combustible o los vapores que éste
despide.
5.
Almacene el combustible siguiendo las ordenanzas
locales y estatales y las recomendaciones del
proveedor de combustible.
6.
Compruebe el aceite del motor al inicio de cada
jornada de trabajo y antes de encender el motor. Si el
nivel de aceite está bajo, retirar la tapa de llenado de
aceite y añadir aceite según necesidad. No llenar
demasiado.
NOTAS
7
7
NOTAS
ES-21
Calidad, Rendimiento y Asistencia de Clase Mundial
El equipo de Jacobsen está construido exactamente
conforme a las normas establecidas por el registro de la
ISO 9001 e ISO 14001 en todas nuestras plantas de fabricación.
Una red mundial de distribuidores y técnicos capacitados
en fábrica y respaldados por Textron Parts Xpress
que ofrece asistencia de producto segura y de alta calidad.
Textron Golf, Turf & Specialty Products
PO Box 7708, Charlotte, NC 28241-7708
www.ttcsp.com