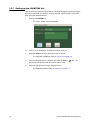
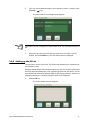
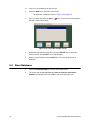
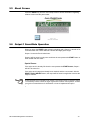
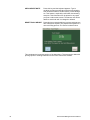
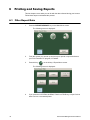
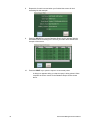
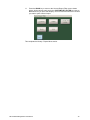
1
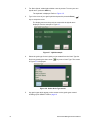
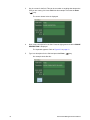
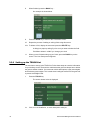
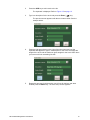
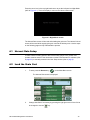
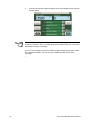
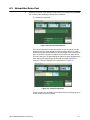
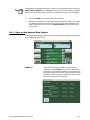
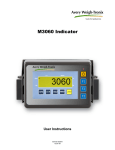
Field Foreman
Harvest Data Management
User Instructions
NORTH AMERICA
AWT 35-500619
Issue AC
February 2013
© Avery Weigh-Tronix, LLC 2013 All rights reserved.
No part of this publication may be reproduced, stored in an electronic retrieval system, or transmitted in any form
or by any means, electronic, mechanical, photocopying, recording or otherwise without the prior written consent of
the copyright owner, or as permitted by law or under license. Full acknowledgment of the source must be given.
Avery Weigh-Tronix is a registered trade mark of the Avery Weigh-Tronix, LLC. This publication was correct at the
time of going to print however, Avery Weigh-Tronix, LLC reserves the right to alter without notice the specification,
design, price or conditions of supply of any product or service at any time.
All third party brands and product names used within this document are trademarks or registered trademarks of
their respective holders.
FF_Harvest_u_en_500619.book
Table of Contents
page
Chapter 1 General information and warnings ......................................................................................... 5
About this manual .............................................................................................................. 5
Text conventions ......................................................................................................... 5
Special messages ....................................................................................................... 5
Customer Service Information ........................................................................................... 5
Chapter 2 Introduction .............................................................................................................................. 6
Installation .......................................................................................................................... 6
Chapter 3 Setup ......................................................................................................................................... 7
System Overview ............................................................................................................... 7
Field Foreman PC Import ................................................................................................... 7
System Setup Using the Model 3060 ................................................................................. 8
View the APPLICATION SETTINGS ........................................................................... 9
SmartLoad Settings ................................................................................................... 11
Setting up the GRAIN TYPE ..................................................................................... 12
Setting up the HYBRID List ....................................................................................... 13
Setting up the FIELD List .......................................................................................... 15
Setting up the TRUCK List ........................................................................................ 18
Setting up the LOCATION List .................................................................................. 20
Setting up the ID List ................................................................................................. 21
Clear Database ................................................................................................................ 22
About Screen ................................................................................................................... 23
Output 1 SmartGate Operation ........................................................................................ 23
Chapter 4 Harvest Process ..................................................................................................................... 24
Harvest Data Setup .......................................................................................................... 25
Load the Grain Cart ......................................................................................................... 25
Unload the Grain Cart ...................................................................................................... 27
Keys on the Harvest Data Screen ............................................................................. 29
Chapter 5 Exporting Field Foreman PC Data ........................................................................................ 31
Chapter 6 Printing and Saving Reports ................................................................................................. 32
Filter Report Data ............................................................................................................. 32
Harvest Data Management User Manual
3
4
Harvest Data Management User Manual
1
General information and warnings
1.1
About this manual
This manual is divided into chapters by the chapter number and the large text at the top
of a page. Subsections are labeled as shown by the 1 and 1.1 headings shown above.
The names of the chapter and the next subsection level appear at the top of alternating
pages of the manual to remind you of where you are in the manual. The manual name
and page numbers appear at the bottom of the pages.
1.1.1 Text conventions
Key names are shown in bold and reflect the case of the key being described. This
applies to hard keys and onscreen or soft keys.
Displayed messages appear in bold italic type and reflect the case of the displayed
message.
Screen labels and labels within screens appear in italic type and reflect the case of the
displayed label.
1.1.2 Special messages
Here is an example of a NOTE message you will see in this manual.
NOTE: This is a Note symbol. Notes give additional and important information, hints
and tips that help you to use your product.
1.2
Customer Service Information
24 hours a day 7 days a week Customer Support
Avery Weigh-Tronix is dedicated to customer service. We understand downtime is not
an option for AG producers and we're ready to help anytime. The technical support
team for all Avery Weigh-Tronix agri-business scales is available 24 hours a day 7 days
a week.
Ag Technical Support Group
USA and Canada Toll free Phone: (800) 458 - 7062
Outside USA: (507) 238-8261
Tech Support Phone 7:00 am to 5:00 pm CST (800) 458-7062 Ext. 8261
Tech Support Phone/ after hours answering 5:00 pm to 7:00 am CST (800) 458-7062
Service e-mail: [email protected]
Harvest Data Management User Manual
5
2
Introduction
This manual covers the installation and use of the Field Foreman Harvest Data
Management software. The Harvest Data software installs on the Model 3060 indicator
as part of the Field Foreman management package. For the Harvest Data program the
indicator is usually attached to a grain cart equipped with Avery Weigh-Tronix loadcells.
The software allows you to track all the weight based data for different grain types,
hybrids, fields, truck loading, storage locations and operators.
For complete mangagement of your crops you can use this with the Avery WeighTronix Field Foreman PC software package which installs on your PC.
2.1
Installation
If the Model 3060 was ordered with Field Foreman there is no need to install the
software. Refer to Figure 2.1 for an illustration of the Main Menu screen. If you are
adding Field Foreman to a Model 3060 follow the steps below.
1.
Remove the two screws holding on the memory slot cover on the right side of
the Model 3060.
2.
Insert the pre-programmed SD card into the slot.
3.
The software will automatically load. Follow any onscreen prompts.
4.
When complete, the Main Menu screen shown in Figure 2.1 will appear when
you power up the Model 3060.
This screen gives you access to the Seed Management, Application
Management and Harvest Data Management programs, if they are all
installed.
Seed
Management
Application
Management
Harvest
Management
Figure 2.1 Main Menu screen
Any time you want to see the weight on the grain cart, press the SCALE MODE key
when viewing the Main Menu screen. The weight display will appear. Press the BACK
key to exit the scale mode.
5.
6
Reinstall the memory slot cover.
Harvest Data Management User Manual
3
Setup
3.1
System Overview
Below is a brief overview of the Field Foreman application. The steps you need to
perform are:
l
Enter information about your operation.
This can be done using the indicator in the User Setup screen but IT IS
RECOMMENDED THAT THE FIELD FOREMAN PC SOFTWARE IS USED TO
IMPORT ALL THE SETUP INFORMATION FROM YOUR PC.
l
Start the Harvest Data application by pressing the Harvest Data icon.
l
Begin weighing grain loaded from your harvester or grain storage.
l
Create and print any reports you want from the collected data.
Complete instructions for these steps are in the following sections.
3.2
Field Foreman PC Import
1.
Insert a USB thumb drive into the USB port of the Model 3060. The thumb drive
must contain the information exported from the Field Foreman PC software.
Refer to the Field Foreman PC User Manual (part # AWT35-500630) for
exporting setup data to the USB thumb drive.
1a.
If the volume is on and the USB inserted properly you will here a beep.
2.
Press the IMPORT SETUP key from the User Setup screen to import the setup
information from a USB thumb drive connected to your Model 3060.
3.
The screen will ask you to OK the import because all the setup information
in your Model 3060 will be overwritten by this process. Press Yes to
proceed and the setup files are imported.
A message will appear to let you know if a thumb drive is not attached or if there is no
setup file on the thumb drive.
Information from Field Foreman in the 3060 must be imported to the Field Foreman
PC package before downloading new information to the 3060 from Field Foreman
PC.
Harvest Data Management User Manual
7
3.3
System Setup Using the Model 3060
This includes user settings and manually setting harvesting data.
1.
To setup your system, press the USER SETUP/IMPORT key on the Main Menu
screen. The User Setup screen shown in Figure 3.1 is displayed..
Figure 3.1 User Setup screen
2.
Press the MORE key to view page 2 of the User Setup menu.
Figure 3.2 User Setup screen (page 2)
8
Harvest Data Management User Manual
3.3.1 View the APPLICATION SETTINGS
1.
From the User Setup (Page 2) screen, press the APPLICATION SETTINGS
key…
The following screen appears:
Truck Reset Fill Percentage
This enables setting the percentage full threshold for resetting truck weight.
1.
l
If the checkbox is checked, conditional resetting is enabled. When a new
truck is selected the previous truck weight will only be "reset" to tare weight if
the preset % of gross weight is reached or surpassed.
l
If the box is unchecked, conditional % resetting is disabled, i.e., when a new
truck is selected, the previous truck weight will “reset” to tare weight.
The default setting is 95 percent. To change the percentage value, press the
light green box containing the number.
The keyboard is displayed. Refer to Figure 3.5 on page 12.
2.
Key in the desired percentage value and press the Enter (
) key. The
Application Settings screen will be displayed and the change made to the
percentage should be displayed in the light green box.
3.
Press the BACK key and you will be prompted to save this change to the
setup. Press Yes to agree or No to cancel and not save the change.
A screen showing Changes have been saved appears.
Harvest Data Management User Manual
9
4.
Click the OK key. The User Setup screen appears.
Auto Night Mode
The Auto Night Mode (or sleep mode) is a setting to darken the backlight display after
being inactive for a specified period of time.
1.
l
If the checkbox is checked, auto night mode is enabled.
l
If the box is unchecked, auto night mode is disabled and the screen will not
timeout.
The default setting is 60 seconds. To change the timeout, press the light green
box between timeout and sec to set a new timeout value.
The keyboard is displayed. Refer to Figure 3.5 on page 12.
2.
Key in the number of seconds desired and press the Enter (
) key. The
Application Settings screen will be displayed and the change made to the
seconds should be displayed in the light green box.
3.
Press the BACK key and you will be prompted to save this change to the
setup. Press Yes to agree or No to cancel and not save the change.
A screen showing Changes have been saved appears.
4.
Click the OK key. The User Setup screen appears.
Print Setting
1.
The default setting is for a print function to occur every time the SAVE key is
pressed. To disable this function, tap the checkmark in the box to remove it.
2.
Press the BACK key and you will be prompted to save this change to the
setup. Press Yes to agree or No to cancel and not save the change.
A screen showing Changes have been saved appears.
3.
10
Click the OK key. The User Setup screen appears.
Harvest Data Management User Manual
3.3.2 SmartLoad Settings
The default settings for Auto Start are 800 lbs and 5 seconds This means once the cart
unloads 800 lbs or more in 5 seconds or less it will start recording the weight including
the 800 pounds that has just been unloaded. Depending on your cart type you might
have to adjust either number up or down some
The default settings for Auto Save are 100 pounds and 3 seconds. Once it senses that
the cart is not dropping more than 100 lbs in 3 seconds it saves the information
Use this to set the auto start and auto save values while unloading.
1.
l
If the checkbox is checked, SmartLoad is enabled.
l
If the box is unchecked, SmartLoad is disabled.
Press the light green box to set a new weight or time. .
Figure 3.3 SmartLoad Settings screen
The keyboard is displayed. Refer to Figure 3.5 on page 12
2.
Key in the desired weight or seconds and press the Enter (
3.
Press the BACK key and you will be prompted to save this change to the
setup. Press Yes to agree or No to cancel and not save the change.
) key.
A screen showing Changes have been saved appears.
4.
Click the OK key. The User Setup screen appears.
Harvest Data Management User Manual
11
3.3.3 Setting up the GRAIN TYPE
Use this to group grains into types. For example, you could create groups like Corn,
Soybeans, Oats, etc. Or, you could make groups like BT Corn, non-GMO Grain, etc.
The test weight for each grain type can only be entered within the Field Foreman PC
software. The test weight per bushel used in calculating bushels per acre and total
bushels can only be entered in via the PC package. Unless test weight is added in the
PC package bushels will not show up in the Field Foreman PC reports.
1.
Press the GRAIN TYPE key on the User Setup screen. The screen in Figure
3.4 is displayed.
2.
In this screen you can delete a grain type, add one or edit an existing grain
type. If this is your initial setup,no grain types exist yet, press the ADD key.
Figure 3.4 Grain Types screen
The keyboard screen, shown in Figure 3.5, is displayed.
Figure 3.5 Keyboard screen
3.
Touch the keyboard to type in your grain type (corn, oats, beans, etc.).
4.
Press the Enter (
) key to accept the displayed grain type. The Grain
Types screen, shown in Figure 3.4, is displayed with the new grain type listed.
12
Harvest Data Management User Manual
5.
Repeat steps through 4 to add all your grain types to the list.
6.
Press the BACK key to exit the Grain Types setup. The User Setup screen is
displayed.
In this manual the keys are explained in a certain order but you can add your
information in any order you want. With one exception you can not create a corn
Hybrid until corn has been added as a grain type.
As information is entered it is instantly saved to the database. There is no ‘Save’
function.
3.3.4 Setting up the HYBRID List
Use this to specify hybrids or grain varieties. Most likely these will be the seed names
as they come from your seed supplier. If you are a custom harvester and do not have
access to the Hybrid type, enter in default Hybrids that are the same as the grain types
(i.e. enter yellow corn for hybrid for grain that is yellow corn).
1.
Press the HYBRID key on the User Setup screen…
The screen in Figure 3.6 is displayed.
Figure 3.6 Grain Hybrid Setup Menu screen
Harvest Data Management User Manual
13
2.
For Grain Hybrid, a blank place holder name is present. To enter your own
hybrid name, press the ADD key.
The keyboard is displayed. Refer to Figure 3.5.
3.
Type in the name of your grain hybrid and press the press the Enter (
)
key to accept the name.
The display returns to the previous screen with the hybrid name
displayed. See the example in Figure 3.7.
Figure 3.7 Hybrid example
4.
Select the grain type for the hybrid you just created from the Grain Type list.
Do this by pressing the down arrow
in Figure 3.8 is displayed.
key next to Grain Type. The screen
Figure 3.8 Select Grain Type screen
5.
14
Any grain types which appear on the screen are the grain types created
inSetting up the GRAIN TYPE on page 12.
Harvest Data Management User Manual
6.
Touch the grain type you want and press the SELECT key.
The screen shown below is displayed with the type you selected next to
Grain Type. In this example we’ve selected Corn.
7.
Repeat steps 2 through 6 to add all your grain hybrids. When you are finished,
press the BACK key. The User Setup screen is displayed.
3.3.5 Setting up the FIELD List
Use this to create a list of your field names and descriptions. You will also tie in the
associated hybrids and acreages.
1.
Press the FIELD key on the User Setup screen.
The screen in Figure 3.9 is displayed.
Figure 3.9 Field Editor screen
2.
If this is a new installation there are no fields entered and BLANK FIELD is
displayed. You must add fields before you can pick one from the Field Name
line. To do this, press the ADD key.
The keyboard is displayed. Refer to Figure 3.5 on page 12.
Harvest Data Management User Manual
15
3.
Key in a name for the field. This can be a number or anything that denotes the
field you are naming. We’ll use Field 1 in this example. Press the the Enter
(
) key.
The screen shown below is displayed:
4.
Next, enter a description for the field. Press the light green area where BLANK
DESCRIPTION is displayed.
The keyboard appears. Refer to Figure 3.5 on page 12.
5.
Type in a description for the field and press the Enter (
) key.
Our example looks like this:
16
Harvest Data Management User Manual
6.
Next, enter the grain hybrid type and the acres planted to this hybrid. To do this
press the light green area to the right of Grain Hybrid, Grain Type and Acres
A list of hybrids and associated grains, created earlier, appears as
shown below:
7.
Touch a hybrid name to select it (a checkmark appears next to the name).
Press the EDIT ACRES key and type in the number of acres planted to this
variety. Press the ENTER key to accept this and the screen returns to one like
our example below.
NOTE: If you make a mistake press the RESET button to go back to the previous
saved acreage and hybrids for the field.
The arrow to the right of the lower box means there are more hybrids in this field than
just the one displayed. Touch this arrow to scroll through any other hybrids listed. The
arrow will change to an up arrow when you are at the bottom of the list.
Harvest Data Management User Manual
17
8.
When finished, press the BACK key…
Our example is shown below.
9.
Press the BACK key to return to the Field Editor screen.
10.
Repeat the process of adding or editing fields using this screen.
10a. To delete a field, display the name and press the DELETE key.
A dialog box pops up asking if you’re sure you want to delete the field.
Pick Yes to delete it or No if you change your mind.
11.
When you are finished setting up your fields, press the BACK key on the
screen. The User Setup screen appears.
3.3.6 Setting up the TRUCK List
The next item to set up is the TRUCK list. Follow these steps to enter the information
for your delivery trucks. These are the vehicles that the grain cart dumps into to deliver
the grain to another location. You must enter vehicle descriptions, empty tare weights,
and maximum gross weights. This is used when loading the trucks from the grain cart
to prevent overweight loads.
1.
Press the TRUCK key.
The screen shown below is displayed.
1a.
18
If this is a new installation, no truck description exists yet.
Harvest Data Management User Manual
2.
Press the ADD key to add a truck to the list.
The keyboard is displayed. Refer to Figure 3.5 on page 12.
3.
Type in a description for the truck and press the Enter (
) key.
The previous screen appears with the truck name visible. See the
example below.
4.
Press the light green boxes to the right of the other items and use the
keyboard that appears to type in a description for the truck, the empty tare
weight of the truck and the maximum gross weight for the truck. When done
your screen will look something like this:
5.
Repeat this process for all the trucks you will use for delivery and when
finished press the BACK key. The User Setup screen appears.
Harvest Data Management User Manual
19
3.3.7 Setting up the LOCATION List
The next item to set up is the LOCATION list. Follow these steps to enter the places the
grain will be delivered. The location can be a grain bin, a grain elevator or any other
place your grain will be delivered.
1.
Press the LOCATION key.
The screen shown below is displayed.
1a.
If this is a new installation, no delivery locations exist yet.
2.
Press the ADD key to add a delivery location to the list.
The keyboard is displayed. Refer to Figure 3.5 on page 12.
3.
Type in a description for the location and press the Enter (
) key. The
previous screen appears with the location name visible.
4.
Press the light green box next to Extended Desc.
The keyboard appears. Refer to Figure 3.5 on page 12.
20
Harvest Data Management User Manual
5.
Type in a more detailed description of the delivery location, if needed. Press
the Enter (
) key.
A screen similar to our example below appears.
Only Delivery Locale is displayed in Harvest Data mode. The extended description is
not.
6.
Repeat this procedure for each delivery location you use. When you are
finished, press the BACK key. The User Setup screen is displayed.
3.3.8 Setting up the ID List
The next item to set up is the ID list. The ID field was designed to be customized for
your operation needs.
Examples include entering all individual combines so you can compare performance
each day and make adjustments if one is performing worse than the others. You can
also use this field to document different tillage or agronomy practices for a test plot i.e.
fungicide treatment etc. Follow these steps to enter the ID categories.
1.
Press the ID key.
The screen shown below is displayed.
Harvest Data Management User Manual
21
1a.
If this is a new installation no IDs exist yet.
2.
Press the ADD key to add entry to the ID list.
The keyboard is displayed. Refer to Figure 3.5 on page 12.
3.
Type in a name and press the Enter (
) key. The previous screen appears
with the entered name visible.
Figure 3.10 List of IDs example screen
3.4
22
4.
Repeat this procedure for each entry. Use the DELETE key to delete any
name in the list. Use the EDIT key to edit the name.
5.
When you are finished, press the BACK key. The User Setup screen is
displayed.
Clear Database
1.
Press the CLEAR DATASE key from the User Setup screen.
2.
The screen will ask Are you sure you want to delete the transaction
database. Press Yes to proceed or No to exit the deleting process.
Harvest Data Management User Manual
3.5
About Screen
Press the ABOUT key from the User Setup screen to access information regarding
software version and the part number.
3.6
Output 1 SmartGate Operation
When you press the START button to begin unloading grain, Output 1 is turned on for
5 seconds when the TRUCK WEIGHT reaches the target gross weight.
Output 1 is turned off at all other times.
Output 1 will be turned on only once each time the user presses the START button or
when SmartLoad auto starts.
Special Cases:
If the active truck is already full when the user presses the START button, Output 1
will NOT be turned on.
If the active truck’s target has already been reached, and the user resets it with the
RESET TRUCK WEIGHT button, the output will be turned on again the next time the
target is reached.
A special power cord is needed to use Output 1 to activate a relay or solenoid. Output
1 is commonly used to control an auger or gate that is electric over hydraulic. Contact
your grain cart manufacturer for information on how to implement this option.
Harvest Data Management User Manual
23
4
Harvest Process
Once the setup process is complete you are ready to begin the harvest process and
record grain weights by field, hybrid, storage location, etc.
To access the Harvest Data screen, press the
screen.
(Harvest icon) on the Main Menu
In the harvest process you will mainly use two screens, the Harvest Data screen and
the Harvest Unload screen. These are shown in Figure 4.1 and Figure 4.2.
The SmartLoad indicator will be lit when the auto start and auto save functions are
enabled.
Figure 4.1 Harvest Data Screen
Figure 4.2 Harvest Unload Screen
24
Harvest Data Management User Manual
Press the moon icon in the top right-hand corner to put the indicator into Night Mode
(refer to Figure 4.1). Touch the display to return to the Harvest Data screen.
Figure 4.3 Night Mode screen
The Harvest Data screen will be used while loading the grain cart. The Harvest Unload
screen will be used while emptying the grain cart into the delivery truck. Use the steps
on the following pages to fully understand the process.
4.1
Harvest Data Setup
In order to start recording harvest, data such as field, hybrid, truck, location and
operator must be entered. This can be done via the Field Foreman PC software (refer
to page 22) or manually entered in the User Setup screen (refer to page 8).
4.2
Load the Grain Cart
1.
To start, press the Harvest key,
, on the Main Menu screen.
The Harvest Data screen is displayed.
2.
Change data fields if necessary by pressing the light green area of the field to
be changed or use the
Harvest Data Management User Manual
key.
25
3.
Load the cart and the weight will appear in the Cart Weight window. See the
example below.
The screen shown above is the one you use while loading the grain cart from the
combine or harvester. There is no data being saved during this process. The screen
will show the live grain cart weight.
You can use the weight recorded to compare the grain weight with the grain monitor
in the harvestor/combine. This can help you calibrate the yield monitor more
accurately.
26
Harvest Data Management User Manual
4.3
Unload the Grain Cart
4.
When the cart is full, move the cart to the delivery truck and press the START
key or simply start unloading if SmartLoad is activated.
The following is displayed:
Figure 4.4 Harvest Unload Screen
This screen shows the current cart weight. As you unload the cart the
display shows how much weight has been moved to the truck. It also
shows a bar graph representation for the tare weight of the truck and the
grain on the truck. As grain is added to the truck the bar graph will let
you know when you are approaching the maximum gross weight for this
truck. Max gross weight target will activate the output mentioned in
section 3.6. See the example of the progression in Figure 4.5.
Figure 4.5 Unload Progression
As you can see, the cart weight goes down and the truck weight goes up
as the unload process continues.
Harvest Data Management User Manual
27
5.
Press the SAVE key when you are finished unloading the cart onto the delivery
truck. If SmartLoad is active you do not need to press the Save key
The following screen appears...
5a.
If the CHANGE key is pressed, changes can be made to the truck name,
location, ID, Note and grain moisture percentage.
5b.
If the OK key is not pressed within 10 seconds, the unload data will be saved
automatically. The screen then returns to the HARVEST DATA screen and you
are ready for the next cart full of grain.
If the delivery truck is not full, another grain cart load can be added to it. The display
will show the previous weight as a yellow portion of the bar graph and the new grain
being added will show up as a blue section section of the bar graph.
28
Harvest Data Management User Manual
All the delivery truck weight information is saved as one transaction until you press the
RESET TRUCK WEIGHT key or change the truck you are loading. When you change
the truck you are loading, the previous truck’s weight will be reset to its tare weight.
6.
Press the BACK key to return to the previous screen.
7.
Repeat these steps as you load and unload the grain cart. When you change
to a different field, hybrid, delivery truck, or any of the other paramaters you
want recorded, be sure to press the CHANGE DATA key and update to the
current data.
4.3.1 Keys on the Harvest Data Screen
On the Harvest Data screen there are three keys which perform different tasks. Below
is an explanation of those keys.
SUMMARY
Harvest Data Management User Manual
Press this key to view a summary of what has been
unloaded. Press the BACK key to return to the Harvest
Data screen. The Summary defaults to the Field thus the
total for the Hybrid is how much came form that field and
the total for the truck is how much has been hauled out of
that field including any other hybrids.
29
ADD HARVEST NOTE
Press this key and the keyboard appears. Type in
anything you want recorded about this harvest situation,
such as field conditions, weather history, insect damage,
etc. This feature is especially useful when documenting
test plots. This information can be printed in any report
you print out about the harvest. The harvest note will be
added to each load until it is changed or deleted.
RESET TRUCK WEIGHT
Press this key to reset the delivery truck net weight to zero
after it has been emptied. This prepares the system for a
new truck filling process. The screen is shown below:
This completes the harvesting portion of the instructions. The next section deals with
printing reports or sending information to the Field Foreman PC software.
30
Harvest Data Management User Manual
5
Exporting Field Foreman PC Data
If you have the Field Foreman PC software package loaded on your computer, you can
transfer all scale data from the Model 3060 to the PC via a USB thumb drive. Follow
these few steps to export this data.
1.
From the History / Report Menu screen, press the EXPORT TRANSACTIONS
key.
This dialog box appears:
2.
Press the Yes key to export the file to a thumb drive attached to the USB port
of the Model 3060. Press the No key to abort this process.
If exporting is successful you will see the screen shown below:
3.
Press OK key to return to the History/Report Menu screen.
Harvest Data Management User Manual
31
6
Printing and Saving Reports
This last chapter covers what you can do with the data collected during your harvest.
Follow these steps to understand the process.
6.1
Filter Report Data
1.
Press the REPORTS/EXPORT key on the Main Menu screen.
The following screen is displayed:
2.
From this screen you can set up and print your reports or export the data to
your Field Foreman PC program, if installed.
3.
Press this key,
, on the History / Report Menu screen.
The following screen is displayed:
4.
32
If you press the LOCATION, HYBRID, TRUCK or FIELD key, a report for that
data is sent to a connected printer.
Harvest Data Management User Manual
5.
To create a custom report, press the CUSTOM DATA FILTER key.
The following screen is displayed:
6.
Use these selectable fields to turn on or off any of the data categories you
setup in the chapter Setup on page 7. Select the light green area to the right of
Field Name.
The following screen is displayed.
7.
Touch the box next to a field name to include that field’s data in a report. You
can select multiple items in the list. In our example we’ll pick East Place and
N. Half Section. Press the SELECT key and the Harvest Report Filter screen
appears but now the fields we selected appear next to Field Name, as shown
below.
Harvest Data Management User Manual
33
8.
Repeat this for each item and when your finished the screen will look
something like this example:
9.
Press the SELECT key and the Database Report screen appears with the
information filtered according to the choices you made above. Below is an
example of the screen:
10.
Press the PRINT key to print the report to a connected printer.
A dialog box appears telling you that the report is being printed. When
complete the screen returns to the Database Report screen shown
above.
34
Harvest Data Management User Manual
11.
Press the BACK key to return to the Harvest Report Filter screen shown
below. All the choices made under the CUSTOM DATA FILTER key reset to
ALL whenever you leave that display. You must reset the filters the next time
you want to print a filtered report.
This completes the History / Report Menu section.
Harvest Data Management User Manual
35
36
Harvest Data Management User Manual
Avery Weigh-Tronix USA
1000 Armstrong Dr.
Fairmont MN 56031 USA
Tel:507-238-4461
Fax:507-238-4195
Email: [email protected]
www.agscales.com
To access manuals on
the Ag website
Avery Weigh-Tronix UK
Foundry Lane,
Smethwick, West Midlands,
England B66 2LP
Tel:+44 (0) 8453 66 77 88
Fax: +44 (0)121 224 8183
Email: [email protected]
www.averyweigh-tronix.com