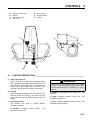
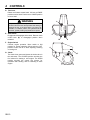
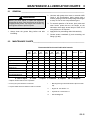
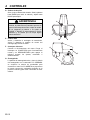
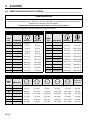
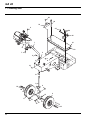
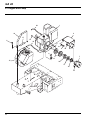
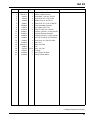
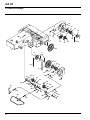
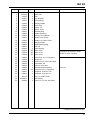
1
4132280-ES
Technical Manual
Manual Técnico
GA 24
Modelo 544907
To Order Parts
1. Write your full name and complete address on the
order.
5. Send or bring the order to an authorized Textron Turf
Care And Specialty Products Dealer.
2. Explain where and how to make shipment.
6. Inspect all shipments on receipt. If any parts are damaged or missing, file a claim with the carrier before
accepting.
3. Give product number, name and serial number that is
stamped on the name plate or serial plate of your product.
4. Order by the quantity desired, the part number, paint
code, and description of the part as given in the parts
list.
7. Do not return material without a letter of explanation,
listing the parts being returned. Transportation charges
must be prepaid.
Use of other than authorized parts will void the warranty.
Table of Contents
1
1.1
1.2
2
2.1
2.2
2.3
2.4
2.5
2.6
3
3.1
3.2
4
4.1
5
5.1
5.2
5.3
5.4
5.5
5.6
5.7
5.8
5.9
Safety
Operating Safety ................................................. 4
Important Safety Notes .......................................5
Specifications
Product Identification .......................................... 6
Engine .................................................................6
Aerator ................................................................6
Tractor ................................................................7
Weights and Dimensions ....................................7
Accessories & Support Literature .......................7
Decals and Icons
Decals................................................................. 8
Icons ...................................................................8
Controls
Control Descriptions ...........................................9
Operation
Daily InspectioN................................................ 11
Operator Presence Control (OPC) ....................11
Operating Procedures .......................................12
Starting .............................................................12
Stopping / Parking ............................................13
To Drive / Transport ..........................................13
Hillside Operation .............................................13
Aerating ............................................................14
Trailering ...........................................................14
6
6.1
6.2
6.3
6.4
6.5
6.6
6.7
6.8
7
7.1
7.2
7.3
7.4
7.5
7.6
7.7
7.8
7.9
7.10
7.11
7.12
8
8.1
9
9.1
9.2
10
11
11.1
Adjustments
General ............................................................ 15
Turf Guard ........................................................ 15
Aerator Drive Idler Cable .................................. 15
Traction Drive Idler Cable ................................ 16
Aerator Timing .................................................. 16
Shift Control Cable ........................................... 17
Lift Cable .......................................................... 17
Torque Specification ........................................ 18
Maintenance
General ............................................................ 19
Engine .............................................................. 19
Engine Oil ......................................................... 20
Engine Air Filter ................................................ 20
Fuel .................................................................. 20
Hydraulic Hoses ............................................... 21
Hydraulic Oil ..................................................... 21
Muffler and Exhaust ......................................... 22
Tires ................................................................. 22
Wheel Mounting Procedure .............................. 22
Care and Cleaning ........................................... 22
Storage ............................................................. 23
Troubleshooting
General ............................................................ 24
Maintenance & Lubrication Charts
General ............................................................ 25
Maintenance Charts ......................................... 25
Notes
Parts Catalog
Table Of Contents ............................................ 27
Proposition 65 Warning
Engine exhaust from this product
contains chemicals known to the State
of California to cause cancer, birth
defects, and other reproductive harm
Copyright 2003 Textron Inc. “All rights reserved, including the
right to reproduce this material or portions thereof in any form.”
Litho in U.S.A. 3-2004
Suggested Stocking Guide
To Keep your Equipment fully operational and productive, maintain a stock of the more commonly used maintenance
items. We have included part numbers for additional support materials and training aids. A more complete listing of
accessories and attachments can be found in the Specifications Section
Service Parts
Qty. Part No.
Description
Qty. Part No.
Description
4132280 Technical Manual
Paint Codes
A paint code suffix is required when ordering painted
parts. The available paint codes for each part are listed
in the Parts Catalog using the following format:
[Part Number].[Paint Code]
For example:
123456.7 represents part 123456 painted Gloss Black.
If more than one paint code is listed, choose the paint
code that matches your machine.
Parts listed in the Parts Catalog without a paint code
suffix do not need the suffix added to order parts.
The following is a list of Jacobsen Paint Code Suffixes
.6
.7
.8
.9
.10
.11
Jacobsen Orange
Gloss Black
High Heat Flat Black
Flat Black
Jacobsen White
Jacobsen Non Skid Gray
How To Use This Manual
Abbreviations
N/S - Not serviced seperately, can only be obtained by ordering main component or kit.
AR -Variable quantity or measurement is required to obtain correct adjustment.
Symbols such as ▲, next to the item number, indicate that a note exists which contain additional information
important in ordering that part.
Indented Items
Bulleted items indicate component parts that are included as part of an assembly or another component. These parts
can be ordered separetely or as part of the main component.
Item
▲
Part No.
1
2
3
4
5
123456
789012
345678
N/S
901234.6
Qty
1
1
1
1
1
Description
Mount, Valve
Valve, Lift
• Handle
• Seal Kit
Screw, 1/4-20 x 2” Hex Head
Serial Numbers/Notes
Indicates a piece part
Includes Items 2 and 3
Serviced part included with Item 2
Non serviced part included with Item 2
Indicates a part painted Jacobsen Orange
GB-3
1
SAFETY
1
SAFETY
1.1
OPERATING SAFETY ______________________________________________________
! WARNING
EQUIPMENT OPERATED IMPROPERLY OR BY UNTRAINED PERSONNEL CAN BE DANGEROUS.
Familiarize yourself with the location and proper use of all controls. Inexperienced operator’s should receive
instruction from someone familiar with the equipment before being allowed to operate the machine.
1. Safety is dependent upon the awareness, concern
and prudence of those who operate or service the
equipment. Never allow minors to operate any
equipment.
2. It is your responsibility to read this manual and all
publications associated with this equipment (Engine
Manual, accessories and attachments). If the
operator can not read English it is the owner’s
responsibility to explain the material contained in
this manual to them.
3. Learn the proper use of the machine, the location
and purpose of all the controls and gauges before
you operate the equipment. Working with unfamiliar
equipment can lead to accidents.
4. Never allow anyone to operate or service the
machine or its attachments without proper training
and instructions; or while under the influence of
alcohol or drugs.
5. Wear all the necessary protective clothing and
personal safety devices to protect your head, eyes,
ears hands and feet. Operate the machine only in
daylight or in good artificial light.
6. Inspect the area where the equipment will be used.
Pick up all the debris you can find before operating.
Beware of overhead obstructions (low tree limbs,
electrical wires, etc.) and also underground
obstacles (sprinklers, pipes, tree roots, etc.) Enter a
new area cautiously. Do not enter narrow openings
that may force operator too close to unit. Stay alert
for hidden hazards.
and is responsible for injuries inflicted to
themselves, to bystanders and damage to property.
8. Never operate equipment that is not in perfect
working order or is without decals, guards, shields,
discharge deflectors or other protective devices
securely fastened in place.
9. Carbon monoxide in the exhaust fumes can be fatal
when inhaled. Never operate the engine without
proper ventilation.
10. Fuel is highly flammable, handle with care.
11. Keep the engine clean. Allow the engine to cool
before storing and always remove the ignition key.
12. Disengage all drives and engage parking brake
before starting the engine (motor).
13. Equipment must comply with the latest federal,
state, and local requirements when driven or
transported on public roads.
14. Never use your hands to search for oil leaks.
Hydraulic fluid under pressure can penetrate the
skin and cause serious injury.
15. Operate the machine up and down the face of the
slopes (vertically), not across the face (horizontally).
16. To prevent tipping or loss of control, do not start or
stop suddenly; reduce speed when making sharp
turns. Use caution when changing direction on
slopes.
7. Never direct discharge of material toward
bystanders, nor allow anyone near the machine
while in operation. The owner/operator can prevent
This machine is to be operated and maintained as specified in this manual and is intended for the professional
maintenance of specialized turf grasses. It is not intended for use on rough terrain or long grasses.
GB-4
SAFETY
1.2
1
IMPORTANT SAFETY NOTES ________________________________________________
!
This safety alert symbol is used to alert you to potential hazards.
DANGER - Indicates an imminently hazardous situation which, if not avoided, WILL result in death or serious injury.
WARNING - Indicates a potentially hazardous situation which, if not avoided, COULD result in death or serious
injury.
CAUTION - Indicates a potentially hazardous situation which, if not avoided, MAY result in minor or moderate injury
and property damage. It may also be used to alert against unsafe practices.
For pictoral clarity, some illustrations in this manual may show shields, guards or plates open or removed. Under no
circumstances should this equipment be operated without these devices securely fastened in place
! WARNING
The Operator Presence Control (OPC) on this machine will shut off the
aerator and traction drive if the operator releases the OPC handle.
To protect the operator and others from injury, never operate equipment with
the OPC system disconnected or malfunctioning.
! WARNING
1. Before leaving the operator’s position for any reason:
a.
b.
c.
d.
Release OPC handle.
Lower aerator head to the ground.
Stop engine
Disconnect spark plug wire.
2. Keep hands, feet, and clothing away from moving parts. Wait for all
movement to stop before you clean, adjust or service the machine.
3. Keep the area of operation clear of all bystanders and pets.
4. Never carry passengers.
5. Never operate mowing equipment without the discharge deflector
securely fastened in place.
By following all instructions in this manual, you will prolong the life of your machine and maintain its maximum
efficiency. Adjustments and maintenance should always be performed by a qualified technician.
If additional information or service is needed, contact your Authorized Jacobsen Dealer who is kept informed of the
latest methods to service this equipment and can provide prompt and efficient service. Use of other than original or
authorized Jacobsen parts and Accessories will void the warranty.
GB-5
2
2
2.1
SPECIFICATIONS
SPECIFICATIONS
PRODUCT IDENTIFICATION_________________________________________________
544907 ............................ GA 24 Aerator with OPC, 8 hp
gasoline engine.
Serial Number ................ An identification plate, like the one
shown, listing the serial number, is
attached to the right side frame,
near the engine.
Always provide the serial number of the unit when ordering
replacement parts or requesting service information.
®
A Textron Company
CHARLOTTE, NC
544907
2.2
Capacity.................... 2.5 U.S. Gal. (9.5 liters)
Governor......................... Flyweight Mechanical
Lubrication:
Capacity.................... 1 quart (0.95 liters)
Type.......................... SAE 30W
API Classification ..... SG, SH, SJ
Air Filter .......................... Replaceable Dual Element.
Cooling System .............. Air Cooled
AERATOR________________________________________________________________
Spacing ........................... 2 in. (51 mm) on center
Depth of Penetration ....... 3 in. (76 mm) maximum
Standard Tines
Type .......................... Hollow, Tapered
Material ..................... Case Hardened Steel
Quantity .................... Two sets 1/2 in. (13 mm)
diameter
Tine Options
Solid .......................... 1/4 in. (6 mm) Quad Tines
Hollow ....................... 1/4 in. (6 mm), 3/8 in. (9 mm), 5/8
in. (16 mm)
Swath Width.................... 24 in. (609 mm)
GB-6
1601
ENGINE__________________________________________________________________
Make ............................... Briggs & Stratton
Model .............................. Intek Pro OHV
Horsepower .................... 8 hp (6.0 kW) @3600 rpm
Displacement .................. 18.64 cu. In. (305.4 cc)
Bore x Stroke .................. 2.94 x 2.75 in (74.61 x 69.85 mm)
Fuel:
Type .......................... Unleaded Gasoline
Rating ....................... Min. 85 Octane
2.3
MADE IN U.S.A.
SPECIFICATIONS
2.4
2
TRACTOR ________________________________________________________________
Tires
Front.......................... 11 x 4.00 - 5 2 Ply
Rear .......................... 16 x 6.50 - 6 4 Ply
Pressure:................... 14 psi (97 kPa)
Speed:
H (Transport) ........... 0 - 4.0 mph (6.4 kph)
L (Aerate).................. 0 - 0.9 mph (1.4 kph)
R (Reverse) .............. 0 - 1.8 mph (2.9 kph)
Hydraulic System:
Capacity.................... 2 U.S. gal. (7.57 liters)
Fluid Type ................. GreensCare 68
Aerator Head Lift....... Hydraulic Double Acting Cylinders
2.5
WEIGHTS AND DIMENSIONS ________________________________________________
Dimensions:
Inches
(mm)
Length ............................................................. 72 (1676)
Width ............................................................ 49.5 (1257)
Height.............................................................. 48 (1219)
2.6
Weights:
Lbs.
Working Weight Less Fuel ............................ 850
(kg)
(386)
ACCESSORIES & SUPPORT LITERATURE _____________________________________
Contact your area Jacobsen Dealer for a complete listing of accessories and attachments.
! CAUTION
Use of other than Jacobsen authorized parts and accessories may cause personal injury or damage to the
equipment and will void the warranty
Accessories
Air Blow Gun ...........................................................JAC5098
Orange Touch-up Paint (12 oz. spray) ...................... 554598
Coring Quad Tine Accessory ...................................4116987
Solid Quad Tine Accessory......................................4116986
Tines (12 Required)
1/4 in. (6 mm) Coring ................................................ 517486
1/4 in. (6 mm) Solid ................................................... 523863
3/8 in. (9 mm) Coring ................................................ 517487
1/2 in. (13 mm) Coring .............................................. 517488
1/2 in. (13 mm) Heavy Duty Coring........................... 523995
1/2 in. (13 mm) Carbide Tipped Coring..................... 547183
5/8 in. (16 mm) Coring .............................................. 517489
Support Literature
Technical Manual .................................................... 4132280
Operator Training Video .......................................... 4130949
GB-7
3
DECALS AND ICONS
3
DECALS AND ICONS
3.1
DECALS _________________________________________________________________
Familiarize yourself with the decals they are critical to the safe operation of the machine.
REPLACE DAMAGED DECALS IMMEDIATELY.
!
ADVERTENCIA
!
1. Leer el manual del operador. No permitir que personas
no capacitadas para ello usen la maquina.
2. Mantener los escudos en su lugar y la tornilleria
debidamente fijada.
3. Antes de limpiar, ajustar o reparar este equipo,
desengranar todas los mandos, aplicar el freno de
estacionamiento y apagar el motor.
4. Mantener las manos, los pies y la ropa alejados de las
piezas en movimiento.
5. No viajar como pasajero ni llevar pasajeros en
maquinas sin asiento para ello.
6. Mantener a las demas personas alejadas.
7. Si no sabe leer ingles, solictarle a otra persona que le
lea y explique el contenido de las etiquetas y del
manual de le maquina.
WARNING
1. Read operator’s manual. Do not allow
untrained operators to use machine.
2. Keep shields in place and hardware
securely fastened.
3. Before you clean, adjust or repair this
equipment, disengage all drives, engage
parking brake and stop engine.
4. Keep hands, feet and clothing away from
moving parts.
5. Never carry passengers.
6. Keep bystanders away.
340623
DANGER
KEEP HANDS AND FEET AWAY
361854
!
WARNING
Exposed moving parts
can cause severe injury.
Do not operate without
covers in place.
See Operators /
Maintenance manual.
524729
835892
3.2
ICONS ___________________________________________________________________
Read Manual
Fuel
OPC
Release
Engine Throttle
Fast
Choke
Slow
Tine Lever
Lift
Lower
! WARNING
Never attempt to drive the tractor unless you have read the Technical Manual and know
how to operate all controls correctly.
Familiarize yourself with the icons shown above and what they represent. Learn the
location and purpose of all the controls and gauges before operating this tractor.
GB-8
Tine
Engage
CONTROLS
A
B
C
D
E
F
G
Clutch Control Lever
Throttle
Shift Control Lever
Tine Lever
4
OPC Handle
Engine Switch
Choke
A
G
R
F
N
H
L
C
E
D
B
4
4.1
CONTROLS
CONTROL DESCRIPTIONS __________________________________________________
A. Clutch Control Lever
Clutch control lever engages and disengages power
to tine operation clutch and latches OPC handle. Pull
lever until OPC handle (E) closes for Transport. Pull
handle until it clicks and locks in place for tine
operation. Release the OPC handle to disengage.
! WARNING
Damage to turf and/or equipment may occur if aerator
head is not fully raised before engaging OPC handle
with shift control lever (C) in R (Reverse) or H (High)
position.
B. Throttle
Controls the ground speed of the unit. Position lever
between SLOW and FAST to set desired ground
speed. Fully raise lever to STOP position to shut off
engine.
N (Neutral): Disengages both traction and tine
operation.
C. Shift Control Lever
Four position lever used to operate different
functions of machine.
L (Low): Engages aerating traction speed. Tine
operation can be engaged
R (Reverse): Engages
operation is locked out.
reverse
traction.
H (High): Engages transport speed only. Tine
operation is locked out.
Tine
GB-9
4
CONTROLS
D. Tine Lever
Raises and lowers aerator head. Lift lever to RAISE
position to raise head. Push lever to LOWER position
to lower head.
! WARNING
A
To prevent injury from hot hydraulic oil, the tine lever
must be returned to the neutral position after raising or
lowering the unit. If the lever sticks or is held in the
“RAISE” or “LOWER” position, the hydraulic fluid will
overheat, possibly causing a hydraulic line to rupture
R
N
H
L
C
E. OPC Handle
Engages and disengages drive clutch. Returns clutch
control lever (A) to disengaged position when
released.
F.
Engine Switch
Controls engine operation. Move switch to ON
position for normal operation. Move switch to OFF
position to shut unit off or when adjusting, trailering
or storing unit.
G. Choke
The choke lever opens and closes the choke valve in
the carburetor. The CLOSED position enriches the
fuel mixture for starting a cold engine. The OPEN
position provides the correct fuel mixture for
operation after starting, and for restarting a warm
engine.
GB-10
E
B
D
G
F
OPERATION
5
5
OPERATION
5.1
DAILY INSPECTION ________________________________________________________
! CAUTION
The daily inspection should be performed only when
the engine is off and all fluids are cold. Lower aerator
head to the ground, stop engine and disconnect spark
plug wire.
1. Perform a visual inspection of the entire unit, look for
signs of wear, loose hardware, and missing or
damaged components. Check for fuel or oil leaks to
ensure connections are tight and hoses and tubes
are in good condition.
2. Check the hydraulic oil level, fuel supply, crankcase
oil and air cleaner. All fluids must be at the full level
mark with engine cold.
3. Check tires for proper inflation.
5.2
OPERATOR PRESENCE CONTROL (OPC) _____________________________________
1. The OPC system is intended to protect the operator
and others from injury by stopping the aerator and
drive mechanism as soon as the operator releases
the OPC handle.
! WARNING
Never operate equipment with the OPC system
disconnected or malfunctioning.
2. Test OPC system.
a. Start the engine and place throttle (B) at slow.
Fully raise aerator head.
b. Place shift control (C) in R (Reverse) position. In
this position, unit will move away from operator
when testing.
c.
Pull clutch control lever (A) slightly until OPC
handle (E) can be engaed. Do not engage tine
operation.
d. The drive mechanism will engage and the unit
will slowly move backward.
e. Release the OPC handle. The handle must come
up and the wheels must stop. Shut off engine.
f. Place shift control (C) in L (Low) position.
g. Pull clutch control lever (A) slightly until OPC
handle (E) can be engaed. Engage tine
operation.
h. Release the OPC handle (E). The clutch control
lever (A) must return to disengaged position, and
OPC handle must come up.
i.
Check each position of shift control lever (C).
Tine operation should only engage with lever in L
(Low) position.
3. If the wheels begin to turn before the OPC handle is
engaged or the wheels continue to turn after the
OPC handle is released, or clutch control lever does
not return to disengaged position; stop the engine
immediately and have the system repaired.
GB-11
5
OPERATION
5.3
OPERATING PROCEDURES_________________________________________________
! CAUTION
To prevent injury, always wear safety glasses, leather work shoes or boots, a hard hat, and ear protection.
1. Before starting engine, always release OPC handle.
2. Do not operate aerator or attachments with loose,
damaged or missing components.
3. First aerate in a test area to become thoroughly
familiar with the operation of the unit and control
levers.
4. Study the area to determine the best and safest
operating procedure. Consider the type of terrain,
and condition of the surface. Each condition will
require certain adjustments or precautions.
5. Never direct discharge of material toward
bystanders, nor allow anyone near the machine
while in operation. The owner/operator is
responsible for injuries inflicted to bystanders and/or
damage to their property.
! CAUTION
struck by the unit may cause serious injuries to
bystanders and/or damage the equipment.
7. Always raise aerator head and move control lever
out of L position when not aerating.
8. Disengage the tines and raise the aerator head
when crossing paths or roadways. Look out for
traffic.
9. Stop and inspect the equipment for damage
immediately after striking an obstruction or if the
machine begins to vibrate abnormally. Have the
equipment repaired before resuming operation.
! WARNING
Before you clean, adjust, or repair this
equipment, always disengage all drives, lower
aerator head to the ground, stop engine and
disconnect spark plug wire to prevent injuries.
Before operating, pick up all debris such as rocks,
toys and wire which can be thrown by the machine.
Enter a new area cautiously. Always operate at
speeds that allow you to have complete control of the
unit.
10. Slow down and use extra care on hillsides. Read
Section 5.7. Use caution when operating near drop
offs.
6. Use discretion when operating near gravel areas
(roadway, parking areas, cart paths, etc.). Stones
12. Never use your hands to clean aerator. Tine edges
are sharp and can cause serious injuries.
5.4
11. Use care when approaching blind corners, shrubs,
tress or other objects that may obscure vision.
STARTING _______________________________________________________________
1. Check engine crankcase oil levels.
2. Fill fuel tank with fresh, clean unleaded fuel.
3. Turn engine switch to ON position.
A
4. Place shift control lever (C) in neutral, and
disengage clutch control (A).
5. Move throttle lever (B) to 1/2 throttle.
R
6. Pull recoil starter located on right side of engine.
Choke as required to start engine.
L
7. Allow the engine to become warm and properly
lubricated before operating at high RPM.
N
H
C
E
B
D
Figure 5A
GB-12
OPERATION
5.5
STOPPING / PARKING ______________________________________________________
To stop:
a. Release OPC handle to bring unit to a complete
stop.
Release OPC handle to bring unit to a complete stop.
To park the tractor under normal conditions:
1. Release OPC handle, raise the aerator head. Move
shift control lever to H position, engage OPC handle
and move away from the area of operation.
2. Select a flat and level area to park.
5.6
b. Lower aerator head to the ground, reduce throttle
to slow and allow engine to operate at no load for
several minutes.
3. Move engine switch to OFF position.
If an emergency arises and the unit must be parked in the
area of operation, follow the guidelines outlined by the
grounds superintendent. If the unit is parked on an
incline, chock or block the wheels.
TO DRIVE / TRANSPORT ____________________________________________________
Read and follow all safety notes contained in this manual
when driving or transporting tractor. Refer to Section 5.3
for general operating instructions. When operating in
reverse look behind you to ensure you have a clear path.
1. Release OPC handle and raise aerator head.
2. Set throttle lever to slow.
3. Move shift control lever to H position and engage
OPC handle to drive to and from the area of
operation.
5.7
5
4. Adjust throttle lever to desired transport speed.
! CAUTION
When transporting, operate unit in such a manner to
allow you to see the path ahead and quickly move
away from the unit should you accidentally lose
control.
HILLSIDE OPERATION _____________________________________________________
! WARNING
To minimize the possibility of overturning, the safest
method for operating on hills and terraces is to travel
up and down the face of the slope (vertically), not
across the face (horizontally). Avoid unnecessary
turns, travel at reduced speeds, stay alert for hidden
hazards, and drop offs.
2. If the tractor tends to slide or the tires begin to
“mark” the turf, angle tractor into a less steep grade
until traction is regained or tire marking stops.
3. If tractor continues to slide or mark the turf, the
grade is too steep for safe operation. Do not make
another attempt to climb, back down slowly.
Correct tire pressure is essential for maximum traction.
Front 14 psi (97 kPa)
Rear 14 psi (97 kPa)
! CAUTION
Do not operate on slopes greater than 20°.
The unit has been designed for good traction and stability
under normal conditions; however, use caution when
operating on slopes, especially over rough terrain or
when the grass is wet. Wet grass reduces traction and
steering control.
1. Always operate at reduced forward speed to
maintain the control.
GB-13
5
OPERATION
5.8
AERATING _______________________________________________________________
2. Move shift control lever to L position.
! WARNING
To prevent serious injuries, keep hands, feet and
clothing away from aerator mechanism.
NEVER use your hands to clean aerator. Tine edges
can be sharp and could cause injuries.
To clear obstructions from tine, disengage master
clutch, raise aerator head, stop engine and disconnect
spark plug wire, then remove obstruction.
To Aerate:
3. Move throttle lever to SLOW, stand to the side of
unit and slowly engage OPC handle.
a. Adjust throttle to desired walking speed after unit
is in motion.
b. Pull clutch control lever until it clicks and locks in
tine operation position.
c.
At proper starting point on turf, fully lower aerator
head by pushing down on the tine lever.
4. To stop aerating, pull up on the tine lever to raise
aerator head. Disengage OPC handle.
1. Start the engine raise aerator head.
5.9
TRAILERING______________________________________________________________
If the unit experiences problems and must be shut down
and removed from the area, it should be loaded onto a
trailer for transport.
Use care when loading and unloading unit. Tines may
drag or catch on trailer ramp. To prevent push rods from
being bent, remove the two lowest positioned tines.
Fasten unit to trailer to prevent tractor from rolling or
shifting during transport.
Long Distance Trailering / Transport. If the unit is to be
trailered on the highway, before strapping to trailer, inflate
tires to:
Front - 22 psi (152 kPa)
Rear - 22 psi (152 kPa)
After unloading tractor, reduce tire pressure to normal
operating pressure. See Section 5.7
GB-14
ADJUSTMENTS
6
6
ADJUSTMENTS
6.1
GENERAL ________________________________________________________________
! WARNING
To prevent injury, disengage master clutch, lower
aerator head to the ground, stop engine and
disconnect spark plug wire before making any
adjustments or performing maintenance.
Make sure the aerator is parked on a solid and level
surface. Never work on a tractor that is supported
only by the jack. Always use jack stands.
If only the front or rear of the unit is raised, place
chocks in front of and behind the wheels that are not
raised.
1. Adjustments and maintenance should always be
performed by a qualified technician. If proper
adjustment cannot be made, contact an authorized
Jacobsen Dealer.
2. Replace, do
components.
6.2
not
adjust,
worn
or
damaged
3. Long hair, jewelry or loose fitting clothing may get
tangled in moving parts. Remove jewelry, tuck in
loose fitting clothing and tuck long hair under a cap.
! CAUTION
Be careful to prevent entrapment of the hands and
fingers between moving and fixed components of the
machine.
! WARNING
To prevent injury, support upper frame with blocks
when working on unit with aerator head raised.
Hydraulic lines may rupture or lever could be tripped,
causing unit to drop rapidly.
4. Do not change governor settings or overspeed the
engine.
TURF GUARD _____________________________________________________________
The turf guard (C) is used to prevent the turf from lifting
up as cores are pulled out. The pressure on the turf
guard can be adjusted by increasing or decreasing
tension on the springs (A).
Add or remove spacers (B) above spring as required so
the turf guard provides enough presure to prevent turf
from lifting up, but not so much that they mark or cut the
turf.
Figure 6A
6.3
AERATOR DRIVE IDLER CABLE _____________________________________________
1. Engage OPC handle and tine operation. [ See 4.1]
2. Adjust cable nuts (D) as required to obtain 0.18 inch
(3.3 mm) deflection with a 4.4 lb (2.0 kg) push for
new belt or 3.0 lb (1.4 kg) push for used belt at
location shown.
0.18 inch (3.3 mm)
4.4 lb (1.81 kg) New
3.0 lb (1.36 kg) Used
3. Addition adjustment available if required at handle.
D
Figure 6B
GB-15
6
ADJUSTMENTS
6.4
TRACTION DRIVE IDLER CABLE _____________________________________________
1. Engage OPC handle. [ See 4.1]
2. Adjust cable nuts (E) as required to obtain 0.18 inch
(3.3 mm) deflection with a 4.4 lb (2.0 kg) push for
new belt or 3.0 lb (1.4 kg) push for used belt at
location shown.
0.18 inch (3.3 mm)
4.4 lb (1.81 kg) New
3.0 lb (1.36 kg) Used
3. Addition adjustment available if required at handle.
4. Test handle operation. When OPC handle is
engaged, parking brake (F) should release and idler
pulley should engage traction drive.
E
F
Figure 6C
6.5
AERATOR TIMING _________________________________________________________
Note: Improper timing between the aerator crankshaft
and the camshaft will cause elongated holes while
aerating and excessive noise in the camcase.
1. Remove shields from both sides of unit.
Dot towards
front
H
Timing Marks
Horizontal
2. Remove aerator chain connecting crankshaft to
camshaft from both sides of unit.
3. Loosen stud between crankshaft halves.
4. Rotate right camshaft sprocket (G) until the keyway
is pointing towards the front of the unit. Timing
marks should be at a 45° angle with dot towards the
lower front.
5. Rotate right side crankshaft sprocket (H) until the
timing marks are horizontal with the dot towards the
front. Keyway should be at a 45° angle.
6. Install right side aerator chain (J). Crankshaft
sprocket may be rotated up to 5° in a clockwise
direction only to properly mesh with the chain.
7. Rotate left crankshaft sprocket (K) until the timing
marks are vertical and dot is towards the ground.
8. Install left side aerator chain (L). Crankshaft
sprocket may be rotated up to 5° in a counterclockwise direction only to properly mesh with the
chain.
J
Timing Marks
45° Angle
Dot towards
lower front
G
Front
Right Side Aerator Chain
Figure 6D
Timing Marks
Vertical
K
Dot towards
ground
L
9. Tighten stud between crankshaft halves.
10. Install shields
Front
Left Side Aerator Chain
Figure 6E
GB-16
ADJUSTMENTS
6.6
6
SHIFT CONTROL CABLE____________________________________________________
If traction drive system does not shift properly,
adjustment of the shift control cable may be required.
1. Disconnect clevis (N) from shift lever (P).
2. Place the shift control lever in the L position.
3. Rotate shift lever (P) clockwise until it locks into the
low speed detent.
P
4. Adjust cable nuts (M) as required until clevis (N)
aligns with mounting hole in lever (P).
5. If additional adjustment is required, cable may be
adjusted at the handle.
N
M
Figure 6F
6. Test each position of shift control. Shift lever (P)
should lock into each detent at each stop of shift
control.
6.7
LIFT CABLE ______________________________________________________________
If aerator head does not raise or lower properly,
adjustment of the lift cable may be required.
1. Loosen both cable nuts (R). Lift valve should
automaticaly return to center.
2. Place lift control handle in center (neutral) position.
3. Tighten nuts (R).
4. Test operation of lift control.
R
Figure 6G
GB-17
6
ADJUSTMENTS
6.8
TORQUE SPECIFICATION___________________________________________________
CAUTION
All torque values included in these charts are approximate and are for reference only. Use of these torque values is
at your sole risk. Jacobsen is not responsible for any loss, claim, or damage arising from the use of these charts.
Extreme caution should always be used when using any torque value.
Jacobsen uses Grade 5 bolts as standard, unless otherwise noted.
AMERICAN NATIONAL STANDARD FASTENERS
AMERICAN NATIONAL STANDARD FASTENERS
SIZE
UNITS
GRADE 5
GRADE 8
SIZE
UNITS
GRADE 5
GRADE 8
#6-32
in-lbs (Nm)
20 (2.3)
–
7/16-14
ft-lbs (Nm)
50 (67.8)
65 (88.1)
#8-32
in-lbs (Nm)
24 (2.7)
30 (3.4)
7/16-20
ft-lbs (Nm)
55 (74.6)
70 (94.9)
#10-24
in-lbs (Nm)
35 (4.0)
45 (5.1)
1/2-13
ft-lbs (Nm)
75 (101.7)
100 (135.6)
#10-32
in-lbs (Nm)
40 (4.5)
50 (5.7)
1/2-20
ft-lbs (Nm)
85 (115.3)
110 (149.2)
#12-24
in-lbs (Nm)
50 (5.7)
65 (7.3)
9/16-12
ft-lbs (Nm)
105 (142.4)
135 (183.1)
1/4-20
in-lbs (Nm)
95 (10.7)
125 (14.1)
9/16-18
ft-lbs (Nm)
115 (155.9)
150 (203.4)
1/4-28
in-lbs (Nm)
95 (10.7)
150 (17.0)
5/8-11
ft-lbs (Nm)
150 (203.4)
195 (264.4)
5/16-18
in-lbs (Nm)
200 (22.6)
270 (30.5)
5/8-18
ft-lbs (Nm)
160 (217.0)
210 (284.8)
5/16-24
in-lbs (Nm)
240 (27.1)
300 (33.9)
3/4-10
ft-lbs (Nm)
170 (230.5)
220 (298.3)
3/8-16
ft-lbs (Nm)
30 (40.7)
40 (54.2)
3/4-16
ft-lbs (Nm)
175 (237.3)
225 (305.1)
3/8-24
ft-lbs (Nm)
35 (47.5)
45 (61.0)
7/8-14
ft-lbs (Nm)
300 (406.8)
400 (542.4)
METRIC FASTENERS
Non Critical
Fasteners into
Aluminum
4.8
5.8
8.8
10.9
12.9
Nm (in-lbs)
1.2 (11)
1.7 (15)
2.9 (26)
4.1 (36)
5.0 (44)
2.0 (18)
M5
Nm (in-lbs)
2.5 (22)
3.2 (28)
5.8 (51)
8.1 (72)
9.7 (86)
4.0 (35)
M6
Nm (in-lbs)
4.3 (38)
5.7 (50)
9.9 (88)
14.0 (124)
16.5 (146)
6.8 (60)
M8
Nm (in-lbs)
10.5 (93)
13.6 (120)
24.4 (216)
33.9 (300)
40.7 (360)
17.0 (150)
M10
Nm (ft-lbs)
21.7 (16)
27.1 (20)
47.5 (35)
66.4 (49)
81.4 (60)
33.9 (25)
M12
Nm (ft-lbs)
36.6 (27)
47.5 (35)
82.7 (61)
116.6 (86)
139.7 (103)
61.0 (45)
M14
Nm (ft-lbs)
58.3 (43)
76.4 (55)
131.5 (97)
184.4 (136)
219.7 (162)
94.9 (70)
SIZE
UNITS
M4
GB-18
MAINTENANCE
7
7
MAINTENANCE
7.1
GENERAL ________________________________________________________________
b.
Keep all moving parts properly adjusted and lubricated.
c.
Replace worn or damaged parts before operating
the machine.
d.
Keep all fluids at their proper levels.
e.
Keep shields in place and all hardware securely
fastened.
f.
Keep tires properly inflated.
! WARNING
Before you clean, adjust, or repair this equipment,
disengage all drives, lower aerator head to the ground,
stop engine and disconnect spark plug wire to prevent
injuries
Make sure the unit is parked on a solid and level surface.
Never work on a unit that is supported only by the jack.
Always use jack stands.
1.
2.
Adjustment and maintenance should always be
performed by a qualified technician. If proper
adjustments cannot be made, contact an Authorized
Jacobsen Dealer.
Inspect the equipment on a regular basis, establish a
maintenance schedule and keep detailed records.
a.
7.2
3.
Long hair, jewelry or loose fitting clothing may get
tangled in moving parts.
4.
Use the illustrations in the Parts Catalog as reference
for the disassembly and reassembly of components.
5.
Recycle or dispose of all hazardous materials
(batteries, fuel, lubricants, anti-freeze, etc.) according
to local, state or federal regulations.
Keep the equipment clean.
ENGINE _________________________________________________________________
IMPORTANT: A separate Engine Manual, prepared by
the engine manufacturer, is supplied with this unit.
Read the engine manual carefully until you are familiar
with the operation and maintenance of the engine.
Proper attention to the engine manufacturer’s
directions will assure maximum service life of the
engine. To order replacement engine manuals contact
the engine manufacturer.
The proper break-in of a new engine can make a
considerable difference to the performance and life of the
engine.
Note: The aerator is designed to operate most efficiently at
the preset governor setting. Do not change the engine
governor settings or overspeed the engine.
During the break-in period, Jacobsen recommends the
following:
1.
Operate modestly for the first 25 hours at reduced
engine speed.
2.
Avoid full throttle starts and rapid acceleration.
3.
Allow the engine to reach operating temperature before
operating at full load.
4.
Change the oil and filter after the first 5 hours of
operation.
5.
Refer to Section 9.2 and Engine Manual for specific
maintenance intervals.
GB-19
7
MAINTENANCE
7.3
ENGINE OIL ______________________________________________________________
Check the engine oil at the start of each day, before starting
the engine. If the oil level is low, remove oil filler cap and add
oil as required.
FULL
mark
Perform initial oil change after the first 5 hours of operation.
Change oil every 25 hours thereafter.
See the engine manufacturer’s Owners’s Manual for
detailed service information.
Operating
Range
After adding or changing oil, start and run engine at idle with
all drives disengaged for 30 seconds. Shut engine off. Wait
30 seconds and check oil level. Add oil to bring up to FULL
mark on dipstick.
Figure 7A
Use only engine oils with API classification SG, SH or SJ.
Above 32° F (0° C)
SAE 30W
Below 32° F (0° C)
SAE 5W20 or SAE 5W30
7.4
1.
ENGINE AIR FILTER _______________________________________________________
Remove and service the foam pre-cleaner every 25
hours. Replace if dirty or damaged.
To service pre-cleaner, wash in a liquid detergent and
warm water. Rinse Thoroughly and squeeze dry in a
clean cloth. Saturate in clean engine oil and squeeze
out excess oil in a clean, absorbent cloth.
7.5
2.
Replace the paper air cleaner element every 100
hours, more often when operating in dusty conditions.
Note: Always replace the paper element. Do not wash
or use pressurized air to clean cartridge.
See the engine manufacturer’s Owners’s Manual for
detailed service information.
FUEL ____________________________________________________________________
Handle fuel with care - it is highly flammable. Use an
approved container, the spout must fit inside the fuel filler
neck. Avoid using cans and funnels to transfer fuel.
• Store fuel according to local, state or federal ordinances
and recommendations from your fuel supplier.
• Never overfill fuel tank.
! WARNING
Gas Engine:
Never remove the fuel cap from the fuel tank, or add fuel,
when the engine is running or while the engine is hot.
• Use clean, fresh, regular grade, unleaded gasoline
minimum 85 Octane.
Do not smoke when handling fuel. Never fill or drain the
fuel tank indoors.
• Do not use hi-test gasoline or an oil-gasoline mixture.
When using blended fuel, do not use a blend with more
than 10% ethanol. Under no circumstances should you
use a blend with methanol.
Do not spill fuel and clean spilled fuel immediately.
Never handle or store fuel containers near an open flame
or any device that may create sparks and ignite the fuel
or fuel vapors.
Be sure to reinstall and tighten fuel cap securely.
• Fill the fuel tank to within 1 in. (25 mm) of the bottom of
the filler neck.
GB-20
MAINTENANCE
7.6
HYDRAULIC HOSES _______________________________________________________
4.
The replacement tube or hoses must be routed in the
same path as the existing hose, do not move clamps,
brackets and ties to a new location.
5.
Thoroughly inspect all tubes, hoses and connections
every 250 hours.
! WARNING
To prevent serious injury from hot, high pressure oil,
never use your hands to check for oil leaks, use paper or
cardboard.
IMPORTANT: The hydraulic system can be
permanently damaged if the oil becomes
contaminated. Before disconnecting any hydraulic
component, clean the area around the fittings and the
hose ends to keep impurities out of the system.
Hydraulic fluid escaping under pressure can have
sufficient force to penetrate skin. If fluid is injected into
the skin it must be surgically removed within a few hours
by a doctor familiar with this form of injury or gangrene
may result.
DO NOT attempt to replace hydraulic hoses with aerator
head in raised position. Hoses are under extreme
pressure. Releasing pressure improperly could cause
aerator head to drop suddenly.
1.
7
Always disengage all drives, lower aerator head to
ground, stop engine and disconnect spark plug wire
before inspecting or disconnecting hydraulic lines or
hoses.
a.
Before disconnecting any hydraulic component, tag
or mark the location of each hose then clean the
area around the fittings.
b.
As you disconnect the component, be prepared to
assemble plugs or caps to the hose ends and open
ports. This will keep impurities out of the hydraulic
system and also prevent oil spills.
c.
Make sure “O” rings are clean and hose fittings are
properly seated before tightening.
2.
With engine stopped, move tine lever to RAISE
position for 10 seconds and LOWER position for 10
seconds to release system pressure
d.
Keep the hose from twisting. Twisted hoses can
cause couplers to loosen as the hose flexes during
operation resulting in oil leaks.
3.
Check visible hoses and tubes daily. Look for wet
hoses or oil spots. Replace worn or damaged hoses
and tubes before operating the machine.
e.
Kinked or twisted hoses can restrict the oil flow
causing the system to malfunction and the oil to
overheat and also lead to hose failure.
7.7
HYDRAULIC OIL___________________________________________________________
Refer to Section 9.2 for specific maintenance intervals.
3.
Remove drain plug from bottom of main tank and
loosen or remove dipstick/filler cap.
Drain and replace the hydraulic oil after a major component
failure, or if you notice the presence of water or foam in the
oil, or a rancid odor (indicating excessive heat).
4.
After oil has drained install drain plug and fill with
Jacobsen Hydraulic oil.
5.
Purge air from system.
Always replace the hydraulic filter when changing oil.
a.
Operate lift / lower function for several minutes to
purge air out of the system and stabilize the oil
level.
b.
Once the level has stabilized and the air is purged,
fill the tank “FULL” level.
To change hydraulic oil:
1.
Clean the area around the oil cap to prevent impurities
from entering and contaminating the system.
a.
Oil temperature should be at 60° to 90°F (16° 32°C). Do not check oil level when oil is hot.
b. Check oil with aerator head in raised position.
c.
2.
The main oil tank should always be full.
Drain and replace the hydraulic oil every 250 hours or
after a major component failure, or if you notice the
presence of water, foam, or a rancid odor.
GB-21
7
MAINTENANCE
7.8
MUFFLER AND EXHAUST __________________________________________________
! WARNING
Exhaust fumes contain carbon monoxide that is toxic and
can be fatal when inhaled.
NEVER operate an engine without proper ventilation.
To protect from carbon monoxide poisoning, inspect the
complete exhaust system regularly and always replace a
defective muffler.
If you notice a change in the color or sound of the exhaust,
stop the engine immediately. Identify the problem and have
the system repaired.
Torque all exhaust manifold hardware evenly. Tighten or
replace exhaust clamps.
7.9
1.
TIRES ___________________________________________________________________
Keep tires properly inflated to prolong tire life. Check
inflation pressure while the tires are cool. Inspect tread
wear.
! CAUTION
8. Check the pressure with an accurate, low pressure
tire gauge.
Unless you have the proper training, tools and
experience, DO NOT attempt to mount a tire on a rim.
Improper mounting can produce an explosion which
may result in serious injury.
9. Keep tires inflated to 14 psi - (97 kPa)
7.10 WHEEL MOUNTING PROCEDURE ____________________________________________
! WARNING
Make sure the tractor is parked on a solid and level
surface. Never work on a tractor that is supported only by
the jack. Always use jack stands.
If only the front or rear of the tractor is raised, place
chocks in front of and behind the wheels that are not
raised.
1.
Remove dirt, grease and oil from stud thread. Do not
lubricate threads.
2.
Position wheel on hub and inspect to insure full contact
between mounting surface of wheel and hub.
3.
Finger tighten all hardware then torque hardware in
criss-cross order; always tighten nuts in the top
position.
4.
Check and retorque daily until torque is maintained,
85-95 ft.lbs. (115-128 Nm)
7.11 CARE AND CLEANING _____________________________________________________
Wash the unit after each use. Keep the equipment clean.
Note: Do not wash any portion of the equipment while it is
hot. Do not use high pressure spray or steam. Use cold
water and automotive cleaners.
1.
Use compressed air to clean engine and radiator fins. A
special blow gun is available through Jacobsen Dealer.
Repair damaged metal surfaces and use Jacobsen touch-up
paint. Wax the equipment for maximum paint protection.
! CAUTION
Clean debris from drives, muffler and engine to
prevent fires.
2. Use only fresh water for cleaning your equipment.
Note: Use of salt water or effluent water has been known
to encourage rust and corrosion of metal parts resulting
in premature deterioration or failure. Damage of this
nature is not covered by the factory warranty.
3.
Do not spray water directly at bearing housings and
seals.
4.
Clean all plastic or rubber trim with a mild soap
solution or use commercially available vinyl/rubber
cleaners.
GB-22
! WARNING
NEVER use your hands to clean aerator. Tine edges are
sharp and can cause serious injuries.
MAINTENANCE
7
7.12 STORAGE ________________________________________________________________
General
Aerator Mechanism
1.
Wash the unit thoroughly and lubricate. Repair and
paint damaged or exposed metal.
1.
Remove and thoroughly clean tines. Coat lightly with oil
to prevent rust.
2.
Inspect the unit, tighten all hardware, replace worn or
damaged components.
2.
Clean pushrods and coat lightly with oil.
3.
3.
Clean the tires thoroughly and store the unit so the
load is off the tires. If unit is not on jack stands, check
tires at regular intervals and reinflate as necessary.
Lower aerator head to relieve hydraulic system
pressure.
4.
Keep the machine and all its accessories clean, dry
and protected from the elements during storage. Never
store equipment near an open flame or spark which
could ignite fuel or fuel vapors.
Engine
1.
2.
While the engine is warm, remove the drain plug, drain
the oil from the crankcase. Install drain plug and refill
with fresh oil. Let engine cool before storing.
Clean exterior of engine. Paint exposed metal, or apply
a light coat of rust preventative oil.
For engine protection Jacobsen recommends the use of a
fuel additive such as STABIL®. Mix additive following
instructions on container. Run engine for a short time to
circulate additive through carburetor.
After Storage
1. Check or service air cleaner.
2.
Check oil level in the engine crankcase and hydraulic
system.
3.
Fill the fuel tank with fresh fuel.
4.
Make certain that the tires are properly inflated.
5.
Remove all oil from the tines and push rods.
6.
Start and operate the engine at 1/2 throttle. Allow
enough time for the engine to become properly
warmed and lubricated.
! WARNING
Never operate the engine without proper ventilation;
exhaust fumes can be fatal when inhaled.
Remove spark plugs and pour 1 oz. (30 ml) of engine oil into
each cylinder. Replace spark plugs and crank slowly (do not
start) to distribute oil in cylinder. Rotate crankshaft slowly
until piston is at top of stroke.
If storing indoors, drain fuel from tank.
Note: Do not use fuel with ethanol during storage.
GB-23
8
8
TROUBLESHOOTING
TROUBLESHOOTING
8.1
GENERAL________________________________________________________________
The troubleshooting chart below lists basic problems that may occur during start-up and operation. For more detailed
information regarding the hydraulic and electrical systems contact your area Jacobsen Dealer.
Symptoms
Engine will not start.
Possible Causes
Action
1. Fuel tank empty or dirty.
1. Fill with fresh fuel. Change fuel filter.
2. Engine switch OFF.
2. Turn engine switch ON.
Engine hard to start or 1. Fuel level low, fuel or fuel filter 1. Fill with fresh fuel.
runs poorly.
dirty.
2. Air cleaner dirty.
2. Inspect and replace air filter.
3. Engine problem.
3. Consult engine manual
Engine stops.
Fuel tank empty.
Fill with fresh fuel.
Engine overheating
1. Air intake restricted.
1. Clean cooling air intake.
2. Engine overload
2. Reduce forward speed
1. Dirty or corroded tines.
1. Thoroughly clean tines and lightly water greens.
2. Burrs on Tines
2. Remove burrs with file
3. Engine speed too slow
3. Operate at higher engine speed
4. Oversized tires
4. See tire specifications
Tines Plugging.
Tines not Penetrating Tines worn or plugged.
Turf
Replace or clean tines.
Tines not lifting high Low hydraulic fluid
enough
Add hydraulic fluid, See Section 7.7
Tines wont move
Bent pushrod
Replace pushrod
Turf Lifting
Shallow rooted turf
Increase turf guard spring tension. See Section 6.2
Traction drive does not
engage.
Traction drive idler cable out of Adjust cable. See Section 6.4
adjustment
Aerator drive does not
engage
Aerator drive idler cable out of Adjust cable. See Section 6.3
adjustment
Oblong hole in turf
Unit out of time
Check Timing, See Section 6.3
Noise in Camcase
Unit out of time
Check Timing, See Section 6.3
GB-24
MAINTENANCE & LUBRICATION CHARTS
9
9
MAINTENANCE & LUBRICATION CHARTS
9.1
GENERAL ________________________________________________________________
2. Lubricate with grease that meets or exceeds NLGI
Grade 2 LB specifications. Apply grease with a
manual grease gun and fill slowly until grease begins
to seep out. Do not use compressed air guns.
! WARNING
Before you clean, adjust, or repair this equipment,
disengage all drives, lower implements to the ground,
engage parking brake, stop engine and remove key
from ignition switch to prevent injuries
3. For smooth operation of all levers, pivot points and
other friction points that are not shown on the
lubrication chart apply several drops of SAE 30 oil
every 40 hours or as required.
1. Always clean the grease fitting before and after
lubricating.
4. Apply #30 oil or penetrating chain lubricant daily.
5. Grease aerator crankshaft (3) and connecting rod
fittings (6) daily.
9.2
MAINTENANCE CHARTS____________________________________________________
Recommended Service and Lubrication Intervals
Air Filter
Every
8-10
Hours
Every
25
Hours
Every
100
Hours
I
C
R
Every
250
Hours
Cam Case Oil
Engine Oil
Every
500
Hours
Every
1000
Hours
Yearly
See
Section
R
7.4
IV
R
7.3
I
I***
I
7.6
Hydraulic Oil
I-A
R**
7.7
I
7.8
I
Tires
I-A
III
7.9
Front Wheel Bearings
A - Add or Adjust
II
L
Hydraulic Hoses and Tubes
Muffler and Exhaust
Lubricant
Type
C
I-R*
Grease Fittings
Every
400
Hours
L
C - Clean
I - Inspect
L- Lubricate
R - Replace
AR - As Required
* Replace oil after initial 5 hours of operation
** Or every two years whichever comes first.
I
- Manual grease gun with NLGI Grade 2 (Service Class
LB).
II
- Engine Oil - See Section 7.3
III
- Hydraulic Oil - See Section 7.7
*** Inspect visible hoses and tubes for leaks or oil marks.
IV - SAE 30 Weight Oil
GB-25
10
10
NOTES
NOTES
GB-26
Para hacer pedidos de piezas
2. Explicar a dónde y cómo hacer el envío.
5. Enviar o llevar el pedido a un Distribuidor autorizado
Textron turf Care And Specialty Products.
3. Facilitar el número, nombre y número de serie del
artículo, estampado en la placa del fabricante, o placa
de serie de su artículo.
6. Revisar todos los envíos al recibirlos. Si alguna pieza
está dañada o faltante, enviar una reclamación con el
transportista antes de aceptar.
4. Pedir por cantidad deseada, el número de pieza, código
de pintura y descripción de la pieza según aparece en
la lista de piezas.
7. No enviar material sin una carta de explicación, enumerando las piezas que se envían. Se deben pagar de
antemano los gastos de transporte.
1. Escribir el nombre y dirección completos en el pedido.
El uso de piezas no autorizadas invalidará la garantía.
Indice
1
1.1
1.2
2
2.1
2.2
2.3
2.4
2.5
2.6
3
3.1
3.2
4
4.1
5
5.1
5.2
5.3
5.4
5.5
5.6
5.7
5.8
5.9
Seguridad
Manipulación segura........................................... 4
Avisos importantes sobre seguridad ...................5
Especificaciones
Identificación del producto .................................. 6
Motor ...................................................................6
Aireador ..............................................................6
Tractor ................................................................7
Pesos y dimensiones ..........................................7
Accesorios e información adicional ....................7
Etiquetas e iconos
Etiquetas ............................................................. 8
Iconos .................................................................8
Controles
Descripción de los controles ...............................9
Funcionamiento
Revisión diaria .................................................. 11
Control de presencia del operador (opc) ..........11
Procedimientos de funcionamiento ...................12
Puesta en marcha .............................................12
Parada / Estacionamiento .................................13
Conducción / Transporte ..................................13
Funcionamiento en pendiente ..........................13
Aireado .............................................................14
Remolcado ........................................................14
6
6.1
6.2
6.3
Ajustes
Generalidades .................................................. 15
Protector del césped ........................................ 15
Cable de la polea tensora del
transmisor del aireador .................................... 15
6.4 Cable de la polea tensora del
transmisor de traccion ...................................... 16
6.5 Regulación del aireador ................................... 16
6.6 Cable de control de desplazamiento ................ 17
6.7 Cable de elevación ........................................... 17
6.8 Especificacion de par de torsión ...................... 18
7
Mantenimiento
7.1 Generalidades .................................................. 19
7.2 Motor ................................................................ 19
7.3 Aceite de motor ................................................ 20
7.4 Filtro de aire del motor ..................................... 20
7.5 Combustible ..................................................... 20
7.6 Mangueras hidráulicas ..................................... 21
7.7 Aceite hidráulico ............................................... 21
7.8 Silenciador y escape ........................................ 22
7.9 Neumáticos ...................................................... 22
7.10 Procedimiento de montaje de las ruedas ......... 22
7.11 Cuidados y limpieza ......................................... 22
7.12 Almacenamiento .............................................. 23
8
Resolución de problemas
8.1 Generalidades .................................................. 24
9
Cuadros de mantenimiento y lubricación
9.1 Generalidades .................................................. 25
9.2 Cuadros de mantenimiento .............................. 25
10
Notas
Advertencia Proposición 65
El escape del motor de este producto contiene
productos químicos que, según el estado de
California, pueden producir cáncer, defectos
de nacimiento y otros daños reproductivos.
Copyright 2003 Textron Inc. “Todos los derechos reservados, incluyendo el derecho
a reproducir este libro o partes del mismo de cualquier forma.”
Impreso en EE.UU. 3-2004
Guía de Inventario Sugerido
Para mantener el equipo operativo y productivo, mantenga un inventario de las piezas de mantenimiento usadas con más
normalidad. Hemos incluido los números de piezas para ayuda adicional en los materiales e instrumentos de
capacitación. En la sección Especificaciones se puede encontrar un listado más completo de accesorios y acoplamientos.
Piezas de servicio
Cant Nº Pieza
Descripción
Cant Nº Pieza
Descripción
4132280 Manual técnico
Códigos de color
Al pedir piezas de colores se necesita un código de
color. Los códigos disponibles para cada pieza
aparecen en el Catálogo de piezas con el siguiente
formato:
[Número de pieza].[Código de pintura]
Por ejemplo:
123456.7 representa la pieza 123456 de color Negro
brillante.
Si aparece más de un código, elija el más cercano a su
máquina.
Las piezas citadas en el Catálog de piezas sin código
no lo necesitan para pedirlas.
Códigos de pintura Jacobsen
.6
.7
.8
.9
.10
.11
Naranja Jacobsen
Negro brillante
Negro mate térmico
Negro mate
Blanco Jacobsen
Gris Jacobsen
Cómo usar este manual
Abreviaturas
N/R - No revisado por separado, sólo se puede obtener pidiendo el componente principal o el juego
N/S - Es necesaria cantidad o medida variable para obtener el ajuste correcto.
Símbolos como ▲, junto al número de artículo, indica que existe una nota con información adicional importante
al hacer el pedido de esa pieza.
Artículos Seleccionados
Los artículos con una marca de sangría indican las piezas de componentes incluidas como parte de una unidad u
otro componente. Estas piezas se pueden pedir por separado o como parte del componente principal.
Artículo
▲
Nº Pieza
123456
1
2
789012
345678
3
N/S
4
5 901234.6
Cant.
1
1
1
1
1
Descripción
Montura, Válvula
Válvula, Elevación
• Manillar
• Juego de Junta
Tornillo 1/4-20 x 2” cabeza hexagonal
Números de Serie / Notas
Indica una parte de una pieza
Incluye artículos 2 y 3
Parte revisada incluida con artículo 2
Parte no revisada incluida con el artículo 2
Indica una pieza de color naranja Jacobsen
ES-3
1
SEGURIDAD
1
SEGURIDAD
1.1
MANIPULACION SEGURA __________________________________________________
! ADVERTENCIA
EL EQUIPO MANIPULADO INCORRECTAMENTE O POR PERSONAL NO CUALIFICADO PUEDE SER
PELIGROSO.
Familiarícese con la ubicación y la correcta utilización de todos los mandos. Los operadores sin experiencia deben
recibir instrucciones de alguien familiarizado con el equipo antes de que se le permita manipular la máquina.
1. La seguridad depende del conocimiento, la
preocupación y la prudencia de aquellos que
manipulen o pongan en servicio el equipo. No
permita nunca a menores manipular ningún equipo.
2. Debe leer este manual y todas las publicaciones
relacionadas con este equipo (Manual de seguridad
y funcionamiento, manual del motor, accesorios y
herramientas). Si el operardor no puede leer en
español, el propietario será responsable de
explicarle la información contenida en este manual.
3. Aprenda a utilizar correctamente la máquina, la
ubicación y la finalidad de todos los mandos y
medidores antes de manipular el equipo. Trabajar
con equipo con el que no se está familiarizado
puede provocar accidentes.
4. Nunca permita que personas que no han sido
convenientemente instruidas y formadas o bajo los
efectos del alcohol o las drogas manipulen o
pongan en servicio la máquina o sus accesorios.
5. Porte toda la ropa y medios de seguridad personal
necesarios para protegerse la cabeza, los ojos, las
manos y los pies. Manipule la máquina sólo con luz
natural o con buena luz artificial.
6. Inspeccione la zona donde va a utilizar el equipo. Recoja
toda la basura que encuentre. Tenga en cuenta los
obstáculos elevados (ramas de árboles, cables eléctricos,
etc.) y subterráneos (aspersores, tuberías, raíces de
árboles, etc.). Entre en un área nueva con cuidado. No
entre por aberturas estrechas que puedan acercar
al operador demasiado a la unidad. Permanezca
8. Nunca manipule equipo que no esté funcionando en
perfecto orden o sin etiquetas, protecciones,
pantallas, deflectores de descarga o cualquier otro
dispositivo de protección firmemente fijado en su
sitio.
9. La inhalación del monóxido de carbono de los
gases de escape puede ser fatal. No encienda
nunca el motor si no hay una ventilación adecuada
o si está en un sitio cerrado.
10. El combustible es un producto
inflamable. Manipúlelo con cuidado.
sumamente
11. Mantenga limpio el motor. Deje que se enfríe antes
de almacenar la máquina y retire siempre la llave
de encendido.
12. Desactive todas las transmisiones y ponga el freno
de estacionamiento antes de arrancar el motor.
13. Cuando se conduzca o transporte en vías públicas,
el equipo debe cumplir los requisitos locales y
estatales más recientes.
14. Nunca busque fugas de aceite con las manos. El
líquido hidráulico presurizado puede penetrar en la
piel y provocar graves lesiones.
15. Maniobre la máquina por pendientes en sentido
vertical, nunca horizontalmente.
16. Para evitar un vuelco o pérdida de control, no
arranque ni pare repentinamente en pendientes.
Reduzca la velocidad al realizar giros. Tenga
cuidado al cambiar de dirección.
alerta de posibles peligros ocultos.
7. No descargue nunca directamente el material hacia
los peatones ni deje que nadie se acerque a la
máquina mientras ésta esté en funcionamiento. El
propietario/ operador puede prevenir y es
responsable de las lesiones que se provoquen a sí
mismos, a los transeúntes, así como de cualquier
daño material.
Esta máquina debe manipularse y mantenerse según este manual y está diseñada para el mantenimiento profesional de
céspedes. No está diseñada para ser utilizada en terrenos duros o céspedes altos.
ES-4
SEGURIDAD
1.2
1
AVISOS IMPORTANTES SOBRE SEGURIDAD __________________________________
!
Este símbolo de seguridad sirve para alertarle de posibles peligros.
PELIGRO - Indica una situación vigente que es potencialmente peligrosa y que, de no tomarse las medidas
pertinentes, OCASIONARA lesiones graves o accidentes mortales.
ADVERTENCIA - Indica una situación potencialmente peligrosa que, de no tomarse las medidas pertinentes,
PODRIA OCASIONAR lesiones graves o accidentes mortales.
PRECAUCION - Indica una situación potencialmente peligrosa que, de no tomarse las medidas pertinentes,
PODRIA LLEGAR A OCASIONAR pequeñas lesiones y desperfectos materiales. Puede además utilizarse para
advertir contra las prácticas laborales peligrosas.
Para una mayor claridad, algunas de las ilustraciones de este manual pueden mostrar protectores, dispositivos de
protección o chapas abiertas o retiradas. No manipule este equipo sin que estén dichos dispositivos firmemente
asegurados.
! ADVERTENCIA
El Control de presencia del operador (OPC) de esta máquina apaga el
aireador y el sistema de tracción si el operador suelta la palanca OPC.
Para proteger al operador y a otras personas, no opere el equipo con el OPC
desconectado o averiado.
! ADVERTENCIA
1. Antes de abandonar por cualquier motivo la posición del operador:
a.
b.
c.
d.
Suelte la palanca OPC.
Baje el cabezal del aireador al suelo.
Pare el motor
Desconecte el cable de la bujía.
2. Mantenga las manos, los pies y la ropa lejos de las piezas en
movimiento. Espere a que no haya ninguna pieza en movimiento antes
de limpiar, ajustar o reparar la máquina.
3. Mantenga a los peatones y animales alejados de la zona de operación.
4. No lleve nunca pasajeros.
5. No utilice nunca equipos de corte sin el deflector de descarga en su
sitio.
Si sigue todas las instrucciones de este manual, conseguirá prolongar la vida de su máquina y mantener su máximo
rendimiento. Los ajustes y tareas de mantenimiento deben ser siempre realizados por un técnico cualificado.
Si necesita más información, póngase en contacto con su distribuidor Jacobsen quien le informará de los métodos de
mantenimiento más recientes y le proporcionará un servicio puntual y eficaz. El uso de piezas o accesorios no
originales o autorizados por Jacobsen anulará la garantía.
ES-5
2
2
2.1
ESPECIFICACIONES
ESPECIFICACIONES
IDENTIFICACION DEL PRODUCTO ___________________________________________
544907 ............................ Aireador GA 24 con OPC y motor
de gasolina de 6 kW.
Número de Serie ............ Existe una placa de identificación
como la mostrada en el marca
derecho, cerca del motor.
Cite siempre el número de serie de la unidad cuando pida
piezas de repuesto o pida información sobre reparaciones.
®
A Textron Company
CHARLOTTE, NC
544907
2.2
Regulador ....................... Contrapeso regulador mecánico
Lubricatción:
Capacidad ................ 0,95 litros
Tipo........................... SAE 30W
Clasificación API ...... SG, SH, SJ
Filtro de aire.................... Elemento doble desechable
Sistema de
refrigeración.................... Refrigerado por aire
AIREADOR _______________________________________________________________
Espaciamiento ................ 51 mm en el centro
Penetración..................... 76 mm máximo
Púas estándar
Tipo ........................... Huecas, cónicas
Material ..................... Acero reforzado
Cantidad ................... Dos juegos de 13 mm de diámetro
Ociones
Maciza ...................... Púas Quad de 6 mm
Hueca ....................... 6 mm, 9 mm, 16 mm
Anchura de la carrera ..... 609 mm
ES-6
1601
MOTOR __________________________________________________________________
Marca .............................. Briggs & Stratton
Modelo ............................ Intek Pro OHV
Potencia .......................... 6 kW @3600 rpm
Cilindrada........................ 305,4 cc
Calibre x carrera ............. 74,61 x 69,85 mm
Combustible:
Tipo ........................... Gasolina sin plomo
Régimen ................... Min. 85 octanos
Capacidad................. 9,5 litros
2.3
MADE IN U.S.A.
ESPECIFICACIONES
2.4
2
TRACTOR ________________________________________________________________
Neumáticos
Delanteros................. 11 x 4.00 - 5 2 capas
Traseros .................... 16 x 6.50 - 6 4 capas
Presión...................... 97 kPa
Velocidad:
H (Transporte) ......... 6,4 km/h
L (Aireado) ................ 1,4 km/h
R (Marcha atrás)....... 2,9 km/h
Sistema hidráulico:
Capacidad................. 7,57 litros
Tipo de líquido .......... GreensCare 68
Elevación del
cabezal del aireador . Cilindro hidráulico de doble acción
2.5
PESOS Y DIMENSIONES ____________________________________________________
Dimensiones:
mm
Longitud ....................................................................1676
Anchura.....................................................................1257
Peso ..........................................................................1219
2.6
Pesos:
kg
Peso de trabajo sin combustible .................................386
ACCESORIOS E INFORMACION ADICIONAL ___________________________________
Póngase en contacto con su distribuidor Jacobsen para recibir una lista completa de accesorios y herramientas.
! PRECAUCION
El uso de piezas y accesorios no autorizados por Jacobsen puede provocar daños físicos o al equipo y anularán la
garantía.
Accesorios
Pistola de aire .........................................................JAC5098
Pintura para retoques naranja
(pulverizador de 350 ml) ........................................... 554598
Púa hueca Quad ......................................................4116987
Púa maciza Quad ....................................................4116986
Púas (12 requeridas)
Hueca 6 mm.............................................................. 517486
Maciza 6 mm............................................................. 523863
Hueca 9 mm.............................................................. 517487
Hueca 13 mm............................................................ 517488
Hueca robusta 13 mm............................................... 523995
Hueca de carburo 13 mm ......................................... 547183
Hueca 16 mm............................................................ 517489
Información adicional
Manual técnico........................................................ 4132280
Vídeo de formación del operador............................ 4130949
ES-7
3
ETIQUETAS E ICONOS
3
ETIQUETAS E ICONOS
3.1
ETIQUETAS ______________________________________________________________
Familiarícese con las etiquetas, éstas son críticos para el funcionamiento correcto de la
máquina. LAS ETIQUETAS DAÑADAS SE DEBEN CAMBIAR INMEDIATAMENTE.
!
ADVERTENCIA
!
1. Lea el Manual del Operador. No permita
utilizar la máquina a operadores no
formados.
2. Mantenga las protecciones en su lugar y
todo el equipo bien sujeto.
3. Antes de limpiar, ajustar o reparar este
equipo desconecte las transmisiones,
ponga el freno de estacionamiento y
apague el motor.
4. Mantenga las manos, los pies y la ropa
lejos de las piezas en movimiento.
5. No lleve nunca pasajeros.
6. Manténgase alejado de los peatones.
ADVERTENCIA
Las piezas en movimiento
pueden provocar heridas
graves. No trabaje sin las
cubiertas puestas.
Ver el manual de funcionamiento/ mantenimiento.
524729
361854
DANGER
KEEP HANDS AND FEET AWAY
835892
3.2
ICONOS _________________________________________________________________
Leer el
Manual
Combustible
Liberación
OPC
Acelerador del motor
Rápido Estrang. Lento
Palanca de las púas
Subir
Bajar
Aplicación
de las púas
! ADVERTENCIA
No conduzca el tractor a menos que haya leído el Manual técnico y sepa como operar
todos los controles correctamente.
Familiarícese con los iconos indicados anteriormente y lo que representan. Conozca la
situación y uso de todos los controles y marcas antes de operar este tractor.
ES-8
CONTROLES
A
B
C
D
E
F
G
Palanca de control del
embrague
Acelerador
Palanca de control de
desplazamiento
4
Palanca de las púas
Palanca OPC
Interruptor del motor
Estrangulador
A
G
R
F
N
H
L
C
E
B
4
4.1
D
CONTROLES
DESCRIPCION DE LOS CONTROLES _________________________________________
A. Palanca de control del embrague
Activa y desactiva la corriente al embrague de las
púas y aplica la palanca OPC. Tire de la palanca
hasta que se cierre la palanca OPC handle (E) para
transporte. Tire de la palanca hasta que quede
enganchada en posición para operar las púas.
Suelte la palanca OPC para desactivarla.
B. Acelerador
Controla la velocidad de la máquina. Ponga la
palanca entre LENTO y RAPIDO para ajustar la
velocidad deseada. Suba la palanca hata PARADA
para apagar el motor.
C. Palanca de control de desplazamiento
Palanca de cuatro posiciones para operar distintas
funciones de la máquina.
! ADVERTENCIA
Si no se sube completamente el cabezal de aireador
antes de poner la palanca OPC con la palanca de
control de desplazmiento (C) en posición R (Marcha
atrás) o H (Alta) se pueden producir daños en el
césped o el equipo.
N (Punto muerto): Desactiva la atracción y las púas.
H (Alta): Activa la velocidad de transporte. Se
bloquean las púas.
L (Baja): Activa la velocidad de tracción de aireado.
Se pueden activar las púas.
R (Marcha atrás): Aplica la marcha atrás. Se
bloquean las púas.
ES-9
4
CONTROLES
D. Palanca de las púas
Sube y baja el cabezal del aireador. Suba la palanca
hasta SUBIR para subir el cabezal y bájela hasta
BAJAR para bajarlo.
! ADVERTENCIA
A
Para evitar heridas por culpa del aceite hidráulico
caliente, la palanca de las púas debe ponerse en
punto muerto después de subir o bajar la unidad.
Si se engancha la palanca o se queda en
“SUBIR” o “BAJAR” se sobrecalentará el líquido
hidraulico y es posible que se rompa alguna
tubería hidráulica.
R
N
H
L
C
E
E. Palanca OPC
Activa y desactiva el embrague de transmisión.
Vuelve a deactivar la palanca de control del
embrague (A) cuando se suelta.
F.
Interruptor del motor
Controla el funcionamiento del motor. Ponga el
interruptor en CONECTADO para funcionamiento
normal y en DESCONECTADO para apagar la
máquina durante los ajustes, remolcado o
almacenamiento.
G. Estrangulador
La palanca del estrangulador abre y cierra la válvula
del estrangulador en el carburador. En CERRADO
se enriquece la mezcla de combustible para
encender un motor frío. En ABIERTO se proporciona
la mezcla correcta de combustible después de la
puesta en marcha y para volver a encender un motor
caliente.
ES-10
B
D
G
F
FUNCIONAMIENTO
5
5
FUNCIONAMIENTO
5.1
REVISION DIARIA _________________________________________________________
! PRECAUCION
La revisión diaria debe realizarse con el motor
apagado y con todos los líquidos fríos. Baje el
aireador al suelo, apague el motor y desconecte el
cable de la bujía.
1. Realice una revisión visual de toda la unidad, busque
signos de desgaste, piezas sueltas y componentes
extraviados o dañados. Compruebe si hay fugas de
combustible o aceite y asegúrese de que las
conexiones estén bien sujetas, y de que los tubos y
mangueras estén en buen estado.
2. Compruebe el nivel de aceite hidráulico, el
suministro de combustible, el nivel de a ceite del
cárter y el filtro de aire. Con el motor en frío, todos
los líquidos deben estar en la marca de nivel lleno.
3. Compruebe el aire de los neumáticos.
5.2
CONTROL DE PRESENCIA DEL OPERADOR (OPC) _____________________________
1. El sistema OPC está diseñado para proteger al
operador y demás personas contra las lesiones al
detener el aireador y el mecanismo de mando tan
pronto el operador suelte la palanca del OPC.
! ADVERTENCIA
No opere nunca el equipo si el sistema OPC está
desactivado o funciona incorrectamente.
2. Pruebe el sistema OPC.
a. Encienda el motor y ponga el acelerador (B) en
lento. Suba el cabezal del aireador.
b. Ponga el control de desplazamiento (C) en R
(Marcha atrás). En esta posición, la máquina se
alejará del operador al probarla.
c.
Tire de la palanca de control del embrague (A)
ligeramente hasta que se pueda aplicar la
palanca OPC (E). No active las púas.
d. El mecanismo de transmisión se aplicará y la
máquina se movera marcha atrás.
e. Suelte la palancsa OPC. La palanca debe subir y
las ruedas deben parar. Apague el motor.
f. Ponga el control de desplazamiento (C) en L
(Baja).
g. Tire de la palanca de control del embrague (A)
ligeramente hasta que se pueda aplicar la
palanca OPC (E). Active las púas.
h. Suelte la palanca OPC (E). La palanca de control
del embrague (A) debe volver a desactivarse y la
palanca OPC debe subir.
i.
Compruebe las psiciones de la palanca de
control de desplazamiento (C). Las púas sólo
deben activarse con la palanca en L (Baja).
3. Si las ruedas comienzan a girar antes de aplicar la
palanca OPC, siguen girando después de soltar la
palanca OPC o la palanca de control del embrague
no vuelve a desactivarse pare el motor
inmediatamente y repare el sistema.
ES-11
5
FUNCIONAMIENTO
5.3
PROCEDIMIENTOS DE FUNCIONAMIENTO ____________________________________
! PRECAUCION
Lleve gafas de seguridad, zapatos o botas de trabajo de cuero, casco y protectores de oídos para no lesionarse.
1. Suelte la palanca OPC antes de encender el motor.
2. No utilice la el aireador ni los accesorios que tengan
componentes sueltos, dañados o perdidos.
3. Trabaje en una zona de prueba para familiarizarse
con el funcionamiento de la máquina, los controles
y las palancas de control.
4. Estudie la zona para determinar el mejor y más
seguro procedimiento de funcionamiento. Tenga en
cuenta el tipo de terreno y el estado de la
superficie. Las distintas condiciones exigirán
realizar ajustes o tomar precauciones distintas.
5. No dirija nunca la descarga de material hacia los
peatones ni permita que se acerque nadie cuando
esté en funcionamiento. El propietario/operador es
responsable de las lesiones producidas a los
peatones y/o los daños a su propiedad.
! PRECAUCION
Antes de trabajar, limpie la suciedad, piedras,
juguetes y cables que puedan ser arrojados por la
máquina. Entre en las zonas de trabajo con cuidado.
Conduzca siempre a velocidades que permitan tener
un control total de la máquina.
6. Tenga cuidado al trabajar en zonas con gravilla
(caminos, zonas de estacionamiento, senderos para
carros, etc.). Las piedras pueden causar lesiones
graves a las personas y dañar el equipo.
5.4
7. Suba siempre el cabezal del aireador y saque la
palanca de control de L cuando no airee.
8. Desactive las púas y suba el cabezal del aireado al
cruzar caminos o carreteras. Controle el tráfico.
9. Pare y revise el equipo en busca de daños
inmediatamente después de haber golpeado algún
objeto o si la máquina comienza a vibrar de forma
anormal. Haga que reparen el equipo antes de
seguir trabajando.
! ADVERTENCIA
Antes de limpiar, ajustar o reparar el equipo
desconecte siempre las transmisiones, baje el
cabezal del aireador al suelo, apague el motor y
desconecte el cable de la bujía para evitar
lesiones.
10. Frene y tenga más cuidado al trabajar en cuestas.
Lea la sección 5.7. Sea prudente cuando trabaje
cerca de desprendimientos.
11. Tenga cuidado cuando se aproxime a esquinas
donde no llegan bien las herramientas, arbustos,
árboles u otros objetos que pueden impedir la
visión.
12. No limpie nunca el aireador con las manos. Los
bordes de las púas son afilados y podrían provocar
graves heridas.
PUESTA EN MARCHA ______________________________________________________
1. Compruebe el nivel de aceite del cárter del motor.
2. Llene el depósito de combustible con combustible
nuevo, limpio y sin plomo.
A
3. Ponga el interrptor del motor en CONECTADO.
4. Ponga la palanca de control de desplazamiento (C)
en punto muerto y suelte el embrague (A).
R
N
H
5. Ponga la palanca del acelerador (B) a medio gas.
6. Tire del motor de arranque de bobina a la derecha
del motor lo necesario para encender el motor.
7. Deje que se caliente y se lubrique el motor antes
de trabajar a revoluciones altas.
L
C
E
B
D
Figura 5A
ES-12
FUNCIONAMIENTO
5.5
PARADA / ESTACIONAMIENTO ______________________________________________
Para parar:
a. Suelte la palanca OPC para detener completamente la unidad.
Suelte la palanca OPC para detener completamente la
unidad.
Para aparcar el tractor en condiciones normales:
1. Suelte la palanca OPC y suba el cabezal del
aireador. Ponga la palanca de control de
desplazamiento en H, aplique la palanca OPC y
aléjese de la zona de trabajo.
2. Seleccione una zona plana y nivelada para aparcar.
5.6
b. Baje el cabezal del aireador al suelo, reduzca la
velocidad y deje que el motor funcione sin carga
unos minutos.
3. Ponga
el
interurptor
DESCONECTADO.
del
motor
en
Si surge una emergencia y hay que aparcar la máquina
en la zona de trabajo, siga las instrucciones dadas por el
encargado del campo. Si hay que aparcar la máquina en
pendiente, inmovilice o bloquee las ruedas.
CONDUCCION / TRANSPORTE_______________________________________________
Lea y siga las notas de seguridad de este manual al
conducir o transportar el tractor. Consulte la Sección 5.3
para obtener información sobre las instrucciones
generales de funcionamiento. Cuando maniobre marcha
atrás mire detrás de usted para asegurarse de que el
camino esté libre.
3. Ponga la palanca de control de desplazamiento en
H y aplique la palanca OPC para conducir a y
desde la zona de trabajo.
4. Ajuste la palanca del aceelrador a la velocidad de
transporte deseada.
! PRECAUCION
1. Suelte la palanca OPC y suba el cabezal del
aireador.
2. Ponga la palanca del acelerador en lento.
5.7
5
Conduzca siempre de modo que pueda ver el camino
y alejarse de la máquina si pierde el control.
FUNCIONAMIENTO EN PENDIENTE___________________________________________
! ADVERTENCIA
Para evitar vuelcos, el método más seguro para
trabajar en pendientes y desniveles es conducir en
sentido vertical, nunca horizontalmente. Evite los
giros innecesarios, conduzca despacio y esté alerta
de posibles peligros y caídas.
! PRECAUCION
No trabaje en pendientes superiores a 20°.
2. Si el tractor tiende a resbalar o los neumáticos
marcan el césped, colóquelo en una pendiente
menos empinada hasta que se vuelva a recuperar
la tracción o los neumáticos dejen de marcar.
3. Si sigue resbalando, es señal de que la pendiente
es demasiado inclinada para un trabajo seguro. No
vuelva a intentar subir, descienda despacio.
Para conseguir la máxima tracción es imprescindible que
la presión de los neumáticos sea la correcta.
Delante 97 kPa
Detrás 97 kPa
La máquina está diseñada para ofrecer una buena
tracción y estabilidad en condiciones operativas
normales. No obstante, hay que tener cuidado al trabajar
en pendientes, especialmente cuando la arena o el
césped estan mojados. El terreno mojado reduce la
tracción y el control de la dirección.
1. Trabaje siempre a velocidad baja para mantener el
control.
ES-13
5
FUNCIONAMIENTO
5.8
AIREADO ________________________________________________________________
! ADVERTENCIA
2. Ponga la palanca de control de desplazamiento en
L.
Para evitar heridas graves, aleje las manos, los pies y
la ropa del aireador.
3. Ponga la palanca del acelerador en LENTO,
póngase a un lado de la máquina y aplkique
lentamente la palanca OPC.
No use NUNCA las manos para limpiar el aireador.
Los bordes de las púas son afilados y pueden
provocar heridas.
a. Ajuste el acelerador a la velocidad deseada
cuando la máquina eté en movimiento.
Para limpiar las obstrucciones en la púas, suelte el
embrague principal, suba el cabezal del aireador y
desconecte el cable de la bujía primero.
b. Tire de la palanca de control el embrague hasta
que se aplique y se bloquee en posición de
activación de las púas.
c.
Para airear:
1. Encienda el motor y suba el cabezal del aireador.
Baje totalmente el cabezal del aireador bajando
la palanca de las púas en la zona donde desee
comenzar a trabajar.
4. Para dejar de airear, suba la palanca para subir el
cabezal del aireador. Desactive la palanca OPC.
5.9
REMOLCADO_____________________________________________________________
Si debido a problemas es necesario interrumpir
temporalmente la actividad del tractor y llevarlo fuera de
la zona de trabajo tendrá que ser cargado en un trailer.
Tenga cuidado al cargar y descargar la máquina. Las
púas podrían arañar o engancharse en la rampa del
remolque. Para evitar que las varillas de empuje se
doblen, quite las dos púas más inferiores. Sujete la
máquina al remolque para evitar que se balancee o se
mueva durante el transporte.
Remolcado/transporte a largas distancias. Si hay que
remolcar la máquina en carretera, antes de sujetarla al
remolque infle los neumáticos a:
Delanteros - 152 kPa
Traseros - 152 kPa
Después de bajar el tractor, reduzca la presión a sus
parametros normales. Ver la sección 5.7.
ES-14
AJUSTES
6
6
AJUSTES
6.1
GENERALIDADES _________________________________________________________
! ADVERTENCIA
Para evitar heridas, suelte el embrague principal,
baje el cabezal del aireador al suelo, pare el motor y
desconecte el cable de la bujía antes de realizar
ningún ajuste o realizar tareas de mantenimiento.
Asegúrese de que el aireador esté aparcado en un
superficie sólida y nivelada. No trabaje en un tractor
subido solamente en un soporte. Utilice siempre
soportes regulables.
3. El pelo largo, las joyas o la ropa suelta pueden
trabarse en las partes móviles. Quítese las joyas,
cíñase la ropa suelta y recógase el pelo.
! PRECAUCION
Evite que las manos y los dedos queden atrapados
entre los components móviles y fijos de la máquina.
! ADVERTENCIA
Si sólo está levantada la parte delantera o trasera de
la máquina, ponga calzos delante y detrás de las
ruedas que no están levantadas.
Para evitar heridas, sujete el bastidor superior con
soportes al trabajar en la máquina con el cabezal del
aireador levantado.
1. Los ajustes y las tareas de mantenimiento deben ser
realizadas siempre por un técnico cualificado. Si no
puede realizar los ajustes necesarios, póngase en
contacto con un distribuidor Jacobsen.
Las tuberías hidráulicas pueden romprese o la
palanca podría activarse haciendo caer la máquina
rápidamente.
2. Cambie, no ajuste, los componentes desgastados y
dañados.
6.2
4. No modifique los valores del regulador ni sobrepase
la velocidad de régimen de la máquina.
PROTECTOR DEL CESPED _________________________________________________
El protector del césped (C) se utiliza para impedir que se
levante el césped al sacar las púas. La presión del
protector puede ajustarse aumentando o disminuyendo
la tensión de los muelles (A).
Ponga o quite separadores (B) encima del muelle para
que el protector aplique la presión necesaria y evite que
se levante el césped, pero no demasiada como para que
lo marque o lo corte.
Figura 6A
6.3
CABLE DE LA POLEA TENSORA DEL TRANSMISOR DEL AIREADOR ______________
1. Aplique la palanca OPC y active las púas. [Ver 4.1]
2. Ajuste las tuercas del cable (D) lo necesario para
obtener una deflexión de 3,3 mm con un empuje de
2,0 kg para la correa nueva o 1,4 kg para la correa
usada en el lugar mostrado.
0.18
inch (3.3 mm)
3,3 mm
4.4 kg
lb (1.81
2,0
Nuevakg) New
3.0
lb
(1.36
1,4 kg Usadakg) Used
3. Puede realizar ajustes adicionales con la palanca.
D
Figura 6B
ES-15
6
AJUSTES
6.4
CABLE DE LA POLEA TENSORA DEL TRANSMISOR DE TRACCION _______________
1.
Aplique la palanca OPC. [Ver 4.1]
2.
Ajuste las tuercas del cable (E) lo necesario para
obtener una deflexión de 3,3 mm con un empuje de
2,0 kg para la correa nueva o 1,4 kg para la correa
usada en el lugar mostrado.
3.
Puede realizar ajustes adicionales con la palanca.
4.
Compruebe el funcionamiento de la palanca. Cuando
aplique la palanca OPC deberá soltarse el freno de
estacionamiento (F) y la polea tensora deberá aplicar
la transmisón de tracción.
3,3 mm
0.18
inch (3.3 mm)
4.4kg
lb Nueva
(1.81 kg) New
2,0
3.0kg
lb Usada
(1.36 kg) Used
1,4
E
F
Figura 6C
6.5
REGULACION DEL AIREADOR ______________________________________________
Nota: Una regulación incorrecta entre el árbol del cigüeñal
del aireador y el eje de distribución provocará orificios
alargados al airear y hará demasiado ruido en el bastidor de
levas.
1. Quite las protecciones de los laterales de la máquina.
2.
Quite la cadena del aireador que conecta el árbol del
cigüeñal y el eje de distribución a ambos lados de la
máquina.
3.
Afloje el arnés entre las mitades del árbol del cigüeñal.
4.
Gire la rueda dentada del árbol de distribución derecho
(G) hasta que la ranura de chaveta apunte hacia la
parte delantera de la unidad. Las marcas de reglaje
deben estar a un ángulo de 45° con el punto hacia la
parte delantera inferior.
5.
Gire la rueda dentada del árbol de la distribución
derecha (H) hasta que las marcas de relgaje estén
horizontales con el punto hacia la parte delantera. La
ranura de chaveta debe estar a un ángulo de 45°.
6.
Instale la cadena derecha del aireador (J). La rueda
dentada del árbol de distribución puede girarse hasta
5° hacia la derecha para encajar con la cadena.
7.
Gire la rueda dentada del árbol de distribución (K)
hasta que las marcas de reglaje estén verticales con el
punto hacia el suelo.
8.
Instale la cadena izquierda del aireador (L). La rueda
dentada del árbol de distribución puede girarse hasta
5° hacia la izquierda para encajar con la cadena.
9.
Apriete el husillo entre las mitades del árbol de
distribución.
10. Instale los protectores.
ES-16
Punto hacia la
parte
delantera
H
Marcas de
reglaje
horizontales
J
Marcas de
reglaje a 45°
Punto hacia la
parte delantera
inferior
G
Parte delantera
Cadena derecha del aireador
Figura 6D
Marcas de
reglaje verticales
K
Punto hacia el
suelo
L
Parte delantera
Cadena izquierda del aireador
Figura 6E
AJUSTES
6.6
6
CABLE DE CONTROL DE DESPLAZAMIENTO __________________________________
Si el sistema de impulsión de la tracción no se desplaza
correctamente es posible que haya que ajustar el cable
de control de desplazamiento.
6. Pruebe las posiciones de la palanca de control de
desplazamiento. La palanca de desplazamiento (P)
debe bloquearse en todos los topes del control de
desplazamiento.
1. Desconecte la horquilla (N) de la palanca de
dezplazamiento (P).
2. Ponga la palanca de control de desplazamiento en
la posición L.
3. Gire la palanca de desplazamiento (P) a la derecha
hasta que quede bloqueada en el tope de velocidad
baja.
P
4. Ajuste las tuercas del cable (M) lo necesario hasta
que la horquilla (N) quede alineada con el orificio de
montaje en la palanca (P).
5. Si hay que realizar más ajustes, el cable puede
ajustarse en el asa.
6.7
N
M
Figura 6F
CABLE DE ELEVACION _____________________________________________________
Si el cabezal de aireador no sube o baja correctamente
es posible que haya que ajustar el cable de elevación.
1. Afloje las tuercas del cable (R). La válvula de
elevación debe volver automáticamente al centro.
2. Ponga la palanca de control de elevación en el
centro (punto muerto).
3. Apriete las tuercas (R).
4. Pruebe el funcionamiento del control de elevación.
R
Figura 6G
ES-17
6
AJUSTES
6.8
ESPECIFICACION DE PAR DE TORSION ______________________________________
PRECAUCION
Todos los valores de par de torsión incluidos en estos cuadros son aproximados y para referencia solamente. Su
utilización es responsabilidad suya. Jacobsen no se hace responsable de ninguna pérdida, reclamación o daño
producido por la utilización de estos cuadros.
Tenga siempre mucho cuidado cuando utilice un valor de par de torsión.
Jacobsen utiliza pernos de grado 5 de serie a menos que se diga lo contrario.
FIJADORES DE SERIE AMERICANOS
FIJADORES DE SERIE AMERICANOS
GRADO 8
TAMAÑO
UNIDADES
GRADO 5
GRADO 8
20 (2,3)
–
7/16-14
ft-lbs (Nm)
50 (67,8)
65 (88,1)
in-lbs (Nm)
24 (2,7)
30 (3,4)
7/16-20
ft-lbs (Nm)
55 (74,6)
70 (94,9)
#10-24
in-lbs (Nm)
35 (4,0)
45 (5,1)
1/2-13
ft-lbs (Nm)
75 (101,7)
100 (135,6)
#10-32
in-lbs (Nm)
40 (4,5)
50 (5,7)
1/2-20
ft-lbs (Nm)
85 (115,3)
110 (149,2)
#12-24
in-lbs (Nm)
50 (5,7)
65 (7,3)
9/16-12
ft-lbs (Nm)
105 (142,4)
135 (183,1)
1/4-20
in-lbs (Nm)
95 (10,7)
125 (14,1)
9/16-18
ft-lbs (Nm)
115 (155,9)
150 (203,4)
1/4-28
in-lbs (Nm)
95 (10,7)
150 (17,0)
5/8-11
ft-lbs (Nm)
150 (203,4)
195 (264,4)
5/16-18
in-lbs (Nm)
200 (22,6)
270 (30,5)
5/8-18
ft-lbs (Nm)
160 (217,0)
210 (284,8)
5/16-24
in-lbs (Nm)
240 (27,1)
300 (33,9)
3/4-10
ft-lbs (Nm)
170 (230,5)
220 (298,3)
3/8-16
ft-lbs (Nm)
30 (40,7)
40 (54,2)
3/4-16
ft-lbs (Nm)
175 (237,3)
225 (305,1)
3/8-24
ft-lbs (Nm)
35 (47,5)
45 (61,0)
7/8-14
ft-lbs (Nm)
300 (406,8)
400 (542,4)
TAMAÑO
UNIDADES
GRADO 5
#6-32
in-lbs (Nm)
#8-32
FIJADORES METRICOS
TAMAÑO
UNIDADES
M4
Fijadores no
críticos para
el aluminio
4.8
5.8
8.8
10.9
12.9
Nm (in-lbs)
1,2 (11)
1,7 (15)
2,9 (26)
4,1 (36)
5,0 (44)
2,0 (18)
M5
Nm (in-lbs)
2,5 (22)
3,2 (28)
5,8 (51)
8,1 (72)
9,7 (86)
4,0 (35)
M6
Nm (in-lbs)
4,3 (38)
5,7 (50)
9,9 (88)
14,0 (124)
16,5 (146)
6,8 (60)
M8
Nm (in-lbs)
10,5 (93)
13,6 (120)
24,4 (216)
33,9 (300)
40,7 (360)
17,0 (150)
M10
Nm (ft-lbs)
21,7 (16)
27,1 (20)
47,5 (35)
66,4 (49)
81,4 (60)
33,9 (25)
M12
Nm (ft-lbs)
36,6 (27)
47,5 (35)
82,7 (61)
116,6 (86)
139,7 (103)
61,0 (45)
M14
Nm (ft-lbs)
58,3 (43)
76,4 (55)
131,5 (97)
184,4 (136)
219,7 (162)
94,9 (70)
ES-18
MANTENIMIENTO
7
7
MANTENIMIENTO
7.1
GENERALIDADES _________________________________________________________
! ADVERTENCIA
b. Mantenga todas las piezas móviles debidamente
ajustadas y lubricadas.
Antes de limpiar, ajustar o reparar este equipo,
desconecte todas las transmisiones, baje el cabezal
del aireador al suelo, pare el motor y desconecte el
cable de la bujía para evitar heridas.
c.
Asegúrese de quela unidad esté aparcada en un
terreno sólido y nivelado. No trabaje en una máquina
que sólo esté sujeta por un gato. Utilice siempre
soportes regulables.
e. Mantenga las protecciones en su lugar y todo el
equipo bien sujeto.
1. Los ajustes y las tareas de mantenimiento deben ser
siempre realizadas por un técnico cualificado. Si
puede realizar los ajustes necesarios, póngase en
contacto con un distribuidor autorizado Jacobsen.
2. Revise el equipo regularmente, establezca u
programa de mantenimiento y mantenga los
registros detallados.
a. Mantenga el equipo limpio.
7.2
Cambie las piezas gastadas o dañadas antes de
operar la máquina.
d. Mantenga todos los líquidos a los niveles
correspondientes
f.
Mantenga los neumáticos debidamente inflados.
3. El pelo largo, las joyas o la ropa suelta pueden
trabarse en las partes móviles.
4. Utilice las ilustraciones del Catálogo de piezas
como referencia para desmontar y volver a montar
los componentes.
5. Recicle o tire los materiales peligrosos (baterías,
combustible, lubricantes, anti congelante, etc.)
conforme a las normativas locales, estatales o
federales.
MOTOR __________________________________________________________________
IMPORTANTE: Con esta máquina se incluye un
Manual del Motor adicional, preparado por el
fabricante del motor. Lea este manual detenidamente
hasta
familiarizarse
con
la
operación
y
mantenimiento del motor. La atención adecuada a
las indicaciones del fabricante asegurarán una vida
de servicio máxima del mismo. Para pedir manuales
de recambio del motor se deberá poner en contacto
con el fabricante del mismo.
4. Cambie el aceite y el filtro después de las primeras
5 horas de operación.
5. Consulte la sección 9.2 y el Manual del motor sobre
intervalos específicos de mantenimiento.
El rodaje adecuado de un nuevo motor puede aportar
considerables diferencias a su rendimiento y duración.
Nota: El aireador está diseñado para operar de la forma
más eficaz con el ajuste predeterminado del regulador.
No altere los ajustes del regulador del motor ni lo haga
funcionar a velocidad excesiva.
Jacobsen recomienda lo siguiente durante el período de
rodaje:
1. Conduzca de forma suave durante las primeras 25
horas a una velocidad reducida.
2. Evite arranques con el acelerador a toda marcha y
una aceleración rápida.
3. Deje que el motor llegue a la temperatura de
operación antes de operar con carga completa.
ES-19
7
MANTENIMIENTO
7.3
ACEITE DE MOTOR ________________________________________________________
Compruebe el aceite del motor al inicio de cada jornada
de trabajo y antes de encender el motor. Si está bajo,
retire el tapón del tubo de llenado y añada el aceite
necesario.
Realice el cambio inicial de aceite a las primeras 5 horas
de operación. Después cambie el aceite cada 25 horas.
Utilice aceites de motor con clasificación API, SF, SG,
SH.
Por encima de 0° C
SAE 30W
Por debajo de 0°C
SAE 5W20 o SAE 5W30
Marca de
LLENO
Consulte el Manual del propietario del fabricante del
motor con información detallada del servicio.
Después de añadir o cambiar el aceite, encienda el
motor y manténgalo en ralentí durante 30 segundos.
Apague el motor. Espere 30 segundos y revise el nivel
de aceite. Añada aceite hasta que llegue a la marca
LLENO en la varilla.
Gama de
funcionamiento
Figura 7A
7.4
FILTRO DE AIRE DEL MOTOR _______________________________________________
1. Saque y revise el prelimpiador de espuma cada 25
horas. Cámbielo si está sucio o dañado.
Para revisar el prelimpiador, lave con detergente
líquido y agua. Escurra en un paño limpio. Sumerja
en aceite limpio de motor y escurra el exceso de
aceite sobre un paño limpio absorbente.
2. Cambie el elementoe del filtro de aire de papel cada
100 horas, más a menudo en ambientes con mucho
polvo.
Nota: Cambie siempre el elemento de papel. No lave
ni use aire a presión para limpiar el cartucho.
Consulte el Manual del propietario del fabricante del
motor con información detallada del servicio.
7.5
COMBUSTIBLE ___________________________________________________________
Manipule el combustible con cuidado, es altamente
inflamable. Utilice un contenedor adecuado de modo
que la espita quepa en el cuello del tubo de llenado de
combustible. Evite la utilización de latas y embudos para
transferir el combustible.
! ADVERTENCIA
Nunca retire el tapón del depósito de combustible, o
añada combustible, con el motor en marcha o caliente.
No fume cuando manipule combustible. No llene ni vacíe
nunca el depósito en espacios cerrados.
No vierta combustible y límpielo inmediatamente.
Nunca manipule o almacene contenedores con
combustible cerca de llamas o de ningún dispositivo que
pudiera lanzar chispas y hacer prender el combustible o
los vapores que éste despide.
Asegúrese de volver a instalar y apretar el tapón de
combustible.
ES-20
• Llene el depósito del combustible hasta una altura de
25 mm del fondo del cuello del tubo de llenado.
• Almacene el combustible siguiendo las ordenanzas
locales y estatales y las recomendaciones del
proveedor de combustible.
• Nunca llene en exceso el depósito de combustible.
Motor de gasolina:
• Utilice gasolina sin plomo limpia, nueva, de grado
regular con un mínimo de 85 octanos.
• No utilice gasolina de alto grado ni mezcla de gasolina
y aceite. Cuando utilice una mezcla de combustible, no
utilice una con más de 10% de etanol. En ninguna
circunstancia se debe utilizar una mezcla con metanol.
MANTENIMIENTO
7.6
7
MANGUERAS HIDRAULICAS ________________________________________________
5.
! ADVERTENCIA
Inspeccione
detenidamente
todos
los
mangueras y conexiones cada 250 horas.
tubos,
IMPORTANTE: El sistema hidráulico puede quedar
permanentemente dañado si se contamina el aceite.
Antes de desconectar cualquier componente hidráulico,
limpie la zona alrededor de los accesorios y de los
extremos de las mangueras para limpiar de impurezas
el sistema.
Para evitar heridas graves producidas por el aceite
caliente a alta presión, no utilice nunca las manos al
comprobar fugas de aceite, utilice papel o cartón.
El líquido hidráulico que sale a presión puede tener
suficiente fuerza como para penetrar la piel. Si sucede
esto, debe ser extraído quirúrgicamente lo antes posible
para evitar que se cangrene la zona.
NO cambie las mangueras hidráulicas con el cabezal del
aireador subido. Las mangueras están a mucha presión.
Liberar presión incorrectamente podría hacer que el
cabezal del aireador cayera repentinamente.
a.
Antes de conectar cualquier componente
hidráulico, etiquete o marque la ubicación de cada
manguera y, a continuación, limpie la zona
alrededor de los accesorios.
b.
Cuando desconecte el componente, esté
preparado para montar los insertos o tapones en
los extremos de las mangueras y en los puertos
abiertos. Con ello se evitará la entrada de
impurezas en el sistema hidráulico y el derrame de
aceite.
1.
Desconecte siempre todas las transmisiones, baje el
cabezal del aireador al suelo, pare el motor y
desconecte el cable de la bujía antea de revisar o
desconectar los tubos o mangueras hidráulicas.
c.
2.
Con el motor apagado, ponga la palanca de las púas
en SUBIR durante 10 segundos y en BAJAR durante
10 segundos para liberar la presión del sistema.
Asegúrese de que las juntas tóricas estén limpias y
de que los accesorios de las mangueras estén
correctamente asentados antes de apretarlos.
d.
3.
Compruebe el estado de los tubos y las mangueras
diariamente. Busque mangueras mojadas o manchas
de aceite. Sustituya las mangueras y tubos
desgastados o dañados antes de poner en
funcionamiento la máquina.
No retuerza la manguera. Las mangueras
retorcidas pueden hacer que los acopladores se
aflojen conforme flexan las mangueras durante el
funcionamiento provocando, así pues, fugas de
aceite.
e.
4.
El tubo o manguera nuevo debe colocarse en el
mismo sitio que el retirado, no coloque las mordazas,
abrazaderas o uniones en un sitio distinto al original.
Las mangueras retorcidas o ensortijadas pueden
restringir el flujo de aceite, con el consiguiente mal
funcionamiento
del
sistema,
excesivo
calentamiento del aceite y fallo de las mangueras.
7.7
ACEITE HIDRAULICO ______________________________________________________
Consulte en la Sección 9.2 los intervalos específicos de
mantenimiento.
Vacíe y cambie el aceite hidráulico su ha tenido lugar un
fallo de componentes grave, si advierte la presencia de
agua o espuma en el aceite o si nota un olor rancio (lo que
indica un calor excesivo).
Sustituya siempre el filtro hidráulico cuando cambie el
aceite.
2.
Vacíe y sustituya el aceite hidráulico cada 250 horas o
después de que haya ocurrido un fallo grave de
componentes, o si advierte la presencia de agua,
espuma o un olor rancio.
3.
Quite el tapón de vaciado de la parte inferior del
depósito principal y afloje o saque la varilla/tapón de
llenado.
4.
Cuando haya vaciado el aceite, ponga el tapón de
vaciado y llene el depósito cn aceite hidráulico
Jacobsen.
5.
Purgue el aire del sistema.
Para cambiar el aceite hidráulico:
1.
Limpie la zona alrededor del tapón del aceite para evitar
que entren impurezas en el sistema y lo contaminen.
a.
La temperatura del aceite debe estra entre 16 y
32°C. No compruebe el aceite cuando esta
caliente.
a.
Opere la función de subida / bajada varios minutos
para purgar el aire del sistema y estabilizar el
aceite.
b.
Compruebe el aceite con el cabezal del aireador
subido.
b.
c.
El depósito principal de aceite debe estar siempre
lleno.
Una vez estabilizado el aceite y purgado el aire,
llene el depósito de expansión hasta la marca de
“LLENO”.
ES-21
7
MANTENIMIENTO
7.8
SILENCIADOR Y ESCAPE __________________________________________________
! ADVERTENCIA
Los humos del escape pueden contener monóxido de
carbono, el cual es tóxico y puede ser mortal si se inhala.
NUNCA encienda un motor sin la ventilación adecuada.
7.9
1.
Para protegerse del monóxido de carbono, inspeccione todo
el sistema de escape regularmente y sustituya siempre el
silenciador si está dañado.
Si advierte un cambio de color y de sonido del escape, pare
el motor inmediatamente. Averigüe cuál es el problema y
mande el equipo a reparar.
Apriete los componentes del colector del escape
regularmente. Apriete o cambie las abrazaderas del escape.
NEUMATICOS_____________________________________________________________
Mantenga los neumáticos correctamente inflados para
prolongar su vida útil. Compruebe la presión de inflado
cuando los neumáticos estén fríos. Inspeccione el
desgaste de la pisada.
2.
Compruebe la presión con una galga para neumáticos
de baja presión y precisa.
3.
Mantenga los neumáticos inflados a 97 kPa.
! PRECAUCION
A menos que esté formado para ello y tenga las
herramientas y la experiencia necesaria, NO monte un
neumático o una llanta. Un montaje incorrecto puede
producir una explosión y graves heridas.
7.10 PROCEDIMIENTO DE MONTAJE DE LAS RUEDAS ______________________________
1.
Limpie la suciedad, la grasa y el aceite de la rosca de
los pernos sin cabeza. No lubrique las roscas.
2.
Coloque la rueda en el cubo y preste atención para
que la superficie de la rueda esté totalmente en
contacto con el cubo o el tambor del freno.
3.
Apriete con los dedos todos los componentes y
aplique par de torsión en orden cruzado; apriete
siempre las tuercas en la posición superior.
4.
Compruebe y vuelva a apretar diariamente hasta que
el par de torsión se mantenga entre 115 -128 Nm.
! ADVERTENCIA
Asegúrese de aparcar el tractor en una superficie sólida
y nivelada. No trabaje en un tractor que esté sujeto por
soportes. Utilice gatos.
Si sólo esta subida la parte delantera o trasera del
tractor, ponga calzos delante y detrás de las ruedas que
no estén subidas.
7.11 CUIDADOS Y LIMPIEZA ____________________________________________________
Lave la unidad después de cada utilización. Mantenga el
equipo limpio.
Nota: No lave el equipo si está caliente. No use rociadores
de alta presión. Use agua fría y limpiadores para
automóviles.
1. Limpie con aire comprimido el motor y las aletas del
radiador. En los distribuidores Jacobsen puede
conseguirse un rociador especial.
2.
Limpie todas las piezas de plástico o goma con una
solución jabonosa suave o con los limpiadores para
goma y vinilo disponibles en el mercado.
Repare las superficies metálicas dañadas y utilice pintura
de retoque Jacobsen. Aplique una capa de cera al equipo
para proteger la pintura.
! PRECAUCION
Utilice agua fría para limpiar el equipo.
Nota: Se ha observado que el uso de agua salada o agua
de efluente favorece el óxido y corrosión de las partes
metálicas, causando un deterioro prematuro o avería. Los
desperfectos de esta naturaleza no están cubiertos por la
garantía de fábrica.
3.
4.
No rocíe agua directamente a los alojamientos de los
cojinetes ni las juntas.
ES-22
Limpie la suciedad de las transmisiones, silenciador y
motor para evitar incendios.
! ADVERTENCIA
No limpie NUNCA el aireador con las manos. Los bordes
de las púas están afilados y pueden provocar graves
heridas.
MANTENIMIENTO
7
7.12 ALMACENAMIENTO________________________________________________________
Generalidades
Mecanismo del aireador
1. Lave la unidad a fondo y lubríquela. Repare y pinte el
metal dañado o expuesto.
1. Quite las púas y límpielas. Ponga un poco de aceite
para que no se oxiden.
2. Inspeccione la unidad, apriete todos los elementos,
sustituya los componentes desgastados o dañados.
2. Limpie las varillas de empuje y póngales un poco
de aceite.
3. Limpie a fondo los neumáticos y almacene el tractor
de manera que la carga no esté sobre los
neumáticos. Si la unidad no está sobre soportes
para gatos, compruebe los neumáticos a intervalos
regulares e ínflelos según sea necesario.
3. Baje el cabezal del aireador para liberar presión del
sistema hidráulico.
4. Mantenga limpia y seca la máquina y todos sus
accesorios y proteja el equipo de las inclemencias
del tiempo cuando lo almacene. No almacene
equipo cerca de llamas o chispas expuestas que
puedan provocar prender combustible o vapores.
2. Compruebe el nivel de aceite del cárter del motor y
del sistema hidráulico.
Motor
1. Con el motor caliente, quite el tapón de vaciado y
vacíe el aceite del cárter. Ponga el tapón de vaciado
y llene con aceite nuevo. Deje que se enfríe el motor
antes de almacenar la máquina.
2. Limpie el exterior del motor. Pinte el metal expuesto
o aplique una ligera capa de aceite anticorrosión.
Jacobsen recomienda utilizar un aditivo para
combustible como STABIL® para proteger el motor.
Mezcle el aditivo siguiendo las instrucciones en el
envase. Haga funcionar el motor brevemente para que el
aditivo circule por el carburador.
Tras el almacenamiento
1. Compruebe o repare el filtro de aire.
3. Llene el depósito de combustible con combustible
nuevo.
4. Asegúrese de que
correctamente inflados.
los
neumáticos
están
5. Limpie el aceite de las púas y de las varillas de
empuje.
6. Arranque y deje funcionar el motor a medio gas.
Deje pasar tiempo suficiente para que el motor se
caliente y lubrique adecuadamente.
! ADVERTENCIA
No encienda nunca el motor si no hay una ventilación
adecuada; los humos del escape pueden ser mortales
si se inhalan.
Retire las bujías y ponga 30 ml de aceite de motor en
cada cilindro. Vuelva a poner las bujías y acelere
lentamente (sin arrancar) para distribuir el aceite en el
cilindro.
Si almacena la máquina en interior, vacíe el depósito de
combustible.
Nota: No use combustible con etanol mientras esté
guardado.
ES-23
8
8
RESOLUCION DE PROBLEMAS
RESOLUCION DE PROBLEMAS
8.1
GENERALIDADES _________________________________________________________
El siguiente cuadro indica los problemas básicos que pueden surgir durante el arranque y la operación. Para obtener una
información más detallada sobre los sistemas hidráulico y eléctrico, póngase en contacto con el distribuidor de Jacobsen
local.
Síntomas
El motor no arranca.
Posibles causas
Acción
1. Depósito de combustible vacío
o sucio.
1. Llenar con combustible nuevo. Cambiar el filtro
de combustible.
2. Interruptor del motor
DESCONECTADO.
2. Poner el interruptor del motor en CONECTADO.
1. Nivel de combustible bajo,
combustible o filtro de
combustible sucio.
1. Llenar con combustible nuevo.
2. Filtro de aire sucio.
2. Revisar y cambiar el filtro de aire.
3. Inyectores, bomba de
combustible.
3. Consultar el manual del motor.
El motor se para.
Depósito de combustible vacío.
Llenar el depósito con combustible nuevo.
El motor se
sobrecalienta.
1. Entrada de aire restringida.
1. Limpiar la entrada de aire de refrigeración.
2. Sobrecarga del motor.
2. Reducir la velocidad hacia delante.
1. Púas sucias u oxidadas.
1. Limpiar las púas y regar ligeramente los greens.
2. Rebabas en las púas.
2. Quitar las rebabas con una lima.
3. Velocidad del motor
demasiado lenta.
3. Trabajar a más velocidad.
4. Neumáticos demasiado
grandes.
4. Ver las especificaciones de los neumáticos.
Las púas no penetran
el césped.
Púas desgastadas o atascadas.
Cambiar o limpiar las púas.
Las púas no se
levantan lo suficiente.
Nivel de líquido hidráulico bajo.
Añadir líquido hidráulico. Ver sección 7.7
Las púas no se
mueven.
Varilla de empuje doblada.
Cambiar la varilla de empuje.
El césped se levanta.
Césped con raíces poco
profundas.
Aumentar la tensión del muelle protector del césped.
Ver sección 6.2
El impulsor de
tracción no se activa.
Cable de la polea impulsora de
tracción desajustada.
Ajustar el cable. Ver sección 6.4
El impulsor del
aireador no se activa.
Cable de la polea impulsora del
aireador desajustada.
Ajustar el cable. Ver sección 6.3
Orificio alargado en el
céped.
Unidad desajustada.
Comprobar la regulación. Ver sección 6.3
Ruido en el cárter.
Unidad desajustada.
Comprobar la regulación. Ver sección 6.3
Al motor le cuesta
arrancar o funciona
mal.
Las púas se atascan.
ES-24
CUADROS DE MANTENIMIENTO Y LUBRICACION
9
9
CUADROS DE MANTENIMIENTO Y LUBRICACION
9.1
GENERALIDADES _________________________________________________________
3. Para un correcto funcionamiento de todas las
palancas, los puntos de pivote y demás puntos de
fricción no mostrados en el cuadro de lubricación,
aplique varias gotas de aceite SAE 30 cada 40
horas o según sea necesario.
! ADVERTENCIA
Antes de limpiar, ajustar o reparar este equipo
desengrane siempre todos los engranajes, baje los
útiles hasta el suelo, eche el freno de
estacionamiento, apague el motor y saque la llave de
encendido para así evitar lesiones.
4. Ponga aceite #30 o lubricante penetrante de
cadena a diario.
5. Engrase el árbol del cigüeñal del aireador (3) y los
accesorios de la varilla de conexión (6) a diario.
1. Limpie siempre el accesorio engrasador antes y
después de lubricar.
2. Utilice grasa que cumpla o supere las
especificaciones NLGI Grado 2 LB. Aplique grasa
con una pistola manual y llene despacio hasta que
la grasa comience a subir. No utilice pistolas de aire
comprimido.
9.2
.
CUADROS DE MANTENIMIENTO _____________________________________________
Intervalos recomendados de servicio y lubricación
Filtro de aire
Cada
8-10
horas
Cada
25
horas
Cada
100
horas
I
C
R
Cada
250
horas
Aceite del bastidor de levas
Aceite del motor
Mangueras
y
hidráulicas
Aceite hidráulico
tuberías
Escape y silenciador
Cada
500
horas
Cada
1000
horas
Anualmente
Ver
Sección
R
7.4
C
I-R*
Accesorios de engrase
Cada
400
horas
IV
R
7.3
L
II
I
I***
I
7.6
I-A
R**
7.7
I
I
7.8
Neumáticos
Tipo de
lubricante
I-A
III
7.9
Cojinetes de las ruedas
delanteras
L
A - Añadir o Ajustar C - Limpiar I - Inspeccionar L - Lubricar R - Reemplazar
AR - Según Necesidad
* Cambiar el aceite tras las primeras 5 horas.
** O cada dos años, lo que ocurra antes.
I
- Pistola de engrase manual con NLGI Grado 2 (Clase
LB).
*** Revisar los manguitos y tuberías en busca de fugas o
marcas de aceite.
II
- Aceite del motor - Ver sección 7.3
III
- Aceite hidráulico - Ver sección 7.7
IV - Aceite SAE 30
ES-25
10
10
NOTAS
NOTAS
ES-26
NOTAS
10
ES-27
PARTS CATALOG
11
11
PARTS CATALOG
11.1 TABLE OF CONTENTS______________________________________________________
1.1 ......... Decals ................................................................
2.1 ......... Chassis ..............................................................
3.1 ......... Aerator Enclosure .............................................
4.1 ......... Controls .............................................................
5.1 ......... Chassis ..............................................................
6.1 ......... Transaxle ...........................................................
7.1 ......... Steering Axle .....................................................
8.1 ......... Engine and Pump..............................................
28
30
32
34
36
38
40
42
9.1......... Belts & Pulleys ..................................................
10.1....... Cam Case...........................................................
11.1....... Aerator Crankshaft ...........................................
12.1....... Hydraulic System..............................................
13.1....... Slide and Glide Assmebly ................................
14.1....... Turf Guard Assembly .......................................
15.1....... Tines and Holders.............................................
44
46
48
50
52
54
56
GA 24
Serial No. All
1.1 Decals
6
6
GA 24 OPC
GA 24 OPC
DANGER
KEEP HANDS AND FEET AWAY
8
12
9
7
5
10
OPERATION
READ MANUAL BEFORE OPERATING.
REPLACEMENT MANUAL AVAILABLE
FROM: LOCAL DEALER
11
4
1
2
3
2
DANGER
13
KEEP HANDS AND FEET AWAY
5
4
3
GA 24 OPC
1
6
!
WARNING
1
1. Read operator's manual. Do not allow
untrained operators to use machine.
2. Keep shields in place and hardware
securely fastened.
Before
you clean, adjust or repair this
3.
equipment, disengage all drives, engage
parking brake and stop engine.
4. Keep hands, feet and clothing away
from moving parts.
5. Never carry passengers
6. Keep bystanders away.
10
28
9
!
ADVERTENCIA
1. Leer el manual del operador. No permitir que
personas no capacitadas para ello usen la maquina
2. Mantener los escudos en su lugar y la tornilleria
debidamente fijada.
3. Antes de limpiar, ajustar o reparar este equipo,
desengranar todas los mandos, aplicar el freno de
estacionamiento y apagar el motor.
4. Mantener las manos, los pies y la ropa alejados de
las piezas en movimiento.
5. No viajar como pasajeros ni llevar pasajeros en
maquinas sin asiento para ellos.
6. Mantener a las demas personas alejadas
7. Si no sabe leer ingles, solicitarle a otra persona que
le lea y explique el contenido de las etiquetas y del
manual de la maquina.
11
!
WARNING
Exposed moving parts.
Can cause severe injury.
Do not operate without
covers in place
See Operator/
Maintenance manual
12
13
GA 24
Item
1
2
3
4
5
6
7
8
9
10
11
12
13
Part No.
Qty.
Description
4132318
1
Decal, Throttle
4116118
4132147
4116785
4132281
4124712
4124870
4124871
835892
361854
340623
524729
4132146
1
1
1
2
2
1
1
1
1
1
1
1
Decal, Gear Selector
Decal, Tine Raise/Lower
Decal, Operating Instructions
Decal, No Step
Decal, Product ID, GA 24
Decal, GA 24 New Stripe-Left Hand
Decal, GA 24 New Stripe-Right Hand
Decal, Danger Hands & Feet
Decal, Warning
Decal, Spanish Warning
Decal, Crushing Warning
Decal, OPC/Mechanical Latch
Serial Numbers/Notes
> Change from previous revision
29
GA 24
Serial No. All
2.1 Chassis
14
17
10
13
3
8
23
10
2
6
18
16
25
24
4
22
11
26
27
9
1
12
6
2
8
28
3
9
7
21
19
26
27
15
20
7
30
GA 24
Item
1
2
3
4
5
6
7
8
9
10
11
12
13
14
15
16
17
18
19
20
21
22
23
24
25
26
27
28
Part No.
Qty.
Description
446116
8
Lockwasher. .194 x .337 x .047
446128
400104
444310
452002
453023
404014
404018
522516
548900
800390
827449
832578
2703553
2703622
4111943
4116068
4119864.7
4124956
4124958
4125856
308687
402006
444304
446106
517340
548238
4132129
5
5
8
4
5
5
6
6
8
4
2
2
1
1
1
1
1
1
1
1
4
4
4
4
2
2
1
Lockwasher, 255 x .493 x .062
Screw, 1/4-20 x 1/2” Hex Head
Nut, #10-24 Hex
Washer, Flat .24 x .54 x .05
Washer, Flat .25 x .62 x .05
Screw, 1/4-20 x 1/2” Truss Head
Screw, 1/4-20 x 3/4” Truss Head
Mount, Isolation
Screw, #10-24 x 1/2” Hex Head
Pop Rivet, 1/8 x 3/8”
Handle, Latch
Keeper, Latch
Cover, Rear
Cover, Drive Side
Cover, Hydraulic Tank
Hinge, Rear Cover
Belt Cover, Front
Cover, Controls- Top
Cover, Controls- Bottom
Belt Cover, Rear
Flat Washer, .16 x .31 x .04
Screw, #6-32 x 1/2” Slotted
Nut, #6-32 Hex
Lockwasher, #6 Heavy
Guide
Pop Rivet, 3/16 x 5/8”
Support, Hinge
Serial Numbers/Notes
> Change from previous revision
31
GA 24
Serial No. All
3.1 Aerator Enclosure
2
2
5
1
3
5
8
4
7
6
1 Ref
9
10
32
GA 24
Item
1
2
3
4
5
6
7
8
9
10
Part No.
Qty.
Description
2703142.7
1
2703714.7
403746
548900
800521
521050
545371
400106
445794
320107
2
2
4
6
6
6
12
12
6
Serial Numbers/Notes
Plate, Rear
Plate, Cover Seal
Screw, #10-24 x 3/4” Hex Head
Screw, #10-24 x 1/2” YS HSF G5
Nut, #10-24 YS HSF
Boot
Ring Assembly, Plated
Screw, 1/4-20 x 5/8” Hex Head
Nut, 1/4-20 Crownlock
Tie, Plastic
> Change from previous revision
33
GA 24
Serial No. All
4.1 Controls
29 Ref
29
2
2
39
22
28
9
3
23
10
11
34
10
40
26
38
36
19
1
37
21
21
41
32
21
10
42
15
4
33
35
16
8 21
6
24
24
37
30
5
31
18
1
20
1
1
24
19
1
7
21
25
21
14
24
5
17
12
34
26
27
13
GA 24
Item
1
2
3
4
5
6
7
8
9
10
11
12
13
14
15
16
17
18
19
20
21
22
23
24
25
26
27
28
29
30
31
32
33
34
35
36
37
38
39
40
41
42
Part No.
Qty.
Description
453009
5
460014
460010
443102
400190
402118
460026
452002
453010
440078
461466
455012
520328
548848
548882
444782
444708
800305
400190
400196
445796
806765
816401
825560
1003815
2702712
4112561
4112567
4112641.7
4112662.7
4113477
4113515
4114714
4114725
4114893
4115444
4115509
4115712
4116811
4125837
4130234.7
827821
2
1
1
2
2
1
2
1
8
1
1
1
1
1
2
1
1
2
1
13
1
1
2
1
2
1
1
1
1
1
1
1
1
1
1
2
1
1
1
2
1
Serial Numbers/Notes
Flat Washer, .31 x .69 x .06
Pin, Cotter
Pin, Cotter
Nut, 1/4-20 Hex
Screw, 5/16-18 x 1-1/4” Hex Head
Screw, #10-24 x 1/2”
Pin, Cotter
Flat Washer, .24 x .54 x .05
Flat Washer, .41 x .81 x .06
Carriage Bolt, 5/16-18 x 3/4”
Pin, Clevis
Flat Washer, .50 x .75 x .06
Stud, Threaded- Plated
Spring, Compression
Control, Knob
Nut, #10-24 Hex Centerlock
Nut, 1/4-20 Hex Centerlock
Screw, 1/4-20 Hex Head
Screw, 5/16-18 x 1-1/4” Hex Head
Screw, 5/16-18 x 2” Hex Head
Nut, 5/16-18 Crownlock
Pin, Clevis
Spring, Torsion
Knob
Bracket, Weldment
Bushing, Lever
Lever, Lift
Latch, Mechanical Drive
Handle, OPC
Handle, Controls
Clutch Lever
Control Assembly, Throttle
Lever Assembly, Selector
Bracket, Shifter Control
Spacer, Tube
Latch, Mechanical
Grip, Handle
Spring, Torsion
Pin, Clevis
Stops, Mechanical
Bracket, Cover
Knob, Throttle
> Change from previous revision
35
GA 24
Serial No. All
5.1 Chassis
3
5
6
7
4
2
3
1
5
4
7 6
8 9
10
14
16
11
12
36
13
15
GA 24
Item
1
2
3
4
5
6
7
8
9
10
11
12
13
14
15
16
Part No.
Qty.
Description
2702892
1
Chassis, Front
2703216
4113007
4113032.7
4113031.7
400410
446152
400406
446152
2702704.7
2702668.7
2702667.7
548458
460030
308197
443114
2
2
2
2
4
4
6
6
1
1
1
2
2
6
6
Cam Case
Cylinder Assembly, Hydraulic Lift
Mount, Outer Cylinder
Mount, Inner Cylinder
Screw, 1/2-13 x 1-3/4” Hex Head
Lockwasher, .509 .879 .171
Screw, 1/2-13 x 1-1/4” Hex Head
Lockwasher, .509 .879.171
Cross Tube Assembly
Axle Assembly, Right Hand
Axle Assembly, Left Hand
Pin, Clevis
Cotter, Pin
Screw, 7/16-14 x 1-1/2” Hex Head
Nut, 7/16-14 Hex
Serial Numbers/Notes
> Change from previous revision
37
GA 24
Serial No. All
6.1 Transaxle
6
8
31
12
28
22
30
22
37
35
34
20
36
23
17 13
6
4
14
8
16
11
12
Part of Front Chassis
19
7
15
5
20
2
21
3
11
21
24 25
33
29
18
10
20
32
33
9
9
15
13
16
21
17
15
19
4
26 / 27
38
1
9
GA 24
Item
Part No.
1
2
3
4
5
6
7
8
9
10
11
12
13
14
15
16
17
18
19
20
21
22
23
24
25
26
27
28
29
30
31
32
33
34
35
36
37
Qty.
Description
446140
2
2702438
2702591.7
4116957
816320
2702673
2702965
400144
463017
446128
400262
400200
400264
453023
354774
4112443
522723
545786
548349
604174
440086
445795
445796
887552
2700335
400268
2702679.7
2703280
876431
4113516
4114412
4125175
REF
4111460.7
521679
1
2
2
4
2
1
2
1
2
2
8
6
2
2
1
4
2
2
2
6
14
8
2
1
2
2
2
2
1
2
1
1
1
2
2
2
2
8
4114480
548880
805860
Serial Numbers/Notes
Lockwasher, 3/8
Transaxle
Rear Hub
• Bearing, Ball
• Wheel Bolt, 7/16-14 x 1-1/8”
Scrocket, #40 16 Tooth
Gearbox, 90°
Screw, 1/4-28 x 5/8” Hex Head
Key, 3/16 x 3/4” #9 Woodruff
Lockwasher, 1/4
Screw, 3/8-16 x 1” Hex Head
Screw, 5/16-18 x 2-1/2” Hex Head
Screw, 3/8-16 x 1-1/4” Hex Head
Flat Washer, 1/4
Key, 1/4 Square x 1”
Linkage, Shifter Extension
Flange, Bearing
Bearing
Snap RIng, External
Flat Washer, 3/8
Carriage Bolt, 5/16-18 x 1-1/2”
Nut, 5/16-18 Crownlock Flange
Nut, 3/8-16 Crownlock Flange
Yoke
Spring, Extension
Screw, 3/8-16 x 1-3/4” Hex Head
Bracket, Idler
Chain, #40 Roller
#40 Master Link
Lever, Shifter
Sprocket, #40
Cable, Shift Control
Lever Assembly, Selector
Link, Parking Brake
Bushing
Tire
Rim
Valve Stem
Lug Nut, 7/16-14
Includes Clevis Pin and Cotter Pin
See 4.1
> Change from previous revision
39
GA 24
Serial No. All
7.1 Steering Axle
26
20
23
6
25
26
24
1
21
8
22
5
7
4
3
19
3
2
18
6
17
16
15
12
9
10 11
12
40
14
13
9
15 16
17
18
GA 24
Item
Part No.
1
2
3
4
5
6
7
8
9
10
11
12
13
14
15
16
17
18
19
20
21
22
23
24
25
26
4113476.7
4113562.7
522011
400268
445796
440078
445795
REF
N/S
545213
548545
548880
400272
453010
521206
4116182.7
523221
548477
452008
446140
400262
548224
545801
4120230
520243
4117067
4117070
4114181
403751
Qty.
Description
1
Serial Numbers/Notes
Steering Column
1 Shaft Assembly, Steering
2 Bearing, Nylon
2 Screw, 3/8-16 x 1-3/4” Hex Head
2 Nut, 3/8-16 Flange Crownlock
2 Bolt, Carriage 5/16-18 x 3/4
2 Nut, 5/16-18 Flange Crownlock
1 Control Assembly, Steering
2 Wheel and Tire Assembly
1 • Rim and Bearing Assembly
1 • Tire, 11 x 4 - 5 2 Ply
1 • Valve Stem
1 Screw, 3/8-16 x 2-1/4 Hex Head
1 Washer, Flat .41 .81 .06
2 Bushing
1 Axle Assembly, Steering
1 Spacer
2 Spacer
2 Washer, Flat 3/8
2 Lockwasher, 3/8
2 Screw, 3/8-16 x 1” Hex Head
1 Grease Fitting
1 Dipstick, Cam Case
1 Cover, Cam Case
1 Gasket, Cam Case
1 Bracket, Right Cover - Rear
1 Bracket, Left Cover - Rear
1 Bracket, Hydraulic “T” Fittings
14 Screw, 5/16-18 x 3/4” Hex Head
See 4.1
> Change from previous revision
41
GA 24
Serial No. All
8.1 Engine and Pump
1
20
16
2
1
17
21
6
18
8
3
19
4
19
14
6
9
3
15
7
10
11
12
13
42
GA 24
Item
1
2
3
4
5
6
7
8
9
10
11
12
13
14
15
16
17
18
19
20
21
Part No.
Qty.
Description
N/S
1
2704105.7
306325
306369
453009
306501
2702984
520574
4112762
4128971
4128973
4128970
800697
800453
4118263
4119323.7
359979
554752
320107
4132340
4132488
1
2
2
4
5
1
1
2
1
1
1
4
4
1
1
2
9-5/16
2
1
1
Serial Numbers/Notes
Engine, 8 HP Intek Pro
Bracket, Hydraulic Pump
Lockwasher, .319 .591 .078 YS
Screw, 5/16-24 x 1 YS HX G5
Washer, Flat .32 .63 .06 YS
Screw, 5/16-18 x 1-1/2 YS HX G5
Pump Assembly, Hydraulic
Key, Square .25 x 2.50
Pulley, 3.0” OD, 3V, I Groove
Coupling, 1.0 Bore, .25 Key, Set SC
Coupling, Element Urethane
Coupling, 0.5 Bore, 1/8 Key, Set SC
Nut, 5/16-18 CS HF GF Crownlock
Screw, 5/16-18 x 7/8 YS HX G8
Tank, Fuel
Strap, Fuel Tank
Pad
Hose, 1/4” Fuel
Tie Strap
Hose, Engine Oil Drain
Clamp, Throttle Cable
> Change from previous revision
43
GA 24
Serial No. All
9.1 Belts & Pulleys
19
11
8
12
11
20
13
9
17
18
16
4
10
4
14
15
3
4
5
1
11
7
6
12
11
2
10
24
34 31
23
16
42
25
44
33
22
39
27
26
41
43
32
31
26
27
38
34
36
37
40
27
27
38
35
37
44
25
45
28
29
30
16
21
GA 24
Item
1
2
3
4
5
6
7
8
9
10
11
12
13
14
15
16
17
18
19
20
21
22
23
24
25
26
27
28
29
30
31
32
33
34
35
36
37
38
39
40
41
42
43
44
45
Part No.
Qty.
Description
4112767
1
4113436
4112381
463021
4112766
4113435
2703012
446152
400404
440082
522723
545723
445795
4113428
400272
445796
400270
4111480
2702961.7
4112441
4113437
2703944.7
800453
446134
2704101.7
2704104
48094A
306978
446140
400262
4111480
400268
440124
445796
4113005
4113992
402122
444782
809252
REF
REF
400108
445784
517094
518497
1
1
4
1
1
1
3
3
6
4
2
10
1
1
2
1
1
1
1
1
1
3
3
2
2
4
1
1
1
2
1
1
2
1
1
2
2
1
1
1
1
1
1
1
Pulley, 8.83” OD, 1” Bore, 3V
Belt, 3V, Mechanism
Pulley, 8.83” OD, 1” Bore, 2-3V
Key, Woodruff
Pulley, 4.75” OD, 1” Bore, 3V
Belt, 3V, Transport
Shaft, Drive Mechanism
Lockwasher, .509 x .879 x .171
Screw, 1/2-13 x 1” Hex Head
Bolt, Carriage 5/16-18 x 1”
Flange, Bearing
Bearing Assembly
Nut, 5/16-18 Crownlock
Tensioner, Rotary
Screw, 3/8-16 x 2-1/4” Hex Head
Nut, 3/8-16 Crownlock
Screw, 3/8-16 x 2” Hex Head
Pulley, Idler, Nylon 2.75” OD
Bracket Assembly
Pulley, 3” OD, 1” Bore, 2-3V
Belt, 3V, 2 Rib, Mechanism
Bracket Assembly, Idler Pivot
Screw, 5/16-18 x 7/8” Hex Head
Lockwasher, .319 x .591 x .078
Arm Assembly, Idler Tensioner
Washer, .688” ID x 1.135” OD
Bearing, .669” ID x 1.575” OD
Washer, Flat .38 x .81 x .06
Lockwasher, .382 x .688 x .094
Screw, 3/8-16 x 1” Hex Head
Pulley, Idler, 2.75”
Screw, 3/8-16 x 1-3/4” Hex Head
Bolt, Carriage 3/8-16 x 1-3/4”
Nut, 3/8-16 Crownlock
Cable, Tensioner
Cable, Tensioner
Screw, #10-24 x 3/4”
Nut, #10-24 Nylock Jam
Retaining Ring
OPC Handle
Clutch Lever
Screw, 1/4-20 x 3/4” Hex Head
Nut, 1/4-20 Whiz-Lock Flange
Clip, Spring
Spring, Extension
Serial Numbers/Notes
Includes Items 3 and 4
See 4.1
See 4.1
> Change from previous revision
45
GA 24
Serial No. All
10.1 Cam Case
26
25
4
23
4
3
9
3
6
7
24
5
4
4
8
9
6
7
22
3
18
5
4
4
3
19 / 20 / 21
8
17
16
15 7
27
14
12
13
11
10
1
32
30
28
29
30
29
33
10
11
31
13
12
14
7
22
15
16
19 / 20 / 21
18
2
46
17
GA 24
Item
1
2
3
4
5
6
7
8
9
10
11
12
13
14
15
16
17
18
19
20
21
22
23
24
25
26
27
28
29
30
31
32
33
Part No.
Qty.
Description
2703216
1
2703105
521302
463021
520237
520232
520228
520458
520456
548327
520242
520229
520231
520230
520233
548926
548272
520236
520238
520239
520240
548902
521803
400286
446140
444742
540094
400262
548201
548813
800113
4115988.7
400400
1
6
6
2
2
4
2
2
2
2
2
2
2
2
2
2
2
AR
AR
AR
8
6
6
6
6
6
24
2
2
3
1
4
Serial Numbers/Notes
Cam Case
Shaft, Cam
Cam
Key, Woodruff
Liner, Bearing
Bearing, Needle
Race, Inner
Spacer, 1/4”
Spacer, 15/32”
Retaining Ring
Washer, Retaining
Bearing, Thrust Needle
Washer, Inner Thrust
Washer, 1/8” Outer Thrust
Bearing, Needle
Spiral Retaining Ring
Seal, Oil
Cage, Bearing
Shim, 0.005”
Shim, 0.010”
Shim, 0.020”
Screw, 5/16-18 x 1” Flangelock
Slinger, Oil
Screw, 3/8-16 x 2-3/4” Hex Head
Lockwasher, 3/8
Locknut, 3/8-16 Hex
Slide and Guide Assembly
Screw, 3/8-16 x 1” Flangelock
Set Screw, 5/16-18 x 5/16”
Set Screw, 5/16-18 x 1/2”
Plug, 1/2-14 NPT Drain
Tab, Holding
Screw, 1/2-13 x 3/4” Hex Head
Add shims as required to obtain
0.005” to 0.015” end play
See 13.1
> Change from previous revision
47
GA 24
Serial No. All
11.1 Aerator Crankshaft
28
29
30
33
27
35
6
36
4
21
3
34
7
37
10
11
31
32
4
20
18
17
14
3
8
9
Part of 15
2
2
16
20
7
11
3
10
29
13
30
14
16
6
15
23
22
26
19
5 23
22
1
27 28
38
25 26
24
29
30
28
27
38
48
4
21
12
GA 24
Item
1
2
3
4
5
6
7
8
9
10
11
12
13
14
15
16
17
18
19
20
21
22
23
24
25
26
27
28
29
30
31
32
33
34
35
36
37
38
Part No.
Qty.
Description
545520
1
544792
548815
548224
548811
520458
520278
520360
520228
443810
447216
520554
400264
446140
544300
545306
400264
548229
434039
520374
548814
547293
548797
524118
434028
446130
4115946.7
463021
434036
446136
4113428
400272
445796
547596
400268
4113563
445796
548891
548481
2
1
1
6
2
2
1
1
2
2
3
12
12
6
1
2
1
2
2
2
2
1
6
6
6
4
4
4
4
2
2
2
2
2
2
2
2
1
Support, Left Side Crankshaft
Support, Right Side Crankshaft
• Bearing, Needle
• Grease Fitting
Wrist Pin
Spacer, 1/4”
Crankshaft, Aerator
Stud, Spacer
Race, Inner
Nut, 3/8-16 Hex Jam
Lockwasher, 3/8 Shakeproof
Pin, Locating
Screw, 3/8-16 x 1-1/4” Hex Head
Lockwasher, 3/8
Connecting Rod
• Set, Bearing Sleeve
• Screw, 3/8-16 x 1-1/4” Hex Head
• Grease Fitting, 45°
• Screw, 1/4-20 x 1” Socket Head
Spacer
Race, Inner
Retainer, Bearing
• Bearing
Push Rod
Screw, 1/4-20 x 3/4” Socket Head
Lockwasher, 1/4
Sprocket, Crankshaft
Key, Woodruff
Screw, 5/16-18 x 1-1/4” Socket Head
Lockwasher, 5/16
Tensioner, Rotary
Screw, 3/8-16 x 2-1/4” Hex Head
Nut, 3/8-16 Crownlock
Sprocket, Idler
Screw, 3/8-16 x 1-3/4” Hex Head
Adapter, Shoulder
Nut, 3/8-16 Crownlock
Aerator Chain, #50, 81 Link
• #50 Connector Link
Serial Numbers/Notes
Includes Items 3 and 4
Includes two (2) of Item 14 and 26
Not Shown
> Change from previous revision
49
GA 24
Serial No. All
12.1 Hydraulic System
13
12
1
6
4
16
2
5
16
6
9
12
17
13
17
7
14
10
3
15
11
4
1
5
8
14
7
19 20
18
30
32
34
27
33
28
A
29
22
A
5
25
23
50
31
24
26
21
GA 24
Item
1
2
3
4
5
6
7
8
9
10
11
12
13
14
15
16
17
18
19
20
21
22
23
24
25
26
27
28
29
30
31
32
33
34
Part No.
Qty.
Description
400108
3
Screw, 1/4-20 x 3/4” Hex Head
522113
522127
522650
445794
823118
826558
827395
832794
2703312
2703314
2703316
2703317
2703318
4114534
4114536
829997
4123824
400184
446134
547896
884599
400126
4113668
461453
460002
800577
523049
887552
Ref
548900
800521
814924
472207
453009
1
1
3
7
2
2
1
1
1
1
2
2
2
1
2
3
1
4
4
1
1
4
1
1
1
1
1
1
1
2
2
2
1
4
Hose, Pump to Lift/Lower Valve
Adapter, Straight to 90° Elbow
Clamp
Nut, 1/4-20 Crownlock
Fitting, Straight
Elbow, 90° w/o O-Ring
Adapter, Hydrostat
Elbow, Street 1/2 NPT to 45°
Hose, Lift/Lower Valve to Reservoir
Hose, Pump to Reservoir
Hose, Tee to Cylinder
Hose, Tee to Cylinder
Hose, Lift/Lower Valve to Tee
Adapter, 90° 1/2 NPT to 37° Flare
Fitting, Tee 1/4 NPT to 37°
Grommet, 1.31 x 2.00 x .48
Hydraulic Tank
Screw, 5/16-18 x 3/4” Hex Head
Lockwasher, 5/16
Valve, Lift
• Seal Repair Kit
Screw, 1/4-20 x 3” Hex Head
Yoke, Valve
Clevis Pin, 3/16 x 1”
Cotter Pin, 1/16 x 1/2”
Nut, #10-24 Hex Nylock
Cable, Lift / Lower
Yoke
Lift / Lower Lever
Screw, #10-24 x 1/2”
Nut, #10-24 Hex
Clamp, Hose
Plug, 1/2 NPT Square Head
Flat Washer, 1/4
Serial Numbers/Notes
Includes Cap
Includes Clevis Pin and Cotter Pin
See 4.1
> Change from previous revision
51
GA 24
Serial No. All
13.1 Slide and Glide Assmebly
2
3
6
1
5
4
9
7
8
3
1
2
8
10
12
11
13
14
13
52
15
GA 24
Item
1
2
3
4
5
6
7
8
9
10
11
12
13
14
15
Part No.
Qty.
Description
2702293
1
Slide Assembly
800766
522636
522644
522641
306959
522643
522637
522639
518503
521846
800427
522708
548869
445781
2
2
1
2
1
1
2
1
1
1
1
2
1
1
Seal, Oil
Bushing, Split
Retainer, Disc
Disc, Felt
Plug, Expansion
Guide, Slide
Bushing, Split
Seal, Oil
Spring
Retainer, Spring
Screw, .31-18 x 2” Hex Head
Washer, Shim
Roller, Cam Yoke
Nut, .31-18 Hex
Serial Numbers/Notes
> Change from previous revision
53
GA 24
Serial No. All
14.1 Turf Guard Assembly
7
5
8
11
10
9
11
4
6
12
1
14
3
13
2
13
54
GA 24
Item
1
2
3
4
5
6
7
8
9
10
11
12
13
14
Part No.
Qty.
Description
4115936.7
1
4115939.7
4115931.7
4115935.7
4115944
518510
460316
822529
548458
548165
548902
403751
445781
444742
1
2
2
2
2
2
2
2
2
8
10
18
2
Serial Numbers/Notes
Mounting Plate
Guard, Turf
Bar, Turf Guard
Bracket, Connecting
Link, Adjustment
Spring, Compression
Pin, Hair .78 x 2.69 x .15
Pin, Hair .44 x 2.00 x .13
Pin, Clevis
Washer, Flat .62 x .94 x .09
Screw, 5/16-18 x 1” Hex Head
Screw, 5/16-18 x 3/4” Hex Head
Nut, 5/16-18 Hex Head
Locknut, 3/8-16 Hex
> Change from previous revision
55
GA 24
Serial No. All
15.1 Tines and Holders
Optional Accessories
Standard Tine Holder
5/8" O.D. Tines
(Use with Item 31)
36
25
42
26
28
35
33
32
3/4" O.D. Tines
(Use with Item 37)
Optional Tine Holder
41
33
32
38
39
27 / 29 / 30
34
38
39
40
31
37
Optional Quad Tine Accessory
17
1/2" O.D. Tines
18
12
8
21
20
19
22
15
14
9
6
11
16
9
5
13
7
10
10
2/3/4
10
56
1 / 24
23
GA 24
Item
Part No.
Qty.
Description
4116987
4116986
1
1
Serial Numbers/Notes
Accessory, Quad Tine (Coring) (Optinal)
Accessory, Quad Tine (Solid) (Optional)
Includes Items 2 through 24
Includes Items 1 through 23
1
2
3
4
5
6
7
8
9
10
11
12
13
14
15
16
17
18
523863
24
• Tine, 1/4” Solid
1/2” Mounting O.D.
4116989
4115972.7
4115958.7
4115931.7
4115935.7
4115936.7
403751
548902
445781
518510
4115944
444742
452008
548458
460316
822529
523249
1
1
1
2
2
1
6
8
14
2
1
2
2
2
2
2
6
Includes Items 2 through 17
19
547849
6
20
21
22
23
24
25
26
27
28
29
30
31
32
33
34
35
36
37
38
39
40
41
42
446136
800512
800694
829973
523864
517486
517487
517488
517489
523995
547132
547860
446134
400190
523826.7
545104
800503
547861
446134
400190
523907.7
545104
800503
1
1
2
2
24
12
12
12
12
12
12
6
3
3
1
1
1
6
3
3
1
1
1
• Accessory, Quad Tine Turf Guard
• • Turf Guard Assembly
• • • Turf Guard
• • • Bar
• • • Bracket, Connecting
• • • Mounting Plate
• • • Screw, 5/16-18 x 3/4” Flangelock
• • • Screw, 5/16-18 x 1” Flangelock
• • • Nut, 5/16-18 Flangelock
• • Spring
• • Link, Adjustment
• • Locknut, 3/8-16
• • Flat Washer, 3/8
• • Clevis Pin, 1/2 x 1-1/4”
• • Hair Pin, 5/32 x 2-11/16
• • Hair Pin, 1.8 x 2”
• Washer, Special
• Tine Holder for 1/2” Mounting O.D.
Tines
• • Lockwasher, 5/16
• • Screw, 5/16-18 x 1-1/14 Socket Hd
• • Screw, 5/16-18 x 2-1/2 Grade 8
• • Washer, Special
• Tine, 1/4” Side Ejecting Coring
Tine, 1/4” Coring (5/8” Mounting O.D.)
Tine, 3/8” Coring (5/8” Mounting O.D.)
Tine, 1/2” Coring (5/8” Mounting O.D.)
Tine, 5/8” Coring (3/4” Mounting O.D.)
Tine, 1/2” HD Coring (5/8” Mounting O.D.)
Tine, 1/2” Carbide (5/8” Mounting O.D.)
Tine Holder for 5/8” Mounting O.D. Tines
• Lockwasher, 5/16
• Screw, 5/16-18 x 1-1/4” Hex Head
• Holder, Tine
• Deflector, Core
• • Screw, 1/4-20 x 5/8” Self Locking
Tine Holder for 3/4” Mounting O.D. Tines
• Lockwasher, 5/16
• Screw, 5/16-18 x 1-1/4” Hex Head
• Holder, Tine
• Deflector, Core
• • Screw, 1/4-20 x 5/8” Self Locking
1/2” Mounting O.D.
Optional, Uses 547860 Holder
Optional, Uses 547860 Holder
Standard, Uses 547860 Holder
Optional, Uses 547861 Holder
Optional, Uses 547860 Holder
Optional, Uses 547860 Holder
Standard
Optional
> Change from previous revision
57
INDEX
1003815.......................35
2700335.......................39
2702293.......................53
2702438.......................39
2702591.7....................39
2702667.......................37
2702668.......................37
2702673.......................39
2702679.7....................39
2702704.......................37
2702712.......................35
2702892.......................37
2702961.7....................45
2702965.......................39
2702984.......................43
2703012.......................45
2703105.......................47
2703142.......................33
2703216.................37, 47
2703280.......................39
2703312.......................51
2703314.......................51
2703316.......................51
2703317.......................51
2703318.......................51
2703553.......................31
2703622.......................31
2703714.......................33
2703944.......................45
2704101.......................45
2704104.......................45
2704105.......................43
306959 ........................53
320107 ..................33, 43
340623 ........................29
354774 ........................39
359979 ........................43
361854 ........................29
4111460.......................39
4111480.......................45
4111943.......................31
4112381.......................45
4112441.......................45
4112443.......................39
4112561.......................35
4112567.......................35
4112641.7....................35
4112662.......................35
4112762.......................43
4112766.......................45
4112767.......................45
4113005.......................45
4113007.......................37
4113031.......................37
4113032.......................37
4113428.................45, 49
58
4113435.......................45
4113436.......................45
4113437.......................45
4113476.......................41
4113477.......................35
4113515.......................35
4113516.......................39
4113562.......................41
4113563.......................49
4113668.......................51
4113992.......................45
4114181.......................41
4114412.......................39
4114480.......................39
4114534.......................51
4114536.......................51
4114714.......................35
4114725.......................35
4114893.......................35
4115444.......................35
4115509.......................35
4115712.......................35
4115931.......................55
4115931.7....................57
4115935.......................55
4115935.7....................57
4115936.......................55
4115936.7....................57
4115939.......................55
4115944................ 55, 57
4115946.7....................49
4115958.7....................57
4115972.7....................57
4116068.......................31
4116118.......................29
4116182.......................41
4116785.......................29
4116811.......................35
4116957.......................39
4116986.......................57
4116987.......................57
4116989.......................57
4117067.......................41
4117070.......................41
4118263.......................43
4119323.......................43
4119864.7....................31
4120230.......................41
4123824.......................51
4124712.......................29
4124870.......................29
4124871.......................29
4124956.......................31
4124958.......................31
4125175.......................39
4125837.......................35
4125856 ...................... 31
4128970 ...................... 43
4128971 ...................... 43
4128973 ...................... 43
4130234.7 ................... 35
4132129 ...................... 31
4132146 ...................... 29
4132147 ...................... 29
4132281 ...................... 29
4132318 ...................... 29
4132340 ...................... 43
4132488 ...................... 43
48094A ....................... 45
517094 ....................... 45
517340 ....................... 31
517486 ....................... 57
517487 ....................... 57
517488 ....................... 57
517489 ....................... 57
518497 ....................... 45
518503 ....................... 53
518510 ................. 55, 57
520228 ................. 47, 49
520229 ....................... 47
520231 ....................... 47
520232 ....................... 47
520233 ....................... 47
520236 ....................... 47
520237 ....................... 47
520238 ....................... 47
520239 ....................... 47
520240 ....................... 47
520242 ....................... 47
520243 ....................... 41
520278 ....................... 49
520328 ....................... 35
520360 ....................... 49
520374 ....................... 49
520456 ....................... 47
520458 ................. 47, 49
520554 ....................... 49
520574 ....................... 43
521050 ....................... 33
521206 ....................... 41
521302 ....................... 47
521679 ....................... 39
521803 ....................... 47
521846 ....................... 53
522011 ....................... 41
522113 ....................... 51
522127 ....................... 51
522516 ....................... 31
522636 ....................... 53
522637 ....................... 53
522639 ....................... 53
522641 ....................... 53
522643 ....................... 53
522644 ....................... 53
522650 ....................... 51
522708 ....................... 53
522723 ................. 39, 45
523049 ....................... 51
523221 ....................... 41
523249 ....................... 57
523826.7 ..................... 57
523863 ....................... 57
523864 ....................... 57
523907.7 ..................... 57
523995 ....................... 57
524118 ....................... 49
524729 ....................... 29
540094 ....................... 47
544300 ....................... 49
544792 ....................... 49
545104 ....................... 57
545213 ....................... 41
545306 ....................... 49
545371 ....................... 33
545520 ....................... 49
545723 ....................... 45
545786 ....................... 39
545801 ....................... 41
547132 ....................... 57
547293 ....................... 49
547596 ....................... 49
547849 ....................... 57
547860 ....................... 57
547861 ....................... 57
547896 ....................... 51
548224 ................. 41, 49
548229 ....................... 49
548272 ....................... 47
548327 ....................... 47
548458 ...........37, 55, 57
548477 ....................... 41
548481 ....................... 49
548545 ....................... 41
548797 ....................... 49
548811 ....................... 49
548814 ....................... 49
548815 ....................... 49
548848 ....................... 35
548869 ....................... 53
548880 ................. 39, 41
548882 ....................... 35
548891 ....................... 49
548900 ....................... 51
548902 ....................... 47
548926 ....................... 47
554752 ....................... 43
800113 ....................... 47
800766 ....................... 53
INDEX
805860
806765
809252
814924
816320
816401
823118
825560
826558
827395
827449
827821
829973
829997
832578
832794
835892
876431
884599
887552
....................... 39
....................... 35
....................... 45
....................... 51
....................... 39
....................... 35
....................... 51
....................... 35
....................... 51
....................... 51
....................... 31
....................... 35
....................... 57
....................... 51
....................... 31
....................... 51
....................... 29
....................... 39
....................... 51
................. 39, 51
59
Textron Golf, Turf & Specialty Products
PO Box 7708, Charlotte, NC 28241-7708
www.ttcsp.com