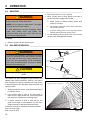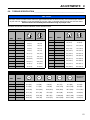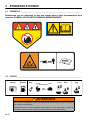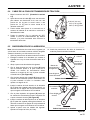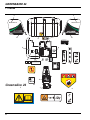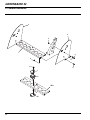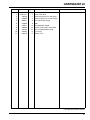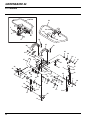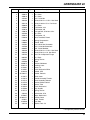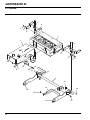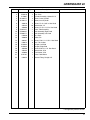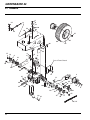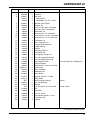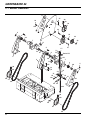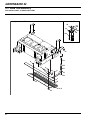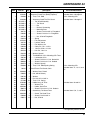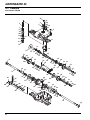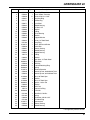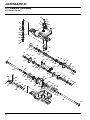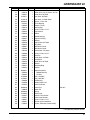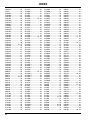
1
4268272-ES-Rev A Technical Manual Manual técnico GreensAire® 24 Model / Modelo 58234 WARNING WARNING: If incorrectly used this machine can cause severe injury. Those who use and maintain this machine should be trained in its proper use, warned of its dangers and should read the entire manual before attempting to set up, operate, adjust or service the machine. ADVERTENCIA ADVERTENCIA: Si se usa de forma incorrecta, esta máquina puede causar graves lesiones. Cualquier persona que use y mantenga esta máquina deberá estar entrenada en su uso correcto, instruida de sus peligros y deberá leer el manual completamente antes de tratar de instalar, operar, ajustar o revisar la máquina. When Performance Matters.™ GB ES United Kingdom Spain FOREWORD This manual contains safety, operating, adjustment, maintenance, troubleshooting instructions, and parts list for your new Jacobsen® aerator. This manual should be stored with the aerator for reference during operation. The serial plate is located on the right side of the frame near the engine. Jacobsen recommends you record these numbers below for easy reference. Before you operate your aerator, you and each operator you employ should read the manual carefully in its entirety. By following the safety, operating, and maintenance instructions, you will prolong the life of your aerator and maintain its maximum efficiency. 11524WILMAR BLVD, CHARLOTTE, NC 28273 ® PRODUCT OF U.S.A. kg A Textron Company 1-800-848-1636 (US) kW If additional information is needed, contact your Jacobsen Dealer. Suggested Stocking Guide To keep your aerator fully operational and productive, Jacobsen suggests you maintain a stock of the more commonly used maintenance items. We have included part numbers for additional support materials and training aids. To order any of the following material: 1. Write your full name and complete address on your order form. 2. Explain where and how to make shipment: q UPS q Regular Mail q Overnight q 2nd Day 3. Order by the quantity desired, the part number, and the description of the part. 4. Send or bring the order to your authorized Jacobsen Dealer. Service Parts Qty. Part No. Description 548481 876431 4113436 4113435 4113437 #50 Chain Connector Link #40 Chain Connector Link Belt, Mechanism Belt, Transport Belt, 2 Rib Mechanism Qty. Part No. Description Service Support Material Qty. Part No. Description Qty. Description 4268272 Technical Manual 4191623 DVD, Operator Training Proposition 65 Warning © 2010, Jacobsen, A Textron Company/Textron Innovations Inc. All rights reserved, including the right to reproduce this material or portions thereof in any form. Litho in U.S.A. 5-2012 2 This product contains or emits chemicals known to State of California to cause cancer and birth defects or other reproductive harm. Table of Contents 1 1.1 1.2 2 2.1 2.2 2.3 2.4 2.5 2.6 2.7 3 3.1 3.2 4 4.1 5 5.1 5.2 5.3 5.4 5.5 5.6 5.7 5.8 5.9 6 6.1 6.2 6.3 6.4 6.5 6.6 6.7 6.8 Safety Operating Safety ................................................ 4 Important Safety Notes ....................................... 5 Specifications Product Identification.......................................... 6 Engine ................................................................ 6 Aerator ................................................................ 6 Aerator ................................................................ 7 Weights and Dimensions .................................... 7 Accessories & Support Literature ....................... 7 Declaration of Conformity ................................... 8 Decals and Icons Decals .............................................................. 10 Icons ................................................................. 10 Controls Control Descriptions ......................................... 11 Operation Daily Inspection ................................................ 13 Operator Presence Control (OPC) ................... 13 Operating Procedures ...................................... 14 Starting ............................................................. 14 Stopping / Parking ............................................ 15 To Drive / Transport ......................................... 15 Trailering .......................................................... 15 Aerating ............................................................ 16 Hillside Operation ............................................. 16 Adjustments General............................................................. 18 Turf Guard ........................................................ 18 Aerator Drive Idler Cable .................................. 18 Traction Drive Idler Cable ................................. 19 Aerator Timing .................................................. 19 Shift Control Cable ........................................... 20 Lift Cable .......................................................... 20 Torque Specification ......................................... 21 7 7.1 7.2 7.3 7.4 7.5 7.6 7.7 7.8 7.9 7.10 7.11 7.12 7.13 8 8.1 9 9.1 9.2 10 11 12 12.1 12.2 12.1 Maintenance General ............................................................ 22 Engine .............................................................. 22 Engine Oil ......................................................... 23 Engine Air Filter ................................................ 23 Fuel .................................................................. 23 Hydraulic Hoses ............................................... 24 Hydraulic Oil ..................................................... 24 Muffler and Exhaust ......................................... 25 Tires ................................................................. 25 Wheel Mounting Procedure .............................. 25 Care and Cleaning ........................................... 25 Pushrod Installation .......................................... 26 Storage ............................................................. 26 Troubleshooting General ............................................................ 27 Maintenance & Lubrication Charts General ............................................................ 28 Maintenance Charts ......................................... 28 tine selection guide Parts Catalog How To Use The Parts Catalog ....................... 30 To Order Parts ................................................. 30 Table Of Contents ............................................ 31 3 1 1 1.1 SAFETY SAFETY OPERATING SAFETY ______________________________________________________ ! WARNING EQUIPMENT OPERATED IMPROPERLY OR BY UNTRAINED PERSONNEL CAN BE DANGEROUS. Familiarize yourself with the location and proper use of all controls. Inexperienced operators should receive instruction from someone familiar with the aerator before being allowed unsupervised operation of the aerator. 1. Safety is dependent upon the awareness, concern, and prudence of those who operate or service the aerator. Never allow minors to operate any equipment. 2. It is your responsibility to read this manual and all publications associated with this aerator (Engine Manual, accessories, and attachments). If the operator can not read English it is the owner’s responsibility to explain the material contained in this manual to them. 3. Learn the proper use of the aerator, the location and purpose of all the controls before you operate the equipment. Working with unfamiliar equipment can lead to accidents. 4. Never allow anyone to operate or service the aerator or its attachments without proper training and instructions or while under the influence of alcohol or drugs. 5. Wear all the necessary protective clothing and personal safety devices to protect your head, eyes, ears, hands, and feet. Operate the machine only in daylight or in good artificial light. 9. Carbon monoxide in the exhaust fumes can be fatal when inhaled. Never operate the engine without proper ventilation. 10. Fuel is highly flammable. Handle with care. 11. Keep the engine clean. Allow the engine to cool before storing and always remove the spark plug wire. 12. Disengage all drives and engage parking brake before starting the engine (motor). 13. Never use your hands to search for oil leaks. Hydraulic fluid under pressure can penetrate the skin and cause serious injury. 14. Operate the machine up and down the face of the slopes (vertically) not across the face (horizontally). 15. To prevent tipping or loss of control, do not start or stop suddenly on slopes. Reduce speed when making sharp turns. Use caution when changing direction on slopes. 6. Inspect the area where the equipment will be used. Pick up all the debris you can find before operating. Beware of overhead obstructions (low tree limbs, electrical wires, etc.) and also underground obstacles (sprinklers, pipes, tree roots, etc.) Enter a new area cautiously. Do not enter narrow openings that may force operator too close to aerator. Stay alert for hidden hazards. 7. Never direct discharge of material toward bystanders nor allow anyone near the aerator while in operation. The owner/operator can prevent, and is responsible for, injuries inflicted to themselves, to bystanders, and damage to property. 8. Never operate equipment that is not in perfect working order or is without decals, guards, shields, discharge deflectors, or other protective devices securely fastened in place. This machine is to be operated and maintained as specified in this manual and is intended for the professional maintenance of specialized turf grasses. It is not intended for use on rough terrain or long grasses. 4 SAFETY 1.2 1 IMPORTANT SAFETY NOTES ________________________________________________ This safety alert symbol is used to alert you to potential hazards. DANGER - Indicates an imminently hazardous situation which, if not avoided, WILL result in death or serious injury. WARNING - Indicates a potentially hazardous situation which, if not avoided, COULD result in death or serious injury. CAUTION - Indicates a potentially hazardous situation which, if not avoided, MAY result in minor or moderate injury and property damage. It may also be used to alert against unsafe practices. NOTICE - Indicates a potentially hazardous situation which, if not avoided, MAY result in property damage. It may also be used to alert against unsafe practices. For pictoral clarity, some illustrations in this manual may show shields, guards or plates open or removed. Under no circumstances should this equipment be operated without these devices securely fastened in place. ! WARNING The Operator Presence Control (OPC) on this machine will shut off the aerator and traction drive if the operator releases the OPC handle. To protect the operator and others from injury, never operate the aerator with the OPC system disconnected or malfunctioning. ! WARNING 1. Before leaving the operator’s position for any reason: a. b. c. d. Release OPC handle. Lower aerator head to the ground. Stop engine. Disconnect spark plug wire. 2. Keep hands, feet, and clothing away from moving parts. Wait for all movement to stop before you clean, adjust, or service the machine. 3. Keep the area of operation clear of all bystanders and pets. 4. Never carry passengers. 5. Never operate mowing equipment without the discharge deflector securely fastened in place. By following all instructions in this manual you will prolong the life of your machine and maintain its maximum efficiency. Adjustments and maintenance should always be performed by a qualified technician. If additional information or service is needed, contact your Authorized Jacobsen Dealer who is kept informed of the latest methods to service this equipment and can provide prompt and efficient service. 5 2 SPECIFICATIONS 2 2.1 SPECIFICATIONS PRODUCT IDENTIFICATION_________________________________________________ 58234.............................. GreensAire 24 Aerator with OPC, 10 hp gasoline engine. Serial Number ................ An identification plate, like the one shown, listing the serial number, is attached to the right side frame, near the engine. Always provide the serial number of the unit when ordering replacement parts or requesting service information. 2.2 11524WILMAR BLVD, CHARLOTTE, NC 28273 ® PRODUCT OF U.S.A. 358 A Textron Company 6.9 kg 1-800-848-1636 (US) XXXX kW 58234001651 Product EEC Sound Power Operator Ear Vibration M/S2 58234 105 dBa 88 dBa 4.335 Arms ENGINE__________________________________________________________________ Make ............................... Briggs & Stratton Model .............................. Vanguard Horsepower .................... 10 hp (7.46 kW) @3600 RPM Displacement .................. 18.61 cu. in. (305 cc) Bore x Stroke .................. 3.12 x 2.44 in. (79 x 62 mm) Fuel: Type .......................... Unleaded Gasoline Governor......................... Flyweight Mechanical Lubrication: Capacity.................... 28 oz. (0.8 liters) Type.......................... SAE 30W API Classification ..... SG, SH, SJ Air Filter .......................... Replaceable Dual Element Cooling System .............. Air Cooled Rating ....................... Min. 85 Octane Capacity .................... 2.5 U.S. gal. (9.5 liters) NOTICE Do not use premium gasoline or an oil-gasoline mixture. When using blended fuel, do not use a blend with more than 10% ethanol. Under no circumstances should you use a blend with methanol. 2.3 AERATOR________________________________________________________________ Spacing ........................... 2 in. (51 mm) on center Depth of Penetration ....... 3 in. (76 mm) maximum Standard Tine Type .......................... Duratine XLT top eject Material ..................... Hardened steel with carbide tip Quantity .................... Two sets 1/2 in. (13 mm) diameter Tine Options Solid .......................... 1/4 in. (6 mm), 3/8 in. (9 mm), 5/8 (16 mm) Top Eject Coring ....... 1/4 in. (6 mm), 3/8 in. (9 mm), 1/2 in. (13 mm), 5/8 in. (16 mm) Side Eject Coring ...... 1/4 in. (6 mm) Quad Tines ............... 1/4 in. (6 mm) Solid, 1/4 in. (6 mm) coring, 1/2 in. (13 mm) coring Swath Width.................... 24 in. (609 mm) 6 SPECIFICATIONS 2.4 2 AERATOR ________________________________________________________________ Tires Front.......................... 11 x 4.00 - 5 2 Ply Rear .......................... 16 x 6.50 - 8 4 Ply Pressure:................... 14 psi (97 kPa) Speed: H (Transport) ........... 0 - 4.0 mph (6.4 kph) L (Aerate).................. 0 - 0.9 mph (1.4 kph) R (Reverse) .............. 0 - 1.8 mph (2.9 kph) Hydraulic System: Capacity.................... 2 U.S. gal. (7.57 liters) Fluid Type ................. GreensCare 68™ Aerator Head Lift....... Hydraulic Double Acting Cylinders 2.5 WEIGHTS AND DIMENSIONS ________________________________________________ Dimensions: Inches (mm) Length ............................................................. 72 (1676) Width ............................................................ 49.5 (1257) Height.............................................................. 48 (1219) 2.6 Weights: Lbs. Working Weight Less Fuel ............................ 850 (kg) (386) ACCESSORIES & SUPPORT LITERATURE _____________________________________ Contact your area Jacobsen Dealer for a complete listing of accessories and attachments. ! CAUTION Use of other than Jacobsen authorized parts and accessories may cause personal injury or damage to the equipment. Accessories Orange Touch-up Paint (12 oz. spray).................... 4184140 1/4 in. Solid Quad Tine Accessory .......................... 4116986 1/4 in. Coring Quad Tine Accessory ....................... 4116987 1/2 in. Coring Quad Tine Accessory ........................... 58231 Pushrod Installation Tool .......................................... 517693 Windrow Attachment Accessory ............................... 544918 Tines 1/4 in. (6 mm) Coring, 5/8 in. O.D. ............................ 517486 1/4 in. (6 mm) Solid, 1/2 in. O.D................................ 523863 3/8 in. (9 mm) Coring, 5/8 in. O.D. ............................ 517487 1/2 in. (13 mm) Coring, 5/8 in. O.D. .......................... 517488 5/8 in. (16 mm) Coring, 3/4 in. O.D. .......................... 517489 VenTine, 5/8 in. O.D. .............................................. 2702060 Tine Holders Tine Holder, 1/2 in. O.D. Tines ..................................547849 l Tine Holder, 5/8 in. O.D. Tines ................................547860 Tine Holder, 3/4 in. O.D. Tines ..................................547861 Support Literature Technical Manual.....................................................4268272 Operator Training DVD ............................................4191623 l GA-24 is supplied with twenty four 1/2 in. (13 mm) coring tines (4180567) and six 5/8 in. O.D. tine holders (547860). DuraTines 1/4 in. (6 mm) Coring, 1/2 in. O.D. (XLT) ................ 4180561 1/4 in. (6 mm) Solid, 1/2 in. O.D. (XL) ..................... 4180562 1/4 in. (6 mm) Solid, 5/8 in. O.D. (XL) ..................... 4180563 3/8 in. (9 mm) Solid, 5/8 in. O.D. (XL) ..................... 4180564 1/2 in. (13 mm) Coring, 5/8 in. O.D. (XL) ................ 4180566 l 1/2 in. (13 mm) Coring, 5/8 in. O.D. (XLT) ............ 4180567 5/8 in. (16 mm) Coring, 3/4 in. O.D. (XL) ................ 4180571 5/8 in. (16 mm) Coring, 3/4 in. O.D. (XLT) .............. 4180572 5/8 in. (16 mm) Solid, 3/4 in. O.D. (XL) ................... 4180573 7 2 SPECIFICATIONS 2.7 DECLARATION OF CONFORMITY ____________________________________________ DECLARATION OF CONFORMITY ▪ ДЕКЛАРАЦИЯ ЗА СЪОТВЕТСТВИЕ ▪ PROHLÁŠENÍ O SHODĚ ▪ OVERENSSTEMMELSESERKLÆRING ▪ CONFORMITEITSVERKLARING ▪ VASTAVUSDEKLARATSIOON ▪ VAATIMUSTENMUKAISUUSVAKUUTUS ▪ DECLARATION DE CONFORMITE ▪ KONFORMITÄTSERKLÄRUNG ▪ ∆ΗΛΩΣΗ ΣΥΜΜΟΡΦΩΣΗΣ ▪ MEGFELELŐSÉGI NYILATKOZAT ▪ DICHIARAZIONE DI CONFORMITÀ ▪ ATBILSTĪBAS DEKLARĀCIJA ▪ ATITIKTIES DEKLARACIJA ▪ DIKJARAZZJONI TAL-KONFORMITÀ ▪ DEKLARACJA ZGODNOŚCI ▪ DECLARAÇÃO DE CONFORMIDADE ▪ DECLARAŢIE DE CONFORMITATE ▪ VYHLÁSENIE O ZHODE ▪ IZJAVA O SKLADNOSTI ▪ DECLARACIÓN DE CONFORMIDAD ▪ DEKLARATION OM ÖVERENSSTÄMMELSE Business name and full address of the manufacturer ▪ Търговско име и пълен адрес на производителя ▪ Obchodní jméno a plná adresa výrobce ▪ Producentens firmanavn og fulde adresse ▪ Bedrijfsnaam en volledig adres van de fabrikant ▪ Tootja ärinimi ja täielik aadress ▪ Valmistajan toiminimi ja täydellinen osoite ▪ Nom commercial et adresse complète du fabricant ▪ Firmenname und vollständige Adresse des Herstellers ▪ Επωνυμία και ταχυδρομική διεύθυνση κατασκευαστή ▪ A gyártó üzleti neve és teljes címe ▪ Ragione sociale e indirizzo completo del fabbricante ▪ Uzņēmuma nosaukums un pilna ražotāja adrese ▪ Verslo pavadinimas ir pilnas gamintojo adresas ▪ Isem kummerċjali u indirizz sħiħ tal-fabbrikant ▪ Nazwa firmy i pełny adres producenta ▪ Nome da empresa e endereço completo do fabricante ▪ Denumirea comercială şi adresa completă a producătorului ▪ Obchodný názov a úplná adresa výrobcu ▪ Naziv podjetja in polni naslov proizvajalca ▪ Nombre de la empresa y dirección completa del fabricante ▪ Tillverkarens företagsnamn och kompletta adress Jacobsen, A Textron Company 11524 Wilmar Blvd. Charlotte, NC 28273, USA Product Code ▪ Код на продукта ▪ Kód výrobku ▪ Produktkode ▪ Productcode ▪ Toote kood ▪ Tuotekoodi ▪ Code produit ▪ Produktcode ▪ Κωδικός προϊόντος ▪ Termékkód ▪ Codice prodotto ▪ Produkta kods ▪ Produkto kodas ▪ Kodiċi tal-Prodott ▪ Kod produktu ▪ Código do Produto ▪ Cod produs ▪ Kód výrobku ▪ 58234 Oznaka proizvoda ▪ Código de producto ▪ Produktkod Machine Name ▪ Наименование на машината ▪ Název stroje ▪ Maskinnavn ▪ Machinenaam ▪ Masina nimi ▪ Laitteen nimi ▪ Nom de la machine ▪ Maschinenbezeichnung ▪ Ονομασία μηχανήματος ▪ Gépnév ▪ Denominazione della macchina ▪ Iekārtas nosaukums ▪ Mašinos pavadinimas ▪ Isem talMagna ▪ Nazwa urządzenia ▪ Nome da Máquina ▪ Numele echipamentului ▪ Názov stroja ▪ Naziv stroja ▪ Nombre de la máquina ▪ Maskinens namn GA-24 Designation ▪ Предназначение ▪ Označení ▪ Betegnelse ▪ Benaming ▪ Nimetus ▪ Tyyppimerkintä ▪ Pažymėjimas ▪ Bezeichnung ▪ Χαρακτηρισμός ▪ Megnevezés ▪ Funzione ▪ Apzīmējums ▪ Lithuanian ▪ Denominazzjoni ▪ Oznaczenie ▪ Designação ▪ Specificaţie ▪ Označenie ▪ Namen stroja ▪ Descripción Scarifier, Article 13, Item 49 ▪ Beteckning Serial Number ▪ Сериен номер ▪ Sériové číslo ▪ Serienummer ▪ Serienummer ▪ Seerianumber ▪ Valmistusnumero ▪ Numéro de série ▪ Seriennummer ▪ Σειριακός αριθμός ▪ Sorozatszám ▪ Numero di serie ▪ Sērijas numurs ▪ Serijos numeris ▪ Numru Serjali ▪ Numer seryjny ▪ Número de Série ▪ Număr de serie ▪ Sériové číslo ▪ Serijska številka ▪ Número de serie ▪ Serienummer 5823401651-5823404500 Engine ▪ Двигател ▪ Motor ▪ Motor ▪ Motor ▪ Mootor ▪ Moottori ▪ Moteur ▪ Motor ▪ Μηχανή ▪ Modulnév ▪ Motore ▪ Dzinējs ▪ Variklis ▪ Saħħa Netta Installata ▪ Briggs and Stratton Vanguard Silnik ▪ Motor ▪ Motor ▪ Motor ▪ Motor ▪ Motor ▪ Motor Net Installed Power ▪ Нетна инсталирана мощност ▪ Čistý instalovaný výkon ▪ Installeret nettoeffekt ▪ Netto geïnstalleerd vermogen ▪ Installeeritud netovõimsus ▪ Asennettu nettoteho ▪ Puissance nominale nette ▪ Installierte Nettoleistung ▪ Καθαρή εγκατεστημένη ισχύς ▪ Nettó beépített teljesítmény ▪ Potenza netta installata ▪ Paredzētā tīkla jauda ▪ Grynoji galia ▪ Wisa’ tal-Qtugħ ▪ Moc zainstalowana netto ▪ Potência instalada ▪ Puterea instalată netă ▪ Čistý inštalovaný výkon ▪ Neto vgrajena moč ▪ Potencia instalada neta ▪ Nettoeffekt 6,71 kW @ 3600 RPM Cutting Width ▪ Широчина на рязане ▪ Šířka řezu ▪ Skærebredde ▪ Maaibreedte ▪ Lõikelaius ▪ Leikkuuleveys ▪ Largeur de coupe ▪ Schnittbreite ▪ Μήκος μισινέζας ▪ Vágási szélesség ▪ Larghezza di taglio ▪ Griešanas platums ▪ Pjovimo plotis ▪ Tikkonforma mad-Direttivi ▪ Szerokość cięcia ▪ Largura de Corte ▪ Lăţimea de tăiere ▪ Šírka záberu ▪ Širina reza ▪ Anchura de corte ▪ Klippbredd NA Conforms to Directives ▪ В съответствие с директивите ▪ Splňuje podmínky směrnic ▪ Er i overensstemmelse med direktiver ▪ Voldoet aan de richtlijnen ▪ Vastab direktiividele ▪ Direktiivien mukainen ▪ Conforme aux directives ▪ Entspricht Richtlinien ▪ Ακολουθήστε πιστά τις Οδηγίες ▪ Megfelel az irányelveknek ▪ Conforme alle Direttive ▪ Atbilst direktīvām ▪ Atitinka direktyvų reikalavimus ▪ Valutazzjoni tal-Konformità ▪ Dyrektywy związane ▪ Cumpre as Directivas ▪ Respectă Directivele ▪ Je v súlade so smernicami ▪ Skladnost z direktivami ▪ Cumple con las Directivas ▪ Uppfyller direktiv 2004/108/EC 2006/42/EC 2000/14/EC, 2005/88/EC 2006/66/EC Conformity Assessment ▪ Оценка за съответствие ▪ Hodnocení plnění podmínek ▪ Overensstemmelsesvurdering ▪ Conformiteitsbeoordeling ▪ Vastavushindamine ▪ Vaatimustenmukaisuuden arviointi ▪ Evaluation de conformité ▪ Konformitätsbeurteilung ▪ ∆ιαπίστωση Συμμόρφωσης ▪ Megfelelőség-értékelés ▪ Valutazione della conformità ▪ Atbilstības novērtējums ▪ Atitikties įvertinimas ▪ Livell tal-Qawwa tal-Ħoss Imkejjel ▪ Ocena zgodności ▪ Avaliação de Conformidade ▪ Evaluarea conformităţii ▪ Vyhodnotenie zhodnosti ▪ Ocena skladnosti ▪ Evaluación de conformidad ▪ Bedömning av överensstämmelse 2006/42/EC Annex VIII Measured Sound Power Level ▪ Измерено ниво на звукова мощност ▪ Naměřený akustický výkon ▪ Målte lydstyrkeniveau ▪ Gemeten geluidsniveau ▪ Mõõdetud helivõimsuse tase ▪ Mitattu äänitehotaso ▪ Niveau de puissance sonore mesuré ▪ Gemessener Schalldruckpegel ▪ Σταθμισμένο επίπεδο ηχητικής ισχύος ▪ Mért hangteljesítményszint ▪ Livello di potenza sonora misurato ▪ Izmērītais skaņas jaudas līmenis ▪ Išmatuotas garso stiprumo lygis ▪ Livell tal-Qawwa tal-Ħoss Iggarantit ▪ Moc akustyczna mierzona ▪ Nível sonoro medido ▪ Nivelul măsurat al puterii acustice ▪ Nameraná hladina akustického výkonu ▪ Izmerjena raven zvočne moči ▪ Nivel de potencia sonora medido ▪ Uppmätt ljudeffektsnivå 105 dB(A) LWA Guaranteed Sound Power Level ▪ Гарантирано ниво на звукова мощност ▪ Garantovaný akustický výkon ▪ Garanteret lydstyrkeniveau ▪ Gegarandeerd geluidsniveau ▪ Garanteeritud helivõimsuse tase ▪ Taattu äänitehotaso ▪ Niveau de puissance sonore garanti ▪ Garantierter Schalldruckpegel ▪ Εγγυημένο επίπεδο ηχητικής ισχύος ▪ Szavatolt hangteljesítményszint ▪ Livello di potenza sonora garantito ▪ Garantētais skaņas jaudas līmenis ▪ Garantuotas garso stiprumo lygis ▪ Livell tal-Qawwa tal-Ħoss Iggarantit ▪ Moc akustyczna gwarantowana ▪ Nível sonoro farantido ▪ Nivelul garantat al puterii acustice ▪ Garantovaná hladina akustického výkonu ▪ Zajamčena raven zvočne moči ▪ Nivel de potencia sonora garantizado ▪ Garanterad ljudeffektsnivå 105 dB(A) LWA Conformity Assessment Procedure (Noise) ▪ Оценка за съответствие на процедурата (Шум) ▪ Postup hodnocení plnění podmínek (hluk) ▪ Procedure for overensstemmelsesvurdering (Støj) ▪ Procedure van de conformiteitsbeoordeling (geluid) ▪ Vastavushindamismenetlus (müra) ▪ Vaatimustenmukaisuuden arviointimenettely (Melu) ▪ Procédure d’évaluation de conformité (bruit) ▪ Konformitätsbeurteilungsverfahren (Geräusch) ▪ ∆ιαδικασία Αξιολόγησης Συμμόρφωσης (Θόρυβος) ▪ Megfelelőség-értékelési eljárás (Zaj) ▪ Procedura di valutazione della conformità (rumore) ▪ Atbilstības novērtējuma procedūra (troksnis) ▪ Atitikties įvertinimo procedūra (garsas) ▪ Proċedura tal-Valutazzjoni tal-Konformità (Ħoss) ▪ Procedura oceny zgodności (poziom hałasu) ▪ Processo de avaliação de conformidade (nível sonoro) Procedura de evaluare a conformităţii (zgomot) ▪ Postup vyhodnocovania zhodnosti (hluk) ▪ Postopek za ugotavljanje skladnosti (hrup) ▪ Procedimiento de evaluación de conformidad (ruido) ▪ Procedur för bedömning av överensstämmelse (buller) 2000/14/EC Annex V UK Notified Body for 2000/14/EC ▪ Нотифициран орган в Обединеното кралство за 2000/14/ЕО ▪ Úřad certifikovaný podle směrnice č. 2000/14/EC ▪ Det britiske bemyndigede organ for 2001/14/EF ▪ Engels adviesorgaan voor 2000/14/EG ▪ Ühendkuningriigi teavitatud asutus direktiivi 2000/14/EÜ mõistes ▪ Direktiivin 2000/14/EY mukainen ilmoitettu tarkastuslaitos Isossa-Britanniassa ▪ Organisme notifié concernant la directive 2000/14/CE ▪ Britische benannte Stelle für 2000/14/EG ▪ Κοινοποιημένος Οργανισμός Ηνωμένου Βασιλείου για 2000/14/ΕΚ ▪ 2000/14/EK – egyesült királyságbeli bejelentett szervezet ▪ Organismo Notificato in GB per 2000/14/CE ▪ 2000/14/EK AK reģistrētā organizācija ▪ JK notifikuotosios įstaigos 2000/14/EC ▪ Korp Notifikat tar-Renju Unit għal 2000/14/KE ▪ Dopuszczona jednostka badawcza w Wielkiej Brytanii wg 2000/ 14/WE ▪ Entidade notificada no Reino Unido para 2000/14/CE ▪ Organism notificat în Marea Britanie pentru 2000/14/CE ▪ Notifikovaný orgán Spojeného kráľovstva pre smernicu 2000/14/ES ▪ Britanski priglašeni organ za 2000/14/ES ▪ Cuerpo notificado en el Reino Unido para 2000/14/CE ▪ Anmält organ för 2000/14/EG i Storbritannien Number: 1088 Sound Research Laboratories Limited Holbrook House, Little Waldingfield Sudbury, Suffolk CO10 0TH Operator Ear Noise Level ▪ Оператор на нивото на доловим от ухото шум ▪ Hladina hluku v oblasti uší operátora ▪ Støjniveau i førers ørehøjde ▪ Geluidsniveau oor bestuurder ▪ Müratase operaatori kõrvas ▪ Melutaso käyttäjän korvan kohdalla ▪ Niveau de bruit à hauteur des oreilles de l’opérateur ▪ Schallpegel am Bedienerohr ▪ Επίπεδο θορύβου σε λειτουργία ▪ A kezelő fülénél mért zajszint ▪ Livello di potenza sonora all’orecchio dell’operatore ▪ Trokšņa līmenis pie operatora auss ▪ Dirbančiojo su mašina patiriamo triukšmo lygis ▪ Livell tal-Ħoss fil-Widna tal-Operatur ▪ Dopuszczalny poziom hałasu dla operatora ▪ Nível sonoro nos ouvidos do operador ▪ Nivelul zgomotului la urechea operatorului ▪ Hladina hluku pôsobiaca na sluch operátora ▪ Raven hrupa pri ušesu upravljavca ▪ Nivel sonoro en el oído del operador ▪ Ljudnivå vid förarens öra 88 dB(a) Leq (2006/42/EC) 8 SPECIFICATIONS 2 Harmonised standards used ▪ Използвани хармонизирани стандарти ▪ Použité harmonizované normy ▪ Brugte harmoniserede standarder ▪ Gebruikte geharmoniseerde standaards ▪ Kasutatud ühtlustatud standardid ▪ Käytetyt yhdenmukaistetut standardit ▪ Normes harmonisées utilisées ▪ BS EN ISO 20643 Angewandte harmonisierte Normen ▪ Εναρμονισμένα πρότυπα που χρησιμοποιήθηκαν ▪ Harmonizált szabványok ▪ Standard armonizzati applicati ▪ BS EN ISO 5349-1 Izmantotie saskaņotie standarti ▪ Panaudoti suderinti standartai ▪ Standards armonizzati użati ▪ Normy spójne powiązane ▪ Normas harmonizadas usadas BS EN ISO 5349-2 ▪ Standardele armonizate utilizate ▪ Použité harmonizované normy ▪ Uporabljeni usklajeni standardi ▪ Estándares armonizados utilizados ▪ Harmoniserade standarder som används Technical standards and specifications used ▪ Използвани технически стандарти и спецификации ▪ Použité technické normy a specifikace ▪ Brugte tekniske standarder og specifikationer ▪ Gebruikte technische standaards en specificaties ▪ Kasutatud tehnilised standardid ja spetsifikatsioonid ▪ Käytetyt tekniset standardit ja eritelmät ▪ Spécifications et normes techniques utilisées ▪ Angewandte technische Normen und Spezifikationen ▪ Τεχνικά πρότυπα και προδιαγραφές που χρησιμοποιήθηκαν ▪ Műszaki szabványok és specifikációk ▪ Standard tecnici e specifiche applicati ▪ Izmantotie tehniskie standarti un specifikācijas ▪ Panaudoti techniniai standartai ir techninė informacija ▪ Standards u speċifikazzjonijiet tekniċi użati ▪ Normy i specyfikacje techniczne powiązane ▪ Normas técnicas e especificações usadas ▪ Standardele tehnice şi specificaţiile utilizate ▪ Použité technické normy a špecifikácie ▪ Uporabljeni tehnični standardi in specifikacije ▪ Estándares y especificaciones técnicas utilizadas ▪ Tekniska standarder och specifikationer som används ISO 2631-1 The place and date of the declaration ▪ Място и дата на декларацията ▪ Místo a datum prohlášení ▪ Sted og dato for erklæringen ▪ Plaats en datum van de verklaring ▪ Deklaratsiooni väljastamise koht ja kuupäev ▪ Vakuutuksen paikka ja päivämäärä ▪ Lieu et date de la déclaration ▪ Ort und Datum der Erklärung ▪ Τόπος και ημερομηνία δήλωσης ▪ A nyilatkozat kelte (hely és idő) ▪ Luogo e data della dichiarazione ▪ Deklarācijas vieta un datums ▪ Deklaracijos vieta ir data ▪ Il-post u d-data tad-dikjarazzjoni ▪ Miejsce i data wystawienia deklaracji ▪ Local e data da declaração ▪ Locul şi data declaraţiei ▪ Miesto a dátum vyhlásenia ▪ Kraj in datum izjave ▪ Lugar y fecha de la declaración ▪ Plats och datum för deklarationen Jacobsen, A Textron Company 11524 Wilmar Blvd. Charlotte, NC 28273, USA May 1, 2011 Signature of the person empowered to draw up the declaration on behalf of the manufacturer, holds the technical documentation and is authorised to compile the technical file, and who is established in the Community. Подпис на човека, упълномощен да състави декларацията от името на производителя, който поддържащ техническата документация и е оторизиран да изготви техническия файл и е регистриран в общността. Podpis osoby oprávněné sestavit prohlášení jménem výrobce, držet technickou dokumentaci a osoby oprávněné sestavit technické soubory a založené v rámci Evropského společenství. Underskrift af personen, der har fuldmagt til at udarbejde erklæringen på vegne af producenten, der er indehaver af dokumentationen og er bemyndiget til at udarbejde den tekniske journal, og som er baseret i nærområdet. Handtekening van de persoon die bevoegd is de verklaring namens de fabrikant te tekenen, de technische documentatie bewaart en bevoegd is om het technische bestand samen te stellen, en die is gevestigd in het Woongebied. Ühenduse registrisse kantud isiku allkiri, kes on volitatud tootja nimel deklaratsiooni koostama, kes omab tehnilist dokumentatsiooni ja kellel on õigus koostada tehniline toimik. Sen henkilön allekirjoitus, jolla on valmistajan valtuutus vakuutuksen laadintaan, jolla on hallussaan tekniset asiakirjat, joka on valtuutettu laatimaan tekniset asiakirjat ja joka on sijoittautunut yhteisöön. Signature de la personne habilitée à rédiger la déclaration au nom du fabricant, à détenir la documentation technique, à compiler les fichiers techniques et qui est implantée dans la Communauté. Unterschrift der Person, die berechtigt ist, die Erklärung im Namen des Herstellers abzugeben, die die technischen Unterlagen aufbewahrt und berechtigt ist, die technischen Unterlagen zusammenzustellen, und die in der Gemeinschaft niedergelassen ist. Υπογραφή ατόμου εξουσιοδοτημένου για την σύνταξη της δήλωσης εκ μέρους του κατασκευαστή, ο οποίος κατέχει την τεχνική έκθεση και έχει την εξουσιοδότηση να ταξινομήσει τον τεχνικό φάκελο και ο οποίος είναι διορισμένος στην Κοινότητα. A gyártó nevében meghatalmazott személy, akinek jogában áll módosítania a nyilatkozatot, a műszaki dokumentációt őrzi, engedéllyel rendelkezik a műszaki fájl összeállításához, és aki a közösségben letelepedett személy. Firma della persona autorizzata a redigere la dichiarazione a nome del fabbricante, in possesso Della documentazione tecnica ed autorizzata a costituire il fascicolo tecnico, che deve essere stabilita nella Comunità. Tās personas paraksts, kura ir pilnvarota deklarācijas sastādīšanai ražotāja vārdā, kurai ir tehniskā dokumentācija, kura ir pilnvarota sagatavot tehnisko reģistru un kura ir apstiprināta Kopienā. Asmuo, kuris yra gana žinomas, kuriam gamintojas suteikė įgaliojimus sudaryti šią deklaraciją, ir kuris ją pasirašė, turi visą techninę informaciją ir yra įgaliotas sudaryti techninės informacijos dokumentą. Il-firma tal-persuna awtorizzata li tfassal id-dikjarazzjoni f’isem il-fabbrikant, għandha d-dokumentazzjoni teknika u hija awtorizzata li tikkompila l-fajl tekniku u li hija stabbilita fil-Komunità. Podpis osoby upoważnionej do sporządzenia deklaracji w imieniu producenta, przechowującej dokumentację techniczną, upoważnioną do stworzenia dokumentacji technicznej oraz wyznaczonej ds. wspólnotowych. Assinatura da pessoa com poderes para emitir a declaração em nome do fabricante, que possui a documentação técnica, que está autorizada a compilar o processo técnico e que está estabelecida na Comunidade. Semnătura persoanei împuternicite să elaboreze declaraţia în numele producătorului, care deţine documentaţia tehnică, este autorizată să compileze dosarul tehnic şi este stabilită în Comunitate. Podpis osoby poverenej vystavením vyhlásenia v mene výrobcu, ktorá má technickú dokumentáciu a je oprávnená spracovať technické podklady a ktorá je umiestnená v Spoločenstve. Podpis osebe, pooblaščene za izdelavo izjave v imenu proizvajalca, ki ima tehnično dokumentacijo in lahko sestavlja spis tehnične dokumentacije, ter ima sedež v Skupnosti. Firma de la persona responsable de la declaración en nombre del fabricante, que posee la documentación técnica y está autorizada para recopilar el archivo técnico y que está establecido en la Comunidad. Undertecknas av den som bemyndigad att upprätta deklarationen å tillverkarens vägnar, innehar den tekniska dokumentationen och är bemyndigad att sammanställa den tekniska informationen och som är etablerad i gemenskapen. Certificate Number ▪ Номер на сертификат ▪ Číslo osvědčení ▪ Certifikatnummer ▪ Certificaatnummer ▪ Sertifikaadi number ▪ Hyväksyntänumero ▪ Numéro de certificat ▪ Bescheinigungsnummer ▪ Αριθμός Πιστοποιητικού ▪ Hitelesítési szám ▪ Numero del certificato ▪ Sertifikāta numurs ▪ Sertifikato numeris ▪ Numru taċ-Ċertifikat ▪ Numer certyfikatu ▪ Número do Certificado ▪ Număr certificat ▪ Číslo osvedčenia ▪ Številka certifikata ▪ Número de certificado ▪ Certifikatsnummer 2006/42/EC Annex II 1.A.2 Tim Lansdell Technical Director Ransomes Jacobsen Limited West Road, Ransomes Europark, Ipswich, IP3 9TT, England 2006/42/EC Annex II 1.A.10 Vasant Godhalekar VP of Engineering Jacobsen, A Textron Company 11524 Wilmar Blvd, Charlotte, NC 28273, USA 4268272 Rev A GB BG CZ DK NL EE FI FR DE GR HU English български čeština dansk Nederlands eesti suomi français Deutsch Ελληνικά magyar IT LV LT MT PL PT RO SK SI ES SE italiano latviešu valoda lietuvių kalba Malki polski português Română slovenčina Ελληνικά Svenska slovenščina 9 3 3 3.1 DECALS AND ICONS DECALS AND ICONS DECALS _________________________________________________________________ Familiarize yourself with the decals as they are critical to the safe operation of the aerator. REPLACE DAMAGED DECALS IMMEDIATELY. 4164281 1 38 64 41 840891 3.2 ICONS ___________________________________________________________________ Read Manual Fuel OPC Release Engine Throttle Fast Choke Slow Tine Lever Lift Lower ! WARNING Never attempt to operate the aerator unless you have read the Technical Manual and know how to operate all controls correctly. Familiarize yourself with the icons shown above and what they represent. Learn the location and purpose of all the controls before operating the aerator. 10 Tine Engage CONTROLS A B C D E F G Clutch Control Lever Throttle Shift Control Lever Tine Lever 4 OPC Handle Engine Switch Choke A F R N H L G C E D B 4 4.1 CONTROLS CONTROL DESCRIPTIONS _________________________________________________ A. Clutch Control Lever Clutch control lever engages and disengages power to tine operation clutch and latches OPC handle. Pull lever until OPC handle (E) closes for transport. Pull handle until it clicks and locks in place for tine operation. Release the OPC handle to disengage. B. Throttle Controls the ground speed of the unit. Position lever between Slow and Fast to set desired ground speed. Fully raise lever to Stop position to shut off engine. C. Shift Control Lever Four position lever used to operate different functions of machine. R (Reverse): Engages operation is locked out. reverse traction. ! WARNING Damage to turf and/or aerator may occur if aerator head is not fully raised before engaging OPC handle with shift control lever (C) in R (Reverse) or H (High) position. N (Neutral): Disengages both traction and tine operation. H (High): Engages transport speed only. Tine operation is locked out. L (Low): Engages aerating traction speed. Tine operation can be engaged. Tine 11 4 CONTROLS D. Tine Lever Raises and lowers aerator head. Lift lever to Raise position to raise head. Push lever to Lower position to lower head. ! WARNING A To prevent injury from hot hydraulic oil, the Tine Lever must be returned to the Neutral position after raising or lowering the unit. If the lever sticks or is held in the Raise or Lower position, the hydraulic fluid will overheat, possibly causing a hydraulic line to rupture. E. OPC Handle Engages and disengages drive clutch. Returns clutch control lever (A) to disengaged position when released. R N H L C E B F. Engine Switch Controls engine operation. Move switch to ON position for normal operation. Move switch to OFF position to shut unit off or when adjusting, trailering, or storing unit. G. Choke The choke lever opens and closes the choke valve in the carburetor. The Closed position enriches the fuel mixture for starting a cold engine. The Open position provides the correct fuel mixture for operation after starting and for restarting a warm engine. 12 D F G OPERATION 5 5 OPERATION 5.1 DAILY INSPECTION ________________________________________________________ ! CAUTION The daily inspection should be performed only when the engine is off and all fluids are cold. Lower aerator head to the ground, stop engine, and disconnect spark plug wire. 1. Perform a visual inspection of the entire aerator, looking for signs of wear, loose hardware, and missing or damaged components. Check for fuel or oil leaks to ensure connections are tight and hoses and tubes are in good condition. 2. Check the hydraulic oil level, fuel supply, crankcase oil, and air cleaner. All fluids must be at the Full level mark with engine cold. 3. Check tires for proper inflation. 5.2 OPERATOR PRESENCE CONTROL (OPC) _____________________________________ 1. The OPC system is intended to protect the operator and others from injury by stopping the aerator and drive mechanism as soon as the operator releases the OPC handle. d. e. f. ! WARNING Never operate equipment with the OPC system disconnected or malfunctioning. g. Pull clutch control lever (A) slightly until OPC handle (E) can be engaged. Engage tine operation. h. Release the OPC handle (E). The clutch control lever (A) must return to disengaged position and OPC handle must come up. i. Check each position of shift control lever (C). Tine operation should only engage with lever in L (Low) position. 2. Test OPC system. a. Start the engine and place throttle (B) at Slow. Fully raise aerator head. b. c. Place shift control (C) in R (Reverse) position. In this position, unit will move away from operator when testing. Pull clutch control lever (A) slightly until OPC handle (E) can be engaged. Do not engage tine operation. With Engine Running Shift Control Position R R OPC Handle Engaged Disengaged 4 4 The drive mechanism will engage and the unit will slowly move backward. Release the OPC handle. The handle must come up and the wheels must stop. Shut off engine. Place shift control (C) in L (Low) position. Without Engine Running Can Clutch Lever be Fully Engaged Gear Selector R No N No H No L Yes 3. Stop the engine immediately and have the system repaired if any of the following occurs: Wheels Turn No Yes a. The wheels begin to turn before the OPC handle is engaged. b. The wheels continue to turn after the OPC handle is released. c. Clutch control lever does not return to disengaged position. 13 5 OPERATION 5.3 OPERATING PROCEDURES_________________________________________________ ! CAUTION To prevent injury, always wear safety glasses, leather work shoes or boots, a hard hat, and ear protection. 1. Before starting engine, always release OPC handle. 2. Do not operate aerator or attachments with loose, damaged, or missing components. 3. First aerate in a test area to become thoroughly familiar with the operation of the aerator and control levers. 4. Study the work area to determine the best and safest operating procedure. Consider the type of terrain and condition of the surface. Each condition will require certain adjustments or precautions. 5. Never direct discharge of material toward bystanders nor allow anyone near the aerator while in operation. The owner/operator is responsible for injuries inflicted to bystanders and/or damage to their property. ! CAUTION struck by the aerator may cause serious injuries to bystanders and/or damage the aerator. 7. Always raise aerator head and move control lever out of L position when not aerating. 8. Disengage the tines and raise the aerator head when crossing paths or roadways. Look out for traffic. 9. Stop and inspect the equipment for damage immediately after striking any obstruction or if the machine begins to vibrate abnormally. Have the equipment repaired before resuming operation. ! WARNING Before you clean, adjust, or repair the aerator, always disengage all drives, lower aerator head to the ground, stop engine, and disconnect spark plug wire to prevent injuries. Before operating the aerator, pick up all debris such as rocks, toys, and wire which may be thrown by the machine. Enter a new area cautiously. Always operate at speeds that allow you to have complete control of the aerator. 10. Slow down and use extra care on hillsides. Read Section 5.8. Use caution when operating near drop offs. 6. Use discretion when operating near gravel areas (roadways, parking areas, cart paths, etc.). Stones 12. Never use your hands to clean aerator. Tine edges are sharp and can cause serious injuries. 5.4 11. Use care when approaching blind corners, shrubs, trees, or other objects that may obscure vision. STARTING _______________________________________________________________ 1. Check engine crankcase oil levels. 2. Fill fuel tank with fresh, clean unleaded fuel. 3. Turn engine switch to ON position. A 4. Place Shift Control Lever (C) in Neutral and disengage clutch control (A). 5. Move Throttle lever (B) to 1/2 throttle. R 6. Pull recoil starter located on right side of engine. Choke as required to start engine. L 7. Allow the engine to become warm and properly lubricated before operating at high RPM. N H C E B D Figure 5A 14 OPERATION 5.5 STOPPING / PARKING ______________________________________________________ To stop: Release OPC handle (E) to bring unit to a complete stop. To park the aerator under normal conditions: 1. Release OPC handle (E), raise the aerator head (D). Move Shift Control Lever (C) to H position, engage OPC handle and move away from the area of operation. 2. Select a flat and level area to park. 5.6 5 a. Release OPC handle (E) to bring unit to a complete stop. b. Lower aerator head (D) to the ground, reduce throttle to slow, and allow engine to operate at no load for several minutes. 3. Move engine switch to OFF position. If an emergency arises and the unit must be parked in the area of operation, follow the guidelines outlined by the grounds superintendent. If the unit is parked on an incline, chock or block the wheels. TO DRIVE / TRANSPORT____________________________________________________ Read and follow all safety notes contained in this manual when driving or transporting aerator. Refer to Section 5.3 for general operating instructions. When operating in Reverse look behind you to ensure you have a clear path. 1. Release OPC handle (E) and raise aerator head (D). 2. Set Throttle lever (B) to Slow. 4. Adjust Throttle lever (B) to desired transport speed. ! CAUTION When transporting, operate the aerator in such a manner to allow you to see the path ahead and quickly move away from the aerator should you accidentally lose control. 3. Move Shift Control Lever (C) to H position and engage OPC handle (D) to drive to and from the area of operation. 5.7 TRAILERING ______________________________________________________________ If the aerator experiences problems and must be shut down and removed from the work area, the aerator should be loaded onto a trailer for transport. Use care when loading and unloading aerator. Tines may drag or catch on trailer ramp. To prevent push rods from being bent, remove the two lowest positioned tines. Fasten aerator to trailer to prevent rolling or shifting during transport. Long Distance Trailering / Transport. If the aerator is to be trailered on the highway, before strapping to trailer, inflate tires to: Front - 22 psi (152 kPa). Rear - 22 psi (152 kPa). After unloading aerator, reduce tire pressure to normal operating pressure. See Section 5.8 15 5 OPERATION 5.8 AERATING _______________________________________________________________ 2. Move Shift Control Lever to L position. ! WARNING To prevent serious injuries, keep hands, feet, and clothing away from aerator mechanism. NEVER use your hands to clean aerator. Tine edges are sharp and could cause injuries. To clear obstructions from tine, disengage master clutch, raise aerator head, stop engine, and disconnect spark plug wire. Only then can the obstruction be safely removed. 3. Move Throttle lever to Slow. Stand to the side of aerator and slowly engage OPC handle. a. Adjust throttle to desired walking speed after aerator is in motion. b. Pull Clutch Control Lever until it clicks and locks in tine operation position. c. At proper starting point on turf, fully lower aerator head by pushing down on the Tine Lever. 4. To stop aerating, pull up on the Tine Lever to raise aerator head. Disengage OPC handle. To Aerate: 1. Start the engine and raise aerator head. 5.9 HILLSIDE OPERATION _____________________________________________________ ! WARNING To minimize the possibility of overturning, the safest method for operating on hills and terraces is to travel up and down the face of the slope (vertically), not across the face (horizontally). Avoid unnecessary turns, travel at reduced speeds, stay alert for hidden hazards, and avoid drop offs. 20° Maximum 36.4% ! CAUTION Do not operate on inclines greater than 20° or 36.4% grade. 1. Always operate the aerator at reduced forward speed to maintain control. 2. If the aerator tends to slide or the tires begin to mark the turf, angle aerator into a less steep grade until traction is regained or tire marking stops. 3. If aerator continues to slide or mark the turf, the grade is too steep for safe operation. Do not make another attempt to climb and back down slowly. Correct tire pressure is essential for maximum traction. Front: 14 psi (97 kPa). Rear: 14 psi (97 kPa). 16 45 ° /2 -1 ° 3 4 42 4° / -1 ° 40 -3/4 ° 8 3 -3/4 % 36 5° 95 0% 3 9 5% ° 8 0% 33 8 5% 1° 3 ° 7 % 3/4 8 70 % 2 - /2° 1 65 % 6 2 60 % 1/4° 24- /4° 55 % 1 50 2 -3 ° /4 45% 19-1 ° % 0 4 16-3/4 35% 14° 30% 25% 11-1/4° 20% 8-1/2° 15% 5-3/4° 10% 2-3/4° 5% 0° 0% D Degrees are shown to nearest 1/4° eg re es ° Figure 5B G r 10 ade 0% The aerator has been designed for good traction and stability under normal conditions, however, use caution when operating on inclines, especially over rough terrain or when the grass is wet. Wet grass reduces traction and steering control. 20° Maximum 36.4% Figure 5C OPERATION How to calculate a slope: 5 B Tools Required: Level (A), either 1 yard, or 1 meter long. Tape measure (B). A With the level (A) positioned horizontally, measure the distance (C) with tape measure (B). Use the chart to calculate either the slope angle or the % grade of the slope (D). C D Figure 5D Height (C) Inches with 1 Yard Level (A) Result (D) Millimeters with 1 Meter Level (A) Slope in Degrees Slope Grade % 4.8 8.3 100 5.7 10.0 150 8.5 15 9.5 16.7 11.3 20.0 11.8 20.8 3 6 200 7.5 9 225 12.7 22.5 250 14 25.0 275 15.4 27.5 15.5 27.8 16.7 30.0 17.0 30.6 18.0 32.5 18.4 33.3 19.3 35.0 19.9 36.1 20.6 37.5 21.3 38.9 21.8 40.0 22.6 41.7 23.0 42.5 24 44.4 10 300 11 325 12 350 13 375 14 400 15 425 16 18 475 25.4 47.5 500 26.6 50.0 29.1 55.6 600 31.0 60.0 34.8 69.4 800 38.7 80.0 39.8 83.3 900 42.0 90 1000 45.0 100 20 25 30 36 17 6 6 6.1 ADJUSTMENTS ADJUSTMENTS GENERAL________________________________________________________________ 3. Long hair, jewelry, or loose fitting clothing may get tangled in moving parts. Remove jewelry, tuck in loose fitting clothing, and tuck long hair under a cap. ! WARNING To prevent injury, disengage master clutch, lower aerator head to the ground, stop engine, and disconnect spark plug wire before making any adjustments or performing maintenance. Make sure the aerator is parked on a solid and level surface. Never work on a aerator that is supported only by a jack. Always use jack stands. ! CAUTION Be careful to prevent entrapment of the hands and fingers between moving and fixed components of the aerator. If only the front or rear of the aerator is raised, place chocks in front of and behind the wheels that are not raised. 1. Adjustments and maintenance should always be performed by a qualified technician. If proper adjustment cannot be made, contact an authorized Jacobsen Dealer. 2. Replace, do components. 6.2 not adjust, worn or damaged ! WARNING To prevent injury, support upper frame with blocks when working on aerator with aerator head raised. Hydraulic lines may rupture or lever could be accidentally tripped, causing aerator head to drop rapidly. 4. Do not change governor settings or overspeed the engine. TURF GUARD_____________________________________________________________ The Turf Guard (C) is used to prevent the turf from lifting up as cores are pulled out. The pressure on the turf guard can be adjusted by increasing or decreasing tension on the springs (A). Add or remove spacers (B) above spring as necessary to ensure the turf guard provides enough pressure to prevent turf from lifting up but not so much that the turf guard marks or cuts the turf. B A C Figure 6A 6.3 AERATOR DRIVE IDLER CABLE _____________________________________________ 1. Engage OPC handle [ See Section 4.1] and tine operation. 2. Adjust cable nuts (D) as necessary to obtain 0.18 inch (3.3 mm) deflection with a 4.4 lb (2.0 kg) push for new belt or 3.0 lb (1.4 kg) push for used belt at location shown. 0.18 inch (3.3 mm) 4.4 lb (1.81 kg) New 3.0 lb (1.36 kg) Used 3. Addition adjustment available if required by moving cable bracket and at handle. D 18 Figure 6B ADJUSTMENTS 6.4 6 TRACTION DRIVE IDLER CABLE _____________________________________________ 1. Engage OPC handle. [ See Section 4.1] 2. Adjust cable nuts (E) as necessary to obtain 0.18 inch (3.3 mm) deflection with a 4.4 lb (2.0 kg) push for new belt or 3.0 lb (1.4 kg) push for used belt at location shown. 0.18 inch (3.3 mm) 4.4 lb (1.81 kg) New 3.0 lb (1.36 kg) Used 3. Addition adjustment available at handle end of cable or by moving cable bracket. 4. Test handle operation. When OPC handle is engaged, parking brake (F) should release and idler pulley should engage traction drive. E F Figure 6C 6.5 AERATOR TIMING _________________________________________________________ Note: Improper timing between the aerator crankshaft and the camshaft will cause elongated holes while aerating and excessive noise in the camcase. 1. Remove shields from both sides of unit. Dot towards front H Timing Marks Horizontal 2. Remove aerator chain connecting crankshaft to camshaft from both sides of unit. 3. Loosen stud between crankshaft halves. 4. Rotate right camshaft sprocket (G) until the keyway is pointing towards the front of the unit. Timing marks should be at a 45° angle with dot towards the lower front. [See Figure 6D] 5. Rotate right side crankshaft sprocket (H) until the timing marks are horizontal with the dot towards the front. Keyway should be at a 45° angle. 6. Install right side aerator chain (J). Crankshaft sprocket may be rotated up to 5° in a clockwise direction only to properly mesh with the chain. 7. Rotate left crankshaft sprocket (K) until the timing marks are vertical and dot is towards the ground. [See Figure 6E] 8. Install left side aerator chain (L). Crankshaft sprocket may be rotated up to 5° in a counterclockwise direction only to properly mesh with the chain. 9. Tighten stud between crankshaft halves. Torque hardware to 30 ft lbs. (40.7 Nm). 10. Install shields. Do not operate aerator without all shields properly installed. J Timing Marks 45° Angle Dot towards lower front G Front Right Side Aerator Chain Figure 6D Timing Marks Vertical K Dot towards ground L Front Left Side Aerator Chain Figure 6E 19 6 ADJUSTMENTS 6.6 SHIFT CONTROL CABLE ___________________________________________________ If traction drive system does not shift properly, adjustment of the shift control cable may be required. 1. Disconnect clevis (N) from shift lever (P). 2. Place the shift control lever in the L position. 3. Rotate shift lever (P) clockwise until it locks into the low speed detent. P 4. Adjust cable nuts (M) as necessary until clevis (N) aligns with mounting hole in lever (P). 5. If additional adjustment is required, cable may be adjusted at the handle. N M Figure 6F 6. Test each position of shift control. Shift lever (P) should lock into each detent at each stop of shift control. 6.7 LIFT CABLE ______________________________________________________________ If aerator head does not raise or lower properly, adjustment of the lift cable may be required. 1. Loosen both cable nuts (R). Lift valve should automatically return to center. 2. Place lift control handle in center (Neutral) position. 3. Tighten nuts (R). 4. Test operation of lift control. R Figure 6G 20 ADJUSTMENTS 6.8 6 TORQUE SPECIFICATION ___________________________________________________ NOTICE All torque values included in these charts are approximate and are for reference only. Use of these torque values is at your sole risk. Jacobsen is not responsible for any loss, claim, or damage arising from the use of these charts. Extreme caution should always be used when using any torque value. Jacobsen uses Grade 5 bolts as standard, unless otherwise noted. AMERICAN NATIONAL STANDARD FASTENERS AMERICAN NATIONAL STANDARD FASTENERS SIZE UNITS GRADE 5 GRADE 8 SIZE UNITS GRADE 5 GRADE 8 #6-32 in-lbs (Nm) 20 (2.3) – 7/16-14 ft-lbs (Nm) 50 (67.8) 65 (88.1) #8-32 in-lbs (Nm) 24 (2.7) 30 (3.4) 7/16-20 ft-lbs (Nm) 55 (74.6) 70 (94.9) #10-24 in-lbs (Nm) 35 (4.0) 45 (5.1) 1/2-13 ft-lbs (Nm) 75 (101.7) 100 (135.6) #10-32 in-lbs (Nm) 40 (4.5) 50 (5.7) 1/2-20 ft-lbs (Nm) 85 (115.3) 110 (149.2) #12-24 in-lbs (Nm) 50 (5.7) 65 (7.3) 9/16-12 ft-lbs (Nm) 105 (142.4) 135 (183.1) 1/4-20 in-lbs (Nm) 95 (10.7) 125 (14.1) 9/16-18 ft-lbs (Nm) 115 (155.9) 150 (203.4) 1/4-28 in-lbs (Nm) 95 (10.7) 150 (17.0) 5/8-11 ft-lbs (Nm) 150 (203.4) 195 (264.4) 5/16-18 in-lbs (Nm) 200 (22.6) 270 (30.5) 5/8-18 ft-lbs (Nm) 160 (217.0) 210 (284.8) 5/16-24 in-lbs (Nm) 240 (27.1) 300 (33.9) 3/4-10 ft-lbs (Nm) 170 (230.5) 220 (298.3) 3/8-16 ft-lbs (Nm) 30 (40.7) 40 (54.2) 3/4-16 ft-lbs (Nm) 175 (237.3) 225 (305.1) 3/8-24 ft-lbs (Nm) 35 (47.5) 45 (61.0) 7/8-14 ft-lbs (Nm) 300 (406.8) 400 (542.4) METRIC FASTENERS Non Critical Fasteners into Aluminum 4.8 5.8 8.8 10.9 12.9 Nm (in-lbs) 1.2 (11) 1.7 (15) 2.9 (26) 4.1 (36) 5.0 (44) 2.0 (18) M5 Nm (in-lbs) 2.5 (22) 3.2 (28) 5.8 (51) 8.1 (72) 9.7 (86) 4.0 (35) M6 Nm (in-lbs) 4.3 (38) 5.7 (50) 9.9 (88) 14.0 (124) 16.5 (146) 6.8 (60) M8 Nm (in-lbs) 10.5 (93) 13.6 (120) 24.4 (216) 33.9 (300) 40.7 (360) 17.0 (150) M10 Nm (ft-lbs) 21.7 (16) 27.1 (20) 47.5 (35) 66.4 (49) 81.4 (60) 33.9 (25) M12 Nm (ft-lbs) 36.6 (27) 47.5 (35) 82.7 (61) 116.6 (86) 139.7 (103) 61.0 (45) M14 Nm (ft-lbs) 58.3 (43) 76.4 (55) 131.5 (97) 184.4 (136) 219.7 (162) 94.9 (70) SIZE UNITS M4 21 7 MAINTENANCE 7 MAINTENANCE 7.1 GENERAL________________________________________________________________ ! WARNING Before you clean, adjust, or repair the aerator, disengage all drives, lower aerator head to the ground, stop engine, and disconnect spark plug wire to prevent injuries. Make sure the aerator is parked on a solid and level surface. Never work on an aerator that is supported only by a jack. Always use jack stands. 1. 2. Adjustment and maintenance should always be performed by a qualified technician. If proper adjustments cannot be made, contact an authorized Jacobsen Dealer. Inspect the aerator on a daily basis. Establish a maintenance schedule and keep detailed records. a. 7.2 Keep all moving parts properly adjusted and lubricated. c. Replace worn or damaged parts before operating the aerator. d. Keep all fluids at their proper levels. e. Keep shields in place and all hardware securely fastened. f. Keep tires properly inflated. 3. Long hair, jewelry, or loose fitting clothing may get tangled in moving parts. 4. Use the illustrations in the Parts Catalog as reference for the disassembly and assembly of components. 5. Recycle or dispose of all hazardous materials (batteries, fuel, lubricants, antifreeze, etc.) according to federal, state, and local regulations. Keep the aerator clean. ENGINE _________________________________________________________________ IMPORTANT: A separate Engine Manual, prepared by the engine manufacturer, is supplied with this unit. Read the Engine Manual carefully until you are familiar with the operation and maintenance of the engine. Proper attention to the engine manufacturer’s directions will assure maximum service life of the engine. To order a replacement Engine Manual contact the engine manufacturer. The proper break-in of a new engine can make a considerable difference to the performance and life of the engine. Note: The aerator is designed to operate most efficiently at the preset governor setting. Do not change the engine governor settings or overspeed the engine. During the break-in period, Jacobsen recommends the following: 1. Operate modestly for the first 25 hours at reduced engine speed. 2. Avoid full throttle starts and rapid acceleration. 3. Allow the engine to reach operating temperature before operating at full load. 4. Change the oil and filter after the first 5 hours of operation. 5. Refer to Section 9.2 and the Engine Manual for specific maintenance intervals. 22 b. MAINTENANCE 7.3 7 ENGINE OIL ______________________________________________________________ Check the engine oil at the start of each day, before starting the engine. If the oil level is low, remove oil filler cap, and add oil as necessary. FULL mark FULL ADD Perform initial oil change after the first 5 hours of operation. Change oil every 25 hours thereafter. See the Engine Manual for detailed service information. After adding or changing oil, start and run engine at idle with all drives disengaged for 30 seconds. Shut engine off. Wait 30 seconds and check oil level. Add oil to bring up to FULL mark on dipstick. Operating Range Figure 7A Use only engine oils with API classification SG, SH, or SJ. Above 32° F (0° C) SAE 30W Below 32° F (0° C) SAE 5W20 or SAE 5W30 7.4 1. ENGINE AIR FILTER _______________________________________________________ Remove and service the foam pre-cleaner every 25 hours. Replace if damaged. To service pre-cleaner, wash in a liquid detergent and warm water. Rinse thoroughly and squeeze dry in a clean cloth. Saturate in clean engine oil and squeeze out excess oil in a clean, absorbent cloth. 7.5 2. Replace the paper air cleaner element every 100 hours, more often when operating in dusty conditions. Note: Always replace the paper element. Do not wash or use pressurized air to clean cartridge. See the Engine Manual for detailed service information. FUEL ____________________________________________________________________ Fuel is highly flammable. Handle with care. Use an approved container. The spout must fit inside the fuel filler neck. Avoid using cans and funnels to transfer fuel. ! WARNING • Never overfill fuel tank. Gas Engine: • Use clean, fresh, regular grade unleaded gasoline with a minimum 85 Octane rating. Never remove the fuel cap from the fuel tank or add fuel when the engine is running or while the engine is hot. NOTICE Do not smoke when handling fuel. Never fill or drain the fuel tank indoors. Do not use premium gasoline or an oil-gasoline mixture. When using blended fuel, do not use a blend with more than 10% ethanol. Under no circumstances should you use a blend with methanol. Do not spill fuel. If fuel is spilled, clean spilled fuel immediately. Never handle or store fuel containers near an open flame or any device that may create sparks and ignite the fuel or fuel vapors. Be sure to install and tighten fuel cap securely. • Fill the fuel tank to within 1 in. (25 mm) of the bottom of the filler neck. • Store fuel according to federal, state, and local ordinances and recommendations from your fuel supplier. 23 7 MAINTENANCE 7.6 HYDRAULIC HOSES _______________________________________________________ 4. Replacement tubes and hoses must be routed in the same path as the existing tubes and hoses. Do not move clamps, brackets, and ties to a new location. 5. Thoroughly inspect all tubes, hoses, and connections every 250 hours. ! WARNING To prevent serious injury from hot, high pressure oil, never use your hands to check for oil leaks. Always use paper or cardboard. IMPORTANT: The hydraulic system can be permanently damaged if the oil becomes contaminated. Before disconnecting any hydraulic component, clean the area around the fittings and the hose ends to keep impurities out of the system. Hydraulic fluid escaping under pressure can have sufficient force to penetrate skin. If fluid is injected into the skin it must be surgically removed within a few hours by a doctor familiar with this form of injury or gangrene may result. Do not attempt to replace hydraulic hoses with aerator head in raised position. Hoses are under extreme pressure. Releasing pressure improperly could cause aerator head to drop suddenly. 1. Always disengage all drives, lower aerator head to ground, stop engine, and disconnect spark plug wire before inspecting or disconnecting hydraulic lines or hoses. a. Before disconnecting any hydraulic component, tag or mark the location of each hose, and then clean the area around the fittings. b. As you disconnect the component, be prepared to assemble plugs or caps to the hose ends and open ports. This will keep impurities out of the hydraulic system and also prevent excessive oil spills. c. Make sure o-rings are clean and hose fittings are properly seated before tightening. 2. With engine stopped, move Tine Lever to Raise position for 10 seconds and Lower position for 10 seconds to release system pressure. d. Keep the hose from twisting. Twisted hoses can cause couplers to loosen as the hose flexes during operation resulting in oil leaks. 3. Check visible hoses and tubes daily. Look for wet hoses or oil spots. Replace worn or damaged hoses and tubes before operating the aerator. e. Kinked or twisted hoses can restrict the oil flow causing the system to malfunction and the oil to overheat and also lead to premature hose failure. 7.7 HYDRAULIC OIL __________________________________________________________ Refer to Section 9.2 for specific maintenance intervals. 2. Drain and replace the hydraulic oil after a major component failure, if you notice the presence of water or foam in the oil, or a rancid odor (indicating excessive heat). Drain and replace the hydraulic oil every 250 hours or after a major component failure, if you notice the presence of water, foam, or a rancid odor. 3. Remove drain plug from bottom of main tank and loosen or remove dipstick/filler cap. Always replace the hydraulic filter when changing oil. 4. After oil has drained install drain plug and fill with Jacobsen GreensCare 68. 5. Purge air from system. To change hydraulic oil: 1. 24 Clean the area around the oil cap to prevent impurities from entering and contaminating the system. a. Oil temperature should be between 60° to 90°F (16° - 32°C). Do not check oil level when oil is hot. b. Check oil with aerator head in raised position. c. The main oil tank should always be full. a. Operate lift / lower function for several minutes to purge air out of the system and stabilize the oil level. b. Once the level has stabilized and the air is purged, fill the tank to the Full level. MAINTENANCE 7.8 7 MUFFLER AND EXHAUST___________________________________________________ ! WARNING Exhaust fumes contain carbon monoxide that is toxic and can be fatal when inhaled. NEVER operate an engine without proper ventilation. To protect from carbon monoxide poisoning, inspect the complete exhaust system regularly and immediately replace a defective muffler. If you notice a change in the color or sound of the exhaust, stop the engine immediately. Identify the problem and have the system repaired. Torque all exhaust manifold hardware evenly. Tighten or replace leaking exhaust clamps. 7.9 1. TIRES ___________________________________________________________________ Keep tires properly inflated to prolong tire life. Check inflation pressure while the tires are cool. Inspect tread wear. ! CAUTION 2. Check the pressure with an accurate, low pressure tire gauge. Unless you have the proper training, tools, and experience, do not attempt to mount a tire on a rim. Improper mounting can produce an explosion which may result in serious injury. 3. Keep tires inflated to 14 psi (97 kPa). 7.10 WHEEL MOUNTING PROCEDURE ____________________________________________ 1. Remove dirt, grease, and oil from stud thread. Do not lubricate threads. 2. Make sure the aerator is parked on a solid and level surface. Never work on a aerator that is supported only by a jack. Always use jack stands. Position wheel on hub and inspect to ensure full contact between mounting surface of wheel and hub. 3. If only the front or rear of the aerator is raised, place chocks in front of and behind the wheels that are not raised. Finger tighten all hardware then torque hardware in criss-cross order while always tightening lug nuts in the top (12 o’clock) position. 4. Check and torque lug nuts daily until 85-95 ft.lbs. (115128 Nm) torque is maintained. ! WARNING 7.11 CARE AND CLEANING _____________________________________________________ Wash the aerator after each use. Keep the aerator clean. Note: Do not wash any portion of the aerator while aerator is hot. Do not use high pressure spray or steam. Use cold water and automotive cleaners. 1. Use compressed air to clean engine and radiator fins. A special blow gun is available through Jacobsen dealers. 2. Use only fresh water for cleaning your aerator. Note: Use of salt water or effluent water has been known to encourage rust and corrosion of metal parts resulting in premature deterioration or failure. Damage of this nature is not covered by the factory warranty. 3. Do not spray water directly at bearing housings and seals. 4. Clean all plastic or rubber trim with a mild soap solution or use commercially available vinyl/rubber cleaners. Repair damaged metal surfaces and use Jacobsen touchup paint. Wax the aerator for maximum paint protection. ! CAUTION Clean debris from drives, muffler, and engine to prevent fires. ! WARNING NEVER use your hands to clean aerator. Tine edges are sharp and can cause serious injuries. 25 7 MAINTENANCE 7.12 PUSHROD INSTALLATION __________________________________________________ Whenever the push rods are removed for service or replaced, a pushrod installation tool (A) (Jacobsen Part No. 517693) is required to prevent damage to triple lip seals. [See Figure 7B] A Figure 7B 7.13 STORAGE________________________________________________________________ General Aerator Mechanism 1. Clean the aerator thoroughly and lubricate. Repair and paint damaged or exposed metal. 1. Remove and thoroughly clean tines. Coat tines lightly with oil to prevent rust. 2. Inspect the aerator. Tighten all hardware and replace worn or damaged components. 2. Clean pushrods and coat lightly with oil. 3. 3. Clean the tires thoroughly and store the aerator so the load is off the tires. If aerator is not on jack stands, check tires at regular intervals and inflate as necessary. Lower aerator head to relieve hydraulic system pressure. 4. Keep the aerator and all its accessories clean, dry, and protected from the elements during storage. Never store the aerator near an open flame or spark which could ignite fuel or fuel vapors. After Storage 1. Check or service air cleaner. 2. Check oil levels in the engine crankcase and hydraulic system. 3. Fill the fuel tank with fresh fuel. Engine 4. Make certain that the tires are properly inflated. 1. 5. Remove all oil from the tines and push rods. 6. Connect spark plug wire. Start and operate the engine at 1/2 throttle. Allow enough time for the engine to become properly warmed and lubricated. 2. While the engine is warm, remove the drain plug and drain the oil from the crankcase. Install drain plug and refill with fresh oil. Let engine cool before storing. Clean exterior of engine. Paint exposed metal or apply a light coat of rust preventative oil. For engine protection Jacobsen recommends the use of a fuel additive such as STABIL®. Mix additive following instructions on container. Run engine for a short time to circulate additive through carburetor. Disconnect spark plug wire. Remove spark plug and pour 1 oz. (30 ml) of engine oil into cylinder. Replace spark plug and crank slowly (do not start) to distribute oil in cylinder. Rotate crankshaft slowly until piston is at top of stroke. If storing indoors, drain fuel from tank. Note: Do not use fuel with ethanol during storage. 26 ! WARNING Never operate the engine without proper ventilation. Exhaust fumes can be fatal when inhaled. TROUBLESHOOTING 8 8.1 8 TROUBLESHOOTING GENERAL ________________________________________________________________ The troubleshooting chart below lists basic problems that may occur during start-up and operation. For more detailed information regarding the hydraulic and electrical systems, contact your area Jacobsen dealer. Symptoms Engine will not start. Possible Causes Action 1. Fuel tank empty or dirty. 1. Fill with fresh fuel. Change fuel filter. 2. Engine switch OFF. 2. Turn engine switch ON. Engine hard to start or 1. Fuel level low. Fuel or fuel filter 1. Fill with fresh fuel. Clean or replace fuel filter. runs poorly. dirty. 2. Air cleaner dirty. 2. Inspect and replace air filter. 3. Engine problem. 3. Consult engine manual. Engine stops. Fuel tank empty. Fill with fresh fuel. Engine overheating. 1. Air intake restricted. 1. Clean cooling air intake. 2. Engine overload. 2. Reduce forward speed. 1. Dirty or corroded tines. 1. Thoroughly clean tines and lightly water greens. 2. Burrs on tines. 2. Remove burrs with file. 3. Engine speed too slow. 3. Operate aerator at higher engine speed. 4. Oversized tires. 4. See tire specifications. Tines plugging. Tines not penetrating Tines worn or plugged. turf. Replace or clean tines. Tines not lifting high Low hydraulic fluid. enough. Add hydraulic fluid. [See Section 7.7] Tines wont move. Bent pushrod. Replace pushrod. Turf lifting. Shallow rooted turf. Increase turf guard spring tension. [See Section 6.2] Traction drive does not Traction drive idler cable out of Adjust cable. [See Section 6.4] engage. adjustment. Aerator drive does not Aerator drive idler cable out of Adjust cable. [See Section 6.3] engage. adjustment. Oblong hole in turf. Aerator out of timing. Check timing. [See Section 6.3] Noise in cam case. Aerator out of timing. Check timing. [See Section 6.3] 27 9 MAINTENANCE & LUBRICATION CHARTS 9 9.1 MAINTENANCE & LUBRICATION CHARTS GENERAL________________________________________________________________ 2. Lubricate with grease that meets or exceeds NLGI Grade 2 LB specifications. Apply grease with a manual grease gun and fill slowly until grease begins to seep out. Do not use compressed air guns. ! WARNING Before you clean, adjust, or repair the aerator, disengage all drives, lower implements to the ground, engage parking brake, stop engine, and disconnect spark plug wire to prevent injuries. 3. For smooth operation of all levers, pivot points, and other friction points that are not shown on the lubrication chart apply several drops of SAE 30 oil every 40 hours or as necessary. 4. Apply #30 oil or penetrating chain lubricant daily. 1. Always clean grease fittings before and after lubricating. 9.2 5. Grease aerator crankshaft (3 places) and connecting rod fittings (6 places) daily. MAINTENANCE CHARTS ___________________________________________________ Recommended Service and Lubrication Intervals Air Filter Cam Case Oil Engine Oil Grease Fittings Hydraulic Hoses and Tubes Hydraulic Oil Muffler and Exhaust Tires Front Wheel Bearings Every 8-10 Hours Every 25 Hours Every 100 Hours I C R I-R* L I*** I-A I Every 500 Hours Every 1000 Hours Yearly See Section R 7.4 R Lubricant Type 7.3 I R** I 7.6 7.7 7.8 7.9 I-A L C - Clean I - Inspect * Replace oil after initial 5 hours of operation. ** Or every two years whichever comes first. *** Inspect visible hoses and tubes for leaks or oil marks. I - Manual grease gun with NLGI Grade 2 (Service Class LB). II - Engine Oil - See Section 7.3. III - Hydraulic Oil - See Section 7.7. 28 Every 400 Hours C A - Add or Adjust IV - SAE 30 Weight Oil. Every 250 Hours L- Lubricate R - Replace AR - As Required IV II I III TINE SELECTION GUIDE 10 10 TINE SELECTION GUIDE Original and DuraTine™ Hole/Core Size Type Duty Part Number Wall Thickness Mount Diameter Hole/Core Length Total Length Original 523864 Solid Side Eject 1/2 in. (13 mm) 2.50 in. (64 mm) 4.00 in. (102 mm) Primarily used for light aeration for soil-based greens and overseeding. DuraTine XLT 4180561 Solid Side Eject 1/2 in. (13 mm) 2.50 in. (64 mm) 4.00 in. (102 mm) Primarily used for light aeration for soil-based greens and overseeding with no rocks where tine wear rate is a problem. Original 517486 0.036 in. (0.91 mm) 5/8 in. (16 mm) 2.50 in. (64 mm) 4.28 in. (109 mm) Less penetration (use on hard soils). DuraTine XL 4180562 Solid 1/2 in. (13 mm) 3.13 in. (79 mm) 5.03 in. (128 mm) Primarily used for light aeration on greens with out removing cores. DuraTine XL 4180563 Solid 5/8 in. (16 mm) 3.09 in. (78 mm) 5.00 in. (127 mm) Primarily used for light aeration on greens without removing cores. Original 517487 0.049 in. (1.2 mm) 5/8 in. (16 mm) 2.50 in. (64 mm) 4.28 in. (109 mm) Less penetration (use on hard soils). DuraTine XL 4180564 Solid 5/8 in. (16 mm) 3.25 in. (83 mm) 5.00 in. (127 mm) For drought conditions or areas that won’t take water. Original 517488 0.049 in. (1.24 mm) 5/8 in. (16 mm) 2.50 in. (64 mm) 4.28 in. (109 mm) Light aeration with less penetration Use on hard soils, sports turf. Duratine XL 4180566 0.065 in. (1.65 mm) 5/8 in. (16 mm) 2.50 in. (64 mm) 4.28 in. (109 mm) Medium aeration or soil change with less penetration on greens where tine wear rate is a problem. Duratine XLT 4180567 0.065 in. (1.65 mm) 5/8 in. (16 mm) 2.50 in. (64 mm) 4.28 in. (109 mm) Medium aeration or soil change with less penetration on greens insoils with no rocks where tine wear rate is a problem. Original 517489 0.049 in. (1.24 mm) 3/4 in. (19 mm) 2.50 in. (64 mm) 4.28 in. (109mm) Medium aeration or soil change with less penetration in greens or fairways. Duratine XL 4180571 0.065 in. (1.65 mm) 3/4 in. (19 mm) 2.50 in. (64 mm) 4.28 in. (109 mm) Medium aeration or soil change with less penetration on greens or fairways where tine wear rate is a problem. Duratine XLT 4180572 0.065 in. (1.65 mm) 3/4 in. (19 mm) 2.50 in. (64 mm) DuraTine XL 4180573 Solid 3/4 in. (19 mm) 3.22 in. (82 mm) Side Eject 1/4 in. (6 mm) Top Eject Application Solid Top Eject 3/8 in. (10 mm) Solid 1/2 in (13 mm) Top Eject Top Eject 5/8 in. (16 mm) Solid 4.28 in. (109 mm) 5.00 in. (127 mm) Medium aeration or soil change with less penetration on greens or fairways in soils with no rocks where tine wear rateis a problem. Medium aeration without removing the cores. 11 29 12 12 PARTS CATALOG PARTS CATALOG 12.1 HOW TO USE THE PARTS CATALOG _________________________________________ Abbreviations Indented Items N/S - Not serviced separately, can only be obtained by ordering main component or kit. AR -Variable quantity or measurement is required to obtain correct adjustment. Symbols such as l, next to the item number, indicate that a note exists which contains additional information important in ordering that part. Indented items indicate component parts that are included as part of an assembly or another component. These parts can be ordered separately or as part of the main component. Item l 1 2 3 4 5 Part No. 123456 789012 345678 N/S 901234 Qty 1 1 1 1 1 Description Mount, Valve Valve, Lift • Handle • Seal Kit Screw, 1/4-20 x 2” Hex Head Serial Numbers/Notes Indicates a piece part Includes Items 2 and 3 Serviced part included with Item 2 Non serviced part included with Item 2 12.2 TO ORDER PARTS ________________________________________________________ 1. Write your full name and complete address on the order. 5. Send or bring the order to an authorized Jacobsen Distributor. 2. Explain where and how to make shipment. 6. Inspect all shipments on receipt. If any parts are damaged or missing, file a claim with the carrier before accepting. 3. Give product number, name, and serial number that is stamped on the name plate or serial plate of your product. 4. Order by the quantity desired, the part number, and description of the part as given in the parts list. 30 7. Do not return material without a letter of explanation and a listing of the parts being returned. Transportation charges must be prepaid. PREFACIO Este manual contiene instrucciones de seguridad, uso, ajuste, mantenimiento y resolución de problemas, así como una lista de piezas para su aireadora Jacobsen® nueva. Este manual debe guardarse con la aireadora para poder consultarlo durante el funcionamiento. La placa de datos está situada en el lado derecho del bastidor, cerca del motor. Jacobsen aconseja anotar los números para tener a mano su referencia. 11524WILMAR BLVD, CHARLOTTE, NC 28273 ® Antes de utilizar la aireadora, es necesario que usted y todos los operarios lean detenidamente el manual en toda su totalidad. Si se siguen las instrucciones de seguridad, funcionamiento y mantenimiento se prolongará la vida de la aireadora y será más eficaz. PRODUCT OF U.S.A. kg A Textron Company 1-800-848-1636 (US) kW Si necesita más información póngase en contacto con su distribuidor Jacobsen. Guía de almacenamiento recomendado Para que la aireadora esté en todo momento operativa y productiva, Jacobsen recomienda que almacene los repuestos más comúnmente utilizados. Hemos incluido números de piezas para los materiales de apoyo adicionales y ayudas a la formación. Para realizar el pedido de alguno de los siguientes materiales: 1. Escriba su nombre completo y complete la dirección en el formulario de pedido. 3. Especifique la cantidad, el número de pieza y la descripción de la pieza. 2. Indique la dirección y el método de envío: 4. Envíe o lleve el pedido a un distribuidor autorizado Jacobsen. q UPS q Correo normal q Día siguiente q 2 días Piezas de servicio Cant. Nº Pieza 548481 876431 4113436 4113435 4113437 Descripción Cant. Nº Pieza Descripción Eslabón de conexión de la cadena #50 Eslabón de conexión de la cadena #40 Correa, mecanismo Correa, transporte Correa, mecanismo de 2 rodaduras Material de apoyo al servicio Cant. Nº Pieza Descripción Cant. Descripción 4268272 Technical Manual 4191623 DVD, Operator Training Advertencia - Proposición 65 © 2010, Jacobsen, A Textron Company/Textron Innovations Inc. Todos los derechos reservados, incluyendo el derecho a reproducir este material de cualquier forma. Impreso en EE.UU. 5-2012 es-2 Este producto contiene o emite sustancias químicas que, según el estado de California, pueden producir cáncer, defectos de nacimiento y otros daños reproductivos. Índice 1 1.1 1.2 SEGURIDAD Manipulación segura ..................................... 4 Avisos importantes sobre seguridad ............ 5 7.11 7.12 7.13 Cuidados y limpieza ..................................... 25 Instalación de la varilla impulsora ................ 26 Almacenamiento .......................................... 26 2 2.1 2.2 2.3 2.4 2.5 2.6 2.7 ESPECIFICACIONES Identificacion del producto ........................... 6 Motor ............................................................ 6 Aireadora ..................................................... 6 Aireadora ..................................................... 7 Pesos y dimensiones ................................... 7 Accesorios e información adicional .............. 7 Declaración de conformidad ........................ 8 8 8.1 RESOLUCIÓN DE PROBLEMAS Generalidades .............................................. 27 9 9.1 9.2 TABLAS DE MANTENIMIENTO Y DE LUBRICACIÓN Generalidades .............................................. 28 Tabla de mantenimiento .............................. 28 10 GUÍA DE SELECCIÓN DE PÚAS 3 3.1 3.2 ETIQUETAS E ICONOS Etiquetas ...................................................... 10 Iconos .......................................................... 10 4 4.1 CONTROLES Descripción de los controles ........................ 11 11 11.1 11.2 11.3 CATÁLOGO DE PIEZAS Cómo usar el catálogo de piezas ................. 30 Para hacer pedidos de piezas ..................... 30 Índice ........................................................... 31 5 5.1 5.2 5.3 5.4 5.5 5.6 5.7 5.8 5.9 FUNCIONAMIENTO Inspección diaria .......................................... 13 Control de presencia del operario (OPC) ..... 13 Procedimientos de funcionamiento .............. 14 Arranque ...................................................... 14 Parada / Aparcamiento ................................ 15 Conducción / Transporte .............................. 15 Transporte en un remolque .......................... 15 Aireado ......................................................... 16 Maniobras en pendientes ............................. 16 6 6.1 6.2 6.3 6.5 6.6 6.7 6.8 AJUSTES Generalidades .............................................. 18 Protección de césped .................................. 18 Cable de la polea de transmisión de la aireadora ............................................. 18 Cable de la polea de transmisión de tracción ................................................... 19 Sincronización de la aireadora ..................... 19 Cable de control de desplazamiento ............ 20 Cable de elevación ...................................... 20 Especificación del par de apriete ................. 21 7 7.1 7.2 7.3 7.4 7.5 7.6 7.7 7.8 7.9 7.10 MANTENIMIENTO Generalidades .............................................. 22 Motor ............................................................ 22 Aceite del motor ........................................... 23 Filtro de aire del motor ................................. 23 Combustible ................................................. 23 Mangueras hidráulicas ................................. 24 Aceite hidráulico ........................................... 24 Escape y silenciador .................................... 25 Neumáticos .................................................. 25 Montaje de las ruedas .................................. 25 6.4 es-3 1 SEGURIDAD 1 1.1 SEGURIDAD MANIPULACIÓN SEGURA __________________________________________________ ! ADVERTENCIA EL EQUIPO MANIPULADO INCORRECTAMENTE O POR PERSONAL NO CUALIFICADO PUEDE SER PELIGROSO Familiarícese con la ubicación y la correcta utilización de todos los mandos. Los operarios sin experiencia deben recibir instrucciones de alguien familiarizado con la aireadora antes de que se les permita manipularla sin supervisión. 1. La seguridad depende del grado de concienciación, interés y prudencia de quienes utilicen o se encarguen del servicio técnico de la aireadora. No permita nunca que menores de edad manejen ningún equipo. 2. Es responsabilidad del operario leer este manual y todas las publicaciones relacionadas con esta aireadora (manual del motor, accesorios y acoplamientos). Si el operario no puede leer en español, el propietario será responsable de explicarle la información contenida en este manual. 3. Aprenda el manejo correcto de la aireadora, la ubicación y la finalidad de todos los controles e instrumentos antes de manejar el equipo. Si utiliza el equipo sin conocerlo a fondo, pueden producirse accidentes. 4. No permita nunca que nadie utilice ni repare la aireadora o sus accesorios sin tener la capacitación y conocimiento adecuados, o si está bajo la influencia del alcohol o las drogas. 5. Lleve toda la ropa y medios de seguridad personal necesarios para protegerse la cabeza, los ojos, las manos y los pies. Maneje la máquina sólo a la luz del día o con buena iluminación artificial. 6. Inspeccione el área donde va a utilizar el equipo. Recoja toda la basura que encuentre. Estar atento a las obstrucciones por encima de la cabeza (ramas de árboles bajas, cables eléctricos, etc.) y también a los obstáculos subterráneos (regadores, tubos, raíces de árboles, etc.). Entrar a una zona nueva con cuidado. No entre por aperturas estrechas que obliguen al operario a acercarse demasiado a la aireadora. Esté alerta por si existen riesgos ocultos. 8. No manipule nunca equipo que no esté funcionando en perfecto orden o sin etiquetas, protectores, deflectores de descarga o cualquier otro dispositivo de protección firmemente fijado en su sitio. 9. El monóxido de carbono presente en los gases de escape es mortal si se inhala. Nunca accione el motor sin la adecuada ventilación. 10. El combustible es muy inflamable. Manipúlelo con precaución. 11. Mantenga limpio el motor. Deje que se enfríe antes de almacenar la máquina y retire siempre el cable de la bujía. 12. Desactive todas las transmisiones y ponga el freno de estacionamiento antes de encender el motor. 13. No busque nunca fugas de aceite con las manos. El líquido hidráulico a presión puede penetrar en la piel y provocar graves lesiones. 14. Maniobre la máquina por las pendientes en sentido vertical, nunca horizontalmente. 15. Para evitar un vuelco o pérdida de control, no arranque ni pare repentinamente en pendientes. Reduzca la velocidad al realizar giros grandes. Tenga cuidado al cambiar de dirección en las pendientes. 7. Nunca dirija la descarga de material hacia los transeúntes ni permita que nadie se acerque a la aireadora mientras esté funcionando. El operario es responsable de las lesiones causadas a las demás personas y/o los daños a la propiedad. Esta máquina debe ser manipulada y puesta en servicio según se especifica en este manual y ha sido diseñada para el mantenimiento profesional de céspedes especializados. No está diseñado para ser usado en terreno irregular o en zonas con hierba alta. es-4 SEGURIDAD 1.2 1 AVISOS IMPORTANTES SOBRE SEGURIDAD __________________________________ Este símbolo de seguridad sirve para alertarle de posibles peligros. PELIGRO - Indica una situación de inminente peligro que, de no ser evitada, PROVOCARÁ la muerte o graves lesiones. ADVERTENCIA - Indica una situación potencialmente peligrosa que, de no ser evitada, PUEDE PROVOCAR la muerte o graves lesiones. PRECAUCIÓN - Indica una situación potencialmente peligrosa que, de no ser evitada, PODRÍA PROVOCAR lesiones moderadas o daños materiales menores. También puede utilizarse para advertir contra las prácticas laborales peligrosas. AVISO - Indica una situación potencialmente peligrosa que, de no ser evitada, PUEDE PROVOCAR daños materiales. También puede utilizarse para advertir contra las prácticas laborales peligrosas. Para una mayor claridad, algunas de las ilustraciones de este manual podrían mostrar protectores, dispositivos de protección o chapas abiertas o retiradas. Bajo ninguna circunstancia se debe manipular este equipo sin que estén dichos dispositivos firmemente asegurados. ! ADVERTENCIA El control de presencia del operario (OPC) de la máquina detiene la aireadora y el mecanismo de mando tan pronto el operario suelta la manivela del OPC. Para proteger al conductor y a otros de posibles lesiones, nunca manejar la aireadora con el sistema OPC desconectado o averiado. ! ADVERTENCIA 1. Antes de abandonar por cualquier motivo la posición del operario: a. b. c. d. Libere la manivela del OPC. Baje la aireadora al suelo. Apague el motor. Desconecte el cable de la bujía. 2. Mantenga las manos, los pies y la ropa lejos de las piezas en movimiento. Espere a que no haya ninguna pieza en movimiento antes de limpiar, ajustar o reparar la máquina. 3. Mantenga a los peatones y animales alejados de la zona de trabajo. 4. No lleve nunca pasajeros. 5. Nunca manipule una máquina que esté cortando césped sin que el deflector de descarga esté firmemente colocado en su sitio. Si sigue todas las instrucciones de este manual, conseguirá prolongar la vida de su máquina y mantener su máxima eficacia. Los ajustes y las tareas de mantenimiento deben ser realizadas siempre por un técnico cualificado. Si necesita más información, póngase en contacto con su distribuidor Jacobsen, quien le informará de los métodos de mantenimiento más recientes y le proporcionará un servicio puntual y eficaz. es-5 2 ESPECIFICACIONES 2 2.1 ESPECIFICACIONES IDENTIFICACION DEL PRODUCTO ___________________________________________ 58234.............................. Aireadora GreensAire 24 con OPC, motor de gasolina de 10 CV. Número de serie ............ En el bastidor derecho, cerca del motor, hay colocada una placa de identificación, como la que se muestra, con el número de serie. Cite siempre el número de serie de la unidad cuando pida piezas de repuesto o pida información sobre reparaciones. 2.2 11524WILMAR BLVD, CHARLOTTE, NC 28273 ® PRODUCT OF U.S.A. 358 A Textron Company 6.9 kg 1-800-848-1636 (US) XXXX kW 58234001651 Producto Potencia sonora CEE Oído operario Vibración M/S2 58234 105 dBA 88 dBA 4.335 Brazos MOTOR __________________________________________________________________ Marca .............................. Briggs & Stratton Modelo ............................ Vanguard Potencia .......................... 10 CV a 3600 rpm Cilindrada........................ 305 cc Diámetro y carrera .......... 79 x 62 mm Combustible: Tipo........................... Gasolina sin plomo Regulador ....................... Mecánico con contrapeso Lubricación: Capacidad ................ 0,8 litros Tipo........................... SAE 30W Clasificación API....... SG, SH, SJ Filtro de aire.................... Elemento doble sustituible Sistema de refrigeración. Refrigerado por aire Octanaje ................... Mín. 85 Octanos Capacidad................. 9,5 litros AVISO No utilice gasolina superior ni mezcla de gasolina y aceite. Cuando utilice una mezcla de combustible, no utilice una con más de 10% de etanol. En ninguna circunstancia se debe utilizar una mezcla con metanol. 2.3 AIREADORA______________________________________________________________ Separación...................... 51 mm en el centro Profundidad de penetración ..................... 76 mm máximo Púa estándar Tipo........................... Duratine XLT eyección superior Material ..................... Acero endurecido con punta de carburo Cantidad ................... Dos juegos de 13 mm de diámetro Opciones de púas Sólida ........................ 6 mm, 9 mm, 16 mm Núcleo de eyección superior...... 6 mm, 9 mm, 13 mm, 16 mm Núcleo de eyección lateral ......... 6 mm es-6 Púa cuádruple .......... núcleo de 6 mm, 6 mm, 13 mm Anchura de pasada ........ 609 mm ESPECIFICACIONES 2.4 2 AIREADORA ______________________________________________________________ Neumáticos Delanteras................. 11 x 4,00 - 5 2 capas Traseras.................... 16 x 6,50 - 8 4 capas Presión:..................... 14 psi (97 kPa) Velocidad: H (Transporte) ......... 6,4 km/h L (Airear)................... 1,4 km/h R (Marcha atrás)....... 2,9 km/h Sistema hidráulico: Capacidad................. 7,57 litros Tipo de líquido .......... GreensCare 68™ Elevación del cabezal de aireación. Cilindros de doble activación hidráulicos 2.5 PESOS Y DIMENSIONES ____________________________________________________ Dimensiones: pulgadas (mm) Longitud .......................................................... 72 (1676) Anchura........................................................ 49,5 (1257) Altura............................................................... 48 (1219) 2.6 Pesos: libras Peso operativo sin combustible .................... 850 (kg) (386) ACCESORIOS E INFORMACIÓN ADICIONAL ___________________________________ Póngase en contacto con su distribuidor Jacobsen local para recibir una lista completa de accesorios y herramientas. ! PRECAUCIÓN El uso de piezas y accesorios no autorizados por Jacobsen pueden causar lesiones personales o daños al equipo. Accesorios Pintura para retoques naranja (pulverizador de 340 g) ........................................... 4184140 Accesorio de púa cuádruple sólida 1/4 in. .............. 4116986 Accesorio de púa cuádruple nucleada 1/4 in. ......... 4116987 Accesorio de púa cuádruple nucleada 1/2 in. ............. 58231 Herramienta de instalación de varilla impulsora ....... 517693 Accesorio de acoplamiento del alineador ................. 544918 Portapúas Portapúas, púas 1/2 in. D.E.......................................547849 Portapúas, púas 5/8 in. D.E. ..................................547860 Portapúas, púas 3/4 in. D.E.......................................547861 Púas 6 mm Nucleada, 5/8 in. D.E. ..................................... 517486 6 mm Sólida, 1/2 in. D.E. .......................................... 523863 9 mm Nucleada, 5/8 in. D.E. ..................................... 517487 13 mm Nucleada, 5/8 in. D.E. ................................... 517488 16 mm Nucleada, 3/4 in. D.E. ................................... 517489 VenTine, 5/8 in. D.E. ............................................... 2702060 GA-24 viene con veinticuatro púas nucleadas de 13 mm (4180567) y con seis portapúas de 5/8 in. D.E. (547860). Documentación de apoyo Manual técnico.........................................................4268272 DVD de formación del operario ...............................4191623 DuraTines 6 mm Nucleada, 1/2 in. D.E. ................................... 4180561 6 mm Sólida, 1/2 in. D.E. (XL) ................................ 4180562 6 mm Sólida, 5/8 in. D.E. (XL) ................................ 4180563 9 mm Sólida, 5/8 in. D.E. (XL) ................................ 4180564 13 mm Nucleada, 5/8 in. D.E. (XL) ......................... 4180566 13 mm Nucleada, 5/8 in. D.E. (XLT) ................... 4180567 16 mm Nucleada, 3/4 in. D.E. (XL) ......................... 4180571 16 mm Nucleada, 3/4 in. D.E. (XLT) ....................... 4180572 16 mm Sólida, 3/4 in. D.E. (XL) .............................. 4180573 es-7 2 ESPECIFICACIONES 2.7 DECLARACIÓN DE CONFORMIDAD __________________________________________ DECLARATION OF CONFORMITY ▪ ДЕКЛАРАЦИЯ ЗА СЪОТВЕТСТВИЕ ▪ PROHLÁŠENÍ O SHODĚ ▪ OVERENSSTEMMELSESERKLÆRING ▪ CONFORMITEITSVERKLARING ▪ VASTAVUSDEKLARATSIOON ▪ VAATIMUSTENMUKAISUUSVAKUUTUS ▪ DECLARATION DE CONFORMITE ▪ KONFORMITÄTSERKLÄRUNG ▪ ∆ΗΛΩΣΗ ΣΥΜΜΟΡΦΩΣΗΣ ▪ MEGFELELŐSÉGI NYILATKOZAT ▪ DICHIARAZIONE DI CONFORMITÀ ▪ ATBILSTĪBAS DEKLARĀCIJA ▪ ATITIKTIES DEKLARACIJA ▪ DIKJARAZZJONI TAL-KONFORMITÀ ▪ DEKLARACJA ZGODNOŚCI ▪ DECLARAÇÃO DE CONFORMIDADE ▪ DECLARAŢIE DE CONFORMITATE ▪ VYHLÁSENIE O ZHODE ▪ IZJAVA O SKLADNOSTI ▪ DECLARACIÓN DE CONFORMIDAD ▪ DEKLARATION OM ÖVERENSSTÄMMELSE Business name and full address of the manufacturer ▪ Търговско име и пълен адрес на производителя ▪ Obchodní jméno a plná adresa výrobce ▪ Producentens firmanavn og fulde adresse ▪ Bedrijfsnaam en volledig adres van de fabrikant ▪ Tootja ärinimi ja täielik aadress ▪ Valmistajan toiminimi ja täydellinen osoite ▪ Nom commercial et adresse complète du fabricant ▪ Firmenname und vollständige Adresse des Herstellers ▪ Επωνυμία και ταχυδρομική διεύθυνση κατασκευαστή ▪ A gyártó üzleti neve és teljes címe ▪ Ragione sociale e indirizzo completo del fabbricante ▪ Uzņēmuma nosaukums un pilna ražotāja adrese ▪ Verslo pavadinimas ir pilnas gamintojo adresas ▪ Isem kummerċjali u indirizz sħiħ tal-fabbrikant ▪ Nazwa firmy i pełny adres producenta ▪ Nome da empresa e endereço completo do fabricante ▪ Denumirea comercială şi adresa completă a producătorului ▪ Obchodný názov a úplná adresa výrobcu ▪ Naziv podjetja in polni naslov proizvajalca ▪ Nombre de la empresa y dirección completa del fabricante ▪ Tillverkarens företagsnamn och kompletta adress Jacobsen, A Textron Company 11524 Wilmar Blvd. Charlotte, NC 28273, USA Product Code ▪ Код на продукта ▪ Kód výrobku ▪ Produktkode ▪ Productcode ▪ Toote kood ▪ Tuotekoodi ▪ Code produit ▪ Produktcode ▪ Κωδικός προϊόντος ▪ Termékkód ▪ Codice prodotto ▪ Produkta kods ▪ Produkto kodas ▪ Kodiċi tal-Prodott ▪ Kod produktu ▪ Código do Produto ▪ Cod produs ▪ Kód výrobku ▪ 58234 Oznaka proizvoda ▪ Código de producto ▪ Produktkod Machine Name ▪ Наименование на машината ▪ Název stroje ▪ Maskinnavn ▪ Machinenaam ▪ Masina nimi ▪ Laitteen nimi ▪ Nom de la machine ▪ Maschinenbezeichnung ▪ Ονομασία μηχανήματος ▪ Gépnév ▪ Denominazione della macchina ▪ Iekārtas nosaukums ▪ Mašinos pavadinimas ▪ Isem talMagna ▪ Nazwa urządzenia ▪ Nome da Máquina ▪ Numele echipamentului ▪ Názov stroja ▪ Naziv stroja ▪ Nombre de la máquina ▪ Maskinens namn GA-24 Designation ▪ Предназначение ▪ Označení ▪ Betegnelse ▪ Benaming ▪ Nimetus ▪ Tyyppimerkintä ▪ Pažymėjimas ▪ Bezeichnung ▪ Χαρακτηρισμός ▪ Megnevezés ▪ Funzione ▪ Apzīmējums ▪ Lithuanian ▪ Denominazzjoni ▪ Oznaczenie ▪ Designação ▪ Specificaţie ▪ Označenie ▪ Namen stroja ▪ Descripción Scarifier, Article 13, Item 49 ▪ Beteckning Serial Number ▪ Сериен номер ▪ Sériové číslo ▪ Serienummer ▪ Serienummer ▪ Seerianumber ▪ Valmistusnumero ▪ Numéro de série ▪ Seriennummer ▪ Σειριακός αριθμός ▪ Sorozatszám ▪ Numero di serie ▪ Sērijas numurs ▪ Serijos numeris ▪ Numru Serjali ▪ Numer seryjny ▪ Número de Série ▪ Număr de serie ▪ Sériové číslo ▪ Serijska številka ▪ Número de serie ▪ Serienummer 5823401651-5823404500 Engine ▪ Двигател ▪ Motor ▪ Motor ▪ Motor ▪ Mootor ▪ Moottori ▪ Moteur ▪ Motor ▪ Μηχανή ▪ Modulnév ▪ Motore ▪ Dzinējs ▪ Variklis ▪ Saħħa Netta Installata ▪ Briggs and Stratton Vanguard Silnik ▪ Motor ▪ Motor ▪ Motor ▪ Motor ▪ Motor ▪ Motor Net Installed Power ▪ Нетна инсталирана мощност ▪ Čistý instalovaný výkon ▪ Installeret nettoeffekt ▪ Netto geïnstalleerd vermogen ▪ Installeeritud netovõimsus ▪ Asennettu nettoteho ▪ Puissance nominale nette ▪ Installierte Nettoleistung ▪ Καθαρή εγκατεστημένη ισχύς ▪ Nettó beépített teljesítmény ▪ Potenza netta installata ▪ Paredzētā tīkla jauda ▪ Grynoji galia ▪ Wisa’ tal-Qtugħ ▪ Moc zainstalowana netto ▪ Potência instalada ▪ Puterea instalată netă ▪ Čistý inštalovaný výkon ▪ Neto vgrajena moč ▪ Potencia instalada neta ▪ Nettoeffekt 6,71 kW @ 3600 RPM Cutting Width ▪ Широчина на рязане ▪ Šířka řezu ▪ Skærebredde ▪ Maaibreedte ▪ Lõikelaius ▪ Leikkuuleveys ▪ Largeur de coupe ▪ Schnittbreite ▪ Μήκος μισινέζας ▪ Vágási szélesség ▪ Larghezza di taglio ▪ Griešanas platums ▪ Pjovimo plotis ▪ Tikkonforma mad-Direttivi ▪ Szerokość cięcia ▪ Largura de Corte ▪ Lăţimea de tăiere ▪ Šírka záberu ▪ Širina reza ▪ Anchura de corte ▪ Klippbredd NA Conforms to Directives ▪ В съответствие с директивите ▪ Splňuje podmínky směrnic ▪ Er i overensstemmelse med direktiver ▪ Voldoet aan de richtlijnen ▪ Vastab direktiividele ▪ Direktiivien mukainen ▪ Conforme aux directives ▪ Entspricht Richtlinien ▪ Ακολουθήστε πιστά τις Οδηγίες ▪ Megfelel az irányelveknek ▪ Conforme alle Direttive ▪ Atbilst direktīvām ▪ Atitinka direktyvų reikalavimus ▪ Valutazzjoni tal-Konformità ▪ Dyrektywy związane ▪ Cumpre as Directivas ▪ Respectă Directivele ▪ Je v súlade so smernicami ▪ Skladnost z direktivami ▪ Cumple con las Directivas ▪ Uppfyller direktiv 2004/108/EC 2006/42/EC 2000/14/EC, 2005/88/EC 2006/66/EC Conformity Assessment ▪ Оценка за съответствие ▪ Hodnocení plnění podmínek ▪ Overensstemmelsesvurdering ▪ Conformiteitsbeoordeling ▪ Vastavushindamine ▪ Vaatimustenmukaisuuden arviointi ▪ Evaluation de conformité ▪ Konformitätsbeurteilung ▪ ∆ιαπίστωση Συμμόρφωσης ▪ Megfelelőség-értékelés ▪ Valutazione della conformità ▪ Atbilstības novērtējums ▪ Atitikties įvertinimas ▪ Livell tal-Qawwa tal-Ħoss Imkejjel ▪ Ocena zgodności ▪ Avaliação de Conformidade ▪ Evaluarea conformităţii ▪ Vyhodnotenie zhodnosti ▪ Ocena skladnosti ▪ Evaluación de conformidad ▪ Bedömning av överensstämmelse 2006/42/EC Annex VIII Measured Sound Power Level ▪ Измерено ниво на звукова мощност ▪ Naměřený akustický výkon ▪ Målte lydstyrkeniveau ▪ Gemeten geluidsniveau ▪ Mõõdetud helivõimsuse tase ▪ Mitattu äänitehotaso ▪ Niveau de puissance sonore mesuré ▪ Gemessener Schalldruckpegel ▪ Σταθμισμένο επίπεδο ηχητικής ισχύος ▪ Mért hangteljesítményszint ▪ Livello di potenza sonora misurato ▪ Izmērītais skaņas jaudas līmenis ▪ Išmatuotas garso stiprumo lygis ▪ Livell tal-Qawwa tal-Ħoss Iggarantit ▪ Moc akustyczna mierzona ▪ Nível sonoro medido ▪ Nivelul măsurat al puterii acustice ▪ Nameraná hladina akustického výkonu ▪ Izmerjena raven zvočne moči ▪ Nivel de potencia sonora medido ▪ Uppmätt ljudeffektsnivå 105 dB(A) LWA Guaranteed Sound Power Level ▪ Гарантирано ниво на звукова мощност ▪ Garantovaný akustický výkon ▪ Garanteret lydstyrkeniveau ▪ Gegarandeerd geluidsniveau ▪ Garanteeritud helivõimsuse tase ▪ Taattu äänitehotaso ▪ Niveau de puissance sonore garanti ▪ Garantierter Schalldruckpegel ▪ Εγγυημένο επίπεδο ηχητικής ισχύος ▪ Szavatolt hangteljesítményszint ▪ Livello di potenza sonora garantito ▪ Garantētais skaņas jaudas līmenis ▪ Garantuotas garso stiprumo lygis ▪ Livell tal-Qawwa tal-Ħoss Iggarantit ▪ Moc akustyczna gwarantowana ▪ Nível sonoro farantido ▪ Nivelul garantat al puterii acustice ▪ Garantovaná hladina akustického výkonu ▪ Zajamčena raven zvočne moči ▪ Nivel de potencia sonora garantizado ▪ Garanterad ljudeffektsnivå 105 dB(A) LWA Conformity Assessment Procedure (Noise) ▪ Оценка за съответствие на процедурата (Шум) ▪ Postup hodnocení plnění podmínek (hluk) ▪ Procedure for overensstemmelsesvurdering (Støj) ▪ Procedure van de conformiteitsbeoordeling (geluid) ▪ Vastavushindamismenetlus (müra) ▪ Vaatimustenmukaisuuden arviointimenettely (Melu) ▪ Procédure d’évaluation de conformité (bruit) ▪ Konformitätsbeurteilungsverfahren (Geräusch) ▪ ∆ιαδικασία Αξιολόγησης Συμμόρφωσης (Θόρυβος) ▪ Megfelelőség-értékelési eljárás (Zaj) ▪ Procedura di valutazione della conformità (rumore) ▪ Atbilstības novērtējuma procedūra (troksnis) ▪ Atitikties įvertinimo procedūra (garsas) ▪ Proċedura tal-Valutazzjoni tal-Konformità (Ħoss) ▪ Procedura oceny zgodności (poziom hałasu) ▪ Processo de avaliação de conformidade (nível sonoro) Procedura de evaluare a conformităţii (zgomot) ▪ Postup vyhodnocovania zhodnosti (hluk) ▪ Postopek za ugotavljanje skladnosti (hrup) ▪ Procedimiento de evaluación de conformidad (ruido) ▪ Procedur för bedömning av överensstämmelse (buller) 2000/14/EC Annex V UK Notified Body for 2000/14/EC ▪ Нотифициран орган в Обединеното кралство за 2000/14/ЕО ▪ Úřad certifikovaný podle směrnice č. 2000/14/EC ▪ Det britiske bemyndigede organ for 2001/14/EF ▪ Engels adviesorgaan voor 2000/14/EG ▪ Ühendkuningriigi teavitatud asutus direktiivi 2000/14/EÜ mõistes ▪ Direktiivin 2000/14/EY mukainen ilmoitettu tarkastuslaitos Isossa-Britanniassa ▪ Organisme notifié concernant la directive 2000/14/CE ▪ Britische benannte Stelle für 2000/14/EG ▪ Κοινοποιημένος Οργανισμός Ηνωμένου Βασιλείου για 2000/14/ΕΚ ▪ 2000/14/EK – egyesült királyságbeli bejelentett szervezet ▪ Organismo Notificato in GB per 2000/14/CE ▪ 2000/14/EK AK reģistrētā organizācija ▪ JK notifikuotosios įstaigos 2000/14/EC ▪ Korp Notifikat tar-Renju Unit għal 2000/14/KE ▪ Dopuszczona jednostka badawcza w Wielkiej Brytanii wg 2000/ 14/WE ▪ Entidade notificada no Reino Unido para 2000/14/CE ▪ Organism notificat în Marea Britanie pentru 2000/14/CE ▪ Notifikovaný orgán Spojeného kráľovstva pre smernicu 2000/14/ES ▪ Britanski priglašeni organ za 2000/14/ES ▪ Cuerpo notificado en el Reino Unido para 2000/14/CE ▪ Anmält organ för 2000/14/EG i Storbritannien Number: 1088 Sound Research Laboratories Limited Holbrook House, Little Waldingfield Sudbury, Suffolk CO10 0TH Operator Ear Noise Level ▪ Оператор на нивото на доловим от ухото шум ▪ Hladina hluku v oblasti uší operátora ▪ Støjniveau i førers ørehøjde ▪ Geluidsniveau oor bestuurder ▪ Müratase operaatori kõrvas ▪ Melutaso käyttäjän korvan kohdalla ▪ Niveau de bruit à hauteur des oreilles de l’opérateur ▪ Schallpegel am Bedienerohr ▪ Επίπεδο θορύβου σε λειτουργία ▪ A kezelő fülénél mért zajszint ▪ Livello di potenza sonora all’orecchio dell’operatore ▪ Trokšņa līmenis pie operatora auss ▪ Dirbančiojo su mašina patiriamo triukšmo lygis ▪ Livell tal-Ħoss fil-Widna tal-Operatur ▪ Dopuszczalny poziom hałasu dla operatora ▪ Nível sonoro nos ouvidos do operador ▪ Nivelul zgomotului la urechea operatorului ▪ Hladina hluku pôsobiaca na sluch operátora ▪ Raven hrupa pri ušesu upravljavca ▪ Nivel sonoro en el oído del operador ▪ Ljudnivå vid förarens öra 88 dB(a) Leq (2006/42/EC) es-8 ESPECIFICACIONES 2 Harmonised standards used ▪ Използвани хармонизирани стандарти ▪ Použité harmonizované normy ▪ Brugte harmoniserede standarder ▪ Gebruikte geharmoniseerde standaards ▪ Kasutatud ühtlustatud standardid ▪ Käytetyt yhdenmukaistetut standardit ▪ Normes harmonisées utilisées ▪ BS EN ISO 20643 Angewandte harmonisierte Normen ▪ Εναρμονισμένα πρότυπα που χρησιμοποιήθηκαν ▪ Harmonizált szabványok ▪ Standard armonizzati applicati ▪ BS EN ISO 5349-1 Izmantotie saskaņotie standarti ▪ Panaudoti suderinti standartai ▪ Standards armonizzati użati ▪ Normy spójne powiązane ▪ Normas harmonizadas usadas BS EN ISO 5349-2 ▪ Standardele armonizate utilizate ▪ Použité harmonizované normy ▪ Uporabljeni usklajeni standardi ▪ Estándares armonizados utilizados ▪ Harmoniserade standarder som används Technical standards and specifications used ▪ Използвани технически стандарти и спецификации ▪ Použité technické normy a specifikace ▪ Brugte tekniske standarder og specifikationer ▪ Gebruikte technische standaards en specificaties ▪ Kasutatud tehnilised standardid ja spetsifikatsioonid ▪ Käytetyt tekniset standardit ja eritelmät ▪ Spécifications et normes techniques utilisées ▪ Angewandte technische Normen und Spezifikationen ▪ Τεχνικά πρότυπα και προδιαγραφές που χρησιμοποιήθηκαν ▪ Műszaki szabványok és specifikációk ▪ Standard tecnici e specifiche applicati ▪ Izmantotie tehniskie standarti un specifikācijas ▪ Panaudoti techniniai standartai ir techninė informacija ▪ Standards u speċifikazzjonijiet tekniċi użati ▪ Normy i specyfikacje techniczne powiązane ▪ Normas técnicas e especificações usadas ▪ Standardele tehnice şi specificaţiile utilizate ▪ Použité technické normy a špecifikácie ▪ Uporabljeni tehnični standardi in specifikacije ▪ Estándares y especificaciones técnicas utilizadas ▪ Tekniska standarder och specifikationer som används ISO 2631-1 The place and date of the declaration ▪ Място и дата на декларацията ▪ Místo a datum prohlášení ▪ Sted og dato for erklæringen ▪ Plaats en datum van de verklaring ▪ Deklaratsiooni väljastamise koht ja kuupäev ▪ Vakuutuksen paikka ja päivämäärä ▪ Lieu et date de la déclaration ▪ Ort und Datum der Erklärung ▪ Τόπος και ημερομηνία δήλωσης ▪ A nyilatkozat kelte (hely és idő) ▪ Luogo e data della dichiarazione ▪ Deklarācijas vieta un datums ▪ Deklaracijos vieta ir data ▪ Il-post u d-data tad-dikjarazzjoni ▪ Miejsce i data wystawienia deklaracji ▪ Local e data da declaração ▪ Locul şi data declaraţiei ▪ Miesto a dátum vyhlásenia ▪ Kraj in datum izjave ▪ Lugar y fecha de la declaración ▪ Plats och datum för deklarationen Jacobsen, A Textron Company 11524 Wilmar Blvd. Charlotte, NC 28273, USA May 1, 2011 Signature of the person empowered to draw up the declaration on behalf of the manufacturer, holds the technical documentation and is authorised to compile the technical file, and who is established in the Community. Подпис на човека, упълномощен да състави декларацията от името на производителя, който поддържащ техническата документация и е оторизиран да изготви техническия файл и е регистриран в общността. Podpis osoby oprávněné sestavit prohlášení jménem výrobce, držet technickou dokumentaci a osoby oprávněné sestavit technické soubory a založené v rámci Evropského společenství. Underskrift af personen, der har fuldmagt til at udarbejde erklæringen på vegne af producenten, der er indehaver af dokumentationen og er bemyndiget til at udarbejde den tekniske journal, og som er baseret i nærområdet. Handtekening van de persoon die bevoegd is de verklaring namens de fabrikant te tekenen, de technische documentatie bewaart en bevoegd is om het technische bestand samen te stellen, en die is gevestigd in het Woongebied. Ühenduse registrisse kantud isiku allkiri, kes on volitatud tootja nimel deklaratsiooni koostama, kes omab tehnilist dokumentatsiooni ja kellel on õigus koostada tehniline toimik. Sen henkilön allekirjoitus, jolla on valmistajan valtuutus vakuutuksen laadintaan, jolla on hallussaan tekniset asiakirjat, joka on valtuutettu laatimaan tekniset asiakirjat ja joka on sijoittautunut yhteisöön. Signature de la personne habilitée à rédiger la déclaration au nom du fabricant, à détenir la documentation technique, à compiler les fichiers techniques et qui est implantée dans la Communauté. Unterschrift der Person, die berechtigt ist, die Erklärung im Namen des Herstellers abzugeben, die die technischen Unterlagen aufbewahrt und berechtigt ist, die technischen Unterlagen zusammenzustellen, und die in der Gemeinschaft niedergelassen ist. Υπογραφή ατόμου εξουσιοδοτημένου για την σύνταξη της δήλωσης εκ μέρους του κατασκευαστή, ο οποίος κατέχει την τεχνική έκθεση και έχει την εξουσιοδότηση να ταξινομήσει τον τεχνικό φάκελο και ο οποίος είναι διορισμένος στην Κοινότητα. A gyártó nevében meghatalmazott személy, akinek jogában áll módosítania a nyilatkozatot, a műszaki dokumentációt őrzi, engedéllyel rendelkezik a műszaki fájl összeállításához, és aki a közösségben letelepedett személy. Firma della persona autorizzata a redigere la dichiarazione a nome del fabbricante, in possesso Della documentazione tecnica ed autorizzata a costituire il fascicolo tecnico, che deve essere stabilita nella Comunità. Tās personas paraksts, kura ir pilnvarota deklarācijas sastādīšanai ražotāja vārdā, kurai ir tehniskā dokumentācija, kura ir pilnvarota sagatavot tehnisko reģistru un kura ir apstiprināta Kopienā. Asmuo, kuris yra gana žinomas, kuriam gamintojas suteikė įgaliojimus sudaryti šią deklaraciją, ir kuris ją pasirašė, turi visą techninę informaciją ir yra įgaliotas sudaryti techninės informacijos dokumentą. Il-firma tal-persuna awtorizzata li tfassal id-dikjarazzjoni f’isem il-fabbrikant, għandha d-dokumentazzjoni teknika u hija awtorizzata li tikkompila l-fajl tekniku u li hija stabbilita fil-Komunità. Podpis osoby upoważnionej do sporządzenia deklaracji w imieniu producenta, przechowującej dokumentację techniczną, upoważnioną do stworzenia dokumentacji technicznej oraz wyznaczonej ds. wspólnotowych. Assinatura da pessoa com poderes para emitir a declaração em nome do fabricante, que possui a documentação técnica, que está autorizada a compilar o processo técnico e que está estabelecida na Comunidade. Semnătura persoanei împuternicite să elaboreze declaraţia în numele producătorului, care deţine documentaţia tehnică, este autorizată să compileze dosarul tehnic şi este stabilită în Comunitate. Podpis osoby poverenej vystavením vyhlásenia v mene výrobcu, ktorá má technickú dokumentáciu a je oprávnená spracovať technické podklady a ktorá je umiestnená v Spoločenstve. Podpis osebe, pooblaščene za izdelavo izjave v imenu proizvajalca, ki ima tehnično dokumentacijo in lahko sestavlja spis tehnične dokumentacije, ter ima sedež v Skupnosti. Firma de la persona responsable de la declaración en nombre del fabricante, que posee la documentación técnica y está autorizada para recopilar el archivo técnico y que está establecido en la Comunidad. Undertecknas av den som bemyndigad att upprätta deklarationen å tillverkarens vägnar, innehar den tekniska dokumentationen och är bemyndigad att sammanställa den tekniska informationen och som är etablerad i gemenskapen. Certificate Number ▪ Номер на сертификат ▪ Číslo osvědčení ▪ Certifikatnummer ▪ Certificaatnummer ▪ Sertifikaadi number ▪ Hyväksyntänumero ▪ Numéro de certificat ▪ Bescheinigungsnummer ▪ Αριθμός Πιστοποιητικού ▪ Hitelesítési szám ▪ Numero del certificato ▪ Sertifikāta numurs ▪ Sertifikato numeris ▪ Numru taċ-Ċertifikat ▪ Numer certyfikatu ▪ Número do Certificado ▪ Număr certificat ▪ Číslo osvedčenia ▪ Številka certifikata ▪ Número de certificado ▪ Certifikatsnummer 2006/42/EC Annex II 1.A.2 Tim Lansdell Technical Director Ransomes Jacobsen Limited West Road, Ransomes Europark, Ipswich, IP3 9TT, England 2006/42/EC Annex II 1.A.10 Vasant Godhalekar VP of Engineering Jacobsen, A Textron Company 11524 Wilmar Blvd, Charlotte, NC 28273, USA 4268272 Rev A GB BG CZ DK NL EE FI FR DE GR HU English български čeština dansk Nederlands eesti suomi français Deutsch Ελληνικά magyar IT LV LT MT PL PT RO SK SI ES SE italiano latviešu valoda lietuvių kalba Malki polski português Română slovenčina Ελληνικά Svenska slovenščina es-9 3 3 3.1 ETIQUETAS E ICONOS ETIQUETAS E ICONOS ETIQUETAS ______________________________________________________________ Familiarícese con los adhesivos, ya que son críticos para el buen funcionamiento de la aireadora. CAMBIE LAS ETIQUETAS DAÑADAS INMEDIATAMENTE. 4164281 1 38 64 41 840891 3.2 ICONOS _________________________________________________________________ Leer el manual Com- Liberación Acelerador del motor bustible OPC Rápido Lento Estrangulador Palanca de púas Elevar Bajar Activación púas ! ADVERTENCIA No conduzca la aireadora a menos que haya leído el manual técnico y sepa cómo utilizar los controles correctamente. Familiarícese con los iconos indicados anteriormente y lo que representan. Conozca la situación y uso de todos los controles y marcas antes de operar esta aireadora. es-10 CONTROLES A B C D E F G Palanca de control del embrague Acelerador Palanca de control de desplazamiento 4 Palanca de púas Manivela del OPC Interruptor del motor Estrangulador A F R N H L G C E B 4 4.1 D CONTROLES DESCRIPCIÓN DE LOS CONTROLES_________________________________________ A. Palanca de control del embrague Esta palanca activa y desactiva el embrague de las púas y activa la manivela del OPC. Tire de la palanca hasta que la manivela del OPC (E) se cierre para el transporte. Tire del mango hasta bloquearlo para trabajar con púas (se oirá un clic). Libere la manivela del OPC para desactivarla. B. Acelerador Control la velocidad de la unidad sobre el terreno. Sitúe la palanca entre Lento y Rápido para ajustar la velocidad deseada. Para apagar el motor, levante completamente la palanca hasta la posición de Stop. C. Palanca de control de desplazamiento Para utilizar las distintas funciones de la máquina, se emplea la palanca de cuatro posiciones. R (Marcha atrás): Activa la tracción marcha atrás. Las púas se bloquean. ! ADVERTENCIA Antes de meter la manivela del OPC con la palanca de control de desplazamiento (C) en posición R (marcha atrás) o H (elevada), debe levantar completamente el cabezal de aireación. De lo contrario podría dañar el césped y la aireadora. N (Punto muerto): Desactiva la tracción y las púas. H (Elevado): Activa solo la velocidad de transporte. Las púas se bloquean. L (Bajo): Activa la velocidad de tracción de aireación. Pueden activarse las púas. es-11 4 CONTROLES D. Palanca de púas Sube y baja el cabezal de aireación. Para elevar el cabezal, levante la palanca hasta la posición de elevación. Para bajar el cabezal, empuje la palanca hasta la posición de descenso. A ! ADVERTENCIA Para no hacerse daño con el aceite hidráulico caliente, la palanca de púas debe situarse en la posición Punto muerto después de elevar y bajar la unidad. Si la palanca se atasca o se mantiene en posición de elevación o de descenso, el fluido hidráulico se calentará en exceso, lo que podría agrietar la tubería hidráulica. R N H L C E B E. Manivela del OPC Activa y desactiva el embrague de transmisión. Al liberarlo, la palanca de control del embrague (A) vuelve a la posición desactivada. F F. Interruptor del motor Controla el funcionamiento del motor. Para manejar normalmente la unidad, mueva el interruptor a la posición ON. Para apagar la unidad o si necesita ajustarla, remolcarla o almacenarla, muévalo a la posición OFF. G. Estrangulador La palanca del estrangulador abre y cierra la válvula del estrangulador en el carburador. La posición Closed (cerrada) enriquece la mezcla de combustible para encender un motor frío. La posición Open (abierta) proporciona la mezcla de combustible correcta para el funcionamiento después de encender, y para volver a poner en marcha un motor caliente. es-12 D G FUNCIONAMIENTO 5 5 FUNCIONAMIENTO 5.1 INSPECCIÓN DIARIA _______________________________________________________ ! PRECAUCIÓN Las inspecciones diarias deben realizarse sólo cuando el motor está apagado y todos los fluidos están fríos. Baje el cabezal de aireación al suelo, apague el motor y desconecte el cable de la bujía. 1. Realice una inspección visual de toda la aireadora, busque indicios de desgaste, piezas sueltas, componentes perdidos o dañados. Compruebe si hay fugas de combustible o aceite y asegúrese de que las conexiones estén bien apretadas, y que los tubos y mangueras estén en buen estado. 2. Compruebe el nivel de aceite hidráulico, el suministro de combustible, el nivel de aceite en el cárter y el depurador del aire. Con el motor en frío, los líquidos deben estar en la marca de llenado. 3. Compruebe el aire de los neumáticos. 5.2 CONTROL DE PRESENCIA DEL OPERARIO (OPC) ______________________________ 1. El sistema OPC sirve para proteger de posibles lesiones al operario y otras personas deteniendo la aireadora y el mecanismo de tracción cuando el operario suelta la manivela del OPC. ! ADVERTENCIA No utilice nunca el equipo si el sistema OPC está desconectado o funciona incorrectamente. 2. Probar el sistema OPC. a. Arranque el motor y sitúe el acelerador (B) en Lento. Levante hasta el tope el cabezal de aireación. b. Sitúe el control de desplazamiento (C) en posición R (marcha atrás). En esta posición, la unidad se alejará del operario al hacer la prueba. c. Tire ligeramente de la palanca de control del embrague (A) hasta conectar la manivela del OPC (E). No active el funcionamiento de las púas. Con el motor en marcha Posición del control de desplazamiento R R Manivela del OPC activarse Desactivado Las ruedas completagiran mente 4 No 4 Sí d. e. f. El mecanismo de transmisión se activará y la unidad se moverá lentamente hacia atrás. Libere la manivela del OPC. La manivela se elevará y las ruedas se detendrán. Apague el motor. Sitúe el control de desplazamiento (C) en posición L (Lenta). g. Tire ligeramente de la palanca de control del embrague (A) hasta conectar la manivela del OPC (E). Active el funcionamiento de las púas. h. Libere la manivela del OPC (E). La palanca de control del embrague (A) debe volver a la posición desactivada y la manivela del OPC, subir. i. Compruebe cada posición de la palanca de control de desplazamiento (C). El funcionamiento de las púas solo debe activarse con la palanca en posición L (Baja). Con el motor detenido La palanca del embrague debe activarse completamente Selector de marcha R No N No H No L Sí 3. Apague inmediatamente el motor y mande reparar el sistema si ocurre algunos de los siguientes hechos: a. Las ruedas empiezan a girar antes de meter la manivela del OPC. b. Las ruedas siguen girando después de liberar la manivela del OPC. c. La palanca de control del embrague no vuelve a la posición desactivada. es-13 5 FUNCIONAMIENTO 5.3 PROCEDIMIENTOS DE FUNCIONAMIENTO ____________________________________ ! PRECAUCIÓN Para ayudar a prevenir lesiones, lleve siempre gafas de seguridad, zapatos o botas de trabajo de piel, un casco duro, y protección en los oídos. 1. Antes de arrancar el motor, libere siempre la manivela del OPC. 2. No use la aireadora ni sus accesorios componentes sueltos, dañados o que falten. 3. Airee primero una zona de prueba hasta familiarizarse con el funcionamiento de la aireadora y las palancas de control. Examine la zona de trabajo para determinar el procedimiento óptimo y más seguro de funcionamiento. Tenga en cuenta el tipo de terreno y el estado de la superficie. Cada uno de estos estados requerirá ciertos ajustes o precauciones. Nunca dirija la descarga de material hacia los transeúntes ni permita que nadie se acerque a la aireadora mientras esté funcionando. El propietario/ operario es responsable de las lesiones producidas a los peatones y/o daños a su propiedad. 4. 5. con ! PRECAUCIÓN Antes de utilizar la aireadora, elimine la suciedad, piedras, juguetes y cables que puedan ser arrojados por la máquina. Entre en una nueva zona con precaución. Conduzca siempre a velocidades que permitan tener un control total de la aireadora. 6. Trabaje con cuidado cerca de zonas con gravilla (caminos, zonas de estacionamiento, senderos para carros, etc.). Las piedras lanzadas por la aireadora 5.4 8. 9. Cuando cruce caminos o carreteras, desactive las púas y levante el cabezal de aireación. Esté atento al tráfico. Pare y revise el equipo en busca de daños inmediatamente después de chocar con un obstáculo o si la máquina comienza a vibrar anormalmente. Repare el equipo antes de reanudar el trabajo. ! ADVERTENCIA Antes de limpiar, ajustar o reparar la aireadora, desengrane todas las transmisiones, baje el cabezal hasta el suelo, apague el motor y desconecte el cable de las bujías para evitar lesiones. 10. Reduzca la velocidad y tenga sumo cuidado en pendientes. Lea la Sección 5.8. Tenga cuidado cuando trabaje cerca de pendientes. 11. Tenga cuidado al acercarse a esquinas ciegas, setos, árboles y otros objetos que puedan tapar la visión. 12. No limpie nunca la aireadora con las manos. Los bordes de las púas están muy afiladas y pueden causar graves lesiones. ARRANQUE ______________________________________________________________ 1. Compruebe el nivel de aceite del cárter del motor. 2. Llene el depósito de combustible con combustible limpio, nuevo y sin plomo. 3. Conecte el interruptor de encendido 4. Sitúe la palanca de control de desplazamiento (C) en punto muerto y desactive el control del embrague (A). 5. Mueva la palanca del acelerador (B) hasta la mitad. 6. Tire del arranque de retroceso situado a la derecha del motor. Use el estrangulador como sea necesario para encender el motor. 7. 7. pueden lesionar gravemente a los transeúntes o dañar la aireadora. Cuando no trabaje, levante siempre el cabezal de aireación y saque la palanca de control de la posición L. Deje que se caliente y lubrique debidamente el motor antes de utilizar la máquina a RPM elevadas. A R N H L C E B D Figura 5A es-14 FUNCIONAMIENTO 5.5 PARADA / APARCAMIENTO _________________________________________________ Para parar: Suelte la manivela del OPC (E) para que se detenga completamente la unidad. Para aparcar la aireadora en condiciones normales: 1. Libere la manivela del OPC (E), eleve el cabezal de aireación (D). Mueva la palanca de control de desplazamiento (C) hasta la posición H, meta la manivela OPC y aléjese de la zona. 2. Seleccione una zona lisa y llana para aparcar. 5.6 a. Suelte la manivela del OPC (E) para que se detenga completamente la unidad. b. Baje el cabezal de aireación (D) al suelo, reduzca la velocidad y deje que el motor funcione en ralentí durante varios minutos. 3. Mueva el interruptor del motor a la posición OFF. Si surge una emergencia y hay que aparcar la máquina en la zona de trabajo, siga las instrucciones dadas por el encargado del campo. Si hay que aparcar la máquina en pendiente, inmovilice o bloquee las ruedas. CONDUCCIÓN / TRANSPORTE_______________________________________________ Lea y siga las notas de seguridad de este manual al conducir o transportar la aireadora. Consulte la Sección 5.3 para ver las instrucciones generales de funcionamiento. Cuando maniobre marcha atrás mire detrás de usted para asegurarse de que el camino esté libre. 1. Libere la manivela del OPC (E), eleve el cabezal de aireación (D). 2. Ajuste la palanca del acelerador (B) a Lento. 5.7 5 3. Mueva la palanca de control de desplazamiento (C) hasta la posición H y meta la manivela del OPC (D) para acercarse y alejarse de la zona. 4. Ajuste la palanca del acelerador (B) a la velocidad de transporte deseada. ! PRECAUCIÓN Durante el transporte, maneje la aireadora de forma tal que pueda ver el camino que tiene delante y alejarse rápidamente de ella si pierde el control. TRANSPORTE EN UN REMOLQUE ___________________________________________ Si debido a problemas es necesario interrumpir temporalmente la actividad de la aireadora y llevarla fuera de la zona de trabajo, tendrá que ser cargada en un trailer. Tenga cuidado al cargar y descargar la aireadora. Podría arrastrar las púas o atascarlas en la rampa del remolque. Para evitar que se doble la varilla impulsora, quite las dos púas situadas en la posición inferior. Sujete la aireadora al remolque para evitar que se balancee o se mueva durante el transporte. Remolque / Transporte de larga distancia Si la aireadora se debe remolcar en autovía y antes de unir el remolque, la presión de los neumáticos debe ser la siguiente: Delanteros: 22 psi - (152 kPa). Traseros: 22 psi (152 kPa). Después de descargar la aireadora, disminuya la presión de los neumáticos al valor de presión normal. Ver sección 5.8 es-15 5 FUNCIONAMIENTO 5.8 AIREADO ________________________________________________________________ ! ADVERTENCIA 2. Mueva la palanca de control de desplazamiento a la posición L. 3. Mueva la palanca del acelerador a Lento. Sitúese en el lateral de la aireadora y meta la manivela del OPC lentamente. Para evitar lesiones graves, mantenga las manos, pies y ropa alejados del mecanismo de la aireadora. NUNCA limpie la aireadora con las manos. Los bordes de las púas están muy afiladas y pueden causar lesiones. Para eliminar los residuos de las púas, desactive el embrague maestro, levante el cabezal de aireación, apague el motor y desconecte el cable de bujías. Solo entonces podrá quitar los residuos con seguridad. Cómo airear: 1. 4. Encienda el motor y levante el cabezal de aireación. 5.9 a. Con la aireadora en movimiento, ajuste acelerador a la velocidad de marcha deseada. el b. Tire de la palanca de control del embrague hasta bloquearla en la posición de funcionamiento de las púas (oirá un clic). c. Una vez situado en el punto de inicio del césped, baje totalmente el cabezal de aireación empujando hacia abajo la palanca de las púas. Para detener la aireación, tire de la palanca de púas hacia arriba para levantar el cabezal de aireación. Libere la manivela del OPC. MANIOBRAS EN PENDIENTES ______________________________________________ ! ADVERTENCIA Para evitar vuelcos, el método más seguro para trabajar en pendientes y desniveles es conducir en sentido vertical, nunca horizontalmente. Evite los giros innecesarios, conduzca despacio y esté alerta de posibles peligros y caídas. 20° Maximum 36.4% ! PRECAUCIÓN No maniobre en pendientes con desniveles superiores a 20° o 36,4%. La aireadora está diseñada para ofrecer una buena tracción y estabilidad en condiciones operativas normales. No obstante, hay que tener cuidado al trabajar en pendientes, especialmente en terrenos abruptos o cuando el césped esté mojado. El césped mojado reduce la tracción y el control de la dirección. 20° Maximum 36.4% Para no perder el control, utilice la aireadora siempre a velocidad moderada marcha adelante. 2. Si la aireadora tiende a resbalar o los neumáticos marcan el césped, coloque la aireadora en una pendiente menos inclinada hasta que se vuelva a recuperar la tracción o los neumáticos dejen de marcar el césped. 3. Si la aireadora continúa resbalando o marcando el césped, la pendiente es demasiado inclinada y no se puede maniobrar la máquina con seguridad. No vuelva a intentar subir y baje despacio. Para conseguir la máxima tracción es imprescindible que la presión de los neumáticos sea la correcta. Delanteros: 14 psi (97 kPa). Traseros: 14 psi (97 kPa). es-16 D ° /2 -1 ° 3 4 42 4° / -1 ° 40 -3/4 ° 8 3 -3/4 % 36 5° 95 0% 3 9 5% ° 8 0% 33 8 5% 1° 3 ° 7 % 3/4 8 70 % 2 - /2° 1 65 % 6 2 60 % 1/4° 24- /4° 55 % 0 1 5 2 -3 ° /4 45% 19-1 ° % 0 4 16-3/4 35% 14° 30% 25% 11-1/4° 20% 8-1/2° 15% 5-3/4° 10% 2-3/4° 5% 0° 0% G r 10 ade 0% Degrees are shown to nearest 1/4° 1. eg r 45 ees ° Figura 5B Figura 5C FUNCIONAMIENTO Cómo calcular una pendiente: 5 B Herramientas necesarias: Nivel (A), 1 yarda o 1 metro de longitud. Cinta métrica (B). A Con el nivel (A) colocado horizontalmente, mida la distancia (C) con cinta métrica (B). Utilice el cuadro para calcular el ángulo de la pendiente o el % de desnivel (D). C D Figura 5D Altura (C) Pulgadas con nivel de 1 yarda (A) Resultado (D) Milímetros con nivel de 1 metro (A) Pendiente en grados Porcentaje de pendiente 4.8 8.3 100 5.7 10.0 150 8.5 15 9.5 16.7 11.3 20.0 11.8 20.8 3 6 200 7.5 9 225 12.7 22.5 250 14 25.0 275 15.4 27.5 15.5 27.8 16.7 30.0 17.0 30.6 18.0 32.5 18.4 33.3 19.3 35.0 19.9 36.1 20.6 37.5 21.3 38.9 21.8 40.0 22.6 41.7 23.0 42.5 24 44.4 10 300 11 325 12 350 13 375 14 400 15 425 16 18 475 25.4 47.5 500 26.6 50.0 29.1 55.6 600 31.0 60.0 34.8 69.4 800 38.7 80.0 39.8 83.3 900 42.0 90 1000 45.0 100 20 25 30 36 es-17 6 6 6.1 AJUSTES AJUSTES GENERALIDADES _________________________________________________________ ! ADVERTENCIA Para evitar lesiones, antes de realizar tareas de ajuste o mantenimiento, desactive el embrague maestro, baje el cabezal hasta el suelo, apague el motor y desconecte el cable de las bujías para evitar lesiones. Asegúrese de que la aireadora esté aparcada en una superficie llana y nivelada. Nunca trabaje en una aireadora que sólo esté apoyada sobre un gato. Utilice siempre soportes para gatos. Si sólo está elevada la parte delantera o trasera de la aireadora, coloque bloques delante y detrás de las ruedas que estén apoyadas en el suelo. 1. Los ajustes y las tareas de mantenimiento deben ser realizadas siempre por un técnico cualificado. Si no puede realizar el ajuste deseado, póngase en contacto con un distribuidor Jacobsen autorizado. 2. Cambie, no ajuste, los componentes desgastados y dañados. 6.2 3. El pelo largo, las joyas o la ropa suelta pueden trabarse en las partes móviles. Quítese las joyas, no lleve ropa suelta y recójase el pelo largo en una gorra. ! PRECAUCIÓN Tenga cuidado para evitar que las manos y los dedos queden atrapados entre los componentes móviles y fijos de la aireadora. ! ADVERTENCIA Para evitar lesiones cuando trabaje con el cabezal de aireación levantado, apoye el bastidor superior con bloques. Las tuberías hidráulicas podrían fracturarse o la palanca activarse por accidente, provocando la caída rápida del cabezal de aireación. 4. No modifique los valores del regulador ni sobrepase la velocidad de régimen de la máquina. PROTECCIÓN DE CÉSPED__________________________________________________ La protección de césped (C) evita que se levante el césped al extraer los testigos. Es posible ajustar su presión incrementando o reduciendo la tensión de los resortes (A). Añada o quite los espaciadores (B) situados sobre los resortes como sea necesario para asegurarse de que la protección de césped ejerza la suficiente presión como para evitar que el césped se levante, pero no tanta como para dejar marcas o cortarlo. B A C Figura 6A 6.3 CABLE DE LA POLEA DE TRANSMISIÓN DE LA AIREADORA ____________________ 1. Meta la manivela del [Consulte la sección 4.1] OPC y las púas. 2. Ajuste las tuercas del cable (D) como sea necesario para obtener una desviación de 3,3 mm con una presión de 2,0 kg para la correa nueva o una presión de 1,4 kg para la correa usada en la ubicación mostrada. 0.18 inch (3.3 mm) 4.4 lb (1.81 kg) New 3.0 lb (1.36 kg) Used 3. Puede realizar más ajustes si es necesario moviendo la abrazadera del cable y en la manivela. D es-18 Figura 6B AJUSTES 6.4 6 CABLE DE LA POLEA DE TRANSMISIÓN DE TRACCIÓN _________________________ 1. Meta la manivela del OPC. [Consulte la sección 4.1] 2. Ajuste las tuercas del cable (E) como sea necesario para obtener una desviación de 3,3 mm con una presión de 2,0 kg para la correa nueva o una presión de 1,4 kg para la correa usada en la ubicación mostrada. 3. Puede realizar más ajustes si es necesario en el extremo del cabezal de la manivela o moviendo la abrazadera del cable. 4. Pruebe la manivela. Con la manivela del OPC metida, el freno de estacionamiento (F) debería liberarse y la polea intermedia debe accionar la transmisión de tracción. 0.18 inch (3.3 mm) 4.4 lb (1.81 kg) New 3.0 lb (1.36 kg) Used E F Figura 6C 6.5 SINCRONIZACIÓN DE LA AIREADORA ________________________________________ Note: Una sincronización incorrecta entre el cigüeñal y el eje de levas de la aireadora crearían orificios alargados durante la aireación y un ruido excesivo en el eje. 1. Quite las protecciones de ambos lados de la unidad. 10. Instale las protecciones. No utilice la aireadora sin todas las protecciones bien instaladas. H 2. Extraiga la cadena de la aireadora que conecta el cigüeñal con el eje de levas de ambos lados de la unidad. 3. Afloje el perno entre las mitades del cigüeñal. 4. Gire el piñón derecho del eje de levas (G) hasta que la bocallave apunte a la parte frontal de la unidad. Las marcas de sincronización deben situarse a un ángulo de 45° con el punto orientado al frontal inferior. [Ver Figura 6D] 5. Gire el piñón derecho del cigüeñal (H) hasta que las marcas de sincronización queden horizontales con el punto orientado al frente. La bocallave debe quedar a un ángulo de 45°. Punto dirigido al frente inferior G Frente Cadena derecha de la aireadora Figura 6D Marcas de sincronización verticales 7. Gire el piñón izquierdo del cigüeñal (K) hasta que las marcas de sincronización queden verticales con el punto orientado al suelo. [Ver Figura 6E] Punto dirigido al suelo 9. Apriete el perno entre las mitades del cigüeñal. Apriete los herrajes 30 ft lbs. (40,7 Nm). Marcas de sincronización horizontales J Marcas de sincronización a un ángulo de 45° 6. Instale la cadena del lado derecho de la aireadora (J). El piñón del cigüeñal puede girarse hasta 5° en dirección de las agujas del reloj únicamente hasta que se engrane correctamente con la cadena. 8. Instale la cadena del lado izquierdo de la aireadora (L). El piñón del cigüeñal puede girarse hasta 5° en dirección contraria a las agujas del reloj únicamente hasta que se engrane correctamente con la cadena. Punto dirigido al frente K L Frente Cadena izquierda de la aireadora Figura 6E es-19 6 AJUSTES 6.6 CABLE DE CONTROL DE DESPLAZAMIENTO __________________________________ Si el sistema de tracción no se desplaza correctamente, es posible que necesite ajustar el cable de control de desplazamiento. 1. Desconecte la horquilla (N) de la palanca de desplazamiento (P). 6. Pruebe cada posición del control de desplazamiento. La palanca de desplazamiento (P) debería bloquearse en cada retén cada vez que detenga el control. 2. Sitúe la palanca de control de desplazamiento en la posición L. 3. Gire la palanca de desplazamiento (P) en el sentido de las agujas del reloj hasta bloquearla en el retén de la baja velocidad. P 4. Ajuste las tuercas de los cables (M) como sea necesario hasta que la horquilla (N) se alinee con el orificio de montaje en la palanca (P). 5. Si necesita más ajustes, puede ajustar el cable en la manivela. 6.7 N M Figura 6F CABLE DE ELEVACIÓN ____________________________________________________ Si el cabezal de aireación no sube ni baja correctamente, es posible que necesite ajustar el cable de elevación. 1. Afloje las dos tuercas del cable (R). La válvula de elevación debería volver al centro automáticamente. 2. Sitúe la manivela de control de elevación en posición central (punto muerto). 3. Apriete las tuercas (R). 4. Compruebe elevación. el funcionamiento del control de R Figura 6G es-20 AJUSTES 6.8 6 ESPECIFICACIÓN DEL PAR DE APRIETE ______________________________________ AVISO Los valores de par de apriete de estas tablas son aproximados y sólo sirven como referencia. La utilización de estos valores es responsabilidad del usuario. Jacobsen no se hace responsable de ninguna pérdida, reclamación o daño surgido por la utilización de estas tablas. Tenga siempre especial cuidado al utilizar valores de par de apriete. Jacobsen utiliza pernos Grado 5 de serie, a menos que se cite lo contrario. FIJADORES CON ESTÁNDAR NACIONAL AMERICANO FIJADORES CON ESTÁNDAR NACIONAL AMERICANO TAMAÑ O UNIDADES GRADO 5 GRADO 8 TAMAÑ O UNIDADES GRADO 5 GRADO 8 #6-32 in-lb (Nm) 20 (2.3) – 7/16-14 ft-lb (Nm) 50 (67.8) 65 (88.1) #8-32 in-lb (Nm) 24 (2.7) 30 (3.4) 7/16-20 ft-lb (Nm) 55 (74.6) 70 (94.9) #10-24 in-lb (Nm) 35 (4.0) 45 (5.1) 1/2-13 ft-lb (Nm) 75 (101.7) 100 (135.6) #10-32 in-lb (Nm) 40 (4.5) 50 (5.7) 1/2-20 ft-lb (Nm) 85 (115.3) 110 (149.2) #12-24 in-lb (Nm) 50 (5.7) 65 (7.3) 9/16-12 ft-lb (Nm) 105 (142.4) 135 (183.1) 1/4-20 in-lb (Nm) 95 (10.7) 125 (14.1) 9/16-18 ft-lb (Nm) 115 (155.9) 150 (203.4) 1/4-28 in-lb (Nm) 95 (10.7) 150 (17.0) 5/8-11 ft-lb (Nm) 150 (203.4) 195 (264.4) 5/16-18 in-lb (Nm) 200 (22.6) 270 (30.5) 5/8-18 ft-lb (Nm) 160 (217.0) 210 (284.8) 5/16-24 in-lb (Nm) 240 (27.1) 300 (33.9) 3/4-10 ft-lb (Nm) 170 (230.5) 220 (298.3) 3/8-16 ft-lb (Nm) 30 (40.7) 40 (54.2) 3/4-16 ft-lb (Nm) 175 (237.3) 225 (305.1) 3/8-24 ft-lb (Nm) 35 (47.5) 45 (61.0) 7/8-14 ft-lb (Nm) 300 (406.8) 400 (542.4) FIJADORES MÉTRICOS Fijadores no críticos con el aluminio 4.8 5.8 8.8 10.9 12.9 Nm (in-lbs) 1.2 (11) 1.7 (15) 2.9 (26) 4.1 (36) 5.0 (44) 2.0 (18) M5 Nm (in-lbs) 2.5 (22) 3.2 (28) 5.8 (51) 8.1 (72) 9.7 (86) 4.0 (35) M6 Nm (in-lbs) 4.3 (38) 5.7 (50) 9.9 (88) 14.0 (124) 16.5 (146) 6.8 (60) M8 Nm (in-lbs) 10.5 (93) 13.6 (120) 24.4 (216) 33.9 (300) 40.7 (360) 17.0 (150) M10 Nm (ft-lbs) 21.7 (16) 27.1 (20) 47.5 (35) 66.4 (49) 81.4 (60) 33.9 (25) M12 Nm (ft-lbs) 36.6 (27) 47.5 (35) 82.7 (61) 116.6 (86) 139.7 (103) 61.0 (45) M14 Nm (ft-lbs) 58.3 (43) 76.4 (55) 131.5 (97) 184.4 (136) 219.7 (162) 94.9 (70) TAMAÑ O UNIDADES M4 es-21 7 MANTENIMIENTO 7 MANTENIMIENTO 7.1 GENERALIDADES _________________________________________________________ ! ADVERTENCIA Antes de limpiar, ajustar o reparar la aireadora, desengrane todas las transmisiones, baje el cabezal hasta el suelo, apague el motor y desconecte el cable de las bujías para evitar lesiones. Asegúrese de que la aireadora esté aparcada en una superficie llana y nivelada. Nunca trabaje en una aireadora que sólo esté apoyada sobre un gato. Utilice siempre soportes para gatos. 1. 2. Los ajustes y las tareas de mantenimiento deben ser siempre realizadas por un técnico cualificado. Si no puede realizar el ajuste deseado, póngase en contacto con un distribuidor Jacobsen autorizado. Inspeccione la aireadora diariamente. Establezca un programa de mantenimiento y lleve registros detallados. a. 7.2 b. Mantenga todas las piezas móviles debidamente ajustadas y lubricadas. c. Cambie las piezas gastadas o dañadas antes de operar la aireadora. d. Mantenga todos correspondientes e. Mantenga las protecciones en su lugar y todo el equipo bien sujeto. f. Mantenga las llantas debidamente infladas. los líquidos a los niveles 3. El pelo largo, las joyas o la ropa suelta pueden trabarse en las partes móviles. 4. Utilice las ilustraciones del Catálogo de piezas como referencia para desmontar y montar los componentes. 5. Recicle o tire los materiales peligrosos (baterías, combustible, lubricantes, anticongelante, etc.) siguiendo a las normativas locales, regionales o nacionales. Mantenga limpia la aireadora. MOTOR _________________________________________________________________ IMPORTANTE: Con esta unidad se incluye un manual del motor adicional, preparado por el fabricante del motor. Lea el manual del motor detenidamente hasta familiarizarse con el funcionamiento y mantenimiento del motor. La atención adecuada a las indicaciones del fabricante asegurarán una vida de servicio máxima del mismo. Para solicitar un Manual del motor de recambio, póngase en contacto con el fabricante del motor. El rodaje adecuado de un nuevo motor puede aportar considerables diferencias a su rendimiento y duración. Nota: La aireadora está diseñada para funcionar con más eficacia con el ajuste predeterminado del regulador. No altere los ajustes del regulador del motor ni lo haga funcionar a velocidad excesiva. Durante el período de rodaje, Jacobsen recomienda lo siguiente: 1. Trabaje de forma suave durante las primeras 25 horas a una velocidad reducida. 2. Evite arranques con el acelerador a toda marcha y una aceleración rápida. 3. Deje que el motor llegue a la temperatura de operación antes de operar con carga completa. 4. Cambie el aceite y el filtro después de las primeras 5 horas de operación. 5. Consulte la Sección 9.2 y el manual del motor para conocer los intervalos específicos de mantenimiento. es-22 MANTENIMIENTO 7.3 7 ACEITE DEL MOTOR _______________________________________________________ Compruebe el aceite del motor al inicio de cada jornada de trabajo y antes de encender el motor. Si el nivel de aceite está bajo, retire el tapón de llenado de aceite y añada el aceite necesario. Superior a 0° C SAE 30W Inferior a 0° C SAE 5W20 o SAE 5W30 Marca de llenado Realice el cambio inicial de aceite a las primeras 5 horas de operación. Después cambie el aceite cada 25 horas. Después de añadir o cambiar el aceite, encienda el motor y manténgalo en ralentí durante 30 segundos. Apague el motor. Espere 30 segundos y revise el nivel de aceite. Añada aceite hasta que llegue a la marca LLENO en la varilla. FULL ADD Consulte el manual del motor con información detallada del servicio. Rango operativo Figura 7A Utilice aceites de motor con clasificación SG, SH o SJ. 7.4 1. FILTRO DE AIRE DEL MOTOR _______________________________________________ Saque y revise el prelimpiador de espuma cada 25 horas. Cámbielas si estuviesen dañadas. Para revisar el prelimpiador, lave con detergente líquido y agua templada. Enjuáguelo a conciencia y séquelo con un paño limpio. Sumerja en aceite limpio de motor y escurra el exceso de aceite sobre un paño limpio absorbente. 7.5 2. Cambie el cartucho de papel del limpiador de aire cada 100 horas, con más frecuencia cuando se opere en condiciones polvorientas. Nota: Sustituya siempre el cartucho de papel. No lave ni utilice aire a presión para limpiar el cartucho. Consulte el manual del motor con información detallada del servicio. COMBUSTIBLE____________________________________________________________ El combustible es muy inflamable. Manipúlelo con precaución. Utilice contenedores aprobados. La espita debe caber en el cuello del tubo de llenado de combustible. Evite utilizar latas y embudos para el llenado de combustible. ! ADVERTENCIA Nunca retire el tapón del depósito de combustible, ni añada combustible cuando el motor está en marcha o si está caliente. No fume cuando manipule combustible. Nunca llene ni vacíe el depósito de combustible en el interior. No derrame combustible. Si derrama combustible, límpielo inmediatamente. Nunca manipule ni almacene depósitos de combustible cerca de una llama viva, ni ningún dispositivo que pueda producir chipas y prender el combustible o los gases de combustible. • Llene el depósito del combustible hasta una altura de 25 mm del fondo del cuello del tubo de llenado. • Guarde el combustible según las normativas locales, regionales o nacionales y las recomendaciones de su proveedor de combustible. • Nunca llene el depósito de combustible en exceso. Motor de gasolina • Utilice gasolina sin plomo limpia, nueva, de grado regular con un mínimo de 85 octanos. AVISO No utilice gasolina superior ni mezcla de gasolina y aceite. Cuando utilice una mezcla de combustible, no utilice una con más de 10% de etanol. En ninguna circunstancia se debe utilizar una mezcla con metanol. Asegúrese de instalar y apretar firmemente el tapón de combustible. es-23 7 MANTENIMIENTO 7.6 MANGUERAS HIDRÁULICAS ________________________________________________ 5. ! ADVERTENCIA El líquido hidráulico que sale a presión puede tener suficiente fuerza como para penetrar la piel. Si sucede esto, debe ser extraído quirúrgicamente lo antes posible para evitar que se cangrene la zona. No intente sustituir los manguitos hidráulicos cuando el cabezal de aireación se encuentra en posición elevada. Los manguitos soportan una presión extrema. Liberar esta presión indebidamente podría provocar la caída repentina del cabezal de aireación. Antes de inspeccionar o desconectar las tuberías y mangueras hidráulicas, saque siempre todas las transmisiones, baje al suelo el cabezal de aireación, apague el motor y desconecte el cable de las bujías. 2. Con el motor detenido, mueva la palanca de púas a la posición de elevación durante 10 segundos y a la posición de bajada durante otros 10 para liberar la presión del sistema. 3. Compruebe el estado de los tubos y las mangueras diariamente. Busque mangueras mojadas o manchas de aceite. Sustituya las mangueras y tubos desgastados o dañados antes de poner en funcionamiento la aireadora. 4. Los tubos o mangueras de sustitución deben colocarse en el mismo sitio que las viejas. No coloque las fijaciones, abrazaderas o uniones en un sitio distinto al original. 7.7 tubos, IMPORTANTE: El sistema hidráulico puede quedar permanentemente dañado si se contamina el aceite. Antes de desconectar cualquier componente hidráulico, limpie la zona alrededor de los accesorios y de los extremos de las mangueras para limpiar de impurezas el sistema. Para no provocarse lesiones graves con el aceite caliente a alta presión, no utilice nunca las manos al comprobar fugas de aceite. Utilice siempre un papel o un cartón. 1. Inspeccione detenidamente todos los mangueras y conexiones cada 250 horas. a. Antes de conectar cualquier componente hidráulico, etiquete o marque la ubicación de cada manguera y, a continuación, limpie la zona alrededor de los accesorios. b. Cuando desconecte el componente, esté preparado para montar los insertos o tapones en los extremos de las mangueras y en los puertos abiertos. Con ello se evitará la entrada de impurezas en el sistema hidráulico y el derrame excesivo de aceite. c. Asegúrese de que las juntas tóricas estén limpias y de que los accesorios de las mangueras estén correctamente asentados antes de apretarlos. d. No retuerza la manguera. Las mangueras retorcidas pueden hacer que los acopladores se aflojen conforme se doblan las mangueras durante el funcionamiento provocando, así pues, fugas de aceite. e. Las mangueras retorcidas o ensortijadas pueden restringir el flujo de aceite, con el consiguiente mal funcionamiento del sistema, excesivo calentamiento del aceite y fallo prematuro de las mangueras. ACEITE HIDRÁULICO ______________________________________________________ Consulte en la Sección Section 9.2 los intervalos específicos de mantenimiento. c. El depósito de aceite principal siempre debe estar lleno. 2. Vacíe y sustituya el aceite hidráulico cada 250 horas o después de que haya ocurrido un fallo grave de componentes, o si advierte la presencia de agua, espuma o un olor rancio. 3. Quite el tapón de vaciado de la parte inferior del depósito principal y afloje o quite la varilla de aceite o el tapón de llenado. Para cambiar el aceite hidráulico: 4. Después de sacar el aceite, ponga el tapón de vaciado y llene el depósito con Jacobsen GreensCare 68. 1. 5. Purgue el aire del sistema. Vacíe y cambie el aceite hidráulico su ha tenido lugar un fallo de componentes grave, si advierte la presencia de agua o espuma en el aceite o si nota un olor rancio (lo que indica un calor excesivo). Sustituya siempre el filtro hidráulico cuando cambie el aceite. Limpie la zona alrededor del tapón del aceite para evitar que entren impurezas en el sistema y lo contaminen. a. La temperatura del aceite debe estar entre 16° y 32°C. No compruebe el nivel de aceite cuando el aceite esté caliente. b. Compruebe el aceite con el cabezal de aireación en posición elevada. es-24 a. Active las funciones elevar y bajar durante varios minutos para purgar el aire del sistema y estabilizar el aceite. b. Una vez estabilizado el aceite y purgado el aire, llene el depósito hasta la marca de LLENO. MANTENIMIENTO 7.8 7 ESCAPE Y SILENCIADOR ___________________________________________________ ! ADVERTENCIA Los humos de escape contienen monóxido de carbono tóxico y pueden ser fatales sin son inhalados. NUNCA arranque un motor sin la adecuada ventilación. Si advierte un cambio de color y de sonido del escape, pare el motor inmediatamente. Averigüe cuál es el problema y mande el equipo a reparar. Apriete los componentes del colector del escape regularmente. Apriete o sustituya las abrazaderas del escape si presentan fugas. Para protegerse del monóxido de carbono, inspeccione todo el sistema de escape regularmente y sustituya inmediatamente el silenciador si está dañado. 7.9 1. NEUMÁTICOS_____________________________________________________________ Mantenga los neumáticos correctamente inflados para prolongar su vida útil. Compruebe la presión de inflado cuando los neumáticos estén fríos. Inspeccione el desgaste de la pisada. ! PRECAUCIÓN A menos que haya recibido la formación adecuada y posea las herramientas y la experiencia idónea, no intente montar un neumático en la llanta. Un montaje incorrecto puede dar lugar a una explosión y provocar graves lesiones. 2. Compruebe la presión de los neumáticos con un manómetro preciso de baja presión. 3. Mantener los neumáticos inflados a 14 psi (97 kPa). 7.10 MONTAJE DE LAS RUEDAS _________________________________________________ 1. Limpie la suciedad, la grasa y el aceite de la rosca de los pernos sin cabeza. No lubrique las roscas. 2. Asegúrese de que la aireadora esté aparcada en una superficie llana y nivelada. Nunca trabaje en una aireadora que sólo esté apoyada sobre un gato. Utilice siempre soportes para gatos. Coloque la rueda en el cubo y preste atención para que la superficie de la rueda esté totalmente en contacto con el cubo. 3. Si sólo está elevada la parte delantera o trasera de la aireadora, coloque bloques delante y detrás de las ruedas que estén apoyadas en el suelo. Apriete con los dedos todos los componentes y aplique par de torsión en orden cruzado; apriete siempre las tuercas de perno en la posición superior (12 en punto). 4. Compruebe y apriete las tuercas de perno diariamente hasta que el par de torsión se mantenga entre 115 128 Nm. ! ADVERTENCIA 7.11 CUIDADOS Y LIMPIEZA_____________________________________________________ Lave la aireadora después de cada utilización. Mantenga limpia la aireadora. Nota: No lave ninguna parte de la aireadora si está caliente. No utilice rociadores de alta presión. Use agua fría y limpiadores para automóviles. 1. Limpie con aire comprimido el motor y las aletas del radiador. Puede adquirir nuestra pistola de aire comprimido especial a través de un distribuidor Jacobsen. 2. Utilice agua fría para limpiar la aireadora. Note: Se sabe que la utilización de agua marina o aguas residuales acelera la oxidación y la corrosión de las piezas metálicas, dando lugar a un deterioro o fallo prematuro. Los desperfectos de esta naturaleza no están cubiertos por la garantía de fábrica. 3. No rocíe agua directamente sobre los alojamientos de los cojinetes y las juntas. 4. Limpie todas las piezas de plástico o goma con una solución jabonosa suave o con los limpiadores para goma y vinilo disponibles en el mercado. Repare las superficies metálicas dañadas y utilice pintura para retoques Jacobsen. Aplique una capa de cera a la aireadora para proteger la pintura. ! PRECAUCIÓN Limpie los restos de las transmisiones, el silenciador y el motor para evitar posibles incendios. ! ADVERTENCIA NUNCA limpie la aireadora con las manos. Los bordes de las púas están muy afiladas y pueden causar graves lesiones. es-25 7 MANTENIMIENTO 7.12 INSTALACIÓN DE LA VARILLA IMPULSORA ___________________________________ Cuando necesite extraer las varillas impulsoras para su mantenimiento o sustitución, una herramienta de instalación especial (A) (Jacobsen n.º referencia 517693) evitará dañar los sellos de borde triples. [Ver Figura 7B] A Figura 7B 7.13 ALMACENAMIENTO _______________________________________________________ Generalidades Nota: No use combustible con etanol mientras esté guardado. 1. Limpie a fondo la aireadora y lubríquela. Repare y pinte el metal dañado o desnudo. 2. Inspeccione la aireadora. Apriete todos los herrajes y sustituya los componentes desgastados o dañados. 1. Extraiga y limpie a fondo las púas. Aplíqueles una ligera capa de aceite para impedir su oxidación. 3. Limpie a fondo los neumáticos y guarde la aireadora de manera que la carga no esté sobre los neumáticos. Si la aireadora no está sobre soportes, compruebe los neumáticos con regularidad e ínflelos lo necesario. 2. Limpie las varillas impulsoras y aplíqueles una ligera capa de aceite. 3. Baje el cabezal de aireación para liberar la presión del sistema hidráulico. 4. Mantenga limpia y seca la aireadora y todos sus accesorios; proteja el equipo de las inclemencias del tiempo cuando lo almacene. Nunca guarde la aireadora cerca de llamas o chispas que podrían prender el combustible o los gases que éste despide. Mecanismo de la aireadora Tras el almacenamiento 1. Compruebe o ponga a punto el limpiador de aire. 2. Compruebe los niveles de aceite en el cárter del motor y en el sistema hidráulico. 3. Llene el depósito de combustible con combustible nuevo. 4. Asegúrese de que los neumáticos están correctamente inflados. Limpie el exterior del motor. Pinte el metal desnudo o aplique una ligera capa de aceite anticorrosión. 5. Retire todo el aceite de las púas y de las varillas impulsoras. Para proteger el motor, Jacobsen recomienda utilizar un aditivo para combustible como STABIL®. Mezcle el aditivo siguiendo las instrucciones en el envase. Haga funcionar el motor brevemente para que el aditivo circule por el carburador. 6. Conecte el cable de la bujía. Arranque y deje funcionar el motor a medio gas. Deje pasar tiempo suficiente para que el motor se caliente y lubrique adecuadamente. Motor 1. 2. Con el motor caliente, quite el tapón de vaciado y vacíe el aceite del cárter. Ponga el tapón de vaciado y llene con aceite nuevo. Deje enfriar el motor antes de guardar el aparato. Desconecte el cable de la bujía. Retire la bujías y ponga 30 ml de aceite de motor en el cilindro. Vuelva a poner la bujía y acelere lentamente (sin arrancar) para distribuir el aceite en el cilindro. Gire lentamente el cigüeñal hasta que el pistón esté en la parte superior del recorrido. Si lo guarda en el interior, vacíe el depósito de combustible. es-26 ! ADVERTENCIA Nunca accione el motor sin la adecuada ventilación. Los gases de escape pueden ser mortales si se inhalan. RESOLUCIÓN DE PROBLEMAS 8 8.1 8 RESOLUCIÓN DE PROBLEMAS GENERALIDADES _________________________________________________________ El siguiente cuadro indica los problemas básicos que pueden surgir durante el arranque y la operación. Para obtener una información más detallada sobre los sistemas hidráulico y eléctrico, póngase en contacto con el distribuidor de Jacobsen local. Síntomas Posibles causas Acción El motor no arranca. 1. Depósito de gasolina vacío o sucio. 1. Llenar con combustible nuevo. Cambiar el filtro de combustible. 2. Interruptor de encendido desconectado. 2. Conecte el interruptor de encendido. 1. Nivel de combustible bajo. Combustible o filtro de combustible sucio 1. Llenar con combustible nuevo. Limpie o sustituya el filtro de combustible. 2. Limpiador de aire sucio. 2. Revise y cambie el filtro de aire. 3. Problema con el motor. 3. Consulte el manual del motor. Al motor le cuesta arrancar o funciona mal. El motor se para. Depósito de combustible vacío. Llenar con combustible nuevo. El motor se sobrecalienta. 1. Entrada de aire atascada. 1. Limpie la entrada de aire del refrigerante. 2. Sobrecarga del motor. 2. Reducir la velocidad hacia delante. 1. Púas sucias o desgastadas. 1. Limpie a conciencia las púas y riegue ligeramente la hierba. 2. Rebabas en las púas. 2. Quite las rebabas con una lima. 3. Velocidad del motor demasiado lenta. 3. Utilice la aireadora con una velocidad superior del motor. 4. Neumáticos demasiado grandes. 4. Consulte las especificaciones de los neumáticos. Púas obstruidas. Las púas no penetran en el césped. Púas gastadas u obstruidas. Cambie o limpie las púas. Las púas no se levantan lo suficiente. Bajo fluido hidráulico. Añada fluido hidráulico. [Consulte la sección 7.7] Las púas no se mueven. Varilla impulsora doblada. Sustituya la varilla impulsora. El césped se levanta. Césped de raíz superficial. Aumente la tensión del resorte de la protección del césped. [Consulte la sección 6.2] La transmisión de tracción no se activa. El cable de la polea de transmisión está mal ajustado. Ajuste el cable. [Consulte la sección 6.4] La transmisión de la aireadora no se activa. El cable de la polea de transmisión de la aireadora está mal ajustado. Ajuste el cable. [Consulte la sección 6.3] Orificio oblongo en el césped. Aireadora desincronizada. Compruebe la sincronización. [Consulte la sección 6.3] Ruido en el eje de levas. Aireadora desincronizada. Compruebe la sincronización. [Consulte la sección 6.3] es-27 9 TABLAS DE MANTENIMIENTO Y DE LUBRICACIÓN 9 9.1 TABLAS DE MANTENIMIENTO Y DE LUBRICACIÓN GENERALIDADES _________________________________________________________ 2. Utilice grasa que cumpla o supere las especificaciones NLGI Grado 2 LB. Aplique grasa con una pistola manual y llene despacio hasta que la grasa comience a subir. No utilice pistolas de aire comprimido. ! ADVERTENCIA Antes de limpiar, ajustar o reparar esta aireadora, desengranar todas las direcciones, bajar las herramientas al terreno, engranar el freno de estacionamiento, parar el motor y desconectar el cable de las bujías para evitar lesiones. 3. Para garantizar un funcionamiento suave de todas las palancas, puntos de pivote y otros puntos de fricción que no se muestran en el cuadro de lubricación, aplique varias gotas de aceite SAE 30 cada 40 horas o según sea necesario. 1. Limpie siempre los puntos de lubricación antes y después de lubricar. 4. Aplique diariamente aceite n.º 30 o lubricante para cadena. 5. Todos los días, lubrique el cigüeñal de la aireadora (tres lugares) y los herrajes de la varilla de conexión (seis lugares). 9.2 TABLA DE MANTENIMIENTO ________________________________________________ Intervalos de servicio y de lubricación recomendados Filtro de aire Aceite del eje de levas Aceite del motor Accesorios de engrase Manguitos y tubos hidráulicos Aceite hidráulico Escape y silenciador Neumáticos Cojinetes de ruedas delanteras Cada 8-10 horas Cada 25 horas Cada 100 horas I C R Cada 250 horas Cada 400 horas Cada 500 horas Cada 1000 horas I-R* L I*** R 7.4 R I-A I 7.3 I 7.6 R** I 7.7 7.8 7.9 I-A * Cambie el aceite después de las 5 primeras horas de funcionamiento. ** O cada dos años (lo que ocurra en primer lugar). *** Revisar los manguitos y tuberías visibles en cuanto a fugas o marcas de aceite. I - Pistola Manual con grasa NLGI de Grado 2 (Servicio Clase LB). II - Aceite motor – Ver Sección 7.3. III - Aceite de motor – Consultar la sección 7.7. es-28 Ver sección C A - Añadir o Ajustar C - Limpiar I - Inspeccionar L - Lubricar R - Reemplazar IV - Aceite SAE 30. Anualm ente Tipo de Tipo IV II I III L AR - Según Necesidad GUÍA DE SELECCIÓN DE PÚAS 10 10 GUÍA DE SELECCIÓN DE PÚAS Original y DuraTine™ Tamaño de orificio / núcleo Tipo Servicio N.º referen cia Grosor de pared Diámetro de montaje Longitud de orificio / núcleo Longitud total Original 523864 Sólido Eyección lateral 1/5,08 cm. (13 mm) 6,35 cm. (64 mm) 10,16 cm. (102 mm) Utilizada principalmente para la aireación ligera de césped de suelo y resiembra. DuraTine XLT 4180561 Sólido Eyección lateral 1/5,08 cm. (13 mm) 6,35 cm. (64 mm) 10,16 cm. (102 mm) Utilizada principalmente para la aireación ligera de césped de suelo y resiembra sin roca cuando el desgaste de la púa es un problema Original 517486 0,914 mm. (0,91 mm) 5/20,32 cm. (16 mm) 6,35 cm. (64 mm) 10,87 cm. (109 mm) Menor penetración (utilizada en suelos duros). DuraTine XL 4180562 Sólido 1/5,08 cm. (13 mm) 7,95 cm. (79 mm) 12,78 cm. (128 mm) Utilizada principalmente para la aireación ligera de césped sin extracción de testigos. DuraTine XL 4180563 Sólido 5/20,32 cm. (16 mm) 7,85 cm. (78 mm) 12,70 cm. (127 mm) Utilizada principalmente para la aireación ligera de césped sin extracción de testigos. Original 517487 1,245 mm. (1,2 mm) 5/20,32 cm. (16 mm) 6,35 cm. (64 mm) 10,87 cm. (109 mm) Menor penetración (utilizada en suelos duros). DuraTine XL 4180564 Sólido 5/20,32 cm. (16 mm) 8,26 cm. (83 mm) 12,70 cm. (127 mm) En condiciones de sequía o zonas que no reciben agua. Original 517488 1,245 mm. (1,24 mm) 5/20,32 cm. (16 mm) 6,35 cm. (64 mm) 10,87 cm. (109 mm) Aireación ligera con menor penetración Utilizada en suelos duros y en césped deportivo. Duratine XL 4180566 1,651 mm. (1,65 mm) 5/20,32 cm. (16 mm) 6,35 cm. (64 mm) Duratine XLT 4180567 1,651 mm. (1,65 mm) 5/20,32 cm. (16 mm) 6,35 cm. (64 mm) Original 517489 1,245 mm. (1,24 mm) 3/4 in. (19 mm) 6,35 cm. (64 mm) Duratine XL 4180571 1,651 mm. (1,65 mm) 3/4 in. (19 mm) 6,35 cm. (64 mm) Duratine XLT 4180572 1,651 mm. (1,65 mm) 3/4 in. (19 mm) 6,35 cm. (64 mm) DuraTine XL 4180573 Sólido 3/4 in. (19 mm) 8,18 cm. (82 mm) Eyección lateral 1/4 in. (6 mm) Eyección superior Aplicación Sólido Eyección superior 3/20,32 cm. (10 mm) Sólido 1/2 in (13 mm) 5/20,32 cm. (16 mm) Eyección superior Eyección superior Sólido 10,87 cm. (109 mm) 10,87 cm. (109 mm) 10,87 cm. (109mm) 10,87 cm. (109 mm) 10,87 cm. (109 mm) 12,70 cm. (127 mm) Aireación o cambio de suelo medio con menos penetración en el césped cuando el desgaste de la púa es un problema. Aireación o cambio de suelo medio con menos penetración en suelos de césped sin roca cuando el desgaste de la púa es un problema. Aireación o cambio de suelo medio con menos penetración en césped o calles. Aireación o cambio de suelo medio con menos penetración en césped o calles cuando el desgaste de la púa es un problema. Aireación o cambio de suelo medio con menos penetración en suelos de césped o calles sin roca cuando el desgaste de la púa es un problema. Aireación media sin extracción de testigos. 11 es-29 12 12 CATÁLOGO DE PIEZAS CATÁLOGO DE PIEZAS 12.1 CÓMO USAR EL CATÁLOGO DE PIEZAS ______________________________________ Artículos seleccionados Abreviaciones N/S - No revisado por separado, sólo se puede obtener pidiendo el componente principal o el juego. AR - Es necesaria cantidad o medida variable para obtener el ajuste correcto.. Símbolos como l, junto al número de artículo, indica que existe una nota con información adicional importante al hacer el pedido de esa pieza. Artículo l 1 2 3 4 5 N.º de Cant. pieza 123456 1 789012 1 345678 1 N/S 1 901234 1 Los artículos con una marca de sangría indican las piezas de componentes incluidas como parte de una unidad u otro componente. Estas piezas se pueden pedir por separado o como parte del componente principal. Descripción Números de Serie/Notas Montura, Válvula Válvula, Elevación • Manija • Juego de Junta Tornillo 1/4-20 x 2 cabeza hexagonal Indica una parte de una pieza Incluye artículos 2 y 3 Parte revisada incluida con artículo 2 Parte no revisada incluida con el artículo 2 12.2 PARA HACER PEDIDOS DE PIEZAS __________________________________________ 1. Escriba su nombre y dirección completos en el pedido. 5. Envíe o lleve el pedido a un distribuidor autorizado Jacobsen. 2. Indique la dirección y el método de envío: 6. Revise todos los envíos al recibirlos. Si alguna pieza está dañada o faltante, enviar una reclamación con el transportista antes de aceptar. 3. Facilite el número, nombre y número de serie del artículo que aparece estampado en la placa del fabricante, o la placa de serie de su artículo. 4. Especifique la cantidad deseada, el número de pieza y la descripción de la pieza según aparece en la lista de piezas. es-30 7. No envíe material sin una carta de explicación enumerando las piezas que se envían. Se deben pagar de antemano los gastos de transporte. CATÁLOGO DE PIEZAS 12 12.1 ÍNDICE___________________________________________________________________ 1.1 ......... Decals ................................................................ 2.1 ......... Chassis .............................................................. 3.1 ......... Aerator Enclosure ............................................. 4.1 ......... Controls ............................................................. 5.1 ......... Chassis .............................................................. 6.1 ......... Transaxle ........................................................... 7.1 ......... Steering Axle ..................................................... 8.1 ......... Engine and Pump.............................................. 9.1 ......... Belts & Pulleys .................................................. 10.1 ....... Cam Case........................................................... 11.1 ....... Aerator Crankshaft ........................................... 12.1 ....... Hydraulic System .............................................. 13.1 ....... Slide and Glide Assembly ................................ 14.1 ....... Turf Guard Assembly ....................................... 15.1 ....... Tines and Holders ............................................. 15.1 ....... Quad Tine Accessory ....................................... 16.1 ....... Transaxle ........................................................... 16.1 ....... Transaxle (Continued) ...................................... 32 34 36 38 40 42 44 46 48 50 52 54 56 58 60 62 64 66 es-31 GREENSAIRE 24 Serial No. All 1.1 Decals 5 5 GreensAire 24 GreensAire 24 1 438 416 7 10 8 6 Important Emissions Information Date Of Manuf: Located on Frame Evaporative Emissions Family: CO Emission Control System (OR ecs): Evap Canister, Fuel Hose, Fuel Tank Cap This equipment conforms to 2010 California EVP Regulations for small off road engines under 13 CCR Section 2766 (b) ® 17 4 8 12 14 IMPORTANT This machine uses GreensCare 68, biodegrable hydraulic fluid. (Order 5003103 for 5 gal. pail) 15 16 13 1 3 2 13 4 2 L WA 11 105 dB 15 GreensAire 24 5 3 1 4164281 9 32 1 38 64 41 8 10 11 GREENSAIRE 24 Item 1 2 3 4 5 6 7 8 9 10 11 12 13 14 15 16 17 Part No. Qty. Description 4132318 1 Decal, Throttle 4116118 4132147 4132281 4124712 4152417 4152418 4164381 4181860 840891 4132146 3008577 3002308 2812032 4117468 REF N/S 1 1 2 2 1 1 1 1 1 1 1 1 1 1 1 1 Decal, Gear Selector Decal, Tine Raise/Lower Decal, No Step Decal, Product ID, GA 24 Decal, GA 24 New Stripe-Left Hand Decal, GA 24 New Stripe-Right Hand Decal, Danger Hands & Feet Decal, Warning Decal, Crushing Warning Decal, OPC/Mechanical Latch Decal, Hydraulic Oil Decal, Gas Decal, Greenscare 68 Decal, Noise 105dB Serial Plate Decal, 2010 Emissions Serial Numbers/Notes Located on Front Frame Located on Front Frame Located on Front Frame > Change from previous revision 33 GREENSAIRE 24 Serial No. All 2.1 Chassis 14 17 10 13 3 8 23 10 2 6 18 16 25 24 4 22 11 26 27 9 1 12 6 2 8 28 3 9 7 21 19 26 8 27 15 20 7 34 9 GREENSAIRE 24 Item 1 2 3 4 5 6 7 8 9 10 11 12 13 14 15 16 17 18 19 20 21 22 23 24 25 26 27 28 Part No. Qty. Description 446116 8 Lockwasher, #10 446128 400104 444310 452002 453023 404014 404018 522516 548900 800390 827449 832578 2703553 2703622 4111943 4116068 4119864.7 4124956 4124958 4125856 308087 402006 444304 446106 517340 548238 4132129 5 5 8 4 5 5 8 7 8 4 2 2 1 1 1 1 1 1 1 1 4 4 4 4 2 2 1 Lockwasher, 1/4 Screw, 1/4-20 x 1/2 in. Hex Head Nut, #10-24 Hex Flat Washer, 3/16 Flat Washer, 1/4 Screw, 1/4-20 x 1/2 in. Truss Head Screw, 1/4-20 x 3/4 in. Truss Head Mount, Isolation Screw, #10-24 x 1/2 in. Hex Head Pop Rivet, 1/8 x 3/8 in. Handle, Latch Keeper, Latch Cover, Rear Cover, Drive Side Cover, Hydraulic Tank Hinge, Rear Cover Belt Cover, Front Cover, Controls- Top Cover, Controls- Bottom Belt Cover, Rear Flat Washer, #6 Screw, #6-32 x 1/2 in. Slotted Nut, #6-32 Hex Lockwasher, #6 Heavy Guide Pop Rivet, 3/16 x 5/8 in. Support, Hinge Serial Numbers/Notes > Change from previous revision 35 GREENSAIRE 24 Serial No. All 3.1 Aerator Enclosure 2 2 5 1 3 5 11 8 4 7 6 1 Ref 9 10 36 GREENSAIRE 24 Item 1 2 3 4 5 6 7 8 9 10 11 Part No. Qty. Description 2703142.7 1 2703714.7 403746 548900 800521 521050 545371 400106 445794 320107 548178 2 2 4 6 6 6 12 12 6 2 Serial Numbers/Notes Plate, Rear Plate, Cover Seal Screw, #10-24 x 3/4 in. Hex Head Screw, #10-24 x 1/2 in. Hex Flange Nut, #10-24 Hex Flange Boot Ring Assembly, Plated Screw, 1/4-20 x 5/8 in. Hex Head Nut, 1/4-20 Spiralock Flange Tie, Plastic Washer, Flat > Change from previous revision 37 GREENSAIRE 24 Serial No. All 4.1 Controls 29 Ref 29 2 22 28 9 3 23 10 11 34 10 40 21 26 1 38 43 26 37 36 19 21 1 21 41 32 21 10 42 15 4 44 19 33 35 16 8 21 6 24 24 37 30 5 31 18 1 20 1 1 24 19 1 7 21 25 21 14 24 5 17 12 38 26 27 13 39 GREENSAIRE 24 Item 1 2 3 4 5 6 7 8 9 10 11 12 13 14 15 16 17 18 19 20 21 22 23 24 25 26 27 28 29 30 31 32 33 34 35 36 37 38 39 40 41 42 43 44 Part No. Qty. Description 453009 6 460014 460010 443102 400190 402118 460026 452002 453010 440078 461466 455012 520328 548848 548882 444782 444708 800305 400190 400196 445795 806765 816401 825560 1003815 2702712 4112561 4112567 4140129 4112662.7 4113477 4113515 4114714 4114725 4114893 4115444 4115509 4115712 446134 4125837 4130234.7 827821 4133596 446128 1 1 1 2 2 1 2 1 8 1 1 1 1 1 2 1 1 3 1 14 1 1 4 1 3 1 1 1 1 1 1 1 1 1 1 2 1 1 1 2 1 1 1 Serial Numbers/Notes Flat Washer, 5/16 Pin, Cotter Pin, Cotter Nut, 1/4-20 Hex Screw, 5/16-18 x 1-1/4 in. Hex Head Screw, #10-24 x 1/2 in. Pan Head Pin, Cotter Flat Washer, #10 Flat Washer, 3/8 Carriage Bolt, 5/16-18 x 3/4 in. Pin, Clevis Flat Washer, 1/2 Stud, Threaded, Plated Spring, Compression Control, Knob Nut, #10-24 Hex Centerlock Nut, 1/4-20 Hex Centerlock Bolt, 1/4-20 Shoulder Screw, 5/16-18 x 1-1/4 in. Hex Head Screw, 5/16-18 x 2 in. Hex Head Nut, 5/16-18 Spiralock Flange Pin, Clevis Spring, Torsion Knob Bracket, Weldment Bushing, Lever Lever, Lift Latch, Mechanical Drive Handle, OPC Handle, Controls Clutch Lever Control Assembly, Throttle Lever Assembly, Selector Bracket, Shifter Control Spacer, Tube Latch, Mechanical Grip, Handle Spring, Torsion Lockwasher, 5/16 Stops, Mechanical Bracket, Cover Knob, Throttle Cam Stop Washer, Lock 1/4 > Change from previous revision 39 GREENSAIRE 24 Serial No. All 5.1 Chassis 3 5 6 7 4 2 1 3 5 4 7 6 22 21 18 8 7 20 19 17 9 13 16 12 10 15 11 40 14 GREENSAIRE 24 Item 1 2 3 4 5 6 7 8 9 10 11 12 13 14 15 16 17 18 19 20 21 22 Part No. Qty. Description 1 2703216 4113007 4113032.7 4113031.7 400410 446154 400406 2702704.7 2702668.7 2702667.7 548458 460030 308197 548912 4139232 4139233 400188 446134 453009 4141187 548224 2 2 2 2 4 10 6 1 1 1 2 2 6 6 1 1 2 2 2 1 1 Serial Numbers/Notes Chassis, Front Service Cam Case Cylinder Assembly, Hydraulic Lift Mount, Outer Cylinder Mount, Inner Cylinder Screw, 1/2-13 1-3/4 in. Hex Head Lockwasher, 1/2 Screw, 1/2-13 x 1-1/4 in. Hex Head Cross Tube Assembly Axle Assembly, Right Hand Axle Assembly, Left Hand Pin, Clevis Cotter, Pin Screw, 7/16-14 x 1-1/2 in. Hex Head Nut, 7/16-16 Hex Scraper, Left Side Scraper, Right Side Screw, 5/16-18 x 1 in. Hex Head Lockwasher, 5/16 Flat Washer, 5/16 Plate, Cable Mount Grease Fitting, Straight 1/4 > Change from previous revision 41 GREENSAIRE 24 Serial No. All 6.1 Transaxle 6 8 31 12 28 22 40 30 22 37 35 34 20 36 23 17 13 6 4 14 8 16 11 12 Part of Front Chassis 19 7 15 5 20 2 21 21 33 3 11 24 25 38 29 32 10 39 9 18 20 15 13 16 21 17 33 21 15 19 4 26 / 27 42 1 9 GREENSAIRE 24 Item Part No. 1 2 3 4 5 6 7 8 9 10 11 12 13 14 15 16 17 18 19 20 21 22 23 24 25 26 27 28 29 30 31 32 33 34 35 36 37 38 39 40 Qty. Description 446140 2 2702438 2702591 4116957 816320 2702673 2702965 400144 463017 446128 400262 400200 400264 453023 354774 4112443 522723 545786 548349 604174 440086 445795 445796 4113668 2700335 400268 2702679.7 2703280 876431 4113516 4114412 4125175 REF 4140316 521679 N/S 4114480 548880 805860 440120 452008 521206 1 2 2 4 2 1 2 1 2 2 8 6 2 2 1 4 2 2 2 6 14 8 2 1 2 2 2 2 1 2 1 1 1 2 2 2 2 8 1 1 1 Serial Numbers/Notes Lockwasher, 3/8 Transaxle Rear Hub • Bearing, Ball • Wheel Bolt, 7/16-14 x 1-1/8 in. Sprocket, #40 16 Tooth Gearbox, 90° Screw, 1/4-28 x 5/8 in. Hex Head Key, 3/16 x 3/4 in. #9 Woodruff Lockwasher, 1/4 Screw, 3/8-16 x 1 in. Hex Head Screw, 5/16-18 x 2-1/2 in. Hex Head Screw, 3/8-16 x 1-1/4 in. Hex Head Flat Washer, 1/4 Key, 1/4 Square x 1 in. Linkage, Shifter Extension Flange, Bearing Bearing Snap Ring, External Flat Washer, 3/8 Carriage Bolt, .31-18 1.50 Nut, 5/16-18 Spiralock Flange Nut, 3/8-16 Spiralock Flange Yoke, Hydraulic Valve Spring, Extension Screw, 3/8-16 x 1-3/4 in. Hex Head Bracket, Idler Chain, #40 Roller #40 Master Link Lever, Shifter Sprocket, #40 16T 1 in. Bore Cable, Shifter Lever Assembly, Selector Link, Parking Brake Bushing Tire, 16 x 6.5 x 8 4 Ply Terra Rib Rim Valve Stem Lug Nut, 7/16-14 Carriage Bolt, 3/8-16 x 1-1/4 in. Flat Washer, 3/8 Bushing Includes Clevis Pin and Cotter Pin See 4.1 Obtain Locally > Change from previous revision 43 GREENSAIRE 24 Serial No. All 7.1 Steering Axle 25 14 27 19 26 22 6 25 24 29 28 23 14 20 1 7 21 5 30 4 3 18 3 2 5 18 17 15 11 8 8 9 44 10 13 11 12 15 16 17 GREENSAIRE 24 Item Part No. 1 2 3 4 5 6 7 8 9 10 11 12 13 14 15 16 17 18 19 20 21 22 23 24 25 26 27 28 29 30 Qty. Description 4113476 1 4113562 522011 400268 445796 440078 REF N/S 545213 548545 548880 400272 453010 521206 4116182.7 523221 4133028 452008 446140 400262 548224 545801 4120230 520243 4117067 4117070 4114181 548604 4140870 819898 4116811 REF 445795 1 2 2 3 2 1 2 1 1 1 1 1 2 1 1 2 2 2 2 1 1 1 1 1 1 1 14 1 1 1 1 2 Serial Numbers/Notes Steering Column Shaft Assembly, Steering Bearing, Nylon Screw, 3/8-16 x 1-3/4 in. Hex Head Nut, 3/8-16 Spiralock Flange Bolt, Carriage 5/16-18 x 3/4 in. Control Assembly, Steering Wheel and Tire Assembly • Rim and Bearing Assembly • Tire, 11 x 4 - 5 2 Ply • Valve Stem Screw, 3/8-16 x 2-1/4 in. Hex Head Flat Washer, 3/8 Bushing Axle Assembly, Steering Spacer Brace, Cover Washer, Flat 3/8 Lockwasher, 3/8 Screw, 3/8-16 x 1 in. Hex Head Grease Fitting Dipstick, Cam Case Cover, Cam Case Gasket, Cam Case Bracket, Right Cover - Rear Bracket, Left Cover - Rear Bracket, Hydraulic T Fittings Screw, 5/16-18 x 3/4 in. Hex Flange Bracket, OPC Spring Spring Clevis Pin, 5/16 x 1-1/4 in. Cable, OPC Nut, 5/16-18 Spiralock Flange See 4.1 Hook through hole in clevis pin > Change from previous revision 45 GREENSAIRE 24 Serial No. All 8.1 Engine and Pump 31 1 20 16 17 19 A 26 6 37 B 25 24 22 21 30 19 27 23 A 2 8 19 29 3 19 18 4 28 14 6 34 9 7 3 15 19 35 19 B 5 19 10 32 11 12 33 36 46 13 GREENSAIRE 24 Item 1 2 3 4 5 6 7 8 9 10 11 12 13 14 15 16 17 18 19 20 21 22 23 24 25 26 27 28 29 30 31 32 33 34 35 36 37 Part No. N/S Qty. Description 1 2704105.7 1 446136 7 400226 3 453009 4 306501 5 2702984 1 349404 1 4112762 2 4128971 1 4128973 1 4128970 1 445795 4 400186 4 4235340 1 4119323.7 1 558012 2 4218620 11-1/2” 48540-01 7 4132340 1 22372 1 4133098 1 445784 1 453023 1 446128 1 443102 1 361117 1 4168131 1 4170840 1 4173422 1 4191780 1 4221122 1 4221123 1 831039 30” 4218621 2” 400112 1 834037 1 Serial Numbers/Notes Engine, 10 HP B & S Vanguard Bracket, Hydraulic Pump Lockwasher, 5/16 Screw, 5/16-24 x 1 in. Hex Head Flat Washer, 5/16 Screw, 5/16-18 x 1-1/2 in. Hex Head Pump Assembly, Hydraulic Key, Square .25 x 2.50 in. Pulley, 3.0 in. OD, 3V, I Groove Coupling, 1.0 Bore, .25 Key, Set SC Coupling, Element Urethane Coupling, 0.5 Bore, 1/8 Key, Set SC Nut, 5/16-18 Spiralock Flange Screw, 5/16-18 x 7/8 in. Hex Head Tank, Fuel Strap, Fuel Tank Pad Hose, 1/4 in. Fuel Hose, Clamp Worm Gear Hose, Engine Oil Drain Clamp, Throttle Cable Guide, Belt Nut, 1/4-20 Whizlock Flange Flat Washer, 1/4 Lockwasher, 1/4 Nut, 1/4-20 Hex Bushing Grommet Roll Over Valve Tube, Pick-up Fuel Cap Canister, 200 cc Carbon Clamp, Canister Hose, 3/16” Fuel Hose, 5/16” Fuel Screw, 1/4-20 x 1” Hex Head Connector, Hose 10 foot roll, cut to length 5 foot roll, cut to length 25 foot roll, cut to length 6 foot roll, cut to length > Change from previous revision 47 GREENSAIRE 24 Serial No. All 9.1 Belts & Pulleys 19 11 8 12 11 20 13 9 17 18 16 4 10 4 14 15 3 5 1 4 6 11 2 12 11 7 10 24 34 31 23 16 41 25 43 33 22 39 27 26 40 32 31 26 42 25 27 38 36 34 37 44 27 27 38 35 48 37 28 29 30 16 21 GREENSAIRE 24 Item 1 2 3 4 5 6 7 8 9 10 11 12 13 14 15 16 17 18 19 20 21 22 23 24 25 26 27 28 29 30 31 32 33 34 35 36 37 38 39 40 41 42 43 44 Part No. Qty. Description 4112767 1 Pulley, 8.83 in. OD, 1 in. Bore, 3V 4113436 4112381 463021 4112766 4113435 2703012 446152 400404 440082 522723 545786 445795 4113428 400272 445796 400270 4111480 4147382 4112441 4113437 2703944.7 800453 446134 4140182 2704104 366707 306978 446140 400262 4111480 400268 440124 445796 4113005 4113005 402120 444782 809252 REF 400108 445784 517094 518487 1 1 4 1 1 1 3 3 6 4 2 6 1 1 2 1 1 1 1 1 1 3 3 2 2 4 1 1 1 2 1 1 2 1 1 2 2 1 1 1 1 1 1 Belt, 3V, Mechanism Pulley, 8.83 in. OD, 1 in. Bore, 2-3V Key, Woodruff Pulley, 4.75 in. OD, 1 in. Bore, 3V Belt, 3V, Transport Shaft, Drive Mechanism Lockwasher, 1/2 Screw, 1/2-13 x 1 in. Hex Head Bolt, Carriage 5/16-18 x 1 in. Flange, Bearing Bearing Assembly Nut, 5/16-18 Spiralock Flange Tensioner, Rotary Screw, 3/8-16 x 2-1/4 in. Hex Head Nut, 3/8-16 Spiralock Flange Screw, 3/8-16 x 2 in. Hex Head Pulley, Idler, Nylon 2.75 in. OD Bracket Assembly Pulley, 3 in. OD, 1 in. Bore, 2-3V Belt, 3V, 2 Rib, Mechanism Bracket Assembly, Idler Pivot Screw, 5/16-18 x 7/8 in. Hex Head Lockwasher, 5/16 Arm Assembly, Idler Tensioner Flat Washer, 5/8 Bearing, Ball Flat Washer, 3/8 Lockwasher, 3/8 Screw, 3/8-16 x 1 in. Hex Head Pulley, Idler, 2.75 in. Screw, 3/8-16 x 1-3/4 in. Hex Head Bolt, Carriage 3/8-16 x 1-3/4 in. Nut, 3/8-16 Spiralock Flange Cable, Tensioner Cable, Tensioner Screw, #10-24 x 3/4 in. Nut, #10-24 Nylock Jam Retaining Ring Clutch Lever Screw, 1/4-20 x 3/4 in. Hex Head Nut, 1/4-20 Whiz-Lock Flange Clip, Spring Spring, Extension Serial Numbers/Notes Includes Items 3 and 4 OPC Aerator Mechanism See 4.1 > Change from previous revision 49 GREENSAIRE 24 Serial No. All 10.1 Cam Case 24 4 23 4 3 9 3 6 7 25 26 5 4 4 8 9 6 7 22 3 18 5 4 4 3 19 / 20 / 21 8 17 16 15 7 27 14 12 13 11 10 1 32 30 28 29 30 29 33 10 11 31 13 12 14 7 22 15 16 19 / 20 / 21 2 50 18 17 GREENSAIRE 24 Item 1 2 3 4 5 6 7 8 9 10 11 12 13 14 15 16 17 18 19 20 21 22 23 24 25 26 27 28 29 30 31 32 33 Part No. Qty. Description 2703216 1 2703105 521302 463021 520237 520232 520228 520458 520456 548327 520242 520229 520231 520230 520233 548926 548272 520236 520238 520239 520240 548902 521803 400286 446140 444742 540094 548905 548201 548813 800113 4115988 400400 1 6 6 2 2 4 2 2 2 2 2 2 2 2 2 2 2 AR AR AR 8 6 6 6 6 6 24 2 2 3 1 4 Serial Numbers/Notes Cam Case Shaft, Cam Cam Key, Woodruff Liner, Bearing Bearing, Needle Race, Inner Spacer, 1/4 in. Spacer, 15/32 in. Retaining Ring Washer, Retaining Bearing, Thrust Needle Washer, Inner Thrust Washer, 1/8 in. Outer Thrust Bearing, Needle Spiral Retaining Ring Seal, Oil Cage, Bearing Shim, 0.005 in. Shim, 0.010 in. Shim, 0.020 in. Screw, 5/16-18 x 1 in. Hex Flange Slinger, Oil Screw, 3/8-16 x 2-3/4 in. Hex Head Lockwasher, 3/8 Locknut, 3/8-16 Center Slide and Guide Assembly Screw, 3/8-16 x 1 in. Hex Flange Set Screw, 5/16-18 x 5/16 in. Set Screw, 5/16-18 x 1/2 in. Plug, 1/2-14 NPT Drain Tab, Holding Screw, 1/2-13 x 3/4 in. Hex Head Add shims as required to obtain 0.005 in. to 0.015 in. end play Torque oil slinger hardware to 18-22 ft-lbs. See 13.1 > Change from previous revision 51 GREENSAIRE 24 Serial No. All 11.1 Aerator Crankshaft 27 28 29 32 26 37 34 6 35 4 20 3 33 7 32 10 11 30 31 4 19 17 13 14 3 8 9 Part of 15 2 2 16 20 7 11 3 10 28 13 29 14 16 6 15 22 21 25 18 5 22 21 1 26 27 36 24 25 23 28 29 27 26 36 52 4 20 12 GREENSAIRE 24 Item Part No. Qty. Description 1 2 3 4 5 6 7 8 9 10 11 12 13 14 15 16 17 18 19 20 21 22 545520 1 544792 548815 548224 548811 520458 520278 520360 520228 443810 447216 520554 400264 446140 544300 545308 548226 800583 520374 548814 547293 548797 2 1 1 6 2 2 1 1 2 2 3 28 24 6 1 6 12 2 2 2 1 23 524118 6 Push Rod 24 25 26 27 28 29 30 31 32 33 34 35 36 434028 446130 4115946 463021 434036 446136 4113428 400272 445796 547596 400268 4113563 523960 548481 452008 6 6 2 4 4 4 4 2 4 2 2 2 2 2 2 Screw, 1/4-20 x 3/4 in. Socket Head Lockwasher, 1/4 Heavy Sprocket, Crankshaft Key, Woodruff Screw, 5/16-18 x 1-1/4 in. Socket Head Lockwasher, 5/16 Heavy Tensioner, Rotary Screw, 3/8-16 x 2-1/4 in. Hex Head Nut, 3/8-16 Spiralock Flange Sprocket, Idler Screw, 3/8-16 x 1-3/4 in. Hex Head Adapter, Shoulder Aerator Chain, #50, 81 Link • #50 Connector Link Flat Washer, 3/8 37 Support, Left Side Crankshaft Support, Right Side Crankshaft • Bearing, Needle • Grease Fitting Dowel Pin Spacer, 1/4 in. Crankshaft, Aerator Stud, Spacer Race, Inner Nut, 3/8-16 Hex Jam Lockwasher, 3/8 Shakeproof Pin, Locating Screw, 3/8-16 x 1-1/4 in. Hex Head Lockwasher, 3/8 Connecting Rod • Set, Bearing Sleeve • Grease Fitting, Straight 1/8 NPT • Screw, 1/4-20 x 1 in. Socket Head Spacer Race, Inner Retainer, Bearing • Bearing Serial Numbers/Notes Includes Items 3 and 4 Includes two (2) of Item 14 and 25 Pushrod Installation Tool, Part No. 517693, is required to install push rod through slide seals Not Shown > Change from previous revision 53 GREENSAIRE 24 Serial No. All 12.1 Hydraulic System 13 12 1 6 4 16 2 5 16 6 9 12 17 13 17 7 14 10 3 15 11 4 1 5 8 14 7 19 20 18 30 32 34 27 33 28 A 29 22 A 5 25 23 54 31 24 26 21 GREENSAIRE 24 Item 1 2 3 4 5 6 7 8 9 10 11 12 13 14 15 16 17 18 19 20 21 22 23 24 25 26 27 28 29 30 31 32 33 34 Part No. Qty. Description 400108 3 Screw, 1/4-20 x 3/4 in. Hex Head 522113 522127 522650 445794 823118 826558 827395 832794 2703312 2703314 2703316 2703317 2703318 4114534 4114536 829997 4123824 4139462 400184 446134 547896 884599 400126 4113668 461453 460002 800577 523049 887552 Ref 548900 800521 814924 472207 453009 1 1 3 7 2 2 1 1 1 1 2 2 2 1 2 3 1 1 4 4 1 1 4 1 1 1 1 1 1 1 2 2 2 1 4 Hose, Pump to Lift/Lower Valve Adapter, Straight to 90° Elbow Clamp Nut, 1/4-20 Spiralock Flange Fitting, Straight Elbow, 90° w/o O-Ring Adapter, Hydrostat Elbow, Street 1/2 NPT to 45° Hose, Lift/Lower Valve to Reservoir Hose, Pump to Reservoir Hose, Tee to Cylinder Hose, Tee to Cylinder Hose, Lift/Lower Valve to Tee Adapter, 90° 1/2 NPT to 37° Flare Fitting, Tee 1/4 NPT to 37° Grommet, 1.31 x 2.00 x .48 Hydraulic Tank • Tank Cap with Chain Screw, 5/16-18 x 3/4 in. Hex Head Lockwasher, 5/16 Valve, Lift • Seal Repair Kit Screw, 1/4-20 x 3 in. Hex Head Yoke, Valve Clevis Pin, 3/16 x 1 in. Cotter Pin, 1/16 x 1/2 in. Nut, #10-24 Hex Nylock Cable, Lift / Lower Yoke Lift / Lower Lever Screw, #10-24 x 1/2 in. Nut, #10-24 Hex Clamp, Hose Plug, 1/2 NPT Square Head Flat Washer, 1/4 Serial Numbers/Notes Includes Cap Includes Clevis Pin and Cotter Pin See 4.1 > Change from previous revision 55 GREENSAIRE 24 Serial No. All 13.1 Slide and Glide Assembly 2 3 6 1 5 4 9 7 8 3 1 2 8 10 12 11 13 14 13 56 15 GREENSAIRE 24 Item Part No. Qty. Description 540094 1 Slide and Guide Assembly 540095 1 • Slide Assembly 1 2702293 1 • • Slide Assembly 2 800766 2 • • Seal, Oil 3 4 5 6 522636 522644 522641 306959 2702104 522643 522637 522639 518503 521846 800427 522708 548869 800697 2 1 2 1 1 1 2 1 1 1 1 2 1 1 • • Bushing, Split • • Retainer, Disc • • Disc, Felt • • Plug, Expansion • Guide, Slide Assembly • • Guide, Slide • • Bushing, Split • • Seal, Oil • Spring • Retainer, Spring • Screw, 5/16-18 x 2 in. Hex Head • Washer, Shim • Roller, Cam Yoke • Nut, 5/16-18 Hex Flange 7 8 9 10 11 12 13 14 15 Serial Numbers/Notes Pushrod Installation Tool, Part No. 517693, is required to install push rod through slide seals Torque to 20 ft lbs > Change from previous revision 57 GREENSAIRE 24 Serial No. All 14.1 Turf Guard Assembly 7 5 8 11 10 9 11 4 6 12 1 14 3 13 2 13 58 GREENSAIRE 24 Item 1 2 3 4 5 6 7 8 9 10 11 12 13 14 Part No. Qty. Description 4115936 1 4115939 4115931 4115935 4115944 518510 809265 822529 548458 548165 548902 548604 445795 548052 1 2 2 2 2 2 2 2 2 8 10 18 2 Serial Numbers/Notes Mounting Plate Guard, Turf Bar, Turf Guard Bracket, Connecting Link, Adjustment Spring, Compression Pin, Hair .78 x 2.69 x .15 Pin, Hair .44 x 2.00 x .13 Pin, Clevis Washer, Flat .62 x .94 x .09 Screw, 5/16-18 x 1 in. Hex Flange Screw, 5/16-18 x 3/4 in. Hex Flange Nut, 5/16-18 Spiralock Flange Locknut, 3/8-16 Hex > Change from previous revision 59 GREENSAIRE 24 Serial No. All 15.1 Tines and Holders Optional Accessories Standard 5/8 in. O.D.Tine Holder 11 10 8 8 7 7 9 Optional 3/4 in. O.D.Tine Holder 17 16 13 13 14 14 15 1/2 in. O.D. Tine Holder 3 2 1 4 5 60 GREENSAIRE 24 Item 1 2 3 4 5 6 7 8 9 10 11 12 13 14 15 16 17 18 19 20 21 22 23 24 25 26 27 28 29 30 31 32 33 Part No. Qt y. 547849 6 446136 800512 800694 829973 547860 446134 400190 523826.7 545104 800503 547861 446134 400190 523907.7 545104 800503 523863 523864 517486 517487 517488 517489 4180566 4180567 2702060 4180561 4180562 4180563 4180564 4180566 4180567 4180573 1 1 2 2 6 3 3 1 1 1 6 3 3 1 1 1 24 24 12 12 12 12 12 12 12 24 24 24 12 12 12 12 Description Tine Holder for 1/2 in. Mounting O.D. Tines • Lockwasher, 5/16 • Screw, 5/16-18 x 1-1/14 in. Socket Hd • Screw, 5/16-18 x 2-1/2 in. Grade 8 • Washer, Special Tine Holder for 5/8 IN. Mounting O.D. Tines • Lockwasher, 5/16 • Screw, 5/16-18 x 1-1/4 in. Hex Head • Holder, Tine • Deflector, Core • • Screw, 1/4-20 x 5/8 in. Self Locking Tine Holder for 3/4 in. Mounting O.D. Tines • Lockwasher, 5/16 • Screw, 5/16-18 x 1-1/4 in. Hex Head • Holder, Tine • Deflector, Core • • Screw, 1/4-20 x 5/8 in. Self Locking Tine, 1/4 in. Solid Tine, 1/4 in. Side Ejecting Coring Tine, 1/4 in. Coring (5/8 in. Mounting O.D.) Tine, 3/8 in. Coring (5/8 in. Mounting O.D.) Tine, 1/2 in. Coring (5/8 in. Mounting O.D.) Tine, 5/8 in. Coring (3/4 in. Mounting O.D.) DuraTine, 1/2 in. Coring 5/8 in. O.D. (XL) DuraTine, 1/2 in. Coring 5/8 in. O.D. (XLT) VenTine, 5/8 in. O.D. DuraTine, 1/4 in. Side Eject, 1/2 in. O.D. (XLT) DuraTine, 1/4 in. Solid, 1/2 in. O.D. (XL) DuraTine, 1/4 in. Solid, 5/8 in. O.D. (XL) DuraTine, 3/8 in. Solid, 5/8 in. O.D. (XL) DuraTine, 5/8 in. Coring 3/4 in. O.D. (XL) DuraTine, 5/8 in. Coring 3/4 in. O.D. (XLT) DuraTine, 5/8 in. Solid, 3/4 in. O.D. (XL) Serial Numbers/Notes Optional Standard Optional Optional, Uses 547849 Holder Optional, Uses 547849 Holder Optional, Uses 547860 Holder Optional, Uses 547860 Holder Optional, Uses 547860 Holder Optional, Uses 547861 Holder Optional, Uses 547860 Holder Standard, Uses 547860 Holder Optional, Uses 547860 Holder Optional, Uses 547849 Holder Optional, Uses 547849 Holder Optional, Uses 547860 Holder Optional, Uses 547860 Holder Optional, Uses 547861 Holder Optional, Uses 547861 Holder Optional, Uses 547861 Holder > Change from previous revision 61 GREENSAIRE 24 15.1 Quad Tine Accessory Part Numbers 58231, 4116986 and 4116987 Optional Quad Tine Accessory 1/2 in. O.D. Tines 18 21 20 19 22 1 / 24 17 12 8 15 14 9 6 11 16 9 5 13 7 10 10 2/3/4 10 62 23 GREENSAIRE 24 Item Part No. 4116986 4116987 523863 1 2 3 4 5 6 7 8 9 10 11 12 13 14 15 16 17 18 19 20 21 22 23 24 4116989 4115972.7 4115958.7 4115931.7 4115935.7 4115936.7 403751 548902 445781 518510 4115944 444742 452008 548458 460316 822529 523249 547849 446136 800512 800694 829973 523864 25 58231 26 27 28 29 30 31 32 33 34 35 36 37 38 4183840 548052 548156 809265 517488 4176460 829973 4164400 800513 4176461 4164540 548604 548911 Qty. Description 1 Accessory, Quad Tine (Coring) (Optional) 1 Accessory, Quad Tine (Solid) (Optional) Serial Numbers/Notes Includes Items 1 through 23 Includes Items 3 through 24 24 • Tine, 1/4 in. Solid 1/2 in. Mounting O.D. 1 1 1 2 2 1 6 8 14 2 1 2 2 2 2 2 6 6 1 1 2 2 24 Accessory, Quad Tine Turf Guard • Turf Guard Assembly • • Turf Guard • • Bar • • Bracket, Connecting • • Mounting Plate • • Screw, 5/16-18 x 3/4 in. Flangelock • • Screw, 5/16-18 x 1 in. Flangelock • • Nut, 5/16-18 Flangelock • Spring • Link, Adjustment • Locknut, 3/8-16 • Flat Washer, 3/8 • Clevis Pin, 1/2 x 1-1/4 in. • Hair Pin, 5/32 x 2-11/16 • Hair Pin, 1.8 x 2 in. Washer, Special Tine Holder for 1/2 in. Mounting O.D. Tines • Lockwasher, 5/16 • Screw, 5/16-18 x 1-1/4 in. Socket Hd • Screw, 5/16-18 x 2-1/2 in. Grade 8 • Washer, Special Tine, 1/4 in. Side Ejecting Coring Includes Items 2 through 17 • • • • • • • • • • • • • • • • • • • • • • • 1 Quad Tine w/ Turf Guard, 5/8 in. 6 2 2 2 24 6 2 1 1 1 1 6 14 • • • • • • • • • • • • • Washer, Dust, Plated Nut, 3/8-16 Unitorq Washer Pin, Hair, 3/4 x 2-3/4 in. Tine, 1/2 in. Coring Holder Assy, 4X Tines • Washer, Flat • Holder, Quad Tine • Screw, 5/16 x 18 x 1-1/4 in. Grade 8 Guard Assy, Turf Quad Tines • Guard, Turf Quad Tines • Screw, 5/16-18 x 3/4 in. • Nut, 5/16-18 1/2 in. Mounting O.D. Includes Items 11, 12, 15, and 17 Includes Items 20 and 22 Includes Items 5, 6, 7, and 9 > Change from previous revision 63 GREENSAIRE 24 Serial No. All 16.1 Transaxle Part Number 2702438 42 41 40 39 4 6 5 7 8 9 38 37 10 12 3 11 13 1 14 15 21 36 17 18 19 22 23 24 57 58 59 61 25 79 29 56 55 60 76 60 74 59 58 64 88 81 87 80 32 33 82 34 28 47 31 35 12 68 71 48 53 21 45 63 65 67 68 69 20 18 51 70 72 62 21 49 50 69 70 83 30 27 43 73 84 26 44 45 21 46 75 85 16 54 57 77 86 25 44 52 66 72 71 73 75 74 2 76 78 79 64 GREENSAIRE 24 Item 1 2 3 4 5 6 7 8 9 10 11 12 13 14 15 16 17 18 19 20 21 22 23 24 25 26 27 28 29 30 31 32 33 34 35 36 37 38 39 40 41 42 43 44 45 Part No. Qty. Description 556331 1 556333 556350 556351 551171 556371 556332 556355 556383 556384 556382 556373 556385 556342 551163 4144272 556356 556391 556394 556393 182172 590294 556337 5003322 556338 5003338 5003339 4144273 556348 556349 4144269 590297 4144268 5003334 590295 5003323 182174 5003336 551168 551169 590296 551188 4144277 556399 556400 1 17 1 1 1 1 1 1 1 1 3 1 1 1 1 1 2 1 1 5 1 1 1 4 2 1 1 1 1 1 5 1 4 1 1 1 1 1 1 1 1 1 2 2 Serial Numbers/Notes Case, Top Transaxle Case, Bottom Transaxle Screw, 5/16-18 x 1-3/4” Retaining Ring Ball Bearing Input Shaft Needle Bearing Oil Seal, 3/4” Washer O-Ring Thrust Bearing Washer Cupped Washer Pinion, 13 Tooth Bevel Snap Ring Shaft, Shifter and Brake Brake Disk Sleeve, Bearing Needle Bearing Needle Bearing O-Ring Washer Spur Gear, 15 Tooth Steel Shift Collar Shift Key Inverted Retaining Ring Spring Reverse Sprocket Neutral Spacer, 0.350/0.340 Thick Neutral Spacer, 0.276/0.268 Thick Gear, 20 Tooth Spur Washer Gear, 37 Tooth Spur Spacer, 1-3/8 x 3/8 Washer Shift Fork Square Cut Ring Push Nut Steel Ball, 5/16 Dia. Spring Set Screw, 3/8-16 x 3/8” Threaded Plug Countershaft Sleeve, Bearing Needle Bearing > Change from previous revision 65 GREENSAIRE 24 16.1 Transaxle (Continued) Part Number 2702438 42 41 40 39 4 6 5 7 8 9 38 37 10 12 3 11 13 1 14 15 21 36 17 18 19 22 23 24 57 58 59 61 25 79 29 56 55 60 76 60 74 59 58 64 88 81 87 80 32 33 82 34 28 47 31 35 12 68 71 48 53 21 45 63 65 67 68 69 20 18 51 70 72 62 21 49 50 69 70 83 30 27 43 73 84 26 44 45 21 46 75 85 16 54 57 77 86 25 44 52 66 72 71 73 75 74 2 76 78 79 66 GREENSAIRE 24 Item 46 47 48 49 50 51 52 53 54 55 56 57 58 59 60 61 62 63 64 65 66 67 68 69 70 71 72 73 74 75 76 77 78 79 80 81 82 83 84 85 86 87 88 89 90 Part No. 556390 556376 556341 4144271 4144270 5003333 551434 590294 556379 590297 556335 556396 556398 556397 556354 556336 556345 556387 556386 446130 556388 556347 556344 556346 556343 556353 556351 556352 5003341 556403 556402 4144266 4144267 556380 551660 551654 5003326 590046 5003339 4144265 551637 551661 590297 556381 510334 Qty. Description 1 1 1 1 1 4 1 2 1 2 1 2 2 2 2 1 1 1 1 8 8 1 2 2 2 2 2 4 2 1 1 1 1 2 1 1 1 2 1 1 1 1 1 1 1 Washer Roller Chain, No. 41 Chain, 22 Link Bevel Gear, 33 Tooth Spur Gear, 30 Tooth Spur Gear, 12 Tooth Steel Spacer, 1-1/8 x 3/8 Thrust Bearing Washer, Thrust Bearing Cap Screw, 1/4-20 x 1-1/4” Output Shaft Sleeve Needle Bearing Square Cut Ring Washer Output Gear, 35 Tooth Ring Gear Differential Carrier Differential Carrier Lockwasher, 1/4 Heavy Screw, 1/4-20 x 2-1/4” Drive Pin Pinion Gear, 10 Tooth Drive Block Bevel Gear, 16 Tooth Washer Retaining Ring Washer Sleeve Assembly • Needle Bearing • Oil Seal Axle, 14-43/64” Axle, 18-37/64” Ball Bearing Holder, Brake Pad Brake Pad Plate Brake Pad Dowel Pin Spring Brake Lever Locknut, 5/16-24 Hex Brake Lever Bracket Screw, 1/4-20 x 1-1/4” Grease, 32 oz. Bentonite Gasket, Eliminator (Loctite #515) Serial Numbers/Notes Set of 2 > Change from previous revision 67 INDEX 1003815 ......................35 22372.. ........................43 2700335.......................39 2702060.......................57 2702104 ......................53 2702293.......................53 2702438.......................39 2702591.7....................39 2702667.......................37 2702668...................... 37 2702673 ......................39 2702679.7 ...................39 2702704 ......................37 2702712 ......................35 2702965 ......................39 2702984 ......................43 2703012 ......................45 2703105 ......................47 2703142 ......................33 2703216 ................37, 47 2703280 ......................39 2703312 ......................51 2703314 ......................51 2703316 ......................51 2703317 ......................51 2703318 ......................51 2703553 ......................31 2703622 ......................31 2703714 ......................33 2703944 ......................45 2704104 ......................45 2704105 ......................43 2812032 ......................29 3002308 ......................29 3008577 ......................29 306959 ........................53 308197 ........................37 320107 ..................33, 43 349404 ........................43 354774 ........................39 359979 ........................43 361854 ........................29 366707 ........................45 400188 ........................37 400406 ........................37 400410 ........................37 4111480 ......................45 4111943 ......................31 4112381 ......................45 4112441 ......................45 4112443 ......................39 4112561 ......................35 4112567 ......................35 4112662 ......................35 4112762 ......................43 4112766 ......................45 68 4112767 ......................45 4113005 ......................45 4113007 ......................37 4113031 ......................37 4113032 ......................37 4113428 ................45, 49 4113435 ......................45 4113436 ......................45 4113437 ......................45 4113476 ......................41 4113477 ......................35 4113515 ......................35 4113516 ......................39 4113562 ......................41 4113563 ......................49 4113668 ................39, 51 4114181 ......................41 4114412 ......................39 4114480 ......................39 4114534 ......................51 4114536 ......................51 4114714 ......................35 4114725 ......................35 4114893 ......................35 4115444 ......................35 4115509 ......................35 4115712 ......................35 4115931 ......................55 4115931.7 ...................59 4115935 ......................55 4115935.7 ...................59 4115936 ......................55 4115936.7 ...................59 4115939 ......................55 4115944 ................55, 59 4115946.7 ...................49 4115958.7 ...................59 4115972.7 ...................59 4115988 ......................47 4116068 ......................31 4116118 ......................29 4116182 ......................41 4116811 ......................41 4116957 ......................39 4116986 ......................59 4116987 ......................59 4116989 ......................59 4117067 ......................41 4117070 ......................41 4117468 ......................29 4118263 ......................43 4119323 ......................43 4119864.7 ...................31 4120230 ......................41 4123824 ......................51 4124712 ......................29 4124956 ..................... 31 4124958 ..................... 31 4125175 ..................... 39 4125837 ..................... 35 4125856 ..................... 31 4128970 ..................... 43 4128971 ..................... 43 4128973 ..................... 43 4130234.7 .................. 35 4132129 ..................... 31 4132146 ..................... 29 4132147 ..................... 29 4132281 ..................... 29 4132318 ..................... 29 4132340 ..................... 43 4133028 ..................... 41 4133098 ..................... 43 4133596 ..................... 35 4139232 ..................... 37 4139233 ..................... 37 4139462 ..................... 51 4140129 ..................... 35 4140182 ..................... 45 4140316 ..................... 39 4140870 ..................... 41 4141187 ..................... 37 4144385 ..................... 37 4147382 ..................... 45 4152417 ..................... 29 4152418 ..................... 29 4164400 ..................... 59 4164540 ..................... 59 4176460 ..................... 59 4176461 ..................... 59 4180561 ..................... 57 4180562 ..................... 57 4180563 ..................... 57 4180564 ..................... 57 4180573 ..................... 57 4183840 ..................... 59 446134 ....................... 37 453009 ....................... 37 460030 ....................... 37 472207 ....................... 51 517094 ....................... 45 517340 ....................... 31 517486 ....................... 57 517487 ....................... 57 517488 ................. 57, 59 517489 ....................... 57 518487 ....................... 45 518503 ....................... 53 518510 ................. 55, 59 520228 ................. 47, 49 520229 ....................... 47 520230 ....................... 47 520231 ....................... 47 520232 ....................... 47 520233 ....................... 47 520236 ....................... 47 520237 ....................... 47 520238 ....................... 47 520239 ....................... 47 520240 ....................... 47 520242 ....................... 47 520243 ....................... 41 520278 ....................... 49 520328 ....................... 35 520360 ....................... 49 520374 ....................... 49 520456 ....................... 47 520458 ................. 47, 49 520554 ....................... 49 521050 ....................... 33 521206 ................. 39, 41 521302 ....................... 47 521679 ....................... 39 521803 ....................... 47 521846 ....................... 53 522011 ....................... 41 522113 ....................... 51 522127 ....................... 51 522516 ....................... 31 522636 ....................... 53 522637 ....................... 53 522639 ....................... 53 522641 ....................... 53 522643 ....................... 53 522644 ....................... 53 522650 ....................... 51 522708 ....................... 53 522723 ................. 39, 45 523049 ....................... 51 523221 ....................... 41 523249 ....................... 59 523826.7 .................... 57 523863 ................. 57, 59 523864 ................. 57, 59 523907.7 .................... 57 523995 ....................... 57 524118 ....................... 49 524729 ....................... 29 540094 ................. 47, 53 540095 ....................... 53 544300 ....................... 49 544792 ....................... 49 545104 ....................... 57 545213 ....................... 41 545306 ....................... 49 545371 ....................... 33 545520 ....................... 49 545786 ................. 39, 45 INDEX 545801 ....................... 41 547132 ....................... 57 547293 ....................... 49 547596 ....................... 49 547849 ................. 57, 59 547860 ....................... 57 547861 ....................... 57 547896 ....................... 51 548224 ........... 37, 41, 49 548229 ....................... 49 548272 ....................... 47 548327 ....................... 47 548458 ........... 37, 55, 59 548481 ....................... 49 548545 ....................... 41 548797 ....................... 49 548811 ....................... 49 548814 ....................... 49 548815 ....................... 49 548848 ....................... 35 548869 ....................... 53 548880 ................. 39, 41 548882 ....................... 35 548891 ....................... 49 548900 ....................... 51 548902 ....................... 47 548912 ....................... 37 548926 ....................... 47 58231 . ....................... 59 800113 ....................... 47 800766 ....................... 53 805860 ....................... 39 806765 ....................... 35 809252 ....................... 45 814924 ....................... 51 816320 ....................... 39 816401 ....................... 35 819898 ....................... 41 823118 ....................... 51 825560 ....................... 35 826558 ....................... 51 827395 ....................... 51 827449 ....................... 31 827821 ....................... 35 829973 ................. 57, 59 829997 ....................... 51 832578 ....................... 31 832794 ....................... 51 835892 ....................... 29 876431 ....................... 39 884599 ....................... 51 887552 ....................... 51 69 World Class Quality, Performance And Support Equipment from Jacobsen is built to exacting standards ensured by ISO 9001 and ISO 14001 registration at all of our manufacturing locations. A worldwide dealer network and factory trained technicians backed by Genuine Jacobsen Parts provide reliable, high-quality product support. Calidad, rendimiento y asistencia de clase mundial El equipo de Jacobsen está construido exactamente conforme a las normas establecidas por las certificaciones ISO 9001 e ISO 14001 en todas nuestras plantas de fabricación. Una red mundial de distribuidores y técnicos formados en fábrica y respaldados por las piezas originales Jacobsen ofrece asistencia de producto segura y de alta calidad. When Performance Matters.™ Jacobsen, A Textron Company 11108 Quality Drive, Charlotte, NC 28273, EE.UU. www.Jacobsen.com 800-848-1636 Ransomes Jacobsen Limited West Road, Ransomes Europark, Ipswich, IP3 9TT, Inglaterra Número de registro de empresa en Inglaterra: 1070731 www.ransomesjacobsen.com +44 (0) 1473 270000