1
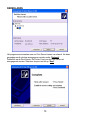
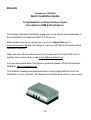
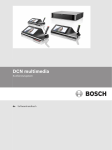
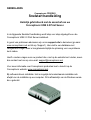
NEDERLANDS
Conceptronic CPSERVU
Snelstart handleiding
Hartelijk gefeliciteerd met de aanschaf van uw
Conceptronic USB 2.0 Print Server.
In de bijgaande Snelstart handleiding wordt stap voor stap uitgelegd hoe u de
Conceptronic USB 2.0 Print Server installeert.
In geval van problemen adviseren wij u onze support-site te bezoeken (ga naar:
www.conceptronic.net en klik op ‘Support’). Hier vindt u een database met
veelgestelde vragen waar u hoogstwaarschijnlijk de oplossing voor uw probleem
kunt vinden.
Heeft u andere vragen over uw product die u niet op de website kunt vinden, neem
dan contact met ons op via e-mail: [email protected]
Voor meer informatie over Conceptronic producten kunt u terecht op de
Conceptronic website: www.conceptronic.net.
Bij software/drivers installatie: Het is mogelijk dat onderstaande installatie iets
afwijkt van de installatie op uw computer. Dit is afhankelijk van de Windows versie
die u gebruikt.
1
NEDERLANDS
1.
Introductie
Gefeliciteerd met de aanschaf van de Conceptronic Print Server, een simpele en
snelle manier om printers aan uw netwerk toe te voegen.
Deze USB 2.0 Print Server zorgt ervoor dat u gemakkelijk een USB printer kunt
toevoegen aan uw netwerk. Na de installatie kan elke gebruiker in het netwerk de
printer gebruiken zonder dat de printer op een computer geïnstalleerd moet zijn.
De Print Server is uitgerust met een netwerkpoort zodat u een netwerkapparaat
(bijvoorbeeld een switch, netwerk kaart of hub) kunt aansluiten. Wanneer u de Print
Server aansluit op een draadloze router, is het zelfs mogelijk dat de draadloze pc’s
(notebooks) worden aangesloten met de print Server.
2.
Algemene specificaties
•
•
•
•
•
•
•
•
•
•
•
3.
Compatible met USB 1.1/2.0 Hi-speed
Voorzien van een 10/100 auto-MDIX Fast Ethernet netwerkaansluiting
Multi protocol support. Ideaal voor gedeeld printer gebruik in een gemixte
netwerkomgeving.
Windows-gebaseerde software om de Print Server in een paar minuten te
configureren.
LPR ondersteuning voor Windows 95/98/Me TCP/IP printen
Ondersteuning voor IP toewijzing door DHCP server
Ondersteuning voor configuratie via de Webbrowser
Flash memory voor eenvoudige firmware upgrade’s
IPP ondersteuning voor Windows 2000/XP
Ondersteuning voor een 2e http poort voor configuratie en IPP printen.
Ondersteuning voor Mac OS 10.2 "Rendezvous" zero-configuration
Minimale Systeemvereisten
Besturingssysteem:
•
Microsoft Windows 95/98/ME/NT/2000/XP/2003.
•
Apple Mac OS X of hoger
Voor Web Configuratie:
•
Web browser met Java ondersteuning, zoals Microsoft® Internet
Explorer 5.0, Netscape Navigator 6.0 of Mozilla Firefox 1.x
2
NEDERLANDS
4.
Inhoud van de verpakking
De volgende onderdelen vindt u in de verpakking met de Conceptronic Print Server:
•
•
•
•
5.
Conceptronic Print Server
Voedingsadapter 5V DC, 2,5A
Meertalige snelstarthandleiding
CD-ROM met software
Hardware installatie
1.
2.
3.
4.
5.
Zorg ervoor dat uw printer correct functioneert voordat u verder gaat.
Zet de printer uit en koppel deze los van de computer.
Sluit de printer met de USB kabel aan op uw Conceptronic Print Server.
Sluit een netwerkkabel aan op uw Conceptronic Print Server en op uw switch of
router.
Zet de printer aan en sluit de spanningsadapter van de Conceptronic Print Server
aan.
LET OP: Uw Conceptronic Print Server is voorzien van een standaard IP adres. Dit IP
adres kan verschillen met de IP reeks die u in uw netwerk gebruikt, of het
kan een conflict geven met een ander netwerkapparaat. Om dit te
voorkomen kunt u de Conceptronic Print Server Utility gebruiken om het IP
adres van de Print Server te wijzigen.
Het standaard IP adres van de Print Server is: 192.168.0.2
6.
Software Installatie
1.
2.
3.
4.
Plaats de meegeleverde CD-ROM van uw Conceptronic Print Server
in uw CD-ROM speler.
Start Windows Verkenner, navigeer naar de CD-ROM en open de
map “PS Utility”.
Voer het programma “Setup.exe” in de map “PS Utility” uit en volg
de stappen op het scherm om de installatie te voltooien.
Na de installatie kunt u de Configuratie applicatie voor uw Print
Server vinden in het “Start Menu”.
3
NEDERLANDS
7.
Uw Conceptronic Print Server Configureren
Om uw Conceptronic Print Server te configureren kunt u de geïnstalleerde
Configuratie applicatie gebruiken. Als u de applicatie opstart krijgt u het volgende
scherm te zien:
1
2
Aan de linkerkant (1) ziet u de gevonden Print Servers in uw netwerk. Aan de
rechterkant (2) ziet u de informatie van de geselecteerde Print Server.
Binnen de Conceptronic CPSERVU applicatie heeft u de volgende opties:
Optie
Beschrijving
Discover Device
Ververst het scherm en zoekt opnieuw naar alle
aanwezige Print Servers in uw netwerk.
Setup Wizard
Opent de Setup Wizard om de Print Server te
configureren.
Change IP Address
Verandert het IP Adres van de Print Server.
4
NEDERLANDS
Show Web-Setup
Start Internet Explorer en opent de webconfiguratie
voor uw Print Server.
Update Firmware
Voert een firmware update voor uw Print Server
uit.
Factory Reset
Herstelt de Print Server naar de
fabrieksinstellingen. Alle gemaakte wijzigingen
worden gewist.
Print test
Print een testpagina uit op de aangesloten printer.
About
Informatie over de Configuratie applicatie.
Close
Sluit de Configuratie applicatie.
Klik op “Setup Wizard” om de configuratie van de Print Server te beginnen. Een
introductie dialoogvenster zal tevoorschijn komen. Klik op “Next” om de
configuratie voort te zetten. U zult het volgende scherm zien:
5
NEDERLANDS
U kunt hier de Print Server een naam binnen uw netwerk geven. Deze kunt u
invoeren bij “Server Name”. De “Port Name” is voor de naam van de USB poort
op de Print Server.
Als u de Print Server wilt beveiligen met een wachtwoord kunt u deze invoeren bij
het veld “Password”.
Als u de bovenstaande informatie heeft ingevuld kunt u de configuratie
voortzetten met “Next”. U krijgt het venster met de IP Configuratie te zien:
6
NEDERLANDS
Indien nodig kunt u het IP adres en het subnet masker van de Print Server
wijzigen. U kunt de Print Server ook instellen op “DHCP Assign Automatically”
als u een DHCP server in uw netwerk heeft.
LET OP: Als u de Print Server configureert voor gebruik met DHCP zal het IP adres
onbekend worden voor de gebruiker. Als u de Print Server wilt configureren
na deze instelling kunt u de applicatie gebruiken om de Print Server te
vinden.
Klik op “Next” om de configuratie voort te zetten.
Voer bij het volgende scherm uw werkgroep in bij het veld “Workgroup” en klik
op “Next” om de configuratie voort te zetten. U zult een samenvatting van de
configuratieinstellingen zien:
7
NEDERLANDS
Om de instellingen te bewaren, klik op “Save”. Om wijzigingen te maken in de
configuratie, klik op “Back” of klik op “Cancel” als u de configuratie wilt afbreken.
Als u op “Save” klikt wordt de configuratie opgeslagen in de Print Server. De Print
Server is nu correct geconfigureerd voor uw netwerk.
8
NEDERLANDS
8. Uw Printer Configureren
Als de Print Server is geconfigureerd dient u de stuurprogramma’s van de printer
te wijzigen voor gebruik met de Print Server. Dit kunt u automatisch laten doen
met het programma “PS Wizard”, welke op de CD-ROM gevonden kan worden.
Plaats de meegeleverde CD-ROM van uw Conceptronic Print Server in uw CDROM speler. Start Windows Verkenner, navigeer naar de CD-ROM en open de
map “PS Wizard”.
Voer het programma “PS Wizard.exe” in the map “PS Wizard” uit.
Het programma “Conceptronic Printer Wizard” zal gestart worden. Klik op
“Next” om te beginnen met de configuratie van uw printer:
Selecteer de printer die u wilt configureren voor gebruik met de Conceptronic
Print Server en klik op “Next”.
9
NEDERLANDS
Het programma zal zoeken naar uw Print Server binnen uw netwerk. Als deze
gevonden wordt zal deze weergegeven worden onder “Network”.
Dubbelklik op de Print Server. De Printer Poort van de Print Server zal
weergegeven worden. Selecteer de poort en klik op “Next”.
10
NEDERLANDS
De Wizard is nu klaar om uw printerinstellingen te wijzigen.
Klik op “Finish” om de instellingen op te slaan en de Wizard af te sluiten.
Klik op “Continue” om de instellingen op te slaan en terug te keren naar het
begin van de Wizard.
Klik op “Previous” om wijzigingen te maken in de voorgaande configuratie.
Klik op “Cancel” om de configuratie af te breken en de Wizard af te sluiten.
Uw printer is nu klaar voor gebruik met de Print Server
LET OP: Een uitgebreide handleiding kan gevonden worden in de map “Manual” op
de CD-ROM. (U kunt hier een Engelse handleiding vinden met daarin een
uitleg van alle opties van de software)
11
ENGLISH
Conceptronic CPSERVU
Quick Installation Guide
Congratulations on the purchase of your
Conceptronic USB 2.0 Print Server.
The enclosed Hardware Installation Guide gives you a step-by-step explanation of
how to install the Conceptronic USB 2.0 Print Server.
When problems occur, we advise you to go to our support-site (go to
www.conceptronic.net and click ‘Support’. Here you will find the Frequently Asked
Questions Database.
When you have other questions about your product and you cannot find it at our
website, then contact us by e-mail: [email protected]
For more information about Conceptronic products, please visit the Conceptronic
Web Site: www.conceptronic.net
The Software installation as described below, may be slightly different from the
installation on your computer. This depends on the Windows version you are using.
12
ENGLISH
1.
Introduction
Congratulations on purchasing the Conceptronic Print Server, the easiest and fastest
way to deploy printers on your network.
This USB Print Server enables you to easily add a USB printer to your network. After
installation, the printer can be used by any computer user inside the network without
the need to have the printer connected to a computer.
The Print Server is equipped with a network port in order to connect to network
devices (for example a switch, network card or hub).
When you connect the Print Server to a wireless router, the Print Server even works
wireless!
2.
General Features
•
•
•
•
•
•
•
•
•
•
•
3.
Compliant with USB 1.1/2.0 Hi-speed
Equipped with a 10/100 auto-MDIX Fast Ethernet LAN port
Multi protocol support is ideal for shared printing in mixed-LAN environments
Windows-based program makes it possible to set up the Print Server in just a few
minutes.
LPR program for Windows 95/98/Me TCP/IP printing
IP assignment support for DHCP
Support Web configuration
Flash memory for easy firmware upgrade
Support IPP for Windows 2000/XP
Support second http port for remote web configuration and IPP printing.
Support Mac OS 10.2 "Rendezvous" zero-configuration feature
System Requirements
Operating System:
•
Microsoft Windows 95/98/ME/NT/2000/XP/2003.
•
Apple Mac OS X or above
For Web Configuration:
•
Java-enabled web browser, such as Microsoft® Internet Explorer 5.0,
Netscape Navigator 6.0 or Mozilla Firefox 1.x
13
ENGLISH
4.
Package Contents
The following items are present in the package of the Conceptronic Print Server:
•
•
•
•
5.
Conceptronic Print Server
Power Supply 5V DC, 2,5A
Multi Language Quickstart Manual
CD-ROM with software
Hardware installation
1.
2.
3.
4.
5.
Make sure your printer is working normally on your computer before you
proceed.
Power down the printer and disconnect the printer from the computer.
Connect the printer with the USB cable to your Conceptronic Print Server.
Connect a LAN network cable to your Conceptronic Print Server and your switch
or router.
Power-on the Printer and connect the power supply to the Conceptronic Print
Server.
NOTE:
Your Conceptronic Print Server is equipped with a default IP address. This IP address
can be different than the IP Range in your network, or it can give a conflict with a device
in your network with the same IP Address.
To prevent this, you can use the Conceptronic Print Server Utility to change the IP
address of the Print Server. By default, the IP address of the Print Server is: 192.168.0.2
6.
Software Installation
1.
2.
3.
4.
Place the CD-ROM delivered with the Conceptronic Print Server in
your CD-ROM drive.
Open Windows Explorer, navigate to the CD-ROM and open the
folder “PS Utility”.
Execute “Setup.exe” from the directory “PS Utility” and complete
the installation steps on your screen.
After installation, you can find the Configuration Utility for the Print
Server in your ‘Start Menu”.
14
ENGLISH
7.
Configuring your Conceptronic Print Server
To configure your Conceptronic Print Server, you can use the installed
Configuration Utility. When you execute the Utility, you will get the following
screen:
1
2
At the left (1), you can see the discovered devices in your network. At the right
(2), you see the information of the selected Print Server.
You have the following selections in the Conceptronic CPSERVU Utility:
Selection
Description
Discover Device
Refreshes the screen and searches for all
available Print Servers in your network.
Setup Wizard
Launches the Setup Wizard to configure the Print
Server.
Change IP Address
Changes the IP Address of the Print Server
15
ENGLISH
Show Web-Setup
Launches your Internet Explorer and opens the
web configuration of the Print Server.
Update Firmware
Updates the firmware for your Print Server.
Factory Reset
Resets the Print Server to its factory default
settings. All changes made will be erased.
Print test
Prints a test page on the connected printer.
About
Shows information about the Utility
Close
Closes the Configuration Utility.
Press “Setup Wizard” to begin with the configuration of the Print Server. An
introduction Dialog Box will appear. Press “Next” to continue the configuration.
You will see the following screen:
16
ENGLISH
You can give the Print Server a name in your network. Enter this at “Server
Name”. The “Port Name” represents the name of the port where your printer is
connected to.
To protect your Print Server with a password, enter the password desired.
When the above information is entered, press “Next”. You will see the IP
Configuration screen.
17
ENGLISH
When needed, you can change the IP address and Subnet Mask of your Print
Server. You can also set the configuration to “DHCP Assign Automatically” if
you have a DHCP server in your network.
NOTE: If you configure the Print Server for DHCP, the IP address of the Print Server can
become unknown to the user.
If you want to configure the device after this change, you can use the Utility to scan for
the Print Server.
Press “Next” to continue the configuration.
Enter the workgroup name which is used in your network in the “Workgroup”
Field and press “Next” to continue the installation. You will see a summary of the
configuration settings:
18
ENGLISH
To save your settings, press “Save”. To make any changes, press “Back”, or
press “Cancel” to abort the configuration.
When you press “Save”, the configuration will be saved in the Print Server. The
Print Server is now correctly configured for your network.
19
ENGLISH
8.
Configuring your Printer
When the Print Server is configured, you need to adjust the installed printer
drivers to communicate with the Print Server. You can do this automatically with
the program “PS Wizard”, which can be found on the CD-ROM.
Place the CD-ROM delivered with the Conceptronic Print Server in your CD-ROM
drive. Open Windows Explorer, navigate to the CD-ROM and open the folder “PS
Wizard”.
Run the program “PS Wizard.exe” in the directory “PS Wizard”.
The program “Conceptronic Printer Wizard” will start. Press “Next” to start with
configuring your printer:
Select the printer you want to configure for the Conceptronic Print Server and
press “Next”.
20
ENGLISH
The program will scan for the Print Server in your network. When it is found, it will
be shown at the “Network” Section.
Double-click on the Print Server. The Printer port on the Print Server will be
shown. Select the port and press “Next”.
21
ENGLISH
The Wizard is ready to change your printer settings.
Press “Finish” to save the settings and exit the Wizard.
Press “Continue” to save the settings and return to the first screen of the Wizard.
Press “Previous” to make adjustments in your configuration.
Press “Cancel” to abort the configuration and exit the Wizard.
Your printer is now ready for use with the Print Server!
NOTE:
A full detailed manual can be found in the folder “Manual” on the CD-ROM.
(You will find an English manual with all options of the software explained)
22
ESPAÑOL
Conceptronic CPSERVU
Guía de iniciación rápida
Enhorabuena por la compra de su
Servidor de Impresión Conceptronic USB 2.0.
La Guía de instalación del hardware incluida le ofrece una explicación paso a paso
de cómo instalar el Conceptronic USB 2.0 Print Server de Conceptronic.
Si encuentra problemas, le aconsejamos que se dirija a nuestra página web
www.conceptronic.net y haga clic en «Support». Aquí encontrará la base de datos
de las preguntas más frecuentes o FAQ.
Si tiene otras preguntas sobre su producto y no las encuentra en nuestro sitio web,
póngase en contacto con nuestro servicio técnico por correo electrónico:
[email protected]
Para obtener más información acerca de productos de Conceptronic por favor
visite el sitio Web de Conceptronic: www.conceptronic.net
La instalación de software, tal y como se describe a continuación, puede ser algo
diferente de la instalación en su ordenador. Eso depende de la versión de
Windows que esté usando.
23
ESPAÑOL
1.
Introducción
Enhorabuena por haber adquirido el Servidor de Impresión Conceptronic, la forma
más fácil y rápida de utilizar impresoras en su red.
Este Servidor de Impresión USB le permite añadir fácilmente una impresora USB a su
red. Tras la instalación, la impresora puede utilizarse por cualquier usuario de un
ordenador de dentro de la red sin necesidad de que la impresora esté conectada a un
ordenador. El Servidor de Impresión está equipado con un puerto de red para
conectarlo a los dispositivos de la red (por ejemplo, un interruptor, tarjeta de red o un
hub (concentrador). Cuando usted conecta el Servidor de Impresión a un router sin
cable, ¡el Servidor de Impresión funciona incluso sin cables!
2.
Características generales
•
•
•
•
•
•
•
•
•
•
•
3.
Compatible con USB 1.1/2.0.
Equipado con un puerto LAN Fast Ethernet auto-MDIX de 10/100.
El soporte multiprotocolario es ideal para la impresión compartida en entornos
mixtos LAN.
El programa basado en Windows posibilita instalar el Servidor de Impresión en
sólo unos minutos.
Programa LPR para la impresión TCP/ IP con Windows 95/98/Me.
Soporte de asignación IP para DHCP.
Soporte de Configuración web .
Memoria flash para una fácil actualización del firmware.
Soporta IPP para Windows 2000/XP.
Soporta un puerto http secundario para una configuración remota de web e
impresión IPP.
Soporte de configuración cero “Rendez-vous” de Mac OS 10.2.
Requisitos del sistema
Sistema operativo:
•
Microsoft Windows 95/98/ME/NT/2000/XP/2003.
•
Apple Mac OS X o superior.
Para la configuración web:
•
Navegador web que opere con Java, como Microsoft® Internet Explorer 5.0,
Netscape Navigator 6.0 o Mozilla Firefox 1.x
24
ESPAÑOL
4.
Contenidos del paquete
Los artículos siguientes se encuentran en el paquete del Servidor de Impresión
Conceptronic:
•
•
•
•
5.
Servidor de Impresión Conceptronic
Suministro eléctrico 5V DC, 2,5A
Manual de instalación rápida en varios idiomas
CD-ROM con software
Instalación de hardware
1.
2.
3.
4.
5.
Asegúrese de que su impresora funciona con normalidad en su ordenador antes
de proceder a la instalación de hardware.
Desactive la impresora del suministro eléctrico y desconéctela del ordenador.
Conecte la impresora con el USB a su Servidor de Impresión Conceptronic.
Conecte un cable de red LAN a su Servidor de Impresión Conceptronic y a su
interruptor o router.
Encienda la Impresora y conecte el suministro eléctrico al Servidor de Impresión
Conceptronic.
NOTA:
Su Servidor de Impresión Conceptronic está equipado con una dirección IP por defecto.
Esta dirección IP puede ser diferente a aquella del Campo IP de su red, o puede suponer
un conflicto con un dispositivo en su red que tenga la misma dirección IP.
Para evitarlo, puede utilizar la Utilidad del Servidor de Impresión Conceptronic para
cambiar la dirección IP del Servidor de Impresión. Por defecto, la dirección IP del
Servidor de Impresión es: 192.168.0.2
6.
Instalación de software
1.
2.
3.
4.
Coloque el CD-ROM que se entrega con el Servidor de Impresión
Conceptronic en su unidad de CD-ROM.
Abra el Explorador de Windows, navegue hasta el CD-ROM y abra
la carpeta “PS Utility”.
cute “Setup.exe” del directorio “PS Utility” y siga los pasos de
instalación que aparecen en su pantalla.
s la instalación, usted puede encontrar la Utilidad de Configuración
para el Servidor de Impresión en su ‘Start Menu”.
25
ESPAÑOL
7.
Configuración de su Servidor de Impresión Conceptronic
Para configurar su Servidor de Impresión Conceptronic, puede utilizar la Utilidad
de Configuración instalada. Cuando ejecute la Utilidad, aparecerá la pantalla
siguiente:
1
2
A la izquierda (1), puede ver los dispositivos descubiertos en su red. A la derecha
(2), ve la información del Servidor de Impresión seleccionado.
Usted dispone de las selecciones siguientes en la Utilidad CPSERVU
Conceptronic:
Selección
Descripción
Discover Device
Refresca la pantalla y busca todos los Servidores
de Impresión disponibles en su red.
Setup Wizard
Inicia el Asistente de Instalación para configurar el
Servidor de Impresión.
Change IP Address
Cambia la dirección IP del Servidor de Impresión.
26
ESPAÑOL
Show Web-Setup
Inicia su Explorador de Internet y abre la
configuración web del Servidor de Impresión.
Update Firmware
Actualiza el firmware de su Servidor de Impresión.
Factory Reset
Reinicia el Servidor de Impresión instalando sus
configuraciones de fábrica por defecto. Se
eliminarán todos los cambios realizados.
Print test
Imprime una página de prueba en la impresora
conectada.
About
Muestra la información referente a la Utilidad.
Close
Cierra la Utilidad de Configuración.
Presione “Setup Wizard” para iniciar la configuración del Servidor de Impresión.
Aparecerá un Recuadro de Diálogo de introducción. Presione “Next” para
continuar con la configuración. Verá la pantalla siguiente:
27
ESPAÑOL
Puede dar un nombre al Servidor de Impresión de su red. Introdúzcalo en
“Server Name”. El “Port Name” representa el nombre del puerto al que está
conectada su impresora.
Para proteger su Servidor de Impresión con una contraseña, introduzca la
contraseña deseada.
Cuando se haya introducido la información anterior, presione “Next”. Verá la
pantalla de Configuración IP.
28
ESPAÑOL
Cuando sea necesario, usted puede modificar la dirección IP y la Máscara de
Subred de su Servidor de Impresión. También puede determinar la configuración
de “DHCP Assign Automatically” si posee un servidor DHCP en su red.
NOTA: Si usted configura el Servidor de Impresión para DHCP, la dirección IP del
Servidor de Impresión puede resultar desconocida para el usuario.
Si desea configurar el dispositivo tras esta modificación, puede utilizar la Utilidad para
buscar el Servidor de Impresión.
Presione “Next” para continuar con la configuración.
Introduzca el nombre del grupo de trabajo que se utiliza en su red en el Campo
“Workgroup” y presione “Next” para continuar con la instalación. Verá un
resumen de los ajustes de configuración:
29
ESPAÑOL
Para guardar sus ajustes, presione “Save”. Para realizar cambios, presione
“Back”, o bien presione “Cancel” para abandonar la configuración.
Cuando presione “Save”, se guardará la configuración en el Servidor de
Impresión. Ahora el Servidor de Impresión está correctamente configurado para
su red.
30
ESPAÑOL
8
Configuración de su impresora
Cuando esté configurado el Servidor de Impresión, debe ajustar el driver de la
impresora instalado para que se comunique con el Servidor de Impresión. Puede
hacerlo automáticamente con el programa “PS Wizard”, que puede encontrarse
en el CD-ROM.
Coloque el CD-ROM que se entrega con el Servidor de Impresión Conceptronic
en su unidad de CD-ROM. Abra Windows Explorer, navegue hasta el CD-ROM y
abra la carpeta “PS Wizard”.
Ejecute el programa “PS Wizard.exe” del directorio “PS Wizard”.
Se iniciará el programa “Conceptronic Printer Wizard”. Presione “Next” para
iniciar la configuración de su impresora:
Seleccione la impresora que desea configurar para el Servidor de Impresión
Conceptronic y presione “Next”.
31
ESPAÑOL
El programa buscará ahora el Servidor de Impresión de su red. Cuando se haya
encontrado, se mostrará en el apartado “Network”.
Haga doble clic en el Servidor de Impresión. Aparecerá el puerto de la Impresora
del Servidor de Impresión. Seleccione el puerto y presione “Next”.
32
ESPAÑOL
El Asistente está listo para modificar las configuraciones de su impresora.
Presione “Finish” para guardar las configuraciones y salir del Asistente.
Presione “Continue” para guardar las configuraciones y regresar a la primera
pantalla del Asistente.
Presione “Previous” para realizar ajustes en su configuración.
Presione “Cancel” para abandonar la configuración y salir del Asistente.
¡Ahora su impresora está preparada para utilizar el Servidor de Impresión!
NOTA:
Puede encontrarse un manual con todos los detalles en la carpeta “Manual”
del CD-ROM. (Encontrará un manual en inglés con todas las opciones del
software explicado)
33
DEUTSCH
Conceptronic CPSERVU
Schnellinstallationsanleitung
Wir gratulieren Ihnen zum Kauf Ihres
Conceptronic USB 2.0 Print Server.
In beiliegendem Hardwareinstallationshandbuch finden Sie schrittweise
Erklärungen für die Installation Ihres Conceptronic USB 2.0 Print Server.
Wenn Probleme auftreten sollten, besuchen Sie unsere Support-Seite (unter
www.conceptronic.net) und klicken Sie auf ‚Support’. Dort steht Ihnen unsere FAQDatenbank mit den häufig gestellten Fragen zur Verfügung.
Wenn Sie weitere Fragen zu Ihrem Produkt haben, die Sie auf unserer Webseite
nicht beantworten können, kontaktieren Sie uns per E-Mail:
[email protected]
Detaillierte Informationen über Conceptronic Produkte finden Sie auf unserer
Webseite: www.conceptronic.net
Möglicherweise weicht die Softwareinstallation auf Ihrem Computer von der im
Folgenden beschriebenen etwas ab. Dies hängt vom Windows-Betriebssystem ab,
das Sie verwenden.
34
DEUTSCH
1.
Einleitung
Wir gratulieren Ihnen zum Kauf des Conceptronic Print Servers, der Ihnen den
einfachen und schnellen Einsatz der Drucker in Ihrem Netzwerk ermöglicht.
Mit diesem USB Print Server können Sie auf einfache Weise einen zusätzlichen USBDrucker an Ihr Netzwerk anschließen. Der Drucker kann nach der Installation von
jedem Computer im Netzwerk verwendet werden, ohne dass er an einen Computer
angeschlossen werden muss.
Der Print Server verfügt über einen Netzwerk-Port für den Anschluss an
Netzwerkgeräte (zum Beispiel an einen Switch, eine Netzwerkkarte oder einen Hub).
Wenn Sie ihn an einen kabellosen Router anschließen, funktioniert er auch kabellos!
2.
Allgemeine Eigenschaften
•
•
•
•
•
•
•
•
•
•
•
3.
Kompatibel mit USB 1.1/2.0 Hi-Speed
Verfügt über einen 10/100 auto-MDIX Fast Ethernet LAN-Port
Multi-Protokoll-Unterstützung – ideal für gemeinsames Drucken in gemischten
LAN-Umgebungen
Das auf Windows basierende Programm ermöglicht die Einrichtung der Print
Servers in wenigen Minuten.
LPR-Programm für TCP/IP-Drucken aus Windows 95/98/ME
Unterstützt IP-Zuweisung für DHCP
Unterstützt Webkonfiguration
Flash-Memory für einfaches Firmware-Upgrade
Unterstützt IPP für Windows 2000/XP
Unterstützt zweiten HTTP-Port für Fernkonfiguration und IPP-Druck
Unterstützt Mac OS 10.2 „Rendezvous“ mit Zero-Configuration-Technologie
Systemanforderungen
Betriebssystem:
•
Microsoft Windows 95/98/ME/NT/2000/XP/2003.
•
Apple Mac OS X oder höher
Für Webkonfiguration:
•
Java-aktivierter Webbrowser wie Microsoft® Internet Explorer 5.0,
Netscape Navigator 6.0 oder Mozilla Firefox 1.x
35
DEUTSCH
4.
Packungsinhalt
In der Verpackung des Conceptronic Print Servers ist Folgendes enthalten:
•
•
•
•
5.
Conceptronic Print Server
Netzteil 5V Gleichstrom 2,5A
Mehrsprachiges Schnellstarthandbuch
CD-ROM mit Software
Installation der Hardware
1.
2.
3.
4.
5.
Vergewissern Sie sich, dass Ihr Drucker auf Ihrem Computer normal funktioniert,
bevor Sie fortfahren.
Schalten Sie den Drucker aus und trennen Sie die Verbindung zum Computer.
Schließen Sie den Drucker mit dem USB-Kabel an Ihren Conceptronic Print
Server an.
Schließen Sie ein LAN-Netzwerkkabel an Ihren Conceptronic Print Server und
Ihren Switch oder Router an.
Schalten Sie den Drucker ein und schließen Sie den Conceptronic Print Server
an die Stromversorgung an.
HINWEIS:
Ihr Conceptronic Print Server verfügt über eine Standard-IP-Adresse. Diese IP-Adresse
kann vom IP-Bereich in Ihrem Netzwerk abweichen oder einen Konflikt mit einem Gerät in
Ihrem Netzwerk, das die selbe IP-Adresse hat, verursachen.
Um dies zu vermeiden, können Sie mit dem Hilfsprogramm des Conceptronic Print Servers
die IP-Adresse des Print Servers ändern. Die Standard-IP-Adresse des Print Servers ist:
192.168.0.2
6.
Software-Installation
1.
2.
3.
4.
Legen Sie die im Lieferumfang des Conceptronic Print Servers
enthaltene CD-ROM in Ihr CD-ROM-Laufwerk.
Öffnen Sie den Windows Explorer, rufen Sie die CD-ROM auf und
öffnen Sie den Ordner „PS Utility”.
Führen Sie „Setup.exe” aus dem Verzeichnis „PS Utility” mit allen
erforderlichen Installationsschritten aus.
Nach der Installation finden Sie das Conceptronic Hilfsprogramm für
den Print Server in Ihrem ‚Startmenü”.
36
DEUTSCH
7.
Konfiguration des Conceptronic Print Servers
Sie können für die Konfiguration des Conceptronic Print Servers das installierte
Konfigurationshilfsprogramm verwenden. Wenn Sie das Hilfsprogramm
ausführen, erscheint folgende Anzeige:
1
2
Auf der linken Seite (1) sind die in Ihrem Netzwerk erkannten Geräte aufgeführt.
Auf der rechten Seite (2) werden die Informationen des ausgewählten Print
Servers angezeigt.
Das Conceptronic Hilfsprogramm CPSERVU bietet folgende Optionen:
Option
Beschreibung
Discover Device
Neuanzeige und Suche nach allen verfügbaren
Print Servern auf Ihrem Netzwerk.
Setup Wizard
Startet den Einrichtungsassistenten für die
Konfiguration des Print Servers.
37
DEUTSCH
Change IP Address
Hier kann die IP-Adresse der Print Servers
geändert werden.
Show Web-Setup
Startet den Internet Explorer und öffnet die
Webkonfiguration des Print Servers.
Update Firmware
Über diese Schaltfläche kann die Firmware für den
Print Server aktualisiert werden.
Factory Reset
Setzt den Print Server auf seine
Werkseinstellungen zurück. Alle vorgenommenen
Änderungen werden rückgängig gemacht.
Print test
Druckt eine Testseite auf dem angeschlossenen
Drucker.
About
Zeigt Informationen über das Hilfsprogramm
Close
Schließt das Konfigurationshilfsprogramm
Klicken Sie auf „Setup Wizard”, um mit der Konfiguration des Print Servers zu
beginnen. Es erscheint ein einleitendes Dialogfeld. Klicken Sie auf „Next”, um mit
der Konfiguration fortzufahren. Folgendes wird angezeigt:
38
DEUTSCH
Sie können dem Print Server einen Namen in Ihrem Netzwerk geben. Geben Sie
diesen in das Feld „Server Name” ein. Im Feld „Port Name” steht der Name des
Ports, an den Ihr Drucker angeschlossen ist.
Zum Schutz Ihres Print Servers können Sie ein beliebiges Passwort eingeben.
Nach Eingabe dieser Daten klicken Sie auf „Next”. Es erscheint die Anzeige für
die IP-Konfiguration:
39
DEUTSCH
Nach Bedarf können Sie die IP-Adresse und Subnetzmaske Ihres Print Servers
ändern. Sie können außerdem die Konfiguration auf „DHCP Assign
Automatically” einstellen, wenn Sie einen DHCP-Server in Ihrem Netzwerk
haben.
HINWEIS: Nach der Konfiguration des Print Servers für DHCP ist möglicherweise die IPAdresse des Print Servers unbekannt.
Wenn Sie das Gerät nach dieser Änderung konfigurieren möchten, können Sie mit dem
Hilfsprogramm nach dem Print Server suchen.
Klicken Sie auf „Next”, um die Konfiguration fortzusetzen.
Geben Sie den Namen der Arbeitsgruppe im Feld „Workgroup” ein und klicken
Sie auf „Next”, um die Installation fortzuführen. Es erscheint eine
Zusammenfassung der konfigurierten Einstellungen:
40
DEUTSCH
Um Ihre Einstellungen zu speichern, klicken Sie auf „Save”. Wenn Sie
Änderungen vornehmen möchten, klicken Sie auf „Back” oder auf “Cancel”, um
die Konfiguration abzubrechen.
Wenn Sie auf „Save” klicken, wird die Konfiguration im Print Server gespeichert.
Damit ist der Print Server für die Verwendung in Ihrem Netzwerk korrekt
konfiguriert.
41
DEUTSCH
8.
Konfiguration des Druckers
Nachdem Sie den Print Server konfiguriert haben, müssen Sie die installierten
Druckertreiber für die Kommunikation mit dem Printer Server einrichten. Dies
kann über das Programm „PS Wizard” automatisch erfolgen. Dieses Programm
befindet sich auf der CD-ROM.
Legen Sie die im Lieferumfang des Conceptronic Print Servers enthaltene CDROM in Ihr CD-ROM-Laufwerk ein. Öffnen Sie den Windows Explorer, rufen Sie
die CD-ROM auf und öffnen Sie den Ordner „PS Wizard”.
Starten Sie das Programm „PS Wizard.exe” im Verzeichnis „PS Wizard”.
Es erscheint die Anzeige des „Conceptronic Printer Wizard”. Klicken Sie auf
„Next”, um mit der Konfiguration Ihres Druckers zu beginnen:
Wählen Sie den Drucker, den Sie für den Conceptronic Print Server konfigurieren
möchten und klicken Sie auf „Next”.
42
DEUTSCH
Das Programm sucht in Ihrem Netzwerk nach dem Print Server. Sobald es
diesen gefunden hat, wird er unter „Network” angezeigt.
Doppelklicken Sie auf den Print Server. Der Druckerport des Print Servers wird
angezeigt. Wählen Sie den Port aus und klicken Sie auf „Next”.
43
DEUTSCH
Der Einrichtungsassistent ist jetzt bereit, die Einstellungen Ihres Druckers zu
ändern.
Klicken Sie auf „Finish”, um die Einstellungen zu speichern und den
Einrichtungsassistenten zu schließen.
Klicken Sie auf „Continue”, um die Einstellungen zu speichern und auf die erste
Anzeige des Einrichtungsassistenten zurückzukehren.
Klicken Sie auf „Previous”, um Änderungen an Ihrer Konfiguration vorzunehmen.
Klicken Sie auf „Cancel”, um die Konfiguration abzubrechen und den
Einrichtungsassistenten zu schließen.
Jetzt können Sie Ihren Drucker mit dem Print Server verwenden!
HINWEIS: Der Ordner „Manual” auf der CD-ROM enthält ein detailliertes Handbuch.
(In diesem sind alle Softwareoptionen in englischer Sprache erklärt.)
44
FRANÇAIS
Conceptronic CPSERVU
Guide d'installation rapide
Nous vous félicitons d'avoir acheté votre
Serveur d’imprimante USB 2.0 de Conceptronic
Le Guide d’Installation de Hardware livré avec votre appareil vous expliquera pas à
pas comment installer le Conceptronic USB 2.0 Print Server.
En cas de problème, nous vous conseillons de vous rendre sur notre site de
support technique (rendez-vous sur le site de www.conceptronic.net et cliquez
sur « Support ». Vous trouverez ici la Base de données de la Foire aux Questions.
En cas de questions concernant votre produit et si vous n’obtenez pas de réponse
sur notre site web, n’hésitez pas à nous contacter par e-mail :
[email protected]
Pour plus d'informations concernant produits Conceptronic, veuillez consulter notre
site web : www.conceptronic.net
L’installation du Software décrite ci-après peut être légèrement différente de
l’installation sur votre ordinateur. Cela dépendra de la version Windows que vous
utilisez.
45
FRANÇAIS
1.
Introduction
Nous vous félicitons d’avoir acheté le Serveur d’Imprimante de Conceptronic, le
moyen le plus simple et le plus rapide d’installer des imprimantes sur votre réseau.
Le Serveur d’Imprimante USB vous permet d’ajouter facilement une imprimante USB
à votre réseau. Après l’installation, vous pouvez utiliser l’imprimante avec n’importe
quel ordinateur à l’intérieur du réseau sans avoir besoin de connecter l’imprimante à
cet ordinateur. Le Serveur d’Imprimante est équipé d’un port de réseau pour le
connecteur aux dispositifs du réseau (par exemple un interrupteur, une carte de
réseau ou un concentrateur). Lorsque vous connectez le Serveur d’Imprimante sur un
routeur sans fil, le Serveur d’Imprimante peut même fonctionner sans fil !
2.
Caractéristiques générales
•
•
•
•
•
•
•
•
•
•
•
3.
Applicable pour à haute vitesse USB 1.1/2.0.
Équipé d’un port LAN Fast Éthernet 10/100 auto-MDIX.
Le support multi-protocole est idéal pour l’impression partagée dans des
environnements LAN mixtes.
Le programme basé sur Windows permet de régler le Serveur d’Imprimante en
quelques minutes seulement.
Programme LPR pour l’impression TCP/IP sous Windows 95/98/Me.
Support d’affectation IP pour DHCP.
Supporte la configuration Web.
Mémoire Flash pour mise à jour facile du microprogramme.
Supporte IPP pour Windows 2000 / XP.
Supporte un deuxième port http pour la configuration web à distance et
l’impression IPP.
Supporte MAC OS 10.2 Caractéristique « Rendez-vous » zéro configuration.
Conditions Minimales du système
Système d’Exploitation :
•
Microsoft Windows 95/98/ME/NT/2000/XP/2003.
•
Apple Mac OS X ou supérieur
Pour la configuration Web.
•
Navigateur web avec Java, tel que Microsoft® Internet Explorer 5.0, Netscape
Navigator 6.0 ou Mozilla Firefox 1.x
46
FRANÇAIS
4.
Contenu du Coffret
Les éléments suivants sont fournis dans le paquet avec le Serveur d’Imprimante de
Conceptronic.
•
•
•
•
5.
Serveur d’Imprimante de Conceptronic.
Alimentation électrique 5V CC – 2,5 A
Manuel de démarrage rapide en plusieurs langues
Cd-Rom avec logiciel
Installation du hardware
1.
2.
3.
4.
5.
Vérifiez que votre imprimante fonctionne normalement sur votre ordinateur avant
de continuer.
Éteignez l’imprimante et débranchez-la de l’ordinateur.
Branchez l’imprimante avec le câble USB sur votre Serveur d’Imprimante de
Conceptronic.
Branchez un câble de réseau LAN sur votre Serveur d’Imprimante de
Conceptronic et sur votre interrupteur ou routeur.
Allumez l’Imprimante et branchez l’alimentation électrique sur le Serveur
d’Imprimante de Conceptronic.
REMARQUE:
Votre serveur d’imprimante de Conceptronic possède une adresse IP par défaut. Cette
adresse IP peut être différente de celle du champ IP de votre réseau, ou peut engendrer
un conflit avec un dispositif de votre réseau ayant la même adresse IP. Pour éviter cela,
vous pouvez utiliser les Utilités du serveur d’imprimante de Conceptronic pour modifier
l’adresse IP du serveur d’impression. L’adresse IP du serveur d’impression par défaut
est : 192.168.0.2
6.
Installation du Logiciel
•
•
•
•
Placez le Cd-Rom fourni avec le Serveur d’Imprimante de
Conceptronic dans votre lecteur de Cd-Rom.
Ouvrez Windows Explorer, naviguez dans le Cd-Rom et ouvrez le
répertoire « PS Utility »
Exécutez « Setup.exe » du répertoire « PS Utility » et exécutez les
opérations d’installation indiquées à l’écran.
Après l’installation, vous pouvez trouver l’ Utilité de Configuration du
Serveur d’Imprimante dans votre « Start Menu ».
47
FRANÇAIS
7
Configuration de votre Serveur d’Imprimante de Conceptronic
Pour configurer votre Serveur d’Imprimante de Conceptronic, vous pouvez utiliser
l’Utilité de Configuration installée. Lorsque vous exécutez l’Utilité, vous voyez
s’afficher l’écran suivant :
1
2
Vous pourrez voir à gauche (1) les dispositifs détectés dans votre réseau. À
droite (2), vous voyez les informations sur le Serveur d’Imprimante sélectionné.
Vous disposez des sélections suivantes dans l’Utilité CPSERVU de
Conceptronic :
Sélection
Description
Discover Device
Rafraîchit l’écran et recherche tous les Serveurs
d’Imprimante disponibles sur votre réseau.
Setup Wizard
Lance l’Assistant de Configuration pour configurer
le Serveur d’Imprimante.
Change IP Address
Change l’adresse IP de votre Serveur
d’Imprimante.
48
FRANÇAIS
Show Web-Setup
Lance Internet Explorer et ouvre la configuration
web du Serveur d’Imprimante.
Update Firmware
Met à jour le microprogramme pour votre Serveur
d’Imprimante.
Factory Reset
Réinitialise le Serveur d’Imprimante sur ses
paramètres par défaut. Toutes les modifications
seront effacées.
Print test
Imprime une page de test sur l’imprimante
connectée.
About
Présente les informations sur l’Utilité.
Close
Ferme l’Utilité de Configuration.
Cliquez sur « Setup Wizard » pour configurer le Serveur d’Imprimante. Une
Boîte de Dialogue d’introduction apparaît. Appuyez sur « Next » pour poursuivre
la configuration. Vous verrez s’afficher l’écran suivant :
49
FRANÇAIS
Vous pouvez donner un nom à votre Serveur d’imprimante dans votre réseau.
Entrez-le dans « Server Name ». Le « Port Name » représente le nom du port
auquel votre imprimante est connectée.
Pour protéger votre Serveur d’Imprimante avec un mot de passe, entrez le mot
de passe souhaité.
Lorsque les informations ci-dessus sont saisies, appuyez sur « Next » Vous
verrez s’afficher l’écran de configuration IP :
50
FRANÇAIS
Vous pouvez au besoin modifier l’adresse IP et le Masque de Sous-réseau de
votre Serveur d’Imprimante. Vous pouvez aussi régler la configuration sur “DHCP
Assign Automatically” si vous avez un serveur DHCP dans votre réseau.
REMARQUE: Si vous configurez le Serveur d’imprimante de Conceptronic pour DHCP,
l’adresse IP du serveur d’imprimante peut être inconnue pour l’utilisateur. Si vous
souhaitez configurer le dispositif après cette modification, vous pouvez utiliser l’Utilité
pour rechercher le serveur d’imprimante.
Appuyez sur « Next » pour poursuivre la configuration.
Entrez le nom du groupe de travail qui est utilisé dans votre réseau dans le
champ “Workgroup” et appuyez sur “Next” pour continuer l’installation. Vous
verrez un résumé des paramètres de configuration :
51
FRANÇAIS
Pour conserver les paramètres, appuyez sur “Save”. Pour faire les modifications,
appuyez sur “Back” ou appuyez sur “Cancel” pour interrompre la configuration.
Lorsque vous appuyez sur “Save”, la configuration est enregistrée dans le
Serveur d’Imprimante. Le Serveur d’Imprimante est à présent correctement
configuré dans votre réseau.
52
FRANÇAIS
8
Configuration de votre Imprimante
Lorsque le Serveur d’Imprimante est configuré, vous devez régler les drivers
d’imprimante installés pour communiquer avec le Serveur d’Imprimante. Vous
pouvez faire ceci automatiquement avec le programme “PS Wizard” que vous
trouverez sur le Cd-Rom.
Placez le Cd-Rom fourni avec le Serveur d’Imprimante de Conceptronic dans
votre lecteur de Cd-Rom. Ouvrez Windows Explorer, naviguez dans le Cd-Rom
et ouvrez le répertoire « PS Wizard »
Lancez le programme “PS Wizard.exe” dans le répertoire “PS Wizard”.
Le programme “Conceptronic Printer Wizard” démarre. Appuyez sur “Next”
pour lancer la configuration de votre imprimante.
Sélectionnez l’imprimante que vous voulez configurer pour le Serveur
d’Imprimante de Conceptronic et appuyez sur “Next”.
53
FRANÇAIS
Le programme recherche à présent le Serveur d’imprimante dans votre réseau.
Lorsqu’il l’a trouvé, il l’affiche dans la section “Network”.
Faites double clic sur le Serveur d’Imprimante. Le port de l’Imprimante sur le
Serveur d’Imprimante est affiché. Sélectionnez le port et cliquez sur “Next”.
54
FRANÇAIS
L’Assistant est à présent prêt à modifier les paramètres de l’imprimante.
Appuyez sur “Finish” pour enregistrer les paramètres et quitter l’Assistant.
Appuyez sur “Continue” pour enregistrer les paramètres et revenir au premier
écran de l’Assistant.
Appuyez sur “Previous” pour régler votre configuration.
Appuyez sur “Cancel” pour interrompre la configuration et quitter l’Assistant.
Vous pouvez dès à présent utiliser votre imprimante avec le Serveur
d’Imprimante !
REMARQUE : Vous trouverez un manuel détaillé dans le repertoire ”Manual” du
Cd-Rom. (Vous trouverez un manuel en Anglais avec toutes les
options du logiciel expliquées).
55
ITALIAN
Conceptronic CPSERVU
Guida d’installazione rapida
Grazie per l’acquisto del Print Server USB 2.0 Conceptronic.
La guida per l’installazione dell’hardware acclusa spiegherà passo a passo del
USB 2.0 Print Server Conceptronic.
Se dovessero esserci dei problemi, vi consigliamo di visitare il nostro sito di
supporto (andate su www.conceptronic.net e cliccate ‘support’), dove potrete
trovare il Database delle Risposte alle Domande più Frequenti (FQA).
Se doveste avere altre domande riguardanti il prodotto che non trovate sul nostro
sito Web vi preghiamo di contattarci attraverso l’e-mail: [email protected]
Per ulteriori informazioni dei prodotti Conceptronic, la preghiamo di visitare il sito
Web della Conceptronic: www.conceptronic.net
La successiva descrizione relativa all’installazione del software potrebbe essere
leggermente diversa dall’installazione sul vostro computer. Ciò dipende della
versione di Windows in uso.
56
ITALIAN
1.
Introduzione
Vi ringraziamo per aver acquistato il Print Server Conceptronic, il metodo più veloce e
più facile per utilizzare tutte le vostre stampanti direttamente sulla rete.
Grazie a questo Print Server USB sarà possibile aggiungere facilmente una
stampante USB alla rete in uso. Dopo aver realizzato l’installazione, la stampante
potrà essere utilizzata da qualsiasi computer collegato a tale rete, senza bisogno di
connettere la stampante a un computer.
Il Print Server è dotato di una porta di rete grazie alla quale si può collegare a
dispositivi di rete (come ad esempio switch, schede di rete o hub)
Quando il Print Server viene collegato a un router wireless, esso funzionerà anche in
modalità wireless!
2.
Caratteristiche generali
•
•
•
•
•
•
•
•
•
•
•
3.
Conforme con la norma USB 1.1/2.0 ad alta velocità
Dotato di una porta LAN 10/100 auto-MDIX Fast Ethernet
Il supporto multiprotocollo è ideale per condividere stampanti in ambienti mixedLAN
Grazie al programma basato su Windows, è possibile configurare il Print Server
in pochissimi minuti
Programma LPR per stampa in Windows 95/98/Me TCP/IP
Supporto per DHCP per l’assegnazione IP
Supporto configurazione web
Memoria flash per u facile aggiornamento del firmware
Supporto IPP per Windows 2000/XP
Supporto di una seconda porta http per configurazione web remota e stampa
IPP.
Supporto Mac OS 10.2 "Rendezvous" con configurazione zero
Requisiti di sistema
Sistema operativo:
•
Microsoft Windows 95/98/ME/NT/2000/XP/2003.
•
Apple Mac OS X o superiore
Per la configurazione web:
•
Browser con Java abilitato, come ad esempio Microsoft® Internet Explorer 5.0,
Netscape Navigator 6.0 o Mozilla Firefox 1.x
57
ITALIAN
4.
Contenuto della confezione
Nella confezione Print Server del Conceptronic vi sono i seguenti componenti:
•
•
•
•
5.
Print Server Conceptronic
Alimentatore di corrente 5V DC, 2,5A
Guida d’installazione rapida multilingue
CD-ROM con software
Installazione dell’hardware
1.
2.
3.
4.
5.
Prima di iniziare, assicurarsi che la stampante funzioni correttamente sul
computer
Spegnere la stampante e scollegarla dal computer
Collegare la stampante al Print Server Conceptronic mediante il cavo USB
Collegare un cavo di rete LAN al Print Server Conceptronic e al switch o al router
Accendere la stampante e collegare l’alimentatore di corrente al Print Server
NOTA:
Il Print Server Conceptronic è dotato di un indirizzo assegnato per IP. Esso potrebbe
essere diverso da quello contenuto nel range IP della rete in uso, o potrebbe entrare in
conflitto con i dispositivi della rete che possiedono lo stesso indirizzo IP.
Pere evitare tale problema, si consiglia di usare l’utility del Print Server Conceptronic per
modificare l’indirizzo IP del Print Server. Per default, l’indirizzo IP del Print Server è:
192.168.0.2
6.
Installazione del software
1
2.
3.
4.
Introdurre nell’unità CD-ROM il CD-ROM accluso al Print Server
Conceptronic
Aprire “Esplora risorse”, sfogliare il CD-ROM e aprire la cartella “PS
Utility”.
Aprire “Setup.exe” dalla directory “PS Utility” e completare il
processo di installazione seguendo le istruzioni a video.
Dopo aver realizzato l’installazione, nel “Menu di Avvio” apparirà
l’utility per la configurazione del Print Server
58
ITALIAN
7.
Configurazione del Print Server Conceptronic
Per configurare il Print Server Conceptronic è possibile utilizzare l’utility di
configurazione appena installata. Una volta aperta, apparirà sullo schermo la
seguente videata:
1
2
Sulla sinistra (1) appaiono i dispositivi rilevati nella rete, mentre sulla destra (2)
vengono visualizzate le informazioni del Print Server selezionato.
L’utility CPSERVU Conceptronic offre le seguenti opzioni:
Selezione
Descrizione
Discover Device
Aggiorna la videata e cerca tutti i Print Server
disponibili nella rete in uso
Setup Wizard
Apre l’Assistente alla configurazione grazie al
quale è possibile configurare il Print Server
59
ITALIAN
Change IP Address
Modifica l'indirizzo IP del Print Server
Show Web-Setup
Apre Internet Explorer e avvia la configurazione
web del Print Server
Update Firmware
Aggiorna il firmware del Print Server
Factory Reset
Reimposta il Print Server ai valori di default
stabiliti in fabbrica. Tutte le modifiche realizzate
verranno cancellate
Print test
Stampa una pagina di prova attraverso la
stampante collegata
About
Mostra le informazioni relative all’utility
Close
Chiude l’utility di configurazione
Premere “Setup Wizard” per avviare la configurazione del Print Server. Apparirà
una finestra di dialogo, premere “Avanti” per procedere alla configurazione.
Apparirà la seguente videata:
60
ITALIAN
È possibile dare al Print Server un nome nella rete, che dovrà essere introdotto
nel campo “Server Name” (Nome del server). “Port Name” (Nome della porta)
informa della porta alla quale è collegata la stampante.
Per proteggere il Print Server mediante una password, è possibile introdurla
nell’apposito campo.
Dopo aver introdotto tutte le informazioni qui descritte, premere “Avanti”, e
apparirà la videata relativa alla configurazione IP:
61
ITALIAN
Se necessario, è possibile modificare l’indirizzo IP e la Subnet Mask del Print
Server. È anche possibile impostare la configurazione su “DHCP Assign
Automatically” (Assegnazione automatica del DHCP) nel caso in cui si disponga
di server DHCP nella rete.
NOTA: se il Print Server viene configurato per il DHCP, l'indirizzo IP del Print Server
potrebbe divenire sconosciuto all’utente.
Se si desidera configurare il dispositivo dopo tale modifica, è possibile usare l’utility per
cercare il Print Server.
Premere “Avanti” per continuare la configurazione.
Nel campo “Workgroup” (Gruppo di lavoro) si deve introdurre il nome del gruppo
di lavoro usato nella rete, dopo di che premere “Avanti” per continuare
l’installazione. Apparirà un riassunto delle impostazioni della configurazione:
62
ITALIAN
Per salvare tali impostazioni, premere “Salva”. Per realizzare qualsiasi modifica,
premere “Indietro”, o “Annulla” per cancellare la configurazione.
Quando viene premuto “Salva”, la configurazione verrà salvata nel Print Server. Il
Print Server è configurato correttamente nella rete usata.
63
ITALIAN
8.
Configurazione della stampante
Dopo aver configurato il Print Server sarà necessario configurare anche i driver
della stampante installata affinché essi possano comunicare con il Print Server.
Si tratta di un’operazione che si può realizzare automaticamente grazie al
programma “PS Wizard”, che si trova nel CD-ROM.
Introdurre nell’unità CD-ROM il CD-ROM accluso al Print Server Conceptronic.
Aprire “Esplora risorse”, sfogliare il CD-ROM e aprire la cartella “PS Wizard”.
Aprire il programma “PS Wizard.exe” contenuto nella directory “PS Wizard”.
Si aprirà il programma “Conceptronic Printer Wizard”. Premere “Avanti” per
iniziare il processo di configurazione della stampante.
Selezionare la stampante che si desidera configurare per il Print Server
Conceptronic, dopo di che premere “Avanti”.
64
ITALIAN
Il programma cercherà il Print Server nella rete in uso, e una volta rilevato, lo
mostrerà nella sezione “Network” (Reti)..
Fare doppio clic sul Print Server; verrà mostrata la porta della stampante sul Print
Server. Selezionare la porta e premere “Avanti”.
65
ITALIAN
L’assistente è pronto per modificare la configurazione della stampante.
Premere “Fine” per salvare le impostazioni e uscire dall’assistente.
Premere “Continua” per salvare le impostazioni e tornare alla prima videata
dell’assistente.
Premere “Indietro” per realizzare modifiche alla configurazione.
Premere “Cancella” per annullare la configurazione e uscire dall’assistente.
Ora la stampante è pronta per essere usata con il Print Server!
NOTA: Nella cartella “Manual” del CD-ROM esiste una guida completa in inglese,
con la spiegazione di tutte le opzioni del software.
66
PORTUGUÊS
Conceptronic CPSERVU
Iniciação Rápida
Os nosso parabéns pela compra do seu
USB 2.0 Print Server Conceptronic.
O Guia de Instalação do Hardware que se inclui fornece-lhe uma explicação passo
a passo de como instalar seu USB 2.0 Print Server Conceptronic.
Se tiver algum problema, aconselhamos consultar o nosso site de assistência (vá
a www.conceptronic.net e clique em ‘assistência’ Aqui pode encontrar a Base de
Dados das Perguntas Mais Frequentes.
Se tiver outras questões relativas ao nosso produto e não as conseguir encontrar
no nosso webiste, pode-nos contactar através do e-mail:
[email protected]
Para mais informações sobre produtos de Conceptronic, por favor visite o Web Site
da Conceptronic: www.conceptronic.net
A instalação do Software conforme se encontra descrita abaixo pode
ser ligeiramente diferente da instalação do seu computador. Isso
depende da versão do Windows que está a utilizar.
67
PORTUGUÊS
1.
Introdução
Os nossos parabéns por ter adquirido o Servidor de Impressão Conceptronic – a
maneira mais fácil e mais rápida de implementar impressoras na sua rede.
Este Servidor de Impressão USB permite-lhe adicionar facilmente uma impressora
USB à sua rede. Após a instalação, a impressora pode ser usada por qualquer
utilizador dos computadores que se encontrarem na rede sem precisar de ter a
impressora ligada a um computador.
O Servidor de Impressão está equipado com uma porta de rede para ligação a
dispositivos de rede (por exemplo, um comutador, cartão de rede ou concentrador).
Quando ligar o Servidor de Impressão a um router sem fios, o Servidor de Impressão
funciona até sem fios!
2.
Características Gerais
•
•
•
•
•
•
•
•
•
•
•
3.
Conformidade com de alta velocidade USB 1.1/2.0
Equipado com uma porta LAN Ethernet Fast auto-MDIX 10/100
Suporte de protocolos múltiplos - ideal para impressões partilhadas em
ambientes LAN mistos
O programa com base em Windows faz com que seja possível configurar o
Servidor de Impressão em apenas alguns minutos.
O programa LPR para Windows 95/98/Me – impressão TCP/IP
Suporte de atribuição IP para DHCP
Suporte de configuração Web
Memória flash para uma actualização fácil de firmware
Suporte IPP para Windows 2000/XP
Suporte secundário de porta http para configuração remota Web e impressão
IPP.
Suporte Mac OS 10.2 "Rendezvous" - dispositivo de configuração zero
Requisitos do Sistema
Sistema Operativo:
•
Microsoft Windows 95/98/ME/NT/2000/XP/2003.
•
Apple Mac OS X ou superior
Para Configuração Web:
•
Navegadores Web activados em Java, tais como Microsoft® Internet Explorer
5.0, Netscape Navigator 6.0 ou Mozilla Firefox 1.x
68
PORTUGUÊS
4.
Conteúdo do Pacote
Os itens abaixo estão incluídos no pacote do Servidor de Impressão Conceptronic:
•
•
•
•
5.
Servidor de Impressão Conceptronic
Alimentação 5V CC, 2,5A
Manual de Instalação Rápida em vários idiomas
CD-ROM com software
Instalação de Hardware
1.
2.
3.
4.
5.
Certifique-se de que a impressora está a funcionar normalmente no seu
computador antes de prosseguir.
Desactive a impressora e desligue-a do computador.
ue a impressora com o cabo USB ao seu Servidor de Impressão Conceptronic.
ue um cabo de rede LAN ao seu Servidor de Impressão e ao seu comutador ou
concentrador.
Desactive a Impressora e ligue a alimentação ao Servidor de Impressão
Conceptronic.
NOTA:
O seu Servidor de Impressão Conceptronic está equipado com um endereço IP
predefinido. Este endereço IP pode ser diferente da Gama IP existente na sua rede, ou
pode entrar em conflito com algum dispositivo com o mesmo endereço IP que tenha na
sua rede.
Para evitar isto, pode usar o Utilitário do Servidor de Impressão Conceptronic para alterar
o endereço IP do Servidor de Impressão. Por defeito, o endereço IP do Servidor de
Impressão é: 192.168.0.2
6.
Instalação de Software
1.
2.
3.
4.
Coloque o CD-ROM que é fornecido com o Servidor de Impressão
Conceptronic na sua unidade de CD-ROM.
Abra o Windows Explorer, navegue no CD-ROM e abra a pasta “PS
Utility”.
Execute “Setup.exe” a partir do directório “PS Utility” e conclua os
passos de instalação indicados no seu ecrã.
Depois da instalação, pode encontrar o Utilitário de Configuração
para o Servidor de Impressão no seu “Start Menu”.
69
PORTUGUÊS
7.
Como configurar o seu Servidor de Impressão Conceptronic
Para configurar o seu Servidor de Impressão Conceptronic pode usar o Utilitário
de Configuração que está instalado. Quando executar o Utilitário, aparece o
seguinte ecrã:
1
2
À esquerda (1), pode ver os dispositivos que foram encontrados na sua rede. À
direita (2), pode ver a informação do Servidor de Impressão que está
seleccionado.
No Utilitário CPSERVU da Conceptronic tem ao seu dispor as seguintes
selecções:
Selecção
Descrição
Discover Device
Actualiza o ecrã e procura todos os Servidores de
Impressão existentes na sua rede.
Setup Wizard
Inicializa o Assistente de Configuração para
configurar o Servidor de Impressão.
70
PORTUGUÊS
Change IP Address
Altera o Endereço IP do Servidor de Impressão
Show Web-Setup
Inicializa o seu Internet Explorer e abre a
configuração Web do Servidor de Impressão
Update Firmware
Actualiza o firmware do seu Servidor de
Impressão.
Factory Reset
Repõe o Servidor de Impressão nas suas
predefinições de fábrica. Todas a alterações
efectuadas podem ser apagadas.
Print test
Imprime uma página de teste na impressora que
está ligada.
About
Mostra as informações sobre o Utilitário.
Close
Fecha o Utilitário de Configuração.
Prima “Setup Wizard” para iniciar a configuração do Servidor de Impressão.
Aparece uma Caixa de Diálogo de introdução. Prima “Next” para continuar a
configuração. Aparece o seguinte ecrã:
71
PORTUGUÊS
Pode atribuir um nome ao Servidor de Impressão na sua rede. Introduza o nome
em “Server Name”. O “Port Name” representa o nome da porta onde a sua
impressora está ligada.
Para proteger o seu Servidor de Impressão com uma palavra-passe, introduza a
palavra-passe pretendida.
Depois de introduzir a informação acima, prima “Next”. Aparece o seguinte ecrã
de Configuração IP.
72
PORTUGUÊS
Se necessário, pode alterar o endereço IP e a Máscara Subnet do seu Servidor
de Impressão. Também pode definir a configuração para “DHCP Assign
Automatically”, se tiver um servidor DHCP na sua rede.
NOTA: Se configurar o Servidor de Impressão para DHCP, o endereço IP do Servidor de
Impressão pode tornar-se desconhecido para o utilizador.
Se pretender configurar o dispositivo depois dessa alteração, pode usar o Utilitário para
pesquisar o Servidor de Impressão.
Prima “Next” para continuar a configuração.
Introduza o nome do grupo de trabalho que está a utilizar na sua rede no campo
“Workgroup” e depois prima “Next” para continuar a instalação. Aparece o
seguinte resumo das definições de configuração:
73
PORTUGUÊS
Para guardar as suas configurações, prima “Save”. Para efectuar quaisquer
alterações, prima “Back” ou prima “Cancel” para cancelar a configuração.
Quando premir “Save”, a configuração será guardada no Servidor de Impressão.
A partir deste momento, o Servidor de Impressão está correctamente
configurado para a sua rede.
74
PORTUGUÊS
8.
Como configurar a sua Impressora
Depois do Servidor de Impressão estar configurado, precisa de ajustar os
controladores da impressora instalada para que comunique com o Servidor de
Impressão. Pode fazer isto automaticamente através do programa “PS Wizard”,
que pode encontrar no CD-ROM.
Coloque o CD-ROM que é fornecido com o Servidor de Impressão Conceptronic
na sua unidade de CD-ROM. Abra o Windows Explorer, navegue no CD-ROM e
abra a pasta “PS Wizard”.
Execute o programa “PS Wizard.exe” no directório “PS Wizard”.
O programa “Conceptronic Printer Wizard” será iniciado. Prima “Next” para
iniciar a configuração da sua impressora:
Seleccione a impressora que deseja configurar para o Servidor de Impressão
Conceptronic e prima “Next”.
75
PORTUGUÊS
O programa pesquisará o Servidor de Impressão na sua rede. Depois de ser
encontrado, será mostrado na Secção “Network”.
Faça duplo clique no Servidor de Impressão. Será mostrada a porta da
Impressora no Servidor de Impressão. Seleccione a porta e prima “Next”.
76
PORTUGUÊS
O Assistente está pronto para alterar as configurações da sua impressora.
Prima “Finish” para guardar as configurações e sair do Assistente.
Prima “Continue” para guardar as configurações e voltar ao primeiro ecrã do
Assistente.
Prima “Previous” para fazer quaisquer ajustamentos na sua configuração.
Prima “Cancel” para cancelar a configuração e sair do Assistente.
A partir deste momento, a sua impressora está pronta para ser utilizada
com o Servidor de Impressão !
NOTA: Na pasta “Manual” incluída no CD-ROM, pode encontrar um manual
completo e detalhado.
(Encontrará um manual em inglês com todas as opções de software
devidamente explicadas)
77