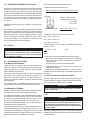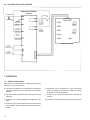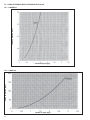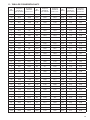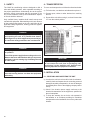
1
CWAZH072 – CWAZ-120
UNIDADES ENFRIADORAS DE LÍQUIDOS DE
CONDENSACIÓN POR AIRE
Manual de Instalación,
Operación y Mantenimiento
AIR CONDENSED LIQUID CHILLERS
Installation, Operation and
Maintenance Manual
Capacidad Nominal: 6 y 10 Tons (21,1 y 35,2 kW ) 50 Hz
Nominal Capacity: 6 and 10 Tons (21.1 and 35.2 kW ) 50 Hz
Instructions in ENGLISH beginning on page 27.
Índice
1. NOMENCLATURA .................................................................................................................................................. 4
2. CARACTERÍSTICAS TÉCNICAS GENERALES y DATOS FÍSICOS – 50Hz ........................................................ 5
3. SEGURIDAD .......................................................................................................................................................... 6
4. TRANSPORTE ....................................................................................................................................................... 6
5. INSTALACIÓN ........................................................................................................................................................ 6
5.1 - RECIBIMIENTO E INSPECCIÓN DE LA UNIDAD ......................................................................................... 6
5.2 - DIMENSIONES DE LA UNIDAD .................................................................................................................... 7
5.2.1 - CWAZH072 ......................................................................................................................................... 7
5.2.2 - CWAZ-120 .......................................................................................................................................... 7
5.3 - TUBERÍAS/CONEXIONES DE AGUA FRÍA .................................................................................................. 8
5.4 - FILTROS ........................................................................................................................................................ 8
5.5 - CONEXIONES ELÉCTRICAS ........................................................................................................................ 8
5.6 - DATOS ELÉCTRICOS ................................................................................................................................... 9
5.7 - DATOS DE PERFORMANCE ...................................................................................................................... 10
6. ESPECIFICACIONES DEL CONTROL ................................................................................................................ 11
6.1 - UNIDAD LÓGICA DE CONTROL ................................................................................................................. 11
6.2 - ESQUEMA DE PLACA DE CONTROL ........................................................................................................ 11
6.3 - DESCRIPCIÓN DE LOS TERMINALES ...................................................................................................... 11
6.4 - BOTONES E INDICADORES DEL FRENTE DEL CONTROL ..................................................................... 11
6.5 - CONEXIÓN ELÉCTRICA SUGERIDA ......................................................................................................... 12
7. OPERACIÓN ........................................................................................................................................................ 12
7.1 - VERIFICACIÓN INICIAL .............................................................................................................................. 13
7.2 - SECUENCIA DE OPERACIÓN Y CONTROL .............................................................................................. 13
7.2.1 - FUNCIONAMIENTO DEL CONTROL ............................................................................................... 13
7.2.2 - SECUENCIA DE TEST ..................................................................................................................... 13
7.3 - CUIDADOS GENERALES ........................................................................................................................... 15
7.4 - CARGA DE REFRIGERANTE ...................................................................................................................... 15
7.5 - CAÍDA DE PRESIÓN EN EL ENFRIADOR DE PLACAS ............................................................................. 16
7.5.1 - CWAZH072 ....................................................................................................................................... 16
7.5.2 - CWAZ-120 ........................................................................................................................................ 16
7.6 - CIRCUITO ELÉCTRICO .............................................................................................................................. 17
7.6.1 - CWAZH072 380V .............................................................................................................................. 17
7.6.2 - CWAZ-120 380V ............................................................................................................................... 18
8. MANTENIMIENTO ............................................................................................................................................... 19
8.1 - TABLERO ELÉCTRICO ............................................................................................................................... 19
8.2 - EVENTUALES ANORMALIDADES ............................................................................................................. 20
8.3 - CÁLCULO DE SUBENFRIAMIENTO Y RECALENTAMIENTO ................................................................... 23
9. CONSIDERACIONES PARA EL CUIDADO DE LOS INTERCAMBIADORES ..................................................... 24
10. INFORME DE ARRANQUE INICIAL .................................................................................................................. 24
11. TABLA DE CONVERSIÓN R-407C .................................................................................................................... 25
1 - NOMENCLATURA
CW A
Z
H
072 - - - S
E
Unidad Enfriadora de Agua
Condensación por Aire
A : por Aire
Diseño de Serie
E - Versión del proyecto
(Refrigerante R-407C)
Z : 400/380V - 3Ph - 50Hz
– : Descarga Vertical (Solo tamaño 120)
H : Descarga Horizontal (Solo tamaño 072)
Capacidad Nominal:
072 - 21.1 kW (6 Tons)
120 - 35.2 kW (10 Tons)
Evaporador del tipo placas, de acero inoxidable soldadas.
4
Marca
S : Surrey
Aletas de Serpentina
- : Aluminio (Estándar)
2 - CARACTERÍSTICAS TÉCNICAS GENERALES y DATOS FÍSICOS – 50Hz
Unidad Enfriadora de Agua Condensación por Aire CWAZ
Tamaños
072
120
6
10
Capacidad Nominal (TR)
380V / 3ph / 50Hz
Alimentación Principal
24V / 1ph / 50Hz
Alimentación de Comando
1
1
Núm. Circuitos Frigoríficos
Características
1
1
Núm. Etapas de Capacidad
R-407C
Refrigerante - Tipo
3.45
7.58
Refrigerante - Carga (kg)
130
250
Peso en Operación (kg)
Scroll
Tipo
ZR72
SZ160
Modelo
Compresor
1
Cantidad
3600
Rotación (rpm)
POE
Carrier
Código: 70102011
Aceite Recomendado
1.95
3.25
Carga de Aceite (l)
Intercambiador
de
calor
de
placas
de
acero
soldadas
Tipo
B25x22
V45x20
Modelo
1
Cantidad
1
Núm. Circuitos
3
Evaporador
2.20
4.60
Caudal de Agua (m /h)
3.6 / 35
3.8 / 38
Pérdida de Carga (mca) / (kPa)
1
1”
1 /2 ”
Diámetro (in.)
BSP
Conexiones Tipo
1/1
Núm. Entr/Salida
0.86
2.2
Área Frontal (m²)
2
Núm. de Filas
15
Aletado
Aletas/Pulgadas (FPI)
9.52
Diámetro do Tubo (mm)
Aluminio con Tubos de Cobre Corrugados Internamente
Tipo de Circuito
6
10
Núm. Circuitos
Condensador
Axial
Tipo
3...610
3...660
Ventilador
Núm. de Palas...Diámetro (mm)
3
6600
10800
Caudal (m /h)
Motor
Monofásico
Tipo
PSC
Tipo
220V/ 1F/ 50Hz
Motor
Alimentación
775
940
Rotación (rpm)
NEMA 48
Carcaza ABNT
Dispositivos de Operación Termostato de Operación - Set Point (OC)
6
Abre - 426 / Cierra - 320
Alta (psig)
Presostato
Dispositivos de Seguridad
Abre - 27 / Cierra - 67
Baja (psig)
4
Fusible de Comando (A)
NOTA: Para la alimentación eléctrica de la unidad, se deberá colocar un interruptor termomagnético. Toda la instalación
eléctrica deberá cumplir con las normas eléctricas locales. Las unidades enfriadoras son para uso exclusivo de confort.
Su uso para aplicaciones industriales y/o procesos invalida la garantía.
Estas unidades solo se podrán conectar con sus correspondientes unidades fan-coil marca Surrey. Las unidades están
provistas con compresores tipo scroll. Estos compresores son sensibles al sentido de giro. Un excesivo ruido o presiones
igualizadas indican una rotación inversa. Desconecte eléctricamente la unidad y cambie la secuencia de fases de
alimentación. El funcionamiento con el sentido de giro inverso invalida la garantía.
5
3 - SEGURIDAD
4 - TRANSPORTE
Las unidades de aire acondicionado CWAZ están diseñadas
para ofrecer un servicio seguro y confiable cuando se las
opera dentro de las especificaciones del proyecto. Sin
embargo, debido a la presión del sistema, componentes
eléctricos y movimiento de la unidad, deberán observarse
algunos aspectos de la instalación, arranque inicial y
mantenimiento de esos equipos.
Para mover y transportar la unidad siga las siguientes
recomendaciones:
Solamente instaladores autorizados por Surrey deben
instalar, arrancar y hacer el mantenimiento de este equipo.
Cuando esté trabajando en el equipo, observe todos los
avisos de precaución de las etiquetas colocadas en la
unidad, siguiendo todas las normas de seguridad aplicables
y utilizando ropas y equipos de protección adecuados.
c) No balancee la unidad durante el transporte y tampoco
la incline mas de 15° en relación a la vertical.
a) Para izar la unidad utilice soportes conforme se indica
en la figura 1.
b) Evite que cuerdas, cadenas u otros dispositivos toquen
la unidad.
PROTECTOR
CORREA
PRECAUCIÓN
CENTRO DE
GRAVEDAD
Desconecte la alimentación de fuerza y comando
antes de efectuar el mantenimiento o reparaciones
en la unidad. Es posible que ocurran descargas
eléctricas que causen serios perjuicios personales,
en caso de no observar esas medidas de seguridad.
LADO
COMPRESOR
PRECAUCIÓN
Nunca coloque la mano dentro de la unidad mientras
el ventilador esté funcionando.
Apague la alimentación de fuerza antes de trabajar
en la unidad. Remueva los fusibles y llévelos consigo
para evitar accidentes. Deje un aviso indicando que
la unidad está en reparación.
PRECAUCIÓN
Verifique los pesos y tamaños de las unidades para
tener la seguridad que sus aparatos de movimiento
soportan el manejo del equipo con seguridad.
IMPORTANTE
Para evitar daños durante el transporte, no remueva
el embalaje de la unidad hasta que esta llegue al local
definitivo de la instalación.
5 - INSTALACIÓN
5.1 - RECIBIMIENTO E INSPECCIÓN DE LA UNIDAD
a) Revise la unidad, inspecciónela cuidadosamente en
lo que se refiere a eventuales daños causados por el
transporte. Habiendo daños avise inmediatamente a la
compañía de transporte y a Surrey.
b) Verifique si la alimentación de fuerza del local está de
acuerdo con las características eléctricas del equipo,
conforme lo especificado en la placa de identificación
de la unidad.
c) Para mantener la garantía, evite que la unidad quede
expuesta a la intemperie o accidentes de obra,
procurando el inmediato transporte hacia el local de
instalación u otro local seguro.
6
5.2 - DIMENSIONES DE LA UNIDAD
5.2.1 - CWAZH072
SENTIDO DE AIRE
SENTIDO DE GIRO
ENTRADA DE AGUA
SENTIDO DE
AIRE
SALIDA DE AGUA
ACCSESO A VALV.
DE EXP.
Antes de colocar el equipo en el local verifique los siguientes aspectos (todos los modelos):
a) El piso debe soportar el peso de la unidad en operación (Ver Peso en Datos Físicos). Consulte el proyecto estructural
del edificio o normas aplicables para la verificación de la carga admisible. Instale refuerzos si es necesario.
b) Prever el suficiente espacio para servicios de mantenimiento. El frente del equipo debe permanecer libre para
permitir el flujo de aire y el acceso al interior de la unidad.
5.2.2 - CWAZ-120
SENTIDO DE AIRE
ENTRADA DE AGUA
SALIDA DE AGUA
Antes de colocar el equipo en el local verifique los siguientes aspectos (todos los modelos):
a) El piso debe soportar el peso de la unidad en operación (Ver Peso en Datos Físicos). Consulte el proyecto estructural
del edificio o normas aplicables para la verificación de la carga admisible. Instale refuerzos si es necesario.
b) Prever el suficiente espacio para servicios de mantenimiento. El frente del equipo debe permanecer libre para
permitir el flujo de aire y el acceso al interior de la unidad.
7
5.3 - TUBERÍAS/CONEXIONES DE AGUA FRÍA
Desarrolle el proyecto de la tubería de tal modo que tenga
un número mínimo de cambios de niveles de elevación.
Instalar válvulas de purga de aire manual o automática en
los puntos más elevados de la línea, manteniendo la presión
del sistema a través del uso de un tanque de presurización
con válvulas de alivio y reductoras. Instalar termómetros y
manómetros en las líneas de salida y entrada del agua en
la unidad.
Cálculo de desbalanceamiento de tensión:
- Desbalanceamiento de tensión (%)=
= Máx. desviación en el promedio de tensión x 100
Promedio de tensión
- Ejemplo:
380V - 3 fases - 50Hz
- Mediciones: AB = 383V
BC = 378V
AC = 374V
Instalar puntos de medición de caudal en las tuberías del
agua fría.
Se recomienda usar válvula globo para ajuste del caudal del
agua. Colocar conexiones de drenaje en todos los puntos
bajos de la instalación hidráulica para permitir un drenaje
completo del sistema. Instalar válvulas de bloqueo cerca
de las conexiones de entrada y salida del agua. Utilizar
conexiones flexibles en las tuberías del enfriador para
reducir la transmisión de las vibraciones.
- Promedio de tensión = 383 + 378 + 374 = 378 V
3
- Máxima desviación del promedio de tensión:
AB = 383V - 378V = 5V
BC = 378V - 378V = 0V
AC = 378V - 374V = 4V
5.4 - FILTROS
ATENCIÓN
Se recomienda que se use filtros con malla instalados
en la línea de entrada del fluido al evaporador
(Intercambiador de placas), lo mas próximo posible
de la tubería de entrada.
5.5 - CONEXIONES ELÉCTRICAS
a) ALIMENTACIÓN GENERAL:
Instale próximo a la unidad una llave seccionadora con
fusibles o disyuntor termomagnético con características de
ruptura equivalentes. Los datos eléctricos de las unidades
están indicados en la tabla 5.6.
Consulte a un ingeniero electricista o un técnico acreditado
para evaluar las condiciones del sistema eléctrico y la
protección adecuada. Surrey no se responsabiliza por
problemas causados debido a no haber observado esta
recomendación.
Se aconseja usar un candado para bloquear la llave o
disyuntor abierto durante el mantenimiento del aparato.
b) CABLEADO DE FUERZA:
Instale la conexión a partir del punto de entrada de tensión
del cliente directamente a la bornera de la unidad.
Los cables alimentadores de la unidad deberán soportar la
suma de las corrientes máximas. No se olvide de instalar
el conductor de protección (conductor de puesta a tierra).
El clase del cables debéran seguir las normas locales.
La tensión suministrada deberá estar de acuerdo con la
tensión de la placa característica.
La tensión entre fases debe ser equilibrada dentro del 2%
de desbalanceamiento y la corriente dentro del 10%, con el
compresor en funcionamiento. Pongase en contacto con la
compañía prestataria de energía eléctrica para corregir la
tensión inadecuada o el desequilibrio de fases.
8
- Mayor diferencia es 5V. Luego, el desbalanceamiento de
tensión en % es:
5 x 100 = 1,32%
378
(OK)
Notas:
- Pueden ser causa de desbalanceamiento de tensión:
• Mal contacto (en contacto de contactoras, conexiones
eléctricas, cables flojos, conductores oxidados o
carbonizados);
• Secciones de los conductores inadecuadas.
• Desbalanceamiento de carga en el sistema de
alimentación trifásica.
- El cálculo de desbalanceamiento de corrientes debe
hacerse de la misma forma que el desbalanceamiento de
tensiones.
c) LLAVE DE FLUJO DE AGUA FRÍA (CWFS):
En cada unidad, se debe instalar una llave de flujo de agua
fría para proteger el equipo contra el bajo caudal de agua.
(No provista/responsabilidad del instalador).
IMPORTANTE
Si no se instala la llave de flujo de agua, el equipo
perderá la garantía.
La instalación debe hacerse en la tubería de salida de
agua.
ATENCIÓN
Es necessario tener cuidado en la instalación del llave
de flujo de agua fría. La flecha indicativa de flujo, con
una marcación en el lateral del llave de flujo de agua,
deberá estar apuntado en dirección a la pletina en la
boca de salida.
Refiérase al diagrama eléctrico de la unidad para mayores
detalles de la interconexión eléctrica de la llave de flujo con
el equipamiento.
5.6 - DATOS ELÉCTRICOS
UNIDAD
CWAZ
Tensión [ V ] / [Hz]
Compresor
Ventilador
Datos Técnicos Complementarios
Alimentación / Frecuencia
Datos Técnicos
Datos Técnicos
Circuito A
Nominal
Min.
Máx.
RLA [A]
LRA [A]
KW
RLA [A]
P [HP]
072
380 / 50
342
418
10
74
5,3
1,13
1/6
0,12
11,3
5,42
25
120
380 / 50
342
418
21,6
150
11,6
2,12
1
0,75
23,8
12,35
40
KW Total RLA Total [A] KW Total [W] MOPA [A]
Leyenda
RLA
LRA
MOPA
KW
Corriente Nominal (Rated Load Amps).
Corriente Rotor Bloqueado (Locked Rotor Amps).
Capacidad máxima recomendada para el fusible de protección contra cortocircuito.
Potencia Nominal Consumida.
OBSERVACIONES IMPORTANTES:
Datos obtenidos del catálogo técnico de compresores del proveedor.
1 - Los valores RLA, KW, RLA TOTAL y KW TOTAL mostrados en la tabla se refieren a datos nominales de operación de la unidad en régimen.
Temperatura de succión: 45°F (7.2°C) y temperatura de condensación: 130°F (54.4°C) - Condición ARI.
2 - Los valores de MOPA mostrados en la tabla fueron calculados a partir de los valores máximos de operación de la unidad.
3 - Todos los compresores son del tipo Scroll.
9
10
CAP. (kW)
kW
l/s
CAP. (kW)
kW
l/s
CAP. (kW)
kW
l/s
CAP. (kW)
kW
l/s
CAP. (kW)
kW
l/s
CAP. (kW)
kW
l/s
CAP. (kW)
kW
l/s
CAP. (kW)
kW
l/s
CAP. (kW)
kW
l/s
Unidad de
Medida
30
13,16
5,96
0,59
13,64
6,08
0,61
14,21
6,19
0,63
14,59
6,31
0,65
15,07
6,42
0,67
15,54
6,54
0,69
16,11
6,65
0,72
17,55
7,00
0,78
19,07
7,45
0,85
14,21
6,65
0,63
14,59
6,77
0,65
15,07
6,88
0,67
16,40
7,34
0,78
17,74
7,68
0,79
13,64
6,42
0,61
35
12,30
6,08
0,55
12,78
6,31
0,57
13,35
6,31
0,59
40
11,54
6,19
0,52
11,82
6,42
0,53
12,30
6,54
0,55
12,59
6,65
0,56
13,06
6,88
0,58
13,44
6,88
0,60
13,92
7,11
0,62
15,26
7,57
0,68
16,50
7,91
0,74
45
10,49
6,42
0,46
10,87
6,54
0,48
11,16
6,77
0,50
11,54
6,88
0,52
12,11
7,00
0,54
12,40
7,11
0,55
12,78
7,23
0,57
13,92
7,68
0,62
15,26
8,14
0,68
50
9,44
6,54
0,42
9,92
6,65
0,44
10,20
6,88
0,45
10,49
7,00
0,46
10,87
7,11
0,48
CWAZH072
Temperatura de Entrada de Aire al Condensador (°C)
30
27,41
12,52
1,23
28,45
12,75
1,28
29,50
12,98
1,32
30,26
13,21
1,36
31,31
13,44
1,40
32,35
13,79
1,45
33,59
13,90
1,51
36,45
14,71
1,63
39,68
15,63
1,78
29,50
13,90
1,32
30,26
14,13
1,36
31,31
14,36
1,40
34,16
15,28
1,63
36,92
16,20
1,66
28,45
13,56
1,28
35
25,69
12,87
1,15
26,64
13,10
1,19
27,79
13,33
1,24
40
23,98
13,10
1,08
24,65
13,44
1,11
25,60
13,67
1,15
26,26
14,02
1,18
27,22
14,25
1,22
27,98
14,48
1,25
28,93
14,82
1,30
31,78
15,74
1,43
34,35
16,66
1,54
45
21,79
13,44
0,97
22,55
13,67
1,00
23,22
14,13
1,04
24,07
14,25
1,08
25,12
14,59
1,13
25,79
14,82
1,15
26,64
15,17
1,19
28,93
16,20
1,30
31,78
17,12
1,42
50
19,70
13,67
0,88
20,65
13,90
0,92
21,22
14,25
0,95
21,79
14,59
0,97
22,55
14,94
1,00
CWAZ-120
Temperatura de Entrada de Aire al Condensador (°C)
CAP - Capacidad de Enfriamiento en kW
kW - Consumo en kW
Las capacidades están dadas para un salto térmico del agua de 5,6 °C.
Para otros saltos térmicos pueden utilizarse los mismos valores variando solo el caudal de agua en forma inversamente proporcional al salto de temperatura.
16
13
10
9
8
7
6
5
4
Temperatura de
Salida del Agua
(°C)
5.7 - DATOS DE PERFORMANCE
6 - ESPECIFICACIONES DEL CONTROL
6.1 - UNIDAD LÓGICA DE CONTROL
IN 6
: La activación del control remoto: Sin
conectar, el control es local a través
de los botones del frente del control;
conectando a 24Vca, el control es
remoto por medio de la entrada IN5.
A3
: Conector para el sensor de
temperatura de agua en la salida de
la enfriadora(sensor interno).
A4
: Conector para el sensor de temperatura
de agua fuera de la unidad enfriadora
(sensor externo).
OUT1
: Salida para accionamiento del
contactor del compresor.
OUT2
: Salida para accionamiento de la
solenoide de línea de líquido.
Descripción:Unidad lógica de control para enfriamiento
de líquidos con las siguientes características:
- Panel de control tipo “Soft Touch” con botón de
encendido/apagado, e indicadores de: Alimentación
eléctrica, compresor en funcionamiento, temporizador,
protección contra congelamiento y protección por
presostatos.
- Entradas analógicas para sensores de temperatura de
salida de agua y retorno del equipo.
- Entradas digitales para: Selección de temperatura de
congelamiento(2°C o –7°C), presostato de protección
y entradas para controlar a distancia.
- Salidas para comando de compresor y solenoide de
línea de líquido.
- Potenciómetro para ajuste de temperatura y salida de
agua.
6.4 - BOTONES E INDICADORES DEL FRENTE DEL
CONTROL
6.2 - ESQUEMA DE PLACA DE CONTROL
A la placa de control
Conector
ajuste de
temperatura
Conector
frente de
control
6.3 - DESCRIPCIÓN DE LOS TERMINALES
24V, GND : Alimentación eléctrica para la placa
de control, 24Vca-50/60Hz.
P1
: Botón de apagado.
P2
: Botón de encendido.
L1
: Indicador de equipo encendido.
L2
: Indicador de compresor en
funcionamiento.
IN 1
: Entrada de presostatos.
IN 2
: Alimentación eléctrica para válvula
solenoide.
L3
: Indicador de temporizador anti-reciclo
activado.
IN 4
: Selección de temperatura de
congelamiento: sin conectar equivale
a 2°C, conectando a 24Vca equivale
a –7°C.
L4
: Indicador de protector de
congelamiento activado.
L5
: Indicador de abertura de presostato.
IN 5
: Encendido/apagado remoto: Sin
conectar, la unidad permanece
apagada, conectando a 24Vca,
la unidad se encenderá de forma
remota o local según la entrada IN6.
L6
: Indicador de alimentación eléctrica
habilitada.
11
6.5 - CONEXIÓN ELÉCTRICA SUGERIDA
UNIDAD DE CONTROL
UC4230
Transformador
Presostatos
alta
baja
Selector
temperatura
congelamiento
Abierto: 2°C
Cerrado: -7°C
Contactor
compresor
Encendido
Compresor
Pulsador
Encendido
Encendio
Apagado Remoto
Abierto: Apag.
Cerrado: Enc.
Valvula
soneloide
Antireciclo
Pulsador
Apagado
Seleccion
control
Congelamiento
Abierto: Local
Cerrado: Remoto
Presostato
Habilitacion
FRENTE DE CONTROL
Sensor
temperatura
retorno de agua
Sensor
temperatura
salida de agua
7. OPERACIÓN
7.1 - VERIFICACIÓN INICIAL
Antes de que la unidad arranque, verifique las condiciones
anteriores y los siguientes ítem:
a) Verifique la instalación y funcionamiento de todos los
equipos auxiliares tales como bombas de circulación
de agua.
e) Asegúrese que el compresor se mueve libremente
sobre los aisladores de vibración. (Afloje los tornillos
de fijación de los compresores).
b) Verifique la adecuada fijación de todas las conexiones
eléctricas.
f) Verifique si el sentido de rotación del ventilador es
correcto.
c) Confirme que no existe perdida de refrigerante o de
agua.
g) Verifique si el sentido de giro del compresor es correcto.
d) Confirme que el aprovisionamiento de la fuerza motriz
es compatible con las características eléctricas de la
unidad.
12
7.2 - SECUENCIA DE OPERACIÓN Y CONTROL
La siguiente figura muestra un dibujo del panel de
control de todas las unidades:
12345678-
Indicador de equipo encendido
Indicador de compresor en marcha
Indicador de temporizador antireciclo activado
Indicador de protector de congelamiento
activado
Indicador de apertura de presostato
Pulsador de encendido
Pulsador de apagado
Indicador de alimentación eléctrica habilitada
Observaciones: Antes de encender el compresor, la
bomba de agua fría deberá estar accionada.
La unidad entrará en operación automáticamente
cuando se accione la llave “encendido”. Para más detalles,
verifique el ítem Funcionamiento del control.
7.2.1 - FUNCIONAMIENTO DEL CONTROL
Cuando la unidad tenga alimentación eléctrica, todos
los indicadores luminosos del panel de control se quedarán
encendidos durante 5 segundos. En este estado es posible
accionar el modo de test (ver “Secuencia de Test”).
Transcurrido los 5 segundos, se apagaran todos
los indicadores, excepto el de Habilitación. Las salidas
para compresores y válvula solenoide permanecerán
desactivadas.
Modo Local:
El control estará en este modo cuando la entrada IN6
esté abierta. La entrada IN5 funcionará como habilitación
a la unidad, solamente si en ésta entrada está aplicada
una tensión de 24V. La unidad se encenderá presionando
el botón de encendido, y se apagará presionando el botón
de apagado.
Modo Remoto:
El control estará en este modo cuando la entrada
IN6 esté conectada a 24V. La entrada IN5 actuará en el
enciende/apaga de la unidad. La unidad se encenderá
al ser provisto 24V en la entrada IN5, y se apagará si no
tiene alimentación.
En ambos modos de funcionamiento, al colocarse
la unidad en funcionamiento(presionando en botón de
encendido o aplicando 24V a IN5, respectivamente), el
indicador de “enciende” se encenderá.
El compresor se encenderá si no existe ninguna
protección activa(los indicadores anti-reciclo, congelamiento
y presostato apagado), y la temperatura medida por el
sensor de agua de retorno es 1°C mayor que la indicada
en el potenciómetro de ajuste de temperatura.
El compresor parará cuando la temperatura de agua de
retorno sea 1°C menor que el ajuste de temperatura. La
válvula solenoide se desactivará siempre junto con el
compresor, y se encenderá 3 segundos antes que este.
Toda detención del compresor provocará que se
encienda el indicador de Anti-reciclo. Mientras este
indicador se encuentre encendido, el compresor no
arrancará aunque la temperatura de retorno de agua
así lo requiera. El indicador de Antireciclo permanecerá
encendido durante 4 minutos luego de la parada del
compresor. En los últimos 30 segundos este indicador
comenzará a destellar, indicando la finalización del período
de antireciclo.
El indicador de Congelamiento se encenderá si la
temperatura medida por el sensor de agua de salida es
menor de 2°C. Esto provocará la detención del compresor,
la desactivación de la válvula solenoide y el encendido
del indicador de Antireciclo. Mientras el indicador de
Congelamiento esté encendido, el compresor no volverá
a arrancar. Cuando la temperatura de salida de agua sea
mayor que 4°C, el indicador se apagará, permitiendo el
arranque del compresor.
Si se abre algún presostato conectado a la entrada IN1,
se encenderá el indicador de Presostato, deteniéndose
el compresor y desactivándose la válvula solenoide. La
unidad permanecerá en este estado aunque el presostato
vuelva a cerrarse. Para que vuelva a ponerse en marcha,
se debe quitar la alimentación eléctrica del control durante
unos segundos y volvérsela a suministrar.
El control puede funcionar con un único sensor
conectado en la entrada A3. En este caso la temperatura
medida por este sensor se utilizará para encender o
apagar el compresor según la temperatura ajustada, o
para detener la unidad por congelamiento.
7.2.2 - SECUENCIA DE TEST
Si durante los 5 segundos iniciales en que permanecen
encendidos todos los indicadores, se presionan
simultáneamente P1 y P2, se pasa al estado de prueba
que consta de una secuencia de 10 pasos.
Durante esta secuencia, las luces indicadoras L1, L2, L3
y L4 señalarán el número de paso dentro de la secuencia,
mientras que L5 dará información relacionada con cada paso.
Cada vez que se presione el pulsador P1, se avanzará
al siguiente paso de la secuencia de prueba, al llegar al
paso 10, presionando P1 se comienza nuevamente con
el paso 1. Presionando en cualquier momento P2, se
sale de la secuencia de prueba, y se pasa al estado de
funcionamiento normal. También se pasa al estado de
funcionamiento normal si durante 3 minutos no se presiona
ningún pulsador.
Los pasos de la secuencia de prueba son los siguientes:
Paso 1: L1, L2 y L3 apagados, L4 titila.
L5 encenderá si la temperatura medida por el sensor
de temperatura de retorno de agua (conectado en A4)
está comprendida entre –5°C y 15°C.
13
Paso 2: L1 y L2 apagados, L3 titila, L4 apagado.
L5 encenderá si la temperatura medida por el sensor
de temperatura de salida de agua (conectado en A3)
está comprendida entre –5°C y 15°C.
Paso 3: L1 y L2 apagados, L3 y L4 titilan.
L5 encenderá si hay 24Vca en el terminal IN4 (Entrada
para selección de temperatura de congelamiento).
Paso 4: L1 apagado, L2 titila, L3 y L4 apagados.
L5 encenderá si la temperatura seleccionada en el
ajuste de temperatura se encuentra comprendida entre
–5°C y 15°C.
Paso 5: L1 apagado, L2 titila, L3 apagado, L4 titila.
L5 siempre encenderá.
Paso 6: L1 apagado, L2 y L3 titilan, L4 apagado.
L5 encenderá si hay 24Vca en el terminal IN1 (Entrada
para los presostatos).
Paso 7: L1 apagado, L2, L3 y L4 titilan.
L5 encenderá luego de 1 segundo y permanecerá
encendido durante 5 segundos. El contacto IN1OUT1 permanecerá cerrado mientras L5 se encuentre
encendido (Contacto para manejo del contactor del
compresor).
Paso 8: L1 titila, L2, L3 y L4 apagados.
L5 encenderá luego de 1 segundo y permanecerá
en ese estado.El contacto IN2-OUT2 permanecerá
cerrado mientras L5 se encuentre encendido (Contacto
para manejo de la válvula solenoide).
Paso 9: L1 titila, L2 y L3 apagados, L4 titila.
L5 encenderá si hay 24Vca en el terminal IN6 (Entrada
para el contacto de control remoto).
Paso 10: L1 titila, L2 apagado, L3 titila, L4 apagado.
L5 encenderá si hay 24Vca en el terminal IN5 (Entrada
para el contacto de encendido / apagado remoto).
ESPECIFICACIONES:
Tensión de alimentación:
24V ±15%, 50Hz or 60Hz.
Consumo máximo:
200mA
Temperatura de operación:
-20°C a +60°C
Entradas digitales (IN1, IN4, IN5, IN6)
Tensión máxima permanente
80Vca ou 60Vcc
Corriente de entrada
0,65mA @ 24Vca
(para IN1 adicionar corriente no OUT1)
Tensión de desactivación máxima
1Vca
Tensión de activación mínima
4Vca
Tiempo de respuesta 0 a 24Vca
0,25s
Tiempo de respuesta 24 a 0Vca
1s
Entradas analógicas (A3, A4) Tipo de sensor
NTC de 5kW @ 25°C
Entrada ajuste temperatura
Regulación de temperatura
Potenciómetro lineal
Salidas digitales
• OUT1
Tensión máxima
80Vca
Corriente máxima
16A carga resistiva
• OUT2
14
Tensión máxima
250Vca
Corriente máxima
16A carga resistiva
Dimensiones placa de control
121 x 123 mm
Dimensiones frente de control
100 x 100 mm
Dimensiones ajuste de temperatura
45 x 35 mm, alta: 35mm con inclusión
manual
Largo cable a frente de control
300mm
Largo cable a ajuste de temperatura
250mm
7.3 - CUIDADOS GENERALES
a) Mantenga el gabinete y las rejillas así como el área
alrededor de la unidad lo más limpia posible.
f) Verificar limpieza del filtro Y de la línea de alimentación
de agua.
b) Periódicamente limpie la serpentina condensadora
con un cepillo suave. Si las aletas están muy sucias,
utilice, en el sentido inverso del flujo del aire, chorros
de aire o de agua a baja presión. Tenga cuidado para
no dañar las aletas. Si ellas están aplastadas, se
recomienda utilizar un “peine” de aletas adecuado para
la corrección del problema.
g) Verificar funcionamiento de la válvula de flujo de agua
fría.
7.4 - CARGA DE REFRIGERANTE
c) Verifique el ajuste de las conexiones y otras fijaciones,
evitando la aparición de vibraciones, pérdidas y ruidos.
Estas unidades están provistas de fábrica con carga
completa de refrigerante. Caso que se constate la falta
de refrigerante en algún equipo ya cargado, proceda
conforme como se indica en el siguiente diagrama de flujo:
d) Asegúrese que las aislaciones de las piezas de chapa
y tuberías estén en el lugar correcto y en buenas
condiciones.
ATENCIÓN
Nunca cargue refrigerante en estado líquido por el
lado de baja presión del sistema.
e) Periódicamente verifique si la tensión y el
desbalanceamiento entre fases se mantiene dentro
de los límites específicos.
Procedimiento para recargar el refrigerante
INICIO
LOCALIZAR PÉRDIDA
ARREGLAR PÉRDIDA
VERIFICAR ESTANQUEIDAD
HACER VACÍO
CARGAR REFRIGERANTE(CARGA PARCIAL)
ENCENDER EL EQUIPO
COMPLETAR LA CARGA DE REFRIGERANTE
FIN
15
7.5 - CAÍDA DE PRESIÓN EN EL ENFRIADOR DE PLACAS
Caída de presion (kPa)
7.5.1 - CWAZH072
Caudal de agua (kg/s)
Caída de presion (kPa)
7.5.2 - CWAZ-120
Caudal de agua (kg/s)
16
7.6 - CIRCUITO ELÉCTRICO
7.6.1 - CWAZH072 380V
17
7.6.2 - CWAZ-120 380V
18
8 - MANTENIMIENTO
8.1 - TABLERO ELECTRICO
a) OBSERVACIONES GENERALES:
La caja eléctrica de las unidades CWAZ fue
proyectada de manera de simplificar los servicios de
inspección y mantenimiento. Todos los elementos
de comando, accionamiento y protección del equipo
están localizados allí.
Existen dos borneras para conexiones de cables
de control y de fuerza. En la bornera también está
incluido el terminal “tierra”.
b) PRESOSTATOS:
Los presostatos en la maquinas CWAZ son de tipo
individual para los lados de baja y alta. Ambos son
de rearme automático y el de alta es de tipo miniatura
acoplado directamente en la linea de descarga.
Independientemente de que el rearme sea automático
o manual, al desarmar, la máquina queda bloqueada
por el módulo. Los valores de desarme para
estos presostatos están indicados en la tabla de
características generales.
Una vez verificada y corregida la causa del desarme, la
reconexión (RESET) puede ser realizada desconectando
y conectando la unidad del panel de control o a traves de
la restauración de la fuerza para el comando.
d) PROTECCIÓN DE LOS COMPRESORES:
- Compresores 380V - Line Break (interno)
El Line Break es un dispositivo de protección contra
sobrecarga y sobrecalentamiento del motor del
compresor que es instalado internamente (en el estator
del motor).
Éste actua directamente en el circuito de fuerza del
motor, rearmando automáticamente con el descenso de
la temperatura, sin embargo el compresor permanecerá
desconectado debido a la acción del Dispositivo Antireciclo. El rearme puede ser realizado a través de la
llave CONECTA/ DESCONECTA de la unidad.
19
8.2 - EVENTUALES ANORMALIDADES
PROBLEMA
1. La unidad no arranca.
CAUSA PROBABLE
PROCEDIMIENTO
Fases R, S, T no están en la secuencia * Invertir dos cables de alimentación
correcta.
en la conexión.
Falta de alimentación eléctrica.
* Verificar aprovisionamiento de
fuerza.
* Verificar fusibles, llaves
seccionadoras y diyuntores.
* Verificar contactos eléctricos.
Tensión inadecuada o fuera de los límites * Verificar y corregir problema.
permisibles.
Fusibles de comando quemados.
* Verificar cortocircuito en el
comando, conexión equivocada
o componentes defectuosos.
Corregir y sustituir fusibles.
Dispositivos de protección abiertos.
* Verificar presostatos, válvulas,
relés y contactos auxiliares.
Contactor, motor o compresor defectuosos. * Probar y sustituir.
2. Ventilador del condensador no
opera.
Contactora o relé de sobrecarga defectuosos. * Probar y sustituir.
Motor defectuoso.
* Probar y sustituir.
Conexiones eléctricas con mal contactos. * Revisar y ajustar.
3. Compresor “zumba” pero no arranca.
4. Compresor arranca, pero no
mantiene su funcionamiento.
Baja tensión.
* Verificar y corregir problema.
Motor del compresor defectuoso.
* Sustituir el compresor.
Compresor atascado.
* Verificar y sustituir el compresor.
Compresor o contactora defectuosos.
* Probar y sustituir.
Falta de refrigerante.
* Verificar y corregir pérdida. Adicionar
refrigerante si es necesario.
Carga térmica insuficiente
* Verificar condiciones de proyecto.
Sobrecarga o calentamiento en el motor * Ve r i f i c a r a c t u a c i ó n d e l o s
del compresor.
dispositivos de protección. Sustituir
si es necesario.
* Verificar tensión o falta de fase.
Corregir problema.
* Verificar regulación de la válvula
de expansión. Verificar temperatura
(o presión) en la succión y
condensación.
20
PROBLEMA
CAUSA PROBABLE
5. Unidad opera continuamente Carga térmica excesiva.
pero con bajo rendimiento.
Falta de refrigerante.
PROCEDIMIENTO
* Verificar condiciones de proyecto.
* Verificar y corregir pérdida. Adicionar
refrigerante si es necesario.
Suciedad en los condensadores.
* Verificar y limpiar.
Compresor defectuoso.
* Verificar presiones y corrientes del
compresor, sustituir si es necesario.
Insuficiente alimentación de refrigerante * Verificar obstrucción en el filtro secador
en el evaporador.
o en las líneas. Sustituir o corregir.
* Verificar obstrucción en la válvula de
expansión. Sustituir si es necesario.
* Verificar posición del bulbo o del tubo
ecualizador de la válvula de expansión.
Corregir de acuerdo con especificación
de fábrica.
Aislamiento térmico deficiente.
* Repare o sustituya.
Aire en el sistema de agua fría.
* Purgue el aire.
Aceite en el evaporador.
* Verificar y drenar.
Compresor opera con rotación invertida. * Verificar las presiones de succión
y descarga. En caso de verificar
la inversión, invertir dos cables de
alimentación de la bornera de la unidad.
Verificar rotación del ventilador.
6. Presión de descarga elevada.
Bajo caudal de aire en el condensador.
* Verificar rotación del ventilador. Ajustar
si es necesario.
* Verificar funcionamiento del motor.
Sustituir si es necesario.
* Verificar suciedad en la serpentina.
Limpiar y hacer el filtrado adecuado.
Condensador con suciedad.
* Verificar y limpiar.
Temperaturas elevada de entrada del aire * Verificar cortocircuito del aire de
de condensación.
condensación o toma de aire insuficiente.
Corregir.
* Verificar componentes de la instalación
de enfriamiento de agua.Corregir.
Exceso de refrigerante.
7. Presión de descarga reducida.
* Verificar y retirar el exceso, ajustando
el subenfriamiento entre 8 y 11 °C.
Excesivo caudal de aire en el condensador. * Verificar y ajustar.
Falta de refrigerante.
* Verificar y corregir pérdidas. Adicionar
refrigerante si es necesario.
Compresor defectuoso.
* Verificar presiones de succión y de
descarga. Sustituir si es necesario.
Compresor opera con rotación invertida. * Verificar presiones de succión y
de descarga. En caso de verificar
la inversión, invertir dos cables de
alimentación de la bornera de la unidad.
21
PROBLEMA
CAUSA PROBABLE
8. Presión succión reducida, Presión de descarga reducida.
pudiendo o no ocasionar la
Carga térmica insuficiente.
apertura del presostato de baja.
Falta de refrigerante.
Bajo caudal de agua en el evaporador.
PROCEDIMIENTO
* Ver item 7.
* Verificar condiciones de proyecto.
* Verificar y corregir pérdidas. Adicionar
refrigerante si es necesario.
* Verificar válvula de regulación de
caudal de agua del evaporador.
* Verificar regulación del registro de la
bomba de agua fría.
* Verificar filtro de agua fría.
Insuficiente alimentación de refrigerante * Verificar obstrucción en el filtro secador
o en las líneas. Sustituir o corregir.
en el evaporador.
* Verificar obstrucción en la válvula de
expansión. Sustituir si es necesario.
* Verificar posición del bulbo y del tubo
ecualizador de la válvula de expansión.
Corregir de acuerdo con especificación
de fábrica.
* Verificar operación de la válvula
solenoide.
9. Presión de succión elevada.
Carga térmica excesiva.
* Verificar condiciones del proyecto.
Compresor defectuoso.
* Verificar presiones de succión y de
descarga. Sustituir si es necesario.
Compresor opera con rotación invertida. * Verificar las presiones de succión y
de descarga. En caso de verificarse
la inversión, invertir dos cables de
alimentación de la bornera de fuerza
de la unidad.
10. Pérdida de agua.
Conexiones de agua fría defectuosas.
* Verificar y corregir.
Drenajes de condensado obstruidos.
* Verificar y limpiar bandejas y drenajes.
Línea de drenaje instalada incorrectamente. * Verificar conexiones y sifones. Corregir
si es necesario.
11. Unidad con ruido.
Compresor con ruido.
* Verificar regulación de la válvula de
expansión.
* Verificar ruido interno. Sustituir si es
necesario.
Vibración en las tuberías de refrigerante
o agua de condensación.
Paneles o piezas metálicas mal fijadas.
12. La línea de líquido “suda” Filtro secador con pasaje restringido.
(Condensa agua en la superficie
externa).
13. La línea de succión “suda”.
22
* Verificar secuencia de fases correcta.
* Verificar y corregir.
* Verificar y fijar.
* Remover restricciones y/o cambiar
filtros secadores.
L a v á l v u l a d e e x p a n s i ó n a d m i t e * Ajustar la válvula de expansión.
refrigerante en exceso.
8.3 - CALCULO DEL SUBENFRIAMIENTO Y SOBRECALENTAMIENTO
SUBENFRIAMIENTO
SOBRECALENTAMIENTO
1. Definición:
1. Definición:
Diferencia entre temperatura de condensación saturada
(TCS) y la temperatura de la línea de líquido (TLL).
Diferencia entre temperatura de succión (Ts) y la
temperatura de evaporación saturada (TEV).
SA = Ts – TEV
SR = TCS – TLL
2. Equipos necesarios para la medición:
2. Equipos necesarios para la medición:
•
•
•
•
Manifold
Termómetro de bulbo o electrónico (con sensor de
temperatura).
Filtro o espuma aislante.
Tabla de conversión Presión-Temperatura para R-407C.
3. Pasos para medición:
1°) Coloque el bulbo o sensor del termómetro en contacto
con la línea de líquido próximo al filtro deshidratador
(sólo tamaño120). Cuide que la superficie esté limpia.
Recubra el bulbo o sensor con espuma, de modo de
aislarlo de la temperatura ambiente.
•
•
•
•
Manifold
Termómetro de bulbo o electrónico (con sensor de
temperatura).
Filtro o espuma aislante.
Tabla de conversión Presión-Temperatura para R-407C.
3. Pasos para medición:
1°) Coloque el bulbo o sensor del termómetro en contacto
con la línea de succión, lo más cerca posible del bulbo
de la válvula de expansión. Cuide que la superficie esté
limpia. Recubra el bulbo o sensor con espuma, de modo
de aislarlo de la temperatura ambiente.
2°) Instale el manifold en las líneas de descarga (manómetro
de alta) y succión (manómetro de baja).
2°) Instale el manifold en las líneas de descarga (manómetro
de alta) y succión (manómetro de baja).
3°) Después que las condiciones de funcionamiento se
estabilicen, lea la presión en el manómetro de la línea
de succión.
3°) Después que las condiciones de funcionamiento se
estabilicen, lea la presión en el manómetro de la línea
de descarga.
4°) De la tabla de R-407C obtenga la temperatura de
evaporación saturada (TEV).
NOTA:Las mediciones deben hacerse con el equipo
trabajando dentro de las condiciones de proyecto de
la instalación para permitir alcanzar el desempeño
deseado.
4°) De la tabla de R-407C obtenga la temperatura de
condensación saturada.
5°) En el termómetro lea temperatura de la línea de líquido.
Réstelo a la temperatura de condensación saturada; la
diferencia es el subenfriamiento.
6°) Si el subenfriamiento está entre 8°C a 11°C, la carga
está correcta. Si está por debajo, agregue refrigerante;
si está por arriba, retire refrigerante.
4. Ejemplo de cálculo:
- Presión de la línea de descarga
(Manómetro) ................................. 20,34 Bar (295 psig)
- Temperatura de condensación saturada (Tabla) .....49°C
- Temperatura de la línea de líquido (Termómetro) ...45°C
- Subenfriamiento (resta) .............................................4°C
¡Agregar refrigerante!
5°) En el termómetro lea temperatura de la línea de succión
(Ts). Haga varias lecturas y calcule su promedio que será
la temperatura adoptada.
6°) Reste la temperatura de evaporación saturada
a la temperatura de succión, la diferencia es el
recalentamiento.
7°) Si el recalentamiento está entre 4°C y 6°C, la regulación
de la válvula de expansión está correcto. Si está por
debajo, mucho refrigerante está siendo inyectado en
el evaporador y es necesario cerrar la válvula (girar
tornillo de regulación para la derecha, sentido horario).
Si el recalentamiento está alto, poco refrigerante está
siendo inyectado en el evaporador y es necesario abrir
la válvula (girar tornillo de regulación para la izquierda,
sentido antihorario).
4. Ejemplo de cálculo:
- Presión de la línea de succión
(Manómetro) ......................................4,75 Bar (69 psig)
- Temperatura de la línea de succión (Termómetro) . 1 5 ° C
- Temperatura de evaporación saturada (Tabla)......... 7 ° C
- Recalentamiento (resta) ........................................... 8°C
¡Recalentamiento alto: abrir la válvula de expansión!
OBS.: Después de hacer el ajuste de TEV no olvidar de
poner novamente su casco.
23
9 - CONSIDERACIONES PARA EL CUIDADO DE LOS INTERCAMBIADORES
Se recuerdan algunas medidas de prevención que deben ser consideradas para evitar daños en los
intercambiadores que puedan dejar sin efecto la garantía:
•
Protección contra falta de flujo de agua. (Flow Switch)
•
Realización del enclavamiento del sistema de bombeo y seguridades que provoque la detención de
la máquina en el caso de algún inconveniente en el sistema de circulación de agua.
•
Circulación de agua previo al arranque del compresor.
•
Evacuación del circuito de agua en épocas invernales o de baja temperatura.
•
En zonas donde la temperatura desciende por debajo de 0°C, utilizar glicol o evacuar el sistema.
•
Verificación periódica del buen funcionamiento del sistema de seguridad.
•
Colocación de filtro “Y” Mesh 20 para la protección contra obstrucciones.
•
Utilización de control de condensación en máquinas que trabajen en temporadas intermedias.
•
Utilización de la proporción adecuada de glicol cuando operen a una temperatura de salida de
agua menor a 4,5°C.
•
Volumen mínimo de agua en el sistema de 12lts./ton. en aplicaciones de aire acondicionado y
24lts./ton. en aplicaciones de proceso.
•
Instalación de tanque acumulador en caso de no satisfacer los requerimientos mínimos de
volúmenes de agua.
•
Deberán evitarse las soluciones: Cloruros > 300mg/l, Sulfitos libres de cloro, Soluciones con PH < 7.
•
El circuito de agua deberá contar con un tanque de expansión o algún dispositivo para evitar los
golpes de ariete en la tubería.
No eliminar ningún elemento de protección de la unidad.
10 - INFORME DE ARRANQUE INICIAL
Cliente: _______________________________________________________________________________
Local de la obra:________________________________________________________________________
Instalador:_____________________________________________________________________________
Distribuidor: ___________________________________________________________________________
Arranque ejecutado por:__________________________ Fecha: _________________________________
Equipo: _______________________________________________________________________________
Enfriadora de Líquido modelo:____________________ N° de Serie: ______________________________
24
11 - TABLA DE CONVERSIÓN R-407C
Bar
(relativo)
Temperatura
saturada del
punto de ebulición
Temperatura
saturada del
punto de rocío
Bar
(relativo)
Temperatura
saturada del
punto de ebulición
Temperatura
saturada del
punto de rocío
Bar
(relativo)
Temperatura
saturada del
punto de ebulición
Temperatura
saturada del
punto de rocío
1
-28.55
-21.72
10.5
23.74
29.35
20
47.81
52.55
1.25
-25.66
-18.88
10.75
24.54
30.12
20.25
48.32
53.04
1.5
-23.01
-16.29
11
25.32
30.87
20.5
48.83
53.53
1.75
-20.57
-13.88
11.25
26.09
31.62
20.75
49.34
54.01
2
-18.28
-11.65
11.5
26.85
32.35
21
49.84
54.49
2.25
-16.14
-9.55
11.75
27.6
33.08
21.25
50.34
54.96
2.5
-14.12
-7.57
12
28.34
33.79
21.5
50.83
55.43
2.75
-12.21
-5.7
12.25
29.06
34.5
21.75
51.32
55.9
3
-10.4
-3.93
12.5
29.78
35.19
22
51.8
56.36
3.25
-8.67
-2.23
12.75
30.49
35.87
22.25
52.28
56.82
3.5
-7.01
-0.61
13
31.18
36.55
22.5
52.76
57.28
3.75
-5.43
0.93
13.25
31.87
37.21
22.75
53.24
57.73
4
-3.9
2.42
13.5
32.55
37.87
23
53.71
58.18
4.25
-2.44
3.85
13.75
33.22
38.51
23.25
54.17
58.62
4.5
-1.02
5.23
14
33.89
39.16
23.5
54.64
59.07
4.75
0.34
6.57
14.25
34.54
39.79
23.75
55.1
59.5
5
1.66
7.86
14.5
35.19
40.41
24
55.55
59.94
5.25
2.94
9.11
14.75
35.83
41.03
24.25
56.01
60.37
5.5
4.19
10.33
15
36.46
41.64
24.5
56.46
60.8
5.75
5.4
11.5
15.25
37.08
42.24
24.75
56.9
61.22
6
6.57
12.65
15.5
37.7
42.84
25
57.35
61.65
6.25
7.71
13.76
15.75
38.31
43.42
25.25
57.79
62.07
6.5
8.83
14.85
16
38.92
44.01
25.5
58.23
62.48
6.75
9.92
15.91
16.25
39.52
44.58
25.75
58.66
62.9
7
10.98
16.94
16.5
40.11
45.15
26
59.09
63.31
7.25
12.02
17.95
16.75
40.69
45.71
26.25
59.52
63.71
7.5
13.03
18.94
17
41.27
46.27
26.5
59.95
64.12
7.75
14.02
19.9
17.25
41.85
46.82
26.75
60.37
64.52
8
14.99
20.85
17.5
42.41
47.37
27
60.79
64.92
8.25
15.94
21.77
17.75
42.98
47.91
27.25
61.21
65.31
8.5
16.88
22.68
18
43.53
48.44
27.5
61.63
65.71
8.75
17.79
23.57
18.25
44.09
48.97
27.75
62.04
66.01
9
18.69
24.44
18.5
44.63
49.5
28
62.45
66.49
9.25
19.57
25.29
18.75
45.17
50.02
28.25
62.86
66.87
9.5
20.43
26.13
19
45.71
50.53
28.5
63.27
67.26
9.75
21.28
29.96
19.25
46.24
51.04
28.75
63.67
67.64
10
22.12
27.77
19.5
46.77
51.55
29
64.07
68.02
10.25
22.94
28.56
19.75
47.29
52.05
29.25
64.47
68.39
25
26
Contents
1. NOMENCLATURE ................................................................................................................................................ 28
2. GENERAL TECHNIQUES CHARACTERISTICS and PHYSICAL DATA - 50Hz ................................................. 29
3. SAFETY ................................................................................................................................................................ 30
4. TRANSPORTATION ............................................................................................................................................. 30
5. INSTALLATION .................................................................................................................................................... 30
5.1 - RECEIVING AND INSPECTING THE UNIT ................................................................................................. 30
5.2 - UNIT DIMENSIONS ..................................................................................................................................... 31
5.2.1 - CWAZH072 ....................................................................................................................................... 31
5.2.2 - CWAZ-120 ........................................................................................................................................ 31
5.3 - COLD WATER PIPING/CONNECTIONS ..................................................................................................... 32
5.4 - FILTERS ....................................................................................................................................................... 32
5.5 - ELECTRIC CONNECTIONS ........................................................................................................................ 32
5.6 - ELECTRICAL DATA ..................................................................................................................................... 33
5.7 - PERFORMANCE DATA .............................................................................................................................. 34
6. CONTROL SPECIFICATIONS ............................................................................................................................. 35
6.1 - LOGIC CONTROL UNIT .............................................................................................................................. 35
6.2 - CONTROL BOARD DIAGRAM .................................................................................................................... 35
6.3 - DESCRIPTION OF TERMINALS ................................................................................................................. 35
6.4 - CONTROL FRONT BUTTONS AND INDICATORS ..................................................................................... 35
6.5 - SUGGESTED ELECTRIC CONNECTION ................................................................................................... 36
7. OPERATION ......................................................................................................................................................... 36
7.1 - FIRST CHECK ............................................................................................................................................. 36
7.2 - SEQUENCE OF OPERATION AND CONTROL .......................................................................................... 37
7.2.1 - CONTROL OPERATION ................................................................................................................... 37
7.2.2 - TEST SEQUENCE ............................................................................................................................ 37
7.3 - GENERAL CARE ......................................................................................................................................... 39
7.4 - REFRIGERANT CHARGE ........................................................................................................................... 39
7.5 - PRESSURE DROP IN THE PLATE EXCHANGER ..................................................................................... 40
7.5.1 - CWAZH072 ....................................................................................................................................... 40
7.5.2 - CWAZ-120 ........................................................................................................................................ 40
7.6 - ELECTRICAL CIRCUIT ................................................................................................................................ 41
7.6.1 - CWAZH072 380V .............................................................................................................................. 41
7.6.2 - CWAZ-120 380V ............................................................................................................................... 42
8. MAINTENANCE ................................................................................................................................................... 43
8.1 - ELECTRIC BOX ........................................................................................................................................... 43
8.2 - EVENTUAL FAILURES ................................................................................................................................ 44
8.3 - SUB-COOLING AND OVERHEATING CALCULATION ............................................................................... 47
9. CONSIDERATIONS ON THE EXCHANGERS CARE .......................................................................................... 48
10. START-UP REPORT .......................................................................................................................................... 48
11. CONVERSION TABLE R-407C .......................................................................................................................... 49
27
1 - NOMENCLATURE
CW A
Z
H
072 - - - S
E
Air Condensed Liquid Chiller
A : Air
Serial Design
E - Project version
(Refrigerante R-407C)
Z : 400/380V - 3Ph - 50Hz
– : Vertical Discharge (only for 120)
H : Horizontal Discharge (only for 072)
Nominal Capacity:
072 - 21.1 kW (6 Tons)
120 - 35.2 kW (10 Tons)
Plate type evaporator made in welded stainless steel.
28
S : Surrey
Coil Fins
– : Aluminum (Standard)
2 - GENERAL TECHNIQUES CHARACTERISTICS and PHYSICAL DATA – 50Hz
Characteristics
Compressor
Evaporator
Condenser
Devices of Operation
Devices of Security
Air Condensed Water Chiller CWAZ
Sizes
072
120
6
10
Nominal Capacity (TR)
380V / 3ph / 50Hz
Power Suplly
24V / 1ph / 50Hz
Comand Supply
1
1
Quantity Cold Storage Room
1
1
Quantity Capacity Stages
R-407C
Refrigerant
3.45
7.58
Refrigerant - Load (kg)
130
250
Operation weight (kg)
Scroll
Type
ZR72
SZ160
Model
1
Quantity
3600
Rotation (rpm)
POE
Carrier
P.N.: 70102011
Recommended Oil
1.95
3.25
Load Oil (l)
Blaze
Plate
Heat
Exchange
(Stain
Steel)
Type
B25x22
V45x20
Model
1
Quantity
1
Quantity of Circuit
3
2.20
4.60
Water Flow (m /h)
3.6 / 35
3.8 / 38
Pressure Drop (mca) / (kPa)
1
1”
1 /2”
Diameter (in.)
BSP
Conexion
Type
1/1
Quantity in/out
0.86
2.2
Front area (m²)
2
Number of Rows
15
Coil
FPI
9.52
Tube diameter (mm)
Aluminum with cooper pipes corrugated internally
Circuit Type
6
10
Quantity of Circuit
Axial
Type
3...610
3...660
Fan
Blades...Diameter (mm)
3
6600
10800
Flow (m /h)
Single-Phase
Engine
Type
PSC
Type
220V/ 1F/ 50Hz
Motor
Power supply
775
940
Rotation (rpm)
NEMA 48
Shell
O
6
Operation Termostat - Set Point ( C)
Open - 426 / Close - 320
High (psig)
Pressostat
Open - 27 / Close - 67
Low (psig)
4
Comand Fuse (A)
NOTE: For the unit power supply, it is necessary to install a thermo-magnetic circuit breaker. All the electric installation
shall comply with the local electric regulations. The chillers are for comfort use only. Their use for industrial and/or process
applications make the warranty void.
These units can be connected only to their corresponding Surrey fan-coil units. The units are supplied with scroll
compressors, which are sensible to their rotation direction. Excessive noise or equalized pressures indicate a reverse
rotation. Disconnect the unit from the power supply, and change the supply phase sequence. The operation in reverse
rotation makes the warranty void.
29
3 - SAFETY
4 - TRANSPORTATION
The CWAZ air conditioning units are designed to offer a
safe and reliable operation, when operated according to
the project specifications. Undoubtedly, due to the system
pressure, electric components and the movement of the
unit, some installation, start-up and maintenance aspects
of the unit shall be observed.
To move and transport the unit follow the directions below:
Only certified Surrey installers shall install, start-up and
maintain this equipment. When working on the unit, observe
all the warning tags placed on the unit, and follow all the
applicable safety regulations, wearing protective apparel
and equipment.
a) To lift the units, use brackets as indicated on picture 1.
b) Prevent ropes, chains or other devices from touching
the unit.
c) Do not tilt the unit while moving it, nor bend it more than
15° from the vertical position.
PROTECTION
BELT
WARNING
Disconnect the power supply before maintaining
and repairing the unit. It is possible that electric
discharges occur, which might cause personal injury
in case these safety precautions are not observed.
GRAVITY
CENTER
COMPRESSOR
SIDE
WARNING
Never put your hands inside the unit while the fan is
in operation.
Turn off the power supply before working on the unit.
Remove the fuses and take them with you to prevent
accidents. Leave a warning sign indicating the unit
is under repair.
IMPORTANT
To prevent damages to the unit during transportation,
do not remove the unit from its packaging until
positioning it at the definitive site. Suspend and
carefully deposits the equipment in the floor.
WARNING
Check the weights and the sizes of the units to be
sure their moving devices can bear the equipment
with safety.
5 - INSTALLATION
5.1 - RECEIVING AND INSPECTING THE UNIT
a) It confers the unit for the forma bill of sale of remittance.
carefully check and inspect the unit concerning eventual
damages caused by transportation. In case of damages
immediately file a claim to the shipping company and to
Surrey.
b) Check if the location power supply conforms to the
electrical characteristics of the equipment, specified on
the unit nameplate.
c) To keep the warranty, do not let the unit exposed to
bad weather or to accidents providing its immediate
transportation to the installation site or to any other safe
location.
30
5.2 - UNIT DIMENSIONS
5.2.1 - CWAZH072
AIR DIRECTION
ROTATION DIRECTION
WATER INLET
THREAD
AIR DIRECTION
WATER OUTLET
THREAD
ACCESS TO THE
EXPANSION VALVE
Before placing the unit on the site check the following items (all models):
a) The floor shall bear the weight of the unit in operation. (See item 2 - Physical Data). Refer to the structural project
of the building for the applicable regulations concerning the admissible load. If required, reinforce the structure.
b) Choose a location with space enough to allow repairs and general maintenance services. The front of the equipment
shall be free to allow the air flow and the access to the unit inside.
5.2.2 - CWAZ-120
AIR DIRECTION
WATER INLET
WATER OUTLET
2 THREADS
Before placing the unit on the site check the following items (all models):
a) The floor shall bear the weight of the unit in operation. (See item 2 - Physical Data). Refer to the structural project
of the building for the applicable regulations concerning the admissible load. If required, reinforce the structure.
b) Choose a location with space enough to allow repairs and general maintenance services. The front of the equipment
shall be free to allow the air flow and the access to the unit inside.
31
5.3 - COLD WATER PIPING/CONNECTIONS
Develop a piping design in a way it has minimum changes
of the elevation levels. Install manual or automatic air purge
valves at the highest points of the line, keeping the system
pressure through a pressurization tank with relief and
reducing valves. Install thermometers and pressure gauges
at the water outlet and inlet lines of the unit.
Voltage imbalance calculation:
- Voltage imbalance (%)=
= Max. deviation of the average voltage x 100
Voltage average
- Exemple:
380V - 3 - phase - 50Hz
- Measurement: AB = 383V
BC = 378V
AC = 374V
Install measurement points of the flow at the cold water
piping. To adjust as table, characteristics techniques, the
loss of nominal load of the evaporator.
It is recommended to use a globe valve to set the water
flow. Put draining connections at all the low points of the
hydraulic installation in order to allow a full draining of the
system. Install blocking valves near the water inlet and
outlet connections. To clean the lines before the operating
units use flexible connections at the chiller piping in order
to reduce the transmission of vibrations.
- Voltage average = 383 + 378 + 374 = 378 V
3
- Maximum deviation of the voltage average:
AB = 383V - 378V = 5V
BC = 378V - 378V = 0V
AC = 378V - 374V = 4V
5.4 - FILTERS
- Highest difference is 5V. Then, the voltage imbalance in % is:
ATTENTION
It is advisable to use mesh filters installed in the
evaporator inlet liquid line (Plate Exchanger), the
nearest possible to the inlet piping.
5 x 100 = 1,32%
378
(OK)
Notes:
- The following items can cause voltage imbalance:
5.5 - ELECTRIC CONNECTIONS
a) GENERAL POWER SUPPLY:
Install near the unit a switch isolator with fuses or a
thermo-magnetic circuit breaker with equivalent rupture
characteristics. The technical data of the unit are indicated
on table 5.6.
Consult an electric engineer or an accredited technician
to evaluate the electric system conditions and the proper
protection. Surrey is not liable for problems caused by the
non-observance of this recommendation.
It is recommended to use a lock to block the switch or any
open circuit breaker during the maintenance of the unit.
b) POWER CABLING:
Install the connection from the power input point of the
customer directly to the terminal of the unit.
The power supply cables should bear the sum of the
maximum currents. Do not forget to install the protective
cable (grounding). The voltage shall be in accordance to
the voltage of the nameplate.
The section of the feeder from the unit must more be
dimensioned for addition of maximum chains, or either, equal
the 125% of compressor or motor greater 100% of all the
other compressors and engines. The handles will have to
be classe 90°C or superior.
The voltage between the phases shall be balanced within
the 2% of imbalance and the current within 10%, with the
compressor in operation. Contact your local power supplier
in order to correct any improper voltage or the phase
imbalance.
32
•
Bad contact (in contact with contactors, electric
connections, loose cables, oxidized or burnt conductors);
•
Improper conductor sections;
•
Load unbalancing in 3-phase power supply system.
- The current imbalance calculation shall be made in the
same way as the voltage imbalance calculation.
c) COLD WATER FLOW SWITCH (CWFS)
On each unit there must be a cold water flow switch in
order to protect the equipment against low water flow
(Not provided/installer responsibility).
IMPORTANT
If a water flow switch is not installed, the equipment
warranty will be void.
The installation must be made in the water outlet
installation.
ATENÇÃO
It is necessary to have care in the installation of
the key of the flow cold water. The indicative arrow
marked in the lateral of the water flow will have to be
pointed in the direction to the flare in the exit nipple.
To great details it goes until the electrical diagram
and verifies the interconnection of the key flow with
the equipment.
5.6 - ELECTRICAL DATA
Voltage [ V ] / [Hz]
CWAZ
Power supply / Frequency
UNIT
Nominal
Min.
Max.
Compressor
Fan
Complementary Technical Data
Technical Data
Technical Data
Circuit A
RLA [A]
LRA [A]
KW
RLA [A]
P [HP]
KW Total RLA Total [A] KW Total [W] MOPA [A]
072
380 / 50
342
418
10
74
5,3
1,13
1/6
0,12
11,3
5,42
25
120
380 / 50
342
418
21,6
150
11,6
2,12
1
0,75
23,8
12,35
40
Legends:
RLA
LRA
MOPA
KW
Nominal Current (Rated Load Amps).
Locked Rotor Current (Locked Rotor Amps).
Maximum recommended capacity for the protection of the fuse against short circuit.
Consumed Rated Power
IMPORTANT NOTES:
Data from the supplier’s technical catalog.
1 - RLA, KW, RLA TOTAL and KW TOTAL refer to nominal operation data with the unit in operation.
Suction temperature: 45°F (7.2°C) and condensation temperature: 130°F (54.4°C) - ARI conditions.
2 - MOPA values shown in the table were calculated taking into consideration the maximum operation values of the unit.
3 - All compressors are Scroll.
33
34
CAP. (kW)
kW
l/s
CAP. (kW)
kW
l/s
CAP. (kW)
kW
l/s
CAP. (kW)
kW
l/s
CAP. (kW)
kW
l/s
CAP. (kW)
kW
l/s
CAP. (kW)
kW
l/s
CAP. (kW)
kW
l/s
CAP. (kW)
kW
l/s
Units
30
13,16
5,96
0,59
13,64
6,08
0,61
14,21
6,19
0,63
14,59
6,31
0,65
15,07
6,42
0,67
15,54
6,54
0,69
16,11
6,65
0,72
17,55
7,00
0,78
19,07
7,45
0,85
14,21
6,65
0,63
14,59
6,77
0,65
15,07
6,88
0,67
16,40
7,34
0,78
17,74
7,68
0,79
13,64
6,42
0,61
35
12,30
6,08
0,55
12,78
6,31
0,57
13,35
6,31
0,59
40
11,54
6,19
0,52
11,82
6,42
0,53
12,30
6,54
0,55
12,59
6,65
0,56
13,06
6,88
0,58
13,44
6,88
0,60
13,92
7,11
0,62
15,26
7,57
0,68
16,50
7,91
0,74
45
10,49
6,42
0,46
10,87
6,54
0,48
11,16
6,77
0,50
11,54
6,88
0,52
12,11
7,00
0,54
12,40
7,11
0,55
12,78
7,23
0,57
13,92
7,68
0,62
15,26
8,14
0,68
CWAZH072
Input Air Temperature at Condenser (°C)
50
9,44
6,54
0,42
9,92
6,65
0,44
10,20
6,88
0,45
10,49
7,00
0,46
10,87
7,11
0,48
30
27,41
12,52
1,23
28,45
12,75
1,28
29,50
12,98
1,32
30,26
13,21
1,36
31,31
13,44
1,40
32,35
13,79
1,45
33,59
13,90
1,51
36,45
14,71
1,63
39,68
15,63
1,78
29,50
13,90
1,32
30,26
14,13
1,36
31,31
14,36
1,40
34,16
15,28
1,63
36,92
16,20
1,66
28,45
13,56
1,28
35
25,69
12,87
1,15
26,64
13,10
1,19
27,79
13,33
1,24
40
23,98
13,10
1,08
24,65
13,44
1,11
25,60
13,67
1,15
26,26
14,02
1,18
27,22
14,25
1,22
27,98
14,48
1,25
28,93
14,82
1,30
31,78
15,74
1,43
34,35
16,66
1,54
45
21,79
13,44
0,97
22,55
13,67
1,00
23,22
14,13
1,04
24,07
14,25
1,08
25,12
14,59
1,13
25,79
14,82
1,15
26,64
15,17
1,19
28,93
16,20
1,30
31,78
17,12
1,42
CWAZ-120
Input Air Temperature at Condenser (°C)
CAP - Cooling capacity in kW
kW - Consumption in kW
The capacities are for a water thermal loop of 5.6 °C.
For other thermal loops, apply the same values, changing only the water flow in a way inversely proportional to the temperature loop.
16
13
10
9
8
7
6
5
4
Output Water
Temperature
(°C)
50
19,70
13,67
0,88
20,65
13,90
0,92
21,22
14,25
0,95
21,79
14,59
0,97
22,55
14,94
1,00
5.7 - PERFORMANCE DATA
6 - CONTROL SPECIFICATIONS
6.1 - LOGIC CONTROL UNIT
Description: Logic control unit for liquid chillers with the
following characteristics:
-
Control panel of the “Soft Touch” type with on/off
keys and indicators of: Power supply, compressor
in operation, timer, protection against freezing and
protection by pressostats.
IN 6
: Remote control activation: Without
connecting, the control is local through
the control front buttons, connecting
at 24VCa, the remote control is made
through the IN5 input.
A3
: Connector for the water temperature
sensor at the chiller outlet (inside
sensor).
-
Analog inputs for leaving/return water temperature
sensors.
-
Digital inputs for: Selection of the freezing temperature
(2°C o –7°C), protection pressostat and inlets to control
the distance.
A4
: Connector for the water temperature
sensor outside the chiller (outside
sensor).
-
Control outlets for the compressor and liquid line
solenoid.
OUT1
: Output for the activation of the
compressor contactor.
-
Potentiometer to set the temperature and water outlet.
OUT2
: Output for the liquid line solenoid
activation.
6.2 - CONTROL BOARD DIAGRAM
6.4 - CONTROL FRONT BUTTONS AND INDICATORS
Connecting
adjustment
temperature
To board control
Connecting
front of the
control
6.3 - DESCRIPTION OF TERMINALS
24V, GND : Power supply for the control board,
24Vca - 50/60Hz.
P1
: OFF button.
P2
: ON button.
L1
: Equipment ON indicator.
L2
: Operating compressor indicator.
IN 1
: Pressostat input
IN 2
: Power supply for the solenoid valve
IN 4
: Freezing temperature selection: without
connecting it is equivalent to 2°C,
connecting to 24Vca it is equal to –7°C
L3
: Activated anti-cycling timer indicator.
L4
: Anti-freeze device activated.
: Remote On/Off: without connecting,
the unit remains off, connecting at
24Vca, the unit will turn on remotely
or locally depending on the IN6 input.
L5
: Pressostat opening indicator.
L6
: Power supply ON Indicator.
IN 5
35
6.5 - SUGGESTED ELECTRIC CONNECTION
CONTROL UNIT
UC4230
Transformer
Pressure
switch
low
high
Select freezing
temperature
Open: 2°C
Closed: -7°C
Compressor
contact
On
Button on
Compressor
Turn on/turn off
remote
Open: Turn off
Closed: Turn on
Valve solenoid
Anti recycle
Button off
Freezing
Control select
Open: Local
Closed: Remote
Pressure
switch
Habilitation
CONTROL FRONT
Sensor
temperature
water return
Sensor
temperature
water exit
7 - OPERATION
7.1 - FIRST CHECK
Before starting-up the unit, check the prior conditions and
the following items:
a) Check the installation and operation of all the auxiliary
equipments, such as condensers and evaporators.
b) See if all the electrical connections are set.
c) Check if there is no refrigerant or water leaks.
d) Check if the power supply is proper for the electrical
characteristics of the unit (U= 10% nominal value).
36
e) Be sure the compressor can freely move in all
directions on the buffers (loosen the fastening screws
of the compressors).
f) Check if the direction of the fans is correct.
g) Check if the operating direction of the compressor
is correct.
7.2 - SEQUENCE OF OPERATION AND CONTROL
The following picture shows a drawing of a control board
of all units:
Every stop of the compressor will make the anti-cycling
indicator turn on. While the indicator is on, the compressor
will not start up even if the temperature of the return water
requires it.
The anti-cycling indicator will remain on for four minutes
after the compressor stop. In the last 30 seconds this
indicator will start to shut down, indicating the end of the
anti-cycling period.
1 - Indicator of equipment on
2 - Indicator of compressor in operation
3 - Indicator of activated anti-recycling timer
4 - Indicator of anti-freezing protection on
5 - Indicator of open pressostat
6 - On button
7 - Off button
8 - Indicator of enabled power supply
Notes: Before turning on the compressor, the chilled water
pump shall be started.
The unit will start operating automatically when the key
“on” is turned. For more details, check the item “Control
Operation”.
7.2.1 - CONTROL OPERATION
When the unit is powered up, all the lights of the control
panel will remain on for 5 seconds. In this status, it is possible
to activate the test mode (see “Test Sequence”).
After 5 seconds all the indicators will turn off, except
for the Habilitation. The outputs for the compressors and
solenoid valve will remain off.
Local Mode:
The control will be in this mode when the input IN6 is off.
The IN5 Input will operate to enable and the unit will operate
only if a 24V tension is applied to this input. The unit will turn
on when the on button is pressed and will turn off when the
off button is pressed.
Remote Mode:
The control will be in this mode when the IN6 input is
connected to 24V. The IN5 input will actuate on the unit on/
off. The unit will turn on when 24V is supplied to the IN5
input and will turn off in case of power supply lack.
For both operation modes, when the unit is put in
operation (pressing the on button or applying 24V to IN5
respectively, the “on” indicator will light.
The compressor will turn on if no protection is active
(anti-cycling indicators, freezing and pressostat off] and
if the temperature measured by the return water sensor
is 1°C higher then the one indicated in the potentiometer.
The return water is 1°C lower than the set temperature.
The solenoid valve will always turn off together with the
compressor and will turn on 3 seconds before it.
The Freezing indicator will turn on if the temperature
measured by the leaving water sensor is lower than 2°C.
This will cause the compressor to stop, the de-activation
of the solenoid valve and the anti-cycling indicator will turn
on. While the freezing indicator is on, the compressor will
not start up again. When the leaving water temperature
is higher than 4°C, the indicator will turn off, allowing the
compressor start-up.
If any pressostat connected to the IN1 input opens, the
Pressostat indicator will turn on, the compressor will stop
and the solenoid valve will be de-activated. The unit will
remain in this status even if the pressostat closes again. In
order to start-up again, the power supply must be turned
off for few seconds and turned on a little later.
The control can operate with a single sensor connected
to the A3 input. In this case, the temperature measured by
this sensor will be used to turn on or off the compressor
according to the set temperature, or to stop the unit due
to freezing.
7.2.2 - TEST SEQUENCE
If P1 and P2 are pressed during the first 5 seconds when
the indicators are on, a test status will start, comprising 10
steps.
During this sequence, the lights L1, L2, L3 and L4 will
exhibit the number of the step within the sequence, while
L5 will provide information related to each step.
Every time the P1 button is pressed, one step will be
advanced, until arriving at step 10. If P1 is pressed, the
sequence will restart at sep 1. If, at any moment, P2 is
pressed, one leaves the test sequence and enters in normal
operating status. One also goes to the normal operating
status if, during 3 minutes, no button is pressed.
The sequence steps are:
Step 1: L1, L2 and L3 off, L4 blinks.
L5 will light if the temperature measured by the outside
sensor (connected to A4) is between –5 °C and 15 °C.
Step 2: L1 and L2 off, L3 blinks, L4 off.
L5 will light if the temperature measured by the inside
sensor (connected to A3) is between –5 °C and 15 °C.
Step 3: L1 and L2 off, L3 and L4 blink.
L5 will turn on if there is 24 Vca in the IN4 terminal (input
for the frozen water temperature selection).
37
Step 4: L1 off, L2 blinks, L3 and L4 off.
L5 will turn on if the selected temperature is between
–5°C and 15°C.
Step 5: L1 off, L2 blinks, L3 off, L4 blinks.
Step 8: L1 blinks, L2, L3 and L4 off.
L5 will turn on after 1 second and will remain in this
status. The IN2-OUT2 contact will remain closed while
L5 is ON (Contact to handle the solenoid valve).
Step 9: L1 blinks, L2 and L3 off, L4 blinks.
L5 will always turn on.
Step 6: L1 off, L2 and L3 blink, L4 off.
L5 will turn on if there is 24Vca in the IN1 terminal
(Pressostat input).
Step 7: L1 off, L2, L3 and L4 blink.
L5 will turn on if there is 24 Vca in the IC3 terminal
(Input for the remote control contact).
Step 10: L1 blinks, L2 off, L3 blinks, L4 off.
L5 will turn on if there is 24 Vca in the IC4 terminal
(Input for the ON/OFF remote control).
L5 will turn on after 1 second and will remain on during
5 seconds. The IN1-OUT1 contact will remain closed
while L5 is ON (Contact for the compressor contactor
handling).
SPECIFICATIONS:
Power voltage:
24V ±15%, 50Hz or 60Hz.
Maximum consumption:
200mA
Operating temperature:
-20°C a +60°C
Digital inputs (IN1, IN4, IN5, IN6)
Maximum permanent voltage
80Vca ou 60Vcc
Input current
0,65mA @ 24Vca
(for IN1 add current in OUT1)
Maximum de-activation voltage
1Vca
Minimum activation voltage
4Vca
Answer time 0 to 24Vca
0,25s
Answer time 24 to 0Vca
1s
Analog inputs (A3,A4) Sensor type
NTC de 5kW @ 25°C
Temperature setting input
Temperature setting
Lineal potentiometer
Saídas digitais
• OUT1
Maximum voltage
80Vca
Maximum current
16A resistive charge
• OUT2
38
Maximum voltage
250Vca
Maximum current
16A resistive charge
Control board dimensions
121 x 123 mm
Control front dimensions
100 x 100 mm
Temperature setting dimensions
45 x 35 mm, high: 35mm with handle
included
Long cable in front of control
300mm
Long temperature setting cable
250mm
7.3 - GENERAL CARE
a) Keep the cabinet and the grids, as well as the area
around the unit as clean as possible.
b) Periodically clean the condenser coil with a soft brush.
If the fins are too dirty use low-pressure water or air in
the direction opposite to the air flow. Be careful not to
damage the fins. If they are creased, it is advisable to
use a proper fin comb to correct the problem.
f) Check if the Y filter and the water supply line are clean.
g) Check the operation of the cold water flow valve.
7.4 - REFRIGERANT CHARGE
These units are shipped with full refrigerant R-407C
charge.
c) Check the setting of the connections and other fixtures,
preventing vibrations, losses and noises.
In case a lack of refrigerant is found a equipment already
charged, proceed as indicated in the flowchart below:
d) Make sure the insulation of the plated parts and piping
are at the proper location and in good conditions.
ATTENTION
e) Periodically check if the voltage and the phase
imbalance is within the specific limits.
Never load refrigerant in the state for the side low
pressure of the system.
Procedure for reloading of refrigerant
START
LOCATE LOSS
FIX LOSS
CHECK TIGHTNESS
PERFORM VACUUM
CHARGE REFRIGERANT R-407C (PART CHARGE)
START-UP EQUIPMENT
COMPLETE REFRIGERANT CHARGE WITH R-407C
END
39
7.5 - PRESSURE DROP IN THE PLATE EXCHANGER
Pressure Drop (kPa)
7.5.1 - CWAZH072
Water flow (kg/s)
Pressure Drop (kPa)
7.5.2 - CWAZ-120
Water flow (kg/s)
40
ELECTRICAL DIAGRAM
AMR - YELLOW
AZL - BLUE
BRC - WHITE
CNZ - GRAY
LRJ - ORANGE
MRM - BROWN
PRT - BLACK
ROS - PINK
VIO - VIOLET
VRD - GREEN
VRM - RED
COLORS CODIFICATION
LEGEND:
BC - CONTROL TERMINAL BLOCK
LPS - LOW PRESSURE SWITCH
BF - POWER TERMINAL BLOCK
PC - DISPLAY (IHM)
COMP - COMPRESSOR
PLC - ELECTRONIC BOARD
CAP - CAPACITOR
TR - TRANSFORMER
CB - PUMP CONTACT
OFM - OUTDOOR FAN MOTOR
CC - COMPRESSOR CONTACTOR
VS - VALVE SOLENOID
CH - CRANCKASE HEATER
RT1 - LIVING WATER TEMPERATURE SENSOR
F - FUSE
RT2 - ENTERING WATER TEMPERATURE SENSOR
FS - FLOW SWITCH
PA - SET POINT TEMPERATURE ADJUST
HPS - HIGH PRESSURE SWITCH
* - ACESSORY
ICD - REMOTE SWITCH
-- -- -- CONNECT MADE IN FIELD
C - COMMON TERMINAL
BS - SENSOR TERMINAL BLOCK
PTC - COMPRESSOR TERMIC PROTECTOR (ONLY IN SOME
MODELS)
4 - IF THIS TEMPERATURE IS SETTED IN 2°C MINIMUM (WITHOUT ELECTRICAL BRIDGE
BETWEEN TERMINALS 5 AND IN4) AND PUT THE PA TO LESS OF 2°C , THE UNIT WILL BE
INTERRUPTED BY FREEZING.
3 - IF THE UNIT TURN OFF BY SOME REASON, THEN THE LED N°3 WILL BE ILUMINATED
INDICATING THAT THIS UNIT WILL TURN ON IN THE NEXT 4 MINUTES, 30 SEC, BEFORE THE
FINISHING OF THE MINUTES, THE LED N°3 WILL BEGIN BLINK ANNOUCING THE CONCLUSION
OF TIMER.
2 - CONNECT ELECTRICAL BRIDGE BETWEEN TERMINALS 5 AND IN6, IF IS DESIRED TO
COMMAND THE UNIT AT A DISTANCE BY THE ICD, IF:
ICD OPENED - BLINKING SLOW LED N°1.
ICD CLOSED - BLINKING FAST LED N°1.
IT MUST BE CONNECTED BETWEEN TERMINALS 5 AND 6, FLOW SWITCH, NORMALLY OPEN
CONTACT PUMP AND REMOTE SWITCH.
1 - CONNECT ELECTRICAL BRIDGE BETWEEN TERMINALS 5 AND IN4, IF WANT TO WORK IN LOW
TEMPERATURE (–7°C).
NOTES:
7.6 - ELECTRICAL CIRCUIT
7.6.1 - CWAZH072 380V
41
42
IMPORTANT:
TO LOOK THAT THE
NEUTRAL SHOULD BE
CONECTED IN L2.
ELECTRICAL DIAGRAM
AMR - YELLOW
AZL - BLUE
BRC - WHITE
CNZ - GRAY
LRJ - ORANGE
MRM - BROWN
PRT - BLACK
ROS - PINK
VIO - VIOLET
VRD - GREEN
VRM - RED
COLORS CODIFICATION
LEGEND:
BC - CONTROL TERMINAL BLOCK
BF - POWER TERMINAL BLOCK
COMP - COMPRESSOR
CAP - CAPACITOR
CB - PUMP CONTACT
CC - COMPRESSOR CONTACTOR
CH - CRANCKASE HEATER
F - FUSE
FS - FLOW SWITCH
HPS - HIGH PRESSURE SWITCH
ICD - REMOTE SWITCH
C - COMMON TERMINAL
BS - SENSOR TERMINAL BLOCK
PTC - COMPRESSOR TERMIC
PROTECTOR (ONLY IN SOME MODELS)
OFC - CONDENSER CONTACTOR
E1 - OVERLOAD RELAY (ADJUST 2,2A)
LPS - LOW PRESSURE SWITCH
PC - DISPLAY (IHM)
PLC - ELECTRONIC BOARD
TR - TRANSFORMER
OFM - OUTDOOR FAN MOTOR
VS - VALVE SOLENOID
RT1 - LIVING WATER TEMPERATURE
SENSOR
RT2 - ENTERING WATER TEMPERATURE
SENSOR
PA - SET POINT TEMPERATURE ADJUST
* - ACESSORY
-- -- -- CONNECT MADE IN FIELD
4 - IF THIS TEMPERATURE IS SETTED IN 2°C MINIMUM (WITHOUT ELECTRICAL
BRIDGE BETWEEN TERMINALS 5 AND IN4) AND PUT THE PA TO LESS OF 2°C , THE
UNIT WILL BE INTERRUPTED BY FREEZING.
3 - IF THE UNIT TURN OFF BY SOME REASON, THEN THE LED N°3 WILL BE
ILUMINATED INDICATING THAT THIS UNIT WILL TURN ON IN THE NEXT 4 MINUTES,
30 SEC, BEFORE THE FINISHING OF THE MINUTES, THE LED N°3 WILL BEGIN BLINK
ANNOUCING THE CONCLUSION OF TIMER.
2 - CONNECT ELECTRICAL BRIDGE BETWEEN TERMINALS 5 AND IN6, IF IS DESIRED
TO COMMAND THE UNIT AT A DISTANCE BY THE ICD, IF:
ICD OPENED - BLINKING SLOW LED N°1.
ICD CLOSED - BLINKING FAST LED N°1.
IT MUST BE CONNECTED BETWEEN TERMINALS 5 AND 6, FLOW SWITCH,
NORMALLY OPEN CONTACT PUMP AND REMOTE SWITCH.
1 - CONNECT ELECTRICAL BRIDGE BETWEEN TERMINALS 5 AND IN4, IF WANT TO
WORK IN LOW TEMPERATURE (–7°C).
NOTES:
7.6.2 - CWAZ-120 380V
8 - MAINTENANCE
8.1 - ELECTRIC BOX
a) GENERAL NOTES :
The electric box of the CWAZ units were designed in
order to make the inspection and maintenance services
easier. All the control, start-up and protection devices are
located there.
A time verified and cured the cause of disarms it, reseting
can to be made disconnect and restarting the unit in the
panel of control or through the restoration of force to the
command.
Exist two terminals block to control and power wire. In the
terminal block also be includ the ground terminal.
d) PROTECTION OF THE COMPRESSORS:
- Compressors 380V - Line break (intern)
b) PRESSURE SWITCH:
The pressure switch in the machines CWAZ are the
individual type both sides(High and Low). Both are rearm
automatic and of the side high it`s of the type miniature
connected in the discharge line.
Independent of it rearms it to be automatic or amnual
when disarming the machine is blocked for the module.
The valves of disarm these pressure switch are indicated
in the table of general characteristics.
The “line break” is a protection dispositive against overload
and superheating of the engine from the compressor that
is installed inside (in the stator of motor).
It directly acts in the circuit of engine force, rearming
automatically with the decrease of the temperature,
however the compressor will remain off due action of the
device anti-recycle. It rearms it can be made through the
key ON/OFF from the unit.
43
8.2 - EVENTUAL FAILURES
PROBLEMA
1. Unit does not start up.
POSSíVEL CAUSA
PROCEDIMENTO
Phases R, S, T are not in the correct * Revert the power supply cables in
sequence.
the connection.
Lack of power supply.
* Check power supply.
* Check fuses, circuit breakers and
switches.
* Check electrical contacts.
Inadequate voltage or out of the allowed * Check and correct.
limits.
2. Condenser fan does not run.
Burnt control fuses.
* Check control short circuit, wrong
connection or faulty items. Fix and
replace fuses.
Protection devices opened.
* Check pressostats, flow switches,
relays and auxiliary contacts.
Faulty contactor, motor or compressor.
* Test and replace.
Defective overload relay or contactor.
* Test and replace.
Defective motor.
* Test and replace.
Bad contact in the electrical connections. * Check and tighten.
3. Compressor ‘’roars” but does not
start up.
4. Compressor starts up, but does not
run continuously.
Low voltage.
* Check and tighten.
Faulty compressor motor.
* Replace compressor.
“Locked” compressor.
* Check and replace compressor.
Defective compressor or contactors.
* Test and replace.
Lack of refrigerant
* Check and correct loss.
* Add refrigerant if necessary.
Insufficient thermal load.
* Check design conditions.
C o m p r e s s o r m o t o r o v e r l o a d o r * Check protection device operation.
overheating.
Replace if necessary.
* Check voltage or phase imbalance.
Correct the problem.
* Check expansion valve adjustments.
* Check temperature (or pressure) at
suction and at condensation.
44
PROBLEMA
POSSíVEL CAUSA
5. Unit runs continuously, but with Excessive thermal load.
low performance.
Refrigerant lack.
PROCEDIMENTO
* Check project conditions.
* Check and fix leaks. Add refrigerant if
required.
Dirt in the condensers.
* Check and clean.
Defective compressor.
* Check compressor pressures and
currents. Replace if required.
Insufficient refrigerant supply in the * Check if there are obstructions in the
evaporator.
dryer filter, or in the lines. Replace or
correct.
* Check expansion valve obstruction.
Replace if necessary.
* Check the position of the expansion
valve bulb or equalizer tube. Correct
according to manufacturer specifications.
Faulty thermal insulation.
* Fix or replace.
Air in the system cold water.
* To take air of the system.
Oil in evaporator.
* Check and drain.
Compressor runs in reverse rotation.
* Check suction and discharge pressures.
In case reversion is detected, invert the
terminal power cables.
Check fan rotation.
6. High discharge pressure
Low air flow in condenser.
* Check fan rotation. Fix if necessary.
* Check motor operation. Replace if
necessary.
* Check dirt in the coil. Clean and provide
proper filtering.
Dirty condenser.
* Check and clean.
High condensation entering air
temperatures.
* Check condensation air short circuit or
insufficient air intake. To correct.
* Check components of the chilled water
installation. To correct.
7. Reduced discharge pressure.
Excess of refrigerant.
* Check and remove excess, setting subcooling between 8 and 11 °C.
Excessive air flow in the condenser.
* Check and adjust.
Refrigerant lack.
* Check and fix leaks. Add refrigerant if
required.
Defective compressor.
* Check suction and discharge pressures.
Replace if necessary.
Compressor runs in reverse rotation.
* Check suction and discharge pressures.
In case reversion is detected, invert the
terminal power cables.
45
PROBLEMA
POSSíVEL CAUSA
8. Presión succión reducida, Reduced discharge pressure.
pudiendo o no ocasionar la
Insufficient thermal load.
apertura del presostato de baja.
PROCEDIMENTO
* See item 7.
* Check design conditions.
Refrigerant lack.
* Check and fix leaks. Add refrigerant
if required.
Low evaporator water flow.
* Check water flow stopcocks in the
evaporator.
* Check setting of the cold water pump
stopcock.
* Check cold water filter.
Insufficient refrigerant supply in the * Check obstructions in the dryer filter or
evaporator.
in the lines. Replace or correct.
* Check expansion valve obstructions.
Replace if necessary.
* Check the position of the expansion
valve bulb, and equalizer tube. Fix
according to manufacturer specifications.
* Check solenoid valve operation.
9. High suction pressure
10. Water leaks
Excessive thermal load.
* Check design conditions.
Defective compressor.
* Check suction and discharge
pressures. Replace if necessary.
Compressor runs at reversed rotation.
* Check suction and discharge pressures.
In case, reversion is detected, invert the
terminal power cables.
Defective cold water connections.
* Check and correct.
Obstructed condensate draining.
* Check and clean condensate trays
and drains.
Improper installation of the draining lines. * Check connections and siphons.
Correct if necessary.
11. Noisy unit
Noisy compressor.
* Check expansion valve setting.
Check internal noises. Replace if
required.
Check correct phase sequence.
Vi b r a t i o n s i n t h e r e f r i g e r a n t o r
condensation water piping.
* Check and correct.
Panels or metallic parts not properly * Check and fix.
fastened.
12. Liquid line “sweats” (water Dryer filter with restricted passage.
condensation on the outside
surface)
13. Suction line “sweats”
46
* Remove restrictions and/or replace the
dryer filters.
The expansion valve accepts excessive * Fix the expansion valve.
refrigerant.
8.3 - SUB-COOLING AND OVERHEATING CALCULATION
SUB-COOLING
OVERHEATING
1. Definition:
1. Definition:
Difference between saturated condensation temperature
(TCS) and liquid line temperature (TLL).
Difference between suction temperature (Ts) and saturated
evaporation temperature (TEV).
SR = TCS - TLL
SA = Ts - TEV
2. Required measurement equipment:
2. Required measurement equipment:
•
•
•
•
•
•
•
•
Manifold
Bulb or electronic thermometer (with temperature sensor)
Filter or insulating foam
Pressure-Temperature Conversion Table for R-407C.
3. Measurement steps:
1°) Place the thermometer bulb or sensor in contact with the
liquid line near the dryer filter (only for 120 size). Assure
the surface is clean. Cover the bulb or sensor with foam,
to isolate it from the ambient temperature.
2°) Install the manifold at the discharge (high manometer)
and suction (low manometer) lines.
3°) After the operation conditions stabilize, read the pressure
in the discharge line manometer.
NOTE:
Measurement shall be made with the equipment
operating within the installation project conditions to
allow achieving the desired performance.
4°) From R-407C table, get saturated condensation
temperature (TCS).
Manifold
Bulb or electronic thermometer (with temperature sensor)
Filter or insulating foam
Pressure-Temperature conversion table for R-407C.
3. Measurement steps:
1°) Place thermometer bulb or sensor in contact with the
suction line, the closest possible to the expansion valve
bulb. The surface shall be clean and the measurement
performed at the upper tube portion to prevent false
readings. Cover bulb or sensor with foam, to isolate them
from the ambient temperature.
2°) Install the manifold in the discharge (high manometer)
and suction (low manometer) lines.
3°) When the operation conditions stabilize, read the
pressure in the suction line manometer. From R-407C
table, get saturated evaporation temperature (TEV).
4°) Read the suction temperature (Ts) in the thermometer.
Perform several readings and calculate the average.
This will be the adopted temperature.
5°) Subtract the saturated evaporation temperature
(TEV) from the suction temperature: the difference is
overheating.
6°) If the sub-cooling is between 8°C and 11°C, the charge
is correct. If it is below, add refrigerant; if it is above, take
away some refrigerant.
6°) If the overheating is between 4°C and 6 °C, the expansion
valve setting is correct. If it is below, much refrigerant is
being injected into the evaporator and it is necessary to
close the valve (turn set screw to the right - clockwise). If
the overheating is high, little refrigerant is being injected
into the evaporator and it is necessary to open the valve
(turn set screw to left - counterclockwise).
4. Calculation example:
4. Calculation example:
5°) Read the liquid line temperature (TLL) on the
thermometer. Subtract it from the saturated condensation
temperature; the difference is the sub-cooling.
- Discharge line pressure
(manometer) .................................. 20,34 Bar (295 psig)
- Saturated condensation temperature (table) ...........49°C
- Liquid line temperature (thermometer) ....................45°C
- Sub-cooling (subtraction) ..........................................4°C
Add refrigerant!
- Suction line pressure
(manometer) ......................................4,75 Bar (69 psig)
- Suction line temperature (thermometer)................. 15°C
- Saturated evaporation temperature (table) .............. 7°C
- Overheating (subtraction) ......................................... 8°C
High overheating: open the expansion valve!
Obs.: After to make TEV adjustment don’t forget to replace
the helmet.
47
9 - CONSIDERATIONS ON THE EXCHANGERS CARE
In order to prevent damages to the exchangers that can make the warranty void, some preventive care
must be adopted:
•
Protection against water flow shortage. (Flow Switch)
•
Interlocking of the pump and safety systems to cause the machine to stop in case of any failure in
the water circulation system.
•
Water circulation before the compressor start-up.
•
Evacuation of the water circuit in winter, or in low temperature periods.
•
In locations where the temperatures decrease to below 0°C, use glycol to evacuate the system.
•
Periodic checking of the good operation of the safety system.
•
Installation of a “Y” filter, mesh 20, to protect them against obstructions.
•
Use of a condensation control in machines that operate in intermediate seasons.
•
Use of the proper rate of Glycol when operating at a leaving water temperature below 4.5°C.
•
Minimum water volume in the system: 12liters/ton. for air conditioning applications and 24liters/ton.
for process applications.
•
Installation of an accumulator tank in case it does not meet the minimum requirements of water
volumes.
•
The solutions must be prevented: Chlorines > 300mg/l, Chlorine-free sulphite, solutions with PH < 7.
•
The water circuit shall count on an expansion tank or a device to prevent the pressure surges in
the piping.
Do not remove any protective device from the unit.
10 - START-UP REPORT
A) INFORMAÇÃOES PRELIMINARES
Customer: _____________________________________________________________________________
Installation Site: ________________________________________________________________________
Installer: ______________________________________________________________________________
Distributor: ____________________________________________________________________________
Start-up performed by:__________________________ Date: ____________________________________
Equipment: ____________________________________________________________________________
Liquid chiller model:____________________ Serial number: ____________________________________
48
11 - CONVERSION TABLE R-407C
Bar
(relative)
Saturated
temperature of
boiling point
Saturated
temperature of
dew point
Bar
(relative)
Saturated
temperature of
boiling point
Saturated
temperature of
dew point
Bar
(relative)
Saturated
temperature of
boiling point
Saturated
temperature of
dew point
1
-28.55
-21.72
10.5
23.74
29.35
20
47.81
52.55
1.25
-25.66
-18.88
10.75
24.54
30.12
20.25
48.32
53.04
1.5
-23.01
-16.29
11
25.32
30.87
20.5
48.83
53.53
1.75
-20.57
-13.88
11.25
26.09
31.62
20.75
49.34
54.01
2
-18.28
-11.65
11.5
26.85
32.35
21
49.84
54.49
2.25
-16.14
-9.55
11.75
27.6
33.08
21.25
50.34
54.96
2.5
-14.12
-7.57
12
28.34
33.79
21.5
50.83
55.43
2.75
-12.21
-5.7
12.25
29.06
34.5
21.75
51.32
55.9
3
-10.4
-3.93
12.5
29.78
35.19
22
51.8
56.36
3.25
-8.67
-2.23
12.75
30.49
35.87
22.25
52.28
56.82
3.5
-7.01
-0.61
13
31.18
36.55
22.5
52.76
57.28
3.75
-5.43
0.93
13.25
31.87
37.21
22.75
53.24
57.73
4
-3.9
2.42
13.5
32.55
37.87
23
53.71
58.18
4.25
-2.44
3.85
13.75
33.22
38.51
23.25
54.17
58.62
4.5
-1.02
5.23
14
33.89
39.16
23.5
54.64
59.07
4.75
0.34
6.57
14.25
34.54
39.79
23.75
55.1
59.5
5
1.66
7.86
14.5
35.19
40.41
24
55.55
59.94
5.25
2.94
9.11
14.75
35.83
41.03
24.25
56.01
60.37
5.5
4.19
10.33
15
36.46
41.64
24.5
56.46
60.8
5.75
5.4
11.5
15.25
37.08
42.24
24.75
56.9
61.22
6
6.57
12.65
15.5
37.7
42.84
25
57.35
61.65
6.25
7.71
13.76
15.75
38.31
43.42
25.25
57.79
62.07
6.5
8.83
14.85
16
38.92
44.01
25.5
58.23
62.48
6.75
9.92
15.91
16.25
39.52
44.58
25.75
58.66
62.9
7
10.98
16.94
16.5
40.11
45.15
26
59.09
63.31
7.25
12.02
17.95
16.75
40.69
45.71
26.25
59.52
63.71
7.5
13.03
18.94
17
41.27
46.27
26.5
59.95
64.12
7.75
14.02
19.9
17.25
41.85
46.82
26.75
60.37
64.52
8
14.99
20.85
17.5
42.41
47.37
27
60.79
64.92
8.25
15.94
21.77
17.75
42.98
47.91
27.25
61.21
65.31
8.5
16.88
22.68
18
43.53
48.44
27.5
61.63
65.71
8.75
17.79
23.57
18.25
44.09
48.97
27.75
62.04
66.01
9
18.69
24.44
18.5
44.63
49.5
28
62.45
66.49
9.25
19.57
25.29
18.75
45.17
50.02
28.25
62.86
66.87
9.5
20.43
26.13
19
45.71
50.53
28.5
63.27
67.26
9.75
21.28
29.96
19.25
46.24
51.04
28.75
63.67
67.64
10
22.12
27.77
19.5
46.77
51.55
29
64.07
68.02
10.25
22.94
28.56
19.75
47.29
52.05
29.25
64.47
68.39
49
ANOTACIONES / NOTES
_______________________________________________________________________________________
_______________________________________________________________________________________
_______________________________________________________________________________________
_______________________________________________________________________________________
_______________________________________________________________________________________
_______________________________________________________________________________________
_______________________________________________________________________________________
_______________________________________________________________________________________
_______________________________________________________________________________________
_______________________________________________________________________________________
_______________________________________________________________________________________
_______________________________________________________________________________________
_______________________________________________________________________________________
_______________________________________________________________________________________
_______________________________________________________________________________________
_______________________________________________________________________________________
_______________________________________________________________________________________
_______________________________________________________________________________________
_______________________________________________________________________________________
_______________________________________________________________________________________
_______________________________________________________________________________________
_______________________________________________________________________________________
_______________________________________________________________________________________
_______________________________________________________________________________________
_______________________________________________________________________________________
_______________________________________________________________________________________
_______________________________________________________________________________________
_______________________________________________________________________________________
_______________________________________________________________________________________
_______________________________________________________________________________________
50
51
A criterio de la fábrica y teniendo en vista el perfeccionamiento del producto, las características citadas en este encarte podrán sufrir alteraciones en cualquier momento, sin previo aviso.
At the manufacturer’s discretion and aiming at improvements in the product, the characteristics herein contained may be changed without
prior notice.
IOM Surrey CWAZ - B - 07/13
00DCC90080000A