1
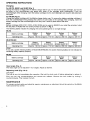
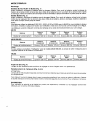
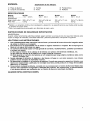
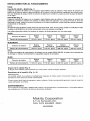
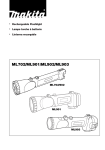
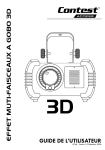
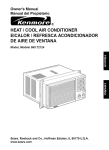
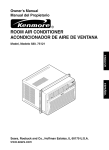
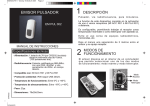
Rechargeable TorchlRechargeable Flashlight
Lampe Torche a Batterie
Linterna Recargable
ML702/ML901/M L902/ML903
1
2
3
4
5
2
ENGLISH
Explanation of general view
0 Set plate
0 Screw
@ Battery cartridge
@ Ring
@ Bulb holder
@ Reflector
SPECIFICATIONS
Model
ML702
Bulb ......................... 7.2V 0.55A
Dimensions
(L x W x H) ............. 283 x 67 x 71 mm
ML901
9.6V 0.5A
ML902
9.6 V 0.5 A
ML903
9.6V 0 . 5 A
254 x 67 x 96 mm
325 x 67 x 71 mm
254 x 77 x 98 mm
(11-1/8"~2-5/8"~2-13/16")
(lOx2-5/8"~3-3/4)
Net weight ........._..._.
0.3 kg (0.66 Ibs)
0.3 kg (0.66 Ibs)
(12-13/16'x2-5/8"x2-13/16')(1Ox3'x3-7/8")
0.3 kg (0.66 Ibs)
0.3 kg (0.66 Ibs)
Due to the continuing program of research and development, the specifications herein are subject to change
without prior notice.
Note: Specifications may differ from country to country.
IMPORTANT SAFETY INSTRUCTIONS
WARNING:
When using electric tools, basic safety precautions should always be followed to reduce the risk of fire, electric
shock, and personal injury, including the following:
READ ALL INSTRUCTIONS.
1. Read this instruction manual and the charger instruction manual carefully before use.
2. This torchlflashlight is not water-proof. Do not use it in damp or wet locations. Do not expose it to
rain or snow. Do not wash it in water.
3. A short-circuit can cause a large current flow, overheating, possible burns and even a breakdown.
(1) Do not touch the inside of the torchlflashlight head with tweezers, metal tools, etc.
(2) Do not touch the battery terminals with any conductive material.
(3) Avoid storing the battery cartridge in a container with any metal objects such as nails, coins, etc.
4. Never expose the battery cartridge to flames, fire or great heat. Breakage may cause release of
injurious material.
5. Do not disassemble the charger or battery cartridge; take it to a qualified serviceman when service
or repair is required. Incorrect reassembly may result in a risk of electric shock or fire.
6. If any problem develops, consult your nearest Makita Service Center or dealer. To maintain product
safety and reliability, repairs, maintenance or adjustment should be carried out by Makita
Authorized Service Center.
SAVE THESE INSTRUCTIONS.
For USA only
Recycling the Battery
The only way t o dispose of a Makita battery is to recycle it. The law
prohibits any other method of disposal.
To recycle the battery:
1. Remove the battery from the
tool.
ps
Ni-Cd
2. a). Take the battery to your nearest Makita Factory Service Center
or
b). Take the battery to your nearest Makita Authorized Service Center or Distributor that has been
designated as a Makita balterv recvclina location.
Call your nearest Makita Sewice Center or Distributor to determine the location that provides Makita
battery recycling. See your local Yeltow Pages under "Tools-Electric".
I
I
-
3
.
OPERATING INSTRUCTIONS
Charging
For ML702, ML901 and ML902 (Fig. 1)
Charge the battery cartridge with the Makita charger before use. To remove the battery cartridge, pull out the
set plate on the torch/flashlight and grasp both sides of the cartridge while withdrawing it from the
torch/flashlight. After charging, insert the battery cartridge into the torch/flashlight and snap the set plate back
into place.
For ML903 (Fig. 2)
Charge the battery cartridge with the Makita charger before use. To remove the battery cartridge, withdraw it
from the torch/flashlight while pressing the buttons on both sides of the cartridge. After charging, insert the
battery cartridge into the torch/flashlight all the way until it locks in place with a little click.
-
NOTE:
Battery cartridges 9100, 9101, 9101A, 9102, 9102A can be used on ML903 if you install the set plate. Install
the set plate on ML903 with the screw provided as shown in Fig. 3.
The following tables indicate the charging time and operating time on a single charge.
ML702
1
Battery cartridge
Operating time
.
Battery
Battery
Battery
Battery
9100/9120
9101/9101A
9102/9102N9122
9133
Approx. 120 min. Approx. 170 min. Approx. 200 min. Approx. 220 min.
ML902
Battery cartridge
Operating time
Battery
Battery
Battery
Battery
9001
9002
9033
Approx. 120 min. Approx. 170 min. Approx. 200 min. Approx. 220 min.
9000
Head angle (Fig. 4)
The head angle can be adjusted in four stages. Adjust as desired.
Replacing bulb (Fig. 5 & 6)
CAUTION:
The bulb is very hot immediately after operation. Wait until the bulb cools off before attempting to replace it.
First, turn the ring counterclockwise and remove the reflector. Remove the bulb holder by turning it
counterclockwise. Then replace the bulb.
.
MAINTENANCE
To maintain product safety and reliability, repairs, maintenance or adjustment should be carried out by Makita
Authorized Service Center.
4
FRANCAIS
DescriDtif
‘3Plaque de fixation
@ Vis
@
@
Batterie
@ Douille d’ampoule
8
Bague
SPECIFICATIONS
Modele
ML702
Ampoule ................ 7,2V 0,55A
Dimensions
( L x W x H ) ............. 2 8 3 x 6 7 ~ 7 mm
1
Poids net .................0,3kg
ML901
9,6 V 0,5 A
Reflecteur
ML902
9,6V 0,5A
ML903
9,6V 0,5A
254x67x96mm
325x67~71
mm
0 3 kg
0 3 kg
254x77x98mm
0 3 kg
Etant donne I’evolutionconstante de notre programme de recherche et de developpement, les specifications
contenues dam ce manuel sont sujettes a modification sans preavis.
Note : Les specifications peuvent varier suivant les pays.
CONSIGNES DE SECURITE IMPORTANTES
AVERTISSEMENT :
Lorsque vous utilisez un outil electrique, vous devez toujours observer un certain nombre de consignes de
securite elementaires afin d’eviter tout risque de feu, de choc electrique et de blessures physiques,
notamment :
LISEZ TOUT LE MODE D’EMPLOI.
1. Avant I’utilisation, lisez attentivement ce mode d’emploi et le mode d’emploi du chargeur.
2. La l a m p torche n’est pas etanche. Ne I’utilisez pas dans des endroits humides ou mouilles. Ne
I’exposez pas a la pluie ni a la neige. Ne la lavez pas a I’eau.
3. Un court-circuit peut provoquer un fort debit de courant, une surchauffe, parfois des blessures et
mi?“ une panne.
(1) Ne touchez pas I’interieur de la t6te de la lampe torche avec des pinces, des outils metalliques,
etc.
(2) Ne touchez pas les bornes de la batterie avec un materiau conducteur :
(3) Evitez de ranger la batterie dans un conteneur renfermant des objets metalliques, par exemple
des clous, des pieces de monnaie, etc.
4. N’exposez jamais la batterie aux flammes, au feu ni a une forte chaleur. Une rupture pourrait liberer
des matieres dangereuses pour la sante.
5. Ne demontez pas le chargeur ni la batterie ; portez-les a un technicien qualifie s’ils ont besoin d’un
entretien ou d’une reparation. Tout remontage incorrect pourrait entrainer un risque de choc
electrique ou de feu.
6. En cas de probleme, consultez le Centre de service apres-vente ‘Makita le plus proche de votre
domicile ou votre agent. Pour maintenir la securite et la fiabilite du produit, les reparations,
I’entretien ou les reglages doivent 6tre effectues par le Centre d’Entretien Makita.
CONSERVEZ CES INSTRUCTIONS.
5
MODE D’EMPLOI
Batterie
7033
Environ 220 mn
Batterie
Batterie
7000
Batterie
7001
Batterie
7002
Duree de fonctionnement
Environ 120 mn
Environ 170 mn
Environ 200 mn
Batterie
Batterie
9100/9120
Batterie
91 01/9101A
Batterie
9102/9102Al9122
Duree de fonctionnement
Environ 120 mn
Environ 170 mn
Environ 200 mn
Batterie
9133
Environ 220 mn
Batterie
9000
Environ 120 mn
Batterie
9001
Environ 170 mn
Batterie
9002
Environ 200 mn
Batterie
9033
Environ 220 mn
Batterie
I
Duree de fonctionnement
I
I
1
I
Angle de tkte (Fig. 4)
L‘angle de tdte possede quatre positions de reglage au choix. Reglez selon vos preferences
Remplacement de I’ampoule (Fig. 5 et 6)
ATTENTION :
L‘ampoule est tres chaude lorsqu’elle vient de fonctionner. Attendez que I’ampoule ait refroidi avant de proceder
au remplacement.
Tout d’abord, tournez la bague dans le sens inverse des aiguilles d’une montre et retirez le reflecteur. Retirez
la douille d’ampoule en la tournant dans le sens inverse des aiguilles d’une montre. Puis, remplacez I’ampoule.
ENTRETIEN
Pour maintenir la securite et la fiabilite du produit, les reparations, I’entretien ou les reglages doivent dtre
effectues par le Centre d’Entretien Makita.
6
ESPANOL
Explicacion de 10s dibujos
0 Placa de fijacion
0 Tornillo
@ Cartucho de baterias
@ Anillo
@ Portabombilla
@ Reflector
ESPECIFICACIONES
Modelo
ML702
Bombilla .................. 7,2 V 0 3 5 A
Dimensiones
(largo x ancho x alto) .._283 x 67 x 71 mm
Peso net0 ................0,3 kg
ML901
9,6 V 0,5A
ML902
9,6 V 0,5 A
ML903
9,6V 0,5A
254 x 67 x 96 mm
0,3 kg
325 x 67 x 71 mm
0,3 kg
254 x 77 x 98 mm
0 3 kg
Debido a un programa continuo de investigaciony desarrollo, las especificacionesaqui dadas estan sujetas
a cambios sin previo aviso.
Nota: Las especificaciones pueden ser diferentes de pais a pais.
INSTRUCCIONES DE SEGURIDAD IMPORTANTES
ADVERTENCIA:
Cuando utilice herramientas electricas debera seguir siempre las precauciones de seguridad basicas para
reducir el riesgo de incendios, sacudidas electricas y lesiones personales, incluyendo lo siguiente:
LEA TODAS LAS INSTRUCCIONES.
1. Lea cuidadosamente este manual de instrucciones y el manual de instrucciones del cargador antes
de utilizar la linterna y el cargador.
2. Esta linterna no es impermeable. No la utilice en lugares humedos o mojados. No la exponga a la
lluvia ni a la nieve. No la lave con agua.
3. Un cortocircuito puede causar un flujo grande de corriente, recalentamiento, posibles quemaduras
e incluso una averia.
(1) No toque el interior de la cabeza de la linterna con pinzas, herramientas metalicas, etc.
(2) No toque 10s bornes de la bateria con ningun material conductor.
(3)Evite guardar el cartucho de baterias en un recipiente que tenga objetos metalicos tales como
clavos, monedas, etc.
4. Nunca exponga el cartucho de baterias a las llamas, al fuego o a un calor excesivo. Las roturas
pueden causar escapes de materiales nocivos.
5. No desmonte el cargador ni el cartucho de baterias. Cuando sea necesario repararlos, llevelos a un
tecnico en reparaciones cualificado. Un montaje incorrect0 podria producir un riesgo de sacudida
electrica o un incendio.
6. Si se produce cualquier problema, consulte con su concesionario o Centro de Servicio Makita mas
cercano. Para mantener la seguridad y fiabilidad del productoi las reparaciones, el mantenimiento
y 10s ajustes deberan ser realizados por un Centro de Servicio Autorizado de Makita.
GUARDE ESTAS INSTRUCCIONES.
INTRUCCIONES PARA EL FUNCIONAMIENTO
Carga
Para ML702, ML901 y ML902 (Fig. 1)
Cargue el cartucho de bateria con el cargador rapido Makita antes de utilizarlo. Para extraer el cartucho de
bateria de la linterna, saque la placa de fijacion de la linterna y tire del cartucho sujetandolo por ambos lados.
Una vez finalizada la carga, inserte el cartucho de bateria en la linterna y vuelva a poner la placa de fijacion
en su lugar.
Para ML903 (Fig. 2)
Cargue el cartucho de bateria con el cargador rapido Makita antes de utilizarlo. Para extraer el cartucho de
bateria de la linterna, presione 10s botones a ambos lados del cartucho a la vez que tira de el. Una vez
finalizada la carga, inserte el cartucho de bateria en la linterna metiendolo a tope hasta que quede bloqueado
produciendo un chasquido.
NOTA:
Si instala la placa de fijacion podra utilizar 10s cartuchos 9100,9101,9101A, 9102,9102Acon el ML903. lnstale
la placa en el ML903 con el tornillo suministrado como se muestra en la Fig. 3.
Las tablas siguientes indican 10s tiempos de carga y de funcionamiento con una sola carga.
ML702
Cartucho de bateria
Tiempo de funcionamiento
Cartucho de bateria
Tempo de funcionamiento
Bateria
7000
120 min. aprox.
Bateria
7001
170 min. aprox.
Bateria
7002
200 min. aprox.
Bateria
7033
220 min. aprox.
Bateria
9100/9120
120 min. aprox.
Bateria
Bateria
9101/9101A
9102/9102N9122
170 min. aprox.
200 min. aprox.
Bateria
9133
220 min. aprox.
(Nota)
Si utiliza una bateria de comprobacion de energia con el modelo ML901/ML903, la bateria de comprobacion
de energia no indicara correctamente la capacidad restante de la bateria.
ML902
Cartucho de bateria
Tempo de funcionamiento
I
Bateria
9000
120 min. aprox.
1
Bateria
9001
170 min. aprox.
I
Bateria
9002
200 min. aprox.
I
Bateria
9033
220 min. aprox.
II
Angulo de la cabeza (Fig. 4)
El angulo de la cabeza puede ajustarse en cuatro pasos. Ajuste el angulo deseado.
Reemplazo de la bombilla
(Fig.5 y 6)
PRECAUCION:
La bombilla estara rnuy caliente inmediatamente despues de haber estado funcionando. Espere a que la
bombilla se enfrie antes de intentar reemplazarla.
Primero, gire el anillo hacia la izquierda y quite el reflector. Quite el portabombilla girandolo hacia la izquierda.
Luego reemplace la bombilla.
MANTENIMIENTO
Para mantener la seguridad y fiabilidad del producto, las reparaciones, el mantenimiento y 10s ajustes deberan
ser realizados por un Centro de Servicio Autorizado de Makita.
Makita Corporation
3-1 1-8, Sumiyoshi-cho,
Anjo, Aichi 446-8502 Japan
884052B069