1
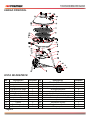
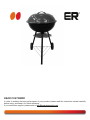
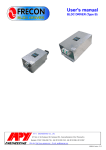
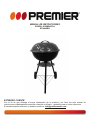
MANUAL DE INSTRUCCIONES
PARRILLA BARBACOA
ED-4449BQ
ESTIMADO CLIENTE
Con el fin de que obtenga el mayor desempeño de su producto, por favor lea este manual de
instrucciones cuidadosamente antes de comenzar a utilizarlo, y guárdelo para su futura referencia.
Si necesita soporte adicional, no dude en escribir a: [email protected]
LÍNEAS DE SERVICIO AL CLIENTE PREMIER
Venezuela:
Colombia:
Panamá:
Sitio Web:
E-mail:
0800 – ELECTRIC (353-2874)
01-900-331-PEJC (7352)
300-5185
www.premiermundo.com
[email protected]
NOTA
Nos reservamos el derecho de modificar las especificaciones, características y/u operación de esta
unidad sin previo aviso, con el fin de continuar las mejoras y desarrollo del mismo.
Pagina 1
UNIDAD PRINCIPAL
VISTA DE DESPIECE
No.
1
2
3
4
5
6
7
8
9
10
11
12
Descripción
Cubierta
Rejilla de cocción
Rejilla de carbón
Recipiente de fuego
Soporte de patas
Cenicero
Pata larga
Rejilla de trípode
Espaciador
Rueda
Arandela grande
Tuerca roscada
Pagina 2
Cantidad
1
1
1
1
3
1
1
1
2
2
6
2
No.
13
14
15
16
17
18
19
20
21
22
23
24
Descripción
Tornillo (M4 x 20mm)
Manija de la cubierta
Soporte de suspensión de la tapa
Arandela pequeña
Tuerca
Ventilación de cenizas
Manija de recipiente de fuego
Tornillo (M6 x 20mm)
Tornillo (M4 x 10mm)
Ventilación de aire
Manija de ventilación
Pata pequeña
Cantidad
2
1
1
4
4
1
2
4
2
1
1
2
INSTRUCCIONES DE ENSAMBLAJE
1. UNIR LAS PATAS Retire el tornillo y la arandela de las patas (7). Coloque el soporte de patas (5)
sobre el mismo extremo y asegure al recipiente de fuego (4) con la arandela y el tornillo. Repita este
procedimiento para cada pata.
2. COLOCAR LAS RUEDAS Ajuste la rejilla de trípode (8) en los orificios de cada pata. Introduzca el
extremo con gancho de la repisa en la pata con el tapón de goma. Coloque los espaciadores (9) en el
extremo roscado de la rejilla del trípode (8) que se encuentran a través de las otras 2 patas y luego
coloque las ruedas (10). Continúe con la arandela (11) y luego la tuerca roscada (12). Asegure
firmemente con pinzas.
3. COLOCAR LAS MANIJAS DEL RECIPIENTE DE FUEGO Monte un tornillo (20) con una arandela
(11) y colóquelo a través de los orificios de las manijas en el interior del recipiente de fuego. Coloque las
manijas (19) uniéndolas al tornillo (20) desde la parte exterior del recipiente de fuego.
4. COLOCAR LA VENTILACIÓN Coloque la ventilación (18) en la parte inferior del recipiente de fuego
con los dientes en el orificio adecuado. Monte el tornillo más pequeño (21) con una arandela (16) y
colóquelo a través de la ventilación. En la parte inferior del recipiente una la manija de ventilación (23) y
asegure firmemente con la tuerca (17).
5. UTILIZAR LA TAPA Coloque el tornillo (13) a través de los orificios en la manija (14) y luego monte
en la tapa asegurando con el soporte de suspensión de la tapa (15), la arandela (16) y la tuerca (17).
Una la tapa de ventilación de aire (22) montando el tornillo más pequeño (21) con una arandela (16).
Colóquelo a través de la ventilación y la tapa de cocción (1) asegurando con una tuerca (17).
6. TERMINACIÓN Coloque la rejilla de carbón (3) y la rejilla de cocción (2) en el recipiente de fuego.
Coloque cenicero (6) entre las patas y fije como muestra la ilustración.
INSTRUCCIONES DE SEGURIDAD
•
•
•
•
•
•
•
Esta BBQ está diseñada para ser utilizada únicamente en exteriores. No la utilice en lugares
cerrados.
Coloque la BBQ en un lugar firme lejos de cercas de madera, árboles u otros objetos inflamables.
No utilice gasolina con la rejilla. Utilice únicamente carbón adecuado cumpla con las normas para
parrilla.
No coloque un volumen de carbón que sobrepase el 75% de capacidad del recipiente.
La BBQ debe ser calentada y el carbón debe mantenerse rojo por al menos 30 minutos antes de
cocinar por primera vez. No cocine antes de que el carbón tenga una capa de cenizas.
Mantenga la BBQ fuera del alcance de los niños y las mascotas cuando la esté utilizando.
Cuando el carbón se enciende, la parrilla se pone muy caliente. Utilice guantes apropiados para
cocción y utensilios para evitar el contacto con la piel con todas las superficies metálicas de la
parrilla.
Pagina 3
INSTRUCTION MANUAL
BBQ GRILL
ED-4449BQ
DEAR CUSTOMER
In order to achieve the best performance of your product, please read this instruction manual carefully
before using, and keep it for future reference.
If you need extra support, please write to [email protected]
PREMIER CUSTOMER SERVICE
Venezuela:
Colombia:
Panama:
Website
E-mail:
0800 – ELECTRIC (353-2874)
01-900-331-PEJC (7352)
300-5185
www.premiermundo.com
[email protected]
NOTE
This unit may be submitted to changes in specifications, characteristics and/or operation without prior
notice to the user, in order to continue improving and developing its technology.
Pagina 1
EXPLODE VIEW
Pagina 2
Code
NO.
1
2
3
4
5
6
7
8
Cover
Cooking grid
Charcoal grid
Fire bowl
Leg Holder
Ash tray
Long leg
Tripod grill
QTY.
pcs
1
1
1
1
3
1
1
1
Code
NO.
13
14
15
16
17
18
19
20
9
Spacer
2
21
10
11
12
Wheel
Large Washer
Cap Nut
2
6
2
22
23
24
Description.
Description.
Screw (M4 x 20mm)
Cover handle
Lid hanger bracket
Small Washer
Nut
Ash vent
Fire bowl Handle
Screw (M6 x 20mm)
Screw (M4mm x
10mm)
Air vent
Vent Handle
Short legs
QTY.
pcs
2
1
1
4
4
1
2
4
2
1
1
2
ASSEMBLY
SAFETYINSTRUCTION
GUIDELINES
1) Attaching the Legs
Remove the screw and washer from the legs (7). Put the leg holder (5) over the same end and secure to
the fire bowl (4) with the washer and screw. Repeat this process for each leg.
2) Fitting the Wheels
Fit the tripod grill (8) into the holes on each leg. Insert the hooked end of the shelf into the leg with the
rubber bung.
Put the spacers (9) on the threaded end of the tripod grill (8) that are through the other 2 legs and then
put on the wheels (10). Follow with washer (11) and then cap nut (12). Secure firmly with pliers.
3) Attaching the Fire Bowl Handles
Mount a screw (20) with a washer (11) and place through the handle holes on the inside of the fire bowl.
Attach the handles (19) to the screw (20) from the outside of the fire bowl.
4) Attaching the Vent
Place the vent (18) in the bottom of the fire bowl with the tooth in the correct hole. Mount the smaller
screw (21) with a washer (16) and place through the vent. On the underside of the bowl attach the vent
handle (23) and firmly secure with the nut (17).
5) Working the lid
Place the screw (13) through the holes in the handle (14) and then mount onto the lid securing with the
lid hanger bracket (15), washer (16) and nut (17).
Attach the lid air vent (22) by mounting the smaller screw (21) with a washer (16). Place through the vent
and cooking lid (1) securing with a nut (17).
6) Completion
Place the charcoal grid (3) and cooking grid (2) into the fire bowl. Place the ash tray (6) among the legs
and fix as shown in illustration.
1.This BBQ is intended for OUTDOOR USE ONLY . Do not attempt to use this grill in enclosed
areas.
2.Place your BBQ outside on a firm, Level surface away from wooden fences . Overhanging
trees, or other flammable objects before using the BBQ.
3.Do not use gasoline in grill. Use only the suitable charcoal complying to EN-1860-3 when
grilling. Please do not load the charcoal more than 75% volume of the fire bowl
4.The BBQ shall be heated up and the fuel kept red hot for at least 30 min prior to the first
cooking on the BBQ. Please do not cook before the fuel has a coating of ash.
5.Keep children and pets away from the BBQ when grilling.
6.After the charcoal is lit, the grill become very hot. Use proper outdoor cooking gloves , utensil and
avoid skin contact with all metal surfaces on the grill.
Pagina 3