1
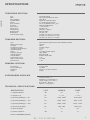
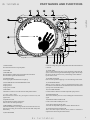
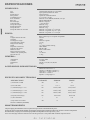
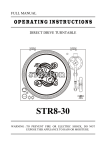
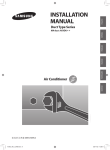
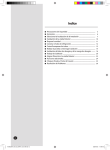
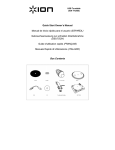
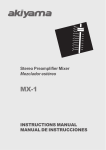
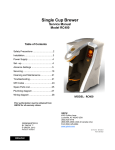
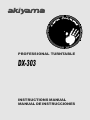
PROFESSIONAL TURNTABLE
DX-303
INSTRUCTIONS MANUAL
MANUAL DE INSTRUCCIONES
WARNINGS
dx turntables
CAUTION
RISK OF ELECTRIC SHOCK
DO NOT OPEN
CAUTION: To reduce the risk of electric shock, do not remove any cover.
No user-serviceable parts inside. Refer servicing to qualified service
personnel only.
The exclamation point within the equilateral triangle is
intended to alert the user to the presence of important
operation and maintenance (servicing) instructions in the
literature accompanying this appliance.
english
The lightning flash with arrowhead symbol within the
equilateral triangle is intended to alert the use to the
presence of un-insulated “dangerous voltage” within the
product's enclosure that may be of sufficient magnitude to
constitute a risk of electric shock.
To prevent electric shock, do not use this polarized plug with an extension cord,
receptacle or other outlet unless the blades can be fully inserted to prevent blade
exposure.
1.
Read Instructions. All the safety and operating instructions
should be read before this product is operated.
2. Retain Instructions. The safety and operating instructions should
be retained for future reference.
3. Heed Warnings. All warnings on the appliance and in the
operating instructions should be adhered to.
4. Follow Instructions. All operating and use instructions should
be followed.
5. Water and Moisture. The appliance should not be used near
water - for example, near a bathtub, washbowl, kitchen sink,
laundry tub, in a wet basement, or near a swimming pool, and the
like.
6. Carts and Stands . The appliance should be used only with a cart
or stand that is recommended by the manufacturer.
An appliance and cart combination should be moved with care.
Quick stops, excessive force, and uneven surfaces may cause the
appliance and cart combination to overturn
7.
8.
9.
10.
11.
12.
13.
Wall or Ceiling Mounting. The product should be mounted to
a wall or ceiling only as recommended by the manufacturer.
Heat. The appliance should be situated away from heat sources
such as radiators, heat registers, stoves, or other appliances
(including amplifiers) that produce heat.
Power Sources. This product should be operated only from the
type of power source indicated on the rating label. If you are
not sure of the type of power supply to your home, consult your
product dealer or local power company. For products intended
to operate from battery power, or other sources, refer the
operating instructions.
Grounding or Polarization. This product may be equipped with
a polarized alternation-current line plug (a plug having one blade
wider than the other). This plug will fit into the power outlet only
one way. This is a safety feature. If you are unable to insert the
plug fully into the outlet, try reversing the plug. If the plug
should still fail to fit, contact your electrician to replace your
obsolete outlet. Do not defeat the safety purpose of the polarized
plug.
Power-Cord Protection. Power-supply cords should be routed so
that they are not likely to be walked on or pinched by items
placed upon or against them, paying particular attention to the
cord in correspondence of plugs, convenience receptacles, and
the point where they exit from the appliance.
Clea ning . The appl ianc e shou ld be clea ned only as
recommended by the manufacturer.
Clean by wiping with a cloth slightly damp with water. Avoid
getting water inside the appliance.
For AC line powered units. Before returning repaired unit to user,
use an ohm-meter to measure from both AC plug blades to all
exposed metallic parts. The resistance should be more than
100,000 ohms.
14. Non-use Periods. The power cord of the appliance should be
unplugged from the outlet when left unused for a long period of
time.
15. Object and Liquid Entry. Care should be taken so that objects do
not fall and liquids are not spilled into the enclosure through
openings.
16. Damage Requiring Service. The appliance should be serviced by
qualified service personnel when:
! The power-supply cord or the plug has been damaged; or
! Objects have fallen, or liquid has been spilled into the
appliance; or
! The appliance has been exposed to rain; or
! The appliance does not appear to operate normally or exhibits
a marked change in performance; or
! The appliance has been dropped, or the enclosure damaged.
17. Servicing. The user should not attempt any service to the
appliance beyond that described in the operating instructions.
All other servicing should be referred to qualified service
personnel.
18. Ventilation. Slots and openings in the cabinet are provided for
ventilation and to ensure reliable operation of the product and to
protect it from overheating, and these openings must not be
blocked or covered. The openings should never be blocked by
placing the product on a bed, sofa, rug, or other similar surface.
This product should not be placed in a built-in installation such
as a bookcase or rack unless proper ventilation is the
manufacturer's instructions have been adhered to.
19. Attachments. do not use attachments not recommended by the
product manufacturer as they may cause hazards.
20. Accessories. Do not place this product on an unstable cart,
stand, tripod, bracket, or table. The product may fall, causing
serious injury to a child or adult, and serious damage to the
product. Use only with a cart, stand, tripod, bracket, or table
recommended by the manufacturer, or sold with the product.
Any mounting of the product should follow the manufacturer's
ins tru cti ons , and sho uld use a mou nti ng acc ess ory
recommended by the manufacturer.
20. Lightning. For added protection for this product during a
lightning storm, or when it is left unattended and unused for long
periods of time, unplug it from the wall outlet and disconnect the
antenna or cable system. This will prevent damage to the product
due to lightning and power-line surges.
22. Replacement Parts. When replacement parts are required, be
sure the service technician has used replacement parts specified
by the manufacturer or have the same characteristics as the
original part. Unauthorized substitutions may result in fire,
electric shock, or other hazards.
23. Safety Check. Upon completion of any service or repairs to this
product, ask the service technician to perform safety checks to
determine that the product is in proper operating condition.
dx turntables
1
SPECIFICATIONS
english
TURNTABLE SECTION:
Type
Motor
Driving Method
Turntable Platter
Speeds
Wow and Flutter
S/N Ratio
Pitch Controls
Starting Time
Starting Torque
Braking system
Braking Time
Time for Speed Change
3-speed full manual
8 pole, 3phase,brushless DC motor
Direct Drive
330mm dia. Aluminum diecast
331/3 and 45 rpm and 78 Rpm
Less 0.15% WRMS with 33 1/3rpm
More than 60dB (DIN-B)
+/- 8%,12%,20%
Less than 1 sec
More than 1.6 Kgf.cm
Electronic brake
Less than 1 sec.
Less than 1 sec. from 331/3 to 45 rpm.
Less than 1 sec. from 45 to 331/3 rpm.
Less than 1 sec. from 331/3 to 78 rpm
TONEARM SECTION:
Type
Effective Arm Length
Overhang
Tracking Error Angle
Applicable Cartridge Weight
Anti-skating Range
Output
Frequency Response
Channel Separation
Channel Balance
Needle Pressure range
High of cue(first track)
Descend of cue
Static balanced S-shaped tonearm with detachable headshell
230.5mm
15mm
Less than 3 degree
13~18g
0-3g
1.5~3.6mV at 1KHz 5cm/sec
20Hz-20KHz
More than 15dB
Within 2.5dB at 1KHz
3~4g
7.5~10mm
1~3sec
GENERAL SECTION:
Power Supply
Power Consumption
Dimensions
Weight
AC 230V, 50Hz
10.5 Watts
450 (W) x 370 (D) x 86 (H) mm
8.5 Kgs
ACCESSORIES SUPPLIED
Instruction manual x 1,
Headshell x 1, 45 rpm adaptor x 1,
Counter weight x 1, AC cord x 1,
RCA cable x 1, Platter x1
Slipmat x 1, Target light x 1
TECHNICAL SPECIFICATIONS
DESCRIPTIONS
UNIT
NORMAL
LIMIT
(1) Outp ut Difference
dB
2.3
2.5
(2) Outp ut Level
mv
1.7~3.5
1.5~3.6
(3) Sp eed (Sp eed Range) +/- 8%
Hz
2760↓, 3240↑
2770↓,3230↑
(3) Sp eed (Sp eed Range) +/- 12%
Hz
2640↓, 3360↑
2650↓, 3350↑
(3) Sp eed (Sp eed Range) +/- 20%
Hz
2400↓, 3600↑
2410↓, 3590↑
(4) Sp eed (Center Range)
Hz
2995~3005
2990~3010
%
0.1
0.15
dB
16
15
(5) Wow and Flutter
(6) Channel s eparation
NOTE: CARTRIDGE(AT3600L)
dx turntables
2
PART NAMES AND FUNCTIONS
dx turntables
16
15
17
18
3
14
13
english
1
12
2
11
10
9
1
4
5
6 7 8
1) START/STOP
Press this button to start or stop the platter.
Use this to change the speed of the platter when the PITCH indicator
is NOT lit.
2) PLATTER
3) MOTOR OFF
Press the button to enable motor off, and the led will be flash
Press the button again to disable function.
11) TONE ARM
This is a fully manual tone arm. To start playback, gently place the
stylus on the record using the headshell finger support. Do not drop
the stylus onto the record as it may cause damage to the diamond
tip and to the record.
4) TARGET LIGHT
Insert target light to the deck and it will light up.
12) 45 RPM ADAPTOR
Place on centre spindle for playing 7” records with large centre holes.
5) PLATTER REVOLUTION SPEED BUTTONS
33 rpm press 33
45 rpm press 45
78 rpm press 33 and 45
13) ANTI SKATE KNOB
When a record is playing, a force is generated drawing the stylus
towards the centre of the record. Set this knob to the same value as the
stylus pressure to offset this force.
6) REVERSE
This button is used to reverse the direction of the platter rotation.
14) COUNTER WEIGHT
Use this to balance the tone arm and to adjust the stylus pressure.
7) +/-8%,+/-12%,+/-20%
Press the button to switch to 8%, press again to switch to 12%, and
again to 20%.
15) POWER SWITCH
This switch turns the power on or off, including the motor and audio
signal.
8) QUARTZ LOCK
On will hold the revolution speed to 0%.
Off will allow use of the pitch adjust.
16) POWER CORD CONNECTOR
Used to connect the included power cord.
9) HEADSHELL LOCKING NUT
Attach the headshell by inserting into the front end of the tone arm,
then turn the locking nut clockwise with the head shell firmly held
horizontally.
17) OUTPUT SIGNAL SELECTOR
Two forms of output audio signal are available: Phono and Line.
18) AUDIO OUTPUT CONNECTOR
This is the audio output connector (RCA). Must be connected as
explained at Connections part of this manual.
10) PITCH SLIDER
dx turntables
3
english
TONE ARM ASSEMBLY
19.Headshell - Install cartridge here. When installing a cartridge, refer to the
installation instructions supplied by the manufacturer of that cartridge. During
installation, attach the stylus protector to guard the stylus tip from damage.
Attach wires as follows:
White (L+)
Left channel+
Blue (L-)
Left channel Red (R+)
Right channel+
Green (R-)
Right channel-
23
22
20.S-Shaped ToneArm
21
21.ToneArm Lift - This elevates the tone arm above the record surface.
24
22.Anti-Skate Control - This applies inward force to the tone arm so it doesn't skip
outward across the record due to the centrifugal force of the record spinning.
Cartridge manufacturers usually specify the proper setting of this.
23.Counterweight - Adjustment creates the proper downward pressure of the
stylus to the record. Attach now by sliding the counterweight onto the rear of the
tone arm. Twist it lightly and it will screw onto the rear shaft of the tone arm.
20
19
24.Tone Arm Clamp and Rest - Use this rest for the tone arm and clamp it in
position during transportation.
OPERATION
1. Push the power to on and the speed indicator and the strobeilluminator will light up.
10. Set the desired pitch adjusts range by depressing the buttons until
the desired pitch is reached.
Options are +/-8% or +/-12% or +/-20%.
2. Insert target light for illumination the stylus.
3. Place a record on the turntable mat. When playing a 45rpm
record with a large center hole; place the 45-rpm adapter on the
centre spindle.
4. Set the rotation speed (33/45/78) to match the record.
11. Adjust the pitch to a desirable speed. During play, observe the
strobe dots. If the strobe dots appear to the right, the pitch is
slower than the rated speed. If they flow to the left, the rated
speed.
If the strobe dots appear stationary, which means the platter is in
normal turntable speed, move the pitch control slider up or down
to adjust the speed.
5. Release the arm clamp.
12. To suspend play, lift tone arm with cueing lever.
6. Set the cueing lever to the up position.
7. Press the Start/Stop button and the turntable platter will start to
rotate.
13. When play is finished, raise the cueing lever, move the tone arm to
the armrest and secure the tone arm with the arm clamp.
14. Press the Start/Stop button to stop the platter rotating.
8. Move the tone arm over the desired groove.
15. Push the power to off.
9. Set the cueing lever to the down position, the tone arm will descend
slowly onto the record and play begins.
dx turntables
4
AVISOS SEGURIDAD
dx turntables
ATENCIÓN: PARA REDUCIR EL RIESGO DE ELECTROCUCIÓN, NO MANIPULE
EL INTERIOR DEL EQUIPO.
PARA REALIZAR EL MANTENIMIENTO DEL EQUIPO PONGASE EN CONTACTO
CON EL PERSONAL CUALIFICADO
CAUTION
RISK OF ELECTRIC SHOCK
DO NOT OPEN
Esta señal indica la presencia de lugares donde habiendo
un elevado voltaje no presentan aislamiento y por tanto
constituye un claro riesgo de electrocución.
Esta señal indica la presencia de componentes del equipo
que precisan de mantenimiento. Para más información
sobre éstos lea el manual.
Para prevenir un posible riesgo de electrocución asegúrese de que al conectar el
equipo a la red el conector encaja perfectamente en la toma de la pared o del
adaptador. Las puntas del conector no deben quedar expuestas.
1. Lea detenidamente este manual antes de utilizar su equipo.
2. Mantenga el manual a su disposición para su uso en el futuro.
3. Siga las advertencias que se le proporcionan en este manual.
4. Siga las instrucciones consignadas en este manual, un uso indebido
podría dejar sin efecto la garantía.
5. Agua y humedad. No utilice el equipo cerca del agua o en lugares
muy húmedos (fregadero, lavadora, etc.) para evitar riesgos de
descarga eléctrica o fuego.
6. Transporte del equipo. Transporte el equipo con mucho cuidado.
Los golpes o las vibraciones fuertes pueden dañarlo mecánicamente.
7. Montaje en pared o techo. Siga las instrucciones del fabricante.
8. Fuentes de calor. Tenga cuidado de no colocar el equipo cerca de
fuentes de calor (Ej. radiadores, estufas, amplificadores)
9. Voltaje. Antes de conectar el aparato a la red asegúrese de que se
trata del mismo voltaje y frecuencia para las que el equipo está
especificado. En caso contrario no conecte el equipo y póngase en
contacto con su distribuidor.
10. Protección del cable. Escoja una posición para el cable de
corriente de modo que esté lo menos expuesto a pisotones y demás
agresiones. Especial atención con los dos extremos del cable de toma
de corriente, la clavija de enchufe a la red y la clavija de alimentación
del equipo.
11. Limpieza. Desconecte el equipo antes de realizar alguna
operación de limpieza del aparato. Utilice un trapo suave y seco para
limpiar. Asegúrese de que los cables están correctamente conectados
antes de volver a enchufar el aparato.
12. Control de seguridad. La diferencia de potencial entre la toma de
corriente de la pared y cualquier pieza metálica del equipo debe ser de
al menos 100.000 ohmios.
13. Periodos largos de reposo del equipo. Desconecte el equipo de la
red en caso de reposo prolongado.
14. Líquidos y objetos extraños. En caso de que algún fluido o
pequeñas partículas sólidas sean derramadas sobre el aparato y se
introduzcan en los circuitos apague el aparato y llévelo a su
distribuidor.
15. Daños en el quipo que precisen reparación. El equipo deberá ser
reparado o revisado por personal cualificado en caso de:
A. El cable de toma de corriente o su conector han sido dañados.
B. Objetos o líquidos se han introducido en el equipo.
C. El aparato ha sido expuesto a la lluvia.
D. El equipo no parece funcionar o lo hace de modo poco usual.
E. EL aparato ha caído al suelo o presenta deterioros en su caja
exterior.
16. Mantenimiento. No abra el equipo para labores de mantenimiento
pues en este aparato no hay piezas que necesiten manutención. En
caso de que abriendo el equipo sea éste dañado o lo sea la persona que
lo manipula la empresa no será responsable por este servicio de
mantenimiento no autorizado. Además en este caso la garantía
perdería su vigencia.
17. Ventilación. El aparato está provisto de hendiduras de
ventilación, es importante no cubrirlas o bloquearlas. La ventilación
del aparato podría verse comprometida resultando en un
sobrecalentamiento que podría dañar el equipo. Tenga siempre en
cuenta que colocar el aparato en un lugar sin ventilación puede
producir un sobrecalentamiento de éste.
18. Nunca utilice accesorios o modificaciones no autorizados por el
fabricante. Ello puede afectar la seguridad del aparato y el fabricante
no será responsable en este caso.
19. Accesorios. No deposite o instale el equipo sobre superficies o
estructuras inestables. El aparato podría precipitarse y causar
lesiones a las personas en las proximidades de éste. Cualquier
montaje o instalación del equipo deberá ser realizado siguiendo las
instrucciones o recomendaciones dadas en este manual o por el
fabricante directamente.
20. Precaución durante tormentas. Durante una tormenta desconecte
el equipo de la red para evitar que los posibles picos de corriente
dañen el equipo.
21. Durante cualquier manipulación del equipo, para mantener todas
las cualidades de éste tanto en prestaciones como en seguridad para el
oper ante es nece sari o util izar solo reca mbio s orig inal es.
Consecuentemente asegúrese de que la empresa que realice el
mantenimiento sea autorizada por el fabricante o importador.
22. Comprobación de seguridad. Una vez realizada una reparación o
servicio del equipo pida al personal cualificado que realice una
comprobación para asegurarse de que el equipo le es devuelto en
perfectas condiciones de uso.
dx turntables
5
ESPECIFICACIONES
GIRADISCOS:
Tipo
Motor
Sistema de giro
Plato giratorio
Velocidades de giro
Wow and Flutter
Ratio S/N
Par de arranque
Control de Pitch
Tiempo de arranque
Sistema de frenado
Tiempo de freno
Tiempo de cambio de velocidad
Completamente manual de 3 velocidades
8 pole, 3phase,brushless DC motor
Tracción Directa
330mm dia. Aluminum diecast
331/3, 45 rpm y 78 rpm
Menos de 0.15% WRMS (JIS WTD) a 33 rpm
Más de 60dB (DIN-B)
Más de 1.6 Kgf.cm
+/- 8%,12%,20%
Menos de 1 seg.
Freno electrónico
Menos de 1 seg.
Menos de 1 seg. desde 33 1/3 a 45 rpm.
Menos de 1 seg. desde 45 a 331/3 rpm.
Menos de 1 seg. desde 331/3 a 78 rpm.
BRAZO:
Brazo estático tipo S con cápsula reemplazable
230 mm
15mm
Menos de 3 grados
13~18g
0-3g
1.5~3.6mV at 1KHz 5cm/seg
20Hz-20KHz
Más de 15dB
Entre 2.5dB a 1KHz
3~4g
7.5~10 mm
1~3seg.
Tipo
Longitud efectiva del brazo
Overhang
Tracking Error Angle
Carga aplicable a capsula
Rango de Anti-skating
Salida
Respuesta en frecuencia
Separación de canales
Balance de canal
Rango de presión de aguja
Altura de Cue (primera pista)
Descenso de Cue
GENERAL:
Alimentación
Consumo
Dimensiones
Peso
AC 230V, 50Hz
10.5 Watts
450 (W) x 370 (D) x 86 (H) mm
8.5 Kgs
ACCESSORIOS SUMINISTRADOS
Manual de instrucciones x 1,
Cápsula x 1, adaptador a 45 rpm x 1,
Contrapeso x 1, Cable corriente x 1,
Cable RCA x 1, Plato x1
Slipmat x 1, Target light x 1
ESPECIFICACIONES TÉCNICAS
DESCRIPCIONES
UNIDADES
NORMAL
LIMITE
(1) D iferencia en s alida
dB
2.3
2.5
(2) N ivel de s alida
mv
1.7~3.5
1.5~3.6
(3) Velocidad (rango) +/- 8%
Hz
2760↓, 3240↑
2770↓,3230↑
(3) Velocidad (rango) +/- 12%
Hz
2640↓, 3360↑
2650↓, 3350↑
(3) Velocidad (rango) +/- 20%
Hz
2400↓, 3600↑
2410↓, 3590↑
(4) Sp eed (Center R ange)
Hz
2995~3005
2990~3010
%
0.1
0.15
dB
16
15
(5) Wow and Flutter
(6) Sep aración ent re canales
NOTA: CAPSULA(AT3600L)
MANTENIMIENTO
Limpie la aguja periódicamente con un cepillo suave para evitar la acumulación de polvo.
En caso de que el sonido pierda calidad, verifique que la aguja está en perfectas condiciones. En caso contrario reemplácela.
Periódicamente, la tapa y la carcasa del equipo deben ser limpiadas con un trapo suave y seco.
No use cerca del equipo sustancias volátiles como el alcohol, gasolina, etc. éstos podrían dañar el acabado superficial de éste.
dx turntables
6
dx turntables
DESCRIPCION DE MANDOS Y FUNCIONES
16
15
17
18
3
1
14
13
12
2
11
10
9
1
4
1. PUESTAEN MARCHA YPARO
Presione este botón para poner en marcha o parar el plato.
2. PLATO
3. PARADA DEL MOTOR
Presione este botón para parar el plato, el Led parpadeará.
Presione otra vez para anular el paro.
4. LUZ PARAILUMINACIÓN DE LA AGUJA
Inserte la luz en su conexión y se encenderá, apunte a la aguja.
5. SELECCIÓN DE VELOCIDAD DE GIRO (rpm)
33 rpm Presione 33
45 rpm Presione 45
78 rpm Presione los botones 33 y 45 simultáneamente. Para
volver al modo de velocidad 33 ó 45 rpm simplemente
presione el botón adecuado.
6 7 8
11 . BRAZO
Es completamente manual. Para iniciar la reproducción de un disco
sitúe la aguja en la superficie del disco utilizando el brazo del porta
cápsulas. No suelte bruscamente el brazo, podría dañar el disco y
la aguja.
12. ADAPTADORA 45 R.P.M.
Sitúelo alojado en el centro del eje para reproducir aquellos discos
que lo precisen.
13. CONTROL ANTI-PATINAMIENTO (ANTI-SKATE)
Al reproducir un disco una fuerza es generada atrayendo la cápsula
hacia el centro de rotación del disco. Para contrarrestar esta fuerza
actúe sobre el control anti-patinamiento. Los fabricantes de cápsulas
acostumbran a proporcionar el valor de Anti-Skate adecuado para
cada modelo.
14. CONTRAPESO
Su ajuste proporciona la fuerza descendente adecuada para el trabajo
de la aguja sobre el disco.
6. CONTROL DE SENTIDO DE GIRO
Utilícelo para escoger el sentido de giro.
7. RANGO DE PITCH +/-8%,+/-12%,+/-20%
Presione el botón repetidamente para seleccionar los distintos rangos
de Pitch disponibles.
8. QUARTZ LOCK
Activada: mantiene la velocidad de giro a un 0% de PITCH.
9. ROSCA DE BLOQUEO DEL PORTACÁPSULAS
Inserte el porta cápsulas en el extremo del brazo. Gire la rosca en el
sentido de las agujas de reloj manteniendo el porta cápsulas firme en
posición horizontal
10. AJUSTE DE VELOCIDAD “PITCH”
Utilícelo para variar la velocidad de giro del plato.
5
15. PUESTAEN MARCHA DEL EQUIPO
Arranque y paro de motor y audio
16. CONECTOR PARACABLE DE RED
Conecte aquí el cable de red.
17. SELECTOR DE SEÑAL DE SALIDA
Podemos escoger entre dos formatos de señal de salida; Phono y
Línea.
18. CONEXIÓN DE SALIDA PHONO/LINE
Es la salida (RCA) de la señal de audio. Deberá ser conectada tal
como se indica en el apartado Conexiones.
dx turntables
7
19. PORTACÁPSULAS
Instale la cápsula aquí. Al instalarla siga las instrucciones proporcionadas por el fabricante
de la misma. Durante la instalación disponga el protector de la aguja para evitar desperfectos.
CONJUNTO BRAZO
Conecte los cables al terminal de la cápsula. La mayoría de los cables están codificados
por colores. Conecte cada cable al terminal del mismo color:
23
Blanco (L+), … canal izquierdo +
Azul (L-), … canal izquierdo Rojo (R+), … canal derecho +
Verde (R-), …. canal derecho
22
21
24
20
20.BRAZO METÁLICO TIPO “S”
21. ELEVADOR DEL BRAZO
Permite elevar el brazo por encima de la superficie del disco
22. CONTROL ANTI-PATINAMIENTO (ANTI-SKATE)
Al reproducir un disco una fuerza es generada atrayendo la cápsula hacia el centro de
rotación del disco. Para contrarrestar esta fuerza actúe sobre el control anti-patinamiento.
Los fabricantes de cápsulas acostumbran a proporcionar el valor de Anti-Skate adecuado
para cada modelo.
23. CONTRAPESO
Su ajuste proporciona la fuerza descendente adecuada para el trabajo de la aguja sobre el
disco.
Montaje del contrapeso: encaje el contrapeso en el extremo posterior del brazo, gírelo y
enrósquelo.
Ajuste del punto cero (0) del balance horizontal y de la presión de la aguja:
19
A. Retire el protector de la aguja sin tocar ésta.
B. Disponga la palanca (21) tal que el brazo esté en su posición más baja.
C. Retire el seguro que inmoviliza el brazo y déjelo en posición de libre movimiento.
D. Manipule el contrapeso hasta que el brazo esté nivelado horizontalmente (flotará un poco).
E. Vuelva a inmovilizar el brazo con el seguro. Manteniendo el contrapeso inmóvil, gire la escala de éste
hasta que el punto cero esté alineado con la marca coaxial del brazo.
F. Gire el contrapeso en el sentido de las agujas del reloj hasta que la escala muestre el valor de presión
correspondiente a la aguja utilizada. En el caso de la aguja que se proporciona con el equipo el valor es
2gr.
24.FIJACIÓN DEL BRAZO
Permite fijar el brazo. Utilícelo al transportar el giradiscos.
IMPORTANTE. Retire el contrapeso del brazo siempre que
transporte el tocadiscos. En caso contrario puede romperse el brazo.
En este caso perdería la garantía.
FUNCIONAMIENTO
1. Accione el botón de puesta en marcha. El indicador de velocidad
y la luz del estroboscopio se encenderán.
9. Disponga la palanca elevación/descenso tal que el brazo descienda
hasta posar la aguja sobre la pista del disco deseada. En este
momento comenzará la reproducción.
2. Inserte la luz de punto de aguja.
3. Ponga un disco en la alfombrilla, en caso de ser un disco a 45
r.p.m. Deberá situar el adaptador encajándolo en el tetón central.
10. Seleccione el rango de velocidad (PITCH) deseado, a
+/-8% ó +/-12% ó +/-20%.
11. Ajuste el control de velocidad PITCH a la velocidad deseada.
4. Escoja el valor de velocidad de giro adecuado al disco que va a
reproducir (33/45/78) .
5. Retire el protector de la aguja y libere el brazo.
12. Cuando quiera terminar la reproducción sitúe el brazo en posición
levantado.
6. Disponga la palanca elevación/descenso tal que el brazo esté
levantado.
13. Cuando la reproducción ha terminado, levante el brazo
mediante la palanca elevación/descenso y fíjelo en su posición
de reposo.
7. Presione el botón “Start/Stop”, el plato comenzará girar.
14. Accione el botón “Start/Stop” para que el plato deje de girar.
8. Sitúe el brazo encima de la pista que desea comenzar a reproducir.
15. Presione el botón de encendido para desconectar el aparato.
dx turntables
8
CONNECTIONS/CONEXIONES
dx turntables
english
DX-303/DX-505 turntables offer two signal output possibilities,
PHONO and LINE. The output mode will be selected by means of the
selector switch located at the rear side of the turntable.
If PHONO is selected the unit must be connected to a device equipped
with Phono input RIAA. Most likely this will be a stereo mixer as seen at
the draw below.
Al escoger PHONO deberemos conectar el giradiscos a un equipo
dotado de entrada Phono (RIAA). Normalmente este equipo será un
mezclador estéreo como se muestra en el dibujo.
If LINE is selected the unit can be connected to almost all amplifying
units. Just make sure that you connect it at the Line level input of the
amplifier. This will be labelled as Line, CD, Tape or AUX.
english
Los giradiscos DX-303 y DX-505 disponen de dos posibles formatos
de señal de salida, PHONO y LÍNEA. Mediante el selector situado
en el panel trasero podremos seleccionar el formato de señal de
salida adecuado.
Al escoger el formato LÍNEA podremos conectar el giradiscos a
cualquier amplificador o mezclador. En caso de desear conectar el
giradiscos a un amplificador doméstico deberemos seleccionar una
entrada tipo Línea. Normalmente estas entradas aparecen señaladas
como Línea, CD, Tape o AUX. En el dibujo se muestran los distintos
tipos de conexión que podemos realizar.
This product complies with the EMC
and LVD European Directives
inputs
outputs
STEREO MIXER
ANY OF THESE THREE INPUT IS SUITABLE
CUALQUIERA DE ESTAS TRES ENTRADAS ES ADECUADA
LINE/CD
TAPE
AUX
L
R
VOLUME
LINE/CD
TUNER
TAPE
AUX
INPUT SELECTOR
DOMESTIC AMPLIFIER
dx turntables
9
C/ Praga, nº11. P. Cova Solera. 08191 Rubí (España). Tel: 0034935861730. Fax: 0034936996087
[email protected] / www.akiyamadj.com