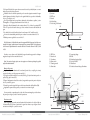
1
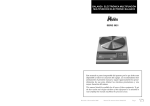
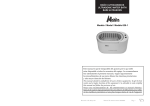
DESTILADOR DE VIDRIO 4 L/H, QUARTZ
GLASS WATER STILL 4 L/H, QUARTZ
DISTILLATEUR EN VERRE 4 L/H, QUARTZ
Este manual es parte inseparable del aparato por lo que debe estar disponible a todos los usuarios del equipo. Le recomendamos leer atentamente
el presente manual y seguir rigurosamente los procedimientos de uso para
obtener las máximas prestaciones y una mayor duración del mismo.
This manual should be available for all users of these equipments. To get the best
results and a higher duration of this equipment it is advisable to read carefully this
manual and follow the processes of use.
Nous vous recommandons lire attentivement cet manuel d’instructions et
suivre tous les procédures d’usage, à fin d’obtenir les meilleures prestations et une mayeur durée de l’équipe.
Manual de instrucciones 59002114
Pág. 1
Revisión 1 Febrero 2014
CASTELLANO
Gracias por haber adquirido este equipo. Deseamos sinceramente que disfrute del
Destilador de agua Quartz. Le recomendamos que cuide el equipo conforme a lo expuesto en este manual.
Nahita desarrolla sus productos según las directrices del marcado CE teniendo en cuenta la ergonomía y seguridad del usuario. La calidad de los materiales empleados en la
fabricación y el correcto proceder le permitirán disfrutar del equipo por muchos años.
El uso incorrecto o indebido del equipo puede dar lugar a accidentes, descargas eléctricas, cortocircuitos, fuegos, lesiones, etc. Lea el punto de Mantenimiento, donde se recogen
aspectos de seguridad.
LEA DETALLADAMENTE ESTE MANUAL DE INSTRUCCIONES ANTES DE
OPERAR CON ESTE EQUIPO CON EL FIN DE OBTENER LAS MÁXIMAS PRESTACIONES Y UNA MAYOR DURACIÓN DEL MISMO.
Tenga especialmente presente lo siguiente:
Este manual es parte inseparable del Destilador de agua Quartz, por lo que debe estar
disponible para todos los usuarios del equipo.
Establezca todas las medidas requeridas por la normativa vigente en materia de seguridad e higiene en el trabajo (dispositivos de seguridad eléctrica, productos inflamables,
tóxicos y/o patológicos, etc).
Debe manipularse siempre con cuidado evitando los movimientos bruscos, golpes o
manipulación con objetos punzantes.
Nunca desmonte el equipo para repararlo usted mismo, además de perder la garantía
podría producir un funcionamiento deficiente de todo el equipo, así como daños a las personas que lo manipulan.
Cualquier duda puede ser aclarada por su distribuidor (instalación, puesta en marcha,
funcionamiento). Usted puede también mandarnos sus dudas o sugerencias a la siguiente dirección de correo del Servicio Técnico Nahita ([email protected]).
Este equipo está amparado por la Ley de garantías y bienes de consumo (10/2003).
No se consideran en garantía las revisiones del equipo.
La manipulación del equipo por personal no autorizado provocará la pérdida total de
la garantía.
Los fusibles o accesorios, así como la pérdida de los mismos, no están cubiertos por
dicha garantía. Tampoco estarán cubiertos por el periodo de garantía las piezas en su desgaste por uso natural.
Asegúrese de guardar la factura de compra para tener derecho de reclamación o prestación de la garantía. En caso de enviar el equipo al Servicio Técnico adjunte factura o
copia de la misma como documento de garantía.
El fabricante se reserva los derechos a posibles modificaciones y mejoras sobre este
manual y equipo.
Manual de instrucciones 59002114
Pág. 2
Revisión 1 Febrero 2014
ENGLISH
Technical Assistance Department.
Cleaning
You should clean the distiller regularly. So, in this way, the results will be better and you
can get a distiller more durable.
The cleaning periodicity depends on the salts which water supply contains.
You should clean the filters of the tubes whenever you clean the still. Steps to follow:
- Put acetic acid or hydrochloric acid into the boiler through cleaning mouth (2.5). The
water should be hot.
- Wait for the attack to the residues.
- Rinse with clean water once or twice.
- Fill with water until you see the water level is on the heater.
ATTENTION!! IF EQUIPMENTS ARE NOT PROPERLY CLEAN AND
DISINFECTED THEY WOULD NOT BE ALLOWED TO REPAIR BY OUR
TECHNICAL SERVICE.
6. ACCESSORIES
There are accessories available for substitute or replacement components and for complement the device applications with the following references:
Code
99002110
99002111
99002112
99002113
99002114
Description
Boiler
Condenser
Level
Heater
Flow limiter
INSTRUCTIONS ON ENVIRONMENT PROTECTION
At the end of its life cycle, please, does not dispose of this equipment by throwing it in the usual garbage; hand it over a collection point for the recycling of
electrical and electronic appliances. It does not contain dangerous or toxic products for humans but a non-adequate disposal would damage the environment.
The materials are recyclable as mentioned in its marking. By recycling material
or by other forms of re-utilization of old appliances, you are making an important contribution to
protect our environment.
Please inquire at the community administration for the authorized disposal location.
Instruction manual 59002114
Pag. 15
Version 1 February 2014
ENGLISH
water goes out through the outlet (2.4)
If water steam went out through steam hole (2.2) you would have to increase water
supply.
Security
The water distiller must be used by previously qualified staff that knows how the
equipment works thanks to the user manual.
You should put the water distiller in a horizontal plane stable table, having a safety area
of at least 30 cm per side.
Follow all required applicable laws about safety and health (electrical security devices,
inflammable, toxic and/or pathological products, etc.).
Do not place the water distiller near any warm supply (burners, blowlamps, etc), nor
expose it directly to the sun. Avoid vibrations, dust and dry environments.
During its functioning dangerous materials such as flammable or pathological substances must be out of the safety area.
When you are not using the water distiller for a long period of time please make sure it
is unplugged in order to avoid possible accidents.
It is essential to have the equipment switched off and unplugged from the net before
cleaning, checking components or replacing any piece (e.g. replacement of a fuse).
Never try to repair the water distiller by yourself, since you will lose the warranty and
may provoke damages to the general operating system or the electrical installation, as
well as injuries to the people that usually handle the equipment (burns, hurts…).
Made under the European regulations for electrical security, electromagnetic compatibility and security on machines.
CASTELLANO
¡ATENCIÓN! NO SE ADMITIRÁ NINGÚN APARATO PARA REPARAR
QUE NO ESTÉ DEBIDAMENTE LIMPIO Y DESINFECTADO.
ÍNDICE DE IDIOMAS
Castellano
2-8
Inglés
9-15
ÍNDICE DE CONTENIDOS
1. APLICACIONES DEL EQUIPO
3
2. DESCRIPCIÓN
4
3. ESPECIFICACIONES TÉCNICAS
5
4. INSTALACIÓN / PUESTA EN MARCHA
5
5. MANTENIMIENTO Y LIMPIEZA
7
6. ACCESORIOS
8
5. MAINTENANCE AND CLEANING
To get the best results and a higher duration of this equipment it is essential to follow
the processes of use.
Note: All the processes of use mentioned below will not have any value unless you keep
a continued and careful maintenance.
Please follow the processes of use of this manual.
This manual should be available for all users of this equipment.
Always use original components and supplies. Other devices can be similar but they
can damage the equipment.
Never try to repair the water distiller by yourself, since you will lose the warranty and
may provoke damages to the general operating system or the electrical installation, as
well as injuries to the people that usually handle the water distiller (burns, hurts…) or
damages in nearby equipment.
In the event of breakdown please contact your distributor to overhaul through Nahita
Instruction manual 59002114
Pag. 14
Version 1 February 2014
1. APLICACIONES DEL EQUIPO
Destilador automático y de producción continua que nos proporciona una alta calidad
de destilación con un resultado de gran pureza, exento de iones metálicos y sustancias
pirógenas. Con resistencia de cuarzo y fabricado en su totalidad en vidrio borosilicato de
alta calidad, permite un uso continuado del equipo y garantiza su durabilidad.
Dispone de un mecanismo de seguridad que desconecta automáticamente la resistencia
de cuarzo al disminuir la presión del agua de refrigeración, y la conecta de nuevo al recuperarse.
Cuenta con un soporte adaptado para su acoplamiento a la pared y sus dimensiones
reducidas permiten un fácil manejo y limpieza.
El equipo encuentra su aplicación en clínicas, hospitales y laboratorios en general situados en los departamentos de investigación de empresas agroalimentarias, farmacéuticas,
sanitarias, así como en los centros de enseñanza y universidades.
Manual de instrucciones 59002114
Pág. 3
Revisión 1 Febrero 2014
CASTELLANO
ENGLISH
Please put the water distiller on top of a horizontal, plane and stable table making a free
2. DESCRIPCIÓN
1.1 Junta tórica
1.2 Tuerca
1.3 Casquillo
1.4 Casquillo guía
1.5 Terminal de la resistencia
space at least at 30 cm per side.
Follow all required applicable laws about safety and health (electrical security devices,
inflammable, toxic and/or pathological products, etc.).
Do not put the water distiller near any warm supply (burners, blowlamps…), nor expose it directly to the sun, etc.
Please insert the wire that feeds the AC electric current in the base of current 220V 50Hz
±10% provided with earth wire and to the other end to the water distiller connector.
Electrical wiring must be, at least, of 2,5 mm2 section.
Power point must let intensity of 11 A pass.
The tap water should have screw mouth of ¾”.
1.1
1.2
1.3
Neither the manufacturer nor the distributor will assume any responsibility for the
damages produced to the equipment during its installation or damages to persons suffered by the improper use of the electric connection. The tension should be 220V 50Hz ±10%.
1.4
If you are not using the water distiller for a long period of time please make sure it is
disconnected from the net and protected from dust (this way you will avoid accidents and
will extend its working-life).
1.5
2.1 Tuerca
2.2 Orificio de exceso de vapor
2.3 Refrigerante
2.4 Salida del agua
2.5 Tubo de rebose
2.6 Toma de entrada del destilador
2.7 Brida soporte
2.8 Calderín de agua
2.9 Piloto indicador del nivel del agua
2.10 Interruptor ON/OFF
2.11 Base metálica
2.12 Enchufe de la resistencia
2.3
2.7
2.2
2.5
2.4
2.8
Switch on
Before switch on connect the end wiring of the heater to the socket, which is on the
2.1
2.12
2.6
2.11
2.9
Manual de instrucciones 59002114
Assembly
Be sure that heater elements (washer of silicone rubber, guide fitting and PBTP nut) are
in the order and position that the fig.1 shows.
Insert the heater through the screw mouth (see fig.2): hold the heater of the fitting (1.3)
and turn the PBTP nut (1.2).
Place the condenser onto the vertical tube. Be sure that the O-rings are on the surface of
the tube and connect the silicon tubes.
Put the water inlet tube on the inlet still (2.6).
Be sure of putting the filter, of tightening and connecting the other end to the tap.
Once you have assembled check the silicone tubes hold suitable position to let water
pass and to avoid water pressures.
metallic base (2.12) and turn the tap on. Turn off the tap when you see that the water level
is on the heater.
Switch ON/OFF (2.10). This will light showing that the distiller is connecting to the
power point. The warning light will also light (2.9) showing that the water supply is not
enough.
Turn the tap on slowly until the pilot (2.9) turns off.
Before few minutes, the heater will be getting red and boiling will start. The stilled
2.10
Pág. 4
Revisión 1 Febrero 2014
Instruction manual 59002114
Pag. 13
Version 1 February 2014
ENGLISH
3. TECHNICAL SPECIFICATIONS
Code
Output
Conductivity at 20 ºC
Water consumption
Consumption
Power supply
Dimensions
Weight
3. ESPECIFICACIONES TÉCNICAS
Entre sus principales prestaciones técnicas podemos destacar:
59002114
4 l/h
2 µS/cm
1,0 liters/min.
1 x 2500 W
230 V / 50-60Hz / 11 A
55 x 15 x 50 cm
4 Kg
Referencia
Producción
Conductividad a 20 ºC
Consumo de agua
Resistencia
Alimentación
Dimensiones
Peso
4. INSTALLATION / SETTING UP
59002114
4 l/h
2 µS/cm
1,0 litros/min.
1 x 3000 W
230 V / 50-60Hz / 11A
55 x 15 x 50 cm
4 Kg
4. INSTALACIÓN / PUESTA EN MARCHA
Preliminary inspection
Unwrap the water stiller, take off the involving plastic and take off the poliespan protection in which it comes fitted.
Please make sure that it does not present any damage because of the shipment. If it does
please communicate to your transport agent or suministrator immediately, so that they
can make the claims in the correct time limit.
We will only accept any equipment return within 15 days after delivery and provided it comes in its original package and with all accessories and documents supplied
Please check that all the accessories are enclosed with the equipment:
- Quartz heater
- Filter
- Feed tube (¾”)
- Support for water still
- Set of silicone tubes
- User manual
Installation
Before using this instrument, it is convenient for you to familiarize with its components
and basic essentials.
PLEASE READ THOROUGHLY THE INSTRUCTIONS BEFORE CONNECTING
AND OPERATING WITH THIS EQUIPMENT
Instruction manual 59002114
CASTELLANO
Pag. 12
Version 1 February 2014
Inspección preliminar
el Destilador, retire el plástico que lo envuelve y quite la protección de
poliespán en que viene encajado.
Sin conectar el equipo a la red eléctrica, asegúrese de que no presenta ningún daño debido al transporte. De ser así, comuníquelo inmediatamente a su distribuidor afín de poder
hacer las reclamaciones pertinentes en el plazo establecido por el servicio de transporte.
Desembale
Las devoluciones de equipos se podrán efectuar dentro de los 15 días posteriores al
envío y siempre que vengan completos en su embalaje original con todos los accesorios y documentos incluidos
Compruebe los componentes que usted debe recibir junto al equipo:
- Resistencia de cuarzo
- Filtro
- Goma de conexión agua (¾”)
- Soporte para colgar destilador
- Juego de gomas de silicona
- Manual de instrucciones
Instalación
Antes de comenzar a utilizar el instrumento, es conveniente familiarizarse con sus componentes y fundamentos básicos, así como con las funciones de sus controles.
LEA DETALLADAMENTE ESTE MANUAL DE INSTRUCCIONES ANTES DE
OPERAR CON ESTE EQUIPO CON EL FIN DE OBTENER LAS MÁXIMAS PRESTACIONES Y UNA MAYOR DURACIÓN DEL MISMO.
Manual de instrucciones 59002114
Pág. 5
Revisión 1 Febrero 2014
CASTELLANO
Coloque el Destilador de agua sobre una mesa horizontal y estable, dejando a su alre-
dedor el espacio de trabajo necesario.
Establezca todas las medidas requeridas por la normativa vigente en materia de seguridad e higiene en el trabajo (dispositivos de seguridad eléctrica, productos inflamables,
tóxicos y/o patológicos, etc).
No coloque el equipo en zonas próximas a fuentes de calor (mecheros, sopletes...), material magnético o lo exponga directamente a la luz del sol, etc.
Inserte el cable de alimentación de corriente alterna (CA) a la base de corriente 220V
50Hz ±10% provista de toma de tierra y por el otro extremo al conector del destilador de
agua.
Los cables de la instalación eléctrica han de ser al menos de 2,5 mm2 de sección.
La toma de corriente debe permitir el paso continuo de consumo mínimo de 11 A.
Debería poseer un grifo de boca roscada de ¾”.
ENGLISH
2. DESCRIPTION
1.1 Junction
1.2 PBTP nut
1.3 Ferrule
1.4 Guide fitting
1.5 End wiring of the heater
1.1
1.2
1.3
1.4
Ni el fabricante ni el distribuidor asumirán responsabilidad alguna por los daños ocasionados al equipo, instalaciones o lesiones sufridas a personas debido a la inobservancia del correcto procedimiento de conexión eléctrica. La tensión debe ser de 220 V, 50 Hz
± 10%.
Cuando no vaya a hacer uso del destilador de agua durante largos periodos de tiempo
asegúrese de que está desconectado de la red.
Nota: No conecte el equipo junto con otros equipos en el mismo prolongador, podría
sufrir sobrecalentamiento.
1.5
2.1 PBTP nut
2.2 Steam hole
2.3 Condenser
2.4 Water outlet
2.5 Cleaning mouth
2.6 Water inlet
2.7 Supporting flange
2.8 Boiler
2.9 Water level warning light
2.10 Switch ON/OFF
2.11 Metal base
2.12 Socket for the end wiring of the heater
Montaje del aparato
Asegúrese de que los elementos de la resistencia (junta tórica, casquillo guía, tuerca)
vayan en el orden y posición que aparece en la fig. 1.
Coloque la resistencia sobre la boca roscada (véase fig. 2): Sujete la resistencia por el casquillo (1.3) y gire la tuerca (1.2).
Ponga el refrigerante sobre el tubo vertical, asegurándose que están puestas las juntas
tóricas y conecte las gomas.
Conecte la goma de entrada del agua sobre la toma de entrada del destilador (2.6).
Asegúrese de poner el filtro, apretar y conectar el otro extremo al grifo.
2.3
2.7
2.2
2.5
2.4
2.1
Una vez montado, compruebe que los tubos de silicona mantengan la posición adecuada para el paso de agua y evite la creación de presiones.
Puesta en marcha
Antes de ponerlo en marcha conecte el terminal de la resistencia a la clavija alojada en
la base metálica (2.12), abra el suministro de agua hasta observar que el agua cubre la
resistencia en el depósito y vuélvalo a cerrar.
Manual de instrucciones 59002114
Pág. 6
Revisión 1 Febrero 2014
2.8
2.12
2.6
2.11
2.9
Instruction manual 59002114
2.10
Pag. 11
Version 1 February 2014
ENGLISH
ATTENTION!! IF EQUIPMENTS ARE NOT PROPERLY CLEAN AND
DISINFECTED THEY WOULD NOT BE ALLOWED TO REPAIR BY OUR
TECHNICAL SERVICE.
INDEX OF LANGUAGES
Spanish
2-8
English
9-15
Seguridad
destilador de agua debe ser utilizado por personal cualificado previamente, que
conozca el equipo y su manejo mediante el manual de uso.
Establezca todas las medidas requeridas por la normativa vigente en materia de seguridad e higiene en el trabajo (dispositivos de seguridad eléctrica, productos inflamables,
corrosivos, tóxicos y/o patológicos, etc).
No coloque el destilador de agua en zonas próximas a fuentes de calor (mecheros,
sopletes...), ni exponga el equipo directamente a la luz del sol.
Para prevenir fuego o descargas eléctricas, evite los ambientes secos y polvorientos así
como el derrame de líquidos sobre el equipo. Si esto ocurre, desenchufe inmediatamente
el equipo de la toma de corriente.
Cuando no vaya a hacer uso del equipo por largos períodos de tiempo, asegúrese de
que está desconectado de la red para evitar posibles accidentes.
Para cualquier manipulación de limpieza, verificación de los componentes o sustitución
de cualquier componente (ej: sustitución de fusible) es imprescindible apagar el equipo y
desconectarlo de la toma de corriente.
No intente repararlo usted mismo; además de perder la garantía puede causar daños en
el funcionamiento general del equipo, así como lesiones a personas (quemaduras, heridas...) y daños a la instalación eléctrica.
Fabricado según las directivas europeas de seguridad eléctrica, compatibilidad electromagnética y seguridad en máquinas.
El
INDEX OF CONTENTS
1. USES OF THE INSTRUMENT
10
2. DESCRIPTION
11
3. TECHNICAL SPECIFICATIONS
12
4. INSTALLATION / SETTING UP
12
5. MAINTENANCE AND CLEANING
14
6. ACCESSORIES
15
1. USES OF THE INSTRUMENT
This is the Nahita 4 l/h water distiller with automatic and continuous production that
provides a high quality distillation. The results are high purity, free of metal ions and
pyrogenic substances. Quartz resistance manufactured in high quality borosilicate glass
allowing continued use of the equipment and ensures its durability.
It provides safety mechanism that automatically switches off the quartz resistance when
the cooling water pressure is reduced and reconnect when recover.
Include with an adapted bracket and small dimensions that allow easy handling and
cleaning
The device is designed for clinical medicine, hospitals, researching laboratories, agroalimentary or pharmaceutical industries and schools or universities.
Instruction manual 59002114
CASTELLANO
A continuación:
Conecte el interruptor ON/OFF (2.10). Éste se iluminará indicando que el aparato recibe corriente. También se iluminará el piloto indicador (2.9) señalando que el suministro
de agua es insuficiente.
Abra lentamente el suministro de agua hasta que se apague la luz del piloto indicador (2.9)
A los pocos minutos, la resistencia adquiere un color rojo visible y comenzará la ebullición. El agua destilada se recoge por la salida (2.4)
Si por el orificio de exceso de vapor (2.2) saliese vapor de agua habría que aumentar el
caudal de agua.
Pag. 10
Version 1 February 2014
5. MANTENIMIENTO Y LIMPIEZA
Todas las normas de utilización citadas anteriormente carecerán de valor si no se
realiza una continua labor de mantenimiento
Para un adecuado funcionamiento del equipo es necesario seguir algunas recomendaciones.
Siga las instrucciones y advertencias relativas a este manual.
Tenga este manual siempre a mano para que cualquier persona pueda consultarlo.
Manual de instrucciones 59002114
Pág. 7
Revisión 1 Febrero 2014
CASTELLANO
Utilice siempre componentes y repuestos originales. Puede ser que otros dispositivos
sean parecidos, pero su empleo puede dañar el equipo.
Proceda con precaución para evitar que se desprendan, doblen o deterioren los cables u
otros componentes.
No intente repararlo usted mismo; además de perder la garantía puede causar daños en
el funcionamiento general del destilador de agua, así como lesiones a personas (quemaduras, heridas...) y daños en la instalación eléctrica, o equipos eléctricos cercanos.
En caso de avería diríjase a su proveedor para la reparación a través del Servicio Técnico
de Nahita.
Limpieza
Se recomienda la limpieza periódica del destilador. De esta forma, se mejoran los rendimientos en las destilaciones y se obtiene una mayor longevidad del aparato.
La frecuencia de limpiado depende en cada d caso de las sales que contenga el agua
suministrada.
Es recomendable limpiar los filtros alojados en la goma de conexión del agua. Pasos a
seguir:
1. Introduzca por el tubo de rebose de nivel (2.5) un poco de ácido acético o ácido clorhídrico. Es preferible que el agua esté caliente.
2. Espere a que se produzca el ataque a los residuos y vacíe el aparato.
3. Aclárelo con agua limpia una o dos veces.
4. Llénelo de agua hasta que el nivel de la misma en el depósito cubra la vaina de cuarzo.
6. ACCESORIOS
A continuación le detallamos las referencias de los accesorios disponibles para la sustitución o reposición de componentes.
Referencia
99002110
99002111
99002112
99002113
99002114
Descripción
Calderín
Refrigerante
Nivel
Resistencia de cuarzo
Limitador de caudal
INSTRUCCIONES SOBRE PROTECCIÓN DEL MEDIO AMBIENTE
No deposite el equipo en la basura ordinaria cuando haya terminado su ciclo de
vida; llévelo a un punto de recogida para el reciclaje de aparatos eléctricos y electrónicos, siguiendo la reglamentación general y local vigente.
No contiene elementos peligrosos o tóxicos para el ser humano, pero una eliminación no adecuada perjudicaría el medio ambiente.
Los materiales son reciclables tal como se indica en la marcación.
Al reciclar materiales o reutilizando los equipos usados, está Ud. haciendo una contribución
importante a la protección del medio ambiente.
Por favor póngase en contacto con la administración de su comunidad para que le asesoren sobre
los puntos de recogida locales.
Manual de instrucciones 59002114
Pág. 8
Revisión 1 Febrero 2014
ENGLISH
Thank you for choosing this equipment. We sincerely wish that you enjoy your Water
distiller Quartz. We highly recommend looking after this equipment according to what is
stated in this manual.
Nahita develops its products according to the CE marking regulations as well as
emphasizing the ergonomics and security for its user.
The correct using of the equipment and its good quality will permit you to enjoy this
equipment for years.
The improper use of the equipment can cause accidents and electric discharges, circuit
breakers, fires, damages, etc. Please read the point of Maintenance, where we expose the
security notes.
TO GET THE BEST RESULTS AND A HIGHER DURATION OF THE EQUIPMENT IT IS ADVISABLE TO READ THOROUGHLY THIS MANUAL BEFORE
OPERATING WITH THE EQUIPMENT.
Please bear in mind the following:
This
manual is inseparable from the Water distiller Quartz, so it should be available for
all the users of this equipment.
Follow all required applicable laws about safety and health (electrical security devices,
inflammable, toxic and/or pathological products, etc.).
You should carefully handle the water distiller avoiding sudden movements, knocks,
free fall of heavy / sharp objects on it. Avoid spilling liquids inside the equipment.
Never dismantle the different pieces of the water distiller to repair it yourself, since it
could produce a defective use of the whole equipment and a loss of the product warranty,
as well as injuries on people that handle the water distiller.
To prevent fire or electric discharges avoid dry or dusty environments. In case it may
happen unplug the equipment immediately.
If you have any doubt about setting up, installation or functioning do not hesitate in
contacting your wholesaler. You can also tell us any doubts or suggestions you have by
contacting Nahita Technical Assistance Department by email to [email protected].
This equipment is protected under the Warranties and consumer goods regulation
(10/2003).
Overhaul is not covered by the water distiller warranty.
Operations made by non-qualified staff will automatically produce a loss of the water
distiller warranty.
Neither fuses (1A) nor accessories (including their loss), are covered by the product’s
warranty. The warranty neither covers piece’s deterioration due to the course of time.
Please make sure you keep the invoice, either for having the right to claim or asking for
warranty coverage. In case you have to send the equipment to Nahita Technical Assistance
Department you should enclose the original invoice or a copy as guarantee.
Manufacturer reserves the right to modify or improve the manual or equipment.
Instruction manual 59002114
Pag. 9
Version 1 February 2014