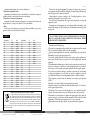
1
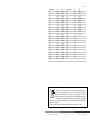
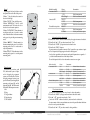
ANALIZADOR DE OXÍGENO DISUELTO PORTÁTIL 912/8
PORTABLE DISSOLVED OXYGEN ANALYZER 912/8
Por favor, lea detalladamente el manual de instrucciones antes de comenzar a utilizar el equipo y siga todas las normas y procedimientos de seguridad indicados.
This manual should be available for all users of these equipments. To get the best
results and a higher duration of this equipment it is advisable to read carefully
this manual and follow the processes of use.
Manual de instrucciones 50912080
Pág. 1
Revisión 1 Octubre 2014
ENGLISH
Temperature
ºC
0.0
1.0
2.0
3.0
4.0
5.0
6.0
7.0
8.0
9.0
10.0
11.0
12.0
13.0
14.0
15.0
16.0
17.0
18.0
19.0
20.0
CS
mg/l
14.46
14.22
13.82
13.44
13.09
12.74
12.42
12.11
11.81
11.53
11.26
11.01
10.77
10.53
10.30
10.08
9.86
9.66
9.46
9.27
9.08
ΔCS
mg/l
0.0925
0.0890
0.0857
0.0827
0.0798
0.0771
0.0745
0.0720
0.0697
0.0675
0.0653
0.0633
0.0614
0.0595
0.0577
0.0559
0.0543
0.0527
0.0511
0.0496
0.0481
Temperature
ºC
21.0
22.0
23.0
24.0
25.0
26.0
27.0
28.0
29.0
30.0
31.0
32.0
33.0
34.0
35.0
36.0
37.0
38.0
39.0
40.0
CS
mg/l
8.90
8.73
8.57
8.41
8.25
8.11
7.96
7.82
7.69
7.56
7.43
7.30
7.18
7.07
6.95
6.84
6.73
6.63
6.53
6.41
ΔCS
mg/l
0.0467
0.0453
0.0440
0.0427
0.0415
0.0404
0.0393
0.0382
0.0372
0.0302
INSTRUCTIONS ON ENVIRONMENT PROTECTION
At the end of its life cycle, please, does not dispose of this equipment by throwing it in the usual garbage; hand it over a collection point for the recycling of
electrical and electronic appliances. It does not contain dangerous or toxic products for humans but a non adequate disposal would damage the environment.
The materials are recyclable as mentioned in its marking. By recycling material
or by other forms of re-utilization of old appliances, you are making an important contribution to
protect our environment.
Please inquire at the community administration for the authorized disposal location.
Instruction manual 50912080
Pag. 30
Version 1 October 2014
ENGLISH
6. TROUBLESHOOTING
After the electrode is installed with new electrolyte and membrane, output of DO electrode is low and the electrode is not able to be calibrated.
After the electrode is connected to the meter, turn on the meter and polarize the electrode, the reading still can't reach the needed value, there are two possibilities: One is that
the membrane is not stuck to gold negative pole closely; the other is that the surface of
gold negative pole is not wet, you should hit the DO electrode lightly on the desk or the
bench. If reading increases, it indicates that the electrode function has restored.
Otherwise, change membrane.
The DO electrode is polarized, zero oxygen value is higher than specification
Check if negative pole is damaged, if there is hollow or small hole on surface of gold
negative pole; check if the surrounding of gold negative pole is out of the basic seat.
The meter doesn't print the data
Check if the meter works normally, if RS-232 print line is properly connected, and if the
printer works normally.
The meter doesn't communicate normally
Check if the meter works normally, data collecting software setting is correct and RS232 communicating line is properly connected.
The others
If all the above efforts fail to restore normal work, it is suggested to get in touch with
the service department of our factory.
7. APPENDIX
This appendix is extracted from ISO 5813-1983 water quality analyses-DO determination in water- iodometry
Instruction manual 50912080
Pag. 29
Version 1 October 2014
CASTELLANO
Gracias por haber adquirido este equipo. Deseamos sinceramente que disfrute del analizador de oxígeno disuelto portátil Nahita modelo 912/8. Le recomendamos que cuide el
equipo conforme a lo expuesto en este manual.
Nahita desarrolla sus productos según las directrices del marcado CE teniendo en cuenta la ergonomía y seguridad del usuario. La calidad de los materiales empleados en la
fabricación y el correcto proceder le permitirán disfrutar del equipo por muchos años.
El uso incorrecto o indebido del equipo puede dar lugar a accidentes, descargas eléctricas, cortocircuitos, fuegos, lesiones, etc. Lea el punto de Mantenimiento, donde se recogen
aspectos de seguridad.
LEA DETALLADAMENTE ESTE MANUAL DE INSTRUCCIONES ANTES DE
OPERAR CON ESTE EQUIPO CON EL FIN DE OBTENER LAS MÁXIMAS PRESTACIONES Y UNA MAYOR DURACIÓN DEL MISMO.
Tenga especialmente presente lo siguiente:
Este manual es parte inseparable del analizador de oxígeno disuelto portátil Nahita
modelo 912/8, por lo que debe estar disponible para todos los usuarios del equipo.
Establezca todas las medidas requeridas por la normativa vigente en materia de seguridad e higiene en el trabajo (dispositivos de seguridad eléctrica, productos inflamables,
tóxicos y/o patológicos, etc.).
Debe manipularse siempre con cuidado evitando los movimientos bruscos, golpes o
manipulación con objetos punzantes.
Nunca desmonte el equipo para repararlo usted mismo, además de perder la garantía
podría producir un funcionamiento deficiente de todo el equipo, así como daños a las personas que lo manipulan.
Cualquier duda puede ser aclarada por su distribuidor (instalación, puesta en marcha,
funcionamiento). Usted puede también mandarnos sus dudas o sugerencias a la siguiente dirección de correo del Servicio Técnico Nahita ([email protected]).
Este equipo está amparado por la Ley de garantías y bienes de consumo (10/2003).
No se consideran en garantía las revisiones del equipo.
La manipulación del equipo por personal no autorizado provocará la pérdida total de
la garantía.
Los fusibles o accesorios, así como la pérdida de los mismos, no están cubiertos por
dicha garantía. Tampoco estarán cubiertos por el periodo de garantía las piezas en su desgaste por uso natural.
Asegúrese de guardar la factura de compra para tener derecho de reclamación o prestación de la garantía. En caso de enviar el equipo al Servicio Técnico adjunte factura o
copia de la misma como documento de garantía.
El fabricante se reserva los derechos a posibles modificaciones y mejoras sobre este
manual y equipo.
Manual de instrucciones 50912080
Pág.2
Revisión 1 Octubre 2014
CASTELLANO
¡ATENCIÓN! NO SE ADMITIRÁ NINGÚN APARATO PARA REPARAR
QUE NO ESTÉ DEBIDAMENTE LIMPIO Y DESINFECTADO.
ÍNDICE DE IDIOMAS
Castellano
2-15
Inglés
or replacing any piece (e.g. replacement of a fuse).
Never try to repair the dissolved oxygen analyzer by yourself, since you will lose the
warranty and may provoke damages to the general operating system or the electrical installation, as well as injuries to the people that usually handle the equipment (burns,
hurts…).
Made under the European regulations for electrical security, electromagnetic compatibility and security on machines.
16-30
ÍNDICE DE CONTENIDOS
5. MAINTENANCE AND CLEANING
1. APLICACIONES DEL EQUIPO
3
2. DESCRIPCIÓN
4
3. ESPECIFICACIONES TÉCNICAS
6
4. INSTALACIÓN / PUESTA EN MARCHA
7
5. MANTENIMIENTO Y LIMPIEZA
14
6. RESOLUCIÓN DE PROBLEMAS
14
7. APÉNDICE
15
1. APLICACIONES DEL EQUIPO
El analizador de oxígeno disuelto portátil tiene un amplio uso relacionado con las soluciones acuosas en la industria, en piscifactorías, protección del medio ambiente, plantas
de tratamiento de aguas residuales, industrias de alimentación y departamentos de investigación. Tiene un diseño inteligente, fácil de llevar y conveniente para ser usado en un
lugar estable o en el campo.
Basado en la tecnología de microprocesador incluye funciones de compensación automática de la temperatura y calibración del oxígeno cero, escala completa, de la presión
atmosférica y la salinidad. Dispone de mecanismo de protección frente a cortes del suministro eléctrico, con recuperación de los datos almacenados y conservación de los parámetros preseleccionados.
Las mediciones pueden ser almacenadas, eliminadas, visualizadas o impresas. Hasta
100 grupos de datos de concentración de OD, saturación de OD y potencial electroquímico se pueden almacenar. Con salida RS-232 que conecta con el TP-16 de la impresora de
resultados o al ordenador.
Con un diseño de bajo consumo de energía y de visualización de bajo nivel de energía
en la pantalla. LCD de pantalla ancha con un sistema de fácil y rápido uso.
Con el panel del PC de nuevo material y una buena fiabilidad del medidor.
El grado de protección es IP65, resistente al agua y la suciedad para operaciones de campo.
Manual de instrucciones 50912080
ENGLISH
It is essential to have the equipment switched off before cleaning, checking components
Pág. 3
Revisión 1 Octubre 2014
To get the best results and a higher duration of this equipment it is essential to follow
the processes of use.
Note: All the processes of use mentioned below will not have any value unless you keep
a continued and careful maintenance.
Please follow the processes of use of this manual.
This manual should be available for all users of this equipment.
Always use original components and supplies. Other devices can be similar but they
can damage the equipment.
Before turning on the meter, make sure if the batteries are installed in safe connection
of the electrode must be reliable, and prevent the meter from corrosive gas.
When the DO electrode is not working, it should be preserved in distilled water that is
boiled in first and then cooled. Avoid the electrode from immerging in sodium sulfite
solution. If the above solution flows into the inside of the electrode, the performance of
the electrode will be influenced seriously.
If the meter won't work for a long time, take the batteries out of the rear panel, to avoid
the leakage of the batteries.
Never try to repair the dissolved oxygen analyzer by yourself, since you will lose the
warranty and may provoke damages to the general operating system or the electrical installation, as well as injuries to the people that usually handle the dissolved oxygen analyzer (burns, hurts…) or damages in nearby equipments.
In the event of breakdown please contact your distributor to overhaul through Nahita
Technical Assistance Department.
Cleaning
Never use scourers or substances that can grate for cleaning metallic parts such as stain-
less steel, aluminum, coatings, etc. as they damage the dissolved oxygen analyzer and
produce an early ageing of the equipment.
Use a fluff-free cloth dampened with soaped water that does not contain abrasives
Instruction manual 50912080
Pag. 28
Version 1 October 2014
ENGLISH
At this time, the correspondent data is displayed on the screen, the number of the present data is displayed on the position of the vice displaying.
Press "▲" or "▼" button to turn page and search stored data.
Press "ENTER" button, view function has finished. The meter will exit from "VIEW"
mode and return to selection mode.
Before pressing “ENTER” button in the view mode, please press “MODE/MEAS” button to cancel this mode and return to measurement mode directly.
CASTELLANO
2. DESCRIPCIÓN
Construcción del medidor
El medidor está compuesto por un sistema con un microprocesador que controla sus
funciones y un sistema de electrodo con un electrodo polarográfico. El medidor mide el
valor de OD y temperatura simultáneamente
Note: If there is no data saved in the storages, the meter will display "--" on the position of vice displaying.
5. Power supply management
The meter is regarded as portable instrument with 4 AA alkaline batteries in it. The
meter has battery management function in order to reduce the battery consumption and
be easy for the users to operate.
The meter has low voltage indication function. When the batteries are lack of energy, the
sign of low voltage (1) will be displayed on LCD, which reminds you to change the batteries.
Note: Before changing the batteries, turn off the meter.
6. Communication function
This meter is equipped with jack socket (8) it can be connected with computer through
RS-232 wire (14) and with a printer through TP-16 wire (16) supplied.
Before communicating, please connect the computer to the meter with RS-232 communicating connecting line, turn on the computer and operate the data collecting software.
The meter will collect measuring data and the data will be displayed in it and on the computer.
Note: Operating software, please refer to data collecting software menu of our company.
Security
The dissolved oxygen analyzer must be used by previously qualified staff that knows
how the equipment works thanks to the user manual.
Follow all required applicable laws about safety and health (electrical security devices,
inflammable, toxic and/or pathological products, etc.).
Do not place the dissolved oxygen analyzer near any warm supply (burners, blowlamps, etc), nor expose it directly to the sun. Avoid vibrations, dust and dry environments.
During its functioning dangerous materials such as flammable or pathological substances must be out of the safety area.
Instruction manual 50912080
Pag. 27
Version 1 October 2014
Pantalla
1. Signo de batería baja
2. Valor de medida
3. Unidad del valor de medida
4. Valor de temperatura de medida
5. Numero de medida
6. Modo de trabajo
Panel trasero del medidor
Hay tres tomas en el panel trasero para
conectar:
1. Conexión del electrodo
2. Conexión para sensor temperatura
3. Conexión clavija jack ( para cables RS-232
y TP-16)
1
2
Manual de instrucciones 50912080
Pág. 4
3
Revisión 1 Octubre 2014
CASTELLANO
Teclado
1. Teclado sencillo con sólo seis botones en
el panel frontal que serán usados en el proceso de medición.
Botón " ": Enciende la luz de la pantalla
mientras se mantiene pulsado.
Botón "ON/OFF": Enciende/apaga el equipo.
Botón "MODE/MEAS": Se utiliza para cambiar el modo en el que se encuentra. También
se utiliza este botón para volver a la función
anterior.
Botón "ENTER/PRINT": Cuando el medidor está en selección de modo púlselo para
seleccionar. Cuando el medidor está en modo
medición púlselo para imprimir el resultado
en ese momento.
OD saturation
ON
OFF
ENTER
PRINT
Electrode current
MODE
MES
Form
RESULT
T: 25.0
DO: 8.25mg/L
RESULT
T: 25.0
SAT: 100.0%
RESULT
T: 25.0
I: 1008nA
Remarks
Temperature value
DO concentration value
Temperature value
DO concentration value
Temperature value
DO concentration value
- Stored data print
DO/I/%
SAVE
Botón "▲/DO/I/% ": Cuando el medidor
está en modo medición púlselo para cambiar
el presente modo de medición. Púlselo también para ajustar los parámetros.
Botón "▼/SAVE": Cuando el medidor está
en modo medición púlselo para guardar el resultado de la medida actual. Púlselo también
para ajustar los parámetros.
Sistema del electrodo
El medidor tiene un grado de protección IP65, el sistema del electrodo
está compuesto de un enchufe resistente al agua y un electrodo OD. El
enchufe resistente al agua está compuesto de una tuerca (9), una junta de
goma (10), un capuchón de sellado
del medidor (11) y un enchufe (12). El
electrodo de oxígeno disuelto (13)
incluye el sensor de temperatura.
9. Tuerca
10. Junta
11. Capuchón de sellado del medidor
12. Enchufe de conexión del electrodo
13. Electrodo OD
Manual de instrucciones 50912080
ENGLISH
Measurement mode
OD concentration
Press "MODE" button in the mode of measurement, the meter will enter into selection
mode.
Press "▲" or "▼" button to select "VIEW" mode.
Press "ENTER" button, the meter will enter view mode.
Press “PRINT” button again.
At this time, the meter displays "PRINT" to start printing. When printing finishes, the
meter will return to selection mode.
Note: If there is no data saved in the storages, the meter will display "--" on the position of vice displaying for several seconds and then return to selection mode automatically.
Stored data print form is as following:
Measurement mode
Concentración OD
Saturación OD
Potencial electroquímico
Form
No. 1
T: 21,0
DO: 8,31mg/L
No. 1
T: 20,0
SAT: 50,0%
No. 1
T: 20,0
I: 900nA
Comentarios
No. 2
T: 25,0
DO: 8,25mg/L
No. 2
T: 10,5
SAT: 98,2%
No. 2
T: 25,0
I: 1808nA
Stored DO concentration data number
Temperature value
DO concentration value
Stored DO concentration data number
Temperature value
DO concentration value
Stored DO concentration data number
Temperature value
DO concentration value
4. View function
View function helps you view and search the stored data.
Press "MODE" button in the measurement mode, the meter enters selection mode.
Press "▲" or "▼" button to select "VIEW" mode.
Press "ENTER" button, the meter will enter view function mode.
Pág. 5
Revisión 1 Octubre 2014
Instruction manual 50912080
Pag. 26
Version 1 October 2014
ENGLISH
Press "SAVE" button, "Save" is displayed and “the number of the stored data” is showed
on the position of vice display, it indicates that the data is being stored.
When saving finishes, the meter will return to measurement mode.
Note: The number of the stored data follows the previous number of the data, at most
100 sets of measured data can be stored in each measuring mode. The meter will repeat
from Nº 0 automatically if the sets of measuring data are more than 100 sets, and the
other sets will also be stored.
CASTELLANO
Cable de conexión RS-232 y cable de conexión TP-16
14. Cable de conexión a ordenador RS-232
15. Clavija jack
16. Cable de la impresora TP-16
2. Delete function
When the meter is in a certain measurement mode,
Press "MODE" button, the meter will enter into selection mode.
Press "▲" or "▼" button to select "DELETE" mode.
Press "ENTER" button, the meter enters into delete mode.
At this time, the meter displays "Sure".
Press "ENTER" button if you really need to delete the data, the meter will display "--"
on the vice displaying to indicate the data is being deleted.
When deleting finishes, the meter will exit from "DELETE" mode automatically and
return to selection mode.
When "Sure" is displayed, you can press "MODE/MEAS" button to cancel this mode
before pressing "ENTER" button and the meter will return to measurement.
Note: This kind of delete function is to delete all the stored data, please operate with
caution. DO concentration data is deleted in DO concentration measurement mode; DO
saturation data is deleted in DO saturation measurement mode; electrode current data is
deleted in electrode current measurement mode.
3. Print function
The meter can be regarded as laboratory regular instrument with print function. There
are two print functions: instant print and stored data print.
Note: Before printing, please refer to the operating instruction of the printer, set the
band rate to 9600. Insert connection line of the printer (16) into RS-232 interface.
- Instant print
Press "ENTER" button in the mode of measurement, "PRINT" is displayed on the left
bottom of the screen, the present measured DO concentration, saturation or current value
will be printed at once, and the present temperature value will be printed simultaneously.
After printing finishes, the meter will return to measuring mode.
Instant print form is as following:
Instruction manual 50912080
Pag. 25
Version 1 October 2014
3. ESPECIFICACIONES TÉCNICAS
Referencia: 50912080
Rango de medida
Concentración OD
0,00~19,99 mg/l
Saturación OD
0,0~199,9 %
Temperatura
0,0~40,0ºC
Precisión de la unidad electrónica
Concentración OD
±0,10mg/L
Saturación OD
±2,5%
Temperatura
±0,3ºC ±1bit
Estabilidad
±0,10mg/l/3h
Temperatura
±0,5ºC ±1 bit
Estabilidad
±0,20mg/l/1h
Precisión del medidor
Concentración OD
±0,50mg/l:Cuando
la diferencia entre la
T de calibración y la T
de la solución problema no es superior a
±15,0ºC
Saturación OD
±10,0%: Cuando
la diferencia entre
la T de calibración
y la de la solución
problema no es
superior a ±15,0ºC
Reproducibilidad
0,20 mg/l
Compensación automática de temperatura: 0,0A 40,0ºC.
Temperatura base: 20±1ºC.
Corriente restante: ≤0,10 mg/l.
Tiempo de respuesta: ≤45s (90% de respuestas a 20,0ºC).
Condiciones de trabajo normales
- Temperatura ambiente: 0,0A 40,0ºC.
- Grado de protección del medio ambiente: IP65.
- Fuente de alimentación: 4 pilas alcalinas AA.
Manual de instrucciones 50912080
Pág. 6
Revisión 1 Octubre 2014
CASTELLANO
- Sin perturbaciones por campos electromagnéticos excepto el campo magnético terrestre.
Dimensiones exteriores (L x W x H): 210x86x50 mm
Peso: ±0,5 Kg.
Máxima potencia: ±35 mW.
4. INSTALACIÓN / PUESTA EN MARCHA
Inspección preliminar
Desembale el analizador de oxígeno disuelto, retire el plástico que lo envuelve y quite
la protección de poliespán en que viene encajado.
Asegúrese de que no presenta ningún daño debido al transporte. De ser así, comuníquelo inmediatamente a su distribuidor afín de poder hacer las reclamaciones pertinentes
en el plazo establecido por el servicio de transporte.
Las devoluciones de equipos se podrán efectuar dentro de los 15 días posteriores al
envío y siempre que vengan completos en su embalaje original con todos los accesorios y
documentos incluidos
Compruebe los accesorios que usted debe recibir junto al equipo:
- Electrodo OD
- 5 Reemplazos de membrana
- 4 Pilas alcalinas AA
- Cable impresora TP16
- Cable ordenador RS-232
- Software
- Manual
Instalación
Antes de comenzar a utilizar el instrumento, es conveniente familiarizarse con sus componentes y fundamentos básicos, así como con las funciones de sus controles.
¡LEA DETALLADAMENTE ESTE MANUAL DE INSTRUCCIONES
ANTES DE OPERAR CON ESTE EQUIPO CON EL FIN DE OBTENER LAS
MÁXIMAS PRESTACIONES Y UNA MAYOR DURACIÓN DEL MISMO.
No coloque el equipo en zonas próximas a fuentes de calor (mecheros, sopletes...), material magnético o lo exponga directamente a la luz del sol, etc.
Queda prohibida la presencia de productos inflamables (gases y líquidos) en el lugar de
trabajo.
Conexiones del medidor
1. Conexión del sistema del electrodo
Manual de instrucciones 50912080
Pág. 7
Revisión 1 Octubre 2014
ENGLISH
meter. Please select suitable salinity value before measurement.
Press "MODE" button to enter into selection mode.
Press "▲" or "▼" button to select "Salt" mode.
Press "ENTER" button to enter to salinity calibration mode.
At this time, the meter displays present salinity value.
Press "▲" or "▼" button to change salinity value according to actual salinity.
Press "ENTER" button, the meter finishes salinity calibration and then exit from “Salt”
mode to return to selection mode.
Press “MODE/MEAS” to exit to measurement mode.
Before pressing “ENTER” button in the mode of salinity calibration, please press
“MODE/MEAS” button to cancel this mode and return to measurement mode directly.
Note: In general water solution measurement, salinity need not calibrating. The presetting salinity value is 0.0g/ml in meter.
4. Atmospheric pressure calibration
DO value is related to atmosphere pressure value. Preset atmosphere pressure value in
meter is 101.3Pa. You should select suitable atmosphere value before measuring.
Press "MODE" button to enter into selection mode.
Press "▲" or "▼" button to select "Air" mode.
Press "ENTER" button to enter into atmosphere pressure calibration mode.
At this time, the meter displays present atmosphere pressure value.
Press
"▲" or "▼" button to change atmosphere pressure value according to actual
atmosphere pressure;
Press "ENTER" button, the meter finishes atmosphere pressure calibration and then
exits from “Air” mode automatically to return to selection mode.
Press “MODE/MEAS” to exit to measurement mode.
Other functions of the meter
In order to obtain better performance, the meter has several other functions besides the
basic measurement and calibration function.
1. Store function
The 912/8 DO Analyzer is able to work both in the laboratory and on the spot. It will
make you operate easily to the function of present measuring, data collecting and store
data. The present measuring result can be stored to be searched or analyzed on computer.
The meter has three storages. One is for storing measured DO concentration value in
DO concentration measurement. The second is for storing measured DO saturation value
in DO saturation measurement. The third is for storing measured current value in current
measurement. At most 100 sets of data can be stored in each measurement mode.
In measurement of the meter:
Instruction manual 50912080
Pag. 24
Version 1 October 2014
CASTELLANO
ENGLISH
3. Electrode current value measurement
In the mode of electrode current value measurement, the meter displays the present
electrode current and temperature value. The default unit is “nA”. "Measure" is displayed
on the right bottom of screen.
Function of calibration
If meter has not been used in 24 hours, the electrode is new or electrolyte has been changed, the electrode needs electric polarization in 30-60 minutes once the electrode is connected with DO analyzer and switched on before measurement. Then calibrate de electrode. The electrode also needs electric polarization in 5-25 minutes when is not connected with the meter or turning off the meter before one hour.
Electrode should be calibrated in zero oxygen mode and full scale mode.
1. Zero oxygen calibration
Put DO electrode into fresh 5% sodium sulfite solution.
Press "MODE/MEAS" button to enter into selection mode.
Press "▲" or "▼" button to select “Zero” mode.
Press "ENTER" button to enter into zero calibration mode.
After reading is stable, press “ENTER” button, the meter exists to selection mode. The
calibration of zero oxygen is finished.
Pulse “MODE/MEAS” to exit to measurement mode.
Before pressing “ENTER” button in the mode of zero oxygen calibration, please press
“MODE/MEAS” button to cancel this mode and return to measurement mode directly.
When the meter finishes zero oxygen calibration, then full scale must be calibrated.
2. Full scale calibration
Take DO electrode out of solution, clean it with distilled water, absorb the water drops
on surface of membrane carefully with filter paper, and then put it in the air, the electrode can't be touched water drop.
Press “MODE/MEAS” button in the mode of measurement, the meter enters into selection mode.
Press "▲” or “▼” button to select “Full” mode; or press "▲” or “▼” button to select
“MODE” button directly in the selection mode.
Press “ENTER” button to return to full scale calibration mode.
When reading is stable, press "ENTER" button, the meter exits “Full” mode and return
to selection mode. The meter has finished full scale calibration.
Press “MODE/MEAS” to exit to measurement mode.
Before pressing “ENTER” button in the mode of full scale calibration, please press
“MES” button to cancel this mode and return to measurement mode directly.
3. Salinity calibration
The DO value correlates with salinity value. The presetting salinity value is 0.0g/ml in
Instruction manual 50912080
Pag. 23
Version 1 October 2014
- Para garantizar el grado de protección IP65 el medidor tiene un sistema impermeable.
Antes de instalar el electrodo de oxígeno, la clavija de conexión (12) debe estar conectada
antes en el conector de la parte trasera del aparato (6). Después ensambla el sistema del
electrodo en el orden correcto. Cuando desarme el electrodo hágalo en el orden contrario.
- Ponga la tapa de protección en la salida para el sensor de temperatura (7).
2. Conexión RS-232
Si el usuario dispone de impresora TP-16 (consulte las instrucciones de uso de su impresora) para imprimir o conectar al pc, conecte el extremo del cable correspondiente (15) en
la salida del aparato para ello (8). Si no se va a conectar ponga la tapa de protección.
Nota: Cuando el electrodo de oxígeno no está conectado al medidor o el sensor de temperatura está dañado, la temperatura seleccionada debe ser 25,0ºC, El valor de oxígeno
disuelto medido estará medido y compensado de acuerdo con dicha temperatura.
Puesta en marcha
El medidor usa 4 pilas alcalinas AA, abra la tapa en el panel trasero y ponga las cuatro
pilas alcalinas en el interior de acuerdo con los signos “+” y “-” indicados. Cierre la tapa
y el medidor se encenderá y se pondrá en modo medición automáticamente. Si no ocurre,
pulse el botón “On/off”, se encenderá el LCD y el medidor se pondrá en modo medición
tras dos segundos.
Nota: si no va a usar el aparato en un tiempo prolongado, por favor, saque las pilas.
La primera medida
Retire el capuchón del electrodo y limpie el electrodo de oxígeno disuelto varias veces
con agua destilada, después límpielo una vez con el electrolito. Ponga en su interior unas
gotas del electrolito suministrado e introduzca el electrodo de modo que se pongan en
contacto a través del electrolito la punta de oro del electrodo y la membrana. Limpie la
superficie del electrodo con agua destilada para retirar los restos de electrolito.
Empezará a medir después de encender el aparato. En el modo medición el medidor
calcula el valor de la concentración de oxígeno disuelto, la saturación de oxígeno disuelto y el potencial electroquímico. Para cambiar la medida mostrada pulse el botón
“▲/DO/I/%”.
1. Medición de la concentración de oxígeno disuelto.
En el modo de medida de concentración de oxígeno disuelto, en la pantalla aparecen la
concentración de oxígeno disuelto presente y la temperatura de la solución. La unidad de
concentración es “mg/l”. En la parte inferior derecha de la pantalla aparece “Measure”
indicando que está en modo de medición.
2. Medición de la saturación de oxígeno disuelto.
En el modo de medición de la saturación de oxígeno disuelto, en la pantalla aparecen el
valor de la saturación de oxígeno disuelto y la temperatura de la solución. La unidad de
medida es “%”. En la parte inferior derecha de la pantalla aparece “Measure” indicando
Manual de instrucciones 50912080
Pág. 8
Revisión 1 Octubre 2014
CASTELLANO
ENGLISH
que está en el modo de medición.
3. Medición del valor de potencial electroquímico.
En el modo de medición del potencial electroquímico, en la pantalla aparecerá este valor
y la temperatura de la solución. La unidad es “nA”. En la parte inferior derecha de la pantalla aparece “Measure” indicando que está en el modo de medición.
electrode waterproof system. Before installing the oxygen electrode, the connection
plug (12) should first be inserted into oxygen electrode socket (6) on rear panel. Then
assemble the DO electrode in proper order. When disassembling the oxygen electrode,
take off the fittings of electrode system in opposite order.
Insert measuring seal sleeve in the place of (7) without connecting electrode.
2. Connection of RS-232 line
If the user is equipped with TP-16 printer (Installation of the printer see operating instruction of this product) to print or connect the computer communication, insert the proper line (15) into correspondent socket (8). If the socket is not used, put the protection seal
sleeve.
Función de calibración
Si no ha usado el analizador en 24 horas, el electrodo es nuevo o se ha cambiado el electrolito, una vez conectado electrodo al analizador espere un periodo de aproximadamente 30-60 minutos antes de su uso para que se complete el proceso de polarización del
mismo y a continuación proceda a su calibración. Si el electrodo no ha estado conectado
con el medidor o ha sido apagado hace más de una hora necesita de 5 a 25 minutos de
polarización.
Tras polarizar el electrodo se debe calibrar al menos en modo cero de oxígeno y escala
completa.
1. Calibración a modo cero de oxígeno
Poner el electrodo DO en solución de sulfito de sodio al 5% nueva.
Pulse el botón "MODE" para entrar en modo selección.
Pulse los botones "▲" o "▼" para seleccionar el modo “Zero”.
Pulse el botón "ENTER" para entrar en el modo de calibración en cero de oxígeno.
Cuando la lectura sea estable pulse el botón “ENTER”. La calibración a oxígeno cero
habrá acabado.
Pulse el botón “MODE/MEAS” para salir al modo medición.
Si desea cancelar este modo, antes de pulsar el botón “ENTER” pulse el botón
“MODE/MEAS” para volver directamente al modo de medición.
Una vez calibrado en modo cero de oxígeno, el equipo ha de ser calibrado en escala
completa.
2. Calibración en modo escala completa
Saque el electrodo DO fuera de la solución y límpielo con agua destilada. Seque con cuidado las gotas de agua que queden en la superficie y en la membrana absorbiéndolas con
papel de filtro y coloque el electrodo sin llegar a tocar en ningún caso el agua, o simplemente déjelo suspendido en el aire.
Pulse el botón “MODE” para entrar en modo selección.
Pulse los botones “▲” o “▼” para seleccionar el modo “Full”.
Pulse el botón “ENTER” para entrar al modo de calibración a escala completa
Cuando la lectura sea estable, pulse el botón “ENTER”. Habrá acabado la calibración a
escala completa.
Pulse el botón “MODE/MEAS” para salir al modo medición.
Si desea cancelar este modo, antes de pulsar el botón “ENTER” pulse el botón
“MODE/MEAS” para volver directamente al modo de medición.
Manual de instrucciones 50912080
Pág. 9
Revisión 1 Octubre 2014
Note: When DO electrode is not connected to the meter or temperature sensor in the DO
electrode is damaged, temperature is displayed 25.0℃, the DO value is measured and
compensated according to temperature at 25.0℃.
Power on
The meter uses 4 AA alkaline batteries, for the first time operation, open the battery
cover on the rear panel, put 4 alkaline batteries into the case according to the sign "+", "-"
correctly. Put the cover back to the place, the meter will be switched on and enter measuring mode automatically. If the meter doesn't work with batteries in it, press "ON/OFF"
button, LCD shows, the meter will enter measuring mode automatically 2 seconds later.
Note: If the meter won't work for a long time, please take the batteries out
The first time measurement
Take off the electrode cap and clean OD Electrode with distilled water for several times,
the n wash the OD electrode with the electrolyte solution. Put into the cap the electrolyte
solution and immerse the OD electrode in it carefully to make membrane stuck to the surface of gold electrode. Clean the electrode surface with distilled water to remove the
remaining electrolyte.
Measurement can begin after the meter is switched on. In measuring mode of the meter,
the meter calculates the value of DO concentration, saturation and electrode current. You
may press "▲/DO/I/%" button to switch the display.
1. DO concentration measurement
In the mode of DO concentration measurement, the meter displays the present DO concentration and temperature value of measured solution. The unit of concentration is
“mg/l”. "Measure" is displayed on the right bottom of screen.
2. DO saturation measurement
In the mode of DO saturation measurement, the meter displays the present DO saturation and temperature value. The unit of saturation is “%”. "Measure" is displayed on the
right bottom of screen.
Instruction manual 50912080
Pag. 22
Version 1 October 2014
ENGLISH
- Without disturbing by electromagnetic field except terrestrial magnetic field.
Outside dimension (L x W x H): 210 x 86 x 50 mm.
Weight: about 0,5kg.
Max. Power rating: about 35 mW.
4. INSTALLATION / SETTING UP
Preliminary inspection
Unwrap the balance, take off the involving plastic and take off the poliespan protection
in which it comes fitted.
Please make sure that it does not present any damage because of the shipment. If it does
please communicate to your transport agent or suministrator immediately, so that they
can make the claims in the correct time limit.
We will only accept any equipment return within 15 days after delivery and provided
it comes in its original package and with all accessories and documents supplied
Please check that all the accessories are enclosed with the equipment:
- DO electrode
- 5 Electrode membrane cap
- 4 AA alkaline batteries
- TP-16 serial printer connecting line
- Communicating connecting line RS-232
- Data collection software
- User guide
Installation
Before using this instrument, it is convenient for you to familiarize with its components
and basic essentials.
PLEASE READ THOROUGHLY THE INSTRUCTIONS BEFORE CONNECTING AND OPERATING WITH THIS EQUIPMENT
Do not put the dissolved oxygen analyzer near any warm supply (burners, blowlamps…), nor expose it directly to the sun, etc.
Avoid inflammable or toxic substances in the working area.
Connection of the meter
1. Connection of the electrode system
In order to guarantee the protection grade IP65 of the meter, the design has considered
Instruction manual 50912080
Pag. 21
Version 1 October 2014
CASTELLANO
3. Calibración en modo salinidad
El valor de oxígeno disuelto está correlacionado con el nivel de salinidad del agua. El
valor de salinidad configurado en el aparato es de 0,0 g/ml. En el caso de medir agua de
mar o piscifactoría, seleccione el valor de salinidad adecuado antes de medir.
Pulse el botón “MODE” para entrar al modo de selección cuando esté en el modo de
medida.
Pulse el botón “▲” o “▼” para seleccionar el modo “Salt”.
Pulse el botón “ENTER” para entrar a la calibración en modo salinidad.
En este momento, se muestra en la pantalla el valor de salinidad actual.
Pulse el botón “▲” o “▼” para cambiar la salinidad de acuerdo con el valor actual.
Pulse el botón “ENTER” para acabar la calibración y volverá al modo selección.
Pulse el botón “MODE/MEAS” para salir al modo medición.
Si desea cancelar este modo, antes de pulsar el botón “ENTER” pulse el botón “MES”
para volver directamente al modo de medición
Nota: En medidas en agua general la salinidad no necesita ser calibrada. El valor preconfigurado en el aparato es de 0,0 g/ml.
4. Calibración en modo presión atmosférica
El valor de oxígeno disuelto también está relacionado con el valor de presión atmosférica. El valor predeterminado en el analizador es de 101,3 Pa. Si existe una gran diferencia entre la presión atmosférica real y la de medida seleccione el valor adecuado antes de
medir.
Pulse el botón “MODE” para entrar al modo selección cuando esté en modo de medida.
Pulse el botón “▲” o “▼” para seleccionar el modo “Air”.
Pulse el botón “ENTER” para entrar en el modo de calibración a presión atmosférica.
En este momento en la pantalla se muestra el valor de la presión atmosférica actual.
Pulse el botón “▲” o “▼” para cambiar el valor de presión atmosférica de acuerdo con
el valor actual de presión atmosférica.
Pulse el botón “ENTER” para terminar la calibración y el analizador saldrá del modo
“Air” al modo de selección.
Pulse el botón “MODE/MEAS” para salir al modo medición.
Otras funciones del analizador
Con el fin de obtener un mejor rendimiento, el equipo tiene otras funciones además de
la de medición y la función de calibración:
1. Función de almacenamiento
El analizador de oxígeno disuelto 912/8 puede ser utilizado tanto en laboratorio como
sobre el terreno. La función de almacenar datos hará esto más fácil ya que los datos tomados podrán ser analizados en un ordenador posteriormente.
Manual de instrucciones 50912080
Pág.10
Revisión 1 Octubre 2014
CASTELLANO
El medidor tiene tres memorias. Una es para almacenar medias de concentración de oxígeno disuelto, otra para guardar medidas de saturación de oxígeno disuelto y la tercera
para almacenar medidas del potencial electroquímico. Se guardan hasta 100 grupos de
datos de cada memoria.
Durante la medición con el equipo:
Pulse el botón “SAVE” y aparecerá “Save” en la pantalla y el número de dato correspondiente al número de datos guardados. Esto indica que el dato se ha almacenado. El
medidor volverá al modo de medida.
ENGLISH
RS-232 connection line and TP-16 printer
connection line
14. RS-232connection wire
15. Jack plug
16. TP-16 connection wire
Nota: El número de datos guardados va aumentando hasta llegar a los 100 a partir del
cual empezarán a contar desde el Nº 1 automáticamente.
2. Función de eliminación
Cuando el analizador está en modo de medida:
Pulse botón “MODE” y el equipo entrará en modo selección.
3. TECHNICAL SPECIFICATIONS
Pulse el botón “▲” o “▼” para seleccionar el modo “Delete”.
Pulse el botón “ENTER” y el equipo entra en función de eliminación.
Code: 50912080
En este momento la parte superior de la pantalla se mostrará “Sure”.
Pulse el botón “ENTER” si realmente necesita borrar los datos, la pantalla mostrará “—
” para indicar que los datos han sido borrados.
Cuando el borrado de datos acabe, el equipo saldrá del modo “Delete” automáticamente y volverá al modo selección.
Cuando se muestre “Sure” en la pantalla puede pulsar el botón “MODE/MEAS” para
cancelar este modo y volverá al modo de medición.
Measuring range
Nota: En este tipo de funciones de eliminación de datos, por favor, opere con cuidado
asegurándose de lo que borra.
Accuracy of the meter:
3. Función de impresión
El medidor posee también funciones de impresión. Hay dos modos: impresión instantánea e impresión de datos guardados.
Antes de imprimir, por favor, consulte las instrucciones de funcionamiento de su impresora, ajuste la velocidad de transmisión a 9600 e inserte el cable de la impresora (16) a la
salida RS-232 del equipo.
- Impresión instantánea
Pulse el botón “ENTER” en el modo de medición, en la parte inferior izquierda de la
pantalla aparece “Print” y la actual medida será imprimida junto con la temperatura
actual. Cuando acabe la impresión el equipo volverá al modo de medida.
El modo de impresión instantánea se muestra como sigue:
Manual de instrucciones 50912080
Pág. 11
Revisión 1 Octubre 2014
DO concentration
0,00~19,99 mg/l
DO saturation
0,0~199,9 %
Temperature
0,0~40,0ºC
Accuracy of electronic unit
DO concentration
±0,10mg/L
DO concentration
±0,50mg/l:When
the difference between calibrating and
measured solution
temp. is not over
±15.0℃.
DO saturation
±2,5%
Temperature
±0,3ºC ±1bit
Stability
±0,10mg/l/3h
DO saturation
Temperature
±0,5ºC ±1 bit
Stability
±0,20mg/l/1h
±10,0%: Cuando la
diferencia entre la T
de calibración y la
de la solución problema no es superior a ±15,0ºC
Reproducibility
0,20 mg/l
Automatic temperature compensation: 0.0~40.0 ℃.
Basing temperature: 20±1℃.
Remaining current: ≤0.10 mg/l.
Response time ≤45s (90% response at 20.0℃).
Normal operating conditions:
- Ambient temperature: 0.0~40.0 ℃.
- Environmental protection grade: IP65.
- Power supply: 4 AA alkaline batteries.
Instruction manual 50912080
Pag. 20
Version 1 October 2014
ENGLISH
Keypad
Simple keypad with only six buttons on the
front panel to be used in the whole process.
Button " ": Press this button, the screen is in
the state of back-light
Button "ON/OFF": Turn on/off the power.
Button "MODE/MEAS": Used to switch
measurement mode. This button also has a
function of cancel current operation.
Button "ENTER/PRINT": When the meter is
in selection mode, press it to select a certain
mode. When the meter is in the measurement
mode, press it to print the present measuring
result.
Button "▲/DO/I/% ": When the meter is in
the measurement mode, press it to switch the
measuring mode. Press it to select mode or
adjust the parameters.
Saturación OD
ON
OFF
ENTER
PRINT
Potencial electroquímico
MODE
MES
Forma
RESULT
T: 25.0
DO: 8.25mg/L
RESULT
T: 25.0
SAT: 100.0%
RESULT
T: 25.0
I: 1008nA
Comentarios
Valor de temperatura
Valor de concentración de OD
Valor de temperatura
Valor de la saturación de OD
Valor de temperatura
Valor de potencial electroquímico
4. Impresión de datos almacenados
DO/I/%
SAVE
Pulse el botón “MODO” en el modo de medición y el equipo entra en modo selección.
Pulse el botón “▲” o “▼” para seleccionar el modo “View”.
Pulse el botón “ENTER” y el aparato entrará en el modo view.
Pulse el botón “PRINT” de nuevo.
En ese momento en la pantalla se muestra “Print” para indicar que comienza a imprimir. Tras la impresión, el equipo regresa al modo de trabajo previo.
Si no hay datos guardados en las memorias en la pantalla aparecerá unos segundos “—
” y volverá automáticamente al modo de trabajo anterior.
El modo de impresión de los datos almacenados se muestra como sigue:
Button "▼/SAVE": When the meter is in the
measuring mode, press it to save the present
measuring result.
Modo de medida
Concentración OD
Electrode system
The meter has protection grade
IP65, the electrode system is composed of electrode plug waterproof
system and DO electrode. The electrode plug waterproof system is composed of the nut (9), one ring (10), the
measuring seal sleeve (11) and the
electrode plug (12). The DO electrode
(13) includes the temperature sensor.
9. Nut
10. Ring
11. Plug seal sleeve
12. Electrode plug
13. DO Electrode
Instruction manual 50912080
CASTELLANO
Modos de medida
Concentración OD
Saturación OD
Potencial electroquímico
Forma
No. 1
T: 21,0
DO: 8,31mg/L
No. 1
T: 20,0
SAT: 50,0%
No. 1
T: 20,0
I: 900nA
Comentarios
No. 2
T: 25,0
DO: 8,25mg/L
No. 2
T: 10,5
SAT: 98,2%
No. 2
T: 25,0
I: 1808nA
Número de datos almacenados
Valor de temperatura
Valor de la concentración OD
Número de datos almacenados
Valor de temperatura
Valoración de saturación de OD
Número de datos almacenados
Valor de temperatura
Valor del potencial electroquímico
5. Visualización de datos
La función de visualización ayuda a ver y buscar los datos almacenados.
Pulsa el botón “MODO” y el equipo entra en el menú selección de modo.
Pulsa “▲” o “▼” para seleccionar el modo “View”.
Con la tecla “ENTER” confirma la selección y entra en el modo visualización.
En este momento el dato correspondiente se mostrará en la pantalla además del número de dato con el que está almacenado
Pulse el botón “▲” o “▼” para buscar entre los datos guardados.
Pag. 19
Version 1 October 2014
Manual de instrucciones 50912080
Pág. 12
Revisión 1 Octubre 2014
CASTELLANO
Pulsa el botón “ENTER” cuando quera acabar la función de visualización y el equipo
volverá al modo de trabajo anterior.
Si desea cancelar este modo, antes de pulsar el botón “ENTER” pulse el botón
“MODE/MEAS” para volver directamente al modo de medición
Si no hay datos guardados en la memoria en la pantalla se mostrará “—”
ENGLISH
2. DESCRIPTION
Meter construction
The meter is composed by micro-processor system and one polarographic electrode.
The meter can measure value of DO and temperature simultaneously.
6. Gestión de la fuente de alimentación
El aparato está considerado un instrumento portátil que funciona con 4 pilas alcalinas
AA. Tiene una función de ahorro de energía y un símbolo indicador de la batería baja en
la pantalla (1).
Nota: Antes de cambiar las pilas, apague el aparato.
7. Función de comunicación
Este equipo lleva una conexión tipo jack (8) y puede ser conectado una impresora a través del cable TP-16 (16) o con el ordenador a través del cable RS-232 (14) suministrados.
Antes de trabajar conectados por favor, conecte el ordenador al aparato a través del
cable RS-232, encienda el ordenador y trabaje con el software que almacena los datos. En
esta función se recopilan los datos y se muestran tanto en el ordenador como en el equipo.
Seguridad
El analizador de oxígeno disuelto debe ser utilizado por personal cualificado previa-
mente, que conozca el equipo y su manejo mediante el manual de uso.
Establezca todas las medidas requeridas por la normativa vigente en materia de seguridad e higiene en el trabajo (dispositivos de seguridad eléctrica, productos inflamables,
corrosivos, tóxicos y/o patológicos, etc.).
No coloque el analizador de oxígeno disuelto en zonas próximas a fuentes de calor
(mecheros, sopletes...), ni exponga el equipo directamente a la luz del sol.
Queda absolutamente prohibida la presencia de productos inflamables (gases y líquidos) en el lugar de trabajo.
Para cualquier manipulación de limpieza, verificación de los componentes o sustitución
de cualquier componente es imprescindible apagar el equipo.
No intente repararlo usted mismo; además de perder la garantía puede causar daños en
el funcionamiento general del equipo, así como lesiones a personas (quemaduras, heridas...).
Procure que no entre agua en el cuadro de controles, aunque éste se encuentre debidamente aislado.
Fabricado según las directivas europeas de seguridad eléctrica, compatibilidad electromagnética y seguridad en máquinas.
Displaying
1. Lack of voltaje sing
2. Measuring value
3. Measuring value unit
4. Temperature measuring value
5. Vice displaying
6. State indicate
Rear panel of the meter
There are three sockets on the rear panel:
1. Oxygen electrode socket
2. Temperature sensor
3. Jack plug
1
2
Manual de instrucciones 50912080
Pág. 13
Revisión 1 Octubre 2014
Instruction manual 50912080
Pag. 18
3
Version 1 October 2014
ENGLISH
ATTENTION!! IF EQUIPMENTS ARE NOT PROPERLY CLEAN AND
DISINFECTED THEY WOULD NOT BE ALLOWED TO REPAIR BY OUR
TECHNICAL SERVICE.
INDEX OF LANGUAGES
SPANISH
2-15
ENGLISH
16-30
INDEX OF CONTENTS
1. USES OF THE INSTRUMENT
17
2. DESCRIPTION
18
3. TECHNICAL SPECIFICATIONS
20
4. INSTALLATION / SETTING UP
21
5. MAINTENANCE AND CLEANING
28
6. TROUBLESHOOTING
29
7. APPENDIX
29
1. USES OF THE INSTRUMENT
Dissolved Oxygen Analyzer is used to measure oxygen of water solution in running water
factory, aquatic farm, environmental protection, sewage treatment plant, drink industry and
scientific research departments. It is smart in style and easy to carry, and suitable for both
on the spot and field operation. And the battery has a long life to ensure meter continue
working. The meter can be used as a conventional laboratory analysis instrument.
Functions of DO concentration, DO saturation, electrode current and temperature measuring. With micro-processor technology, with the functions of automatic temperature compensation and calibration of zero oxygen, full scale, atmosphere pressure and salinity. The
meter has the function of protection from electricity cutting off. The stored data and parameters will be kept even if unusual electricity cutting off happens.
Measuring results can be stored, deleted, viewed and printed. At most 100 sets of data of
DO concentration value, DO saturation value or current value can be stored. With RS-232
interface which is connected with TP-16 printer to print measuring results or connected
with computer to communicate.
With low power consumption design, with the functions of lack of voltage display.
Wide screen LCD easy to operate with the prompt facility.
With PC panel of new material, thus the meter has good reliability.
Grade of the case protection is IP65, resistant to water and dirt, suitable for field operation.
Instruction manual 50912080
Pag. 17
Version 1 October 2014
CASTELLANO
5. MANTENIMIENTO Y LIMPIEZA
Todas las normas de utilización citadas anteriormente carecerán de valor si no se realiza una continua labor de mantenimiento
Para un adecuado funcionamiento del equipo es necesario seguir algunas recomendaciones.
Siga las instrucciones y advertencias relativas a este manual.
Tenga este manual siempre a mano para que cualquier persona pueda consultarlo.
Utilice siempre componentes y repuestos originales. Puede ser que otros dispositivos
sean parecidos, pero su empleo puede dañar el equipo.
Cuando el electrodo de oxígeno disuelto no se está empleando, debe preservarse inmerso en agua destilada, evitando cualquier contacto fortuito o accidental con solución de sulfito sódico, circunstancia que mermaría considerablemente el rendimiento del electrodo.
Si no va a usar el medidor durante un tiempo, saque las pilas de la parte trasera, para
evitar que se descarguen.
Proceda con precaución para evitar que se desprendan, doblen o deterioren los cables u
otros componentes.
No intente repararlo usted mismo; además de perder la garantía puede causar daños en
el funcionamiento general del analizador de oxígeno disuelto, así como lesiones a personas (quemaduras, heridas...) y daños en la instalación eléctrica, o equipos eléctricos cercanos.
En caso de avería diríjase a su proveedor para la reparación a través del Servicio Técnico
de Nahita.
Limpieza
Para la limpieza de las partes metálicas, acero inoxidable, aluminio, pinturas, etc. nunca
utilice estropajos o productos que puedan rayar ya que deterioran el equipo, limitando su
vida útil.
Para la limpieza del equipo recomendamos se utilice un trapo libre de pelusa humedecido con agua jabonosa que no contenga productos abrasivos.
6. RESOLUCIÓN DE PROBLEMAS
Después de haber sido instalado con el nuevo electrolito y la membrana, la salida de
electrodo DO es baja y electrodo no puede ser calibrado.
Después de que el electrodo es conectado al medidor, encender el medidor y polarizar
el electrodo, la lectura todavía no puede alcanzar el valor necesario, hay dos posibilidades: Una es que la membrana no está en contacto con el polo negativo de oro, y la otra que
la superficie del polo negativo no está húmeda. Debes golpear el electrodo DO suavemente. Si la lectura incrementa indica que la función del electrodo ha sido restaurada. De
lo contrario, cambie de membrana.
El electrodo DO está polarizado y el valor cero del oxígeno es mayor de lo especificado.
Compruebe si el polo negativo está dañado, si hay algún desperfecto en la superficie o
Manual de instrucciones 50912080
Pág. 14
Revisión 1 Octubre 2014
CASTELLANO
ENGLISH
si el entorno del polo negativo de oro no tiene medio básico.
El medidor no imprime los datos.
Compruebe que el medidor funciona con normalidad, que el cable hacia la impresora
esté bien conectado y que la impresora funcione correctamente.
El medidor no se comunica correctamente.
Compruebe si el medidor funciona correctamente, si la configuración del software de
recogida de datos es correcta y si el cable RS-232 está conectado bien.
Otros.
Si todas las opciones anteriores para restaurar el trabajo normal fallan, por favor pónganse en contacto con el servicio técnico de Nahita.
Thank you for choosing this equipment. We sincerely wish that you enjoy your dissolved oxygen analyzer Nahita model 912/8. We highly recommend looking after this equipment according to what is stated in this manual.
Nahita develops its products according to the CE marking regulations as well as
emphasizing the ergonomics and security for its user.
The correct using of the equipment and its good quality will permit you to enjoy this
equipment for years.
The improper use of the equipment can cause accidents and electric discharges, circuit
breakers, fires, damages, etc. Please read the point of Maintenance, where we expose the
security notes
APÉNDICE
Temperatura
ºC
0.0
1.0
2.0
3.0
4.0
5.0
6.0
7.0
8.0
9.0
10.0
11.0
12.0
13.0
14.0
15.0
16.0
17.0
18.0
19.0
20.0
CS
mg/l
14.46
14.22
13.82
13.44
13.09
12.74
12.42
12.11
11.81
11.53
11.26
11.01
10.77
10.53
10.30
10.08
9.86
9.66
9.46
9.27
9.08
ΔCS
mg/l
0.0925
0.0890
0.0857
0.0827
0.0798
0.0771
0.0745
0.0720
0.0697
0.0675
0.0653
0.0633
0.0614
0.0595
0.0577
0.0559
0.0543
0.0527
0.0511
0.0496
0.0481
Temperatura
ºC
21.0
22.0
23.0
24.0
25.0
26.0
27.0
28.0
29.0
30.0
31.0
32.0
33.0
34.0
35.0
36.0
37.0
38.0
39.0
40.0
CS
mg/l
8.90
8.73
8.57
8.41
8.25
8.11
7.96
7.82
7.69
7.56
7.43
7.30
7.18
7.07
6.95
6.84
6.73
6.63
6.53
6.41
ΔCS
mg/l
0.0467
0.0453
0.0440
0.0427
0.0415
0.0404
0.0393
0.0382
0.0372
0.0302
INSTRUCCIONES SOBRE PROTECCIÓN DEL MEDIO AMBIENTE
No deposite el equipo en la basura ordinaria cuando haya terminado su ciclo de vida; llévelo a un punto de recogida para el reciclaje de aparatos eléctricos y electrónicos, siguiendo la
reglamentación general y local vigente. No contiene elementos peligrosos o tóxicos para el ser
humano, pero una eliminación no adecuada perjudicaría el medio ambiente.Los materiales
son reciclables tal como se indica en la marcación. Al reciclar materiales o reutilizando los
equipos usados, está Ud. haciendo una contribución importante a la protección del medio
ambiente. Por favor póngase en contacto con la administración de su comunidad para que le asesoren sobre los
puntos de recogida locales.
Manual de instrucciones 50912080
Pág. 15
Revisión 1 Octubre 2014
TO GET THE BEST RESULTS AND A HIGHER DURATION OF THE EQUIPMENT IT IS ADVISABLE TO READ THOROUGHLY THIS MANUAL BEFORE
OPERATING WITH THE EQUIPMENT.
Please bear in mind the following:
This manual is inseparable from the portable dissolved oxygen analyzer Nahita model
912/8, so it should be available for all the users of this equipment.
Follow all required applicable laws about safety and health (electrical security devices,
inflammable, toxic and/or pathological products, etc.).
You should carefully handle the dissolved oxygen analyzer avoiding sudden movements, knocks, free fall of heavy / sharp objects on it. Avoid spilling liquids inside the
equipment.
Never dismantle the different pieces of the dissolved oxygen analyzer to repair it yourself, since it could produce a defective use of the whole equipment and a loss of the product warranty, as well as injuries on people that handle the dissolved oxygen analyzer.
If you have any doubt about setting up, installation or functioning do not hesitate in
contacting your wholesaler. You can also tell us any doubts or suggestions you have by
contacting Nahita Technical Assistance Department by email to [email protected].
This equipment is protected under the Warranties and consumer goods regulation
(10/2003).
Overhaul is not covered by the dissolved oxygen analyzer warranty.
Operations made by non-qualified staff will automatically produce a loss of the e dissolved oxygen analyzer warranty.
Neither fuses (1A) nor accessories (including their loss), are covered by the product’s
warranty. The warranty neither covers piece’s deterioration due to the course of time.
Please make sure you keep the invoice, either for having the right to claim or asking for
warranty coverage. In case you have to send the equipment to Nahita Technical Assistance
Department you should enclose the original invoice or a copy as guarantee.
Manufacturer reserves the right to modify or improve the manual or equipment.
Instruction manual 50912080
Pag. 16
Version 1 October 2014