1
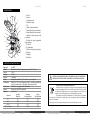
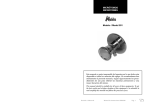
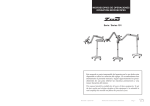
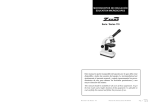
MICROSCOPIO DIGITAL BINOCULAR LED
LED DIGITAL BINOCULAR MICROSCOPE
DECLARACIÓN DE CONFORMIDAD CE
CE DECLARATION OF CONFORMITY
DÉCLARATION DE CONFORMITÉ CE
El fabricante | The manufacturer | Le fournisseur:
AUXILAB, S.L.
Modelo / Model 148/7
Declara que el equipo | Declare that the equipment | Declare que l´appareil:
MICROSCOPIOS | MICROSCOPES | MICROSCOPES
Código | Code | Code:
50135006, 50135007,
50158007, 50158008
50122147, 50122148,
50100106, 50100107,
50128000, 50128001,
50116000
50148007 (digital)
50122107, 50122108
50100127, 50100117, 50100204
50128002, 50128022
Series │ Series │Séries:
135, 148, 158, 122, 100, 128, 116
Cumple las siguientes directivas | Meet the following directives | Accomplit les directives suivantes:
2006/95/CE
Directiva sobre material eléctrico destinado a utilizarse con determinados límites de tensión (Directiva sobre Baja Tensión)
Directive relating to electrical equipment designed for use within certain voltage limits (Low Voltage Directive)
Directive relative aux matériels électriques à employer dans certaines limites de tension (Directive de basse tension)
Cumple las siguientes Normas: | Meet the following Standars | Accomplit les normes suivantes:
EN 61010-1:2010
Requisitos de seguridad de equipos eléctricos de medida, control y uso en laboratorio. Parte 1: Requisitos generales
Safety requirements for electrical equipment for measurement, control and laboratory use -- Part 1: General requirements
Règles de sécurité pour appareils électriques de mesurage, de régulation et de laboratoire -- Partie 1: Exigences générales
Este manual es parte inseparable del aparato por lo que debe estar disponible a todos los usuarios del equipo. Le recomendamos leer atentamente el presente manual y seguir rigurosamente
los procedimientos de uso para obtener las máximas prestaciones y una mayor duración del
mismo.
This manual should be available for all users of these equipments. To get the best results and
a higher duration of this equipment it is advisable to read carefully this manual and follow the
processes of use.
Ce mode d’emploi fait partie de l’appareil, c'est pourquoi il doit être disponible à tous les utilisateurs. Nous vous recommandons de lire attentivement ce mode d’emploi et suivre tous les procédures d’emploi, afin d’obtenir les meilleures prestations et une plus longue durée de l’appareil.
Fecha:BERIAIN a 14 ENERO de 2015
Estíbaliz Erviti: Responsable de producto / Product manager
Pol. Morea Norte, Calle D Nº 6 · C.P.: 31191 · Beriain (Navarra) ESPAÑA · T.: +34 948 310 513 · Email: [email protected] · ww.auxilab.com
Manual de instrucciones 50148007
Pág. 1
Versión 1 Marzo 2015
CASTELLANO
Gracias por haber adquirido este equipo. Deseamos sinceramente que disfrute del
microscopio digital Zuzi 148. Le recomendamos que cuide el equipo conforme a lo
expuesto en este manual.
Zuzi desarrolla sus productos según las directrices del marcado CE teniendo en cuenta
la ergonomía y seguridad del usuario. La calidad de los materiales empleados en la fabricación y el correcto proceder le permitirán disfrutar del equipo por muchos años.
El uso incorrecto o indebido del equipo puede dar lugar a accidentes, descargas eléctricas, cortocircuitos, fuegos, lesiones, etc. Lea el punto de Mantenimiento, donde se recogen
aspectos de seguridad.
LEA DETALLADAMENTE ESTE MANUAL DE INSTRUCCIONES ANTES DE
OPERAR CON ESTE EQUIPO CON EL FIN DE OBTENER LAS MÁXIMAS PRESTACIONES Y UNA MAYOR DURACIÓN DEL MISMO.
Tenga especialmente presente lo siguiente:
Este manual es parte inseparable del microscopio digital Zuzi 148, por lo que debe estar
disponible para todos los usuarios del equipo.
Establezca todas las medidas requeridas por la normativa vigente en materia de seguridad e higiene en el trabajo (dispositivos de seguridad eléctrica, productos inflamables,
tóxicos y/o patológicos, etc.).
Debe manipularse siempre con cuidado evitando los movimientos bruscos, golpes o
manipulación con objetos punzantes.
Para prevenir fuego o descargas eléctricas, evite los ambientes secos y polvorientos así
como el derrame de líquidos sobre el equipo. Si esto ocurre, desenchufe inmediatamente
el equipo de la toma de corriente.
Nunca desmonte el equipo para repararlo usted mismo, además de perder la garantía
podría producir un funcionamiento deficiente de todo el equipo, así como daños a las personas que lo manipulan.
Cualquier duda puede ser aclarada por su distribuidor (instalación, puesta en marcha,
funcionamiento). Usted puede también mandarnos sus dudas o sugerencias a la siguiente dirección de correo del Servicio Técnico Zuzi ([email protected]).
Este equipo está amparado por la Ley de garantías y bienes de consumo (10/2003).
No se consideran en garantía las revisiones del equipo.
La manipulación del equipo por personal no autorizado provocará la pérdida total de
la garantía.
Los fusibles o accesorios, así como la pérdida de los mismos, no están cubiertos por
dicha garantía. Tampoco estarán cubiertos por el periodo de garantía las piezas en su desgaste por uso natural.
Asegúrese de guardar la factura de compra para tener derecho de reclamación o prestación de la garantía. En caso de enviar el equipo al Servicio Técnico adjunte factura o
copia de la misma como documento de garantía.
El fabricante se reserva los derechos a posibles modificaciones y mejoras sobre este
manual y equipo.
Manual de instrucciones 50148007
Pág. 2
Versión 1 Marzo-2015
CASTELLANO
¡ATENCION! NO SE ADMITIRA NINGUN APARATO PARA REPARAR QUE NO ESTE DEBIDAMENTE LIMPIO Y DESINFECTADO.
ÍNDICE DE IDIOMAS
Castellano
Inglés
2-9
10 - 17
ÍNDICE DE CONTENIDOS
1. APLICACIONES DEL EQUIPO
2. DESCRIPCIÓN
3. ESPECIFICACIONES TÉCNICAS
4. INSTALACIÓN / PUESTA EN MARCHA
5. MANTENIMIENTO Y LIMPIEZA
ANEXO I: CERTIFICADO CE
3
4
4
5
8
20
1. APLICACIONES DEL EQUIPO
El microscopio Zuzi modelo 148 está especialmente diseñado para exámenes clínicos y
para usarse en laboratorios de enseñanza, tanto en ámbito educativo como médico. Es
también un instrumento ideal para la investigación biológica, bacteriológica, patológica y
farmacéutica debido a su diseño, su gran capacidad y bajo precio también se convierte en
la primera elección para escuelas e investigadores.
Manual de instrucciones 50148007
Pág. 3
Versión 1 Marzo-2015
CASTELLANO
ENGLISH
2. DESCRIPCIÓN
1
2
3
4
16
5
15
14
6
13
7
8
12
11
9
10
1. Ocular
2. Cámara
3. Cabeza binocular
4. Tornillo de ajuste
5. Pie
6. Anillo de ajuste de tensión
7. Mando de enfoque macrométrico
8. Mando de enfoque micrométrico
9. Mando de ajuste transversal del
portaobjetos
10. Mando de ajuste longitudinal
del portaobjetos
11. Colector
12. Condensador
13. Palanca de ajuste de la apertura
14. Platina
15. Objetivo
16. Revolver
3. ESPECIFICACIONES TÉCNICAS
Referencia
Cabezal
Cámara
Oculares
Revolver
Platina
Condensador
50148007
Binocular inclinado 30º (apertura entre ojos de 55 a 75 mm)
3 MP
10x WF
Cuádruple
Mecánica de doble lecho (150 x 180 mm) con traslación XY
Abbe (A.N. 1,25) con diafragma graduado y portafiltros regulable en
altura. Precondensador con diafragma de campo graduado.
Fuente de luz
LED blanco con regulación de la intensidad
Colector
Iluminación tipo Köhler regulable.
Objetivos
Acromáticos
Apertura
Distancia
Grosor
Aumento
numérica
de trabajo (mm)
del cubre (mm)
4x
0.1
37.5
0.17
10 x
0.25
6.54
0.17
40 x (S)
0.65
0.63
0.17
100 x (S) Aceite
1.25
0.195
0.17
Manual de instrucciones 50148007
Pág. 4
Versión 1 Marzo-2015
ATTENTION!! IF EQUIPMENTS ARE NOT PROPERLY CLEAN AND DISINFECTED
THEY WOULD NOT BE ALLOWED TO REPAIR BY OUR TECHNICAL SERVICE.
INSTRUCTIONS ON ENVIRONMENT PROTECTION
At the end of its life cycle, please, do not dispose of this equipment by throwing
it in the usual garbage; hand it over a collection point for the recycling of electrical and electronic appliances. It does not contain dangerous or toxic products for
humans but a non adequate disposal would damage the environment.
The materials are recyclable as mentioned in its marking. By recycling material
or by other forms of re-utilization of old appliances, you are making an important contribution to
protect our environment.
Please inquire at the community administration for the authorized disposal location.
Instruction manual 50148007
Pag. 17
Version 1 March-2015
ENGLISH
5.MAINTENANCE AND CLEANING
CASTELLANO
4.INSTALACIÓN / PUESTA EN MARCHA
All the processes of use mentioned below will not have any value unless you keep a
continued and careful maintenance.
Please follow the processes of use of this manual.
This manual should be available for all users of this equipment.
Always use original components and supplies. Other devices can be similar but they
can damage the equipment.
The microscope is supplied with a Schuko standard wire. It has to be plugged to an
earth connection and the socket should be handy and ready to unplug the equipment in
case of emergency.
Never try to repair the microscope by yourself, since you will lose the warranty and
may provoke damages to the general operating system or the electrical installation, as
well as injuries to the people that usually handle the microscope (burns, hurts…) or damages in nearby equipments.
In the event of breakdown please contact your distributor to overhaul through Zuzi
Technical Assistance Department.
Bulb and fuse replacement: The power wire must be disconnected
• Bulb replacement: Loosen the knurled screw on the underside of microscope and
open the panel to expose the bulb. Remove the old bulb after it becomes cool. (The bulb
will become very hot when using or after using.) Don’t touch the new bulb with finger, if
there is a fingerprint and dirt, that will decrease the brightness and shorten the life of the
bulb, wipe it with clean and soft cloth. Hold the new bulb with the same specification with
clean gloves or gauze and vertically insert the pins to the jack. Close the panel and tighten the knurled screw with finger.
Inspección preliminar
Desembale el microscopio, retire el plástico que lo envuelve y quite la protección de
poliespán en que viene encajado.
Sin conectar el equipo a la red eléctrica, asegúrese de que no presenta ningún daño debido al transporte. De ser así, comuníquelo inmediatamente a su distribuidor a fin de poder
hacer las reclamaciones pertinentes en el plazo establecido por el servicio de transporte.
Las devoluciones de equipos se podrán efectuar dentro de los 15 días posteriores al
envío y siempre que vengan completos en su embalaje original con todos los accesorios y
documentos incluidos.
Compruebe los accesorios que usted debe recibir junto al equipo:
-Kit de limpieza.
-CD Software + Driver
-Cable Schuko
-Aceite de inmersión
-1 portaobjetos con escala (1mm /dividido en 0.01mm)
-Fusible 1 A
-Filtro azul, verde y amarillo
-Funda
-Cable USB
Instalación
Antes de comenzar a utilizar el instrumento, es conveniente familiarizarse con sus componentes y fundamentos básicos, así como con las funciones de sus controles.
• Fuse replacement: Open the fuse holder with a“- ”screwdriver in the back of the
microscope. Remove the old fuse and install a new fuse with the same specification.
Replace fuse holder in place.
LEA DETALLADAMENTE ESTE MANUAL DE INSTRUCCIONES ANTES DE
OPERAR CON ESTE EQUIPO CON EL FIN DE OBTENER LAS MÁXIMAS PRESTACIONES Y UNA MAYOR DURACIÓN DEL MISMO.
Cleaning
Never use scourers or substances that can grate for cleaning metallic parts such as stainless steel, aluminum, coatings, etc. as they damage the microscope and produce an early
ageing of the equipment.
Use a fluff-free cloth dampened with soaped water that does not contain abrasives.
If there is dust on the lens, blow it by rubber ball blower, after that clean the lens gently
with a soft brush pen, carefully wipe off oil or fingerprints on the lens surface with lens
tissue or absorbent cotton moistened with a few organic solvent (ether and alcohol 7:3)
Don’t wipe the lens surface regularly, or else the lens will be scraped, reduce the quality
of the transmission and imaging. Please keep the instrument clean.
Coloque el microscopio sobre una mesa horizontal y estable, dejando a su alrededor el
espacio de trabajo necesario.
Ponga el cabezal binocular en su lugar del soporte, sujételo apretando el tornillo con los
dedos.
Familiarícese con las partes mecánicas del microscopio, para ello toque cuidadosamente con su mano cada parte del microscopio y observe cómo se comporta y qué resultados
produce.
Establezca todas las medidas requeridas por la normativa vigente en materia de seguridad e higiene en el trabajo (dispositivos de seguridad eléctrica, productos inflamables,
tóxicos y/o patológicos, etc.).
No coloque el equipo en zonas próximas a fuentes de calor (mecheros, sopletes...), material magnético o lo exponga directamente a la luz del sol, etc.
Instruction manual 50148007
Pag. 16
Version 1 March-2015
Manual de instrucciones 50148007
Pág. 5
Versión 1 Marzo-2015
CASTELLANO
ENGLISH
Inserte el cable de alimentación de corriente alterna (CA) a la base de corriente 100-240V
Turn coarse & fine focusing knob to focus the specimen till you see clear image of spe-
50-60Hz ±10% provista de toma de tierra y por el otro extremo al conector del microscopio.
Ni el fabricante ni el distribuidor asumirán responsabilidad alguna por los daños ocasionados al equipo, instalaciones o lesiones sufridas a personas debido a la inobservancia del correcto procedimiento de conexión eléctrica. La tensión debe ser de 100-240V, 5060 Hz ± 10%.
Cuando no vaya a hacer uso del microscopio durante largos periodos de tiempo asegúrese de que está desconectado de la red.
Nota: No conecte el equipo junto con otros equipos en el mismo prolongador, podría
sufrir sobrecalentamiento.
Puesta en marcha
Conecte el microscopio a la red y enciéndalo del interruptor, ajuste la intensidad de la
luz optimizándola al 70% de las posibilidades máximas.
Coloque el portaobjetos en la platina con el cubreobjetos hacia el objetivo. Sujételo con
las pinzas móviles.
La magnitud del haz de luz incidente puede ser ajustada mediante la apertura del diafragma. Los objetivos alcanzarán su mayor resolución al ajustarse correctamente esta
apertura. Cuando cambie los objetivos, quite los oculares y observe el tamaño de apertura del diafragma a través del tubo de los oculares, ajústela con esto hasta que sea un poco
menor que la apertura del ocular.
Nota: la apertura del diafragma no es para ajustar la intensidad, la intensidad se ajusta mediante su propio mando.
Extraiga el soporte del filtro, de acuerdo con sus necesidades, ponga el filtro deseado y
colóquelo de nuevo.
Gire el revólver para cambiar el objetivo. El objetivo estará colocado en la trayectoria
correcta de la luz cuando escuche “click”.
Al ajustar el enfoque, con el fin de evitar que se toquen el objetivo y la muestra, ajuste
con el mando macrométrico hasta que la distancia sea de unos 3 mm y después observando despacio hasta obtener una imagen. Use el micrométrico para obtener la imagen
más clara de la muestra. Si cambia el objetivo, ajuste la imagen con el micrométrico.
Cuando utilice el objetivo 100x, levante el condensador a la posición más alta, a continuación ponga un poco de aceite de inmersión entre el objetivo y el cubreobjetos de forma
que no quede aire entre ellos. Ambas partes deben limpiarse inmediatamente tras la
observación con un trapo o papel para cristales suave. Para eliminar el aceite use xileno.
También puede ajustar la tensión necesaria para mover la platina arriba y abajo mediante el correspondiente anillo de ajuste de tensión. Gire el anillo en el sentido de las agujas
del reloj para apretar.
Manual de instrucciones 50148007
Pág. 6
Versión 1 Marzo-2015
cimen when observing the fixed eyepiece with eye. Then rotate the diopter adjusting ring,
if the image is unclear when observing the another eyepiece with another eye, also still
you see clear image of specimen (Remember your eye’s diopter, so that you could use next
time).When using two eyes to observe, hold the base of the prism and rotate them around
the axis until there is only one field of view.
Security
The microscope must be used by previously qualified staff that knows how the equip-
ment works thanks to the user manual.
You should put the microscope in a horizontal plane stable table, having a safety area
of at least 30 cm per side.
Follow all required applicable laws about safety and health (electrical security devices,
inflammable, toxic and/or pathological products, etc.).
Do not place the microscope near any warm supply (burners, blowlamps, etc), nor
expose it directly to the sun. Avoid vibrations, dust and dry environments.
Working environment: Indoor temperature: 0 - 40ºC and maximum relative humidity:
85 %.
During its functioning dangerous materials such as flammable or pathological substances must be out of the safety area.
When you are not using the microscope for a long period of time please make sure it is
unplugged in order to avoid possible accidents.
It is essential to have the equipment switched off and unplugged from the net before
cleaning, checking components or replacing any piece (e.g. replacement of a fuse).
Never try to repair the microscope by yourself, since you will lose the warranty and
may provoke damages to the general operating system or the electrical installation, as
well as injuries to the people that usually handle the equipment (burns, hurts…).
Try not to spill any liquid on the control panel, though it is properly insulated. In case
you have any doubts do please immediately unplug the microscope (see Maintenance).
Made under the European regulations for electrical security, electromagnetic compatibility and security on machines.
Instruction manual 50148007
Pag. 15
Version 1 March-2015
ENGLISH
CASTELLANO
Neither the manufacturer nor the distributor will assume any responsibility for the
damages produced to the equipment during its installation or damages to persons suffered by the improper use of the electric connection. The tension should be 100-240V 5060Hz ±10%
Utilizando los mandos de ajuste transversal y longitudinal situados debajo de la plati-
If you are not using the microscope for a long period of time please make sure it is disconnected from the net and protected from dust (this way you will avoid accidents and
will extend its working-life).
Setting up
Turn on the power switch, adjust the brightness adjusting knob to make the brightness
70% of the full load.
Place the slide to be viewed smoothly onto the stage, cover slip to face to the objective.
Clamp specimen slide carefully with the movable spring clip.
The magnitude of incident beam of light can be changed when adjusting the aperture
diaphragm. The highest resolution of the objectives can reach when the fitted aperture
diaphragm is adjusted. When the objectives are changed, in order to get the best resolution of the objective, please take off the eyepiece to observe the size of aperture diaphragm
in the eyepiece tube. It is better to adjust aperture diaphragm till it is a little smaller than
the aperture of the objective.
Note: aperture diaphragm is not for adjusting the brightness, the brightness is adjusted through
brightness adjusting knob.
Swing out the filter holder, according to user needs put filter in the filter holder and
then backtrack.
Turn the nosepiece when changing the objective 4x or 10x, and make sure the
objective is shift in the light path until hear a”click”.
When adjusting the focus, in order to prevent objective touch the slide, turn the coarse focusing knob until the slide is approximately 3 mm from the objective.
Slowly turn the coarse focusing knob until a clear image is obtained, then use the fine
focusing knob to enhance the observation of the specimen to its clearest image. If the magnification is increased, here you can obtain clear image under other higher magnification objectives with a little fine adjustment.
When using objective 100x to observe, lift the condenser to the highest position, then
drop a little oil on surface of objective 100x and cover slip. If there’s air bulb in oil, it will
influence observation. The 100x oil immersion objective and specimen should be wiped
off with a piece of soft clean cloth or lens tissue to remove the cedar oil with xylene immediately after using.
If you find to lift the mechanical stage too tension or loosen in use. Turn the tension
adjusting ring. Coarse focusing knob would be tightening if it turns in the clockwise direction, on the other hand it would be loosen.
Turn transversal and longitudinal direction adjustable knobs located just below the
stage, the specimen may be moved to the center of the eyepiece’s viewing field for observation.
Instruction manual 50148007
Pag. 14
Version 1 March-2015
na puede mover la muestra por el campo de visión.
Utilice los mandos macrométrico y micrométrico para enfocar la muestra hasta que
obtenga una imagen clara. Gire el anillo de ajuste de dioptrías si la imagen no es clara al
observar con los dos oculares. (recuerde las dioptrías de su ojo para ajustarlo la próxima
vez que lo use).
Seguridad
El microscopio debe ser utilizado por personal cualificado previamente, que conozca el
equipo y su manejo mediante el manual de uso.
Establezca todas las medidas requeridas por la normativa vigente en materia de seguridad e higiene en el trabajo (dispositivos de seguridad eléctrica, productos inflamables,
corrosivos, tóxicos y/o patológicos, etc.).
No coloque el microscopio en zonas próximas a fuentes de calor (mecheros, sopletes...),
ni exponga el equipo directamente a la luz del sol.
Las condiciones de trabajo idóneas serían una temperatura interior entre 0 y 40ºC y
máxima humedad relativa del 85%.
Para prevenir fuego o descargas eléctricas, evite los ambientes secos y polvorientos así
como el derrame de líquidos sobre el equipo. Si esto ocurre, desenchufe inmediatamente
el equipo de la toma de corriente.
Queda absolutamente prohibida la presencia de productos inflamables (gases y líquidos) en el lugar de trabajo.
Cuando no vaya a hacer uso del equipo por largos períodos de tiempo, asegúrese de
que está desconectado de la red para evitar posibles accidentes.
Para cualquier manipulación de limpieza, verificación de los componentes o sustitución
de cualquier componente (ej.: sustitución de fusible) es imprescindible apagar el equipo y
desconectarlo de la toma de corriente.
No intente repararlo usted mismo; además de perder la garantía puede causar daños en
el funcionamiento general del equipo, así como lesiones a personas (quemaduras, heridas...) y daños a la instalación eléctrica.
Procure que no entre agua en el cuadro de controles, aunque éste se encuentre debidamente aislado. Si por cualquier causa sospecha que ha entrado agua o cualquier líquido
desconecte el equipo inmediatamente de la red.
El equipo dispone de un cable de red Schuko; éste debe conectarse a una toma de
corriente provista de toma a tierra, debiendo quedar a mano para poder desconectarlo en
caso de emergencia.
Fabricado según las directivas europeas de seguridad eléctrica, compatibilidad electromagnética y seguridad en máquinas.
Manual de instrucciones 50148007
Pág. 7
Versión 1 Marzo-2015
CASTELLANO
5.MANTENIMIENTO Y LIMPIEZA
4. INSTALLATION / SETTING UP
Todas las normas de utilización citadas anteriormente carecerán de valor si no se realiza una continua labor de mantenimiento.
Para un adecuado funcionamiento del equipo es necesario seguir algunas recomendaciones.
Siga las instrucciones y advertencias relativas a este manual.
Tenga este manual siempre a mano para que cualquier persona pueda consultarlo.
Utilice siempre componentes y repuestos originales. Puede ser que otros dispositivos
sean parecidos, pero su empleo puede dañar el equipo.
Proceda con precaución para evitar que se desprendan, doblen o deterioren los cables u
otros componentes.
No intente repararlo usted mismo; además de perder la garantía puede causar daños en
el funcionamiento general del microscopio, así como lesiones a personas (quemaduras,
heridas...) y daños en la instalación eléctrica, o equipos eléctricos cercanos.
En caso de avería diríjase a su proveedor para la reparación a través del Servicio Técnico
de Zuzi.
Cambio de la bombilla y el fusible: El microscopio debe estar desconectado de la red
eléctrica.
• Sustitución de la bombilla: Soltar el tornillo de la parte de abajo del microscopio y
abrir el panel para ver la bombilla. La bombilla mientras se usa o tras su uso está caliente, debe esperar a que se enfríe para quitarla. No toque la nueva bombilla con los dedos,
si hay una huella o suciedad puede disminuir el brillo y acortar la vida de la bombilla, si
es necesario límpiela con un paño limpio y suave. Sostenga la nueva bombilla de forma
vertical e insértela en su lugar. Cierre el panel y apreté el tornillo con los dedos.
• Sustitución del fusible: Abra el compartimento del fusible con un destornillador
“—” que se encuentra en la parte posterior del microscopio. Quite el fusible fundido e instale un fusible nuevo con la misma especificación. Vuelva a cerrar el departamento del
fusible.
Limpieza
Para la limpieza de las partes metálicas, acero inoxidable, aluminio, pinturas, etc. nunca
utilice estropajos o productos que puedan rayar ya que deterioran el equipo, limitando su
vida útil.
Para la limpieza del equipo recomendamos se utilice un trapo libre de pelusa humedecido con agua jabonosa que no contenga productos abrasivos.
Si hay polvo en la lente, sóplelo y después limpie la lente cuidadosamente con un pincel suave. Limpie el aceite o huellas digitales de la superficie con un pañuelo para lentes
o algodón absorbente humedecido con un disolvente orgánico (éter y alcohol 7:3).
No limpie la superficie del objetivo con regularidad la lente puede rallarse y reducir la
calidad de la transmisión y de imagen. Por favor, mantenga el microscopio limpio.
Manual de instrucciones 50148007
ENGLISH
Pág. 8
Versión 1 Marzo-2015
Preliminary inspection
Unwrap the microscope, take off the involving plastic and take off the poliespan protection in which it comes fitted.
Please make sure that it does not present any damage because of the shipment. If it does
please communicate to your transport agent or provider immediately, so that they can
make the claims in the correct time limit.
We will only accept any equipment return within 15 days after delivery and provided
it comes in its original package and with all accessories and documents supplied
Please check that all the accessories are enclosed with the equipment:
- Cleaning kit
- CD with software and driver
- Cable Schuko
- Immersion oil
- Scale microscope slide
- Fuse 1A
- Blue, green and yellow filters
- Cover
- USB wire
Installation
Before using this instrument, it is convenient for you to familiarize with its components
and basic essentials.
PLEASE READ THOROUGHLY THE INSTRUCTIONS BEFORE CONNECTING
AND OPERATING WITH THIS EQUIPMENT
Please put the microscope on top of a horizontal, plane and stable table making a free
space at least at 30 cm per side. Do not put the microscope near any warm supply (burners, blowlamps…), nor expose it directly to the sun, etc.
Put the binocular head into the adapter, tighten the knurled screw with finger.
Familiarize yourself the mechanical parts of your microscope. Gently operate each part
by hand to see how it behaves and what result it produces.
Avoid inflammable or toxic substances in the working area.
The microscope is supplied with a Schuko standard wire
Please insert the wire that feeds the AC electric current in the base of current 220V 50Hz
±10% provided with earth wire and to the other end to the microscope connector.
Instruction manual 50148007
Pag. 13
Version 1 March-2015
ENGLISH
CASTELLANO
2. DESCRIPTION
1
2
3
4
16
5
15
14
6
13
7
8
12
11
9
10
1. Eyepiece
2. Camera
3. Binocular head
4. Tornillo de ajuste
5. Stand
6. Tension adjusting ring
7. Coarse focusing knob
8. Fine focusing knob
9. Transversal adjusting knob of
stage
10. Longitudinal adjusting knob of
stage
11. Collector
12. Condenser
13. The adjusting rod of aperture
14. Mechanical stage
15. Objective
16. Nosepiece
3. TECHNICAL SPECIFICATIONS
Code
Viewing head
Camera
Eyepiece
Nosepiece
Stage
Condenser
Focusing
50148007
Compensation free binocular head, inclined at 30º (55 – 75 mm)
3 MP
WF10x
Quadruple
Double layer mechanical stage (150 x 180 mm) with moving clamp
N.A. 1,25 Abbe condenser with iris diaphragm & filter
Coaxial coarse & fine focusing adjustment with rack and pinion
mechanism. Fine focusing scale value 0.002 mm
Light source
White LED with intensity regulation
Collector
High brightness Kohler illumination
Objectives
Achromatic
Numerical
Working
Cover slip
Magnification
aperture
distance (mm)
thickness (mm)
4x
0.1
37.5
0.17
10 x
0.25
6.54
0.17
40 x (S)
0.65
0.63
0.17
100 x (S) Oil
1.25
0.195
0.17
Instruction manual 50148007
Pag. 12
Version 1 March-2015
¡ATENCION! NO SE ADMITIRA NINGUN APARATO PARA REPARAR QUE NO ESTE DEBIDAMENTE LIMPIO Y DESINFECTADO.
INSTRUCCIONES SOBRE PROTECCIÓN DEL MEDIO AMBIENTE
- No deposite el equipo en la basura ordinaria cuando haya terminado su ciclo
de vida; llévelo a un punto de recogida para el reciclaje de aparatos eléctricos y
electrónicos, siguiendo la reglamentación general y local vigente.
- No contiene elementos peligrosos o tóxicos para el ser humano, pero una eliminación no adecuada perjudicaría el medio ambiente.
- Los materiales son reciclables tal como se indica en la marcación.
- Al reciclar materiales o reutilizando los equipos usados, está Ud. haciendo una contribución
importante a la protección del medio ambiente.
- El gas R134A es biodegradable, no deteriora el medio ambiente.
- Por favor póngase en contacto con la administración de su comunidad para que le asesoren
sobre los puntos de recogida locales.
Manual de instrucciones 50148007
Pág. 9
Versión 1 Marzo-2015
ENGLISH
Thank you for choosing this equipment. We sincerely wish that you enjoy your microscope Zuzi 148. We highly recommend looking after this equipment according to what is
stated in this manual.
Zuzi develops its products according to the CE marking regulations as well as emphasizing the ergonomics and security for its user.
The correct using of the equipment and its good quality will permit you to enjoy this
equipment for years.
The improper use of the equipment can cause accidents and electric discharges, circuit
breakers, fires, damages, etc. Please read the point of Maintenance, where we expose the
security notes.
ENGLISH
ATTENTION!! IF EQUIPMENTS ARE NOT PROPERLY CLEAN AND DISINFECTED
THEY WOULD NOT BE ALLOWED TO REPAIR BY OUR TECHNICAL SERVICE.
INDEX OF LANGUAGES
Spanish
English
2-9
10 - 17
TO GET THE BEST RESULTS AND A HIGHER DURATION OF THE EQUIPMENT IT IS ADVISABLE TO READ THOROUGHLY THIS MANUAL BEFORE
OPERATING WITH THE EQUIPMENT.
INDEX OF CONTENTS
Please bear in mind the following:
This manual is inseparable from the microscope Zuzi 148, so it should be available for
all the users of this equipment.
Follow all required applicable laws about safety and health (electrical security devices,
inflammable, toxic and/or pathological products, etc.).
You should carefully handle the microscope avoiding sudden movements, knocks, free
fall of heavy / sharp objects on it. Avoid spilling liquids inside the equipment.
Never dismantle the different pieces of the microscope to repair it yourself, since it
could produce a defective use of the whole equipment and a loss of the product warranty,
as well as injuries on people that handle the microscope.
To prevent fire or electric discharges avoid dry or dusty environments. In case it may
happen unplug the equipment immediately.
If you have any doubt about setting up, installation or functioning do not hesitate in
contacting your wholesaler. You can also tell us any doubts or suggestions you have by
contacting Zuzi Technical Assistance Department by email to [email protected].
This equipment is protected under the Warranties and consumer goods regulation
(10/2003).
Overhaul is not covered by the microscope warranty.
Operations made by non-qualified staff will automatically produce a loss of the microscope warranty.
Neither fuses (1A) nor accessories (including their loss), are covered by the product’s
warranty. The warranty neither covers piece’s deterioration due to the course of time.
Please make sure you keep the invoice, either for having the right to claim or asking for
warranty coverage. In case you have to send the equipment to Zuzi Technical Assistance
Department you should enclose the original invoice or a copy as guarantee.
Manufacturer reserves the right to modify or improve the manual or equipment.
Instruction manual 50148007
Pag. 10
Version 1 March-2015
1. USES OF THE INSTRUMENT
2. DESCRIPTION
3. TECHNICAL SPECIFICATIONS
4. INSTALLATION / SETTING UP
5. MAINTENANCE AND CLEANING
ANNEX I: CE CERTIFICATE
11
12
12
13
16
20
1. USES OF THE INSTRUMENT
Microscope Zuzi model 148 is specially designed for clinical examination and teaching
demonstrations in laboratories, colleges and medical fields. It is also ideal instrument for
biological, bacteriological, pathological and pharmaceutical research. Because of higher
capability with lower price and humanized configuration design, it also becomes the first
choice of individual, schools and scientific research organization.
Instruction manual 50148007
Pag. 11
Version 1 March-2015