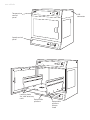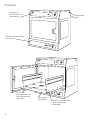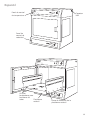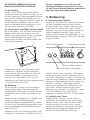
1
Shaking Incubator
SI500
SI600
Instructions for use
Manuel d’utilisation
Istruzioni per l’uso
Instrucciones de funcionamiento
Bedienungsanweisung
temperature ϒC
orbital incubator
SI500
on/off
orbital incubator
S1600
press
to start
rpm
time
on/off
start/stop
mode
Version 1.0
English
on/off
temperature ϒC
Temperature
control
panel
orbital incubato r
SI500
press
to start
temperature ϒC
orbital incubato r
SI500
on/off
press
to start
Speed control
panel
rpm
time
on/off
start/stop
mode
rpm
time
on/off
start/stop
mode
on/off
temperature ϒC
orbital incubato r
SI500
press
to start
temperature ϒC
orbital incubato r
SI500
press
to start
rpm
time
on/off
start/stop
Locating holes
for tube accessory
racks
mode
rpm
time
on/off
start/stop
Retractable
platform
mode
Retractable
platform
release
knob
on/off
USB
connector
Shaking IncubatorS
SI500, SI600
Instructions for use
1. Introduction
Thank you for purchasing this piece of Stuart
equipment. To get the best performance from
this equipment please read these instructions
carefully before use. Before discarding the
packaging check that all parts are present and
correct.
Item number
Description
HH179(S)
UK mains lead with plug
HH180(S)
EU mains lead with plug
SI500-89 or SI600-89 Instruction manual
I/FCALUSB
USB cable
RSSL1 or SI600/1
Securing bars (4)
7001096
Guarantee card
For your own safety and that of others
please read and understand the safety
advice given below before using the
equipment.
2. Safety advice before use
If the equipment is not used in the manner
described in this manual and with
accessories other than those recommended
by Stuart, the protection provided might
be impaired.
This equipment is designed to operate under the
following conditions:
❖ For indoor use only
❖ Use in a well ventilated area
❖ Ambient temperature range +5ºC to +40ºC
❖ Altitude to 2000m
❖ Relative humidity not exceeding 80%
❖ Mains supply fluctuation not exceeding 10%
❖ Over-voltage category II IEC60364-4-443
❖ Pollution degree 2
Operational warnings and conditions:
CAUTION: HEAVY OBJECT. Do not
attempt to lift or carry the unit
alone.
❖ Use with a minimum distance all around of
200mm (100mm at the rear) from walls or
other items.
❖ Not to be used to heat or mix materials which
could result in liberation of gases, or cause
explosions or implosions.
❖ Not to be used or placed in areas known to
be hazardous.
❖ Never move or carry the unit when in use or
connected to the mains electricity supply.
❖ When lifting or moving the unit, always lift
from the base.
❖ Do not use in a hazardous atmosphere or
with hazardous materials.
❖ Ensure that the load is balanced.
❖ Do not attempt to stop movement by hand.
❖ Do not lean on the open door of the SI600 as
this could cause the unit to tilt, particularly
when the platform is extended. Furthermore,
do not leave the incubator unattended with
the door open.
❖ Fitting of feet brackets to the SI600 is
required prior to use (see 4.3).
❖ In the case of mains interruption, the unit will
not restart on restoration of the electricity
supply. In the case of mechanical interruption,
(e.g. motor stall), the unit will continue
operating on removal of interruption.
❖ Mechanical energy can lead to breakage of
glass vessels. Use with care.
Use caution when removing
vessels from the incubator as
parts may be hot.
3. General description
The Stuart SI500 and SI600 orbital incubators are
ideal for mixing and aerating various biological
samples under accurate temperature controlled
conditions. The rotating platform has a digital
speed setting providing a smooth, uniform
circular motion with an orbit of 16mm. The
speed range is 30 to 300rpm. There is also an
adjustable digital countdown timer that
automatically stops after the set time (1 second
steps to 1h, 1 minute steps to 24h or 1h steps to
9 days). The shaking platform has a drawer
mechanism for easy access to the incubation
vessels. The temperature is controlled by a simple
“press to set” system in 0.1ºC intervals from
ambient +5ºC to 60ºC.
1
The incubators come fitted with a fully
adjustable cradle system to accommodate a wide
range of flasks and bottles. Optional accessories
include racks to accommodate 1.5ml, 15ml and
50ml tubes.
4. Preparation for use
4.1 Electrical installation
THIS INSTRUMENT MUST BE EARTHED
Before connecting the instrument please read
and understand these instructions and ensure
that the line supply corresponds to that shown
on the rating plate. The instrument is designed
for use on 230V 50Hz. The power consumption
of the unit is 300W for the SI500 and 500W for
the SI600. Ensure that a mains supply lead with
the correct ratings for the product is used. The
instrument is fitted with an IEC socket at the rear
of the instrument for connection of the mains
lead. The mains supply lead is the means of
disconnection for the instrument.
Caution: Fuses are fitted in both live and
neutral lines.
Fuses:
230V - 3.15A anti surge fuse. For all other
voltages always replace with an equivalent fuse
type and rating as those being removed,
alternatively see rating plate for fuse type and
rating.
This unit is supplied with two mains leads fitted
with IEC plugs for connection to the instrument.
One lead has a U.K. 3 pin plug and the other has
a 2-pin “Shuko” plug for connection to the
mains. Choose the lead appropriate for your
electrical installation and discard the other.
Should neither lead be suitable, take the lead
with the U.K. plug and replace the plug with a
suitable alternative. This involves cutting off the
moulded plug, preparing the cable and
connecting to the rewireable plug in accordance
with its instructions.
IT IS IMPORTANT THAT THIS OPERATION
SHOULD ONLY BE UNDERTAKEN BY A
QUALIFIED ELECTRICIAN
NOTE: Refer to the equipment’s rating plate to
ensure that the plug and fusing are suitable for
2
the voltage and wattage stated. The wires in the
mains cable are coloured as follows:
LIVE - BROWN
NEUTRAL - BLUE
EARTH - GREEN/YELLOW
The appropriate mains lead should be connected
to the instrument BEFORE connection to the
mains supply. Should the mains lead need
replacement a cable of 1mm2 of harmonised
code H05VV-F connected to an IEC320 plug
should be used. N.B. the U.K. mains lead is
protected by a 10A fuse mounted in the plug
top.
IF IN DOUBT CONSULT A QUALIFIED
ELECTRICIAN
4.2 Positioning
Place the unit on a strong, sturdy, level, non-slip
surface ensuring that there is sufficient free
space on all sides without coming into contact
with anything during use. Allow at least 100mm
at the rear for easy access to the mains power
supply lead and 200mm at each side of the
instrument.
4.3 Fixing feet brackets (SI600 only)
To prevent the unit from vibrating or moving
during use, the SI600 must be secured to the
bench top using feet brackets. Two feet brackets
are provided for securing the rear feet.
1
2
Ensure the unit is positioned correctly. From the
sides of the unit, slide the feet brackets around
each of the rear feet (1). Secure in place by fixing
with two No.8 x 20mm screws (2).
Connect to the electricity supply - DO NOT
SWITCH ON.
500
4.4 Loading
Caution: keep loose items clear of the door
before opening.
motion will stop; the word “door” will also be
momentarily displayed on the screen. Close the
door to continue.
Open the door. Pull the two black sprung release
knobs either side of the cradle outwards towards
the sides of the incubator and draw the cradle
platform out of the incubator towards you.
5.2 Setting the timer
In order to use the timer, stop the rotation and
press the mode button so that the red dot in the
display appears below “time”. The display will
show three horizontal lines or the last stored
time. Select the desired countdown time using
the control knob. The time will be displayed first
in minutes and seconds, next in hours and
minutes then in days and hours up to a
maximum of 9 days.
Load the cradle with vessels, adjusting the
rubber-covered securing bars as required. Ensure
that the load is evenly balanced and does not
exceed the maximum load stated.
Gently push the platform back into the incubator
until it locks in place. Close the door.
N.B: Please ensure that the retractable
on/off
platform has clicked
and locked
in place
temperature
°C
before attempting to operate the unit.
Failure to do this can result in damage
to the unit.
press to set
5. Operation
5.1 Setting the speed
Using the keypad at the base of the instrument,
switch the unit ON by pressing the control knob.
Press the mode button until a red dot shows in
the display below “rpm”. The display will then
show the last set speed. Adjust the speed by
turning the control knob. The minimum speed is
30rpm and the maximum, 300rpm.
Time/speed LED
Red digital display
rpm
start/stop
time
on/off
When the display shows the correct time, press
the start/stop button to begin operating. During
operation, motion can be paused at any time by
pressing the start/stop button. If the button is
pressed again, motion will start again and the
timer will continue to count down. The timer can
be adjusted without halting the unit. When the
timer reaches zero, the unit will automatically
stop and an alert will sound. If the door is
opened while the unit is counting down, a
warning alert will sound and the motion and
countdown will stop; the word “door” will also
be momentarily displayed on the screen. Close
the door to continue and the countdown will
resume from the point at which it was stopped.
N.B to disable the timer and revert to
continuous rotation, select - - - in the display
during timer mode.
5.3 Setting the temperature
Using the top control panel, switch the
temperature control unit ON by pressing the
control knob. Holding down the “press to set”
button, turn the knob until the correct
temperature is displayed. Release the “press to
set button”. The incubator will then begin to
mode
Press to set
Control knob
Mode button
temperature °C
Start/stop button
Once the correct speed is displayed press the
start/stop button to begin motion. The speed can
be adjusted without halting the unit. The unit
can be halted at any time by pressing the start/
stop button. If the door is opened while the unit
is in motion a warning alert will sound and the
on/off
press to set
Red digital display
3
heat to the set temperature. The actual
temperature inside the unit will be displayed on
the screen. The minimum set temperature is
ambient +5ºC and the maximum, 60ºC.
5.4 USB Connectivity
Your incubator has capability to connect to a PC
via USB for long term tracking of the incubator
temperature, whilst left overnight for instance.
Remove the waterproof cap from the USB port
on the incubator and connect the included cable.
Connect the other end of the cable to a free USB
port on your PC. The latest version of our PC
software is available for download from www.
bibby-scientific.com. Once downloaded, select
run the program and follow the on screen
commands.
the Service Department at;
[email protected]
Tel: +44 (0)1785 810475
Fax: +44 (0)1785 810471
Quote both the model and serial number.
For any other technical enquiries, please contact
the Technical Support Department at:
[email protected]
Tel: +44 (0)1785 810433.
7. Accessories
Code
Description
SI500/1 Tube holder 64 x 1.5ml tubes
SI500/2 Tube holder 25 x 15ml tubes
SI500/3 Tube holder 12 x 50ml tubes
6. Maintenance, servicing
and repair
SI500/4 Tube holder 16 x 30ml universal container
WARNING: Ensure the unit is disconnected
from the mains electricity supply by
removing the mains power lead before
attempting maintenance or servicing.
SI600/1 Spare securing bar for SI600
This equipment does not require routine
servicing. The only maintenance required is to
clean internal and external surfaces with a damp
cloth and mild detergent. Spillages or splashes
should be cleaned up straightaway after isolating
the unit from the mains electricity supply. Allow
the unit to dry completely before operating
again.
6.1 Repairs and support
Any repairs or replacement of parts MUST be
undertaken by suitably qualified personnel.
Only spare parts supplied or specified by
Stuart or its agent should be used. Fitting of
non-approved parts may affect the
performance of the safety features designed
into the instrument.
For a comprehensive list of parts required by
service engineers conducting internal repairs,
or to receive a service manual, please contact
4
RSSL1
Spare securing bar for SI500
8. Warranty
Stuart warrants this instrument to be free from
defects in material and workmanship, when used
under normal laboratory conditions, for a period
of three (3) years. In the event of a justified
claim, Stuart will replace any defective
component or replace the unit free of charge.
This warranty does NOT apply if damage is
caused by fire, accident, misuse, neglect,
incorrect adjustment or repair, damage caused
by installation, adaptation, modification, fitting
of non-approved parts or repair by unauthorised
personnel.
Bibby Scientific Ltd.
Beacon Road,
Stone,
Staffordshire
ST15 0SA
United Kingdom
Tel: +44 (0)1785 812121
Fax: +44 (0)1785 813748
E-mail: [email protected]
www.stuart-equipment.com
9. Specification
SI500
SI600
Ambient +5ºC to 60ºC
Ambient +5ºC to 60ºC
0.1ºC
0.1ºC
Technical specification
Temperature range
Temperature display resolution
Temperature precision
Temperature fluctuation
Temperature variation
Speed range
Orbit diameter
Warm up time 20-60˚C
+/-0.5ºC
+/-0.5ºC
+/-0.5ºC (at 37ºC)
+/-0.5ºC (at 37ºC)
<0.5ºC
<0.5ºC
30 to 300 rpm
30 to 300 rpm
16mm
16mm
<30 min
<30 min
Maximum load
10kg
10kg
Net weight
30kg
53kg
Heating power rating
250W
400W
230V, 50Hz, 300W
230V, 50Hz, 500W
Height
522mm
640mm
Depth 474mm
542mm
Width
450mm
675mm
Height
297mm
395mm
Depth
408mm
455mm
Width
422mm
625mm
Electrical supply
External dimensions
Incubator internal dimensions
Maximum vessel height
Platform size
250mm
320mm
335 x 335mm
525 x 390mm
Incubator capacity
2800ml Fernbach flasks
0
2
2000ml conical flasks
0
6
1000ml conical flasks
4
9
500ml conical flasks
9
15
Magnetic accessories
4
6
5
Français
Panneau de
commande de la
température
on/off
temperature ϒC
orbital incubato r
SI500
temperature ϒC
press
to start
orbital incubato r
SI500
on/off
press
to start
Panneau de commande
de la vitesse
rpm
time
on/off
start/stop
rpm
time
mode
on/off
start/stop
mode
on/off
temperature ϒC
orbital incubato r
SI500
temperature ϒC
press
to start
orbital incubato r
SI500
on/off
press
to start
rpm
time
on/off
Orifice de
positionnement de
porte-éprouvettes
optionnels
6
start/stop
rpm
time
mode
on/off
start/stop
Plate-forme
rétractable
mode
Bouton de verrouillage
de la plate-forme
rétractable
Connecteur
USB
Agitateur incubateurS
SI500, SI600
Instructions d’utilisation
1. Introduction
Nous vous remercions d'avoir fait l'acquisition de
cet équipement Stuart. Pour profiter au mieux
des performances de cet équipement, lisez
attentivement ces instructions avant toute
utilisation. Avant de jeter l'emballage, vérifiez que
tous les elements sont présents et en bon état.
Numéro de l'article
Description
HH179(S)
Cordons d'alimentation équipés de prises CEE
HH180(S)
Cordons d'alimentation équipés de prises CEE
SI500-89 ou SI600-89 Manuel d’instruction
I/FCALUSB
Câble USB
RSSL1 or SI600/1
Barres de fixation (4)
7001096
Label de garantie
SI600-214
Supports de pieds (2) et vis(4) pour SI600
Pour votre propre sécurité ainsi que pour
celle d'autrui, assurez-vous de lire et de
parfaitement comprendre les consignes de
sécurité décrites ci-dessous avant d'utiliser
l'appareil.
2. Consignes de sécurité
Si l'appareil n'est pas utilisé conformément
aux directives détaillées dans ce manuel ou
avec des accessoires différents de ceux
recommandés par Stuart, la protection
fournie risque d'être inefficace.
Cet appareil est conçu pour fonctionner dans les
conditions suivantes :
❖ Utilisation à l'intérieur uniquement
❖ Utilisation dans un lieu correctement ventilé
❖ Température ambiante de +5 ºC à +40 ºC
❖ Altitude maximale de 2000m
❖ Taux d'humidité relative de 80 % au plus
❖ Fluctuations de l'alimentation secteur ne
dépassant pas 10%
❖ Surtension de catégorie II IEC60364-4-443
❖ Degré de pollution 2
Avertissements et conditions de fonctionnement :
ATTENTION : OBJET LOURD. Ne pas
essayer de soulever ou de
transporter l'appareil seul.
❖ Laisser une distance minimum autour de
l'appareil 200 mm (100 mm à l'arrière) par
rapport aux murs ou aux autres éléments.
❖ Ne pas utiliser pour chauffer ou mélanger des
matières susceptibles de dégager des gaz, ou
de provoquer des explosions ou des
implosions.
❖ Ne pas utiliser ou installer l'appareil dans des
zones dangereuses.
❖ Ne jamais déplacer ou porter l'appareil
lorsqu'il est en fonctionnement ou connecté à
l'alimentation secteur.
❖ Ne pas utiliser dans une atmosphere
dangereuse ou en présence de substances
dangereuses.
❖ S'assurer de l'équilibre de la charge.
❖ Ne pas tenter de stopper le mouvement de
l'appareil manuellement.
❖ Ne pas s'appuyer sur la porte ouverte du
SI600 car cela peut faire basculer l'appareil, en
particulier quand la plateforme est dépliée. En
outre, ne pas laisser l'incubateur sans
surveillance quand la porte est ouverte.
❖ La fixation des supports de pieds sur le SI600
est nécessaire avant emploi (voir 4.3).
❖ En cas de coupure de l'alimentation secteur,
l'appareil ne redémarrera pas a rétablissement
de l'alimentation. En cas d'interruption
mécanique (par exemple, en cas de calage du
moteur), l'appareil reprendra son
fonctionnement une fois la cause de
l'interruption corrigée.
❖ L'énergie mécanique peut provoquer le bris
des récipients en verre. À utiliser avec
précaution.
Prendre des précautions lors du
retrait des récipients de
l'incubateur car certaines parties
peuvent être chaudes.
3. Description générale
Les incubateurs orbital Stuart SI500 et SI600 sont
idéales pour le mélange ou l'aération
d'échantillons biologiques variés dans des
conditions de contrôle précis de la température.
7
Sa plateforme rotative dispose d'un système de
réglage numérique de la vitesse, pour produire un
mouvement circulaire uniforme et régulier, avec
une orbite de 16 mm. Elle atteint une vitesse de
rotation de 30 à 300 tr/min. L'incubateur est
également équipé d'une minuterie numérique
réglable qui contrôle l'arrêt automatique de
l'appareil une fois le délai prédéfini écoulé (pas
d'1 seconde à 1 heure, pas d'1 minute à 24
heures ou pas d'1 heure à 9 jours). La plateforme
d'agitation est équipée d'un mécanisme
coulissant pour permettre un accès facile aux
récipients d'incubation. La température est
contrôlée par un système de réglage simple par
pression sur un bouton, par intervalles de 0,1 ºC,
de la température ambiante + 5 °C et jusqu'à 60
ºC.
fusible par un fusible de type et de calibre
équivalents. Vous pouvez également vous
reporter à la plaque signalétique pour connaître
le type et le calibre des fusibles. L'appareil est
fourni avec deux cordons d'alimentation équipés
de fiches IEC. L'un de ces cordons est équipé
d'une fiche britannique à 3 broches et l'autre est
équipé d'une fiche “Shuko” à deux broches.
Choisissez le cordon d'alimentation adapté à
votre installation électrique et mettez l'autre de
côté. Si aucun des cordons ne convient, utilisez le
cordon équipé d'une fiche britannique après avoir
remplacé celle-ci par une fiche appropriée. Pour
ce faire, coupez le cordon du côté de la fiche
moulée, préparez les fils et connectez-les à une
fiche démontable, conformément aux instructions
fournies avec cette dernière.
Les incubateurs sont livrés avec un système de
réceptacles totalement réglable afin d'accueillir
une large gamme de flacons et de bouteilles. Les
accessoires optionnels comportent des casiers
pouvant accueillir des éprouvettes de 1,5 ml, 15
ml et 50 ml.
IL EST IMPORTANT QUE CETTE OPÉRATION
SOIT RÉALISÉE PAR UN ÉLECTRICIEN
QUALIFIÉ UNIQUEMENT.
4. Préparation à l'utilisation
4.1 Installation électrique
CET APPAREIL DOIT ÊTRE MIS À LA TERRE.
Avant de connecter l'appareil, assurez-vous de lire
et de parfaitement comprendre ces instructions.
Vérifiez que l'alimentation secteur correspond aux
caractéristiques indiquées sur la plaque
signalétique. Cet appareil est conçu pour une
utilisation avec une alimentation de 230V et
50Hz. La consommation électrique de l'appareil
est de 300 W pour le SI500 et de 500 W pour le
SI600. S'assurer qu'un cordon d'alimentation
correspondant à la tension requise est utilisé.
L'instrument est livré avec une prise CEI à l'arrière
de l'instrument pour le branchement à
l'alimentation secteur. Pour isoler l'instrument de
l'alimentation électrique, débrancher le câble de
la prise CEI.
Attention: Des fusibles sont installés sur les
lignes de phase et de neutre.
Fusibles:
Fusibles de 230 V - 3,15 A anti-surtensions. Pour
toutes les autres tensions, remplacez toujours un
8
REMARQUE: Reportez-vous à la plaque
signalétique de l'appareil afin de vous assurer que
la fiche et les fusibles sont adaptés à la tension et
à la puissance mentionnées. Les couleurs des fils
du cordon d'alimentation sont les suivantes :
PHASE
NEUTRE
TERRE
- MARRON
- BLEU
- VERT/JAUNE
Le cordon d'alimentation approprié doit être
connecté à l'appareil AVANT de le connecter à
une prise secteur. Si le cordon d'alimentation doit
être remplacé, utilisez un câble d'1mm2 de type
H05VV-F harmonisé, connecté à une fiche
IEC320. Remarque: Le cordon d'alimentation
équipé d'une fiche britannique est protégé par
un fusible de 10 A monté dans la partie
supérieure de la fiche.
EN CAS DE DOUTE, CONSULTEZ UN
ÉLECTRICIEN QUALIFIÉ.
4.2 Positionnement
Placer l'appareil sur une surface solide, plane, non
glissante, en s'assurant de disposer d'un espace
libre suffisant de tous les côtés garantissant
l'absence de tout contact pendant l'utilisation.
Laisser au moins 100 mm à l'arrière pour un
accès facile au cordon d'alimentation électrique
et 200 mm de chaque côté de l' instrument.
temperature °C
4.3 Fixation des supports de pieds (SI600
uniquement)
SI500 Pour empêcher l'appareil de vibrer ou de se
déplacer pendant l'utilisation, le SI600 doit être
fixé à la paillasse à l'aide de supports de pieds.
Deux supports de pieds sont fournis pour fixer les
pieds arrières.
1
2
5. Utilisation
press to set
5.1 Réglage de la vitesse
Mettez l'appareil sous tension (ON) en appuyant
sur le bouton de commande du panneau situé à
la base de l'appareil. Appuyez sur le bouton
“mode” jusqu'à ce qu'un point rouge apparaisse
sur l'écran d'affichage, sous l'indication “rpm”.
L'écran d'affichage indique alors la dernière
vitesse définie. Réglez la vitesse en tournant le
bouton de commande. La vitesse minimale est de
30 tr/min et la vitesse maximale est de 300 tr/
min.
Affichage
Voyant de minuterie/vitesse
digital rouge
rpm
S'assurer que l'appareil est positionné
correctement. Depuis les côtés de l'appareil, faire
glisser les supports de pieds autour de chacun
des pieds arrière (1). Les fixer en place à l'aide
des deux vis n° 8 x 20mm (2).
Brancher l'alimentation électrique - NE PAS
METTRE SOUS TENSION.
4.4 Chargement
Ouvrir la porte. Tirer vers l'extérieur les deux
molettes à ressort noires de chaque côté du
support, en direction des côtés de l'incubateur et
sortir la plateforme du support de l'incubateur
vers soi. Charger le support avec les récipients, si
nécessaire en réglant les barres de fixation
caoutchoutées. S'assurer que la charge est
répartie de façon équilibrée et qu'elle ne dépasse
pas la charge maximale autorisée.
Repousser doucement la plateforme dans
l'incubateur jusqu'à ce qu'elle se verrouille en
place. Fermer la porte.
Remarque: Assurez-vous que la plate-forme
rétractable a émis un clic et s'est bloquée
dans la position appropriée avant de mettre
l'appareil en marche. Dans le cas contraire,
vous risqueriez d'endommager l'appareil.
on/off
start/stop
time
on/off
mode
Bouton “mode”
Bouton “start/stop” (marche/arrêt)
Lorsque la vitesse souhaitée s'affiche, appuyez sur
le bouton “start/stop” (marche/arrêt) pour lancer
la rotation. Il est possible de régler la vitesse sans
arrêter l'appareil. Vous pouvez arrêter l'appareil à
tout moment en appuyant sur le bouton “start/
stop” (marche/arrêt). Si la porte est ouverte alors
que l'appareil est en fonctionnement, une alarme
retentit et le mouvement de l'appareil est
interrompu. Le mot “door” (porte) s'affiche à
l'écran durant quelques instants. Refermez la
porte pour continuer.
5.2 Réglage de la minuterie
Pour utiliser la minuterie, arrêtez la rotation de
l'appareil et appuyez sur le bouton “mode” afin
qu'un point rouge s'affiche à l'écran sous
l'indication “time” (durée). L'écran affiche alors
trois lignes horizontales ou la dernière durée
mémorisée. Sélectionnez la durée de compte à
rebours souhaitée à l'aide du bouton de
commande. La durée de compte à rebours
s'affiche tout d'abord en minutes et en secondes,
puis en heures et en minutes et enfin en jours et
en heures, jusqu'à un maximum de 9 jours.
9
Lorsque l'écran affiche la durée souhaitée,
appuyez sur le bouton “start/stop” (marche/arrêt)
afin de mettre l'appareil en marche. Il est possible
d'arrêter l'appareil à tout moment en cours de
fonctionnement en appuyant sur le bouton
“start/stop”. Si vous appuyez de nouveau sur ce
bouton, l'appareil se remet en marche et la
minuterie reprend son décompte. Il est possible
de régler la minuterie sans arrêter l'appareil.
Lorsque la minuterie atteint zéro, l'appareil
s'arrête automatiquement et émet un
avertissement sonore. Si la porte est ouverte alors
que la minuterie est en marche, une alarme
retentit, le mouvement de l'appareil et le
décompte de la minuterie sont interrompus et le
mot “door” (porte) s'affiche à l'écran durant
quelques instants. Refermez la porte pour
remettre l'appareil en marche. Le décompte de la
minuterie reprend au stade où il avait été arrêté.
Remarque : Pour désactiver la minuterie et utiliser
l'appareil en mode de rotation continue,
sélectionnez le réglage - - - affiché en l'écran en
mode Minuterie.
5.3 Réglage de la température
Bouton “press to set”
(appuyer pour régler)
temperature °C
Bouton de
commande
on/off
press to set
Affichage digital
rouge
5.4 Connectivité USB
Il est possible de connecter
votre incubateur à un ordinateur, grâce à un port
USB, pour assurer le suivi à long terme de la
température de l'incubateur, par exemple durant
la nuit. Retirez le capuchon du port USB de
l’incubateur et connectez le câble fourni.
Branchez l'autre extrémité du câble sur un port
USB disponible de votre ordinateur. La dernière
version de notre logiciel peut être téléchargée sur
time
rpm
le site www.stuart-equipment.com.
Une
on/offfois le
10
start/stop
mode
téléchargement terminé, exécutez le programme
et suivez les instructions affichées à l'écran.
6. Maintenance, entretien
et réparations
ATTENTION : s'assurer que l'appareil est
débranché en retirant le cordon
d'alimentation électrique avant de
commencer les opérations de maintenance
ou d'entretien.
Cet appareil ne nécessite pas d'entretien de
routine. La seule maintenance nécessaire est le
nettoyage des surfaces internes et externes avec
un tissu humide et un détergent doux. Les
écoulements ou les éclaboussures doivent être
nettoyés tout de suite après avoir débranché
l'appareil. Laisser l'appareil sécher complètement
avant de le remettre en marche.
6.1 Réparations et assistance
Toute opération de réparation ou de
remplacement de pièces DOIT être réalisée par un
technicien qualifié.
Seules des pièces détachées fournies ou
spécifiées par Stuart ou l'un de ses
représentants doivent être utilisées.
L'installation de pièces non approuvées peut
affecter l'efficacité des dispositifs de sécurité
intégrés à l'appareil.
Pour obtenir la liste complète des pièces
nécessaires aux techniciens de maintenance
réalisant des réparations internes ou pour obtenir
un manuel d'entretien, contactez notre service
d'assistance à l'adresse : service@bibby-scientific.
com, par téléphone au numéro +44 (0)1785
810475 ou par fax au numéro +44 (0)1785
810471. Vous devez indiquer la référence du
modèle et son numéro de série.
Pour toute autre question technique, contactez le
service d'assistance technique à l'adresse
[email protected] ou par téléphone
au numéro +44 (0)1785 810433.
7. Accessoires
8. Garantie
Code
Stuart garantit cet appareil contre tout défaut de
pièces ou de main-d'œuvre, dans des conditions
d'utilisation normale en laboratoire, pour une
période de trois (3) ans. En cas de réclamation
justifiée, Stuart remplacera gratuitement l'appareil
ou tout composant défectueux. Cette garantie NE
s'applique PAS en cas de dommages provoqués
par un incendie, un accident, une utilisation
inappropriée, une négligence, un réglage
incorrect, une réparation inadéquate, une
installation, une adaptation ou une modification
inappropriée, l'installation de pièces non
approuvées ou la réalisation de réparations par
un personnel non autorisé.
Bibby Scientific Limited
Bâtiment Le Deltaparc Parc Silic PN2
7 rue du Canal
BP 55437 VILLEPINTE
95944 ROISSY Charles de Gaulle
France
Tel: +33(0)148 63 78 03
Fax: +33(0)148 63 78 01
e-mail: [email protected]
www.bibby-scientific.com
Description
SI500/1 Porte-éprouvettes pour 64 éprouvettes de 1,5 ml
SI500/2 Porte-éprouvettes pour 25 éprouvettes de 15 ml
SI500/3 Porte-éprouvettes pour 12 éprouvettes de 50 ml
SI500/4 Porte-éprouvettes pour 16 récipients universels de 30 ml
RSSL1
Barre de fixation de rechange
pour SI500
SI600/1 Barre de fixation de rechange
pour SI600
11
8. Caractéristiques
SI500
SI600
Caractéristiques techniques:
Température
Résolution d'affichage de la température
Précision de la température
Fluctuation de la température
Variation de la température
Plage de vitesse
Diamètre d'orbite
Temps de préchauffage 20-60˚C
De la température
De la température
ambiante +5ºC à 60ºC
ambiante +5ºC à 60ºC
0,1ºC
0,1ºC
+/-0,5ºC
+/-0,5ºC
+/-0,5ºC (à 37ºC)
+/-0.5ºC (à 37ºC)
<0,5ºC
<0,5ºC
De 30 à 300 tr/min
De 30 à 300 tr/min
16mm
16mm
<30 min
<30 min
Charge maximale
10kg
10kg
Poids net
30kg
53kg
Puissance électrique de chauffage
250W
400W
230V, 50Hz, 300W
230V, 50Hz, 500W
Hauteur
522mm
640mm
Profondeur
474mm
542mm
Largeur
450mm
675mm
Hauteur
297mm
395mm
Profondeur
408mm
455mm
Largeur
422mm
625mm
Alimentation
Dimensions générales
Dimensions internes de l'incubateur
Hauteur maximale des récipients
Dimensions de la plate-forme:
250mm
320mm
335 x 335mm
525 x 390mm
Capacité d'incubateur
2800ml flacons Fernbach
0
2
2000ml flacons coniques
0
6
1000ml flacons coniques
4
9
500ml flacons coniques
9
15
Accessoires magnétiques
4
6
12
Italiano
on/off
temperature ϒC
Pannello di
controllo della
temperatura
orbital incubato r
SI500
press
to start
temperature ϒC
orbital incubato r
SI500
on/off
Connettore
USB
press
to start
Pannello di
controllo della
velocità
rpm
time
on/off
start/stop
mode
rpm
time
on/off
start/stop
mode
on/off
temperature ϒC
orbital incubato r
SI500
press
to start
temperature ϒC
orbital incubato r
SI500
on/off
press
to start
rpm
time
on/off
start/stop
Fori di riferimento
per rastrelliere
porta accessori
mode
rpm
time
on/off
start/stop
Piattaforma
estraibile
mode
Manopola di sgancio
della piattaforma
estraibile
13
IncubatRICI agitatore
SI500, SI600
Istruzioni per l'uso
❖ Oscillazione dell'alimentazione elettrica non
superiore al 10%
❖ Categoria di sovratensione II IEC60364-4-443
❖ Grado di inquinamento 2
Avvertenze e condizioni di funzionamento:
1. Introduzione
Grazie per aver acquistato questo apparecchio
Stuart. Per assicurare sempre prestazioni ottimali,
leggere attentamente le istruzioni di questa
apparecchiatura prima dell'uso. Prima di eliminare
la confezione controllare che tutti i componenti
siano presenti ed integri.
Numero articolo
Descrizione
HH179(S)
Cavo di alimentazione britannico con spina
HH180(S)
Cavo di alimentazione europeo con spina
SI500-89 o SI600-89
Manuale di istruzioni
I/FCALUSB
Cavo USB
RSSL1 o SI600/1
Barre di fissaggio (4)
7001096
Carta di garanzia
SI600-214
Supporti (2) e viti (4)
per SI600
Per garantire la sicurezza propria e degli
altri, prima di usare l'apparecchio leggere e
memorizzare le indicazioni di sicurezza
fornite di seguito.
2. Indicazioni di sicurezza da leggere prima dell'uso
L'uso per scopi diversi da quelli indicati sul
manuale e l'impiego di accessori differenti
da quelli raccomandati da Stuart possono
compromettere la protezione fornita
dall'apparecchio.
Condizioni di esercizio previste:
❖ Solo per uso in ambienti chiusi
❖ Usare in ambienti ben ventilati
❖ Campo di temperatura ambiente da +5ºC a
+40ºC
❖ Altitudine fino a 2000 m
❖ Umidità relativa non superiore all'80%
14
ATTENZIONE: OGGETTO PESANTE. Non
cercare di sollevare o trasportare
l'unità senza aiuto.
❖ Utilizzare l'unità ad una distanza minima di
200 mm (100 mm sul retro) dalle pareti e da
altri oggetti.
❖ Non utilizzare per il riscaldamento o il
mescolamento di materiali che potrebbero
causare il rilascio di gas oppure provocare
esplosioni o implosioni.
❖ Non usare o collocare in aree pericolose
❖ Non spostare o trasportare l'unità se in
funzione o collegata alla rete elettrica.
❖ Non usare in atmosfere pericolose o con
sostanze pericolose.
❖ Controllare che il carico sia bilanciato.
❖ Non fermare il movimento manualmente.
❖ Non appoggiarsi allo sportello aperto dell'unità
SI600 perché ciò potrebbe farla inclinare, in
particolare quando la piattaforma si trova in
posizione estratta. Inoltre, non lasciare
l'incubatore incustodito quando lo sportello è
aperto.
❖ Prima di utilizzare l'unità SI600 è necessario
procedere all'installazione dei supporti (vedasi
la sezione 4.3).
❖ In caso di interruzione della rete elettrica, al
ripristino dell'alimentazione l'unità non
riprende a funzionare.
❖ In caso di interruzione dovuta a causa
meccanica (ad esempio stallo del motore), una
volta eliminata la ragione del blocco l'unità
riprende a funzionare.
❖ L'energia meccanica può rompere i recipienti
di vetro. Usare cautela.
Nel rimuovere i recipienti
dall'incubatore, prestare
attenzione per l'eventuale
presenza di parti calde.
3. Descrizione generale
Le incubatrici orbitali Stuart SI500 e SI600 sono
ideali per permiscelare ed aerare diversi campioni
biologici in accurate condizioni di temperatura
controllata. La piattaforma girevole ha un sistema
di regolazione digitale della velocità che assicura
un moto circolare omogeneo e uniforme
conun'orbita di 16 mm. La velocità è compresa
fra 30 e 300 giri/min. L'apparecchio è anche
provvisto di un timer digitale regolabile che si
ferma una volta trascorso l'intervallo di tempo
definito (intervalli da 1 secondo fino a 1 ora,
intervalli da 1 minuto fino a 24 ore e intervalli da
1 ora fino a 9 giorni). La piattaforma agitatrice ha
un meccanismo di estrazione a cassetto per
accedere comodamente ai recipienti di
incubazione. La temperatura è controllata con un
semplice sistema di regolazione a pulsante con
intervalli da 0,1°C in un range di temperature
ambiente compreso tra +5°C e 60°C.
Le incubatrici hanno un sistema di supporto
regolabile in grado di accogliere diversi tipi di
beute e flaconi. Gli accessori opzionali
comprendono rastrelliere in grado di alloggiare
provette da 1,5 ml, 15 ml e 50 ml.
4. Preparazione per l'uso
4.1 Impianto elettrico
COLLEGARE LO STRUMENTO A TERRA
Prima di collegare lo strumento leggere
attentamente le istruzioni e controllare che
l'alimentazione di rete corrisponda a quella
indicata sulla targhetta. Lo strumento funziona
con un'alimentazione di 230 V, 50 Hz. La potenza
assorbita dall'unità è di 300W per il modello
SI500 e di 500W per il modello SI600. Assicurarsi
di utilizzare un cavo di alimentazione con
caratteristiche elettriche adeguate al prodotto
utilizzato. Sul retro dell'apparecchio è presente
una presa IEC per il collegamento del cavo di
alimentazione. Quando si desidera isolare il
strumento dalla rete di alimentazione, scollegare
il cavo dalla presa IEC.
Attenzione: sono presenti fusibili sia sulla
linea di fase che sul neutro.
Fusibili:
Fusibili da 230 V - 3,15 A contro le sovracorrenti.
Per tutte le altre tensioni sostituire sempre con un
fusibile di tipo e amperaggio equivalente a quello
tolto, oppure consultare la targhetta dei dati
nominali.
L'unità ha due cavi di alimentazione dotati di
connettori IEC per l'attacco allo strumento. Un
cavo ha un connettore tripolare tipo UK, l'altro
un connettore bipolare tipo Shuko. Usare il cavo
adatto all'impianto elettrico in uso. Se nessuno
dei due connettori è adatto sostituire il
connettore tipo UK con quello di tipo idoneo. A
questo scopo tagliare il connettore, preparare il
cavo e collegarlo al connettore corretto seguendo
le istruzioni.
AFFIDARE QUESTA OPERAZIONE SOLO A UN
ELETTRICISTA QUALIFICATO
NOTA: per controllare che il connettore e i fusibili
siano adatti alla tensione e alla potenza indicate
consultare la targhetta dei dati nominali
dell'apparecchio. Colori dei conduttori nel cavo di
alimentazione:
FASE - MARRONE
NEUTRO - BLU
TERRA - VERDE/GIALLO
Collegare il cavo di alimentazione PRIMA allo
strumento, quindi alla presa di alimentazione. Se
necessario, sostituire il cavo di alimentazione con
un cavo da 1 mm2 codice armonizzato H05VV-F
collegato a un connettore IEC320. N.B. il cavo di
rete tipo UK è protetto da un fusibile da 10 A
montato sulla sommità del connettore.
IN CASO DI DUBBIO CONTATTARE UN
ELETTRICISTA QUALIFICATO
4.2 Posizionamento
Posizionare l'unità su di una superficie solida,
piana e non scivolosa, assicurandosi che vi sia
spazio libero sufficiente su tutti i lati e che
durante il funzionamento l'apparecchio non entri
in contatto con alcun oggetto. Lasciare uno
spazio libero di almeno 100 mm sul retro
dell'unità, per permettere un facile accesso al
cavo di alimentazione di rete, e di almeno 200
mm sui restanti lati.
15
SI500
press to set
4.3 Installazione dei supporti
(soltanto per SI600)
Per evitare vibrazioni o spostamenti durante l'uso,
l'unità SI600 deve essere fissata al piano
d'appoggio mediante supporti. Sono forniti due
supporti per il fissaggio dei piedini posteriori.

1
5. Funzionamento
5.1 Regolazione della velocità
Con la tastiera alla base dello strumento
accendere l'unità premendo la manopola di
comando. Premere il pulsante modo fino a
quando sul display, sotto “rpm” (giri/min),
compare un punto rosso. Il display mostra l'ultima
velocità impostata. Regolare la velocità ruotando
la manopola di comando. La velocità minima è di
30 giri/min, la massima di 300 giri/min.
LED tempo/velocità
2
rpm
start/stop
Assicurarsi che l'unità sia stata posizionata
correttamente. Dai lati dell'unità, collocare
ciascun supporto intorno a uno dei piedini
posteriori (1). Fissare i supporti mediante due viti
N°8 x 20 mm (2).
Connettere l'unità alla rete elettrica - NON
ACCENDERE.
4.4 Caricamento
Aprire lo sportello. Tirare le due manopole con
ritorno a molla poste ai due lati della piattaforma
estraibile verso le pareti dell'incubatore, quindi
estrarre la piattaforma dall'incubatore tirando
verso di sé.
Collocare i recipienti sulla piattaforma, regolando
opportunamente la posizione delle barre di
fissaggio gommate. Assicurarsi che il carico sia
ben bilanciato e non superi il valore massimo
indicato.
Inserire nuovamente la piattaforma
nell'incubatore spingendola delicatamente fino
alla posizione di arresto. Chiudere lo sportello.
N.B: prima di azionare l'unità controllare che
la piattaforma estraibile sia bloccata in sede;
in caso contrario l'apparecchio potrebbe
danneggiarsi.
Display digitale rosso
time
on/off
mode
Pulsante modo
Pulsante start/stop
Quando sul display compare la velocità desiderata
premere il pulsante start/stop per avviare il
movimento. La velocità si può regolare senza
fermare l'unità. L'apparecchio si può fermare in
qualsiasi momento premendo il pulsante start/
stop. Se durante il movimento si apre lo sportello
lo strumento emette un segnale acustico e si
ferma; sul display compare temporaneamente la
scritta “door” (sportello). Chiudere lo sportello
per continuare.
5.2 Regolazione del timer
Per usare il timer fermare la rotazione e premere
il pulsante modo fino a quando sul display
compare un punto rosso in corrispondenza di
“time” (tempo). Sul display compaiono tre linee
orizzontali oppure l'ultima durata memorizzata.
Selezionare la durata desiderata per il conto alla
rovescia con la manopola di comando. Il tempo
viene visualizzato dapprima in minuti e secondi,
quindi in ore e minuti e infine in giorni e ore, fino
a un massimo di 9 giorni.
Quando sul display compare il tempo desiderato
premere il pulsante start/stop per avviare
16
l'apparecchio. Il movimento dell'apparecchio si
può fermare in qualsiasi momento premendo il
pulsante start/stop. Premendo ancora il pulsante il
movimento riprende e il timer prosegue il conto
alla rovescia. Il timer si può regolare senza
fermare l'unità. Quando il timer arriva a zero
l'unità si ferma automaticamente ed emette un
segnale acustico. Se durante il conto alla rovescia
si apre lo sportello lo strumento emette un
segnale acustico e il timer si ferma; sul display
compare temporaneamente la scritta “door”
(sportello). Per continuare chiudere lo sportello; il
conto alla rovescia riprende dal punto in cui si era
interrotto.
N.B. per disattivare il timer e tornare alla
rotazione continua selezionare - - - sul
display dopo aver attivato il modo timer.
Premere per regolare
temperature °C
Manopola di comando
on/off
press to set
Display digitale rosso
5.3 Regolazione della temperatura
Con il pannello di controllo superiore attivare
l'unità di controllo della temperatura premendo la
manopola di comando. Tenendo premuto il
pulsante “press to set” (premere per regolare)
ruotare la manopola fino a visualizzare la
temperatura desiderata. Rilasciare il pulsante
“press to set”. L'incubatore inizia a scaldarsi per
raggiungere la temperatura impostata. Sul display
compare la temperatura effettiva all'interno
dell'unità. La temperatura
minima regolabile è
time
rpm
on/off
Tamb + 5°C, quella massima è di 60°C.
5.4 Connettività USB
L'IS500 si può collegare a un PC via USB per
tracciaremode
nel tempo la temperatura
start/stop
dell'incubatore, ad esempio durante la notte.
Togliere il cappuccio ermetico dalla porta USB
dell'IS500 e collegare il cavo accluso, collegare
l'altra estremità a una porta USB libera sul PC. Per
scaricare la versione più aggiornata del software
IS500 accedere al sito www.bibby-scientific.com;
dopo aver scaricato il programma lanciarlo e
seguire le istruzioni a video.
6. Manutenzione, assistenza
e riparazione
ATTENZIONE: prima di intraprendere
qualsiasi operazione di manutenzione o
riparazione, rimuovere il cavo di
alimentazione per assicurarsi che l'unità sia
scollegata dalla rete elettrica.
Questa apparecchiatura non necessita di
manutenzione periodica. L'unico intervento di
manutenzione necessario consiste nella pulizia
delle superfici interne ed esterne mediante un
panno umido e un detergente delicato.
Rimuovere immediatamente i travasi o gli schizzi
eventuali, dopo aver isolato l'unità dalla rete
elettrica. Prima di azionare nuovamente l'unità,
attendere che sia completamente asciutta.
6.1 Riparazioni e assistenza
Affidare riparazioni o sostituzioni SOLO a
personale qualificato.
Usare solo ricambi forniti o autorizzati da
Stuart o dai suoi distributori. L'impiego di
componenti non autorizzati può
compromettere le prestazioni o le
caratteristiche di sicurezza dello strumento.
Per un elenco completo dei componenti
necessari alle riparazioni interne o per richiedere
il manuale di assistenza contattare il Servizio
Assistenza [email protected],
tel: +44 (0)1785 810475, fax: +44 (0)1785
810471 indicando modello e numero di serie.
Per altre richieste di carattere tecnico contattare
il Servizio di assistenza tecnica,
[email protected],
tel: +44 (0)1785 810433.
7. Accessori
Codice
Descrizione
SI500/1 Supporto per 64 provette da 1,5 ml
SI500/2 Supporto per 25 provette da 15 ml
SI500/3 Supporto per 12 provette da 50 ml
SI500/4 Supporto per 16 provette universali da 30 ml
RSSL1
Barra di fissaggio di ricambio per SI500
SI600/1 Barra di fissaggio di ricambio per SI600
17
8. Garanzia
componenti non approvati o riparazioni condotte
da personale non autorizzato.
Stuart garantisce questo strumento da difetti di
materiale e fabbricazione per un periodo di tre
(3) anni, se utilizzato in normali condizioni di
laboratorio. In caso di reclamo giustificato Stuart
sostituirà gratuitamente qualsiasi componente
difettoso o l'intera unità. Questa garanzia NON
copre i danni provocati da incendi, incidenti, uso
non conforme, negligenza, errori di regolazione o
di riparazione, danni dovuti a installazioni,
adattamenti, modifiche, montaggio di
Bibby Scientific Italia Srl
Via Alcide de Gasperi 56
20077 Riozzo di Cerro al Lambro
Milano Italia
Tel: +39 (0)2 98230679
Fax: +39 (0)2 98230211
e-mail: [email protected]
www.bibby-scientific.it
9. Dati tecnici
Dati tecnici:
Campo di temperatura:
Risoluzione di visualizzazione temperatura
Precisione di temperatura
Fluttuazione termica
Variazione termica
Campo di velocità
Diametro dell'orbita
Tempo di preriscaldamento 20-60˚C
Carico massimo
Peso netto
Potenza nominale di riscaldamento
Alimentazione elettrica
Dimensioni complessive
Altezza
Profondità
Larghezza
Dimensioni interne incubatore
Altezza
Profondità
Larghezza
Altezza massima recipiente
Dimensioni della piattaforma
Capienza dell'incubatrice
2800ml boccette Fernbach
2000ml boccette coniche 1000ml boccette coniche 500ml boccette coniche Accessori magnetici
18
SI500
SI600
Ambiente +5ºC - 60ºC
0,1ºC
+/-0,5ºC
+/-0,5ºC (a 37ºC)
<0,5ºC
Da 30 a 300 giri/min
16mm
<30 min
10kg
30kg
250W
230V, 50Hz, 300W
Ambiente +5ºC - 60ºC
0,1ºC
+/-0,5ºC
+/-0,5ºC (a 37ºC)
<0,5ºC
Da 30 a 300 giri/min
16mm
<30 min
10kg
53kg
400W
230V, 50Hz, 500W
522mm
474mm
450mm
640mm
542mm
675mm
297mm
408mm
422mm
250mm
335 x 335mm
395mm
455mm
625mm
320mm
525 x 390mm
0
0
4
9
4
2
6
9
15
6
~
Espanol
on/off
temperature ϒC
Panel de control
de temperatura
orbital incubato r
SI500
press
to start
temperature ϒC
orbital incubato r
SI500
on/off
Conector
USB
press
to start
Panel de
control de
velocidad
rpm
time
on/off
start/stop
mode
rpm
time
on/off
start/stop
mode
on/off
temperature ϒC
orbital incubato r
SI500
press
to start
temperature ϒC
orbital incubato r
SI500
on/off
press
to start
rpm
time
on/off
start/stop
Orificios
localizadores para
bastidores de
Plataforma
tubos
retráctil
mode
rpm
time
on/off
start/stop
mode
Pomo de liberación de la
plataforma retráctil
19
IncubadorAS agitador
SI500, SI600
Instrucciones de uso
1. Introducción
Gracias por adquirir este equipo de Stuart. Para
conseguir el mejor rendimiento de este equipo,
lea atentamente estas instrucciones antes de
ponerlo en marcha. Antes de desechar el
embalaje, compruebe que todas las piezas estén
presentes y en buen estado.
Referencia
Descripción
HH179(S)
Cable de alimentación con enchufe británico
HH180(S)
Cable de alimentación con enchufe europeo
SI500-89 o SI600-89 Manual de instrucciones
I/FCALUSB
Cable USB
RSSL1 o SI600/1
Barras de protección (4)
7001096
Tarjeta de garantía
SI600-214
Abrazaderas para patas (2) y tornillos (4) para SI600
Para su propia seguridad y la de los demás,
lea detenidamente el aviso de seguridad que
aparece a continuación antes de utilizar el
equipo.
2. Aviso de seguridad antes del uso
Si el equipo no se utiliza tal como se
describe en este manual y se emplean
accesorios distintos a los recomendados
por Stuart, la protección ofrecida puede
verse afectada.
Este equipo se ha diseñado para funcionar en las
condiciones ambientales siguientes:
❖
❖
❖
Sólo para uso en interior
Debe utilizarse en un área bien ventilada
Rango de temperatura ambiente:
de +5 ºC a + 40 ºC
20
❖ Altitud hasta 2.000 m
❖ Humedad relativa no superior al 80%
❖ Fluctuación de la alimentación eléctrica no superior al 10%
❖ Categoría de sobretensión II según la norma
❖ IEC60364-4-443
❖ Grado de contaminación 2
Advertencias y condiciones de uso:
PRECAUCIÓN: OBJETO PESADO. No
intente levantar o transportar
la unidad sin ayuda.
❖ Debe utilizarse a una distancia mínima de 200
mm (100 mm en la parte trasera) de paredes
u otros objetos cercanos.
❖ No debe utilizarse para calentar o mezclar
materiales que puedan dar lugar a la
liberación de gases o provocar explosiones o
implosiones.
❖ No debe colocarse (ni utilizarse) en áreas que
se consideren peligrosas.
❖ No mueva ni transporte nunca la unidad
cuando esté en funcionamiento o esté
conectada a la alimentación de red eléctrica.
❖ No debe utilizarse en atmósferas peligrosas ni
junto con materiales peligrosos.
❖ Asegúrese de que la carga esté equilibrada.
❖ No intente detener el movimiento de la unidad
de forma manual.
❖ No se apoye en la puerta abierta del SI600, ya
que eso podría hacer volcar la unidad,
especialmente cuando la plataforma esté
extraída. Tampoco deje la incubadora
desatendida con la puerta abierta.
❖ Antes de utilizar la SI600 es necesario
colocarle unas abrazaderas para patas
(consulte 4.3).
❖ En caso de que se interrumpa la alimentación
eléctrica, la unidad no volverá a arrancar tras
restaurarse el suministro eléctrico.
❖ En caso de una interrupción mecánica (por
ejemplo, el calado del motor), la unidad
continuará funcionando una vez que finalice
dicha interrupción.
❖ La energía mecánica puede provocar la rotura
de los recipientes de cristal. Debe utilizarse
con precaución.
Tenga cuidado al retirar
recipientes de la incubadora, ya
que puede haber partes muy
calientes
3. Descripción general
Las incubadoras orbitales SI500 y SI600 de Stuart
son ideales para mezclar y airear diversas
muestras biológicas en condiciones de
temperatura precisas y controladas. La plataforma
giratoria tiene un ajuste de velocidad digital que
proporciona un movimiento circular suave y
uniforme con una órbita de 16 mm. El rango de
velocidad oscila entre 30 y 300 rpm. También
dispone de un temporizador de cuenta atrás
digital ajustable que se detiene automáticamente
una vez que haya transcurrido el tiempo
establecido (pasos de 1 segundo hasta 1 hora,
pasos de 1 minuto hasta 24 horas o pasos de 1
hora hasta 9 días). La plataforma de agitación
dispone de un mecanismo con cajones que
permite acceder fácilmente a los recipientes de
incubación. La temperatura se controla mediante
un sencillo sistema de “pulsar para establecer”
con intervalos de 0,1 ºC para una temperatura
ambiente de +5ºC hasta 60ºC.
Las incubadoras están equipadas con un sistema
de soporte ajustable que permite alojar una gran
variedad de frascos y botellas. Entre los accesorios
opcionales se incluyen bastidores capaces de
alojar tubos de 1,5 ml, 15 ml y 50 ml.
4. Preparación para uso
4.1 Instalación eléctrica
ESTE INSTRUMENTO DEBE CONECTARSE A
TIERRA
Antes de conectar el instrumento, lea
detenidamente estas instrucciones y asegúrese de
que la alimentación de línea corresponde a la que
se muestra en la placa de características. El
instrumento funciona con una alimentación de
230 V a 50 Hz. El consumo energético de la
unidad es de 300 W para el modelo SI500 y de
500 W para el modelo SI600. Asegúrese de
utilizar un cable de alimentación eléctrica con las
características correctas para el producto. El
instrumento lleva incorporada una toma CEI en
su parte trasera para la conexión del cable de
alimentación eléctrica. Cuando desee aislarlo del
suministro eléctrico, desconecte el cable de la
toma CEI.
Precaución: Los cables de fase y neutro están
provistos de fusibles.
Fusibles:
Fusible contra transitorios de 230 V - 3,15 A.
Para el resto de tensiones, los fusibles deben
sustituirse siempre por tipos de fusibles y
potencias equivalentes a los que se van a retirar.
Como alternativa, consulte el tipo de fusible y la
potencia en la placa de características.
La unidad se suministra con dos cables de
alimentación provistos de enchufes IEC que se
conectan al instrumento. Uno de los cables tiene
un enchufe de tres pines (Reino Unido) y el otro
dispone de un enchufe “Shuko” de dos pines
para la conexión a la red eléctrica. Elija el cable
adecuado para su instalación eléctrica y deseche
el otro. Si ninguno de los dos es adecuado,
seleccione el cable que tiene el enchufe para el
Reino Unido y sustituya el enchufe por otro que
sea apropiado. Esto implica cortar el enchufe
moldeado, preparar el cable y conectarlo al
enchufe desmontable según las instrucciones
pertinentes.
ES IMPORTANTE QUE ESTA OPERACIÓN
SÓLO LA LLEVE A CABO UN ELECTRICISTA
CUALIFICADO
NOTA: Consulte la placa de características del
equipo para asegurarse de que el enchufe y el
fusible sean los adecuados para la tensión y
potencia indicadas. Los hilos del cable de
alimentación tienen los colores siguientes:
FASE
-
NEUTRO -
TIERRA -
MARRÓN
AZUL
VERDE/AMARILLO
El cable de alimentación adecuado debe
conectarse al instrumento ANTES de conectarlo a
la alimentación de red eléctrica. En caso de que
deba sustituirse el cable de alimentación, se
utilizará un cable de 1 mm2 de código
armonizado H05VV-F conectado a un enchufe
IEC320.
Nota: El cable de alimentación para el Reino
Unido está protegido con un fusible de 10A
montado en la parte superior del enchufe.
SI TIENE DUDAS AL RESPECTO, CONSULTE A
UN ELECTRICISTA CUALIFICADO
21
SI500
4.2 Colocación
Coloque la unidad en una superficie firme,
nivelada y no deslizante, y asegúrese de que se
disponga de suficiente espacio libre en todos los
lados para evitar que pueda entrar en contacto
con cualquier otra cosa durante su
funcionamiento. Deje un espacio de al menos
100 mm en la parte trasera para facilitar el
acceso al cable de alimentación eléctrica, así
como 200 mm en cada lateral.
Empuje suavemente la plataforma de nuevo hacia
el interior de la incubadora hasta dejarla
bloqueada en su sitio. Cierre la puerta.
4.3 Fijación de las abrazaderas para patas
(sólo SI600)
Para evitar que la unidad vibre o se desplace
durante su funcionamiento, el modelo SI600
debe ir fijado al banco trabajo mediante
abrazaderas para patas. Se facilitan dos
abrazaderas para la fijación de las patas traseras.
5. Funcionamiento
1
NOTA: Asegúrese de que la plataforma
retráctil se haya bloqueado tras un
chasquido antes de intentar hacer funcionar
la unidad. De lo contrario, se pueden
on/off
time
rpmla
producir daños en
unidad.
temperature
°C
on/off
start/stop
press to set
mode
5.1 Ajuste de la velocidad
Utilice el teclado situado en la base del
instrumento para encender (ON) la unidad
pulsando el botón de control. Pulse el botón
mode (modo) hasta que aparezca un punto rojo
en la pantalla debajo de “rpm”. A continuación,
la pantalla mostrará la última velocidad
establecida. Ajuste la velocidad girando el botón
de control. La velocidad mínima es de 30 rpm y la
máxima de 300 rpm.
Pantalla digital
de color rojo
LED de tiempo/velocidad
2
Asegúrese de que la unidad esté colocada
correctamente. Desde los laterales de la unidad,
deslice las abrazaderas en torno a cada una de
las patas traseras (1). Fíjelas en su lugar por
medio de dos tornillos nº 8 de 20 mm (2).
Conecte la unidad a la alimentación eléctrica. NO
LA ENCIENDA.
4.4 Carga
Abra la puerta. Tire de los dos pomos de
liberación con muelle negros situados a cada lado
del soporte hacia los laterales de la incubadora y
extraiga de la incubadora la plataforma de
soporte arrastrándola hacia usted.
Cargue el soporte con recipientes y ajuste las
barras de protección recubiertas de goma según
corresponda. Asegúrese de que la carga esté
equilibrada de manera uniforme y no supere la
carga máxima indicada.
22
rpm
start/stop
time
on/off
mode
Botón mode (modo)
Botón start/stop (arranque/parada)
Cuando aparezca la velocidad correcta, pulse el
botón start/stop (arranque/parada) para poner la
unidad en movimiento. La velocidad se puede
ajustar sin detener la unidad. La unidad se puede
detener en cualquier momento pulsando el botón
start/stop (arranque/parada). Si se abre la puerta
mientras la unidad está en movimiento, se oirá
una alerta de advertencia y la unidad dejará de
moverse. La palabra “door” (puerta) también
aparecerá brevemente en la pantalla. Cierre la
puerta para continuar.
5.2 Ajuste del temporizador
Para utilizar el temporizador, detenga la rotación
y pulse el botón mode (modo) para que aparezca
el punto rojo en la pantalla debajo de “time”
(tiempo). Se mostrarán tres líneas horizontales en
la pantalla o el último tiempo almacenado.
Seleccione el tiempo de cuenta atrás deseado con
el botón de control. El tiempo se mostrará
primero en minutos y segundos, después en
horas y minutos y, a continuación, en días y horas
hasta un máximo de 9 días.
pulsando el botón de control. Mantenga pulsado
el botón “press to set” (pulsar para establecer) y
gire el botón hasta que se muestre la
temperatura correcta. Suelte el botón “press to
set” (pulsar para establecer). A continuación, el
incubadora empezará a calentarse hasta la
temperatura establecida. La temperatura real
dentro de la unidad se mostrará en la pantalla. La
temperatura mínima establecida es una
temperatura ambiente de +5ºC y la temperatura
máxima es de 60ºC.
Cuando la pantalla muestre el tiempo correcto,
pulse el botón start/stop (arranque/parada) para
que empiece a funcionar la unidad. Durante el
funcionamiento, el movimiento se puede detener
en cualquier momento pulsando el botón start/
stop (arranque/parada). Si se vuelve a pulsar el
botón, se reanudará el movimiento y el
temporizador continuará con la cuenta atrás. El
temporizador se puede ajustar sin detener la
unidad. Cuando el temporizador llegue a cero, la
unidad se detendrá automáticamente y se oirá
una alerta. Si se abre la puerta mientras la unidad
está en proceso de cuenta atrás, se oirá una
alerta de advertencia y se detendrá el movimiento
y la cuenta atrás. La palabra “door” (puerta)
también aparecerá brevemente en la pantalla.
Cierre la puerta para continuar y se reanudará la
cuenta atrás en el punto en que se detuvo.
5.4 Conectividad USB
La incubadora tiene la posibilidad de conectarse a
un PC vía USB para realizar un seguimiento a
largo plazo de la temperatura del incubadora, por
ejemplo, mientras funciona durante la noche.
Extraiga el tapón hermético del puerto USB de la
unidad incubadora y conecte el cable
suministrado, conecte el otro extremo del cable a
un puerto
NOTA: Para desactivar el temporizar y volver
a la rotación continua, seleccione - - - en la
pantalla durante el modo de temporizador.
5.3 Ajuste de la temperatura
Press to set
(Pulsar para establecer)
temperature °C
Botón de control
on/off
press to set
Pantalla digital de
color rojo
Utilice el panel de control superior para encender
(ON) la unidad de control de temperatura
USB libre del PC. La versión más reciente de
nuestro software se puede descargar en www.
stuart-equipment.com. Una vez descargado,
ejecute el programa y siga las indicaciones que
aparecen en la pantalla.
6. Servicio, reparación y
mantenimiento
ADVERTENCIA: Asegúrese de que la unidad
esté desconectada del suministro eléctrico
retirando el cable de alimentación antes de
intentar realizar tareas de mantenimiento o
reparaciones.
Este equipo no precisa operaciones de
mantenimiento de rutina. El único mantenimiento
necesario es la limpieza de las superficies internas
y externas con un paño húmedo y un detergente
suave. Las salpicaduras o los vertidos se deben
limpiar inmediatamente tras aislar previamente la
unidad del suministro eléctrico. Deje que la
unidad seque completamente antes de ponerla
nuevamente en funcionamiento.
6.1 Reparaciones y asistencia
Cualquier reparación o sustitución de piezas que
se efectúe DEBE ser llevado a cabo por personal
cualificado.
23
Sólo se deben utilizar piezas de repuesto
suministradas o especificadas por Stuart o su
agente. La instalación de piezas no aprobadas
puede afectar al rendimiento de las funciones de
seguridad diseñadas en el instrumento.
Para obtener una lista completa de las piezas que
necesitarán los técnicos que efectúen
reparaciones internas o para recibir un manual de
servicio, póngase en contacto con el
Departamento de servicio (service@
bibby-scientific. com), tel.: +44 (0)1785 810475,
fax: +44 (0)1785 810471 e indique el modelo y
el número de serie.
Si desea realizar otras consultas técnicas, póngase
en contacto con el Departamento de asistencia
técnica ([email protected]), tel.:
+44 (0)1785 810433.
7. Accesorios
Código
Descripción
SI500/1 Gradilla para 64 tubos de 1,5 ml
SI500/2 Gradilla para 25 tubos de 15 ml
SI500/3 Gradilla para 12 tubos de 50 ml
SI500/4 Gradilla para 16 recipientes universales de 30 ml
RSSL1
Barra de protección de repuesto para SI500
SI600/1 Barra de protección de repuesto para SI600
24
8. Garantía
Stuart garantiza que este producto estará libre de
defectos de material o fabricación, siempre que
se utilice en condiciones normales de laboratorio,
por un período de tres (3) años. En caso de una
reclamación justificada, Stuart sustituirá cualquier
componente que sea defectuoso o bien sustituirá
la unidad de forma gratuita. Esta garantía NO se
aplicará a ningún daño causado por incendio,
accidente, uso inadecuado, negligencia, ajuste
incorrecto o reparación, ni ningún daño causado
por una instalación, adaptación, modificación,
instalación de piezas no aprobadas o reparación
llevada a cabo por personal no autorizado.
Bibby Scientific Ltd.
Stone, Staffordshire ST15 0SA
United Kingdom
Tel: +44 (0)1785 812121
Fax: +44 (0)1785 813748
e-mail [email protected]
www.bibby-scientific.com
9. Especificaciones
SI500
SI600
Ambiente de +5ºC a 60ºC
Ambiente de +5ºC a 60ºC
0,1ºC
0,1ºC
Especificaciones técnicas
Rango de temperatura
Resolución de visualización de temperatura
Precisión de temperatura
Fluctuación de temperatura
Variación de temperatura
Rango de velocidad
Diámetro orbital
Tiempo de calentamiento 20-60˚C
+/-0,5ºC
+/-0,5ºC
+/-0,5ºC (a 37ºC)
+/-0,5ºC (a 37ºC)
<0.5ºC
<0.5ºC
De 30 a 300 rpm
De 30 a 300 rpm
16mm
16mm
<30 min
<30 min
Carga máxima
10kg
10kg
Peso neto 30kg
53kg
Potencia nominal de calefacción
250W
400W
230V, 50Hz, 300W
230V, 50Hz, 500W
Altura
522mm
640mm
Profundidad 474mm
542mm
Anchura
450mm
675mm
Altura
297mm
395mm
Profundidad
408mm
455mm
Anchura
422mm
625mm
Alimentación eléctrica
Dimensiones totales
Dimensiones internas del incubadora
Altura máxima del recipiente
Tamaño de la plataforma
250mm
320mm
335 x 335mm
525 x 390mm
Capacidad de la incubadora
2800ml frascos Fernbach
0
2
2000ml frascos cónicos 0
6
1000ml frascos cónicos 4
9
500ml frascos cónicos 9
15
Accesorios magnéticos
4
6
25
Deutsch
on/off
temperature ϒC
Temperaturbedienfeld
orbital incubato r
SI500
press
to start
temperature ϒC
orbital incubato r
SI500
on/off
USBSchnittstelle
press
to start
Drehzahlbedienfeld
rpm
time
on/off
start/stop
mode
rpm
time
on/off
start/stop
mode
on/off
temperature ϒC
orbital incubato r
SI500
press
to start
temperature ϒC
orbital incubato r
SI500
on/off
press
to start
rpm
time
on/off
start/stop
rpm
Positionierungsloch
für Zubehörgestell
time
on/off
start/stop
Teleskoptisch
26
mode
mode
Verriegelungsknopf für Teleskoptisch
SchüttelinkubatorEN
SI500, SI600
Gebrauchsanweisung
1. Einführung
Vielen Dank, dass Sie sich für dieses Stuart-Gerät
entschieden haben. Um die optimale Leistung des
SI500 und SI600 zu erreichen, lesen Sie bitte
diese Gebrauchsanweisung sorgfältig durch,
bevor Sie das Gerät in Betrieb nehmen.
Überprüfen Sie bitte vor dem Entsorgen der
Verpackung, dass alle Teile vorhanden und in
Ordnung sind.
Artikel-NummerBeschreibung
HH179(S)
Netzkabel mit GB-Stecker
HH180(S)
Netzkabel mit EU-Stecker
SI500-89 oder
SI600-89
Bedienungsanweisung
I/FCALUSB
USB-Kabel
RSSL1 oder SI600/1
Sicherungsstangen (4)
7001096
Garantiekarte
SI600-214
Fixierung für Standfüße (2) und Schrauben (4) für SI600
Zu Ihrer eigenen Sicherheit und der
Sicherheit anderer Personen sollten Sie die
nachfolgenden Sicherheitshinweise vor
Inbetriebnahme des Geräts lesen und
verstehen.
2. Sicherheitshinweise
Das Gerät darf nur in der hier
beschriebenen Weise und mit Zubehör
betrieben werden, das von Stuart
empfohlen wurde; andernfalls kann der
gewährte Schutz beeinträchtigt werden.
❖ Dieses Gerät ist für den Betrieb unter
folgenden Bedingungen ausgelegt:
❖ Nur für den Betrieb in Innenräumen
❖ Betrieb in gut belüfteten Räumen
❖ Umgebungstemperatur +5 ºC bis +40 ºC
❖
❖
❖
❖
❖
Höhenlage bis 2000 m
Relative Luftfeuchtigkeit maximal 80 %
Schwankungen in der Stromversorgung
maximal 10 %
Überspannungskategorie II IEC60364-4-443
Verschmutzungsgrad 2
Sicherheitshinweise:
VORSICHT: SCHWERER GEGENSTAND.
Versuchen Sie nicht, das Gerät
allein zu heben oder zu
transportieren.
❖ Halten Sie einen Mindestabstand von 200 mm
nach allen Seiten (100 mm an der Rückseite)
von der Wand oder anderen Gegenständen
ein.
❖ Nicht zum Erhitzen oder Mischen von
Materialien verwenden, die Gase freisetzen
oder Explosionen oder Implosionen
verursachen könnten.
❖ Nicht in Bereichen aufstellen (oder einsetzen),
die als gefährlich bekannt sind
❖ Transportieren Sie das Gerät nicht, wenn es in
Betrieb oder an die Netzstromversorgung
angeschlossen ist.
❖ Betreiben Sie das Gerät nicht in einer
gefährlichen Umgebung oder einer Umgebung
mit gefährlichen Werkstoffen.
❖ Stellen Sie eine ausgeglichene Last sicher.
❖ Versuchen Sie nicht, die Bewegung des Geräts
mit der Hand zu stoppen.
❖ Lehnen Sie sich nicht auf die offene Tür des
SI600, da dies zum Umkippen des Gerätes
führen könnte, besonders dann, wenn der
Teleskoptisch herausgezogen ist. Lassen Sie
den Inkubator außerdem nicht
unbeaufsichtigt, wenn die Tür offen steht.
❖ Das Anbringen der Fixierungen für die
Standfüße des SI600 ist vor der
Inbetriebnahme erforderlich (vgl. 4.3).
❖ Bei Stromausfällen startet das Gerät nicht
automatisch, wenn die Stromversorgung
wieder hergestellt ist.
❖ Bei mechanischen Unterbrechungen (z. B.
Stoppen des Motors) setzt das Gerät den
Betrieb fort, sobald die Ursache für die
Unterbrechung beseitigt ist.
❖ Mechanische Energie kann zum Zerbrechen
der Glasgefäße führen. Behandeln Sie die
Glasgefäße daher mit Vorsicht.
27
Nehmen Sie die GefäSSe vorsichtig
aus dem Inkubator heraus, da sie
heiSS sein können.
3. Allgemeine Beschreibung
Die Schüttelinkubatoren SI500 and SI600 von
Stuart sind ideal geeignet zum Mischen und
Belüften verschiedener biologischer Proben unter
genauen, temperaturgesteuerten Bedingungen.
Der Schütteltisch hat eine digital gesteuerte
Geschwindigkeitseinstellung, die eine ruckfreie,
gleichförmige Drehbewegung mit einer
Umlaufbahn von 16 mm gewährleistet. Der
Drehzahlbereich liegt zwischen 30 und 300 U/
Min. Außerdem verfügt das Gerät über einen
einstellbaren Countdown-Timer, der automatisch
nach der eingestellten Zeit (1-Sekunden-Schritte
bis 1 Stunde, 1-Minuten-Schritte bis 24 Stunden
oder 1-Stunden-Schritte bis 9 Tage) stoppt. Der
Schubladenmechanismus des Schütteltisches
ermöglicht einen einfachen Zugang zu den
Inkubationsbehältern. Die Temperatur wird über
ein einfaches Tastendrucksystem in Intervallen
von 0,1 ºC bei Raumtemperaturen von +5 ºC bis
60 ºC gesteuert.
Der SI500 und der SI600 sind beide mit einem
vollständig einstellbarem Tablarsystem
ausgestattet, das zur Unterbringung der
verschiedensten Glaskolben und Flaschen
geeignet ist. Das optionale Zubehör umfasst
Gestelle zur Aufnahme von Röhrchen der Größe
1,5 ml, 15 ml und 50 ml.
4. Vorbereitungen zur Inbetriebnahme
4.1 Elektrische Installation
DIESES INSTRUMENT MUSS GEERDET
WERDEN.
Lesen Sie bitte die nachstehenden Anweisungen
und stellen Sie sicher, dass die Stromversorgung
den auf dem Geräteschild angegebenen Werten
entspricht, bevor Sie das Instrument anschließen.
Das Instrument ist für den Anschluss an eine
Stromversorgung mit 230 V, 50 Hz ausgelegt. Die
Leistungsaufnahme beträgt 300 W für den SI500
und 500 W für den SI600. Vergewissern Sie sich,
28
dass die richtige Netzspannung für das Gerät
verwendet wird. Auf der Rückseite des
Instruments befindet sich eine IEC-Buchse für den
Anschluss des Netzkabels. Wollen Sie das
Instrument von der Stromversorgung trennen,
ziehen Sie das Kabel aus der IEC-Buchse.
Achtung: Sowohl die spannungsführenden
als auch die Neutralleiter sind mit
Sicherungen versehen.
Sicherungen:
Sicherung mit Überspannungsschutz 230 V - 3,15 A.
Ersetzen Sie bei allen anderen Spannungen die
Sicherung durch einen entsprechenden
Sicherungstyp mit den entsprechenden Nenndaten.
Alternativ sind Sicherungstyp und Nenndaten auf
dem Geräteschild angegeben.
Dieses Gerät ist mit zwei Netzkabeln mit IECSteckern
für den Anschluss an das Instrument ausgestattet.
Zum Anschluss an die Stromversorgung ist ein Kabel
mit einem
3-poligen GB-Stecker, das andere mit einem
2-poligen Schukostecker versehen. Wählen Sie das
für Ihre Elektroinstallation geeignete Kabel und
entfernen Sie das andere. Sollten beide Kabel
ungeeignet sein, entfernen Sie den GBStecker und
ersetzen Sie ihn durch eine geeignete Alternative.
Dazu müssen Sie den Formstecker abschneiden, das
Kabel vorbereiten und den verdrahtbaren Stecker
gemäß den Anweisungen anschließen.
DIESER VORGANG DARF NUR VON EINEM
QUALIFIZIERTEN ELEKTRIKER
DURCHGEFÜHRT WERDEN.
HINWEIS: Prüfen Sie anhand des Geräteschildes,
dass Stecker und Sicherungen für die angegebene
Spannungs- und Stromstärke geeignet sind. Die
Leiter des Netzkabels sind wie folgt farbcodiert:
SPANNUNGSFÜHREND - BRAUN
NEUTRAL - BLAU
MASSE
- GRÜN-GELB
Der entsprechenden Netzstromleiter sollte mit
dem Instrument verbunden werden, BEVOR der
Anschluss an die Stromversorgung erfolgt. Sollte
ein Austausch des Netzkabels erforderlich sein,
muss ein Kabel mit einem Querschnitt von 1mm2
mit dem harmonisierten Code H05VV-F und
einem IEC320-Stecker verwendet werden.
Hinweis: Das GB- Netzkabel ist durch eine im
Oberteil des Steckers angebrachte
10-A-Sicherung geschützt.
BEI ZWEIFELN WENDEN SIE SICH AN
EINEN QUALIFIZIERTEN ELEKTRIKER.
4.2 Aufstellung
Stellen Sie das Gerät auf eine feste, ebene,
rutschfeste Fläche und stellen Sie sicher, dass es
auf allen Seiten des Gerätes genügend Freiraum
gibt, damit es während des Betriebs nicht mit
SI500 anderen Dingen in Berührung kommt. Lassen Sie
auf der Rückseite mindestens 100 mm Platz,
damit das Netzkabel leicht zugänglich ist, und
200 mm rechts und links des Gerätes.
4.3 Fixierung der Standfüße (nur beim SI600)
Um zu verhindern, dass das Gerät während des
Betriebs vibriert oder sich bewegt, muss der
SI600 auf der Arbeitsfläche mit den Fixierungen
für die Standfüße gesichert werden. Zur
Sicherung der hinteren Standfüße werden zwei
Fixierungen mitgeliefert.
Hinweis: Vergewissern Sie sich, dass der
Teleskoptisch hörbar eingerastet ist, bevor
Sie das Gerät in Betrieb nehmen. Andernfalls
on/off
time
rpmtemperature
kann das Gerät beschädigt
°C werden. on/off
5. Bedienung
start/stop
press to set
mode
5.1 Einstellung der Drehzahl
Schalten Sie das Gerät EIN, indem Sie den Regler
auf dem Tastenfeld unten am Gerät drücken.
Drücken Sie die Taste “mode” (Modus), bis ein
roter Punkt am Display unter “rpm” (U/Min)
angezeigt wird. Am Display erscheint danach die
zuletzt eingestellte Drehzahl. Stellen Sie die
Drehzahl durch Drehen des Regelknopfs ein. Die
Mindestdrehzahl beträgt 30 U/Min, der maximale
Werte 300 U/Min.
LED für Zeit/Drehzahl
1
rpm
2
start/stop

Vergewissern Sie sich, dass das Gerät richtig
aufgestellt ist. Schieben Sie die Fixierungen
jeweils von der Seite des Geräts um einen der
hinteren Standfüße (1). Befestigen Sie die
Fixierung mit 2 Schrauben (8 x 20 mm) (2).
Verbinden Sie das Gerät mit der Stromversorgung
- SCHALTEN SIE ES NICHT EIN.
4.4 Beladung
Öffnen Sie die Tür. Ziehen Sie die schwarzen
Verriegelungsknöpfe auf beiden Seiten des
Teleskoptisches nach außen und ziehen Sie den
Teleskoptisch dann aus dem Inkubator zu sich
heraus.
Beladen Sie den Teleskoptisch mit Gefäßen und
richten Sie die kunststoffüberzogenen
Sicherungsstangen wie erforderlich ein. Stellen
Sie sicher, dass die Beladung gleichmäßig verteilt
und die angegebene maximale Beladung nicht
überschritten ist.
Schieben Sie den Tisch vorsichtig wieder in den
Inkubator, bis er einrastet. Schließen Sie die Tür.
Rote digitale Anzeige
time
on/off
mode
Taste "Mode" (Modus)
Taste "Start/Stop" (Start/Stopp)
Drücken Sie die Taste “start/stop” (Start/Stopp),
sobald die richtige Drehzahl angezeigt wird, um
das Gerät in Bewegung zu setzen. Sie können die
Drehzahl ohne Anhalten des Geräts einstellen. Sie
können das Gerät jederzeit anhalten, indem Sie
die Taste “start/stop” (Start/Stopp) drücken.
Wenn die Tür geöffnet wird, während sich das
Gerät dreht, ertönt ein Warnsignal und die
Bewegung wird gestoppt. Das Wort Taste “door”
(Tür) wird außerdem kurz am Bildschirm
angezeigt. Schließen Sie die Tür, um fortzufahren.
5.2 Einstellen des Timers
Stoppen Sie die Drehung, um den Timer zu
verwenden, und drücken Sie die Taste “mode”
(Modus). Unter “time” (Zeit) auf dem Display
erscheint daraufhin ein roter Punkt. Danach
werden drei horizontale Linien oder die zuletzt
gespeicherte Zeit angezeigt. Wählen Sie die
gewünschte Zeiteinstellung mithilfe des
29
Regelknopfes. Die Zeit wird zunächst in Minuten
und Sekunden, danach in Stunden und Minuten
und schließlich in Tagen und Stunden bis maximal
9 Tage angezeigt.
Wenn die richtige Zeit angezeigt wird, drücken
Sie die Taste “start/stop” (Start/Stopp), um das
Gerät in Betrieb zu setzen. Sie können das Gerät
jederzeit während des Betriebs anhalten, indem
Sie die Taste “start/stop” (Start/Stopp) drücken.
Wenn Sie diese Taste erneut drücken, wird die
Bewegung fortgesetzt und der Timer fährt mit
dem Countdown fort. Sie können den Timer
ohne Anhalten des Geräts einstellen. Sobald der
Timer Null erreicht hat, wird das Gerät
automatisch gestoppt und ein Warnsignal
ausgegeben. Wenn die Tür geöffnet wird,
während der Countdown läuft, ertönt ein
Warnsignal und die Bewegung sowie der
Countdown werden gestoppt. Das Wort “door”
(Tür) wird außerdem kurz am Bildschirm
angezeigt. Schließen Sie die Tür, um fortzufahren.
Der Countdown wird an dem Punkt fortgesetzt,
an dem er gestoppt wurde.
Hinweis: Um den Timer zu deaktivieren und
zur Dauerdrehung zurückzukehren, wählen
Sie “- - -” an der Anzeige im aktivierten
Timer-Modus.
5.3 Einstellen der Temperatur
Schalten Sie den Temperaturregler EIN, indem Sie
den Regler im oberen Bedienfeld drücken. Halten
Sie die Taste “press to set” (zum Einstellen
drücken) gedrückt und drehen Sie dabei den
Knopf, bis die richtige Temperatur angezeigt
Zum Einstellen drücken
temperature °C
Regler
on/off
press to set
Rote digitale Anzeige
wird. Lassen Sie die Taste “press to set” (zum
Einstellen drücken) los. Der Inkubator beginnt mit
der Erwärmung auf die eingestellte Temperatur.
Die tatsächliche Temperatur im Gerät wird am
Bildschirm angezeigt. Die Mindestsolltemperatur
30
ist die Umgebungstemperatur +5 ºC, die
maximale Solltemperatur beträgt 60 °C.
5.4 USB-Anschluss
Der Schüttelinkubator kann über eine
USB-Schnittstelle zwecks Langzeitüberwachung
der Temperatur, zum Beispiel über Nacht, an
einen PC angeschlossen werden. Nehmen Sie die
wasserdichte Verschlusskappe von der
USBSchnittstelle am Schüttelinkubator ab und
schließen Sie ein Ende des mitgelieferten Kabels
an das Gerät und das andere Ende an eine freie
USB-Schnittstelle Ihres PC an. Sie finden die
aktuellste Version der Software als Download
unter www.stuart-equipment.com. Führen Sie
nach dem Herunterladen das Programm aus und
befolgen Sie die Befehle am Bildschirm.
6. Service, Wartung
und Reparatur
ACHTUNG: Stellen Sie sicher, dass das Gerät
von der Stromversorgung getrennt ist,
indem Sie das Netzkabel aus der Buchse
ziehen, bevor Sie Service- oder
Wartungsarbeiten durchführen.
Dieses Gerät erfordert keine regelmäßigen
Servicearbeiten. Die einzige erforderliche Wartung
ist die Reinigung des Gerätes innen und außen
mit einem feuchten Tuch und einem milden
Reinigungsmittel. Verschüttetes Material oder
Spritzer sollten sofort entfernt werden, nachdem
Sie zuerst das Gerät von der Stromversorgung
getrennt haben. Lassen Sie das Gerät wieder
völlig trocken werden, bevor Sie es wieder in
Betrieb nehmen.
6.1 Reparatur und Support
Reparaturen und ein Austausch von Teilen
MÜSSEN von entsprechend qualifizierten Personal
durchgeführt werden.
Es dürfen nur Ersatzteile verwendet werden,
die von Stuart oder seinem Vertreter
geliefert oder angegeben werden. Die
Verwendung nicht genehmigter Teile kann
die Leistung der in das Gerät integrierten
Sicherheitseinrichtungen beeinträchtigen.
Um eine umfassende Ersatzteilliste anzufordern,
die Servicetechniker für interne Reparaturen
benötigen, oder um ein Servicehandbuch zu
bestellen, wenden Sie sich bitte an die Serviceabteilung unter [email protected], Tel.:
+44 (0)1785 810475, Fax: +44 (0)1785 810471.
Geben Sie bitte die Modell- und die Seriennummer an.
Andere technische Fragen richten Sie bitte an die
Kundendienstabteilung unter
[email protected]
Tel.: +44 (0)1785 810433.
7. Zubehör
CodeBeschreibung
SI500/1 Röhrchenhalter für 64 x 1,5 ml
Röhrchen
SI500/2 Röhrchenhalter für 25 x 15 ml
Röhrchen
SI500/3 Röhrchenhalter für 12 x 50 ml
Röhrchen
Material- und Herstellungsfehlern ist. Bei Einsatz
unter normalen Laborbedingungen wird eine
Garantie von drei (3) Jahren gewährt. Bei einem
berechtigten Garantieanspruch ersetzt Stuart defekte Bauteile oder das gesamte Gerät kostenlos.
Diese Garantie gilt NICHT, wenn Schäden durch
Feuer, Unfall, Missbrauch, Nachlässigkeit, falsche
Einstellung oder Reparatur, durch Installation,
Adaption, Modifikation, Montage nicht genehmigter Teile oder Reparatur durch nicht autorisierte Personen entstanden sind.
Bibby Scientific Ltd.
Beacon Road
Stone,
Staffordshire
ST15 0SA
United Kingdom
Tel: +44 (0) 1785 812121
Fax: +44 (0) 1785 813748
E-mail: [email protected]
www.stuart-equipment.com
SI500/4 Röhrchenhalter für 16 x 30 ml
Universalbehälter
RSSL1
Ersatzsicherungsstange für SI500
SI600/1 Ersatzsicherungsstange für SI600
8. Garantie
Stuart garantiert, dass dieses Gerät frei von
31
9. Spezifikation
SI500
SI600
Umgebungstemperatur Umgebungstemperatur
+5 ºC bis 60 ºC
+5 ºC bis 60 ºC
Technische Daten
Temperaturbereich
Auflösung der Temperaturanzeige
0,1 ºC
0,1 ºC
Temperaturgenauigkeit
+/-0,5 ºC
+/-0,5 ºC
Temperaturschwankung
+/-0,5 ºC (bei 37 ºC)
+/-0,5ºC (bei 37 ºC)
Temperaturabweichung
<0,5 ºC
<0,5 ºC
30 bis 300 U/Min
30 bis 300 U/Min
Drehzahlbereich
Bahndurchmesser
16 mm
16 mm
Vorwärmungszeit 20-60˚C
<30 min
<30 min
10 kg
10 kg
Maximale Last
Nettogewicht 30 kg
53 kg
Heiznennleistung
250 W
400 W
Stromversorgung
230 V, 50 Hz, 300 W
230 V, 50 Hz, 500 W
Höhe
522 mm
640 mm
Tiefe
474 mm
542 mm
Breite
450 mm
675 mm
Höhe
297 mm
395 mm
Tiefe
408 mm
455 mm
Breite
422 mm
625 mm
Maximale Gefäßhöhe
250 mm
320 mm
335 x 335 mm
525 x 390 mm
Gesamtabmessungen:
Innenabmessungen des Inkubators
Tischgröße
Brutkastenkapazität
2800ml Fernbach Flaschen
0
2
2000ml Erlenmeyerkolben
0
6
1000ml Erlenmeyerkolben
4
9
500ml Erlenmeyerkolben
9
15
Magnetische Zubehör
4
6
32
These products meet the relevant EC
harmonised standards for radio frequency
interference and may be expected not to
interfere with, or be affected by, other equipment with
similar qualifications. We cannot be sure that other
equipment used in their vicinity will meet these standards
and we cannot guarantee that interference will not occur
in practice. Where there is a possibility that injury,
damage or loss might occur if equipment malfunctions
due to radio frequency interference, or for general advice
before use, please contact the Technical Service
Department of Bibby Scientific Ltd.
Declaration of Conformity
INSPECTION REPORT
MODELS SI500 and SI600
ELECTRICAL SAFETY
1. Earth continuity
2. Insulation
3. Flash test
✓
❏
✓
❏
✓
❏
FUNCTIONAL
1. Indicators
2. Stirring function
3. Visual acceptance
✓
❏
✓
❏
✓
❏
QUALITY CONTROL INSPECTOR
UK
North & South America
Middle East
Bibby Scientific Ltd.
Beacon Road, Stone
Staffordshire ST15 0SA
United Kingdom
Tel: +44 (0)1785 812121
Fax: +44 (0)1785 810405
e-mail: [email protected]
www.bibby-scientific.com
Bibby Scientific US Inc.
t/a Techne Inc.
3 Terri Lane, Suite 10
Burlington, NJ 08016 USA
Toll Free (in NA): 800-225-9243
Tel: +1 609 589 2560
Fax: +1 609-589-2571
e-mail: [email protected]
www.techneusa.com
Bibby Scientific Middle East Ltd.
PO Box 27842, Engomi 2433
Nicosia
Cyprus
Tel: +357 22 660 423
Fax: +357 22 660 424
e-mail: [email protected]
France
Italy
Asia
Bibby Scientific Limited
Bâtiment Le Deltaparc Parc Silic PN2
7 rue du Canal
BP 55437 VILLEPINTE
95944 ROISSY Charles de Gaulle
France
Tel: +33(0)148 63 78 03
Fax: +33(0)148 63 78 01
e-mail: [email protected]
www.bibby-scientific.com
Bibby Scientific Italia Srl
Via Alcide de Gasperi 56
20077 Riozzo di Cerro al Lambro
Milano Italia
Tel: +39 (0)2 98230679
Fax: +39 (0)2 98230211
e-mail: [email protected]
www.bibby-scientific.it
Bibby Scientific - Singapore
Prudential Tower, Level 26
30 Cecil Street
Singapore 049712
Tel: +65 6631 2976
Fax: +44 (0)1785 810405
e-mail: [email protected]
www.bibby-scientific.com