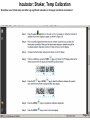
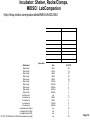
1
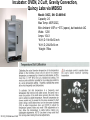
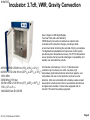
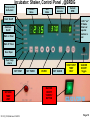
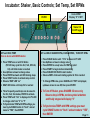
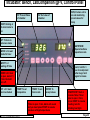
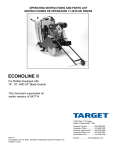
CO2 Tanks & Regulator Isotemp @ FV Refrigerated Shaker@ BRDG Shaker@FV CO2 @BRDG Chicago LabLine @FV LabCompanion @ FV 30 cuft Precision @ Trophomax 40 cuft w CO2 Imperial III @FV Incubators 28cuft Sheldon Percival Plant Diurnal @ BRDG LabLine Detect on Instrument Picture to Jump to that SOP Prepared by: Bob Morrison CPLS - Instrumentation Specialist Oct 2008, Latest rev Oct 2012 Link to SERVICE/REPAIR INFO Hybridization Microwave Countertop Bench Oven, 2cuft Gravity UV Crosslinker Page 1 Incubators: Local Service Center STLCC-CPLS:Morrison 2/19/2013 Page 2 Incubator: OVEN, 2 Cu.ft, Gravity Convection, Quincy Labs via MIDSCI Model: 30GC, SN: G3-008946 Capacity: 2.0 Max Temp: 450F/232C, Min: Ambient +25F or ~37C (specs), but tested at 44C Watts: 1200 Amps: 10.43 W,H, D: 18x16x12 inch W,H, D; 20x25x14 cm Weight: 78lbs STLCC_CPLS;Morrison 2/19/2013 Page 3 Incubator: Refrigerated, Shel-Lab, Bench/Floor Model: LI5, SN 09009810 Microprocessor Control P.I.D. Temperature Control LED Display of Setpoint and Chamber Temperature High and Low Limit Thermostats Interior Electrical Outlet Fan Assisted/Forced-Air Circulation Hermetically Sealed Compressor Capacity 3.2 cu.ft. Interior Dimensions WxDxH in. (cm) 16 x 14 x 25 (41 x 36 x 64) Exterior Dimensions WxDxH in. (cm) 24 x 22 x 33 (61 x 56 x 84) Temperature Range 0°C to 45°C (at 21°C ambient) Temperature Uniformity +/- 0.5°C at 20°C Electrical Specifications Volts: 120V Hertz: 50/60Hz Watts: 400W Amps: Capacity of Standard B.O.D. Bottles 62 Shelving 2 Supplied Interior Outlet 110V-1 Hot link to Sheldon Incubator User Manual … pdf STLCC_CPLS;Morrison 2/19/2013 Page 4 Incubator: Low Temp, ShelLab, Basic Operations • Set Main Temperature – Press either the Up or Down arrow ONE TIME – While the display is blinking, continue to press the up or down arrows to reach the desired set point – Temporarily set the Over-temperature dial to the maximum position (clockwise) until the desired set point is reach. – After the set point has stabilized, turn the Over-temperature dial back (counter-clockwise) until the light goes out, then clockwise again just past this mark. STLCC_CPLS;Morrison 2/19/2013 Page 5 Incubator; Refrigerated Control Panel STLCC_CPLS;Morrison 2/19/2013 Page 6 Incubator; Refrigerated, Sheldon, Operations STLCC_CPLS;Morrison 2/19/2013 Page 7 91945337 UTF-8 Incubator: 3.7cft, VWR, Gravity Convection Seven Segment LED Digital Display Two-Year Parts and Labor Warranty VWR® Gravity Convection Incubators are ideal for safe incubation with reduced air changes, providing a stable environment while minimizing the potential of drying out samples. The digital advanced adaptive microprocessor control system provides superior temperature accuracy. The PT100 temperature sensor provides the best overall advantages in repeatability and stability over extended time periods. 48.5W x 40.9D x 53.6H cm (191/8 x 161/8 x 211/8") 64.5W x 57.7D x 84.1H cm (2513/32 x 2223/32 x 331/8") 120V, 60Hz, 320W 88 kg (191 lbs.) 69.9W x 65D x 100.1H cm (271/2 x 255/8 x 3913/32") 105 L (3.7 cu. ft.) – 14004-622 Each $1,928.56 STLCC_CPLS;Morrison 2/19/2013 All incubator units feature a 3.3cm (1.3") stainless steel ventilation cap, two doors (one solid, one glass), high temperature grade foamed silicone rubber door gaskets, overtemperature and over-current protection, and sensor error detection. Units are constructed with a durable, powder-coated steel exterior, stainless steel interior, two stainless steel shelves, and glass wool insulation. Units are also equipped with an internal 110V outlet for auxillary equipment. Page 8 Incubator: Shaker, Floor, LabCompanion, @BRDG Model: IS-971 Incubated Shaker, Cat#AAH23336U : Digital PID Microprocessor Controller Patented CLS (Custom Logical Safety) System, exceeding DIN Class 2 Chamber Volume 250L Temperature Control Range Amb.+ 5.0 ~ 60.0 C (R Type + 4.0 ~ 60.0C) Auto Tuning and Bias Function (Internal Sensor Calibration) 99h 59m Timer with Time Delay ON-OFF Door & Over Temperature Alarms Shaking amplitude 30, 40, 50, 60 and 70mm (30mm standard) RS 232 with FREE LabTracer Software 10 to 300 rpm Shaking Speed with Opto-Electronic Feedback 999h 59m Shaking Timer Programmable motion - Clockwise, Anti-Clockwise and Pause Dimenstions: 44.6x31.9x41.1 inches, Weight 379 lbs Optional : Flask Clamp, Universal Platform, Spring Wire Rack, Separate Funnel Clamp, Test Tube Rack, Rubber Mat Link to Jeiotech IS_971 User Manual … pdf Link to Jeiotech IS_971 Engineering data … pdf Link to Jeiotech IS_971 Calibration Supplement … pdf STLCC_CPLS;Morrison 2/19/2013 Page 9 Incubator: Shaker, Control Panel , @BRDG Temp control Active/not Present Value SET Value RPM Motion indicator Current RPM Heat On/off LED “ on” if Shake timers or special motion is set Autotune On/off Wait on Timer Wait off Timer Door Open Over Temp Alarm SET TEMP SET MAX TEMP LIMIT STLCC_CPLS;Morrison 2/19/2013 SET TIMER ENTER SET SHAKE START/STOP TEMP ONLY SHAKER ON/OFF Toggle MASTER ON/OFF “GREEN” BUTTON Page 10 Incubator: Shaker, Basic Controls; Set Temp, Set RPMs ENTER Current RPM Display “0” if OFF Shaker I/O On/Off toggle SET and HOLD TEMP Turn on device with GREEN button 1. Press TEMP once or until SV blinks (PV LED may cycle thru Sv1, Sv2, SV3 Uni, 0.0) until blink mode is reached 2. Use Up/Down arrows to change value 3. Press ENTER and wait until SV blinking stops 4. Press START button to activate temp control 5. Observe TEMP LED “on” 6. HEAT LED blinks until temp SV is reached Three frequently used temps can be saved in the Sv1, Sv2, Sv3 modes, ENTER to activate. Press TEMP until “Uni” is displayed in PV LED to change units from “C” to “F” To Synchronize TEMP with RPM settings you must cycle SHAKE button to “Snch” and set mode to “YES”, then ENTER SET and HOLD SHAKER RPMs, CHANGE RPMs, TURN OFF RPMs 1. 2. 3. 4. 5. 6. Press SHAKE button until “rPm” is shown in PV LED Use Up/Down arrows to change value Press ENTER to accept value for RMP set point Press START to begin motion immediately Press SHAKER I/O ONCE to start motion Observe RMPs climb and rotating symbol to SV is reached 7. To Change RPM value, press SHAKE until “rPM” is displayed, up/down arrows to new SV, then press ENTER To Turn off Shaker, press SHAKER I/O once only Observe drop in RPMs, motion symbol at bottom and finally stopped will display “0” To Synchronize TEMP with RPM settings you must cycle SHAKE button to “Snch” and set mode to “YES”, then ENTER Page 11 Incubator: Shaker, Detailed SHAKE Operations ENTER SHAKE LED will be lit if timers are set SET TIMER for SHAKE Operations Use RPM set mode (previous slide) to set RPMs for Timed Operations NOTE: Total time for run = HOUR setting + MINUTES+SECONDS settings Shaker I/O On/Off toggle 1. For HOUR SETTING: • Press SHAKE button until “runH” is displayed • Use Up/Down arrows to change value, Shake LED blinks • Press ENTER to accept value, press SHAKE I/O to start timer 2. For MINUTES and SECONDS SETTING: • Press SHAKE button until “runS” is displayed • Use Up/Down arrows to change value • Press ENTER to accept value, press SHAKE I/O to start timer 3. For FORWARD Clockwise Time Shaking • Press SHAKE button until “For.S” is displayed • Use Up/Down arrows to change value • Press ENTER to accept value, press SHAKE I/O to start timer 4. For BACKWARD Counter-clockwise Shaking • Press SHAKE button until “bAC.S” is displayed • Use Up/Down arrows to change value • Press ENTER to accept value, press SHAKE I/O to start timer 5. For PAUSE in shaking time • Press SHAKE button until “Pau.S” is displayed • Use Up/Down arrows to change value • Press ENTER to accept value, press SHAKE I/O to start timer 6. To Synchronize TEMP with RPM settings you must cycle SHAKE button to “Snch” and set mode to “YES”, then ENTER Page 12 Incubator: Floor Shaker, Start Issues If the Shaker does not start when all setting have been made, Check the Door/Lid Open/Close switch on the right corner. Cycle this several times to made sure it is responsive STLCC_CPLS;Morrison 2/19/2013 Page 13 Incubator: Shaker, Temp Calibration Should be run at initial setup and after any significant relocation or changes in ambient environment. STLCC_CPLS;Morrison 2/19/2013 Page 14 Incubator: Shaker, Auto-tune Function Should be run at initial setup and after any significant change in operating system environment or extreme run conditions. During auto-tuning the controller heats to 75% of the set point temperature, where it oscillates above and below the set point as many as three (3) times before loading the new tuning parameters. After the tuning parameters are loaded it heats to the set point temperature. Auto-tuning is dependent on the operating conditions and can take up to 45 minutes. It is best done before any experiment is run. STLCC_CPLS;Morrison 2/19/2013 Page 15 Incubator: Shaker, Racks/Clamps, MIDSCI LabCompanion http://shop.midsci.com/productdetail/M50/AAH23336U Capacities: Attachment flask clamp flask clamp flask clamp flask clamp flask clamp flask clamp flask clamp flask clamp flask clamp flask clamp test-tube rack funnel clamp funnel clamp funnel clamp funnel clamp microplate rack (tower) microplate rack (4-flat) microplate rack (3-flat) STLCC_CPLS;Morrison 2/19/2013microplate rack (single) Size 50ml 100ml 250ml 300ml 500ml 1000ml 2000ml 2800ml 4000ml 6000ml n/a 250ml 500ml 1000ml 2000ml n/a n/a n/a n/a IS-971/R 99 74 39 39 25 14 9 6 4 4 6 11 9 5 4 16 3 5 25 Page 16 Incubator: Shaker, Platform Options http://www.gmi-inc.com/Genlab/Jeiotech%20971%20Series%20Incubator.htm STLCC_CPLS;Morrison 2/19/2013 Page 17 Incubators: Floor/Shaker, Parts List STLCC_CPLS;Morrison 2/19/2013 Page 18 Incubator: Shaker; Floor,Belt, Jeiotech Lab Companion Company: JEIO TECH INC Reference Number: CW-4468 7/12/12 RGM ordered v. MC Subtotal: $50.74 Tax: $0.00 Shipping: $0.00 Total: $50.74 STLCC_CPLS;Morrison 2/19/2013 Page 19 Incubator : Shaker, Floor, NewBrunswick, @FV New Brunswick Scientific C25 Incubated Floor Model Shaker Part Number: M1246-0000 44” W x 25” D x 34” H STLCC_CPLS;Morrison 2/19/2013 The C-25 Classic Incubator and C-25KC Classic Refrigerated Incubator Shakers are large capacity shakers utilizing an eccentric counter balanced drive to provide horizontal plane rotary motion in a 1" (2.54 cm) circular orbit. A Proportional/Integral (PI) Microprocessor controller with instantaneous digital feedback controls the speed over a range of 50-400 rpm. The C-25 provides temperature control over a range of 7°C above ambient to 60°C, and the C-25KC provides temperature control over a range of 15°C below ambient (minimum 4°C ) to 60°C. Ambient temperature is defined as the temperature within one meter of the shaker. The shakers may be operated either continuously or in a timed mode via a programmable timer for shaking periods of 0.1 hr. to 99.9 hrs. For safe operation, both the C-25 and C-25KC are designed with a safety switch that automatically stops the shaker mechanism when the lid is lifted. In addition, the C-25 and C25KC are equipped with visual and audible alarms that alert the user to the following conditions: • The end of a timed run • Deviations of shaking speed • Deviations of temperature setpoint • Power failure • Lid open A wide variety of platforms can be used with the C-25 or C25KC. Product Family: C-25, C25, C 25, C-25KC, C25KC, C 25KC Page 20 Incubator: Shaker, Floor, @FV, C-25 Specifications STLCC_CPLS;Morrison 2/19/2013 Page 21 Incubator: Floor, Upright,Reach-in, Sheldon Manf RI28 28 cu ft Reach-In Incubator (120V), Sheldon Manf. Reach In The Model RI28 incubator provides extra-large capacities while minimizing the amount of floor space used. This large space is kept uniform by intergrating a highly responsive mircoprocessor with the appropriatly sized heating element. A totally independent secondary temperature controller offers the added security of over-temperature protection. Our unique forced air circulation system creates a one-pass circulation pattern that provides both exceptional temperature uniformity and rapid heat recovery. The chamber floors are ruggedly reinforced to support roller apparatus or shakers. The RI28 is supplied with: six (6) study shelves that will not sag or bend under heavy loads. Microprocessor Control 5C to 70C Power: 120V, 8.5A 28 cuft internal Viewing Window Accomodates Roller Bottle Apparatus Power Coated White Interior Supplied with 6 Shelves 12 Month Warranty Hotlink to Shel-Lab RI28 Incubator User Manual … pdf STLCC_CPLS;Morrison 2/19/2013 Page 22 Incubator: Shel-Lab, 28 cuft, Main Controls STLCC_CPLS;Morrison 2/19/2013 Page 23 Incubator: Shel lab 40cuft, Reach-in, CO2 Regulated • • • • • 42”w x 34”deep x 88” high Sheldon Model 1927 SN 1200300 Heat control Tested at Oakland Warehouse 6/8/11 Moved to BRDG by July 2011 CO2 Loss rate 1% per hour tested 9/13/11 or about 24 cu ft per day without door openings and at Zero input pressure (gas off). Hotlink to Shel-Lab Model 1927 Incubator User Manual … pdf STLCC_CPLS;Morrison 2/19/2013 Page 24 Incubator: Temp and CO2, Control Panel Shel-lab, 40cuft Set for max allowed over set temp value Power ON/OFF 37.0 Use up/down to set Temp, degrees C 5.0 Use up/down to set Desired CO2 level % Set Regulator on Supply tank to about 12 PSI Max STLCC_CPLS;Morrison 2/19/2013 Page 25 Incubators: CO2 Tank order, Airgas, continuing STLCC_CPLS;Morrison 2/19/2013 Page 26 Incubator: Bench, 2 cft, VWR Model: VWR E1510, 2cuft, from Sheldon Manf. 2. Place thermometer and samples on shelves Weight 71.00 lbs Incubator Interior Dimensions WxDxH in. (cm) 17 x 12 x 17 in. Interior Dimensions WxDxH in. (cm) 21.5 x 18 x 25.5 in. Temperature Range 5°C above ambient to 70°C www.shellab.com 5. Monitor Actual vs. Desired Temperature, Adjust setting as needed 1. On/Off 4. Note Heat ON Light STLCC_CPLS;Morrison 2/19/2013 3. Set Temp Control Per Chart for Approx Temperature C Page 27 Incubator: Benchtop or Stacked, @FV, LabCompanion, Lab Companion™ Air-Jacketed Incubators (Jeio Tech Inc, China) IB-25G Incubator CLS - Control System and PID microprocessor controller with enhanced safety features. Temperature safety exceeds DIN Class II controller. Auto-Tuning function & Bias function - internal built in re-calibration Timer : Time Delay ON / OFF (standard 99hr 59min) Selectable measuring temperature units C and F Selectable Auto-run or Manual -run Audible visual and audio alarm - OT and Door Open Temperature range : Ambient. 5 to + 70.0 C Very good uniformity and stability Incolony sheath heater Magnetic type door sealing : Easy and convenient door open and close. Inner door glass : No interference during outer door open. Tempered safety glass and Sealing chamber perfectly. Dial type handle for inner door : Solid and Easy open and close. Shelf bracket can be removed for easy cleaning with disinfectant Upgraded 3 set point memories in advance : Save time without AUTO-TUNING Internal tempered safety glass (5 mm) Optional : Perforated shelf Master On/Off Toggle Switch Present Temperature Set Temperature STLCC_CPLS;Morrison 2/19/2013 Page 28 Incubator: Bench, LabCompanion @FV, Control Panel PV: Present Value of chamber SV: Set value of chamber RUN; lit when unit is on and monitoring preset values for temp HEAT: blinking or lit when heater is on A/T: flickers in auto-tune mode AUTOTUNE: Special test/tune operation mode W/ON: Lit in wait mode for timer W/OFF: Lit waiting off time Lock; hold for 3 sec to lock/protect other keys; hold again to release DOOR: Lit if door is open, alarm if > 1 min. Heat will turn off. O/T: Lit if alarm and overheated TEMP: To set temperature TIMER: To set timer mode ENTER: To accept values If Door is open >1min, Alarm will sound and you must press START to resume previous settings/temperatures STLCC_CPLS;Morrison 2/19/2013 START/STOP: Start or resume. Note, if inner door is open > 1min, press START to resume heating, look for blinking heat light. Page 29 Incubator: 30cuft, Precision Sci, Model 30M Property of: St. Louis Community College CPLS (Donated by Gallus) The temperature range is ambient +5C to 65C. Precision Mechanical Convection Incubator Model # 30M Glass; S/N # 699050714 Biological Indicator testing (55C – 60C) ~10 -12 years Unit has been maintained, validated and calibrated on scheduled basis. Production speeds N/A - 120V; 1450 W; 12.1 Amps Jean Stuckey QC Microbiology Manager Gallus BioPharmaceuticals, LLC (314) 733-3107 (office) (618) 407-3880 (cell) 4766 LaGuardia Drive St. Louis, MO 63134-3117 STLCC_CPLS;Morrison 2/19/2013 Page 30 Incubator: Precision, 30cuft, Controls, (Donated-Gallus) Set Over-temp range adjustment knob/screw Set Temperature, adjustment knob/screw Over-temp range light indicator, “on” at limit Heat on indicator, lighted when heat elements are on/active Interior light “on” will illuminate with door open Heating Master Switch Set “on” for normal use Power connected indicator light Heat Wattage Knob: 350, 700, 1400 Use Higher settings to reach set-point faster, then set to lower wattage to maintain Temporary tool to adjust heat/range screws GENERAL OPERATIONS: 1. Turn temperature set screw/knob clockwise to increase temperature setting 2. Set wattage to highest value (1400) t o reach set point faster 3. Set limit or range for allowance above set point temperature 4. Monitor temperature gage and adjust temperature screw/knob until desired temperature is reached 5. Set wattage to a lower value to maintain temperature, monitor for other changes. STLCC_CPLS;Morrison 2/19/2013 Page 31 Incubator : LabLine Imperial III @FV LabLine Imperial III 120V 41” W x 28” D x 35” H On Off Oven Temperature Control (dial) Thermostat Control (dial) STLCC_CPLS;Morrison 2/19/2013 Page 32 Incubator : Chicago Surgical/LabLine @FV, Model Cat 600 Cat 600, SN 0-69, 120V, 500Watts 41” W x 26” D x 40” H On/Off Analog Dial Temp Control 0-9 STLCC_CPLS;Morrison 2/19/2013 Page 33 Incubator : Fisher Scientific Isotemp @FV Fisher Scientific Isotemp Incubator STLCC 001804 25” w x 25” D x 45” H Woods -20 C Freezer (ref) Fisher Scientific Isotemp Incubator STLCC 001805 25” w x 25” D x 45” Set at 36.8C STLCC_CPLS;Morrison 2/19/2013 Page 34 Incubator : Microwave Oven, Countertop, Turntable, @FV GE .7 cu ft Typical PN: DE68-40289B STLCC_CPLS;Morrison 2/19/2013 Page 35 Incubator: Microwave, Benchtop, VWR/Argos Compact Microwave Oven, Argos Technologies The compact design of this 19.8L capacity oven makes it ideal for the crowded lab, as it occupies only minimal counter top area. The control panel is easy to read and use. The Minute Plus* feature sets the oven at high power with a single touch. An internal turntable rotates during operation for even heat distribution. (Argos 111 071) Note: Unit is not explosion-proof and is not intended for use in acid digestion applications. Meets or exceeds all safety performance and sanitation standards set for Commercial Food Service Microwave Ovens by HHS, FCC, and NSF. UL listed. Capacity: 19.8 L (0.7 cu. ft.) Electrical: 120V, 60Hz, 700W Interior Dimensions: 32.1W x 33.7D x 20H cm (125/8 x 131/4 x 77/8") Shipping Weight: 15 kg (33 lbs.) STLCC_CPLS;Morrison 2/19/2013 Page 36 Incubator : Plant, Percival Upright Percival Adv Intellus Environment Control Model: CU36L4.A SN: 9012.01.061 110V, 10amp Refr: 134A, 15oz Temp Range: (All lights on) 10-44±0.7 ºC Interior Space Volume: 29.6 ft3 (0.84 m3) Total Shelving Floor Area: 22 ft2 (2.4 m2) Maximum Growing Height: 7 7/8 in. (20 cm) Exterior Dimensions: inches(cm) Height: 77(195.6) Width: 33.5(85.1) Depth: 33.9(86.1) Light Intensity:(6" from lamps unless otherwise noted) 140 µmol/m2/s Link to User Manual … pdf Link to Installation/Maintenance Manual ..pdf Place a pan under the center of the unit to capture any condensation; dump periodically If individual lights in a bay are not “on”, check to ensure that the lamp metal end probes extend into the plastic end-caps at both ends and make sure the end-caps are securely in place. If this is the case and the lamp does not light it is probably burned out/bad. Swap a suspected burned out lamp with another rack spot that is working to validate this. If an entire bay of lamps are out, one or more lamps may be improperly secured in the plastic end-caps. Remove each and make sure the lamp metal ends extend into the end-cap and re-secure end caps. STLCC_CPLS;Morrison 2/19/2013 Page 37 Incubator: CO2, Steri-Cycle, Thermo Electron On/Off Toggle Switch (side) Control Panel (see other slides) STLCC_CPLS;Morrison 2/19/2013 CO2 Connection in Rear Sterilizer Cycle On/Operating Button The Model 370 direct heat Steri-Cycle CO2 incubator combines the best of both worlds - a unique in-chamber HEPA air filtration system providing continuous protection against unwanted airborne contaminants and an on-demand, high temperature sterilization cycle, to simplify your routine cleaning practices. Providing precise CO2 control with choice of TC (thermal conductivity), excellent temperature uniformity and recovery characteristics Specifications: Temperature Range : +5C above ambient to +50C Temperature Uniformity : +/-0.3C @ 37C Humidity System : 3.2 quart (3.0 liter) pan Humidity Range : Ambient to 95% @ 37C Interior Volume : 6.5 cu.ft. (184.1 liters) Interior W x H x F-B : 21.3" x 26.8" x 20.0" (54.1cm x 68.1cm x 50.8 cm) Exterior W x H x F-B : 26.3" x 39.5" x 25.0" (66.3cm x 100.3cm x 63.5cm) Ship Weight : 315 lbs. (142.9 kg.) Page 38 Incubator: CO2, Control Panel Mode Button: Cycles are; Run, Set, Calibrate, Configure Up/Down: Used to set values, Enter when done STLCC_CPLS;Morrison 2/19/2013 Left/Right : moves through options in each mode Enter: When an option and value has been set Page 39 Incubator: CO2; Activating Sterilizer Cycle (Recommended at Semester Breaks and/or before new Projects) 1. 2. 3. 4. 5. 6. STLCC_CPLS;Morrison 2/19/2013 Turn on device on left side Use Mode button to select RUN Press and Hold HEAT button > 5 seconds to activate Follow messages; remove HEPA, remove Water Press ENTER when ready to start Sterilization Cycle Cycle runs through four phases, total about 5 hours. Page 40 Incubator: CO2 ThermaForma 370; HEPA and In-line Filter • • Replacing the Filter: – Open the outer and inner glass door – Remove the old filter by twisting and pulling downward. – Locate a replacement filter and write date of replacement on it – Install the replacement (see info at right) filter and make sure it is pushed completely against the mounting cylinder/ring. Setting the HEPA filter reminder – Press the Mode key until the Config indicator lights – Press the right arrow until REPL HEPA XX is displayed – Press the up/down arrow to choose the number of months desired – Press ENTE to save the number – Press the MODE key to return to the RUN mode or right/left to go to the next parameter – To check the setting, go to the CONFIG mode, then right arrow until the NEW HEPA XX displays. This is the number of days remaining until the replacement interval runs out. – A suggested interval of 6 months is the default setting, however the interval may be adjusted due to environmental or other considerations. HEPA Filter Information ThermoForma, Part number 760175, SN TF0529411316 H Air Flow 4 CFM, Resistance <.44 inches w.g., Efficiency> 99.97 (0.3 microns) 1/18/12 Info: Main HEPA Filter; For 3110 Series, 310 Series (w/ HEPA option), Steri-Cycle Series incubators Fisher Sci Cat #15-497-022 Thermo Scientific No.:760175 Each for $66.03 LabSource Catalog # 15497026 Manufactured By: Thermo Forma Replacement in-line filters Manufacturer's Part No: 760210 Description: NAPCO 8000 GAS FILTER PK Incubator accessories Gas Line Filters, Incubator Accessory; For Isotemp Large Capacity and NAPCO 8000 Series CO2 Incubators; Item No 15497026 $130.40 PK STLCC_CPLS;Morrison 2/19/2013 Page 41 Incubators: CO2 Thermo, Warning Messages STLCC_CPLS;Morrison 2/19/2013 Page 42 CO2 Incubator/Sterilizer ; Model 370 Specifications STLCC_CPLS;Morrison 2/19/2013 Page 43 CO2 Incubator Sterilizer ; Model 370 PartNos Link to ThermaForma Brochure.(pdf) STLCC_CPLS;Morrison 2/19/2013 Page 44 Incubators: CO2 Tank Pressure vs. Volume STLCC_CPLS;Morrison 2/19/2013 Page 45 Incubator CO2: Tank and Regulators Spare Tank; Main shut-off valve. Clockwise CW to shut valve (off), CCW to open. Regulator (Valve) Brass Fixture and Coupling Nut Supply Line to CO2 Incubator Regulator shutoff valve to Incubator, turn CCW to full open position for normal operation. Turn CW to shut off supply completely. Regulator Valve, Turn CCW to decrease pressure to incubator. Adjust to about 12 psi for normal operation. SUPPLY TANK PRESSURE: Raw tank pressure, near 900 psi when full, stays near this during use due to evaporation. STLCC_CPLS;Morrison 2/19/2013 When it starts to drop, supply tanks is near empty. OUTPUT TO INSTRUMENT: Tank pressure meter to incubator supply line. Adjust to about 12 psi pressure maximum. Page 46 Incubator CO2: Changing Tanks, transfer regulator Supply Tank Shut off valve Regulator Shut off valve Regulate pressure to instrument or device Regulator Coupling Nut Note: on CO2, do not use washer Check for leaks using soap bubbles 1. 2. 3. 4. 5. 6. 7. 8. 9. ON ACTIVE TANK Turn Regulator shutoff valve on active tank Clockwise CW to full off position. Turn Tank shutoff valve on the current active tank Clockwise CW to full off position Loosen the Regulator coupling nut with large pliers or wrench (counter clockwise ,CCW to loosen) ON SPARE or NEW TANK Add pipe thread teflon tape if available. Transfer the Regulator valve assembly to the spare or secondary full tank and tighten the coupling nut by turning it CW until resistance is felt. Be careful not to strip the brass coupling nut or over-tighten. Open the Regular shutoff valve by turning CCW to the full open position Open the Tank shutoff valve by turning CCW slowly until a pressure of <20psi is achieved. Adjust the Regulator main valve to a setting of about 12 psi maximum on the meter. Verify and/or reset CO2 pressure settings on the incubator and wait until desired set level is achieved. STLCC_CPLS;Morrison 2/19/2013 Page 47 Crosslinker: Stratalinker 1800 UV The Stratalinker® UV crosslinker is designed to crosslink DNA or RNA to nylon, nitrocellulose, or nylon-reinforced nitrocellulose membranes. The process takes only 25–50 seconds, in contrast to the traditional method of baking filters at 80°C for 2 hours. Additionally, crosslinking has been shown to significantly increase hybridization signals when compared to oven-baking. Each UV crosslinker is equipped with an internal photodetector designed to compensate for the natural shift in power output of aging ultraviolet bulbs. The crosslinker may be used for Northern, Southern, dot or slot blot analysis,1–3 colony or plaque screening, nicking of DNA in agarose gels prior to blotting,4 dimer formation to perform partial digests for rapid restriction mapping,5 UV sensitivity testing for host strain verification,6 and UV irradiation of PCR samples. Internal Dimensions (cm) 33.7 W x 18.1 D x 16.8 H External Dimensions (cm) 46.2 W x 22.4 D x 26.7 H Weight 9.7 kg UV Bulbs 8 Watts Each Three independent modes of Power Delivered ~3000 µwatts/cm² operation: Time, Energy, or Autocross. Link to Stratagene Stratalinker Manual ..(pdf) STLCC_CPLS;Morrison 2/19/2013 Page 48 UV Crosslinking: Modes of Operation-Stratalinker 1800 STLCC_CPLS;Morrison 2/19/2013 Page 49 UV Crosslinking: Standard Procedures STLCC_CPLS;Morrison 2/19/2013 Page 50 Incubator: Hybridization Oven, Rotation, Fisher @BRDG Fischer Biotech, Model FBH110, 110V Approx Dim: 14 x 13 x 16 inches Hybridization Notes from Wikipedia: is the process of establishing a non-covalent, sequence-specific interaction between two or more complementary strands of nucleic acids into a single hybrid, which in the case of two strands is referred to as a duplex. Oligonucleotides, DNA, or RNA will bind to their complement under normal conditions, so two perfectly complementary strands will bind to each other readily. In order to reduce the diversity and obtain the most energetically preferred hybrids, a technique called annealing is used in the laboratory practice. However, due to the different molecular geometries of the nucleotides, a single inconsistency between the two strands will make binding between them less energetically favorable. Measuring the effects of base incompatibility by quantifying the rate at which two strands anneal can provide information as to the similarity in base sequence between the two strands being annealed. The hybrids may be dissociated by thermal denaturation also referred to as melting. Here, the solution of hybrids is heated to break the hydrogen bonds between nucleic bases, after which the two strands separate. In the absence of external negative factors, the processes of hybridization and melting may be repeated in succession indefinitely long, which lays the ground for polymerase chain reaction. Most commonly, the pairs of nucleic bases A=T and G=C are formed, of which the latter is more stable. STLCC_CPLS;Morrison 2/19/2013 Page 51