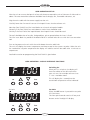
1
TECAL 700XS
operator's manual
Issue 1
10/09
contents
page
Introduction
1
Safety and Installation
2
Securite et consignes d'installation
6
Sicherheits- und Installationsinformationen
9
Informazioni sulla sicurezza e l’installazione
12
Información de seguridad e instalación
15
Contact InforMation
18
Tecal 700XS specification
19
User operation set up
21
Display interface
21
Switch test instructions
23
Run Switch test 24
Retrieve Switch test results
26
rUnning the Tecal 700XS from a PC
26
Connecting the unit to the computer using a USB cable
26
AFTER Use
27
Additional information
27
GENERAL ADVICE
27
Insert Block removal
27
Fault Finding
27
Over-temperature cut-out
27
Cleaning your Tecal 700XS
28
Fuses
28
Insulation testing
28
accessories
28
SLIM INSERT BLOCKS
29
introduction
The Tecal 700XS is designed to provide an exceptionally stable and accurate heat source that can be used
in a calibration laboratory or a field environment. These units enable precise temperature calibration of
a wide range of temperature sensors and thermostats to be carried out. They offer fast heat up times,
with unrivalled accuracy and repeatability.
The Tecal 700XS accepts interchangeable insert probe sleeves allowing many sizes of probes to be
calibrated. The unit uses a PRT sensor and 4 specially manufactured heaters to achieve stable and uniform
temperatures throughout the block. The unit has a large fixed block with multiple bores accepting 5
different probe sizes as well as a separate bore for slim insert blocks to allow virtually any probe sizes to
be calibrated. The fixed aluminium bronze block offers improved thermal conduction across the block and
gives the flexibility of many probe sizes being catered for. Large removable insert blocks can give errors
due to the thermal breaks between the bore of the block and the clearance required to allow the insert
blocks’ insertion and removal. This new design reduces these errors.
The all new control PCB features a large LED display allowing operating parameters including the block
temperature, block stability, heating status, and current set-point to be reviewed. The temperature can
be easily set using the control buttons to any desired temperature within the calibrator’s specified range.
The 4 push buttons can also be easily used to perform switch test functions.
If the unit is used correctly this instrument will provide continued accurate calibration of temperature
sensors and devices in many applications.
The Tecal 700XS calibrator is designed to display the same temperature as the test sensor in the block. If
the unit is set to 700°C and the display reads 700°C and the calibration well is at 700°C.
Before using the Tecal 700XS make sure you have read this manual carefully. If there is any
doubt relating to the proper use of this equipment, the staff at Techne or your supplier will be
happy to assist.
1
SAFETY AND INSTALLATION
Operator Safety
Please read this manual carefully before using the Tecal 700XS Calibrator. If the equipment is not used
in the manner described in this manual the protection provided by the equipment might be impaired.
All Techne instruments are designed to conform to international safety requirements and are fitted with
an over-temperature cut-out. If a safety problem should be encountered then switch off the unit at the
mains socket and remove the plug from the electricity supply.
The following definitions apply to the terms Warning and Caution:Warning identifies conditions and actions that may pose hazards to the user.
Caution identifies conditions and actions that may damage the instrument being used.
Warnings
HIGH TEMPERATURES ARE DANGEROUS as they can cause serious burns to operators and ignite
combustible material. Users should be aware of the following to avoid personal injury:
•
USE CARE AND WEAR PROTECTIVE GLOVES TO PROTECT HANDS
•
DO NOT use combustible substances near hot objects
•
DO NOT operate the instrument in the vicinity of inflammable liquids or gases
•
DO NOT operate the instrument under any structure or in a cabinet – clearance of 20cm
on all sides and 1m above the calibrator is recommended
•
NEVER use any liquids or heat transfer fluids such as silicone oil paste as dangerous fumes
may be given off
•
After heating test samples, remember that parts of the instrument, namely the block and
any associated accessories may be very hot.
Cautions
Users should be aware of the following to avoid damage to the instrument:
•
DO NOT use if the cooling fan in the instrument is not working correctly
•
DO NOT operate if the instrument appears damaged or operates abnormally
•
DO NOT place any liquids or heat transfer fluids such as silicone oil paste etc onto the
instrument
•
Do not use this instrument if it is excessively wet, dirty or dusty
•
DO NOT interchange slim metric inserts with slim Imperial inserts as they will become
jammed. Slim Inserts are available to suit both models
•
Note that the lifetime of some components can be shortened by continuous high
temperature operation
2
Additional Notes.
The Tecal 700XS is a precision calibration instrument designed for optimum durability and trouble free
operation but it must be handled with care.
The unit should always be carried in the upright position to prevent the insert blocks from being dropped
out and damaged.
Test probes and the Tecal 700XS block may have differing thermal expansion rates. The precision bores
are manufactured to a very close tolerance to allow for probe expansion inside the well as the block heats
up. Otherwise, the probe may become stuck in the well.
Some test probes have temperature limits so it is advisable not to exceed this temperature. Ensure that
the air temperature above the Tecal 700XS does not exceed the probe handle’s temperature limit.
The air above the block may be over 200°C and if the probe handle limits are exceeded, the probe may
be permanently damaged.
Unpacking
When unpacking please ensure that the following have been removed from the packaging:
• Tecal 700XS Calibrator
• Calibration certificate
• Mains cable
• TechneWorks software on CD
• Guarantee card
The user is advised to keep the original packaging in case the instrument ever needs to be returned for
service or repair. Techne accepts no responsibility for damage incurred unless the unit is correctly packed
and transported in its original packaging.
3
Installation
The instrument should be carried either holding the front and the rear of the instrument or using the
carry strap provided. Never move or carry the instrument when in use or connected to the mains
electricity supply.
1.
All Techne instruments are supplied with a mains power cable.
2.
Before connecting the instrument to the mains electricity supply, check the voltage against the
rating plate (located on the side of the unit). Please note that the unit must be earthed to
ensure proper electrical safety. Connect the mains cable to a suitable plug according to the
table below.
Connection
220/240V, 50/60Hz Supply
110V/120V Supply, 50/60Hz
Live
Brown
Black
Neutral
Blue
White
Earth
Green/yellow
Green
3.
UK ONLY: The fused plug supplied with the mains cable is fitted with a 10 Amp fuse to protect
the instrument and the user.
4.
Units showing 230V, 50/60Hz on the rating plate also operate between 210 and 260V; units
with 120V, 50/60Hz also operate between 100 and 130V and units marked with 100V will
operate between 90 and 110V. In all cases the heating rate will degrade by approximately 8%
at the extremes of the voltage range.
5.
Plug the mains cable into the socket on the side of the instrument.
6.
Place the unit on a suitable flat bench ensuring that the air inlet vents on the underside are
free from obstruction.
7.
Switch on the instrument:
I mains switch On
O mains switch Off
USB connection
with cover
Mains switch
On/Off
Power inlet
Fuses
4
Replacement cable
Should the mains lead need replacement, a cable of 1mm2 of harmonized code H05VV-F connected to an
IEC320 plug should be used. IF IN DOUBT CONSULT A QUALIFIED ELECTRICIAN.
Working Conditions
The Tecal 700XS calibrator is designed to operate under the following conditions:
•
•
•
•
•
•
•
•
Indoor use
Ambient temperature range +5°C to +40°C
Altitude to 2000m
Relative humidity not exceeding 95%
Mains supply fluctuations not exceeding 10%
Over voltage category II IEC 60364-4-443
Pollution degree 2
Environmental conditions should not be excessively dusty or dirty
Note: The control specifications are quoted at an ambient temperature of 20°C. The specification may
deteriorate outside an ambient temperature of 10°C to 30°C.
The instrument has been tested for radio frequency interference and is certified under EN61326.
Guarantee
The instrument is guaranteed against any defect in material or workmanship for the period specified on
the enclosed guarantee card. This period is effective from the date of purchase; within this period all
defective parts will be replaced free of charge provided that the defect is not the result of an accident,
misuse or negligence. The screen of the calibrator can be damaged by sharp objects such as pens, pencils
and fingernails. Damage of this sort will be considered misuse and will invalidate the guarantee for this
component.
Servicing under this guarantee should be obtained from the supplier of the instrument.
This manual has been prepared for the convenience of Techne customers and nothing in this manual shall
be taken as a warranty, condition or representation concerning the description, merchantability, fitness
for purpose or otherwise of the unit or components.
Notwithstanding the description and specification(s) of the instruments contained in the operator’s
manual, Techne reserves the right to make such changes as it sees fit to the instruments or to any of the
components.
5
Sécurité et consignes d’installation
Sécurité de l’opérateur
Lire attentivement le présent manuel avant d’utiliser le Calibrateur de température. Si ce matériel n’est
pas utilisé de la manière décrite dans le présent manuel, la protection fournie risque d’être
compromise.
Tous les appareils Techne sont conçus pour être conformes aux exigences internationales de sécurité et
sont dotés d’une coupure en cas de surchauffe. Si un problème de sécurité survient, mettre l’appareil
hors tension au niveau de la prise secteur et débrancher la fiche de l’alimentation électrique.
Avertissement
Les TEMPÉRATURES ÉLEVÉES SONT DANGEREUSES car elles peuvent provoquer de graves brûlures chez
l’opérateur et enflammer les matériaux combustibles. Les utilisateurs devront être conscients des dangers
potentiels suivants :
•
AGIR AVEC PRUDENCE ET PORTER DES GANTS DE PROTECTION POUR LES MAINS
•
NE PAS utiliser de substances combustibles à proximité d’objets chauds
•
NE PAS utiliser l’appareil au voisinage de liquides ou de gaz inflammables
•
NE PAS placer un quelconque liquide directement sur l’appareil Rappel : après le chauffage d’échantillons, certaines parties de l’appareil, notamment le couvercle et le
bloc, ainsi que les accessoires associés, peuvent être brûlants.
Déballage
Au moment du déballage, vérifier que l’emballage contenait les articles suivants :
•
Calibrateur de température
•
Câble d’alimentation
•
Certificat de traçabilité
•
Logiciel TechneWorks sur CD
•
Carte de garantie
Il est conseillé à l’utilisateur de conserver l’emballage d’origine s’il devait s’avérer nécessaire de renvoyer
l’appareil pour une intervention d’entretien ou de réparation. Techne n’accepte aucune responsabilité
pour les dégâts survenus si l’appareil n’est pas correctement emballé et transporté dans son emballage
d’origine.
Noter que des objets pointus tels que crayons, stylos et ongles peuvent facilement endommager l’écran
du Calibrateur de température.Ce type de dégâts sera considéré comme une mauvaise utilisation et
annulera la garantie de l’appareil.
6
Installation
Porter l’appareil à deux mains. Ne jamais déplacer ou transporter l’appareil lorsqu’il est en service ou
branché à l’alimentation électrique.
1. Tous les appareils Techne sont livrés avec un câble d’alimentation, qui peut être intégré à l’appareil
ou muni d’une fiche.
2. Avant de raccorder l’appareil à l’alimentation électrique, vérifier la tension par rapport à la plaque
signalétique (située au dos de l’appareil). Vérifier que le sélecteur de tension (situé au-dessus de
l’interrupteur Marche/Arrêt) est réglé sur la tension correspondant au réseau local. Noter que
l’appareil doit être relié à la terre pour assurer une bonne sécurité électrique. Brancher le câble
secteur sur une fiche adéquate d’après le tableau suivant.
Connexion
Alimentation 220/240V, 50/60Hz
Alimentation 110V/120V, 50/60Hz
Phase
Marron
Noir
Neutre
Bleu
Blanc
Terre
Vert/jaune
Vert
3. ROYAUME-UNI SEULEMENT : La prise à fusible fournie avec le câble secteur est munie d’un fusible
10 A destiné à protéger l’appareil et l’utilisateur.
4. Les appareils portant l’indication 230 V, 50/60 Hz sur la plaque signalétique fonctionnent également
entre 210 et 260 V ; les appareils portant l’indication 120 V, 50/60 Hz fonctionnent également entre
100 et 130 V et les appareils portant l’indication 100 V fonctionneront entre 90 et 110 V. Dans tous
les cas, la puissance de chauffage se dégrade d’environ 8% aux extrêmes de la plage de tension.
5. Brancher le câble d’alimentation dans la prise au dos de l’appareil.
6. Disposer l’appareil sur une paillasse ou sous une hotte aspirante si nécessaire, en veillant à ce que
les prises d’air situées au-dessous ne soient pas obstruées. Positionner l’appareil avec tout autour
un écartement minimum de 200 mm par rapport aux murs ou autres éléments, ainsi qu’entre
chaque appareil en cas d’utilisation d’appareils multiples, afin de permettre une circulation d’air
efficace pour chaque appareil.
7. Allumer l’appareil.
I
Interrupteur secteur en position Marche
O
Interrupteur secteur en position Arrêt
Câble de rechange
S’il s’avère nécessaire de remplacer le cordon secteur, utiliser un câble de 1 mm² au code harmonisé
H05VV-F raccordé à une fiche IEC320. EN CAS DE DOUTE, CONSULTER UN ÉLECTRICIEN QUALIFIÉ.
7
Conditions de travail
Le calibrateur de température est conçu pour fonctionner dans les conditions suivantes :
•
•
•
•
•
•
•
Utilisation en intérieur
Plage de température ambiante : +5 à +40°C
Altitude jusqu’à 2000m
Humidité relative ne dépassant pas 95%
Fluctuations de l’alimentation sur secteur ne dépassant pas 10%
Surtensions de catégorie II selon la norme IEC 60364-4-443
Degré de pollution 2
Remarque : Les caractéristiques de régulation sont indiquées pour une température ambiante de 20°C.
Ces caractéristiques peuvent se détériorer au dessus d’une température ambiante de 10 à 30°C.
L’appareil a été testé en matière de perturbations radioélectriques et est certifié selon la norme
EN61326.
Garantie
L’appareil est garanti contre tout défaut de matériaux ou vice de fabrication pendant la période précisée
sur la carte de garantie jointe. Cette période s’applique à compter de la date d’achat ; pendant cette
période, toutes les pièces défectueuses seront remplacées gratuitement à condition que le défaut ne
soit pas le résultat d’un accident, d’une mauvaise utilisation ou d’une négligence. Des objets pointus
tels que crayons, stylos et ongles peuvent endommager l’écran du Calibrateur de température. Les
dégâts de cette sorte seront considérés comme une mauvaise utilisation et annuleront la garantie de
l’appareil.
Dans le cadre de cette garantie, le service après-vente est à effectuer auprès du fournisseur de
l’appareil.
Le présent manuel a été préparé pour le confort des clients de Techne et rien dans son contenu ne doit
être pris comme une garantie, une condition ou une affirmation concernant la description, la qualité
marchande, l’adéquation à un usage particulier ou autre de l’appareil ou de ses composants.
Nonobstant la description et les caractéristiques techniques des appareils figurant dans le manuel de
l’utilisateur, Techne se réserve le droit d’apporter aux appareils ou à n’importe quel composant les
changements jugés utiles.
8
Sicherheits- und Installationsinformationen
Sicherheit des Bedienpersonals
Lesen Sie diese Anleitung vor Verwendung des Temperatur Kalibratoren bitte sorgfältig durch. Wenn
das Gerät nicht entsprechend der Bedienungsanleitung eingesetzt wird, können die Schutzfunktionen
des Gerätes beeinträchtigt werden.
Alle Geräte von Techne entsprechen den internationalen Sicherheitsanforderungen und sind mit einer
Übertemperatur-Schutzvorrichtung ausgestattet. Bei einer Sicherheitsstörung bitte das Gerät an der
Steckdose ausschalten und den Netzstecker ziehen.
Achtung
HOHE TEMPERATUREN STELLEN EINE GEFAHRENQUELLE DAR. Sie können schwere Brandverletzung
verursachen und brennbare Stoffe entzünden. Der Benutzer sollt sich mit den möglichen Gefahren
vertraut machen:
•
UMSICHTIG VORGEHEN UND SCHUTZHANDSCHUHE TRAGEN
•
KEINE brennbaren Stoffe in der Nähe heißer Gegenstände verwenden
•
Das Gerät NICHT in der Nähe entzündlicher Flüssigkeiten oder Gase betreiben
•
Flüssigkeiten NICHT direkt auf das Gerät auftragen
Nach der Erhitzung von Proben daran denken, dass bestimmte Geräteteile wie Deckel, Thermoblock
und Zubehörteile sehr heiß sein können.
Auspacken
Beim Auspacken darauf achten, dass der folgende Lieferumfang vorhanden ist:
•
Kalibrator
•
Netzkabel
•
Garantiekarte
Wir empfehlen die Originalverpackung aufzubewahren, falls das Gerät zwecks Wartung oder Reparatur
zurückgeschickt werden muss. Techne übernimmt keine Verantwortung für Transportschäden, wenn
das Gerät nicht ordnungsgemäß verpackt in der Originalpackung verschickt wird.
Achten Sie bitte darauf, dass die Anzeige des Temperatur Kalibratoren durch spitze bzw. scharfe
Gegenstände wie Stifte, Bleistifte und Fingernägel leicht zerkratzt wird. Diese Art von Beschädigung gilt
als Missbrauch des Geräts und führt zur Ungültigkeit der Garantie für dieses Gerät.
9
Inbetriebnahme
Das Gerät mit beiden Händen tragen. Das Gerät unter keinen Umständen transportieren, wenn es in
Betrieb ist, oder während das Gerät noch am Netz angeschlossen ist.
1. Alle Geräte von Techne werden mit einem Netzkabel geliefert, das entweder eingesteckt wird oder
fest mit dem Gerät verbunden ist.
2. Vor dem Anschluss bitte kontrollieren, ob die Stromversorgung den Angaben auf dem Typenschild
(auf der Geräterückseite) entspricht. Darauf achten, dass der Spannungswähler (über dem Ein/
Aus-Schalter) auf die entsprechende örtliche Spannung eingestellt ist. Um die elektrische Sicherheit
zu gewährleisten, muss dieses Gerät geerdet werden. Schließen Sie das Netzkabel entsprechend der
folgenden Tabelle an einen geeigneten Stecker an.
Anschluss
220/240V, 50/60Hz
110V/120V, 50/60Hz
Phase
Braun
Schwarz
Neutral
Blau
Weiß
Erde
Grün/Gelb
Grün
3. NUR FÜR GROSSBRITANNIEN: der mit dem Netzkabel gelieferte Sicherungsstecker enthält eine 10
Amp. Sicherung zum Schutz des Geräts und des Anwenders.
4. Geräte mit der Bezeichnung 230V, 50/60Hz auf dem Typenschild können mit Spannungen zwischen
210 und 260V betrieben werden; Geräte für 120V, 50/60Hz können mit Spannungen zwischen 100
und 130V betrieben werden. Bei Geräten für 100V gilt der Bereich 90 bis 110V. In allen Fällen
reduziert sich die Erhitzungsrate um etwa 8% in den äußeren Spannungsbereichen.
5. Stecken Sie das Netzkabel in die Buchse auf der Geräterückseite ein.
6. Stellen Sie das Gerät auf einen geeigneten ebenen Tisch oder in einem Abzugsschrank auf und
sorgen Sie dafür, dass die Lufteinlassschlitze auf der Geräteunterseite nicht blockiert sind. Das Gerät
muss einen Mindestabstand von 200mm zu Wänden und anderen Gegenständen bzw. zu anderen
Geräten dieser Art aufweisen, um einen ausreichenden Luftstrom zu gewährleisten.
7. Schalten Sie das Gerät ein:
I
Netzschalter Ein
O
Netzschalter Aus
10
Ersatzkabel
Bei einem eventuellen Austausch des Netzkabels wird ein Kabel vom Typ H05VV-F mit 1mm2
Adernquerschnitt und Europastecker (IEC 320) benötigt. IM ZWEIFELSFALL EINEN ELEKTROFACHMANN HINZUZIEHEN.
Einsatzbedingungen
Der Temperatur-Kalibratoren ist für den Einsatz unter folgenden Bedingungen ausgelegt:
•
•
•
•
•
•
•
Gebrauch in Innenräumen
Umgebungstemperatur zwischen +5ºC to +40ºC
Höhe: bis zu 2000m
Relative Feuchte nicht über 95%
Netzspannungsschwankungen nicht über 10%
Überspannungsklasse 2 IEC 60364-4-443
Verschmutzungsgrad 2
Hinweis: Die Gerätespezifikationen beziehen sich auf eine Umgebungstemperatur von 20ºC und
können sich außerhalb des Bereichs 10ºC bis 30ºC verschlechtern.
Das Gerät wurde auf HF-Störeinflüsse geprüft und entspricht den EMV-Bedingungen nach EN61326.
Garantie
Techne gewährleistet, dass dieses Gerät für den auf der Garantiekarte angegebenen Zeitraum keine
Herstellungs- und Materialmängel aufweist. Dieser Zeitraum tritt ab dem Verkaufsdatum in Kraft.
Innerhalb dieses Zeitraums werden alle defekten Teile kostenlos ausgetauscht, soweit der Defekt nicht
auf einen Unfall, Missbrauch oder Nachlässigkeit zurückzuführen ist. Die Anzeige des Temperatur
Kalibratoren kan durch spitze/scharfe Gegenstände wie Stifte, Bleistifte und Fingernägel beschädigt
werden. Diese Art von Beschädigung gilt als Missbrauch des Geräts und führt zur Ungültigkeit der
Garantie für dieses Gerät.
Wartungsarbeiten, die unter diese Garantie fallen, müssen von der Verkaufsstelle für dieses Gerät
gehandhabt werden.
Diese Anleitung wurde zur Information der Kunden von Techne erstellt und stellt in keinster Weise eine
Gewährleistung, Bedingung oder Darstellung bezüglich der Beschreibung, Marktgängigkeit oder
Zweckdienlichkeit dieser Geräte oder Bauteile dar.
Unabhängig von Beschreibung und Spezifikation(en) des hier beschriebenen Geräts behält sich Techne
das Recht vor, Änderungen an diesem Gerät oder dessen Bauteilen vorzunehmen.
11
Informazioni sulla sicurezza e l‘installazione
Sicurezza dell’operatore
Leggere attentamente il presente manuale prima di usare il calibratore. Se non si usa l’apparecchiatura
nel modo descritto nel presente manuale, la protezione fornita dall’unità potrebbe risultarne
diminuita.
Tutti gli strumenti Techne sono progettati per rispettare i requisiti di sicurezza internazionali e sono
previsti con un dispositivo di sovratemperatura. In caso di problemi di sicurezza, spegnere l’unità dalla
presa di rete centrale e togliere la spina dall’alimentazione elettrica.
Avvertenza
Le ALTE TEMPERATURE SONO PERICOLOSE in quanto possono provocare serie ustioni agli operatori e
dare fuoco al materiale combustibile. Gli utenti devono conoscere i seguenti pericoli potenziali:
•
PRESTARE ATTENZIONE ED INDOSSARE GUANTI PROTETTIVI PER LE MANI
•
NON usare sostanze combustibili vicino ad oggetti caldi
•
NON mettere in funzione lo strumento nei pressi di liquidi o gas infiammabili
•
NON collocare alcun tipo di liquido direttamente nello strumento
Dopo aver riscaldato i campioni, ricordare che le parti dello strumento, cioè il coperchio ed il blocco ed
eventuali accessori associati potrebbero essere molto caldi.
Disimballaggio
Durante il disimballaggio, assicurarsi di aver tolto quanto segue dall’imballo:
•
Calibratore
•
Certificato di tracciabilità
•
Cavo di alimentazione di rete
•
Scheda di garanzia
Si consiglia all’utente di conservare l’imballaggio originale nel caso in cui occorresse restituire lo
strumento per assistenza o riparazioni. Se l’unità non è correttamente imballata e trasportata nel suo
imballo originale, Techne non accetta alcuna responsabilità per eventuali danni che dovessero
verificarsi.
Notare come lo schermo del Calibratore termico si possa danneggiare facilmente con oggetti appuntiti
come penne, matite ed unghie. Questo tipo di danni sarà considerato come uso improprio e renderà
nulla la garanzia per questo componente.
12
Installazione
Occorre trasportare lo strumento usando entrambe le mani. Non spostare né trasportare lo strumento
quando è in funzione o collegato all’alimentazione elettrica di rete.
1. Tutti gli strumenti Techne sono forniti con un cavo di alimentazione; può essere integrale o plugin.
2. Prima di collegare lo strumento all’alimentazione elettrica di rete, controllare la tensione
confrontandola con la targhetta riportante i valori nominali (si trova sul retro dell’unità). Assicurarsi
che il selettore di tensione (posto sopra l’interruttore On/Off) sia impostato sulla tensione corretta
per l’alimentazione locale. Notare che al fine di garantire la corretta sicurezza elettrica, occorre che
l’unità sia messa a terra. Collegare il cavo di rete ad una presa idonea secondo la tabella riportata
alla pagina successiva.
Connessione
220/240V, Alimentazione 50/60Hz
Alimentazione 110V/120V, 50/60Hz
Phase
Sotto tensione
Marrone Nero
Neutro Blu
Bianco
Terra
Verde/giallo
Verde
3. SOLO REGNO UNITO: la spina con fusibile fornita con il cavo di rete è dotata di un fusibile da 10Amp
per proteggere lo strumento e l’utente.
4. Le unità la cui targhetta dei valori nominali indica 230V, 50/60Hz funzionano anche tra 210 e 260V;
quelle con 120V, 50/60Hz funzionano anche tra 100 e 130V e quelle contrassegnate da 100V
funzionano tra 90 e 110V. In tutti i casi, il tasso di riscaldamento diminuirà di circa l’8% agli estremi
dell’intervallo di tensione.
5. Inserire il cavo di rete nella presa che si trova sul retro dello strumento.
6. Collocare l’unità su un banco piano idoneo o in una cappa aspirante se necesario, assicurandosi che
gli sfiati delle prese d’aria nella parte inferiore non siano ostruiti. Posizionare lo strumento con una
distanza minima attorno di 200 mm. dalle pareti o da altri oggetti e tra ciascuna unità, nel caso in
cui si usino unità multiple, in modo da consentire un flusso di’aria efficace per ciascuno
strumento.
7. Accendere lo strumento:
I
Interruttore di rete Acceso
O
Interruttore di rete Spento
13
Cavo di ricambio
Qualora occorra sostituire il cavo di rete, si dovrà utilizzare un cavo di 1mm2 codice armonizzato
H05VV-F collegato ad una spina IEC 320. IN CASO DI DUBBIO, RIVOLGERSI A UN ELETTRICISTA
QUALIFICATO.
Condizioni di esercizio
Il calibratore è stato progettato per funzionare nelle seguenti condizioni:
•
•
•
•
•
•
•
uso interno
campo di temperatura ambiente da +5ºC a +40ºC
altitudine massima 2000m.
umidità relativa non superiore all’95%
oscillazione dell’alimentazione di rete non superiore al 10%
categoria di sovratensione II IEC 60364-4-443
grado di inquinamento 2
Nota: le specifiche di controllo sono indicate ad una temperatura ambiente di 20ºC. Le specifiche
potrebbero peggiorare fuori da una temperatura ambiente compresa tra 10ºC e 30ºC.
Lo strumento è stato collaudato per interferenze da radiofrequenze ed è certificato secondo la norma
EN61326.
Garanzia
Lo strumento è garantito da qualsiasi difetto nei materiali o nella lavorazione per il periodo specificato
nella scheda di garanzia allegata. Questo periodo è valido dalla data di acquisto; entro tale periodo,
tutte le parti difettose saranno sostituite gratuitamente, a condizione che il difetto non sia la
conseguenza di un incidente, un uso improprio o negligenza. Lo schermo del calibratore può essere
danneggiato da oggetti appuntiti come penne, matite ed unghia. Tale tipo di danno sarà considerato
uso improprio e renderà nulla la garanzia per questo componente.
L’assistenza secondo quanto stabilito dalla presente garanzia deve essere fornita dal fornitore dello
strumento.
Il presente manuale è stato preparato ad uso dei clienti di Techne e niente di quanto in esso contenuto
costituisce garanzia, condizione o rappresentanza riguardo la descrizione, la commerciabilità, l’idoneità
allo scopo o altrimenti dell’unità o dei componenti.
Nonostante la descrizione e le specifiche dello strumento contenuti nel manuale dell’operatore, Techne
si riserva il diritto di apportare le modifiche ritenute opportune agli strumenti o a qualsiasi loro
componente.
14
Información de seguridad e instalación
Seguridad del operario
Lea atentamente este manual antes de utilizar el calibrador. Si el equipo no se utiliza de la forma
descrita en este manual, se reducirá la protección ofrecida por el equipo.
Todos los instrumentos Techne están diseñados para cumplir los requisitos internacionales de seguridad,
e incluyen un dispositivo de corte de sobretemperatura. Si se produce un problema de seguridad,
apague la unidad en la toma de alimentación y retire el enchufe del suministro eléctrico.
Advertencia
LAS ALTAS TEMPERATURAS SON PELIGROSAS, ya que pueden ocasionar quemaduras graves a los
operarios y prender el material combustible. Los usuarios deben conocer los posibles riesgos:
•
TENGA CUIDADO Y LLEVE GUANTES DE PROTECCIÓN PARA PROTEGERSE LAS
MANOS
•
NO utilice sustancias combustibles cerca de objetos calientes
•
NO utilice el instrumento cerca de líquidos o gases inflamables
•
NO coloque un líquido directamente en el instrumento. Después de calentar las
muestras, recuerde que hay componentes del instrumento que pueden calentarse
mucho, concretamente la tapa y el cuerpo y todos los accesorios asociados
Desembalaje
Durante el desembalaje, asegúrese de sacar los siguientes componentes del embalaje:
•
Calibrador
•
Cable de alimentación
•
Tarjeta de garantía
Se recomienda guardar el embalaje original en caso de que tenga que enviar el instrumento para un
trabajo de mantenimiento o reparación. Techne no se responsabiliza de los daños producidos si la
unidad no está debidamente embalada y no se envía en su embalaje original.
Tenga en cuenta que los objetos punzantes, p.ej.: bolígrafos, lápices y uñas, pueden dañar fácilmente
la pantalla del calibrador. Este tipo de daño se considerará como un uso incorrecto, e invalidará la
garantía de este componente.
15
Instalación
El instrumento se debe transportar con las dos manos. No mueva ni lleve el instrumento cuando se
utilice o esté conectado al suministro eléctrico principal.
1. Todos los instrumentos Techne se suministran con un cable de alimentación, que puede ser
integrado o ‘enchufable’.
2. Antes de conectar el instrumento al suministro eléctrico, compruebe que el voltaje coincida con el
indicado en la placa de régimen (situada en la parte trasera de la unidad). Asegúrese de que el
interruptor de selección de voltaje (situado encima del interruptor de encendido/apagado) está
ajustado al voltaje correcto del suministro eléctrico. El instrumento debe disponer de una toma de
tierra para garantizar la seguridad eléctrica adecuada. Conecte el cable de alimentación a un
enchufe adecuado según la siguiente tabla.
Conexión
220/240V, 50/60Hz Supply
110V/120V Supply, 50/60Hz
Con corriente
Marrón
Negro
Neutro
Azul
Blanco
Toma de tierra
Verde/amarillo
Verde
3. SÓLO PARA EL REINO UNIDO: El enchufe suministrado con el cable de alimentación incluye un
fusible de 10 amperios para ofrecer protección al instrumento y al usuario.
4. Las unidades cuya placa de régimen indique 230V, 50/60Hz también pueden funcionar entre 210 y
260V; las unidades con 120V, 50/60Hz también funcionan entre 100 y 130V, y las unidades con
100V funcionan entre 90 y 110V. En todos los casos, el porcentaje de calentamiento disminuirá un
8% aproximadamente en los dos extremos del intervalo de voltaje.
5. Conecte el cable de alimentación en el enchufe situado en la parte trasera del instrumento.
6. Sitúe la unidad sobre una mesa plana o en una campana de laboratorio si es necesario, y asegúrese
de que los orificios de ventilación situados en la parte inferior no tienen ninguna obstrucción.
Coloque el instrumento a una distancia mínima de 200 mm alrededor de paredes u otros elementos,
y entre cada unidad (en caso de que se utilicen varias) para que haya una circulación de aire
adecuada para cada instrumento.
7. Encienda el instrumento:
I
O
Interruptor de alimentación encendido
Interruptor de alimentación apagado
16
Cable de repuesto
Si es necesario sustituir el cable de alimentación, se debe utilizar un cable de 1mm2 de código armonizado
H05VV, conectado a un enchufe IEC320. EN CASO DE DUDA, PÓNGASE EN CONTACTO CON UN
ELECTRICISTA.
Condiciones de trabajo
El ciclador térmico está diseñado para utilizarse en las condiciones siguientes:
•
•
•
•
•
•
•
Uso en interior
Intervalo de temperatura ambiente +5°C a +40°C
Altitud: hasta 2.000 m
Humedad relativa no superior al 95%
Fluctuaciones del suministro eléctrico no superiores al 10%
Categoría de sobrevoltaje II IEC 60364-4-443
Nivel de contaminación 2
Nota: Las especificaciones de control corresponden a una temperatura ambiental de 20ºC. Las
especificaciones pueden empeorar si se utiliza el instrumento fuera del intervalo de temperatura
comprendido entre 10°C y 30°C
Se han realizado pruebas para comprobar la interferencia de radiofrecuencia del instrumento, el cual
cumple la normativa EN61326.
Garantía
El instrumento está garantizado contra cualquier defecto en el material o la fabricación durante el
período especificado en la tarjeta de garantía que se adjunta. Este período entra en vigor a partir de la
fecha de compra. Durante este período, se reemplazarán sin cargo alguno todas las piezas defectuosas,
a condición que el defecto sea resultado de un accidente, uso incorrecto o negligencia. Tenga en
cuenta que los objetos punzantes, p.ej.: bolígrafos, lápices y uñas, pueden dañar fácilmente la pantalla
del calibrador. Este tipo de daño se considerará como un uso incorrecto, e invalidará la garantía de este
componente.
El distribuidor del instrumento proporcionará información sobre las reparaciones realizadas bajo esta
garantía.
Este manual se ha preparado con una finalidad informativa para los clientes de Techne, y ninguna parte
del manual se deberá considerar como una garantía, condición o reflejo con respecto a la descripción,
comerciabilidad, idoneidad para un fin determinado o de otro tipo de la unidad o sus componentes.
Con independencia de la descripción y las especificaciones del instrumento que se indican en el manual
del operario, Techne se reserva el derecho de realizar cambios en el instrumento o en cualquiera de sus
componentes cuando lo estime oportuno.
cool the unit down. The calibrator should be returned to your supplier for repair.
17
Contact Information
For technical, sales or servicing information, contact your local Techne dealer or:
North and South America
Techne Inc.
3 Terri Lane, Suite 10
Burlington, N.J. 08016
USA
Tel: 800-225-9243
Fax: 609-589-2571
e-mail: [email protected]
www.techneusa.com
UK and Rest of World
Bibby Scientific Limited
Beacon Road, Stone
Staffordshire ST15 0SA
Tel: +44 (0)1785 812121
Fax: +44 (0)1785 813748
e-mail: [email protected]
www.bibby-scientific.com
France
Bibby Scientific France SAS
ZI du Rocher Vert - BP 79
77793 Nemours Cedex
France
Tel: +33 1 64 45 13 13
Fax: +33 1 64 45 13 00
e-mail: [email protected]
www.bibby-scientific.fr
Italy
FAS international srl
Via Koristka, 10
20154 Milano
Italia
Tel: +39 (0)2 98230679
Fax: +39 (0)2 98230211
e-mail: [email protected]
www.fasint.it
Middle East
Techne Middle East Ltd.
PO Box 27887, Engomi 2433
Nicosia
Cyprus
Tel: +357 22 660427
Fax: +357 22 660356
e-mail: [email protected]
Germany and the Netherlands
IPPN Measurement & Controls
Weteringstraat 13b
NL 7041 GW 's-Heerenberg
The Netherlands
Tel: +31 314 667748
Fax: +31 314 668626
e-mail [email protected]
www.ippn.de
When contacting a Service Center for support, please have the following information
available:
• Model Number
• Serial Number
• Voltage
• Description of the problem
18
Tecal 700XS specification
Temperature
Temperature range (min set point 10°C or 50°F)
Amb.+25°C to 700°C (or 1292°F)
Temperature set point precision
0.01
Display Accuracy at 660°C
±0.25°C
Display Accuracy at 425°C
±0.2°C
Display Accuracy at 100°C
±0.1°C
Set point Display °C or °F
Switch test ramp rate
0.1 to 10.0°C or 0.1 to 18.0°F
Stability (in amb of 25°C) after 10 mins at temperature over 30 minute period
425 - 700°C
±0.10°C
100 - 425°C
±0.04°C
50 - 100°C
±0.02°C
Axial Uniformity (between 0-40mm from base of well)
425 - 700°C
±1.5°C
100 - 425°C
±1.5°C
50 - 100°C
±0.5°C
Radial Uniformity
425 - 700°C
±0.5°C
100 - 425°C
±0.1°C
50 - 100°C
±0.02°C
Loading effect
425 - 700°C
±0.04°C
50 - 425°C
±0.02°C
Hysteresis ±0.07°C
Heating/Cooling Rate
Heating rate between 50°C and 700°C
25 minutes
Cooling rate between 700°C and 100°C 30 minutes
Cooling rate between 700°C and 50°C 30 minutes
19
Tecal 700XS specification (Continued)
Well dimensions (6 bores)
Well depth
152 mm
Well diameters (Metric version)
15,10,8, 6, 4.5, 3 mm
Well diameters (Imperial version)
5/8, 3/8, 5/16,1/4, 3/16, 1/8”
Insert dimensions
Slim insert dimensions (Metric version)
15mm o/d
Slim insert dimensions (Imperial version)
3/8”o/d
System
Fan cooling
Automatic (when cooling)
Switch test
Yes (display and buzzer)
Communication
USB 1.1
Dimensions
Dimensions H x W x D 297x190x426 mm
Weight 10kg / 22lbs
Power
Main Supply 230v (±10%) 50/60Hz
1100W
Main Supply 120v (±10%) 50/60Hz
1100W
The performance will vary and will not necessarily meet the above typical specification at the extremes of voltage.
Fuse Rating
230v
6.3A
120v
10A
Standard NIST traceable cert
100, 200, 350, 500, 650°C
20
User Operation set up
Place the unit on an even horizontal surface with clearance around the unit of 20cm on all sides and 1m
above. The area around the calibrator should be free of draught, dirt, flammable substances, etc.
Plug the mains cable with the correct supply into the unit.
Carefully lower the slim metric inserts or slim Imperial inserts into the relevant unit.
Note that Tecal 700XSS has Slim Insert blocks to suit metric or imperial models.
Generally if the Tecal 700XS has metric bores a metric insert should be used.
Similarly if the Tecal 700XS has imperial bores then imperial inserts should be used.
The well should be clear of any dirt, foreign objects, grit or grease before the insert is fitted.
The Slim insert block sits proud of the block and has 2 removal holes for use with the insert extraction
tool.
Turn on the power to the unit with the switch above the mains cable inlet.
The unit will display the current temperature and heat or cool to the current set point. When the unit
has reached the set point temperature the display will stabilise and will be stable after 10 minutes at
temperature.
Detailed instruction on programming the Tecal 700XS is given below.
User operation – Display Interface Functions
F 100
set
Switching On
When you first switch on, the display will
show the edition of the software which
your unit uses. For example software issue
“F 1.00” would be shown.
This will display for 1 second then the
actual block temperature will be indicated.
Test
Set Point
When the SET button is pressed the set point
LED illuminates.
The front panel controls consist of four push
Set Point
70000
set
buttons and a five digit LED display.
Test
21
Adjust (Set point)
Adjust Set Point
35000
If the SET button is pressed and held
for a few seconds the Adjust Set point
LED illuminates. Then using just the
UP or DOWN ARROW adjust the Set
temperature.
Speed of Change of Set Temperature
Test
set
Each press of the UP ARROW or DOWN
ARROW buttons will increase or decrease
the set temperature by 0.1°C. If the
buttons are held down the temperature
change will accelerate to 5°C per second.
Once adjustment has been made and
following approximately 3 seconds the
Adjust Set Point LED goes out and the
unit returns to display the current block
temperature. The unit will then heat to the
Set point.
U C
set
Display Units setting °C or °F
Press the set button 5 times and hold for a
few seconds which will display U C or U F.
Then use either the UP ARROW or DOWN
ARROW buttons to select either °C or °F.
The unit will return to the current block
temperature display after a few seconds in
the selected units.
Test
Heater LED
Heater On
70000
set
When the set temperature is higher than
the block temperature this indicator will
light. If the light is on continuously the
block is getting constant power. The only
exception is described in the section on the
over-temperature cut-out operation. As
the block temperature approaches the set
point temperature the heater indicator will
flash. When set temperature is reached the
indicator will stay on for shorter periods.
Test
22
SWITCH TEST INSTRUCTIONS
Switch test - Plateau Set Point
Plateau
P 1500
To check the starting point (Plateau)
for the initial temperature of the switch
test. Press the Set button twice. The P
set point temperature will be displayed.
Values between 10 and 700°C can be set.
Thermostats must not be connected to
any other voltage sources during test.
Test
set
Adjust (Plateau)
SWITCH TEST - Adjust Plateau Set Point
P 1500
To Adjust the Plateau temperature press
the Set button twice and continue to hold
until the LED shown illuminates. Then
using just the UP or DOWN ARROW adjust
the Plateau temperature value. Press the
Set button once more to move on to the
ramp rate.
Test
set
Ramp rate C/min or F/min
SWITCH TEST - Ramp rate °C/minute
or °F/minute
05
To check the Ramp rate for the switch
test press the Set button three times. (If
checking after adjusting the Plateau press
the Set button once). The r value will be
shown as here. Values can be set between
0.1 and 10.0°C/minute (or 0.1 and 18.0°F/
minute).
Test
set
SWITCH TEST - Adjust Ramp rate
Adjust (Ramp rate)
05
set
To Adjust the Ramp rate press the Set
button three times and continue to hold
until the LED shown illuminates. Then
using just the UP or DOWN ARROW adjust
the ramp rate value. Press the Set button
once more to move on to the Switch Test
End point.
Test
23
End point
E2000
set
SWITCH TEST -End point
To check the End point for the final set
temperature of the switch test. Press the
Set button four times. (If checking after
adjusting the ramp rate press the Set
button once). End point values must be
higher than the Plateau set point values
and can be set to 700°C.
Test
Adjust (End point)
Switch Test - Adjust End Point
E2000
set
To Adjust the End point temperature press
the Set button four times and continue to
hold until the LED shown illuminates.
Then using just the UP or DOWN ARROW
adjust the End point value. The End point
value must be higher than the Plateau set
point.
Test
Note
Values set for all of the above will be
retained after the unit is powered off.
RUN SWITCH TEST
P 1500
set
Start Switch Test Program
Once the P, r , E values have been set the
Switch test can be started by pressing and
holding the Test button for a few seconds.
The display will show a flashing P and the
current block temperature which will flash
until the Plateau temperature is reached.
When the Plateau temperature has
stabilised the P will display continuously.
Test
Then use the UP ARROW button to
proceed to the next temperature with the
controlled heating ramp rate.
24
1617
set
Start Switch Test Ramping
The display will show a flashing r and
the current block temperature which will
increase in temperature at the selected
ramp rate until either the switch contacts
change state or the end temperature is
reached. The heater LED will illuminate for
differing periods depending on the value of
ramp rate set.
Test
E 1801
set
Switch Test - valid test results
When the contacts close or open the
current block temperature will be stored.
The unit will also beep 3 times to signify
the successful end of the test. The E
illuminates to show the temperature at the
change of Switch state. If the contacts are
in the closed state to start the test the LED
will go out at the change temperature and
vice versa.
Test
EE EE E
set
Switch Test - invalid test results
If the contacts do not change state during
the Ramp period the End temperature will
be reached and this display will be shown.
The test can be re-run by pressing the
Down Arrow.
Test
P 1500
set
Repeat Switch Test Program
Once the test has finished the test can be
re-run by pressing the Down Arrow. The
test will be repeated as above.
Test
25
P 1500
set
Exit Switch Test Program
When in the Switch Test mode the test run
may be stopped at any point by pressing
the Set button. The unit will then return to
the normal set point temperature.
Test
E 1801
set
RETRIEVE SWITCH TEST Results
Switch Test Results
Once the test results have been taken
they can be retrieved by pressing the Test
button which will show the last result. This
data is stored until the next Switch Test run
has been completed.
Test
Switch Contact Status
Contacts Closed
P 1800
P 2000
When in the Switch Test mode the Set LED
shows the switch contact status. If the
switch contacts are normally closed the
LED will be on. If the contacts are normally
open the LED will be off.
Contacts Open
Running the Tecal 700XS from a PC
The Tecal 700XS can be run from a PC using our TechneWorks software.
This software is available free of charge to download from the Techne web-sites at www.techne.com or
www.techneusa.com
Connecting the unit to the computer using a USB cable
When connecting The Tecal 700XS to a PC for the first time using USB connection the next available
comms port will be allocated.
The hardware wizard will direct you through the installation for a USB to UART connection.
Techneworks includes a help file giving full instructions for use with the Tecal 700XS.
26
AFter Use
When you have finished heating samples, remember that parts of the unit, inserts and associated
accessories may be very hot. Take the precautions listed earlier. We recommend that the inserts should
be allowed to cool to 70°C before being removed from the Tecal 700XS unit. They will still have to be
handled with care.
If you need to remove an insert while it is hot, fit the extractor tool into the locating holes and lift the
insert out carefully. Never leave the extractor tool in the insert while it is being used in the Tecal unit.
Additional information
Brief fault finding notes and lists of replacement parts, accessories and inserts for the Tecal are given in
this section.
NOTE THAT THIS EQUIPMENT SHOULD ONLY BE DISMANTLED BY PROPERLY TRAINED PERSONNEL.
REMOVING THE OUTER COVERS EXPOSES POTENTIALLY LETHAL MAINS VOLTAGES.
THERE ARE NO OPERATOR SERVICEABLE PARTS WITHIN THE EQUIPMENT.
general advice
In the unlikely event that you experience any problems with your Tecal which cannot be easily remedied,
you should contact your supplier and return the unit if necessary.
Please include any details of the fault observed and remember to return the unit in its original packing.
The slim insert block must be removed from the unit and packed separately within the case. Techne accept
no responsibility for damage to units which are not properly packed for shipping: if in doubt, contact your
supplier.
fault finding
HELP display
If HELP is displayed there is a problem with the internal sensing device. The cooling will come on and cool
the unit down. The calibrator should be returned to your supplier for repair.
Over-temperature cut-out
The unit is fitted with an over-temperature cut-out. It will operate if a fault develops and the unit exceeds
its maximum operating temperature. The cut-out will remove power to the heaters and return the unit to
ambient temperature. The heater LED will still be illuminated continuously but the temperature displayed
will decrease. If the cut-out has tripped it can be reset by switching the unit off, waiting a few seconds
and then switching it on again to reset it.
If the unit is switched off and then switched on again quickly this may also cause the over-temperature
cut-out to trip. If this occurs, turn the unit off, wait 5 seconds or more then switch it on again. Repeated
tripping of the cut-out may indicate a fault and you should contact your supplier for more information.
27
Cleaning your Tecal unit
Before cleaning your unit, disconnect from the power supply and allow to cool to ambient temperature.
You can clean the case of the Tecal with a cloth dipped in water or ethanol (methanol can also be used).
No part of the case or cover should be immersed in the solvents.
Do not use acetone or abrasive cleaners.
Before using any cleaning or decontamination method except those recommended in this manual, the
responsible body should check with Techne that the proposed method will not damage the equipment.
Fuses
If neither the power light nor display (on the front panel) is lit, one of the two fuses may have blown.
Make sure there is no external cause (such as a faulty plug or lead).
Check both fuses and replace the faulty fuse with a new one of the correct value (fuse values are given
on the label next to the power inlet). Fuses should only be changed by suitably qualified personnel.
The holder for the two fuses is built into the mains input socket. First remove the power cable and then
gently prise the fuse drawer open with a flat-bladed screwdriver or similar tool.
Each fuse can be removed by using the screwdriver as a lever.
Exchange the faulty fuse in the fuse holder for a working fuse of the correct value. Finally, replace the
fuse drawer in the fuse compartment and push the drawer shut.
If the fuses blow persistently, a serious fault is indicated and you should return the calibrator to your
supplier for repair.
Never fit a fuse rated higher than the value indicated on the unit, serious damage or personal injury may
result.
Insulation testing
This equipment is fitted with RFI suppression circuitry. Any check of the electrical insulation by means
of high voltage dielectric testing (for example as in BS EN 61010-1) must be carried out using only a
DC voltage.
This unit contains semiconductor components which may be damaged by electric field effects.
accessories
The following parts may be purchased:Part Nº Description
FSC700X Soft carrying case
FCAL700 Hard Carrying case
FDB00CP Cooling probe for use in 10mm diameter or larger hole or 3/8”
FCALUSB USB cable IP68 mini B to std A type
28
SLIM Insert blocks
Inserts are made from aluminium-bronze and must be ordered separately from the calibrator.
Each insert is stamped for identification.
A blank insert is available which may be drilled to suit your application.
Immersion Depth 152.4 mm or 6”
Number Probe diameter
METRIC
FINS7100
FINS7080
FINS7060
FINS7045
FINS7030
Insert
Insert
Insert
Insert
Insert
Block
Block
Block
Block
Block
probe
probe
probe
probe
probe
10.0mm
8.0mm
6.0mm
4.5mm
3.0mm
BLANK
FINS7BLM Metric blank
IMPERIAL
FINS7375 FINS7312 FINS7250
FINS7220 FINS7187 FINS7125
Insert
Insert
Insert
Insert
Insert
Insert
Block
Block
Block
Block
Block
Block
probe
probe
probe
probe
probe
probe
3/8”
5/16”
1/4”
7/32”
3/16”
1/8”
BLANK
FINS7BLI Imperial Blank
If you require further technical or application assistance please contact Bibby Scientific Ltd at:
[email protected]
For servicing information please contact: [email protected]
We are continually striving to improve our Tecal Dri-block calibrators and software.
If you have any comments and suggestions on how we can do things better please send them to us
at:- [email protected]
29
Bibby Scientific Ltd
Bibby Scientific France SAS
Beacon Road Stone
Staffordshire ST15 0SA
United Kingdom
Tel: +44 (0)8449 360234
Fax:+44 (0)8449 360235
e-mail: [email protected]
www.bibby-scientific.com
ZI du Rocher Vert - BP 79
77793 Nemours Cedex
France
Tel: +33 1 64 45 13 13
Fax:+33 1 64 45 13 00
e-mail: [email protected]
www.bibby-scientific.com
Techne Inc.
Bibby Scientific Italia Srl
3 Terri Lane, Suite 10
Burlington, N.J. 08016
USA
Tel: 800-225-9243
Fax: 609-589-2571
e-mail: [email protected]
www.techneusa.com
Via Alcide de Gasperi 56
20077 Riozzo di Cerro al Lambro
Milano Italia
Tel: +39 (0)2 98230679
Fax: +39 (0)2 98230211
e-mail: [email protected]
www.bibby-scientific.it