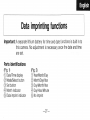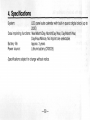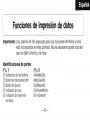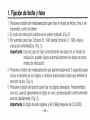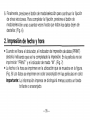
1
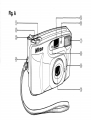
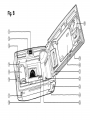
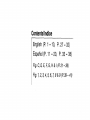
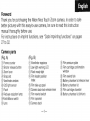
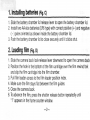
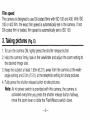
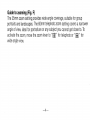
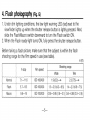
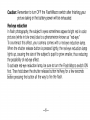
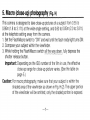
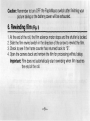
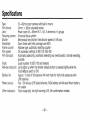
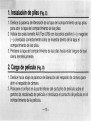
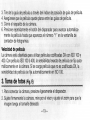
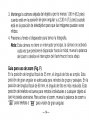
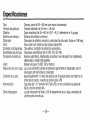
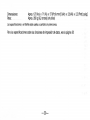
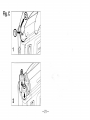
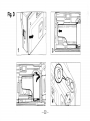
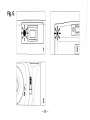
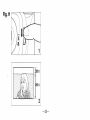
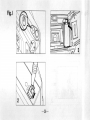
Nikon NiceoIouchZoom
Instruction Manual
Manual de instrucciones
Fig. B
Contents/lndice
English (P. 1 - 1 0 , P. 27 - 32)
Espafiol (P. 11 - 20, P. 33 - 38)
Fig. C, D, E, F, G, H & I (P. 21 - 26)
Fig. 1, 2, 3, 4, 5,6,7,8 8,9 (P. 39 - 41)
English
Foreword
Thank you for purchasing the Nikon Nice Touch Zoom camera. In order to take
better pictures with this easy-to-use camera, be sure to read this instruction
manual thoroughly before use.
For instructions on imprint functions, see "Data imprinting functions" on pages
27 to 32.
Camera parts
(Fig. A)
© Frame counter
© Shutter release button
© Zoom lever
© Strap slot
© Viewfinder window
© CdS light sensor
© Flash
® Red-eye reduction lamp
©Flash/Macro switch
© Lens
(Fig. B)
®
@
©
©
©
©
@
©
@
Viewfinder eyepiece
Low light warning LED
Flash ready-light
Film leader position
index
Film take-up spool
Camera back lock-release lever
Film rewind switch
Film sprocket
Camera back
® Film pressure plate
® Film cartridge confirmation
window
@ Film rewind fork
@ Battery chamber lid release lever
® Battery chamber lid
© Film cartridge chamber
@ Battery chamber lid (lithium)
1. Installing batteries (Fig, q
1. Slide the battery chamber lid release lever to open the battery chamber lid.
2. Install two AA-size batteries (LR6 type) with correct positive (+) and negative
( - ) poles oriented as shown inside the battery chamber lid.
3. Push the battery chamber lid to close securely until it clicks shut.
2. Loading film (Fig. D)
1. Slide the camera back lock-release lever downward to open the camera back.
2. Position the hole in the bottom of the film cartridge over the film rewind fork
and slip the film cartridge into the film chamber.
3. Pull film leader across to the film leader position index.
4. Make sure the film stays flat between the film guides.
5. Close the camera back.
6. To advance the film, press the shutter release button repeatedly until
" I " appears in the frame counter window.
—2—
Film speed
The camera is designed to use DX-coded films with ISO 100 and 400. With ISO
100 or 400 film, the exact film speed is automatically set in the camera. If non
DX-coded film is loaded, film speed is automatically set to ISO 100.
3. Taking pictures (Fig. E)
1. To turn the camera ON, lightly press the shutter release button.
2. Hold the camera firmly, look in the viewfinder and adjust the zoom setting to
the desired image size.
3. Keep the subject at least 1.90m (6.2 ft.) away from the camera at the wideangle setting and 2.3m (7.5 ft.) at the telephoto setting for sharp pictures.
4. Fully press the shutter release button to take pictures.
Note: As no power switch is provided with this camera, the camera is
activated everytime you press the shutter release button halfway,
move the zoom lever or slide the Flash/Macro switch down.
—3—
Guide to zooming (Fig. F)
The 35mm zoom setting provides wide-angle coverage, suitable for group
portraits and landscapes. The 60mm telephoto zoom setting covers a narrower
angle of view, ideal for portraiture or any subject you cannot get close to. To
activate the zoom, move the zoom lever to "GO" for telephoto or "rng" for
wide-angle view.
4. Flash photography (Fig. G)
1. Under dim lighting conditions, the low light warning LED (red) next to the
viewfinder lights up when the shutter release button is lightly pressed. Next,
slide the Flash/Macro switch downward to turn the Flash switch ON.
2. When the Flash ready-light turns ON, fully press the shutter release button.
Before taking a flash picture, make sure that the subject is within the flash
shooting range for the film speed in use (see table).
m(ft)
Shooting range
F-stop
Film speed
Wide
Tele
Normal
7.1—11.6
ISO 100/400
1.9 (6.2)—oo
2.3 (7.5)—oo
Flash
5.7—9.3
ISO 100/400
1.3—2.9(4.2—9.5)
1.4—2.3(4.6—7.5)
Macro
9.8—16
ISO 100/400
—5—
0.55—0.95(1.8—3.1) 0.6—0.85 (2.0—2.8)
Caution: Remember to turn OFF the Flash/Macro switch after finishing your
picture taking or the battery power will be exhausted.
Red-eye reduction
In flash photography, the subject's eyes sometimes appear bright red in color
pictures (white in b/w ones) due to a phenomenon known as "red-eye."
To counteract this effect, your camera comes with a red-eye reduction lamp.
When the shutter release button is pressed lightly, the red-eye reduction lamp
lights up, causing the size of the subject's pupil to grow smaller, thus reducing
the possibility of red-eye effect.
To activate red-eye reduction lamp, be sure to turn the Flash/Macro switch ON
first. Then hold down the shutter release button halfway for a few seconds
before pressing the button all the way to fire the flash.
—6—
5. Macro (close-up) photography (Fig, H)
This camera is designed to take close-up pictures of a subject from 0.55 to
0.95m (1.8 to 3.1 ft.) at the wide-angle setting, and 0.60 to 0.85m (2.0 to 2.8 ft.)
at the telephoto setting away from the camera.
1. Set the Flash/Macro switch to "ON" and wait until the flash ready-light turns ON.
2. Compose your subject within the viewfinder.
3. While holding the Flash/Macro switch all the way down, fully depress the
shutter release button.
Important: Depending on the ISO number of the film in use, the effective
close-up range for close-up picture varies. (See the table on
page 5.)
Caution: For macro photography, make sure that your subject is within the
shaded area of the viewfinder as shown in Fig. H (2). The upper portion
of the viewfinder will be omitted; only the shaded portion is exposed.
—7—
Caution: Remember to turn OFF the Flash/Macro switch after finishing your
picture taking or the battery power will be exhausted.
6. Rewinding film (Fig, i)
1. At the end of the roll, the film advance motor stops and the shutter is locked.
2. Slide the film rewind switch in the direction of the arrow to rewind the film.
3. Check to see if the frame counter has returned back to "S".
4. Open the camera back and remove the film for processing without delay.
Important: Film does not automatically start rewinding when film reaches
the end of the roll.
—8—
Specifications
Type:
Film format:
Lens:
Focusing system:
Shutter:
Viewfinder:
Frame counter:
Film speed:
Film transport.
35—60mm zoom camera with built-in macro
24mm x 36mm standard format
Power zoom 35—60mm f/5.7—9.3, 5 elements in 5 groups
Universal focus system
Mechanical lens shutter, fixed shutter speed of 1/90 sec.
Zoom finder with field coverage over 80%
Additive type: automatic resetting counter
DX automatic settings to ISO 100, ISO 400
Automatic advancing, automatic rewinding via rewind switch, mid-roll rewinding
possible
Flash:
Guide number 10 (ISO 100 and meters)
Red-eye reduction: Lamp lights up when the shutter release button is pressed lightly while the
Flash/Macro switch is ON.
Battery life:
Approx. 13 rolls of 36-exposure film with flash for half of all exposures with
LR6 batteries
Power source:
Two 1,5V AA-size (LR6 type) batteries, NiCd battery and AA-size lithium battery
not usable
Other indicators:
Flash ready-light, low light warning LED, film confirmation window
—9-
Dimensions:
Weight:
Approx. 127 (W) x 71 (H) x 57 (D)mm [5 (W) X 2.8 (H) X 2.2 (D) in.]
Approx. 260g (9.2 oz) (without batteries)
Specifications and design are subject to change without notice.
For specifications on data imprinting functions, see page 32.
— 10—
Espanol
Introduction
Le agradecemos la compra de la camara Nikon Nice Touch Zoom. Para que
pueda obtener mejores imageries con esta camara sencilla, asegurese de leer
completamente este manual de instrucciones antes de utilizarla.
Para las instrucciones sobre las funciones de impresion, vea "Funciones de
impresion de datos" en las paginas 33 a 38.
Partes de la camara
(Fig. A)
© Contactor de fotogramas
© Boton del disparador
© Palanca de zoom
© Ranura de correa
© Venlanilla del visor
© Sensor de luz CdS
©Flash
® Luz de reduccion de ojos rojos
© Interrupter de flash/macro
® Objetrvo
(Fig. B)
© Ocular de visor
@ LED de advertencia de luz baja
@ Luz de irtdicacion de flash
® Indice de position de guia de pelicula
© Carrete de extraccidn de pelicula
© Palanca de liberacidn del respaldo
de camara
© Interruptor de rebobinado de pelicula
@ Rollo de pelicula
© Respaldo de camara
— 11 —
© Placa de presibn de pelicula
® ventanilla de confirmation de rollo de
pelicula
® Gancho de rebobinado
de pelicula
© Palanca de liberacidn de tapa del
compartimiento de las pilas
@ Tapa del compartimiento de las pilas
@ Compartimiento de la pelicula
© Compartimiento de la pila (litio)
1. Instalacion de pilas (Fig. o
1. Deslice la palanca de liberacion de la tapa del compartimiento de las pilas
para abrir la tapa del compartimiento de las pilas.
2. Instale dos pilas tamano AA (Tipo LR6) con los polos positivo (+) y negativo
( - ) orientados correctamente como se muestra dentro de la tapa el
compartimiento de las pilas.
3. Presione la tapa del compartimiento de las pilas hasta estar seguro de que
cierra hermeticamente.
2. Carga de pelfcula (Fig, p)
•
1. Deslice hacia abajo la palanca de liberacion del respaldo de camara para
abrir el respaldo de camara.
2. Posicione el orificio en la parte inferior del cartucho de pelfcula sobre el
gancho de rebobinado de pelfcula e introduzca el cartucho de pelfcula en el
compartimiento de la pelfcula.
— 12—
3. Tire de la guia de pelicula a traves del fndice de posicion de guia de pelicula.
4. Asegiirese que la pelicula quede plana entre las guias de pelicula.
5. Cierre el respaldo de la camara.
6. Presione repetidamente el boton del disparador para avanzar automaticamente la pelicula hasta que aparezca el numero " 1 " en la ventanilla de
contador de fotogramas.
Velocidad de pelicula
La camara esta disenada para utilizar peliculas codificadas DX con ISO 100 y
400. Con pelicula ISO 100 6 400, la sensibilidad exacta de pelicula se fija automaticamente en la camara. Si se carga pelicula que no es codificada DX, la
sensibilidad de pelicula se fija automaticamente en ISO 100.
3. Toma de fotos (Fig. E)
1. Para conectar la camara, presione ligeramente el disparador.
2. Sujete firmemente la camara, mire por el visor y ajuste el zoom para que la
imagen tenga el tamano deseado.
—13—
3. Mantenga la camara alejada del objeto a por lo menos 1,90 m (6,2 pies)
cuando esta en la posicion de gran angular y a 2,30 m (7,5 pies) cuando
esta en la posicion de teleobjetivo para que las imagenes puedan verse
nftidas.
4. Presione a fondo el disparador para tomar la fotograffa.
Nota: Esta camara no tiene un interruptor principal, la camara se activara
cada vez que presione el disparador hasta la mitad, mueva la palanca
del zoom o deslice el interruptor del flash/macro hacia abajo.
Guia para uso de zoom (Fig. F)
En la posicion de longitud focal de 35 mm, el angulo de foto es amplio. Esta
posicion de gran angular es adecuada para retratos de grupo y paisajes. En la
posicion de longitud focal de 60 mm, el angulo de foto es mas reducido. Esta
posicion de telefoto es buena para retratos individuales o cualquier objeto al
que no pueda acercarse. Para activar el zoom, mueva la palanca de zoom a
"CID" para telefoto o "[•*»]" para vision de gran angular.
— 14—
4. Fotografia con flash (Fig. G)
1. Bajo condiciones de iluminacion debil, el LED (rojo) de advertencia de luz
baja proximo al visor se enciende cuando el boton del disparador se
presiona ligeramente. Entonces, deslice el interruptor Flash/Macro hacia
abajo para conectar el interruptor de Flash.
2. Cuando se encienda la luz de indicacion de flash, presione completamente
el boton del disparador.
Antes de tomar una foto con flash, asegurese que el objeto este dentro de la
distancia de alcance del flash para la velocidad de pelfcula en uso (vea latabla).
F-parada
Distancia de alcance
Sensibilidad de
pelicula
Amplio
Tele
1,9(6,2)—oo
2,3 (7,5)—oo
Normal
7,1—11,6
ISO 100/400
Flash
5,7—9,3
ISO 100/400
1,3—2,9(4,2—9,5)
1,4—2,3 (4,6—7,5)
Macro
9,8—16
ISO 100/400
0,55—0,95(1,8—3,1)
0,6—0,85 (2,0—2,8)
m (pies)
Precaucion: Recuerde apagar el interruptor de flash/macro despues de
terminar de tomar las fotos o la potencia de la pila se agotara.
Reduccion de ojos rojos
En la fotograffa con flash, los ojos de las personas fotografiadas aparecen,
a veces, con un color rojo brillante en las pelfculas en color (o blancos en las
fotograffas en bianco y negro) debido a un fenomeno conocido como de "ojos
rojos". Para evitar este efecto, su camara tiene una luz de reduccion de ojos
rojos. Cuando se presion el disparador hasta la mitad, se enciende la luz de
reduccion de ojos rojos haciendoque disminuya el tamano de la pupila de las
personas que estan frente a la camara, reduciendo asi la posibilidad de que se
produzca este efecto de ojos rojos.
Para activar la luz de reduccion de ojos rojos, debera conectarse primero el
interruptor del flash/macro. A continuacion, mantenga presionado hasta la
mitad el disparador durante unos segundos antes de presionarlo a fondo para
que destelle el flash.
— 16—
5. Fotografia macro (acercamiento) (Fig. H>
Esta camara esta disefiada para tomar fotos de acercamiento de un objeto
desde 0,55 a 0,95 m (1,8 a 3,1 pies) en posicion de gran angular, y de 0,60
a 0,85 m (2,0 a 2,8 pies) en posicion de telefoto desde la camara.
1. Fije el interrupter flash/macro en "ON" y espere hasta que se encienda la
luz de indicacion de flash.
2. Componga su objeto dentro del visor.
3. Deslice hacia abajo el interrupter de flash/macro lo mas lejos posible, y
presione completamente el boton del disparador mientras lo presiona hacia
abajo.
Importante: Dependiendo del numero ISO de la pelicula en uso, varia la
distancia efectiva de acercamiento para las fotos con
acercamiento. (Vea la tabla en la pagina 15.)
—17—
Precaucion: Para fotograffa macro, asegurese que su objeto este dentro del
area sombreada del visor como se muestra en la Fig. H (2). La
porcion superior del visor se omitira; solamente se expondra la
porcion sombreada.
Precaucion: Recuerde apagar el interruptor de flash/macro despues de
terminar de tomar las fotos o la potencia de la pila se agotara.
6. Rebobinado de pelicula (Fig, p
1. Al final del rollo, se detiene el motor de avance de pelicula y se cierra el
obturador.
2. Deslice el interruptor de rebobinado de pelicula en la direccion de la flecha
para rebobinar la pelicula.
3. Verifique que el contador de fotogramas haya regresado a "S".
4. Abra el respaldo de la camara y retire cuanto antes la pelicula para su
procesamiento.
Importante: La pelicula no empieza a rebobinar automaticamente cuando
llega al final del rollo.
—18—
Especificaciones
Tipo:
Formato de pelfcula:
Objetivo:
Sistema de enfoque:
Obturador:
Visor:
Contador de fotogramas:
Sensibilidad de pelicula:
Transporte de pelicula:
Camara zoom de 35—60 mm con macro incorporado
Formato estandar de 24 mm x 36 mm
Zoom mecanico de 35—60 mm f/5,7—9,3, 5 elementos en 5 grupos
Sistema de enfoque universal
Obturador de objetivo mecanico, velocidad de obturador fijada en 1/90 seg.
Visor zoom con cobertura de campo sobre 80%
Tipo aditivo; contador de refijacidn automatica
Fijaciones automaticas DX en ISO 100, ISO 400
Avance automatico, rebobinado automatico via interrupter de rebobinado,
rebobinado a medio rollo posible
Flash:
Niimero de guia 10 (ISO 100 y metros)
La luz se enciende cuando se presiona ligeramente el disparador con el
Reduccibn de ojos rojos: interruptor del flash/macro conectado.
Aproximadamente 13 rollos de pelicula de 36 exposiciones con flash en la
Duracion de la pila:
mitad de los casos, cuando se utilizan pilas LR6
Dos pilas de 1,5 V tamano AA (Tipo LR6), no son utilizables las pilas de
Alimentacion:
NiCd y de litio tamano AA
Luz de indicacion de flash, LED de advertencia de luz baja, ventanilla de
Otros indicadores:
confirmacion de pelicula
-19—
Dimensiones:
Aprox. 127 (An) x 71 (Al) x 57 (Prof) mm [5 (An) x 2,8 (Al) x 2,2 (Prof.) pulg.]
Peso:
Aprox. 260 g (9,2 onzas) (sin pilas)
Las especiticaciones y el diseiio estan sujetos a cambios sin previo aviso.
Para las especiticaciones sobre las funciones de impresion de datos, vea la pagina 38.
—20—
Fig.C
—21 —
Fig. D
-22—
Fig. E
Fig. F
-23-
Fig.G
>E
—24—
Fig. H
-25—
Fig. I
-26-
Data imprinting functions
Important:, A separate lithium battery for time and date functions is built in to
this camera. No adjustment is necessary once the date and time
are set.
Parts identifications
(Fig- D
© Date/Time display
© Mode/Select button
© Set button
© Month indicator
© Data imprint indicator
(Fig. 2)
© Year/Month/Day
© Month/Day/Year
© Day/Month/Year
© Day/Hour/Minute
© No imprint
—27—
1. Setting date and time
1. Press the Mode/Select button to select Date, Time, or No imprint mode as
desired.
2. The display mode changes in the indicated order. (Fig. 2)
3. For example, to set October 25, 1995 from current October 21, 1995, choose
Year/Month/Day display. (Fig. 3)
Important: Once data is set correctly in one display mode, data in other
display modes can also be set automatically.
4. Press the Mode/Select button for approximately 2 seconds to start the digits
blinking, and to press it twice more until the Day section blinks. (Fig. 4)
5. Press the Set button to set desired digit(s). Pressing it once lightly advances
the digit by one and pressing it continuously advances it quickly. (Fig. 5)
Important: Year returns to 89 (1989) after 20 (2020).
6. Finally, press the Mode/Select button to continue setting other sections. To
complete the setting, press the Mode/Select button a few times until all data
stops blinking. (Fig. 6)
2. Date & Time imprinting
• When the shutter is released, the data imprint indicator (PRINT) blinks
indicating the imprinting is completed. "PRINT" and month indicator " M " will
not be imprinted on the film. (Fig. 7)
• Date or Time is imprinted at the location as shown in the figure. (Fig. 8) Data
is imprinted in orange on color films.
Important: Imprinted information will be less distinct against bright or orange
background.
—29—
3. Replacement of lithium battery CR2025
In the following cases replace the camera's lithium battery:
When imprinted date and time are dim or illegible on the film though date and
time display is clear.
Important:
• The built-in lithium battery has a life of about 3 years from the date the
camera was manufactured.
• Do not replace the battery when film is loaded in your camera.
1. Remove the battery chamber lid.
Open the back cover of the camera, push the lock-release lever to open the
battery chamber lid. (Fig. 9)
2. Replace the lithium battery.
Take out the used battery and install a new battery (CR2025) with the (+)
side up. (Fig. 9)
—30—
3. Close the battery chamber lid.
To close, push the lid down until it snaps into place.
Correct data on the display if necessary (the display or digits shown may
change after the replacement of the lithium battery.) If you have any
questions, consult your Nikon dealer.
Important:
• Use specified lithium battery (CR2025) or equivalent.
• Do not burn used batteries.
• Do not short-circuit, disassemble, heat or attempt to recharge batteries.
• Keep batteries out of children's reach. If swallowed, call a doctor
immediately.
—31 —
4. Specifications
System:
LCD panel auto calendar with built-in quartz digital clock (up to
2020)
Data imprinting functions: Year/Month/Day, Month/Day/Year, Day/Month/Year,
Day/Hour/Minute, No imprint are selectable.
Battery life:
Approx. 3 years
Power source:
Lithium battery (CR2025)
Specifications subject to change without notice.
—32—
Funciones de impresion de datos
Importante: Una bateria de litio separada para las funciones de fecha y hora
esta incorporada en esta camara. No es necesario ajuste una vez
que se fijan la fecha y la hora.
Identificaciones de partes
(Fig. D
©
©
©
©
©
Indicacion de fecha/hora
Boton de modo/seleccion
Boton de fijacion
Indicador de mes
Indicador de impresion
de datos
(Fig. 2)
Ano/Mes/Dfa
Mes/Di'a/Ano
Dia/Mes/Afio
Dia/Hora/Minuto
Sin impresion
—33—
1. Fijacion de fecha y hora
1. Presione el boton de modo/seleccion para fijar el modo de fecha, hora o sin
impresion, como se desee.
2. El modo de indicacion cambia en el orden indicado. (Fig. 2)
3. For ejemplo, para fijar Octubre 25, 1995 desde Octubre 21, 1995, elija la
indicacion Aho/Mes/Dia. (Fig. 3)
Importante: Una vez que se fijan correctamente los datos en un modo de
indicacion, pueden fijarse automaticamente los datos en otros
modos de indicacion.
4. Presione el boton de modo/seleccion por aproximadamente 2 segundos para
iniciar el destello de los digitos y continue presionando hasta que destelle la
seccion de dfa. (Fig. 4)
5. Presione el boton de fijacion para fijar los dfgitos deseados. Presionandolo
una vez, avanza ligeramente el digito en uno y presionandolo continuamente
avanza rapidamente. (Fig. 5)
Importante: El digito de aho regresa a 89 (1989) despues de 20 (2020).
—34—
6. Finalmente, presione el boton de modo/seleccion para continuar la fijacion
de otras secciones. Para completar la fijacion, presione el boton de
modo/seleccion unas cuantas veces hasta que todos los datos dejen de
destellar. (Fig. 6)
2. Impresion de fecha y hora
• Cuando se libera el obturador, el indicador de impresion de datos (PRINT)
destella indicando que se ha completado la impresion. En la pelicula no se
imprimiran "PRINT" y el indicador de modo "M". (Fig. 7)
• La fecha o la hora se imprimen en la ubicacion que se muestra en la figura.
(Fig. 8) Los datos se imprimen en color anaranjado en las pelfculas en color.
Importante: La informacion impresa se distinguira menos contra un fondo
brillante o anaranjado.
—35—
3. Reemplazo de la bateria de litio CR2025
En los siguientes casos reemplace la bateria de litio de la camara:
Cuando la fecha y hora impresas son opacos o ilegibles en la pelfcula aunque
la indicacion de fecha y hora este clara.
Importante:
• La bateria de litio incorporada tiene una duracion de aproximadamente 3
ahos desde la fecha en que se fabrico la camara.
• No reemplace la bateria cuando se cargue la pelfcula en su camara.
1. Retire la tapa del compartimiento de las pilas
Abra el respaldo de la camara, presione la palanca de liberacion de seguro
para abrir la tapa del compartimiento de las pilas. (Fig. 9)
2. Reemplace la bateria de litio
Extraiga la bateria usada e instale una nueva bateria (CR2025) con el lado
(+) hacia arriba. (Fig. 9)
—36—
3. Cierre la tapa del compartimiento de las pilas
Para cerrar, presione la tapa hacia abajo hasta que se asegure en su lugar.
Corrija los datos en la indicacion si fuera necesario (la indicacion o los
dfgitos mostrados pueden cambiar despues del reemplazo de la bateria de
litio.) Si tiene alguna pregunta, consulte con el distribuidor de Nikon.
Importante:
• Utilice la baterfa de litio especificada (CR2025) o equivalente.
• No queme las baterfas usadas.
• No cortocircuite, desensamble, caliente ni intente recargar las batenas.
• Mantenga las baterfas fuera del alcance de los nifios. Si las ingieren, Name
de inmediato a un medico.
—37—
4. Especificaciones
Sistema:
Funciones de impresion
de datos:
Duracion de bateria:
Alimentacion:
Calendario automatico de panel LCD con reloj digital de
cuarzo incorporado (hasta el 2020)
Se puede seleccionar Afio/Mes/Dia, Mes/Dia/Ano,
Dia/Mes/Afio, Dia/Hora/Minuto, sin impresion.
Aprox. 3 afios
Bateria de litio (CR2025)
Las especificaciones 'estan sujetas a cambios sin previo aviso.
—38—
Fig. 2
1-1
PTOr
'35 3c','
3<?rgs
<?l 3'3Si
4
*? i w JB
4
-39-
Fig. 3
QC f P D >
MODE)
Gfo
Fig. 4
•
(
( MODE)
or©
-40-
Fig. 7
Fig. 9
. !
'95 3 S'ii
Fig. 8
-41 —
Nikon NiceoTbudiZoom
Nikon
IMPORTANT NOTICE:
YOU MUST PRESENT THE ATTACHED WARRANTY FORM (PART 1)
TOGETHER WITH PROOF-OF-PURCHASE AND PROOF-OFPURCHASE DATE TO OBTAIN WARRANTY SERVICE.
—42—
THIS FORM MUST BE PRESENTED FOR WARRANTY SERVICE
This is your Nikon Inc. One Year Limited
Warranty (valid in the Continental United
States, Alaska, Hawaii, Puerto Rico, U.S. and
U.S. Virgin Islands).
NiceoTbuchZoom
YOU MUST PRESENT THIS FORM (PART 1) TOGETHER WITH PROOF-OF-PURCHASE AND PROOF OF-PURCHASE DATE TO
OBTAIN WARRANTY SERVICE.
This HBron Product is warranted by Mfeeti fc»c. to be Iree from defects in material and workmanship for a period of o n * (1)
year from B e date of purchase. During M l | W M , 1 1 thto Product I t lound lo bo defective In rrteterial or workmarumip, fwfean Jn«
or Its authorized service station will at Ita option either repair or'rapiaca mis Product without charge subject to tha following
limitations and axclualons:
This warranty extends to the original consumer purchaser only and is not assignable or transferable
This warranty shall not apply to the following:
1 Any product which has been subject to misuse, abuse, negligence or accident
2 Arty delects Q' damage directly or indirectly caused by the use o( unauthorized replacement parts andfor service performed
by unauthorized personnel.
3 Any batteries
ALL WARRANTIES IMPLIED BY LAW INCLUDING ANY WARRANTY OF MERCHANTABILITY OR FITNESS FOR A PARTICULAR
PURPOSE SHALL BE OF A DURATION OF ONE (1) YEAR FROM DATE OF PURCHASE. THE WARRANTIES HEREIN ARE
EXPRESSLY IN LIEU OF ALL OTHER EXPRESS WARRANTIES INCLUDING THE PAYMENT OF CONSEQUENTIAL OR
INCIDENTAL DAMAGES FOR THE BREACH OF ANY WARRANTY.
Soma states do not aMow (a) limitations on how long an Implied warranty lasts or (b) the exclusion or limitation of Incidental
or consequential damages so tha above limitations or exclusions may not apply to you. This warranty gives you specific legal rights
and you may also have other fights which vary from state to elate.
In order to obtain parformsnce of tha warranty obligation*, the original consumer purchaser must return this
warranty and this ffaton product together with proof of LAST
purchase and proof of purchase date (bill of sele) either NAME
r
in person or addressed to the warranty department of FIRST
NAME
L
Nikon inc., at 1300 Wall Wrrnman Rd Melville. N V 117473064 or any one of the authorized service stations at their
respective addresses listed on the reverse side The original
consumer purchaser in returning this Nikon product must
prepay all postage, shipping, transportation, insurance
and delivery costs to the repair facility.
i i i i i i i M i i i i n
f i i i i i i i i i i i i in
ADDRESS
LLL_U_L I I I J M 3
CITY
II
M
THIS WARRANTY FORM MAY NOT BE REPRODUCED OR COPIED AND
SHALL BE VALID ONLY WITH PRODUCTS
SOLD BY Nftton Inc.
43
II
ITT1
Nikon
ST»TE m
PART 1
Nikon
AUTHORIZED SERVICE STATIONS
DISTRICT OF COLUMBIA
THE AUTHORIZED SERVICE STATIONS LISTED
ABOVE ARE SUBJECT TO C H A N G E WITHOUT NOTICE.
AA
Retain this Worldwide Warranty with proot of purchase for your
records
Nikon ONE YEAR WORLDWIDE
LIMITED WARRANTY
(Excluding the Continental Unitod States, Alaska, Hawaii,
Puerto Rico, U.S. and U.S. Virgin Islands)
Welcome to the worldwide family of Nikon owners.
Your Nikon equipment has been manufactured to the Highest quality standards by NIKON CORPORATION, Tokyo. Japan
This warranty entitles the original consumer to worldwide warranty protection in accordance with the terms and conditions It
affords the consumer warranty protection outside the continental United States. Alaska, Hawaii. Puerto Rico and the US Virgin
Island Such warranty coverage is supplemental to and not m lieu ot the United States Nikon One Year Limited Warranty which
is received by the customer with the Niton product
This Mhun product except (or batteries is warranted by NIKON CORPORATION, Tokyo, Japan to be tree from defects in materials
or workmanship for a period of one year from the date of purchase During this period any one of the worldwide repair facilities
listed or the reverse side will repair without charge any parts or assembly of parts found to be defective in material or workmanship
subject ID the totlowing limitations
1 This warranty extends to the original consumer purchaser only and is not assignable or transferable
2. This warranty shall not extend to any product which has been subject to misuse, abuse, negligence, accident or unauthorized repair
All warranties implied by law including any warranty ot merchantability or fitness for a particular purpose shall be of a duration of one (1) year from date of purchase. The warranties herein are expressly in lieu of all other express warranties including
the payment of consequential or incidental damages for the breach ol any warranty.
No warranties, whether express or implied, Including the warranties of merchantability or fitness for a particular purpose
are made by any distributor or dealer of the product herein warranted; nor shall such dealer or distributor be liable for the
payment of any direct incidental or consequential damages.
In order to obtain worlcrwtde service, the consumer should
return the Wirori product, either in person or addressed to
the Warranty Department of any authorized service repair LAST
station hsted on the reverse side together with proof of pur- NAME
chase and this warranty The original consumer in return- FIRST
ing this product, must prepay all postage, shipping, NAME
transportation, insurance and delivery costs to the repair
ADDRESS
facility
Fpr prompt response of worldwide warranty inquiries, CITY
STATE
m
please direct all correspondence to
NIKON CORPORATION
cxrxxxxxx
x:i i i i i x
i
i i i i i
XX
—45—
Nikon
PART 2
Nikon
SERVICE FACILITIES
(P.O. Boi 4iD)*«acucho 1235, Buenos Aires, Aigeniina
27. Level A, 100 Harris Stieei Pyrmonl 2009. N.S.*.
«: [6>) 2-660.7086
-••ierjsasse 14
Poland: Polo S Video Sei
Portugal: Stolo-Soc imc
Be Folografia,
Reunion; Omscipfiol Si
ah (Poslal Address) Hail Commeicial Ci
;
rancisto. 438 (5ia Cecilia) Sic Panic
PMone ,;*',;atmi; "
Cano*lain31. P 0 Boi 7
3, 06021 Barcelona
Sania C<N2 oefeoojiiapt
Slepanska 45(640. 111 2
Phone (02| ?4?;j59ij
ProouHionsvej23R DKi
P h i ™ [886)2-311-7975. 33l
II. A. E.: Giand Sloies
• » * . : D *. j D a —
S.A
Fen. Hep. p. ( , . , » . « . : N.kon Qn*H
Hc^PC0na:Sh.im(K«)Lia
J j a j * s L £ 5£TPaleo Fa
£ o ^
Plwna (66) 2-235-2929
;
. ADU DhaBi, U.A
Plione. 44 (081) 541 1440
Aula. IB de Jllio 1202, Monte
^ ^ U e , ufej H 404 72 I
l ^ h ^ H * * . . .0
Phone: 3-623407/8
Phane: (011)3102151
Phone: 5312960;S312'
Nagoya 5e<vice Cenler
.i.uumeoaBWQ., e
2359, Nownt'3 Phone. 72
le Bag 92146, Auckland P
—46—
Notes
—47—
Notes
—48—
No reproduction in any form of this manual, in whole or in part (except for brief quotation in
critical articles or reviews), may be made without written authorization from
NIKON CORPORATION.
Queda prohibida la reproduccidn total o parcial de este folleto (salvo en lo que se refiere a
citas breves en articulos o revistas especializadas), sin la autorizacion escrita de
NIKON CORPORATION.
NIKON CORPORATION
FUJI BLDG., 2-3, MARUNOUCHI 3-CHOME,
CHIYODA-KU, TOKYO 100, JAPAN
PHONE: 81-3-3214-5311 TELEX: NIKON J22601
FAX: 81-3-3201-5856
Nikon