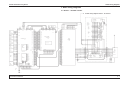
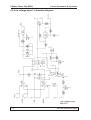
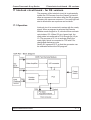
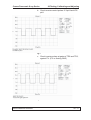
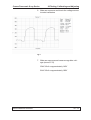
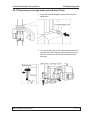
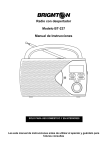
1
Cranex Panoramic X-ray Series
Contents
Service Manual
for the
Cranex Dental Panoramic X-ray Series
(Excel, Excel Ceph, Excel D,
BaseX and BaseX D)
(This manual can also be used to service the
Cranex 3+ Ceph, 3+, 2.5+ and C)
Medical Device Directive
93/42/EEC
October 2003
Document number 8200909 ver 0310
Original approved English language version
Manufactured by SOREDEX
P.O. BOX 250
FIN-00031 SOREDEX, FINLAND
Tel. +358 10 394 820
Fax. + 358 9 701 5261
Service Manual 8200909
i
Contents
ii
Cranex Panoramic X-ray Series
Service Manual 8200909
Cranex Panoramic X-ray Series
Contents
Contents
1 Introduction ............................................................................................................... 1 - 1
1.1 Scope of this manual ................................................................................ 1 - 1
1.2 Associated documentation ....................................................................... 1 - 2
1.3 Servicing warnings and precautions .........................................................
General precautions ..............................................................................
Radiation Safety ....................................................................................
Mechanical safety ..................................................................................
Electrical Safety ....................................................................................
Electrostatic discharge ..........................................................................
Explosion Hazard ..................................................................................
Operating warnings and precautions......................................................
Unauthorized Modifications ...................................................................
Disposal ................................................................................................
Disclaimer .............................................................................................
1-2
1-2
1-2
1-3
1-3
1-3
1-4
1-4
1-5
1-6
1-6
2 Unit description ........................................................................................................ 2 - 1
2.1 Versions .................................................................................................. 2 - 1
2.2 Main parts - Excel, Excel D, BaseX and BaseX D .................................... 2 - 2
2.3 Main parts - Excel Ceph ........................................................................... 2 - 4
2.4 Mechanical description and operation ......................................................
Column ..................................................................................................
Z-carriage .............................................................................................
Rotating unit (not Cranex C) ...................................................................
2-5
2-5
2-5
2-6
2.5 Circuit board location ............................................................................... 2 - 7
2.6 Which circuit board which version ............................................................. 2 - 9
2.7 Electrical operation ................................................................................ 2 - 10
General description ............................................................................. 2 - 10
The Operating Principle of the Generator ............................................. 2 - 10
High Voltage Section ........................................................................... 2 - 10
X-ray Tube Current ...............................................................................2 - 11
Automatic kV selection ......................................................................... 2 - 11
Exposure times ................................................................................... 2 - 12
Service Manual 8200909
iii
Contents
Cranex Panoramic X-ray Series
3 Main wiring diagrams ................................................................................................ 3 - 1
3.1 Sheet 1 - cassette version ........................................................................ 3 - 1
3.2 Sheet 1 - DM version ............................................................................... 3 - 2
3.3 Sheet 1 - DS fixed version ........................................................................ 3 - 3
3.4 Sheet 1 - DS cassette version .................................................................. 3 - 4
3.5 Sheet 2 - all versions ................................................................................ 3 - 5
4 Microswitches ........................................................................................................... 4 - 1
4.1 Cassette carriage (cassette carriage versions only) ................................. 4 - 1
4.2 Rotating unit microswitches ...................................................................... 4 - 2
5 Capacitor Board ........................................................................................................ 3 - 1
6 Mains Power Unit (MPU) .......................................................................................... 6 - 1
6.1 General description .................................................................................. 6 - 1
6.2 High Voltage Board .................................................................................. 6 - 1
6.3 Low Voltage Board .................................................................................. 6 - 1
6.4 Connection box at rear of Z-Carriage ....................................................... 6 - 2
6.5 Power Line Connection ............................................................................ 6 - 3
6.6 Mains Power Unit Connectors .................................................................. 6 - 4
6.7 MPU schematic diagram .......................................................................... 6 - 6
6.8 MPU Component Layout .......................................................................... 6 - 7
6.9 Low voltage board - schematic diagram ................................................... 6 - 8
6.10 Low voltage board - component layout ................................................... 6 - 9
6.11 High voltage board - component layout ................................................. 6 - 10
7 Pulse Logic Unit (PLU) ............................................................................................. 7 - 1
7.1 Exposure Logic ........................................................................................ 7 - 1
7.2 Return Function ........................................................................................ 7 - 4
7.3 Technique Selection ................................................................................. 7 - 4
7.4 Filament Control Circuitry ......................................................................... 7 - 4
7.5 Power Inverter Control .............................................................................. 7 - 5
7.6 High Voltage Control Circuitry .................................................................. 7 - 6
7.7 PSU Protection Circuit ............................................................................. 7 - 7
7.8 Motor Drive .............................................................................................. 7 - 8
7.9 Pulse Logic Unit connectors ..................................................................... 7 - 9
iv
Service Manual 8200909
Cranex Panoramic X-ray Series
Contents
7.10 PLU Schematic diagram ...................................................................... 7 - 13
7.11 PLU Component Layout ....................................................................... 7 - 14
8 Partial Exposure Controller (PEC) .......................................................................... 8 - 1
8.1 Block diagram.......................................................................................... 8 - 1
8.2 Operation ................................................................................................. 8 - 1
8.3 Eprom 27128 (IC2) and Divider 4040 (IC1) .............................................. 8 - 2
8.4 Mode selector .......................................................................................... 8 - 3
8.5 Motor Driving ........................................................................................... 8 - 3
8.6 PEC J3 1 ................................................................................................. 8 - 3
8.7 IC 10 ........................................................................................................ 8 - 3
8.8 PEC control panel .................................................................................... 8 - 3
8.9 Lengths of exposured areas using the PEC .............................................. 8 - 4
8.10 Partial Exposure Controller (PEC) Connectors ....................................... 8 - 5
8.11 Partial Exposure Controller (PEC) schematic diagram ........................... 8 - 7
8.12 Partial Exposure Controller (PEC) component layout .............................. 8 - 8
8.13 PEC Switches - schematic diagram
8.14 PEC Switches - component layout........................................................ 8 - 10
9 Front Panel board 4050-1 ......................................................................................... 9 - 1
9.1 Functional Description ............................................................................. 9 - 1
9.2 Connector Signals ................................................................................... 9 - 2
9.3 Front panel board- schematic diagram ..................................................... 9 - 3
9.4 Front panel board - component layout ....................................................... 9 - 4
10 kV selector ............................................................................................................. 10 - 1
10.1 kV-Selector 4120-1 - functional description .......................................... 10 - 1
10.2 kV-Selector 4120-1 - Automatic kV select ............................................ 10 - 2
10.3 kV selector - Connectors ...................................................................... 10 - 4
10.4 kV selector - schematic diagram 1 ....................................................... 10 - 5
10.5 kV selector - schematic diagram 2 ....................................................... 10 - 6
10.6 kV selector - component layout ............................................................. 10 - 7
10.7 kV selector switches - schematic diagram ............................................ 10 - 9
10.8 kV selector switches - component layout ............................................ 10 - 10
Service Manual 8200909
v
Contents
Cranex Panoramic X-ray Series
11 Time Selector 4230-1 ............................................................................................ 11 - 1
11.1 Introduction ............................................................................................ 11 - 1
11.2 Time Selector 4230-1 - functional description ........................................ 11 - 1
11.3 Time selector - schematic diagram ........................................................ 11 - 5
11.4 Time selector - component layout........................................................... 11 - 6
11.5 Time selector switches - schematic diagram.......................................... 11 - 7
11.6 Time selector switches - component layout ............................................ 11 - 8
12 Power Switching Units ......................................................................................... 12 - 1
12.1 PSU 47602 .......................................................................................... 12 - 1
12.2 Filament Drive Circuit - 47602.............................................................. 12 - 1
12.3 Regulator TR4, TR5 - 47602 ................................................................ 12 - 1
12.4 Inverter TR2, TR3 - 47602 .................................................................... 12 - 1
12.5 Protection Circuit - 47602 .................................................................... 12 - 2
12.6 Transformer T1 - 47602 ........................................................................ 12 - 2
12.7 Power Switching Unit (PSU) Connector Signals - 47602 ...................... 12 - 3
12.8 Power Switching Unit - 47602 schematic diagram ................................ 12 - 5
12.9 Power Switching Unit - 47602 component layout .................................. 12 - 6
12.10 OLD Power Switching unit (PSU) - 47601 .......................................... 12 - 7
12.11 Power transistor verification - 47601 ................................................ 12 - 10
12.12 Power switching unit connector signals - 47601 ................................. 12 - 11
12.13 OLD PSU - 47601 schematic diagram sheet 1 ................................ 12 - 13
12.14 OLD PSU - 47601 schematic diagram sheet 2 ................................ 12 - 14
12.15 OLD PSU - 47601 component layout ............................................... 12 - 15
13 Tube Head Assembly (THA) .................................................................................. 13 - 1
13.1 Description .......................................................................................... 13 - 1
13.2 Circuit diagram .................................................................................... 13 - 2
14 Position Display Board ......................................................................................... 14 - 1
14.1 The Position Display ............................................................................ 14 - 1
14.2 Position Display Connector Signals ..................................................... 14 - 2
14.3 Position display schematic diagram ..................................................... 14 - 3
14.4 Position display component layout........................................................ 14 - 4
vi
Service Manual 8200909
Cranex Panoramic X-ray Series
Contents
15 Z-Driver Unit .......................................................................................................... 15 - 1
15.1 Speed Reference Circuit ...................................................................... 15 - 1
15.2 Moset - Output Stage ........................................................................... 15 - 1
15.3 6V Step-up Circuit ................................................................................ 15 - 1
15.4 Current Limit ........................................................................................ 15 - 2
15.5 Patient positioning lights ...................................................................... 15 - 2
15.6 Z-Driver Unit Connector Signals ........................................................... 15 - 2
15.7 Z-driver schematic diagram .................................................................. 15 - 3
15.8 Z-driver component lay out ................................................................... 15 - 4
16 PDC timing circuit - for DM versions .................................................................. 16 - 1
16.1 Operation ............................................................................................. 16 - 1
16.2 PDC timing circuit connector signals .................................................... 16 - 2
16.3 PDC timing circuit (DM) schematic diagram......................................... 16 - 3
16.4 PDC timing circuit (DM version) component layout ............................... 16 - 4
17 Interlock circuit board - for DS versions ............................................................ 17 - 1
17.1 Operation ............................................................................................. 17 - 1
17.2 Interlock circuit board connector signals ............................................... 17 - 2
17.3 Interlock circuit board (DS) - schematic diagram .................................. 17 - 5
17.4 Interlock circuit board (DS) - component layout ..................................... 17 - 6
18 Troubleshooting ................................................................................................... 18 - 1
18.1 Fuse Chart ........................................................................................... 18 - 1
18.2 Problems, causes (c) and solutions (s) ................................................. 18 - 2
Operating problems - panoramic units ................................................. 18 - 2
No power when the unit is switched on (switch light not on) ....................... 18 - 2
Exposure warning lights and buzzer come on when unit switched on ........ 18 - 2
The READY light does not come on.......................................................... 18 - 2
Protection light comes on .......................................................................... 18 - 3
None of the patient positioning lights come on .......................................... 18 - 4
One of the positioning lights does not come on ......................................... 18 - 4
Bulbs in the patient positioning lights keep blowing .................................... 18 - 4
The patient positioning lights do not switch off after the preset time .......... 18 - 4
Height adjustment movement (pan or pan/ceph) does not work ............... 18 - 4
No radiation when exposure taken (movement but no lights) .................... 18 - 5
Service Manual 8200909
vii
Contents
Cranex Panoramic X-ray Series
Image quality problems - panoramic units ............................................ 18 - 7
End of the image is missing (partial exposure) ......................................... 18 - 7
Part of the image is in focus and part out of focus .................................... 18 - 7
Image too light, too dark or not enough contrast - cassette versions only 18 - 7
The image is not symmetrical ................................................................... 18 - 8
There are dark vertical lines (over exposure) on the film .......................... 18 - 8
The length of the image (exposed area) in not correct .............................. 18 - 9
The middle balls on the ball/pin image are oval and not round .................. 18 - 9
Image quality problems - Ceph units .................................................. 18 - 10
The margins are not all the same width ................................................... 18 - 10
19 Removing covers.................................................................................................. 19 - 1
19.1 Rotating unit ......................................................................................... 19 - 1
19.2 Upper shelf cover ................................................................................. 19 - 4
20 Testing, Calibrating and Adjusting ...................................................................... 20 - 1
20.1 kV/mA Calibration procedure ............................................................... 20 - 1
20.2 Adjusting the low line triggering ............................................................ 20 - 5
20.3 Backup timer test ................................................................................. 20 - 5
20.4 Calibrating the Autoset kV (cassette units only) .................................... 20 - 6
20.5 Calibrating the positioning display ........................................................ 20 - 8
20.6 Adjusting the Z-motor belt ................................................................... 20 - 10
20.7 Adjusting the up/down speed (z-driver)
(Excel and Excel Ceph units only) ........................................................... 20 - 11
20.8 Adjusting the volume of the exposure warning tone .............................. 20 - 11
20.9 Calibrating CCD sensors - DM versions .............................................. 20 - 11
20.10 Calibrating CCD sensors - DS versions ........................................... 20 - 13
20.11 Checking the operation of PSU 47602-1 ..........................................
Checking the reference voltages ........................................................
Power transistor verification...............................................................
Checking the wave forms ...................................................................
viii
20 - 14
20 - 14
20 - 15
20 - 16
Service Manual 8200909
Cranex Panoramic X-ray Series
Contents
21 Aligning procedures ............................................................................................. 21 - 1
21.1 Taking a ball/pin exposure .................................................................... 21 - 1
21.2 Analysing the ball/pin image .................................................................
The correct shape image .....................................................................
Image length correct, but image not symmetrical ..................................
Image too long or too short (Cassette versions only) ............................
The middle balls are not the same shape as the side balls ...................
The shape of the balls are not the same on both sides .........................
21 - 4
21 - 4
21 - 4
21 - 5
21 - 5
21 - 6
22 Replacing parts ..................................................................................................... 22 - 1
22.1 Replacing the Mains Power Unit (MPU) ................................................ 22 - 1
22.2 Replacing the Pulse Logic Unit (PLU). .................................................. 22 - 1
22.3 Replacing the Partial Exposure Controller (PEC).................................. 22 - 1
22.4 Replacing the Front panel board .......................................................... 22 - 2
22.5 Replacing the kV and Time Selector ..................................................... 22 - 2
22.6 Replacing the Power Switching Unit (PSU)........................................... 22 - 2
22.7 Replacing the Tube Head Assembly ..................................................... 22 - 3
22.8 Replacing the Cephalometric Tube Head ............................................. 22 - 5
22.9 Replacing the Position Display Assembly ............................................. 22 - 5
22.10 Replacing Z-Driver Unit Board (Excel units only) ................................. 22 - 5
22.11 Replacing positioning light bulbs ........................................................ 22 - 6
22.12 Replacing the Focal Trough Cable ..................................................... 22 - 7
22.13 Replacing z-carriage brake pads (BaseX Only) .................................. 22 - 9
22.14 Replacing the cassette carriage roller. ............................................... 22 - 11
22.15 Replacing the CCD sensor - DM version .......................................... 22 - 12
22.16 Replacing the CCD sensor - DS version .......................................... 22 - 13
23 Yearly check .......................................................................................................... 23 - 1
Service Manual 8200909
ix
Contents
Cranex Panoramic X-ray Series
24 Theory of operation .............................................................................................. 24 - 1
24.1 Working principles of narrow beam rotational radiology ........................ 24 - 1
24.2 Quality Cephalometric Radiographs ..................................................... 24 - 5
24.3 X-ray principles ....................................................................................
Beam Quality .......................................................................................
Focal Spot ...........................................................................................
Magnification .......................................................................................
24 - 6
24 - 6
24 - 6
24 - 7
25 Technical specifications ...................................................................................... 25 - 1
Unit dimensions ........................................................................................... 25 - 7
x
Service Manual 8200909
Cranex Panoramic X-ray Series
1 Introduction
1 Introduction
1.1 Scope of this manual
This manual describes how to service the Cranex
Excel range of dental panoramic x-ray units. The
range includes four cassette versions and two digital
versions.
The cassette versions are the:
- Excel
- Excel Ceph
- BaseX
- Cranex C (cephalometric unit only)
These use conventional film and/or Soredex imaging
plates.
The digital versions are the:
- Excel D
- BaseX D
The digital versions use CCD sensors. Two versions
of the sensor are available, DM and DS versions.
Functional and operational differences between the
different versions are given where appropriate.
IMPORTANT NOTE
The information in this manual also applies to earlier
cassette versions of the Cranex, the Cranex 3+
Ceph, 3+, 2.5+ and Cranex C. Differences between
these earlier versions and the latest Excel and
BaseX versions will be described where appropriate.
Service Manual 8200909
1-1
1 Introduction
Cranex Panoramic X-ray Series
1.2 Associated documentation
Cranex Excel/BaseX user’s manuals.
These describe how to operate the different versions
of the unit.
Cranex Excel/BaseX installation manual and separate appendices.
These describe how to install and set up the different
versions of the unit.
1.3 Servicing warnings and precautions
General precautions
The Cranex Excel range of dental x-ray units must
only be serviced and repaired by service personnel
who have been trained and approved by Soredex.
This manual is an aid to servicing the units and is
NOT a substitute for approved Soredex service
training.
Before attempting to service a unit make sure that
you know how to operate it. Read the appropriate
Cranex Excel user's manual.
Only use original Soredex spare parts when repairing the unit or replacing parts.
Radiation Safety
Before servicing the unit familiarise yourself with
local and national radiation safety standards and
requirements relating to dental x-ray equipment.
If you need to take test exposures you MUST take
adequate steps to protect yourself from radiation.
Use a lead apron or stand behind a suitable radiation
shield.
In addition, when taking exposures stand at least
two metres (six feet) from the unit.
1-2
Service Manual 8200909
Cranex Panoramic X-ray Series
1 Introduction
Mechanical safety
Switch the power off before repairing or replacing
mechanical parts.
Be careful when operating the unit not to get body
parts or clothing trapped between moving parts.
The aperture plate in the collimator is made of lead
(Pb) which is a toxic material. Do not touch it with your
bare hands.
Electrical Safety
Switch the power off before repairing or replacing
electrical parts.
Live electrical terminals are potentially dangerous.
Make sure that main power supply is OFF before
removing covers or circuit boards.
This equipment should be used only in areas that are
provided with a protective earth connection to ensure
an equipotential ground connection.
Before cleaning or disinfecting the unit switch the
main power supply off.
Electrostatic discharge
Electrostatic Discharge (ESD) can damage or destroy electronic components.
A static electricity charge builds up in everyone. The
build up is due to movement, humidity, the person's
clothing and the conductivity of the floor. If anyone
charged with static electricity touches a electronic
component the static electricity will discharge
through the component and can damage or destroy
it. Note that components damaged by electrostatic
discharge can fail at a later date.
When servicing the unit take proper precautions to
avoid electrostatic build up and discharge (ESD).
Follow the recommendations for the prevention of
ESD that are used in the country in which you are
working. If no recommendations are available follow
the guide lines below.
Service Manual 8200909
1-3
1 Introduction
Cranex Panoramic X-ray Series
Before handling any electrical parts or components
make sure that any static electricity charge that has
built up in you body is discharged.
When handling electrical parts or components use an
elasticated wrist wrap which is connected to a ground
point through a 1 Mohm current limiting cable. For a
ground point use water pipes, radiators or other
objects that are known to be connected to the ground.
Also use a cable to connect the unit to the same
ground potential as the wrist wrap.
If an antistatic mat is used, connect the wrist wrap
to the carpet and the carpet to the ground potential.
Wash the wrist wrap and check that it is good condition frequently.
Explosion Hazard
Certain disinfectants and cleaning agents may vaporize to form an explosive vapour. If such chemicals
are used the vapour should be allowed to disperse
before switching the unit on.
Operating warnings and precautions
The x-ray unit must only be used to take dental, TMJ
and cephalometric (optional) x-ray exposures. It
must not be used for any other purpose.
The unit or its accessories must not be modified,
altered or remanufactured in any way. Repairing
shall be performed by Soredex authorized service
only.
As radiation safety and protection requirements vary
from country to country and state to state it is the
responsibility of the operator to ensure that all local
and national radiation safety and protection requirements are met.
Never leave film cassettes open in daylight. Daylight
can damage intensifying screens.
1-4
Service Manual 8200909
Cranex Panoramic X-ray Series
1 Introduction
The use of ACCESSORY equipment not complying
with the equivalent safety requirements of this equipment may lead to a reduced level of safety of the
resulting system. Consideration relating to the choice
shall include:
– use of the accessory in the PATIENT VICINITY
– evidence that the safety certification of the ACCESSORY has been performed in accordance to the
appropriate IEC 601-1 or IEC 950 and/or IEC 601-11 harmonized national standard.
Unauthorized Modifications
Unauthorized changes or modifications to any part of
the unit or its equipment can have hazardous consequences. Changes or modifications must not be
made unless specifically authorized by Soredex.
When properly assembled with a compatible beamlimiting device, the diagnostic source assembly will
fully meet the United States of America Federal
Performance Standards for Diagnostic X-Ray Systems and their Components (21 CFR 1020 .30-.32)
provided no components or parts are removed from
the unit and no unauthorized adjustments are made
to the beam-limiting device or tube housing assembly.
Never remove or remanufacture any part of the tube
head assembly or beam-limiting device unless under
the direction of Soredex or their authorized distributor.
Never adjust any part of the beam-limiting device
unless under the direction of Soredex or their authorized distributor.
Service Manual 8200909
1-5
1 Introduction
Cranex Panoramic X-ray Series
Disposal
At the end of the useful working life of the equipment
and/or its accessories make sure that you follow
national and local regulations regarding the disposal
of the equipment, its accessories, parts and materials.
The equipment may include some or all of the following parts that are made of or include materials that
are non-environmentally friendly or hazardous:
- batteries
- x-ray tube head (Pb, Be and mineral oil)
- all electronic circuit boards
- column counter weight (Pb)
- cassettes (Pb), intensifying screens and imaging
plates
Disclaimer
Soredex shall have no liability for consequential
damages, personal injury, loss, damage or expense
directly or indirectly arising from the use of its products. No agent, distributor or other party is authorized to make any warranty or other liability on behalf
of Soredex with respect to its products.
1-6
Service Manual 8200909
Cranex Panoramic X-ray Series
2 Unit description
2 Unit description
2.1 Versions
Excel Ceph
The Excel Ceph is a dental panoramic x-ray unit that
uses film or Soredex imaging plates as the imaging
media. It can take panoramic, reduced width panoramic, sinus and TMJ exposures. In addition, Symmetric Vertical (SV), Asymmetric Vertical (AV) and
Horizontal (H) exposures to be taken with the cephalometric unit. The Excel Ceph has three patient
positioning lights, midsagittal, frankfort, focal trough, a
focal trough position indicator and motorized height
adjustment.
Excel
Similar to the Excel Ceph but does not have the
cephalometric unit.
BaseX
Similar to the Excel, but can only take panoramic,
reduced width panoramic and sinus exposures. In
addition, it only has two positioning lights, frankfort
and focal trough, does not have a focal trough position indicator and the height adjustment is manual.
Excel D
Similar to the Excel but uses a CCD sensor as the
imaging media.
BaseX D
Similar to the BaseX but uses a CCD sensor as the
imaging media.
Cranex C
This is a cephalometric only unit and takes Symmetric Vertical (SV), Asymmetric Vertical (AV) and Horizontal (H) exposures.
The Cranex 3+ Ceph, 3+ and 2.5+ are earlier
versions of the Excel Ceph, Excel and BaseX,
repectively, but they do not include the Auto kV
feature.
Service Manual 8200909
2-1
2 Unit description
Cranex Panoramic X-ray Series
2.2 Main parts - Excel, Excel D, BaseX and BaseX D
2-2
Service Manual 8200909
Cranex Panoramic X-ray Series
Service Manual 8200909
2 Unit description
2-3
2 Unit description
Cranex Panoramic X-ray Series
2.3 Main parts - Excel Ceph
2-4
Service Manual 8200909
Cranex Panoramic X-ray Series
2 Unit description
2.4 Mechanical description and operation
The units consist of a column, a Z-carriage, that can
slide up and down the column, and a rotating unit
(not Cranex C) that is attached to the Z-carriage.
Column
The top of the column is attached to the wall with a
wall bracket and the bottom of the column is freestanding on a rubber foot pad. The Z-carriage
moves vertically up and down the column and is
connected, by means of steel wires, to a counterweight inside the column.
With Excel versions an electric motor at the rear of
the Z-carriage drives the Z-carriage up and down.
The motor control is on the left-hand side of the Zcarriage.
With BaseX versions the Z-carriage is moved up and
down manually. A lever on the side of the Z-carriage
allows the Z-carriage to be locked when it is in the
required position.
Z-carriage
The Z-carriage comprises upper and lower shelves.
The upper shelf holds the rotating unit and the lower
shelf the patient chin rest, patient positioning knob
and focal trough light. When the knob is turned to
position the focal trough correctly, the rotating unit
moves simultaneously with the light. The frankfort
plane positioning light is attached to the left-hand
side of the Z-carriage and the midsagittal positioning
light (Excel units only) is under the upper shelf. At the
back of the Z-carriage there is the mains input, with
fuses and the main power switch. The exposure
switch is connected to the rear of the Z-carriage.
The upper shelf houses the mains power unit that
supplies power to the X-ray generator.
Service Manual 8200909
2-5
2 Unit description
Cranex Panoramic X-ray Series
Rotating unit (not Cranex C)
The rotating unit is attached to the underside of the
upper shelf. It comprises a tube head and a cassette
carriage (with digital units a CCD sensor). During an
exposure the rotating unit rotates around the patient’s head in the horizontal plane. The tube head
generates the x-ray beam which is collimated by the
primary slit. The radiation passes through the patient
to the secondary slot. Behind the secondary slot the
x-ray beam strikes the film/imaging plate cassette
which is synchronized to move linearly as the rotating
unit rotates (with digital units a CCD sensor is used).
A cam mechanism also slides the rotating unit backwards and forwards along the x-axis as the rotating
unit rotates. This x-axis movement allows the x-ray
beam to follow the shape of the jaw more accurately
and avoids x-ray concentration at the stationary
rotation center.
During rotation, the speed of the cassette carriage
varies in relation to other movements (with digital
units the speed profile, TDI-file, of the CCD sensor
determines the virtual movement). This movement
determines the imaging layer (focal trough). Basic
synchronization of the drive motor and the cassette
drive motor is done electrically. The two AC motors
run at the same speed. The speed of the cassette
carriage is adjusted by changing the angle at which
the drive wheel touches the cassette carriage roller.
This is accomplished with a cam and follower
mechanism.
2-6
Service Manual 8200909
Cranex Panoramic X-ray Series
2 Unit description
2.5 Circuit board location
Service Manual 8200909
2-7
2 Unit description
2-8
Cranex Panoramic X-ray Series
Service Manual 8200909
Cranex Panoramic X-ray Series
2 Unit description
Service Manual 8200909
BaseX
(Cranex 2.5+)
Excel D
BaseX D
Cranex C
Mains Power Unit (MPU)
High-Voltage Board
Low-Voltage Board
Power Switching Unit (PSU)
Tubehead Exchanger
Z-Drive Unit
Position Display
Pulse Logic Board (PLU)
kV Selector Assembly
Time Selector Assembly
Partial Exposure Controller (PEC)
Front Panel Board
PDC Timing Circuit (DM vers. only)
OR
Interlock Circuit Board (DS vers. only)
Excel Ceph
(Cranex 3+)
Circuit Board
Excel Ceph
(Cranrx 3+ Ceph)
2.6 Which circuit board which version
Yes
Yes
Yes
Yes
Yes
Yes
Yes
Yes
Yes
Yes
Yes
Yes
-
Yes
Yes
Yes
Yes
Yes
Yes
Yes
Yes
Yes
Yes
-
Yes
Yes
Yes
Yes
Yes
Yes
Yes
-
Yes
Yes
Yes
Yes
Yes
Yes
Yes
Yes
Yes
Yes
Yes
Yes
Yes
Yes
Yes
Yes
Yes
Yes
Yes
Yes
Yes
Yes
Yes
Yes
Yes
Yes
Yes
Yes
Yes
-
-
-
-
Yes
Yes
-
2-9
2 Unit description
Cranex Panoramic X-ray Series
2.7 Electrical operation
General description
The unit has a high frequency switching mode X-ray
generator consisting of five units: The mains power
unit (MPU) located in the upper shelf of the Z-carriage, the power switching unit (PSU), the pulse and
logic unit (PLU), the partial exposure controller
(PEC), and the tube head (THA) located in the rotating unit.
The Operating Principle of the Generator
The generator is fed by a single phase 220 VAC line.
Auxiliary voltages are produced by a 50/60 Hz transformer, rectifying and filtering networks. All auxiliary
voltages are grounded.
High Voltage Section
The mains input is rectified and filtered and then fed
to the high frequency generator. This supply is connected to the power switching regulator. The regulator works at 23.5 kHz (old 20 kHz) and consists of
transistor switches, a LC network, and a flywheel
diode. The voltage across the LC network capacitor
is dependent on the duty cycle (on time, a pulse
width of 23.5 kHz waveform) of the transistor
switches.
2 - 10
Service Manual 8200909
Cranex Panoramic X-ray Series
2 Unit description
The output voltage of the power switching regulator
(= capacitor voltage of the LC network) is fed to the
power inverter. The power inverter consists of two
transistor switches, working at 23.5 kHz (old 20
kHz). The transistor switches work in a push-pull
mode, creating an AC waveform in the output of the
H.T. transformer. The output of the H.T. transformer
is connected to voltage multipliers that multiply,
rectify and filter high voltage for the X-ray tube.
The level of high voltage is dependent on the input
voltage of the power inverter. As a result, the high
voltage is dependent on the pulse width of the power
switching regulator. There is feedback from the high
voltage which is compared with a preset value, and if
it is found to be different, the error is corrected by
varying the pulse width of the power switching regulator. This feedback works in real time and is fast
enough to compensate, for example, a 60 Hz ripple.
X-ray Tube Current
Filament heating, that controls the X-ray tube current, is produced by using a high frequency 23.5 kHz
inverter. The pulse width of the inverter is variable to
allow filament heating to be adjusted. The actual Xray tube current is compared to a preset value and if
it is found to be incorrect the inverter pulse width is
changed to compensate the error.
Automatic kV selection
The head support has a built-in potentiometer that
measures the patient’s head when the temple supports are closed. A signal from the potentiometer
goes to the kV selector, which then selects a suitable kV value.
Service Manual 8200909
2 - 11
2 Unit description
Cranex Panoramic X-ray Series
Exposure times
Normal
Child/Sinus
Sides
Middle
TMJ
2 - 12
50 Hz
19 s
17 s
11 s
10 s
3.3 + 3.3 s
60 Hz
16 s
14 s
9s
8s
3.3 + 3.3 s
Tolerance
+/- 15%
+/- 15%
+/- 15%
+/- 15%
+/- 15%
Service Manual 8200909
Cranex Panoramic X-ray Series
3 Main wiring diagrams
3 Main wiring diagrams
3.1 Sheet 1 - cassette version
Service Manual 8200909
3-1
3 Main wiring diagrams
Cranex Panoramic X-ray Series
3.2 Sheet 1 - DM version
3-2
Service Manual 8200909
Cranex Panoramic X-ray Series
3 Main wiring diagrams
3.3 Sheet 1 - DS fixed version
Service Manual 8200909
3-3
3 Main wiring diagrams
Cranex Panoramic X-ray Series
3.4 Sheet 1 - DS cassette version
3-4
Service Manual 8200909
Cranex Panoramic X-ray Series
3 Main wiring diagrams
3.5 Sheet 2 - all versions
Service Manual 8200909
3-5
3 Main wiring diagrams
3-6
Cranex Panoramic X-ray Series
Service Manual 8200909
Cranex Panoramic X-ray Series
4 Microswitches
4 Microswitches
4.1 Cassette carriage (cassette carriage versions only)
Cassette (CAS) microswitch, connects to PLU/J9
Pin
4
Signal
NO
5
C
Description
Closed when cassette is in start position. Enables ready
condition.
Film (FILM) microswitch, connects to PLU/J9
Pin
1
Signal
NO
2
3
C
NC
Description
Closed when cassette carriage is in start and stop
positions (film beginning and end). Controls radiation on
and off. Stops exposure normally.
Cephalo (CEPH) microswitch, connected to PLU/J9
Pin
6
Signal
C
7
NC
Service Manual 8200909
Description
Open when cassette carriage is in CEPH position.
Stops cassette carriage movement when unit is moving
to CEPH position.
4-1
4 Microswitches
Cranex Panoramic X-ray Series
4.2 Rotating unit microswitches
Start (START) microswitch, connects to PLU/J8
Pin
6
Signal
NC
7
C
Description
Closed when rotating unit is in start position. Enables
ready condition. Stops return movement.
Cephalo 1 (CEPH 1) microswitch, connects to PLU/J8
Pin
8
Signal
C
9
NC
4-2
Description
Open when rotating unit is in the CEPH position (parallel
to wall). Stops rotation when it reaches the CEPH
position in the CEPH mode.
Service Manual 8200909
Cranex Panoramic X-ray Series
4 Microswitches
End (END) microswitch, connects to PLU/J8
Pin
1
Signal
NC
2
C
Description
Opens when the rotating unit reaches the end position.
This is a safety function to stop an exposure.
In normal operation the microswitch is closed until the
rotating unit reaches the end position, the film
microswitch stops the exposure when the cassette
comes to the end position.
Density (DENS) microswitch, connects to PLU/J10
Pin
D1
Signal
C
D2
NC
Service Manual 8200909
Description
Opens in middle of exposure if compensation is
selected, DENS increases the mA in middle of
an exposure.
4-3
4 Microswitches
4-4
Cranex Panoramic X-ray Series
Service Manual 8200909
Cranex Panoramic X-ray Series
5 Capacitor Board
5 Capacitor Board
Key Switch
F1, F2
FI1
Capacitor Board
MLS
Service Manual 8200909
Cuts off AXV from Exposure Switch line.
8 A slow main fuses.
RFI filter on back bracket.
Filter signals going to remote control and exposure
switch.
Patient positioning light trigger switch.
5-1
5 Capacitor Board
5-2
Cranex Panoramic X-ray Series
Service Manual 8200909
Cranex Panoramic X-ray Series
6 Mains Power Unit (MPU)
6 Mains Power Unit (MPU)
6.1 General description
The Mains Power Unit (MPU) consists of a High
Voltage Board and a Low Voltage Board. Mains
power is supplied to the MPU through 2 x 8 A slowblow fuses and a two-pole main switch.
Transformer T1 produces all the auxiliary voltages
for the unit.
6.2 High Voltage Board
The mains power is fed to the High Voltage Board,
which supplies power to the power switching unit. At
the start of an exposure, a PRV signal turns high,
and closes relays P1, P2 and P3. When P1 and P2
close, they connect the mains power to filter network
C1 - CH1 - C2, and through resistor R1 to rectifier
D1. R1 limits the surge current when capacitor C4 is
initially charged. After the preheating time has
elapsed, the TH signal turns low, closes relay R, and
allows C4 to be charged directly from the mains.
Capacitor C4 has a DC voltage of 230 - 300 VDC,
which is supplied to the PSU through fuses F3 and
F4, in the form of PV+ and PV- signals.
6.3 Low Voltage Board
Transformer T1 supplies power to the Low Voltage
Board which then produces auxillary voltages from
this power. T1 secondary-coils are connected
through fuses F5 and F6 to rectifiers D4 and D6, and
filtered with capacitors C5, C6 and C7.
Relay P3 connects the supply-voltage to a regulator
network which then produces a filament inverter
supply voltage (FIV). When FIV is used the positioning lights are turned off.
IC1 is a voltage regulator that produces a 20 V
output. TR1 and TR4 are used to increase the output
current capability of the regulator.
Service Manual 8200909
6-1
6 Mains Power Unit (MPU)
Cranex Panoramic X-ray Series
Supply voltage for the two drive motors (MD1, MD2)
is derived from a 24 V transformer secondary-coil.
Voltage from capacitor C7 (AXV) is supply to exposure switch (J1/6), digital display (J1/6), and pulse
logic board (J4/7).
Power to the positioning light control relay V is supplied through the normally closed P3 contact, ensuring that the patient position lights turn off when P3 is
opened. When the positioning light switch is pressed
it allows capacitor C11 to be charged through resistor R12. Transistor TR3 receives base current
through R13. The base current generates an emitter
current which then causes the V relay to close.
When the V relay closes, a half-wave rectified (D17)
voltage of 12 VRMS is supplied to the patient positioning lights.
The patient positioning light bulbs are 12 V. Relay V
will open when capacitor C11 is discharged through
R13, or when relay P3 closed.
At the beginning of an exposure the PRV signal goes
high and triggers relays P1 and 2 and close the
contacts that they control. The PRV signal also
triggers relay P3 which opens two and closes one of
the contacts it controls. The R9 - C9 - D11 - D12
network produces a pull-out delay for relays, ensuring that no power is going through P1 and 2 contacts
when disconnected.
6.4 Connection box at rear of Z-Carriage
The mains power is connected through the mains
input terminal, radio interference filter and 2 x 8 A
slow main fuses to a double-pole mains switch.
The connection box also includes a RFI capacitor
board that filters AXV-, EXP-, EXL-, GND- signals
using 4.7 nF capacitors.
6-2
Service Manual 8200909
Cranex Panoramic X-ray Series
6 Mains Power Unit (MPU)
6.5 Power Line Connection
The unit can be used with line voltages ranging from
175 to 250 volts. The factory setting is 220 volts
(between 205 - 225 V).
1. With a digital volt meter (DVM) check the line
voltage to which the unit is to be connected. Also
check the earth connection and the circuit
breaker.
If the line voltage is not the same as the factory
setting, the voltage of the unit must be changed.
2. To change the voltage of the unit move the wire
marked “L”, on the transformer terminal block, to
the terminal with the line voltages to be used.
The line voltage ranges for the terminals are as
follows:
LINE VOLTAGES
- 175 - 190 V, use the
- 190 - 205 V, use the
- 205 - 225 V, use the
- 225 - 250 V, use the
TERMINAL
190 V terminal
200 V terminal
220 V terminal
240 V terminal
IMPORTANT NOTE
If the mains resistance is significant, the input
voltage will drop below the required level when
an exposure is taken. In this case, select a
terminal one step lower to ensure proper operation.
Service Manual 8200909
6-3
6 Mains Power Unit (MPU)
Cranex Panoramic X-ray Series
6.6 Mains Power Unit Connectors
MPU/J1:At back of MPU.
Pin
1
(2)
Signal
GND
JM
3
4
EXL
EXP
(5)
RYL
6
7, 8
AXV
-
9
-
10
-
11, 12,
-
6-4
Description
Ground
Not used.
(Unregulated supply 30 VDC for Z-magnetic
brake in older Cranex models).
Exposure light. High (24 V) when kV over 50.
Exposure command. High (28-35 VDC) when
exposure switch pressed.
Not used. (Ready light. High (24VDC) when unit is
ready).
Unregulated supply 28 - 35 VDC.
Positioning light supply. High 12 VDC across
whenpositioning lights triggered on.
Positioning light trigger. High (28 -35 VDC) when
light trigger switch.
Unregulated supply for positioning light trigger. Low
during exposure.
220 VAC input mains voltage. Present when the
unit is switched on.
Service Manual 8200909
Cranex Panoramic X-ray Series
6 Mains Power Unit (MPU)
MPU/J4: In front of MPU.
Pin
1
Signal
BFD
2
3
4
(5)
6
PRV
TH
GND
RVL
FIV
7
(8)
AXV
RYL
9
EXP
10
11, 12
EXL
MD1, MD2
Description
Not used (Unregulated supply for PSU).
High (20-30 VDC) during exposure.
P-relay control. High (28-35 VDC) during exposure.
R-relay control. Low after preheat.
Signal ground.
Not used. (Relay Voltage. Full wave rectified 20 VAC).
Filament inverter supply. Regulated.
High (20VDC) during exposure.
Unregulated supply 28-35 VDC.
Not used. (Ready light drive. High (24 VDC) when
unit is ready for exposure).
Exposure command. High (28-35 VDC) when
exposure switch pressed.
Exposure light drive. High (24 VDC) when kV over 50.
Supply for drive motors, PSU and low voltage supply.
24 VAC across.
MPU/J5: In front of MPU
Pin
1, 2
3, 4
Signal
BV1, BV2
PV+, PV-
Service Manual 8200909
Description
Supply for tube head cooling fan. 24 VDC .
Supply for power switching unit. High (230-300 VDC
across) during exposure.
6-5
6 Mains Power Unit (MPU)
Cranex Panoramic X-ray Series
6.7 MPU schematic diagram
6-6
Service Manual 8200909
Cranex Panoramic X-ray Series
6 Mains Power Unit (MPU)
6.8 MPU Component Layout
Service Manual 8200909
6-7
6 Mains Power Unit (MPU)
Cranex Panoramic X-ray Series
6.9 Low voltage board - schematic diagram
6-8
Service Manual 8200909
Cranex Panoramic X-ray Series
6 Mains Power Unit (MPU)
6.10 Low voltage board - component layout
Service Manual 8200909
6-9
6 Mains Power Unit (MPU)
Cranex Panoramic X-ray Series
6.11 High voltage board - component layout
6 - 10
Service Manual 8200909
Cranex Panoramic X-ray Series
7 Pulse Logic Unit (PLU)
7 Pulse Logic Unit (PLU)
The Pulse Logic Unit is located beneath the control
panel. It includes all the X-ray generator controls,
protection circuits and exposure logic. Voltage is
supplied to the PLU board by the AXV. IC16 produces a 24 volt supply for technique selector boards,
indicator lights and microswitches. IC15 produces a
+15 volt supply for the logic and generator control
ICs. The R37 - C12 network supplies a reduced
input voltage for IC15.
IC8 is located on the Partial Exposure Controller
board (PEC). (Note that not all units have the PEC
board)
7.1 Exposure Logic
In normal operation the TA switch is in the DOWN
position. If the TA switch is in the UP (TEST) position
radiation is generated when the exposure button is
pressed, but the rotating unit and cassette carriage
do not move and all the microswitches, except for
the thermal switch in the tube head, are bypassed.
The unit is ready to take an exposure when a high
voltage (+15 VDC) is supplied to IC9, pin 6. This
happens when:
1. The start microswitch is closed, indicating that
the rotating unit is in the start position.
2. The CAS microswitch is closed, indicating that
the cassette carriage is in start position.
3. The temperature sensor(s) is closed, indicating
that the temperature in normal in the tube
head(s).
4. Protection circuitry not activated.
If the TA switch is UP, only the temperature sensor
and protection circuitry are checked to see that they
are in the ready condition.
Service Manual 8200909
7-1
7 Pulse Logic Unit (PLU)
Cranex Panoramic X-ray Series
When a high voltage is supplied to pin 6 on IC9 the
ready-light (RYL signal) will come on. The protection circuitry trigger will prevent an exposure when
a low voltage is supplied to pin 6 on IC7. The
protection light will then come on.
When the EXPOSURE switch is pressed, a high
voltage is produced on pin 13 on J1. Because the
END microswitch is closed in the ready state, a
high voltage is also produced on pin 5, IC7. This
produces a low voltage on pin 4, IC9. Pin 6, IC9,
has a high voltage because of the ready condition.
This produces a low voltage on pin 13, IC8.
Before exposure starts a high voltage is produced
on pin 10, IC9, and a low voltage on pin 8, IC9.
This produces a high voltage on pin 12, IC9, which
in turn produces a low voltage on pin 12, IC8.
Thus a high voltage is produced on pin 11, IC8
(PRE signal). When the PRE signal voltage goes
high preheating begins.
If a kV value has been selected (the unit is not in
the TEST mode) pin 14, IC4, produces a low
voltage. If a kV value is selected instead of TEST
TR1 will come on and produce a high voltage PRV
signal that activates the P-relays on the MPU. If
the show switch connection to the MPU is cut (the
show switch is down for the show mode) the PRV
signal is not transmitted to the MPU and the Prelays are disabled.
Capacitor C4 begins to charge through R9 and
when pin 12, IC2, reaches the voltage level of pin
13, IC2 (approximately 9 volts), the voltage of pin
14, IC2, goes up. Now the voltage of pin 16, IC3,
goes low which closes the M-relay and the drive
motors are energized (with digital units software
handles the movement). When leading edge of the
film reaches the secondary slot, the F-microswitch
connects pin 14, IC2, to pin 10, IC2, (over 9 volts)
and the voltage of pin 8, IC2, goes up.
7-2
Service Manual 8200909
Cranex Panoramic X-ray Series
7 Pulse Logic Unit (PLU)
The voltage of pin 11, IC5, goes up because pin 13,
IC5, was at a high voltage level. The voltage of pin
13, IC5, stays at a high voltage level as long as the
voltage of capacitor C6 is less than the voltage of
the V-TIMER. C6 is charged through R12 and gives
BACK - UP -TIME of about 23.5 sec.
The high voltage of pin 11, IC5, causes the voltage
of pin 12, IC9, to go down, but because the voltage
of pin 5, IC8, is high, the voltage of pin 4, IC8, remains low.
A high voltage on pin 11, IC5, normally produces a
low voltage on pin 11, IC7 (EXT-NOT-signal). When
the EXT-NOT-signal is low the X-rays will be generated.
When the trailing edge of the film passes the secondary slot, the F-microswitch grounds pin 10, IC2,
which causes the voltage at pin 8, IC2, to go down
and the voltage (EXT-NOT-signal) at pin 11, IC7,
goes up, causing the generation of X-ray stop.
When the voltage on pin 11, IC5, goes down, the
voltage on pin 4, IC8, goes up and a low voltage is
produced on pin 11, IC8, which deactivates the Prelay. If the exposure switch is released during
exposure or the END microswitch opens at end of
rotation, the voltage of pin 4, IC7, will go up, producing high voltage on pin 13, IC8, and a low voltage pin
12, IC8. This causes the voltage (PRE-signal) on pin
11, IC8, to go down turning off X-ray generation.
Further exposure is possible only after the unit is
returned to the ready position again and the voltage
on pin 6, IC7, goes up.
Service Manual 8200909
7-3
7 Pulse Logic Unit (PLU)
Cranex Panoramic X-ray Series
7.2 Return Function
When the RETURN switch is pressed, the voltage
on pin 9, IC5, goes up, and if the voltage on pin 8,
IC5, is high, a high voltage is produced on pin 10,
IC5, which, with the help of D4, holds itself at the
high level. When the voltage at pin 10, IC5, is at a
high level, it drives the D- and M-relays. The Drelays change rotating direction of motors to return. The voltage at pin 8, IC5, goes down when
the EXP switch is pressed (pin 8, IC8, goes high)
or when the rotating unit reaches start position and
START microswitch closes (pin 9, IC8, goes high).
7.3 Technique Selection
Technique selection is done with the kV selector
row. The kV selector generates a selected reference voltage to kV REF output. When TEST mode
is selected, TEST 1 contact is low, inhibiting Prelay pull-in and TEST 2 contact is high, connecting high to IC8, pin 1, that prevents the EXT-NOT
signal from going low.
7.4 Filament Control Circuitry
IC14 produces pulse-width controlled 23.5 kHz
drive signals to the filament inverter transistors on
the PSU through FIL1 and FIL2. IC14 has two
separate controls for pulse width: preheating and
tube current feedback.
Regulated supply voltage for filament inverter, FIV,
is connected to R83 - R82 - C34 network and
produces reference to IC14, pin 4 through R40 R41 - R43 - C16. In the beginning of the preheat
period IC10b turns on and connects reference to
IC14, pin 4 since IC10d is on (EXT-NOT-signal
high). The voltage of IC14, pin 4 rises. This voltage controls the duty cycle during preheat time.
After the preheat time, the EXT- NOT signal goes
low, turns IC10d off and IC14, pin 4 drops low.
Pulse width is now controlled by tube current
feedback.
7-4
Service Manual 8200909
Cranex Panoramic X-ray Series
7 Pulse Logic Unit (PLU)
The tube current feedback signal, MAI, is connected
through R75 to R38. The voltage across R38 is fed
into -input of error amplifier, IC14, pin 2. The +input
IC14, pin 1 is connected to reference voltage on
capacitor C19. Reference voltage is derived from 5
volts source of IC13 through R48 - R51 - R50 network.
If 6 mA selection is made, resistor R84 connects in
parallel with R50. In compensation mode, R85 connects in parallel with R50, except in the middle part
of exposure to produce a lower (7.5 or 4.5 mA)
current on sides and full (10 mA or 6 mA) current in
the middle.
The R86 - C19 network filters the reference voltage
to give a smooth change for tube current in compensation mode. Error amplifier adjusts pulse width, so
that feedback signal across R38 is the same as
reference across C19. If this does not hold true, the
pulse width will change in order to compensate for
the error.
R69 and R70 supply base current through IC14 to
filament inverter transistors.
R44 - R45 and C17 determine the clock frequency of
X-ray generator. It is adjusted with R45 to be 47
kHz. The output of IC12, 13, 14 has 23.5 kHZ waveform because of an internal divider of IC’s. IC14 acts
as master oscillator. It gives frequency to IC12 and
IC13 through pin 5’s which are connected together.
7.5 Power Inverter Control
IC13 operates as a controller for the power inverter
transistors. It works at a constant pulse width, duty
cycle being 90%. In case of an mA overrun, pin 4
goes high and shuts down the power inverter.
Service Manual 8200909
7-5
7 Pulse Logic Unit (PLU)
Cranex Panoramic X-ray Series
7.6 High Voltage Control Circuitry
IC12 operates as a power regulator drive circuit. It
produces variable pulse width according to feedback
signals from the power regulator output voltage
(RFB) and high voltage (HFB).
After preheat time, the EXT-NOT signal turns low,
turning off IC10c. IC12, pin 4 drops low and output
pulse width is controlled by error amplifier of IC12.
EXT-NOT going low turns off, also IC10a and kVREF signal on IC11, pin 5 begins to rise in compliance with the R61 -C22 network towards value
selected in kV-selector. IC11, pin 7 begins to rise
because of +input going higher than -input. IC12, pin
2 goes higher than IC2, pin 1 and pulse width on
output pins 8,11 begins to increase. Thus, the power
regulator output voltage rises and also the RFBsignal on IC12, pin 1 rises following IC12, pin 2. High
voltage on tube rises also according to the power
regulator output voltage and the HFB signal begins
to rise. IC11, pin 3 and 1 rises and follows the voltage on IC11, pin 5. Stable condition in feedback
system is achieved when IC11, pin 1 has the same
voltage as IC11, pin 5 and IC12, pin 2 same as
IC12, pin 1. Now, the feedback system works to
maintain this condition.
If, for some reason, the HFB-signal is missing and
IC11, pin 7 stays high, RFB signal level will match
the level on IC12, pin 2 and the power regulator
output voltage is limited to yield approximately 85 kV
on tube.
7-6
Service Manual 8200909
Cranex Panoramic X-ray Series
7 Pulse Logic Unit (PLU)
7.7 PSU Protection Circuit
Normally the PSU protection circuit is activated when
the regulator voltage or inverter current are too high.
When the PSU protection circuit is active it will trigger the PLU protection circuit through the HFB line.
The X-ray generator has circuitry that inhibits or
interrupt exposure if an unsafe condition exists. IC6,
pin 10 is normally low, and when high, it interrupts
exposure by producing low on IC7, pin 6, and by
raising EXT-NOT high by low on IC8, pin 3 and
indicates the condition through low on IC4, pin 15,
which drives the protection indicator lamp. IC6, pin
*(4) 11 high indicates the protection condition. When
IC5, pin 5 goes high after preheating, output IC5, pin
4 is dependent on output IC6, pin *(4) 11. If the
condition still exists, IC6, pin 8 goes high and latches
IC6, pin 10 high. Connection of IC6, pin 10 to pin 9
makes the high stay until power is switched off.
IC2, pin 6 is connected through divider R15 - R16 R17 - C7 to unregulated supply voltage, AXV. If AXV
is too low, indicating a low mains voltage, IC2, pin 6
goes lower than 9 volts reference (V9) on IC2 pin 5,
and output IC2 pin 7 and also IC6 pin *(4) 11 will go
high. IC1, pin 10 is connected to HFB signal through
R18 - C8. If it goes higher than 9 volts (V9) indicating a high voltage on X-ray tube (90 kV), output IC1,
pin 8 and also IC6, pin 4 will go high. IC1, pin 5 is
also connected to HFB-signal. Output IC1, pin 7 is
controls the EXL signal through IC3, pin 10 and TR2.
EXL signal is high if the tube has more than 50 kV.
The tube current is sensed on R75 - R38 by IC17,
pin 6. If the current becomes too high, indicating
tube arc, output IC17, pin 1 goes high and latches
high on IC6, pin 10 and about IC13, pin 4 that inhibits
power inverter drive pulses. IC17, pin 1 is brought
low by a pulse on IC17, pin 4 through C28 - R72 at
power up.
Service Manual 8200909
7-7
7 Pulse Logic Unit (PLU)
Cranex Panoramic X-ray Series
7.8 Motor Drive
J1/23, 24 (MD1) and J1/25, 26 (MD2) use 24 AC
supply derived from the MPU. MD2 is brought
through a TA switch contact that disables motors
when in the up position.
M-relay controls supply to motors through contacts
in both MD1 and MD2 line. D-relay controls direction
of motor run by connecting MD1 signal either to J6/1
and J7/3 or J6/3 and J7/1. (J4/8 and J4/9 are
shorted together with a jumper on connector.)
7-8
Service Manual 8200909
Cranex Panoramic X-ray Series
7 Pulse Logic Unit (PLU)
7.9 Pulse Logic Unit connectors
PLU/J1: 26-pin ribbon cable
Pin
Signal
1
MAI
2, 3, 4, 6 GND
5, 7, 8
AXV
(9)
RVL
10
BI1 (RI1)
11
RYL
12
BI2
13
EXP
14
15, 16
17, 18
19, 20
23-26
HFB
EXL
PRV
TH
MD1, MD2
Description
Tube current feedback from panoramic tube head.
Signal ground.
Unregulated supply 28-35 VDC.
Not in use. Full wave rectified 20 VAC.
Tube head temperature signal. High (24 VDC)
when unit in start position, kV selected and tube
head temperature sensor closed or TA switch on
PLU board up and tube head temperature sensor
closed.
Ready light drive. High (24 VDC) when unit ready
for exposure.
Tube head temperature sensor supply. High when
unit in start position and kV selected, or TA-switch
on PLU board up.
Exposure command. High (28-35 VDC) when
exposure switch pressed.
High voltage feedback from pan tube head.
Exposure light drive. High (24 VDC) when kV over 50.
P-relay control. High (28-35 VDC) during exposure.
R-relay control. Low after preheat.
Supply for drive motors. 24 VAC across.
PLU/J2: 20-pin ribbon cable
Pin
1, 2
3
4
9, 13
Signal
RFB
+15
F1, F2
15,17,19 FIV
16, 18
R1, R2
14, 20
I1, I2
Service Manual 8200909
Description
Signal ground.
Regulator voltage feedback.
Regulated supply +15V
Filament inverter control. High (1.2 VDC, 0.2 VAC)
during exposure.
Filament inverter supply. High (20 VDC) during
exposure.
Power regulator control. High (2.2 DC) during
preheat, low (1.5 DC) after preheat.
Power inverter control. 1.5 DC, 0.3 VAC during
exposure.
7-9
7 Pulse Logic Unit (PLU)
Cranex Panoramic X-ray Series
PLU/J3: Front panel connector
Pin
11
10
Signal
GND
RYL
9
FAILURE
8
RET
7
2
+24V
D2
1
MAR
Description
Signal ground.
Ready light drive. High (24 VDC) when unit ready
for exposure.
Protection indicator drive. Low when protection
condition occurs.
Return command. High (24 VDC) when return
switch is pressed.
Regulated supply. +24 VDC.
Compensation selection. Shorted to ground when
compensation selected.
6/10 mA selection. Shorted to ground when
6 mA selected.
(PLU/J4) Cassette motor versions only.
Special note, pins 8 and 9 must be shorted
(PLU/J5:) Not in use. Test circuit connector.
Pin
4
Signal
-
3
RET
2
1
GND
+24V
Description
Exposure command. High (28-35 VDC) when
exposure switch pressed.
Return command. High (24 VDC) when return
switch pressed.
Signal ground. Ground point for DMM.
Regulated supply. 24 VDC.
PLU/J6: Cassette motor (where applicable)
Pin
1
Signal
-
2
3
-
7 - 10
Description
Cassette motor supply. High (24 VAC to 2) during
return movement, when TA switch is down.
Cassette motor supply.
Cassette motor supply. High (24VAC to 2) after
preheat, when TA switch is down.
Service Manual 8200909
Cranex Panoramic X-ray Series
7 Pulse Logic Unit (PLU)
PLU/J7: Rotation motor
Pin
1
Signal
-
2
3
-
Description
Rotation motor supply. High (24 VAC to 2) after
preheat, when TA switch is down.
Rotation motor supply.
Rotation motor supply. High (24 VAC to /2) during
return movement, when TA switch is down.
PLU/J8: Rotation microswitches
Pin
1
Signal
-
2
-
3, 4, 5
6
-
7
8, 9
-
Description
Exposure command. High (28-35 VDC) when
exposure switch pressed.
Exposure command. High (28-35 VDC) when
exposure switch pressed and rotation unit “not in
end” position.
Not in use.
Rotation start position. High (24 VDC) when
rotation unit in start position.
Regulated supply. +24 VDC.
Rotation unit position in Ceph mode. Open across
when rotation unit in Ceph position.
PLU/J9: Cassette carriage microswitches (cassette versions)
Pin
1
2
Signal
-
3
4
-
5
-
6, 7
-
Service Manual 8200909
Description
Signal ground.
Radiation enable signal. High (15 VDC) after
preheat when film comes behind secondary slot.
Motors start signal. High (15 VDC) after preheat.
Cassette start supply. High (24 VDC) when
rotation unit is in start position.
Cassette start signal. High (24 VDC) when
rotation unit and cassette carriage are in start
position.
Cassette carriage position in Ceph mode. Open
across when cassette carriage in Ceph position.
7 - 11
7 Pulse Logic Unit (PLU)
Cranex Panoramic X-ray Series
PLU/J9: Cassette carriage microswitches (DM versions)
Pin
1
2/3
4/5
Signal
-
Description
Not in use.
Shorted.
Shorted.
PLU/J9: Cassette carriage microswitches (DS versions)
Pin
1
2
2/3
4/5
Signal
-
Description
CDR remote control box.
CDR remote control box.
Shorted.
Shorted.
PLU/J10: Compensation microswitch
Pin
2
Signal
D1
1
D2
7 - 12
Description
Compensation control signal. Shorted to ground in
compensation mode except in the middle part of
the revolution.
Compensation selection. Shorted to ground when
compensation selected.
Service Manual 8200909
Cranex Panoramic X-ray Series
7 Pulse Logic Unit (PLU)
7.10 PLU Schematic diagram
Service Manual 8200909
7 - 13
7 Pulse Logic Unit (PLU)
Cranex Panoramic X-ray Series
7.11 PLU Component Layout
7 - 14
Service Manual 8200909
Cranex Panoramic X-ray Series
8 Partial Exposure Controller (PEC)
8 Partial Exposure Controller (PEC)
8.1 Block diagram
8.2 Operation
The main parts of the partial exposure controller are
a 12-bit divider 4040 (IC1), EPROM 27128 (IC2)
and push buttons which are selecting the exposure
method. The timing pulse is produced from AC voltage MD1 (J1, pin 23,24), which is in line frequency
(50/60 Hz). Divider makes an 11-bit address for
EPROM (IC2). All the 6 partial exposure methods
are stored in EPROM (IC2). When the partial program is selected, the PEC board drives signals PRE
(PLU/IC8 pin 11) and EXT (PLU/IC7 pin 13) in the
PLU board through IC 8 socket and also drives
motors with relays RL1 and RL2 in the PEC. PRE
and -EXT signals control irradiation in the pulse and
logic unit. During normal exposure, PEC has no
effect on the actions of the PLU and motors when
normal PAN is selected. Both 15+ and 5+ DC
voltages are used, because of the EPROM. They
are produced from AXV connection (J1 6,7,8) by
regulators IC11 +15V and IC12 +5V.
Service Manual 8200909
8-1
8 Partial Exposure Controller (PEC)
Cranex Panoramic X-ray Series
8.3 Eprom 27128 (IC2) and Divider 4040 (IC1)
When a partial program is selected, one of the data
bits of the EPROM (IC2) 0, 1, 2, 4, or 5 is connected to drive PRE signal. Bit no. 3 drives -EXT
signal of the PLU board and preheating of filament.
When the EXPOSURE button is pressed, the state
of PEC J2 14 changes “0" (= PLU IC 9 pin 2), with
the result that IC 1 pin 11 (Reset) and IC 2 pin 22
change to "0"-state and divider 4040 and EPROM
are activated. The connection of the F-microswitch in
the cassette carriage changes the state of Flip Flop
(FF) IC 9 pin 3 (clk input) to “1" through PLU J2 7
with the result that pin 2 (-Q) changes to ”0". Then
the IC 4040 counter receives the clock signal (IC1
pin 10) and starts the stepping and EPROM the
program. Memory starts the operation from address
000 except when the TMJ 2 program is selected,
when the start address is Hex. 800. The address
increases by increasing one step every line cycle
(50/60 Hz). The state “1" of the selected driving bit
(IC 2 output) causes the PRE signal (IC7 pin 3, J2
10) to rise to +15 V. The rising edge of PRE signal
(IC 9 pin 11) sets the output Q of IC 9 to “1” if bit 3
is “1” in EPROM. The state of FF (IC9) keeps the
preheating on by keeping the -EXT signal (PEC J2
pin 11) in +15 V until bit 3 changes to ”0" state with
the result that FF is reset, -EXT drops to “0" and
radiation starts. When -EXT changes back to +15V,
the radiation stops.
8-2
Service Manual 8200909
Cranex Panoramic X-ray Series
8 Partial Exposure Controller (PEC)
8.4 Mode selector
The push buttons located on PEC controlling board
are comprised of switches SW1 - SW7. Selecting
logic includes the ten counter IC3 4017, the
Darlington transistor circuit IC6 2003 and NAND IC7.
When the button is pushed, IC7 pin 13 is connected
to +15V. This causes the oscillator circuit which is
comprised of NAND IC7 to start, and IC3 receives
the clock signal (pin 14). The counter IC3 starts to
step if reset pin 15 is “0". The outputs of IC3 Q0-Q1
are rise to state ”1" one by one. IC6 converts all the
inputs to state “0". Stepping continues as long as the
corresponding output is activated. In consequence,
when pin 13 of IC7 changes to ”0" state, the oscillator and counter stop. The corresponding output of
pushed button remains in the “1" state and lights up
the LED by IC6. The selected output (IC3 Q0..Q6)
also activates the corresponding selecting switch
from IC4 or IC5 which causes selection of the desired program output of IC2 (D0, D1...).
8.5 Motor Driving
Bits 6 and 7 of IC2 drive the cassette and rotating
motors. When bit 7 is in “1" state relay RL1 is
closed, and when bit 6 is in ”1", relay RL2 is closed.
8.6 PEC J3 1
Signal connection ensures that the partial exposure
logic can not operate when cephalometric operation
is selected.
8.7 IC 10
The PEC is connected to the PLU trough IC8 socket
in the PLU and IC8 is transferred to the PEC (IC10).
8.8 PEC control panel
Switches SW1 - SW7 and LEDs D1 - D7 are located
in control panel, which is mounted at the top of PEC
board. Locations of previous versions buttons and
LEDs are also present in PEC board of maintenance
purpose.
Service Manual 8200909
8-3
8 Partial Exposure Controller (PEC)
Cranex Panoramic X-ray Series
8.9 Lengths of exposured areas using the PEC
1.
2.
3.
4.
5.
6.
7.
8-4
Normal width panoramic X-ray
Reduced width X-ray for children
Temporomandibular joints, first exposures
Temporomandibular joints, second exposure
Left side of the panoramic X-ray
Right side of the panoramic X-ray
Middle part of the panoramic X-ray
265 mm +/- 5
235 mm +/- 5
2 x 70 mm +/- 5
2 x 70 mm +/- 5
150 mm +/- 5
150 mm +/- 5
100 mm +/- 5
Service Manual 8200909
Cranex Panoramic X-ray Series
8 Partial Exposure Controller (PEC)
8.10 Partial Exposure Controller (PEC) Connectors
PEC/J1: Connected parallel to 26-pin
Pin
Signal
2, 3, 4, 6 GND
5, 7, 8
AXV
23, 24
MD1
25, 26
MD2
Description
Signal ground.
Unregulated supply 28-35 VDC.
Supply for drive motors 20 VAC.
Clock signal for IC1.
PEC/J2: Connects PEC IC10 to PLU IC8
Pin
3
4, 5, 6, 8,
9, 12, 13,
15, 16
7
Signal
GND
-
Description
Signal ground.
No special action in PEC circuit. Connections only
replace IC8 functions in PLU.
-
10
PRE
11
EXT
14
-
Start signal for PEC. Rising up when F-micro
switch in cassette carriage changes the state at
the beginning of movement.
Driving the PRE signal (pre heating of tube
filament) in PLU. Rising up (15VDC) 1 sec. before
radiation.
Driving the -EXT signal in PLU. Up (15VDC)
during radiation.
Reset signal for PEC. Low when exposure button
pressed.
PEC/J3:
Pin
Signal
Description
Securing that PLU logic can not start when cephalometric operation is selected.
Low when cephalostat is selected.
PEC/J4: Cassette motor supply from PLU (where appropriate)
Pin
1
Signal
-
2
3
-
Service Manual 8200909
Description
Cassette motor supply. High (20 VAC MD1 to /2)
during return movement, when TA switch is down.
Cassette motor supply (MD2).
Cassette motor supply. High (20 VAC MD1 to /2)
after preheating, when TA switch is down.
8-5
8 Partial Exposure Controller (PEC)
Cranex Panoramic X-ray Series
PEC/J5: Cassette motor (where appropriate)
Pin
1
Signal
-
2
3
-
Description
Cassette motor drive. High (20 VAC to /2) during
return movement, when TA switch is down.
Cassette motor drive.
Cassette motor drive. High (20 VAC to /2) when
RL1 is “0" and RL2 ”1" or RL1 and RL2 are “1".
PEC/J6: Rotation motor supply from PLU
Pin
1
Signal
-
2
3
-
Description
Rotation motor supply. High (20 VAC MD1 to /2)
after preheating, when TA switch is down.
Rotation motor supply (MD2).
Rotation motor supply. High (20 VAC MD1 to /2)
during return movement, when TA switch is down.
PEC/J7: Rotation motor
Pin
1
Signal
-
2
3
-
8-6
Description
Rotation motor supply. High (20 VAC to /2) when
RL1 “0" and RL2 ”1" or RL1 “1" and RL2 ”0".
Rotation motor supply.
Rotation motor supply. High (20 VAC to /2) during
return movement, when TA switch is down.
Service Manual 8200909
Cranex Panoramic X-ray Series
8 Partial Exposure Controller (PEC)
8.11 Partial Exposure Controller (PEC) schematic diagram
Service Manual 8200909
8-7
8 Partial Exposure Controller (PEC)
Cranex Panoramic X-ray Series
8.12 Partial Exposure Controller (PEC) component layout
8-8
Service Manual
Cranex Panoramic X-ray Series
8 Partial Exposure Controller (PEC)
8.13 PEC Switches - schematic diagram
Service Manual 8200909
8-9
8 Partial Exposure Controller (PEC)
Cranex Panoramic X-ray Series
8.14 PEC Switches - component layout
8 - 10
Service Manual 8200909
Cranex Panoramic X-ray Series
9 Front Panel board 4050-1
9 Front Panel board 4050-1
9.1 Functional Description
The main function of front panel board is to support
toggle type switches: compensation off/on and mA =
10 or 6. There are also located return switch and
unit state indicating LEDs: ready and protection.
When power is switched on the RC-network (C7 and
R6) resets IC1, so outputs (Q) in pin 1 and pin 13
are low. This puts the system into the default state
(the default can be set by repositioning jumper JP1):
LEDs D6 and D8 on, indicating that compensation is
off and selected tube current is 10 mA (TR1 and
TR2 are off). When the user pushes SW1 the IC1 is
clocked (pin 3 goes high) and changes its state to 1,
so Q (pin 1) goes high (led D6 off, TR1 on) and -Q
(pin 2) goes low, which switches LED D7 on (compensation on). When user push SW1 again the state
returns back to default (D6 on, TR1 off, D7 off).
SW2 controls mA level same way. IC2 is used to
sharpen the clock signal. R2, R3, C5 and R4, R5,
C6 are needed to get switch open level signal, level
shift and filtration. IC3 regulates +15V power
needed by CMOS logic (IC1 and IC2). SW3 is return
switch and it is connected to PLU logic. D1-D4 are
indicating that unit is ready for exposure, controlled
by RYL signal from PLU. D5 is protection circuit
activation indicator, controlled by FAIL_L* signal
from PLU.
Service Manual 8200909
9-1
9 Front Panel board 4050-1
Cranex Panoramic X-ray Series
9.2 Connector Signals
The front panel connects directly to PLU J3. The pin numbers for that connector are
given below.
Front panel board connects to PLU/J3
Pin
Signal
Description
1
MAR
2
D2
7
8
9
+24V
RETURN
FAIL _L*
10
RYL
11
GND
6/10 mA selection. Low when 6 mA is selected, high
impedance when 10 mA is selected (default).
Compensation selection. Low when comp. selected,
high impedance when not (default).
Regulated +24V supply.
Return command. High when return switch is pressed.
Protection indicator drive. High (+24) when unit is
ready for exposure.
Ready LEDs drive. High (+24V) when unit is ready for
exposure.
Signal ground.
Jumper JP1 allows the default mA at start up to be set
Connect pins 1 - 2 for 10 mA default
Connect pins 2 - 3 for 6 mA default
9-2
Service Manual 8200909
Cranex Panoramic X-ray Series
9 Front Panel board 4050-1
9.3 Front panel board- schematic diagram
Service Manual 8200909
9-3
9 Front Panel board 4050-1
Cranex Panoramic X-ray Series
9.4 Front panel board - component layout
9-4
Service Manual 8200909
Cranex Panoramic X-ray Series
10 kV selector
10 kV selector
10.1 kV-Selector 4120-1 - functional description
The main function of the kV-selector is to give a
reference voltage to the X-ray generator. This reference voltage depends on which kV-value is
selected by the user. So, when the user presses one
of the selector buttons on the kV-selector card, this
one-of-eleven data is transferred to a 4-bit binary
word by two 8-bit priority encoders (IC3 & IC4). This
4-bit word is latched (IC5) and this latched data is
then driving two 1-of-16 analog multiplexers /
demultiplexers (IC1 & IC2). First of them (IC1) selects
the LEDs on the selector buttons so that only one
LED is burning at a time showing the selected
kV-value. At the same time the other demultiplexer
(IC2) gives to the kVref-output (J1/5) the right reference voltage value (for the selected kV-value) from
the voltage divider circuit (resistors R10-R20). When
the user selects TEST-mode from the kV-selector
two things happens. Firstly the kVref is switched to
the 0-potential (IC2) and secondly transistor TR2 is
turned off and transistor TR3 is turned on. When
TR2 is off no X-rays are produced during exposure
(on TEST-mode). As TR3 is turned on, the TEST2line (J1/8) will rise near 15 volts. During exposure
the TEST1IN-line is near zero volts preventing the
change of kV-value by dragging the EI-line down
(IC4,pin 5). After power has been turned on the R2,
C2-circuit will RESET the circuit and selecting the
71kV-value automatically. The other RC-circuit (R1 &
C1) gives a necessary delay to the CLK-signal (IC5,
pin 9) of the data latches.
Physically the circuit is divided in two circuit boards,
one containing the switches (with in-build LEDs) and
the other with the rest of the circuit.
Service Manual 8200909
10 - 1
10 kV selector
Cranex Panoramic X-ray Series
10.2 kV-Selector 4120-1 - Automatic kV select
Note
The automatic kV select is only used with the Excel,
Excel Ceph, Excel D, BaseX and BaseX D. It is not
used with the Cranex 3+, 3+ Ceph, 2.5+ or C.
Measuring the patient’s head
The head support has a built-in potentiometer that
measures the patient’s head when the temple supports are closed. A signal from the potentiometer
goes to the kV selector, which then selects the kV.
Automatic selection of the kV to be used
Measurement of the size of the patients head is
given to the kV-selector. This voltage is connected to
A/D converter (IC 7), pin 11. This circuit has adjustments for zero, relative 0 and gain. The result of this
measurement is given in a four bit digital BCD word
from A/D converter. Word “0” corresponds to 63kV
and word “9” 81kV.
Adjustment of this circuit is as follows
Zero: short connect analog inputs of A/D converter
and adjust output to “0000” (R 43).
Relative zero: the head support closed should now
be adjusted to give BCD word 0000 if you want the
minimum kV value to be 63 kV (R45).
Note that the value of kV selector can only be
changed when the “Ready”- light comes on!
Gain: Is used to get BCD word “9” when the head
support is wide open (R44).
With these two adjustments you can also determine
the limits for min. and max. kV to be used by the
automatic select.
10 - 2
Service Manual 8200909
Cranex Panoramic X-ray Series
10 kV selector
Autoset kV
The most significant digit from A/D converter is read
to multiplexer circuit (IC10) through latch circuit (IC9).
Ten outputs of this multiplexer are controlled by BCD
word. “0”=0000, “9”=1001. If the measured value from
head support is “0”, the minimum, small patient, the
multiplexer (IC10) selects its output “0” (pin 9) to be
activated. This means that there is a connection
between pin 9 and pin 1 (common). Outputs of the
multiplexer are connected to Cranex
kV-selector: “0”-63kV…”9”-81kV. The selected kVvalue is transferred to kV-selector the moment the
unit is in the “Ready” position and ready to take an
exposure.
If unit is set to the “Test” or “Ceph” mode, no automatic kV- select is possible.
Changing kV after automatic select of kV
The automatic kV value can always be changed
manually if required (select a new kV value during
the “Ready” mode before exposure.)
After the exposure the automatic kV select is ready
again.
Service Manual 8200909
10 - 3
10 kV selector
Cranex Panoramic X-ray Series
10.3 kV selector - Connectors
kV selector/J1 (goes to PLU/J12)
Pin
1
2
3
4
5
6
7
8
9
10 - 4
Signal
GND
+24 V
test 1 out
test 1 in
kV ref
N/C
+15 V
test 2
N/C
Description
Service Manual 8200909
Cranex Panoramic X-ray Series
10 kV selector
10.4 kV selector - schematic diagram 1
Service Manual 8200909
10 - 5
10 kV selector
Cranex Panoramic X-ray Series
10.5 kV selector - schematic diagram 2
10 - 6
Service Manual 8200909
Cranex Panoramic X-ray Series
10 kV selector
10.6 kV selector - component layout
Service Manual 8200909
10 - 7
10 kV selector
10 - 8
Cranex Panoramic X-ray Series
Service Manual 8200909
Cranex Panoramic X-ray Series
10 kV selector
10.7 kV selector switches - schematic diagram
Service Manual 8200909
10 - 9
10 kV selector
Cranex Panoramic X-ray Series
10.8 kV selector switches - component layout
10 - 10
Service Manual 8200909
Cranex Panoramic X-ray Series
11 Time selector
11 Time Selector 4230-1
11.1 Introduction
Time selector (TSEL) controls cephalo exposure
times. In panorama mode (power up) it is used as
backup timer (time out after 25 seconds in panorama mode). It is connected to pulse and logic board
via six pin connector J1. Three pins of J1 is used by
digital signals TIME1, TIME2 and CEPH_ON and
other three are power lines. All three signals are
active high and logic level is +15V. Three power lines
are +24V, +15V and ground. Time selector uses
+24V from which it regulates +5V with regulator IC4.
The +15V is used only for digital signals CEPH_ON
and TIME2 so the supply current depends on the
loads on pulse and logic board. Jumper JP1 is
added on TSEL-board to tell timing controller (IC1)
in which unit it is operating (Excel, Excel Ceph and
Cranex C). When it is shorted (IC1 pin 25 connected
to ground) then Cranex C is selected and Excel
Ceph when left open. Exposure is always disabled in
panorama mode in Cranex C by setting TIME2 high
irrespective of whether exposure key is pressed or
not.
11.2 Time Selector 4230-1 - functional description
Time selector is based on timing controller unit (IC1).
It only needs external oscillator which is generated
from 4MHz crystal X1 (all exposure times are based
on this frequency).
Timing controller scans 11 key keyboard which is
organized as matrix having three rows. First and
second rows have both four keys and third has
three. Timing controller’s scanning TTL logic level
signals KEY_SCN0, KEY_SCN1 and KEY_SCN2 are
made open collector with transistors TR1, TR2 and
TR3. Keyboard columns are pulled up and connected directly to Timing controller’s pins 15 -19. A
pressed key grounds one key column signal. When a
valid key (only one key is active at a time) is found
then internal status is changed, new exposure time is
written to internal timer and a LED is switched on the
Service Manual 8200909
11 - 1
11 Time selector
Cranex Panoramic X-ray Series
operating panel. If the key pressed was a cephalo
exposure time signal is active then signal CEPH_ON
is activated (logic high). LEDs are connected to
+24V with series current limiting resistors (R3 and
R4) and are driven with darlington transistors (IC2
and IC3). Only one LED is on at a time. Transistors
TR4 to TR7 converts logic levels. TR4 and TR5 from
+15V to +5V and transistors TR6 and TR7 from +5V
to +15V. Test point TP5 is ‘connected’ to Timing
controller’s internal timer and toggles between 0V
and +5V after every 10ms only during exposure
(TIME1 high and TIME2 low).
A logic high level on signal TIME1 starts the timing
sequence. The internal timer is started and 100Hz
square wave signal appears to TP5. When selected
time is reached TIME_OUT signal goes high enabling logic high level on signal TIME2 which terminates the exposure by triggering the backup timer on
pulse and logic board. LM393 generates RESET to
timing controller whenever +5V drops under 4V.
Timing controller can operate from 3.3V to 5V.
The panoramic exposure mode is always disabled in
the Cranex C by setting TIME2 high irrespective of
whether the exposure key is pressed or not.
JMP1
Shorted
Open
11 - 2
UNIT
Cranex C
Excel or BaseX
Service Manual 8200909
Cranex Panoramic X-ray Series
11 Time selector
Time selector/J1 (goes to PLU/J13)
Pin
1
2
3
4
5
6
Signal
GND
TIME1
TIME2
CEPH_ON
+24V DC
+15V DC
Service Manual 8200909
Description
Signal and power ground
11 - 3
11 Time selector
11 - 4
Cranex Panoramic X-ray Series
Service Manual 8200909
Cranex Panoramic X-ray Series
11 Time selector
11.3 Time selector - schematic diagram
Service Manual 8200909
11 - 5
11 Time selector
Cranex Panoramic X-ray Series
11.4 Time selector - component layout
11 - 6
Service Manual 8200909
Cranex Panoramic X-ray Series
11 Time selector
11.5 Time selector switches - schematic diagram
Service Manual 8200909
11 - 7
11 Time selector
Cranex Panoramic X-ray Series
11.6 Time selector switches - component layout
11 - 8
Service Manual 8200909
Cranex Panoramic X-ray Series
12 Power Switching Units (PSU)
12 Power Switching Units
12.1 PSU 47602
The PSU 47602 includes high frequency power
circuits and their drive circuits, as well as a filament
inverter.
12.2 Filament Drive Circuit - 47602
Filament inverter transistors (Fet) TR6, TR7 drive
the filament transformer at a frequency of 23.5 kHz.
Drive signal pulse width for TR6 and TR7 is controlled by the PLU board.
12.3 Regulator TR4, TR5 - 47602
The regulator controls the voltage across C13. The
voltage is then fed to the tube head by the power
inverter. The MPU supplies rectified and filtered line
voltage PV+, PV-. PV+ is fed through TR4 and TR5
to C13. Regulator transistors TR4 and TR5 control,
through CH2, the voltage across C13.
The regulator is controlled by the PLU using pulse
width modulation.
The drive pulse is formed by connecting drive signals
R1 and R2 in parallel on PSU board. This pulse is
fed to IC9, then to TR8 and then to opto driver IC4.
The opto driver IC4 controls TR4 and TR5. The opto
driver IC4 also provides galvanic isolation between
the low and high voltage circuits.
12.4 Inverter TR2, TR3 - 47602
The inverter works in a push pull mode using a 90%
duty cycle, and transfers the regulator voltage to the
tube head. The PLU controls the inverter using drive
signals I1, I2, which are fed to opto isolators IC1
and IC2, which are drive inverter transistors TR2,
TR3. TR2 and TR3 which control the high voltage
transformer in the push pull mode.
Service Manual 8200909
12 - 1
12 Power Switching Units (PSU)
Cranex Panoramic X-ray Series
12.5 Protection Circuit - 47602
The protection circuit monitors the inverter over
current and regulator over voltage. The comparator
IC7 monitors current through inverter transistors and
also the voltage across C13. Protection logic is
performed by IC9 and the surrounding components.
In the event of over current (tube arching) or over
voltage (over 90kV) occuring, IC7 output will trigger
opto isolator IC8 which in turn will trigger IC9. IC9
will shut down the regulator pulses through TR8 and
inverter pulses through TR1. It will raise the HFB
signal to a value that will trigger the PLU protection
circuit and then switch the protection light on.
D15 is the protection indicator for PSU protection. To
reset the protection circuit the unit must be switched
off briefly.
12.6 Transformer T1 - 47602
T1 is used to supply operating voltages to opto
isolators and IC7.
12 - 2
Service Manual 8200909
Cranex Panoramic X-ray Series
12 Power Switching Units (PSU)
12.7 Power Switching Unit (PSU) Connector Signals - 47602
PSU/J3: Above panoramic tube head
Pin
1, 3
Signal
FP1, FP2
2
FIV
4, 6
HP1, HP2
5
HPI
7, 8
BI1, BI2
9
10, 12
11
HFB/PAN
BV1, BV2
MAI/PAN
Service Manual 8200909
Description
Filament transformer drive. High (20 VDC, 32
VAC) during exposure.
Filament inverter supply. High (20VDC) during
exposure.
High voltage transformer drive. High (100VAC
across) after preheat.
High voltage inverter supply. High (120 –190 VDC
to – PV) after preheat.
Tube head temperature signal. High (24VDC)
when unit is in start position and the tube head
temperature sensor is closed or when the TAswitch on the PLU board up.
High voltage feedback from panoramic tube head.
Tube head cooling FAN supply (24 VAC across).
Tube current feedback from panoramic tube head.
12 - 3
12 Power Switching Units (PSU)
12 - 4
Cranex Panoramic X-ray Series
Service Manual 8200909
Cranex Panoramic X-ray Series
12 Power Switching Units (PSU)
12.8 Power Switching Unit - 47602 schematic diagram
Service Manual 8200909
12 - 5
12 Power Switching Units (PSU)
Cranex Panoramic X-ray Series
12.9 Power Switching Unit - 47602 component layout
12 - 6
Service Manual 8200909
Cranex Panoramic X-ray Series
12 Power Switching Units (PSU)
12.10 OLD Power Switching unit (PSU) - 47601
The PSU includes high frequency power circuits and
their drive circuits, as well as a filament inverter.
The power transistor base drive circuits and filament
inverter are located on the kV/mA drive board
attached to the PSU. BFD voltage gives supply for
drive signals. Drive transistor T1 is controlled by I1
signal derived from the PLU D1 -D2 - D43 network
prevent TR1 saturation making its transitions faster.
Transistor TR1 drives pulse transformer T1. Resistor
R4 and capacitor C1 form current limiting and pulse
shaping network. Pulse transformer T1 isolates and
makes the drive pulse bipolar. D44 -C16 -R14 - D51 D52 networks protect transistor against voltage
spikes. Power transistor on the secondary side of T1
is turned on when TR1 is turned off by low in T1. The
other three drive circuits (TR2, 3, 4) are identical to
this.
Filament inverter power transistors TR6 and TR7
drive filament transformer in 20 kHz frequency through
FP1 and FP2. FIV is constant voltage supply. TR6
and TR7 are controlled through F1 and F2 derived
from the PLU. Networks D11 - D 53 -D54 and D12 D40 - D50 prevent transistor saturation making
switching faster.
Networks D13 - C6 - R22 and P14 - C7 - R23 protect
transistors in turn-off state and diodes D56 and D57
make opposite path for inverter current.
The power section of the unit has two sections, the
power regulator section and power inverter section.
C10 is the output capacitor of the power regulator and
feeds the power inverter.
Service Manual 8200909
12 - 7
12 Power Switching Units (PSU)
Cranex Panoramic X-ray Series
The power regulator is supplied with rectified and
filtered mains through PV+ and PV-. Capacitor C20
filters the supply input. CH1 - R46 -D19 network forms
turn-on protection for switching transistors.
TR8 and TR7 work in parallel and are driven by
pulse transformer T2 through antisaturation network
D15 - D17 - D18. Diode D16 improves transistors
turn-off. Resistors R26 and R27 balance current
through the transistors.
The other pair of transistors TR10 and TR11 are
identical, and the two pairs are driven at 20 kHz in
push-pull mode to increase the power handling
capability of the section. C9 -D24 - R30 network
protects transistor pairs in turn-off.
CH2 and C10 form an LC network that filters switched
square-wave voltage across flywheel diode D25.
When transistor pairs are driven on, current flows
along the path (PV+) - (CH1) -(TR8-9) - (CH2) - (C10)
- (PV-) or (PV+) - (CH1) - (TR10-11) - (CH2) -(CH10) (PV-); and when driven off the current will continue,
because of inductance, along path (CH2) - (CH10) (D25). The duty cycle of transistors determines
voltage across C10. C14 - R41 protect D25 against
voltage spikes. Opto-isolator IC1 LED is fed through
R31 R45 -C19 to give feedback signal (RFB) which
depends on C10 voltage. RFB signal goes to the
PLU. C10 voltage is fed to power inverter section
through fuse F1. Power inverter transistors TR13 and
TR14 work in push-pull mode at 20 kHz frequency and
constant 90% duty cycle. They are driven through T1
and T4. The power inverter drives a high tension
transformer in tube head trough HP1 and HP2.
Transformers T5 and T6 with D41 and D42 balance
loading. C13 is an intermediate filter capacitor.
12 - 8
Service Manual 8200909
Cranex Panoramic X-ray Series
12 Power Switching Units (PSU)
D26 - D27 - D29 network prevents TR13 saturation,
and D28 improves turn-off. D32 - C11-R35 protects
TR13 against voltage spikes in turn-off and D31
forms an opposite current path. Identical networks can
be found at TR14. When operating, power inverter
current flows along the path (C10+) - (F1) - (HPI) (H.T.) - (HP1) - (D30) - (TR13) - (C10) or (C10+) (F1)-(HPI)-(HP2)-(D35)-(TR14) - (C10).
NOTE: The power section of unit is galvanically
connected to mains, whereas all other parts of
electronics, including kV/mA drive board, are
grounded. Never measure the power section with a
grounded oscilloscope.
Test point
Steady state
ACV
DCV
0
0.5
Pre-heat
ACV
DCV
11-14
15-19
Exposure
ACV
DCV
11-14
19-22
TP7, TP8
(Reg. dr.9)
0
0.5
0
1.6
10-13
14-19
TP5, TP6
(Fil. dr.9)
0
0.5
8-10
19-21
8-11
19-20
TP2, TP3
(Inv. dr)
Service Manual 8200909
12 - 9
12 Power Switching Units (PSU)
Cranex Panoramic X-ray Series
12.11 Power transistor verification - 47601
This procedure will reveal faulty power transistors in
the PSU. Use DMM in diode range to get correct
readings.
Look at the transistor so that the pins are pointing
towards you and are closer to the top hole. Base (B)
is left pin, Emitter (E) is the right pin, and Collector (C)
is the case.
If one test fails, the transistors must be replaced.
BUY 69 A or equipvalent in Power Regulator:
Red Led
B (left)
B (left)
C (case)
Black lead
E(right)
C(case)
E (right)
Reading if OK
0.4 - 0.8
0.4 - 0.8
Open
BUT15, MJ10009, MJ10014, ST10014 or equivalent Darlingten transistor:
Red Led
B (left)
B (left)
C (case)
E (right)
Black Led
E (right)
C (case)
E (right)
C (case)
Reading if OK
Not short
0.4 - 0.8
Open
0.4 - 0.8
If your DMM does not have a diode range, resistor
range 200 kOhm will give 20 - 50 kOhm reading,
rather than 0.4 - 0.8.
12 - 10
Service Manual 8200909
Cranex Panoramic X-ray Series
12 Power Switching Units (PSU)
12.12 Power switching unit connector signals - 47601
PSU/J3: Above panoramic tube head
Pin
1, 3
Signal
FP1,
Description
Filament transformer drive. High (20 FP2 VDC, 32 VAC)
during exposure.
2,
FIV
Filament inverter supply. High (20 VDC) during exposure.
4, 6
HP1,
High voltage transformer drive. High HP2
(100 VAC across) after preheat. Floating.
5
HPI
High voltage inverter supply. High
(120-190 VDC to - PV) after preheat. Floating.
7
RI1 (BI1)
Tube head temperature signal. High (24 VDC) when
unit in start position, kV selected and tube head
temperature sensor closed or TA-switch on PLU board
up and tube head temperature sensor closed.
8
BI2
Tube head temperature sensor supply. High (24 VDC)
when unit in start position, kV selected or TA switch
on PLU board up.
9
HFB/
High voltage feedback from PAN panoramic tube head.
10, 12
11
Tube head cooling fan supply
(110 BV1,BV2 VAC across). Floating potential.
MAI/
Service Manual 8200909
Tube current feedback from PAN panoramic tube head.
12 - 11
12 Power Switching Units (PSU)
12 - 12
Cranex Panoramic X-ray Series
Service Manual 8200909
Cranex Panoramic X-ray Series
12 Power Switching Units (PSU)
12.13 OLD PSU - 47601 schematic diagram sheet 1
Service Manual 8200909
12 - 13
12 Power Switching Units (PSU)
Cranex Panoramic X-ray Series
12.14 OLD PSU - 47601 schematic diagram sheet 2
12 - 14
Service Manual 8200909
Cranex Panoramic X-ray Series
12 Power Switching Units (PSU)
12.15 OLD PSU - 47601 component layout
Service Manual 8200909
12 - 15
12 Power Switching Units (PSU)
12 - 16
Cranex Panoramic X-ray Series
Service Manual 8200909
Cranex Panoramic X-ray Series
13 Tube Head Assembly (THA)
13 Tube Head Assembly (THA)
13.1 Description
THERE ARE NO SERVICEABLE PARTS INSIDE
THE TUBE HOUSING ASSEMBLY.
THE OPENING OR REASSEMBLY OF THE TUBE
HOUSING ASSEMBLY BY OTHER THAN
SOREDEX IS PROHIBITED AND VOIDS THE WARRANTY CERTIFICATION.
The panoramic and cephalometric tube heads are
identical. The tube head contains the high voltage
section of the generator. High frequency power
signals HP1, HPI and HP2 are connected to high
tension transformer T1, which supplies the two
cascade multipliers C1 - 15 and C16 - 30. Cascade
multipliers C1 - 15 multiply, rectify and filter the
transformer output to a maximum +41 kV, and cascade multipliers C16 - 30 to a maximum of -41 kV.
The tube voltage is derived from this bipolar supply
through surge resistors R4 - 9. The positive half of
the tube voltage is connected to 3 x 150 Mohm
resistors that a form high voltage feedback signal
(HFB). High frequency filament heating signals FP1,
FIV, FP2 are connected to the filament transformer
T2 which supplies the X-ray tube filament.
The other return line of the high tension transformer
is grounded, and the other forms the MAI signal to
the PLU for tube current adjustment. The current in
the MAI line is equal to the tube current. The tube
head contains temperature sensor that opens if the
oil temperature reaches 75 C = 167 F. The ready
signal is disabled in this case and next exposure is
possible only after cooling. The panoramic tube head
has a fan to improve cooling.
Service Manual 8200909
13 - 1
13 Tube Head Assembly (THA)
Cranex Panoramic X-ray Series
13.2 Circuit diagram
13 - 2
Service Manual 8200909
Cranex Panoramic X-ray Series
14 Position Display Board
14 Position Display Board
14.1 The Position Display
The position display board is located inside the lower
shelf. It includes a slide potentiometer, A/D converter, display driver and two seven segment displays. The potentiometer is connected to the focal
trough light support bracket. The potentiometer
supplies input voltage to the A/D converter. IC2, pin
11 is dependent on focal trough light adjustment. A/D
converters voltage difference in pins 10 and 11 to 3
digit BCD output, digit selection being on pins 3, 4
and 5 and BCD code on 1, 2, 15 and 16. When IC2
outputs a digit to display, it also outputs the corresponding BCD code. BCD code is connected to IC3
to be converted to a seven segment display drive
signal.
A zero reading is adjusted with R9. Gain of conversion is adjusted with R10. Supply voltage for the
board is derived from AXV. R1 - D1 - TR1 regulate
the supply to 10 volts which is connected to a 5volts regulator, IC1. Capacitors C6, 7, 8, 9 reduce
noise produced by IC3.
Service Manual 8200909
14 - 1
14 Position Display Board
Cranex Panoramic X-ray Series
14.2 Position Display Connector Signals
PD/J9: At lower shelf.
Pin
1
2
14 - 2
Signal
AXV
GND
Description
Unregulated supply 28-35 VDC.
Signal ground.
Service Manual 8200909
Cranex Panoramic X-ray Series
14 Position Display Board
14.3 Position display schematic diagram
Service Manual 8200909
14 - 3
14 Position Display Board
Cranex Panoramic X-ray Series
14.4 Position display component layout
14 - 4
Service Manual 8200909
Cranex Panoramic X-ray Series
15 Z-Driver Unit
15 Z-Driver Unit
15.1 Speed Reference Circuit
The speed reference circuit (IC1, NAND) controls
the motor drive circuit (IC2, pulse width modulator)
with two signals: SHUT-signal (IC2, pin 4) enables
the motor drive when low. Vref signal (IC2, pin 1)
determines duty cycle of IC2; the lower voltage Vref,
the higher the duty cycle of IC2 is and the faster the
motor runs. When the UP/DOWN-switch is pushed,
either the REV or the FW signal is grounded (low)
and the START-signal become high. Therefore the
SHUT signal becomes low, which activates the motor
drive (IC2). At the same time, IC1 pin 8 gets high,
but pin 9 remains low due to
The SLOW signal is now high and the FAST signal
low. Voltage Vref is now formed by R8, R9 and R10.
After the voltage across capacitor C3 rises, IC1 pin
9 becomes high, the SLOW signal gets low and the
FAST signal high, and voltage Vref is formed by R11,
R12 and R13. When the UP/DOWN-switch is
pushed, voltage Vref is grounded through capacitor
C4. This supplies full power to the motor for about
50 ms to get the motor running.
15.2 Moset - Output Stage
The output stage is controlled by the REV signal and
buffers IC3 and IC4, and by pulse width modulator
IC2. When the motor runs forwards (REV signal
high) transistors T3 and T4 are off, T2 is on, and
transistor T5 is switching with the same duty cycle
as pulse width modulator IC2.
When the motor runs backwards (REV signal low)
transistors T2 and T5 are off, T3 is on, and transistor T4 is switching.
15.3 6V Step-up Circuit
Transistors T2 and T3 use 36V gate voltage. The
voltage is produced by diodes D4, D5 and capacitors C9, C10. When the motor is running, IC2, pin 10
switches between 0V and 12V. The voltage across
capacitor C9 is 24V. The voltage at the anode of
diode D5 varies between 24V and 36V, and the
voltage capacitor C10 is 36V.
Service Manual 8200909
15 - 1
15 Z-Driver Unit
Cranex Panoramic X-ray Series
15.4 Current Limit
Current through the output stage is measured with
resistor R7. Voltage across R7 should be less than
the current reference, voltage at IC2, pin 15. When
the current increases, voltage at IC2, pin 16 increases. If voltage at IC2, pin 16 reaches the voltage at IC2, pin 15, motor control circuit IC2 limits the
duty cycle, and the current, to that value.
15.5 Patient positioning lights
When the UP/DOWN-switch is pushed, transistor T1
(controlled by the START signal) turns on. This
triggers the positioning light timer in the mains power
unit and patient positioning lights are automatically
switched on.
15.6 Z-Driver Unit Connector Signals
ZDU/J1: At lower shelf
Pin
1
2
3
Signal
+24V
GND
LIGHT
4
5
6
-REW
-FW
GND
15 - 2
Description
Unregulated supply 28-35 VDC.
Signal ground.
Patient positioning lights trigger.
High when (28-30 VDC) Up/Down switch is
pressed.
Z-carriage moves down when grounded low.
Z-carriage moves up when grounded low.
Signal ground.
Service Manual 8200909
Cranex Panoramic X-ray Series
15 Z-Driver Unit
15.7 Z-driver schematic diagram
Service Manual 8200909
15 - 3
15 Z-Driver Unit
Cranex Panoramic X-ray Series
15.8 Z-driver component lay out
15 - 4
Service Manual 8200909
Cranex Panoramic X-ray Series
16 PDC timing circuit - for DM versions
16 PDC timing circuit - for DM versions
The purpose of the PDC Timing circuit is to galvanically isolate the PDC cassette from the Cranex unit
and to act as a timer for the PDC supply voltage.
16.1 Operation
PDC timing circuit is connected in series with the
exposure signal. Pressing the exposure button will
activate relay K1 which will supply the operating
voltage to PDC. R6 and C4 initiate a two second
delay of the exposure signal, which gives the PDC
electronics time to stabilize.
At same time counter IC3 starts to time the operating power to the sensor, which must stay on for
about 2 minutes. The purpose of R5, R16 and C4 is
to cause a time delay that is the same as the Cranex
pre-heat time. When IC1 pin 8 goes high, J3 pin 5 is
pulled down, the speed profile (TDI-file) starts to be
read, which times the speed profile so that it is equal
to the rotating speed of the Cranex unit.
Switch S1 (when in on position) allows the beam
alignment to be checked.
Service Manual 8200909
16 - 1
16 PDC timing circuit - for DM versions
Cranex Panoramic X-ray Series
16.2 PDC timing circuit connector signals
PDC/J1: 26-pin ribbon cable
Pin
Signal
1
MAI
2, 3, 4, 6 GND
5, 7, 8
AXV
(9)
RVL
10
BI1 (RI1)
11
RYL
12
BI2
13
EXP
14
15, 16
17, 18
19, 20
23-26
HFB
EXL
PRV
TH
MD1, MD2
Description
Tube current feedback from panoramic tube head.
Signal ground.
Unregulated supply 28-35 VDC.
Not in use. Full wave rectified 20 VAC.
Tube head temperature signal. High (24 VDC)
when unit in start position, kV selected and tube
head temperature sensor closed or TA switch on
PLU board up and tube head temperature sensor
closed.
Ready light drive. High (24 VDC) when unit ready
for exposure.
Tube head temperature sensor supply. High when
unit in start position and kV selected, or TA-switch
on PLU board up.
Exposure command. High (28-35 VDC) when
exposure switch pressed.
High voltage feedback from pan tube head.
Exposure light drive. High (24 VDC) when kV over 50.
P-relay control. High (28-35 VDC) during exposure.
R-relay control. Low after preheat.
Supply for drive motors. 24 VAC across.
PDC/J3
Pin
1, 4
2, 3
5
Signal
+5v
GND
EXP
6
Flame
16 - 2
Description
5 VDC input to the PDC timing circuit
Ground input to the PDC circuit
Goes up to +5v when radiation starts and starts to
read the TDI profile from the PDC
Goes up to +5v when radiation starts and switch S1 is
in the ON position
Service Manual 8200909
Cranex Panoramic X-ray Series
16 PDC timing circuit - for DM versions
16.3 PDC timing circuit (DM) schematic diagram
Service Manual 8200909
16 - 3
16 PDC timing circuit - for DM versions
Cranex Panoramic X-ray Series
16.4 PDC timing circuit (DM version) component layout
16 - 4
Service Manual 8200909
Cranex Panoramic X-ray Series
17 Interlock circuit board - DS versions
17 Interlock circuit board - for DS versions
The purpose of the interlock circuit is to galvanically
isolate the CCD-sensor from the Cranex unit and to
allow an exposure to be taken after the DS program
activates the exposure sequence. The ready light will
start to blink when an exposure can be taken.
17.1 Operation
Interlock circuit is connected in series with the ready
signal. When a program is selected the Remote
Module sends a signal to J3, which will then activate
opto isolator IC3. When IC3 pin 4 goes high, the
ready state is transferred to PLU through pin J2 pin
10. The purpose of IC1 is to activate (flash) the
ready light, which is connected to TP2 with C4’s
charge and discharge cycle.
Switch S1 bypasses IC3, so that the generator can
be calibrated without the DS program.
Service Manual 8200909
17 - 1
17 Interlock circuit board - DS versions
Cranex Panoramic X-ray Series
17.2 Interlock circuit board connector signals
Interlock/J1: 26-pin ribbon cable
Pin
Signal
1
MAI
2, 3, 4, 6 GND
5, 7, 8
AXV
(9)
RVL
10
BI1 (RI1)
11
RYL
12
BI2
13
EXP
14
15, 16
HFB
EXL
17, 18
PRV
19, 20
23-26
TH
MD1, MD2
Description
Tube current feedback from panoramic tube head.
Signal ground.
Unregulated supply 28-35 VDC.
Not in use. Full wave rectified 20 VAC.
Tube head temperature signal. High (24 VDC)
when unit in start position, kV selected and tube
head temperature sensor closed or TA switch on
PLU board up and tube head temperature sensor
closed.
Ready light drive. High (24 VDC) when unit ready
for exposure.
Tube head temperature sensor supply. High when
unit in start position and kV selected, or TA-switch
on PLU board up.
Exposure command. High (28-35 VDC) when
exposure switch pressed.
High voltage feedback from pan tube head.
Exposure light drive. High (24 VDC) when kV over
50.
P-relay control. High (28-35 VDC) during
exposure.
R-relay control. Low after preheat.
Supply for drive motors. 24 VAC across.
Interlock/J2: 20-pin ribbon cable
Pin
1, 2
3
4
9, 13
Signal
RFB
+15
F1, F2
15,17,19 FIV
16, 18
R1, R2
14, 20
I1, I2
17 - 2
Description
Signal ground.
Regulator voltage feedback.
Regulated supply +15V
Filament inverter control.
High (1.2 VDC, 0.2 VAC) during exposure.
Filament inverter supply. High (20 VDC) during
exposure.
Power regulator control. High (2.2 DC) during
preheat, low (1.5 DC) after preheat.
Power inverter control. 1.5 DC, 0.3 VAC during
exposure.
Service Manual 8200909
Cranex Panoramic X-ray Series
Pin
1
Signal
TP2
17 Interlock circuit board - DS versions
Description
Ready signal
Interlock/J3
Pin
1
2
Signal
Service Manual 8200909
Description
Trigger signal
Ground
17 - 3
17 Interlock circuit board - DS versions
17 - 4
Cranex Panoramic X-ray Series
Service Manual 8200909
Cranex Panoramic X-ray Series
17 Interlock circuit board - for DS vers
17.3 Interlock circuit board (DS) - schematic diagram
Service Manual 8200909
17 - 5
17 Interlock circuit board - DS versions
Cranex Panoramic X-ray Series
17.4 Interlock circuit board (DS) - component layout
17 - 6
Service Manual 8200909
Cranex Panoramic X-ray Series
18 Troubleshooting
18 Troubleshooting
18.1 Fuse Chart
Service Manual 8200909
18 - 1
18 Troubleshooting
Cranex Panoramic X-ray Series
18.2 Problems, causes (c) and solutions (s)
Operating problems - panoramic units
No power when the unit is switched on (switch light not on)
1c
1s
There is no line voltage.
Check and correct reason for line voltage failure.
2c
2s
Fuses F1 and F2 have blown.
Replace F1 and F2 with an 8 A fuse.
Turn the power on. If the display lights come on, the low voltage side of the
power supply is operating.
Press the exposure button. If fuse F1 or F2 blows again, the high voltage
card is shorted.
Check diode bridge D1 on MPU High Voltage Board. If D1 is faulty, replace.
Exposure warning lights and buzzer come on when unit switched on
1c
1s
TR2 is shorted on the PLU board and the exposure warning lights sockets
have been damaged by overtightening the bulbs
Replace the lamp sockets, transistor TR3 or the PLU board.
The READY light does not come on
1c
1s
The unit is not in the ready position.
Press the RETURN key to drive the unit to the ready position. Then slide the
cassette carriage (where applicable) to the left as far as it will go.
2c
Unit in the ready position but no READY light. The cassette carriage or start
microswitch is defective, or the unit is in the protection mode or the thermal
switch inside the tube head is open.
Turn the TA switch on the PLU board to the up position. If the READY light
comes on the cassette carriage or start microswitch is defective. If it does not
the unit is in the protection mode or the thermal switch inside the tube head
is open.
1s
18 - 2
Service Manual 8200909
Cranex Panoramic X-ray Series
18 Troubleshooting
Protection light comes on
1c
1s
Line voltage not compatible with the terminal setting on the MPU.
Check line voltage or voltage and then check the terminal setting on the
MPU. If the setting is not compatible with the line voltage change the terminal
setting. The line voltage and terminal settings are as follows:
Line voltages
Terminal
175 - 190 V, use the 190 V terminal
190 - 205 V, use the 200 V terminal
205 - 225 V, use the 220 V terminal
225 - 250 V, use the 240 V terminal
2c
2s
The kV / mA levels are too high.
Check and if necessary adjust the kV / mA levels of the PLU board.
3c
3s
A head holder cable or connector is loose or damaged.
Check all cables, connectors and ground wires. Replace if necessary.
4c
4s
kV too high.
The PSU protection circuit monitors the regulator voltage. If the regulator
voltage is 200 V or above, the PSU protection circuit will be activated which
will terminate the regulator- and inverter pulses, raise the HFB signal to a
value that will trigger the PLU protection circuit, and switch the protection
light on.
Check and if necessary calibrate the generator.
5c
5s
Inverter current too high.
Check and if necessary calibrate the generator.
6c
6s
Shorted D8 on PLU
If the tube head arcs the mA will increase which can then destroy D8 on the
PLU. Replace D8 or the PLU.
7c
7s
Tube head defective.
Replace tube head.
8c
8s
Poor or no grounding between PLU, PSU, MPU and tube head.
Check groundings
Service Manual 8200909
18 - 3
18 Troubleshooting
Cranex Panoramic X-ray Series
None of the patient positioning lights come on
1c
1s
The light button is defective.
Check operation of the button. Replace if defective.
2c
2s
Fuse F5 on the MPU has blown.
Replace fuse F5.
3c
3s
D17 on the MPU low voltage board is defective.
Replace D17 or Low Voltage Board.
4c
4s
The positioning light timer or V-relay not working.
Replace Low Voltage Board.
One of the positioning lights does not come on
1c
1s
Bulb blown.
Replace bulb.
Bulbs in the patient positioning lights keep blowing
1c
3s
D17 on MPU low voltage board may be short-circuited.
Replace D17 or Low Voltage Board.
The patient positioning lights do not switch off after the preset time
1c
1s
Timer circuit on the MPU Low Voltage Board does not work.
Replace Low Voltage Board.
Height adjustment movement (pan or pan/ceph) does not work
1c
1s
The switch is faulty.
Replace switch.
2c
Check the reference voltage from the Z-drive board. If no voltage, the board
is faulty.
Replace the Z-drive board.
2s
18 - 4
Service Manual 8200909
Cranex Panoramic X-ray Series
18 Troubleshooting
3c
The Z-drive motor is faulty.
3s
Replace the motor.
4c
The drive belt is slipping or broken.
4s
Replace the drive belt. See section “20 Testing, Calibrating and Adjusting Adjusting the Z-motor belt”:
No radiation when exposure taken (movement but no lights)
1c
1s
Fuses F3 and F4 on MPU have blown.
Replace fuses. Make sure that they are the correct rating, 6.3 AFF very fast.
Also check the regulator and inverter transistors on the PSU.
2c
2s
Tube head malfunctioning.
Replace the tube head.
3c
3s
Circuit breaker on MPU has tripped.
Reset the circuit breaker CB1. If it trips repeatedly, R1 on MPU High Voltage
Board has blown. Replace R1 or the High Voltage Board.
5c
5s
Connector pins are damaged or have been pushed out of the connector.
Check all cables and connectors. Replace if they cannot be repaired.
None of the lights come on
1c
1s
Fuse F6 has blown.
Replace fuse.
2c
2s
AXV 28 VDC shorted to ground.
Check wiring for shorts to ground.
3c
3s
Exposure switch shorted to ground.
Replace exposure switch
Service Manual 8200909
18 - 5
18 Troubleshooting
4c
4s
Cranex Panoramic X-ray Series
Voltage regulators or other circuits on the PLU, Partial Exposure Controller
(PEC), Position Display, Z-Driver Unit or PDC Timing Circuit (DM version only)
arr short circuiting.
Replace defective board.
Rotating unit and/or cassette carriage do not move during exposure
1c
1s
Fuse F6 blown.
Replace fuse.
2c
2s
Motor(s) malfunctioning.
Replace motor(s).
Exposure apparently normal, but no image produced
1c
1s
No mA.
Check the FIV line, fuse F5 and the transistors on the PSU. Replace any that
are faulty. Check the operation of the PSU after replacing any of the transistors
18 - 6
Service Manual 8200909
Cranex Panoramic X-ray Series
18 Troubleshooting
Image quality problems - panoramic units
The easiest way to determine if there is an operating
or alignment problem is to take a ball/pin exposure.
From the size and shape of the ball/pin image, operating malfunctions and alignment errors can be
identified and then corrected.
For information on how to take a ball/pin exposure
see section “21 Aligning procedures - Taking a ball/
pin exposure”.
End of the image is missing (partial exposure)
1c.
1s.
Exposure button released too early.
Operator error. Retake the exposure if required.
2c
2s
Film microswitch activated too early.
Adjust position of the microswitch.
3c
3s
Back-up timer not set correctly (time too short).
Carry out a back-up timer test and then set the back-up timer.
Part of the image is in focus and part out of focus
1c.
1s.
Unit not correctly aligned.
Take a ball pin exposure to determine the alignment error. Realign the unit
accordingly.
2c
2s
Focal trough adjustment (y-movement) wire is broken.
Replace the wire.
Image too light, too dark or not enough contrast - cassette versions only
1c.
1s.
Film/screen incompatibility.
Check the film and intensifying screens being used are compatible. Replace
or change if necessary.
2c.
2s.
Faulty film processing.
Make sure that the film processing system is working correctly and that the
processing chemicals are correct, fresh and at the right temperatures.
Service Manual 8200909
18 - 7
18 Troubleshooting
Cranex Panoramic X-ray Series
3c.
3s.
Incorrect kV.
Check the generator calibration
4c.
4s.
Darkroom is not light-tight or the wrong lamp is being used with the safelight.
Check that there are no light leaks in the darkroom. Do this by placing a coin
on a piece of unexposed film placed on a flat surface in the darkroom. After
five minutes process the film. If an image of the coin appears on the film, it
indicates that the darkroom is not light-tight. If there is no image on the film,
the lamp is correct for the safelight.
The image is not symmetrical
1c
1s
The column is not vertical which is causing the rotating unit to change speed
during exposures
Reposition the column to get the unit in to the vertical position.
There are dark vertical lines (over exposure) on the film
1c
1c
The cassette carriage bearing block is dirty or loose.
Clean or adjust the bearing block.
2c
2c
The cassette carriage roller is dirty.
Clean cassette carriage roller with alcohol.
3c
3c
The cassette carriage roller is worn.
Replace cassette carriage roller.
4c
4c
The cassette motor drive wheel does not touch the cassette roller.
Adjust the cassette motor drive wheel so that it touches the cassette roller.
5c
5s
The rotation drive gear wheel or gear track is dirty or damaged (broken
tooth).
Clean if dirty, replace relevant parts if broken.
6c
6c
The cam pin on top trim cover of rotation unit is not in the slot.
Reposition the pin so that it is in the slot.
18 - 8
Service Manual 8200909
Cranex Panoramic X-ray Series
18 Troubleshooting
The length of the image (exposed area) in not correct
1c
1s
The cassette carriage is not moving at the correct speed.
Check and if necessary adjust the speed of the cassette carriage.
2c
2s
The cassette carriage drive wheel is not in proper contact with the roller.
Check that cassette drive wheel makes proper contact with roller.
3c
3s
The FILM microswitch and / or the END microswitch are out of adjust.
Readjust the positions of the microswitches.
The middle balls on the ball/pin image are oval and not round
1c
1s
The focal trough is not correctly aligned in relation to the rotating unit.
Check and if required realign the focal trough.
2c
2s
The profile follower is broken or is not in proper contact with the lower profile
Replace the profile arm assembly if the follower is broken and reposition the
follower if not in proper contact with the lower profile.
DM and DS digital versions:
1c.
1s.
The CCD sensor has not been calibrated correctly.
Refer to the separate calibrating instructions supplied with the DM and DS
versions of the unit.
Service Manual 8200909
18 - 9
18 Troubleshooting
Cranex Panoramic X-ray Series
Image quality problems - Ceph units
The margins are not all the same width
1c
1s
The beam is out of alignment.
Check and if necessary adjust the beam alignment. Refer to the installation
manual.
2c
2s
The ear rings are not concentric.
Adjust the position of the ear posts to get the ear rings concentric.
3c
3s
The soft tissue filter does not move.
Replace the soft tissue adjustment screw.
18 - 10
Service Manual 8200909
Cranex Panoramic X-ray Series
19 Removing covers
19 Removing covers
Most of the unit covers are held in place with Torx
screws. A Torx screwdriver is supplied with every
unit. Be careful when removing covers as many have
ground wire connected to them.
NOTE
When replacing covers ALWAYS reconnect the
ground wires.
NOTE
When replacing covers ALWAYS replace grounding
washers in their original positions.
19.1 Rotating unit
1. The upper cover on the control panel side of the
rotating unit is held in place with four (4) screws,
two on the top and two on the side. Note that
you may have to turn the rotating unit to access
the top two screws.
The control panel is held in place with three (3)
screws. These cannot be accessed until the
upper cover has been removed.
Service Manual 8200909
19 - 1
19 Removing covers
Cranex Panoramic X-ray Series
2. The upper cover on the tube head side of the
rotating unit is held in place with four (4) screws.
Note that you may have to turn the rotating unit
to access the top two screws.
3. The collimator cover is held in place with two
screws.
19 - 2
Service Manual 8200909
Cranex Panoramic X-ray Series
19 Removing covers
4. The left lower cover is held in place with 4
screws. The right lower cover is held in place
with 4 screws.
Service Manual 8200909
19 - 3
19 Removing covers
Cranex Panoramic X-ray Series
19.2 Upper shelf cover
1. Remove the front cover first (2 screws) and then
the upper cover from the shelf (4 screws).
19 - 4
Service Manual 8200909
Cranex Panoramic X-ray Series
20 Testing, Calibrating and Adjusting
20 Testing, Calibrating and Adjusting
20.1 kV/mA Calibration procedure
A digital multimeter (DMM) with a frequency counter
of known accuracy is required to complete this
procedure. PLU boards from type 4001-8 are fitted
with test points (TP) PKV+, PKV- CKV+, CKV-,
mA+, mA-.
1. Remove the control panel covers and the control
panel. Place lead shield over the primary slit.
2. Turn TA switch to the up “TEST” position and
check that the PRE switch is to the right, in the
normal (ON) position. Both switches are on the
PLU board.
3. Switch the unit on.
4. Select the frequency counter mode, and then
connect the DMM to TP mA- and pin 5 on IC14.
5. Adjust R45 to get a frequency of:
- 47 kHz, for tube heads with serial numbers
beginning with 13xxxxx and 23xxxxx
- 40 kHz old tube heads with serial numbers
beginning with 12xxxxx and 22xxxxx
6. Turn trimpots:
- R41(PRE) to the middle position,
- R51(mA) counter clockwise to a minimum,
- R56(kV) clockwise to a maximum,
- R65(RFB) counter clockwise to a minimum.
7. Connect the DMM to TPs PKV+ and PKV- on the
PLU.
8. Select exposure values of 81kV, 10mA and no
compensation.
Service Manual 8200909
20 - 1
20 Testing, Calibrating and Adjusting
Cranex Panoramic X-ray Series
9. Press and hold down the exposure switch and
adjust R65(RFB) until the DMM reading is 8.15V
(= 90kV).
Then adjust R56 (kV) until the DMM reading is
7.34V (= 81kV).
10. Connect the DMM to TPs mA+ and mA- on the
PLU board.
11. Push the PRE switch to the left, the OFF position. Select exposure values of 63kV, 10mA and
no compensation.
12. Press and hold down the exposure switch and
adjust R41(PRE) until the DMM reading is:
- 1.5V - 1.6V (40 kHz) old tube heads with serial
numbers beginning with 12xxxxx and 22xxxxx
- 1.2 - 1.3V (47kHz) old tube heads with serial
numbers beginning with 12xxxxx and 22xxxxx,
- 2.55 - 2.65V (47kHz) new tube heads with
serial numbers beginning with 13xxxxx and
23xxxxx
13. Push the PRE switch to the right, to the ON
(normal) position. Select exposure values of
63kV, 10mA and no compensation.
14. Press and hold down the exposure switch and
adjust R51(mA) until the DMM reading is 2.8V (=
10mA)
15. Select exposure values of 63kV, 6mA and no
compensation. Press and hold down the exposure switch and check the DMM reading, it
should be 1.6V - 1.8V.
20 - 2
Service Manual 8200909
Cranex Panoramic X-ray Series
20 Testing, Calibrating and Adjusting
16. Connect the DMM across Test Point PKV+,
PKV- on PLU
17. Check the voltage levels for the different kV
selections according to following table:
63kV = 5.72V
73kV = 6.62V
65kV = 5.90V
75kV = 6.80V
67kV = 6.08V
77kV = 6.98V
69kV = 6.26V
79kV = 7.16V
71kV = 6.44V
81kV = 7.34V
Following steps apply to ceph units only
1. Turn trimpots:
- R42(PRE) to the middle position,
- R52(mA) counter clockwise to a minimum,
- R54(kV) clockwise to a maximum.
2. Connect the DMM to TPs CKV+ and CKV- on
the PLU.
3. Select exposure values of 81kV, 10mA , no
compensation, 3.2 seconds. Place the lead
shield in front of the cephalostat beam
4. Press and hold down the exposure switch and
adjust R54(kV) until the DMM reading is 7.34V
(= 81kV).
5. Connect DMM across Test Points mA+, mA- on
the PLU.
6. Push the PRE switch to the left the OFF position.
Select exposure values of 63kV, 10 mA and no
compensation.
Service Manual 8200909
20 - 3
20 Testing, Calibrating and Adjusting
Cranex Panoramic X-ray Series
7. Press and hold down the exposure switch and
adjust R41(PRE) until the DMM reading is:
- 1.5V - 1.6V (40 kHz) old tube heads with serial
numbers beginning with 12xxxxx and 22xxxxx
- 1.2 - 1.3V (47kHz) old tube heads with serial
numbers beginning with 12xxxxx and 22xxxxx,
- 2.55 - 2.65V (47kHz) new tube heads with
serial numbers beginning with 13xxxxx and
23xxxxx.
8. Push the PRE switch to the right, to the ON
(normal) position.
9. Press and hold down the exposure switch and
adjust R52(mA) until the DMM reading is 2.8V
(=10mA).
10. Connect the DMM across TPs CKV+ and CKVon the PLU.
11. Check the voltage levels for the different kV
selections according to following table:
20 - 4
63kV = 5.72V
73kV = 6.62V
65kV = 5.90V
75kV = 6.80V
67kV = 6.08V
77kV = 6.98V
69kV = 6.26V
79kV = 7.16V
71kV = 6.44V
81kV = 7.34V
Service Manual 8200909
Cranex Panoramic X-ray Series
20 Testing, Calibrating and Adjusting
20.2 Adjusting the low line triggering
1. Rotate trimpot R16, on the PLU, clockwise as
far as it will go.
20.3 Backup timer test
The units are equipped with a backup exposure timer
to prevent excessive exposure periods. The backup
timer test circuit can be tested as follows:
1. Remove the cover from the PLU board.
2. Push the TA switch to the UP (TEST) position.
3. Turn the power on.
4. Select exposure values of 63 kV, 6 mA and no
compensation.
5. Place the radiation shield over the collimator.
6. Press and hold down the exposure switch and
time the audible signal using a stopwatch.
7. Proper exposure or audible signal should be 23
seconds +/- 1.5 seconds.
8. If the backup time is not correct it can be adjusted with potentiometer R26 on the PLU.
Service Manual 8200909
20 - 5
20 Testing, Calibrating and Adjusting
Cranex Panoramic X-ray Series
20.4 Calibrating the Autoset kV (cassette units only)
1. Disconnect the cable that goes to the head
support from J6 on the kV selector board (41202).
2. On the kV selector board, short pins 10 and 11
on IC 7.
3. Make sure that the x-ray unit is NOT in the
READY position.
4. Push the TA switch on the PLU board to the
DOWN position and then adjust trimmer R43 on
4120-2 to set the kV value to 63 kV. Note that
the kV value will NOT change when you adjust
the trimmer. To check that the 63 kV has been
selected push the TA switch to the UP position
and check that the 63 kV light comes on. If it
does not push the TA switch to the DOWN position again, and readjust the trimmer.
20 - 6
Service Manual 8200909
Cranex Panoramic X-ray Series
20 Testing, Calibrating and Adjusting
5. Remove the short from pins 10 and 11 and reconnect the head support cable to J6.
6. Close the temple supports as far as they will go.
7. Repeat the operation described in 4 above, only
this time adjust trimmer R45 to set the kV value
to 67 kV.
8. Open the temple supports as far as they will go.
9. Repeat the operation described in 4 above, only
this time adjust trimmer R44 to set the kV value
to 79 kV.
The head support calibration is now complete.
NOTE
The kV range from 67 – 79 is based on:
- a Kodak T-MAT G / Lanex Medium film/screen
combination (240 speed) at 10 mA with spinal
compensation ON
- or a Kodak T-MAT G / Lanex Regular film/
screen combination (400 speed) at 6 mA with
spinal compensation ON
Service Manual 8200909
20 - 7
20 Testing, Calibrating and Adjusting
Cranex Panoramic X-ray Series
20.5 Calibrating the positioning display
After the positioning display board or focal trough
wire has been, the position display must be calibrated. This is done as follows:
1. Remove the cap from the focal trough positioning
knob, loosen the nut that holds the knob in position and then remove the knob.
Remove the top cover from the lower shelf and
then replace the focal trough positioning knob
and secure it in position.
2. Insert the chin rest into the lower shelf.
3. Switch the unit on and then switch the patient
positioning lights on.
4. Rotate the focal trough positioning light knob until
the focal trough light strikes the side of the chin
rest.
5. Adjust trimmer R10 on the positioning display
board until the number on the display is zero
(00).
20 - 8
Service Manual 8200909
Cranex Panoramic X-ray Series
20 Testing, Calibrating and Adjusting
6. Rotate the focal trough positioning knob clockwise to move the light beam 20 mm backwards
(away from the column). Use a ruler to position it
correctly.
7. Adjust trimmer R9 on the positioning display
board until the number on the display is 20.
8. Rotate the focal trough position knob back to its
original position (striking the side of the chin rest)
and check that the number on the display is still
zero (00). If not, adjust trimmer R10 again.
9. Replace the top cover.
Service Manual 8200909
20 - 9
20 Testing, Calibrating and Adjusting
Cranex Panoramic X-ray Series
20.6 Adjusting the Z-motor belt
If the Z-motor is running but the Z-carriage does not
move, the tension of the Z-motor belt needs to be
adjusted. To do this:
1. Remove the back cover.
2. Loosen the three screws that secure the motor
base plate to the Z-carriage frame.
3. Push the motor assembly to tension the belt and
then tighten the base plate screws.
4. Press the up/down switch to check that the Zcarriage moves up and down.
Replace the cover.
20 - 10
Service Manual 8200909
Cranex Panoramic X-ray Series
20 Testing, Calibrating and Adjusting
20.7 Adjusting the up/down speed (z-driver)
(Excel and Excel Ceph units only)
The speed at which the Z-carriage moves up and
down can be adjusted. There are two speed adjustments. Slow speed - when the height adjusting key
is initially pressed; and high speed if the key is
pressed and held down.
Adjust the speeds with the adjustment screws on the
underside of the lower shelf.
20.8 Adjusting the volume of the exposure warning tone
The volume of the buzzer can be adjusted with the
trimmer T11 inside the rear bracket cover.
20.9 Calibrating CCD sensors - DM versions
Service Manual 8200909
20 - 11
20 Testing, Calibrating and Adjusting
Cranex Panoramic X-ray Series
1. Remove the cover from the PLU board and push
the TA switch to the UP (TEST) position.
2. Remove the cover from the +5 V power supply
unit that is connected to the CCD sensor.
3. Remove the covers from the CCD sensor
4. Connect a voltmeter across pin 13 and the metal
body of the D-connector.
5. Place the radiation shield over the collimator.
6. Take an exposure and adjust the trimmer in the
power supply unit to get a voltage of 5 VDC
±0.05 VDC.
7. Replace all the covers.
20 - 12
Service Manual 8200909
Cranex Panoramic X-ray Series
20 Testing, Calibrating and Adjusting
20.10 Calibrating CCD sensors - DS versions
For information on calibrating DS versions of the
CCD sensor, refer to the documentation supplied
with the sensor.
Service Manual 8200909
20 - 13
20 Testing, Calibrating and Adjusting
Cranex Panoramic X-ray Series
20.11 Checking the operation of PSU 47602-1
Checking the reference voltages
Turn the power on and check the reference voltages.
1. Switch the power on and check the following
reference voltages with a DMM:
- the 15V output voltage of IC 3.
Use case of IC3 as GND and pin 8 on IC4 as
output.
- the 15V output voltage of IC 5.
Use case of IC5 as GND and the top end of R16
as output.
- the 15V between IC9 pin 14 and 1
Use top end of R27 as GND and the bottom end
of R28 as output.
20 - 14
Service Manual 8200909
Cranex Panoramic X-ray Series
20 Testing, Calibrating and Adjusting
Power transistor verification
This procedure will reveal faulty power transistors on
the PSU. Use a DMM in the diode range to get the
correct readings
Service Manual 8200909
20 - 15
20 Testing, Calibrating and Adjusting
Cranex Panoramic X-ray Series
Checking the wave forms
1. Switch the power on.
2. Disconnect J2/J3 on MPU
a. Take an exposure and verify the filament inverter
pulse wave form from TR6 and TR7 drain
against GND
fig 1
20 - 16
Service Manual 8200909
Cranex Panoramic X-ray Series
20 Testing, Calibrating and Adjusting
b. Check inverter control pulses IC1/pin3 and IC2/
pin3
fig 2
c. Check inverter pulses at gates of TR2 and TR3,
against PV- (PV- is floating GND)
fig 3
Service Manual 8200909
20 - 17
20 Testing, Calibrating and Adjusting
Cranex Panoramic X-ray Series
d. Check regulator pulses IC4/pin3 against GND
fig 4
e. Check regulator pulses at gates of TR4 and TR5
(against source)
fig 5
20 - 18
Service Manual 8200909
Cranex Panoramic X-ray Series
20 Testing, Calibrating and Adjusting
3. Check protection circuit operation
Press the exposure button and short IC8 pins 4
and 5. LED15 must light up and exposure must
terminate. Switch power off for 20 seconds and
switch it back on.
Check IC7 reference voltages pin3 = 1.6V and
pin 5 = 5V
4. Connect J2/J3 on MPU
Select 63kV/10mA, take an exposure and check
the current wave form for tube head from J3/5
(HPI) with a current probe.
fig 6
Service Manual 8200909
20 - 19
20 Testing, Calibrating and Adjusting
Cranex Panoramic X-ray Series
Current Wave form with 81kV/10mA
fig 7
5. Make an exposure and check the voltage across
regulator transistors
fig 8
20 - 20
Service Manual 8200909
Cranex Panoramic X-ray Series
20 Testing, Calibrating and Adjusting
6. Make an exposure and check the voltage across
inverter transistors
fig 9
7. Make an exposure and measure regulator voltage (across C13)
63kV/10mA = approximately 145V
81kV/10mA = approximately 180V
Service Manual 8200909
20 - 21
20 Testing, Calibrating and Adjusting
20 - 22
Cranex Panoramic X-ray Series
Service Manual 8200909
Cranex Panoramic X-ray Series
21 Aligning procedures
21 Aligning procedures
The procedures in this section describe how to
identify and correct operating and image quality
problems.
21.1 Taking a ball/pin exposure
The first step towards correcting image quality and/
or operating problems is to take a ball/pin exposure.
From the size and shape of the balls and pins on the
image, alignment and operating problems can be
identified and then corrected.
Taking a ball/pin exposure
1. Slide the ball/pin fixture in the lower shelf.
2. Switch the positioning lights on and position the
focal trough light beam so that it is on the middle
of the two front balls.
Service Manual 8200909
21 - 1
21 Aligning procedures
Cranex Panoramic X-ray Series
Cassette versions:
3. Insert into the cassette carriage a cassette
loaded with film and its sheet of backing paper
(the film must be placed on the side of the cassette with the L/R marks), or a cassette with an
imaging plate.
4. Press the return key to drive the unit to the ready
position. Select exposure values of 63 kV, 6 mA
with spinal compensation off. Slide the cassette
carriage to the left until the READY light comes
on.
DM digital versions:
3
Open DfW and open a new patient card.
4. Press the RETURN key to drive the rotating unit
to the start position.
The READY light and 65 kV light will come on.
DS digital versions:
3. Open the CDR program. When the program is
running open a “New Exam”. This will activate the
CCD sensor in the unit so that an exposure can
be taken.
Refer to the “User’s Guide” supplied with the
CDRPan software for information on how to do
this.
21 - 2
Service Manual 8200909
Cranex Panoramic X-ray Series
21 Aligning procedures
4. Press the return key to drive the unit to the ready
position. Select exposure values of 75 kV, 6 mA
with spinal compensation off.
Slide the cassette carriage to the left until the
ready light on the unit control panel starts to
flash. This indicates that an exposure can be
taken.
5. Protect yourself from radiation and take an
exposure.
6. Process the film and examine the image.
With imaging plates scan the image and then
open the image and examine it using the dental
imaging software that is being used.
With digital versions of the unit, use the dental
imaging software being used to examine the
image.
Service Manual 8200909
21 - 3
21 Aligning procedures
Cranex Panoramic X-ray Series
21.2 Analysing the ball/pin image
The correct shape image
If the unit is set-up, aligned and operating correctly,
the distance between the two outermost pins of the
ball and pin image will be between 260 - 270 mm. In
addition, the distances from the middle pin to the left
and right outermost pins will be equal (withinn 3mm)
and between 130 - 135 mm. The balls will also be
round and not oval.
Image length correct, but image not symmetrical
If the length of the image is correct but the two sides
of the image are not the same length (the image is
not symmetrical) it indicates that the unit is not vertical.
To adjust the unit so that it is vertical see “Adjusting
the symmetry of the image” in the Installation
Manual.
21 - 4
Service Manual 8200909
Cranex Panoramic X-ray Series
21 Aligning procedures
Image too long or too short (Cassette versions only)
If the image is too long (above 270 mm) or too short
(below 260 mm), it indicates that the cassette carriage is moving either too fast or too slow.
To adjust the speed of the cassette carriage see
“Adjusting the length of the image” in the installation
manual.
The middle balls are not the same shape as the side balls
If the images of the balls in the middle of the exposure are a different oval shape to the balls at the
sides, this indicates that the focal trough is not correctly positioned.
To adjust the position of the focal trough see “Checking the position of the focal trough” in the Installation
Manual.
Service Manual 8200909
21 - 5
21 Aligning procedures
Cranex Panoramic X-ray Series
The shape of the balls are not the same on both sides
If the images of the balls on one side of the exposure are a different oval shape to the balls on the
side, it indicates that the centre of rotation is not
correctly positioned.
To adjust the centre of rotation see “Checking and
adjusting the centre of rotation” in the Installation
manual.
21 - 6
Service Manual 8200909
Cranex Panoramic X-ray Series
22 Replacing parts
22 Replacing parts
CAUTION
Switch the unit off before repairing or replacing any
parts or circuit boards. All recognised safety procedures should be followed, including power off.
22.1 Replacing the Mains Power Unit (MPU)
The MPU is removed by removing the screws (one in
each corner). The connectors should be removed by
pressing the release buttons and pulling apart. The
ground wires should also be removed. Reinstallation
is performed by reversing this procedure.
After the MPU has been installed the following procedure MUST be carried out:
a. Check the power line connection
b. kV-mA calibration procedure.
22.2 Replacing the Pulse Logic Unit (PLU).
The connectors should be removed from the circuit
board after removal of the four nut pins that hold it in
place. Caution is advised in the replacement of
covers to prevent jamming of selector switches and
pinching of wires.
After the PLU has been installed the following procedure MUST be carried out:
a
kV-mA calibration procedure.
b
Backup timer confirmation.
22.3 Replacing the Partial Exposure Controller (PEC)
The exposure controller can be removed by detached the control panel, opening the connectors and
finger nuts. If the controller is broken it could be
temporarily taken off when IC10 in the PEC is transferred to the IC8 socket in the PLU and the motor
connectors are connected to the PLU. The functions
of the PEC procedure must be checked after replacement.
Service Manual 8200909
22 - 1
22 Replacing parts
Cranex Panoramic X-ray Series
22.4 Replacing the Front panel board
Make sure that the default mA is set (Jumper).
22.5 Replacing the kV and Time Selector
Check the reference voltages. Refer to kV/mA calibration.
Calibrate the autoset kV.
22.6 Replacing the Power Switching Unit (PSU)
The power switching unit should be removed by
unfastening the screws from the metal chassis. Care
should be taken to observe the polarity of the ribbon
connectors. All AMP connectors should be inspected
after replacement to prevent pushed out pins from
causing accidental failure. Ground wires must also
be removed and replaced. Failure to replace ground
wires here, or on the tube head, may cause external
arcing.
After the PSU has been installed the following procedure MUST be carried out:
a
22 - 2
kV-mA calibration procedure.
Service Manual 8200909
Cranex Panoramic X-ray Series
22 Replacing parts
22.7 Replacing the Tube Head Assembly
The following special tools are required for electrical
and mechanical checks when the tube
head is changed:
- DVM
- Alignment spike
- Panoramic fluorescent screen
- Ball and pin phantom
CAUTION
Protect your self from radiation when taking test
exposures.
1. Turn the power off. Install the transportation pin
into the counterweight. Disconnect the connector
and the ground wires from the tube head.
2. Remove the tube head covers. Mark the position
of the THA and then remove the tube head by
unscrewing two 13 mm nuts that hold the tube
head to the rotating unit.
3. Remove the beam collimator from the old tube
head and attach it to the replacement tube head.
4. Install the new tube head and covers on the
rotational drive unit casting. Finger tighten the
M13 mounting nuts.
5. Reconnect the connectors and ground wires.
Check for pushed out pins.
6. Calibrate the tube head, see “kV/mA calibration
procedure” for information on how to do this.
7. Turn the rotating unit parallel to the wall. Install
the fluorescent screen and an empty cassette.
8. Remove the head holder and screw the alignment spike into the center hole.
Service Manual 8200909
22 - 3
22 Replacing parts
Cranex Panoramic X-ray Series
9. Select 71 kV, 10 mA, compensation OFF and
turn the TA switch on the PLU to the up position.
10. Remove the primary slit from the beam collimator.
11. Take an expose and adjust the focal trough
adjustment so that the image of the alignment
spike is in the center of the fluorescent screen.
13. Turn the rotating unit 180 degrees. Make sure
that the Y-movement stays the same. Take a
second exposure. The image of the alignment
spike shadow may be offset on the fluorescent
screen.
14. Adjust for half of the offset by moving the tube
head towards the error. Adjust the other half by
adjusting the focal trough.
15. Turn the rotating unit 180 degrees and verify the
adjustment. Repeat if necessary. The focal spot
rotation centre and secondary slot are now on
the same center line.
16. Tighten the tube head securing screws and
replace the primary slit to the beam collimator.
17. Remove the alignment spike.
18. Replace the primary slit. Adjust the beam collimator. See “Checking the position of the panoramic beam” in the Installation Manual.
19. Remove fluorescent screen and push the TA
switch to the down position.
20. Carry out a ball and pin test to check the alignment. See section 7 “Aligning Procedures” in this
manual.
21. Replace covers.
22 - 4
Service Manual 8200909
Cranex Panoramic X-ray Series
22 Replacing parts
22.8 Replacing the Cephalometric Tube Head
When replacing the cephalometric tube head follow
the same procedure as used when changing the
panorama tube head.
After the cephalometric tube head has been replaced the following procedure MUST be carried out:
a
kV-mA calibration procedure.
b
Cephalometric beam alignment test. See section
“Aligning the cephalostat” in the Cranex Installation Manual.
22.9 Replacing the Position Display Assembly
The display board can be replaced by removing the
top cover from the lower shelf.
After the board has been replaced, the position
display must be reset.
See section 20: Testing, Calibrating and Adjusting Calibrating the positioning display, in this manual.
22.10 Replacing Z-Driver Unit Board (Excel units only)
The driver board can be detached by removing the
bottom cover from the lower shelf of the z-carriage
and removing the connectors. The vertical movement speed adjustment procedure must be completed after replacement. See section 20: Testing,
Calibrating and Adjusting - Adjusting the up/down
speed (z-driver).
Service Manual 8200909
22 - 5
22 Replacing parts
Cranex Panoramic X-ray Series
22.11 Replacing positioning light bulbs
1. Switch the power off
2. Pry the front cover off of the light with a small
screwdriver.
NOTE. Handle the light insert carefully, so that
the position of apertures do not move.
3. Remove the blown light bulb and insert the the
new bulb into the bulb holder.
4. Switch the power on. Make sure that light insert
is not grounded by the metal covers. Switch on
the positioning lights.
5. Rotate the bulb in its holder until the light is the
brightest and sharpest.
6. Slide the front cover back onto the light..
22 - 6
Service Manual 8200909
Cranex Panoramic X-ray Series
22 Replacing parts
22.12 Replacing the Focal Trough Cable
Service Manual 8200909
22 - 7
22 Replacing parts
22 - 8
Cranex Panoramic X-ray Series
Service Manual 8200909
Cranex Panoramic X-ray Series
22 Replacing parts
22.13 Replacing z-carriage brake pads (BaseX Only)
1. Lock the counter weight in place with counterweight pin.
2. Turn the brake lver to the downwards position to
release the brake. Remove the brake lever and
then the cover from the left-hand side of the zcarriage.
Service Manual 8200909
22 - 9
22 Replacing parts
Cranex Panoramic X-ray Series
3. Remove the brake assembly and slide out the
brake pads and replace them with new ones
4. Reassemble in reverse order
22 - 10
Service Manual 8200909
Cranex Panoramic X-ray Series
22 Replacing parts
22.14 Replacing the cassette carriage roller.
1. Remove the left-hand cassette carriage end.
(If it is a BaseX unit remove the adult/child selection knob first)
2. Lift the cassette carriage motor up slightly, and
then side out the cassette carriage roller.
3. Pull out the cassette drive shaft.
4. Insert the new cassette carriage roller.
5. Replace the cassette carriage end. (If the unit is
a BaseX also replace the selection knob.
Service Manual 8200909
22 - 11
22 Replacing parts
Cranex Panoramic X-ray Series
22.15 Replacing the CCD sensor - DM version
1. Remove the upper cover and the control panel
cover from the rotating unit.
2. Disconnect the cable from the side of the CCD
sensor and then remove the sensor. It is held in
place with four (4) screws.
3. Install the new CCD sensor, reconnect the cable
and then replace the covers.
4. Calibrate the new CCD sensor and then check
the beam alignment. Refer to the DM installation
appendix
22 - 12
Service Manual 8200909
Cranex Panoramic X-ray Series
22 Replacing parts
22.16 Replacing the CCD sensor - DS version
1. Remove the upper cover from the rotating unit.
2. Disconnect the cable, that goes to the CCD
sensor, from the remote module.
Service Manual 8200909
22 - 13
22 Replacing parts
Cranex Panoramic X-ray Series
3. Remove the lower left-hand cover and then the
CCD sensor assembly.
4. Disconnect the trigger cable from the CCD sensor and then remove the CCD sensor and flat
cable from the rear of the CCD sensor assembly.
5. Attach a new CCD sensor to the rear of the CCD
sensor assembly. Route the flat cable through
the unit and connect it to the remote module.
Reconnect the trigger cable to the CCD sensor.
6. Reattach the CCD assembly to the unit.
Calibrate the new CCD sensor and then check
the beam alignment. Refer to the DS installation
appendix. Replace all the covers.
22 - 14
Service Manual 8200909
Cranex Panoramic X-ray Series
23 Yearly check
23 Yearly check
Once a year an authorized service technician must
carry out a full inspection of the unit.
During the inspection the following test and checks
MUST be carried out:
Service Manual 8200909
–
a kV/mA test
–
a ceph exposure time test (ceph units only)
–
a beam alignment test
–
a ball/pin test
–
a check to see that the safety ground is connected
–
a check to see that the positioning lights operate
–
a check to see that the tube head is not leaking
–
a check to see that the cassette carriage roller is
not worn or damaged (cassette versions only)
–
a check to see that all covers and mechanical
parts are correctly secured and have not come
loose.
23 - 1
23 Yearly check
23 - 2
Cranex Panoramic X-ray Series
Service Manual 8200909
Cranex Panoramic X-ray Series
24 Theory of operation
24 Theory of operation
24.1 Working principles of narrow beam rotational radiology
Rotational panoramic radiography is a specific radiographic projection technique which utilizes a narrow
beam of X-rays to image a curved layer. The simplest
projection technique applied in practice utilizes one
stationary rotation center placed at one side of the
jaws projecting the other side onto the film. One side
of the jaws is exposed at a time, and the position of
the rotation center (the functional focus of the
projection) is shifted symmetrically between exposures by moving the patient. This projection technique
creates what is called a SPLIT IMAGE. In Cranex
systems, to create continuous images, several
different movement patterns of the beam are utilized
to achieve the desired projection of the jaws. The
objective is to project each part of the jaws as close
to perpendicular as possible. The beam may be given
a sliding movement throughout the total excursion so
that the effective projection center (the functional
focus) is continuously shifted along a defined path.
The central ray of the beam is always tangential to this
path at some point. The form of the path defines the
direction of the beam and hence the projection of
each successive part of the jaws.
Service Manual 8200909
24 - 1
24 Theory of operation
Cranex Panoramic X-ray Series
The position and form of the layer is independent of
the movement patterns of the beam discussed previously. These movement patterns serve only to define
the projection of the object, the jaws. Starting from any
of possible beam movement patterns, the image layer
may be given any desired form and position by
matching the film speed at each moment during the
exposure to the speed of the moving shadows of
object points in the center of the desired layer. In the
horizontal plane, the plane of rotation, the rotation
center serves as the functional focus of the projection.
The image is registered successively on the moving
film as the beam scans the object. In the vertical
dimension, the tube target serves as the focus of the
projection. The fact that the projections in the
horizontal and vertical directions have different foci
causes distortion effects that are characteristic of
rotational panoramic radiography.
24 - 2
Service Manual 8200909
Cranex Panoramic X-ray Series
24 Theory of operation
At the center of the layer, the magnification factors in
the horizontal and vertical directions are equal. This
implies that a small flat object positioned at the
center of the layer will be portrayed in proper proportion. Outside the center of the layer, the magnification factors in these two dimensions will be unequal. This results in distortion effects. If three
planes are cut out from the layer at different object
depths, the images of objects in these planes will
exhibit different proportions. The plane at the center
of the layer is correctly depicted. The plane positioned toward the rotation center of the beam will be
magnified more in the horizontal than in the vertical
dimension, and will appear too wide. The plane
positioned toward the film will be diminished more in
the horizontal than in the vertical dimension and will
appear too narrow. The preceding considerations
imply that teeth positioned between the center of the
layer and the film appear narrow. This indicates that
the patient has been positioned too far forward
during the exposure. Similarly, teeth positioned
between the center of the layer and the rotation
center of the beam appear wide. This indicates that
the patient has been positioned too far back during
the exposure.
UNSHARPNESS
The film is given a speed which matches the projected speed of points lying in a selected curved
plane. As a result, these points will be sharply depicted on the film. The projection of object points
outside the sharply depicted plane, either toward the
rotation center of the beam or toward the film, will
have a different projected speed at the film plane than
the film itself. As a result, the projection of these
points will move in relation to the film and will appear
blurred. Since the difference between the speed of
the film and the speed of the of the points in the object
will increase with the distance from the sharply
Service Manual 8200909
24 - 3
24 Theory of operation
Cranex Panoramic X-ray Series
depicted object plane, the unsharpness increases in
both directions from this plane. At some distance the
unsharpness will reach a level where an object point
is no longer perceptible in the image. In this way a
zone in the object may be defined which contains
those object points which are depicted with sufficient
resolution that they may be distinguished. This zone
is referred to as the image layer. Preferably, the
layer thickness in rotational panoramic radiography
should be great enough that the whole depth of the
jaws, which in themselves constitute a layer, would
be sharply depicted in the image. In practice this
condition is never realized. Especially in the anterior
region of continuous images the layer is so narrow
that the positioning of the patient is critical.
Unsharpness in this region, lowering the diagnostic
information, is a frequent experience in clinical work
with rotational panoramic radiography. Thus, while
the
unsharpness may be disturbing, it is usually not great
enough to conceal large object details.
However, it may happen that a malpositioned tooth
may be difficult or impossible to detect in the image if
it is positioned toward the rotation center of the
beam and at a great distance from the center of the
layer. Unsharpness alone does not cause this effect in
the image. The extreme magnification of objects
displaced toward the rotation center is also a contributing factor. The tooth in this case is so greatly
magnified in the horizontal dimension that the resulting image has a lower contrast relative to the surrounding structures than it would have had without the
magnification. The tooth will be concealed due to the
combined effects of distortion and unsharpness. The
unsharpness and distortion effects are important
criteria when evaluating panoramic radiographs. The
fact that the teeth in a certain region appear too broad
as compared to their length indicates, together with
unsharpness, that this region has been malpositioned
toward the rotation center of the beam during the
24 - 4
Service Manual 8200909
Cranex Panoramic X-ray Series
24 Theory of operation
exposure. A narrowing of the teeth, on the other
hand, together with the accompanying unsharpness,
indicates that the region in question has been
malpositioned toward the film during the exposure.
This information is easily used to correct the patient’s
positioning when a retake is made. Generally, if there
is no significant unsharpness and no significant
distortion in a region of a panoramic radiograph, or in
the whole radiograph, this indicates that the image is
essentially reliable when evaluating the morphology of
normal or pathological changed structures. Those
measurements which may be relied upon, for instance
angular measurements, may be performed on such a
panoramic radiograph.
24.2 Quality Cephalometric Radiographs
Cephalometric analysis is the term used for evaluating growth or morphology on the basis of
cephalometric tracing. The accuracy of the tracing
depends on the quality of the film and the ability of the
operator to locate the landmarks. For instance, if the
patient’s head is not exactly centered in the
cephalostat, certain structures will appear on the
cephalogram as double images. Accuracy and consistency of technique are essential, and are developed only through practice. To make a cephalometric
tracing, a sheet of acetate paper is placed over the
cephalometric film and is attached to the film along
one edge with masking tape. Using a sharp pencil,
the landmarks, soft tissue profile, planes, and angles
are traced. The cephalogram should be traced on a
view box in a room with reduced illumination to allow
better visualization of indistinct landmarks. The organization of a cephalometric analysis requires that
first the cephalometric landmarks be located and then
that certain landmarks be joined into cephalometric
planes. Once the planes are established, angles can
be measured and compared with established norms.
Service Manual 8200909
24 - 5
24 Theory of operation
Cranex Panoramic X-ray Series
24.3 X-ray principles
Beam Quality
–
Higher kV = harder beam.
–
Higher kV = lower contrast , lower patient dose.
–
10 kV increase doubles radiation output.
–
Changing mA does not change beam quality.
–
Doubling mA doubles radiation output.
–
More AL-filtration = harder beam.
–
More AL-filtration = less radiation output.
–
DC beam is harder than AC with the same filtration.
–
Optimum contrast in panoramic use is acquired
with 69-77 kV.
–
A smaller focal spot produces sharper images.
–
Size limited by thermal loading (kV, mA, Time).
–
Actual focal spot up to 1.5 x nominal.
–
Nominal focal spot measured in max. kV and half
of mA.
–
Instantaneous loading limits AC use.
–
More mA =larger focal spot.
–
Gauss distribution of intensity most favourable.
Focal Spot
24 - 6
Service Manual 8200909
Cranex Panoramic X-ray Series
24 Theory of operation
Magnification
Service Manual 8200909
–
Reduces scatter radiation.
–
More magnification requires smaller focal spot.
–
More magnification requires less resolution on
screens.
–
Constant magnification enables measurements
(not in PAN).
–
In panoramic radiograph TMJ’s must fit on a 30
cm film, which limits magnification.
24 - 7
24 Theory of operation
24 - 8
Cranex Panoramic X-ray Series
Service Manual 8200909
Cranex Panoramic X-ray Series
25 Technical specifications
25 Technical specifications
Classification
Complies with IEC class I type B, IPX0
Complies with IEC 601-1, IEC 601-2-7 and EN 55011 standards
Group 1, class B
Complies with DHHS Radiation Performance Standard, 21CFR Subchapter J.
The unit must be installed in a protected clinical environment.
Description
Dental panoramic and panoramic/cephalometric x-ray units with a high frequency
switching mode x-ray generators. The panoramic version takes panoramic exposures. The panoramic/cephalometric version takes panoramic and cephalometric
exposures and uses a dedicated x-ray source to take cephalometric exposures.
Generator
TUBE
- OPX/105, DE 100/15 or equivalent
FOCAL SPOT
- 0.5 mm IEC 336
TARGET ANGLE
- 5º
TARGET MATERIAL
- Tungsten
OPERATING TUBE POTENTIAL
- Panoramic 63 - 81 kV (±5 kV) at preselected settings
OPERATING TUBE CURRENT
- 6 mA and 10 mA (±1 mA) at preselector,
4.5 mA and 6 mA or 7.5 mA and 10 mA in compensation mode
MAXIMUM TUBE CURRENT
- 11 mA
MAXIMUM OUTPUT POWER
- 945 W nominal
FILTRATION
- minimum filtration 2.5 mm Al
BEAM QUALITY
- HVL over 2.5 mm Al at 81 kV
OUTER SHELL TEMPERATURE
- +50ºC (122ºF) maximum
DUTY CYCLE
- Panoramic: 1:15, 81 kV/10mA
- Cephalometric: 1:20, 81 kV/10mA
Service Manual 8200909
25 - 1
25 Technical specifications
Cranex Panoramic X-ray Series
Power requirements
INPUT VOLTAGE
- 175-250 VAC (±10%), 50/60 Hz, adjustable, single phase, grounded socket
MAXIMUM LINE CURRENT
- 7 A at 81 kV/10mA
MAXIMUM LINE RESISTANCE
- 1 ohm
MAXIMUM LINE FUSING
- 10 A slow (main fuse 8A slow in device)
LINE SAFETY SWITCH (when required)
- Approved type, min. 10 A 250 VAC
EARTH LEAKAGE CIRCUIT BREAKER (when required)
- Approved type, min. 16 A 250 VAC, breaker activation leakage current in
accordance with local regulations.
Mechanical parameters
PANORAMIC
- SID 520 mm (±10 mm)
- Magnification factor 1.3
CEPHALOMETRIC
- SID 1635 - 1700 mm ±20 mm
- SID, USA only, fixed 1700 mm ±20 mm
- SOD (Source object distance) 1500
- Magnification factor 1.09 - 1.13 (Non US unit, set during installation)
- Magnification factor, USA only, fixed 1.13
WEIGHT
- Panoramic unit 150 kg (330 lb.)
- Pan Ceph unit 195 kg (430 lb.)
DIMENSIONS
- Panoramic unit (HxWxD) 2240 x 1200 x 970 mm (88" x 47" x 38")
- Pan Ceph unit (HxWxD) 2240 x 1200 x 1850 mm (88" x 47" x 74")
VERTICAL HEIGHT OF CHIN REST
- 850-1700 mm (33"-67")
Cassettes
PANORAMIC
- 15 x 30 cm (6" x 12") Optional 24 x 30 cm (10” x 12”) available
CEPHALOMETRIC
- 18 x 24 cm (8" x 10")
- optionally 24 x 30 cm
25 - 2
Service Manual 8200909
Cranex Panoramic X-ray Series
25 Technical specifications
Timer
PANORAMIC EXPOSURE TIMES:
50 Hz
Normal
19 s (±15%)
Child
17 s (±15%)
Sides
11 s (±15%)
Middle
10 s (±15%)
TMJ
3.3 + 3.3 s (±15%)
Max 240 mAs
60 Hz
16 s (±15%)
14 s (±15%)
9 s (±15%)
8 s (±15%)
2.8 + 2.8 s (±15%)
Max 202 mAs
CEPHALOMETRIC EXPOSURE TIMES:
- 0.4 - 3.2 s (±15%), ten steps in accordance with R’ 10, series (ISO)
- 4 mAs - 32 mAs nominal, maximum 40.4 mAs
BACK-UP TIME
- 23.5 s (±1.5s)
Leakage technique factors
PANORAMIC
- 81 kV, 2400 mAs/h (81 kV, 10 mA, duty cycle 1:15)
(One normal exposure per 4 minutes cool-down period)
CEPHALOMETRIC
- 81 kV, 1800 mAs/h (81 kV, 10 mA, duty cycle 1:20)
(One 3.2 s exposure per 1 minute cool-down period)
Service Manual 8200909
25 - 3
25 Technical specifications
Cranex Panoramic X-ray Series
Measurement bases
-
The kV is measured by monitoring the current flowing through a 450 Mohm,
1% feedback resistor connected between the tube anode and ground.
-
The mA is measured by monitoring current in the HT return line, which equals
the tube current.
-
Both parameters are measured using a Soredex kV/mA meter (pt. no.
4800177) or with a digital multimeter (DMM) according to a specified
procedure. The exposure time is measured using a radiation probe positioned in
the primary beam.
Cephalometric collimator
18 x 24 A or 24 x 18 A for lateral projection,
18 x 24 S for P.A. and A.P. projections
24 x 30 aperture optional
8" x 10" A or 10" x 8" A for lateral projections
8" x 10" S for A.P. and P.A. projections
Adjustable soft tissue filter for lateral projection
Operating Room Temperature
- 15ºC (59ºF) to 32ºC (90ºF)
Operating Relative Humidity Maximum
- 95%
Storage/transportation
- +0 - +50ºC, 0 - 85 RH%, 500 - 1080 mbar
25 - 4
Service Manual 8200909
Cranex Panoramic X-ray Series
25 Technical specifications
Tube housing assembly cooling characteristics
Service Manual 8200909
25 - 5
25 Technical specifications
Tube rating chart
Cranex Panoramic X-ray Series
Anode thermal characteristics
OPX/105
Tube rating chart
Anode thermal characteristics
DE 100/15 ö
25 - 6
Service Manual 8200909
Cranex Panoramic X-ray Series
25 Technical specifications
Unit dimensions
Service Manual 8200909
25 - 7
25 Technical specifications
25 - 8
Cranex Panoramic X-ray Series
Service Manual 8200909