1
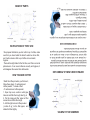
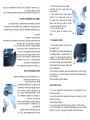
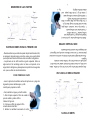
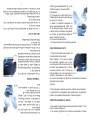
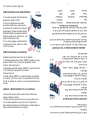
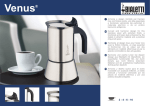
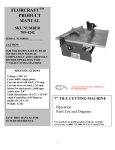
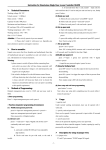
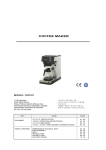
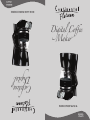
MODEL:
CP43679
INSTRUCTION MANUAL
Cafetera
Digital
Maker
Digital Coffee
MANUAL DE INSTRUCCIONES
MODELO:
CP43679
1
INSTRUCCIONES
Al utilizar este electrodoméstico, preste atención a las
medidas de protección y de seguridad necesarias con
el fin de evitar que se produzca fuego, electrocutarse u
otros daños. Tome en cuenta los siguientes pasos:
·In order to guarantee the life-span of your coffee machine ,
please don’t dismantle the parts without authorization .
·It is not allowed to soak in water.
·The bottom overlays warning content
· Carefully read all items of the instruction before you use it.
· Please keep the plug, coffee machine and hands dry.
· While using and soon after using, if your coffee machine
still generates heat, please don’t touch the hot surface with
hands.
· When the electrical equipment is put by the children or used
by children ,there should be parents to guard.
· If the supply cord is damaged, it must be replaced by the
manufacturer ,its service agent or similarly qualified persons
in order to avoid a hazard.
· When electrical wires, plug are damaged or other malfunctions of the machine, please don’t use it and send it to the
authorized service center.
· Please don’t use it outside
·Please don’t be close to the fire source , the flammables or
the oven while using.
·Before you stop using, or washing the coffeepot, please pull
out the plug first.
When you use this electrical equipment, please follow these
necessary safety protection measures in order to avoid fires,
electrocutions and other losses. Here are the following steps:
INSTRUCTIONS
- Lea con cuidado todas las secciones de las instrucciones
antes de utilizar el electrodoméstico.
- Mantenga el enchufe, la cafetera y sus manos secas.
- Durante el uso y después de éste, si la cafetera aún
generara calor, no toque las superficies calientes con las
manos.
- Si el electrodoméstico va a ser utilizado por niños, éstos
deben ser supervisados por sus padres.
- Si el cordón se dañara, éste debe ser reemplazado por
parte del fabricante, el agente de servicio técnico respectivo
o cualquier persona calificada con el fin de evitar eventualidades.
- Si los cables eléctricos o el enchufe se encontrarán dañados
o si se presentara cualquier desperfecto en el aparato, no lo
utilice y envíelo al centro de servicio técnico autorizado.
- No lo utilice al aire libre.
- No lo utilice cerca de una fuente de calor, llama viva o un
horno.
- Al terminar de utilizar el electrodoméstico o para proceder a
lavarlo, primero desenchúfelo.
- Con el fin de garantizar la duración de la vida útil de su
cafetera, no desarme el aparato sin la debida autorización.
- Nos sumerja el electrodoméstico en agua.
- En la parte inferior del electrodoméstico se verá la siguiente
advertencia:
SÓLO PARA USO DOMÉSTICO
ADVERTENCIA:
CON EL FIN DE REDUCIR EL RIESGO DE QUE SE
PRODUZCA FUEGO O UNA DESCARGA ELÉCTRICA, NO RETIRE
LA TAPA. NO SE ENCONTRARÁ PIEZAS ÚTILES EN EL INTERIOR.
TODO ARREGLO DEBE SER LLEVADO A CABO POR EL PERSONAL
DE SERVICIO TÉCNICO AUTORIZADO SOLAMENTE.
PRECAUCIÓN: NO SUMERJA EL APARATO EN NINGÚN TIPO DE
LÍQUIDO.
1
Tapa
NOMBRES DE LAS PARTES
Tapa
Tanque de agua
Jarra
Mango
Base Inferior
Panel Electrónico
Panel Mecanico
Tapa Inferior
INSTRUCCIONES PARA EL PRIMER USO
- Recomendamos que antes de pasar la primera taza de café,
se asegure de pasar agua pura dos veces ya que esto hará
que la primera taza de café sea más aromática e higiénica.
- La primera vez el café tendrá un gusto especial. Esto es
algo normal. Sin embargo, esto no tiene un impacto en la
seguridad ni la higiene y desaparecerá a partir de la segunda
vez que se utilice el electrodoméstico.
COMO PREPARAR CAFÉ
2
·Wash the coffee pot when you first use it,
follow these steps: “to add water and
coffee powder”, “to make coffee”
• To add water and coffee powder
1. Open top cover, overturn outlet pipe,
take out and filter the trough See Fig. A
2. Put the lump-sum filter paper or filter
screen into and filter the trough.
3. Add the right amount coffee powder
( invites 45 gr ) to the filter paper, and
Fig. A
shake the filter slightly.
HOW TO MAKE COFFEE
·We propose that before you boil a first cup of coffee, make
sure that you have boiled the branch water two times first ,
and it will so make a first cup of coffee more aromatic,
hygiene.
·There will be slight taste for the first time, and this is a normal
phenomenon. It can never influence security and hygiene, it
will disappear the second time afterwards.
INSTRUCTIONS OF FIRST USE
- Lave la jarra de la cafetera antes del primer uso y siga los
siguientes pasos: añada agua y café
molido para preparar el café.
• Como añadir el agua y el café molido.
1. Abra la tapa superior. Déle la vuelta al
pico de salida y retire el filtro.
Véase la Figura A.
2. Coloque un filtro de papel o filtro
colador dentro del filtro.
3. Añada la cantidad necesaria de café Fig. A
NAME OF PARTS
2
3
1. You can adjust the wanting hours by pushing the “hour”
button. See Fig. D
a. you can adjust the wanting minutes by pushing the “min”
button. See Fig. E
·direct coffee making
b. You can make coffee directly by pushing “on/off” button.
2. If “on”LED light is on, it means it has begun to work. It needs
about 13 minutes. 12 cups of aromatic coffee is finished.
·SET THE CLOCK
1 Push switch button, the light is to
be bright Fig. C.
If the light is on, it means the beginning
of making coffee. It needs about 13
minutes, 12 cups of aromatic coffee is
finished, and your coffee machine will
be chosen to keep warm automatically Fig. C
at this moment, the power switch will
be on all the time.
2 Turn off the machine, push the switch button and the light
will not be on. It means that the machine has stopped working. See Fig. C
PCB controlling Coffee Maker:
· TO MAKE COFFEE
4. Put the slot back to the coffee
machine, turn the water pipe the
proper place.
5. Add right amount water (about
1800 CC ) to water tank , look out
for water tank , scales pf the glass.
Make sure that you add a proper
amount of water. See Fig. B
6. Put on the top cover
7. Put the glass in keeping warm
Fig. B
slice
molido (aproximadamente 45 g.) en
el filtro de papel y sacuda el filtro
ligeramente.
4. Colóquelo de vuelta dentro de la
cafetera poniendo el pico para el agua
de nuevo en su lugar.
5. Añada la cantidad necesaria de
agua (aproximadamente 1800 CC)
en el tanque de agua. Fíjese en las
marcas dentro del tanque. Asegúrese
de colocar la cantidad apropiada de Fig. B
agua. Véase la Figura B.
6. Coloque la tapa superior.
7. Coloque la jarra en la base para calentar.
PARA PREPARAR CAFÉ:
1. Presione el botón de encendido. La
luz indicadora se iluminará,
véase Figura C. Si la luz se encuentra encendida, significa que el proceso de pasar café se ha iniciado. Se
necesita aproximadamente 13 minutos para preparar unas 12 tazas de
café aromático. En este momento la Fig. C
cafetera mantendrá el café caliente
de manera automática. El botón de encendido permanecerá
activado todo el tiempo.
Figura C
2. Para apagar el aparato, presione el botón de encendido y
los indicadores se apagarán. Esto significa que el electrodoméstico ha quedado desactivado. Véase la Figura C.
CÓMO PROGRAMAR AL RELOJ
1. Se puede programar las horas presionando el botón “hour”
(hora). Véase la Figura D.
2. Se puede programar los minutos presionando el botón
3
“min” (minuto). Véase la Figura E.
CÓMO PREPARAR CAFÉ DIRECTAMENTE
Fig. G
1. Se puede preparar café directamente
presionando el botón “on/off”.
2. Si la luz indicadora se encuentra
encendida, significa que el proceso ha
comenzado. Se necesita unos 13 minutos
para preparar 12 tazas de café aromático.
El electrodoméstico se apagará automáticamente después de mantener el café
caliente durante dos horas.
3. Si se desea apagar el electrodoméstico durante el proceso, presione el botón
“on/off” dos veces.
Fig. H
CÓMO PROGRAMAR LA CAFETERA
Se debe programar el reloj interno de la cafetera.
1. Mantenga presionado el botón “BREW” (destilar) y luego
presione el botón “hour” (hora) para programar la hora
correcta. Véase la Figura G.
2. Mantenga presionado el botón “BREW” y presione el botón
“min” (minuto) para programar los minutos.
Véase la Figura H.
3. Suelte el botón “BREW” y quedará el tiempo programado.
4. Presione “on/off” dos veces y se encenderá la luz “auto”.
El café se pasará de acuerdo a la hora programada por el
usuario.
Fig. H
LIMPIEZA Y MANTENIMIENTO DE LA CAFETERA
- Después de preparar café, se debe retirar el filtro de la
ranura y limpiar los restos.
- El filtro y la jarra se pueden lavar con agua y jabón suave.
- No sumerja el aparato en agua ni lo lave. Límpielo con
paño de algodón húmedo. Periódicamente se debe limpiar el
interior del electrodoméstico con vinagre.
Fig. G
4
4
WASHING AND MAINTAINING OF THE COFFEEPOT
·After making coffee, you should put down the filter slot, remove the coffee dreg from the filter net.
·Filter slot, glasses can be washed in branch water or the soft
sanitizer.
·The main body can’t be soaked in water and washed definitely, and it can be polished with the wet cotton cloth. At
regular intervals you can clean the inside with the vinegar
Specifications of Coffeepots
Description Mechanical coffeepot
Electronic coffeepot
Type
CP43679
Rated power
120V/60HZ
120V/60HZ
Power
900W
900W
Capacity
1800CC
1800CC
·BOOKING TO MAKE COFFEE MOLD
Users must set the inner clock of the
coffeepot.
Users must set the inner clock of the
coffeepot.
1.Keep on pushing the “BREW” button,
and push “hour” button to adjust to the
right hour. See Fig.G
2. Keep on pushing the “BREW” button,
and push “min” to adjust the right minute.
SEE Fig. H
1. Unloosen “BREW” button, booking
hour is set up.
4.Push “on/off” twice, “auto” light will be
on. Coffee is making, and the coffeepot
will do its work according to the users’
appointed hour.
It will cut off the power after keeping warm for two hours automatically.
1 If you want to turn off the machine in the midway, push “on/
off” button twice.
MODEL:
CP43679
INSTRUCTION MANUAL
Cafetera
Digital
Maker
Digital Coffee
MANUAL DE INSTRUCCIONES
MODELO:
CP43679
INSTRUCCIONES
1
Al utilizar este electrodoméstico, preste atención a las
medidas de protección y de seguridad necesarias con
el fin de evitar que se produzca fuego, electrocutarse u
otros daños. Tome en cuenta los siguientes pasos:
- Lea con cuidado todas las secciones de las instrucciones
antes de utilizar el electrodoméstico.
- Mantenga el enchufe, la cafetera y sus manos secas.
- Durante el uso y después de éste, si la cafetera aún
generara calor, no toque las superficies calientes con las
manos.
- Si el electrodoméstico va a ser utilizado por niños, éstos
deben ser supervisados por sus padres.
- Si el cordón se dañara, éste debe ser reemplazado por
parte del fabricante, el agente de servicio técnico respectivo
o cualquier persona calificada con el fin de evitar eventualidades.
- Si los cables eléctricos o el enchufe se encontrarán dañados
o si se presentara cualquier desperfecto en el aparato, no lo
utilice y envíelo al centro de servicio técnico autorizado.
- No lo utilice al aire libre.
- No lo utilice cerca de una fuente de calor, llama viva o un
horno.
- Al terminar de utilizar el electrodoméstico o para proceder a
lavarlo, primero desenchúfelo.
- Con el fin de garantizar la duración de la vida útil de su
cafetera, no desarme el aparato sin la debida autorización.
- Nos sumerja el electrodoméstico en agua.
- En la parte inferior del electrodoméstico se verá la siguiente
advertencia:
SÓLO PARA USO DOMÉSTICO
ADVERTENCIA:
CON EL FIN DE REDUCIR EL RIESGO DE QUE SE
PRODUZCA FUEGO O UNA DESCARGA ELÉCTRICA, NO RETIRE
LA TAPA. NO SE ENCONTRARÁ PIEZAS ÚTILES EN EL INTERIOR.
TODO ARREGLO DEBE SER LLEVADO A CABO POR EL PERSONAL
DE SERVICIO TÉCNICO AUTORIZADO SOLAMENTE.
PRECAUCIÓN: NO SUMERJA EL APARATO EN NINGÚN TIPO DE
LÍQUIDO.
1
·In order to guarantee the life-span of your coffee machine ,
please don’t dismantle the parts without authorization .
·It is not allowed to soak in water.
·The bottom overlays warning content
· Carefully read all items of the instruction before you use it.
· Please keep the plug, coffee machine and hands dry.
· While using and soon after using, if your coffee machine
still generates heat, please don’t touch the hot surface with
hands.
· When the electrical equipment is put by the children or used
by children ,there should be parents to guard.
· If the supply cord is damaged, it must be replaced by the
manufacturer ,its service agent or similarly qualified persons
in order to avoid a hazard.
· When electrical wires, plug are damaged or other malfunctions of the machine, please don’t use it and send it to the
authorized service center.
· Please don’t use it outside
·Please don’t be close to the fire source , the flammables or
the oven while using.
·Before you stop using, or washing the coffeepot, please pull
out the plug first.
When you use this electrical equipment, please follow these
necessary safety protection measures in order to avoid fires,
electrocutions and other losses. Here are the following steps:
INSTRUCTIONS
2
Base Inferior
Panel Electrónico
Panel Mecanico
Tapa Inferior
INSTRUCCIONES PARA EL PRIMER USO
- Recomendamos que antes de pasar la primera taza de café,
se asegure de pasar agua pura dos veces ya que esto hará
que la primera taza de café sea más aromática e higiénica.
- La primera vez el café tendrá un gusto especial. Esto es
algo normal. Sin embargo, esto no tiene un impacto en la
seguridad ni la higiene y desaparecerá a partir de la segunda
vez que se utilice el electrodoméstico.
COMO PREPARAR CAFÉ
INSTRUCTIONS OF FIRST USE
Jarra
Mango
·We propose that before you boil a first cup of coffee, make
sure that you have boiled the branch water two times first ,
and it will so make a first cup of coffee more aromatic,
hygiene.
·There will be slight taste for the first time, and this is a normal
phenomenon. It can never influence security and hygiene, it
will disappear the second time afterwards.
Tanque de agua
Tapa
HOW TO MAKE COFFEE
Tapa
·Wash the coffee pot when you first use it,
follow these steps: “to add water and
coffee powder”, “to make coffee”
• To add water and coffee powder
1. Open top cover, overturn outlet pipe,
take out and filter the trough See Fig. A
2. Put the lump-sum filter paper or filter
screen into and filter the trough.
3. Add the right amount coffee powder
( invites 45 gr ) to the filter paper, and
Fig. A
shake the filter slightly.
NOMBRES DE LAS PARTES
- Lave la jarra de la cafetera antes del primer uso y siga los
siguientes pasos: añada agua y café
molido para preparar el café.
2
NAME OF PARTS
• Como añadir el agua y el café molido.
1. Abra la tapa superior. Déle la vuelta al
pico de salida y retire el filtro.
Véase la Figura A.
2. Coloque un filtro de papel o filtro
colador dentro del filtro.
3. Añada la cantidad necesaria de café Fig. A
molido (aproximadamente 45 g.) en
el filtro de papel y sacuda el filtro
ligeramente.
4. Colóquelo de vuelta dentro de la
cafetera poniendo el pico para el agua
de nuevo en su lugar.
5. Añada la cantidad necesaria de
agua (aproximadamente 1800 CC)
en el tanque de agua. Fíjese en las
marcas dentro del tanque. Asegúrese
de colocar la cantidad apropiada de Fig. B
agua. Véase la Figura B.
6. Coloque la tapa superior.
7. Coloque la jarra en la base para calentar.
PARA PREPARAR CAFÉ:
1. Presione el botón de encendido. La
luz indicadora se iluminará,
véase Figura C. Si la luz se encuentra encendida, significa que el proceso de pasar café se ha iniciado. Se
necesita aproximadamente 13 minutos para preparar unas 12 tazas de
café aromático. En este momento la Fig. C
cafetera mantendrá el café caliente
de manera automática. El botón de encendido permanecerá
activado todo el tiempo.
Figura C
2. Para apagar el aparato, presione el botón de encendido y
los indicadores se apagarán. Esto significa que el electrodoméstico ha quedado desactivado. Véase la Figura C.
CÓMO PROGRAMAR AL RELOJ
1. Se puede programar las horas presionando el botón “hour”
(hora). Véase la Figura D.
2. Se puede programar los minutos presionando el botón
3
3
1. You can adjust the wanting hours by pushing the “hour”
button. See Fig. D
a. you can adjust the wanting minutes by pushing the “min”
button. See Fig. E
·direct coffee making
b. You can make coffee directly by pushing “on/off” button.
2. If “on”LED light is on, it means it has begun to work. It needs
about 13 minutes. 12 cups of aromatic coffee is finished.
·SET THE CLOCK
1 Push switch button, the light is to
be bright Fig. C.
If the light is on, it means the beginning
of making coffee. It needs about 13
minutes, 12 cups of aromatic coffee is
finished, and your coffee machine will
be chosen to keep warm automatically Fig. C
at this moment, the power switch will
be on all the time.
2 Turn off the machine, push the switch button and the light
will not be on. It means that the machine has stopped working. See Fig. C
PCB controlling Coffee Maker:
· TO MAKE COFFEE
4. Put the slot back to the coffee
machine, turn the water pipe the
proper place.
5. Add right amount water (about
1800 CC ) to water tank , look out
for water tank , scales pf the glass.
Make sure that you add a proper
amount of water. See Fig. B
6. Put on the top cover
7. Put the glass in keeping warm
Fig. B
slice
4
“min” (minuto). Véase la Figura E.
Fig. H
CÓMO PROGRAMAR LA CAFETERA
Se debe programar el reloj interno de la cafetera.
1. Mantenga presionado el botón “BREW” (destilar) y luego
presione el botón “hour” (hora) para programar la hora
correcta. Véase la Figura G.
2. Mantenga presionado el botón “BREW” y presione el botón
“min” (minuto) para programar los minutos.
Véase la Figura H.
3. Suelte el botón “BREW” y quedará el tiempo programado.
4. Presione “on/off” dos veces y se encenderá la luz “auto”.
El café se pasará de acuerdo a la hora programada por el
usuario.
Fig. H
1. Se puede preparar café directamente
presionando el botón “on/off”.
2. Si la luz indicadora se encuentra
encendida, significa que el proceso ha
comenzado. Se necesita unos 13 minutos
para preparar 12 tazas de café aromático.
El electrodoméstico se apagará automáticamente después de mantener el café
caliente durante dos horas.
3. Si se desea apagar el electrodoméstico durante el proceso, presione el botón
“on/off” dos veces.
LIMPIEZA Y MANTENIMIENTO DE LA CAFETERA
It will cut off the power after keeping warm for two hours automatically.
1 If you want to turn off the machine in the midway, push “on/
off” button twice.
4
Fig. G
- Después de preparar café, se debe retirar el filtro de la
ranura y limpiar los restos.
- El filtro y la jarra se pueden lavar con agua y jabón suave.
- No sumerja el aparato en agua ni lo lave. Límpielo con
paño de algodón húmedo. Periódicamente se debe limpiar el
interior del electrodoméstico con vinagre.
·BOOKING TO MAKE COFFEE MOLD
Users must set the inner clock of the
coffeepot.
Users must set the inner clock of the
coffeepot.
1.Keep on pushing the “BREW” button,
and push “hour” button to adjust to the
right hour. See Fig.G
2. Keep on pushing the “BREW” button,
and push “min” to adjust the right minute.
SEE Fig. H
1. Unloosen “BREW” button, booking
hour is set up.
4.Push “on/off” twice, “auto” light will be
on. Coffee is making, and the coffeepot
will do its work according to the users’
appointed hour.
Fig. G
WASHING AND MAINTAINING OF THE COFFEEPOT
·After making coffee, you should put down the filter slot, remove the coffee dreg from the filter net.
·Filter slot, glasses can be washed in branch water or the soft
sanitizer.
·The main body can’t be soaked in water and washed definitely, and it can be polished with the wet cotton cloth. At
regular intervals you can clean the inside with the vinegar
Specifications of Coffeepots
Description Mechanical coffeepot
Electronic coffeepot
Type
CP43679
Rated power
120V/60HZ
120V/60HZ
Power
900W
900W
Capacity
1800CC
1800CC
CÓMO PREPARAR CAFÉ DIRECTAMENTE