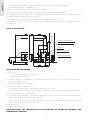
1
MANUAL DE INSTRUCCIONES
NOTICE D’INSTALLATION
INSTRUCTION MANUAL
MANUAL DE INSTRUÇÕES
BEDIENUNGSHANDBUCH
KM 600 - KM 600S - KM 1000S
AENOR
E
I F I
R T
E
C
D
HH H
HHH
H
HHH
HHH
H
M
E
LI
A
ER-1053/1998
QU
Empresa
Registrada
T Y SYS
T
ACCIONADORES PARA PUERTAS CORREDERAS
ACTIONNEURS POUR PORTES COULISSANTES
ACTUATORS FOR SLIDING DOORS
ACCIONADORES PARA PORTAS DE CORRER
ANTRIEBE FÜR SCHIEBETÜREN
MONDRAGON
COMPONENTES
ESPAÑOL
INTRODUCCION
Estos productos han sido diseñados para la automatización de puertas de garaje corredera.
Las instrucciones han sido validadas para facilitar la instalación de los modelos indicados en el cuadro inferior.
CARACTERISTICAS TECNICAS
.- Motor monofasico con condensador permanente
.- Alimentación:
230V-50Hz
.- Velocidad de salida: 57 r.p.m.
.- Factor protección:
IP45
.- Paro suave a final de recorrido
Modelo
Seguridad
Bloqueo
Peso máximo
(kg)
Potencia (W)
Intensidad (A)
KM 600
Regulador electrónico
Si
600
160
1.2
KM 600S
Encoder+Regulador electrónico
Si
600
160
1.2
KM 1000S
Encoder+Regulador electrónico
Si
1000
368
1.67
Cuadro
Incorporado
Incorporado
Incorporado
RECOMENDACIONES PARA EL INSTALADOR
Es importante para la seguridad de las personas seguir todas las instrucciones. Una instalación incorrecta puede causar daños a las
personas y/o bienes. Lea detenidamente las recomendaciones contenidas en este folleto, le proporcionaran importantes
indicaciones con respecto a la seguridad de la instalación, uso y mantenimiento.
Una vez desembalado el producto, compruebe su integridad. En caso de duda no utilice el aparato y póngase en contacto con el
servicio técnico más próximo.
Los elementos del embalaje no deben dejarse al alcance de los niños, ya que constituyen potenciales fuentes de peligro.
También se debe comprobar que la puerta tiene una buena condición mecánica.
Comprobar el correcto funcionamiento manual de la puerta que se va a automatizar.
En el caso de existir rozamientos excesivos, se deberán corregir antes de proceder a la automatización.
En ningún caso se debe instalar un automatismo en una puerta que no funcione correctamente, dado que se pueden deteriorar tanto
la puerta como los componentes instalados e incluso crearse situaciones de peligro.
Este mecanismo debe ser destinado exclusivamente al uso para el cual ha sido diseñado. Cualquier otro uso debe considerarse
inadecuado y por lo tanto peligroso.
La instalación debe realizarla personal cualificado, respetando las indicaciones del fabricante y de acuerdo con la normativa en
vigor.
Preste particular atención a las instrucciones de todos los elementos que forman parte de la instalación.
Compruebe que la tensión nominal de los elementos a instalar se corresponde con la de la red y que la potencia de ésta sea la
adecuada para la potencia máxima de los equipos.
Controlar que la sección de los cables sea idónea con respecto a la potencia absorbida por los elementos. En caso de duda
dirigirse a un profesional.
No instalar nunca ningún aparato sin conectar su correspondiente toma a tierra.
El cable de alimentación debe de quedar convenientemente fijado.
Es necesario el uso del pasacables adecuado como elemento de protección.
Para la instalación es necesario prever un interruptor que asegure el corte omnipolar de la alimentación según las normas de
seguridad en vigor.
El uso de cualquier aparato eléctrico implica la observación de reglas fundamentales tales como:
- No tocar el aparato con las manos o los pies mojados o húmedos
- No manipular el aparato con los pies descalzos.
3
- No permitir que el aparato sea utilizado por niños.
Haga conocer estas advertencias a todos los usuarios de la instalación.
En caso de desperfecto y/o mal funcionamiento del aparato, desconectarlo y abstenerse de manipularlo.
La eventual reparación de los aparatos debe ser efectuada solamente por el fabricante o por un centro de asistencia técnica
autorizado, utilizando exclusivamente repuestos originales.
Indicar claramente sobre la puerta que esta es automática y comandada a distancia (si es el caso).
El fabricante no podrá ser considerado responsable de los eventuales daños causados por el incumplimiento de estas
recomendaciones.
COTAS DE INSTALACIÓN
PUERTA
ESPAÑOL
- No dejar expuesto el aparato a los agentes atmosféricos al menos que esto esté expresamente previsto.
Imán fín de carrera de cerrar
Imán fín de carrera de abrir
Cremallera
Separador Cremallera
Piñón de accionamiento
INSTALACION DEL ACCIONADOR
1.- Fijar el motor:
1.1. Colocar la placa base del motor. (Fig. 1)
1.2. Fijar el motor a la placa base.
2.- Soldar la cremallera, o los separadores de la misma, a la puerta. Es conveniente colocar refuerzos en caso de que la
puerta no disponga de ellos.
3.- Atornillar la cremallera a los separadores.
4.- Desbloquear el motor y verificar que:
4.1. La puerta se mueve a mano sin dificultad a lo largo de todo el recorrido.
4.2. La cremallera está en todo momento en contacto con el piñón de salida, pero sin ejercer ninguna fuerza sobre este.
5.- Fijar definitivamente el motor y la cremallera.
6.- Posicionar las placas porta-imán y los imanes de final de carrera en las posiciones idóneas para detener la puerta.(Placa
pequeña para FC Abrir y placa grande para FC Cerrar).
7.- Se recomienda poner unos topes a la puerta en la posición de apertura y cierre para evitar que, por la inercia, esta pueda
salir del campo de acción de los finales de carrera.
8.- Bloquear el motor.
9.- Regular la fuerza de empuje.
NOTA IMPORTANTE: LOS CONTACTOS PARA LAS FOTOCÉLULAS DEL CUADRO DE MANIOBRAS SON
NORMALMENTE CERRADOS.
4
El aparato dispone de un sistema de desbloqueo del motor que permite mover la puerta de forma manual. El procedimiento de
desbloqueo es el siguiente:
1.- Girar la tapa superior del desbloqueo media vuelta dejando visible la cerradura.
2.- Abrir la cerradura de bombillo.
3.- Girar la maneta 270º en sentido horario hasta tope.
Para volver a bloquear la puerta realizar el procedimiento inverso:
1.- Girar la maneta de desbloqueo 270º en sentido antihorario hasta tope.
2.- Presionar hasta la posición de cierre el bombillo de la cerradura.
3.- Girar la tapa superior del desbloqueo media vuelta para cubrir la cerradura.
4.- Mover manualmente la puerta hasta que ésta se bloquee.
En un funcionamiento normal el motor se desenclava realizando una fuerza moderada sobre la maneta, por lo cual no forzarla
bajo ningún concepto.
ELEMENTOS DE SEGURIDAD
Automatismos Erreka recomienda la instalación de elementos adicionales de seguridad (fotocélulas, bandas de seguridad, etc.)
con el fin de garantizar la seguridad de las personas u otros objetos que pudieran interferir en el movimiento de la puerta.
A su vez es necesario incorporar en la instalación fija elementos de desconexión eléctrica omnipolares que aíslen el equipo de
la red en caso de que sea necesario, y asegurar así el cumplimiento de la normativa vigente.
En ningún caso desbloquear el motor sin haber desconectado previamente la corriente eléctrica.
DESCRIPCION DEL CUADRO
RECEPTOR RADIO
R62
DL11
R61
C3
DL10
IC2
DL6
R60 R72
CD5
DL7
L3
IC5
+
R-PAR
C31
24v
7VA
24v
C42
11
L2
+12
DZ1
R42
7
8
9
10
CN9
C11
C41
R63
SNG
IC8
C16
DL13
C15
C17
T3
R13
D10
CERRAR
CN5
R58
Lamp.
Destell
DL5
R75
RL2
RL1
ABRIR
F1
DL4
R74
COM
17
18
5x20 2,5A
RL1
D1
J
16
RL2
MOTOR
SW3
MOTOR -
15
CERRAR
D2
ABRIR
CN4
R52
TR2
C8
5x20 500mA
OPT2
F2 - ELECT.
ICT
FCT
AOI
R7
C37
14
Luz
Garaje
R4
R27
R68
T1
T2
R28
R5
R69
VDR1
TR3
R8
R39
12
13
RL3
F3 - 24V
D11
C12
C36
ORG
DL8
R76
C27
IC1
R1
R2
+
T- ESPERA
-
C44
2
3
4
5
6
GND
SW4
230V 50Hz
FASE
L1
OFF
C7
C4
R51
SW1
C6
R57
OPT1
NEUTRO
TR1
ON
5
C5
R38
I
COMUN
F.C. C.
C39
DL14
L
G
F.C. A.
C32
R44
POT2
L5
LUZ GARAJE
-
+
C18
5x20
315mA
POT3
Foto. ext
C30
R43
R49
R6
DL9
D3
C40
RS
PUL2
R3
PUL1
R25
C19
C13
F
EMU
COMUN
R35
R26
R41
C34
C35
POT1
Foto. Int
C33
R9
R29
T5
C20
IC6
R40
IC9
ST2
C29
R32
P. ABRIR
CD6
H
Peatonal
CD2
P. CERRAR
IC7
COMUN
R36
R64
CD7
ST1
PUL3
PUL4
R66
C14
R30 R10
E
N
R59
2
1
R24
R37
C28
T4
R65
R23
C1
R22
R67
D6
D4
D7
D5
C22
CN7
D
SEMAFORO
C
C24
DL3 DL2 DL1
C23
R73
MARCHA
R14
R21
IC4
R20
C26
7
6
5
4
3
R19
1
CN8
RB
R18
DL12
CD4
C2
B
CD1
C21
R17
CN6
R16
R31
10
9
8
R15
Q1
IC3
CD3
ANT
C25
SW2
1
CN1
A
CN2
19
20
21
ESPAÑOL
FUNCIONAMIENTO MANUAL
ESPAÑOL
A.- Conector para receptor de radio.
Luces de Aviso:
Bornas de Entrada:
B.- Bornas de conexión de antena.
DL1.- Tiempo de espera.
1-2.- Start 1. Apertura Total.
C.- Selector de 10 dips.
DL2.- Grabación de código de radio.
2-3.- Start 2. Apertura Peatonal.
D.- Conector de semáforo.
DL3.- Grabación de maniobra.
4-5.- Seguridad en apertura.
E.- Pulsadores Marcha-Peatonal.
DL4.- Relé de Abrir.
5-6.- Seguridad al cierre.
F.- Pulsadores Abrir-Cerrar.
DL5.- Relé de Cerrar.
7-8.- Final de Carrera Abrir.
Potenciómetros:
DL6.- Final de Carrera Abrir.
8-9.- Final de Carrera Cerrar.
L.- Luz de Garaje (3-90 seg.)
DL7.- Final de Carrera Cerrar.
10.- Salida 24 v.
G.- Tiempo de Espera (0-90 seg.)
DL8.- Seguridad en la apertura.
11-12-13.- Señal de encoder.
N.- Regulación de Par.
DL9.- Seguridad en el cierre.
14.- Luz de Garaje (libre de tensión).
H.- Válvula reed final de carrera Cerrar.
DL10.- Entrada Puerta Peatonal.
15.- Lampara Destellante (salida 220 v.).
I.- Válvula reed final de carrera Abrir.
DL11.- Entrada Apertura Total.
16-17-18.- Motor monofásico
J.- Interruptor General del cuadro.
DL12.- Señal de Radio.
(condensador entre bornas 16 y 17 ).
19-20.- Alimentación 220 v.
DL13.- Encoder.
DL14.- Alimentación 220 v.
21.- Tierra.
PUESTA EN MARCHA
Antes de alimentar el cuadro a la red, conectar los distintos periféricos al cuadro.
Importante: No olvidar conectar el cable de tierra.
1.- Conectar el cuadro a la red (Interruptor general ON-OFF).
2.- Comprobar que el movimiento de apertura de la puerta coincide con el del motor y su correspondiente final de carrera.
- Comprobar los sentidos de giro del motor con los pulsadores (F). En caso de no coincidir intercambiar los cables de las
bornas 16 y 17. (RL 2 y RL 1).
- Comprobar que los finales de carrera funcionan correctamente haciendo pasar un imán por delante de las válvulas
(H e I) y comprobando que los leds 6 y 7 se apagan correctamente. (Válvula I – Abrir se corresponde con Led DL6 y
válvula H – Cerrar se corresponde con Led DL7).
3.- Regular la fuerza del motor.
- Poner el potenciómetro de par (N) al mínimo (girarlo en sentido antihorario). Con el motor en marcha girarlo
progresivamente en sentido horario hasta que el motor posea fuerza suficiente para mover la puerta a lo largo de todo su
recorrido.
4.- Opciones del selector (G).
DIP 1-ON
Habilita la programación.
DIP 5-ON
Automático opcional.
DIP 2-ON
Aprende el recorrido total.
DIP 5-OFF
NO automático opcional.
DIP 1-ON
Habilita la programación.
DIP 6-ON
Salida intermitente para lámpara.
DIP 3-ON
Aprende el recorrido peatonal.
DIP 6-OFF
Salida para lámpara destellante.
DIP 1-ON
Habilita la programación.
DIP 7-ON
Encoder habilitado.
DIP 4-ON
Graba código-canal apertura total.
DIP 7-OFF
Encoder deshabilitado. Eliminar el
DIP 1-ON
Habilita la programación.
DIP 6-ON
Graba código-canal apertura peatonal.
encoder supone eliminar la
seguridad interna del motor.
DIP 8-ON
Paro suave activado.
Paro suave desactivado.
DIP 2-ON
Preaviso de lámpara (3 seg.)
DIP 8-OFF
DIP 3-ON
Función Paso a Paso.
DIP 9-OFF
Colocar siempre en posición OFF.
DIP 3-OFF
Función Comunitaria.
DIP 10-ON
Deceleración en rampa. (modélos con encoder).
DIP 10-OFF
Deceleración instantánea.
Ambas deceleraciones sólo actúan con
el paro suave activado (DIP 8 ON)
DIP 4-ON
Ciclo Automático.
DIP 4-OFF
Ciclo Semiautomático.
6
5.1.- Grabación del recorrido de la puerta.
- Colocar la puerta en posición cerrada, bien manualmente o por medio de los pulsadores del cuadro.
- Colocar DIP 7 y DIP 8 en ON (Opciones de paro suave y encoder activadas).
- Colocar DIP 1 en ON. (Comprobar encendido del led DL3).
- Colocar DIP 2 en ON.
- Pulsar Marcha (Pulsador E). La puerta comienza a abrir.
- Cuando el imán del final de carrera se encuentre a unos 50 cm del final del recorrido del cuadro pulsar nuevamente
para que inicie la aminoración de velocidad.
- Pulsar E para que la puerta comience a cerrar.
- Cuando el imán del final de carrera se encuentre a unos 50 cm del final del recorrido del cuadro pulsar nuevamente
para que inicie la aminoración de velocidad
- Colocar DIP 1 en OFF.
- Colocar DIP 2 en OFF.
5.2.- Grabación de apertura Parcial (Peatonal):
Para realizar esta grabación conectaremos un pulsador normalmente abierto entre las bornas 2-COMUN y 3-ST2 (Start 2).
- Colocar el DIP 1 en ON.
- Colocar el DIP 3 en ON.
- Pulsar Peatonal. La puerta comienza a abrir.
- Pulsar Peatonal en la posición en la que deseemos que comience a aminorar.
- Pulsar Peatonal para detener la puerta en la posición deseada de apertura peatonal.
- Pulsar Peatonal. La puerta comienza a cerrarse.
- Pulsar Peatonal en la posición en la que deseemos que comience a aminorar. La puerta se detendrá por final de carrera.
- Colocar DIP 1 en OFF.
- Colocar DIP 3 en OFF.
Nota para todo tipo de funcionamientos:
• Si durante la maniobra de apertura la puerta encontrara algún obstáculo en su recorrido, se
detendrá y cerrará 2 seg.
• Si durante la maniobra de cierre la puerta encontrara algún obstáculo, ésta se detendrá e
invertirá su movimiento hasta detenerse en posición de puerta abierta.
• Siempre que la puerta reciba un impulso de llave o fotocélula en la maniobra de cierre, ésta se
detendrá e irá a la posición de puerta abierta.
6.- Selección del modo de funcionamiento.
6.1.- Ciclo Automático/Semi automático:
Ciclo Automático (DIP 4 ON).
“Start” (Pulsador Marcha) – Apertura – Espera en puerta abierta (tiempo regulable con el temporizador G ) – Cierre.
Si se pulsa “marcha” o se activa cualquier fotocélula durante el tiempo de espera, éste se reinicializará.
Ciclo Semiautomático (DIP 4 OFF).
“Start” – Apertura – “Start” – Cierre.
7
ESPAÑOL
5.- Programación del automatismo:
ESPAÑOL
6.2.- Función Comunitaria/Paso a Paso:
Función Comunitaria (DIP 3 OFF).
Un “start” abre y no se aceptan otros comandos “start” en la apertura.
Función Paso a Paso (DIP 3 ON).
Un “start” abre, otro “start” detiene la puerta, un tercer “start” cierra y si durante la maniobra de cierre, activamos start, la
puerta se detiene e invierte el movimiento hasta posición de puerta abierta.
6.3.- Automático opcional
En convinación con DIP 4 ON
- Automático opcional (DIP 5 ON)
Si recibe un “Start” durante el tiempo de espera, la puerta cierra inmediatamente.
- No automático opcional (DIP 5 OFF)
Si recibe un “Start” durante el tiempo de espera, se recarga el tiempo de espera.
7.- Programación de la radio (sólo para código trinario 433 Mhz Erreka RSD-001)
La programación de la radio se realizará con la puerta cerrada.
La grabación de la radio en apertura peatonal y total son independientes. Pudiendo corresponder incluso a mandos distintos
con códigos diferentes.
7.1 Apertura total:
-Colocar el DIP 1 en ON.
-Colocar el DIP 4 en ON. La memoria queda abierta.
-Elegir en el mando código y pulsar el canal a grabar. El led DL2 quedará parpadeando.
-Colocar el DIP 4 en OFF.
-Colocar el DIP 1 en OFF.
7.2 Apertura peatonal:
-Colocar el DIP 1 en ON.
-Colocar el DIP 6 en ON. La memoria queda abierta.
-Elegir en el mando código y pulsar el canal a grabar. El led DL2 quedará parpadeando.
-Colocar el DIP 6 en OFF.
-Colocar el DIP 1 en OFF.
Una vez grabado el código del mando es obligatorio apagar y encender el cuadro.
8.- Seleccionar el tipo de funcionamiento de la lámpara destellante.
8.1.- Función de Preaviso.
Colocando el DIP 2 en ON, la lámpara destellante se enciende 3 segundos antes del comienzo de la maniobra.
8.2.- Salida de la lámpara.
- DIP 6 a ON. La salida a la lámpara es intermitente, por lo que se puede colocar una lámpara normal. La función de
destello la realiza el cuadro.
- DIP 6 a OFF. La salida es fija, por lo que requiere una lámpara destellante.
9.- Funcionamiento de la seguridad.
- Seguridad en Apertura (conexión bornas 4 y 5):
Si se activa el dispositivo (fotocélula, banda, …)en la maniobra de apertura, la puerta se detiene y cierra 20 cm.. En la maniobra de cierre dicha seguridad no actúa.
- Seguridad en Cierre (conexión bornas 5 y 6):
Si se activa el dispositivo (fotocélula, banda, …)en la maniobra de cierre, la puerta se detiene e invierte su marcha hasta
llegar a puerta abierta. En la maniobra de apertura dicha seguridad no actúa.
En ambos casos si se corta la fotocélula durante el tiempo de espera, éste (el tiempo de espera ) se
reinicia.
8
ESPAÑOL
DIAGNOSTICO DE AVERIAS
1.- El motor no funciona:
1.1. Verificar si la instalación está correctamente conectada.(Fig. 2)
1.2. Verificar si llega tensión al motor. (230V AC)
2.- El motor funciona en un único sentido:
2.1.-Verificar si el común del motor está correctamente conectado.(Fig. 2)
2.2.- Verificar si el condensador está conectado.
3.- El motor no tiene fuerza:
3.1. Desbloquear el motor y verificar si la puerta presenta alguna resistencia excesiva en su recorrido. En caso afirmativo,
desmontar el motor y eliminarla hasta que la puerta pueda moverse a mano con facilidad.
3.2. Verificar si se ha conectado el condensador y si la capacidad de éste es la adecuada (Ver etiqueta del motor)
3.3. Verificar si el motor está bloqueado. En caso contrario, bloquearlo.
4.- La puerta no llega al final del recorrido:
Verificar si el tiempo de apertura y cierre son los adecuados para la longitud de la puerta.
Si después de haber realizado todas las verificaciones y ajustes indicados, persiste la avería, diríjase a
su distribuidor o al servicio técnico ERREKA más próximo, indicando con el mayor detalle posible la
avería observada.
INSTALACIÓN DEL AUTOMATISMO
Los modelos referidos en esta documentación cumplen la directiva europea de referencia:
-Directiva de Máquina 89/392/CEE.
-Normativa de baja tensión 73/233/CEE
-Compatibilidad Electromagnética 89/336/CEE
Se recomienda realizar la instalación del automatismo por parte de personal profesionalmente cualificado respetando la
normativa legal correspondiente al lugar de instalación.
CERTIFICADO DE GARANTIA
Automatismos Erreka garantiza el presente equipo durante un periodo de 2 años a partir de la fecha de suministro.
Dicha garantía es aplicable a todo defecto de fabricación.
Es responsabilidad del instalador el hacer llegar el equipo a los servicios técnicos autorizados.
Esta garantía no incluye:
.- Daños ocasionados por una instalación o utilización incorrecta del equipo.
.- Daños ocasionados por la manipulación realizada por personal no autorizado.
.- Daños provocados por agentes externos o atmosféricos (rayos, inundaciones, etc)
9
INTRODUCTION
Ces produits ont été conçus pour l’automatisation de portails de garage coulissants.
Les instructions de montage ont été validées de façon à faciliter l’installation des modèles indiqués ci-dessous.
CARACTÉRISTIQUES TECHNIQUES
FRANÇAIS
.- Moteur monophasé à condensateur permanent
.- Alimentation :
230 V-50Hz
.- Vitesse de sortie :
57 tr/min
.- Facteur de protection : IP45
.- Arrêt progressif en fin de parcours.
Modèle
Sécurité
Verrouillage Poids maximum
(kg)
Puissance (W)
Intensité (A)
KM 600
Régulateur électronique
Oui
600
160
1.2
KM 600S
Codeur + Régulateur électronique
Oui
600
160
1.2
KM 1000S
Codeur + Régulateur électronique
Oui
1000
368
1.67
Tableau
Incorporé
Incorporé
Incorporé
CONSEILS À L’INSTALLETEUR
Il est important, pour la sécurité des personnes, de respecter les consignes de montage. Une installation incorrecte peut provoquer
des dommages aux personnes et/ou biens. Lisez attentivement les recommandations indiquées dans cette notice, elles vous fourniront
d’importantes indications sur la sécurité de l’installation, son usage et son entretien.
Une fois le produit déballé, vérifiez son intégrité. En cas de doute, n’utilisez pas l’appareil et contactez le service technique le plus
proche.
Les éléments de l’emballage ne doivent pas être laissés à la portée des enfants car ils constituent des sources potentielles de danger.
Il convient de s’assurer également que la porte se trouve dans de bonnes conditions mécaniques, en
vérifiant le fonctionnement manuel correct de la porte qui va être automatisée.
En présence de frottements excessifs, ceux-ci devront être corrigés avant de procéder à l’automatisation.
Il ne faut jamais installer un automatisme sur une porte qui ne fonctionne pas correctement, car aussi bien la porte que les éléments
installés peuvent s’endommager et même donner lieu à des situations dangereuses.
Ce mécanisme doit être exclusivement destiné à l’usage pour lequel il a été conçu. Tout autre usage doit être considéré inapproprié
et donc dangereux.
Le montage sera réalisé par un installateur qualifié, en respectant les indications du fabricant et conformément aux règlements en
vigueur.
Une attention particulière doit être accordée aux instructions de chacun des éléments qui composent l’installation.
Assurez-vous que la tension nominale des composants à installer correspond à celle du réseau et que la puissance de celui-ci est
adaptée à la puissance maximale des équipements.
Vérifiez que la section des câbles est adaptée à la puissance absorbée par les éléments. En cas de doute, consultez un professionnel.
Ne jamais installer un appareil sans effectuer la mise à la terre correspondante.
Fixer correctement le câble d’alimentation.
La pose d’un passe-câble adapté est nécessaire en tant qu’élément de protection.
Dans l’installation, il est indispensable de prévoir un interrupteur pour assurer la coupure omnipolaire de l’alimentation selon les
normes de sécurité de vigueur.
Tout usage d’un appareil électrique implique le respect de règles fondamentales telles que :
- Ne pas toucher l’appareil avec les mains ou les pieds mouillés ou humides.
- Ne pas manipuler l’appareil avec les pieds déchaussés.
- Ne pas laisser l’appareil exposé aux agents atmosphériques, à moins que ce cas soit expressément prévu.
10
- Ne pas laisser les enfants faire usage de l’appareil.
Faites connaître ces avertissements à tous les utilisateurs de l’installation.
En cas d’endommagement et/ou de dysfonctionnement de l’appareil , le débrancher et s’abstenir de le manipuler.
L’éventuelle réparation des appareils doit être uniquement réalisée par le fabricant ou un service technique agréé, en utilisant
exclusivement des pièces de rechange originales.
Le fabricant ne peut être tenu responsable des éventuels dommages causés par le non-respect de ces recommandations.
PORTE
COTES D’INSTALLATION
Aimant fin de course Ouvrir
Aimant fin de course Fermer
Crémaillère
Entretoise Crémaillère
Pignon d´entraînement
INSTALLATION DE L’ACTIONNEUR
1.- Fixer le moteur :
1.1. Placer la platine du moteur. (Fig. 1)
1.2. Monter le moteur sur la platine.
2.- Souder la crémaillère, ou ses entretoises, sur la porte. Il convient de placer des renforts si la porte n’en dispose pas déjà.
3.- Visser la crémaillère sur les entretoises.
4.- Débloquer le moteur et vérifier que :
4.1. La porte se déplace à la main sans difficulté sur tout son parcours.
4.2. La crémaillère reste à tout moment en contact avec le pignon de sortie, mais sans exercer aucun effort sur celui-ci.
5.- Fixer définitivement le moteur et la crémaillère.
6.- Placer les plaques porte-aimants et les aimants de fin de course dans les positions appropriées pour arrêter la porte. (Petite
plaque pour FC Ouvrir et grande plaque pour FC Fermer).
7.- Il est recommandé de monter des butées pour la porte en position d’ouverture et de fermeture afin d’éviter que, par inertie,
celle-ci puisse sortir du champ d’action des fins de course.
8.- Bloquer le moteur :
9.- Régler la force de poussée.
NOTE IMPORTANTE : LES CONTACTS DES PHOTOCELLULES DUU TABLEAU DE MANŒUVRE SONT
NORMALEMENT FERMÉS.
11
FRANÇAIS
Il sera clairement indiqué sur la porte que celle-ci est automatisée et télécommandée (le cas échéant).
FONCTIONNEMENT MANUEL
L’appareil est doté d’un système de déblocage du moteur qui permet de déplacer la porte de façon manuelle. La manœuvre de
déblocage est la suivante :
1.-Tourner le couvercle supérieur du déblocage d’un demi-tour pour découvrir la serrure.
2.-Ouvrir la serrure à cylindre.
Pour re-bloquer la porte, on procèdera à l’inverse :
1.-Tournerla manette de déblocage dans 270º le sens anti-horaire jusqu’à faire butée.
2.-Presser le cylindre de la serrure jusqu’à la position de fermeture.
3.-Tourner le couvercle supérieur du déblocage d’un demi-tour pour recouvrir la serrure.
4.-Déplacer la porte à la main jusqu’à ce qu’elle se bloque.
Dans un fonctionnement normal, le moteur se désenclenche en réalisant un effort modéré sur la manette ; il convient donc de
ne jamais la forcer.
ÉLÉMENTS DE SÉCURITÉ
Automatismos Erreka recommande l’installation d’éléments complémentaires de sécurité (photocellules, bandes de sécurité, etc.)
afin de garantir la sécurité des personnes et des objets qui pourraient interférer avec le mouvement de la porte.
De même, il est nécessaire d’incorporer à l’installation des éléments de déconnexion électrique qui puissent isoler l’équipement
du secteur si nécessaire et garantissent le respect des règlements en vigueur. Ne jamais débloquer le moteur sans avoir d’abord
coupé le courant.
DESCRIPTION DU TABLEAU
RÉCEPTEUR RADIO
R62
DL11
R61
C3
DL10
ORG
DL8
R76
IC2
DL9
D3
C40
R59
DL6
R60 R72
C27
CD5
F.C. C.
C31
L3
IC5
R-PAR
+
DL7
IC1
R1
R2
+
T- ATTENTE
-
C44
24v
7VA
POT2
24v
C42
L2
R42
7
8
9
10
CN9
C11
C41
11
+12
R63
D10
CN5
14
R58
DL5
F1
RL2
RL1
DL4
R74
COM
17
18
5x20 2,5A
RL1
D1
J
16
RL2
OUVRIR
MOTEUR -
15
R75
M O TEU R
SW3
Lamp.
Clignotante
FERMER
D2
OUVRIR
CN4
R52
TR2
C8
5x20 500mA
OPT2
F2 - ELECT.
ICT
FCT
AOI
C37
Lumière
Garage
R4
R27
R68
T1
T2
R28
R5
R69
VDR1
TR3
R8
R39
12
13
RL3
F3 - 24V
D11
C12
IC8
C16
DL13
C15
C17
T3
R13
SNG
FERMER
R7
NEUTRE
230V 50Hz
PHASE
OFF
ON
12
C5
L1
C7
C4
R51
SW1
TR1
C6
R57
OPT1
I
COMMUN
2
3
4
5
6
GND
SW4
C36
F.C. A.
C32
R44
C39
DL14
L
G
Photo. ext
C30
R43
R49
R6
C18
5x20
315mA
POT3
L5
C19
C13
F
H
IC4
RS
PUL2
+
R25
POT1
LUMIÈRE GARAGE
R3
-
PUL1
R26
R41
C34
C35
IC9
CD6
EMU
COMMUN
R35
R9
R29
T5
C20
IC6
R40
Photo. Int
C33
CD2
P. FERMER
IC7
ST2
C29
R32
P. OUVRIR
E
N
Pietonnière
R64
CD7
COMMUN
R36
DZ1
R66
C14
R30 R10
ST1
PUL3
PUL4
2
1
R24
R37
C28
T4
R65
R23
C1
R22
R67
D4
D6
D7
D5
C22
CN7
D
FEU TRICOLORE
C
C24
DL3 DL2 DL1
C23
R73
MARCHE
R14
R21
CD4
C2
R20
C26
7
6
5
4
3
R19
1
CN8
RB
R18
CD1
C21
R17
B
DL12
CN6
R16
R31
10
9
8
R15
Q1
IC3
CD3
ANT
C25
SW2
1
CN1
A
R38
FRANÇAIS
3.-Tourner la manette dans 270º le sens horaire jusqu’à faire butée.
CN2
19
20
21
Témoins d’avertissement:
Bornes d’Entrée:
A.- Connecteur pour récepteur radio.
DL1.- Temps d’attente.
1-2.- Start 1. Ouverture Totale.
B.- Bornes de connexion d’antenne.
DL2.- Enregistrement du code radio.
2-3.- Start 2. Ouverture Piétonnière.
C.- Sélecteur 10 dips.
DL3.- Enregistrement de manœuvre.
4-5.- Sécurité à l’ouverture.
D.- Connecteur de feu tricolore.
DL4.- Relais Ouvrir.
5-6.- Sécurité à la fermeture.
E.- Boutons-poussoirs Marche-Piétons.
DL5.- Relais Fermer.
7-8.- Fin de course Ouvrir.
F.- Boutons-poussoirs Ouvrir-Fermer.
DL6.- Fin de course Ouvrir.
8-9.- Fin de course Fermer.
Potentiomètres:
DL7.- Fin de course Fermer.
10.- Sortie 24 v.
L.- Lumière de garage (3-90 sec.)
DL8.- Sécurité à l’ouverture.
11-12-13.- Signal de codeur.
G.- Temps d’attente (0-90 sec.)
DL9.- Sécurité à la fermeture.
14.- Lumière de garage (libre de tension).
N.- Réglage de couple.
DL10.- Entrée Porte Piétonnière.
15.- Lampe clignotante (sortie 220 v.).
H.- Valve reed fin de course Fermer.
DL11.- Entrée Ouverture Totale.
16-17-18.- Moteur monophasé
I.- Valve reed fin de course Ouvrir.
DL12.- Signal Radio.
J.- Interrupteur général du tableau.
DL13.- Codeur.
19-20.- Alimentation 220 v.
DL14.- Alimentation 220 v.
21.- Terre.
(condensateur entre bornes 16 et 17 ).
MISE EN MARCHE
Avant de mettre le tableau sous tension, brancher les différents périphériques au tableau.
Important : Ne pas oublier de connecter le câble de terre.
1.- Mettre le tableau sous tension (Interrupteur général ON-OFF).
2.- Vérifier que le mouvement d’ouverture de la porte coïncide avec celui du moteur et de la fin de
course correspondante.
- Vérifier les sens de rotation du moteur à l’aide des boutons-poussoirs (F). S’il ne coïncide pas, échanger les câbles des
bornes 16 et 17 (RL 2 et RL 1).
- Vérifier que les fins de course fonctionnent correctement en passant un aimant devant les valves (H et I) et en s’assurant
que les diodes 6 et 7 s’éteignent correctement. (Valve I – Ouvrir correspond à la DEL DL6 et valve H – Fermer correspondà la DEL DL7).
3.- Régler l’effort moteur.
- Placer le potentiomètre de couple (N) sur le minimum (en le tournant dans le sens anti-horaire). Avec le moteur en marche,
le tourner progressivement dans le sens horaire jusqu’à ce que le moteur ait la force suffisante pour déplacer la porte sur
tout son parcours.
4.- Options du sélecteur (G).
DIP 1-ON
Active la programmation.
DIP 5-ON
Automatique optionnel.
DIP 2-ON
Apprend le parcours total.
DIP 5-OFF
NON automatique optionnel.
DIP 1-ON
Active la programmation.
DIP 6-ON
Sortie intermittente pour lampe.
DIP 3-ON
Apprend le parcours piétonnier.
DIP 6-OFF
Sortie pour lampe clignotante.
DIP 1-ON
Habilite la programmation.
DIP 7-ON
Codeur activé.
DIP 4-ON
Enregistre code-canal ouverture totale.
DIP 7-OFF
Codeur désactivé. Eliminer le codeur
DIP 1-ON
Habilite la programmation.
DIP 6-ON
Enregistre code-canal ouverture piétonnière.
suppose éliminer la sécurité interne du
moteur.
DIP 8-ON
Arrêt progressif activé.
Arrêt progressif désactivé.
A placer toujours en position OFF.
DIP 2-ON
Préavis de lampe (3 sec.)
DIP 8-OFF
DIP 3-ON
Fonction Pas à Pas.
DIP9-OFF
DIP 3-OFF
Fonction Communautaire.
DIP10-ON
Décélération en rampe. (Modéles avec ancodeur)
DIP10-OFF
Décélération instantanée.
DIP 4-ON
Cycle Automatique.
DIP 4-OFF
Cycle Semi-automatique.
Les décélérations n´agissent qu´avec
l´arrêt progressif activé (DIP 8 ON)
13
FRANÇAIS
Eléments:
5.- Programmation de l’automatisme:
5.1.- Enregistrement du parcours de la porte.
- Placer la porte en position fermée, soit à la main, soit à l’aide des boutons-poussoirs du tableau.
- Placer DIP 7 et DIP 8 sur ON (Options arrêt progressif et codeur activées).
- Placer DIP 1 sur ON. (vérifier l’allumage de la diode DL3).
FRANÇAIS
- Placer DIP 2 sur ON.
- Presser Marche (bouton E). La porte commence à s’ouvrir.
- Lorsque l’aimant de la fin de course se trouve à environ 50 cm environ de la fin du parcours du tableau, ré-appuyer sur
le bouton pour que commence le ralentissement de la porte.
- Presser E pour que la porte commence à se fermer.
- Lorsque l’aimant de la fin de course se trouve à environ 50 cm environ de la fin du parcours du tableau, ré-appuyer sur
le bouton pour que commence le ralentissement de la porte.
- Placer DIP 1 sur OFF.
- Placer DIP 2 sur OFF.
5.2.- Enregistrement d’ouverture Partielle (Piétonnière):
Pour effectuer cet enregistrement, nous connecterons un bouton-poussoir normalement ouvert entre les bornes 2-COMMUN et
3-ST2 (Start 2).
- Placer DIP 1 sur ON.
- Placer DIP 3 sur ON.
- Presser Peatonal. La porte commence à s’ouvrir.
- Presser Peatonal sur la position à laquelle nous voulons commencer le ralentissement.
- Presser Peatonal pour arrêter la porte sur la position d’ouverture piétonnière recherchée.
- Presser Peatonal. La porte commence à se refermer.
- Presser Peatonal sur la position à laquelle nous voulons commencer le ralentissement. La porte s’arrête par fin de course.
- Placer DIP 1 sur OFF.
- Placer DIP 3 sur OFF.
Note pour tout type de fonctionnements:
• Si, pendant la manœuvre d’ouverture, la porte rencontre un obstacle sur son parcours,
s´arrêtera et se fermera 2 sec.
• Si, pendant la manœuvre de fermeture, la porte rencontre un obstacle, elle s’arrête et inverse son
mouvement jusqu’à s’arrêter en position de porte ouverte.
• Chaque fois que la porte reçoit une impulsion de clé ou de photocellule pendant la manœuvre de
fermeture, elle s’arrête et se dirige à la position de porte ouverte.
6.- Sélection du mode de fonctionnement.
6.1.- Cycle Automatique/Semi-automatique:
Cycle Automatique (DIP 4 ON).
“Start” (bouton Marche) – Ouverture – Attente en porte ouverte (temps réglable avec le temporisateur G ) – Fermeture.
En pressant “marche” ou si une photocellule est activée pendant le temps d’attente, il se réinitialise.
Cycle Semi-automatique (DIP 4 OFF).
“Start” – Ouverture – “Start” – Fermeture.
14
6.2.- Fonction Communautaire/Pas à Pas:
Fonction Communautaire (DIP 3 OFF).
Un “start” ouvre et aucune autre commande “start” n’est acceptée à l’ouverture.
Fonction Pas à Pas (DIP 3 ON).
Un “start” ouvre, un autre “start” arrête la porte, un troisième “start” ferme et si, pendant la manœuvre de fermeture, nous
6.3.- Automatique opcional:
En combinaison avec DIP 4 ON
-Automatique optionnel (DIP 5 ON)
Si un “Start” est reçu pendant le temps d´attente, la porte se ferme inmédiatement.
-Non Automatique optionnel (DIP 5 OFF)
Si un “Start” est reçu pendant le temps d´attente, ce temps d´attente est rechargé.
7.- Programmation de la radio (pour code trinaire 433 Mhz Erreka RSD-001 uniquement )
La programmation de la radio est réalisée avec la porte fermée.
L´enregistrement de la radio en ouverture piétonnière et totale est indépendant et peut même correspondre à des commandes
différentes à codes distint.
7.1.- Ouverture totale:
-Placer le DIP 1 sur ON.
-Placer le DIP 4 sur ON. La mémoire s’ouvre.
-Choisir sur la commande et presser sur le canal à enregistrer. La diode DL2 se met à clignoter.
-Placer le DIP 4 sur OFF.
-Placer le DIP 1 sur OFF.
7.2.- Ouverture piétonnière:
-Placer le DIP 1 sur ON.
-Placer le DIP 6 sur ON. La mémoire s’ouvre.
-Choisir le code sur le commande et presser sur le canal à enregistrer. La Del DL2 se met à clignoter.
-Placer le DIP 6 sur OFF.
-Placer le DIP 1 sur OFF.
Une fois le code de la commande enregistré, la tableau do it être éteint et ré-allumé.
8.- Sélectionner le type de fonctionnement de la lampe clignotante.
8.1.- Fonction de Préavis.
En plaçant le DIP 2 sur ON, la lampe clignotante s’allume 3 secondes avant le début de la manœuvre.
8.2.- Sortie de la lampe.
-- DIP 6 sur ON. La sortie à la lampe est intermittente, ce qui permet d’installer une lampe normale. La fonction de
clignotement est réalisée par le tableau.
- DIP 6 sur OFF. La sortie est fixe, ce qui exige une lampe clignotante.
9.- Fonctionnement de la sécurité.
- Sécurité à l´Ouverture (connexion bornes 4 et 5) :
Si le dispositif (photocellule, bande, …) est activé pendant la manœuvre d’ouverture, la porte s’arrête et se referme de 20 cm.
Dans la manœuvre de fermeture, cette sécurité n’intervient pas.
- Sécurité à la Fermeture (connexion bornes 5 et 6) :
Si le dispositif (photocellule, bande, …) est activé pendant la manœuvre de fermeture, la porte s’arrête et inverse sa marche
jusqu’à atteindre la position de porte ouverte. Dans la manœuvre d’ouverture, cette sécurité n’intervient pas.
Dans les deux cas, si la photocellule est coupée pendant le temps d’attente, celui-ci (le temps
d’attente) se réinitialise.
15
FRANÇAIS
activons start, la porte s’arrête et inverse le mouvement jusqu’à la position de porte ouverte.
DIAGNOSTIC DE PANNES
1.- Le moteur ne fonctionne pas :
1.1. Vérifier si l’installation est correctement connectée (Fig. 2)
1.2. Vérifier si le moteur est sous tension. (230V AC)
2.- Le moteur fonctionne dans un seul sens :
FRANÇAIS
2.1.-Vérifier si le commun du moteur est correctement connecté (Fig. 2)
2.2.- Vérifier si le condensateur est connecté.
3.- Le moteur n’a pas de force :
3.1. Débloquer le moteur et vérifier si la porte offre une résistance excessive dans son trajet. Si oui, démonter le moteur et
l’éliminer jusqu’à ce que la porte puisse être déplacée à la main sans difficulté.
3.2. Vérifier que le condensateur a été connecté et que la capacité de ce dernier est adaptée (voir la plaque signalétique
du moteur).
3.3. Vérifier si le moteur est bloqué. Dans le cas contraire, le bloquer.
4.- La porte ne parvient pas à la fin du parcours :
Vérifier si les temps d’ouverture et de fermeture sont corrects pour la longueur de la porte.
Si, après avoir réalisé toutes les vérifications et réglages prescrits, le dysfonctionnement continue,
veuillez vous adresser à votre distributeur ou au service technique ERREKA le plus proche, en décrivant
avec le plus de détails possible le dysfonctionnement observé.
INSTALLATION DE L’AUTOMATISME
Les modèles concernés par cette documentation satisfont à la directive européenne de référence :
- Directive Machines 89/392/CEE.
- Règlement de basse tension 73/233/CEE
- Compatibilité Electromagnétique 89/336/CEE
Il est conseillé de faire installer l’automatisme par des techniciens professionnellement qualifiés, en respectant la réglementation
légale correspondant au lieu d’installation.
CERTIFICAT DE GARANTIE
Automatismos Erreka garantit le présent équipement pour une période de 24 mois à compter de la date de livraison.
Cette garantie est applicable à tout vice de fabrication.
Il incombe à l’installateur de faire parvenir l’équipement aux services techniques agréés.
Cette garantie ne couvre pas :
.- les dommages provoqués par une installation ou une utilisation incorrecte de l’équipement ;
.- les dommages dus à une manipulation effectuée par du personnel non autorisé ;
.- les dommages causés par des agents externes ou atmosphériques (foudre, inondations, etc.)
16
INTRODUCTION
These products have been designed for the automation of sliding garage doors.
The instructions have been validated in order to facilitate the installation of the models indicated in the table below.
TECHNICAL CHARACTERISTCIS
- Single-phase motor with permanent condenser
- Power supply:
230 V-50Hz
- Outgoing speed:
57 r.p.m.
- Protection factor:
IP45
- Gentle stop at the end of its run.
Security
Blockage
Maximum weight
(kg)
Power (W)
Intensity (A)
Table
KM 600
Electronic regulator
Yes
600
160
1.2
Built-in
KM 600S
Encoder + Electronic regulator
Yes
600
160
1.2
Built-in
KM 1000S
Encoder + Electronic regulator
Yes
1000
368
1.67
Built-in
RECOMENDATIONS TO THE FITTER
It is important as far as safety as concerned to follow all the instructions. An incorrect instruction may cause damage to people and/or
property. Read the recommendations in this leaflet carefully; they give important information on the security of the installation and its
use and maintenance.
Once the product has been unpacked, check that it is undamaged. If you are in any doubt do not use the appliance and contact the
nearest technical service.
The elements of the packaging must be kept out of the reach of children, as these items are potentially dangerous.
It should also be checked that the door is in good mechanical condition.
Check that the mechanical operation of the door to be automated is correct.
If friction is excessive, this should be corrected before proceeding to automation.
Under no circumstances should an automation mechanism be installed in a door that is not operating correctly, as both the door and
the components installed may be damaged and this may even be dangerous.
This mechanism must only be put to the use for which it has been designed. Any other type of use must be considered unsuitable and
therefore dangerous.
The installation must be carried out by qualified personnel, respecting the manufacturer’s instructions, and in accordance with current
regulations.
Pay particular attention to the instructions of all the elements that make up the installation.
Check that the normal voltage of the elements to be installed corresponds to that of the mains and that the power of the latter is
appropriate for the maximum power of the equipment.
Check that the section of the cables is suitable regarding the power absorbed by the elements. If in any doubt, consult a professional.
Never install any appliance without its corresponding earth connection.
The power cable must be appropriately secured.
Suitable cable housing must be used as a protection element.
For the installation it is necessary to provide a switch to insure the omnipolar cut-off of the power supply according to current security
regulations.
The use of any electrical appliance implies the observation of fundamental rules such as:
- Do not touch the appliance with wet hands or feet
- Do not handle the appliance with no shoes on.
- Do not leave the appliance exposed to the elements unless this is expressly anticipated
17
ENGLISH
Model
- Do not allow the appliance to be used by children
Inform all users of the installation of these warnings.
In the case of damage to or incorrect operation of the appliance, disconnect it and refrain from using it.
The possible repair of the appliances must be carried out only by the manufacturer or by an authorised technical assistance centre,
using exclusively original spare parts.
It should be clearly indicated on the door that it is automatic and controlled from a distance, if this is appropriate.
The manufacturer cannot be considered responsible for any possible damage caused by failure to follow these recommendations.
DOOR
ENGLISH
INSTALLATION DIMENSIONS
Magnet closing end of run
Magnet opening end of run
Rack
Rack separator
Driving cogwheel
INSTALLATION OF THE ACTUATOR
1.- Secure the motor:
1.1. Fit the base plate of the motor. (Fig. 1)
1.2. Secure the motor to the base plate.
2.- Weld the rack, or its separators, to the door. It is advisable to fit supports if the door does not have them
3.- Screw the rack to the separators.
4.- Unblock the engine and check that:
4.1. The door moves by hand without difficulty throughout its run.
4.2. The rack is always in contact with the outgoing cogwheel, but without exerting any force on it.
5.- Secure the motor and the rack definitively.
6.- Position the plates housing the magnets and the end of run magnets as appropriate for stopping the door (small plate for FC
Open and large plate for FC Close).
7.- It is advisable to fit stoppers to the door in the opening and closing position, to prevent the door from leaving the field of
action of the ends of run.
8.- Block the motor.
9.- Regulate the thrust force.
IMPORTANT NOTE: THE CONTACTS FOR THE PHOTOCELLS OF THE CONTROL PANEL ARE NORMALLY
CLOSED.
18
MANUAL OPERATION
The appliance has a motor unblocking system that allows the door to be moved manually. The unblocking procedure is as
follows:
1.- Turn the upper lid of the unblocking mechanism half a turn, leaving the lock visible.
2.- Open the trap lock.
3.- Turn the handle 270º clockwise as far as the stopper.
To block the door again carry out the reverse procedure:
1.- Turn the unblocking handle 270 º anti-clockwise as far as the stopper.
2.- Press the trap of the lock as far as the closing position.
3.- Give the upper lid of the unblocking mechanism half a turn to cover the lock.
4.- Move the door manually until it blocks.
Under normal operation the motor becomes unlocked by exerting moderate force on the lever; under no circumstance must it be
SAFETY ELEMENTS
Automatismos Erreka recommends the installation of additional safety elements (photocells, safety bands, etc.) so as to
guarantee the safety of persons or objects that may interfere with the movement of the door.
In its turn it is necessary to incorporate to the installation omnipolar electrical disconnection elements to insulate the equipment
from the mains if this is necessary, in order to comply with current legislation. Under no circumstance should the motor be
unblocked without having previously turned off the current.
DESCRIPTION OF THE PANEL
RADIO RECEIVER
R62
DL11
R61
C3
C26
DL10
R76
IC2
DL6
R60 R72
C27
CD5
DL7
L3
IC5
+
-
R-PAR
PH. C.
C31
24v
7VA
24v
L2
L5
C42
C41
R42
2
3
4
5
6
7
8
9
10
CN9
11
+12
R63
C15
DL13
SNG
IC8
C16
R13
C17
T3
GND
D10
CLOSE
14
CN5
15
R58
Flashlamp
CLOSE
DL5
R75
RL2
RL1
OPEN
F1
R74
DL4
MOTOR -
COM
17
18
5x20 2,5A
RL1
D1
J
MOTOR
SW3
16
RL2
D2
OPEN
CN4
R52
TR2
C8
5x20 500mA
OPT2
F2 - ELECT.
ICT
FCT
AOI
R7
C37
Garage
Light
R4
R27
R68
T1
T2
R28
R5
R69
VDR1
TR3
R8
R39
12
13
RL3
F3 - 24V
D11
C12
C36
COMMON
POT2
315mA
SW4
NEUTRAL
230V 50Hz
PHASE
OFF
ON
19
C5
L1
C7
C4
R51
SW1
TR1
C6
R57
OPT1
R38
I
ORG
DL9
D3
C40
IC1
R1
R2
T- WAIT
C44
C39
DL14
L
G
PH. A.
C32
R44
C11
C18
POT3
Photo. ext
C30
R43
R49
R6
EMU
COMMON
R35
DZ1
C19
C13
F
5x20
+
R3
+
R25
POT1
GARAGE LIGHT
-
PUL1
R26
R41
C34
C35
IC9
Photo. Int
C33
PUL2
RS
DL8
R32
R9
R29
T5
C20
IC6
R40
ST2
C29
CD2
CLOSE
CD6
H
Pedestrian
OPEN
IC7
COMMON
R36
R64
CD7
ST1
PUL3
PUL4
R66
C14
R30 R10
E
N
R59
2
1
R24
R37
C28
T4
R65
R23
C1
R22
R67
D4
D6
D7
DL3 DL2 DL1
D5
C22
CN7
D
WARNING LIGHT
C
C24
R73
START
R14
R21
IC4
R20
C23
CN6
7
6
5
4
3
R19
1
CN8
RB
R18
DL12
CD4
C2
B
CD1
C21
R17
R31
10
9
8
R16
Q1
IC3
CD3
ANT
C25
SW2
R15
1
CN1
A
CN2
19
20
21
ENGLISH
forced.
ENGLISH
Elements:
Warning lights:
Entry terminals:
A.- Connector for radio receiver.
DL1.- Waiting time.
1-2.- Start 1. Total opening.
B.- Aerial connection terminals.
DL2.- Radio code recording.
2-3.- Start 2. Opening for pedestrians.
C.- 10-dip selector.
DL3.- Manoeuvre recording.
4-5.- Safety on opening.
D.- Signal connector.
DL4.- Open relay.
5-6.- Safety on closing.
E.- Operation for pedestrians push-buttons. DL5.- Close relay.
7-8.- End of run Open.
F.- Open - Close push-buttons.
DL6.- End of run Open.
8-9.- End of run Close.
Potentiometer:
DL7.- End of run Close.
10.- Outgoing 24 v.
L.- Garage light (3-90 sec.)
DL8.- Safety on opening.
11-12-13.- Encoder signal.
G.- Waiting time (0-90 sec.)
DL9.- Safety on closing.
14.- Garage light (free from voltage).
N.- Couple regulation.
DL10.- Entry pedestrian door.
15.- Bright light (outgoing 220 v.).
H.- End of run reed valve Close.
DL11.- Total aperture entry.
16-17-18.- Single-phase motor
I.- End of run reed valve Open.
DL12.- Radio signal.
J.- General panel switch.
DL13.- Encoder.
19-20.- 220 v power supply.
DL14.- 220 v power supply.
21.- Earth.
(condenser between terminals 16 and 17 ).
STARTING
Before feeding the panel to the mains, connect the various peripherals to the panel.
Important: Do not forget to connect the earth cable.
1.- Connect the panel to the mains (general ON-OFF switch).
2.- Check that the opening movement of the door coincides with that of the motor and its correspon
ding end of run.
- Check the turning directions of the motor with the push-buttons (F). If they do not coincide, exchange the cables of terminals
16 and 17 (RL 2 and RL 1).
- Check that the ends of run operate correctly by passing a magnet in front of the valves (H and I) and checking that leds 6
and 7 turn off correctly. (Valve I – Open corresponds to Led DL6 and valve H – Close corresponds to Led DL7).
3.- Regulating the force of the motor.
- Set the couple potentiometer (N) to the minimum by turning it anti-clockwise. With the motor running turn it progressively
clockwise until the motor has sufficient force to move the door all along its run.
4.- Selector operations (G).
DIP 1-ON
Enables the programming.
DIP 5-ON
Optional automatic.
DIP 2-ON
Learns the total run.
DIP 5-OFF
NO optional automatic.
DIP 1-ON
Enables the programming.
DIP 6-ON
Flashing lamp outlet.
DIP 3-ON
Learns the pedestrian run.
DIP 6-OFF
Bright light outlet.
DIP 1-ON
Enables programming.
DIP 4-ON
Records total openning code/chanel.
DIP 7-ON
DIP 7-OFF
DIP 1-ON
Enables programming.
Disabled encoder.
Disabled encoder. Eliminating the encoder
involves eliminating the internal security
mechanism of the motor.
DIP 6-ON
Records pedestrian openning code/chanel.
DIP 2-ON
Lamp early warning (3 sec.)
DIP 3-ON
Step by step operation.
DIP 3-OFF
Community operation.
DIP 4-ON
Automatic cycle.
DIP 4-OFF
Semi-automatic cycle.
20
DIP 8-ON
Gentle stop activated.
DIP 8-OFF
Gentle stop deactivated.
DIP9-OFF
Turn always to OFF position.
DIP10-ON
Ramp deceleration.
DIP10-OFF
Instant deceleration. (Models with built-in encoder)
Both decelerations only work with the
soft stop activated (DIP 8 ON).
5.- Programming of the automatic mechanism:
5.1.- Recording the door run.
- Place the door in the closed position, either manually or using the push-buttons on the panel.
- Turn DIP 7 and DIP 8 to ON (Gentle stop options and encoder activated).
- Turn DIP 1 to ON (Check the ignition of the DL3 led).
- Turn DIP 2 to ON.
- Push Operation (Push-button E). The door begins to open.
- When the end run magnet is some 50 cm from the end of its run, press again so that the speed begins to
diminish.
- Press E for the door to begin to close.
- When the end run magnet is some 50 cm from the end of its run, press again so that the speed begins to
diminish.
ENGLISH
- Turn DIP 1 to OFF.
- Turn DIP 2 to OFF.
5.2.- Recording partial opening (for pedestrians):
To carry out this recording we will connect a push-button normally open between the 2-COMMON and 3-ST2 terminals (Start 2).
- Turn the DIP 1 to ON.
- Turn the DIP 3 to ON.
- Press Peatonal. The door begins to open.
- Press Peatonal in the position in which we want the decrease to start.
- Press Peatonal to stop the door in the desired position of opening for pedestrians.
- Press Peatonal. The door begins to close.
- Press Peatonal in the position in which we want the decrease to start. The door will stop at the end of the run.
- Turn DIP 1 to OFF.
- Turn DIP 3 to OFF.
Note for all types of operation:
• If during the opening manoeuvre the door encounters an obstacle in its run, it will stop and close
for 2 seconds.
• If during the opening manoeuvre the door encounters an obstacle in its run, it will stop and invert
its movement until it stops in the open position.
• Whenever the door receives a key impulse or photocell in the opening manoeuvre, it will stop
and move to the open door position.
6.- Selection of operating mode.
6.1.- Automatic/Semi-automatic cycle:
Automatic Cycle (DIP 4 ON).
“Start” (Operation button) – Opening – Wait with door open (time can be regulated with timer G) – Closure.
If “operation” is pressed or any photocell is activated during the waiting time, the period will restart.
Semi-Automatic Cycle (DIP 4 OFF).
“Start” – Opening – “Start” – Closure.
21
6.2.- Community operation / Step by step:
Community function (DIP 3 OFF).
One “start” opens; other “start” commands are not accepted in opening.
Step by step function (DIP 3 ON).
One “start” opens, another “start” stops the door, a third “start” closes, and if during the closing manoeuvre we activate
“start”, the door stops and inverts the movement as far as the open door position.
6.3.- Optional Automatic:
In combination with DIP 4 ON.
-Optional automatic (DIP 5 ON)
if “Start” is received during the wait time, the door will close immediately.
-No optional automatic (DIP 5 OFF)
ENGLISH
if “Start” is received during the wait time, the wait time is reset.
7.- Radio programming (for 433 Mhz Erreka RSD-001 trinary code only)
Radio programming must be done with the door closed.
The radio recordings for pedestrian and total opening are independent, and they may even correspond to different controls with
different codes.
7.1.- Total opening:
-Turn DIP 1to ON.
-Turn DIP 4 to ON. The memory is now open.
-Select the code on the control and press the channel to be recorded. LED DL2 will begin to flash.
-Turn DIP 4 to OFF.
-Turn DIP 1 to OFF.
7.2.- Pedestrian opening:
-Turn DIP 1to ON.
-Turn DIP 6 to ON. The memory is now open.
-Select the code on the control and press the channel to be recorded. LED DL2 will flash.
-Turn DIP 6 to OFF.
-Turn DIP 1 to OFF.
When the control code has been recorded, you will need to turn the switchboard off and on again
8.- Select the type of operation of the bright light.
8.1.- Early warning function.
By turning the DIP 2 to ON, the bright light comes on 3 seconds before the beginning of the manoeuvre.
8.2.- Lamp outlet
- DIP 6 to ON. The outlet to the lamp is flashing, owing to which a normal lamp can be fitted. The brightness function is
that of the panel.
- DIP 6 to OFF. The outlet is fixed, owing to which a bright lamp is required.
9.- Safety operation
- Opening Safety (connection terminals 4 and 5):
If the device is activated (photocell, band, …) in the opening manoeuvre, the door stops and closes 20 cm.. In the closing
manoeuvre the said safety mechanism does not operate.
- Closing Safety (connection terminals 5 and 6):
If the device is activated (photocell, band, …) in the closing manoeuvre, the door stops and inverts its movement until the door
is opened. In the opening manoeuvre the said safety mechanism does not operate.
In both cases, if the photo cell is cut during the waiting time, this period restarts.
22
FAULT FINDING
1.- The motor does not operate:
1.1. Check that the installation is correctly connected (Fig. 2)
1.2. Check that voltage is reaching the motor. (230 V AC)
2.- The motor operates in a single direction:
2.1. Check that the standard motor is correctly connected (Fig. 2)
2.2. Check that the condenser is connected.
3.- The motor lacks power:
3.1. Unblock the motor and check whether the door shows excessive resistance in its run. If so, disassemble the motor and
eliminate the resistance until the door can be easily moved by hand.
3.2. Check whether the condenser has been connected and if its capacity is the correct one (see motor label)
4.- The door does not reach the end of its run:
Check whether the opening and closing times are the correct ones for the size of the door.
If after having made all the checks and adjustments indicated the fault persists, contact your nearest
ERREKA dealer or technical service commenting the fault observed in as much detail as possible.
INSTALLATION OF THE AUTOMATIC MECHANISM
The models referred to in this manual comply with the European reference directive:
- Machine directive 89/392/EEC.
- Low voltage regulation 73/233/EEC.
- Electromagnetic compatibility 89/336/EEC
It is recommended that the automatic mechanism should be installed by professionally qualified personnel, respecting the legal
regulations corresponding to the place of installation.
WARRANTY CERTIFICATE
Automatismos Erreka guarantees this equipment for a period of 24 months as from the date of supply.
This guarantee is applicable to any manufacturing defect.
It is the responsibility of the fitter to transfer the equipment to the authorised technical services.
This guarantee does not include:
- Damage caused by incorrect installation or use of the equipment.
- Damage caused by handling by unauthorised personnel.
- Damage caused by external or atmospheric agents (lightning, floods, etc)
23
ENGLISH
3.3. Check whether the motor is blocked. If it is not, block it.
INTRODUÇÃO
Estes produtos foram desenhados para a automatização de portas de correr destinadas a garagens.
As instruções foram validadas de forma a facilitar a instalação dos modelos constantes na tabela abaixo.
CARACTERÍSTICAS TÉCNICAS
.- Motor monofásico com condensador permanente
.- Alimentação:
230 V-50Hz
.- Velocidade de saída: 57 r.p.m.
.- Factor protecção:
IP45
.- Paragem suave em fim de percurso
Modelo
Segurança
Bloqueio
Peso máximo
(kg)
Potência (W)
Intensidade
(A)
Quadro de
comandos
KM 600S
Regulador electrónico
Sim
600
160
1.2
Incorporado
KM 600S
Codificador+Regulador electrónico
Sim
600
160
1.2
Incorporado
KM 1000S
Codificador+Regulador electrónico
Sim
1000
368
1.67
Incorporado
RECOMENDAÇÕES PARA O INSTALADOR
PORTUGUES
É importante para a segurança das pessoas seguir todas as instruções. Uma instalação incorrecta pode ser origem de danos
materiais e/ou de risco de lesões nas pessoas. Leia com atenção as recomendações constantes no presente folheto: proporcionam
importantes instruções sobre a segurança, instalação, uso e manutenção da instalação.
Desempacotado o produto, verifique o estado dos itens. Se tiver qualquer dúvida, não utilize o equipamento e contacte com o serviço técnico mais próximo.
Para evitar eventuais riscos, mantenha fora do alcance das crianças os materiais de embalagem.
Verifique ainda o estado mecânico da porta e certifique-se do correcto funcionamento manual da porta
a ser automatizada.
Se houver qualquer fricção excessiva, deverá ser resolvida antes de iniciar o processo de automatização.
Nunca instale o automatismo numa porta que não funcionar correctamente: tanto a porta como os componentes instalados
poderiam ficar danificados e implicar situações de risco.
Este mecanismo apenas deve ser utilizado para o fim inicialmente previsto para o mesmo, considerando-se inadequada e portanto
perigosa qualquer outra utilização.
A instalação deverá ser realizada por pessoal qualificado, em observância da regulamentação vigente e respeitando as instruções
do fabricante.
Observe pormenorizadamente as instruções de todos os itens que fazem parte da instalação.
Verifique se a tensão nominal dos itens a ser instalados coincide com a tensão da rede de electricidade, e se esta é adequada à
potência máxima do equipamento.
Verifique se os cabos têm uma secção transversal adequada à potência a ser suportada pelos elementos. Se tiver qualquer dúvida,
contacte com pessoal técnico.
Nunca instalar qualquer aparelho sem ligar previamente a correspondente tomada à terra.
O cabo de alimentação deverá ficar adequadamente fixado.
É preciso utilizar o correspondente passa-cabos como elemento de protecção.
A instalação deverá contar com um interruptor mediante o qual garantir o corte omni-polar da alimentação, sempre em observância
da regulamentação vigente.
A utilização de qualquer aparelho eléctrico implica a observância de regras fundamentais, nomeadamente:
- Nunca entre em contacto com o aparelho se tiver húmidos ou molhados os pés ou as mãos.
- Não utilizar nem manusear o aparelho se tiver os pés descalços.
24
- Não expor o aparelho aos agentes atmosféricos, salvo se expressamente previsto.
- Impedir as crianças utilizarem o aparelho.
Informe as advertências acima a todos os utilizadores da instalação.
Em caso de danificação e/ou mal funcionamento do aparelho, desligue-o e abstenha-se de utilizar o equipamento.
A eventual reparação dos aparelhos deverá ser realizada apenas pelo fabricante ou por um serviço autorizado de atendimento
técnico, utilizando exclusivamente peças sobressalentes originais.
Afixar claramente que se trata de uma porta automática e comandada à distância (se for o caso).
A inobservância das presentes recomendações pode ser origem de lesões físicas ou danos materiais, pelos quais o fabricante iria
declinar qualquer responsabilidade.
PORTA
COTAS DE INSTALAÇÃO
Íman fim de percurso (fechar)
Íman fim de percurso (abrir)
Separador Cremalheira
Carreto de accionamento
INSTALAÇÃO DO ACCIONADOR
1.- Fixar o motor:
1.1. Colocar a placa base do motor. (Fig. 1)
1.2. Fixar o motor à placa base.
2.- Soldar a cremalheira e os separadores da mesma à porta. Se a porta não tem reforços, aconselhamos coloca-los.
3.- Aparafusar a cremalheira aos separadores.
4.- Desbloquear o motor e verificar:
4.1. Se a porta corre manualmente sem dificuldade ao longo de todo o seu percurso.
4.2. Se a cremalheira em todo o momento está em contacto com o carreto de saída mas sem aplicar qualquer força sobre
o mesmo.
5.- Fixar definitivamente o motor e a cremalheira.
6.- Colocar as placas porta-íman e os imãs de fim de percurso nas posições adequadas para deter a porta. (Placa pequena
para FC Abrir e placa grande para FC Fechar ).
7.- Aconselhamos colocar peças-limite na posição de abertura e de fecho por forma a evitar que, devido à inércia, a porta
possa sair da área de acção dos limites de percurso.
8.- Bloquear o motor.
9.- Regular a força de impulso.
NOTA IMPORTANTE: OS CONTACTOS DAS CÉLULAS FOTOELÉCTRICAS DO QUADRO DE COMANDOS
ESTÃO NORMALMENTE FECHADOS.
25
PORTUGUES
Cremalheira
FUNCIONAMENTO MANUAL
O aparelho conta com um sistema de desbloqueio do motor que possibilita correr manualmente a porta. O procedimento de
desbloqueio é o seguinte:
1.- Virar 1/2 volta a tampa superior de desbloqueio deixando o fecho visível.
2.- Abrir o fecho de bomba .
3.- Virar a manivela 270º até o fim no sentido dos ponteiros do relógio.
Para voltar a bloquear a porta, o procedimento é o inverso:
1.- Virar a manivela de desbloqueio 270º até o fim no sentido contrário ao dos ponteiros do relógio.
2.- Pressionar a bomba do fecho até a posição fechada.
3.- Virar 1/2 volta a tampa superior de desbloqueio até o fecho ficar coberto.
4.- Deslocar manualmente a porta até a mesma ficar bloqueada.
No funcionamento normal, o motor desencrava-se aplicando uma força moderada no manípulo: portanto, não o force em
circunstância nenhuma.
ELEMENTOS DE SEGURANÇA
Automatismos Erreka aconselha instalar elementos adicionais de segurança (células fotoeléctricas, fitas de segurança, etc.) de
forma a garantir a segurança das pessoas ou dos objectos que puderem interferir no movimento da porta.
É ainda preciso incorporar na instalação elementos omni-polares de desligação eléctrica que, em caso de ser necessário,
isolem da rede de electricidade o equipamento e assim garantir a observância da regulamentação vigente. Nunca
DESCRIÇÃO DO QUADRO
RECEPTOR RADIO
R62
DL11
R61
C3
DL10
PUL4
DL6
R60 R72
C27
CD5
DL7
C31
L3
IC5
R-PAR
C44
F.C. C.
24v
7VA
24v
L2
L5
C42
11
+12
DZ1
R42
7
8
9
10
CN9
C11
C41
2
3
4
5
6
R63
C15
DL13
SNG
D10
FECHAR
CN5
CN4
R52
TR2
14
FECHAR
DL5
R75
RL2
RL1
ABRIR
F1
R74
DL4
MOTOR -
COM
17
18
2,5A
RL1
D1
J
MOTOR
SW3
16
RL2
D2
ABRIR
15
R58
C8
5x20 500mA
F2 - ELECT.
OPT2
Pisca-Pisca
FCT
ICT
AOI
C37
Luz
Garagem
R4
R27
R68
T1
T2
R28
R5
R69
VDR1
TR3
R8
R39
12
13
RL3
F3 - 24V
D11
C12
IC8
C16
R13
C17
T3
GND
R7
NEUTRO
230V 50Hz
FASE
OFF
ON
26
C5
L1
C7
C4
R51
SW1
TR1
C6
R57
5x20
OPT1
I
COMUN
POT2
315mA
SW4
C36
F.C. A.
C32
R44
+
T- ESPERA
-
POT3
Foto. ext
C30
R43
C39
DL14
L
G
ORG
DL8
R76
IC2
DL9
R31
D3
C40
IC1
R1
R2
EMU
COMUN
R35
R49
R6
C18
5x20
+
R3
+
R25
C19
C13
F
LUZ GARAGEM
-
PUL1
R26
R41
C34
C35
POT1
Foto. Int
C33
R9
R29
T5
C20
IC6
R40
IC9
ST2
C29
R32
P. ABRIR
CD6
H
Pedonal
CD2
P. FECHAR
IC7
COMUN
R36
R64
CD7
ST1
PUL3
PUL2
RS
C14
R66
R30 R10
E
N
R59
2
1
R24
R37
C28
T4
R65
R23
R67
D6
D4
D7
D5
R22
CN7
D
SEMAFORO
C
C22
C24
DL3 DL2 DL1
C23
R73
MARCHA
C1
R21
IC4
R20
C26
7
6
5
4
3
R19
1
CN8
R14
R18
DL12
CD4
C2
B
CD1
C21
R17
RB
R16
CN6
10
9
8
R15
Q1
IC3
CD3
ANT
C25
SW2
1
CN1
A
R38
PORTUGUES
desbloquear o motor sem previamente ter desligado a alimentação eléctrica.
CN2
19
20
21
Elementos:
Luzes de Aviso:
Bornes de Entrada:
A.- Conector para receptor de rádio.
DL1.- Período de espera.
1-2.- Start 1. Abertura total.
B.- Bornes de conexão para antena.
DL2.- Memorização de código de rádio. 2-3.- Start 2. Abertura pedonal.
C.- Selector de 10 dips.
DL3.- Memorização de comando.
4-5.- Elemento de segurança na abertura.
D.- Conector de semáforo.
DL4.- Relé de Abrir.
5-6.- Elemento de segurança no fecho.
E.- Botões Marcha-Pedonal.
DL5.- Relé de Fechar.
7-8.- Fim de percurso (Abrir).
F.- Botões Abrir-Fechar.
DL6.- Fim de percurso (Abrir).
8-9.- Fim de percurso (Fechar).
Potenciómetros:
DL7.- Fim de percurso (Fechar).
10.- Saída 24 V.
L.- Luz de garagem (3-90 seg.)
DL8.- Elemento de segurança na abertura. 11-12-13.- Sinal de codificador.
G.- Período de Espera (0-90 seg.)
DL9.- Elemento de segurança no fecho. 14.- Luz de garagem (sem tensão).
N.- Regulação de Par.
DL10.- Entrada porta pedonal.
15.- Pisca-pisca (saída 220 V.).
DL11.- Entrada abertura total.
16-17-18.- Motor monofásico
H.-Válvula reed final de percurso
(Fechar).
(condensador entre bornes 16 e 17 ).
I.- Válvula reed final de percurso (Abrir). DL12.- Sinal de rádio.
J.- Interruptor geral do quadro.
19-20.- Alimentação 220 V.
DL13.- Codificador.
DL14.- Alimentação 220 V.
21.- Terra.
Antes de ligar o quadro à rede de electricidade, ligue os diferentes periféricos ao quadro.
Importante: Não esqueça ligar o cabo de tomada à terra.
1.- Ligue o quadro à rede (Interruptor geral ON-OFF).
2.- Certifique-se de que o movimento de abertura da porta coincida com o do motor e o correspon
dente fim de percurso.
PORTUGUES
COLOCAÇÃO EM SERVIÇO
- Verifique o sentido de rotação do motor mediante os botões (F). Se não coincidir, permute os cabos dos bornes 16 e 17.
(RL 2 e RL 1).
- Certifique-se de que os fins de percurso funcionem correctamente: passe um íman pelas válvulas (H e I) e observe se os
leds 6 e 7 não ficam acesos. (Válvula I – "Abrir" corresponde-se com o Led DL6, e válvula H – "Fechar" corresponde-se
com o Led DL7).
3.- Regule a força do motor.
- Posicione o potenciómetro de par (N) no nível mínimo (vire-o no sentido contrário ao dos ponteiros do relógio). Com o
motor já activado, fazê-lo rodar progressivamente no sentido dos ponteiros do relógio até o motor atingir uma potência
suficiente para deslocar a porta ao longo de todo o percurso da mesma.
4.- Opções do selector (G).
DIP 1-ON
Activa a programação.
DIP 2-ON
Memoriza o percurso total.
DIP 1-ON
Activa a programação.
DIP 3-ON
Memoriza o percurso pedonal.
DIP 1-ON
Activa a programação.
DIP 4-ON
Grava o código-canal abertura total.
DIP 1-ON
Activa a programação.
DIP 6-ON
Grava o código-canal abertura peatonal.
DIP 2-ON
Pré-aviso de lâmpada (3 seg.)
DIP 3-ON
Função Passo a Passo.
DIP 3-OFF
Função Comunitária.
DIP 4-ON
Ciclo Automático.
DIP 4-OFF
Ciclo Semiautomático.
27
DIP 5-ON
DIP 5-OFF
Automático Opcional.
NÃO Automático Opcional.
DIP 6-ON
DIP 6-OFF
Saída intermitente para lâmpada.
Saída para pisca-pisca.
DIP 7-ON
DIP 7-OFF
Codificador activado.
Codificador desactivado. Eliminar o codificador
iria comprometer a segurança interna do
motor.
DIP 8-ON
DIP 8-OFF
Paragem suave activada.
Paragem suave desactivada.
DIP9-OFF
Colocar sempre na posição OFF.
DIP10-ON
DIP 10-OFF
Desaceleração em rampa.
Desaceleração imediata. (Modelos com encoder)
Ambas as desacelerações só actuam com
a paragem suave activada (DIP 8 ON).
5.- Programação do automatismo:
5.1.- Memorização do percurso da porta.
- Colocar a porta na posição fechada, bem manualmente ou mediante os botões de premir localizados no quadro.
- Colocar DIP 7 e DIP 8 em ON (opções de paragem suave e codificador activadas).
- Colocar DIP 1 em ON. (Verificar se o led DL3 acende).
- Colocar DIP 2 em ON.
- Premir Marcha (Botão de premir "E"). A porta inicia a abertura.
- Quando o íman de fim de percurso se encontrar a uns 50 cm. do fim do percurso do quadro , voltar a premir por forma
a iniciar a diminuição da velocidade.
- Premir "E" para iniciar o fecho da porta.
- Quando o íman de fim de percurso se encontrar a uns 50 cm. do fim do percurso do quadro, voltar a premir por forma
a iniciar a diminuição da velocidade
- Colocar DIP 1 em OFF.
- Colocar DIP 2 em OFF.
5.2.- Memorização de abertura parcial (Pedonal):
Para efectuar esta memorização, ligaremos um botão de premir normalmente aberto entre os bornes 2-COMUN e 3-ST2 (Start 2).
- Colocar o DIP 1 em ON.
PORTUGUES
- Colocar o DIP 3 em ON.
- Premir Peatonal. A porta inicia a abertura.
- Premir Peatonal no ponto onde pretendemos a porta diminuir a velocidade.
- Premir Peatonal para deter a porta no ponto desejado de abertura pedonal.
- Premir Peatonal. Inicia-se o fecho da porta.
- Premir Peatonal no ponto onde pretendemos a porta diminuir a velocidade. Deter-se-á no fim de percurso.
- Colocar DIP 1 em OFF.
- Colocar DIP 3 em OFF.
Nota aplicável a qualquer modo de funcionamento:
• Se na operação de abertura a porta encontrar no seu percurso qualquer obstáculo, irá parar e
fechar-se em 2 seg.
• Se na operação de fecho a porta encontrar no seu percurso qualquer obstáculo, a porta deterse-á e inverterá o seu movimento até finalmente se deter na posição de porta aberta.
• Sempre que a porta receber um sinal proveniente da chave ou célula fotoeléctrica na operação
de fecho, a porta deter-se-á e passará à posição de porta aberta.
invertirá su movimiento hasta detenerse en posición de puerta abierta.
• Siempre que la puerta reciba un impulso de llave o fotocélula en la maniobra de cierre, ésta se
detendrá e irá a la posición de puerta abierta.
6.- Selecção do modo de funcionamento.
6.1.- Ciclo Automático/Semi-automático:
Ciclo Automático (DIP 4 ON).
“Start” (Botão Marcha) – Abertura – Espera em porta aberta (período regulável com o temporizador G ) – Fecho.
Ao premir "Marcha" ou ser activada qualquer célula fotoeléctrica durante o período de espera, o período passará ao valor
zero.
Ciclo Semiautomático (DIP 4 OFF).
“Start” – Abertura – “Start” – Fecho.
28
6.2.- Função comunitária/Passo a passo:
Função comunitária (DIP 3 OFF).
Um “start” abre e não se aceitam outros comandos “start” na abertura.
Função passo a passo (DIP 3 ON).
Um “start” abre, outro “start” detém a porta, um terceiro "start" fecha, e se durante a operação de fecho activamos "start",
a porta deter-se-á e inverterá o seu movimento até finalmente se deter no ponto de porta aberta
6.3.- Automático opcional:
Em combinação com DIP 4 ON
- Automático opcional (DIP 5 ON)
Se receber um “Start” durante o tempo de espera, a porta fecha-se imediatamente.
- Não automático opcional (DIP 5 OFF)
Se receber um “Start” durante o tempo de espera, o tempo de espera é recarregado.
7.- Programação do rádio (só para código trinário 433 Mhz Erreka RSD-001)
A programação da rádio será realizada com a porta fechada.
A gravação da rádio em abertura peatonal e total é independente. Podendo corresponder também a comandos diferentes com
códigos diferentes.
7.1.- Abertura total:
-Colocar o DIP 1 em ON.
-Seleccionar o código no comando e premir o canal a gravar. O led DL2 vai ficar a piscar.
-Colocar o DIP 4 em OFF.
-Colocar o DIP 1 em OFF.
7.2.- Abertura peatonal:
-Colocar o DIP 1 em ON.
-Colocar o DIP 6 em ON.A memória fica aberta.
-Seleccionar o código no comando e premir o canal a gravar. O led DL2 vai ficar a piscar.
-Colocar o DIP 6 em OFF.
-Colocar o DIP 1 em OFF.
Quando o código do comando estiver gravado é necessário desligar e ligar o painel.
8.- Seleccionar o tipo de funcionamento do pisca-pisca.
8.1.- Função de aviso prévio.
Ao colocar o DIP 2 em ON, o pisca-pisca acende 3 segundos antes do início da operação.
8.2.- Saída da lâmpada.
- DIP 6 em ON. A saída para a lâmpada é intermitente e portanto pode-se colocar uma lâmpada normal (a intermitência
da mesma é efectuada pelo quadro).
- DIP 6 em OFF. A saída é fixa e portanto é preciso colocar um pisca-pisca.
9.- Função de segurança.
- Segurança em Abertura (conexão bornes 4 e 5):
Se se activar o dispositivo (célula fotoeléctrica, fita, etc.) durante a operação de abertura, a porta irá se deter e fechar 20 cm.
Na operação de fecho, a "segurança interior" não actua.
- Segurança em Fecho (conexão bornes 5 e 6):
Se se activar o dispositivo (célula fotoeléctrica, fita, etc.) durante a operação de fecho, a porta deter-se-á e inverterá o seu
movimento até chegar à posição de porta aberta. Na operação de abertura, a "segurança exterior" não actua.
Em ambos os casos, ao interromper a célula fotoeléctrica durante o período de espera, este período
passará ao valor zero.
29
PORTUGUES
-Colocar o DIP 4 em ON. A memória fica aberta.
DIAGNÓSTICO DE AVARIAS
1.- O motor não funciona:
1.1. Verificar se a instalação está correctamente ligada. (Fig. 2)
1.2. Verificar se o motor recebe tensão. (230V AC)
2.- O motor funciona apenas em 1 sentido:
2.1.- Verificar se o comum do motor está correctamente ligado. (Fig. 2)
2.2.- Verificar se o condensador está ligado.
3.- Potência insuficiente do motor:
3.1. Desbloquear o motor e observar se a porta apresenta qualquer resistência excessiva no seu percurso. Em caso
afirmativo, desmontar o motor e eliminar a resistência referida até se poder abrir manualmente a porta sem
dificuldade.
3.2. Verificar se o condensador está ligado e se a capacidade do mesmo é a apropriada (Ver etiqueta do motor)
3.3. Verificar se o motor está bloqueado. Se não o está, bloqueie-o.
4.- A porta não alcança o fim do percurso:
Verificar se os períodos de abertura e fecho são adequados ao comprimento da porta.
Uma vez efectuados os acertos e verificações acima, se continuar a avaria, contacte com o seu
fornecedor ou serviço de atendimento técnico da ERREKA mais próximo. Descreva pormenorizadamente
PORTUGUES
a avaria observada.
INSTALAÇÃO DO AUTOMATISMO
Os modelos constantes no presente folheto cumprem as seguintes directivas europeias:
- Directiva sobre Máquinas 89/392/CEE.
- Regulamentação em matéria de baixa tensão 73/233/CEE
- Compatibilidade Electromagnética 89/336/CEE
Aconselhamos apenas pessoal qualificado efectuar a instalação do automatismo e em observância da regulamentação
vigente do local de instalação.
CERTIFICADO DE GARANTIA
A garantia da Automatismos Erreka cobre o funcionamento do presente equipamento num período de 24 meses desde
a data de fornecimento do mesmo.
A garantia referida é aplicável a qualquer defeito de fabrico.
O instalador é responsável por disponibilizar o equipamento aos serviços técnicos autorizados.
A garantia não cobre:
.- Danos com origem em instalação ou utilização incorrectas do equipamento.
.- Danos com origem em manuseamento realizado por pessoal não autorizado.
.- Danos com origem na exposição à intempérie ou em elementos atmosféricos (trovoadas, inundações, etc.).
30
EINLEITUNG
Diese Produkte sind für die Automatisierung von Garagen-Schiebetüren vorgesehen.
Die Anleitungen gelten für die Installation der in untenstehender Tabelle aufgeführten Modelle.
TECHNISCHE EIGENSCHAFTEN
.- Einphasenmotor mit Dauerkondensator
.- Spannung: 230 V-50Hz
.- Ausgangsgeschwindigkeit: 57 U.p.m.
.- Sicherheitsfaktor: IP45
.- Sanftes Abbremsen am Endschalter.
Modell
Sicherheit
Blockierung Höchst-gewicht
(kg)
Leistung (W)
Intensität (A)
Schalttafel
KM 600
Elektronischer Regler
Ja
600
160
1.2
KM 600S
Encoder+elektronischer Regler
Ja
600
160
1.2
eingebaut
KM 1000S
Encoder+elektronischer Regler
Ja
1000
368
1.67
eingebaut
eingebaut
EMPFEHLUNGEN FÜR DEN INSTALLATEUR
Für die Sicherheit der Personen ist es von höchster Wichtigkeit, dass alle Hinweise befolgt werden. Eine falsche Installation kann zu
Personen- und/oder Sachschäden führen. Lesen Sie die in dieser Broschüre enthaltenen Empfehlungen bitte aufmerksam da sie Ihnen
wichtige Hinweise zu Installation, Benutzung und Wartung geben.
Nach dem Auspacken des Produkts, überprüfen Sie es bitte auf Vollständigkeit. Im Zweifelsfall benutzen Sie das Gerät nicht und
wenden Sie an den nächsten Kundendienst.
Da die Verpackungsquellen potentielle Gefahrenelemente sind, achten Sie bitte darauf, dass sie sich nicht in der Reichweite von
Kindern befinden.
Überprüfen Sie bitte auch, ob sich die Tür in einwandfreiem mechanischen Zustand befindet.
Sollten stärkere Reibungen bestehen, sind diese vor der Automatisierung zu beheben.
Installieren Sie auf keinen Fall eine Automatisierungsvorrichtung an einer Tür, die nicht korrekt funktioniert, da dabei sowohl die Türe
als auch die installierten Komponenten beschädigt werden und Gefahrensituationen auftreten können.
Dieser Mechanismus darf nur zu den vorgesehenen Zwecken verwendet werden. Alle anderen Zwecke sind unsachgemäß und daher
potentiell gefährlich.
Die Installation muss von qualifiziertem Fachpersonal ausgeführt werden. Dabei sind die Hinweise des Herstellers und die gültigen
gesetzlichen Vorschriften zu beachten.
Achten Sie besonders auf die Hinweise aller Elemente, die die Anlage ausmachen.
Vergewissern Sie sich, dass die Nennspannung der zu installierenden Elemente mit der Netzspannung übereinstimmt und die Leistung
der maximalen Leistung der Anlagen entspricht.
Überprüfen Sie, ob der Kabelquerschnitt für die Aufnahmelesung der Elemente geeignet ist. Im Zweifelsfalle wenden Sie sich bitte an
entsprechendes Fachpersonal.
Installieren Sie niemals ein Gerät, ohne die entsprechende Erdung herzustellen.
Das Versorgungskabel muss korrekt befestigt sein.
Als Schutzelemente sind geeignete Kabeldurchführungen zu verwenden.
Für die Anlage wird ein Schalter benötigt, der eine omnipolare Unterbrechung der Versorgung gemäß der gütigen Sicherheitsnormen
sicherstellt.
Bei der Benutzung elektrischer Geräte sind stets die gewisse grundlegende Sicherheitsregeln zu beachten, wie z.B.:
- Berühren Sie das Gerät nur, wenn Sie keine feuchten oder nassen Hände oder Füße haben.
31
ALEMAN
Vergewissern Sie sich, dass die Tür, die automatisiert werden soll, manuell korrekt funktioniert.
- Handhaben Sie das Gerät nicht barfuss.
- Setzen Sie das Gerät keinen Witterungseinflüssen aus, außer wenn es ausdrücklich dafür vorgesehen ist.
- Das Gerät darf nicht von Kindern bedient werden.
Sorgen Sie dafür, dass allen Benutzern der Anlage diese Hinweise bekannt sind.
Bei einem Schaden und/oder fehlerhafter Funktion des Geräts, schalten Sie es bitte aus und handhaben Sie es nicht.
Eventuelle Reparaturen des Geräts dürfen nur vom Hersteller oder einem zugelassenen technischen Kundendienst ausgeführt werden.
Es dürfen ausschließlich Originalersatzteile verwendet werden.
Bringen Sie an der Tür den klar sichtbaren Hinweis an, dass diese automatisch funktioniert und, sofern dem so ist, ferngesteuert wird.
Der Hersteller kann für Schäden, die sich durch Nichtbeachtung dieser Empfehlungen verursacht werden, nicht haftbar gemacht
werden.
TÜR
INSTALLATIONSMASSE
Magnet Endschalter Schließen
Magnet Endschalter Öffnen
Zahnstange
Trennelement Zahnstange
ALEMAN
Antriebsritzel
INSTALLATION DES ANTRIEBSELEMENTS
1.- Befestigen des Motors:
1.1. Die Motorplatte anbringen (Abb. 1)
1.2. Den Motor auf der Motorplatte befestigen.
2.- Die Zahnstange oder deren Trennelemente an die Tür schweißen. Sollte die Tür keine Verstärkung haben, ist es ratsam, eine
solche anzubringen.
3.- Die Zahnstange an die Trennelemente schrauben.
4.- Motor entriegeln und überprüfen:
4.1. Die Tür muss sich mit der Hand problemlos über den gesamten Weg bewegen lassen.
4.2. Die Zahnstange muss ständigen Kontakt mit dem Ausgangsritzel haben, ohne jedoch Druck auf diesen auszuüben.
5.- Motor und Zahnstange definitiv befestigen.
6.- Die Magnetträgerplatten und Magnete für den Endschalter auf den korrekten Positionen anbringen, damit sie die
Bewegungen der Tür anhalten. (Kleine Platte für ES Öffnen, groß für ES Schließen).
7.- Es ist ratsam, sowohl auf der Position “Offen”, als auch auf der Position “Geschlossen” Anschläge anzubringen, um zu ver
meiden, dass diese nachläuft und dabei den Bereich des Entschalters überschreitet.
8.- Motor verriegeln.
9.- Stellen Sie die Schubkraft so ein.
WICHTIGER HINWEIS: DIE KONTAKTE FÜR DIE FOTOZELLEN AUF DER STEUERTAFEL SIND “NORMAL
GESCHLOSSEN”.
32
HANDBETRIEB
Das Gerät verfügt über ein System zum Blockieren des Motors, wodurch die Tür manuell bewegt werden kann. Zum Entriegeln
gehen Sie bitte folgendermaßen vor:
1.-Den oberen Deckel der Entriegelung eine halbe Umdrehung aufdrehen, so dass das Schloss sichtbar wird.
2.-Das Zylinderschloss öffnen.
3.-Den Schaltgriff bis zum Anschlag 270º im Uhrzeigersinn drehen.
Um die Tür wieder zu schließen, gehen Sie bitte umgekehrt vor:
1.- Den Schaltgriff der Entriegelung bis zum Anschlag 270º gegen den Uhrzeigersinn drehen .
2.-Den Zylinder des Schlosses auf Schließposition drücken
3.-Den oberen Deckel der Entriegelung um eine halbe Umdrehung drehen, um das Schloss abzudecken.
4.-Die Tür per Hand bewegen, bis sie blockiert.
Bei normalem Betrieb wird der Motor durch mäßigen Druck auf den Schaltgriff entriegelt; auf diesen darf daher unter keinen
Umständen zu starker Druck ausgeübt werden.
SICHERHEITSELEMENTE
Automatismos Erreka empfiehlt die Installation zusätzlicher Sicherheitselemente (Fotozellen, Sicherheitszonen, etc.), damit die
Sicherheit der Personen und Gegenstände im Zusammenhang mit der Bewegung der Tür gewährleistet ist.
Gemäß der gültigen Vorschriften, muss die Anlage Elemente zur omnipolaren Unterbrechung der Stromversorgung umfassen, die
die Anlage notwendigenfalls vom Netz isolieren. Unter keinen Umständen darf der Motor entriegelt werden, ohne zuvor den
elektrischen Netzanschluss unterbrochen zu haben.
BESCHREIBUNG DER SCHALTTAFEL
FUNKEMPFÄNGER
R62
DL10
ORG
DL8
R76
T4
DL9
IC2
DL6
R60 R72
C27
CD5
C31
L3
R-PAR
IC5
+
DL7
IC1
WARTEN
C44
24v
7VA
24v
L2
L5
C42
CN9
C11
C41
11
+12
DZ1
R42
7
8
9
10
C15
DL13
R63
C17
IC8
C16
SNG
RL3
F3 - 24V
D11
D10
SCHLIESSEN
14
CN5
15
R58
Blinkleuchte
SCHLIESSEN
DL5
R75
F1
R74
DL4
MOTOR -
COM
17
18
2,5A
RL1
D1
J
MOTOR
RL2
RL1
ÖFFNEN
SW3
16
RL2
D2
ÖFFNEN
CN4
R52
TR2
C8
5x20 500mA
OPT2
F2 - ELECT.
ICT
FCT
AOI
R7
C37
Garagelicht
R4
R27
R68
T1
T2
R28
R5
R69
VDR1
TR3
R8
R39
12
13
230V 50Hz
PHASE
OFF
ON
33
C5
L1
C7
C4
R51
SW1
C6
R57
5x20
OPT1
NEUTRAL
TR1
CN2
19
20
21
ALEMAN
DL11
R61
C3
D3
C40
RS
R1
R2
+
GEMEINS
ES. C.
C39
DL14
R13
C12
C36
ES. A.
C32
R44
POT2
315mA
SW4
R38
I
Foto. ext
C30
R43
2
3
4
5
6
GND
T3
L
G
GEMEINS
R35
R49
R6
C18
5x20
EMU
POT3
Foto. Int
C33
PUL2
R3
R25
C19
C13
F
GARAGENLICHT
-
PUL1
+
R26
-
R41
C34
C35
POT1
ST2
C29
R32
R9
T5
R29
C20
IC6
R40
IC9
H
Fussg
ÖFFNEN
CD6
GEMEINS
R36
CD2
SCHLIESSEN
IC7
ST1
C28
R64
CD7
R37
PUL3
PUL4
R66
C14
R30 R10
E
N
R59
2
1
R24
C1
R65
R23
R67
D6
D4
D7
D5
R22
CN7
D
AMPEL
C
C22
C24
DL3 DL2 DL1
C23
R73
START
R14
R21
IC4
R20
C26
7
6
5
4
3
R19
1
CN8
RB
R18
DL12
CD4
C2
B
CD1
C21
R17
CN6
R16
R31
10
9
8
R15
Q1
IC3
CD3
ANT
C25
SW2
1
CN1
A
Elemente:
Hinweisleuchten:
Eingangsklemmen
A.- Anschluss für den Funkempfänger
DL1.- Wartezeit.
1-2.- Start 1. Vollständiges Öffnen
B.- Anschlussklemmen Antenne
DL2.- Aufzeichnen des Funkcodes.
2-3.- Start 2. Öffnen Fußgänger
C.- Wahlschalter 10 DIPs.
DL3.- Aufzeichnen Steuerung.
4-5.- Sicherheit beim Öffnen.
D.- Anschluss Ampel
DL4.- Relais Öffnen
5-6.- Sicherheit beim Schließen.
E.- Drucktasten Start - Fußgänger
DL5.- Relais Schließen
7-8.- Endschalter Öffnen.
F.- Drucktasten Öffnen - Schließen
DL6.- Endschalter Öffnen
8-9.- Endschalter Schließen
Potentiometer:
DL7.- Endschalter Schließen
10.- Ausgang 24 V
L.- Garagenbeleuchtung (3-90 s)
DL8.- Sicherheit bei Öffnen.
11-12-13.- Encoder-Signal
G.- Wartezeit (0-90 s)
DL9.- Sicherheit bei Schließen.
14.- Garagenbeleuchtung (spannungsfrei).
N.- Kraftmomenteinstellung.
DL10.- Eingang Fußgängertür.
15.- Blinkleuchte (Ausgang 200 V).
H.- Reed Ventil Endschalter Schließen.
DL11.- Eingang vollständiges Öffnen
I.- Reed Ventil Endschalter Öffnen.
DL12.- Funksignal
16-17-18.- Einphasen-Motor
(Kondensator zwischen Klemmen 16 und 17 ).
J.- Hauptschalter Schalttafel
DL13.- Encoder.
19-20.- Versorgung 220 V.
DL14.- Versorgung 220 V
21.- Erdung.
START
Bevor Sie die Schalttafel ans Netz schließen, schließen Sie bitte die verschiedenen peripheren Geräte zunächst an die
Schalttafel.
Wichtig: Vergessen Sie nicht, das Erdungskabel anzuschließen.
1.- Die Schalttafel ans Netz schließen (Hauptschalter ON-OFF).
2.-Überprüfen, dass die Öffnungsbewegung der Tür mit der des Motors und dem entsprechenden
Endschalter übereinstimmen.
- Die Drehrichtungen des Motors mit den Drucktasten (F) überprüfen. Sollten diese nicht korrekt sein, müssen die Kabel der
Klemmen 16 und 17. (RL 2 und RL 1) getauscht werden.
ALEMAN
- Überprüfen, ob die Endschalter korrekt funktionieren, indem man einen Magnet an den Ventilen (H und I) vorbeibewegt und
kontrolliert, ob die Leuchtdioden 6 und 7 sich ausschalten (Ventil I – Öffnen entspricht der Led DL6 und das Ventil H –
Schließen der Led DL7)
3.- Einstellen der Kraft des Motors.
- Das Potentiometer für das Kraftmoment (N) auf das Minimum stellen (gegen den Uhrzeigersinn drehen). Danach dreht man
es bei laufendem Motor langsam im Uhrzeigersinn, bis der Motor ausreichende Kraft hat, um die Tür über den gesamten
Weg zu bewegen.
4.- Optionen des Wahlschalters (G).
DIP 5-ON
DIP 5-OFF
Automatik optional
KEINE optionale automatik
DIP 6-ON
DIP 6-OFF
Intermittierender Ausgang Lampe.
Ausgang Blinkleuchte
DIP 7-ON
DIP 7-OFF
Encoder betriebsbereit.
Encoder nicht betriebsbereit. Ein
Unterdrücken des Encoders bedeutet,
dass die interne Sicherung des Motors
ausges chaltet wird.
DIP 1-ON
Programmierung betriebsbereit
DIP 2-ON
Lernen des Gesamtwegs.
DIP 1-ON
Programmierung betriebsbereit
DIP 3-ON
Lernen des Wegs für Fußgänger.
DIP 1-ON
Erlaubt die Programmierung
DIP 4-ON
Zeichnet den Kanalkode für die vollständige Öffnung auf.
DIP 1-ON
Erlaubt die Programmierung
DIP 6-ON
DIP 3-OFF
Zeichnet den Kanalkode für die Fußgänger Öffnung auf. DIP
DIP
Warnung durch Lampe (3 s.)
DIP
Funktion Schritt für Schritt.
DIP
Gemeinschaftliche Funktion.
DIP 4-ON
Automatischer Zyklus
DIP 4-OFF
Halbautomatischer Zyklus
DIP 2-ON
DIP 3-ON
8-ON
8-OFF
Sanftes Abbremsen aktiviert.
Sanftes Abbremsen deaktiviert.
9-OFF
Immer auf die Position OFF stellen.
10-ON
Abbremsung an der Rampe.
(Modelle mit encoder ausgestattet)
Sofortige Abbremsung.
Beide Abbremsungen sind nur aktiv, wenn
der sanfte Stopp aktiviert ist (DIP 8 ON)
DIP 10-OFF
34
5.- Programmieren der Automatik:
5.1.- Aufzeichnen des Wegs der Tür.
- Die Türe entweder manuell oder mittels der Drucktasten der Bedienertafel in geschlossene Position bringen.
- DIP 7 und DIP 8 auf ON stellen (Optionen für sanftes Abbremsen und Encoder aktiviert).
- DIP 1 auf ON stellen. (Überprüfen, ob Led DL3 leuchtet)
- DIP 2 auf ON stellen.
- Starttaste betätigen (Drucktaste E). Die Tür beginnt sich zu öffnen.
- Wenn sich der Magnet des Endschalters ca. 50 cm vor dem Ende des Laufwegs zu beginnen, Taste erneut betätigen,
damit die Reduzierung der Geschwindigkeit beginnt.
- E betätigen, damit die Tür beginnt, sich zu schließen.
- Wenn sich der Magnet des Endschalters ca. 50 cm vor dem Ende des Laufwegs zu beginnen, Taste erneut betätigen,
damit die Reduzierung der Geschwindigkeit beginnt.
- DIP 1 auf OFF stellen.
- DIP 2 auf OFF stellen.
5.2.- Aufzeichnen Teilweises Öffnen der Tür (Fußgänger):
Für diese Aufzeichnung wird eine Drucktaste “normal offen” zwischen die Klemmen 2-COMUN und 3-ST2 (Start 2) geschaltet.
- DIP 1 auf ON setzen.
- DIP 3 auf ON setzen.
- Peatonal betätigen. Die Tür beginnt sich zu öffnen.
- Auf der Position, auf der die Geschwindigkeit verringert werden soll, Peatonal betätigen.
- Um die Tür auf der für den Fußgängerdurchgang gewünschten Position anzuhalten, ernut Peatonal betätigen.
- Peatonal betätigen. Die Tür beginnt sich zu schließen.
- Auf der Position, auf der die Geschwindigkeit verringert werden soll, Peatonal betätigen. Über den Endschalter kommt die
Tür zum Stillstand.
ALEMAN
- DIP 1 auf OFF setzen.
- DIP 3 auf OFF setzen.
Hinweise für alle Funktionsarten:
•Wenn die Tür während des Öffnungsvorgangs auf ein Hindernis trifft, Wir angehalten und
schließt nach 2 Sek.
•Wenn die Tür während des Schließvorgangs auf ein Hindernis trifft, bleibt sie stehen und
bewegt sich dann in umgekehrter Richtung, bis sie auf der Position „Tür offen“ anhält.
•Bei jedem Impuls, den die Tür während des Schließvorgangs über Schlüssel oder Fotozelle erhält,
bleibt sie stehen und geht auf Position „Tür offen“.
6.- Einstellen der Betriebsart:
6.1.-Automatischer / halbautomatischer Zyklus:
Automatischer Zyklus (DIP 4 ON).
“Start” (Starttaste) – Öffnen – Warten auf Position “Tür offen” (die Dauer dieser Wartezeit kann mit dem Zeitschalter G
reguliert werden) – Schließen.
Wird während der Wartephase “Start” betätigt oder eine Fotozelle aktiviert, beginnt die Wartezeit von vorn.
Halbautomatischer Zyklus (DIP 4 OFF).
“Start” – Öffnen – “Start” –Schließen.
35
6.2.- Gemeinschaftliche Funktion/Schritt-für-Schritt-Funktion
Gemeinschaftliche Funktion (DIP 3 OFF).
Mit einem „Start“-Befehl wird geöffnet und während des Öffnungsvorgangs werden keine weiteren „Start“-Befehle
akzeptiert.
Funktion Schritt-für-Schritt (DIP 3 ON).
Mit einem „Start“-Befehl wird geöffnet, ein weiterer “Start”-Befehl hält die Tür an und ein dritter “Start”-Befehl schließt sie.
Wird während des Schließvorgangs “Start” betätigt, hält die Tür an und bewegt sich in umgekehrter Richtung bis auf die
Position “Tür offen“.
6.3.- Automatik optional:
In Kombination mit DIP 4 ON
-Automatik optional (DIP 5 ON)
Wenn ein “Start” während der Wartezeit eingegeben wird, wird das Tor sofort geschlossen.
-KEINE optionale Automatik (DIP 6 OFF)
Wenn ein “Start” während der Wartezeit eingegeben wird, beginnt die Wartezeit von vorne.
7.- Programmierung des Senders (Nur für trinären code 433 Mhz Erreka RSD-001)
Die Programmierung des Senders wird mit dem geschlossenen Tor ausgefürth.
Die Aufzeichnung für den Sender in der Fußgängeröffnung und vollständige Öffnung ist unabhängig von einander und können
auch von verschieden. Fernsteurungen und mit verschiedenen Codes ausgeführt werden.
7.1.- Vollständige Öffnung:
-Stellen Sie den DIP 1 auf ON.
-Stellen Sie den DIP 4 auf ON . Der Speicher ist offen.
-Wählen Sie auf der Fernsteuerung den Code und drücken Sie den Kanal für die Aufzeichnung. Die LED DL2 wird blinken.
-Stellen Sie den DIP 4 auf OFF.
-Stellen Sie den DIP 1 auf OFF.
7.2.- Öffnung für Fußgänger:
-Stellen Sie den DIP 1 auf ON.
ALEMAN
-Stellen Sie den DIP 6 auf ON . Der Speicher ist offen.
-Wählen Sie auf der Fernsteuerung den Code und drücken Sie den Kanal für die Aufzeichnung. Die LED DL2 wird blinken.
-Stellen Sie den DIP 6 auf OFF.
-Stellen Sie den DIP 1 auf OFF.
Wenn der Code für die Steuerung aufgezeichnet ist, wird es notwendig den Schaltkasten ab-und wieder anzuschalten.
8.- Funktionsweise der Blinkleuchte anwählen.
8.1.- Warnfunktion.
Setzt man DIP 2 auf ON, schaltet die Blinkleuchte 3 Sekunden vor Beginn der Bewegung ein.
8.2.- Ausgang Lampe.
- DIP 6 auf ON. Der Ausgang ist intermittierend, so dass eine normale Lampe angeschlossen werden kann. Die Blinkfunktion
führt die Schalttafel aus.
- DIP 6 auf OFF. Der Ausgang ist fest, so dass eine Blinkleuchte notwendig ist.
9.- Funktionsweise der Sicherung.
- Sicherbeit bei der Öffnung (Anschluss Klemmen 4 und 5):
Wenn die Vorrichtung beim Öffnungsvorgang aktiviert wird (Fotozelle, Sicherheitsbereich...), hält die Tür an und schließt 20 cm.
Während des Schließvorgangs hat diese Sicherung keine Wirkung.
- Sicherbeit bei der Schließung (Anschluss Klemmen 5 und 6):
Wenn die Vorrichtung (Fotozelle, Sicherheitsbereich, ...) beim Schließvorgang aktiviert wird, hält die Tür an und bewegt sich in
umgekehrter Richtung auf die Position „Tür offen“. Während des Öffnungsvorgangs hat diese Sicherung keine Wirkung.
In beiden Fällen führt ein Auslösen der Fotozelle während der Wartezeit dazu, dass diese wieder von
vorn beginnt.
36
FEHLERDIAGNOSE
1.- Der Motor funktioniert nicht:
1.1. Prüfen, ob die Anlage korrekt angeschlossen ist (Abb. 2).
1.2. Prüfen, ob der Motor mit Spannung versorgt wird. (230V AC)
2.- Der Motor läuft nur in eine Richtung:
2.1.-Prüfen, ob der Motor korrekt angeschlossen ist (Abb. 2)
2.2.- Prüfen, ob der Kondensator angeschlossen ist.
3.- Der Motor hat keine Kraft:
3.1. Motor entriegeln und prüfen, ob die Tür auf ihrem Weg einen ungewöhnlichen Widerstand aufweist. Wenn dem so ist,
den Motor abbauen und den Widerstand beseitigen, bis die Tür sich mit der Hand leicht bewegen lässt.
3.2. Prüfen, ob der Kondensator angeschlossen ist und dessen Kapazität korrekt ist (vgl. Typenschild Motor)
3.3. Prüfen, ob der Motor blockiert ist. Sollte dem nicht so sein, muss er blockiert werden.
4.- Die Tür bewegt sich nicht bis zum Endschalter:
Prüfen, ob die Öffnungs- und Schließzeit der Länge der Tür angemessen sind.
Wenn nach diesen Nachprüfungen und den angegebenen Nachstellungen das Problem weiter besteht,
wenden Sie sich bitte an Ihren Vertriebshändler oder den nächsten Technischen Kundendienst von
ERREKA. Geben Sie dabei das aufgetretene Problem so genau wie möglich an.
INSTALLIEREN DER AUTOMATIK
Die Modelle, auf die sich dieses Dokument bezieht, erfüllen folgende Europäische Richtlinien:
-Maschinenrichtlinie 89/392/EWG.
-Niederspannungsrichtlinie 73/233/EWG
-Richtlinie zur elektromagnetischen Vereinbarkeit 89/336/EWG
Es ist empfehlenswert, die Automatik von Fachpersonal installieren zu lassen. Bei der Installation müssen die am Ort der Montage
ALEMAN
geltenden gesetzlichen Vorschriften eingehalten werden.
GARANTIEBESCHEINIGUNG
Automatismos Erreka gewährt auf diese Anlage eine 24-monatige Garantie, gültig ab Lieferdatum.
Diese Garantie gilt für alle Herstellungsfehler.
Es ist Aufgabe des Installateurs, die Anlage dem entsprechenden offiziellen Technischen Kundendienst zukommen zu lassen.
Ausgeschlossen von dieser Garantie sind:
.- Schäden aufgrund eine unsachgemäßen Installation oder Anwendung der Anlage.
.- Schäden aufgrund der Manipulation durch nicht autorisiertes Personal.
.- Schäden aufgrund äußerer Einwirkungen oder Witterungsbedingung (Blitzschlag, Überschwemmungen, etc. )
37
MSM - 011/1
Goi Design - Zumárraga