1
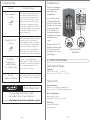
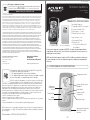
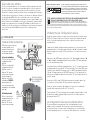
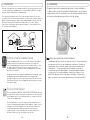
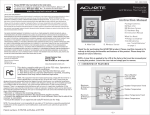
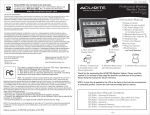
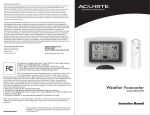
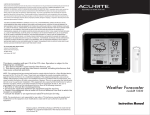
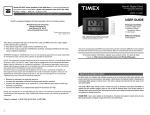
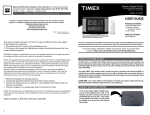
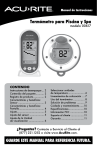
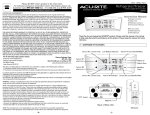
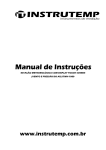
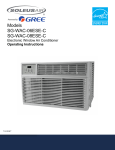
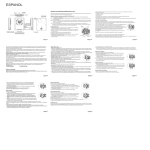
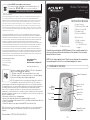
INST - 02002 052708
Please DO NOT return product to the retail store.
For technical assistance and product return information, please call
Customer Care: 877-221-1252 Mon. - Fri. 8:00 A.M. to 4:45 P.M. (CST)
Wireless Thermometer
with atomic clock
www.chaneyinstrument.com
#02002
LIMITED ONE YEAR WARRANTY
Chaney Instrument Company warrants that all products it manufactures to be of good material and workmanship and to be free of
defects if properly installed and operated for a period of one year from date of purchase. REMEDY FOR BREACH OF THIS
WARRANTY IS EXPRESSLY LIMITED TO REPAIR OR REPLACEMENT OF DEFECTIVE ITEMS. Any product which, under normal use
and service, is proven to breach the warranty contained herein within ONE YEAR from date of sale will, upon examination by
Chaney, and at its sole option, be repaired or replaced by Chaney. In all cases, transportation costs and charges for returned
goods shall be paid for by the purchaser. Chaney hereby disclaims all responsibility for such transportation costs and charges.
This warranty will not be breached, and Chaney will give no credit for products it manufactures which shall have received normal
wear and tear, been damaged, tampered, abused, improperly installed, damaged in shipping, or repaired or altered by others than
authorized representatives of Chaney.
THE ABOVE-DESCRIBED WARRANTY IS EXPRESSLY IN LIEU OF ALL OTHER WARRANTIES, EXPRESS OR IMPLIED, AND ALL
OTHER WARRANTIES ARE HEREBY EXPRESSLY DISCLAIMED, INCLUDING WITHOUT LIMITATION THE IMPLIED WARRANTY OF
MERCHANTABILITY AND THE IMPLIED WARRANTY OF FITNESS FOR A PARTICULAR PURPOSE. CHANEY EXPRESSLY DISCLAIMS
ALL LIBILITY FOR SPECIAL, CONSEQUENTIAL OR INCIDENTAL DAMAGES, WHETHER ARISING IN TORT OR BY CONTRACT FROM
ANY BREACH OF THIS WARRANTY. SOME STATES DO NOT ALLOW THE EXCLUSION OR LIMITATION OF INCIDENTAL OR
CONSEQUENTIAL DAMAGES, SO THE ABOVE LIMITATION OR EXCLUSION MAY NOT APPLY TO YOU. CHANEY FURTHER DISCLAIMS
ALL LIABILITY FROM PERSONAL INJURY RELATING TO ITS PRODUCTS TO THE EXTENT PERMITTED BY LAW. BY ACCEPTANCE
OF ANY OF CHANEY’S EQUIPMENT OR PRODUCTS, THE PURCHASER ASSUMES ALL LIABILITY FOR THE CONSEQUENCES
ARISING FROM THEIR USE OR MISUSE. NO PERSON, FIRM OR CORPORATION IS AUTHORIZED TO ASSUME FOR CHANEY ANY
OTHER LIABILITY IN CONNECTION WITH THE SALE OF ITS PRODUCTS. FURTHERMORE, NO PERSON, FIRM OR CORPORATION IS
AUTHORIZED TO MODIFY OR WAIVE THE TERMS OF THIS PARAGRAPH, AND THE PRECEDING PARAGRAPH, UNLESS DONE IN
WRITING AND SIGNED BY A DULY AUTHORIZED AGENT OF CHANEY. THIS WARRANTY GIVES YOU SPECIFIC LEGAL RIGHTS, AND
YOU MAY ALSO HAVE OTHER RIGHTS WHICH VARY FROM STATE TO STATE.
For in-warranty repair, please contact:
Customer Care Department
Chaney Instrument Company
965 Wells Street
Lake Geneva, WI 53147
Chaney Customer Care
877-221-1252
Mon-Fri 8:00 a.m. to 4:45 p.m. CST
www.chaneyinstrument.com
Instruction Manual
RF WIRELESS
What You Need:
• Philips Screwdriver
• (5) AA batteries
-see “Install Batteries”
A. Main Unit
B. Wireless Sensor
on page 2
Thank You for purchasing this ACURITE® product. Please read this manual in it’s
entirety to fully enjoy the benefits and features of this product. Please keep this
manual for future reference.
NOTE: A clear film is applied to the LCD at the factory that must be removed prior
to using this product. Locate the clear tab and simply peel to remove.
1 • OVERVIEW OF FEATURES
This device complies with part 15 of the FCC rules. Operation is
subject to the following two conditions:
1- This device may NOT cause harmful interference, and
2- This device must accept any interference received, including
interference that may cause undesired operation.
NOTE: This equipment has been tested and found to comply with the limits for a
CLass B digital dvice, pursuant to Part 15 of the FCC rules. These limits are
designed to provide reasonable protection against harmful interference in a residential installation.
This equipment generates, uses and can radiate radio frequency energy and, if not installed and used
in accordance with the instructions, may cause harmful interference to radio communications.
However, There is no guarantee that interference will not occur in a particular installation. If this
equipment does cause harmful interference to radio or television reception, which can be determined
by turning the equipment off and on, the user is encouraged to try to correct the interference by one or
more of the following measures:
• Reorient or relocate the receiving antenna.
• Increase the separation between the equipment and the receiver.
• Connect the equipment into an outlet on a circuit different from that to which the
receiver is connected.
• Consult the dealer or an experienced radio/TV technician for help.
Package Contents:
(1) Main Unit (A) with stand
(1) Wireless Sensor (B)
(1) Hardware Bag
(1) Instruction Manual
Outdoor Temperature
Wireless Sensor
Signal Icon
Outdoor
Temperature
Records
Atomic Clock
Atomic Clock
SIgnal Icon
Month & Date
Indoor
Temperature
Setup Buttons
NOTE: The manufacturer is not responsible for any radio or TV interference caused by unauthorized
modifications to this equipment. Such modifications could void the user authority to operate the
equipment.
Tabletop Placement
Display Stand
Patent numbers: 5,978,738; 6,076,044; 6,597,990
-1-
About the Atomic Clock
A clock is considered atomic if it has an accuracy of one second in a million
years. Consumer clocks are considered atomic if they attain this accuracy by
receiving a signal from an atomic clock. In North America, the National Institute
of Standards and Technologies operates an atomic clock in Colorado which
transmits the time codes via the the radio station WWVB. The signal is
transmitted in a very low frequency (60,000 Hz). The Acurite clock you have
purchased includes a built-in receiver which picks up the signal from the WWVB
station. For the best possible reception, place the main unit with the back side
facing Colorado. NOTE: Due to solar radiation in the atmosphere, the atomic
clock signal is weaker during the day. Most synchronization with the WWVB
atomic clock signal happens at night when there is less interference.
40
Extended periods of cold temperatures ( below -4ºF / -20ºC )
can cause alkaline batteries to function improperly. This will
cause the outdoor wireless sensor to stop transmitting
temperature readings. Use lithium batteries in these low
temperature conditions to ensure continued operation for
wireless sensors placed outdoors.
PLEASE DISPOSE OF OLD OR DEFECTIVE BATTERIES IN AN ENVIRONMENTALLY
SAFE WAY AND IN ACCORDANCE WITH YOUR LOCAL LAWS AND REGULATIONS.
BATTERY SAFETY: Follow the polarity (+/-) diagram in the battery compartment. Promptly remove dead batteries from the device.
Dispose of used batteries properly. Only batteries of the same or equivalent type as recommended are to be used. DO NOT incinerate used
batteries. DO NOT dispose of batteries in fire, as batteries may explode or leak. DO NOT mix old and new batteries or types of batteries
(alkaline/standard). DO NOT use rechargeable batteries. DO NOT recharge non-rechargeable batteries. DO NOT short-circuit the supply terminals.
Main Unit : Basic Setup
After installing batteries, the time zone, time, DST (daylight saving time) and ºF
or ºC preferences must be set initially. After the initial manual setting, the
atomic clock will maintain it’s accuracy and adjust for DST automatically.
2 • SETUP
Install Batteries
NOTE: Install all batteries in both
units within a 6 minute period to
ensure proper wireless
functionality.
A. Wireless Sensor
1) Remove the 4 battery
compartment screws.
2) Remove the battery
compartment cover and
install 2 fresh “AA”
batteries as shown here.
Always install batteries
into the wireless sensor
FIRST to ensure proper
wireless synchronization
with the main unit.
B. Main Unit
Remove the battery
compartment cover and
install 3 fresh “AA”
batteries as shown here.
REMOVE
BATTERY
COMPARTMENT
COVER
When first entering basic setup mode, the time zone will be flashing. Adjust the
time zone using the “ ” or “ ” buttons on the side of the main unit, then press
the “SET” button to confirm your time zone selection and move on.
ABC
Now select DST (daylight saving time) “on” or “off” by pressing the “ ” or “ ”
buttons on the side of the main unit. Press the “SET” button to confirm your DST
selection.
Next, adjust the HOUR by pressing the “ ” or “ ” buttons on the back of the
main unit. Press the “SET” button to confirm your HOUR selection and to move
on to MINUTE setting. Again, adjust the MINUTE by pressing the “ ” or “ ”
buttons. You may press and HOLD the “ ” or “ ” to adjust the minutes at a
faster rate. Press the “SET” button again to confirm your time setting.
REMOVE
BATTERY
COMPARTMENT
COVER
ABC
INSTALL
3 “AA”
BATTERIES
Next, adjust the MONTH and then the DATE in the same manner, using the
“ ” and “ ” buttons to adjust and the “SET” button to confirm and move on.
Finally, press the “ ” or “ ” buttons to select between fahrenheit (ºF ) or
celsius (ºC) temperature display units.
Press the “SET” button one more time to exit basic setup mode. You may enter
basic setup mode again at any time by pressing the “SET” button.
Basic Setup is Now Complete
The wireless sensor will soon send a signal to the main unit and the two
units will be synchronized. It may take a few minutes for synchronization to
be complete. If both or one of the units appear to be functioning improperly,
refer to the troubleshooting section in this manual.
-2-
-3-
3 • PLACEMENT
4 • OPERATION
Now that setup is complete, you must choose a location to place the wireless
sensor and the main unit. The wireless sensor MUST be placed less than 100
feet away from the main unit.
After the main unit and the wireless sensor are both powered on and
wirelessly synchronized, no further input is required. The atomic clock
will automatically re-synchronize occasionally to ensure the clock is
accurate.
This wireless thermometer uses radio frequency for communication, which is
susceptible to interference from other electronic devices and large metallic
items or thick walls. Always place both units at least 3 feet away from
appliances ( TV, microwave, radios, etc. ) or objects ( large metal surfaces, thick
stone walls, etc. ) that may interfere with the wireless communication.
TV
A
3
A
Placement of Main Unit
Place the main unit in a dry area free of dirt and dust. To help ensure
an accurate indoor temperature measurement, be sure to place the
main unit out of direct sunlight, and away from any heat sources or
vents in your home. For the best possible atomic clock reception,
place the main unit with the back side facing Colorado.
There are 2 placement options for the the main unit. You may hang
the main unit on a wall using the integrated hang holes on the
bottom of the tilting display stand. Alternatively, you may place the
main unit on a table top or other flat surface.
RF WIRELESS
A
Wireless Signal Reception Icons
The main unit has signal reception icons in the outdoor temperature
display area and near the atomic clock display. If there are a low number
of “bars” present, you may experience no temperature display ( “--” ) or
inaccuracy. In either case, you may need to relocate one or both of the
units. If most or all 4 of the bars are present, wireless reception is good
and no action is required. If the atomic clock signal bars are low, the clock
may be inaccurate or may not automatically adjust for daylight saving
time (DST).
Placement of Sensor
The wireless sensor MUST BE PLACED OUTDOORS to observe
outdoor temperatures and relay the outdoor temperature to the main
unit display. The wireless sensor must be placed less than 100 feet
from the main unit.
The wireless sensor is water resistant and is designed for outdoor
use. However, to extend the life of the product, place the wireless
sensor in an area protected from direct weather elements. To ensure
an accurate outdoor temperature measurement, be sure the wireless
sensor is placed out of direct sunlight and away from any heat
sources.
-4-
-5-
Troubleshooting
Problem
Bad Temperature
Reception
no bars
Bad Atomic Clock
Reception
no bars
Set Wireless ID
Possible Solution
Relocate the main unit and/or the wireless
sensor. Both units must be within 100 feet
from each other. Make sure both units are
placed at least 3 feet from other electronic
appliances and devices that may interfere
with the wireless communication (such as
TV’s, microwaves, computers etc). NOTE: It
may take up to 20 minutes for the main unit
to resynchronize with the sensor when
batteries are replaced.
Relocate the main unit. Make sure the main
unit is placed at least 3 feet from other
electronic appliances and devices that may
interfere with the wireless communication
(such as TV’s, microwaves, computers etc).
Large metallic surfaces will also interfere
with the atomic clock signal. Make sure the
back side of the main unit is facing Colorado.
No Outdoor
Temperature or
Humidity Display
(no communication)
If wireless reception is bad (no bars), see
“Bad Reception” section above. The wireless
ID setting on each unit must match for both
units to communicate properly. See “Set
Wireless ID” on the next page.
Main Unit
Display Not Working
Make certain that the batteries are installed
correctly. The batteries may need replacing.
This wireless thermometer
uses long range 433mhz
radio frequency for
communication.
ABC
ABC
In the event that you have
reception problems due to
interference, both the main
unit and the wireless sensor
have a selectable wireless
ID. The ID switches are
located within the battery
compartments of the main
unit and the wireless
sensor.
ABC
You may choose A, B or C;
but both the main units and
the wireless sensors IDs
must match for successful
synchronization.
Both wireless ID’s
must match
5 • PRODUCT SPECIFICATIONS
Measurement Ranges
Temperature
Main Unit: 32ºF to 122ºF / 0ºC to 50ºC
Wireless Sensor: -40ºF to 158ºF / -40ºC to 70ºC
Specifications
Product Registration
To receive product information, register
your product online. It’s quick and easy!
Log on to http://www.chaneyinstrument.com/product_reg.htm
Power Requirements
Main Unit: 3 x “AA” alkaline or lithium batteries
Wireless Sensor: 2 x “AA” alkaline or lithium batteries
Wireless Communication
Radio Frequency: 433 mhz
Transmission Intervals: every 16 seconds
Atomic Clock
Frequency: WWVB 60Khz
Synchronizes Daily
-6-
ABC
-7-
INST - 02002 052708
NO regrese el producto a la tienda.
Termómetro inalámbrico
Para asistencia técnica e información de devolución de producto, por favor llame a
Servicio al Cliente: 877-221-1252
Lun. - Vie. 8:00 A.M. to 4:45 P.M. (CST)
con reloj atómico
www.chaneyinstrument.com
#02002
UN AÑO DE GARANTÍA LIMITADA
Chaney Instrument Company garantiza que todos los productos que fabrica son de buenos material y mano de obra y están libres
de defectos, si son instalados y operados adecuadamente por un período de un año desde la fecha de compra. EL RECURSO EN
CASO DE INCUMPLIMIENTO DE ESTA GARANTÍA ESTÁ LIMITADO ESPECÍFICAMENTE A LA REPARACIÓN O AL REEMPLAZO DE
LOS ELEMENTOS DEFECTUOSOS. Cualquier producto que, bajo el uso y servicio normal, se demuestre que incumpla con la
garantía contenida en el presente documento en el plazo de un año desde la fecha de venta, será, sujeto a examen por parte de
Chaney, y a su sola opción, reparado o reemplazado por Chaney. En todos los casos, los costos y cargos de transportación por
productos devueltos serán pagados por el comprador. Chaney por este medio renuncia a toda responsabilidad por tales costos y
cargos de transportación. Esta garantía no será incumplida, y Chaney no dará crédito por productos que fabrique los cuales hayan
recibido un desgaste y deterioro normal, hayan sido dañados, manipulados, forzados, e instalados inadecuadamente, dañados en
la transportación, o reparados o alterados por otros distintos que los representantes autorizados de Chaney.
Manual de instrucciones
RF WIRELESS
LA GARANTÍA ANTES DESCRITA ES ESPECÍFICAMENTE EN LUGAR DE TODAS LAS OTRAS GARANTÍAS, EXPRESAS O IMPLÍCITAS,
Y TODAS LAS OTRAS GARANTÍAS SON POR ESTE MEDIO ESPECÍFICAMENTE RENUNCIADAS, INCLUYENDO SIN LIMITACIÓN LA
GARANTÍA IMPLÍCITA DE CAPACIDAD DE COMERCIALIZACIÓN Y LA GARANTÍA IMPLÍCITA DE ADECUACIÓN PARA UN PROPÓSITO
EN PARTICULAR. CHANEY ESPECÍFICAMENTE RENUNCIA A TODA RESPONSABILIDAD POR DAÑOS CONSECUENCIALES
ESPECIALES O INCIDENTALES, SEA QUE DERIVEN DE PERJUICIO O POR CONTRATO O DE ALGUNA INFRACCIÓN DE ESTA
GARANTÍA. ALGUNOS ESTADOS NO PERMITEN LA EXCLUSIÓN O LIMITACIÓN DE DAÑOS INCIDENTALES O CONSECUENCIALES,
POR LO TANTO LA LIMITACIÓN O EXCLUSIÓN ANTERIOR PUEDEN NO APLICAR A USTED. CHANEY RENUNCIA ADEMÁS A TODA
RESPONSABILIDAD POR LESIÓN PERSONAL RELATIVA A SUS PRODUCTOS EN EL GRADO PERMITIDO POR LA LEY. AL ACEPTAR
CUALQUIERA DE LOS EQUIPOS O PRODUCTOS DE CHANEY, EL COMPRADOR ASUME TODA RESPONSABILIDAD POR LAS
CONSECUENCIAS QUE DERIVEN DE SU USO O MAL USO. NINGUNA PERSONA, FIRMA O COMPAÑÍA ESTÁ AUTORIZADA A ASUMIR
POR CHANEY ALGUNA OTRA RESPONSABILIDAD EN RELACIÓN CON LA VENTA DE SUS PRODUCTOS. ADICIONALMENTE,
NINGUNA PERSONA FIRMA O COMPAÑÍA ESTÁ AUTORIZADA A MODIFICAR O RENUNCIAR LOS TÉRMINOS DE ESTE PÁRRAFO, Y
EL PÁRRAFO ANTERIOR, A MENOS QUE ESTO SEA HECHO POR ESCRITO Y FIRMADO POR UN AGENTE DEBIDAMENTE
AUTORIZADO DE CHANEY. ESTA GARANTÍA LE DA DERECHOS LEGALES ESPECÍFICOS, Y USTED PUEDE TENER TAMBIÉN OTROS
DERECHOS QUE PUEDEN VARIAR DE ESTADO A ESTADO.
Para reparación en garantía, por favor contacte al:
Departamento de Servicio al Cliente
Chaney Instrument Company
965 Wells Street
Lake Geneva, WI 53147
Chaney Servicio al Cliente
877-221-1252
Lun-Vie 8:00 a.m. a 4:45 p.m. CST
www.chaneyinstrument.com
A. Unidad principal
B. Sensor inalámbrico
Contenido del paquete:
(1) Unidad principal (A) con soporte
(1) Sensor inalámbrico (B)
(1) Bolsa para accesorios
(1) Manual de instrucciones
Lo que usted necesita:
• Desarmador Philips
• (5) baterías AA
-ver “Instalación de baterías”
en la página 2
Gracias por la compra de este producto ACURITE®. Lea todo este manual para disfrutar
completamente los beneficios y características de este producto. Por favor conserve este
manual para referencia futura.
NOTA: una película transparente se aplica al LCD en la fábrica, usted debe retirarla antes
de usar este producto. Localice la lengüeta transparente y simplemente desprenda para
removerla.
1 • VISIÓN GENERAL DE CARACTERÍSTICAS
Este dispositivo cumple con la Parte 15 de las Reglas FCC. La operación
está sujeta a las siguientes dos condiciones:
1 - Este dispositivo puede NO causar interferencia dañina, y
2 - Este dispositivo debe aceptar cualquier interferencia recibida, incluyendo
interferencia que puede ser causada por operación no deseada.
NOTA: Este equipo ha sido probado y se encontró que cumple con los límites para
un dispositivo digital Clase B, de conformidad con la Parte 15 de las Reglas FCC.
Estos límites están diseñados para proveer protección razonable contra interferencia dañina en una
instalación residencial. Este equipo genera, usa y puede radiar energía de radiofrecuencia y, si no es
instalado y usado de conformidad con las instrucciones, puede causar interferencia dañina a las
radiocomunicaciones. Sin embargo, no hay garantía de que la interferencia no ocurrirá en una
instalación en particular. Si este equipo causa interferencia dañina a la recepción de radio o televisión,
lo cual puede ser determinado apagando y encendiendo el equipo, se sugiere al usuario tratar de
corregir la interferencia mediante una o más de las medidas siguientes:
• Reoriente o reubique la antena receptora.
• Aumente la separación entre el equipo y el receptor.
• Conecte el equipo a una toma de corriente en un circuito diferente de aquél al que está conectado al
receptor.
• Consulte al distribuidor o a un técnico de radio/TV experimentado para ayuda.
Temperatura exterior
Ícono de señal de sensor
inalámbrico
Registros de
temperatura
exterior
Reloj atómico
Ícono de señal de
reloj atómico
Month & Date
Indoor
Temperature
Botones de ajuste
NOTA: el fabricante no es responsable por alguna interferencia de radio o TV causada por modificaciones no autorizadas a este equipo. Tales modificaciones podrían invalidar la autoridad del usuario para
operar el equipo.
Soporte para visualización
para colocarse sobre
una mesa
Patent numbers: 5,978,738; 6,076,044; 6,597,990
-1-
Acerca del reloj atómico
Rango de operación de las baterías
Un reloj es considerado atómico si este tiene una precisión de un segundo en un millón
de años. Los relojes de consumidor son considerados atómicos si estos alcanzan esta
precisión recibiendo una señal de un reloj atómico. En América del Norte, el Instituto
Nacional de Tecnologías y Normas (the National Institute of Standards and Technologies,
en inglés) opera un reloj atómico en Colorado, el cual transmite los códigos de tiempo vía
la estación de radio WWWB. Esta señal es transmitida en una frecuencia muy baja
(60,000 Hz). El reloj Acurite que usted ha comprado incluye un receptor integrado el cual
toma la señal de la estación WWWB. Para la mejor recepción posible, coloque la unidad
principal con el lado posterior hacia Colorado. NOTA: debido a la radiación solar en la
atmósfera, la señal de reloj atómico es más débil durante el día. La mayor sincronización
con la señal del reloj atómico WWWB ocurre por la noche cuando hay menos
interferencia.
40
Periodos extendidos de temperaturas frías (por debajo de -4ºF /
-20ºC ) pueden causar mal funcionamiento de las baterías alcalinas.
Esto causará el sensor inalámbrico exterior deje de transmitir las
lecturas de temperatura. Use baterías de litio en estas condiciones
de temperaturas bajas para asegurar la operación continua de
sensores inalámbricos colocados en el exterior.
ELIMINE LAS BATERÍAS VIEJAS O DEFECTUOSAS EN UNA MANERA AMBIENTALMENTE
SEGURA Y DE CONFORMIDAD CON SUS LEYES Y REGULACIONES LOCALES.
SEGURIDAD DE LAS BATERÍAS: siga el diagrama de polaridad (+/-) en el compartimiento de baterías. Retire inmediatamente del
dispositivo las baterías descargadas. Elimine adecuadamente las baterías usadas. Se recomienda utilizar solamente baterías del
mismo tipo o equivalente. NO incinere baterías usadas. NO elimine las baterías en el fuego, ya que estas pueden explotar o tener fugas. NO
mezcle baterías nuevas y viejas o tipos de baterías (alcalinas/estándar). NO use baterías recargables. NO recargue baterías no recargables. NO
haga cortocircuito en las terminales de suministro.
Unidad principal: Configuración básica
Después de instalar las baterías, las preferencias de huso horario, hora, hora de verano
(DST)) y ºF ó ºC deben establecerse inicialmente. Después de la configuración manual
inicial, el reloj atómico mantendrá su precisión y se ajustará a la hora de verano
automáticamente.
2 • INSTALACIÓN
Instalación de las baterías
NOTA: Instale todas las baterías
en ambas unidades en un
período de 6 minutos para
RETIRE LA CUBIERTA
asegurar una adecuada
DEL COMPARTIMIENTO
DE LAS BATERÍAS
funcionalidad inalámbrica.
A. Sensor inalámbrico
1) Retire los 4 tornillos del
compartimiento de
baterías.
2) Retire la cubierta del
compartimiento de las
baterías e instale 2
baterías “AA” nuevas
como se muestra aquí.
Instale siempre las
baterías en el sensor
inalámbrico PRIMERO
para asegurar una
correcta sincronización
inalámbrica con la unidad
principal.
B. Unidad principal
Retire la cubierta del
compartimiento de las
baterías e instale 3
baterías “AA” nuevas
como se muestra aquí.
Cuando entre al modo de configuración básica por primera vez, el huso horario estará
parpadeando. Ajuste el uso horario usando los botones “ ” o “ ” a un lado de la unidad
principal, luego presione el botón “SET” para confirmar su selección de huso horario y
continuar.
ABC
INSTALE
2 BATERÍAS
“AA”
RETIRE LA CUBIERTA
DEL COMPARTIMIENTO
DE LAS BATERÍAS
Ahora seleccione DST (hora de verano) “on” u “off” presionando los botones “ ”
o “ ” a un lado de la unidad principal. Presione el botón “SET” para confirmar
su selección de hora de verano.
A continuación ajuste la HORA presionando los botones “ ” o “ ” en la parte posterior de
la unidad principal. Presione el botón “SET” para confirmar su selección de HORA y para
continuar al ajuste de MINUTO. Nuevamente, ajuste el MINUTO presionando los botones
“ ” o “ ”. Usted puede presionar y SOSTENER los botones “ ” o “ ” para ajustar los
minutos a una velocidad más rápida. Presione el botón “SET” otra vez para confirmar su
ajuste del tiempo.
Ahora, ajuste el MES y luego la FECHA de la misma manera, usando los botones “ ”
y “ ” para seleccionar y el botón “SET” para confirmar y seguir adelante.
Finalmente, presione los botones “ ” o “ ” para seleccionar entre las unidades de
visualización de temperatura Fahrenheit (ºF ) o Celsius (ºC) .
ABC
INSTALE
3 BATERÍAS
“AA”
Presione al botón “SET” una vez más para salir del modo de configuración básica. Usted
puede entrar al modo de configuración básica nuevamente en cualquier momento
presionando el botón “SET”.
La configuración básica está completa ahora
El sensor inalámbrico enviará pronto una señal a la unidad principal y las dos
unidades estarán sincronizadas. Puede tomar unos cuantos minutos para que la
sincronización termine. Si las dos o una de las unidades parecen estar funcionando
en forma inapropiada, consulte la sección de solución de problemas en este manual.
-2-
-3-
3 • COLOCACIÓN
4 • OPERACIÓN
Ahora que la configuración está terminada, usted debe elegir una ubicación para colocar
el sensor inalámbrico y la unidad principal. El sensor inalámbrico DEBE ser colocado a
menos de 100 pies de distancia de la unidad principal.
Después de que tanto la unidad principal como el sensor inalámbrico
reciban energía y estén sincronizados inalámbricamente, no se requiere
ninguna otra acción. El reloj atómico se resincronizará automáticamente
en forma ocasional para asegurar la precisión del mismo.
Este termómetro inalámbrico usa frecuencias de radio para comunicación, la cual es
susceptible a la interferencia de otros dispositivos electrónicos y de elementos metálicos
grandes o de paredes gruesas. Coloque siempre ambas unidades al menos a 3 pies de
distancia de los aparatos (TV, horno de microondas, radios, etc.) o de los objetos
(superficies de metal grandes, paredes gruesas de piedra, etc.) que puedan interferir
con la comunicación inalámbrica.
TV
A
3
A
100 pies máximo
Colocación de la unidad principal
Coloque la unidad principal en un área seca y libre de polvo. Para ayudar a
asegurar una medición de temperatura interior precisa, asegúrese de
colocar la unidad principal fuera del alcance de la luz directa del sol, y lejos
de cualquier fuente de calor o ventilación en su hogar. Para la mejor
recepción posible del reloj atómico, coloque la unidad principal con la parte
posterior hacia Colorado.
Hay dos opciones de colocación para la unidad principal. Usted puede colgar
la unidad principal sobre una pared usando los orificios para colgar
integrados en la parte inferior del soporte para visualización con inclinación.
Alternativamente, puede colocar la unidad principal sobre una mesa o sobre
otra superficie plana.
RF WIRELESS
A
Iconos de recepción de señal inalámbrica
La unidad principal tiene íconos de recepción de señal en el área de visualización
de temperatura exterior y cerca de la pantalla del reloj atómico. Si hubiera un
número bajo de “barras” presente, puede ser que no haya visualización de la
temperatura ( “--” ) o que haya imprecisión. En cualquier caso, puede ser
necesario reubicar una o ambas unidades. Si la mayoría o todas las 4 barras
están presentes, la recepción inalámbrica es buena y no se requiere acción
alguna. Si las barras de señal de reloj atómico están bajas, el reloj puede ser
impreciso o puede ser que no ajuste automáticamente la hora de verano (DST).
Colocación del Sensor
El sensor inalámbrico DEBE SER COLOCADO EN EL EXTERIOR para observar
las temperaturas exteriores y transmitir la temperatura exterior a la pantalla
de la unidad principal. El sensor inalámbrico debe ser colocado a menos de
100 pies de la unidad principal.
El sensor inalámbrico es resistente al agua y está diseñado para uso en el
exterior. Sin embargo, para prolongar la vida del producto, coloque el sensor
inalámbrico en un área protegida del efecto directo de los elementos del
clima. Para asegurar una medición de temperatura exterior precisa,
asegúrese de que el sensor inalámbrico sea colocado fuera del alcance
directo de la luz del sol y lejos de cualquier fuente de calor.
-4-
-5-
Solución de problemas
Problema
Mala recepción de
temperatura
(sin barras)
Mala recepción
del reloj atómico
(sin barras)
Configuración de Identificador inalámbrico
Posible solución
Reubique la unidad principal y yo el sensor
inalámbrico. Ambas unidades deben estar a
una distancia de 100 pies una de la otra.
Asegúrese de que ambas unidades estén
colocadas al menos a 3 pies de otros aparatos
y dispositivos electrónicos que pueden interferir
con la comunicación inalámbrica (tales como
receptores de TV, hornos de microondas,
computadoras, etcétera). NOTA: cuando se
reemplazan las baterías se puede tomar hasta
20 minutos para que la unidad principal se
vuelva a sincronizar con el sensor.
Reubique la unidad principal. Asegúrese de que
la unidad principal esté colocada al menos a
3 pies de los otros aparatos y dispositivos
electrónicos (tales como receptores de TV, hornos
de microondas, computadoras, etcétera). Las
superficies metálicas grandes también
interferirán con la señal del reloj atómico.
Asegúrese de que el lado posterior de la unidad
principal esté orientado hacia Colorado.
No se visualiza
la temperatura exterior
o la humedad
(sin comunicación)
Si la recepción inalámbrica es mala (sin barras),
vea la sección “Mala Recepción” anterior.. La
configuración de Identificador inalámbrico en cada
unidad debe coincidir para ambas unidades a fin
de que se comuniquen adecuadamente. Vea
“Configuración de Identificador inalámbrico” en
la siguiente página.
Unidad principal
No hay visualización
Asegúrese de que las baterías estén correctamente
instaladas. Puede ser que se necesite reemplazar
las baterías.
Registro de producto
Para recibir información de producto, registre
su producto en línea. Es fácil y rápido!
Visite http://www.chaneyinstrument.com/product_reg.htm
Este termómetro inalámbrico
usa frecuencia de radio de 433
mhz de largo alcance para
comunicación.
ABC
En el caso de que usted tenga
problemas de recepción debido
a interferencia, tanto la unidad
principal como el sensor
inalámbrico tienen un
identificador inalámbrico
seleccionable. Los
conmutadores de identificador
están ubicados dentro de los
compartimientos de baterías
de la unidad principal y del
sensor inalámbrico.
Usted puede elegir A, B o C;
pero tanto los identificadores
de las unidades principales
como de los sensores
inalámbricos deben coincidir
para una sincronización
exitosa.
ABC
ABC
Ambos identificadores inalámbricos
deben coincidir
5 • ESPECIFICACIONES DE PRODUCTO
Rangos de medición
Temperatura
Unidad principal: 32ºF a 122ºF / 0ºC a 50ºC
Sensor inalámbrico: -40ºF a 158ºF / -40ºC a 70ºC
Especificaciones
Requerimientos de energía
Unidad principal: 3 baterías “AA” alcalinas o de litio
Sensor inalámbrico: 2 baterías “AA” alcalinas o de litio
Comunicación inalámbrica
Frecuencia de radio: 433 mhz
Intervalos de transmisión: cada 16 segundos
Reloj atómico
Frecuencia: WWVB 60 Khz
Sincroniza diariamente
-6-
ABC
-7-