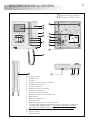
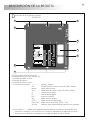
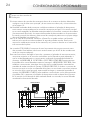
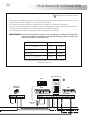
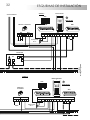
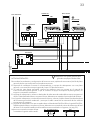
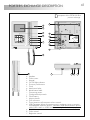
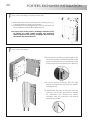
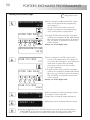
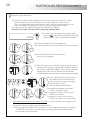
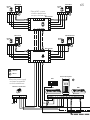
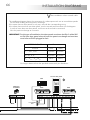
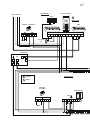
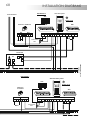
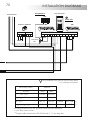
1
Cód. 50121500
Central de conserjería
instalación digital
CETK-590 Plus
manual de instalación
english version (page 36)
T590 ML Rev.0114
1
INTRODUCCIÓN
Ante todo le agradecemos y felicitamos por la adquisición de este producto fabricado por Golmar.
Nuestro compromiso por conseguir la satisfacción de clientes como usted queda manifiesto por nuestra
certificación ISO-9001 y por la fabricación de productos como el que acaba de adquirir.
La avanzada tecnología de su interior y un estricto control de calidad harán que, clientes y usuarios
disfruten de las innumerables prestaciones que este equipo ofrece. Para sacar el mayor provecho de las
mismas y conseguir un correcto funcionamiento desde el primer día, rogamos lea detenidamente este
manual de instrucciones.
ÍNDICE
Introducción .........................................1
Índice ..................................................1
Consejos para la puesta en marcha .........1
Precauciones de seguridad .....................2
Características generales .......................2
Notas para equipos con placas ...............2
Funcionamiento del sistema...............3 a 4
Central de conserjería..............................
Descripción........................................5
Pulsadores de función..........................6
Etiqueta identificativa ..........................6
Microinterruptor de configuración Sw2 ..7
Batería del reloj ..................................7
Bancos de memoria ............................8
Puente final de línea ............................8
Módulo EL562 video con par trenzado...8
Regleta de conexión RCTK-PLUS ...........9
Sujeción de la central ........................10
Programación de la central .......................
Menú de programación ..............11 a 17
Entrada de datos con el teclado ..........18
Desplazamiento rápido .....................18
Instalación del alimentador ..................19
Enlace de varios alimentadores .............19
Teléfono T-940 Plus .................................
Descripción......................................20
Pulsadores de función........................20
Sujeción del teléfono .........................21
Programación ..................................22
Conexionados opcionales........................
Intercomunicación entre teléfonos ......23
Conexión al timbre de puerta..............23
Dos centrales de conserjería ...............24
Esquemas de instalación ..........................
Portero electrónico.....................25 a 26
Videoportero con coaxial.............27a 28
Videoportero sin coaxial .............29 a 30
Placa general de videoportero .....31 a 34
Conformidad......................................71
CONSEJOS PARA LA PUESTA EN MARCHA
Cuando se instale o modifique el equipo, hacerlo sin alimentación.
La instalación y manipulación de este equipo debe ser realizada por personal autorizado.
Toda la instalación debe viajar al menos a 40 cm de cualquier otra instalación.
No apretar excesivamente los tornillos de la regleta del alimentador.
Antes de conectar el equipo, verificar todos los conexionados. Siga en todo momento las instrucciones
de este manual.
O Al poner en marcha el equipo por primera vez, o tras una modificación, el sistema permanecerá
inactivo unos 45 segundos debido al tiempo de canal ocupado.
O En equipos con cable coaxial, utilice siempre cable RG-59 B/U MIL C-17 o RG-11, (ver pág. 28).
No utilice nunca cable coaxial de antena. En instalaciones de hasta 100m puede utilizar el cable
Golmar RAP-5130, que incluye todos los conductores necesarios para la instalación.
O
O
O
O
O
2
PRECAUCIONES DE SEGURIDAD
Cuando se instale o modifique el equipo, hacerlo sin alimentación.
La instalación y manipulación de este equipo debe ser realizada por personal autorizado.
Toda la instalación debe viajar alejada al menos a 40 cm. de cualquier otra instalación.
En el alimentador:
wNo apretar excesivamente los tornillos de la regleta del alimentador.
wInstale el alimentador en un lugar seco y protegido sin riesgo de goteo o proyecciones de agua.
wEvite emplazamientos cercanos a fuentes de calor, húmedos, polvorientos o con mucho humo.
wNo bloquee las ranuras de ventilación para que pueda circular el aire libremente.
wPara evitar daños, el alimentador tiene que estar firmemente anclado.
wPara evitar choque eléctrico, no quite la tapa ni manipule los cables conectados a los terminales.
O En la central de conserjería:
wNo apretar excesivamente los tornillos de la regleta de la central.
wInstale la central en un lugar seco y protegido sin riesgo de goteo o proyecciones de agua.
wEvite emplazamientos cercanos a fuentes de calor, húmedos, polvorientos o con mucho humo.
wNo bloquee las ranuras de ventilación para que pueda circular el aire libremente.
O Recuerde, la instalación y manipulación de estos equipos deben ser realizados por personal
autorizado y en ausencia de corriente eléctrica.
O Siga en todo momento las instrucciones de este manual.
O
O
O
O
CARACTERÍSTICAS GENERALES
O
O
O
O
O
O
O
O
O
O
O
Pantalla TFT Color 3,5"
Menu y mensajes OSD en pantalla.
Gestión de hasta 255 edificios interiores con 1000 apartamentos cada uno de ellos.
Hasta 2 centrales de conserjería dentro de un sistema.
'Lista de llamada directa' que permite llamar a los apartamentos mediante la introducción de un
código distinto al código grabado en los monitores o teléfonos (pág. 13).
Función 'insertar contacto', que permite mantener ordenado el contenido de la agenda (pág. 16).
Edición de texto con el teclado a modo de teléfono móvil (pág. 18).
Permite activar/desactivar la batería del reloj mediante el menú, (valor de fábrica: desactivada).
Función intercomunicación entre 2 centrales de conserjería.
Nueva comunicación por USB para programar la central mediante un ordenador y con el nuevo
programa MEMEDIT 'Ver.4.0' para USB. Importante: Necesario cable de comunicación USB
impresora (USB A Macho-USB B Macho), no se suministra con el equipo.
Compatible con la anterior central de conserjería CE-990 Plus.
NOTAS PARA EQUIPOS CON PLACAS
O Programar los monitores o teléfonos desde las placas, tal y como se indica en los manuales de
instrucciones adjuntos a las mismas. Una vez programados, realizar una llamada a la central de
conserjería para saber el código asignado a cada apartamento.
O Utilizar este manual de instrucciones para la programación de la central de conserjería y para el
cableado del equipo.
O Para la localización de posibles averías, refiérase al manual de instrucciones adjunto con la placa.
O En equipos con placas generales, la(s) central(es) de conserjería deben ser también generales
(comunes para todos los edificios interiores), no pudiendo ser conectadas después de los edificios
interiores (uso particular de un edificio), tal y como se muestra en el esquema de instalación de las
páginas 31 a 34.
FUNCIONAMIENTO DEL SISTEMA
3
Llamada desde una placa a un monitor o teléfono.
O El procedimiento para realizar la llamada desde una placa a un monitor o teléfono se encuentra
detallado en el manual de instrucciones de la placa.
O Si la central de conserjería tiene activada la función de captura de llamadas (página 12), todas las
llamadas realizadas en la placa serán intervenidas por la central de conserjería, con la posibilidad de
transferir la llamada al vecino, previa consulta. En el caso de que la central de conserjería se
encuentre apagada, las llamadas se recibirán directamente en las viviendas.
Llamada desde una placa a la central de conserjería.
O La central de conserjería puede ser programada con un código de llamada directo (ver página 12). Para
llamar a la central de conserjería directamente, el procedimiento será el mismo que si se tratase de
un monitor o teléfono.
En equipos combinados con placa(s), esta(s) quedará(n) automáticamente desconectada(s). En
equipos con placa(s) general(es), será(n) ésta(s) la que quede(n) desconectada(s).
O Una vez realizada la llamada, la pantalla de la central de conserjería mostrará el mensaje
llamando placa y aparecerá la imagen transcurridos unos 3 segundos sin que el visitante lo
perciba. Si la llamada no es atendida antes de 45 segundos, el canal quedará libre.
O Para establecer comunicación, descolgar el auricular de la central.
O La comunicación tendrá una duración de un minuto y medio o hasta colgar el auricular. Durante la
comunicación la pantalla del teclado mostrará el mensaje comunicaciÓn con placa.
Finalizada la comunicación, el canal quedará libre.
O Si se desea abrir la puerta, presionar el pulsador de abrepuertas en cualquier momento: una sola
pulsación activa el abrepuertas durante tres segundos. Durante la apertura de puerta la central
emitirá un tono de advertencia y mostrará el mensaje puerta abierta.
Transferencia de llamadas desde la central de conserjería.
O Durante el proceso de comunicación con la placa de calle, la central de conserjería podrá transferir la
comunicación a un vecino. Una vez en comunicación, introducir el código de la vivienda a llamar, o
buscarlo en la agenda mediante las flechas de desplazamiento, seguido de la tecla 'OK'. En este
instante, el monitor (teléfono) de la vivienda recibe la llamada, apareciendo la imagen en el monitor
principal (caso de existir) unos 3 segundos después de recibir la llamada sin que el visitante lo
perciba.
Para que el vecino se ponga en comunicación con la placa, bastará con que la central cuelgue el
auricular. En ese instante, la pantalla de la central mostrará el mensaje EL SISTEMA ESTÁ
ocupado. Si el vecino no desea atender al visitante, bastará con que cuelgue su auricular,
recuperando la central la comunicación con la placa.
Durante los procesos de llamada y comunicación entre la central de conserjería y el vecino, la placa
de calle quedará en espera, no pudiendo escuchar conversación alguna.
Realización de llamadas usando la agenda.
O Si desconoce el código de la vivienda a llamar, utilice las flechas del teclado para buscar el código en la
agenda. Una vez aparezca el código en pantalla, pulse la tecla 'OK' para realizar la llamada. En la
página 18 se detalla la forma de desplazarse rápidamente a través de la agenda.
Llamada desde la central a un monitor o teléfono.
O Para realizar la llamada, el conserje deberá descolgar el auricular de la central e introducir el código
correspondiente a la vivienda con la que desea establecer comunicación, visualizándose en la
pantalla del teclado la secuencia de marcación. Una vez introducido el código pulsar la tecla 'OK'
para realizar la llamada: unos tonos acústicos advertirán de que la llamada se está realizando y la
pantalla del teclado mostrará el mensaje llamadA EN CURSO. En este instante, el monitor
(teléfono) de la vivienda recibe la llamada. Si se ha introducido un código erróneo, utilizar la tecla de
borrado CANCEL.
Continúa
4
FUNCIONAMIENTO DEL SISTEMA
Viene de la página anterior
En equipos combinados con placa(s), esta(s) quedará(n) automáticamente desconectada(s). En
equipos con placa(s) general(es), será(n) ésta(s) la que quede(n) desconectada(s).: si un visitante
desea llamar, unos tonos telefónicos le advertirán de que el canal está ocupado.
La llamada tiene una duración de 45 segundos. Si la llamada no es atendida antes de 45
segundos, el canal quedará libre.
O Para establecer comunicación, descolgar el auricular del (monitor) teléfono.
La comunicación tendrá una duración de un minuto y medio o hasta colgar el auricular. Durante la
comunicación la pantalla del teclado mostrará el mensaje comunicaciÓn. Finalizada la
comunicación, el canal quedará libre.
Llamada desde un monitor o teléfono a la central.
O Para realizar la llamada, descolgar el auricular del monitor o teléfono y presionar el pulsador de
abrepuertas: unos tonos acústicos en el auricular confirmarán que la llamada se está realizando o
que la central se encuentra en comunicación. En este instante, la central recibe la llamada,
mostrando la pantalla de la central la información del vecino que llama. Si la llamada no es
atendida antes de 45 segundos, esta quedará retenida en la memoria de la central y el led de la
central parpadeará también.
O Para establecer comunicación, descolgar el auricular de la central.
La comunicación tendrá una duración de un minuto y medio o hasta colgar uno de los dos
auriculares. Durante la comunicación la pantalla del teclado mostrará el mensaje
comunicaciÓn. Finalizada la comunicación, el canal quedará libre.
O Si la llamada se realiza sin descolgar el auricular del monitor o teléfono, la central reconocerá que se
trata de una llamada de pánico, mostrando en la pantalla el mensaje AVISO DE pÁnico y la
información del vecino que llama. Para que la central reconozca las llamadas de pánico, se debe
haber activado la correspondiente opción en el menú de configuración (página 13). Las llamadas
de pánico sólo se pueden atender desde la pantalla de retenciones.
Memoria de retenciones de llamada.
O La central dispone una memoria para la retención de las últimas 99 llamadas no atendidas, bien sean
llamadas normales o de pánico. Para disponer de esta función, deberá estar activada la
correspondiente opción del menú de configuración (página 13). En el estado de reposo, la pantalla
de la central muestra de forma cíclica (cada 45 segundos) el número de retenciones en memoria.
El led del monitor nos indicará con un parpadeo si hay retenciones de llamada.
O Para consultar las llamadas retenidas en la central de conserjería, pulsar la tecla flecha abajo,
mostrando la pantalla de la central la última llamada no atendida. Utilizar las flechas de
desplazamiento para visualizar las llamadas no atendidas retenidas con anterioridad. La pantalla de
la central muestra el tipo de llamada retenida (p: Pánico o r: Retención de llamada normal), la
hora en la que se realizó y la información del vecino que la realizó.
O Para atender una llamada retenida descolgar el auricular de la central y posicionarse sobre la retención
deseada, tal y como se explica en el apartado anterior. Seguidamente pulsar la tecla 'OK' para
llamar al vecino correspondiente. Una vez es atendida la retención, ésta queda borrada de la
memoria.
O Las llamadas no atendidas realizadas por un mismo vecino de forma consecutiva no son memorizadas.
.
O Para borrar una retención de llamada, posicionarse sobre la retención a borrar y pulsar la tecla
Equipos con dos centrales de conserjería.
O El funcionamiento de los equipos con dos centrales de conserjería se detalla en la página 24.
5
DESCRIPCIÓN DE LA CENTRAL
D
escripción de la central de
conserjería CETK-590 Plus.
a
g
b
c
-. ?!,
a bc 2
h
d ef 3
d
g hi 4
j kl5
mno6
pqrs7
t uv8
wxyz9
I
.xx
00000000000
j
PRINCIPAL
1
2
3
ATENCIÓN
Alta tensión. No abrir la tapa.
Manipular sólo por personal
del servicio técnico.
+ - 0x *
ancel
PÁNICO
RETENCIONES
WARNING
High voltage. Don't open cover.
Handle only bu technical service.
M. PROTEGIDO
2ª TABLA
DIRECCIÓN
BK1
k
BK0
e
CAPTURA PLACA
4
l
m
f
n
a.
b.
c.
d.
e.
f.
g.
h.
i.
j.
k.
l.
m.
n.
o.
o
p q
r
Brazo auricular.
Pantalla color.
Teclado.
Indicador luminoso de encendido.
Pulsadores de función.
Cordón telefónico.
Anclajes de sujeción regleta.
Etiqueta identificativa.
Puntos de conexión regleta.
Micro-interruptores de configuración.
Batería Reloj.
Bancos de memoria.
Conector CN3.
Regulador de volumen de tres posiciones.
Conector USB, permite programar la central mediante un ordenador
y el programa MEMEDIT Ver.4.0. Necesario cable USB impresora
(USB A Macho-USB B Macho), no se suministra con el equipo.
p. Conector para cordón.
q. Ajuste de color.
r . Ajuste de brillo.
6
DESCRIPCIÓN DE LA CENTRAL
P
ulsadores de función.
Pulsador de encendido-apagado. Si la función "Modo protegido" está activada (pág. 12),
será preciso introducir el código de usuario para encender la central.
Con el auricular colgado no realiza ninguna función. Con el auricular descolgado,
permite realizar la función de intercomunicación con la otra central (caso de existir).
Esta función se describe en la página 24.
Independientemente de la posición del auricular, activa la salida del relé auxiliar 'OA1
(ver página 9).
Con el auricular colgado permite visualizar la imagen procedente de la placa
configurada como principal. Con el auricular descolgado, permite establecer
comunicación de audio y vídeo con la placa que tiene activada la función de
autoencendido. Sólo es operativo si no existe una comunicación en curso.
En el estado de reposo e independientemente de la posición del auricular, activa el
abrepuertas de la placa configurada como principal. Durante los procesos de
recepción de llamada o comunicación con una placa, permite activar el abrepuertas
de la placa que realiza la llamada.
Estos dos últimos pulsadores sólo son operativos en caso de que el sistema disponga
de placa(s).
D
escripción de la etiqueta identificativa.
Para facilitar la reparación o sustitución de una
central existente en una instalación,
complete los datos de la etiqueta identificativa.
.xx
00000000000
PRINCIPAL
CAPTURA PLACA
ATENCIÓN
Alta tensión. No abrir la tapa.
Manipular sólo por personal
del servicio técnico.
WARNING
High voltage. Don't open cover.
Handle only bu technical service.
PÁNICO
RETENCIONES
M. PROTEGIDO
2ª TABLA
DIRECCIÓN
PRINCIPAL: central principal (pág. 12).
M. PROTEGIDO: candado electrónico (pág. 12).
CAPTURA PLACA: captura llamadas de placa (pág. 12).
2ª TABLA: lista llamada directa activada (pág. 13).
PÁNICO: reconoce llamadas de pánico (pág. 13).
RETENCIONES: retiene llamadas perdidas (pág. 13).
DIRECCION: código de llamada a central (pág. 12).
7
DESCRIPCIÓN DE LA CENTRAL
D
escripción del microinterruptor de configuración SW2.
SW2
El microinterruptor de configuración SW2 está ubicado
en la parte posterior izquierda de la central.
1
2
3
4
Sistemas Uno, carga la instalación con una
resistencia de comunicaciones Uno. Para un
correcto funcionamiento, colocar en ON sólo en la placa más
cercana al canal de instalación, dejar el resto en OFF. Si no existen
placas, colocar en ON sólo en la central más cercana al canal de
instalación.
Si existe el uso del repetidor RDPlus-UnoSE:
En el canal de instalación o a la entrada de la placa interior en sistemas
de placas generales, dejar la/s placa/s y la central/es en OFF.
Sistemas Plus, carga la instalación con una resistencia de
comunicaciones Plus. Para un correcto funcionamiento, dejar en ON
sólo en la placa más cercana al canal de instalación o en la placa
general (si existe) colocar el resto en OFF. Si no existen placas, colocar
en ON sólo en la central más cercana al canal de instalación.
Permite reiniciar el código secreto de administrador (ver pág. 11) al
código asignado en fábrica. Utilizar esta función sólo en caso de haber
olvidado el código. Para proceder: sacar la central de la regleta y
colocar el microinterruptor a ON, después poner la central en la regleta,
aparecerá en pantalla el mensaje Modo reinicialización,
cuando desaparezca el mensaje saque de nuevo la central de la regleta
y colocar el microinterruptor a OFF; vuelva a poner la central en la
regleta (ahora el código es el asignado de fábrica).
No se utiliza.
*Valor de fábrica
D
escripción de la batería del reloj.
Al poner en marcha la central en la instalación, es necesario activar la función
'activar batería reloj' mediante el menú de programación, ver página 13.
Reposición batería: código Golmar (50121403 batería CR1220).
Importante: Al reponer la batería verifique la polaridad de la misma, tal
como se muestra en el dibujo
2
3
4
+
BK0
Si la central pierde la hora por un corte de suministro eléctrico, compruebe
que la función 'activar batería reloj' en el menú de programación (ver pág. 13)
está activada, si esto es correcto será necesario sustituir la batería.
1
8
DESCRIPCIÓN DE LA CENTRAL
D
escripción de los bancos de memoria.
La central dispone de dos bancos de memoria para la ubicación de
dos módulos de 256Kb. Cada módulo permite guardar el texto
asignado a 1000 usuarios.
BK0
BK1
El equipo se suministra con un módulo de memoria instalado en el
banco 0 (BK0), en el cual se graban los parámetros de configuración
del sistema. En el caso de centrales con dos módulos de memoria
no intercambiar los módulos de banco una vez grabados.
Para que el equipo funcione correctamente, siempre debe
haber un módulo en BK0.
AJUSTES DE LA CENTRAL
M
anipulación del puente de final de línea.
El puente de final de línea se encuentra ubicado en el conector CN3, situado
en la parte posterior de la central.
En el caso de instalaciones con par trenzado, el puente de final de línea se
encuentra en el módulo EL562 (ver apartado siguiente).
No quitar el puente si el cable de video finaliza en la central. Quitar el puente
si el cable de vídeo continúa después de la central.
M
ódulo EL562 para instalaciones de videoportero con par trenzado.
Localizar el conector CN3 de la parte posterior de la central.
Para insertar el módulo EL562, retirar el puente que hay en el conector.
NOTA: En este tipo de instalaciones, en la placa debe configurarse el
microinterruptor SW1-3 a ON del módulo de sonido, ver manual de
instrucciones T631/Plus ML (pág. 11), o configurar el microinterruptor
SW1-3 a ON del microprocesador EL500SE, ver manual T500SE ML
(pág.12). Utilizar el esquema de instalación específico.
9
DESCRIPCIÓN DE LA REGLETA
D
escripción de la regleta de conexión
RCTK-PLUS.
a
c
b
d
HZ
Out
HZ
Out
CABLE
Max. pelado del cable.
Max. peeled cable.
Max.
5mm
Max. câble dénudé.
Max. aanstrip lengte.
50mm.
(*)
50mm.
(*)
Vin
Vin
Vin
HZS+
Malla
Shield
Malla
Shield
Malla
Shield
Malla
Shield
Malla
Shield
Malla
Shield
S-
Vout
Vout
Vout
A
A
D
D
HZSA
HZINT
INT
2C
SA
SA
AP
Colocar la parte superior de la regleta a 1,60m. del suelo.
Place the top part of the monitor connector at 1,60m.
from the floor.
(*) Distancia mínima entre los laterales de la regleta y
cualquier objeto debe ser de 5cm.
Vi+
MP
-
Vi
VP
44 22 99 88 99 88
CODE
b
17
15
HZ+
AP
Presionar para abrir.
Press to open.
88
18
SA 16
00 11 11 88 5 1
11742080
REF
LOTE
RCTK-PLUS
IMP903012
A/D
SA
A1
VP
VP
MP
MP
R5
90
14
CTO 13
e
S+ 12
S - 11
AP 10
AP
9
BUS 8
f
IN 7
BUS 6
CTO CTO OUT 5
4
2C OA1
HZ
3
A1 OA1
VP
VP
PA
2
MP
MP
PB
1
PLUS CETK590 V2PLUS
a
a. Orificios de fijación a pared (x6).
b. Pestañas de sujeción del monitor (x2).
c. Entrada de cables vertical.
d. Pestaña de fijación.
e. Entrada de cables central.
f. Terminales de conexión: +, –:
positivo, negativo.
Vin :
entrada señal de vídeo a través de cable coaxial.
Malla:
malla cable coaxial.
Vout :
salida señal de vídeo a través de cable coaxial.
A:
comunicación audio.
D:
comunicación digital.
INT :
intercomunicación.
SA :
salida sonería auxiliar.
salida activación distribuidor.
CTO :
OA1,OA1 : salida relé auxiliar (Máx. 30Vcc / 1A).
señal de vídeo balanceada (a través de par trenzado).
Vp, Mp :
Los terminales +, – y Malla están doblados para facilitar la conexión en cascada de otros
monitores o teléfonos. Si la central no se encuentra colocado en la regleta de conexión,
los monitores o teléfonos conectados en cascada quedarán sin alimentación.
10
F
INSTALACIÓN DE LA CENTRAL
ijar la regleta de la central en la pared.
Evite emplazamientos cercanos a fuentes de calor, polvorientos
o con mucho humo.
Instalar la central directamente sobre la pared, realizando
cuatro agujeros de 6mm. de diámetro y utilizando los
tornillos y tacos suministrados.
La parte superior de la regleta se debe ubicar a 1,60m. del
suelo. La distancia mínima entre los laterales de la
regleta y cualquier objeto debe ser de 5cm.
C
olocar la central.
Colocar la central perpendicular a la regleta,
haciendo coincidir los agujeros de la base de
la central con las pestañas de sujeción de la
regleta, tal y como muestra el dibujo.
Cerrar la central en forma de libro, ejerciendo
presión sobre la parte derecha de la central y
hasta escuchar el 'clic' de la pestaña de
fijación de la regleta.
Si se desea sacar la central una vez instalado,
realizar presión mediante un destornillador
plano sobre la pestaña de fijación de la
regleta. Una vez liberado la central, abrirlo
en forma de libro y separarlo de la regleta,
con cuidado de que no caiga.
11
PROGRAMACIÓN DE LA CENTRAL
M
enú de programación.
Para configurar los parámetros del sistema se deberá acceder al menú de programación.
Los menús marcados con un asterisco se deben configurar para que el sistema funcione
correctamente. Existen dos menús de programación: administrador, que permite modificar
todos los parámetros del sistema y usuario, que sólo permite cambiar parámetros
que no afectan al funcionamiento. Los parámetros de programación con texto negro
sobre fondo blanco están disponibles en ambos menús de programación; los parámetros
con texto blanco sobre fondo negro sólo están disponibles en el menú de administrador.
La cumplimentación de los registros de la agenda no es necesaria para el funcionamiento
de la central, siempre y cuando esté desactivada la opción 'lista llamada directa' (pág. 13).
Si una vez dentro del menú de programación, no se realiza ninguna pulsación durante 2 min.,
la central saldrá del menú.
Para desplazarse a través de las opciones de los distintos menús utilizar las flechas.
En cualquiera de estos menús, los cambios de opción se guardan cada vez que se pulsa
la tecla OK, independientemente de que seguidamente se pulse la tecla CANCEL.
Utilizar la tecla CANCEL para salir del menú de programación.
ANCEL
Para entrar en el menú de programación, pulsar
la tecla
seguida del código secreto
de administrador (valor de fábrica 1315)
o de usuario (valor de fábrica 1111).
16:30
codigo PIN
PIN:____
*
1
3
1
5
ó
1
1
1
1
AJUSTES del SISTEMA
Permite cambiar los parámetros de
configuración del sistema. Para acceder
al menú de configuración pulsar OK.
agenda CONTACTOS
Permite configurar los parámetros de
la agenda. Para acceder al menú
de agenda pulsar OK.
Continúa
12
PROGRAMACIÓN DE LA CENTRAL
M
Viene de la página anterior
enú de ajustes del sistema.
Para acceder al menú de ajustes del sistema,
siga los pasos que se describen en la
página 11 y pulse OK cuando visualice el
mensaje AJUSTES DEL SISTEMA.
AJUSTES SISTEMA
castellano
Permite escoger el idioma que presentarán
los mensajes en pantalla y los menús
de configuración. Para cambiar de idioma
pulsar OK hasta encontrar el idioma.
*
ceNTRAL principal
si
Determina si la central es principal o secundaria.
Cada sistema debe tener una sola central
principal; caso de existir otra central,
configurarla como secundaria.
Para cambiar el valor pulsar OK.
*
LLAMADA CENTRAL
:000
Determina el código de llamada directa
a la central. Colocar un valor entre 0 y 999.
Este valor se deberá corresponder con
el del pulsador de llamada a la central
de la placa correspondiente y no podrá
coincidir con el de un monitor o teléfono
existente en la instalación.
Para cambiar el valor pulsar OK, apareciendo
el mensaje ENTRAR NUEVO VALOR;
introducir el código de llamada directa con
el teclado numérico y validar pulsando OK.
Si se pulsa CANCEL se restaurará el valor
anterior.
nuevo VALOR
:000
0
1
5
LLAMADA CENTRAL
:015
*
*
no
Permite la activación de un candado electrónico
que obliga a introducir el código de usuario
(pág. 11) para poder encender la central.
Para cambiar el valor pulsar OK.
si
Permite que las llamadas realizadas desde una
placa sean capturadas por la central.
En caso de que la central esté apagada,
la llamada se recibirá en el apartamento.
Para cambiar el valor pulsar OK.
modo protegido
capturar placa
Continúa
13
PROGRAMACIÓN DE LA CENTRAL
M
Viene de la página anterior
*
enú de ajustes del sistema.
AVISO DE pÁnico
si
*
LLAMADA PERDIDA
si
*
Determina si la central recibe las llamadas
de pánico realizadas desde los monitores
o teléfonos, o cuando se introduce el
código de pánico del control de accesos
de una placa codificada de la instalación.
Para cambiar el valor pulsar OK.
Determina si la central retiene las llamadas
no atendidas, ya sean normales o de pánico.
El número máximo de llamadas retenidas
es de 99.
Para cambiar el valor pulsar OK.
LISTA llamada DIRecta
NO
Posibilita la asignación de un código de
llamada diferente a la dirección real del
monitor; este código se define en la
agenda (pág. 15).
Para cambiar el valor pulsar OK.
ajustar hora
16:24
El sistema dispone de un reloj interno que
muestra la hora en la pantalla del teclado
cuando el equipo se encuentra en reposo.
Esta función se puede desactivar desde los
menús de opciones y usuario.
Una batería interna mantiene el sistema
en hora incluso con el equipo apagado
durante un periodo de tiempo prolongado.
ajustar hora
16:24
1
7
3
0
ajustar hora
17:30
Para poner en hora el reloj pulsar OK,
apareciendo el mensaje ajustar hora;
introducir la hora (0 a 23) y los minutos
(0 a 59) mediante el teclado numérico y
validar pulsando OK. Si se pulsa CANCEL
se restaurará el valor anterior.
NO
Determina si la pantalla del monitor muestra
el reloj durante el estado de reposo.
Para cambiar el valor pulsar OK.
NO
Permite activar la batería del reloj, manteniendo el
sistema en hora incluso con el equipo apagado.
Para cambiar el valor pulsar OK.
mostrar hora
batería reloj
sonido teclado
si
Permite escuchar un tono al pulsar sobre las teclas
del teclado de función.
Para cambiar el valor pulsar OK.
Continúa
14
PROGRAMACIÓN DE LA CENTRAL
M
Viene de la página anterior
enú de ajustes del sistema.
codigo administrador
:1315
entrar nuevo valor
:1315
9
8
7
6
codigo administrador
:9876
codigo usuario
:1111
entrar nuevo valor
:1111
5
4
3
2
codigo usuario
:5432
Permite cambiar el código para acceder al
menú de programación. Este código
sólo debería ser conocido por la persona
encargada de mantener el sistema;
en caso contrario, cualquier manipulación
de los parámetros podrían hacer que el
sistema dejase de funcionar.
Para cambiar el código pulsar OK,
apareciendo el mensaje ENTRAR NUEVO
valor; introducir el código secreto mediante
el teclado numérico y validar pulsando OK.
Si se pulsa CANCEL se restaurará el valor
anterior.
El código debe ser de cuatro cifras.
Permite cambiar el código para acceder al
menú de usuario (ver página 11) o
encender la central cuando la función
modo protegido (página 12) está activada.
Este código permite cambiar parámetros
que no afectan al funcionamiento del
sistema.
Para cambiar el código pulsar OK,
apareciendo el mensaje entrar nuevo
VALOR; introducir el código secreto mediante
el teclado numérico y validar pulsando OK.
Si se pulsa CANCEL se restaurará el valor
anterior.
El código debe ser de cuatro cifras.
central con cámara
no
Permite activar la cámara de la central.
Para cambiar el valor pulsar OK.
Consulte con nuestros servicios de asistencia técnica.
version 1.03
Indica la versión de software de la placa.
Fin del menú de configuración. Utilizar la flecha "ARRIBA” para acceder a las opciones
anteriores. Pulsar CANCEL una vez para salir del menú de configuración y volver
al menú principal, o dos veces para salir del menú de programación.
15
PROGRAMACIÓN DE LA CENTRAL
M
enú agenda de contactos.
Para acceder al menú de agenda, siga los
pasos que se describen en la página 11
y pulse OK cuando visualice el mensaje
agenda de contactos.
agenda contactos
nuevo contacto
entrar codigo bus
:000000
0
0
0
1
0
2
entrar código llamada
:000000
0
0
3
4
0
9
entrar nombre
_
datos guardados
Permite añadir los datos de un nuevo usuario
al final de la agenda. Si desea añadir los
datos en una posición determinada, utilice
la opción Insertar contacto.
Pulsar OK, apareciendo en pantalla el mensaje
entrar código bus; introducir el código
del monitor mediante el teclado numérico
y validar pulsando OK.
Introducir un código de seis dígitos: los tres
primeros corresponden al código del edificio
interior y los tres últimos al del monitor.
Si se trata de un único edificio, asegurarse
de que la(s) placa(s) del edificio han sido
configuradas con el código cero.
IMPORTANTE: si se ha activado la lista de llamada
directa (ver pág. 13), aparecerá el mensaje
entrar código llamada; introducir
el código de seis dígitos que se desea utilizar
para realizar la llamada a este usuario y
pulsar OK para validarlo.
Pulsar OK para asignar un texto al código,
procediendo tal y como se describe en la
página 18.
Finalizada la entrada del registro aparecerá el
mensaje datos guardados, volviendo
a la pantalla inicial. Repetir el proceso para
añadir tantos registros como se deseen.
NOTA: los ceros introducidos a la izquierda de un código no será necesario
introducirlos durante la realización de una llamada.
Continúa
16
PROGRAMACIÓN DE LA CENTRAL
Viene de la página anterior
insertar contacto
jose perez
:000012
:000041
datos guardados
modificar contacto
jose perez
:000012
:000041
borrar contacto
jose perez
:000012
:000041
borrando contacto...
M
enú agenda de contactos.
Permite insertar los datos de un usuario nuevo
en cualquier posición de la agenda.
A diferencia de la opción Nuevo contacto,
permite mantener la agenda ordenada.
Pulsar OK, apareciendo en pantalla la primera
posición de la agenda: si no existe ningún
registro en la agenda, la pantalla mostrará
el mensaje AGENDA VACÍA. Utilizar las
flechas de desplazamiento hasta encontrar
la posición antes de la cual se desea
insertar el nuevo usuario y pulsar OK.
Proceder tal y como se muestra en el apartado
Nuevo contacto.
Finalizada la entrada de datos, la pantalla
mostrará el mensaje datos guardados.
Permite modificar los datos de un usuario
existente en la agenda.
Pulsar OK, apareciendo en pantalla la primera
posición de la agenda: si no existe ningún
registro en la agenda, la pantalla mostrará
el mensaje AGENDA VACÍA. Utilizar las
flechas de desplazamiento hasta encontrar
la posición que se desea modificar
y pulsar OK.
Proceder tal y como se muestra en el apartado
nuevo contacto.
Permite borrar los datos de un usuario existente
en la agenda.
Pulsar OK, apareciendo en pantalla la primera
posición de la agenda: si no existe ningún
registro en la agenda, la pantalla mostrará el
mensaje AGENDA VACÍA. Utilizar las flechas
de desplazamiento hasta encontrar la posición
que se desea borrar. Pulsar OK para confirmar
la operación.
Si la función SONIDO TECLADO está activada
(pág. 13), un tono nos indicará que el registro
se está borrando y el mensaje borrando
CONTACTO aparecerá en pantalla, para
después mostrar el registro siguiente al borrado.
Si la función SONIDO TECLADO no está activada
el mensaje borrando CONTACTO aparecerá
en pantalla, para después mostrar el registro
siguiente al borrado.
Repetir el proceso para borrar tantos registros
como se deseen.
Continúa
17
PROGRAMACIÓN DE LA CENTRAL
Viene de la página anterior
BORRAR AGENDA
COMPLETA
M
enú agenda de contactos.
Permite borrar los datos de todos los usuarios
existentes en la agenda.
Pulsar OK para iniciar el borrado.
Si la función sonido tecladO está activada
(pág.13), un tono nos indicará que los datos se
están borrando.
BORRANDO CONTACTO...
Si la función sonido tecladO no está activada
(pág. 13), aparecerá el mensaje BORRANDO
CONTACTO en pantalla indicando que los datos
se están borrando.
Fin del menú agenda. Utilizar la flecha "ARRIBA” para acceder a las opciones
anteriores. Pulsar CANCEL una vez para salir del menú agenda y volver
al menú principal, o dos veces para salir del menú de programación.
18
PROGRAMACIÓN DE LA CENTRAL
E
dición con el teclado.
Para introducir o editar texto durante la programación, utilizar las teclas tal y como se muestra.
El número máximo de caracteres en una línea de texto es de 16.
La introducción de caracteres se realiza mediante el teclado numérico: pulsar repetidamente
sobre la tecla correspondiente hasta que aparezca el carácter deseado según la tabla.
Utilizar las flechas de desplazamiento para moverse
a lo largo de la línea de texto.
Utilizar la tecla configuración para borrar el carácter situado
sobre el cursor, desplazando una posición hacia atrás
el texto situado a continuación.
Utilizar la tecla OK para validar el texto introducido.
La pantalla mostrará el mensaje datos guardados.
Utilizar la tecla CANCEL para abandonar la edición.
Los cambios realizados quedarán omitidos.
C
ANCEL
_ . 1 ?
! , @& :
" ( ( % $
2
4
GH I 4 g
h i Í Ì Î
Ï í ì î ï
7
PQR S 7
p q r s ß
1
A B C 2 a b c
Ç
Á À Â Ã Ä A
á à â ã ä aæ ç
3
D E F 3 d
e f É È Ê
Ë é è ê ë
5
J K L 5 j
k l
6
M
n
Õ
ô
8
T U V 8 t
u v Ú Ù Û
Ü ú ù û ü
9
WX Y Z 9
0
+ - 0 x *
/ = > < #
º ¿ ¡
o
o
NÑO 6 m
ñ o ÓÒÔ
Ö Ø ó ò
õ ö
ø
w x y z ÿ
D
esplazamiento rápido por la agenda.
Para avanzar de forma rápida por la agenda basta con pulsar la flecha de avance,
seguida del número de registros que se desean avanzar. Si se selecciona el número 0,
el avance se realizará en saltos de 10 y se selecciona la tecla
en saltos de 100.
5
El avance se realiza de 5 en 5 registros. Las teclas flecha quedarán
memorizadas para avanzar de 5 en 5 cada vez que se pulse
una de ellas.
19
INSTALACIÓN DEL ALIMENTADOR
D
etalle de la instalación de los alimentadores FA-PLUS y FA-PLUS/C Rev.938072.
Instale el alimentador en un lugar seco y protegido.
Recuerde que la normativa vigente obliga a
proteger el alimentador con un interruptor
magnetotérmico
Conecte el alimentador FA-Plus a una toma de tierra.
Para instalar el alimentador en pared, realizar dos agujeros
de 6mm. de diámetro, e introducir los tacos. Sujetar el
alimentador mediante los tornillos especificados.
El alimentador puede instalarse en guía DIN 46277
realizando una leve presión. Para sacar el alimentador
de la guía utilizar un destornillador plano
y hacer palanca tal y como muestra el dibujo.
El modelo FA-Plus/C precisa de 6 elementos en la guía
y el modelo FA-Plus de 10.
DIN 46277
IMPORTANTE: el número máximo de unidades que se pueden conectar a un alimentador
FA-Plus/C es de 10, siendo 50 en el caso del modelo FA-Plus.
Para obtener un número superior de unidades enlace alimentadores,
tal y como se muestra en el siguiente apartado.
E
nlace de varias fuentes de alimentación.
Conectar el alimentador a la central o placa (caso de existir) y al primer
grupo de monitores o teléfonos; los siguientes grupos se conectarán
al positivo de su alimentador de ampliación.
Para enlazar los alimentadores basta con unir el borne negativo de los mismos;
NO unir los bornes positivos de alimentadores diferentes.
1er FA-Plus
PRI
~ ~
Red
SEC
+ + - -
2º FA-Plus/C o FA-Plus
PRI
~ ~
Red
SEC
+ + - -
Al segundo grupo de
monitores o teléfonos.
A la placa o central y primer
grupo de monitores
o teléfonos.
20
DESCRIPCIÓN DEL TELÉFONO
D
escripción del teléfono T-940 Plus.
b
d
a
c
e
a. Brazo auricular.
b. Rejilla difusión sonido.
c. Orificio micrófono.
d. Hueco de sujeción.
e. Conectores para cordón telefónico.
f. Pulsadores de función.
g. Indicador luminoso de encendido.
h. Regulador de volumen de llamada.
i. Pulsador de colgado.
f
g
e
h
El teléfono dispone de un conmutador, ubicado en la parte
inferior del teléfono (junto al conector del cordón telefónico),
que permite regular el volumen de la señal de llamada
en los niveles de máximo, medio y mínimo.
i
P
ulsadores de función.
a. Pulsador de encendido-apagado del teléfono.
Después de cualquier reinicialización del teléfono y durante
los 45 segundos siguientes, no se podrá realizar ninguna
operación con el mismo, a excepción de la recepción
de llamadas.
b. Con el auricular descolgado, permite realizar una llamada de
intercomunicación. Esta función se describe en la página 23.
a
b
c
c. Con el auricular colgado realiza una llamada de pánico a
las centrales de conserjería configuradas para recibir
este tipo de llamada. Con el auricular descolgado,
permite realizar una llamada normal a la central principal.
Durante los procesos de recepción de llamada o
o comunicación, activa el abrepuertas.
21
DESCRIPCIÓN DEL TELÉFONO
D
escripción de los bornes de conexión.
+ _ A D INT SA HZ-
+,–:
A,D:
INT :
SA :
HZ- :
positivo, negativo.
comunicación audio, digital.
intercomunicación.
salida sonería auxiliar.
entrada pulsador timbre de puerta.
INSTALACIÓN DEL TELÉFONO
F
ijar el teléfono a la pared.
Para conexionar el teléfono y fijarlo a la pared,
será necesario abrirlo. Para ello, realizar levemente
palanca con un destornillador plano en las ranuras
dispuestas para ello, tal y como muestra el dibujo.
Evitar emplazamientos cercanos a fuentes
de calor, polvorientos o con mucho humo.
El teléfono puede fijarse en caja universal,
o directamente a pared. Para la sujeción
directa a pared, realizar dos taladros de
6mm. de diámetro en las posiciones
especificadas, utilizando tacos de 6mm.
y tornillos Ø3,5 x 25mm.
Pasar los cables por el orificio dispuesto a tal efecto,
y conectarlos a la regleta según los esquemas de instalación.
Cerrar el teléfono tal y como muestra el dibujo. Una vez cerrado,
conectar el auricular mediante el cordón telefónico y colocarlo
en la posición de colgado.
22
PROGRAMACIÓN DE LOS TELÉFONOS
P
rogramación de teléfonos.
En caso de tratarse de una instalación con placas, programar los monitores o teléfonos
desde las placas, tal y como se indica en los respectivos manuales de instrucciones.
Finalizada la programación, realizar una llamada a la central desde cada vivienda,
visualizando en la pantalla de la central el código asignado a cada monitor o teléfono.
Si se trata de una instalación sin placas, programar los teléfonos tal y como se muestra.
Realizar la programación con el auricular de la central descolgado.
13:15
Para que la central entre en el modo de programación,
pulsar la tecla
seguida del código secreto de
administrador (valor de fábrica 1315), tal y como
se indica en la página 11.
Apagar el teléfono a programar.
Una vez se encuentre apagado, presionar el pulsador
de abrepuertas.
Mantenga presionado el pulsador de abrepuertas
y sin soltarlo, encienda el teléfono.
a bc 2
d ef 3
j kl5
mno6
t uv8
wxyz9
1
Para indicar que el equipo está listo para la programación,
la central emitirá unos tonos y mostrará en la pantalla del
teclado el mensaje programación, pudiendo soltar
el pulsador de abrepuertas del teléfono.
Para establecer comunicación de audio con la central,
descolgar los auriculares.
1
0
a bc 2
d ef 3
j kl5
mno6
t uv8
wxyz9
Introducir el código del teléfono a programar,
validar pulsando la tecla OK.
En dicho instante, la central emitirá unos
tonos y parpadeará el indicador
luminoso del teléfono.
Para programar el teléfono como principal,
apagarlo y volverlo a encender.
Para programarlo como secundario,
pulsar el botón de abrepuertas.
Para programarlo como secundario con
intercomunicación, pulsar el botón central.
Cada vivienda debe tener una sola unidad principal; si existen unidades en paralelo
se deberán configurar como secundarias, ya sean monitores o teléfonos.
Programar el resto de teléfonos de la misma forma. Finalizada la programación salir del
menú de configuración pulsando la tecla CANCEL: caso de olvidarse, la central saldrá
automáticamente transcurridos 2 minutos sin realizar ninguna pulsación.
CONEXIONADOS OPCIONALES
I
23
ntercomunicación entre dos puntos
de la misma vivienda.
El teléfono T-940 Plus incorpora de serie la intercomunicación entre dos puntos de la misma
vivienda. Para habilitar esta función será necesario que:
- Uno de los equipos haya sido configurado como principal y el otro como
secundario con intercomunicación, según se describe en la página 22.
- El borne INT de los equipos a intercomunicar esté unido (ver esquema adjunto).
Para intercomunicarse, descolgar el auricular y presionar el pulsador de intercomunicación;
unos tonos acústicos en el auricular confirmarán que la llamada se está realizando, o
que la unidad llamada está en comunicación con la central. Para establecer comunicación,
descolgar el auricular de la unidad llamada. Si durante un proceso de intercomunicación
se recibe una llamada de la central, se escucharán unos tonos acústicos en el auricular de la
unidad principal; para establecer comunicación con la central presionar el pulsador de
intercomunicación de la unidad configurada como principal.
Los tonos de llamada reproducidos son diferentes en función del lugar desde el que se
realizó la llamada, lo cual permite al usuario distinguir su procedencia.
+ _ A D INT
+ _ A D INT
P
ulsador para recepción de llamadas desde la puerta del rellano.
El teléfono T-940 Plus incorpora de serie la recepción de llamada desde la puerta del rellano.
Esta prestación permite ahorrar el uso de un timbre, colocando un pulsador
entre los bornes 'HZ–' y '–' del teléfono.
Los tonos de llamada reproducidos son diferentes en función del lugar desde el que se
realizó la llamada, lo cual permite al usuario distinguir su procedencia. Si durante una
conversación con la central se produce una llamada desde la puerta del rellano,
unos tonos en el auricular advertirán de esta circunstancia.
HZ- -
24
CONEXIONADOS OPCIONALES
E
quipos con dos centrales de
conserjería.
El número máximo de centrales de conserjería dentro de un sistema es de dos, debiéndose
configurar una de ellas como principal y la otra como secundaria, tal y como se describe
en la página 12.
Las llamadas realizadas desde monitores o teléfonos mediante el pulsador de abrepuertas,
serán siempre recepcionadas por la central de conserjería principal. Si la central principal
se encuentra apagada, las llamadas serán desviadas a la central de conserjería secundaria
(funcionamiento día-noche). La captura de llamadas de placa también se recepcionará en
la central principal. No obstante, cada central de conserjería podrá tener su propio código
directo de llamada (ver página 12).
Sólo en el caso de los monitores Tekna Plus y Platea Plus se podrá realizar una llamada
selectiva a la central secundaria mediante el segundo pulsador auxiliar. Esta función
requiere la modificación interna de los monitores, tal y como se describe en el manual de
instrucciones de la placa.
Las centrales CETK-590PLUS incorpora de serie la prestación de intercomunicación entre
dos centrales. Para habilitar esta función será necesario que el INT de las centrales esté
unido (ver esquema adjunto).
Para intercomunicarse, descolgar el auricular y presionar el pulsador de intercomunicación;
unos tonos acústicos en el auricular confirmarán que la llamada se está realizando, o
que la unidad llamada está en comunicación, mostrando la pantalla del teclado los
mensajes llamando a central o sistema ocupado respectivamente.
la pantalla de la central llamada mostrará el mensaje LLAMANDO central. Para
establecer comunicación, descolgar el auricular de la unidad llamada, mostrando las
pantallas de ambas centrales el mensaje comunicación. Si durante un proceso de
intercomunicación se recibe una llamada de la placa, se escucharán unos tonos acústicos
en auricular de la central principal, apareciendo la imagen y mostrando la pantalla el
mensaje llamando placa; para establecer comunicación con la placa presionar
el pulsador OK, o presionar el pulsador de abrepuertas si sólo se desea abrir la puerta.
En el caso de que la llamada se halla realizado desde una vivienda, la central llamada
visualizará la retención de llamada.
CETK-590 Plus
-. ?!,
g hi 4
CN3
+ _ Vin Malla Vout A D
pqrs7
a bc 2
CETK-590 Plus
-. ?!,
d ef 3
j kl5
mno6
t uv8
wxyz9
+ - 0x *
ancel
INT
g hi 4
CN3
+ _ Vin Malla Vout A D
pqrs7
a bc 2
d ef 3
j kl5
mno6
t uv8
wxyz9
+ - 0x *
ancel
INT
25
T-940 Plus
T-940 Plus
+ _ A D
+ _ A D
CETK-590 Plus
T-940 Plus
-. ?!,
CN3
+ _ A D
+ _ Vin Malla Vout A D
g hi 4
pqrs7
a bc 2
d ef 3
j kl5
mno6
t uv8
wxyz9
+ - 0x *
ancel
CTO
P =Principal.
S =Secundario.
Placa de acceso
*Colocar este alimentador
lo más cerca posible
del primer teléfono.
CN5
FA-Plus/C o FA-Plus
PRI
~ ~
Red
8 7 6
1
3 4
2
SW2
SEC
+ + - -
P
10 9
5
SW1
CN2
CV2 CV1 - + + - D Aout Ain Vin- Vin+ Malla Vout+ Vout-
CV
de Vcc
26
ESQUEMAS DE INSTALACIÓN
P
ortero electrónico.
El esquema de instalación muestra el conexionado de un equipo de portero electrónico con
una o varias placas para acceder al edificio y una central de conserjería.
Si su equipo no dispone de placa, o sólo de una, no tenga en cuenta tales conexiones.
Si por el contrario tiene más de una placa, conecte la segunda tal y como muestra el
esquema. En el caso de más de dos placas, conecte las restantes igual que la segunda.
La central de conserjería se conecta igual que si se tratase de un teléfono.
TABLA DE SECCIONES
Secciones hasta
Borne
50m.
150m.
+, –, CV1, CV2
1,00mm²
2,50mm²
Ain, Aout, A, D
0,25mm²
0,25mm²
Para distancias superiores consulte con nuestros servicios
de asistencia técnica.
Placa de acceso
CN5
FA-Plus/C
rev.938072
PRI
1
3 4
2
5
SW1
CN2
CV2 CV1 - + + - D Aout Ain Vin- Vin+ Malla Vout+ Vout-
230 110 0 - - + +
Red
8 7 6
SW2
SEC
S
10 9
Abrepuertas
de c.c.
27
* Sacar el puente JP1 de
todos los distribuidores
excepto del último.
D4L-PLUS
Tekna Plus
CN4
JP1
S
+ _ Vin Malla Vout A D
D1
Tekna Plus
E
CN4
+ _ Vin Malla Vout A D
D2
+
FA-Plus/C
rev.938072
CETK-590 Plus
-. ?!,
g hi 4
CN3
pqrs7
a bc 2
d ef 3
j kl5
mno6
t uv8
wxyz9
+ - 0x *
ancel
SEC
PRI
230 110 0 - - + +
+ _ Vin Malla Vout A D
CTO
Red
P =Principal.
S =Secundario.
Placa de acceso
CN5
Colocar este alimentador
lo más cerca posible
del primer distribuidor.
FA-Plus/C o FA-Plus
PRI
~ ~
Red
8 7 6
1
3 4
2
SW2
SEC
+ + - -
P
10 9
5
SW1
CN2
CV2 CV1 - + + - D Aout Ain Vin- Vin+ Malla Vout+ Vout-
CV
de Vcc
28
ESQUEMAS DE INSTALACIÓN
v
ideoportero con cable coaxial.
El esquema de instalación muestra el conexionado de un equipo de videoportero con una o varias
placas para acceder al edificio y una central de conserjería.
Si su equipo sólo dispone de una placa, no tenga en cuenta la conexión hacia las otras.
Si por el contrario tiene más de una placa, conecte la segunda tal y como muestra el esquema.
En el caso de más de dos placas, conecte las restantes igual que la segunda.
Nota: En instalaciones con cable coaxial se aconseja instalar la central entre el primer distribuidor
y la placa (la central debe tener un alimentador dedicado para alimentar sólo la central).
TABLA DE SECCIONES
Secciones hasta
Borne
C
50m.
150m.
+, –, CV1, CV2
1,00mm²
2,50mm²
Ain, Aout, A, D
0,25mm²
0,25mm²
Vin+, Vout+, Vin, Vout
*RG-59
*RG-59
aracterísticas cable coaxial RG-59 B/U MIL C-17.
*
VALORES
CARACTERÍSTICAS ELÉCTRICAS
Resistencia eléctrica del conductor a 20ºC
Interior (vivo)
Exterior (malla)
Capacidad nominal
_
_
_
<67pf/m
Impedancia característica
75 +
-3
<158 /Km
<10 /Km
_
>66,6 %
Velocidad de propagación
Placa de acceso
CN5
FA-Plus/C
rev.938072
PRI
1
3 4
2
5
SW1
CN2
CV2 CV1 - + + - D Aout Ain Vin- Vin+ Malla Vout+ Vout-
230 110 0 - - + +
Red
8 7 6
SW2
SEC
S
10 9
Abrepuertas
de c.c.
Tekna Plus
29
Tekna Plus
EL562
JP1
EL562
JP1
* Sacar el puente JP1 de
todos los distribuidores
excepto del último.
+ _ A D Vp Mp
Md1
Vd1
+ _ A D Vpo Mpo
D6L-Plus/2H
Md6
Vd6
+
_
A
D
CT
+ _ A D Vp Mp
+
_
A
D
CT
JP1
+ _ A D Vpi Mpi
CETK-590 Plus
Tekna Plus
EL562
JP1
EL562
JP1
-. ?!,
g hi 4
pqrs7
a bc 2
d ef 3
j kl5
mno6
t uv8
wxyz9
+ - 0x *
ancel
+ _ A D Vp Mp
+ _ A D
Md1
Vd1
+ _ A D Vpo Mpo
D6L-Plus/2H
Md6
Vd6
+
_
A
D
CT
Vp Mp
+
_
JP1
+ _ A D Vpi Mpi
A
D
CT
P =Principal.
S =Secundario.
Placa de acceso
CN5
*Colocar este alimentador
lo más cerca posible
del primer distribuidor.
FA-Plus/C o FA-Plus
PRI
~ ~
Red
8 7 6
1
3 4
2
SW2
SEC
+ + - -
P
10 9
5
SW1
CN2
CV2 CV1 - + + - D Aout Ain Vin- Vin+ Malla Vout+ Vout-
CV
Vcc
30
ESQUEMAS DE INSTALACIÓN
v
ideoportero sin cable coaxial.
El esquema de instalación muestra el conexionado de un equipo de videoportero con una o varias
placas para acceder al edificio y una central de conserjería.
Si su equipo no dispone de placa, o sólo de una, no tenga en cuenta tales conexiones.
Si por el contrario tiene más de una placa, conecte la segunda tal y como muestra el esquema. En el
caso de más de dos placas, conecte las restantes igual que la segunda.
La central de conserjería se conecta igual que si se tratase de un monitor.
IMPORTANTE: Este tipo de instalación precisa que las placas se configure el Dip-3 del
micro-interruptor Sw1 a ON (ver manual de la placa) y que la central y los
monitores utilicen el módulo EL562.
TABLA DE SECCIONES
Secciones hasta
Borne
50m.
150m.
+, –, CV1, CV2
1,00mm²
2,50mm²
Ain, Aout, A, D
0,25mm²
0,25mm²
CAT-5
CAT-5
Vin+,-, Vout+,-, Vp,d, Mp,d
Para distancias superiores consulte con nuestros servicios
de asistencia técnica.
Placa de acceso
CN5
FA-Plus/C
rev.938072
PRI
1
3 4
2
5
SW1
CN2
CV2 CV1 - + + - D Aout Ain Vin- Vin+ Malla Vout+ Vout-
230110 0 - - + +
Red
8 7 6
SW2
SEC
S
10 9
Abrepuertas
de c.c.
31
CANAL 1
A los monitores
Placa interior
CN5
8 7 6
1
3 4
FA-Plus o FA-Plus/C
PRI
~ ~
P
10 9
2
Modo EL500
5
SW1
SW2
CN2
CV2 CV1 - + + - D Aout Ain Vin- Vin+ Malla Vout+ Vout-
SEC
+ + - -
Abrepuertas
de c.c.
Red
D4L-PLUS
JP1
E
S
S1
+
CANAL 0
P =Principal.
S =Secundario.
FA-Plus/C
rev.938072
CETK-590 Plus
-. ?!,
g hi 4
CN3
PRI
230 110 0
Red
SEC
- - + +
+ _ Vin Malla Vout A D
pqrs7
a bc 2
d ef 3
j kl5
mno6
t uv8
wxyz9
+ - 0x *
ancel
CTO
32
ESQUEMAS DE INSTALACIÓN
CANAL 2
A los monitores
Placa interior
CN5
8 7 6
1
3 4
2
FA-Plus o FA-Plus/C
Modo EL500
5
SW2
SW1
CN2
CV2 CV1 - + + - D Aout Ain Vin- Vin+ Malla Vout+ Vout-
SEC
+ + - -
PRI
~ ~
P
10 9
Abrepuertas
de c.c.
Red
D4L-PLUS
JP1
S
+
Continúa
en la página siguiente
E
S1
CANAL 0
Placa general
CN5
FA-Plus/C
rev.938072
PRI
230 110 0
Red
S
10 9
8 7 6
1
3 4
2
SW2
5
Modo EL501
SW1
CN2
CV2 CV1 - + + - D Aout Ain Vin- Vin+ Malla Vout+ Vout-
SEC
- - + +
Abrepuertas
de c.c.
33
CANAL 126
A los monitores
Placa interior
CN5
FA-Plus o FA-Plus/C
8 7 6
1
3 4
2
Modo EL500
5
SW2
SW1
CN2
CV2 CV1 - + + - D Aout Ain Vin- Vin+ Malla Vout+ Vout-
SEC
+ + - -
PRI
~ ~
P
10 9
Abrepuertas
de c.c.
Red
D4L-PLUS
JP1
E
S1
+
S
Viene
de la página anterior
S2
NOTAS IMPORTANTES:
v
ideoportero con placa general para
grandes complejos residenciales.
Para realizar la instalación y configuración de forma correcta, ayúdese de este manual, del de la placa
general y de los que se adjuntan con las placas interiores.
El esquema de instalación muestra el conexionado de un equipo de videoportero con una placa
general, una central de conserjería general y hasta 127 placas interiores.
En el caso de más placas generales, conecte las restantes como se muestra en el manual de
instrucciones de la placa general. Si por el contrario el equipo no dispone de placa general, no
tenga en cuenta tales conexiones.
En equipos de videoportero, utilizar un distribuidor de vídeo antes de cada edificio interior excepto en el
último. Todos los distribuidores, excepto el último, deberán tener sacado el puente de final de línea.
Si en lugar de videoportero, se trata de portero electrónico, elimine el cable coaxial y los distribuidores
del montante general de instalación y sustituya el cable coaxial de los montantes de los edificios
interiores por un negativo.
En equipos de videoportero con par trenzado utilizar el distribuidor D6L-Plus/2H en lugar del D4L-Plus.
Todos los distribuidores, excepto en el último, deberán tener quitado el puente de resistencia de final
de línea. En el canal de instalación de los edificios interiores añadir un negativo, (ver pág. 29).
Adjunto se muestra la conexión del par
Vin- Vin+ Malla Vout+ VoutVin- Vin+ Malla Vout+ Vouttrenzado en lugar de cable coaxial.
34
ESQUEMAS DE INSTALACIÓN
CANAL 127
A los monitores
Placa interior
CN5
8 7 6
1
3 4
2
FA-Plus o FA-Plus/C
PRI
~ ~
P
10 9
Modo EL500
5
SW2
SW1
CN2
CV2 CV1 - + + - D Aout Ain Vin- Vin+ Malla Vout+ Vout-
SEC
+ + - -
Abrepuertas
de c.c.
Red
v
ideoportero con placa general para
grandes complejos residenciales.
TABLA DE SECCIONES
Borne
Secciones hasta
100m.
300m.
+, –, CV1, CV2
1,50mm²
2,50mm²
Ain, Aout, A, D
0,25mm²
0,25mm²
Vin+, Vout+
* RG-59
* RG-59
CAT-5
CAT-5
Vin+, Vin-, Vout+, Vout-
Coaxial
Sw1-3 Off (1)
Par Trenzado Sw1-3 On (1)
Para distancias superiores consulte con nuestros servicios de asistencia técnica.
(1) Ver manual de la placa.
* Características cable coaxial RG-59 B/U MIL C-17, (ver página 28).
35
Cód. 50121500
Porter's exchange
digital installation
CETK-590 Plus
Instructions manual
T590 ML Rev.0114
37
INTRODUCTION
First of all we would like to thank and congratulate you for the purchase of this product manufactured by
Golmar.
The commitment to reach the satisfaction of our customers is stated through the ISO-9001 certification
and for the manufacturing of products like this one.
Its advanced technology and exacting quality control will do that customers and users enjoy with the
legion of features this system offers. To obtain the maximum profit of these features and a properly wired
installation, we kindly recommend you to expend a few minutes of your time to read this manual.
INDEX
Introduction........................................37
Index .................................................37
Starting recommendations....................37
Safety precautions ...............................38
System characteristics ..........................38
Notes for systems with door panels .........38
System operation.........................39 to 40
Porter's exchanges ...................................
Description ......................................41
Function push buttons........................42
Identifying label ................................42
Sw2 configuration dip-switch..............43
Clock battery....................................43
Memory banks..................................44
End of line resistor .............................44
EL562 module..................................44
RCTK-PLUS connector description .......45
Fix the porter's exchange ....................46
Porter's exchange programming ................
Programming menues ...............47 to 53
Resident text writing ...........................54
Fast resident search ...........................54
Power supply installation.......................55
Power supply linking.............................55
T-940 Plus telephone ...............................
Description ......................................56
Function push buttons........................56
Telephone installation........................57
Programming ...................................58
Optional connections ..............................
Telephones intercommunication .........59
Door bell push button connection........59
Two porter's exchanges systems ...........60
Installation diagrams ...............................
Audio installation ......................61 to 62
Video installation with coaxial .....63 to 64
Video installation w/o coaxial .....65 to 66
General entrance installation .....67 to 70
Compliance .......................................71
STARTING RECOMMENDATIONS
Install or modify the equipment without the power connected.
The installation and handling of these equipments must be performed by authorised personnel.
The entire installation must be at least 40 cm. away from any other installation.
Do not use excessive force when tightening the power supply connector screws.
Before to connect the system, check all connections. Do always follow the enclosed information.
Each time the power supply is restarted, or after a modification, the system will remain blocked during
45 seconds.
O Always use RG-59 B/U MIL C-17 or RG-11 coaxial cables, (see page 64). Never use coaxial
antenna cable. In istallations no longers than 100m., Golmar RAP-5130 cable can be used.
O
O
O
O
O
O
38
SAFETY PRECAUTIONS
Install or modify the equipment without the power connected.
The installation and handling of these equipments must be performed by authorised personnel.
The entire installation must be at least 40 cm. away from any other installation.
With power supply:
wDo not use excessive force when tightening the connector screws.
wInstall the power supply in a dry and protected place without risk of drip or water projections.
wAvoid to place it near to heating sources, in dusty locations or smoky enviroments.
wDo not block ventilation holes of the unit so that air can circulate freely.
wTo avoid damage, the power supply has to be firmly fixed.
wTo avoid an electrical shock, neither remove the protection cover nor handle the connected wire in
the terminals.
O Porter's exchange:
wDo not use excessive force when tightening the connector screws.
wInstall the porter's exchange in a dry and protected place without risk of drip or water projections.
wAvoid to place it near to heating sources, in dusty locations or smoky enviroments.
wDo not block ventilation holes of the equipments so that air can circulate freely.
O Remember, the installation and handling of these equipments must be performed by authorized
personnel and in the absence of electrical current.
O Do always follow the enclosed information.
O
O
O
O
SYSTEM CHARACTERISTICS
O
O
O
O
O
O
O
O
O
O
O
O
3.5" TFT colour screen.
Menu and OSD messages on screen.
Management of up to 255 internal buildings of 1,000 apartments each.
Up to 2 porter's exchanges in one system.
New programming menu structure.
Direct Call Code that allows to use a different call code from the one recorded on the monitor or
telephone (page 49).
'Insert resident' function, that allows to keep sorted the repertory content (page 52).
Text edition using the keypad as a mobile phone (page 54).
It allows to activate/deactivate the clock battery using the menu, (factory default: deactivate).
Intercom function between 2 porter's exchanges.
New MEMEDIT software "Ver. 4.0" for USB connector, that allows to program porter's exchange
using a computer. Important: Necessary USB communication printer cable (USB-A Male to
USB-B Male), is not supplied with the equipment.
Compatible with previous porter's exchange CE-990 Plus.
NOTES FOR SYSTEMS WITH DOOR PANELS
O Monitors and telephones should be programmed from the door panel, as it's explained on the
corresponding instruction manuals. Once the programming is done, make a call from each
apartment to the porter's exchange: the display will show the assigned code.
O Use this instructions manual to program the porter's exchange and for system wiring purposes.
O Refer to the door panel instructions manual for troubleshooting hints.
O On systems with general entrance door panel(s), the porter's exchange(s) must be also general
(common to all the internal buildings). Consequently, the porter's exchange cannot be connected
in a internal building (for privated use of the internal building), as it's shown on the schematic
diagrams (pages 67 to 70).
SYSTEM OPERATION
39
Calling from the door panel to an apartment.
O This procedure is detailed on the instruction manual included with the door panel.
O If the "capture panel calls" function (page 48) has been activated, the call will be received on the
porter's exchange: it will be possible to transfer the call to the corresponding apartment after tenant
agreement. If the porter's exchange is switched off, the call will be received at the corresponding
apartment.
Calling from the door panel to the porter's exchange.
O The porter's exchange can be programmed with an address (see page 48), that allows to call to the
porter's exchange as if it was an apartment.
In systems with several access doors, the other(s) door panel(s) will be automatically disconnected.
In systems with general entrance door panel(s), these panels will be disconnected, remaining the
internal building door panels free.
O The porter's exchange display will show the message DOOR INCOMING CALL: in case of video
systems, the picture will appear on the screen without the visitor being aware of this. If the call is
not answered in 45 seconds, the system will be freed.
O To stablish communication pick up the porter's exchange handset. The communication will last for one
and a half minutes or until the handset is replaced. During the communication the porter's
exchange display will show the message communication WITH DOOR PANEL. Once
the communication has finished the system will be freed.
O To open the door, press the door release push button at any moment: with one press, the door
release operates during three seconds. During the lock release activation an acoustic tone will be
heard and the porter's exchange display will show the message door opened.
Transferring a door panel call from the porter's exchange.
O During communication with the door panel, the porter's exchange can transfer the communication to
an apartment. While in communication, enter the apartment code or use the arrow keys to look
for the tenant on the resident list: confirm the call by pressing 'OK' key. At this moment the call
tone will be reproduced on the monitor (telephone) during three seconds: after this time (on video
systems only), the picture will appear on the master monitor without the visitor being aware of this.
To communicate the apartment with the door panel, replace the porter's exchange handset. At this
moment, the porter's exchange display will show the message SYSTEM IS Busy.
If the tenant don't want to communicate with the visitor, replace the apartment handset: at this
moment the communication will be restored between the porter's exchange and the door panel.
During call and communication progresses between the porter's exchange and the apartment, the
door panel remains on hold, being not possible to hear any conversation.
Use of the resident list.
O If the porter don't know the code of the apartment he wishes to contact, he could find it on the
repertory name by searching through the arrow keys. Once the code has been found, the call can
be made by pressing the 'OK' key. Refer to page 54 for details about fast resident list searching.
Calling from the porter's exchange to an apartment.
O To make a call, the porter should pick up the hanset and key-in the code corresponding to the
apartment he wishes to contact: the porter's exchange display will show the sequence keyed-in.
Once the code has been introduced, press 'OK' key to confirm the call: acoustic tones will be
heard confirming the call is in progress and the porter's exchange display will show the message
call iS IN PROGRESS. At this moment the call will be received at the monitor (telephone)
in the dwelling. If an incorrect code has been keyed-in, press CANCEL key and try again.
Continue
40
SYSTEM OPERATION
Coming from previous page
In systems combined with door panel(s), the door panel(s) will be automatically disconnected. In
systems with general door panel(s), will be those who remain unconnected: if a visitor tries to call,
an acoustic tone will be heard confirming the system is busy.
If the call is not answered in 45 seconds, the system will be freed.
O To establish communication pick up the monitor (telephone) handset. The communication will last for
one and a half minutes or until one of the handsets is replaced. During the communication the
porter's exchange display will show the message communication. Once the communication
has finished the system will be freed.
Calling from an apartment to the porter's exchange.
O To make a call, pick up the apartment handset and press the lock release push button: acoustic tones
will be heard confirming the call is in progress or that a communication is already established. At
this moment, the porter's exchange receives the call: the porter's exchange display will show the
information corresponding to the caller. If the call is not answered in 45 seconds, the lost call will
be memorized on the porter's exchange and the led will also blink.
O To establish communication pick up the porter's exchange handset. The communication will last for
one and a half minutes or until one of the handsets is replaced. During the communication the
porter's exchange display will show the message communication. Once the communication
has finished the system will be freed.
O If the call is made with the handset on the craddle, the porter's exchange will recognize the call as a
panic call; the porter's exchange will show the message panic ALERT and the information
corresponding to the caller. For panic calls recognition, the corresponding function on the
configuration menu must be activated (page 49). This type of calls must be answered from the
retentions screen.
Calls retention memory.
O The porter's exchange has a memory for up to 99 unattended calls, both panic and normal calls.
For calls retention feature, the corresponding function on the configuration menu must be activated
(page 49). During standby conditions, the porter's exchange display shows the retentions number
cyclically (every 45 seconds).
O Press DOWN arrow key to check for unattended calls: the display will show the last retained call. Use
arrow keys to look for other lost calls. The display shows the type of call (panic or normal call),
the reception hour and the caller information.
O To answer an unattended call proceed as follows: pick up the handset and look for the desired
retention as it is explained on the previous paragraph. Press the 'OK' key to call to the
corresponding apartment. Once the call is made, the porter's exchange deletes this retention from
memory.
O The consecutive unatended calls, that come from the same apartment, aren't memorized.
button.
O To delete a retained call, look for the desired retention and press
Systems with two porter's exchanges.
O The operation of systems with two porter's exchanges is detailed on page 60.
41
PORTER'S EXCHANGE DESCRIPTION
D
escription of the CETK-590 Plus
porter's exchange.
a
g
b
c
-. ?!,
a bc 2
h
d ef 3
d
g hi 4
j kl5
mno6
pqrs7
t uv8
wxyz9
I
.xx
00000000000
j
PRINCIPAL
1
2
3
ATENCIÓN
Alta tensión. No abrir la tapa.
Manipular sólo por personal
del servicio técnico.
+ - 0x *
ancel
PÁNICO
RETENCIONES
WARNING
High voltage. Don't open cover.
Handle only bu technical service.
M. PROTEGIDO
2ª TABLA
DIRECCIÓN
BK1
k
BK0
e
CAPTURA PLACA
4
l
m
f
n
a.
b.
c.
d.
e.
f.
g.
h.
i.
j.
k.
l.
m.
n.
o.
o
p q
r
Handset.
Color screen.
Keypad.
On-Off light indicator.
Function push buttons.
Cord.
Attachment holes.
Identification label.
Connecting points.
Configuration dip-switch.
Clock battery.
Memory banks.
Cn3 connector.
Three positions call reception volume control.
USB Connector, allows to program porter's exchange using a computer
with MEMEDIT software "Ver.4.0". Necessary USB communication printer
cable (USB-A Male to USB-B Male), is not supplied with the equipment.
p. Cable slot.
q. Color control.
r . Brightness control.
42
PORTER'S EXCHANGE DESCRIPTION
F
unction push buttons.
On-Off push button. If the "Protected Mode" function is enabled (page 48), it shall be
necessary to introduce the user code to switch on the porter's exchange.
If the handset is on the craddle no function is activated. If not, allows to make
an intercom call to the other porter's exchange (if exists).
The intercom function is described on page 60.
Regardless of the handset position, activates the 'OA1' output relay (see page 45).
If the handset is on the craddle allows to see the picture from the master door panel.
If not, allows to establish audio and video communication with the door panel
that has been configurated with the autoswitch-on function. This function is
disabled if a communication is already established.
During standby status and with no dependence of the handset position, activates
the lock release of the master door panel. During call reception and communication
progresses allows the lock release activation of the calling door panel.
Lock release activation is only available when systems with door panel(s).
D
escription of the identification label.
For an easiest repair or replacement of an existing
porter's exchange, fill the indentifying label
information.
.xx
00000000000
PRINCIPAL
CAPTURA PLACA
ATENCIÓN
Alta tensión. No abrir la tapa.
Manipular sólo por personal
del servicio técnico.
WARNING
High voltage. Don't open cover.
Handle only bu technical service.
PÁNICO
RETENCIONES
M. PROTEGIDO
2ª TABLA
DIRECCIÓN
PRINCIPAL: master exchange (page 48).
M. PROTEGIDO: protected mode enabled (page 48).
CAPTURE PANEL: capture door panel calls (page 48).
2 TABLA: direct call code enabled (page 49).
PANICO: show panic calls (page 49).
RETENCIONES: memorize missed calls (page 49).
DIRECCION: porter's exchange dial code (page 48).
43
PORTER'S EXCHANGE DESCRIPTION
D
escription of the Sw2 configuration dip- switch.
SW2
The Sw2 configuration dip-switch is located at the lower left side of
the back of the porter's exchange.
1
2
3
4
Uno System, loads the installation with a
communications resistor Uno. For a proper system
operation, set to ON only in the closest door panel to the backbone
installation, placed the rest to OFF. If not there are door panels, set to
ON only in the closest porter's exchange to the backbone installation.
With digital repeater RDPlus-UnoSE:
In the backbone installation or after the inner door panel in systems with
general door panels, placed the door panel/s and porter's exchange to
OFF.
Plus System, loads the installation with a communications resistor Plus.
For a proper system operation, placed to ON only in the closest door
panel to the backbone installation or in the general door panel (if exists),
set the rest to OFF. If not there are door panels, set to ON only in the
closest porter's exchange to the backbone installation.
Allows to reset the administrator PIN code (see page 11) to the factory
default. Use this function only in case to forget this code.
To proceed: disassemble the porter's exchange from the connector and set
the dip-switch to ON, then place the porter's exchange to the connector,
the message RESET SWITCH IS ON will appear on screen, when the
message disappears disassemble the porter's exchange again and set the
dip-switch to OFF; place the porter's exchange to the connector (the PIN
code is now the factory default).
Not used.
*Factory default.
D
escription of the clock battery.
2
3
4
+
BK0
The first time that the porter's exchange is connected to the installation, it is
necessary to activate the function 'enable clock battery' by means of the
programming menu, (see page 49).
1
If the hour is lost in porter's exchange due to a cut-off of electricity, check that the
function 'enable clock battery' in the programming menu is activated (see page 49). If this is correct, it
will be necessary to replace the battery.
Replacement battery: Golmar code (50121403 battery CR1220).
Important: When replacing the battery, check the polarity, as it is shown on the drawing.
44
PORTER'S EXCHANGE DESCRIPTION
D
escription of the memory banks.
The porter's exchange has two memory banks to plug 256Kb memory
modules in. Each module allows to record the custom text for a maximum of
1000 users.
BK0
BK1
The system is delivered with one memory module placed in the bank number
0 (BK0), where the system configuration will be recorded. In case of porter's
exchanges with two memory modules, don't change their position once
they have been recorded.
BK0 bank module must always have a memory module plugged in.
PORTER'S EXCHANGE ADJUSTMENTS
H
andling the end of line jumper.
The end of line jumper is placed on the CN3 connector, that can be located
on the porter's exchange base.
In case of twisted pair cable installations, the end of line jumper is placed in
the EL562 module, also located in the CN3 connector of the porter's
exchange base.
Do not remove the jumper if the video cable finish on porter's exchange.
Remove the jumper on porter's exchange where the video cable continue.
E
L562 module for video installations with twisted pair cable.
Locate the CN3 connector, that's placed in the porter's exchange base.
Remove the existing jumper and plug the EL562 module.
NOTE: On this type of installations, the door panel must be setting with
SW1-3 to ON in the sound module, see T631/Plus ML instructions
manual (page 11), or setting the EL500SE microprocessed circuit with
SW1-3 to ON, see T500SE ML instructions manual (page 12).
Refer to the specific installation diagram.
45
CONNECTOR DESCRIPTION
D
escription of the RCTK-PLUS porter's
exchange connector.
a
c
b
d
HZ
Out
HZ
Out
CABLE
Max. pelado del cable.
Max. peeled cable.
Max.
5mm
Max. câble dénudé.
Max. aanstrip lengte.
50mm.
(*)
50mm.
(*)
Vin
Vin
Vin
HZS+
Malla
Shield
Malla
Shield
Malla
Shield
Malla
Shield
Malla
Shield
Malla
Shield
S-
Vout
Vout
Vout
A
A
D
D
HZSA
HZINT
INT
2C
SA
SA
AP
Colocar la parte superior de la regleta a 1,60m. del suelo.
Place the top part of the monitor connector at 1,60m.
from the floor.
(*) Distancia mínima entre los laterales de la regleta y
cualquier objeto debe ser de 5cm.
Vi+
MP
-
Vi
VP
44 22 99 88 99 88
CODE
b
17
15
HZ+
AP
Presionar para abrir.
Press to open.
88
18
SA 16
00 11 11 88 5 1
11742080
REF
LOTE
RCTK-PLUS
IMP903012
A/D
SA
A1
VP
VP
MP
MP
R5
90
14
CTO 13
e
S+ 12
S - 11
AP 10
AP
9
BUS 8
f
IN 7
BUS 6
CTO CTO OUT 5
4
2C OA1
HZ
3
A1 OA1
VP
VP
PA
2
MP
MP
PB
1
PLUS CETK590 V2PLUS
a
a. Wall attachment hole (x6).
b. Porter's exchange attachment hook (x2).
c. Vertical wiring input.
d. Attachment clip.
e. Wiring input hole.
f. Installation terminals:
+, –:
positive, ground.
Vin :
video signal coaxial input.
Malla:
coaxial shield.
Vout :
video signal coaxial output.
A:
audio communication.
D:
digital communication.
INT :
intercom.
SA :
auxiliary calling device output.
CTO :
video distributor activation output.
OA1,OA1 : Auxiliary rele output (Max. 30Vcc/ 1A).
Vp, Mp :
twisted pair video signal.
Terminals +, – and Malla (shield) are duplicated for easiest cascade installation of parallel
monitors or telephones. If the porter's exchange is not placed on the connector, cascade
units will not be powered.
46
F
PORTER'S EXCHANGE INSTALLATION
ix the porter's exchange connector to the wall.
Avoid to place the porter's exchange near to heating sources,
in dusty locations or smoky environments.
To install the porter's exchange directly over the wall, drill two
holes of Ø6mm. and use the supplied screws.
The upper part of the porter's exchange connector must
be placed at 1,60m. height roughly. The minimum
distance between the porter's exchange connector and
the closest object must be 5cm.
F
ix the porter's exchange.
Place the porter's exchange at right angles to the
connector and align the attaching holes of the
porter's exchange with the attachment hooks
of the connector, as it is shown on the drawing.
Lock out the porter's exchange. Press the right
side till the attachment clip locks the porter's
exchange firmly.
To disassemble the porter's exchange from the
connector, use a plain screwdriver to release
the attachment clip. Remove the porter's
exchange from the connector, with special
attention do not falls.
47
PORTER'S EXCHANGE PROGRAMMING
P
rogramming menu.
It will be necessary to enter into the programming menu to configure the system properties.
For a proper system operation, the menus marked with an asterisk must be configurated.
Two different programming menues are available: administrator, that allows to modifiy any of
the system properties and user, that only allows changes that do not affect the system operation.
Programming options with black text and white background are availables in both menues;
options with white text and black background are only availables on administrator menu.
The first time you enter into the programming menu, the display messages will appear in spanish.
Press OK when the display shows the message AJUSTES DEL SISTEMA: the display will show
now castellano. Press OK to change to english or till the desired language appears.
If the option Auxiliary Resident List (page 49) is disabled, it will not be necessary to fill the repertory
name for a proper system operation.
Use the arrow keys to move through the programming menu. Option changes will be validate
by pressing OK key, even if CANCEL key is pressed later.
Use CANCEL key to exit from the configuration menu. The porter's exchange will automatically exit
from the configuration menu after 2 minutes with no operation.
ANCEL
To enter into the main programming menu,
press
symbol and enter the
administrator PIN code (factory default: 1315)
or the user PIN code (factory default: 1111).
16:30
DIAL pin code
pin:____
*
1
3
1
5
ó
1
1
1
1
SYSTEM configuration
On this menu the system configuration options
can be changed.
Press OK to enter into this menu.
reSIDENT LIST
This menu allows to fill the resident list and
to change its options.
Press OK to enter into this menu.
Continue
48
PORTER'S EXCHANGE PROGRAMMING
C
Coming from previous page
onfiguration menu.
To enter into configuration menu, follow
the steps described on the previous page
and press OK when the display shows the
message SYSTEM CONFIGURAtION.
SYSTEM configuraTION
ENGLISH
Allows to choose the language of the displayed
messages and the programming menues.
To choose a different language press OK
until the desired language will be displayed.
*
MASTER CONCIERGE
YES
Each system must have one master exchange
only; in case of an additional exchange
configure it as slave.
Press OK to change this value.
*
CONCIERGE DIAL CODE
:000
This code allows the visitor to make a direct
call to the porter's exchange.
Choose a code between 0 and 999.
This code must be equal to the one
assigned on the corresponding door panel
push button and must be different to any
of the monitor or telephone existing codes.
To change this value press OK: the display
will show the message ENTER NEW value.
Key in the new code and confirm by
pressing OK.
If CANCEL is pressed the former value
will be restored.
ENTER NEW value
:000
0
1
5
CONCIERGE DIAL CODE
:015
*
protected mode
no
*
capture panel CALLS
yes
Allows the activation of an electronic lock that
requires the introduction of the user pin code
(page 47) to switch the porter's exchange on.
Press OK to enable or disable this feature.
If the option YES is selected, the calls made from
a door panel will be transferred to the porter's
exchange. If the exchange is switched off, the
call will be received on the corresponding
apartment.
Press OK to enable or disable this feature.
Continue
49
PORTER'S EXCHANGE PROGRAMMING
C
Coming from previous page
onfiguration menu.
*
SHOW panic aLERTS
yes
Allows to receive the panic calls made from
a monitor or telephone, or when the
access control panic code is keyed in on a
coded door panel.
Press OK to enable or disable this feature.
*
SHOW MISSED CALLS
yes
Activates the retention of unattended panic or
normal calls. The maximum number of
call retentions is 99.
Press OK to enable or disable this feature.
*
AUXILIARY RESIDENT LIST
NO
Allows the activation of a second call code for
each apartment, that can be different to the
programmed call code. This code must be
assigned on the resident list menu (page 51).
Press OK to disable or enable this feature.
set time
The system has an internal clock that allows
to show the time on the keypad display
when the system is on stand-by position.
This feature can be disabled on the following
step and on the user menu.
An internal battery keep the system on time
even if the power supply is disconnected
during a long period of time.
16:24
SET TIME
16:24
1
7
3
0
set time
17:30
display clock
NO
To set the time press OK: the display will show
the message SET TIME. Key in the hour
value from 0 to 23 and minutes value from
0 to 59 and confirm by pressing OK.
If CANCEL is pressed the former value
will be restored.
Allows to show or to hide the display clock
when the system is on stand-by position.
Press OK to disable or enable this feature.
ENABLECLOCK BATTERY
NO
Allows to activate the clock battery, keeping the
system in an hour even when the equipment is off.
To change the value, press OK.
KEYPAD BEEP
Allows to listen to a tone when you press on the
keys of the function keyboard.
To change the value, press OK.
Continue
YEs
50
PORTER'S EXCHANGE PROGRAMMING
C
Coming from previous page
onfiguration menu.
ADMINISTRATOR PINCODE
:1315
Allows to change the administrator PIN code to
enter into the administrator programming
menu (page 47).
Do not let know this code to untrained
people; any change on the programming
menu could produce a system failure.
enter new value
:1315
To change the PIN code press OK: the display
will show the message enter new value.
Key in the new code and confirm by pressing
OK. If CANCEL is pressed the former value
will be restored.
Always use a four digits code.
9
8
7
6
ADMINISTRATOR PINCODE
:9876
user pin CODE
:1111
enter new value
:1111
5
4
3
2
Allows to change the user PIN code to enter
into the user programming menu (page 47)
or to switch the exchange on when protected
mode function (page 48) is activated.
Any change on this menu will not affect
the system operation.
To change the PIN code press OK: the display
will show the message enter new value.
Key in the new code and confirm by pressing
OK. If CANCEL is pressed the former value
will be restored.
Always use a four digits code.
user pin code
:5432
concierge with camera
no
Allows to activate the porter's exchange camera.
To change the value, press OK.
Contact with our technical support department.
version 1.03
Displays the porter's exchange software version.
End of the configuration menu. Use "UP" arrow key to move to the previous options.
Press CANCEL to exit from the configuration menu and return to the main menu.
If CANCEL is pressed twice the panel will exit from the programming menu.
51
PORTER'S EXCHANGE PROGRAMMING
R
esident list menu.
To enter into resident list menu, follow the
steps described on page 47 and
press OK when the display shows the
message reSIDENT LIST.
reSIDENT LIST
NEW RESIDENT
enter BUS CODE
:000000
0
0
0
1
0
2
enter CALL CODE
:000000
0
0
3
4
0
9
enter name TO DISPLAY
_
settingS recorded
Allows to enter a new entry in the last resident list
position. To choose a specific position,
use the INSERT RESIDENT menu.
Press OK to proceed: the display will show
the message enter BUS CODE; key in the
monitor code and confirm by pressing OK.
A six digits code must be entered:
the three first digits will match the
internal building code and the three last
digits will match the monitor code.
In case of systems with one building only,
confirm that the door panel(s) has been
configurated with zero code.
IMPORTANT: if "Auxiliary Resident List" function
has been enabled (page 49), the display
will show the message enter CALL CODE;
enter the six digits code that will be used
to call to this apartment.
Press OK to validate it.
To assign a text to this entry press OK and
proceed as described on page 54.
Once the new entry has been recorded
the display will show the message
settings recorded, and will return
to the initial screen. Repeat this procedure
to add as much entries as it is needed.
NOTE: to make a call it will not be necessary to enter the zero placed on the left side
of the call code. For instance, if the call code is 000100, it will be enough to
enter 100 to make the call.
Continue
52
PORTER'S EXCHANGE PROGRAMMING
Coming from previous page
insert resident
jose perez
:000012
:000041
settings recorded
modify resident
jose perez
:000012
:000041
delete resident
jose perez
:000012
:000041
deleting resident
R
esident list menu.
Allows to insert a new entry in a specific resident
list position. This function allows to keep the
resident list sorted.
Press OK: the display will show the first resident
list position: in case of no existing entries the
display will show the message resident
list is empty. Use the arrow keys to find the
desired position and press OK: the new entry
will be inserted before the selected position.
Proceed as described on new resident menu.
Once the inserted entry has been recorded the
display will show the message settings
RECORDED. Repeat this procedure to insert
as much entries as it is needed.
Allows to modify the details of an exisiting entry.
Press OK: the display will show the first resident
list position: in case of no existing entries the
display will show the message resident
list is empty. Use the arrow keys to find
the entry to be modified and press OK.
Proceed as described on new resident.
Once the new entry has been modified the
display will show the message settings
recorded. Repeat this procedure to modify
as much entries as it is needed.
Allows to delete an exisiting entry.
Press OK: the display will show the first resident list
position: in case of no existing entries the display
will show the message resident list is
empty. Use the arrow keys to find the entry to
be deleted and press OK.
If keypad beep function is activated (page 49),
a tone will indicate us that the entry has been
deleted and the message deleting RESIDENT
will be displayed.
Once the entry has been deleted, the display will
show the next entry.
If keypad beep function is not activated, the
message deleting RESIDENT will be displayed.
Once the entry has been deleted, the display will
show the next entry.
Repeat this procedure to delete as much entries as
it is needed.
Continue
53
PORTER'S EXCHANGE PROGRAMMING
Coming from previous page
delete residents
list
R
esident list menu.
Allows to delete all residents list.
Press OK to start the deleted residents list.
If keypad beep function is activated (page 49),
a tone will indicate us that residents list are being
deleted.
deleting resident...
If keypad beep function is not activated, the
message deleting resident will be displayed.
End of the resident list menu. Use "UP" arrow key to move to the previous options.
Press CANCEL to exit from the resident list menu and return to the main menu.
If CANCEL is pressed twice the panel will exit from the programming menu.
54
PORTER'S EXCHANGE PROGRAMMING
T
ext edit.
To introduce or edit text during programming, use the keypad as described. The maximum
number of characters in one text line is 16.
Use the numeric keys to introduce text: press several times the corresponding key till the
desired character appears on the display, according with the enclosed characters table.
Use the arrow keys to move through the display.
Use the key symbol to delete the actual character. The rest of the text
will be moved one position backward.
Press OK to record the whole text. The display
will show the message settings recorded.
Press CANCEL key to exit from edition. The former text will be restored
and the display will show the message cancelled.
C
ANCEL
_ . 1 ?
! , @& :
" ( ( % $
2
4
GH I 4 g
h i Í Ì Î
Ï í ì î ï
7
PQR S 7
p q r s ß
1
A B C 2 a b c
Ç
Á À Â Ã Ä A
á à â ã ä aæ ç
3
D E F 3 d
e f É È Ê
Ë é è ê ë
5
J K L 5 j
k l
6
M
n
Õ
ô
8
T U V 8 t
u v Ú Ù Û
Ü ú ù û ü
9
WX Y Z 9
0
+ - 0 x *
/ = > < #
º ¿ ¡
o
o
F
NÑO 6 m
ñ o ÓÒÔ
Ö Ø ó ò
õ ö
ø
w x y z ÿ
ast resident list search.
For fast searching press one of the arrow keys followed by the number of entries to be
skipped. For a faster search use arrow keys followed by number 0 (10 in 10 entries)
or key
(100 in 100 entries).
5
The search is realized of 5 in 5 entries. From that moment, each time
an arrow key is pressed the repertory advances 5 in 5 entries.
55
POWER SUPPLY INSTALLATION
I
nstalling the FA-PLUS and FA-PLUS/C Rev.938072 power supplies.
f3,5 x 45
DIN-7971
f3,5 x 45
DIN-7971
The power supply must be installed in a dry and
protected place. It's recommended to protect
the power supply by using a thermo-magnetic
circuit breaker and to use a ground connection
with FA-Plus power supply.
To install the power supply directly on the wall, drill two holes
of Ø6mm. and insert the wallplugs.
Fix the transformer with the specified screws.
The power supply can be installed on a DIN 46277 guide
simply pressing it. To disassemble the power supply
from the DIN guide, use a plain screwdriver to lever
the flange as shown on the picture.
The FA-Plus/C model uses 6 units over DIN guide,
and 10 units the FA-Plus model.
DIN 46277
IMPORTANT: the maximum number of units that can be connected to a FA-Plus/C power
supply is 10, and 50 units in case of a FA-Plus model.
Link power supplies to connect more units than the specified as it's shown
on the next paragraph.
L
ink of several power supplies units.
The first power supply should be connected to the porter's exchange or door panel (if exists)
and to the first group of monitors or telephones; connect the next groups to the positive
terminal of its corresponding power supply.
To wire several power supplies link their ground terminals;
NEVER link positive terminals of different power supplies.
1st FA-Plus
PRI
~ ~
Main
SEC
+ + - -
2nd FA-Plus/C or FA-Plus
PRI
~ ~
Main
SEC
+ + - -
To the second group of
monitors or telephones.
To the exchange or door panel
and to the 1st group of
monitors or telephones.
56
TELEPHONE DESCRIPTION
D
escription of the T-940 Plus telephone.
b
d
a
c
e
a. Telephone handset.
b. Speaker grille.
c. Microphone hole.
d. Subjection hole.
e. Telephone cord connectors.
f. Function push buttons.
g. On-Off light indicator.
h. Call reception volume control.
i. Hook switch.
f
g
e
h
The telephone has a three positions switch placed on the bottom
part of the telephone (closest to the telephone cord connector)
that allows to control the call reception level volume.
i
F
unction push buttons.
a. On-Off push button.
After any telephone reset, and during the next 45 seconds,
all the telephone functions will be disabled, with the exception
of call reception.
b. This push button allows to make an intercom call when the handset
is not on the craddle. This function is described on page 59.
a
b
c
c. If the handset is on the craddle sends a panic call to the porter's
exchanges that have enabled the reception of this type of call.
If not, allows to call to the master porter's exchange.
During call reception and communication progresses allows
the lock release activation.
57
TELEPHONE DESCRIPTION
T
erminal connector description.
+,–:
A,D:
INT :
SA :
HZ- :
+ _ A D INT SA HZ-
positive, ground.
audio, digital communication.
intercom.
auxiliary calling device output.
door bell push button input.
TELEPHONE INSTALLATION
F
ix the telephone.
It will be necessary to open the telephone for wiring and
fixing purposes. To open the telephone insert a plain
screwdriver into the slots and rotate it as shown.
Avoid to place the telephone near to
heating sources, in dusty locations or
smoky environments.
The telephone can be fixed using an
electrical embedding box or directly
on the wall, as shown on the picture.
If the telephone will be installed directly
over the wall, drill two holes of Ø6mm.
on the specified positions, using 6mm.
wallplugs and Ø3,5 x 25mm. screws.
Pass the installation wires through the corresponding hole and
connect them as shown on the installation diagrams.
Close the telephone as shown on the picture. Once the telephone
is closed, connect the handset using the telephone cord and
put it on the craddle.
58
TELEPHONES PROGRAMMING
P
rogramming the telephones.
On systems with door panels, telephones and monitors programming must be done
from the door panels, as described on the corresponding instruction manual.
Once the programming has been finished, make a call from each apartment to the
porter's exchange: the display will show the corresponding assigned codes.
If no door panels are installed, program the telephones as follows.
Program the system with the porter's exchange handset lifted.
13:15
To enter the porter's exchange into program mode,
press key
and enter the administrator PIN code
(factory default: 1315), as described on page 47.
Switch off the telephone to be programmed.
Once the telephone is off, press the door release push button.
With the door release push button pressed
switch on the telephone.
a bc 2
d ef 3
j kl5
mno6
t uv8
wxyz9
1
To show that the system is ready for programming, the porter's
exchange will reproduce a sound and the display will show
the message program mode. At this moment, the door
release push button can be released. Lift the handset
to stablish audio communication with the porter's exchange.
1
0
a bc 2
d ef 3
j kl5
mno6
t uv8
wxyz9
Enter the code that will be used to call to
this telephone and press the OK key.
At this moment the porter's exchange
will reproduce a sound
and the telephone led will blink.
To program the telephone as master,
switch it off and on again.
To program it as slave, press the door
release push button.
To program it as slave with intercom
function press the center push button.
Each apartment must have one master unit only; in case of parallel units configure them
as slaves, both monitors or telephones.
Repeat these steps to program the rest of telephones.
Once the programming has been finished exit from the programming menu by pressing
CANCEL key. If you don't, the door porter's exchange will automatically exit after
two minutes with no operation.
59
OPTIONAL CONNECTIONS
I
ntercom function.
T-940 Plus telephone have intercom facility between two units of the same apartment.
To enable this function check the following conditions:
- One of the units has been configurated as master and the other unit as slave with
intercom, as described on page 58.
- Link the INT terminal of the units, as it is shown on the enclosed diagram.
To establish an intercom communication lift the handset and press the intercom push button;
acoustic tones will be reproduced on the handset confirming the call is in progress or
that the other unit is communicating with the porter's exchange. To establish communication
lift the handset of the called unit. If during an intercom communication a call is made from
the porter's exchange, acoustic tones will be heard on the master unit handset;
press the intercom push button of the master unit to establish communication with the
porter's exchange.
The reproduced acoustic tones are different depending on their provenance, that allows the
user to distinguish where the call is made from.
+ _ A D INT
+ _ A D INT
D
oor bell push button connection.
T-940 Plus telephone can be used to receive the calls made from the apartment door,
saving the use of a bell. Wire the push button of the apartment to the 'HZ–' and '–'
telephone terminals.
The reproduced acoustic tones are different depending on their provenance, that allows the
user to distinguish where the call is made from. If during a conversation a call is made from
the apartment door, acoustic tones will be reproduced on the hanset to advise that someone
is calling.
HZ- -
60
OPTIONAL CONNECTIONS
S
ystems with two porter's exchanges.
The maximum number of porter's exchanges in one system is two; one of them must be
configured as master and the other one as slave, as it is described on page 48.
Calls made from monitors or telephones by using the lock release push button will be always
received on the master porter's exchange. If the porter's exchange is switched off,
the incoming will be transferred to the slave unit (night operation). The incoming door panel
calls will be also received on the master exchange. However, each porter's exchange can
have its own address direct call code (see page 48).
Tekna Plus and Platea Plus monitors can select to which porter's exchange the call will be sent,
by using the second auxiliary push button. This function requires an internal modification
in the monitor, as it is described on the door panel instructions manual.
CETK-590 Plus porter's exchanges have intercom facility between two porter's exchanges. To
enable this function, link the INT terminal of the units, as it is shown on the enclosed diagram.
To establish an intercom communication, lift the handset and press the intercom push button;
acoustic tones will be reproduced on the handset confirming the call is in progress or
that the other unit is communicating. The display of the caller porter's exchange will show
the messages calling to concierge or system is busy. The display of the
called porter's exchange will show the message concierge incoming call. To
establish communication lift the handset of the called unit: both porter's exchanges displays
will show the message communication. If during an intercom communication a call is
made from the door panel, acoustic tones will be heard on the master unit handset, the picture
will appear and the porter's exchange display will show the message door incoming
call; press the OK key of the master unit to establish communication with the door panel,
or press the door release push button to activate the lock release. If the call has been made
from an apartment, the display of the master porter's exchange will show a new missed call.
CETK-590 Plus
-. ?!,
g hi 4
CN3
+ _ Vin Malla Vout A D
pqrs7
a bc 2
CETK-590 Plus
-. ?!,
d ef 3
j kl5
mno6
t uv8
wxyz9
+ - 0x *
ancel
INT
g hi 4
CN3
+ _ Vin Malla Vout A D
pqrs7
a bc 2
d ef 3
j kl5
mno6
t uv8
wxyz9
+ - 0x *
ancel
INT
61
T-940 Plus
T-940 Plus
+ _ A D
+ _ A D
CETK-590 Plus
T-940 Plus
-. ?!,
CN3
+ _ A D
+ _ Vin Malla Vout A D
g hi 4
pqrs7
a bc 2
d ef 3
j kl5
mno6
t uv8
wxyz9
+ - 0x *
ancel
CTO
M =Master.
S =Slave.
Access door panel
CN5
*Place this power supply
as closest as possible
to the first telephone.
FA-Plus/C or FA-Plus
PRI
~ ~
Main
8 7 6
1
3 4
2
SW2
SEC
+ + - -
M
10 9
5
SW1
CN2
CV2 CV1 - + + - D Aout Ain Vin- Vin+ Malla Vout+ Vout-
Lock r.
Vd.c
62
INSTALLATION DIAGRAMS
A
udio installation.
The installation diagram shows the connection of an audio system with one or several door
panels for the same building and one porter's exchange.
If the system has no door panels or only one, override the corresponding wiring.
If the system has more than one door panel, wire the second panel as shown on the
diagram. In case of more than two door panels, wire them as the second is connected.
Wire the porter's exchange as a telephone.
SECTIONS CHART
Distance
Terminal
50m.
150m.
+, –, CV1, CV2
1,00mm²
2,50mm²
Ain, Aout, A, D
0,25mm²
0,25mm²
For longer distances than the specified contact with your distributor.
Access door panel
CN5
FA-Plus/C
rev.938072
PRI
1
3 4
2
5
SW1
CN2
CV2 CV1 - + + - D Aout Ain Vin- Vin+ Malla Vout+ Vout-
230 110 0 - - + +
Main
8 7 6
SW2
SEC
S
10 9
Lock release
Vd.c.
63
* Take off JP1 jumper
of all the distributors
except in the last one.
D4L-PLUS
Tekna Plus
CN4
JP1
S
+ _ Vin Malla Vout A D
D1
Tekna Plus
E
CN4
+ _ Vin Malla Vout A D
D2
+
FA-Plus/C
rev.938072
CETK-590 Plus
-. ?!,
g hi 4
CN3
pqrs7
a bc 2
d ef 3
j kl5
mno6
t uv8
wxyz9
+ - 0x *
ancel
SEC
PRI
230 110 0 - - + +
+ _ Vin Malla Vout A D
CTO
Main
M =Master.
S =Slave.
Access door panel
CN5
*Place this power supply
as closest as possible
to the first distributor.
FA-Plus/C or FA-Plus
PRI
~ ~
Main
8 7 6
1
3 4
2
SW2
SEC
+ + - -
M
10 9
5
SW1
CN2
CV2 CV1 - + + - D Aout Ain Vin- Vin+ Malla Vout+ Vout-
Lock r.
Vd.c
64
INSTALLATION DIAGRAMS
v
ideo installation with coaxial cable.
The installation diagram shows the connection of a video system with one or several door panels
for the same building and one porter's exchange.
If the system has no door panels or only one, override the corresponding wiring.
If the system has more than one door panel, wire the second panel as shown on the diagram.
In case of more than two door panels, wire them as the second is connected.
Note: In installations with coaxial cable is recommended to install the porter's exchange between
door panel and the first distributor (the porter's exchange must have a dedicated power supply).
SECTIONS CHART
Distance
Terminal
C
50m.
150m.
+, –, CV1, CV2
1,00mm²
2,50mm²
Ain, Aout, A, D
0,25mm²
0,25mm²
Vin+, Vout+, Vin, Vout
* RG-59
* RG-59
oaxial cable characteristics RG-59 B/U MIL C-17.
*
VALUES
ELECTRICAL CHARACTERISTICS
Core max. electrical resistence to 20ºC
Copper core
Copper shield
Nominal capacitance
_
_
_
<67pf/m
Characteristic impedance
75 +
-3
<158 /Km
<10 /Km
_
>66,6 %
Velocity of Propogation
Access door panel
CN5
FA-Plus/C
rev.938072
PRI
1
3 4
2
5
SW1
CN2
CV2 CV1 - + + - D Aout Ain Vin- Vin+ Malla Vout+ Vout-
230110 0 - - + +
Main
8 7 6
SW2
SEC
S
10 9
Lock release
Vd.c.
Tekna Plus
65
Tekna Plus
EL562
JP1
EL562
JP1
* Take off JP1 jumper
of all the distributors
except in the last one.
+ _ A D Vp Mp
Md1
Vd1
+ _ A D Vpo Mpo
D6L-Plus/2H
Md6
Vd6
+
_
A
D
CT
+ _ A D Vp Mp
+
_
A
D
CT
JP1
+ _ A D Vpi Mpi
CETK-590 Plus
Tekna Plus
EL562
JP1
EL562
JP1
-. ?!,
g hi 4
pqrs7
a bc 2
d ef 3
j kl5
mno6
t uv8
wxyz9
+ - 0x *
ancel
+ _ A D Vp Mp
+ _ A D
Md1
Vd1
+ _ A D Vpo Mpo
D6L-Plus/2H
Md6
Vd6
+
_
A
D
CT
Vp Mp
+
_
JP1
+ _ A D Vpi Mpi
A
D
CT
M =Master.
S =Slave.
Access door panel
CN5
*Place this power supply
as closest as possible
to the first distributor.
FA-Plus/C or FA-Plus
PRI
~ ~
Main
8 7 6
1
3 4
2
SW2
SEC
+ + - -
M
10 9
5
SW1
CN2
CV2 CV1 - + + - D Aout Ain Vin- Vin+ Malla Vout+ Vout-
L.r
Vdc
66
INSTALLATION DIAGRAMS
v
ideo installation without coaxial cable.
The installation diagram shows the connection of a video system with one or several door panels
for the same building and one porter's exchange.
If the system has no door panels or only one, override the corresponding wiring.
If the system has more than one door panel, wire the second panel as shown on the diagram.
In case of more than two door panels, wire them as the second is connected.
Wire the porter's exchange as a monitor.
IMPORTANT: For this type of installation, the door panels must have the Dip-3 of the SW1
to ON (see door panel manual) and the porter's exchange and monitors
must have an EL562 plugged in each.
SECTIONS CHART
Distance
Terminal
50m.
150m.
+, –, CV1, CV2
1,00mm²
2,50mm²
Ain, Aout, A, D
0,25mm²
0,25mm²
CAT-5
CAT-5
Vin+,-, Vout+,-, Vp,d, Mp,d
For longer distances than the specified contact with your distributor.
Access door panel
CN5
FA-Plus/C
rev.938072
PRI
1
3 4
2
5
SW1
CN2
CV2 CV1 - + + - D Aout Ain Vin- Vin+ Malla Vout+ Vout-
230110 0 - - + +
Main
8 7 6
SW2
SEC
S
10 9
Lock release
Vd.c.
67
Inner door panel
BACKBONE 1
To the monitors
CN5
8 7 6
1
3 4
FA-Plus or FA-Plus/C
PRI
~ ~
M
10 9
2
EL500 mode
5
SW1
SW2
CN2
CV2 CV1 - + + - D Aout Ain Vin- Vin+ Malla Vout+ Vout-
SEC
+ + - -
Lock release
Vdc.
Main
D4L-PLUS
JP1
E
S
S1
+
BACKBONE 0
M =Master.
S =Slave.
FA-Plus/C
rev.938072
CETK-590 Plus
-. ?!,
g hi 4
CN3
PRI
230 110 0
Main
SEC
- - + +
+ _ Vin Malla Vout A D
pqrs7
a bc 2
d ef 3
j kl5
mno6
t uv8
wxyz9
+ - 0x *
ancel
CTO
68
INSTALLATION DIAGRAMS
BACKBONE 2
To the monitors
Inner door panel
CN5
8 7 6
1
3 4
2
FA-Plus or FA-Plus/C
PRI
~ ~
M
10 9
EL500 mode
5
SW2
SW1
CN2
CV2 CV1 - + + - D Aout Ain Vin- Vin+ Malla Vout+ Vout-
SEC
+ + - -
Lock release
Vd.c.
Main
D4L-PLUS
JP1
S
+
Continue
on the following page
E
S1
BACKBONE 0
General door panel
CN5
FA-Plus/C
rev.938072
PRI
230 110 0
Main
S
10 9
8 7 6
1
3 4
2
SW2
5
EL501 mode
SW1
CN2
CV2 CV1 - + + - D Aout Ain Vin- Vin+ Malla Vout+ Vout-
SEC
- - + +
Lock release
Vd.c.
69
BACKBONE 126
To the monitors
Inner door panel
CN5
FA-Plus or FA-Plus/C
8 7 6
1
3 4
2
SW2
5
EL500 mode
SW1
CN2
CV2 CV1 - + + - D Aout Ain Vin- Vin+ Malla Vout+ Vout-
SEC
+ + - -
PRI
~ ~
M
10 9
Lock release
Vd.c.
Main
D4L-PLUS
JP1
E
S1
+
S
S2
Coming
from previous page
IMPORTANT NOTES:
v
ideo installation with general entrance door panel
for residential complexes.
To wire and configure the system properly, use this instruction manual and the ones enclosed in the
internal building door panels and in the general door panels.
The installation diagram shows the connection of a video system with one general entrance door panel,
a porter's exchange and up to 127 internal building door panels.
In case of more than one general entrance door panel, wire them as it is shown on the instruction
manual of the general door panel. In case of no general entrance door panel, override the
corresponding wiring.
In video systems, use a D4L-Plus distributor at each inner door panel input except on the last one.
Remove the end of line jumper of all the distributors except in the last one.
In case of audio systems only, do not use coaxial cable neither distributors. On the inner buildings
backbones, coaxial cable must be replace by a negative wire.
In video systems with twisted pair use the D6L-Plus/2H distributor instead of D4L-Plus distributor. Take
off JP1 jumper of all the distributors except in the last one. Add a negative in the inner building
installation riser, (see page 65).
Vin- Vin+ Malla Vout+ VoutVin- Vin+ Malla Vout+ VoutBelow shows the connection of the twisted
pair instead of coaxial cable.
70
INSTALLATION DIAGRAMS
BACKBONE 127
To the monitors
Inner door panel
CN5
8 7 6
1
3 4
2
FA-Plus or FA-Plus/C
EL500 mode
5
SW2
SEC
+ + - -
PRI
~ ~
M
10 9
SW1
CN2
CV2 CV1 - + + - D Aout Ain Vin- Vin+ Malla Vout+ Vout-
Lock release
Vd.c.
Main
v
ideo installation with general entrance door panel
for residential complexes.
SECTIONS CHART
Terminal
Distance
100m.
300m.
+, –, CV1, CV2
1,50mm²
2,50mm²
Ain, Aout, A, D
0,25mm²
0,25mm²
Vin+, Vout+
* RG-59
* RG-59
CAT-5
CAT-5
Vin+, Vin-, Vout+, Vout-
Coaxial
Sw1-3 Off (1)
Twisted pair Sw1-3 On (1)
For longer distances than the specified contact with your distributor.
(1) See door panel manual.
* Coaxial cable characteristics RG-59 B/U MIL C-17, (see page 64).
CONFORMIDAD/COMPLIANCE
Este producto es conforme con las disposiciones de las Directivas Europeas
aplicables respecto a la Seguridad eléctrica 2006/95/CEE y la Compatibilidad
Electromagnética 2004/108/CEE, así como con la ampliación en la Directiva del
Marcado CE 93/68/CEE.
This product meets the essentials requirements of applicable European
Directives regarding Electrical Safety 2006/95/ECC, Electromagnetic Compatibility
2004/108/ECC, and as amended for CE Marking 93/68/ECC.
NOTA: El funcionamiento de este equipo está sujeto a las siguientes
condiciones:
(1) Este dispositivo no puede provocar interferencias dañinas, y (2)
debe aceptar cualquier interferencia recibida, incluyendo las que
pueden provocar un funcionamiento no deseado.
NOTE: Operation is subject to the following conditions:
(1) This device may not cause harmful interference, and (2) this device
must accept any received interference, including the ones that may
cause undesired operation.
Finalizada la vida útil del producto no lo tire en contenedores de
basura, contiene una pila en su interior.
The product contains a battery, so it should not be thrown into a
garbage container when it ends its useful life.
[email protected]
www.golmar.es
Golmar se reserva el derecho a cualquier modificación sin previo aviso.
Golmar reserves the right to make any modifications without prior notice.
71