1
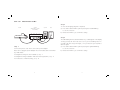
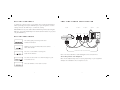
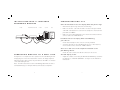
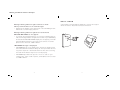
CID98-LS
Large Screen
Caller ID
Caller ID
Large Screen
CID98-LS
Español
Call Waiting ID combines Call Waiting with Caller ID.
TA B L E
OF
CONTENTS
Set-Up Instructions
2
Review Keys
4
Delete Key
4
Dial Key
5
call. All caller information is stored in the order in which it was
Flash Key
5
received for up to 99 calls.
New Call and Message Waiting Light
5
Display Contrast
6
Display Messages
6
2-Line Phone Installation
7
Installation with a Telephone Answering Machine
8
Connecting Directly t o a Wall Jack
8
Troubleshooting Tips
9
Desk Stand
11
Wall Mounting
12
Call Waiting ID enables you to identify an incoming caller
FCC Information
14
when you are already on the phone by showing the caller’s
Warranty
15
Safety Information
16
Say you are already on a call, Call Waiting ID will let you know who
is calling before you answer the phone! The service provides the
caller’s name and phone number, and the date and time of each
The Large Screen Caller ID makes viewing Caller ID information
even easier. The large, easy-to-read display can be viewed
effortlessly, even from across the room. In dark or dimly lit
environments, the night backlight feature automatically lights
up when the phone rings.
information on the Caller ID display. You can then choose to
answer the new call or not.
S E T- U P
INSTRUCTIONS
Step 2
To select the language (English or Español):
PHONE
ID UNIT
(ENLARGED TO SHOW
BACK PANEL)
OUTLET
JACK
a) Press and hold the DIAL key while pressing the left REVIEW key
to see the selections.
b) Release the DIAL key to confirm the setting.
PHONE
TEL LINE 9V DC
Step 3
The Call Waiting ID unit can dial numbers for you that appear in the display.
To help you dial, the unit needs to be set for your local dialing rules. Do
you dial local calls using seven digits, or in your area are you required to
dial ten digits?
Step 1
Connect the phone cords. Then connect the power adapter.
Note: Do not plug the power adapter into a wall outlet that is controlled
by a wall switch.
a) Press and hold the DIAL key while pressing the right REVIEW key
to see the selections.
b) Release the DIAL key to confirm the setting.
For diagram showing two-line installation, see p. 7
For diagram showing installation with an answering machine, see p. 8
For instructions on wall mounting, see p. 12
2
3
DIAL
I N D I C AT O R L I G H T
10:03 AM
12/30
G re e n i f y o u h a v e re c e i v e d n e w
calls that have not been reviewed.
CALLS 48
Red if you subscribe to Voice Mail
service and you have a new
message waiting.
303 - 555 - 1234
JOHNSTON, ROBERT
DELETE
DIAL
KEY
To dial the phone number shown in the display, simply press the REVIEW
keys until the number you want to dial is displayed. Lift the handset and
get a dial tone on the phone connected to the Call Waiting ID unit.
If the number in the display is a local call, press the DIAL key once, and
the unit will dial the last seven digits or all ten digits, according to your
setting for local dialing.
If the number in the display is a long distance call, press the DIAL key
twice within one second, and the unit will dial a “1” before dialing the
area code and number.
REVIEW
FLASH
FLASH
REVIEW
KEYS
Press the REVIEW keys to scroll through the call entries.
KEY
When a Call Waiting call comes in, you can press the FLASH key to
switch to the new call. To return to the original conversation, press
the FLASH key again.
Calls are displayed in the order they were received.
The left REVIEW key displays entries from newest to oldest (from 99 to 1).
NEW
The right REVIEW key displays entries from oldest to newest (from 1 to 99).
The new call indicator and message waiting light flashes green when
you have received any new calls that have not yet been reviewed. If
you subscribe to a voice mail service through your local phone company,
the light will flash red whenever you have a new voice mail message
waiting in your mailbox. For voice mail subscribers, Call Waiting ID model
#CID98-LS detects FSK Visual Message Waiting Indication signaling offered
by your local phone company.
When you reach the end of the call history, the screen displays END OF LIST.
DELETE
KEY
To erase the entry shown on the display press the DELETE key twice within
one second. The display will show DELETED and move to the next entry.
To erase all entries, press and hold the DELETE key for approximately five
seconds until CALLS DELETED appears on the display.
4
CALL
AND
MESSAGE
5
WAITING
LIGHT
D I S P L AY
CONTRAST
TWO-LINE
To adjust the contrast of the screen display, press and hold the DIAL key
while repeatedly pressing the DELETE key to cycle through the contrast
settings. Release the DIAL key to confirm the setting.
PHONE
IMPORTANT: Do not press and hold the DELETE key without pressing the
DIAL key. You could accidentally erase all the Caller ID entries if you press
only the DELETE key.
D I S P L AY
MESSAGES
PHONE
INSTALLATION
ID UNIT 1
PHONE
ID UNIT 2
TEL LINE
PHONE
OUTLET
JACK
TEL LINE
L1/L2
The calling party is blocking name and
number information.
Unable to receive information about the caller’s
name and number.
L1 L2
L1 L2
’
T H R E E - WAY P H O N E J A C K A D A P T E R S
An error occurred while receiving the
Caller ID information.
You have received new voice mail messages in your
Voice Mail service.
Note: You must subscribe to Call Waiting ID service on both lines.
T h re e - w a y P h o n e J a c k A d a p t e r s
One or both adapters may not be necessary, depending on your equipment.
Adapters are available at most telephone stores.
The total number of new calls received.
6
7
INSTALLATION WITH A
ANSWERING MACHINE
PHONE
ANSWERING MACHINE
TELEPHONE
TRO U B L E S H O O T I N G
TIPS
Caller ID information does not display when the phone rings.
ID UNIT
PHONE
OUTLET
JACK
TEL LINE
•
Wait until the phone rings twice before answering.
•
Make sure the line cord from the wall is inserted in the jack marked
“TEL LINE” and that the line cord from the telephone is inserted in the
jack marked “PHONE”.
•
Make sure your Caller Waiting ID service has been activated. Call the
Services Center at 1-800-770-2513.
I n f o r m a t i o n d o e s n o t d i s p l a y w h e n a C a l l Wa i t i n g
call comes in.
•
Check that all telephone line cords are correctly installed.
•
You must subscribe to the Call Waiting ID service for this feature to
work. Call the Services Center at 1-800-770-2513.
T h e re i s n o d i a l t o n e o n t h e t e l e p h o n e a t t a c h e d t o t h e
C a l l Wa i t i n g I D u n i t .
•
CONNECTING
D I R E C T LY
TO
A
WALL
JACK
A telephone is not required for the operation of the Call Waiting ID unit.
Simply plug one end of the included line cord into an empty telephone
wall jack and the other end into the jack marked “TEL LINE” on the back
of the Call Waiting ID unit.
Check all cords to make sure that all connections are secure.
The LCD display is dim.
•
Adjust the contrast control using the DELETE and REVIEW keys to darken
the display. See “DISPLAY CONTRAST” on Page 6 of this manual for
instructions.
Note: You will not be able to receive Call Waiting data when the unit is
connected directly to a wall jack and not connected to a telephone.
8
9
CID98LS_qwest Manual 11/8/00 8:17 AM Page 7
DESK
Message waiting indicator light continues to flash
w h e n y o u k n o w t h e re a re n o n e w m e s s a g e s .
•
STAND
A desk stand is provided with the CID98-LS to increase the angle in
which the unit sits. Attach the stand as shown below.
Unplug the AC adapter cord from the back of the Call Waiting ID unit.
Wait a few seconds and plug it back in.
Message waiting indicator light does not flash and
M E S S A G E WA I T I N G d o e s n o t a p p e a r.
•
If you hear an interrupted dial tone on your phone signaling that you
have new messages but the red light does not flash on your Call Waiting
ID unit and the MESSAGE WAITING display does not appear, your Visual
Message Waiting Indication service may not be turned on. Call the
Qwest Services Center at 1-800-770-2513.
LINE ERROR message is displayed.
•
LINE ERROR appears on the display if the unit detects anything other
than valid Caller ID information during the silent period after the first
ring. If the telephone is answered between the first and second ring,
the Caller ID information may not be received properly.
•
LINE ERROR may indicate the presence of noise or static on your
telephone line. If this condition persists, call the Qwest Services Center
at 1-800-770-2513.
10
11
CID98LS_qwest Manual 11/8/00 8:17 AM Page 8
WALL
MOUNTING
4. Attach the wall mounting bracket to the anchors using two screws.
5. Connect the phone cords to the Call Waiting ID unit
(see Step 1 of Set-up Instructions on Page 2).
6. Slide the unit down onto the wall mounting bracket until it
snaps into place.
7. Plug the power adapter into a wall outlet not controlled by a
wall switch and plug the power adapter jack into the top of the
Call Waiting ID unit.
1. Hold the wall mounting bracket against the wall and use a pencil to
mark the position of the mounting holes.
2. Remove the bracket and drill two holes into the wall to install the
plastic expanding wall anchors (not supplied).
3. Press a plastic anchor into each hole
and gently tap the anchors into the wall with a hammer until the
anchors are completely seated.
12
13
CID98LS_qwest Manual 11/8/00 8:17 AM Page 9
FCC
INFORMATION
LIMITED
To comply with FCC regulation, the following must be met:
This device complies with Part 68 of the FCC rules.
The label on the bottom of this device contains the FCC registration
number and ringer equivalence number.
If requested by the telephone company, the FCC registration number of
this device and the ringer equivalence number must be reported. USOC
jack RJ11. For reliable operation, the sum of the ringer equivalence numbers
for devices connected to a single telephone line should not exceed five.
This device must not be installed on coin operated telephone lines or
party lines.
WARRANTY
Consumerware, Inc. warrants this product to be free from manufacturing
defects for a period of one year from the original date of consumer purchase.
This warranty is limited to the repair or replacement of this product only
and does not extend to consequential or incidental damage to other
products that may be used with this unit. This warranty is in lieu of all
other warranties expressed or implied. If the unit should prove defective
within the warranty period, please call Consumerware Customer Service
at 1-800-456-6076 for product return information.
This device complies with Part 15 of the FCC rules.
Operation is subject to the following two conditions:
1. This device may not cause harmful interference.
2. This device must accept any interference received, including
interference that may cause undesired operation.
Repair work on this device must be done by Consumerware, Inc.
or an authorized repair station.
14
15
CID98LS_qwest Manual 11/8/00 8:17 AM Page 10
SAFETY
INFORMATION
This symbol is to alert you to important operating or servicing
instructions that may appear in this user's manual. Always
follow basic safety precautions when using this product to
reduce the risk of injury, fire, or electric shock.
1. Read and understand all instructions.
2. Follow all warnings and instructions marked on the product.
3. Unplug this product from the wall outlet before cleaning. Do not use
liquid cleaners or aerosol cleaners. Use a damp cloth for cleaning.
4. Do not use this product near water, for example: near a bathtub,
wash bowl, kitchen sink, or laundry tub, in a wet basement, or near
a swimming pool.
5. Do not place this product on an unstable cart, stand, or table.
This product may fall, causing serious damage to the product.
6. Install this product in a protected location where no one can step on
or trip over the line cord. Protect cords from damage or abrasion.
7. To reduce the risk of electric shock, do not disassemble this product,
but take it to a qualified serviceperson when some service or repair
work is required. Opening or removing covers may expose you to
dangerous voltages or other risks. Incorrect reassembly can cause electric
shock when the appliance is subsequently used.
16
8. Unplug this product from the wall outlet and refer servicing to qualified
service personnel under the following conditions:
a) When the power supply cord or plug is damaged or frayed.
b) If liquid has been spilled into the product.
c) If the product does not operate normally by following the operating
instructions. Adjust only those controls that are covered by the operating
instructions because improper adjustment of other controls may result
in damage and will often require extensive work by a qualified technician
to restore the product to normal operation.
d) If the product has been exposed to rain or water.
e) If the product has been dropped or the cabinet has been damaged.
f) If the product exhibits a distinct change in performance.
9. Avoid using a telephone (other than a cordless type) during an electrical
storm. There may be a remote risk of electric shock from lightning.
10. Do not use the telephone to report a gas leak in the vicinity of
the leak.
11. Use only the following type AC power adapter: 120 volt AC, 9 volt DC,
100mA, Polarity - Center / Tip Positive.
17
F o r q u e s t i o n s re g a rd i n g t h e o p e r a t i o n o f y o u r d i s p l a y
12.Este producto viene equipado con un enchufe polarizado en línea (el
que tiene una pata más ancha que las otras). Como medida de seguridad
sólo puede enchufarse de una manera. Si no entra completamente,
intente invirtiendo el enchufe. Si no logra hacerlo, llame a un electricista
para que le cambie el tomacorriente obsoleto. No anule la función del
enchufe polarizado.
18
unit, call the Qwest Services Center at 1-800-770-2513.
13.No sobrecargue los tomacorrientes de la pared ni las extensiones
eléctricas porque podría correr el riesgo de producir un incendio o
recibir una descarga eléctrica.
C O N S E RV E E S TA S I N S T R U C C I O N E S .
SAVE THESE INSTRUCTIONS.
13. Do not overload wall outlets and extension cords as this can result in
the risk of fire or electric shock.
P a r a p re g u n t a s a c e rc a d e l f u n c i o n a m i e n t o d e s u u n i d a d
de visualización, llame a Qwest Services Center al
1-800-770-2513.
12. This product is equipped with a polarized line plug (a plug having one
blade wider than the other). This plug will fit into the power outlet
only one way. This is a safety feature. If you are unable to insert the
plug fully into the outlet try reversing the plug. If the plug should still
not fit, contact your electrician to replace your obsolete outlet. Do not
defeat the safety purpose of the polarized plug.
18
CID98LS_qwest Manual 11/8/00 8:17 AM Page 11
La función de Call Waiting ID combina las funciones de
CONTENIDO
llamadas en espera con identificación de llamadas. Supongamos
Instrucciones Para Instalar la Unidad
2
que ya está en una llamada, Call Waiting ID le permite saber quién
Teclas Review
4
está llamando antes de que conteste el teléfono. El servicio
Tecla Delete
4
proporciona el nombre y el número de la persona que está llamando,
Tecla DIAL
5
y la fecha y la hora de cada llamada. Toda la información de la
Tecla FLASH
5
llamada se almacena en el orden en que se recibieron las llamadas,
Indicador de llamada nueva y mensaje en espera
5
hasta un total de 99 llamadas.
Contraste de Pantalla
6
Mensajes en Pantalla
6
Con la ventanilla grande de Caller ID es todavía más fácil consultar
Instalación con teléfono de dos líneas
7
la información de identificación de llamada. La información se puede
Instalación con un contestador automático
8
ver y leer fácilmente, incluso desde el otro lado de la habitación.
Conexión directa a un enchufe de pared
8
En el caso de lugares oscuros o con poca iluminación, la
Sugerencias para la localización de averías
9
retroiluminación se enciende automáticamente cuando el
Base de sobremesa
11
teléfono suena.
Información den la pared
12
Información de la FCC
14
Call Waiting ID le permite identificar la llamada que está entrando
Garantía
15
cuando usted ya está hablando por teléfono, pues le muestra la
Información sobre seguridad
16
información de la llamada en la ventanilla de Caller ID. De esa
manera, usted decide si desea contestar la nueva llamada.
INSTRUCCIONES
LA UNIDAD
PARA
INSTALAR
Paso 2
Para seleccionar el idioma (inglés o español):
TELÉFONO
UNIDAD DE VISUALIZACIÓN
(AMPLIADA PARA MOSTRAR
PANEL POSTERIOR)
TOMACORRIENTE
ENCHUFE
a) Presione la tecla DIAL y manténgala presionada mientras oprime la tecla
REVIEW izquierda para ver las opciones.
b) Suelte la tecla DIAL para confirmar la configuración.
PHONE
TEL LINE 9V DC
Paso 3
La unidad Call Waiting ID es capaz de marcar los números que se muestran
en la pantalla. Para que la unidad pueda marcar, debe estar configurada
según lo requerido en su zona para llamadas locales. ¿Marca usted siete
dígitos para llamadas locales o tiene que marcar diez dígitos en su zona?
a) Mantenga presionada la tecla DIAL mientras presiona la tecla
derecha REVIEW para ver las alternativas.
Paso 1
Conecte los cables del teléfono. Luego conecte el adaptador de corriente.
b) Suelte la tecla DIAL para confirmar su selección.
Nota: No enchufe el adaptador de corriente en un tomacorriente controlado
por un interruptor de pared.
Para el diagrama de instalación de dos líneas, ver pág. 7.
Para el diagrama de instalación con un contestador, ver pág. 8.
Para instrucciones sobre cómo instalarlo en la pared, ver pág. 12.
2
3
TECLA
LUZ INDICADORA
10:03 AM
12/30
Ve rd e s i u s t e d h a re c i b i d o n u e v a s
l l a m a d a s q u e a ú n n o h a re v i s a d o .
CALLS 48
Roja si usted está suscrito al servicio
de correo de voz (Voice Mail) y tiene
un nuevo mensaje.
303 - 555 - 1234
JOHNSTON, ROBERT
DELETE
DIAL
REVIEW
FLASH
TECLAS
REVIEW
DIAL
Para marcar el número que se indica en la ventanilla, simplemente presione
una de las teclas REVIEW hasta que aparezca el número deseado. Descuelgue
el auricular del teléfono que está conectado a la unidad de Call Waiting
y espere a escuchar el tono de marcar.
Si el número indicado en la ventanilla es local, presione la tecla DIAL una
vez y la unidad marcará los últimos siete dígitos o todos los diez dígitos,
según lo requerido en su zona para llamadas locales. Si el número indicado
en la ventanilla es de larga distancia, presione la tecla DIAL dos veces en
menos de un segundo y la unidad marcará un “1” antes de marcar el
código de acceso y el número de teléfono.
Presione las teclas REVIEW para revisar la lista de llamadas.
Las llamadas aparecen en el orden en que se reciben.
TECLA
La tecla REVIEW izquierda muestra las llamadas comenzando
por la más reciente hasta la más antigua (de 99 a 1).
Cuando entra una llamada por la unidad de Call Waiting, puede presionar
la tecla FLASH para contestarla. Para volver a la conversación original,
presione otra vez la tecla FLASH.
La tecla REVIEW derecha muestra las llamadas comenzando
por la más antigua hasta la más reciente (de 1 a 99).
Cuando haya llegado al final del registro de llamadas, aparece
en la pantalla FIN DE LA LISTA.
TECLA
DELETE
Para borrar las llamadas mostradas en pantalla presione la tecla DELETE dos
veces en un período de un segundo. La palabra BORRADA aparecerá en
pantalla y se avanza al registro que sigue.
Para borrar todos los registros, presione la tecla DELETE, y manténgala
presionada por un período aproximado de cinco segundos, hasta que
aparezcan en pantalla las palabras LLAMS BORRADAS.
4
FLASH
INDICADOR DE LLAMADA
MENSAJE EN ESPERA
NUEVA
Y
El indicador verde de llamada nueva y mensaje en espera se enciende y se
apaga cuando haya recibido alguna llamada nueva que aún no haya revisado.
Si tiene servicio de correo de voz por medio de la compañía de teléfonos
de su localidad, el indicador se muestra rojo y se enciende y se apaga cada
vez que reciba un mensaje de correo de voz en su buzón. Si está inscrito
en un servicio de correo de voz, el modelo #CID98-LS de Call Waiting ID
detecta la señal de indicación visual de mensaje en espera de la compañía
telefónica de su localidad.
5
CONTRASTE
DE
PANTALLA
Para ajustar el contraste de la pantalla de visualización, presione la tecla
DIAL y manténgala presionada mientras oprime repetidamente la tecla
DELETE hasta obtener el resultado deseado. Suelte la tecla DIAL para
confirmar la configuración.
INSTALACIÓN CON
DE DOS LÍNEAS
TELÉFONO
IMPORTANTE: No mantenga presionada la tecla DELETE sin oprimir también
la tecla DIAL. Podría borrar accidentalmente todas las llamadas acumuladas
de Caller ID si oprime solamente la tecla DELETE.
TELÉFONO
UNIDAD
DE ID 1
PHONE
UNIDAD
DE ID 2
TEL LINE
PHONE
TOMACORRIENTE ENCHUFE
TEL LINE
L1/L2
MENSAJES
EN
PANTALLA
L1 L2
L1 L2
La persona que llama tiene bloqueado el nombre
y número de teléfono.
No est á recibiendo información sobre el nombre y número
de teléfono de la persona que llama.
Ocurrió un error cuando se recibía la información
del Caller ID.
Usted ha recibido nuevos mensajes en su servicio
Voice Mail.
El número total de nuevas llamadas recibidas.
6
A D A P TA D O R E S D E E N C H U F E D E T R E S V ÍA S
Nota: Usted deberá estar suscrito al servicio Call Waiting ID
en ambas líneas.
A d a p t a d o re s d e e n c h u f e d e t re s v í a s .
Dependiendo del equipo que tenga, quizás no sea necesario instalar uno
o ambos adaptadores. Los adaptadores se pueden encontrar en la mayor ía
de las tiendas de teléfonos.
7
INSTALACIÓN
AUTOMÁTICO
TELÉFONO
CON
UN
CONTESTADOR
AUTOMÁTICO
CONTESTADOR
UNIDAD
ID
PHONE
TOMACORRIENTE
ENCHUFE
SUGERENCIAS
DE AVERÍAS
PARA
LA
LOCALIZACIÓN
L a i n f o r m a c i ó n d e i d e n t i f i c a c i ó n d e l l a m a d a s n o a p a re c e
c u a n d o e l t e l é f o n o re p i c a .
•
Espere a que repique dos veces antes de contestar.
•
Verifique que el cable de la línea de la pared está conectado en el
enchufe marcado “TEL LINE” y que el cable de la línea del teléfono
está conectado en el enchufe marcado “PHONE”.
•
Cerciórese de que su servicio de Call Waiting ID haya sido activado.
Llame al 1-800-770-2513.
TEL LINE
L a i n f o r m a c i ó n n o a p a re c e e n p a n t a l l a c u a n d o e n t r a u n a
llamada en espera.
CONEXIÓN
DE PARED
DIRECTA
A
UN
ENCHUFE
No se necesita un teléfono para utilizar de la unidad Call Waiting ID.
Simplemente enchufe un extremo del cable que se incluye en un enchufe
de pared que no esté ocupado y el otro extremo en el enchufe marcado
"TEL LINE" en la parte trasera de la unidad Call Waiting ID.
Nota: Usted no podrá recibir los datos de llamada en espera cuando la
unidad esté conectada directamente al enchufe de la pared y no al teléfono.
8
•
Revise si todos los cables de la línea telefónica están instalados
correctamente.
•
Tiene que suscribirse al servicio Call Waiting ID, para
poder tenerlo. Llame al 1-800-770-2513.
No hay tono de marcado en el teléfono conectado a la
unidad Call Waiting ID.
•
Revise todos los cables para asegurarse de que están bien hechas todas
las conexiones.
L a p a n t a l l a L C D a p a re c e o p a c a .
•
Ajuste el control de contraste usando las teclas DELETE y REVIEW para
oscurecer la pantalla. Ver las instrucciones en “CONTRASTE DE
PANTALLA” en la página 6 de este manual.
9
CID98LS_qwest Manual 11/8/00 8:17 AM Page 17
La luz indicadora de mensaje en espera sigue encendida a
pesar de que no hay ningún mensaje nuevo.
•
Desenchufe el cable del adaptador CA de la parte trasera de la unidad
Call Waiting ID. Espere unos segundos y vuélvala a conectar.
BASE
DE
SOBREMESA
La unidad CID98-LS cuenta con una base de sobremesa que aumenta la
inclinación de la unidad. Instale la base como se muestra a continuación.
No funciona la luz indicadora de mensaje en espera y no
a p a re c e l a c o n s i g u i e n t e s e ñ a l M E N S A J E .
•
Si escucha un tono de marcar interrumpido en su teléfono, lo cual le
indica que tiene mensajes nuevos, pero no parpadea el indicador
luminoso rojo de su unidad de Call Waiting ID y no aparece la indicación
de MENSAJE EN ESPERA, es posible que su servicio de indicación visual
de mensaje en espera no haya sido activado. Llame a Qwest Services
Center al 1-800-770-2513.
A p a re c e e l m e n s a j e L I N E A C O N FA LTA .
•
El mensaje LINEA CON FALTA aparece en el visualizador si la unidad
detecta cualquier cosa que no sea la información de identificación de
llamadas válida durante el período de silencio después del primer
repique. Si se contesta el teléfono entre el primer y segundo repique,
la información del Caller ID podría no recibirse bien.
•
LINEA CON FALTA podría indicar la presencia de ruido o estática en su
línea telefónica. Si este problema continúa, llame a Qwest Services
Center al 1-800-770-2513.
10
11
CID98LS_qwest Manual 11/8/00 8:17 AM Page 18
INSTALACIÓN
EN
LA
PARED
4) Sujete el soporte del teléfono en el zoquete usando dos tornillos.
5) Conecte los cables del teléfono a la unidad Call Waiting ID
(ver el paso 1 de las instrucciones de instalación en la página 2).
6) Deslice la unidad hacia abajo sobre el soporte de montaje hasta que
trabe en su lugar.
7) Enchufe el adaptador de corriente en un tomacorriente que no esté
controlado por un interruptor de pared y conecte el otro extremo al
enchufe superior de la unidad Call Waiting ID.
1) Apoye el soporte de montaje contra la pared y con un lápiz marque la
posición de los hoyos.
2) Quite el soporte y taladre dos hoyos en la pared para instalar los
zoquetes o anclas expansivas (no se incluyen).
3) Meta el zoquete plástico en el hoyo y péguele golpecitos suaves con
un martillo para que se asiente completamente en la pared.
12
13
CID98LS_qwest Manual 11/8/00 8:17 AM Page 19
INFORMACIÓN
DE
LA
FCC
Para cumplir con los reglamentos de la FCC, se deben satisfacer las
siguientes condiciones:
Este aparato cumple con la Sección 68 de los
re g l a m e n t o s d e l a F C C .
La etiqueta que aparece en la parte inferior de este dispositivo contiene el
número de registro de la FCC y el número de equivalencia de repique.
Si se lo pide la compañía telefónica, usted deberá informarle del número de
registro de la FCC de este aparato, al igual que el número de equivalencia
de repique. Enchufe RJ11 de USOC. Para un funcionamiento confiable, no
deberá pasar de cinco la suma de los números de equivalencia de los
repicadores de los aparatos conectados a una sola línea. Este dispositivo no
se deberá instalar en líneas telefónicas operadas con monedas ni en líneas
compartidas.
GARANTÍA
LIMITADA
Consumerware, Inc. garantiza este producto contra defectos de fábrica
por un período de un año de la fecha original de su compra. Dicha garantía
se limita únicamente a la reparación o reemplazo de este producto y no
se extiende a daños consecuentes o incidentales causados a otros productos
que puedan usarse con esta unidad. Esta garantía reemplaza todas las
otras garantías explícitas o implícitas. Si la unidad resultara defectuosa
durante el período de garantía, llame por favor al Servicio al Cliente de
Consumerware, al 1-800-456-6076 para información acerca de la devolución
del producto.
Este dispositivo cumple con la Sección 15 de los
re g l a m e n t o s d e l a F C C .
El uso está sujeto a las siguientes dos condiciones:
1. Este aparato no deberá causar interferencia dañina.
2. Este aparato deberá aceptar interferencias recibidas, incluyendo
aquélla que pudiera causar un funcionamiento indeseable.
Consumerware, Inc. o un taller de servicio autorizado, deberá hacer todo
trabajo de reparación de este aparato.
14
15
CID98LS_qwest Manual 11/8/00 8:17 AM Page 20
INFORMACIÓN
SOBRE
SEGURIDAD
Este símbolo sirve para advertirle que el manual de instrucciones
podría tener instrucciones de servicio importantes. Siempre
siga las precauciones básicas en materia de seguridad cuando
use este producto para disminuir los riesgos de lesiones,
incendio o choque eléctrico.
1. Lea y entienda todas las instrucciones.
2. Siga todas las advertencias e instrucciones para este producto.
3. Desconecte este producto del tomacorriente antes de limpiarlo. No use
limpiadores líquidos o de aerosol. Use un paño húmedo para limpiarlo.
4. No use este producto cerca de donde haya agua, por ejemplo, cerca
de la tina del baño, palangana, lavatrastos o lavandero, en un sótano
húmedo, o cerca de la piscina o alberca.
5. No ponga este producto en un lugar, mesa o mueble con ruedas de
poca estabilidad, porque podría caerse y dañarse.
6. Instálelo en un lugar protegido para que nadie tropiece ni se pare sobre
el cable. Proteja los cables contra daños o abrasiones.
7. Para reducir el riesgo de un choque eléctrico no desarme este producto.
Llévelo a una persona capacitada para darle servicio o repararlo. El abrir
o quitar tapas podría exponerlo a voltajes peligrosos u otros riesgos.
El ensamblado incorrecto podría causarle un choque eléctrico cuando
el aparato se vuelva a usar.
16
8. Desenchúfelo del tomacorriente y llévelo con un técnico calificado si
se presentan las condiciones siguientes:
a) Cuando el cordón del suministro de electricidad o el enchufe están
dañados o desgastados.
b) Cuando le ha caído algún líquido.
c) Si no funciona bien después de seguir las instrucciones de uso. Ajuste
solamente los controles indicados en esas instrucciones, ya que el ajuste
incorrecto de otros controles podría dañar el aparato que a menudo
requiere mucho trabajo de un técnico para que pueda volver a funcionar
de manera normal.
d) Si el producto ha estado expuesto al agua o lluvia.
e) Si se ha caído el aparato o se le ha dañado el mueble.
f) Si hay un cambio notable en el funcionamiento del aparato.
9. Evite usar un teléfono que no sea de tipo inalámbrico durante una
tormenta eléctrica. Existe la remota posibilidad de recibir una descarga
eléctrica por un rayo.
10. No use el teléfono para reportar una fuga de gas cercana al mismo.
11.Use solamente los siguientes adaptadores de CA: 120 voltios CA, 9
voltios CD, 100mA de polaridad positiva en el centro del conector.
17