1
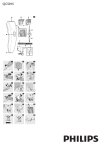
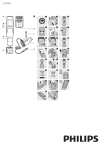
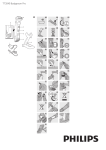
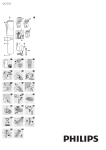
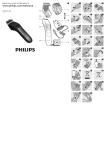
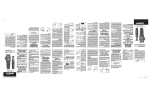
QC5015
A
D
1
E
F
M
H
B
G
I
K
J
L
C
2
3
4
6
7
9
10
12
13
14
15
16
17
18
19
5
1
2
1
8
2
11
1
2
ENGLISH
Introduction
Congratulations on your purchase and welcome
to Philips! To fully benefit from the support that
Philips offers, register your product at www.philips.
com/welcome.
General description (Fig. 1)
A Cutting element
B On/off switch
C Socket for appliance plug
D Hair clipping comb attachment
E Beard trimming comb attachment
F Adjustment button
G Cleaning brush
H Scissors
I Hairdresser’s comb
J Appliance plug
K Adapter
L Charging light
M Hair removal groove
Important
Read this user manual carefully before you use the
appliance and save it for future reference.
-
-
-
-
Do not charge the appliance for more than 24
hours.
-
Note:The appliance cannot be run directly from the
mains.
Charge the appliance for at least 10 hours (NiCd
battery) or 18 hours (NiMh battery) before you
use it for the first time.
-
1 Make sure the appliance is switched off when
you charge it.
Caution
Never immerse the handle in water or any
other liquid, nor rinse it under the tap.
Do not use the appliance in the bath or in the
shower.
Use, charge and store the appliance at a
temperature between 15°C and 35°C.
Only use the adapter supplied to charge the
appliance.
If the adapter is damaged, always have it
replaced with one of the original type in order
to avoid a hazard.
Do not use the appliance when the clipping
attachment or one of the combs is damaged or
broken as this may cause injury.
This appliance is only intended for clipping
human scalp hair. Do not use it for any other
purpose.
Compliance with standards
This Philips appliance complies with all standards
regarding electromagnetic fields (EMF). If handled
properly and according to the instructions in this
user manual, the appliance is safe to use based on
scientific evidence available today.
Preparing for use
Charging
When the appliance is fully charged, it has a
cordless trimming time of up to 35 minutes (NiCd
battery) or 50 minutes (NiMh battery).
4203.000.5742.3
-
2 Insert the appliance plug into the appliance
and insert the adapter into the wall
socket. (Fig. 2)
, The charging light on the adapter goes on to
indicate that the appliance is charging (Fig. 3).
Note:The charging light does not indicate when the
appliance is fully charged.
Note: If the appliance has not been used for a long
time, it must be recharged for at least 10 hours
(NiCd battery) or 18 hours (NiMh battery).
Optimising the lifetime of the battery
Discharge the battery completely twice a year
by letting the motor run until it stops.
Remove the adapter from the wall socket
when the battery is fully charged.
-
Danger
Make sure the adapter does not get wet.
Warning
Check if the voltage indicated on the adapter
and on the appliance corresponds to the
local mains voltage before you connect the
appliance.
The adapter contains a transformer. Do not cut
off the adapter to replace it with another plug,
as this causes a hazardous situation.
This appliance is not intended for use by
persons (including children) with reduced
physical, sensory or mental capabilities, or lack
of experience and knowledge, unless they
have been given supervision or instruction
concerning use of the appliance by a person
responsible for their safety.
Children should be supervised to ensure that
they do not play with the appliance.
Make overlapping passes over the head to
ensure that the appliance catches all the hairs
that need to be cut.
Make sure that the flat part of the hair clipping
comb attachment is fully in contact with the
scalp to obtain an even cutting result.
To achieve a good result with curly, sparse or
long hair, you can use a comb to guide the hair
towards the appliance.
Regularly remove cut hair from the comb
attachment. If a lot of hair has accumulated
in the comb attachment, remove it from the
appliance and blow and/or shake the hair out
of it.
Using the appliance
Clipping with the hair clipping comb
attachment
Note: Make sure your hair is clean and dry. Do not
use the appliance on freshly washed hair.
1 Comb your hair with a styling comb in the
direction of hair growth. (Fig. 4)
2 Slide the comb attachment into the guiding
grooves of the appliance (‘click’). (Fig. 5)
Make sure that the comb attachment has been
properly slid into the grooves on both sides.
3 To set the comb attachment to the desired
hair length, press the adjustment button (1)
and slide the comb attachment to the desired
hair length setting (2). (Fig. 6)
Hair length settings
With the hair clipping comb attachment attached,
the appliance has 7 different hair length settings:
Hair length setting
Resulting hair length
1
3mm
2
6mm
3
9mm
4
12mm
5
15mm
6
18mm
7
21mm
Contouring without hair clipping comb
attachment
You can use the appliance without comb
attachment to cut your hair very close to the skin
(0.8mm) or to contour the neckline and the area
around the ears.
Note:When you use the appliance without comb
attachment, it cuts the hair very close to the skin.
1 To remove the comb attachment, press the
adjustment button (1) and pull the comb
attachment off the appliance (2). (Fig. 8)
2 Before you start to contour the hairline
round the ears, comb the hair ends over the
ears.
3 Tilt the appliance in such a way that only one
edge of the cutting element touches the hair
ends. (Fig. 9)
4 Only cut the hair ends. The hairline has to be
close to the ear.
5 To contour the neckline and sideburns,
turn the appliance and make downward
strokes. (Fig. 10)
6 Move the appliance slowly and smoothly.
Follow the natural hairline.
Trimming with the beard trimming
comb attachment
1 Always comb your beard or moustache with
a fine comb before you start to trim.
2 Slide the comb attachment into the guiding
grooves of the appliance (‘click’). (Fig. 11)
Make sure that the comb attachment has been
properly slid into the grooves on both sides.
3 To set the comb attachment to the desired
hair length, press the adjustment button on
the back of the appliance (1) and slide the
comb attachment to the desired hair length
setting (2). (Fig. 12)
Beard hair length settings
With the beard trimming comb attachment
attached, the appliance has 7 different hair length
settings:
4 Slide the on/off switch to the ‘on’ position.
Hair length setting
Resulting hair length
5 Move the appliance through the hair slowly.
1
2mm
2
4mm
3
6mm
4
8mm
5
10mm
6
12mm
7
14mm
-
Tips:
Start to clip at the highest setting of the comb
attachment and reduce the hair length setting
gradually.
Write down the hair length settings you
selected to create a certain hairstyle as a
reminder for future clipping sessions.
To clip in the most effective way, move
the appliance against the direction of hair
growth. (Fig. 7)
Try different directions (upward, downward
or across), because hair doesn’t all grow in the
same direction.
4 Slide the on/off switch to the ‘on’ position.
2/9
5 Place the beard trimming comb attachment
on the skin and move the appliance slowly
over the beard.
-
-
Tips:
When you trim your beard for the first time,
start at the highest hair length setting and
reduce the hair length setting gradually.
To trim in the most effective way, move
the appliance against the direction of hair
growth. (Fig. 13)
Do not move the appliance too fast. Make
smooth and gentle movements. Make sure the
flat surface of the comb attachment always
stays in contact with the skin.
Regularly remove cut hair from the comb
attachment. If a lot of hair has accumulated in
the comb attachment, remove the comb from
the appliance and blow and/or shake the hair
out of it.
Trimming at the unique ‘stubble look
setting’
1 To create a ‘stubble look’, trim with the beard
trimming comb attachment set to hair length
setting 1. (Fig. 14)
Trimming without the beard trimming
comb attachment
Use the appliance without beard trimming comb
attachment to trim and contour your beard and
remove single hairs.
1 To remove the comb attachment, press the
adjustment button (1) and pull the comb
attachment off the appliance (2). (Fig. 8)
2 Make well-controlled movements and touch
the hair lightly with the cutting element.
Always remove the battery before you
discard and hand in the appliance at an official
collection point. Dispose of the battery at an
official collection point for batteries. If you have
trouble removing the battery, you can also take
the appliance to a Philips service centre. The
staff of this centre will remove the battery for
you and will dispose of it in an environmentally
safe way (Fig. 18).
Removing the battery
Only remove the battery when you discard the
appliance. Make sure the battery is completely
empty when you remove it.
Do not connect the appliance to the mains again
after the battery has been removed.
1 Disconnect the appliance from the mains and
let the appliance run until the motor stops.
2 Insert a screwdriver into the opening in
the bottom of the appliance. Then move
the screwdriver upwards to open the
housing (Fig. 19).
3 Pry the battery out of the appliance.
4 Cut the wires close to the battery with a
pair of household scissors and dispose of the
battery properly.
Guarantee and service
If you need service or information or if you have a
problem, please visit the Philips website at
www.philips.com or contact the Philips Consumer
Care Centre in your country (you find its phone
number in the worldwide guarantee leaflet). If
there is no Consumer Care Centre in your country,
go to your local Philips dealer.
Note:To contour your beard, hold the appliance with
the cutting element pointing upwards (Fig. 15).
Cleaning
Do not use abrasives, scourers, compressed air or
liquids such as alcohol, petrol or acetone to clean
the appliance.
Only clean the appliance and the adapter with the
brush supplied.
Do not use any sharp objects to clean the
appliance.
Clean the appliance after every use.
1 Make sure the appliance is switched off
and disconnected from the mains before
you clean it.
2 To remove the comb attachment, press the
adjustment button (1) and pull the comb
attachment off the appliance (2). (Fig. 8)
3 Clean the cutting element and the hair
removal groove behind the cutting element
with the brush supplied (Fig. 16).
Note:The cutting element cannot be detached and
the appliance cannot be opened.
The appliance does not need any lubrication.
Replacement
Only the adapter, the hair trimming comb
attachment and the beard trimming comb
attachment are replaceable.
-
-
Environment
Do not throw away the appliance with the
normal household waste at the end of its life,
but hand it in at an official collection point for
recycling. By doing this, you help to preserve
the environment (Fig. 17).
The built-in rechargeable battery contains
substances that may pollute the environment.
4203.000.5742.3
3/9
Preparación para su uso
Carga
Español
Introducción
Enhorabuena por la compra de este producto y
bienvenido a Philips. Para sacar el mayor partido
de la asistencia que Philips le ofrece, registre su
producto en www.philips.com/welcome.
Descripción general (fig. 1)
A Elemento de corte
B Interruptor de encendido/apagado
C Toma para la clavija del aparato
D Peine-guía del cortapelos
E Peine-guía del barbero
F Botón de ajuste
G Cepillo de limpieza
H Tijeras
I Peine de peluquero
J Clavija del aparato
K Adaptador de corriente
L Piloto de carga
M Ranura para eliminar el pelo
Importante
Antes de usar el aparato, lea atentamente este
manual de usuario y consérvelo por si necesitara
consultarlo en el futuro.
-
-
-
-
-
Peligro
Asegúrese de que el adaptador no se moje.
Advertencia
Antes de enchufar el aparato, compruebe si el
voltaje indicado en el adaptador y en el propio
aparato se corresponde con el voltaje de red
local.
El adaptador incorpora un transformador. No
corte el adaptador para sustituirlo por otra
clavija, ya que podría provocar situaciones de
peligro.
Este aparato no debe ser usado por personas
(adultos o niños) con su capacidad física,
psíquica o sensorial reducida, ni por quienes
no tengan los conocimientos y la experiencia
necesarios, a menos que sean supervisados o
instruidos acerca del uso del aparato por una
persona responsable de su seguridad.
Asegúrese de que los niños no jueguen con
este aparato.
Precaución
No sumerja nunca el mango en agua u otros
líquidos, ni lo enjuague bajo el grifo.
No utilice el aparato en la bañera o en la
ducha.
Utilice y guarde el aparato a una temperatura
entre 15 °C y 35 °C.
Utilice únicamente el adaptador suministrado
para cargar el aparato.
Si el adaptador está dañado, sustitúyalo siempre
por otro del modelo original para evitar
situaciones de peligro.
No utilice el aparato si el accesorio para cortar
el pelo o alguno de los peines-guía está dañado
o roto, ya que podría ocasionarle lesiones.
Este aparato está ideado para cortar
únicamente el pelo de la cabeza humana. No lo
utilice con otra finalidad.
Cumplimiento de normas
Este aparato Philips cumple todos los estándares
sobre campos electromagnéticos (CEM). Si
se utiliza correctamente y de acuerdo con las
instrucciones de este manual, el aparato se puede
usar de forma segura según los conocimientos
científicos disponibles hoy en día.
Cuando el aparato está completamente cargado,
proporciona un tiempo de corte sin cable de
hasta 35 minutos (batería de NiCd) o 50 minutos
(batería de NiMh).
No cargue el aparato durante más de 24 horas.
Nota: El aparato no se puede utilizar enchufado
directamente a la red.
Cargue el aparato durante al menos 10 horas
(batería de NiCd) o 18 horas (batería de NiMh)
antes de utilizarlo por primera vez.
1 Asegúrese de que el aparato esté apagado
cuando lo cargue.
2 Introduzca la clavija del aparato en el mismo y
enchufe el adaptador a la red. (fig. 2)
, El piloto de carga del adaptador se
iluminará para indicar que el aparato se está
cargando (fig. 3).
Anote las posiciones de longitud de pelo
seleccionadas para conseguir un determinado
estilo de corte, como recordatorio para futuras
ocasiones.
Para cortar de la forma más eficaz, desplace
el aparato en dirección contraria a la de
crecimiento del pelo. (fig. 7)
Pruebe a hacerlo en distintas direcciones (es
decir, hacia arriba, hacia abajo o en diagonal),
ya que todo el pelo no crece en la misma
dirección.
Haga pasadas que se solapen por toda la
cabeza para asegurarse de que el cortapelos
atrapa todo el cabello que quiera cortar.
Asegúrese de que la parte plana del peine-guía
esté completamente en contacto con el cuero
cabelludo para conseguir un corte uniforme.
Para conseguir un buen resultado con pelo
rizado, escaso o largo, utilice un peine para
dirigir el pelo hacia el aparato.
Elimine con regularidad el pelo cortado que
se haya acumulado en el peine-guía. Si se ha
acumulado mucho pelo, quite el peine-guía del
aparato y sople o sacuda para eliminarlo.
-
-
Nota: El piloto de carga no indica cuándo está el
aparato completamente cargado.
Nota: Si no ha utilizado el aparato desde hace mucho
tiempo, deberá recargarlo durante al menos 10 horas
(batería de NiCd) o 18 horas (batería de NiMh).
Cómo optimizar la vida útil de la
batería
Descargue totalmente la batería dos veces al
año dejando que el motor funcione hasta que
se pare.
Desenchufe el adaptador de la red cuando la
batería esté completamente cargada.
-
Uso del aparato
Corte de pelo con el peine-guía del
cortapelos
Nota: Asegúrese de que el cabello esté limpio y seco.
No utilice el aparato con el pelo recién lavado.
1 Peine el pelo con un peine en la dirección de
crecimiento del pelo. (fig. 4)
2 Deslice el peine-guía del cortapelos por las
ranuras de guía del aparato (“clic”). (fig. 5)
Asegúrese de que el peine-guía se ha deslizado
correctamente por las ranuras de ambos lados.
3 Para ajustar el peine-guía a la longitud de pelo
deseada, pulse el botón de ajuste (1) y deslice
el peine hasta la posición adecuada (2). (fig. 6)
Posiciones de longitud de corte
Con el peine-guía colocado en el cortapelos, el
aparato ofrece 7 posiciones diferentes de longitud:
Posición de longitud de
barba
Longitud de barba
resultante
1
3 mm
2
6 mm
3
9 mm
4
12 mm
5
15 mm
6
18 mm
7
21 mm
4 Desplace el interruptor de encendido
/apagado a la posición de encendido.
5 Desplace el aparato lentamente por el pelo.
-
4203.000.5742.3
-
Consejos:
Comience a cortar el pelo con la posición
más alta del peine-guía y vaya reduciendo la
posición de longitud gradualmente.
Perfilado sin el peine-guía
Puede usar el aparato sin peine-guía para cortar
el pelo al ras (0,8 mm) o para perfilar la línea del
cuello y la zona de alrededor de las orejas.
Nota: Cuando utilice el aparato sin el peine-guía, se
cortará el pelo al ras.
1 Para quitar el peine-guía, pulse el botón
de ajuste (1) y separe el accesorio del
aparato (2). (fig. 8)
2 Antes de comenzar a perfilar la zona de
alrededor de las orejas, peine las puntas del
pelo sobre las orejas.
3 Incline el aparato de forma que sólo un
extremo del elemento de corte toque las
puntas del pelo. (fig. 9)
4 Corte sólo las puntas del pelo. La línea del
pelo debe quedar próxima a la oreja.
5 Para perfilar la línea del cuello y las patillas,
dé la vuelta al aparato y haga pasadas hacia
abajo. (fig. 10)
6 Mueva el aparato despacio y suavemente. Siga
la línea natural del pelo.
Corte de barba con el peine-guía del
barbero
1 Antes de comenzar a cortar, peine la barba o
el bigote con un peine fino.
2 Deslice el peine-guía del barbero por las
ranuras de guía del aparato (“clic”). (fig. 11)
Asegúrese de que el peine-guía se ha deslizado
correctamente por las ranuras de ambos lados.
3 Para ajustar el peine-guía a la longitud de
barba deseada, pulse el botón de ajuste
situado en la parte posterior del aparato (1)
y deslice el peine hasta la posición
adecuada (2). (fig. 12)
Posiciones de longitud de barba
Con el peine-guía del barbero colocado en el
aparato, éste ofrece 7 posiciones diferentes de
longitud de barba:
Posición de longitud de
barba
Longitud de barba
resultante
1
2 mm
2
4 mm
3
6 mm
4
8 mm
4/9
Posición de longitud de
barba
Longitud de barba
resultante
5
10 mm
6
12 mm
7
14 mm
4 Desplace el interruptor de encendido
/apagado a la posición de encendido.
5 Coloque el peine-guía del barbero sobre la
piel y mueva el aparato lentamente por la
barba.
-
-
-
Consejos:
Cuando recorte su barba por primera vez,
comience con la posición más alta del peineguía y vaya reduciendo la posición de longitud
gradualmente.
Para cortar de la forma más eficaz, mueva
el aparato en dirección contraria a la de
crecimiento del vello. (fig. 13)
No mueva el aparato demasiado deprisa. Haga
movimientos lentos y suaves asegurándose
de que la superficie plana del peine-guía esté
siempre en contacto con la piel.
Elimine con regularidad el pelo cortado que
se haya acumulado en el peine-guía. Si se ha
acumulado mucho pelo, quite el peine-guía del
aparato y sople o sacuda para eliminarlo.
Corte con la posición “aspecto de barba
de dos días”
1 Para obtener un “aspecto de barba de dos
días”, corte con el peine-guía del barbero en
la posición de longitud 1. (fig. 14)
Corte sin el peine-guía del barbero
Utilice el aparato sin el peine-guía del barbero para
recortar y perfilar la barba y eliminar pelos sueltos.
1 Para quitar el peine-guía, pulse el botón
de ajuste (1) y separe el accesorio del
aparato (2). (fig. 8)
2 Haga movimientos bien controlados y toque
la barba ligeramente con el elemento de
corte.
-
-
Medio ambiente
Al final de su vida útil, no tire el aparato junto
con la basura normal del hogar. Llévelo a un
punto de recogida oficial para su reciclado.
De esta manera ayudará a conservar el medio
ambiente (fig. 17).
La batería recargable incorporada contiene
sustancias que pueden contaminar el medio
ambiente. Quite siempre la batería antes de
deshacerse del aparato o de llevarlo a un
punto de recogida oficial. Deposite la batería
en un lugar de recogida oficial. Si no puede
sacar la batería, puede llevar el aparato a un
servicio de asistencia técnica de Philips. El
personal del servicio de asistencia extraerá
las baterías y se deshará de ellas de forma no
perjudicial para el medio ambiente (fig. 18).
Extracción de la batería
Quite la batería únicamente cuando deseche
el aparato. Asegúrese de que la batería esté
completamente descargada cuando la quite del
aparato.
No conecte el aparato a la red una vez extraída
la batería.
1 Desenchufe el aparato de la red y deje que
funcione hasta que el motor se pare.
2 Inserte un destornillador en la abertura de
la parte inferior del aparato. A continuación,
empuje el destornillador hacia arriba para
abrir la carcasa (fig. 19).
3 Separe la batería del aparato.
4 Corte los cables de conexión de la batería
con unas tijeras y deseche la batería
adecuadamente.
Garantía y servicio
Si necesita información o si tiene algún problema,
visite la página Web de Philips en www.philips.com,
o póngase en contacto con el Servicio de Atención
al Cliente de Philips en su país (hallará el número
de teléfono en el folleto de la garantía mundial). Si
no hay Servicio de Atención al Cliente de Philips
en su país, diríjase a su distribuidor local Philips.
Nota: Para perfilar la barba, sostenga el aparato con
el elemento de corte hacia arriba (fig. 15).
Limpieza
No use agentes abrasivos, estropajos, aire
comprimido ni líquidos tales como alcohol,
gasolina o acetona, para limpiar el aparato.
Limpie el aparato y el adaptador únicamente
con el cepillo que se suministra.
No utilice objetos afilados para limpiar el aparato.
Limpie siempre el aparato después de usarlo.
1 Antes de empezar a limpiarlo, asegúrese de
que el aparato esté apagado y desenchufado
de la red.
2 Para quitar el peine-guía, pulse el botón
de ajuste (1) y separe el accesorio del
aparato (2). (fig. 8)
3 Limpie el elemento de corte y la ranura
para eliminar el pelo, situada detrás del
elemento de corte, con el cepillo que se
suministra (fig. 16).
Nota: El elemento de corte no se puede desmontar y
el aparato no se puede abrir.
El aparato no necesita lubricación.
Sustitución
Sólo se pueden sustituir el adaptador, el peine-guía
del cortapelos y el peine-guía del barbero.
4203.000.5742.3
5/9