1
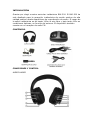
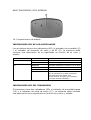
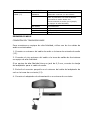
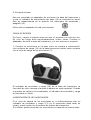
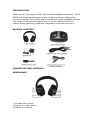
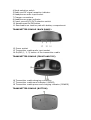
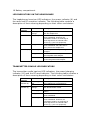
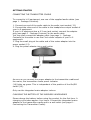
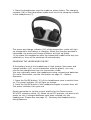
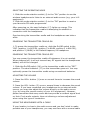
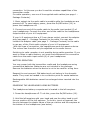
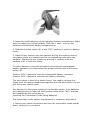
BAI-300
AURICULAR INALÁMBRICO
Manual de usuario
INTRODUCCIÓN
Gracias por elegir nuestro auricular inalámbrico BAI-300. El BAI-300 ha
sido diseñado para la recepción inalámbrica de sonido estéreo de alta
calidad estéreo desde dispositivos de reproducción de audio. El rango de
la señal inalámbrica es de hasta 100m al aire libre y bajo techo 60m en
condiciones óptimas, en función del entorno. El dispositivo también
cuenta con un receptor de radio FM.
CONTENIDO
CONEXIONES Y CONTROL
AURICULARES
1. Aumentar el volumen
2. Búsqueda de emisora de radio FM
3. Reducir el volumen
4. Selector de modo
5. Indicador de señal
6. Entrada de audio para dispositivo externo
7. Conexión para carga
8. Indicador de encendido
9. Selección de alimentación: Batería interna o pilas
10. Botón de encendido y apagado
11. Compartimento de pilas.
BASE-TRANSMISOR VISTA POSTERIOR
12. Toma de corriente
13. Entrada de audio
14. Botón de encendido On / Off
BASE-TRANSMISOR VISTA FRONTAL
16. Conexión para carga de batería
17. Indicador de señal de audio
18. Indicador de encendido y carga
BASE-TRANSMISOR VISTA INFERIOR
19. Compartimento de batería
INDICADORES LED DE LOS AURICULARES
Los auriculares tienen dos indicadores LED; el indicador de encendido (8)
y el indicador de recepción de radio y de RF (5). La siguiente tabla
contiene una descripción de su significado en función de su color y
estado:
INDICADOR LED
IND. ENCENDIDO (8)
IND. DE RECEPCIÓN
(5)
ESTADO
ON, NARANJA
OFF
PARPADEO
NARANJA
PARPADEO VERDE
ON VERDE
ON NARANJA
DESCRIPCIÓN
Auriculares encendidos
Auriculares apagados
Intentado establecer conexión con la base
Escaneando emisoras
Enlace establecido con la base
El enlace se ha establecido.
Pero el transmisor no está recibiendo
una señal de audio desde una
fuente externa de audio (por ejemplo,
su equipo de alta fidelidad).
INDICADORES LED DEL TRANSMISOR
El transmisor tiene dos indicadores LED; el indicador de encendido/carga
(18) y el indicador de señal de audio (17). La siguiente tabla contiene
una descripción de su significado en función de su color y estado:
INDICADOR LED
AUDIO (17)
ENCENDIDO (18)
ESTADO
PARPADEO
NARANJA
ON NARANJA
ON VERDE
ON NARANJA
ON VERDE
OFF
DESCRIPCIÓN
Intentado conectar con auriculares
El enlace se ha establecido.
Pero el transmisor no está recibiendo
una señal de audio desde una
fuente externa de audio (por ejemplo,
su equipo de alta fidelidad).
En enlace se ha establecido
correctamente
Cargando baterías
Alimentado por adaptador
Apagado
PRIMEROS PASOS
CONEXIÓN DEL TRASMISOR-BASE
Para conectarse a equipos de alta fidelidad, utilice uno de los cables de
audio suministrados:
1. Conecte un extremo del cable de audio a la toma de entrada de audio
(13).
2. Conectar el otro extremo del cable a la toma de salida de Auriculares
su equipo de alta fidelidad.
Si su equipo de alta fidelidad tiene un jack de 6,3 mm, conecte la clavija
del adaptador para el cable de audio.
3. Enchufe el conector pequeño en el extremo del cable del adaptador de
red en la toma de corriente (12).
4. Conecte el adaptador de alimentación a una toma de corriente.
5. Encienda la base.
Una vez conectado el adaptador de corriente a la base del transmisor y
la red, el indicador de alimentación del base (18) se iluminará en verde.
Esto es independiente de la posición del interruptor de encendido /
apagado (15).
Utilice sólo el adaptador de red suministrado.
CARGA DE BATERÍA
Por favor, cargue la batería antes de usar el producto por primera vez.
Un ciclo de carga dura aproximadamente cuatro horas. Conecte el
adaptador de red a la base del transmisor y el otro extremo a la pared
1. Coloque los auriculares en la base como se muestra a continuación.
Los contactos de carga (16) de la base-transmisor deben hacer contacto
con la toma de carga de los auriculares (7).
El indicador de encendido y carga (18) de la base del transmisor se
iluminará de color naranja mientras la batería se está cargando. Cuando
el proceso de carga se ha completado, el indicador de encendido y carga
se iluminará en verde.
ALIMENTACIÓN DE LOS AURICULARES
Si el nivel de batería de los auriculares es lo suficientemente alto (el
indicador de encendido y carga (12) en el transmisor debe estar en
verde), puede quitar los auriculares de la base del transmisor.
Si lo desea, puede alimentar los auriculares con baterías convencionales.
1. Pulse el botón On / Off (10) de los auriculares una vez para
encenderlo. El indicador de encendido (8) se iluminará de color naranja.
Por favor, recuerde para fijar la posición correcta para el interruptor de la
fuente de alimentación de selección DC1/DC2 (9). Cuando se establece
en el DC2, el dispositivo se enciende sólo si las pilas cargadas se han
insertado en los auriculares.
SELECCIÓN DEL MODO DE FUNCIONAMIENTO
1. Deslice el interruptor de selección de modo (4) a "WL" para usar los
auriculares con una fuente externa.
2. Deslice el interruptor de selección de modo (4) a la posición "FM" para
recibir sus programas favoritos de radio FM.
ENCENDIDO DEL TRANSMISOR
1. Para alimentar la base del transmisor, deslice el interruptor ON / OFF
a la posición "ON".
Después de encender la base, el indicador de señal (17) se iluminará de
color naranja. Esto indica que el transmisor está tratando de establecer
una conexión con los auriculares.
Nota: La sincronización de la base del transmisor y los auriculares puede
tardar algún tiempo.
APAGADO DEL TRANSMISOR
Usted puede apagar el transmisor cuando no vaya a usarlo. Cuando está
apagado, no se transmitirá ninguna señal de RF
1. Deslice el interruptor ON/OFF (14) en la base del transmisor a la
posición "OFF". El indicador audio (17) en el transmisor se apagará.
Si lo desea, puede alimentar la base del transmisor usando las baterías
convencionales.
AJUSTE DE VOLUMEN
1. Pulse el botón VOL + (1) una o varias veces para aumentar el
volumen del sonido.
2. Pulse el botón VOL-(3) una o varias veces para disminuir el sonido
Si ha conectado los auriculares a una fuente de audio externa, también
puede ajustar el volumen directamente en la fuente de audio (por
ejemplo, utilizando el control remoto de su equipo de alta fidelidad). Sin
embargo, recuerde que muchos dispositivos de audio proporcionan un
nivel de señal constante en sus salidas RCA de audio, lo que no permite
un ajuste de volumen cuando se utiliza este tipo de conexión.
RECEPCIÓN DE EMISORAS DE RADIO
Usted puede cambiar el modo de funcionamiento de sus auriculares para
la recepción de radio FM en cualquier momento.
1. Encienda los auriculares pulsando el botón On/Off (10) una vez. El
indicador de encendido (8) se iluminará de color naranja.
2. Deslice el interruptor de selección de modo (4) de los auriculares a la
posición "FM". El indicador de recepción de la radio (5) no se enciende si
no hay emisoras de radio seleccionadas. Se iluminará en verde tan
pronto como una estación haya sido sintonizada.
3. Pulse el botón de búsqueda (2) de los auriculares una vez para buscar
la siguiente estación disponible.
Durante el escaneo el indicador de recepción de radio (5) parpadeará en
color verde.
4. Cada vez que presione el botón de búsqueda pasará a la siguiente
estación disponible hasta el final de la banda de FM. Después la
exploración continuará automáticamente desde el comienzo de la banda
de FM.
La recepción de la señal FM depende de las condiciones ambientales. Si
la emisora deseada no se puede recibir sin ruidos ni interferencias,
pruebe a cambiar su ubicación.
Para utilizar el sintonizador FM, no es necesario alimentar el transmisor.
Usted puede desactivarlo pulsando el botón On/Off (14).
USO DE LOS AURICULARES CON CABLE
Puede usar los auriculares con una fuente de sonido externa conectada
directamente. Para el funcionamiento a través de cable, utilice un cable
doble jack para conectar los auriculares a la fuente de sonido.
1. La reproducción de música a través del cable de audio es posible,
mientras que los auriculares estén apagados.
2. Conecte un extremo del cable de audio a la toma de entrada de audio
(6) de los auriculares. Conecte el otro extremo del cable a la toma de
salida de auriculares de su equipo.
Si su equipo de alta fidelidad tiene un conector de 6,3 mm estéreo,
conecte el adaptador para el cable. También puede usar el cable RCAjack.
Con este tipo de conexión, los auriculares funcionan como un dispositivo
pasivo. El volumen, por lo tanto, sólo puede ser ajustado en la fuente de
audio.
El cambio a la recepción de radio no es posible durante el funcionamiento
por cable. Si desea escuchar emisoras de radio, primero debe
desconectar el cable de conexión de la toma de entrada de audio (6) de
los auriculares.
FUNCIONAMIENTO A BATERÍA DE LOS AURICULARES
Usted puede usar tanto el receptor como el emisor a baterías
convencionales. Las baterías no están incluidas. Debe quitar las pilas
cuando el dispositivo no va a ser usado durante un tiempo prolongado.
Respete el medio ambiente. Las pilas usadas no deben tirarse a la basura
doméstica. Deben ser entregadas en un punto de recogida de residuos
de pilas.
Las baterías recargables AAA no se pueden ser recargadas cuando se
inserta en el dispositivo emisor.
El compartimiento de la batería está situado en el auricular izquierdo.
Para colocar las pilas siga las siguientes instrucciones:
1.
Apague
los
auriculares
con
el
botón
On/Off
(10).
2. Mantenga el auricular izquierdo con la mano y usar la otra mano para
tirar de la almohadilla de la auricular izquierdo. Para ello, inserte una uña
en la ranura entre el marco de plástico de la almohadilla y el auricular en
la parte inferior de los auriculares (véase figura):
La almohadilla está fijada sobre un marco de plástico. Tiene que tirar de
este marco junto con la almohadilla. No tire solo de la almohadilla en sí.
3. Inserte dos pilas AAA en el compartimiento de baterías del auricular.
Asegúrese de hacer coincidir la polaridad correcta. Tenga en cuenta los
signos + y – en los iconos de las pilas y dentro del compartimento de la
batería.
4. Deslice el selector de funciones (9) a la posición "DC2" para cambiar a
modo de batería.
5. Colocar la almohadilla sobre el auricular de manera que las muecas de
plástico encajen presionando con suavidad.
Para cambiar la alimentación entre baterías convencionales y batería
interna recargable debe seleccionar la posición correcta con el selector
de funciones (9):
Posición "DC1" representa la operación de la batería interna recargable
Posición "DC2" representa la operación de la batería convencional
Preste atención al selector DC, porque si no hay pilas insertadas, en la
posición DC2, el auricular no se encenderá.
FUNCIONAMIENTO A BATERÍA DEL TRANSMISOR
El compartimento de batería del transmisor se encuentra en la parte
inferior.
1. Retire todos los cables de conexión y gire la base del transmisor
2. Abra el compartimiento de la batería deslizando la tapa.
3. Inserte tres pilas AAA en el compartimiento de la batería. Tenga en
cuenta los signos + y – .
4. Colocar la tapa del compartimiento de la batería. A continuación,
cierre la tapa del compartimento de la batería hasta que encaje en su
lugar.
Si ha insertado pilas en el transmisor y lo conecta a la toma de corriente
(12), el funcionamiento de la batería se desactivará automáticamente.
Esto le ayuda a ahorrar energía de la batería cuando el dispositivo está
conectado a la red eléctrica a través del adaptador de corriente.
Si el transmisor está funcionando a baterías convencionales, no cargará
la batería del auricular.
SOLUCIÓN DE PROBLEMAS
Puede resolver los problemas más comunes mediante el uso de los
siguientes consejos. Si el problema persiste después de comprobar las
soluciones sugeridas, póngase en contacto con nuestra Servicio Técnico.
No intente reparar el producto usted mismo.
Los
auriculares
no
encienden,
no
hay
luces
indicadoras.
* Cargue la batería incorporada o insertar las baterías convencionales.
* Compruebe la posición del selector de funciones (9). Para el
funcionamiento a la batería convencional, se debe establecer en el "DC2"
posición: para el funcionamiento de la batería interna recargable que se
debe establecer en "DC1".
No hay salida de sonido.
* Verifique que el transmisor ha sido encendido y se encuentra
conectado correctamente a la fuente de audio. Inicie la reproducción en
la fuente de sonido.
El transmisor no tiene alimentación.
* ¿Ha conectado el adaptador de corriente o insertado baterías
suficientemente cargadas?
El sonido se interrumpe o no es claro
* La batería recargable o las pilas insertadas de los auriculares están
agotadas. Recargar la batería interna o cambiar las pilas.
* Usted está fuera del alcance máximo del transmisor. Acérquese a la
base del transmisor.
* Comprobar si el transmisor está enviando una señal de audio. El
indicador de envío (17) se iluminará en verde.
* Compruebe si los auriculares reciben las señales del transmisor.
* Compruebe si la fuente de audio reproduce una señal de audio. Puede
utilizar un cable de conexión para conectar los auriculares directamente
a la fuente de audio, para esta comprobación.
“Las especificaciones pueden variar sin previo aviso”
IMPORTADO
I.R.P., S.L.
AVDA. SANTA CLARA DE CUBA 5
SEVILLA, SPAIN
DECLARACIÓN DE CONFORMIDAD
I.R.P., S.L. declara bajo su responsabilidad que el aparato indicado cumple los
requisitos de las siguientes directivas:
DIRECTIVAS EMC
EN55013:2001+A1:2003+A2:2006
EN55020:2007
EN61000-3-2:2006
EN61000-3-3:2008
EN300 440-2 V1.3.1
EN301 489-1 V1.8.1
EN301 489-3 V1.4.1
Descripción del aparato:
Modelo BRIGMTON BAI-300
Auricular inalámbrico
Importador: I.R.P., S.L.
Dirección: Avda. Santa Clara de Cuba 5, 41007, Sevilla.
BAI-300
WIRELESS HEADPHONES
Instruction Manual
INTRODUCTION
Thank you for choosing our BAI-300 wireless headphones product. These
863Mhz Wireless Headphones on your hands have been designed for
receiving wireless high-quality stereo sound from audio playback devices.
The range of the wireless signals is up to 100m outdoors and 60m
indoors under optimum conditions, depending on the environment.
PACKAGE CONTENTS
CONNECTORS AND CONTROLS
HEADPHONES
1 Increase the volume
2 Search for radio station
3 Reduce the volume
4 Mode selection switch
5 Radio and RF signal reception indicator
6 Headphones audio input socket
7 Charger connections
8 Headphones power indicator
9 Power source DC1/DC2 selection switch
10 Headphones On/Off button
11 Removable ear cushion pad with battery compartment
TRANSMITTER CRADLE (BACK PANEL)
12 Power socket
13 Transmitter cradle audio input socket
14 On/Off (1, 2, 3) button of the transmitter cradle
TRANSMITTER CRADLE (FRONT AND TOP)
16 Transmitter cradle charging connection
17 Transmitter cradle send indicator (AUDIO)
18 Transmitter cradle power and charging indicator (POWER)
TRANSMITTER CRADLE (BOTTOM)
19 Battery compartment
LED INDICATORS ON THE HEADPHONES
The headphones have two LED indicators: the power indicator (8) and
the radio and RF reception indicator. The following table contains a
description of their meaning depending on their colour and status:
LED
indicator
AUDIO (17)
POWER (18)
Status
Description
Blinking,
orange
Attempting to establish a connection
with the headphones.
On, orange
The RF link to the headphones has
been established. However, the
transmitter cradle is not receiving an
audio signal from an external audio
source (e.g. your hi-fi equipment).
On, green
A connection to the headphones has
been established and audio data is
being sent to the headphones.
On, orange
The headphones battery is being
charged.
On, green
The transmitter cradle is powered via
the integrated mains adapter.
Off
The transmitter cradle is not powered
via the integrated mains adapter.
TRANSMITTER CRADLE LED INDICATORS
The transmitter cradle has two LED indicators: the power/charging
indicator (18) and the RF send indicator. The following table contains a
description of their meaning depending on their colour and status:
LED
indicator
Power
indicator (8)
Reception
indicator (5)
Status
Description
On, orange
The headphones are powered on.
Off
The headphones are powered off.
Blinking,
orange
Attempting to establish a connection
with the transmitter cradle.
Blinking, green
The device is scanning for a radio
station.
On, green
The RF link to the transmitter cradle has
been established.
On, orange
The RF link to the transmitter cradle has
been established. However, the
transmitter cradle is not receiving an
audio signal from an external audio
source (e.g. your hi-fi equipment).
GETTING STARTED
CONNECTING THE TRANSMITTER CRADLE
To connect to hi-fi equipment, use one of the supplied audio cables (see
page 1 - Package Contents).
1. Connect one end of the audio cable to the audio input socket (13).
2. Connect the other end of the cable to the headphones output socket of
your hi-fi equipment.
If your hi-fi equipment has a 6.3 mm jack socket, connect the adapter
plug (see page 1 - Package Contents) to the audio cable.
You may also connect the adapter cable (see page 1 – Package
Contents) to the cable to use the Cinch audio outputs of your hi-fi
equipment.
3. Plug the small plug at the cable end of the mains adapter into the
power socket (12).
4. Plug the power adapter into a wall outlet.
As soon as you connect the power adapter to the transmitter cradle and
the mains, the transmitter cradle power indicator
(18) lights up green. This is independent of the position of the On/Off
switch (15).
Only use the integrated mains adapter indoors.
CHARGING THE BATTERY OF THE WIRELESS HEADPHONES
Please charge the battery before using the product for the first time. A
charging cycle takes approx. four hours. Connect the integrated mains
adapter to the transmitter cradle and to a wall outlet (see page 6 –
Connecting the Transmitter Cradle).
1. Place the headphones onto the cradle as shown below. The charging
contacts (16) of the transmitter cradle must touch the charging contacts
of the headphones (7).
The power and charge indicator (18) of the transmitter cradle will light
up orange while the battery is charging. When the charging process is
completed, the power and charge indicator will light up green.
If you place the headphones onto the transmitter cradle while they are
switched on, they will be switched off automatically.
POWERING THE HEADPHONES ON/OFF
If the battery level of the headphones is high enough (the power and
charge indicator (12) on the transmitter must be green), you may
remove the headphones from the transmitter cradle.
You may optionally power the headphones using conventional batteries.
For more information, see the information on page 12 – Battery
Operation.
1. Press the On/Off button (10) of the headphones once to switch them
on. The power indicator (8) will light up orange.
2. Press the On/Off button of the headphones again to switch them off.
The power indicator then goes out.
Please remember to set the correct position for the Power source
DC1/DC2 selection switch (9). When set at DC2 position, the device will
power on only if charged batteries have been inserted into the
headphones. Please also see page 12 - Powering the Headphones by
Using Batteries.
SELECTING THE OPERATING MODE
1. Slide the mode selection switch (4) to the “WL” position to use the
wireless headphones to listen to an external audio source (e.g. your hi-fi
equipment).
2. Slide the mode selection switch (4) to the “FM” position to receive
your favourite FM radio programmes.
After powering on, the send indicator (17) lights up orange. This
indicates that the transmitter cradle is attempting to establish a
connection with the headphones.
Synchronising the transmitter cradle and the headphones can take a
while.
POWERING THE TRANSMITTER CRADLE ON
1. To power the transmitter cradle on, slide the On/Off switch to the
“ON” (position 1 is 863.5M, position 2 is 864M, position 3 is 864.5M),
and position 2 (864M) is the Default frequency of headphone.
POWERING THE TRANSMITTER CRADLE OFF
You may power the transmitter cradle off whenever it is not needed.
When powered off, it will not transmit any RF signals but the headphones
battery will still be charged.
1. Slide the On/Off switch (14) on the transmitter cradle to the “OFF”
position. The send indicator (17) on the transmitter goes out. You may
optionally power the transmitter cradle using conventional batteries.
ADJUSTING THE VOLUME
1. Press the VOL+ button (1) once or several times to increase the sound
volume.
2. Press the VOL- button (3) once or several times to decrease the sound
volume. If you have connected your headphones to an external audio
source, you may also adjust the volume directly on the audio source
(e.g. by using the remote control of your hi-fi equipment). However,
please remember that many audio devices provide a constant signal level
on their Cinch audio outputs, thus not allowing a volume adjustment
when using this type of connection.
USING THE HEADPHONES WITH A CABLE
If your location is close to the audio source and you don’t wish to make
portable use of your headphones, you may use them with a normal cable
connection. In this case you don’t need the wireless capabilities of the
transmitter cradle.
For cable operation, use one of the supplied audio cables (see page 1 –
Package Contents).
1. Music output via the audio cable is possible while the headphones are
powered off. To save battery power, press the On/Off button (10) to
power the headphones off.
2. Connect one end of the audio cable to the audio input socket (6) of
your headphones. Connect the other end of the cable to the headphones
output socket of your hi-fi equipment.
If your hi-fi equipment has a 6.3 mm stereo socket, connect the adapter
plug (see page 1 – Package Contents) to the cable. You may also
connect the adapter cable (see page 1 – Package Contents) to the cable
to use any of the Cinch audio outputs of your hi-fi equipment.
With this type of connection, the headphones work as a passive device.
The volume can therefore only be adjusted on the audio source.
Switching to radio reception is not possible during cable operation. If you
want to listen to radio stations, you must first disconnect the connection
cable from the audio input socket (6) of your headphones.
BATTERY OPERATION
You may power both the transmitter cradle and the headphones using
conventional batteries. Batteries are not included in the package.
Remove the batteries when the device is not to be used for a long time.
Respect the environment. Old batteries do not belong in the domestic
waste. They must be handed in to a collection point for waste batteries.
Rechargeable AAA batteries cannot be recharged when inserted into the
device.
POWERING THE HEADPHONES USING BATTERIES
The headphones battery compartment is located in the left earpiece.
1. Power the headphones off. To do this, press the On/Off button (10).
2. Hold the left earpiece with your hand and use the other hand to pull
the ear cushion off the left earpiece. To do this, insert a fingernail into
the slot between the plastic frame of the ear cushion and the earpiece at
the bottom of the headphones (see below).
3. Insert two AAA batteries into the earpiece battery compartment. Make
sure you match the correct polarity. Note the + and – icons on the
batteries and inside the battery compartments.
4. Slide the function switch (9) to the “DC2” position to switch to battery
mode.
5. Place the ear cushion onto the earpiece so that the locking noses of
the plastic frame are inserted into the corresponding notches on the
earpiece. Replace the ear cushion by pushing it carefully onto the
earpiece until it clicks into place.
To switch between conventional batteries and internal rechargeable
battery operation you must select the proper position with the function
switch (9).
Position "DC1" represents internal rechargeable battery operation
Position "DC2" represents conventional battery operation
The ear cushion is fixed on a plastic frame. You need to remove this
frame from the locking mechanism together with the ear cushion. Do not
pull on the ear cushion itself.
Pay attention to the proper setting of the function switch. If no batteries
are inserted and you have left the function switch at the “DC2” position,
the headphones will not power on.
Powering the Transmitter Cradle Using Batteries
The transmitter cradle battery compartment is located on the bottom.
1. Remove any cable connections and turn the transmitter cradle upside
down, holding it in your hand.
2. Open the battery compartment by sliding the lock of the compartment
cover into the direction of the compartment. The cover can be opened
and then removed.
3. Insert three AAA batteries into the battery compartment. Note the +
and – icons on the batteries and inside the battery compartment.
4. Place the battery compartment cover over the battery compartment
so that the locking nose of the cover is inserted into the corresponding
notch on the transmitter cradle. Then close the battery compartment
cover until it locks in place.
While the transmitter cradle is on battery power, it will not charge the
built-in headphone battery.
If you have inserted batteries into the transmitter cradle and you
connect the power adapter to the power socket (12), battery operation
will be disabled automatically. This helps you to save battery power
whenever the device is connected to the mains via the power adapter.
APPENDIX
TROUBLESHOOTING
You can solve most common problems yourself by using the following
hints. If the problem persists after checking the suggested solutions,
please contact our company (see gift box). Do not attempt to repair the
product yourself.
The headphones do not power on, there are no indicator lights.
*Recharge the built-in battery or insert conventional batteries.
*Check the position of the function switch (9). For conventional battery
operation it must be set to the “DC2” position: for operation from the
internal rechargeable battery it must be set to “DC1”.
The headphones power on but there is no sound output.
*Check that the transmitter cradle has been powered on and connected
properly to your audio source. Start playback on the sound source.
Unable to power the transmitter cradle on.
*Did you connect the power adapter or are the inserted batteries
sufficiently charged?
Sound is interrupted or noisy.
*The rechargeable battery or the inserted batteries of the headphones
are depleted. Recharge the internal battery or replace the batteries with
new batteries of the same type.
*You are outside the maximum range of the transmitter. Move closer to
the transmitter cradle.
*Check if the transmitter is sending an audio signal. The send indicator
(17) should light up green.
*Check if the headphones receive the signals from transmitter. If not,
you can turn the switch on the transmitter to 1 or 3 position, and also
press the scan on the headphone to search the signals.
*Check if the audio source is playing an audio signal. You can use a
connection cable to connect the headphones directly to the audio source.
“Features can change without notice”
IMPORTADO
I.R.P., S.L.
AVDA. SANTA CLARA DE CUBA 5
SEVILLA, SPAIN
DECLARATION OF CONFORMITY
I.R.P., SL declare under our responsibility that the equipment meets the
requirements indicated in the following directives:
EMC DIRECTIVES
EN55013:2001+A1:2003+A2:2006
EN55020:2007
EN61000-3-2:2006
EN61000-3-3:2008
EN300 440-2 V1.3.1
EN301 489-1 V1.8.1
EN301 489-3 V1.4.1
Description of apparatus:
BRIGMTON Model BAI-300
Wireless headphones
Importer: I.R.P., SL
Address: Avenida Santa Clara de Cuba 5, 41007, Sevilla.