1
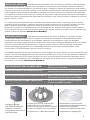
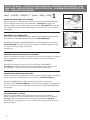
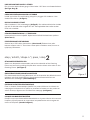
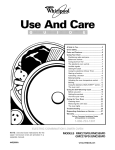
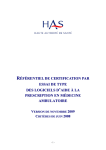
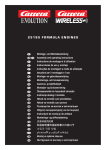
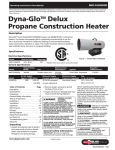
OPERATOR`S MANUAL BEDIENUNGSANLEITUNG MANUEL DE L’UTILISATEUR
MANUAL DEL USUARIO
GEBRUIKSAANWIJZING
INSTRUKSJONSMANUAL
INSTRUKTIONSMANUAL
Vaiheittaiset käyttöohjeet
BEDIENUNGSANLEITUNG
Wischt Für Sie Den Boden
Die Reinigungsrevolution
Weltweit patentiert
MANUEL DE L’UTILISATEUR
Balaie vos sols pour que vous n’ayez pas à le faire!
LA RÉVOLUTION DU NETTOYAGE
Breveté dans le monde entier
REINIGT
BEINHALTET:
60 m2/Std.
RoboMop Wischer
Roboter-Ball
Eingebaute wiederaufladbare Batterie
Batterieladegerät
5 elektrostatische Wischtücher
COMPREND :
Balai RoboMop
Boule robotique
Accu rechargeable intégré
Chargeur d’accus
5 frotteurs électrostatiques
HERVORRAGEND GEEIGNET FÜR
Holzböden
Granit
Marmor
Keramikfliesen
Linoleum
EXCELLENT POUR :
Les planchers en bois
La granite
Le marbre Les carreaux en céramique
Le linoléum
MANUAL DEL USUARIO
Barre los suelos para que usted no tenga que hacerlo
La revolución en la limpieza
Cubre 60
Patentado en todo el mundo
m2/hora
GEBRUIKSAANWIJZING
Poetst de vloer in uw plaats!
De poetsrevolutie
Wereldwijd gepatenteerd
Incluye:
- Barredora RoboMop
- Bola robótica
- Batería recargable integrada
- Cargador de batería
- 5 mopas electrostáticas
BEVAT:
GESCHIKT VOOR:
- RoboMop Poetser
- Houten vloeren
- Robotbal
- Graniet
- Ingebouwde herlaadbare batterij- Marmer
- Batterijlader
- Keramische tegels
- 5 elektrostatische pads
- Linoleum
Excelente para:
- Suelos de madera
- Granito
- Mármol
- Baldosas de cerámica
- Linóleo
WWW.ROBOMOP.NET
F
RoboMop is designed to sweep the floors for you so you will have extra time to OPERATOR`S MANUAL:
take care of more important things or just sit back and relax. Simply attach an
electrostatic and dust absorbing pad, set the cleaning time on the robotic ball, place it in the cleaning frame and
watch RoboMop automatically sweep your floors. Using smart sensor technology, RoboMop navigates smoothly
RoboMop is designed to sweep the floors for you so you will have extra time to take care of
and silently, cleaning dirty edges under the kitchen counter, in corners, around walls and under furniture.
more important things or just sit back and relax. Simply attach an electrostatic and dust
The flexible edges will not damage furniture. It is great for all your hard floor surfaces like wood floors, ceramic tile,
absorbing
set the
time dustpads
on the robotic
ball, place
it in thetocleaning
frame
andas much
granite, marble,
and pad,
linoleum.
Thecleaning
VoltaWebTM
are especially
designed
attract and
retain
watch RoboMop
sweep
Using
smart sensor
technology,
RoboMop
dust as possible
during theautomatically
cleaning session.
Theyour
dustfloors.
attraction
is obtained
through
the unique
composition of
navigates
smoothly
andstatic
silently,
cleaning
dirtyfriction
edges between
under the
kitchen
counter,
in surface.
corners,The pad
fibres in the
cloth that
generates
electricity
though
the
pad and
the floor
around with
wallsmicroscopic
and under dust
furniture.
Thethat
flexible
edges
not damage
furniture.
It is great
for textile.
itself is designed
pockets
absorb
and will
transport
the dust
into the centre
of the
hard floor
surfaces
like
woodeven
floors,
ceramic
tile, granite,
In this wayallit your
is possible
for the
textile to
attract
more
dirt. When
the padmarble,
is soiled,and
justlinoleum.
remove it and toss it
in the trash. Enjoy your RoboMop!
OPERATOR’S MANUAL
The VoltaWebTM dustpads are especially designed to attract and retain as much dust as
possible during the cleaning session. The dust attraction is obtained through the unique
BEDIENUNGSANLEITUNG:
RoboMop
wurde
um anelectricity
Ihrer Stellethough
den Boden
zu between
wischen, the
so dass
composition of fibres in
the cloth
that entworfen,
generates static
friction
Sie zusätzliche
Zeitthe
für floor
wichtigere
Dinge
auch nur,with
um microscopic
sich hinzusetzen
auszuruhen.
pad and
surface.
Thegewinnen
pad itselfoder
is designed
dustund
pockets
that Legen Sie
einfach ein
elektrostatisches
Staubwischtuch
stellen of
Siethe
dietextile.
Reinigungsdauer
absorb
and transport
the dust into auf,
the centre
In this way des
it is Roboterballs
possible for ein,
the legen Sie
ihn in den Wischrahmen und sehen Sie zu, wie der RoboMop automatisch Ihren Boden wischt. Dank der Smart
textile to attract even more dirt. When the pad is soiled, just remove it and toss it in the
Sensor-Technik bewegt sich der RoboMop ruhig und geräuschlos, um schmutzige Stellen unter der Küchenvitrine,
trash.
in Ecken, an den Wänden und unter Möbeln zu säubern. Die weichen Kanten schließen eine Beschädigung der
Möbel aus.
RoboMop
ist hervorragend geeignet für alle harten Bodenbeläge wie Holzböden, Keramikfliesen,
Enjoy
your RoboMop!
Granit, Marmor und Linoleum.
Q
A.
Q
A.
op
Q
A.
re
THIS SET INCLUDES THE FOLLOWING PARTS:
Q
A.
ki
Ro
your new RoboMop.
Q
A.
Die VoltaWebTM-Staubwischtücher sind extra entworfen worden, um während eines Wischeinsatzes so viel Staub
wie möglich anzuziehen und festzuhalten. Die Staubanziehung wird durch die einzigartige Zusammensetzung der
Fasern im Wischtuch erreicht, die durch die Reibung zwischen Wischtuch und Boden elektrostatische Energie
erzeugen.NOTE:
Das Wischtuch selbst weist mikroskopisch kleine 1AC
Staubtaschen
auf, die den Staub absorbieren und in
Battery Charger
die Mitte Read
des Stoffes
transportieren.
Auf diese Weise kann das Wischtuch noch mehr Staub anziehen. Wenn das
all safety
and operating
Wischtuch verschmutzt ist, nehmen Sie es einfach ab und werfen es in den Müll.
instructions before operating
Wir wünschen Ihnen viel Freude an Ihrem RoboMop!
MANUELDE L’UTILISATEUR: RoboMop a été conçu pour balayer les sols de manière à vous donner plus
1 Cleaning
Frame andpour
1 Robotic
Ball et vous reposer. Il suffit de fixer
de temps pour des choses plus importantes
ou tout simplement
vous asseoir
un frotteur électrostatique, qui absorbe les poussières, de régler le temps de nettoyage sur la boule robotique,
de la placer dans le cadre de nettoyage et de surveiller le RoboMop qui balaie automatiquement vos sols.
Recourant à la technologie d’un détecteur intelligent, RoboMop se déplace en douceur et en silence, pour
nettoyer les soins sales sous le plan de travail de la cuisine, dans les coins, autour des murs et sous les meubles.
Les bords souples n’endommagent pas les meubles. RoboMop est formidable pour toutes vos surfaces dures,
comme les planchers en bois, les carreaux en céramique, le granite, le marbre et le linoléum.
Les frotteurs antipoussières VoltaWebTM ont été spécialement conçus pour attirer et retenir la plus grande
quantité possible de poussières pendant le nettoyage. L’attraction des poussières est obtenue par la composition
unique des fibres du tissu qui produit de l’électricité statique grâce au frottement réalisé entre le frotteur et la
surface du
propremenT
dit est conçu
avec des poches à poussières microscopiques qui absorbent
Electrostatic
Disposable
Cloths
2 sol. Le85frotteur
et transportent les poussières jusqu’au centre du textile. De cette manière, il est possible pour le textile d’attirer
encore plus d’impuretés. Une fois que le frotteur est souillé, il suffit de l’enlever et de le jeter à la poubelle.
2
Q
A.
it
its
bl
pr
re
1.
2.
th
Q
A:
gr
Manual del usuario: RoboMop está diseñado para barrer los suelos, de modo que usted pueda tener
tiempo libre para dedicarlo a asuntos más importantes o, simplemente, para sentarse y descansar. Sólo tiene
que colocar una mopa electrostática y que absorbe el polvo, configurar el tiempo de limpieza en la bola robótica,
colocarla en el marco de limpieza y observar cómo RoboMop limpia los suelos automáticamente. Con la ayuda de
la tecnología de sensor inteligente, RoboMop se desplaza suavemente y en silencio, limpiando la suciedad bajo
My RoboMop
los muebles de la cocina, en las esquinas, a lo largo de las paredes y bajo los muebles. Sus Q.
extremos
flexibles nogets
dañan los muebles. Resulta adecuado para todas las superficies, como suelos de madera, baldosas
cerámica, may
A. YourdeRoboMop
granito, mármol y linóleo.
FREQUENTLY
it has not cleaned befo
by posible
turning in diffe
Las mopas para polvo VoltaWeb™ están diseñadas especialmente para atraer y retener todoitself
el polvo
block
any
object
durante la sesión de limpieza. La atracción del polvo se obtiene mediante una composición de fibras única
del that R
tejido que genera electricidad estática por medio de la fricción entre la mopa y la superficie del
suelo. areas have be
problem
Dicha mopa incorpora unos atrapadores
polvo microscópicos
queWhat
absorben
y transportan
el polvo hacia
el RoboM
Q. MydeRoboMop
gets stuck.
should
I do? reposition.
Your
centro del tejido. De este modo, elA.
tejido
atrae
incluso
más
suciedad.
Cuando
la
mopa
se
ensucie,
sólo
tiene
Your RoboMop may occasionally get stuck, especially
in roomsque
1. It is wedged
orthat
pinne
quitarla y tirarla a la papelera. Disfrute de su RoboMop!
it has not cleaned before. If it does get stuck, RoboMop
will
try to
free int
2.
RoboMop
bumps
RoboMop is designed to sweep the floors for you so you will have extra time to take care
of
RoboMop
is designed to sweep the floors for y
turning
inan
different
directions.
If it cannot free
move
orno rela
more important
things or just sit back anditself
relax.by
Simply
attach
electrostatic
and dust
thatitself,
anjust
exit
lon
more important things
or
sit path
back and
GEBRUIKSAANWIJZING:
werd
ontwikkeld
omcleaning
de vloeren
poetsen
inoruwunder.
plaats.Once
Zo heeft
absorbing
pad, set the cleaning time onRoboMop
the
robotic
ball,
placethat
it in the
frame
and
block
any
object
RoboMop
getsteabsorbing
stuck
onpad,
the
set the cleaning time on the ro
meer tijdautomatically
om andere dingen
te doen
of uUsing
gewoon
tesensor
ontspannen.
Bevestig
een elektrostatische en stofawatchuRoboMop
sweep your
floors.
smart
technology,
RoboMop
watch
sweep your floo
problem
areas
have
been
amended,
pick RoboMop
up
your automatically
RoboMop
and
My RoboMop
Clean
bsorberende
stel de poetstijd
in opedges
de robotbal,
plaats
diecounter,
in het poetsframe
en smoothly
kijk hoeQ.RoboMop
navigates
smoothlypad,
and silently,
cleaning dirty
under the
kitchen
in corners,
navigates
and silently, cleaning dirty
reposition.
Your
RoboMop
might
get
stuck
for
several
reasons.
automatisch
uw vloeren
reinigt.
Dankzijedges
de “Smart
beweegt
de
RoboMop
zacht
en
stil,
poetst
around
walls and under
furniture.
The flexible
will notsensor”-technologie
damage furniture. It is
great
for
A.
Please
contact
the
around walls and under furniture. The flexible
allehard
vuile
hoeken
onder
keukenaanrecht,
in hoekjes,
rond de
muren
ofor
onder
meubilair.
De flexibele
1. ceramic
It is wedged
or pinned
between
narrowly
spaced
all your
floor
surfaces
likehet
wood
floors,
tile,
granite,
marble,
and
linoleum.
allunder
yourhet
hard
floor surfaces
likeobjects.
wood floors, ce
hoeken beschadigen het meubilair2.niet.
De RoboMop
is ideaal
voor alleand
harde
vloeroppervlakken,
zoals
RoboMop
bumps
into objects
repositions
them
such
way childr
have extra time to take care of
Q. inAre
petsa and
The VoltaWebTM
dustpads
are especially
attract en
andlinoleum.
retain as much dustThe
as VoltaWebTM dustpads are especially desi
houten vloeren,
keramische
tegels,designed
graniet, to
marmer
ach an electrostatic and dust
that
an
exit
path
no
longer
exists.
A. Children and pets s
possible during the cleaning session. The dust attraction is obtained through the unique
FREQUENTLY ASKED QUESTIONS:
OPERATOR’S MANUAL
OPERATOR’S
ANUAL
possible during the cleaning session. The dust
ce it in the cleaning frame and
composition
of fibres in the cloth
that generates static electricity though friction between
the
Detechnology,
VoltaWeb™stofpads
te trekken
en
opoptimal
te in
nemen
tijdens
het
safety
and
clea
of fibres
the cloth
that
generate
art sensor
RoboMop zijn speciaal ontworpen om zoveel mogelijk stof aancomposition
pad and
the floor
The aangetrokken
pad itself isQ.designed
microscopic
dust Frame
pockets
that
poetsen.
Hetsurface.
wordt
door
dewith
unieke
samenstelling
van vezels
in het
waardoor
statische
My RoboMop
Cleaning
has
What
shall The
I er
do?
padbroken.
and
thedoek,
floor
surface.
pad
itself is des
the kitchen
counter,
instof
corners,
absorb
and transport the dust
the centre
textile.
In vloer.
this way
itpad
is possible
forabsorb
the
and transport
the dust die
into het
the centre
elektriciteit
doorinto
frictie
tussen
dethe
pad
en
de
zelf bevat
microscopische
stofzakjes
t damage
furniture. Itontstaat
is great for
A. ofPlease
contact
theDelocal
distributor
through
www.robomop.net.
Q. more
Does
cle
textilestof
to attract
even more
dirt. When the
pad
soiled, just
it andAls
toss
in the
textile
attract
dirt.RoboMop
When
absorberen
en verplaatsen
naar
hetis midden
vanremove
het textiel.
deitpad
vuil is to
kan
u dieeven
gewoon
afnemen
enthe pad
anite, marble,
and linoleum.
trash.uitschudden in de vuilbak. Geniet van uw RoboMop!
A. RoboMop cleans n
trash.
Q. Are pets and children safe around RoboMop?
reach places.
ct and
retain
much dust as
Enjoy
yourasRoboMop!
Enjoy your RoboMop!
A. Children and pets should always be supervised around RoboMop for
obtained through the unique
NOTE: Read all safety and operating instructions before
ricity though
between theTHE FOLLOWING
optimal PARTS:
safety and cleaning
performance.
THISfriction
SET INCLUDES
Q. Will it go under kic
operating your new RoboMop.
icroscopic dust pockets that
A. Ihres
RoboMop
In this way
it
is
possible
for
the
HINWEIS:
Lesen
Sie
vor
Inbetriebnahme
RoboMopshas been
DIESES SET UMFASST DIE FOLGENDEN
Q. Does TEILE:
RoboMop clean
corners
alongund
theBetriebsanweisungen
walls?
t remove it and toss it in the
aufmerksam
dieand
Sicherheits
kitchen. If yourdurch.
bed or f
THIS SET INCLUDES THE FOLLOWING PARTS:
THIS SET INCLUDES TH
NOTE:
NOTE:corners and other tough to
1AC Battery
Charger
A. RoboMop
cleans
next to walls, most
RoboMop will happily c
Read Este
all safety
and operating
Nota:
Lea
todas
las instrucciones
seguridad
y de
Read
all safetydeand
operating
conjunto
incluye lasreach
siguientes
partes:
places.
funcionamiento antes
de
utilizar
su
nuevooperating
RoboMop.
instructions before operating
instructions before
Q. How long does it ta
your new RoboMop.
your newenRoboMop.
DEZE SET BEVAT DE VOLGENDEQ.ONDERDELEN:
Let op: Leesbeds,
de veiligheidgebruiksaanwijzingen
Will it go under kickboards,
and furniture?
A. Approximately 3-5
vooraleer uw RoboMop te gebruiken.
RoboMop
has been
your
1 Cleaning A.
Frame
and 1 Robotic
Ball designed to fit under the kickboards1in
Cleaning Fram
kitchen. If your bed or furniture is more than 8 cm off
the
floor,
your
Q: Will RoboMop clea
ry Charger
RoboMop will happily clean underneath.
A: RoboMop cleans h
LOWING PARTS:
granite and other hard
Q. How long does it take to recharge the RoboMop?
A. Approximately 3-5 hours.
obotic Ball
2
Q: Will RoboMop clean all floor surfaces?
A: RoboMop
cleans
hardwood,
linoleum,
tile, ceramic
tile,Cloths
marble,
1 Cleaning
Frame and
1 Robotic
Ball
5 Electrostatic
Disposable
85 Electrostatic Disposable Cloths
85 Electrostatic Disposable Cloths
granite and mit
other
hard floor surfaces.
1 AC Battery Charger
1 Wischrahmen
1 Roboterball
52 elektrostatische Einweg-Wischtücher
1 WS - Batterieladegerät
1 Chargeur d’accus AC
1 Cargador de batería de CA
1 AC Batterijlader
1 Cadre de nettoyage et 1 boule robotique 5 Chiffons électrostatiques
1 marco de limpieza y una bola robótica
5 mopas electrostáticas desechables
5 elektrostatische wegwerppad
1 Poetsframe en 1 Robotbal robotique
3
BY STEP
STEP GUIDE BY
/ SCHRITT-FÜR-SCHRITT-ANLEITUNG
CE: STEP
STEP GUIDE: / L’UTILISATION, ETAPE PAR ETAPE / GUÍA
PASO A PASO / GIDS STAP PER STAP / STEG FOR STEG GUIDE / Användarinstruktioner steg för
uld
the
ny
, so
ntact
ay
ra
steg / Vaiheittaiset käyttöohjeet
step
1
1
CHARGE THE ROBOTIC
step / schritt / étape n°/BALL
pasoFOR
/ stap
/ steg
3-5 HOURS
Before initial use, charge the ball.
CHARGE THE ROBOTIC BALL FOR 3-5 HOURS
Insert
the ofplug
of Battery
the ACCharger
Battery
Before initial use, charge the ball. Insert
the plug
the AC
Charger
into
the
Charger
into the Charger Port jack of the Robotic
Ball. (See
Figure
A) Plug
the AC Port
Battery Charger into a voltage tape ACjack
Outlet ONLY.
B) The ball
will
of (See
the Figure
Robotic
Ball.
fully charge in about 3-5 hours. Recharge
unit onlyA)
when itPlug
is completely
(SeetheFigure
the AC
discharged.
Battery Charger into a voltage tape
AC Outlet ONLY.
(See Figure B)
The ball will fully charge in about
ROBOTERBALL 3-5 STUNDEN LADEN
hours.
the unit only
Ball vor der ersten Verwendung laden.3-5
Stecker
desRecharge
WS-Batterieladegeräts
in
when it(siehe
is completely
discharged.
die Ladebuchse des Roboterballs einstecken
Abbildung A).
Figure A
Figure B
PPEDWS-Batterieladegerät AUSSCHLIESSLICH in eine WS-Steckdose einstecken
(siehe Abbildung B). Der Ball ist nach 3-5 Stunden vollständig geladen. Gerät
erst laden, wenn es wieder vollständig
entladen ist.
step
2
ATTACH ONE
CHARGER LA BOULE ROBOTIQUE POUR 3 àELECTROSTATIC
5 HEURES
PAD
Avant une première utilisation, charger la boule. Branchez la fiche du chargeur
Attach
one
disposable
electrostatic
d’accus AC dans la prise prévue pour le chargeur de la boule robotique
pad to the underside of the
(voir figure A).
Cleaning Frame and secure by
get Branchez le chargeur d’accus AC sur une
pushing
theUNIQUEMENT
pad down onto the
prise AC
boule est
de 3 àon
5 heures.
or (voir figure B). La durée totale pour recharger
black lavelcro
tabs
the
complètement
déchargée.
iture Ne rechargez l’unité que lorsqu’elle est
Cleaning
Frame.
(See Figure C)
ce to
big
CARGUE LA BOLA ROBÓTICA DE 3 A 5 HORAS
Mop Antes del primer uso, cargue la bola. Inserte la clavija del cargador de batería
ng a de CA en la toma del cargador de la bola robótica. (Consulte la figura A).
nt of
iture, Enchufe ÚNICAMENTE el cargador de batería de CA a una toma de
PLACE THE CLEANING
le so corriente de CA. (Consulte la figura B). La bola se habrá cargado completamente
CENTER
en un plazo de 3 a 5 horas. RecargueFRAME
la unidad IN
sóloTHE
cuando
esté totalmente
g.
velcro tab
Figure C
step
descargada.
3
OF THE ROOM
Clear the room. Place the
Cleaning Frame in the center of the
Laad de robotbal 3-5 uur op
room.
(See Figure D) For prepaWanneer u de RoboMop voor het eerst gebruikt moet u die opladen.
ration
for clearing
the room,
Steek de stekker van de AC batterijlader
in dehints
aansluiting
van de robotbal
see
page stopcontact
6 of this operator’s
(zie fig. A). Steek de batterijlader in een
geschikt
(zie fig. B). manfordeour
De bal wordt nu opgeladen in 3-5 uur.ual
Laad
bal “For
enkelOptimal
opnieuw Cleaning
op als die
helemaal leeg is.
Performance” tips.”
Figure D
3
4
Lade den robotiske ballen i 3-5 timer
Før du bruker ballen første gang må den lades 1 3-5 timer med batteriladeren.
(Se Figur A og B).
ANCE:
STEP BY STEP GUIDE:
Ladda den elektroniska bolleni 3-5 timmar
ou would
pluggen från laddaren i den
ms on Ladda
the upp bollen före användning. Koppla in
CHARGE THE ROBOTIC
elektroniska bollen. (Se Figur A).
s, or any
BALL FOR 3-5 HOURS
cleans,Koppla
so in sladden i uttaget
Before initial use, charge the ball.
Sätt in laddaren i 220 voltsuttaget. (SeFigur Insert
B). Den the
elektroniska
laddas
ht contact
plug of bollen
the AC
Battery
upp och är helt klar efter ungefär 3-5 tim. Återuppladdas
barathe
efterCharger
att den Port
Charger into
stairway
blivit helt urladdad.
jack of the Robotic Ball.
either a
(See Figure A)
Plug the AC
Battery
Charger
into
a voltage tape
Lataa elektronista palloa 3 - 5 tunnin ajan
ACliitäntä
Outletelektroniseen
ONLY. (See
Figure B)
Lataa pallo aina ennen käyttöä. Kytke laturin
palloon.
The ball will fully charge in about
(Katso kuva A) .
3-5 hours. Recharge the unit only
Kytke verkkojohto pistorasiaan
when it is completely discharged.
step
1
Figure A
Figure B
Asenna laturi 220 voltin pistorasiaan. (Katso kuva B) Elektroninen pallo
latautuu täyteen noin 3 - 5 tunnissa. Lataa pallo uudelleen vasta, kun se on
TRAPPED
tyhjentynyt kokonaan.
step
2
2
ATTACH ONE
step / schritt / étape n°/ paso
/ stap
ELECTROSTATIC
PAD
Attach one disposable electrostatic
ATTACH ONE ELECTROSTATIC PAD
pad
to theof the
underside
Attach one disposable electrostatic pad to the
underside
Cleaning of the
Frame
Frame and secure by pushing the pad downCleaning
onto the black
velcroand
tabssecure
on the by
get
Cleaning
Frame. (See Figure C).
pushing the pad down onto the
can
tween or
black velcro tabs on the
furniture
Cleaning Frame. (See Figure C)
EIN to
ELEKTROSTATISCHES WISCHTUCH AUFLEGEN
entrance
Ein elektrostatisches Einweg-Wischtuch auf die Unterseite des Wischrahmens
barely big
auflegen und durch Andrücken an die schwarzen Klettverschlüsse am
RoboMop
Wischrahmen befestigen (siehe Abbildung C).
. Placing a
in front of
FIXATION D’UN FROTTEUR ELECTROSTATIQUE
f furniture,
PLACE THE CLEANING
Fixez
trouble
so un frotteur électrostatique jetable à la partie inférieure du châssis de
FRAME
IN THE
CENTER
nettoyage et maintenez le en place en poussant
le frotteur
sur les
parties en
working.
velcro tab
Figure C
step
3
velcro noires qui figurent sur le châssis de nettoyage
figure C).
OF THE(voir
ROOM
Clear the room. Place the
Cleaning Frame in the center of the
COLOQUE UNA MOPA ELECTROSTÁTICA
room.
(See Figure D) For prepaColoque una mopa electrostática desechable en la parte inferior del marco de
hints
clearing
limpieza y fíjela ajustando la mopa sobre lasration
pestañas
de for
velcro
negras the
del room,
see page 6 of this operator’s manmarco de limpieza. (Consulte la figura C).
ual for our “For Optimal Cleaning
Performance” tips.”
Figure D
5
3
1
2
2
when FOR
it is completely
discharged.
any
BALL
3-5 HOURS
s, so
Before initial use, charge the ball.
APPED
ntact
Insert the plug of the AC Battery
STEP BY STEP GUIDE / SCHRITT-FÜR-SCHRITT-ANLEITUNG
/ L’UTILISATION,
ETAPE PAR ETAPE / GUÍA
Charger into the Charger
Port
way
PASO A PASO / GIDS STAP PER STAP
/
Användarinstruktioner
steg
för
steg /
jack of the Robotic Ball.
er a
Vaiheittaiset käyttöohjeet
Figure A
(See Figure A)
Plug the AC
Battery
Charger
ATTACH
ONE into a voltage tape
stap / steg
AC
Outlet ONLY. (See
ELECTROSTATIC
PADFigure B)
Figure B
The
ball
will
fully
charge
in about
Attach one disposable electrostatic
3-5 hours. Recharge the unit only
Bevestig een elektrostatische pad pad to the underside of the
it is completely
discharged.
Cleaning
Frame
secure by
velcro tab
Bevestig een elektrostatische pad aanwhen
de
onderkant
van hetand
poetsframe.
get Zorg daarbij dat de pad goed aangedrukt
wordt opthe
de zwarte
velcro onto the
pushing
pad down
PPED
n orstroken op het poetsframe (zie fig. C). black velcro tabs on the
niture
Cleaning Frame. (See Figure C)
nce to
Figure C
Påmonter det elektrostatiske papiret
y big Påmonter det elektrostatiske papiret med de svarte borrelåsene på
oMop rengjørings rammen (Se Figur C).
ATTACH ONE
cing a
ELECTROSTATIC PAD
ont of
Attach one disposable electrostatic
niture,Tryck fast den elektrostatiska moppen
pad
to THE
the CLEANING
underside of the
PLACE
på
undersidan
av ramen. Se till att
ble soTryck fast den elektrostatiska moppenCleaning
Frame
velcro tab
FRAME
IN hårdare
THE and
CENTER
moppen sitter fast längs kanten på ramen.
Stryk lite
där secure by
ng.
get kardborrebanden är så att moppen sitter
pushing
the
pad
down
onto
the
fast
ordentligt.
(Se
Figur
C)
OF THE ROOM
n or
black
tabs onPlace
the the
Clear velcro
the room.
niture
Cleaning
(See
C) the
Cleaning Frame.
Frame in
the Figure
center of
nce toPaina sähköstaattinen moppi paikalleen
Figure C
room. (See Figure D) For prepabig Paina sähköstaattinen moppi kiinni rungon alaosaan. Varmista, että moppi on
ration
hints hieman
for clearing
the room,
kiinni
rungon
reunassa.
Paina
tarranauhan
kohdalla
kovemmin,
jotta
Mop
see
page
moppi menee kunnolla paikalleen. (Katso
kuva
C). 6 of this operator’s maning a
ual for our “For Optimal Cleaning
Figure D
nt of
Performance” tips.”
niture,
PLACE THE CLEANING
ble so step / schritt / étape n°/ paso / stap / steg
FRAME IN THE CENTER
ng.
OF
ROOM
PLACE THE CLEANING FRAME IN THE CENTER OFTHE
THE ROOM
3
Clear
Place
theD).
Clear the room. Place the Cleaning Frame
in the the
center room.
of the room.
(See Figure
Cleaning Frame in the center of the
room. (See Figure D) For prepaWISCHRAHMEN IN DIE RAUMMITTE STELLEN
ration hints for clearing the room,
Raum reinigen. Wischrahmen in die Raummitte stellen (siehe Abbildung D).
see page 6 of this operator’s manual for our “For Optimal Cleaning
Figure D
Performance”
tips.”
PLACEMENT DU CHASSIS DE NETTOYAGE AU
CENTRE DE LA PIECE
step
step
2
3
step
step
3
3
Débarrassez la pièce. Placez le châssis de nettoyage au centre de la pièce (voir figure D).
COLOQUE EL MARCO DE LIMPIEZA EN EL CENTRO DE LA HABITACIÓN
Despeje la habitación. Coloque el marco de limpieza en el centro. (Consulte la figura D).
Plaats het poetsframe in het midden van de ruimte
Maak de ruimte leeg. Plaats het poetsframe in het midden van de ruimte (zie fig. D).
6
3
ga
t of
Plassering av rengjøringsrammen
ure, Plasser RoboMopp rammen i midten av rommet. (Se Figur D).
PLACE THE CLEANING
e so
FRAME IN THE CENTER
.
step
3
OF THE ROOM
Placera RoboMop i mitten av rummet
Clear i mitten
the av
room.
the
Plocka undan i rummet. Placera RoboMop
rummet.Place
(Se Figur
D)
Frame in the center of the
RoboMop fungerar bäst med så friaCleaning
ytor som möjligt.
room. (See Figure D) For preparation hints for clearing the room,
Sijoita RoboMop huoneen keskellesee page 6 of this operator’s manJärjestele huone. Sijoita RoboMop huoneen keskelle. (Katso kuva D)
ual for our “For Optimal Cleaning
RoboMop toimii parhaiten, kun vapaita pintoja on mahdollisimman paljon.
Performance” tips.”
Figure D
STEP BY STEP GUIDE:
4
step
4
SELECT CLEANING TIME
step / schritt / étape n°Press the Green ON/TIME button
3
located on your RoboMop under
SELECT CLEANING TIME
the on
LCD
left.
Press the Green ON/TIME button located
your screen
RoboMop on
underthe
the LCD
Figurescreen
E) The
screen on the left. (See Figure E) The (See
LCD display
willLCD
showdisplay
the amount
will show
the
of
of time the RoboMop will clean your screen
floor. To choose
1 hour
andamount
30 minutes,
press the ON/TIME button once. To choose
1 hour,
press the
button
time the
RoboMop
willON/TIME
clean your
twice. To choose 30 minutes, press the
ON/TIME
button 1three
times.
floor.
To choose
hour
andOnce
30
you have chosen the time, the ON/TIME
buttonpress
on the the
LCD screen
will flash
minutes,
ON/TIME
but- 6X
before turning on automatically, allowing you sufficient time to place the ball in
ton once. To choose 1 hour, press
the Cleaning Frame.
the ON/TIME button twice. To
choose 30 minutes, press the
ON/TIME button three times.
REINIGUNGSDAUER EINSTELLEN
Grünen ON/TIME-Knopf drücken, derOnce
sich an
Ihrem
RoboMop
der
you
have
chosenunterhalb
the time,
grünen LCD-Anzeige auf der linken Seite
befindet (siehe
Abbildung
E). Das
the ON/TIME
button
on the
LCD
LCD-Display zeigt die Dauer an, für die
RoboMop
Ihren Boden
wischt.
Für
screen
will flash
6X before
turning
1 Stunde und 30 Minuten drücken Sie den Knopf ON/TIME einmal. Für 1
on automatically, allowing you
Stunde drücken Sie den Knopf ON/TIME zweimal. Für 30 Minuten drücken Sie
sufficient
time to
placehaben,
the ball
in
den Knopf ON/TIME dreimal. Nachdem
Sie die Dauer
gewählt
blinkt
the Cleaning
Frame.
der ON/TIME-Knopf im LCD-Display sechsmal,
bevor
das Gerät automatisch
step
5
6
startet. Dadurch haben Sie genug Zeit, um den Ball in den Wischrahmen zu
INSERT THE ROBOTIC BALL
legen.
IN THE CLEANING FRAME
W
•
•
•
•
•
•
•
•
•
Figure E
•
Figure F
•
Place the RoboMop ball into the
SELECTION DE LA DUREE DE NETTOYAGEcenter of the Cleaning Frame.
Appuyez sur le bouton vert ON/TIMEWithin
situé sur
RoboMop
l’écran
6 votre
seconds,
the sous
RoboMop
à cristaux liquides qui se trouve à gauche (voir figure E). Cet écran indique le
will turn itself on automatically.
temps pendant lequel le robot va nettoyer votre sol. Pour sélectionner une
(See
F) ON/TIME une seule
durée de 1 heure 30 minutes, appuyez
surFigure
le bouton
fois. Pour sélectionner 1 heure, appuyez sur le bouton ON/TIME deux fois.
AUTOMATIC SHUT OFF
Pour sélectionner 30 minutes, appuyez sur le bouton ON/TIME trois fois. Dès
will automatically
shut
que vous avez sélectionné la durée, RoboMop
le bouton ON/TIME
va clignoter six
fois à
off when ce
thequi
program
is complete,
l’écran avant de s’éteindre automatiquement,
vous laisse
suffisamment
on de
thenettoyage.
time you set it to. To
de temps pour placer la boule dans based
le châssis
•
•
•
•
step
step
stop the RoboMop at any time,
simply press the Red OFF button.
When RoboMop is finished cleaning, remove it from the floor
to avoid tripping or falling over it.
(See Figure G)
DISPOSAL OF PADS
Dispose soiled pads in the trash .
•
•
•
Figure G
•
7A
STEP BY STEP GUIDE / SCHRITT-FÜR-SCHRITT-ANLEITUNG / L’UTILISATION, ETAPE PAR ETAPE / GUÍA
PASO A PASO / GIDS STAP PER STAP / Användarinstruktioner steg för steg /
Vaiheittaiset käyttöohjeet
STEP BY STEP GUIDE:
4
step
paso / stap / steg
4
SELECT CLEANING TIME
Press the Green ON/TIME button
located on your RoboMop under
SELECCIONE EL TIEMPO DE LIMPIEZA
LCD por
screen
left.
Pulse el botón verde ON/TIME, que sethe
encuentra
debajo on
y a la the
izquierda
(See Figure
E) The
display
de la pantalla LCD de su RoboMop. (Consulte
la figura
E). LaLCD
pantalla
LCD
show los
thesuelos.
amount
mostrará el tiempo que va a emplearscreen
RoboMopwill
en limpiar
Paraof
seleccionar 1 hora y 30 minutos, pulse
el botón
ON/TIME una
Para
time
the RoboMop
willvez.
clean
your
seleccionar 1 hora, pulse el botón ON/TIME
doschoose
veces. Para
seleccionar
30
floor. To
1 hour
and 30
minutos, pulse el botón ON/TIME tresminutes,
veces. Unapress
vez que
ha
seleccionado
the ON/TIME but-el
tiempo, el botón ON/TIME de la pantalla LCD parpadeará 6 veces antes de
ton once. To choose 1 hour, press
encenderse automáticamente, lo que le permitirá disponer de suficiente
ON/TIME
button twice. To
tiempo para colocar la bola dentro delthe
marco
de limpieza.
choose 30 minutes, press the
ON/TIME button three times.
STEL DE POETSTIJD IN
Once you have chosen the time,
Druk op de groene ON/TIME toets opthe
de RoboMop,
onderon
hetthe
LCD-LCD
ON/TIMElinks
button
scherm (zie fig. E). Het LCD-scherm toont
hoe lang
uw RoboMop
de vloer
zal
screen
will flash
6X before
turning
poetsen. Om bijv. 1u en 30 minuten te poetsen, druk één keer op de ON/TIME
on automatically, allowing you
toets. Druk twee keer op de ON/TIME toets om één uur in te stellen, om het
time toets.
to place
the ball
half uur in te stellen drukt u drie keersufficient
op de ON/TIME
Van zodra
u dein
tijd
the
Cleaning
Frame.
heeft ingesteld zal de ON/TIME toets op het LCD-scherm zes keer knipperen
step
5
6
vooraleer hij automatisch start. U hebt nog voldoende tijd om de bal in het
INSERT THE ROBOTIC BALL
poetsframe te plaatsen
IN THE CLEANING FRAME
•
•
•
•
Figure E
Figure F
•
Place the RoboMop ball into the
•
(See Figure F)
•
•
•
AUTOMATIC SHUT OFF
Ställ in timern
will
shut
Tryck på den gröna ON/TIME knappenRoboMop
som befinner
sig automatically
snett under RoboMop’s
when att
thevisa
program
is complete,
LCD skärm. (Se Figur E). LCD-skärmenoff
kommer
den tid som
RoboMop
kommer att städa ditt golv. För att välja
1 timme
minuter,
så tryck
based
onoch
the30
time
you set
it to.ON/
To
TIME knappen en gång. För 1 tim, tryck
på ON/TIME
knappen två
För 30
stop
the RoboMop
at gånger.
any time,
minuter, tryck ON/TIME knappen tre gånger.
du har
valtRed
önskad
så
simplyNär
press
the
OFFtidbutton.
kommer LCD skärmen att blinka 6 gånger innan den elektroniska bollen
When
RoboMop
is
finished
cleanautomatiskt startar. Det ger dig tillräckligt med tid för att kunna placera den i
ing, remove it from the floor
ramen med moppen.
step
7
to avoid tripping or falling over it.
(See Figure G)
Säädä ajastin
DISPOSAL
PADSLCD-näytön
Paina vihreää ON/TIME-painiketta, joka
on vinottain OF
RoboMopin
Dispose
pads
in the siivoaa
trash .
alapuolella. (Katso kuva E) LCD-näytössä
näkyy sesoiled
aika, jonka
RoboMop
lattiaa. Jos haluat valita ajaksi 1 tunti (See
ja 30 minuuttia,
paina
Figure H)
Do ON/TIMEpainiketta
not dispose
kerran. Jos haluat valita ajaksi 1 tunnin,
painapads
ON/TIME-painiketta
soiled
in the toilet. kaksi kertaa.
Jos haluat valita ajaksi 30 minuuttia, paina ON/TIME-painiketta kolme kertaa.
Kun olet valinnut haluamasi ajan, LCD-näyttö vilkkuu 6 kertaa ennen kuin
elektroninen pallo käynnistyy automaattisesti. Näin ehdit asentaa sen runkoon
yhdessä mopin kanssa.
8
4
•
•
•
•
•
•
Velg rengjøringstid
center of the Cleaning Frame.
Trykk på den grønne ON/TIME knappen
(Se Figur
E). For å velge
time og 30
Within
6 seconds,
the 1RoboMop
minutter, trykk på knappen 1 gang. For å velge 30 minutter, trykk på knappen
will turn itself on automatically.
3 ganger.
step
W
•
•
•
Figure G
•
•
•
•
Figure H
ON/TIME button three times.
Once you have chosen the time,
Figure E
the ON/TIME button on the LCD
STEP BY STEP GUIDE / SCHRITT-FÜR-SCHRITT-ANLEITUNG
/ L’UTILISATION,
ETAPE PAR ETAPE / GUÍA
screen will flash 6X before
turning
PASO A PASO / GIDS STAP PER STAP
Användarinstruktioner
steg för steg /
on / automatically,
allowing you
Vaiheittaiset käyttöohjeet
sufficient time to place the ball in
the Cleaning Frame.
step
5
6
5
step / schritt / étape n°/INSERT
paso /THE
stap
/ steg BALL
ROBOTIC
IN THE CLEANING FRAME
Figure F
INSERT THE ROBOTIC BALL IN THE CLEANING FRAME
RoboMop
into the
Place the RoboMop ball into the centerPlace
of thethe
Cleaning
Frame.ball
Within
center
of the Cleaning
6 seconds, the RoboMop will turn itself
on automatically.
(See Figure F)Frame.
Within 6 seconds, the RoboMop
will turn itself on automatically.
ROBOTERBALL IN DEN WISCHRAHMEN LEGEN
(See Figure F)
Roboterball in die Mitte des Wischrahmens legen. Nach 6 Sekunden schaltet
sich der RoboMop automatisch ein (siehe
Abbildung F). SHUT OFF
AUTOMATIC
step
RoboMop will automatically shut
off when the program is complete,
INSERTION DE LA BOULE ROBOTIQUE DANS LE CHASSIS DE NETTOYAGE
time you
setles
it 6to. To
Placez la boule RoboMop au centre dubased
châssisondethe
nettoyage.
Dans
stop the RoboMop
at any time,
secondes, le RoboMop s’allume automatiquement
(voir figure F)
simply press the Red OFF button.
When RoboMop is finished cleanINSERTE LA BOLA ROBÓTICA EN EL MARCOing,
DE LIMPIEZA
remove it from the floor
Coloque la bola de RoboMop en el centro
del marco
de limpieza.
Transcurridos
to avoid
tripping
or falling
over it.
6 segundos, RoboMop se encenderá automáticamente. (Consulte la figura F).
(See Figure G)
step
7
Figure G
DISPOSAL OF PADS
PLAATS DE ROBOTBAL IN HET POETSFRAME
Dispose soiled pads in the trash .
Plaats de robotbal in het poetsframe. Na zes seconden start de RoboMop
(See Figure H) Do not dispose
automatisch (zie figuur F).
soiled pads in the toilet.
Plasser den robotiske ballen i rengjøringsrammen
Plasser den robotiske ballen i midten av rengjøringsrammen. Innen noen
sekunder vil RoboMop begynne å rengjøre ( Se figur F)
4
Figure H
Placera den elektroniska bollen i ramen på RoboMop
Placera den elektroniska bollen i ramen med moppen. RoboMop startar
automatiskt efter sex sekunder. (Se Figur F)
Asenna elektroninen pallo RoboMopin runkoon
Asenna elektroninen pallo runkoon mopin kanssa. RoboMop käynnistyy
automaattisesti kuuden sekunnin kuluttua. (Katso kuva F)
9
5
6
IN THE CLEANING FRAME
Place the RoboMop ball into the
center of the Cleaning Frame.
Within 6 seconds, the /RoboMop
STEP BY STEP GUIDE / SCHRITT-FÜR-SCHRITT-ANLEITUNG
L’UTILISATION, ETAPE PAR ETAPE / GUÍA
will/ Användarinstruktioner
turn itself on automatically.
PASO A PASO / GIDS STAP PER STAP
steg för steg /
(See Figure F)
Vaiheittaiset käyttöohjeet
step
6
AUTOMATIC SHUT OFF
step / schritt / étape n°/RoboMop
paso / stap
/ steg
will automatically
shut
off when the program is complete,
AUTOMATIC SHUT OFF
based on the time you set it to. To
RoboMop will automatically shut off when the program is complete, based on
stop at
the
anythe
time,
the time you set it to. To stop the RoboMop
anyRoboMop
time, simplyatpress
Red
press
the itRed
button.
OFF button. When RoboMop is finishedsimply
cleaning,
remove
fromOFF
the floor
to avoid tripping or falling over it. (See When
Figure G)
RoboMop is finished cleaning, remove it from the floor
to avoid tripping or falling over it.
AUTOMATISCHE ABSCHALTUNG
(See
Figure
G)
RoboMop schaltet sich automatisch ab,
wenn
das Reinigungsprogramm,
dessen
Figure G
step
7
Dauer Sie eingestellt haben, beendet ist. Um den RoboMop zu einem anderen
OF PADS
Zeitpunkt auszuschalten, drücken Sie DISPOSAL
den roten OFF-Knopf.
Nachdem RoboMop seine
Dispose
pads
theihn
trash
.
Arbeit beendet hat, nehmen Sie ihn vom
Boden,soiled
damit Sie
nichtinüber
stolpern
oder
fallen (siehe Abbildung G).
(See Figure H) Do not dispose
soiled pads in the toilet.
ARRET AUTOMATIQUE
Le RoboMop s’arrête automatiquement une fois que le programme est achevé, en
fonction du temps que vous avez réglé. Pour arrêter le RoboMop, il suffit d’appuyer
sur le bouton rouge OFF. Lorsque le RoboMop a fini de nettoyer, enlevez-le du sol de
4
manière à éviter de marcher ou de trébucher dessus (voir figure G).
APAGADO AUTOMÁTICO
RoboMop se apagará automáticamente cuando finalice el programa, según el tiempo
que usted haya configurado. Si desea detener el aparato en cualquier momento, sólo
tiene que pulsar el botón rojo OFF. Cuando RoboMop termine de limpiar, levántelo del
suelo para evitar tropezar o caer sobre él. (Consulte la figura G).
AUTOMATISCH UITSCHAKELEN
De RoboMop schakelt automatisch uit wanneer het programma is afgelopen, dit op
basis van de door u ingestelde tijd. Om de RoboMop op een willekeurig tijdstip uit te
schakelen, drukt u gewoon op de rode OFF toets. Als de RoboMop klaar is met poetsen,
neem hem dan weg van de vloer, zodat u er niet over valt of op trapt (zie fig. G).
Slår seg av automatisk
Robomoppen din vil automatisk slå seg av når programmet er fullført i henhold til valgt
program. For å stoppe Robomoppen uavhenging av dette, trykk på den røde OFF
knappen ( Se figur G ).
Automatisk avstängning
RoboMop kommer att stängas av automatiskt när programmet är klart. För att stänga av
RoboMop innan, eller vid önskat tillfälle, tryck på den röda OFF-knappen. Plocka undan
RoboMop när den städat färdigt. Då undviker du att gå eller snubbla på den. (Se Figur G)
Automaattinen sammutus
RoboMop sammuu automaattisesti, kun ohjelma on valmis. Jos haluat sammuttaa
RoboMopin ennen tätä, paina punaista OFF-painiketta. Vie RoboMop säilytykseen, kun
siivous on valmis. Näin kukaan ei kompastu laitteeseen tai kävele sen päälle. (Katso kuva G).
10
Figure H
step
7
(See Figure G)
DISPOSAL OF PADS
7
Figure G
step / schritt / étape n°/Dispose
paso /soiled
stappads
/ steg
in the
trash .
(See
Figure
H)
Do
not
dispose
DISPOSAL OF PADS
pads
in the
toilet.
Dispose soiled pads in the trash. (See soiled
Figure H).
Do not
dispose
soiled pads in
the toilet.
Beseitigen der Wischtücher
4 gebrauchten Wischtücher in die Mülltonne (siehe Abbildung H),
Werfen Sie die
nicht in die Toilette.
Figure H
ELIMINATION DES FROTTEURS
Jetez les frotteurs souillés à la poubelle (voir figure H). Ne pas jeter de
frotteurs souillés dans une toilette.
DESECHO DE MOPAS
Deseche las mopas sucias en la basura. (Consulte la figura H). No tire las
mopas sucias al retrete.
Pads wegwerpen
Gooi vuile pads in de vuilbak (zie fig. H). Gooi de vuile pads niet in het toilet.
Fjerning av papiret
Papiret kan kastes i søppelen når det er blitt tilstrekkelig skittent.
( Se figur H ). OBS: Ikke kast papiret i toalettet.
Släng den förbrukade moppen
Släng de använda mopparna i soporna. (Se Figur H). Slänga dom
INTE i toaletten.
Heitä käytetty moppi pois
Heitä käytetyt mopit roskikseen. (Katso kuva H)
ÄLÄ hävitä moppeja WC-istuimen kautta huuhtomalla.
11
WARNINGS:
• Read all safety and operating instructions before operating RoboMop. • Retain the safety and operating instructions for
future reference. • Always be careful when using your RoboMop. To reduce the risk of injury or damage, keep these safety
precautions in mind when setting up, using and maintaining your equipment. • RoboMop must not be used for any other
purpose other than its intended use. • Store out of reach of children. • Do not bend the Cleaning Frame.
• Charge the robotic ball only when it is completely discharged. • This is an indoor device only.
• Do not use RoboMop on wet or damp surfaces or where immersion in water is a possibility.
• Operate your RoboMop only from the type of power source indicated in this manual. If you are not sure of the type of
power supplied to your home, consult your local power company. • Plug the AC Battery Charger into a voltage tape AC
OUTLET ONLY. Product may not be used with any type of power converter. Any such use will immediately void the Warranty.
• Use only the AC Battery Charger supplied by the manufacturer to charge and recharge this device.
• Charge indoors only. • Never handle the AC Battery Charger with wet hands. • Always remove AC Battery Charger from
wall and disconnect RoboMop after charging. • RoboMop is not for use on carpets. • RoboMop is designed to clean one
room at a time. Confine RoboMop to the room you want cleaned by closing all doors. • Observe RoboMop the first time it
cleans a room to confirm it does not get wedged under or stuck on top of uneven surfaces. • The Cleaning Frame should not
be washed. Clean softly with a duster or clean with a dry soft cloth. • Use the specifically designed electrostatic pads on dry
floors only. • Protect the Cleaning Frame from bending, warping or folding. • When RoboMop is finished cleaning, remove
RoboMop from the floor to avoid tripping over it.
WARNHINWEISE:
• Lesen Sie alle Sicherheits- und Bedienungsanweisungen, bevor Sie den RoboMop in Betrieb nehmen.
• Bewahren Sie die Sicherheits- und Bedienungsanweisungen für ein späteres Nachschlagen auf.
• Seien Sie immer vorsichtig, wenn Sie Ihren RoboMop verwenden. Erinnern Sie sich immer an diese Sicherheitsvorschriften, wenn Sie das Gerät vorbereiten, benutzen und warten, um das Risiko einer Verletzung oder Beschädigung zu
verringern. • RoboMop darf nicht für andere als die vorgesehenen Zwecke verwendet werden. • Außerhalb der Reichweite
von Kindern aufbewahren. • Wischrahmen nicht biegen. • Roboterball erst laden, wenn er vollständig entladen ist.
• Das Gerät darf nur in Innenräumen verwendet werden. • Verwenden Sie RoboMop nicht auf nassen oder feuchten
Flächen oder dort, wo eine Überschwemmung möglich ist. • Laden Sie Ihren RoboMop nur an der Stromquelle, die in dieser
Anweisung angegeben ist. Wenn Sie nicht sicher sind, welche Werte Ihr Stromnetz aufweist, setzen Sie sich mit Ihrem örtlichen Stromversorger in Verbindung. • Stecken Sie das WS-Batterieladegerät NUR IN EINE WS-STECKDOSE ein.
Das Gerät darf nicht mit Umrichtern verwendet werden. Bei einer derartigen Verwendung erlischt die Garantie sofort.
• Verwenden Sie ausschließlich das WS-Batterieladegerät, das der Hersteller geliefert hat, um dieses Gerät zu laden und
wieder aufzuladen. • Laden Sie das Gerät nur in Innenräumen. • Fassen Sie das WS-Batterieladegerät nicht mit nassen
Händen an. • Trennen Sie das WS-Batterieladegerät nach dem Laden immer von der Wandsteckdose und vom RoboMop.
•RoboMop ist nicht für die Verwendung auf Teppich geeignet. • RoboMop ist darauf ausgelegt, um immer nur einen Raum
zu wischen. Begrenzen Sie den Raum, den RoboMop wischen soll, indem Sie alle Türen schließen. • Beobachten Sie den
RoboMop das erste Mal, wenn er einen Raum reinigt, um sicherzustellen, dass er nirgendwo festklemmt oder auf unebenen
Bodenflächen stehen bleibt. • Der Wischrahmen darf nicht gewaschen werden. Reinigen Sie ihn mit einem Staubtuch oder
einem trockenen, weichen Tuch. • Verwenden Sie die elektrostatischen Spezialwischtücher nur auf trockenen Böden.
• Den Wischrahmen nicht biegen, krümmen oder falten. • Sobald RoboMop das Reinigen beendet hat, entfernen Sie ihn
vom Boden, • damit Sie nicht über ihn fallen.
12
IMPORTANT :
• Lisez toutes les instructions de sécurité et de fonctionnement avant
d’utiliser le RoboMop. • Conservez les
instructions de sécurité et de fonctionnement à toutes fins utiles. • Faites toujours preuve de prudence lorsque vous
utilisez le RoboMop. • Pour diminuer les risques de blessures ou de dommages, gardez ces consignes de sécurité à l’esprit
lorsque vous réglez, utilisez et entretenez votre matériel. • Le RoboMop ne peut pas être utilisé à d’autres fins que son
utilisation projetée. • Conservez le RoboMop hors de portée des enfants. • Ne pliez pas le châssis de nettoyage.
• Rechargez la boule robotique uniquement lorsqu’elle est complètement déchargée. • Ceci est un dispositif conçu pour
l’intérieur. • N’utilisez pas le RoboMop sur des surfaces humides ou lorsque une immersion dans l’eau est une possibilité.
• Utilisez uniquement votre RoboMop sur la source de courant indiquée dans ce manuel. Si vous n’êtes pas certain du type
de courant qui alimente votre domicile, consultez votre compagnie d’électricité locale. • Branchez le chargeur d’accus AC
dans une PRISE DE COURANT AC UNIQUEMENT. Le produit ne peut pas être utilisé avec n’importe quel type de
transformateur. • Une telle utilisation rendra la garantie nulle et non avenue. • Utilisez uniquement le chargeur d’accus
AC fourni par le fabricant pour charger et recharger ce dispositif. • Chargez à l’intérieur uniquement. • Ne manipulez
jamais le chargeur d’accus AC avec des mains humides. • Enlevez toujours le chargeur d’accus AC du mur et débranchez
le RoboMop après le chargement. • Le RoboMop ne peut pas être utilisé sur des tapis. • Le RoboMop est conçu pour net-
toyer une pièce à la fois. • Confinez le RoboMop dans la pièce que vous souhaitez nettoyer en fermant toutes les portes.
• Observez le RoboMop la première fois qu’il nettoie une pièce de manière à vérifier qu’il ne reste pas coincé sous des
surfaces inégales ou ne reste pas bloqué sur ces surfaces. • Le châssis de nettoyage ne sera pas lavé. Il suffit de le nettoyer en douceur à l’aide d’un aspirateur ou au moyen d’un chiffon sec et doux. • Utilisez les frotteurs électrostatiques
spécifiquement conçus sur des sols secs uniquement. • Protégez le châssis de nettoyage de manière à ce que celui-ci ne
soit pas plié, faussé ou écrasé. • Lorsque le RoboMop a fini de nettoyer, enlevez-le du sol pour éviter de trébucher dessus.
ADVERTENCIAS:
• Lea todas las instrucciones de seguridad y funcionamiento antes de utilizar RoboMop. • Conserve las instrucciones de
seguridad y funcionamiento para consultarlas en un futuro. • Tenga siempre cuidado al utilizar RoboMop. Para reducir el
riesgo de daños o lesiones, observe siempre estas precauciones de seguridad al configurar, utilizar y mantener el equipo.
• RoboMop no debe utilizarse para ningún otro propósito que no sea el de su uso previsto. • Guarde el equipo fuera
del alcance de los niños. • No doble el marco de limpieza. • Recargue la bola robótica sólo cuando esté totalmente
descargada. • Este dispositivo debe utilizarse únicamente en interiores. • No utilice RoboMop en superficies húmedas o
mojadas o donde haya posibilidad de que se sumerja en agua. • Conecte el aparato únicamente en aquellas fuentes de
alimentación que se indican en este manual. Si no está seguro del tipo de corriente de la que dispone, póngase en contacto
con la compañía de suministro eléctrico. • Conecte el cargador de batería de CA ÚNICAMENTE A UNA TOMA DE CA.
El producto no debe utilizarse con ningún tipo de adaptador de corriente. Dicho uso anulará inmediatamente la garantía.
• Utilice sólo el cargador de batería de CA que proporciona el fabricante para cargar y recargar este dispositivo.
• Cargue el dispositivo sólo en interiores. • No manipule nunca el cargador de batería de CA con las manos húmedas.
• Quite siempre el cargador de batería de CA de la pared y desconecte RoboMop una vez cargado. • RoboMop no debe
utilizarse sobre alfombras.• RoboMop está diseñado para limpiar una habitación cada vez. Deje el aparato dentro de la
habitación que desee limpiar y cierre todas las puertas. • Observe a RoboMop la primera vez que limpia una habitación
para comprobar que no choca ni se queda atascado en superficies irregulares. • No debe lavar el marco de limpieza. Límpielo suavemente con un plumero o con un paño suave y seco. • Las mopas electrostáticas especialmente diseñadas deben
utilizarse única mente sobre suelos secos. • Evite que el marco de limpieza se doble o deforme. • Cuando RoboMop
termine de limpiar, levántelo del suelo para evitar caer sobre él.
vom Boden, • damit Sie nicht über ihn fallen.
13
WAARSCHUWINGEN:
• Lees de veiligheid- en gebruiksaanwijzingen vooraleer uw RoboMop te gebruiken. • Hou de veiligheid- en
gebruiksaanwijzingen bij voor later gebruik. • Wees altijd voorzichtig als u de RoboMop gebruikt. Om het gevaar van
blessures of schade te vermijden, leef dan de veiligheidsvoorschriften na wanneer u het materiaal opstelt, gebruikt of
onderhoudt.• Gebruik de RoboMop enkel om te poetsen en niet voor andere doeleinden. • Bewaar de RoboMop buiten
bereik van kinderen. • Plooi het poetsframe niet. • Laad de robotbal enkel op wanneer de batterij volledig leeg is.
• Dit toestel is enkel voor gebruik binnen in huis bedoeld. • Gebruik de RoboMop niet op natte of vochtige oppervlakken of
waar de RoboMop in water kan worden ondergedompeld. • Gebruik de RoboMop enkel op een geschikte stroombron zoals
aangegeven in deze handleiding. Als u niet zeker bent welke stroom u heeft, raadpleeg dan uw elektriciteitsmaatschappij.
• Sluit de AC batterijlader enkel aan op een AC stopcontact. Het toestel mag niet worden gebruikt met eender welke
stroomomzetter. Bij dergelijk gebruik vervalt de garantie onmiddellijk. • Gebruik enkel de AC batterijlader die door de
fabrikant is geleverd om het toestel te laden en te ontladen. • Laad het toestel enkel binnenshuis op. • Raak de AC
batterijlader nooit aan met natte handen. • Haal de AC batterijlader altijd uit het stopcontact en schakel de RoboMop uit na
het laden. • De RoboMop is niet geschikt voor tapijten. • De RoboMop is ontworpen om één ruimte per keer te poetsen.
Plaats de RoboMop in de ruimte die u wilt poetsen en sluit alle deuren. • Controleer de eerste keer als u een ruimte poetst
de RoboMop om zeker te zijn dat die niet geklemd raakt of vastzit aan oneffen oppervlakken. • Het poetsframe mag niet
gewassen worden. Veeg het af met een stoffer of reinig het met een droge zachte doek. • Gebruik de speciaal ontworpen
elektrostatische pads enkel op droge vloeren. • Zorg dat het poetsframe niet gebogen, kromgetrokken of geplooid wordt.
• Als de RoboMop klaar is met poetsen, neem hem dan weg van de vloer, zodat u er niet over valt of op trapt.
OBSERVERE:
•Oppbevares utilgjengelig for barn.
•Lad bare den elektroniske ballen etter at batteriet er helt utladet.
•Benytt aldri RoboMop på våte eller fuktige flater eller der det er en risiko for at det kan forekomme vann.
•Strømpluggen skal kun benyttes med 220Volts uttak. Produktet skal aldribrukes med andre typer transformatorer da
dette ikke dekkes av garantien.
•Benytt aldri batteriladeren når du er våt på hendene.
•Rammen rengjøres med støvsuger eller tørr klut.
OBSERVERA:
•Förvaras utom räckhåll för barn.
•Ladda den elektroniska bollen enbart när batteriet är helt urladdat.
•Använd aldrig RoboMop på våta eller fuktiga ytor eller där det finns risk att vatten kan tränga in.
•Koppla in transformatorn ENDAST i ett 220-volts uttag. Den här produkten kan inte användas med någon typ av
transformator. Med sådan användning kommer garantin omedelbart upphöra att gälla.
•Handskas aldrig med batteriladdaren när du har våta händer.
•Ramen ska aldrig tvättas av. Torka den bara försiktigt med en dammvippa eller en torr, mjuk trasa.
14
HUOMAA:
pad and the floor surface. The pad itself is designed with microscopic dust pock
absorb and transport the dust into the centre of the textile. In this way it is poss
textile to attract even more dirt. When the pad is soiled, just remove it and toss
trash.
Enjoy your RoboMop!
•Ei lasten ulottuville.
•Lataa elektroninen pallo vasta, kun akku on täysin tyhjä.
•Älä koskaan käytä RoboMopia märillä tai kosteilla pinnoilla tai jos on vaara, että vettä pääsee sisään.
•Kytke vaihtovirtalaturi VAIN 220 voltin pistorasiaan.
NOTE: Tätä tuotetta ei voi käyttää muunlaisella muuntajalla.
1AC Battery Charger
Tällaisessa käytössä takuu raukeaa heti.
Read all safety and operating
•Älä käsittele akkulaturia koskaan märillä käsillä.
instructions before operating
•Runkoa ei saa pestä. Puhdista runko varovasti pölyhuiskulla tai kuivalla, pehmeällä liinalla.
your new RoboMop.
THIS SET INCLUDES THE FOLLOWING PA
1 Cleaning Frame and 1 Robotic Ball
2
85 Electrostatic Disposable Cloths
HOW TO ORDER ADDITIONAL ELECTROSTATIC PADS:
TWO
EASY WAYS TO ORDER
DISPOSABLE ELECTROSTATIC
DISPOSABLE
ELECTROSTATIC
PADS: PADS:
1. Visit our website at www.robomop.net 2. Through your local store selling RoboMop
NACHBESTELLUNG ELEKTROSTATISCHER WISCHTÜCHER:
SIE
KÖNNEN DIE EINWEG-SPEZIALWISCHTÜCHER
GANZ EINFACH AUF ZWEI VERSCHIEDENEN WEGEN BESTELLEN:
DISPOSABLE
ELECTROSTATIC PADS:
1. Besuchen Sie unsere Website: www.robomop.net 2. In Ihrem örtlichen RoboMop-Geschäft
POUR COMMANDER DES FROTTEURS ELECTROSTATIQUES SUPPLEMENTAIRES :
DEUX FACONS SIMPLES POUR COMMANDER DES FROTTEURS ELECTROSTATIQUES JETABLES :
1. Consultez notre site web: www.robomop.net 2. Adressez-vous à votre vendeur RoboMop local
PEDIDOS DE MOPAS ELECTROSTÁTICAS ADICIONALES:
DOS
SENCILLOS MODOS
DE REALIZAR PEDIDOS
DE MOPAS ELECTROSTÁTICAS DESECHABLES:
DISPOSABLE
ELECTROSTATIC
PADS:
1.
Visite nuestro sitio Web en www.robomop.net
2. A través de su tienda distribuidora de productos
Robomop.
HOE EXTRA ELEKTROSTATISCHE PADS BESTELLEN:
Er
zijn twee eenvoudige
manieren om wegwerppads
DISPOSABLE
ELECTROSTATIC
PADS: te bestellen:
1. Via naar onze website www.robomop.net 2. Via uw plaatselijke verkooppunt van RoboMop.
15
RoboMop™ 1 YEAR GUARANTEE
This product is warranted against any defect in workmanship for a period of 1 year. For more
information on RoboMop, please visit us on the web: www.robomop.net EXCEPT AS EXPRESSLY
STATED, Distributor MAKES NO WARRANTY, EXPRESSED OR IMPLIED. Some countries have varying
limitations on how long a warranty period may be, so this may not apply to you. IN NO EVENT SHALL
DISTRIBUTOR BE LIABLE FOR ANY SPECIAL INDIRECT, INCIDENTAL OR CONSEQUENTIAL DAMAGES
caused by the use, misuse, or handling of this product. Liability for this product is limited to the
purchase price of this product.
RoboMop™ 1 JAHR GARANTIE
Für dieses Produkt gilt eine Garantie für Material- und Produktionsfehler von 1 Jahr. Für weitere
Informationen besuchen Sie unsere Webseite: www.robomop.net. MIT AUSNAHME DER
AUSDRÜCKLICH ANGEGEBENEN FÄLLE ÜBERNIMMT DIE VERTRIEBSFIRMA KEINE GARANTIE, WEDER
AUSDRÜCKLICH NOCH IMPLIZIERT. In einigen Ländern gibt es andere Bestimmungen hinsichtlich der
Garantiedauer, weshalb diese Angabe nicht für Sie zutreffen muss. DIE VERTRIEBSFIRMA HAFTET
KEINESFALLS FÜR INDIREKTE, ZUFÄLLIGE ODER FOLGESCHÄDEN, die aus Verwendung, falschem
Gebrauch oder Handhabung des Produkts entstehen. Die Haftung für dieses Produkt ist auf den
Kaufpreis des Produkts beschränkt.
RoboMop™ 1 AN DE GARANTIE
Ce produit est garanti contre tous les défauts de fabrication pendant une période d’un an. Pour plus
de renseignements sur le RoboMop, consultez notre site web: www.robomop.net
SAUF MENTION EXPRESSE, LE DISTRIBUTEUR N’OCTROIE AUCUNE GARANTIE, EXPRESSE OU
IMPLICITE. Certains pays appliquent des périodes de garantie différentes, ce qui fait que la période
indiquée ici ne peut ne pas s’appliquer à vous. EN AUCUN CAS, LE DISTRIBUTEUR NE SERA
RESPONSABLE POUR TOUT DOMMAGE SPÉCIFIQUE, INDIRECT, INCIDENT OU CONSÉCUTIF ENTRAÎNÉ
PAR L’UTILISATION, L’UTILISATION ABUSIVE OU LE MANIEMENT DE CE PRODUIT. La responsabilité
relative à ce produit est limitée au prix d’achat de ce produit.
RoboMop™ 1 año de garantía
Este producto está garantizado frente a cualquier defecto de acabado durante un periodo de 1 año.
Para obtener más información sobre RoboMop, visítenos en nuestro sitio Web: www.robomop.net
EXCEPTO EN EL CASO DE QUE SE INDIQUE ASÍ EXPRESAMENTE, el distribuidor NO EMITE NINGUNA
GARANTÍA, NI EXPRESA NI IMPLÍCITA. En algunos países existen limitaciones en cuanto a la duración
del periodo de garantía, por lo que puede que la afirmación anterior no se aplique a su caso. EN
NINGÚN CASO SERÁ CONSIDERADO EL DISTRIBUIDOR RESPONSABLE DE DAÑOS ESPECIALES,
INDIRECTOS, INCIDENTALES O CONSECUENTES causados por el uso, mala utilización o manejo de
este producto. La responsabilidad de este producto está limitada al precio de compra del mismo.
RoboMop™ 1 jaar garantie
Dit product heeft een garantie van 1 jaar op gebreken aan materialen en werk. Bezoek voor meer
informatie over de RoboMop onze website: www.robomop.net. Tenzij uitdrukkelijk vermeld, geeft de
distributeur geen uitdrukkelijke of impliciet vermelde garantie. In bepaalde landen gelden andere
garantievoorwaarden en –termijnen. Dit kan dus niet van toepassing zijn voor u. In geen geval is de
distributeur verantwoordelijke voor speciale indirecte schade, toevallige schade of gevolgschade
door gebruik, misbruik of manipuleren van dit product. De verantwoordelijkheid voor dit product is
beperkt tot de verkoopprijs ervan.