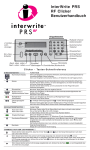
1
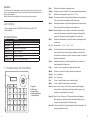
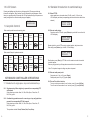
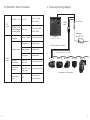
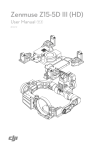
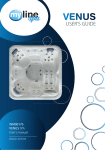
Marshall Electronics
Broadcast A/V Division
VS-PTC-50
Camera PTZ/On-Screen Display Menu
Mini Joystick Controller
User Manual
Thank you for purchasing this Marshall Electronic’s product.
Please read the User Manual thoroughly before attempting to setup & use.
If you have any problems with this product please contact Marshall Electronics.
Tel: (800) 800-6608 / (310) 333-0606
Caution
The LCD screen can be damaged by excessive pressure, direct sunlight, or liquids.
Joystick and keyboard should be used in environments within the temperature and
humidity range specified.
Please follow instructions defined in this manual for setup and operation.
List Of Items
1. Power adapter (Input: 100-240VAC 50/60Hz, Output: DC 12V)
2. Users Manual
Keyboard Specs
Exit key: exit and back to previous menu;
(Setup) Setup key: press and hold for 3s to setup keyboard’s parameter.
(F1) Adjust the control speed, it has 4 level: 1, 2, 3, 4
(Preset) Preset special status of ptz (including direction and zoom times). This key should be used together with number key;
(Shot)
Recall special status of ptz (including direction and zoom times).
This key should be used together with number key.
(Pattern) Start/stop pattern record: press for 3 seconds to start pattern record, after all operation, press this key again to stop pattern record, this key should be used together with number key.
Item
Parameters
(Run)
Recall the stored pattern, this key should be used together with Power Supply
DC12V 1A ±10%
number key.
Temperature
-10°C ~ 55°C
Humidity
≤90%RH (No cream node)
(0) ~ (9) Number key: 0, 1, 2, 3, 4, 5, 6, 7, 8, 9.
Communication
RS485 Half-duplex
Baud Rate
2400bps, 4800bps, 9600bps, 19200bps, 38400bps
Screen
128*32 LCD screen
Package Size
180 (L) x 165 (W) x 90 (H)mm
1.1 Function Keys On Front Panel
②
①
③
④
2
(Esc)
Es c
Setu p
F1
Prese t
1
2
Shot
4
5
Patter n
7
89
ut o
0
Ru nA
3
6
Ca m
Tele
Wide
Nea r
Far
Ope n
Clos e
Aux on
Aux off
1. Joystick
2. LCD screen
3. Function keys
4. Speed dome Setup and recall keys
(Auto)
Control ptz rotate in horizontal direction automatically or clear input number: when user input some numbers, press this key can delete the numbers, else it will control ptz rotate in horizontal direction automatically.
(Cam)
Address selection key: select ptz address; this key should be used together with number key.
(Tele)
Zoom in: zoom in the object, enlarge the object size.
(Wide)
Zoom out: zoom out the object, reduce the object size.
(Open)
Iris + / enlarge iris.
(Close)
Iris - / reduce iris.
(Far)
Focus+ / adjust the lens focus on distant object.
(Near)
Focus- / adjust the lens focus on near object.
(Aux on) Aux on: turn on ptz’s aux. This key should be used together
with number key; directly press this key without keying in any number, the controlled ptz ID will add 1.
(Aux off) Aux off: turn off ptz’s aux. This key should be used together with number key; directly press this key without keying in any number, the controlled ptz ID will take away 1.
(Aux off) Press and hold for 3s to recall number 95 preset, normally it will be opening the menu of ptz.
3
1.2 LCD Screen
1.2
1.2 LCD
LCD Screen
Screen
2.2 Detailed introduction to
Press
eachkey,
function
key,
show relevant
information, press And hold 2.2.1
Press each
function
LCD screen
willLCD
showscreen
relevantwill
information,
press And hold
2.2.1 Select
Select PTZ
PTZ ID:
ID:
Press each function key, LCD screen will show relevant information, press And hold
the key,
relevant
information
will
show
while
release
it
will
disappear.
When
there
speed
dome
or decoder whose ID is 28:
the
key, information
relevant information
show
release
will disappear. When there select
the key,
relevant
will show while will
release
it willwhile
disappear.
Whenitthere
select
speed PTZ
dome
2.2.1 Select
ID:or decoder whose ID is 28:
and holding
each
function
key power-save
will engage the
LCD screen
and relevant
is Pressing
no operation
over 30s,
it will
get into
mode(its
backlight
will be turned
is information
no operation
over
30s, When
it over
will get
into power-save
mode(its
backlight
willmode(its
be
turned backlight will be turned
is no will
operation
30s,
it will
intothey
power-save
appear.
function
keys
are get
released
will disappear.
When
LCD
display
as
protoc
2.2.1 Select PTZ ID:
off ), it will show standby image, details as bellow:
LCD will
will
display
as below(corresponding
below(corresponding
select
speed
dome
or decoder whose IDprotoc
is 28:
there
is
no
operation
within
30
seconds
the
LCD
and
keyboard
will
go
into
power-save
off ), it will show standby image, details as bellow:
select speed dome or decoder whose ID is 28: press 2, 8, Cam in turn,
off
),
it
will
show
standby
image,
details
as
bellow:
PTZ
addr:0
28 ④protocol
mode (backlight will turn off and standby
image will appear).
LCD will display as below
(corresponding
and baud rate will also be protoc
ptz addr : XXX
LCD
will display
PTZ
addr:0
28 ④ as below(corresponding
ptz
addr : B:2400
XXX
P : PelcoD B : 2400
P:PelcoD
showed).
P : PelcoD B : 2400
P:PelcoD B:2400
1.2 LCD Screen
2.2 Detailed introduction to combined keys
ptz addr : XXX
P:PelcoD B:2400
1.3
Joystick
Control
1.3
Joystick
Control
1.3
Joystick
Control
PTZ addr:0 28 ④
When control speed dome and mounting plate:
When control speed dome and mounting plate:
When control speed dome and mounting plate:
1.3 Joystick Control
Output
Output
Output
Operating Output
Operating Output
Operating
Output
Control
Operating Control Operating Control Operating
Control
Controlplate:
When
control speed Control
dome and mounting
Output
Output
Control
Control
Operating
Operating
Upward
Operating
Upward
Output Downward
Operating
Downward
Control
Output
Left
Left
Control
Operating
Output
Right
Right
Control
P : PelcoD and
B : 2400
2.2.2
2.2.2 set
set and recall
recall pattern:
pattern:
Set
pattern:select
PTZ
pattern:select
PTZ addr.,
addr., press【patte
press【patte
2.2.2
set and recall pattern:
2.2.2 Set and recall pattern:Set
LCD
will
display:
Set pattern: select PTZ addr., press (Pattern) key and hold for more than 3s,
LCD
will display:
Set pattern:select
PTZ addr., press【patte
LCD will display:
PTZ addr: 028 ④
PTZ addr:
028 ④
LCD
willrecord
display:
Pattern
Pattern record
PTZ addr: 028 ④
Pattern record
Operate
joystick to control PTZ moving to r
Output
Operate
to control
PTZ
moving to r
Operate joystick
to control PTZ
moving to joystick
relevant position,
adjust zoom
time.
Operating
Control
After setup, press
(Pattern) key
to finish,
LCD press
will display:
【pattern】key to finish, LC
After
setup,
【pattern】key
to finish,toLCr
After
setup,
press to
Operate
joystick
control PTZ moving
When
control
When
controlSetup
Setupofofkeyboard
keyboard controller:
controller:
When control Setup of keyboard controller:
Operating
Operating
Output
Output
Control
Control
Upward
Operating
Operating
Output
Output
Control
Control
PTZ addr:
02 8 press
④
【pattern】key to finish, LC
After
setup,
PTZ addr:
02 8 ④
Output
Downward
Operating
Output
Operating
Control
Control
Menu
Menu
Menu
Parameter
turned up
down
down
of the left
Operating
Operating
turned
Menu
Parameter
When
control
Setup of
keyboard controller:
turned
up
of
the left
turned
Operating
Output
Control
Operating
Output
Control
Output
Left
Output
Control
Control
Parameter
Parameter
of the right
of the right
Operating
Output
Control
KEYBOARD CONTROLLER
OPERATIONS
— 04 —
— 04 —
Menu
2.1 IntroductionMenu
to single-press keys turned
and combined keysParameter
turned up
of the left
down
4
2.1.1
Single-press key: When single key is pressed, the corresponding PTZ will respond.
Single-press keys include: Near, Far, Tele, Wide, Open, Close, Auto, F1, Run, Esc, joystick.
2.1.2 Combined key operations mean 2 or more keys, or key and joystick are pressed, the corresponding PTZ will respond. — 04 —
Single-press keys include: Near, Far, Tele, Wide, Open, Close, Auto, F1, Run, Esc, joystick.
The operations include: Preset, Pattern, Shot, Cam, Setup.
Right
Pattern stop
Pattern stop
PTZ addr: 02 8 ④
Pattern stop
Recall pattern: press (Run) key PTZ will run in the certain route which recorded
in relevant pattern;
Press any single-press key will stop pattern scan and back to normal status.
—
— 05
05 —
—
— 05 —
Note: This keyboard supports setting one pattern at present.
Output
Operating
2.2.3 Set and recall preset point:
Control
Set preset
point 1: key in (1), press (Preset).
Recall preset point 2: key in (2), press (Shot).
2.2.4 Turn on/Turn off aux function:
Parameter
Turn on: need to open number 1 aux. function, press (1), press (AUX on).
right
Turn of
off:the
need
to close number 1 aux. function, press (1), press (AUX off).
5
3.1
Parameter
Setup
And
Inquiry
3.1
Parameter
Setup
And
Inquiry
3.1
Parameter
Setup
And
Inquiry
3.1
Parameter
Setup
And
Inquiry
e.g.:
change
the
protocol
of
PTZ
28
to
e.g.: change the protocol of PTZ 28 to PelcoP,
PelcoP, baud
baud rate
rate to
to 9600.
9600.
P:PELCOD
after
all setup, press【ESC】key to quit setup.
* PTZ
addr:finishing
0-255
P:PELCOD
P:PELCOD
Follow
above
steps,
all
PTZ’s
protocol
and
baud
rate
will
be
se
Note:
Follow
above
steps,
all
PTZ’s
protocol
and
baud
rate
will
be
se
e.g.:
change
the
protocol
of
PTZ
28
to
PelcoP,
baud
rate
to
9600.
Follow
above
steps,
all
PTZ’s
protocol
and
baud
rate
will
be
se
e.g.:
change
the
protocol
of
PTZ
28
to
PelcoP,
baud
rate
to
9600.
Follow
above
steps,
all
PTZ’s
protocol
and
baud
rate
will
be
se
Note:
e.g.:
change
the
protocol
of
PTZ
28
to
PelcoP,
baud
rate
to
9600.
in
normal
status,
press
and
hold【setup】key
for
more
than
3s,
LCD
will
display:
Follow
above
steps,
all
PTZ’s
protocol
and
baud
rate
will
be
se
3.1 Parameter
Setup
&
Inquiry
If
you
to set
all
PTZ’s
protocol
and
baud
rate
as be
sam
e.g.:
change
the
protocol
of
PTZ
28
to
PelcoP,
baud
rate
to
9600.
in
normal
status,
press
and
hold【setup】key
for
more
than
3s,
LCD
If youwill
wantdisplay:
to set
all want
PTZ’s
protocol
and
baud
rate
as same,and
when
you
select
in
normal
status,
press
and
hold【setup】key
for
more
than
3s,
LCD
will
display:
Follow
above
steps,
all
PTZ’s
protocol
baud
rate
will
se
e.g.:
change
the
protocol
of
PTZ
28
to
PelcoP,
baud
rate
to
9600.
in
normal
status,
press
and
hold【setup】key
for
more
than
3s,
LCD
will
display:
PTZ ID
in setup
menu, please select 0-255, details as below:
PTZnormal
addr:028
④the protocol
e.g.:
change
of
PTZ
28
to
PelcoP,
baud
rate
to
9600.
in
status,
press
and
hold【setup】key
for
more
than
3s,
LCD
will
display:
PTZnormal
addr:028
④
e.g.: change
the
protocol
of PTZ press
28 to PelcoP,
baud rate to 9600.
PTZ ID in setup menu, please select 0-255, details as belo
in
status,
and
for
PTZ
addr:028
④
inpassword:---normal
status,
press key
andforhold【setup】key
hold【setup】key
for more
more than
than 3s,
3s, LCD
LCD will
will display:
display:
PTZ
addr:028
④ hold (Setup)
in normal
status,
pressstatus,
and
more than 3s, LCD will display:
password:---PTZ
addr:028
④
inpassword:---normal
press
and
hold【setup】key
for
more
than
3s,
LCD
will
display:
PTZ addr: 0-255Parameter Setup
password:---PTZ addr:028 ④
3.2 *System
PTZ addr:028 ④
password:---password:----
6
3.2
Parameter
P:PELCOD
3.2 System
System
Parameter Setup
Setup
3.2
System
Parameter
Setup
display:
3.2
System
Parameter
Setup
display:
display:
3.2
System
Parameter
Setup
Follow above steps, all PTZ’s protocol and baud rate will
be set as same.
display:
display:
System
parameter
including:language、password、key-press
Follow
above
steps,
all
PTZ’s
protocol
and baud rate will vvvb
display:
System
parameter
including:language、password、key-press
parameter
including:language、password、key-press
display: System
System
parameter
including:language、password、key-press
v
display: default
System parameter
including:language、password、key-press
v
factory
setup。The
following
example
is
“default
fac
default
factory
setup。The
following
example
is
“default
fac
*ptz
setup
System parameter
including:language、password、key-press
v
system
setup
default
factory
setup。The
following
example
is
“default
fac
3.2
System
Parameter
Setup
system
setup
default
factory
setup。The
following
example
is
“default
fac
*ptz
setup
system
setup
Press
joystick,
LCD
will
display:
default
factory
setup。The
following
example
is
“default
fac
steps:
Press
LCD
will
display:
steps:
systemjoystick,
setup
Press
joystick,
LCD
will
display:
default
factory setup。The following example is “default fac
steps:
System
parameter including: language, password, key-press volumn, key backlight,
Press
joystick,
LCD
will
display:
steps:
*PTZ
addr
:
001
Press
joystick,
LCD
will
display:
steps:
Press joystick,
LCD
will
display:
*PTZ
addr
:
001
default
factory
setup.
Press
joystick,
will display:
3.2 System Parameter Setup
*PTZ
addr
: 001 LCD
steps:
P:PELCOD
Press
joystick,
*PTZ
addr
: 001 LCD will display:
P:PELCOD
P:PELCOD
Press
joystick,
LCD
will
display:
*PTZ
addr
:
001
In
normal
status,
press
and
hold
【setup】
key for
more
than
P:PELCOD
*PTZ
addr
In
normal
status,
press
and
hold
【setup】
for
more
than
The following
example
is “default
factory
setup”
operation
steps: key
*PTZ
addr:
: 001
001
P:PELCOD
In
normal
status,
press
and
hold
【setup】
key
for
more
than
P:PELCOD
In
normal
status,
press
and
hold
【setup】
key
for
more
than
*PTZ
addr
:
001
PTZ
addr:028
④
P:PELCOD
Move
the
joystick
toward
left/right
to
select
PTZ
28,
LCD
will
display:
In
normal
status,
press
and
hold
【setup】
key
for
more
than
PTZ
addr:028
④
System
parameter
including:language、password、key-pr
In
normal
status,
press
and
hold
(Setup)
key
for
more
than
3s,
LCD
will
Display:
Move
the
joystick
toward
left/right
to
select
PTZ
28,
LCD
will
display:
PTZ
addr:028
④
P:PELCOD
Move
the
joystick
toward
left/right
to
select
PTZ
28,
LCD
will
display:
password:---In
normal
status,
press
and
hold
【setup】
key
for
more
than
PTZ
addr:028
④
password:---Move
the
joystick
left/right
to
select
PTZ
28,
LCD
will
display:
password:---PTZ
addr:028
④
Move the
joystick
toward
to select PTZ
28, LCD will
display:
*PTZ
addr:
028left/righttoward
Move
the
joystick
toward
left/right
to
select
PTZ
28,
LCD
will
display:
password:---default factory
setup。The following example is “defaul
*PTZ
addr:
028
Move
the
toward
PTZ addr:028
④
*PTZ
addr:
028
Move
the joystick
joystick
toward left/right
left/right to
to select
select PTZ
PTZ 28,
28, LCD
LCD will
will display:
display: password:---P:PelcoD
*PTZ
addr:
028
P:PelcoD
password:---P:PelcoD
Move
the joystick
toward left/right to select PTZ 28, LCD will display:Key steps:
*PTZ addr:
028
in
password(default
password:
8888),
press
joystick,
P:PelcoD
*PTZ addr:
addr:028
028
Key
in
password(default
password:
8888),
press
joystick,
*PTZ
Key
in
password(default
password:
8888),
press
joystick,
P:PelcoD
Key
in
password(default
password:
8888),
press
joystick,
P:PelcoD
Key
in
password
(default
password:
8888),
press
joystick,
LCD
will
display:
*PTZ
addr:
028
P:PelcoD
*ptz
setup
Press
joystick,
LCD
will
display:
Key
in
password(default
password:
8888),
press
joystick,
*ptz
setup
Press
joystick,
LCD
will
display:
*ptz
setup
P:PelcoD
Press
joystick,
LCD
will
display:
Key
in
password(default
password:
8888),
press
joystick,
system
setup
Press joystick,
LCD
will display:
*ptz
setup
system
setup
Press
joystick,
LCD
will
display:
system
setup
PTZ addr:
028 LCD will display:
*ptz
setup
Press
joystick,
system
setup
PTZ
028
In
normal
status, press and hold 【setup】 key for more t
Press
joystick,
will display:
*ptz
setup
PTZ addr:
addr:
028 LCD
system
setup
* P:PelcoD
Press
joystick,
PTZ addr:
028 LCD will display:
** P:PelcoD
system
setup
P:PelcoD
PTZ addr:
028 LCD will display:
Press
joystick,
PTZ
addr:028
④ toward down, LCD will display:
Move
the
joystick
* P:PelcoD
PTZ
Move
the
joystick
toward
down,
LCD
will
display:
PTZ addr:
addr:028
028
* P:PelcoD
the
joystick
down,
LCD
will
display:
MoveMove
the joystick
toward
down,toward
LCD will display:
password:---** P:PelcoD
Move
the
joystick
toward
down,
LCD
will
display:
PTZ
addr:
028
P:PelcoD
ptz
setup
Move
the
joystick
toward
right,
LCD
will
display:
Move
the
joystick
toward
down,
LCD
will
display:
ptz
setup
Move
the
joystick
toward
right,
LCD
will
display:
ptz
setup
Move the
joystick
toward
right,
LCD
will
display:
*
P:PelcoD
Move
the
joystick
toward
right,
LCD
will
display:
Move
the
joystick toward down, LCD will display:
*system
setup
ptz setup
*system
setup
Move
the
joystick
toward
right,
LCD
will
display:
*system
setup
ptz setup
Move
the
joystick
toward
right,
LCD
will
display:
PTZ addr:028
*system
setup
in password(default password: 8888), press joyst
Move
the
joystick
toward
right,
LCD
will
display:
PTZ
ptzKey
setup
*system
setup
PTZ addr:028
addr:028
Move
the
joystick
toward
right,
LCD
will
display:
*P:PelcoP
PTZ
addr:028
*P:PelcoP
*systemjoystick,
setup
Move
the joystick toward right, LCD will display:
*P:PelcoP
PTZ addr:028
LCD
display:
*ptz
setup
*P:PelcoP
Press
joystick,
LCD will
will
display:
PTZ addr:028
addr:028
PressPress
joystick,
LCD
will display:
Press
joystick,
will
display:
PTZ
*P:PelcoP
system
setupLCD
Press
joystick,
LCD
will
display:
*P:PelcoP
PTZ
addr:028
*language
Press
joystick,
finish
protocol
setup
and
switch
to
baud
rate
setup,
LCD
will
display:
*P:PelcoP
Press
joystick,
LCD
will
display:
*language
Press joystick,
finish
protocol
setup
and
switch
to
baud
rate
setup,
LCD
will
display:
Press
joystick,
finish
protocol
setup
and
switch
to
baud
rate
setup,
LCD
will
display:
*language
Press
joystick,
finish
protocol
setup
and
switch
to
baud
rate
setup,
LCD
will
display:
Press
joystick,
LCD will display:
*P:PelcoP
password
setup
*language
password
setup
Press
joystick,
finish
protocol
setup
and
switch
to
baud
rate
setup,
LCD
will
display:
password
setup
*language
PTZ addr:028
Press
joystick,
finish
protocol
setup
and
switch
to
baud
rate
setup,
LCD
will
display:
password
setup
Move
the joystick toward down, LCD will display:
PTZ
Press
joystick,
finish
protocol
setup
and
switch
to
baud
rate
setup,
LCD
will
display:
*language
PTZ addr:028
addr:028
password
setup
Press
joystick,
finish
protocol
setup
and
switch
to
baud
rate
setup,
LCD
will
display:
*B:2400
PTZ
addr:028
*B:2400
password
setup
Press
joystick, finish protocol setup and switch to baud rate setup,
LCD
willptz
display:
*B:2400
PTZ addr:028
setup
Move
joystick
till
LCD
display:
Move
joystick
till
LCD
display:
*B:2400
PTZ addr:028
addr:028
Move
joystick
till
LCD
display:
PTZ
Move
joystick
till
LCD
display:
*B:2400
*system
setup
Move
joystick
till
LCD
display:
*B:2400
** default
factory
PTZ addr:028
Move the
joystick
toward
right till LCD
display:
*B:2400
Move
the
joystick
toward
right
till
LCD
display:
Move
joystick
till
LCD
display:
default
factory
Move
the
joystick
toward
right
till
LCD
display:
* setup
default
factory till LCD display:
Move
the
joystick
toward
right
till
LCD
display:
*B:2400
Move
joystick
*
default
factory
setup
Move
the
joystick
toward
right
till
LCD
display:
* setup
default factory
Move
the
joystick
toward
right
till
LCD
display:
PTZ addr:028
Press
joystick, LCD will display:
* setup
default
factory
Move
the
joystick
toward
right
till
LCD
display:
PTZ
addr:028
setup
PTZ
addr:028
Move
the
joystick
toward
right
till
LCD
display:
*B:9600
PTZ
addr:028
setup
*B:9600
Move
the joystick toward right till LCD display:
MoveMove
joystick
toward right,toward
LCD will display:
*B:9600
PTZ addr:028
*language
joystick
right,
LCD
will
display:
Move
joystick
toward
right,
LCD
will
display:
*B:9600
PTZ addr:028
addr:028
Move
joystick
toward
right,
LCD
will
display:
PTZ
*B:9600
password
setup
Move
joystick
toward
right,
LCD
will
display:
*B:9600
*default
factory
PTZ addr:028
joystick,
finish
setup
and
back
to
select
PTZ
ID
menu,
repeat
above
steps,
Press
Move
joystick
toward
right,
LCD
will
display:
*B:9600
Press joystick,
finish
setup
and
back
to
select
PTZ
ID
menu,
repeat
above
steps,
*default
factory
joystick,
finish
setup
and
back
to
select
PTZ
ID
menu,
repeat
above
steps,
Press
*default
factory
joystick,
finish
setup
and
back
to
select
PTZ
ID
menu,
repeat
above
steps,
Press
Move
joystick
toward
right,
LCD
will
display:
*B:9600
setup
?
factory
you canPress
set otherjoystick,
PTZ parameter.
After finishing
all
setup,
pressto
(ESC)
key toPTZ
quit ID menu, repeat*default
finish
setup
and
back
select
above
steps,
setup ?
?
*default
factory
setup
joystick,
finish
setup
and
back
to
select
PTZ
ID
menu,
repeat
above
steps,
you
can
set
other
PTZ
parameter.
Move
joystick till LCD display:
setup
?
setup. Press
joystick,
finish
setup
and
back
to
select
PTZ
ID
menu,
repeat
above
steps,
you
can
set
other
PTZ
parameter.
Press
*default
factory
you
can
set
other
PTZ
parameter.
joystick,
finish
setup
and
back
to
select
PTZ
ID
menu,
repeat
above
steps,
Press
setup
?
08
—
Press
joystick,
the
buzzer will give out long time sound, the—
question
mark “?“ in
you
can
set
other
PTZ
parameter.
—
08
—
setup
?
joystick,
finish
setup
and
back
to
select
PTZ
ID
menu,
repeat
above
steps,
Press
you
can
set
other
PTZ
parameter.
* default factory
—
08
—
screen
will
disappear,
denote
setup
finished,
press
(ESC)
key
to
quit
setup.
you
can
set
other
PTZ
parameter.
—
08
—
you can set other PTZ parameter.
setup
— 08 —
—
07
—
you can set other PTZ parameter.
— 08 —
—
07
—
—
07
—
—
07
—
—
07 —
—
Move joystick toward right, LCD will display:
7
— 07
07 —
—
— 07 —
PTZ addr:028
④
password:---key
in
password(default:
8888),
press
key
in
password(default:
8888),
press
password:---key
in
password(default:
8888),
press
key
in
password(default:
8888),
press
*ptz
setup
key
in
password(default:
8888),
press
*ptz
setup
key
in
password(default:
8888),
Key in password
(default:
8888),
press
joystick,
LCD
will
display:
*ptz
setup
system
setup
key
in
password(default:
8888), press
press
*ptz
setup
system
setup
system
setup
key
in
password(default:
8888), press
*ptz
setup
system
setup
*ptz
setup
joystick,
joystick,
joystick,
joystick,
joystick,
joystick,
joystick,
joystick,
LCD
LCD
LCD
LCD
LCD
LCD
LCD
LCD
will
will
will
will
will
will
will
will
Press joystick, the buzzer will give out long time sound, the question mark“?”in
screen will disappear, denote setup finished, press 【ESC】 key to quit setup.
Typicalconnecting
connecting diagram
4.4.Typical
diagram
3.3Parameter
ParameterSetup
Setup
Framework
3.3
Framework:
*PTZ addr: xxx
* PTZ
setup
protocol
*PTZ addr: 0-254
(all PTZ parameter
Baud rate
will be set as same)
*Language
Chinese、English
Old password:
T Y P IC A L C O N N E C T IN G D IA G R A M
Pelco D 、PelcoP
HIK、DAHUA
DC connector
RS485
cable
2400、4800、9600、
19200、38400
Power supply
cable (DC 12V)
VS-PTC-50
Move joystick to select
Camera OSD Controller
4 digit number
RS-485+ connection, Teminal A
*password setup
New password:
4 digit number
RS-485+ connection, Teminal B
Enter again:
*system
setup
4 digit number
A
Key-press
sound volumn
close、low、
mid、high
Key backlight
(optional)
close、30S、60S、 Move joystick to select
120S、open
B
A
B
A
B
A
B
A
B
Move joystick to select
Can connect max. 255 cameras
Default factory
setup
N/A
Move and press
joystick to select
— 09 —
— 10 —
8
9
5. FAQ
Symptom
Methods
1. Check the
hardware: RS485
Step 1:
RS485 A and B is reversed
Step 2:
Check RS485 cable
continuity is OK or not
2. Check the software
settings: keyboard
controller and speed
dome address,
protocol, baud rate
Step 1:
check the current protocol and
baud rate is correct or not
Step 2:
Restore the settings to default
setting and reset
1. Check hardware
Check the continuity of each
branch cable
2. Check software
settings
Check the protocol and baud
rate of each address code
3. Might be the problem
of star-type connection
Step 1:
Connect RS485 to a 120Ω
resistor at far end.
Step 2:
Install RS485 distributor
between the speed dome and
keyboard controller.
Many speed
domes respond
simultaneously
when operate
the keyboard
controller
Check the ID
of speed domes
Check whether those
speed dome that respond
simultaneously have the same
address code or not.
Set different address.
No key tone
Turn on key tone in system settings
Keyboard
Controller cannot
control the speed
dome
Some speed
domes can
be controlled
but some not
10
Analysis
Marshall Electronics, Inc.
1910 East Maple Ave. El Segundo, CA 90245
Tel: (800) 800-6608 / (310) 333-0606 • Fax: 310-333-0688
www.LCDracks.com • [email protected]