1
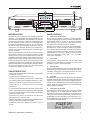
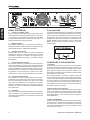
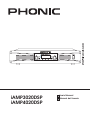
iAMP3020DSP
iAMP4020DSP
User's Manual
Manual del Usuario
English
iAMP3020DSP
iAMP4020DSP
DIGITAL AMPLIFIER
WITH SIGNAL PROCESSING
Español
AMPLIFICADOR DIGITAL
CON PROCESAMIENTO DE SEÑAL
ENGLISH . . . . . . . . . . . . . . . . . . . . . . . . . . . . . . . . . . . . . . . I
ESPAÑOL ......................................II
APPENDIX ....................................III
V1.0 12/23/2014
iAMP3020 DSP / iAMP4020 DSP
English
USER'S MANUAL
CONTENTS
INTRODUCTION
1
FEATURES
1
FRONT PANEL
1
BACK PANEL
2
CONTROLS & DISPLAY
2
OPERATING THE DSP FEATURES
3
SPECIFICATIONS
5
APPENDIX
APPLICATIONS
1
DIMENSIONS
2
Phonic preserves the right to improve or alter any information within this
document without prior notice
iAMP3020 DSP / iAMP4020 DSP
3
IMPORTANT SAFETY INSTRUCTIONS
English
The apparatus shall not be exposed to dripping or splashing and that no objects
with liquids, such as vases,
shall be placed on the apparatus. The MAINS plug is used as the disconnect device, the disconnect device shall
remain readily operable.
Warning: the user shall not place this apparatus in the
can be easily accessible.
area during the operation so that the mains switch
1. Read these instructions before operating this
apparatus.
CAUTION
2. Keep these instructions for future reference.
RISK OF ELECTRIC SHOCK
DO NOT OPEN
3. Heed all warnings to ensure safe operation.
4. Follow all instructions provided in this document.
5. Do not use this apparatus near water or in locations
where condensation may occur.
6. Clean only with dry cloth. Do not use aerosol or liquid
cleaners. Unplug this apparatus before cleaning.
7. Do not block any of the ventilation openings. Install
in accordance with the manufacturer’s instructions.
8. Do not install near any heat sources such as radiators,
heat registers, stoves, or other apparatus (including
.
9. Do not defeat the safety purpose of the polarized or
grounding-type plug. A polarized plug has two blades
with one wider than the other. A grounding type plug
has two blades and a third grounding prong. The wide
blade or the third prong is provided for your safety. If
the provided plug does not into your outlet, consult
an electrician for replacement of the obsolete outlet.
10. Protect the power cord from being walked on or
pinched particularly at plug, convenience receptacles,
and the point where they exit from the apparatus.
11. Only use attachments/accessories
manufacturer.
CAUTION: TO REDUCE THE RISK OF ELECTRIC SHOCK,
DO NOT REMOVE COVER (OR BACK)
NO USER SERVICEABLE PARTS INSIDE
REFER SERVICING TO QUALIFIED PERSONNEL
The lightning flash with arrowhead symbol, within an
equilateral triangle, is intended to alert the user to the
presence of uninsulated “dangerous voltage” within the
product’
magnitude to constitute a risk of electric shock to persons.
The exclamation point within an equilateral triangle is intended to alert the user to the presence of important operating and maintenance (servicing) instructions in the literature
accompanying the appliance.
WARNING: To reduce the risk of
or electric shock, do
not expose this apparatus to rain or moisture.
CAUTION: Use of controls or adjustments or performance
may result in
of procedures other than those
hazardous radiation exposure.
by the
12. Use only with a cart, stand, tripod, bracket, or
by the manufacturer, or sold with
table
the apparatus. When a cart is used, use caution
when moving the cart/apparatus
combination to avoid injury from tipover.
13. Unplug this apparatus during lighting
storms or when unused for long
periods of time.
service personnel.
14. Refer all servicing to
Servicing is required when the apparatus has been
damaged in any way, such as power-supply cord or
plug is damaged, liquid has been spilled or objects
have fallen into the apparatus, the apparatus has
been exposed to rain or moisture, does not operate
normally, or has been dropped.
4
iAMP3020 DSP / iAMP4020 DSP
3
5
4
English
2
1
INTRODUCTION
Congratulations on your purchase of another great Phonic
product. The iAMP3020DSP and iAMP4020DSP were
carefully designed so as to provide phenomenal power
in a low-weight, easily-manageable construction that is
rack-mountable. Phonic combines its revolutionary D-class
amplifier technology with stable, reliable power supplies
for fantastic amplification even under the most rigorous of
conditions. The built-in DSP provides simple yet advanced
signal processing for enhancing your sound.
We know how eager you are to get started – getting the amp
out and hooking all your gear up is probably your number
one priority right now – but before you do, we strongly
urge you to take a look through this manual. Inside, you
will find important facts and figures on the set up, use and
applications of your brand new iAMP DSP. Remember that
safe operation of an amplifier is of the utmost importance,
so we strongly recommend that users heed all warnings
and instructions listed in this manual.
FEATURES
• Each channel runs 1500 Watts or 2000 Watts of power
into 2 ohms (model dependent)
• Innovative class D amplification circuitry
• Independent fourth-order Linkwitz-Riley crossover
• Convenient combo jacks accepting ¼” and XLR inputs
• Detented front panel input gain controls
• Independent ¼” thru jacks for expanded operation
• 4 pole professional speaker twist lock outputs
• Full range of safety circuits for full protection
• Variable crossover plus low pass and high pass filters
• Speaker alignment delay with feet, meter and mSec
parameters
• Output limiter with adjustable threshold, attack and
release parameters
FRONT PANEL
1. Gain Controls
These controls adjust the incoming level received by the
respective channel 1 and channel 2 input jacks on the rear
of the iAMP. It is idea to set these controls to the rightmost position to allow optimal use of the incoming signal
whenever possible.
Whenever the gain controls are used, the resulting output
signal levels will appear on screen. The gain controls can
be locked using the DSP software. If at any point your faders do not allow you to adjust the output level, go into the
following menus: “Out” > “VR” > “Lock” to reactivate them.
2. Signal LED
These LED indicators will light up whenever the iAMP DSP
produces a signal through the corresponding input channels, equal to about 4 volts RMS.
3. Level LEDs
These LEDs will illuminate when the output level of the
iAMP reaches the levels indicated, -20 and 0 dB. For best
results, set the Gain controls to a level that allows the -20
indicator flash steadily.
4. Clip LED
The Clip LED will light up just prior to the clipping of the
output signal, giving users a clear way to know whether
to lower the Gain controls to reduce the outgoing signal.
A steady flashing or constant illumination will require attention by the user, whereas an occasional flash doesn’t
necessarily indicate immediate issues.
5. Power Switch
This switch is used to activate and deactivate the iAMP
DSP. Be sure to power on all input devices, including mixers and/or signal processors before turning the iAMP DSP
on, and ensure the iAMP DSP is the first device you turn
off. When the iAMP DSP is turned off, your current settings
will be automatically saved.
• 31-band graphic equalizer with 15 dB of boost or cut
iAMP3020 DSP / iAMP4020 DSP
1
10
English
9
7
6
8
6
11
BACK PANEL
6. Combo Input Jacks
Both channels of the iAMP DSP offer actively balanced
‘combination’ input jacks. These accept either 3-pin XLR
or ¼” TRS connectors. The design of the iAMP’s circuitry
allows for the highest possible input signal level to be
received from the majority of sources.
DSP Functions
The iAMP DSP models have a built-in DSP processor
offering a multitude of onboard signal processors. These
are controlled using the three buttons and display located
on the front of the amplifier. Functions include a 31-band
equalizer, limiter, phase reverse, crossover and delay,
among other system-related features.
7. Thru Output
These balanced ¼” outputs allow users to patch the
incoming signals directly out to additional amplifiers or
input devices.
8. Speaker Connectors
The iAMP DSP offers a professional-standard 4 pole
speaker connector for each output channel. Twist the
cable clockwise to lock speakers into place and counter
clockwise to release.
9. Breaker Switch
In the unlikely event that an external influence presents
a problem that could potentially harm the unit, the iAMP
DSP’s breaker will trip. Check all wiring and cables before
resetting a tripped breaker. If the breaker repeatedly trips,
we advise that you get in touch with your country’s Phonic
distributor for repairs and services.
10. AC Power Connector
This input connector is for IEC power cables, allowing for
AC power to be sent to the unit. Please use the power cable
provided with the unit to power the iAMP DSP. We strongly
suggest that you under no circumstances remove the
grounding pin from the cable. Doing so could be detrimental
to the iAMP DSP’s operation and to your safety.
11. Cooling Fan
Due to the heat that can be accumulated when amplifying
signals, Phonic includes a variable-speed fan that is
temperature sensitive – activated and deactivating as
necessary.
2
12
14
13
CONTROLS & DISPLAY
12. Display
All DSP functions can be viewed on this display. In the main
menu, the different menu items are listed to the left. These
are: GEQ31, Input, Limiter, Meter, Monitor, Output, Scene,
Crossover and Delay. The 3 control buttons beneath the
display can be used to navigate this menu.
In the main menu, a small square beside a function’s
name indicates that the function is currently selected and
the SET/ENTER button can be pushed to enter the menu.
Inside the individual function menus, a flashing cursor is
an indication that the feature is now being edited. This can
be done with the left/right buttons.
13. Left/Right Buttons
These two buttons are simply used to scroll through the
different options and settings of the onboard DSP. They can
be pushed in for a short time to make scrolling through the
available options faster.
14. SET/ENTER Button
This button is used to enter different functions’ submenus,
as well as being used to confirm settings. When in
submenus, the SET/ENTER button can be pushed and
held for a couple of seconds to return to the previous menu.
iAMP3020 DSP / iAMP4020 DSP
Operating the DSP Features
The iAMP DSP features a 31-band graphic equalizer on
each of the two output channels. There are, of course, 31
different frequencies between 20 Hz and 20 kHz that can
be adjusted by a rate of ±15 dB.
It is possible to link channel 1 and 2 so that the GEQ
settings of one channel will be copied to other. When
selecting the “Link” feature the direction that settings will
be copied is indicated by arrows.
Any GEQ settings can be reset using the “Reset” option.
Doing so will return the boost/cut for each frequency of the
31-band GEQ back to 0 dB.
The GEQ for each channel can also be turned on and off.
Input Settings
The input settings on the iAMP are quite simple. You’re able
to adjust the incoming signal levels (volume), of course,
as well as link channel 1 and 2 settings together. When
channels are linked, settings on one channel will be applied
to the other. The direction of the arrows when the link mode
is selected will determine which channel’s settings will be
copied to which.
In addition to this, you have selectable input modes. The
two settings are “Stereo” and “Mono(In1)”. In Stereo mode,
the channel 1 and 2 inputs will be sent to their respective
outputs. When, however, you select the mono option,
the channel 1 input will automatically be sent to both the
channel 1 and channel 2 outputs.
Limiter
A limiter is used to dynamically limit the output level of your
audio. This can be helpful in a number of ways. It can limit
the abuse of speakers connected to the amplifier, but also
help protect the audience from explosive audio whenever it
may appear. All-in-all, though, it will keep your audio within
a certain audio range.
iAMP3020 DSP / iAMP4020 DSP
The threshold will allow you to select the point at which
the limiter will kick-in. Once your output signal exceeds the
selected threshold, the limiter circuit will activate.
Attack and release times are simply the time in which
the limiter waits before kicking-in or dropping out when
activated. Once the signal passes the threshold, the limiter
will not be applied until the selected attack time has passed.
When the signal once again drops down past the threshold,
the release time determines how long the limiter will stay
active beyond this point.
The gain can be adjusted to simply off-set the overall level
of the entire input signal.
Knee settings determine the ‘harshness’ of the limiter, for
lack of a better word. At 0, this limiter would be considered
a ‘soft knee’ limiter while at 10 it’s ‘hard knee’ (with different
degrees of soft/hard-knee in between). A soft-knee limiter
will be more delicate with the handling of signals, while a
hard-knee limiter may be somewhat noticeable.
Meter
The front of the iAMP features two level meters; one per
channel. These can simply be changed between “input”
and “output” meters using the DSP software. Like many
other features, you can ‘link’ these settings so that channel
1 and 2 are adjusted simultaneously.
Monitor
One fascinating feature of the iAMP is the extensive
monitoring that is included. Using the monitor feature, you
immediately have access to such information as current,
DC voltage, dB attenuation, voltage, power voltage offset,
watts and internal temperature.
The monitor submenu is slightly different to the others.
You’ll be greeted with three options: Esc, View and Set.
In this case, Esc (SET/ENTER) will return you to the main
menu; View (LEFT) will allow you to view all of the currently
selected “monitor” settings, and; Set (RIGHT) will let you
set which properties can be viewed.
3
English
31-band Graphic Equalizer
A graphic equalizer is an essential tool for live events,
where a little contouring of your output signal may be
necessary. It can help reduce feedback and make your
audio sound altogether ‘whole’. Setting your GEQ can
depend on a number of factors, including the timbre of the
instruments you’re using, the positioning of microphones
within your venue, and the size and shape of the venue
itself. Tools like the Phonic PAA3 can be utilized to help
calculate suggested GEQ settings.
The iAMP DSP’s onboard Limiter is feature-packed, with
user-adjustable thresholds, gain, release, attack, and
“knee” settings. Like many other functions on the iAMP
DSP, there are “On/Off” and “Link” options for each channel.
English
You can setup your monitoring by selecting “Set”, obviously.
When setting up monitoring, an asterisk will appear beside
selected properties. You can remove them or add them to
monitoring using the left/right and ENTER/SET buttons.
When you select “View”, the properties selected will take
up the entire screen in place of the main menu. You can
scroll through them at will using the left and right buttons.
However, when you are on the main menu, the “Monitor”
option will still continuously scroll through your selected
parameters anyway.
Output
The output menu has a few options to choose from. The
first you’ll see is “Phase”, which essentially lets you reverse
the phase (180°) of your output signal for each channel.
This is useful if your speakers are incorrectly wired and you
need an easy fix. An audio signal with a reversed phase is
audible ‘muddy’ so you should know immediately whether
or not this function is necessary. There are two settings for
the phase option: Normal or Reversed.
The next and final option in the Output submenu is “VR”
which lets you select the operation of the VR rotary controls
on the front of the iAMP DSP. There are three settings:
Normal, Link and Lock. When set to normal, the left and
right controls will simply adjust their respective output
signals. When set to Link, they will be linked so as to allow
one control to control the output signal of both outputs.
Finally, the locked mode will do just that: lock both rotary
controls so that adjusting them will have no effect on the
output signals.
Scene
The Scenes menu lets you save all of your iAMP DSP
settings. These will be stored until the next time you turn
on the amplifier – and continue to be stored even when the
device is unplugged. There are 8 slots for saving all of your
settings. To save, simply select save and then select one of
the designated slots. You will need to push the SET/ENTER
button to confirm. You may also change the name of your
saved scenes, up to 8 digits. Reloading the “initial” scene
will return the iAMP DSP back to factory default settings.
4
Xover
The crossover of the iAMP essentially enables you to
separate high and low frequency audio between the
two output channels, enabling you to better utilize the
amplifier’s power for subwoofers or two-way speakers.
In addition to the crossover, there are also low pass and
high pass filters available on channels 1 and 2 respectively.
The low and high pass filters essentially allow you to select
a frequency at which signals will begin to be cut, whether
to remove noise and interference or simply improve the
overall efficiency of the amplifier.
The crossover frequency itself can be selected through
the “X-FQ” option. The crossover frequency is the point
at which the high and low frequencies will be separated
and sent to their respective outputs. The actual type of
crossover used is selected using the “Order” option. There
are 12dB/octave, 18dB/octave and 24dB/octave options
available. Each of these becomes gradually steeper, with
12dB/octave being a slight decline and the 24dB/octave
option being a much sharper decline.
Delay
Adding a delay to your outputs can be useful when using
multiple speakers over large areas. A delay time of one
millisecond per foot (or 3 milliseconds per meter) that the
speaker is away from the stage is the general rule of thumb
in this application (your mileage may vary). Thankfully the
iAMP DSP also offers distance settings to help take the
guess-work out of the setup.
Like most of the aforementioned functions, the delay
function offers a link and on/off options.
In addition to this, there are 3 different ways to adjust the
delay time of this function. You can choose to change the
delay in feet, meters or in milliseconds. For feet and meters,
the distance should be that between the speaker and the
stage. While any of these 3 options are adjusted, the other
2 will be adjusted automatically. This being the case, you
can adjust the delay in meters and then immediately go to
the mSec option to check the actual delay time.
iAMP3020 DSP / iAMP4020 DSP
SPECIFICATIONS
iAMP 4020DSP
Continuous Output Per Channel
1KHz, 0.5% THD
Output Power 8 ohms
600W
680W
Output Power 4 ohms
1000W
1200W
Output Power 2 ohms
1500W
2000W
Input Sensitivity
0.775 volts +/- 3% for 1 kHz 4 ohm rated power,
0.68 volts +/- 3% for 1 kHz. 2 ohm rated power
Input Connector
One Combo Jack (XLR+1/4") per channel
Signal Through Out
One 1/4" phone jack per channel
Frequency Response
Speaker Output
Built-in Signal Processors
10Hz – 50KHz
One Speakon connector per channel
31-band GEQ, Delay, Limiter, Phase Reverse, System Monitoring,
Crossover, Low Pass Filter, High Pass Filter
EQ
Crossover
31-band, ±15 dB
HPF, LPF, 3 Xover Types: 12, 18, 24dB/oct
Delay
0ms to 680ms
Limiter
0dB to -50dB (Threshold)
Scenes
8 user-defined slots
S/N Ratio (20 Hz – 20 KHz)
> 105dB A-Weighted
THD @ 1 kHz (10% Rated Output)
Damping Factor (8 ohms)
Less than 0.1%
>225:1 - 1 kHz at 8 ohms
Slew Rate
> 12V/µs
Input CMRR
Protection Circuitry
> -76 dB @ 1 kHz
Multiple Protection designs against DC bias, thermal fault, load mismatch, etc.
Power Consumption
1500W 2Ω LOAD STEREO
2000W 2Ω LOAD STEREO
Dimensions (WxHxD)
483 x 105 x 259 mm
(19.02" x 4.13" x 10.2")
483 x 105 x 259 mm
(19.02" x 4.13" x 10.2")
6.8 kg (14.9 lbs)
7 kg (15.4 lbs)
Weight
iAMP3020 DSP / iAMP4020 DSP
English
iAMP 3020DSP
5
SERVICE AND REPAIR
English
For replacement parts, service and repairs please contact the Phonic distributor in your
country. Phonic does not release service manuals to consumers, and advice users to not
attempt any self repairs, as doing so voids all warranties. You can locate a dealer near you at
http://www.phonic.com/where/.
WARRANTY INFORMATION
Phonic stands behind every product we make with a no-hassles warranty. Warranty coverage
may be extended, depending on your region. Phonic Corporation warrants this product for a
minimum of one year from the original date of purchase against defects in material and
workmanship under use as instructed by the user’s manual. Phonic, at its option, shall repair
or replace the defective unit covered by this warranty. Please retain the dated sales receipt as
evidence of the date of purchase. You will need it for any warranty service. No returns or repairs
will be accepted without a proper RMA number (return merchandise authorization). In order to
keep this warranty in effect, the product must have been handled and used as prescribed in the
instructions accompanying this warranty. Any tampering of the product or attempts of self repair
voids all warranty. This warranty does not cover any damage due to accident, misuse, abuse,
or negligence. This warranty is valid only if the product was purchased new from an authorized
Phonic dealer/distributor. For complete warranty policy information, please visit
http://www.phonic.com/warranty/.
CUSTOMER SERVICE AND TECHNICAL SUPPORT
We encourage you to visit our online help at http://www.phonic.com/support/. There you can find
answers to frequently asked questions, tech tips, driver downloads, returns instruction and other
helpful information. We make every effort to answer your questions within one business day.
[email protected]
http://www.phonic.com
6
iAMP1620
/ iAMP3020
/ iAMP4020
iAMP3020
DSP / iAMP4020
DSP
English
Manual del Usuario
CONTENIDO
1
CARACTERÍSTICAS
1
PANEL FRONTAL
1
PANEL POSTERIOR
2
CONTROLES Y VISUALIZACIÓN
2
FUNCIONAMIENTO DE LAS FUNCIONES DSP
3
ESPECIFICACIONES
5
Español
INTRODUCCIÓN
APÉNDICE
APLICACIONES
1
DIMENSIONES
2
Phonic se reserva el derecho de mejorar o alterar cualquier información
provista dentro de este documento sin previo aviso.
iAMP1620 /DSP
iAMP3020
/ iAMP4020
iAMP3020
/ iAMP4020
DSP
7
English
Español
8
iAMP1620 / iAMP3020 / iAMP4020
3
5
4
English
1
INTRODUCCIÓN
Felicitaciones por la compra de otro fantástico producto
de Phonic. Los iAMP3020DSP y iAMP4020DSP han sido
meticulosamente diseñados para brindarle una potencia
fenomenal en peso liviano, construcción fácil administrable
de rack montable. Phonic combina su tecnología revolucionaria de amplificadores clase D con un suministro
de potencia fiable para excelente amplificación bajo las
condiciones más rigurosas. El DSP incorporado proporciona un procesador de señales sencillo y avanzado para
mejorar su sonido.
Sabemos que usted está ansioso de comenzar el uso de
dicha unidad- antes de comenzar el encablado y salida
de amp de todo su equipo es probablemente unas de las
prioridades ahora-pero antes de hacer tales procesos, le
sugerimos que lea este manual. Dentro usted, encontrará
información importante y figuras sobre la instalación, usos
y aplicaciones para su nuevo iAMP DSP. Recuerde que la
operación segura de un amplificador es lo más importante,
así que le recomendamos hacer caso a las advertencias
e instrucciones listadas en este manual.
CARACTERÍSTICAS
•Cada canal ejecuta 800 Watts, 1500 Watts o 2000 Watts
de potencia a 2 ohms
•Circuito innovador amplificador clase D
•Crossover independiente de cuarta orden Linkwitz-Riley
•Conveniente combo jacks aceptando entradas ¼” y XLR
•Fijador de controles de ganancia en el panel frontal
•Independiente ¼” mediante jacks para ampliar
operaciones
•4 polos twist lock de salida para altavoces profesionales
•Gama completa de protección para circuitos de seguridad
•Crossover (divisor de frecuencias) variable más filtros de
paso bajo y de paso alto.
•Parámetro de retardo de alineación de altavoces
disponible en pies, metros y mSec
•Limitador de salida con parámetros de umbral, de ataque/
attack y de liberación/Release ajustables
PANEL FRONTAL
1. Ganancias de Controles
Estos controles ajustan los niveles de entrada recibidos
por las entradas jacks del panel posterior del iAMP DSP
del respectivo canal 1 y canal 2. Es la idea de configurar
estos controles a la posición más correcta para tener un
uso óptimo de las señales de entrada posibles.
Siempre que se utilicen los controles de ganancia/Gain,
aparecerán los niveles de señal de salida en la pantalla.
Los controles de ganancia/Gain se pueden bloquear utilizando el software DSP. Si en algún momento sus faders
(deslizadores) no le permiten ajustar el nivel de salida,
entre en los siguientes menús: “Out”> “VR”> “Lock/Bloquear” para reactivarlos.
2. Señal LED
Los indicadores LED se iluminarán cuando el iAMP DSP
produzca una señal mediante la entrada de canal correspondiente, igual a o igual 4 volts RMS.
3. Nivel de LED
Estos LED se iluminarán cuando los niveles de salida del
iAMP DSP llegue al nivel indicado, -20 y 0 dB. Para mejores
resultados, configure los controles de Ganancia a un nivel
que deje a los indicadores flash de -20 firmes.
4. Clip LED
El Clip LED se iluminará solo antes que del recorte de la señal
de salida, ofreciendo a los usuarios una manera clara de cómo
bajar los controles Ganancia en reducir la salida de canales.
Un flash firme o constante iluminación requerirá la atención del
usuario, donde en ocasiones el flash no es necesariamente
indica cuestiones inmediatas.
5. Interruptor de Potencia
Este interruptor es usado para activar y desactivar el iAMP
DSP. Asegúrese de encender todas las entradas de los
dispositivos incluyendo mezcladoras y/o procesadores de
señal antes de encender el iAMP DSP, y asegure de que
el iAMP DSP es primer dispositivo que usted apague. Cuando el iAMP DSP está desactivado, los ajustes actuales
se guardarán automáticamente.
•Ecualizador gráfico de 31 bandas con realce o corte 15
de dB
iAMP1620 / iAMP3020 / iAMP4020
1
Español
2
10
English
9
7
6
8
6
11
Español
PANEL POSTERIOR
6. Combo de entradas Jacks
Ambos canales del iAMP DSP ofrece combinación activa
balanceada de entradas jack. Estas aceptan un 3-pin XLR
o conectores ¼” TRS. El diseño del circuito del iAMP DSP
permite posibles entradas de señal de nivel alto a ser
recibidos desde las fuentes principales.
7. Mediante Salida
Estas salidas balanceadas ¼” permite a los usuarios en
parchar las señales entrantes directo a la salida a amplificadores adicionales o entradas de dispositivos.
8. Conectores de Altavoz
El iAMP DSP ofrece un conector de altavoz profesional
estándar de 4 polos para cada salida de canal. El torcido
del cable en dirección en sentido a las agujas del reloj
para cerrar los altavoces en lugar y en sentido contrario
para liberarlo.
Funciones DSP
Los modelos iAMP DSP tienen incorporado un procesador
DSP que ofrece una multitud de procesadores de señal de
a bordo. Estos son controlados que utilizan los tres botones
situados justo abajo de la pantalla en la parte frontal del
amplificador. Las funciones incluyen un ecualizador de 31
bandas, limitador, inversor de fase, de cruce y de retardo,
(limiter, phase reverse, crossover y delay) entre otras
características.
12
14
13
9. Disyuntor (Breaker Switch)
En un evento de caso poco probable una influencia externa
posee una cuestión que puede dañar potencialmente la
unidad, los disyuntores del iAMP DSP se activarán. Revise
todo los encablados y cables antes de re-configurar un disparador disyuntor. Si el disyuntor es activado nuevamente,
le sugerimos en que se ponga en contacto con su distribuidora Phonic de su país para reparaciones y servicios.
CONTROLES Y VISUALIZACIÓN
10. Conector de Potencia AC
Esta entrada de conector es para cables de potencia IEC,
permitiendo que la potencia AC sea enviada a la unidad.
Favor de usar el cable de potencia que viene con la unidad
para potenciar el iAMP DSP. Le recomendamos que bajo
ninguna circunstancia remueva la varada (grounding pin)
del cable. En hacer esto eliminará la seguridad operativa
de su iAMP DSP.
En el menú principal, un pequeño cuadrado al lado del
nombre de una función indica que la función está seleccionada y la tecla SET / ENTER se puede empujar para entrar
en el menú. Dentro de menú de funciones individuales, un
cursor intermitente es una indicación de que la función se
está editando en este momento. Esto se puede hacer con
los botones izquierda / derecha.
11.Ventilador
El calor acumulado durante las amplificaciones de señales,
Phonic ha incluído un ventilador de velocidad variable que
es sensitivo a la temperatura que será activa y desactivada
al ser necesitado.
14. Pantalla
Todas las funciones DSP se pueden ver en esta pantalla.
En el menú principal, los diferentes elementos del menú se
enumeran a la izquierda. Estos son: GEQ31, Input, Limiter,
Meter, Monitor, Output, Scene, Crossover y Delay. Los 3
botones de control debajo de la pantalla se pueden utilizar
para navegar por este menú.
15. Botones Derecha / Izquierda
Estos dos botones se utilizan simplemente para desplazarse por las diferentes opciones y ajustes del DSP. Estos
dos botones pueden ser presionados de forma continua
para desplazarse a través de las opciones disponibles
más rápidamente.
16. SET / ENTER Botón
Este botón se utiliza para acceder a los submenús de diferentes funciones, además de ser utilizado para confirmar
la configuración. Cuando en los submenús, si presiona el
botón SET / ENTER durante un par de segundos, usted
volverá al menú anterior.
2
iAMP1620 / iAMP3020 / iAMP4020
Funcionamiento de las funciones DSP
Ajustes de entrada
Los ajustes de entrada de la iAMP son muy sencillos. Por
supuesto usted es capaz de ajustar los niveles de entrada
de señal (volumen), así como los ajustes del enlace del
canal de 1 y 2. Cuando los canales están en modo enlace
(Link), las configuraciones de un canal se aplicarán al
otro. Utiliza las flechas de dirección para seleccionar el
modo apropiado de enlace, esto determinara cuál es la
configuración del canal seleccionado que se puede copiar.
Además de esto, puede usted seleccionar varios modos
de entrada. Las dos opciones son “Estéreo” y “Mono (In1)”.
En el modo estéreo, las entradas del canal 1 y 2 serán
enviadas a sus salidas respectivas. Sin embargo, cuando
se selecciona la opción mono, la entrada del canal 1 se
enviará automáticamente a ambas salidas del canal 1 y
el canal 2.
Limitador/Limiter
Un limitador se usa para limitar dinámicamente el nivel de
salida de audio. Esto puede ser útil de varias maneras. Se
puede limitar el desgaste de los altavoces conectados al
amplificador, y también ayudar a proteger al público de
sobresaltos de audio, lo que puede suceder a menudo. En
resumen, se mantendrá el audio dentro de un cierto nivel.
El Limitador a bordo del iAMP DSP está repleto de características, con umbrales ajustables por el usuario, ga-
iAMP1620 / iAMP3020 / iAMP4020
Meter/Medidores
La parte frontal de la iAMP cuenta con dos medidores de
nivel; uno por canal. Estos dos medidores de nivel se pueden simplemente, cambiar entre medidores de “entrada”
o “salida” utilizando el software DSP. Al igual que muchas
otras características, puede crear un ‘Enlace’ entre el canal
1 y 2 de forma que los ajustes se harán simultáneamente
en los dos canales.
Monitor
Una característica fascinante del iAMP son las amplias
posibilidades de supervisión incluidas a su alcance. Mediante la función de supervisión (Monitor), usted tiene
acceso inmediato a toda una gama de información sobre
el sistema actual, como la corriente, el voltaje DC, la
atenuación en dB, la tensión de alimentación, vatios y la
temperatura interna.
El submenú de monitor/ supervisión es ligeramente diferente a los demás. Usted será recibido con tres opciones:
Esc, view y Set. En este caso, Esc (SET / ENTER), le hará
regresar al menú principal; View (en la izquierda) le per-
3
Español
El iAMP DSP dispone de un ecualizador gráfico de 31
bandas en cada uno de los dos canales de salida. Hay, por
supuesto, 31 frecuencias diferentes entre 20 Hz y 20 kHz
que se pueden ajustar para una tasa de ± 15 dB.
Es posible vincular el canal 1 y 2, de modo que los ajustes
GEQ de un canal se copiarán a otro. Al seleccionar el “Link”
incluirá la dirección en la que se copiarán los ajustes, los
cuales se indican mediante flechas.
Los ajustes de GEQ se pueden restablecer mediante la
opción “Reset”. Si lo hace, devolverá de nuevo el boost/
cut a 0 dB en cada frecuencia del GEQ de 31 bandas.
El GEQ también se puede encender y apagar en cada
canal.
El umbral le permitirá seleccionar el punto en el cual el
limitador/limiter se activará. Una vez que su señal de
salida supere el umbral seleccionado, el circuito limitador
se activará.
Las Funciones Attack y Release son simplemente el
tiempo en el que el limitador espera antes de activarse o
desactivarse. Una vez que la señal pase el umbral, no se
aplicará el limitador hasta que haya pasado el tiempo de
ataque (attack) seleccionado. Cuando la señal cae más
abajo de lo que el umbral permite, el tiempo de activación
(release time) determinara cuánto tiempo el limitador podrá
mantenerse activo.
La ganancia/Gain se puede ajustar para simplemente reducir el nivel global de la totalidad de la señal de entrada.
Ajustes de la función KNEE determina la ‘agresividad ‘ del
limitador. A 0, este limitador sería considerado un limitador
“suave/soft Knee”, mientras que a 10 sería considerado
como “agresivo/hard Knee” (con diferentes grados en
el medio). Un limitador suave será más delicado con el
manejo de señales, mientras que un limitador más agresivo
puede tener un efecto mucho más notable.
English
Ecualizador gráfico de 31 bandas
Un ecualizador gráfico es una herramienta esencial para
eventos en directo, donde podría ser necesario contornar
la señal de salida. Puede ayudar a reducir la retroalimentación (feedback) y hacer que su sonido suene en completa
armonía. La configuración del GEQ puede depender de
una serie de factores, incluyendo el timbre de los instrumentos que se quiere utilizar, así como la colocación de los
micrófonos en su lugar, y el tamaño y la forma del lugar en
sí. Los aparatos, como el Phonic PAA3 se pueden utilizar
para ayudar a calcular los ajustes GEQ.
nancia/gain, release, attack y la configuración de “Knee”.
Al igual que muchas otras funciones en el iAMP DSP, es
posible activar y desactivar el enlace con la tecla “Iink”
y activar o desactivar funciones con las teclas “On / Off”,
para cada canal.
mitirá visualizar todos los ajustes de “Monitor/ supervisión
“ seleccionados en ese momento, y; Set (en la derecha) le
permitirá configurar las propiedades disponibles.
English
Español
Naturalmente, usted puede configurar su propia supervisión seleccionando “Set”. Al configurar la supervisión
deseada, un asterisco aparecerá junto a propiedades
seleccionadas. Usted puede eliminar o añadir las propiedades de su supervisión mediante las teclas izquierda /
derecha y ENTER / SET.
Al seleccionar “Ver/View”, las propiedades seleccionadas
ocuparán toda la pantalla en lugar del menú principal.
Puede desplazarse a través de ellos a voluntad con los
botones izquierdo y derecho. Sin embargo, la opción “Monitor” estará disponible de forma continua mientras usted
se desplaza a través de los parámetros seleccionados.
Salida/ Output
El menú salida/output tiene un par de opciones de las
cuales usted puede elegir. El primer visible es “Phase/
Fase”, que esencialmente le permite invertir la fase de la
señal de salida para cada canal a (180 °). Esto es útil si
los altavoces están correctamente conectados y necesita
hacer ajustes rápidos. Una señal de audio en fase invertida es audible pero “poco clara/borrosa” por lo que usted
debería saber de inmediato si esta función es necesaria.
Hay dos configuraciones para la opción de fase: normal
o invertida/reversed.
La siguiente opción en el submenú de salida salida/output
es “VR” lo cual le permite seleccionar el funcionamiento de
los controles giratorios VR en la parte frontal de la iAMP
DSP. Hay tres opciones: Normal, Link/Enlace y Lock/Bloqueo. Cuando se ajusta a normal, los controles izquierdo
y derecho simplemente ajustarán sus señales de salida
respectivas. Cuando se ajusta a Link, se vincularán a fin
de permitir el control para ambas salidas. Por último, el
modo de bloqueo/lock hará exactamente eso: bloqueará
ambos controles giratorios para que no tengan ningún
efecto sobre las señales de salida.
Scene/Escena
El menú scene le permite guardar todos los ajustes de su
iAMP DSP. Éstos serán guardados para la próxima vez que
encienda el amplificador - y seguirán guardados incluso
después que el dispositivo haya sido desconectado. Hay 8
ranuras diponibles para guardar todas sus configuraciones.
Para guardar, sólo tiene que seleccionar sabe/guardar y
luego seleccionar una de las ranuras designadas. Usted
tendrá que empujar el botón SET / ENTER para confirmar.
4
También puede cambiar el nombre de sus escenas guardadas, hasta 8 dígitos. Si recarga la escena “initial” esto
devolverá su iAMP DSP a la configuración predeterminada
de fábrica.
Xover
El divisor de frecuencias (Crossover) de la IAMP en esencia le permite separar las frecuencias altas y bajas de
audio entre dos canales de salida, permitiendo mejorar
la utilización de la potencia de su amplificador para un
Subwoofer o altavoces de dos vías.
Además del divisor de frecuencias, también hay filtros de
paso bajo y de paso alto disponibles en los canales 1 y 2
respectivamente. Los filtros de paso bajo y alto esencialmente le permiten seleccionar una frecuencia en la que las
señales comenzarán a cortarse, lo cual le permite eliminar
el ruido y las interferencias o bien, simplemente mejorar
la eficiencia global del amplificador.
La frecuencia del divisor de frecuencias (Crossover) se
puede seleccionar a través de la opción “X-FQ”. La frecuencia de crossover es el punto en el cual las frecuencias
altas y bajas se separan y son enviadas a sus respectivas
salidas. El crossover utilizado se selecciona mediante la
opción “Order/Orden”. Hay opciones disponibles en 12dB /
octava, 18 dB / octava y 24 dB / octava. Cada una de estas
opciones alterará la señal de forma cada vez más pronunciada. Con 12 dB / octava notará un ligero descenso, con
la opción 24dB / octava notará una caída mucho mayor.
Delay/Retraso
Añadir un retraso en sus salidas de audio, puede ser útil,
cuando se utilizan varios altavoces en grandes áreas. Un
tiempo de retardo de un milisegundo por pie (o 3 milisegundos por metro), cuando un altavoz está fuera de los
escenarios, es la regla general en esta aplicación (aunque
pueda variar). Afortunadamente el iAMP DSP también
ofrece ajustes de distancia para ayudar a seleccionar el
retraso adecuado para su configuración.
Como la mayoría de las funciones antes mencionadas,
la función delay/retraso ofrece opciones de enlace y de
activación / desactivación.
Además de esto, hay 3 formas diferentes de ajustar el
tiempo de retardo de esta función. Usted puede optar
por cambiar el retraso en pies, metros o en milisegundos.
Para los ajustes en pies y metros, el arreglo debe hacerse
según la distancia presente entre el altavoz y el escenario.
Ajustando los arreglos en milisegundos los otros 2 se
ajustarán automáticamente. Siendo este el caso, se puede ajustar la demora en metros e inmediatamente ir a la
opción mSeg para comprobar el tiempo de retardo actual.
iAMP1620 / iAMP3020 / iAMP4020
ESPECIFICACIONES
iAMP3020DSP
iAMP4020DSP
Salida de Potencia 8 ohms
600W
680W
Salida de Potencia 4 ohms
1000W
1200W
Salida de Potencia 2 ohms
1500W
2000W
Entrada de Conector
0.775 voltios +/- 3% por 1 kHz 4 ohm potencia nominal,
0.68 voltios +/- 3% por 1 kHz. 2 ohm potencia nominal
Un Combo jack/ cada Canal
Señal mediante Salida
1x1/4" phone jack/ Canal
Respuesta de Frecuencia
10Hz – 50KHz
Salida de Altavoz
Procesadores de Señal
Incorporado
Un Speakon cada Canal
GEQ de 31 bandas , Retraso, limitador, inversor de fase, Supervisión del
sistema, Crossover, filtro de paso bajo, filtro de paso alto
EQ
Crossover (divisor de Frecuencias)
31 bandas, ± 15 dB
HPF, LPF, 3 Tipos de Xover: 12, 18, 24 dB / oct
Delay (retraso)
0 ms a 680ms
Limiter (limitador)
Umbral de 0dB a -50dB
Scenes (Escenas)
8 ranuras definidas por el usuario
S/N Relación (20Hz-20KHz)
105dB Ponderación-A 20Hz-20KHz
THD@ 1 kHz (10% Salida Nominal)
Menos de 0.1%
Factor de Amortiguación (8 ohmios)
> 225:1 - 1 kHz a 8 ohmios
Velocidad de Respuesta
> 12V/μs
Entrada CMRR
Circuito de Protección
Potencia de Consumo
Dimensiones (An x Alt x P),mm
Peso
iAMP1620 / iAMP3020 / iAMP4020
Español
Entrada de sensibilidad
English
Salida por Canal
1KHz, 0.,5%THD
> -76 dB @ 1 kHz
Diseños de Múltiple Protección contra DC sesgo, falla deTermal,
Carga de desajustada, ect.
1500W 2Ω CARGA ESTÉREO
2000W 2Ω CARGA ESTÉREO
483 x 105 x 259 mm
(19.02" x 4.13" x 10.2")
483 x 105 x 259 mm
(19.02" x 4.13" x 10.2")
6.8 kg (14.9 lbs)
7 kg (15.4 lbs)
5
SERVICIO Y REPARACIÓN
English
Para refacciones de reemplazo y reparaciones, por favor póngase en contacto con nuestro
distribuidor de Phonic en su país. Phonic no distribuye manuales de servicio directamente a los
consumidores y, avisa a los usuarios que no intenten hacer cualquier reparación por si mismo,
haciendo ésto invalidará todas las garantías del equipo. Puede encontrar un distribuidor cerca
de usted en http://www.phonic.com/where/.
Español
INFORMACIÓN DE LA GARANTIA
Phonic respalda cada producto que hacemos con una garantía sin enredo. La cobertura de
garantía podría ser ampliada dependiendo de su región. Phonic Corporation garantiza este
producto por un mínimo de un año desde la fecha original de su compra, contra defectos en
materiales y mano de obra bajo el uso que se instruya en el manual del usuario. Phonic, a su
propia opinión, reparará o cambiará la unidad defectuosa que se encuentra dentro de esta
garantía. Por favor, guarde los recibos de venta con la fecha de compra como evidencia de la
fecha de compra. Va a necesitar este comprobante para cualquier servicio de garantía. No se
aceptarán reparaciones o devoluciones sin un número RMA apropiado (return merchandise
autorization). En orden de tener esta garantía válida, el producto deberá de haber sido
manejado y utilizado como se describe en las instrucciones que acompañan esta garantía.
Cualquier atentado hacia el producto o cualquier intento de repararlo por usted mismo,
cancelará completamente esta garantía. Esta garantía no cubre daños ocasionados por
accidentes, mal uso, abuso o negligencia. Esta garantía es válida solamente si el producto fue
comprado nuevo de un representante/distribuidor autorizado de Phonic. Para la información
completa acerca de la política de garantía, por favor visite http://www.phonic.com/warranty/.
SERVICIO AL CLIENTE Y SOPORTE TÉCNICO
Le invitamos a que visite nuestro sistema de ayuda en línea en www.phonic.com/support/. Ahí
podrá encontrar respuestas a las preguntas más frecuentes, consejos técnicos, descarga de
drivers, instrucciones de devolución de equipos y más información de mucho interés. Nosotros
haremos todo el esfuerzo para contestar sus preguntas lo antes posible.
[email protected]
http://www.phonic.com
6
iAMP1620 / iAMP3020 / iAMP4020
APPLICATIONS
APLICACIONES
GUITAR
GUITARRA
Appendix
STEREO OPERATION
OPERACIÓN ESTÉREO
KEYBOARD
TECLADO
AM442D
GUITAR EFFECTS
EFECTOS DE GUITARRA
CD OR
MP3 PLAYER
REPRODUCTOR
CD O MP3
MICROPHONES
MICRÓFONOS
Apéndice
ACTIVE MONITOR
MONITORES ACTIVOS
MAIN OUT
SALIDA PRINCIPAL
iAMP3020DSP
PASSIVE SPEAKER
ALTAVOCES PASIVOS
iSK12
ADDITIONAL AMPLIFIERS
AMPLIFICADORES ADICIONALES
AM642D
2-WAY OPERATION
OPERACIÓN DE 2 VIAS
SUBWOOFER
2-WAY SPEAKER
iAMP3020DSP
iAMP1620
iAMP1620 // iAMP3020
iAMP3020 // iAMP4020
iAMP4020
1
DIMENSIONS
DIMENSIONES
Appendix
482 / 19
Apéndice
259 / 102
88 / 35
Measurements are shown in mm/inches
Todas las medidas están mostradas en mm/pulgadas
2
iAMP1620 / iAMP3020 / iAMP4020
NOTES
Appendix
Apéndice
iAMP1620 / iAMP3020 / iAMP4020
3