1
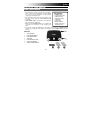
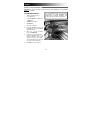
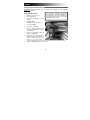
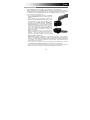
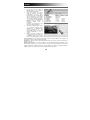
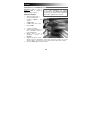
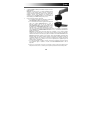
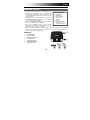
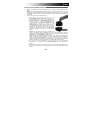
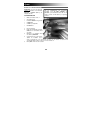
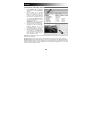
POWER SCAN QUICKSTART GUIDE ENGLISH ( 3 – 6 ) GUÍA DE INICIO RÁPIDO ESPAÑOL ( 7 – 10 ) GUIDE D’UTILISATION SIMPLIFIÉ FRANÇAIS ( 11 – 14 ) GUIDA RAPIDA ITALIANO ( 15 – 18 ) KURZANLEITUNG DEUTSCH ( 19 – 22 ) SNELSTARTGIDS NEDERLANDS ( 23 – 26 ) QUICKSTART GUIDE (ENGLISH) CARE & MAINTENANCE We recommend cleaning your film before inserting it BOX CONTENTS: into the scanner so dust or dirt does not mar the image. POWER SCAN If you do not have the materials to do this properly, Single Frame Holder consult a professional film store. Strip Film Holder We recommend using a clean, dry cotton swab to clean Film Retrieval Strip the glass surface inside the FILM HOLDER SLOT USB Cable periodically. Software CD When POWER SCAN is left unused for a long period of Quickstart Guide time, disconnect the USB cable. Safety Information & When connecting POWER SCAN to your computer, try Warranty Booklet connecting it to a USB port on your computer's rear panel. If you have too many other USB devices connected to your computer (or if POWER SCAN is connected to a USB hub), there may not be enough power for POWER SCAN to operate properly. OVERVIEW 1. SCAN BUTTON 2. FILM FEEDER WHEEL 3. FILM HOLDER SLOT 4. USB PORT 5. FILM RETRIEVAL STRIP 6. STRIP FILM HOLDER 7. SINGLE FRAME HOLDER 3 SOFTWARE INSTALLATION Important! You must first install the included software program BEFORE connecting POWER SCAN to the computer. SYSTEM REQUIREMENTS: • Windows XP-SP3 / Vista / 7 • Free USB 2.0 port • Pentium III 800MHz or higher CPU • 256MB RAM • 512MB free disk space • CD-ROM drive 1. 2. Turn on the computer. Insert the installation CD into the CD-ROM drive and the installation menu will appear.* When you see the installation menu, click NimoFilm. Follow the on-screen instructions. During the installation process, you will be prompted to enter a serial number to activate the software. This serial number can be found on the sleeve of the software CD. Click Exit to close the window. 3. 4. 5. * If the installation menu does not appear automatically, open My Computer and double-click your computer's CD drive to open the disc then click the "autorun" application. 4 SET-UP 1. 2. Connect POWER SCAN to your computer’s USB port with the included USB cable. Note: The first time you connect POWER SCAN to your computer, wait a few seconds until you see a dialog box that says "Found New Hardware" (this means the computer recognizes POWER SCAN). After you see this, POWER SCAN is ready to use. Insert your appropriate holder and film. a. If you are scanning a slide, insert it into the FILM HOLDER SLOT on the top of the device. b. If you are scanning a strip of negatives, insert the included strip film guide into the FILM HOLDER SLOT on the top of the device. Then insert one end of the negative strip into the FILM HOLDER SLOT on the right side of the device. Turn the FILM FEEDER WHEEL counterclockwise while gently "feeding" the negative into the slot. (If you want to go back to a previous frame or if the negative strip is getting jammed, turn the FILM FEEDER WHEEL clockwise while gently pulling the negative from the slot.) Note: The negative strip itself must be at least three frames long. Otherwise, it may get stuck in the device. If a negative strip becomes jammed in the device, you can loosen it by inserting the included film retrieval strip into the FILM HOLDER SLOT. Note: Handle negatives with care. Any dust, scratches or fingerprints will show up on your saved images. If possible use cotton gloves when handling negatives. It is recommended to use compressed air to remove any dust on the negatives. This is not included with the film scanner but can be purchased from an office or electronics supply retailer. c. If you are scanning a single negative frame, insert it into the included single frame holder and insert it into the FILM HOLDER SLOT on the top of the device. d. In the event that films are not able to get out from the film scanner, insert the film retrieval strip into the scanner, and use it as a tool to retriever the film out by feeding it into the device. 5 CAPTURING IMAGES 1. After you have connected POWER SCAN to the computer, open the NimoFilm software. 2. Click “Capture” on the menu bar to enter into “Photo Preview”, then insert the film holder into the film scanner and adjust it in right place. When putting in a film/slide, wait 5-10 seconds to allow POWER SCAN to adjust to optimal brightness before scanning. Note: The film holder cannot be pushed further back. 3. Select the location of the folder to save the image before you capture. By default NimoScan will save in “My Documents\My Pictures”. You can change the location if you wish. 4. Click the “Capture” button in the software or the ‘SCAN’ button on POWER SCAN to capture the image. It will take several seconds to save the image that you have captured. Film Types: There are three film types that you can choose from: Positive, Negative and Black-White. The default film type mode is Negative. Resolution: There are two kinds of photo resolutions that you can choose from when scanning: 900dpi and 1800dpi. Color Adjust: There are 3 Preset modes to select from which will automatically adjust the image settings (Nature, Colorful, Old Photo) or you can select Customize mode which will allow you to adjust the Saturation, Brightness, Contrast, or Color Balance. If you want to change the settings, adjust the cursor to a point where the image looks best. 6 GUÍA DE INICIO RÁPIDO (ESPAÑOL) MANTENIMIENTO Y CUIDADO Recomendamos que limpie su película antes de insertarlas en el escáner, de modo que el polvo o la suciedad no arruinen la imagen. Si no cuenta con los materiales para hacerlo correctamente, consulte en una tienda profesional de fotografía. Recomendamos usar un hisopo de algodón limpio y seco para limpiar periódicamente la superficie de vidrio interna de la RANURA PARA EL SOPORTE DE PELÍCULA. Cuando el POWER SCAN se deja sin usar durante un período prolongado, desconecte el cable USB. CONTENIDO DE LA CAJA POWER SCAN Soporte para cuadro individual Guía de la película Banda de recuperación de película Cable USB CD de software Manual del usuario Folleto de información sobre la seguridad y la garantía Cuando conecte el POWER SCAN a su computadora, trate de conectarlo a un puerto USB del panel trasero de la misma. Si tiene demasiados otros dispositivos USB conectados a la computadora (o si el POWER SCAN está conectado a un concentrador (hub) USB), es posible que no haya suficiente energía como para que el POWER SCAN funcione correctamente. DESCRIPCIÓN GENERAL 1. BOTÓN SCAN (ESCANEAR) 2. RUEDA DE AVANCE DE PELÍCULA 3. RANURA PARA EL SOPORTE DE PELÍCULA 4. PUERTO USB 5. TIRA RECUPERADORA DE PELÍCULA 6. SOPORTE DE TIRA DE PELÍCULA 7. SOPORTE DE MARCO ÚNICO 7 INSTALACIÓN DEL SOFTWARE ¡Importante! Debe instalar primero todo el software incluido ANTES de conectar POWER SCAN a la computadora. REQUISITOS DE SISTEMA: * Si el menú de instalación no aparece automáticamente, abra My Computer (Mi PC), haga doble clic en el lector de CD de la computadora para abrir el disco y luego haga clic en la aplicación "autorun". • Windows XP-SP3 / Vista / 7 • Puerto USB 2.0 libre • Pentium III de 800 MHz o CPU superior • 256 MB de RAM • 512 MB de espacio libre de disco • Lector de CD-ROM 1. 2. Encienda la computadora. Inserte el CD de instalación en el lector de CD-ROM. Aparece el menú de instalación*. Cuando vea el menú de instalación, haga clic en NimoFilm. Siga las instrucciones de la pantalla. Durante el proceso de instalación, el sistema le solicitará que ingrese un número de serie para activar el software. Este número de serie se puede encontrar en la funda del CD de software. Haga clic en Exit (Salir) para cerrar la ventana. 3. 4. 5. 8 CONFIGURACIÓN 1. 2. Conecte el POWER SCAN al puerto USB de su computadora con el cable USB incluido. Nota: la primera vez que conecte POWER SCAN a la computadora, espere algunos segundos hasta ver un cuadro de diálogo que diga "Found New Hardware" (Encontrado nuevo hardware) (esto significa que la computadora reconoce el POWER SCAN). Cuando lo vea, POWER SCAN está listo para usar. Inserte el soporte y la película apropiados. a. Si va a escanear una diapositiva, insértela en la RANURA PARA EL SOPORTE DE PELÍCULA de la parte superior del dispositivo. b. Si va a escanear una tira de negativos, insértela en la RANURA PARA EL SOPORTE DE PELÍCULA de la parte superior del dispositivo. Luego, inserte un extremo de la tira de negativos en la RANURA PARA EL SOPORTE DE PELÍCULA del lado derecho del dispositivo. Gire la RUEDA DE AVANCE DE PELÍCULA en sentido antihorario mientras “alimenta” suavemente el negativo por la ranura. (Si desea volver a un cuadro anterior o si la tira de negativos se atasca, gire la RUEDA DE AVANCE DE PELÍCULA en sentido horario mientras tira suavemente del negativo para extraerlo de la ranura.) Nota: La tira de negativos debe ser por lo menos de tres cuadros de longitud. De lo contrario, puede atascarse en el dispositivo. Si una tira de negativos se atasca en el dispositivo, puede aflojarla insertando la banda recuperadora de película incluida en la RANURA PARA EL SOPORTE DE PELÍCULA. Nota: Manipule los negativos con cuidado. Los rastros de polvo, rayaduras o marcas de los dedos aparecen en las imágenes guardadas. Si es posible, use guantes de algodón para manipular los negativos. Se recomienda usar aire comprimido para quitar el polvo de los negativos. Este elemento no está incluido con el escáner de películas, pero se puede comprar en una tienda minorista de artículos para oficina o electrónicos. c. Si va a escasear un solo negativo, insértelo en el soporte para cuadro individual incluido e insértelo en la RANURA PARA EL SOPORTE DE PELÍCULA de la parte superior del dispositivo. d. En caso de que las películas no puedan salir del escáner, inserte en el mismo la tira recuperadora de película y úsela como herramienta para recuperar la película aplicándola al dispositivo. 9 CÓMO CAPTURAR LAS IMÁGENES 1. 2. 3. 4. Una vez conectado POWER SCAN a la computadora, abra el software NimoFilm. Haga clic en “Capture” (Capturar) en la barra de menú e ingrese en “Photo Preview” (Vista preliminar de la foto), inserte el soporte de la película en el escáner y ajústelo al lugar correcto. Cuando coloque una película o diapositiva, espere de 5 a 10 segundos para permitir que POWER SCAN se ajuste al brillo óptimo antes de escanear. Nota: El soporte de la película no se puede empujar más hacia atrás. Seleccione la ubicación de la carpeta para guardar la imagen antes de capturarla. Por defecto, NimoScan guarda en “My Documents\My Pictures” (Mis documentos/Mis imágenes). Puede cambiar la ubicación si lo desea. Haga clic en el botón “Capture” del software o en el botón ‘SCAN’ (Escanear) de POWER SCAN para capturar la imagen. Guardar la imagen que capturó demora varios segundos. Film Type (Tipo de película): Existen tres tipos de películas entre los que puede elegir: Positive (Positivo), Negative (Negativo) y Black-White (Blanco y negro). El tipo de película predeterminada es Negativo. Resolution (Resolución): Existen dos clases de resolución fotográfica que puede elegir para escanear: 900dpi (900 ppp) y 1800dpi (1800 ppp). Color Adjust (Ajuste de color): Existen 3 modos predeterminados para seleccionar que ajustan automáticamente los parámetros de la imagen (Nature (Naturaleza), Colorful (Colorida) y Old Photo (Foto antigua) o bien puede seleccionar el modo Customize (Personalizar) que le permite ajustar los parámetros Saturation (Saturación), Bright (Brillo), Contrast (Contraste), o Color Balance (Balance de color). Si desea cambiar los parámetros, ajuste el cursor al punto en que la imagen se vea mejor. 10 GUIDE D’UTILISATION SIMPLIFIÉ (FRANÇAIS) ENTRETIEN ET NETTOYAGE Nous vous recommandons de nettoyer le film avant de les insérer dans le numériseur afin que la poussière ou la saleté viennent gâter l’image. Si vous n’avez pas le matériel adéquat pour faire le nettoyage, consultez votre détaillant de produit professionnel. Nous vous recommandons d’utiliser régulièrement un coton-tige propre et sec afin de nettoyer la vitre intérieure de l’emplacement pour porte-négatif. Si le POWER SCAN ne doit pas être utilisé pendant un certain temps, débrancher le câble USB. CONTENU DE LA BOÎTE POWER SCAN Porte-négatif simple Guide pour bande de négatifs Bande d’extraction pour négatifs Câble USB CD logiciel Guide d’utilisation Consignes de sécurité et information concernant la garantie Utilisez de préférence le port USB sur le panneau arrière de l’ordinateur pour brancher le POWER SCAN. Si beaucoup d'appareils USB sont branchés à votre ordinateur (ou si le POWER SCAN est branché à un répéteur USB), il se peut qu’il n’y ait pas suffisamment de puissance pour faire fonctionner le POWER SCAN correctement. VUE D’ENSEMBLE 1. TOUCHE SCAN 2. MOLETTE D’ALIMENTATION POUR NÉGATIF 3. EMPLACEMENT POUR PORTE-NÉGATIF 4. PORT USB 5. BANDE D’EXTRACTION POUR PELLICULE 6. PORTE-PELLICULE 7. PORTE-PELLICULE SIMPLE 11 INSTALLATION LOGICIEL Important! Vous devez installer le logiciel AVANT de brancher le POWER SCAN à votre ordinateur. * Si le menu d’installation ne s’affiche pas automatiquement, ouvrez Poste de travail et double-cliquez sur le lecteur où se trouve le CD afin de l’ouvrir, puis cliquez sur « autorun ». CONFIGURATION REQUISE : • Windows XP-SP3 / Vista / 7 • Port USB 2.0 • Pentium III avec UCT 800MHz ou supérieur • 256 MO DE MÉMOIRE VIVE • 500 Mo d’espace disque libre • Lecteur CD-ROM 1. 2. Mettez l’ordinateur en marche. Insérez le CD d’installation dans le lecteur CD-ROM afin de faire apparaître le menu d’installation.* Lorsque le menu d’installation s’affiche, cliquez sur NimoFilm. Suivez ensuite les instructions à l’écran. Durant le processus d’installation, vous serez invité à entrer le numéro de série du logiciel afin d’activer le logiciel. Le numéro de série se trouve sur le boîtier du CD. Cliquez sur Exit pour fermer la fenêtre. 3. 4. 5. de 12 INSTALLATION DU POWER SCAN 1. 2. Branchez POWER SCAN à un port USB d’un ordinateur à l’aide du câble USB inclus. Remarque : La première fois que vous branchez le POWER SCAN à votre ordinateur, attendez quelques minutes, jusqu’à ce que la boîte de dialogue « Ajout de nouveau matériel détecté » s'affiche indiquant que l’ordinateur reconnait le POWER SCAN. Une fois ce message affiché, le POWER SCAN est prêt à utiliser. Insérez les négatifs dans le support approprié. a. Si c’est un négatif unique que vous désirez numériser, insérez-le dans le porte-négatif simple, puis insérez le porte-négatif dans l’emplacement sur le dessus de l’appareil. b. Si c’est une diapositive que vous désirez numériser, insérez-la dans l’emplacement pour porte-négatif sur le dessus de l’appareil. c. Si c’est une bande de négatifs que vous désirez numériser, insérez le guide pour bande de négatifs dans l’emplacement pour porte-négatif sur le dessus de l’appareil. Insérez ensuite l’extrémité de la bande de négatifs dans l’emplacement pour porte-négatif sur le côté droit de l’appareil. Tournez la molette d’alimentation dans le sens antihoraire tout en insérant délicatement la bande de négatifs dans l'emplacement. (Si vous désirez revenir sur un des négatifs précédents ou si la bande de négatifs se bloque, tournez la molette dans le sens horaire tout en tirant délicatement sur la bande afin de la retirer de la fente.) Remarque : La bande de négatifs doit être composée d’au moins trois négatifs. Autrement, elle pourrait rester bloquée dans l'appareil. Si une bande de négatifs reste bloquée dans l’appareil, vous pouvez la déloger en insérant la bande d'extraction dans l’emplacement pour porte-négatif. Remarque : Manipulez les pellicules avec soins. Toute particule de poussière, égratignure ou trace de doigts apparaîtra sur vos images numérisées. Si possible, utilisez des gants de coton pour manipuler les pellicules. Il est recommandé d’utilise de l’air comprimé afin d’enlever la poussière des pellicules. L’air comprimé n’est pas fourni avec le numériseur, mais peut être acheté chez tout détaillant de fournitures de bureau ou d’électroniques. d. Si une bande de pellicules reste bloquée dans l’appareil, vous pouvez la déloger en insérant la bande d'extraction dans l’emplacement pour porte-pellicule. 13 CAPTURE DES IMAGES 1. 2. 3. 4. Une fois que vous avez branché le POWER SCAN à votre ordinateur, lancez l’application NimoFilm. Cliquez sur « Capture » de la barre de menu afin d’accéder au mode de prévisualisation de photo (Photo Preview), puis insérez le porte-pellicule dans le numériseur en vous assurant qu'il est correctement inséré. Lorsque vous insérez une pellicule, attendez de 5 à 10 secondes afin de permettre au POWER SCAN de déterminer la luminosité adéquate pour la numérisation. Remarque : Le porte-pellicule ne peut être enfoncé plus profondément. Sélectionnez l’emplacement du dossier où vous désirez enregistrer l’image. L’emplacement de sauvegarde par défaut de NimoScan est « Mes documents/Mes images ». Vous pouvez modifier l’emplacement si vous le désirez. Cliquez sur le bouton « Capture » dans le logiciel ou sur la touche « SCAN » sur le POWER SCAN pour numériser l‘image. Cela prendra quelques secondes pour faire l'enregistrement de l'image capturée. Types de pellicules: Il y a trois types de pellicule parmi lesquels vous pouvez choisir : Positive, négative et en noir et blanc. Le type de pellicule par défaut est Négative. Résolution: Il y a trois types de résolution d’image parmi lesquels vous pouvez choisir pour la numérisation : 900 ppp et 1800 ppp. Réglage de la couleur: Il y a 3 modes de réglage de la couleur automatique (Nature (naturelles), Colorful (vives), Old Photo (vieillies)) ou vous pouvez utiliser le mode Customize (personnalisation) afin de faire ces réglages manuellement : Saturation, Luminosité, Contraste, Équilibre des couleurs. Si vous désirez modifier les réglages, placez le curseur sur une des sections de l'image dont vous êtes satisfait. 14 GUIDA RAPIDA MANUTENZIONE E CURA Si raccomanda di pulire la pellicola prima di CONTENUTI DELLA CONFEZIONE inserirla nello scanner in modo che la polvere o la sporcizia non offuschino l’immagine. Se non si POWER SCAN hanno i materiali adatti per procedere Supporto fotogramma singolo adeguatamente a questa operazione, rivolgersi Fascetta guida per pellicola ad un negozio specializzato in fotografia. Fascetta di recupero della pellicola Cavo USB Si consiglia di utilizzare un batuffolo di cotone CD software pulito e asciutto per pulire periodicamente la Manuale per l'uso superficie di vetro interna dello SLOT Libretto di istruzioni di sicurezza e PORTAPELLICOLA. garanzia Quando POWER SCAN è lasciato inutilizzato per lunghi periodi di tempo, scollegare il cavo USB. Quando si collega POWER SCAN al computer, se possibile collegarlo ad una porta USB presente sul pannello posteriore del computer. Se sono presenti troppi dispositivi USB collegati al computer (oppure POWER SCAN è collegato ad un hub USB), potrebbe non esservi energia sufficiente per far funzionare POWER SCAN in maniera adeguata. PANORAMICA 1. 2. 3. 4. 5. 6. 7. TASTO SCAN ROTELLA DI ALIMENTAZIONE DELLA PELLICOLA SLOT PORTAPELLICOLA PORTA USB FASCETTA DI RIAVVOLGIMENTO DELLA PELLICOLA SUPPORTO PELLICOLA SUPPORTO FOTOGRAMMA SINGOLO 15 INSTALLAZIONE DEL SOFTWARE Importante! Installare il software in dotazione PRIMA di collegare il POWER SCAN al computer. REQUISITI DI SISTEMA: * Se il menu d’installazione non compare automaticamente, aprire Risorse del computer e fare doppio clic sul drive CD del computer per aprire il disco, quindi cliccare su "autorun". • Windows XP-SP3 / Vista / 7 • Una porta USB 2.0 libera • Pentium III 800MHz o CPU superiore • 256MB di RAM • 512MB di spazio libero su disco • Drive CD-ROM 1. 2. Accendere il computer. Inserire il CD di installazione nel lettore CD-ROM: compare il menu d'installazione.* Quando compare il menu di installazione, cliccare su NimoFilm. Seguire le istruzioni su schermo. Durante il processo d’installazione, verrà richiesto di inserire un numero di serie per attivare il software. Il numero di serie si trova sulla custodia del CD recante il software. Cliccare su Exit (esci) per chiudere la finestra. 3. 4. 5. 16 SETUP 1. 2. Collegare POWER SCAN alla porta USB del computer con il cavo USB in dotazione. Nota bene: la prima volta che si collega il POWER SCAN al computer, occorre attendere alcuni secondi, fino a quando non compare una finestra di dialogo recante la scritta "Found New Hardware" (“Trovato nuovo hardware”) (ciò significa che il computer riconosce il POWER SCAN). Dopo aver visualizzato la finestra di dialogo, il POWER SCAN è pronto per l’uso. Inserire il supporto adeguato e la pellicola. a. Se si desidera scannerizzare una diapositiva, inserirla nello SLOT PORTAPELLICOLE in cima al dispositivo. b. Se si scannerizza una striscia di negativi, inserire l'apposita guida nello SLOT PORTAPELLICOLA in cima al dispositivo. Quindi inserire un capo del negativo nello SLOT PORTAPELLICOLA a destra del dispositivo. Girare la ROTELLA DI ALIMENTAZIONE PELLICOLA in senso antiorario mentre si fa entrare delicatamente il negativo nello slot (se si desidera tornare ad un fotogramma precedente o se il negativo si sta inceppando, girare la ROTELLA DI ALIMENTAZIONE PELLICOLA in senso orario tirando delicatamente il negativo fuori dallo slot). Nota bene: il negativo deve essere lungo almeno tre fotogrammi. In caso contrario, potrebbe rimanere bloccato nel dispositivo. Se un negativo dovesse rimanere inceppato nel dispositivo, allentarlo inserendo la fascetta di recupero pellicola in dotazione nello SLOT PORTAPELLICOLA. Nota bene: maneggiare i negativi con cura. Polvere, graffi o impronte digitali compariranno sulle immagini salvate. Se possibile, servirsi di guanti di cotone quando si maneggiano i negativi. Si consiglia di utilizzare aria compressa per rimuovere eventuale polvere presente sui negativi. Questa non è inclusa con lo scanner, ma può essere acquistata presso qualsiasi negozio di articoli per ufficio o di elettronica. c. Se si sta scannerizzando un negativo composto da un singolo fotogramma, inserirlo nel supporto per fotogramma singolo in dotazione e inserirlo nello SLOT PORTAPELLICOLA in cima al dispositivo. d. Nel caso in cui la pellicola non riuscisse a uscire dallo scanner, inserire la fascetta di recupero della pellicola nello scanner, e servirsene per recuperare la pellicola inserendola nel dispositivo. 17 ACQUISIZIONE DI IMMAGINI 1. 2. 3. 4. Collegare POWER SCAN alla porta USB del computer. After you have connected POWER SCAN to the computer, aprire il software NimoFilm. Cliccare su “Capture” (acquisisci) sulla barra del menu per entrare in “Photo Preview” (anteprima foto), quindi inserire il supporto per la pellicola nello scanner e regolarlo in posizione. Dopo aver inserito una pellicola/diapositiva, attendere 5-10 secondi per consentire al POWER SCAN di regolare la luminosità ottimale prima di procedere alla scansione. Nota bene: il supporto per la pellicola non può essere spinto ulteriormente indietro. Selezionare la cartella di destinazione in cui salvare l'immagine prima di procedere all'acquisizione. In via predefinita, il NimoScan la salverà in “My Documents\My Pictures” (documenti/immagini). Se lo si desidera, è possibile modificare la destinazione. Cliccare sul tasto “Capture” (acquisisci) nel software o il tasto ‘SCAN’ sul POWER SCAN per acquisire l'immagine. Occorreranno diversi secondi per salvare l'immagine acquisita. Tipo di pellicola: È possibile scegliere tra tre tipi di pellicola: positiva, negativa e bianco-nero. Il tipo di pellicola standard è quella negativa. Resolution (risoluzione): Al momento di effettuare la scansione è possibile scegliere tra due tipi di risoluzione: 900dpi e 1800dpi. Regolazione del colore: Vi sono 3 modalità predefinite tra cui scegliere, che regoleranno automaticamente la configurazione dell'immagine (naturale, colorata, foto anticata) oppure è possibile selezionare la modalità Customize (personalizza) che consentirà di regolare le seguenti configurazioni: Saturazione, Luminosità, Contrasto, o Bilanciamento dei colori. Se si desidera cambiare le impostazioni, regolare il cursore nel punto in cui l'immagine si vede meglio. 18 KURZANLEITUNG (DEUTSCH) REINIGUNG & PFLEGE Wir empfehlen Ihnen, den Film vor dem Einlegen in den LIEFERUMFANG Scanner zu reinigen, damit kein Staub oder anderer Schutz die Bildqualität beeinträchtigt. Sollten Ihnen dazu die POWER SCAN passenden Materialien fehlen, wenden Sie sich bitte an einen Einzelbildhalter Fotofachgeschäft. Filmstreifenführung Wir empfehlen Ihnen, die Glasoberfläche im Inneren des Rückholstreifen FILMSTREIFENHALTERS regelmäßig mit einem sauberen, USB Kabel trockenen Wattestäbchen zu reinigen. Software-CD Bedienungsanleitung Wenn Sie den POWER SCAN längere Zeit nicht benutzen, Broschüre mit Sicherheitstrennen Sie das Gerät bitte vom USB-Kabel. und Garantiehinweisen Wenn Sie den POWER SCAN an Ihren Computer anschließen, verwenden Sie nach Möglichkeit einen USBAnschluss an der Rückseite Ihres Computers. Wenn zu viele andere USB-Geräte an Ihren Computer angeschlossen sind (oder wenn Sie POWER SCAN an einen USB-Hub angeschlossen haben), kann es sein, dass dem POWER SCAN für den Betrieb nicht genug Strom zugeführt wird. ÜBERBLICK 1. 2. 3. 4. 5. 6. 7. SCANNEN-TASTE FILMZUFÜHRRAD FILMSTREIFENHALTER USB-ANSCHLUSS RÜCKHOLSTREIFEN FILMSTREIFENHALTER EINZELBILDHALTER 19 SOFTWARE-INSTALLATION Wichtig! Sie müssen ZUERST das mitgelieferte Software-Programm installieren, BEVOR Sie den POWER SCAN an den Computer anschließen. SYSTEMANFORDERUNGEN: • Windows XP-SP3 / Vista / 7 * Erscheint das Installationsmenü nicht automatisch, Arbeitsplatz öffnen und per Doppelklick auf das CD-Laufwerk die dort befindlichen Dateien abrufen und die Datei "autorun" aufrufen. • Freier USB 2.0-Anschluss • Pentium III 800 MHz oder höher • 256 MB RAM • 512MB verfügbarer Speicherplatz auf der Festplatte • CD-ROM-Laufwerk 1. 2. Schalten Sie den Computer ein. Legen Sie die Installations-CD in das CD-ROM-Laufwerk. Das InstallationsMenü wird nun aufscheinen.* Wenn Sie das Installations-Menü sehen, klicken Sie auf NimoFilm. Befolgen Sie die Anweisungen am Bildschirm. Während des Installationsvorgangs verlangt das Programm eine Seriennummer, mit der die Software aktiviert werden kann. Diese Serienummer befindet sich auf der Hülle der Programm-CD. Klicken Sie auf Schließen, um das Fenster zu schließen. 3. 4. 5. 20 EINRICHTEN DES POWER SCAN 1. 2. Verbinden Sie POWER SCAN mit dem USB-Anschluss Ihres Computers mit dem mitgelieferten USBKabel. Hinweis: Wenn Sie POWER SCAN zum ersten Mal mit Ihrem Computer verbinden, warten Sie einige Sekunden bis Sie das Dialogfeld "Neue Hardware gefunden" sehen (das bedeutet, dass der Computer den POWER SCAN erkannt hat). Nachdem diese Meldung angezeigt wurde ist der POWER SCAN einsatzbereit. Legen Sie den entsprechenden Halter und Film ein. a. Wenn Sie ein Dia scannen, setzen Sie es in den FILMSTREIFENHALTER an der Oberseite des Gerätes ein. b. Wenn Sie Negativstreifen scannen, legen Sie die mitgelieferte Filmstreifenführung in den FILMSTREIFENHALTER an der Oberseite des Gerätes. Führen Sie anschließend ein Ende des Negativstreifens in den FILMSTREIFENHALTER auf der rechten Seite des Geräts ein. Drehen Sie das FILMZUFÜHRRAD gegen den Uhrzeigersinn und führen Sie so den Negativstreifen vorsichtig in den Slot. (Wenn Sie zurück zu einem vorherigen Frame springen möchten, oder wenn der Negativstreifen klemmt, drehen Sie das FILMZUFÜHRRAD vorsichtig im Uhrzeigersinn und ziehen es so aus dem Slot heraus.) Hinweis: Der Negativstreifen selbst muss mindestens eine Länge von drei Frames besitzen. Andernfalls kann er im Gerät stecken bleiben. Wenn ein Negativstreifen im Gerät eingeklemmt wird, können Sie ihn lockern, indem Sie den mitgelieferten Rückholstreifen in den FILMSTREIFENHALTER einsetzen. Hinweis: Behandeln Sie Negative mit großer Sorgfalt. Staub, Kratzer oder Fingerabdrücke werden auf den gespeicherten Bildern zu sehen sein. Verwenden Sie beim Arbeiten mit Negativen möglichst Baumwollhandschuhe. Um Staub von den Negativen zu entfernen, empfehlen wir Ihnen die Verwendung von Druckluft. Dies ist zwar nicht im Lieferumfang des Scanners enthalten, kann aber von jedem Papier- oder Elektrohändler bezogen werden. c. Falls Sie einen einzigen Negativ-Frame scannen, setzen Sie ihn in den mitgelieferten Einzelbildhalter ein und stecken ihn in den FILMSTREIFENHALTER an der Oberseite des Gerätes. d. Falls die Filme nicht vom Scanner entfernt werden können, führen Sie den Rückholstreifen in den Scanner ein und verwenden ihn, um den Film herauszuziehen, indem Sie dem Gerät den Streifen zuführen. 21 AUFNEHMEN VON BILDERN 1. 2. 3. 4. Nachdem Sie den POWER SCAN mit Ihrem Computer verbunden haben, öffnen Sie die NimoFilm-Software. Klicken Sie in der Menüleiste auf "Aufnehmen", um in die "Fotovorschau" zu gelangen. Legen Sie dann den Streifenhalter in den Filmscanner und richten ihn aus. Wenn Sie einen Film/ein Dia einsetzen, warten Sie 5-10 Sekunden, damit sich POWER SCAN vor dem Scannen auf die optimale Helligkeit anpassen kann. Hinweis: Der Filmstreifenhalter kann nicht weiter hineingeschoben werden. Bevor Sie das Bild aufnehmen, wählen Sie den Speicherort des Ordners. Standardmäßig speichert NimoScan in den Ordner "Meine Dokumente\Meine Bilder". Sie können den Speicherort bei Bedarf jederzeit ändern. Klicken Sie in der Software auf die Schaltfläche "Aufnehmen" oder drücken Sie am POWER SCAN die Taste "SCANNEN", um das Bild zu erfassen. Es kann einige Sekunden dauern, um das Bild zu speichern, das Sie aufgenommen haben. Filmtypen: Es gibt drei Filmtypen, die Sie wählen können: Positiv, Negativ und Schwarz-Weiß. Der standardmäßige Filmtyp ist das Negativ. Auflösung: Es gibt zwei Arten von Foto-Auflösungen, die Sie beim Scannen auswählen können: 900dpi und 1800dpi. Farbanpassung: Es gibt 3 Preset-Modi zur Auswahl, die die Bildeinstellungen automatisch anpassen (Natur, Farbreich, Altes Foto). Wahlweise können Sie den benutzerdefinierten Modus wählen, mit dem Sie die angeführten Einstellungen anpassen können: Sättigung, Helligkeit, Kontrast oder Farbausgleich. Wenn Sie die Einstellungen ändern möchten, bringen Sie den Cursor auf die Position, an der das Bild am besten aussieht. 22 SNELSTARTGIDS ONDERHOUD & ZORG Het wordt aanbevolen de film (en de laatjes van de POWER SCAN) schoon te maken voordat ze in de scanner worden geplaatst om zo te voorkomen dat de beelden niet ontsierd worden door stof. Als u niet over de materialen beschikt om dit op juiste wijze te doen, raadpleeg dan een professional. Wij raden aan om een schoon en droog wattenstaafje te gebruiken om het glazen oppervlak van de SLEUF VOOR FILMHOUDER regelmatig schoon te maken. Wanneer de POWER SCAN voor langere periode niet gebruikt zal worden, ontkoppel dan de USB kabel. INHOUD VERPAKKING POWER SCAN Enkele Frame Houder Filmstrookgeleider Terughaalstrook Film USB-kabel Software-CD Gebruikshandleiding Veiligheids- en garantie-informatie Wanneer u de POWER SCAN aansluit op uw computer, gebruik dan een USB poort aan de achterkant van uw computer. Indien er te veel andere apparaten via USB op uw computer zijn aangesloten (of wanneer de POWER SCAN via een USB-hub is aangesloten), zal er misschien niet genoeg vermogen zijn om te POWER SCAN juist te laten functioneren. OVERZICHT 1. SCAN KNOP 2. FILMROLHOUDER 3. SLEUF VOOR FILMHOUDER 4. USB- POORT 5. RETRIEVAL FILMSTRIP 6. FILMSTRIP HOUDER 7. SINGLE-FRAME HOUDER 23 SOFTWARE INSTALLATIE Van Belang! U moet de meegeleverde software programma eerst installeren VOORDAT u POWER SCAN op de computer aansluit. SYSTEEMVEREISTEN: *Als het installatiemenu niet automatisch verschijnt, open dan Mijn Computer en dubbelklik op het CD-station van de PC om de schijf te openen en klik daarna op toepassing "autorun". • Windows XP-SP3 / Vista / 7 • Vrije USB 2.0 port • Pentium III 800MHz of hoger CPU • 256MB RAM • 512MB vrije schijfruimte • CD-ROM drive 1. 2. PC aanschakelen. Plaats de installatie-CD in de CDROM drive en de installatie menu verschijnt.* Wanneer u het installatie menu ziet, klikt u op NimoFilm. Volg de instructies op het scherm. Tijdens de installatie proces, wordt u gevraagd om een serienummer invoeren om de software te activeren. Dit serienummer kunt u vinden op de hoes van de software-cd. Klik op Exit om het venster te sluiten. 3. 4. 5. 24 SET-UP 1. 2. Sluit de POWER SCAN aan op de USB poort van uw computer via de meegeleverde USB kabel. Opmerking: De eerste keer dat u POWER SCAN aansluit op uw computer, moet u een paar seconden wachten totdat u een dialoogvenster ziet met het volgende "Found New Hardware" (dit betekent dat de computer POWER SCAN herkent). Nadat u dit ziet, POWER SCAN is klaar voor gebruik. Plaats de juiste houder en film. a. Als u een dia wilt scannen, plaats deze in de SLEUF VOOR FILMHOUDER bovenaan het apparaat. b. Als u een negatiefstrook wilt scannen, plaats de meegeleverde filmstrookgeleider in de SLEUF VOOR FILMHOUDER aan de bovenkant van het toestel. Plaats dan het uiteinde van het negatief in de SLEUF VOOR FILMHOUDER aan de rechterkant van het apparaat. Draai het FILMROLHOUDER tegen de klok in, terwijl u het negatief voorzichtig in de sleuf begeleid. (Als u terug wilt gaan naar een vorig fragment of wanneer de negatiefstrook vastloopt, draait u het FILMROLHOUDER tegen de klok in, terwijl u het negatief voorzichtig uit de sleuf trekt.) Opmerking: De negatiefstrook moet minstens drie frames lang zijn. Anders bestaat de kans dat deze in het apparaat vastloopt. Als een negatiefstrook vastloopt in het apparaat, kunt u deze losmaken door de bijgeleverde terughaalstrook in de SLEUF VOOR FILMHOUDER te steken. Opmerking: Behandel negatieven met zorg. Enige stof, krassen of vingerafdrukken zullen worden weergegeven op de opgeslagen beelden. Indien mogelijk, gebruik katoenen handschoenen bij het behandelen van negatieven. Het wordt aanbevolen om perslucht te gebruiken om stof te verwijderen op de negatieven. Deze wordt niet meegeleverd met de film scanner, maar kan worden gekocht bij een kantoor of elektronicaketen retailers. c. Als u een enkele negatief frame wilt scannen, plaats deze in de bijgeleverde enkele framehouder en plaats deze in de SLEUF VOOR FILMHOUDER aan de bovenkant van het apparaat. d. In het geval dat films niet in staat zijn om eruit te komen uit de film scanner, plaatst u de retrieval filmstrip in de scanner, en gebruik het als een hulpmiddel om de film op te halen door het in het apparaat door te voeren. 25 VASTLEGGING VAN BEELDEN 1. 2. 3. 4. Nadat u POWER SCAN op de computer hebt aangesloten, opent u de NimoFilm software. Klik op "Capture" op de menubalk "Photo Preview" aan te gaan, dan plaatst u de filmhouder in de film scanner en stel het op juiste plaats. Bij het opzetten van een film/schuif, wacht 5-10 seconden om POWER SCAN naar een optimale helderheid aan te passen voordat u gaat scannen. Opmerking: De film houder kan niet verder naar achteren worden geduwd. Selecteer de locatie van de map om de afbeelding op te slaan vóór vastlegging. Standaard NimoScan zal in “My Documents\My Pictures” opslaan. U kunt de locatie wijzigen als u dat wenst. Klik op de "Capture" knop in de software of de 'SCAN' knop op POWER SCAN om het beeld vast te leggen. Het duurt enkele seconden om het beeld dat u hebt vastgelegd op te slaan. Film Types: Er zijn drie typen films die u kunt kiezen, namelijk: Positief, Negatief en Zwart-Wit. De standaard film type modus is Negatief. Resolutie: Er zijn twee soorten van de foto resoluties die u kunt kiezen bij het scannen: 900dpi en 1800dpi. Kleuraanpassing: Er zijn 3 Fabrieksinstellingen om uit te kiezen die automatisch de beeldinstellingen (Natuur, Kleurrijk, Oude Foto) aanpassen of kunt u de Aanpassen modus kiezen waarmee u de instellingen te zien kunt aanpassen: Intensiteit, Helder, Contrast of Kleurbalans. Als u de instellingen wilt wijzigen, stelt u de cursor naar een punt waar de foto het beste eruit ziet. 26 SPECIFICATIONS Lens: F/3.8, BF=1.10 Sensor: 1.3 megapixel CMOS sensor Focus Range: fixed focus Exposure: Auto Color balance: Auto Scan high resolution: 1800 DPI interpolation resolution Data conversion: 10 bits per color channel Image Format: JPEG Scan Method: Single pass Light source: Backlight (3 white LEDs) Power: Powered from USB Operating System: Windows XP-SP3 / Vista / 7 Interface: USB 2.0 Dimensions: 121mm x 96mm x 55mm (4.8” x 3.8” x 2.2”) Weight: 181g (6.4 oz) www.ionaudio.com/powerscan www.ionaudio.com/supporthome THIS DEVICE COMPLIES WITH PART 15 OF THE FCC RULES. OPERATION IS SUBJECT TO THE FOLLOWING TWO CONDITIONS: (1) THIS DEVICE MAY NOT CAUSE HARMFUL INTERFERENCE, AND (2) THIS DEVICE MUST ACCEPT ANY INTERFERENCE RECEIVED, INCLUDING INTERFERENCE THAT MAY CAUSE UNDESIRED OPERATION. 27 www.ionaudio.com MANUAL VERSION 1.3