1
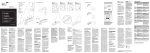
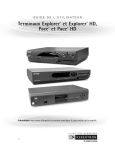
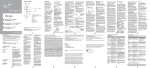
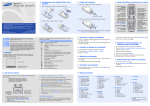
OVERVIEW - SH440 HEADSET
INTRODUCTION
Charging
the Headset
Thank you for choosing a
SH440 Bluetooth® Headset
from AT&T, powered by
SouthWing.
This user guide provides all the
information you will need to use
and care for your product.
All relevant information regarding your SouthWing product can
be found in the support section
of our website:
www.southwing.com/at&t-sh440
Please Note:
· The Headset will not function
while charging.
· If the Indicator Light [2] remains
off while charging, the battery is
already fully charged and does
not require further charging.
· To maximize battery life, do not
charge the Headset for extended
periods of time.
· Full battery capacity will be
achieved after two or three full
charge/discharge cycles.
· When your battery is empty, it
takes up to four hours to completely charge your headset.
The SH440 is the first headset with a voice menu that
allows you to access several
headset features and favorite
numbers in an easy and interactive way. For a detailed
description of the Voice
Menu, refer to section 5.
1. CHARGING THE HEADSET
® Bluetooth is a registered trademark owned by Bluetooth SIG, Inc. U.S.A. and
licensed to SouthWing.
* The features marked with an asterisk will only work with Bluetooth phones
which support the Hands-free profile.
Today, most Bluetooth phones support this profile.
1
in manual pairing mode
By selecting this option, you
connect AT&T's popular *8
VoiceInfo service which gives
you access to rich audio content like sports, stock quotes,
horoscopes, weather and
much more!†
(Standard airtime charges
apply).
Favorite number management
To store your favorite numbers
you have to change the
Bluetooth name of your phone
to the number you want to
store. To do so,
1. Enter the Bluetooth menu of
your mobile phone.
2. Inside Bluetooth menu find
the Bluetooth name. In some
phones (e.g. Motorola, Nokia)
the menu is inside a submenu
called setup or settings.
3. Change the name of the
phone to the number you want
to store as a favorite (e.g.
4045551234, only numeric characters)
4. Enter the Voice Menu of
your Headset.
5. Select the «Store» option
6. Select the favorite number
(1, 2, 3 or 4) under which you
want the phone number to be
saved then press the Multi-function Button once. The number is
stored in the Headset.
Please note that in stand-by
mode, you can make a direct
phone call to Favourite 1 by
simply pressing for two seconds the Multi-function Button.
Select this option to check the
remaining talk-time of the battery
in hours. The numbers go from 0
to 8. By default, you will hear 8
even when the remaining talk-time
excesses 8 hours.
When only 1 hour talk-time is left,
it will be automatically announced.
Pairing
To pair the Headset with your
mobile phone through Voice
Menu, select this option and follow the steps 1 and 2 of the Autopairing section of the user guide.
Suggestions
The Headset will not
turn on
· The Headset battery may be empty.
Try recharging the Headset.
Pairing is
unsuccessful
· Try moving the phone and Headset
closer together during pairing.
· Make sure that the mobile phone is in
the correct Bluetooth mode.
· Some electrical devices such as
microwave ovens create a noisy electrical environment making it difficult for
the Headset to communicate with the
phone. Try moving away from such
devices and try again.
Battery Status
Pairing has succeeded
but calls are not heard
in the Headset
· Make sure that your phone is switched
on and ready to connect to the Headset.
Check your phone user manual on how
to do this.
The Headset stops
responding to button
presses
· Ensure that your Headset battery is charged.
· Try resetting your Headset according to the
directions given in “Resetting your Headset”
6. EXTENDED MENU
To activate the extended menu
functions, press the Vol+ [3],
Vol- [4] and Multi-function [2]
Buttons until you hear a series
of 4 ascending beeps. Do the
same to return to the main
menu (all the settings of extended menu functions will be lost).
For the commands available in
the Extended Menu, See the
Commands Summary Table.
AT&T *8 VoiceInfo Service
Your headset has been preconfigured to access the AT&T *8
VoiceInfo service.
7
8. ADDITIONAL INFORMATION
Battery Care
Customer Service
Visit us online at: www.southwing.com/at&t-sh440
call toll free in USA/Canada
1-877-71S-WING or
1-877-717-9464 or email us at:
[email protected]
Your Headset battery will have a
long life provided you follow
these guide lines:
· Do not charge your Headset
outdoors
· Do not charge your Headset if
the ambient temperature is
above 113 degrees Farenheit
(45 degrees Celsius) or below
50 degrees Farenheit
8
Auto-pairing
For added convenience, your
headset has an auto-pairing
function so that when you turn
the headset on for the first
time, it is already in pairing
mode. Your headset should
beep every 2 seconds to indicate that it is in pairing mode,
and can be paired to your
phone by following these steps:
1. Put the mobile phone into
pairing mode (reference your
Safe Usage Guidelines
· Only use the product according to the directions within this
User Guide. Usage of this product contrary to these directions
could cause injury. In addition,
any usage of this product contrary to this User Guide will void
any warranty.
· Do not use the product in an
environment where it may come
in contact with liquid be
exposed to high humidity or
extreme temperatures.
· Do not place the product in a
fire as it may explode causing
injury or death.
· Do not use the product in
areas where usage of radio
transmitters is prohibited (e.g.
aircraft and hospitals) or close
to sensitive devices that may be
affected by a radio transmitter
(e.g. pacemakers).
· Do not attempt to service this
product yourself. If the product
requires servicing, this must be
performed by an approved service person.
· If the product becomes dirty, it
should be cleaned with a soft
cloth. Do not use any cleaning
agents as these may damage
Caution: Prolonged use of the
headset at high volumes may
affect your hearing capacity.
Limited Warranty & Warranty
Exclusions
Please Note:
For all warranty related issues,
please return with the product to
the shop from which you purchased it.
One year Limited warranty:
what is covered: AT&T warrants
to the first rental purchase of
this wireless accessory that
should this product or any part
be proved defective in materials
9
You can wear your Headset on
either ear and carry it in different ways using the rotating
Multi-function Arm [7].
Wearing the Headset Without
the Earhook
Normal pairing
You will need to follow the
steps below if you want to pair
your Headset with another
mobile phone.
1. Ensure the Headset is off.
2. Put the headset in pairing
mode by pressing and holding
the Multi-function Button [2] for
about 5 seconds until the Indicator Light [2] flashes twice
every second and you hear a
series of high tones.
Alternatively you can also put
the headset in pairing mode by
entering the voice menu and
choosing option "pairing" as
described in section 5.
3. Then complete normal pairing process by following point 1
and 2 of the auto-pairing section
above.
Right
Left
You can wear the Headset without using the Ear Hook. To do so:
1. Rotate the Multi-function Arm
[7] downwards, until it stays in
your ear like a wired headset
cable extension.
2. Gently place the Speaker [5]
into your ear canal.
3. Finally find the most comfortable position by rotating the
Headset forward and backward.
Wearing the Headset with the
Earhook
Wearing the
Headset with
the Earhook
The Ear Hook may also be used
for maximum comfort. To
mount the ear hook, rotate the
Multi-function Arm [7] upwards
and slide it inside the Ear Hook
[8] jack. To place it on your ear
follow these steps:
1. Rotate the Ear Hook [8]
slightly forwards.
2. Gently place the Speaker [5]
into your ear canal.
3. Rotate the Ear Hook [8] backwards and adjust it behind your
ear.
4. To switch from one ear to
the other, simply rotate the
Multi-function Arm [7] downwards and rotate the Ear Hook
[8] to the opposite side.
9. FCC STATEMENT AND NOTICE
(Federal Communications
Commission, USA)
This device complies with Part
15 of the FCC Rules. Operation
is subject to the following two
conditions:
(1) This device may not cause
harmful interference.
(2) This device must accept any
interference received, including
interference that may cause
undesired operation.
For questions regarding your
product or this FCC declaration,
contact:
SouthWing
2655 LeJeune Rd.
10
4. GENERAL USAGE
Turning the Headset On and Off
Clipping the
Headset to
your Clothes
To voice dial press briefly the
Multi-function button and wait
for the feedback tone from the
phone. Then speak the name of
the person you wish to call.
Changing Volume
Press the Multi-function Button
[2] briefly during a call and the
call will be ended.
Accepting/rejecting* a call
The Multi-function Arm [7]
can also be used to carry
your Headset in several convenient ways when the Ear
Hook is not mounted. To clip
it to your clothes do the
following:
1. Rotate the Multi-function
Arm [7] to the same direction
of the microphone [6].
When the phone rings (ring tone
can be heard in Headset), briefly
press the Multi-function Button
[2] once to accept the call. Press
and hold the Multi-function
Button [2] for 1 second to reject
the call.
Initiating a Call from Your Mobile
Phone
To identify this product, refer to
the Part, Series, or Model number found on the product.
The FCC requires the user to be
notified that any changes or
modifications made to this
device that are not expressly
approved by the party responsible for compliance may void the
user's authority to operate the
equipment.
This product emits radio frequency energy, but the radiated
output power of this device is
far below the FCC radio frequency exposure limits.
Nevertheless, the device should
be used in such a manner that
the potential for human contact
with the antenna during normal
operation is minimized.
This equipment has been tested
and found to comply with the
limits for a Class B digital
device, pursuant to Part 15 of
the FCC Rules. These limits are
designed to provide reasonable
protection against harmful interference in a residential installation. This equipment generates,
uses, and can radiate radio frequency energy and, if not
installed and used in accordance with the instructions,
may cause harmful interference
to radio communications.
However, there is no guarantee
that interference will not occur
in a particular installation. If this
equipment does cause harmful
interference to radio or television reception, which can be
determined by turning the
Should your Headset stop
responding, try charging it for a
few seconds. Your Headset
should now function again as
normal.
Store Your Favorite Number
To save any number through
the Voice Menu, please see
section 5.
To save the phone number
of the last incoming call
(only available for the
favorite 1 and 2 numbers):
1. To save it as favorite 1:
when the call has ended,
simultaneously press the
Multi-function Button [2] and
the Vol - Button [4].
2. To save it as favorite 2:
when the call has ended,
simultaneously press the
Multi-function Button [2] and
the Vol + Button [3].
In stand-by mode, you can
make a direct phone call to
Favorite 1 by simply pressing
the Multi-function Button [2].
Note that if the calling number is hidden it cannot be
saved.
Note: your phone must support voice
dialing and you must first record voice
tags into your phone associated to
phone numbers (please check your
phone manual for details)
Ending a call
Battery Life
To conserve battery life, your
Headset features an auto-sleep
function. This function switches
the Headset off after 12 hours
of inaction. Once your Headset
has entered auto-sleep, it can
be switched on again normally.
When the battery has only 10%
charge remaining, the Headset
will produce an audible warning
tone sequence every time a call
is ended.
To check your battery level you
can use the Voice Menu as
Deactivating calling number
announcement (whisper mode)
implement the caller ID feature in
the standard format; therefore
the whisper mode feature cannot
function with these phones.
5. VOICE MENU
Thanks to the innovative and
exclusive voice menu it is possible
to access different headset features in an easy and natural way.
To enter the menu just press
either the Vol - Button [4] or the
Vol + Button [3] in stand-by
mode. To go forward or backward in the menu navigate by
pressing the Vol - Button [4] or
the Vol + Button [3]. Each menu
option is announced and you
can accept an option by pressing the Multi-function Button [2].
To exit the menu, press the
Multi-function Button [2] twice
or wait for the option to be
repeated. After 20 seconds,
you will exit the voice menu
automatically.
Please Note:
1. If the calling number is hidden,
whisper mode will not function.
2. To accept (or reject) the call,
use the Multi-function button at
anytime during the calling number announcement.
3. If the calling number is already
stored as a favorite number it
will be announced as such.
4. Activation of automatic call
pick up (see Commands
Summary Table) will deactivate
whisper mode.
5. Certain mobile phones do not
Available Voice Menu features
1. “Favorite 1” (or 2,3,4): Access
favorite numbers 1 to 4
2. “Voice Info”: AT&T *8
VoiceInfo Service
3. “Battery”: Battery status
when the headset is switched
on
4. “Store”: Store favorite numbers 1 to 4
5. “Pairing”: enter the headset
6
10. COMMANDS SUMMARY TABLE
1. Main menu
2. Extended menu
HOW TO?
ACTION
Power On
In OFF state press and hold
Headset turns on and light
Multi-function Button for 3 sec flashes green
Activate/deactivate
extended menu
In ON state press Vol+, Vol- and A series of 4 beeps is heard
Multi-function Button for 1 sec
Power Off
Light flashes green 3 times every seIn ON state press and hold
Multi-function Button for 3 sec cond, for 2 sec and Headset turns off
Muting microphone
During a call press Multi-function Button twice
Volume up
During a call, press Vol+
Button Repeatedly
During a call, press Vol- Button
Repeatedly
Every press you hear a beep with
higher volume and higher tone
Every press you hear a beep with lower
volume and lower tone
Reactivate microphone
During a call with muted micro- Microphone is reactivated
phone press Multifunction Button twice
IIn OFF state press and hold Multifunction Button for 5 sec and see the
pairing instructions of your phone
During incoming call press Multifunction Button once
Headset light flashes green twice
every second and a series of high
tones can be heard
Headset picks call up
During incoming call press and
hold Multi-function Button for 1 sec
Headset rejects call
In ON state press Multi-function
Button once
Headset makes a series of short
beeps while mobile initiates the voice
dialling command
Headset hangs up the current call
HOW TO? ACTION
Volume down
Pairing Mode
Accept call
Reject Call
1
Voice
2
Dialling
End Call
Enter Voice
Menu
HEADSET RESPONSE
During a call press Multi-function
Button once
In ON state press either Vol+ or
Vol- Button
Headset announces first option in
menu
In Voice Menu wait until option is Headset enters stand-by mode
repeated once and menu ends
automatically (approximately 20
seconds)
Automatic call In ON state press Vol+ and VolSelect Automatic call pick up mode.
pick up
Buttons for 1 sec
You can deactivate in the same way
activation
HEADSET RESPONSE
Microphone is muted and periodic
tones are heard
Last Number Redial1 In ON state press Multi-function Mobile Redials
Button twice
Enter Ringtone
selection
In ON state press and hold either Enters ring tone list
Vol+ or Vol- Buttons for 5 sec
Check different ring
tones
In ring tone menu press Vol+ or Up and down in the ring tone list
Vol- to listen to the different
tones
Select ring tone
In ring tone menu press
Multifunction Button once
Swap Vol+ and Vol- In ring tone menu press Multibuttons
function Button twice
1
2
Selects ring tone in Headset
Swap the Vol+ and the Volbuttons
Only with mobile phones supporting Hands-free mode
Only with mobile phones supporting voice dialling
Exit Voice
Menu
Check battery In ON state press Multi-function
level
Button 4 times
11
The SH440 can inform you
by voice of the calling number on a digit by digit basis
when whisper mode is activated. To deactivate the calling number announcement
feature,
1. Press the Vol + Button [3]
briefly (you will hear a voice
menu option)
2. Long press Vol – Button
[4] and Vol + Button [3] at
the same time for about 1
second
3. You will hear the “whisper
off” option announced
4. Wait for one second and
you will automatically exit
the voice menu
To activate again whisper
mode follow the same steps
until the announcement of
“whisper on” is heard.
5
equipment off and on, the user
is encouraged to try to correct
the interference by one or more
of the following measures:
· Reorient or relocate the receiving antenna.
· Increase the separation
between the equipment and
receiver.
· Connect the equipment into an
outlet on a circuit different from
that to which the receiver is
connected.
· Consult the dealer or an experienced radio or television technician for help.
Suite 810
Coral Gables, FL. 33134
FAX :+ 1 305 442 1676
[email protected]
Resetting your Headset
Initiating a Call with Voice
Dialing
To turn the Headset on, press
and hold the Multi-function
Button [2] for about 3 seconds
until a series of tones is heard.
The Indicator Light [2] will flicker
for 1 second and start flashing.
To turn the Headset off, press
and hold the Multi-function
Button [2] for about 3 seconds
until a series of tones is heard.
The Indicator Light will flash,
before turning off.
To increase the volume, during
a call, press Vol+ Button [3]. To
decrease the volume, press the
Vol- Button [4]. The Headset will
remember all volume settings
even when it is switched off.
described in section 5 or, press
the Multi-function Button [2] 4
times.
Dial the number as usual with your
phone. If your Headset is on and
the phone has been correctly
paired, your phone will transfer the
call to your Headset.
4
tract or tort shall AT&T be liable
for incidental, consequential,
indirect, special, or punitive
damages of any kind resulting
from the use of this product,
including interrupted or incomplete phone calls, or arising out
of any breach of this warranty.
In no event shall AT&T be liable
for damage in excess of the
purchase price. © 2007 AT&T
Knowledge Ventures. All rights
reserved. AT&T, and the AT&T
logo are trademarks of AT&T
Knowledge Ventures and/or
AT&T affiliated companies.
Other manufacturer warranties
may apply.
or workmanship, from the date
of proof of purchase for a period of one (1) year, then it will be
subject to the terms of this one
year limited warranty. Such
defects will be repaired,
replaced or credit issued at
AT&T's option, without charge
for parts or labor directly related
to the defect. Limitations and
Exclusions: This warranty does
not apply to any cost incurred
for removal or reinstallations, or
to any product or part thereof
which has suffered through normal wear and tear, alteration,
improper installation, physical
abuse, misuse, neglect or accident. Nor does it cover defects
caused by shipment to a AT&T
service center, or repair or service of the product by anyone
other than a AT&T service center. Damage resulting from an
act of God, including but not
limited to fire, flood, earthquake
and other natural disasters will
be excluded. This limited warranty is in lieu of all other warranties, express or implied
either in factor by operations of
law, statutory or otherwise,
including, but not limited to any
implied warranty of merchantability or fitness for a particular use. AT&T does not
authorize any other person to
assume any liability beyond the
warranty herein described. In no
event, whether based in con-
2. Use the Multi-function
Arm [7] and Headset Body as
a clip to attach the Headset
to your clothes.
Clipping your Headset to your
Clothes
3
the plastics, electronics or battery.
· Usage of this product while
driving, may reduce your ability
to react to road conditions.
· Be aware that using a wireless
headset while driving is illegal in
certain countries. Therefore,
you should check the local laws
before using the product while
driving.
· As this product contains parts
which may cause injury if consumed, keep it out of reach of
children.
· Use only the power supply
provided by SouthWing or by
AT&T in AT&T packaging labeled
as compatible with the SH440
Headset.
(10 degrees Celsius).
· Do not leave your Headset
connected to the charger for
extended periods of time, as
excessive charging will reduce
battery life.
3. WEARING AND CARRYING THE
HEADSET
Wearing
the Headset
Without
Earhook
2
7. TROUBLESHOOTING
Problem
2. PAIRING THE HEADSET
You will need to charge the battery of your SH440 Headset. To
do so, follow these steps:
1. Plug the power supply into a
power outlet.
2. Plug the connector of the
power supply into the USB
Charging Socket [1]. The
Indicator Light [2] will turn green
to indicate the Headset battery
is charging.
3. Once the Indicator Light [2]
turns off, the Headset is fully
charged and can be removed
from the power supply.
phone user manual). Ensure
that the mobile phone is no
more than 3 feet (1meter) away
from the headset.
2. Enter the PIN number: 0000.
If pairing is successful, the
beeping will stop and the
Indicator Light [2] will begin
flashing every 3 seconds.
12
A series of beeps indicates remaining talk time in hours
† AT&T*8 VoiceInfo services does not have a monthly service fee, but usage incurs
standard airtime charges per your calling plan. See full VoiceInfo Terms and
Conditions online at www.cingular.com/customer_service/voiceinfo. © 2007 AT&T
Knowledge Ventures. All rights reserved. AT&T, and the AT&T logo are trademarks
of AT&T Knowledge Ventures and/or AT&T affiliated companies.
13
VISTA GENERAL - AURICULAR SH440
INTRODUCCIÓN
Carga del
auricular
Gracias por escoger el auricular
inalámbrico Bluetooth® SH440 de
AT&T, diseñado por SouthWing.
Esta guía del usuario proporciona
toda la información necesaria
sobre el uso y el cuidado del producto. Toda la información relevante relacionada con este producto
podrá encontrarse en la sección
de ayuda de la página web:
www.southwing.com/at&t-sh440
Importante:
· El auricular no funcionará mientras se esté cargando.
· Si cuando se carga el auricular,
el indicador luminoso [2] permanece apagado, quiere decir que
la batería ya está totalmente
cargada y no es necesario seguir
con la carga.
· Para alargar al máximo la vida
de la batería, no cargue el auricular durante largos períodos de
tiempo.
· La capacidad máxima de la batería se alcanzará al cabo de dos o
tres ciclos de carga y descarga.
· Si la batería está descargada,
serán necesarias cuatro horas
para cargar completamente el
auricular.
El SH440 es el primer auricular
con un menú de voz que le permite tener acceso a diferentes funciones y números favoritos de una
forma interactiva y fácil. Encontrará una descripción detallada del
menú de voz en la sección 5.
1. CARGA DEL AURICULAR
® Bluetooth es marca registrada propiedad de Bluetooth SIG, Inc. U.S.A. y
SouthWing cuenta con licencia para su uso.
* Las características indicadas con un asterisco solamente funcionarán con
teléfonos Bluetooth compatibles con la configuración manos libres.
Actualmente, la mayoría de los teléfonos Bluetooth poseen esta función.
Es necesario cargar la batería del
Auricular SH440. Para ello, siga
estos pasos:
1. Conecte el adaptador al
tomacorriente.
2. Enchufe el conectador del
adaptador a la ranura de carga
USB [1]. El indicador luminoso
[2] encenderá una luz verde para
indicar que la batería del auricular está en proceso de carga.
3. Cuando el indicador luminoso
[2] se apague, el auricular se
habrá cargado totalmente y se
podrá desenchufar del adaptador.
14
batería cuando el auricular esté
encendido
4. “Store”: guardar números
favoritos 1 a 4
5. “Pairing”: cambiar la modalidad del auricular a enlace manual.
Organización de los números
favoritos (sólo en inglés)
Para guardar sus números favoritos debe cambiar el nombre
Bluetooth de su teléfono móvil
al número que quiere guardar.
Para hacerlo:
1. Ingrese en el menú
Bluetooth de su teléfono móvil
2. En el menú Bluetooth, busque el nombre Bluetooth. En
algunos teléfonos (por ej.
Motorola, Nokia) el menú se
encuentra dentro de un submenú llamado “setup” o “settings”
(configuración)
3. Cambie el nombre del teléfono al número que desea guardar como favorito (por ej.
4045551234, sólo caracteres
numéricos)
4. Ingrese en el menú de voz
de su auricular
5. Seleccione la opción «Store»
(guardar)
6. Seleccione el número favorito (1, 2, 3 o 4) bajo el cual quiere guardar el número del teléfono y acepte oprimiendo el
botón multifuncional una vez. El
número queda guardado en el
auricular. Tenga en cuenta que
en modalidad encendido, puede
hacer una llamada telefónica
20
directa a Favorite 1 simplemente oprimiendo durante dos segundos el botón multifuncional.
Servicio AT&T *8 VoiceInfo (sólo
en inglés)
Su auricular ha sido configurado
para tener acceso al servicio de
AT&T *8 VoiceInfo. Al seleccionar
esta opción, podrá conectarse al
popular servicio de AT&T *8
VoiceInfo, el cual le da acceso a
un gran contenido de audio como
deportes, información bursátil,
horóscopos, información del
tiempo y mucho más.†
(Se cobran cargos normales de
tiempo de uso).
nes del menú adicional, oprima
los botones Vol+ [3], Vol- [4] y
multifuncional [2] hasta que oiga
una serie de 4 pitidos incrementales. Para volver al menú principal, haga lo mismo. (Cuando
Seleccione esta opción para
consultar el tiempo de llamadas
en horas que le queda en la
batería. Los números van de 0 a
8. Por defecto, oirá 8 incluso si
el tiempo de llamadas es mayor
de 8 horas. Cuando sólo quede
una hora de llamadas, se anunciará automáticamente.
Enlace (sólo en inglés)
Para enlazar el auricular con su
teléfono móvil mediante el menú
de voz, seleccione esta opción y
siga los pasos 1 y 2 de la sección de enlace automático de
esta guía.
6. MENÚ ADICIONAL
Para tener acceso a las funcio-
salga del menú adicional, los
ajustes que haya hecho en ese
menú específico se perderán.)
Para conocer los comandos del
menú adicional, vea la Tabla de
Comandos.
Problema
Sugerencias
El auricular no
enciende
· La batería del auricular puede estar
descargada. Intente recargar el auricular.
No se ha
conseguido realizar
el enlace
· Durante el proceso de enlace intente acercar el teléfono y el auricular lo más posible.
· Asegúrese de que el teléfono móvil se encuentra en la modalidad Bluetooth correcta.
· Algunos equipos eléctricos, como los hornos microondas, crean interferencias eléctricas que dificultan la comunicación del
auricular con el teléfono. Inténtelo nuevamente, alejándose de tales equipos.
El enlace se ha
realizado, pero las
llamadas no se
oyen
· Asegúrese de que el teléfono está encendido y listo para conectarse con el auricular.
Consulte cómo realizar esta operación
en el manual de instrucciones del teléfono.
El auricular no
responde a las
acciones de comando
· Asegúrese de que la batería del
auricular esté cargada.
· Intente reinicializar el auricular según las
instrucciones indicadas en “Reinicialización del auricular”.
wing.com
8. INFORMACIÓN ADICIONAL
Atención al cliente
Visite nuestra página web en:
www.southwing.com/at&t-sh440
o llame en EE. UU./Canadá al 1877-71S-WING O 1-877-717-9464
o envíe un correo electrónico a:
customer.serviceusa@south-
Cuidado de la batería
La batería de su auricular tendrá
una vida prolongada si usted
sigue las siguientes indicaciones:
· No cargue su auricular al aire
libre.
21
Enlace automático
Para su conveniencia, el auricular
cuenta con una función de enlace
automático, de modo que cuando
usted encienda el auricular por
primera vez, ya se encontrará en
modalidad enlace. El auricular
emitirá un pitido cada 2 segundos para indicar que se encuentra
en modalidad enlace, y que está
15
7. LOCALIZACIÓN Y RESOLUCIÓN DE PROBLEMAS
Estado de la batería (sólo en
inglés)
2. ENLACE DEL AURICULAR
· No cargue su auricular si la temperatura ambiente supera los 113º
Fahrenheit (45ºC) o está por debajo de los 50º Fahrenheit (10ºC).
· No deje su auricular conectado
al adaptador de corriente durante
largos periodos de tiempo, ya
que el exceso de carga reduce la
vida de la batería.
Indicaciones de seguridad
· Use el producto solamente
según las instrucciones contenidas en esta Guía del usuario. El
uso de este producto contraviniendo estas instrucciones
podría causar lesiones. Además,
cualquier uso de este producto
contraviniendo dichas instrucciones invalidará toda garantía.
· No use el producto en un
ambiente donde pueda entrar
en contacto con líquidos, estar
expuesto a humedad elevada o
temperaturas extremas.
· No exponga este producto al
fuego, ya que podría explotar
causando lesiones o la muerte.
· No use este producto en áreas
donde el uso de transmisores
de radio se encuentra prohibido
(por ej. aviones y hospitales) o
cerca de equipos sensibles a
transmisores de radio (por ej.
marcapasos).
· No intente reparar este producto usted mismo. Si el producto necesita reparación, debe
realizarla personal autorizado.
· Para limpiar el producto utilice
una tela suave. No utilice agen22
listo para enlazarlo con el teléfono. Siga estas instrucciones:
1. Coloque el teléfono móvil en
la modalidad enlace (consulte el
manual del usuario del teléfono). Asegúrese de que el teléfono no esté a más de 3 pies (1
metro) de distancia del auricular.
2. Ingrese el número PIN: 0000.
Si el enlace se ha efectuado
correctamente, los pitidos se
detendrán y la luz indicadora [2]
titilará cada 3 segundos.
mático anterior.
Uso del auricular con el soporte
para la oreja
3. USO Y COLOCACIÓN DEL
AURICULAR
Puede colocarse el auricular en
cualquiera de las dos orejas y
cambiarlo a diferentes posiciones con el brazo multifuncional
giratorio [7].
Uso del auricular sin el soporte
para la oreja
Uso del
auricular sin
el soporte
para la oreja
Enlace manual
Necesitará repetir el siguiente
proceso cada vez que quiera
enlazar su auricular con otro teléfono móvil.
1. Asegúrese de que el auricular esté apagado.
2. Oprima y mantenga presionado el botón multifuncional [2]
durante 5 segundos hasta que el
indicador luminoso [2] titile dos
veces por segundo y que oiga
una serie de pitidos agudos.
También puede poner el auricular en modalidad enlace desde el
menú de voz al escoger la
opción "pairing" (enlace) como se
describe en la sección 5.
3. Complete el proceso manual
de enlace siguiendo los puntos 1
y 2 de la sección de enlace auto-
Derecha
Izquierda
Puede utilizar el auricular sin
necesidad de emplear el soporte para la oreja, para ello:
1. Gire el brazo multifuncional [7]
hacia abajo hasta que calce en la
oreja, como si se tratara de un
auricular con cable.
2. Con suavidad, calce el altavoz [5] en el canal auditivo.
3. Por último, busque la posición
más cómoda girando el auricular
hacia adelante y hacia atrás.
Uso del auricular con el
soporte para
la oreja
Puede emplearse el soporte
para la oreja para máxima
comodidad. Para calzarlo, gire el
brazo multifuncional [7] hacia
arriba y deslícelo dentro del
conectador del soporte para la
oreja [8]. Para colocarlo en la
oreja, siga estos pasos:
1. Gire ligeramente el soporte
[8] hacia delante.
2. Con suavidad, calce el altavoz [5] en el canal auditivo.
3. Gire el soporte [8] hacia atrás
y ajústelo detrás de la oreja.
4. Para cambiar de una oreja a
la otra, gire simplemente el
brazo multifuncional [7] hacia
abajo y mueva el soporte para la
oreja [8] al lado contrario.
Garantía limitada y exclusiones
de garantía
Importante:
Para todos los temas relacionados
con la garantía, por favor devuelva el producto al establecimiento
donde lo adquirió.
Garantía limitada por un año.
Cobertura: AT&T garantiza al primer comprador de este accesorio inalámbrico que si este producto o cualquiera de sus par-
Encendido y apagado del auricular
Para encender el auricular, oprima
y mantenga presionado el botón
multifuncional [2] durante 3 segundos hasta que escuche una serie
de pitidos. El indicador luminoso
[2] parpadeará por 1 segundo y
luego titilará. Para apagar el auricular, oprima y mantenga presionado
el botón multifuncional [2] durante
3 segundos hasta que escuche
una serie de pitidos. El indicador
luminoso titilará y el auricular se
apagará.
Volumen
Para aumentar el volumen duranSujeción del te una llamada, oprima el botón
auricular a la Vol+ [3]. Para disminuir el volumen, oprima el botón Vol- [4]. El
ropa
auricular mantendrá el ajuste del
volumen incluso cuando esté
apagado.
El brazo multifuncional [7]
puede utilizarse, además, para
tes se demostraran defectuosos no autoriza a ninguna otra peren los materiales o fabricación,
sona a asumir ninguna respondesde la fecha de acreditación
sabilidad más allá de la garantía
de la compra y por un periodo
aquí descrita. En ningún caso,
de un (1) año, entonces estarán
ya sea por contrato o en forma
sujetos a los términos de esta
extracontractual, AT&T será resgarantía limitada por un año.
ponsable por daños incidentaTales defectos serán reparados,
les, resultantes, indirectos,
reemplazados o se efectuará un especiales o punitivos de nincrédito a juicio de AT&T, sin
gún tipo resultantes del uso de
cargo por los componentes o
este producto, incluyendo llatrabajo directamente relacionamadas telefónicas incompletas
dos con el defecto.
o interrumpidas, o resultante de
Limitaciones y exclusiones: esta cualquier incumplimiento de
garantía no cubre ningún costo
esta garantía. En ningún caso
incurrido por desmontaje o
será AT&T responsable por
reinstalación, ni ningún producdaños en exceso del importe de
to o componente que haya
compra. © 2007 AT&T
sufrido desgaste normal por
Knowledge Ventures. Todos los
uso, alteración, instalación inco- derechos reservados. AT&T y el
rrecta, abuso físico, mal uso,
logotipo de AT&T son marcas
negligencia o accidente.
comerciales de AT&T
Tampoco cubre los defectos
Knowledge Ventures o compañíocurridos durante el envío a un
as afiliadas de AT&T. Podrán
centro de servicio de AT&T, o la
existir otras garantías de fabrireparación del producto por
cante.
cualquier persona que no sea
de un centro de servicio de
9. DECLARACIÓN Y AVISO DE FCC
AT&T. Daños causados por fuer(Comisión Federal de
zas de la naturaleza, incluyendo, Comunicaciones, EE. UU.)
Este equipo cumple con la Parte
entre otros, fuego, inundación,
15 de las Reglas FCC. Su funterremoto y otros desastres
cionamiento está sujeto a las
naturales serán excluidos. Esta
dos condiciones siguientes: (1)
garantía limitada reemplaza
Este equipo no podrá causar
cualquier otra garantía, expresa
interferencias dañinas. (2) Este
o implícita por ministerio de la
equipo debe aceptar cualquier
ley, sea en bases a leyes o no,
interferencia recibida, incluso
incluyendo, entre otros, a toda
garantía implícita o condición de interferencias que provoquen un
funcionamiento no deseado. En
comercialización o adecuación
caso de preguntas acerca del
para un uso en particular. AT&T
23
4. EMPLEO GENERAL
Sujeción del auricular a la ropa
16
tes limpiadores que puedan
dañar el plástico, los electrónicos y la batería.
· El uso de este producto mientras conduce puede limitar su
capacidad para reaccionar a las
condiciones de la carretera.
· Tenga presente que el uso de
auriculares inalámbricos mientras conduce está prohibido en
ciertos países. Por consiguiente,
debería consultar las leyes locales antes de usar este producto
mientras conduce.
· Este producto contiene partes
que podrían causar lesiones si
se ingieren, por tanto manténgalo fuera del alcance de los
niños.
· Use solamente el adaptador
de corriente suministrado por
SouthWing o por AT&T en el
empaque de AT&T etiquetado
como compatible con el auricular SouthWing SH440.
Precaución: el uso prolongado del
auricular a alto volumen puede
afectar la capacidad auditiva.
sostener el auricular de distintas
maneras cuando se usa sin el
soporte. Para sujetarlo a la ropa
siga estas instrucciones:
1. Gire el brazo multifuncional
[7] en la misma dirección del
micrófono [6].
2. Utilice el brazo multifuncional
[7] y el propio auricular como clip
para calzarlo en la ropa.
producto o de esta declaración
de FCC, contáctese con:
SouthWing
2655 LeJeune Rd.
Suite 810
Coral Gables, FL. 33134
FAX :+ 1 305 442 1676
[email protected]
Para identificar este producto,
consulte el número de unidad,
serie o modelo que aparece en
el producto.
La FCC requiere que se notifique al usuario que cualquier
cambio o modificación efectuado en este equipo y no aprobado expresamente por la parte
responsable del cumplimiento
de estas normas podrá anular el
derecho del usuario de operar
este equipo.
Este equipo ha sido verificado y
cumple con los límites para un
equipo digital de Clase B, según
la Parte 15 de las Reglas FCC.
Estos límites están diseñados
para proveer una protección
razonable contra interferencias
dañinas en una instalación residencial. Este equipo genera,
usa y puede radiar energía de
radio frecuencia y, de no usarse
de acuerdo con las instrucciones, puede causar interferencias perjudiciales a las radiocomunicaciones. Sin embargo, no
hay garantía de que la interferencia no ocurra en una instala-
Aceptar y rechazar* llamadas
Cuando suena el teléfono (puede
oírse el tono de la llamada en el
17
ción particular. Si este equipo
causa interferencias perjudiciales a la recepción de radio o
televisión, que se pueden determinar apagando y encendiendo
el equipo, se recomienda al
usuario que trate de corregir la
interferencia con una o más de
las siguientes medidas:
· Reorientar o reposicionar la
antena receptora
· Aumentar la separación entre
el equipo y el receptor
· Conectar el equipo a un tomacorriente en un circuito diferente del receptor
· Consultar con el vendedor o
un técnico experto de radio o
televisión
Este producto emite energía de
radiofrecuencia, pero la potencia
radiada de este dispositivo está
por debajo de los límites de
exposición de radiofrecuencia
establecidos por la FCC. En todo
caso, el equipo debería ser
usado de modo que se minimice
el contacto humano con la antena durante la operación normal.
de 12 horas de inactividad. Si se
ha activado esta función, el auricular podrá encenderse de nuevo
siguiendo el procedimiento normal.
Cuando la batería esté sólo al
10%, el auricular emite una
secuencia de tonos de advertencia cada vez que se finaliza una
llamada. Para consultar el nivel
de batería, use el menú de voz
como se describe en la sección 5
u oprima el botón multifuncional
[2] 4 veces.
auricular), oprima brevemente el
botón multifuncional [2] para
aceptar la llamada. Para rechazarla, oprima y mantenga presionado
el botón multifuncional [2] durante
1 segundo.
Iniciar una llamada desde el
teléfono móvil
Marque el número con el teléfono móvil. Si el auricular está
encendido y el teléfono se ha
enlazado correctamente, la llamada se transferirá al auricular.
Reinicialización del auricular
Iniciar una llamada con marcado
por voz
Si el auricular no responde,
intente cargarlo de nuevo durante algunos segundos. El auricular debería funcionar ahora con
toda normalidad.
Para usar el marcado por voz,
presione brevemente el botón
multifuncional [2] una vez.
Luego de escuchar un tono de respuesta, pronuncie el nombre de
la persona a la que desee llamar.
Guarde su número favorito
Para grabar cualquier número
mediante el menú de voz, consulte la sección 5. Para grabar el
número de la última llamada
recibida (sólo disponible para
los números favoritos 1 y 2):
1. Para grabarlo como Favorite
1: cuando la llamada ha finalizado, oprima simultáneamente el
botón multifuncional [2] y el
botón Vol - [4].
2. Para grabarlo como Favorite
2: cuando la llamada ha finalizado, oprima simultáneamente el
botón multifuncional [2] y el
botón Vol + [3].
En modalidad encendido, usted
puede hacer una llamada directa
al Favorite 1 simplemente opri-
Importante: su teléfono móvil debe
ser compatible con la función de
marcado por voz y deberá configurar
e ingresar sus etiquetas de voz en su
equipo (consulte el manual del
usuario de su teléfono móvil).
Finalizar llamadas
Oprima el botón multifuncional
[2] brevemente durante una llamada para finalizarla.
Duración de la batería
Para conservar la duración de la
batería, el auricular incorpora la
función "auto-sleep". Esta función
desconecta el auricular después
Desactivar el anuncio de número
que llama (modalidad susurro,
sólo en inglés)
El Auricular SH440 puede informar por voz dígito por dígito el
número de quien llama cuando la
modalidad susurro está activada.
Para desactivar esta función:
1. Oprima el botón Vol+ [3] brevemente (oirá una opción del
menú de voz)
2. Mantenga presionados simultáneamente los botones Vol– [4]
y Vol+ [3] durante 1 segundo
3. Oirá el anuncio de la opción
“whisper off” (desactivado)
4. Espere un segundo y saldrá
automáticamente del menú de voz
5. MENÚ DE VOZ (sólo en inglés)
Gracias al innovador y exclusivo
menú de voz es posible tener
acceso a diferentes funciones
del auricular de una forma interactiva y fácil.
Para ingresar en el menú simplemente oprima el botón Vol - [4] o
Vol + [3] en modalidad encendido. Para avanzar o retroceder en
el menú desplácese oprimiendo
el botón Vol - [4] o Vol + [3]. Se
anunciarán las opciones en el
menú y usted podrá aceptar una
opción oprimiendo el botón multifuncional [2]. Para salir del
menú, oprima el botón multifuncional [2] dos veces o espere a
que se repita la opción. Tras 20
segundos, saldrá automáticamente del menú de voz.
Para activar otra vez la modalidad
susurro, siga los pasos descritos
arriba hasta oír el anuncio de
“whisper on” (activado).
Importante:
1. Si recibe una llamada desde un
número oculto, la modalidad
susurro no funcionará.
2. Para aceptar (o rechazar) la llamada, utilice el botón multifuncional en cualquier momento
durante el anuncio del número
que llama.
3. Si el número que llama ya está
grabado como número favorito,
será anunciado de ese modo.
18
Funciones del menú de voz (sólo
en inglés)
1. “Favorite 1” (o 2,3,4): acceso
a los números favoritos 1 a 4
2. “Voice Info”: servicio de AT&T
*8 VoiceInfo
3. “Battery”: estado de la
19
10. TABLA DE COMANDOS
1. Menú principal
2. Menú adicional
¿CÓMO?
INSTRUCCIONES
RESPUESTA DEL AURICULAR
Encender
Cuando esté apagado, mantener El auricular se encenderá y titilará la
presionado el botón multifuncional luz verde
durante 3 segundos
Activar y desacti- Cuando esté encendido, oprimir Se oye una serie de 4 tonos
var menú adicional los botones Vol+, Vol - y multifuncional durante 1 seg.
Apagar
Cuando esté encendido, mantener La luz verde titilará 3 veces por seg.
presionado el botón multifuncional durante 2 seg. y el auricular se apadurante 3 segundos
gará
Silenciar
el micrófono
Durante una llamada, oprimir el
botón multifuncional dos veces
El micrófono está en silencio y se
oyen tonos periódicamente
Subir el
volumen
Durante una llamada, presionar
repetidamente el botón Vol+
En cada pulsación se oirá un tono con
mayor volumen y de tono más alto
Activar
el micrófono
Durante una llamada con el
micrófono en silencio, oprimir el
botón multifuncional dos veces
El micrófono se reactiva
Bajar el
volumen
Durante una llamada, presionar
repetidamente el botón Vol-
En cada pulsación se oirá un tono con
menor volumen y de tono más bajo
Modalidad
enlace
Cuando esté apagado mantener pre- La luz verde del auricular titilará dos
sionado el botón multifuncional
veces por segundo y se oirá una
durante 5 seg. y vea las instruccio- serie de tonos altos
nes de enlace de su móvil
Ingresar en el
Cuando esté encendido, mante- Ingresa en la lista de tonos de timbre
menú de tonos de ner presionado los botones
timbre
Vol+ o Vol- durante 5 seg.
Aceptar una
llamada
Durante una llamada entrante, opri- El auricular acepta la llamada
mir una vez el botón multifuncional
Comprobar diferen- En el menú de tonos de timbre, Se desplaza por la lista
tes tonos de timbre oprimir los botones Vol + o Volpara oír los diferentes tonos
Rechazar una
llamada1
Durante una llamada entrante,
mantener presionado el botón
multifuncional durante 1 seg.
Seleccionar un
tono de timbre
Marcación
por voz2
Cuando esté encendido, oprimir el El auricular emite una serie de tonos
botón multifuncional una vez
cortos y el móvil inicia la instrucción
de marcado por voz
En el menú de tonos de llamada, oprimir el botón multifuncional una vez
Finalizar una
llamada
Durante una llamada, oprimir el
botón multifuncional 1 vez
Intercambiar los
botones Vol+ y
Vol-
En el menú de tonos de timbre, Intercambia las funciones de los
oprimir dos veces el botón mul- botones Vol+ y Voltifuncional
Acceder al
menú de voz
Cuando esté encendido, oprimir el El auricular anuncia la primera
botón Vol+ o Volopción del menú
Salir del menú
de voz
En el menú de voz espere hasta
que la opción se repita una vez y
el menú finaliza automáticamente
(tras unos 20 segundos).
El auricular rechaza la llamada
El auricular finaliza la llamada en
curso
Comprobar el Cuando esté encendido, oprimir el Una serie de tonos indica el tiempo
nivel de batería botón multifuncional cuatro veces de llamadas restante en horas.
25
¿CÓMO?
INSTRUCCIONES
RESPUESTA DEL AURICULAR
Volver a marcar el Cuando esté encendido, oprimir El teléfono móvil realiza la llamada
último número1
el botón multifuncional 2 veces
Selecciona el tono de llamada
del auricular
1 Sólo con teléfonos móviles compatibles con la modalidad manos libres
2 Sólo con teléfonos móviles compatibles con la función de marcado por voz
El auricular vuelve al modo encendido
Activación de la Cuando esté encendido, oprimir los Se selecciona la contestación autofunción automá- botones Vol+ y Vol- durante 1 seg. mática de llamadas. Se puede destica de contesactivar del mismo modo.
tar una llamada
24
4. La activación de la función automática de contestar llamadas
(vea la Tabla de Comandos) desactivará la modalidad susurro.
5. Algunos teléfonos móviles no
incorporan la función de identificación de llamadas en el formato
estándar; por ello la modalidad
susurro no puede funcionar con
estos teléfonos.
miendo el botón multifuncional [2].
Tenga en cuenta que si la llamada se ha hecho desde un número oculto no se podrá grabar.
† El servicio de AT&T *8 VoiceInfo no tiene un cargo mensual, pero se incurre en
cargos normales por tiempo de uso según el plan de llamadas. Consultar los
Términos y condiciones de VoiceInfo por Internet en www.cingular.com/customer_service/voiceinfo. © 2007 AT&T Knowledge Ventures. Todos los derechos
reservados. AT&T y el logotipo de AT&T son marcas comerciales de AT&T
Knowledge Ventures o compañías afiliadas de AT&T.
26