1
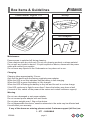
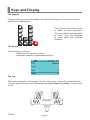
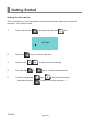
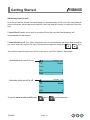
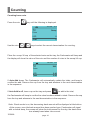
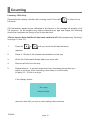
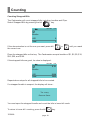
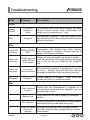
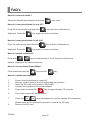
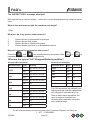
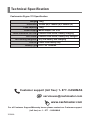
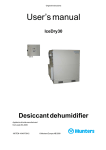
sigma
170
Cashmaster Sigma 170
User Manual
www.cashmaster.com
Cashmaster Sigma 170
User Manual
Thank you for choosing the Cashmaster Sigma 170 money counter. The Sigma
170 is an invaluable, easy to use, and highly accurate money counting device.
The Sigma 170 is designed to manage your cash intelligently, with accuracy and
efficiency. With the Sigma 170 you will speed up cash counting and reconciliation
up to six times faster than by hand.
10244A
Contents
Introduction
Introduction……………………………………………
Box Items and Guidelines
Maintenance…………………………………………..
Charging.………………………………………………
Warning……………….……………………………….
2
3
3
3
Guidelines
Unpacking……………………………………………… 4
Keys and Display
Cashmaster Sigma 170…….………………………..
Keypad..........…………………………………………..
Tray..........……………………………………………....
Screen…………………………………………………..
Cashmaster Key Identification
Key Identification...………...……......……..…………
Fast Keys.………………………………….................
5
6
6
6
7
7
Getting Started
What can you count……………………………………
Switching On……………………………………………
Setting Date and Time…………………………………
Setting Bank mode....................................................
Auto Add and Auto Scroll……………………………...
8
9
10
11
12
Counting
Coins……………………………………………………
Learning………………………………………………..
Bills……………………………………………………...
Totalling, Clearing and Print……………………………..……….
14
16
17
19
Grams/Calculator Mode.……………………………………....… 20
Troubleshooting…………………………………………………... 21
FAQ’s...............………………………………………………….… 22
Technical Specification..…………………………………………. 24
Faster, Accurate and Even More Intelligent
Copyright © 2009 Cashmaster International. All rights reserved. This document may not be copied or reproduced
in whole or in part, or transferred to any other media or language, by means without the written prior permission of
Cashmaster International. We reserve the right to make changes to this document and to the product described
herein without obligation to notify any persons of such changes.
10244A
page 1
Introduction
Introduction
The Cashmaster Sigma 170 is an electronic weighing device which calculates the value
of coins and bills. The Cashmaster Sigma 170 supports your domestic currency: bills
and coins. The intuitive user friendly interface guides you through the cash counting
process. The Cashmaster Sigma 170 is programmed to count the contents of a typical
cash register:
· Bills (loose, bundled, cllipped)
· Coins (loose, rolled)
Using the Cashmaster you will notice some changes in the way you work:
· Reduced paperwork
· Streamlined working methods making the business more competitive
· More time to concentrate on Key Tasks
Guidelines
1. 2. 3. 4. 5. 6. 7. 8. 9. 10.
10244A
Place the Sigma 170 on a firm, even surface, away from draughts and vibrations.
Insert the Tray, pushing down VERY firmly into position until it clicks.
Ensure area around the tray is kept clear.
The coin scoop should NOT be placed on the device before switching on.
Plug in the AC adaptor and switch on at the mains.
The device is not a counterfeit detector and hence will not detect counterfeit money.
Weights may vary from the initial factory setting. It may be necessary to carry
out some initial bill ‘learning’ in order to quickly adjust the machine to your
local conditions.
Ensure money is sorted by denomination before counting. Mixed denominations cannot be counted.
Do not subject the device to strong impact or shock load by any means.
Ensure that money is placed onto the equipment with reasonable care.
page 2
Box Items & Guidelines
Cashmaster Sigma 170
Scoop
AC Adapter
Maintenance
Ensure power is switched off during cleaning.
Clean machine with dry cloth only. Do not use cleaning products or damp material.
Do not spill any liquids on device. If liquid is spilled on device, disconnect the power
cable and contact your supplier.
Do not leave any objects on the Cashmaster or tray when not in use.
Charging
Charging takes approximately 3 hours.
Only use the device with the factory supplied power adapter.
When the LED is red this indicates that the battery is fast-charging.
When the LED is green the battery is fully charged.
When the LED is flashing the battery is very low and the unit is on slow charge.
If the LED continous to flash for more than 3 hours the battery may have a fault
(in event of this, switch off the power at the mains and contact customer support).
Warning
Do not use a damaged or wet power adapter.
Do not connect power adapter with wet hands.
Do not place weights over 1.5kg on the device.
Do not disassemble the device, sensitive elements in the scale may be affected and
this will affect your warranty.
If any of the above are missing please contact Customer support (toll free) on:
1 - 877 - CASHMAS
10244A
page 3
Guidelines
Unpacking
1.
2.
3.
4.
5.
6.
7.
Unpack your Cashmaster machine and check that you have a
Cashmaster scale, a tray and a power adapter.
Fit the tray into the top of the Cashmaster scale. Push down
very firmly until it clicks into place.
(To remove the tray, hold Cashmaster machine firmly and twist the tray
until it clicks, then lift the tray from the base)
Plug the power adapter into the socket at the back of the
Cashmaster scale.
Place the Cashmaster scale on a firm even surface.
Ensure the tray is empty (the coin scoop/till cup should NOT be placed on the tray before switching on).
Plug the power adapter into the power source.
The Cashmaster can now be operated from mains power or from
battery. When the battery is low the display will show
“low battery, recharge now”.
Push down
VERY FIRMLY
until you hear
a click
To fully charge the battery, plug the Cashmaster machine into the mains. The LED on
the front will show GREEN (for one second) then RED.
(A RED LED indicates that the battery is charging. The charging process can take up
to three hours. A GREEN LED indicates that the battery is fully charged and the unit
is connected to the external power supply. If the LED continous to flash for more than
3 hours the battery may have a fault (in event of this, switch off the power at the mains
and contact customer support). No colour indicates that the unit is running on its internal
battery.)
10244A
page 4
Keys and Display
Cashmaster Sigma 170
Tray
Screen
Keypad
The Cashmaster Sigma 170 shown above is the device you are going to use. There are
three main component parts:
· the keypad
· the screen
· the tray
The Cashmaster is robust, and will stand up to all normal Cash Office activities. Treat it
with sensible care.
10244A
page 5
Keys and Display
The Keypad
To keep counting as easy as possible, the number and layout of the keys on the keypad has been kept simple.
The ‘keys’ are ‘full motion’ similar
to those on home computers.
They have their functions printed
on them. They are designed
to resist spills and increase
durability.
The Screen
This is where you will see:
- displays of the amounts counted
- messages related to Cashmaster functions
1c
19.01.2009
10.15
Scoop
Coins
USD
Total
0
0
The Tray
The tray is designed to hold scoops, till cups, rolled coins, loose bills and banded bills.
To insert, place the tray on the Cashmaster and push down very frmly, until your hear
a click.
10244A
page 6
Cashmaster Key Identification
The ON/OFF key. Press once to switch machine on. Press and hold down to
switch machine off.
The STRAPPED BILL key. Push to select strapped bills and to toggle between
loose/ bundled/ clipped bills.
The ROLLED COIN key. Push to select rolled/loose coins.
UP and DOWN arrow keys. There are two sets of these keys, one set to toggle
between bill denominations and another set to toggle between coin denominations.
The PLUS key. Used to add amounts to the total.
The MINUS key. Used to subtract the last value added from the total.
The PRINT key. Press once for a print out of the totals.
The FUNCTION key. In combination with other keys is used to control various
settings.
The CE (CLEAR ENTRY) key. Push once to clear sub totals.
The C (CLEAR) key. Press and hold wait momentarily and press again
to clear the total.
Fast Keys
Fast key functions are controls that allow you to quickly access settings within the
Cashmaster. More information is available on further pages.
To perform the fast key functions press both keys simultaneously.
Bank Setting
Press and hold
down the ‘F’
key and press
the “Bill UP”
key.
This will allow
you to set the
bank amount.
Grams mode
Press both the
“Rolled Coin”
and “Strapped
Bill” keys simultaneously.
Use this function
to weigh objects
(max 1.5kg).
10244A
Auto add
Press and hold
the ‘F’ key and
press the ‘PLUS
(+)’ key. This will
toggle Auto Add
state. “ + ” will be
displayed on the
screen when Auto
Add is on.
Bank On/Off
Press and hold
down the ‘F’
key and press
the “Coin UP”
key.
This will allow
your bank to
be activated or
deactivated.
Contrast
Press and
hold the “F”
key and use
the “up” (to
increase)
and “down”
(to decrease)
the contrast.
page 7
Set time/date
Press and hold the ‘F’
key and press the ‘Coin
DOWN’ key. This will
enter the Time/Date
setting. Use the coin
up/down keys to toggle
and use the “PLUS (+)”
and “MINUS (-)” keys to
increase and decrease.
Auto Scroll
Press and hold the
“F” key and press
the “MINUS (-)”
key. This will toggle
AutoScroll state.“ ”
will be displayed on
the screen when
AutoScroll is on.
Calibrate
Scoop
Press and
hold down
the “F” key
and press the
‘ON/OFF’ key
and follow
the onscreen
instructions.
Getting Started
What you can count
BillS
Loose - for counting loose bills.
Loose bills are counted by placing up to 30 bills at any one time.
Continue to add bills of the same denomination in
quantities of up to 30, until all bills from the selected
denomination have been counted.
Bundles - for counting strapped bills that have been packed in a
bundle.
Clipped - for counting strapped bills that have been packed in a
clip.
COINS
Rolls - for counting and checking rolls of coins.
Scoop or other container - for counting loose coins that are on a
scoop or other calibrated container.
Bill Counting
10244A
Coin Counting
page 8
Roll Counting
Getting Started
Switching On
Press
When the Cashmaster is initially switched on, the display will show the following “Place
Empty Scoop On Scale”.
You must now place the scoop provided on top of the tray. This container is now ready
to use with the machine. (Please bill the scoop must only be used for counting coins).
Place Empty
Scoop On Scale
You are now in count mode.
To recalibrate the scoop at any time (ensure the tray is empty):
Press
10244A
and
, and follow the on screen prompt.
page 9
Getting Started
Setting the time and date
The clock facility on the Cashmaster must be set as follows when you receive the
machine. From count screen:
1.
Press and hold the
key and press the coin
key.
Set Time
[ ]
2.
Press the
3. Use the coin
4.
Then use the
5.
To set the date press
( alternatively press
10244A
key to view the time set.
to select hours or minutes
or
key to increase and decrease.
then
, and repeat as above,
to return to normal operation. )
page 10
Getting Started
Setting Bank Mode
Press
and bill
to enter bank setting. The screen will then show:
Bank
x---.--
Use
or
0.00
to select value position, and use
or
to enter
the bank value.
Press
when finished to set bank value.
Switching Bank Mode On/Off
Once you have stored your default bank amount in memory, you can switch the
bank mode on/off as required.
Press
and then coin
to toggle bank mode on/off.
The display will show the current bank amount stored and you may begin
counting in bank mode.
The bank function can be switched on/off at any time.
19.01.2009
1c
Scoop
Coins
Indicates bank is on
USD
Bank
0
100.00
19.01.2009
1c
10244A
10.15
Scoop
Coins
Indicates bank is off
10.15
USD
Total
0
0
page 11
Getting Started
Switching Auto-Add on/off
Auto add is a feature that allows the Cashmaster to automatically add the value of any
bill/coin amount (that is placed on the tray) to the total amount.
If Auto-Add is on, the value displayed will automatically be added to the totals whenever
the cash is placed on the tray.
If Auto-Add is off, the value displayed will not be automatically added to the
totals, you must press
while the value is being displayed
and the cash still on the tray, to add the value to the totals.
Your device may already have Auto Add set to on/off as default. See below
Indicates auto-add is on
19.01.2009
1c
Scoop
Coins
USD
Total
Indicates auto-add is off
0
0
19.01.2009
1c
USD
Total
10244A
10.15
Scoop
Coins
To switch Auto-Add on/off press
10.15
0
0
and
page 12
simultaneously.
Getting Started
Switching Scroll on/off
Auto Scroll feature allows the cashmaster to automatically scroll up to the next denomination when the value has been added to the total and the money is removed from the
tray.
If Auto-Scroll is on, once cash is removed from the tray the denomination will
automatically be advanced.
If Auto-Scroll is off, the value displayed will not automatically advance denomination,
you must manually select the next denomination required using the
keys.
Your device may already have Auto scroll set to on/off as default. See below
Indicates auto-scroll is on
19.01.2009
1c
Scoop
Coins
USD
Total
Indicates auto-scroll is off
0
0
19.01.2009
1c
USD
Total
10244A
10.15
Scoop
Coins
To switch auto-scroll on/off press
10.15
0
0
and
page 13
simultaneously.
Counting
Counting loose coin
Press the coin
key until the following is displayed.
1c
19.01.2009
15.12.2008
Scoop
Scoop
Coinss
P
USD
tal
Total
Use the coin
10.15
11.53
00
00
keys to select the correct denomination for counting.
Place the scoop/ till cup of the selected coins on the tray; the Cashmaster will beep and
the display will show the value of the coin and the number of coins in the scoop/ till cup:
1c
19.01.2009
15.12.2008
10.15
11.53
X 40
Scoop
Coinss
P
USD
tal
Total
0.400
0.400
If Auto Add is on, The Cashmaster will automatically update the totals, and beep to
confirm the add. Remove the cup from the tray and advance to the next denomination
in the sequence.
If Auto Add is off, leave cup on the tray and press
to add to the total,
the Cashmaster will beep to confirm the value has been added to totals. Remove the cup
from the tray and advance to the next denomination in the sequence.
Note: If bank mode is on, the decreasing bank amount will be displayed at the bottom
of the screen; once the bank amount has been reached your Cashmaster will signal
with a double beep, the screen will show the total amount for the day; the bank value
has already been taken into account.
10244A
page 14
Counting
Rolled Coin
Press the
key until the following is displayed.
19.01.2009
Rolls
EUR
Total
10.15
0
0
Place a roll of coins on the tray. If the roll is full the Cashmaster recognises the weight
then the denomination, together with the value, is shown on the display. For typical Roll
quantities see page 23.
For certain denominations of rolls the display will show:
(2) Possible
Results
You are required to select the denomination of the roll which is on the Cashmaster using
the coin
or
. Press the
key to accept the value.
If the machine does not recognise the weight as a full roll the following will be displayed.
* Suspect *
Using the coin
and
then
SELECT ACTUAL
DENOMINATION
keys, select the actual coin denomination and
the machine will then display the value together with the number of coins in the roll.
Press the
key to accept the value and add to the grand total.
To exit this mode press the
10244A
key.
page 15
Counting
Learning - Bills Only
Ensure that the display indicates bill counting mode. Press bill
bill mode.
to select loose
All Cashmaster machines are calibrated at the factory to the average bill weights of all
UK currency. As bill weights vary slightly depending on age and usage, the following
should be completed on receipt of your new machine.
(Please ensure Auto Add/Scroll has been switched off before beginnning “Learning”
see page 12 and 13.)
1.
Press bill
or
until you reach the bill denomination
required.
2.
Place 8 -10 bills of the chosen denomination on the tray.
3.
When the Cashmaster beeps add some more bills.
4.
Remove all bills from the tray.
5.
Repeat steps 2 - 4 several times each time increasing the number you
apply in one slice. After repeating a few times you will be able
to apply 25 - 30 bills in one go.
If the display shows :
Too many
Remove Some
remove a few until you see a valid reading, then continue.
10244A
page 16
Counting
Counting Loose Bills
Press the bill
key until the following is displayed.
$1
19.01.2009
10.15
Bills
USD
Total
Use the bill
0
0
keys to select the correct denomination for counting.
Place bills of the selected denomination on the tray. Bills should be applied in slices of
up to 30 bills at a time.
$1
19.01.2009
10.15
X 50
Bills
USD
Total
50.00
50.00
The device is constantly learning, if too many bills are applied this message will be
displayed.
Too many
Remove Some
Simply remove a few bills until the message disappears, then continue adding bills to
those already on the tray.
Repeat above steps for each denomination of bill. To skip a denomination, press
bill
10244A
or
.
page 17
Counting
Counting Strapped Bills
The Cashmaster will count strapped bills including; bundles and Clips.
Select Strapped Bills by pressing the bill
key.
19.01.2009
$1
10.15
Bundles
USD
Total
0
0
If the denomination is not the one you want, press bill
the correct one.
or
until you reach
Place the strapped bills on the tray. The Cashmaster accepts bundles of $1, $2, $5, $10,
$20, $50, and $100.
If the strapped bills are good, its value is displayed:
19.01.2009
$1
10.15
X 50
Bundles
USD
Total
50.00
50.00
Repeat above steps for all strapped bills to be counted.
If a strapped bundle is suspect, the display will show :
Too many
Remove Some
You must open the strapped bundle and count the bills in loose bill mode.
To return to loose bill counting, press the bill
10244A
page 18
key.
Totalling, Clearing & Printing
Adding
To add a value, currently on the display, to the total press the
key.
Auto Adding/Scrolling
For auto adding and auto scrolling see page 12 and 13.
Subtracting
To subtract the last value added to the total, press the
key while the value is still
being displayed and the money is still on the machine.
For negative manual entries press
key once value is entered.
Subtotals
To find out the subtotal of any denomination select the denomination required. The
display will show the subtotal for the denomination shown and the number of pieces.
Clearing Sub-Totals
Select the denomination to be cleared by using
the
key.
and
keys then press
Clearing Totals
Press and hold the
key until screen prompt shows “Press C key again to
confirm.
To clear the totals now press the
key again. To cancel clearing press any other
key.
Printing
Providing a printer is connected, print the totals by pressing the
key.
Note: When using the printer it is always advisable to operate the machine with the
mains adapter connected.
10244A
page 19
Grams Mode
Grams Mode
Grams Mode can be used to :
1. 2. Weigh and/or directly compare bundles of bills.
Check that the scale is weighing correctly by applying a weight known
to be accurate.
To enter Grams Mode :
Press
and
at the same time.
The display will show :
0.0g
Grams Mode
If the Cashmaster drifts from 0.0g when the tray is empty, press
zero.
To exit Grams Mode and return to normal operation :
Press
and
at the same time.
Note: The maximum weight the Cashmaster can weigh is 1.5kg.
Do no put any weight above this on the Cashmaster.
10244A
page 20
to reset scale to
Troubleshooting
Mode
Message
Description
Coins
Loose/
Rolled
Roll
Too much
weight on
scale
This means there is too much weight on scale,
simply remove some. The Cashmaster will
weigh up to a maximum of 1.5kg.
* Suspect *
Roll applied is suspect. User may leave roll on
tray and select the correct denomination for the
actual roll amount.
Bills
Loose bill
counting
has drifted from zero (usually
PRESS ZERO Cashmaster
due to draught or vibration). Ensure the tray is
KEY
empty, then press on/off key.
Loose bill
counting
Please remove
scoop/till cup
from scale
Loose bill
counting
Bills should be applied in amounts of up to 30
Too many
a time. Simply remove a few bills until the
Remove some at
message disappears then continue counting
Strapped
Please remove scoop/till cup from the scale
User has selected a bill denomination while the
cup is still on the tray. Remove the scoop/till
cup.
* Suspect *
Bundle applied is suspect. User must split
bundle and count in loose bill mode.
High vibration
lockout
Check that the Cashmaster is placed on a
level surface and away from draughts (e.g. air
conditioning or fan).
Misc
Battery low
Print timeout
Plug machine into power supply to recharge
battery.
Ensure that printer is switched on and properly
connected to the scale before retrying.
Scale is below Indicates that the tray has not been placed
minimum
correctly. Ensure tray is pushed firmly into the
weight!
Cashmaster.
10244A
page 21
FAQ’s
How do I clear sub totals?
Select the desired denomination and press
key once.
How do I clear grand totals for one till?
From the count screen hold down the
displayed. Press the
key until the confirmation is
key again to confirm and clear.
How do I clear grand totals for all tills?
From the main screen hold down the
displayed. Press the
key until the confirmation is
key again to confirm and clear.
How do I switch currencies?
Press both
keys simultaneously to scroll through multicurrency
options, stopping at the desired currency.
How do I access/leave Grams Mode?
Press simultaneously the
key and the
key.
How do I update the firmware?
1. 2.
3. 4. 5. Ensure that the machine is turned off.
Remove cover located to the left underneath the machine.
Insert the SD card in slot marked “SD-CARD”.
Connect the machine to the power adapter.
Press and hold down the
key for approximately 10 seconds
6. The serial number will be displayed.
7. Press the
8. please allow up to 2 minutes for prompt to remove the SD card.
Remove the SD card.
10244A
keys simultaneously and the update will commence,
page 22
FAQ’s
The SUSPECT ROLL message displayed
Roll applied has a suspect weight – select the correct denomination by using the arrow
keys.
What is the maximum weight the machine can weigh?
1.5kg.
What do I do if my printer does not work?
1. 2. 3. 4.
Ensure printer is connected to machine
Ensure printer has power
Ensure printer is loaded with paper
Ensure paper grip lever is in downward position
How do I change the contrast on the screen?
Press the
and
key simultaneously and press either
increase or decrease contrast respectively.
or
to
What are the typical “full” Strapped/Rolled quantities?
Strapped Bill Quantities
Denomination
100$
50$
20$
10$
5$
2$
1$
Rolled Coin Quantities
Type
Quanity
Denomination
Type
Quantity
Bundle
10, 20, 25, 50, 100
100c
Roll
-
Clip
10
50c
Roll
-
Bundle
10, 20, 25, 50, 100
25c
Roll
40
Clip
10
10c
Roll
50
Bundle
10, 20, 25, 50, 100
5c
Clip
10
Roll
40
Bundle
10, 20, 25, 50, 100
1c
Roll
50
Clip
10
Bundle
10, 20, 25, 50, 100
Clip
10
Bundle
10, 20, 25, 50, 100
Clip
10
Bundle
10, 20, 25, 50, 100
Clip
10
The Roll quantities are default from
factory settings that the cashmaster
will recognise automatically. For
Rolls outwith these quantities the
user is required to select the
denomination manually using the
coin up/down keys.
For all other problems or issues contact our Customer Support (toll free) on:
1 - 877 - CASHMAS
10244A
page 23
Technical Specification
Cashmaster Sigma 170 Specification
Weight 1.2kg
Dimension 162mm (W) x 188mm (H) x 282mm (D)
Load Capacity 1.5kg
Power Supply Mains adapter 12V 2.5A
Power Indication LED red: Powered from mains, battery charging
LED Green: Powered from mains, battery fully charged
LED flashing red/green: Very low battery and charging
LED off: Power from battery only
Battery Type LiPo 7.4V 1250mAh
Customer support (toll free): 1- 877- CASHMAS
@ [email protected]
www.cashmaster.com
For all Customer Support/Warranty issues please contact our Customer support
(toll free) on: 1 - 877 - CASHMAS
10244A
Declaration of Conformity
EC Declaration of Conformity
Cashmaster Sigma models manufactured in Scotland, Rosyth are in conformity with the
provisions of the following European Directives:
89/336 and 93/68/EEC Electromagnetic Compatibility Directive
73/23 and 93/68 /EEC Low Voltage Directive
FCC Compliance Statement
This equipment has been tested and found to comply with the limits for a Class B
digital device, pursuant to Part 15 of the FCC Rules. These limits are designed to
provide reasonable protection against harmful interference in a residential installation.
This equipment generates, uses and can radiate radio frequency energy and, if not
installed and used in accordance with the instructions, may cause harmful interference
to radio communications. However, there is no guarantee that interference will not
occur in a particular installation. If this equipment does cause harmful interference to
radio or television reception, which can be determined by turning the equipment off
and on, the user is encouraged to try to correct the interference by one or more of the
following measures:
• Reorient or relocate the receiving antenna.
• Increase the separation between the equipment and receiver.
• Connect the equipment into an outlet on a circut different from the
one which the receiver is connected to.
• Consult the dealer or an experienced radio/TV technician for help.
You are cautioned that changes or modifications not expressly approved by the party
responsible for compliance could void your authority to operate the equipment.
Approvals
Complies to
EU Directive,
2002/95/EC
RoHS
2002/95/EC
Complies with
EU Directive
2002/96/EC
on the restriction
of hazardous
substance
in electrical
& electronic
equipment
Signed for Cashmaster Ltd
Douglas Reid
Engineering Director
10244A
Bill Hamilton
Technical Director
page 25
Contact Details
Head Office (UK)
Innovation Buildings
Fairykirk Road
Rosyth, Fife
KY11 2QQ
SCOTLAND
Cashmaster Turkey
Istanbul HERTEL
Bagdat Caddesi Burc
No:123 / 7
Feneryolu
ISTANBUL 34724
t: +44 (0) 1383 416 098
f: +44 (0) 1383 411 904
[email protected]
t. +90 216 348 6555
t. +90 533 566 5707
f. +90 216 348 6646
[email protected]
Italy Office
Via Duchessa Galleria 26
15076 Ovada Alessandria
ITALY
Spain Office
C/ JAUME ISERN, 20 bajo
(local interior), Mataró
Barcelona 08302
SPAIN
t: +39 (0) 143 835 636
f: +39 (0) 143 835 639
[email protected]
t: +34 (0) 937 999 319
f: +34 (0) 937 589 816
[email protected]
France Office
12 Rue D’Ingré
45380 La Chapelle St Mesmin
FRANCE
Poland Office
Litewska
30-014 Kraków
POLAND
t: 0800 904 936
t: +33 (0) 2 38 43 78 63
f: +44 (0) 2 38 88 61 37
[email protected]
t: +48 (0) 12 2945701
f: +48 (0) 12 2945711
[email protected]
USA East Coast Office
Orange Blossom Center
2593 N. Orange Blossom Trail
Kissimmee
FL 34744
USA
USA West Coast: (CAS0055)
4415 Yeager Way
Suite 300
Bakersfield
CA 93313
USA
t: +1 (407) 518 9134
f: +1 (407) 847 7993
[email protected]
Tel : + (1) 661 397 4088
Fax : + (1) 661 397 4288
[email protected]
Germany Office
Poststr.3
52445 Titz-Hasselsweiler
GERMANY
t: +49 (0) 246 3 999 339
f: +49 (0) 246 3 999 338
[email protected]
10244A
page 26
Sitesi
www.cashmaster.com