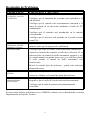
1
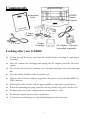
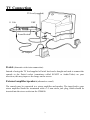
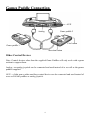
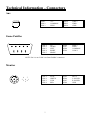
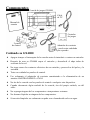
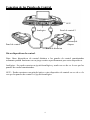
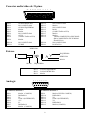
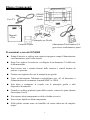
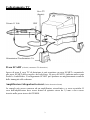
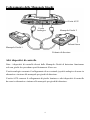
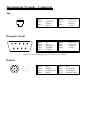
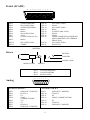
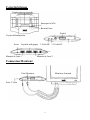
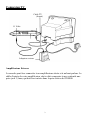
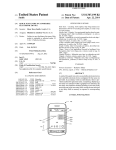
This is the User manual for the Amstrad GX4000 console. © Copyright Amstrad plc Permission has been granted to Kevin Thacker to reproduce this document in electronic form. 616Z001-40993 2630101B 1 GX 4000 USER INSTRUCTIONS MANUAL DEL USUARIO MANUALE D’USO MANUEL DE L’UTILISATEUR AMSTRAD AMSTRAD The product described in this manual and products for use with it are subject to continuous development and improvement. This manual is provided to you free of charge and is intended only to assist the reader in the use of the product. The information contained in this manual and literature provided with the product is given by AMSTRAD in good faith. AMSTRAD MAKES NO WARRANTY OF ANY KIND, EITHER EXPRESS OR IMPLIED, INCLUDING, BUT NOT LIMITED TO, THE IMPLIED WARRANTIES OF MERCHANTABILITY OR FITNESS FOR A PARTICULAR PURPOSE AND AMSTRAD ACCEPTS NO LIABILITY FOR ANY LOSS OR DAMAGE ARISING FROM THE USE OF ANY INFORMATION PROVIDED OR OMITTED. This manual may include technical inaccuracies or typographical errors. Changes are periodically made to the information contained herein; these changes will be incorporated in new editions of the publications. AMSTRAD may make improvements and/or changes in the product(s) and/or the program(s) described in this publication at any time but does not undertake to notify customers of these changes. The products referred to herein are not designed and should not be used for, or in connection with, life critical functions or any activity in which an error or a fault may result in physical damage or injury to person(s) and AMSTRAD does not authorise such use. You must carefully read these instructions, any Software Licence Agreements, the Guarantee Card and all other literature provided with the product. IMPORTANT The terms and instructions, contained in the Guarantee Card provided with the product, must be strictly complied with. EXCLUSIONS OF CONSEQUENTIAL LOSS IN ANY EVENT, AMSTRAD ACCEPTS NO LIABILITY FOR ANY CONSEQUENTIAL LOSS OR DAMAGE ARISING FROM THE USE OF THIS MANUAL OR PRODUCTS USED WITH IT OR ANY INFORMATION PROVIDED IN OR OMITTED FROM THIS MANUAL INCLUDING, BUT NOT LIMITED TO, ECONOMIC OR FINANCIAL LOSS, DAMAGE TO PERIPHERAL EQUIPMENT OR PRODUCTS, LOSS OF USE, PRODUCTIVITY OR TIME. Nothing In this document Is Intended to exclude or restrict any of the consumer's rights where to do so would be illegal. All correspondence relating to the product or this manual should be addressed to: AMSTRAD PLC Brentwood House 169 Kings Road BRENTWOOD Essex CM 14 4EF © Copyright 1990 AMSTRAD plc Neither the whole nor any part of the information contained herein, nor the products described in this manual may be adapted or reproduced in any material form except with the prior written approval of AMSTRAD plc. Written by Sue Maybee, drawings by Gray J Webber, layout and typesetting by Janet Kiddier Published by AMSTRAD PLC Components Instruction book GX4000 Games Console 2 Game Paddles TV Lead Games Cartridge AC adaptor – this may be packed seperately Looking after your GX4000 Always turn off the power switch on the console before inserting or removing a cartridge After use remove the cartridge and unplug the AC adapter from the electrical supply. Never touch the electrical contacts of a cartridge and keep away from dust and dirt Treat the Game Paddles with reasonable care Only use the AC Power adapter supplied or the power via an Amstrad MM12 or CM14 monitor Do not pull at the console with the game paddles or any other control device When disconnecting any plug from the console pull the plug itself -not the wire Do not expose any of the components to extreme heat or cold Do not spill liquids on any of the components If you insist on cleaning use a soft cloth dampened with water only 1 Features Cartridge Slot Power/interlock switch Pause button Peritel UHF Power LED Stereo Analog joystick 5 Volt DC 11 Volt DC Sound switch Auxiliary control device Game paddle 1 Game paddle 2 Monitor Connection Monitor socket Amstrad Monitor 5 Volt Socket 2 TV Connection TV Lead (supplied) 11 Volt UHF Sound Switch AC Adaptor Peritel (alternative television connection) Instead of using the TV lead supplied a Peritel lead can be bought and used to connect the console to the Peritel socket (sometimes called SCART or Audio/Video) on your television, this may improve the image on the screen. External amplifier/speakers (alternative sound) The console may be connected to a stereo amplifier and speaker. The input lead to your stereo amplifier should be terminated with a 3.5 mm stereo jack plug, which should be inserted into the stereo socket on the GX4000. 3 Games Paddle Connection AUX Analog Game paddle 2 Fire button Game paddle 1 direction button Other Control Devices Note: Control devices other than the supplied Game Paddles will only work with a game written to support them. Analog - an analog joystick can be connected and used instead of or as well as the games paddles supplied. AUX - a light gun or other auxiliary control device can be connected and used instead of or as well as the paddles or analog joystick. 4 Operation Start Plug into and switch on the Power Supply If using an Amstrad CM14 or MM12 -plug in and switch on the monitor. If using your television –plug in the AC adapter and switch on. Load the cartridge into the Console Do not use unnecessary force, check you are not trying to insert the cartridge upside down. Switch on the Console Use the power/interlock switch. This switches the console on and locks the cartridge into position. NEVER USE FORCE - SWITCH OFF THE CONSOLE BEFORE LOADING OR ULOADING A CARTRIDGE. Adjust the picture Adjust your monitor to get a clear image on the screen, if you are using a television you will need to tune it: Select a spare or unused channel then adjust the tuning control or if your television has a rotary programme selector knob turn it until the image on the screen becomes steady (the signal will be approximately at channel 36). Adjust the sound Adjust the volume control as required. If there are no game sounds -adjust the sound switch on the games console. Pause Press the pause button to freeze the game. Press it again to continue. Stop When you want to stop a game switch off using the Interlock/power switch and then remove the cartridge – DO NOT ATTEMPT TO REMOVE A CARTRIDGE BEFORE SWITCHING OFF. 5 Problem Solving PROBLEM CHECKS AND ADJUSTMENTS NO PICTURE BUT SCREEN IS LIT Check the power/interlock switch is ON. Check the AC adaptor is plugged into the electrical supply and the socket is switched on. Check the Console is properly connected to the aerial socket on your television using the TV lead supplied. Check the cartridge is inserted into the console correctly. PICTURE IS ROLLING OR HAS BARS OR LINES ON IT POOR PICTURE Check the television is set to the correct channel (Channel 36) Adjust the vertical or horizontal hold controls on your television or monitor until the picture becomes steady. Check all leads are firmly connected. Adjust the fine-tune and contrast controls on your television. If your television has an automatic fine-tuning control turn it off and use the manual control (you cannot do this if your television loses the colour when the automatic fine-tuner is off) NO GAME SOUNDS PROBLEMS RECEIVING TELEVISION PROGRAMMES Move the console away from the television – it may be positioned to close. Adjust the SOUND switch on the console. Adjust the television volume and fine tune control. Check the power switch on your console is turned OFF and the TV lead is disconnected. Check the aerial is connected properly. If you still have a problem contact your dealer or our Customer Services Department. 6 Technical Information - Connectors Aux 123456 PIN 1 PIN 2 PIN 3 +5V COMMON LPEN PIN 4 PIN 5 PIN 6 FIRE 2 FIRE 1 GND Game Paddles 1 2 6 4 3 7 5 PIN 1 PIN 2 PIN 3 PIN 4 PIN 5 9 8 UP DOWN LEFT RIGHT SPARE PIN 6 PIN 7 PIN 8 PIN 9 FIRE 2 FIRE 1 COMMON COM 2 NOTE: Pin 9 is not COM 2 on Game Paddle 2 connector Monitor 6 3 5 7 8 2 4 1 PIN 1 PIN 2 PIN 3 PIN 4 7 SYNC GREEN LUM RED PIN 5 PIN 6 PIN 7 PIN 8 BLUE L SOUND R SOUND GND Peritel PIN 1 PIN 2 PIN 3 PIN 4 PIN 5 PIN 6 PIN 7 PIN 8 PIN 9 PIN 10 PIN 11 20 18 16 14 12 10 21 19 17 15 13 11 AUDIO RIGHT NOT CONNECTED AUDIO LEFT GROUND GROUND NOT CONNECTED BLUE (TIED HIGH) GROUND NOT CONNECTED GREEN 8 9 6 7 4 5 2 3 PIN 12 PIN 13 PIN 14 PIN 15 PIN 16 PIN 17 PIN 18 PIN 19 1 NOT CONNECTED GROUND NOT CONNECTED RED (TIED HIGH) GROUND GROUND COMPOSITE VIDEO (COMPOSITE SYNC IN FRENCH VERSION) NOT CONNECTED SCREEN PIN 21 PIN RIGHT Stereo LEFT RIGHT GND GND LEFT PIN 1 PIN 2 PIN 3 LEFT CHANNEL RIGHT CHANNEL GND Analog 7 8 6 5 4 3 2 1 15 14 13 12 11 10 9 ANALOG STICK 1 ANALOG STICK 2 PIN 1 PIN 2 PIN 3 PIN 4 PIN 5 PIN 6 PIN 7 PIN 8 PIN 9 PIN 10 PIN 11 PIN 12 PIN 13 PIN 14 PIN 15 GND (POT COMMON) FIRE 1 X1 COM 1 (SWITCHES) +5V Y1 FIRE 2 GND (POT COMMON) 8 GND (POT COMMON) FIRE 1 X2 COM 2 (SWITCHES) Y2 FIRE 2 GND (POT COMMON) AMSTRAD El producto descrito en este manual y los que se utilicen con él están sujetos a desarrollos y mejoras continuas. Esta manual se suministra sin cargo alguno y su objetivo es servir de ayuda al lector en el uso del producto. La información contenida en este manual y la información técnica suministrada con el producto es dada por AMSTRAD de buena fe. AMSTRAD NO DA GARANTIAS DE NINGUNA CLASE. NI EXPRESADAS NI IMPLICITAS. RELATIVAS A LA CONVENIENCIA 0 ADAPTABILIDAD DEL PRODUCTO PARA UN PROPOSITO PARTICULAR, Y AMSTRAD NO ACEPTA RESPONSABILIDADES POR PERDIDAS 0 DAÑOS QUE SURJAN COMO CONSECUENCIA DEL USO INCORRECTO DE CUALQUIER INFORMACION SUMINISTRADA U OMITIDA. Este manual puede incluir inexactitudes técnicas o errores tipográficos. Periódicamente este manual será actualizado, introduciendose cambios en versiones futuras. AMSTRAD puede hacer mejoras y/o cambios en el/los producto/s y/o el/los programa/s descrito/s en esta publicación en algún momento, pero no se responsabiliza de notificar estos cambios a los clientes. Los productos aqui referidos no han sido diseñados y no deberian ser usados en, o en conexion con, funciones vitales o alguna actividad en la cual un error pueda ocasionar un daño fisico a la/s persona/s, y AMSTRAD no autoriza tal uso. Debe usted leer cuidadosamente estas instrucciones, los Contratos de Licencia de Software, la Tarjeta de Garantia y cualquier otra información técnica suministrada con el producto. IMPORTANTE Los términos e instrucciones contenidas en la tarjeta de garantia suministrada con el producto, deben ser cumplidas con exactitud. EN NINGUN CASO AMSTRAD ACEPTARA RESPONSABILIDADES POR ALGUNA PERDIDA 0 DAÑO QUE SE PRODUZCA COMO CONSECUENCIA DEL USO INADECUADO DE ESTE MANUAL 0 LOS PRODUCTOS CON EL USADOS 0 CUALQUIER INFORMACION SUMINISTRADA U OMITIDA EN ESTE MANUAL, INCLUYENDO, PERO SIN LIMITARSE A, PERDIDAS ECONOMICAS 0 FINANCIERAS, DAÑOSA EQUIPOS PERIFERICOS 0 PRODUCTOS, PERDIDAS DE USO, PRODUCTIVIDAD 0 TIEMPO. Toda la correspondencia relacionada con el producto o con este manual debe ser dirigida a: AMSTRAD ESPAÑA Avda Valdecarrizo, s/n Poligono Industrial Tres Cantos Colmenar Viejo MADRID ©Copyright 1990 Arnstrad plc Ni este manual ni ninguna de las partes que contiene, no los productos descritos en este manual, pueden ser adaptados ni reproducidos en ninguna forma material sin una aprobación escrita de AMSTRAD plc. Publicado por AMSTRAD PLC Traducido por AMSTRAD ESPANA, S.A. Componentes Consola de juegos GX4000 Cable de TV Manual de usuario Cartucho de juegos 2 panels de control Adatador de corriente - puede estar embalado por seperado Cuidando su GX4000 Apague siempre el interruptor de la consola antes de introducir o extraer un cartucho. Después de usar su GX4000 saque el cartucho y desenchufe el adpa tador de corriente de la red. No toque nunca los contactos eléctricos de un cartucho y preservelos del polvo y la suciedad. Trate con cuidado las paneles de control. Use solamente el adaptador de corriente suministrado o la alimentación de un monitor AMSTRAD MM12 o CM14. No tire de la consola con las paneles de control o cualquier otro dispositivo. Cuando desconecte algún enchufe de la consola, tire del propio enchufe, no del cable. No exponga ninguno de los componentes a temperaturas extremas. No derrame líquidos en ninguno de los componentes. Si necesita limpíarlo use solamente un paño suave humedecido solo con agua. 1 Caracteristicas Ranura para Cartuchos Interruptor de encendido Boton de pausa Conector Audio/Video UHF Indicador de encendido Estereo 5 Voltios c.c. 11 Voltios c.a. Joystick analogico Interruptor de sonido Dispositivo de control auxiliar Panel de control 1 Panel de control 2 Conexion del Monitor Connector para monitor Monitor Amstrad Conector de 5 voltios 2 Conexion de TV Cable de TV (suministrado) 11 voltios UHF Interruptor de sonido Adaptador de corriente Conector Audio/Video de 21 vias (conexión alternativa a televisión). En vez de usar el cable de TV suministrado, puede comprar y utilizar un cable de Audio/Video para conectar la consola a su televisión (algunas veces este conector se llama SCART/PERITEL o EUROCONECTOR). Esto puede mejorar la imagen en la pantalla. Amplificador/altavoces externos (sonido alternativo). La consola puede ser conectada a un amplificador estereo y un altavoz. El cable de entrada de su amplificador estereo deberia tener una clavija estereo de 3.5 mm, para ser insertada en el altavoz estereo del GX4000. 3 Conexion de las Paneles de Control AUX Analogico Panel de control 2 Botones de disparo Panel de control 1 Boton de direccion Otros dispositivos de control. Nota: Otros dispositivos de control distintos a las paneles de control suministradas solamente podrán funcionar con un juego escrito especificamente para estos dispositivos. Analógico - Se puede conectar un joystick analógico y usarlo en vez de o a la vez que las paneles de control suministradas. AUX - Puede conectarse una pistola óptica u otro dispositivo de control en vez de o a la vez que las paneles de control o el joystick analógico. 4 Operación Comienzo Suministro de Corriente Si usa un Amstrad CM14 o MM12 - enchufe y encienda el monitor. Si usa su televisor -enchufe el adaptadorde corriente alterna y encienda. Cargue el cartucho en la Consola No lo fuerce innecesariamente: compruebe que no está insertando el cartucho al revés. Encienda la Consola Use el interruptor de corriente incorporado. Esto enciende la consola y bloquea el cartucho en su posición. NO LO FUERCE NUNCA - APAGUE LA CONSOLA ANTES DE INSERTAR 0 EXTRAER UN CARTUCHO Ajuste de imagen Ajuste su monitor para conseguir una imagen clara en la pantalla: si está usando una televisión necesitará sintonizarla. Seleccione un canal reservado o sin usar, ajuste entonces el control de sintonización o si la televisor tiene un selector de programa rotatorio girelo hasta que la imagen de la pantalla esté estabilizada (la señal estará aproximadamente en el canal 36). Ajuste de sonido Ajuste el volumen como desee. Pausa Pulse el botón de pausa para detener el juego. Púlselo otra vez para continuar el juego. Parar Cuando quiera parar un juego apaguelo usando el interruptor incorporado y entonces extraiga el cartucho - NO INTENTE EXTRAER UN CAR77JCHOANTESDEAPAGAR 5 Resolución de Problemas PROBLEMAS CHEQUEOS Y AJUSTES NO HAY IMAGEN PERO LA PANTALLA ESTA ILUMINADA Verifique que el interruptor está encendido. Verifique que el adaptador de corriente está enchufado a la red eléctrica. Verifique que la consola está correctamente conectada a la toma de antena de su televisión, mediante el cable de TV suministrado. Verifique que el cartucho está introducido en la consola correctamente. Verifique que el televisor está ajustado en el canal correcto (canal 36). LA IMAGEN ESTA INESTABLE 0 TIENE BARRAS 0 LINEAS. IMAGEN POBRE Ajuste los controles vertical u horizontal de su televisor o monitor hasta que la imagen esté estabilizada. Verifique que todos los cables están conectados firmemente. Ajuste los controles de contraste y brillo de su televisor. Si su televisor tiene un control de brillo automático apaguelo y use el control manual (no puede hacer esto si su televisor pierde el color cuando el control de brillo automático esté desactivado). Mueva la consola lejos de¡ televisor – puede estar colocada demasiado cerca. NO HAY SONIDO DE JUEGOS Ajuste el interruptor de sonido de la consola. PROBLEMASAL RECIBIR PROGRAMASDE TELEVISION Verifique que el interruptor de encendido de su consola está apagado y que el cable de la televisión está desconectado. Ajuste el volumen y el control de ajuste del televisor. Verifique que la toma de antena está apropiadamente conectada. Si tiene usted todavia problemas con su GX4000, contacte con su distribuidor o nuestro Departamento de Soporte Técnico. 6 Información Tecnica Conectores Aux 123456 PIN 1 PIN 2 PIN 3 +5V COMUN LAPIZ OPTICO PIN 4 PIN 5 PIN 6 DISPARO 2 DISPARO 1 MASA PIN 1 PIN 2 PIN 3 PIN 4 PIN 5 ARRIBA ABAJO IZQUIERDA DERECHA DISPONIBLE PIN 6 PIN 7 PIN 8 PIN 9 DISPARO 2 DISPARO 1 COMUN COM 2 Paneles de Control 1 2 6 4 3 7 5 9 8 Nota: El Pin 9 no es COM 2 en el conector de la panel de control 2. Monitor 6 3 5 7 8 2 4 1 PIN 1 PIN 2 PIN 3 PIN 4 SINCRONISMO VERDE LUMINOSIDAD ROJO 7 PIN 5 PIN 6 PIN 7 PIN 8 AZUL SONIDO IZQ. SONIDO DER. MASA Conector audio/video de 21 pines 20 18 16 14 12 10 21 19 17 15 13 11 PIN 1 PIN 2 PIN 3 PIN 4 PIN 5 PIN 6 PIN 7 PIN 8 AUDIO DERECHO NO CONECTADO AUDIO IZQUIERDO MASA MASA NO CONECTADO AZUL (CONECTADO ALTO) PIN 9 MASA PIN 10 PIN 11 NO CONECTADO VERDE 8 9 6 7 4 5 PIN 12 PIN 13 PIN 14 PIN 15 PIN 16 PIN 17 PIN 18 PIN 19 2 3 1 NO CONECTADO MASA NO CONECTADO ROJO (CONECTADO ALTO) MASA MASA VIDEO COMPUESTO (SINCRONISMO COMPUESTO EN VERSION FRANCESA) NO CONECTADO PANTALLA PIN 20 PIN 21 DERECHO Estereo IZQUIERDO DERECHO MASA MASA IZQUIERDO PIN 1 PIN 2 PIN 3 Analogic 8 7 6 CANAL IZQUIERDO CANAL DERECHO MASA 5 4 3 2 1 15 14 13 12 11 10 9 ANALOG STICK 1 ANALOG STICK 2 PIN 1 PIN 2 PIN 3 PIN 4 PIN 5 PIN 6 PIN 7 PIN 8 PIN 9 PIN 10 PIN 11 PIN 12 PIN 13 PIN 14 PIN 15 MASA (COMUN) DISPARO 1 X1 COM 1 (INTERRUPT.) +5V Y1 DISPARO 2 MASA (COMUN) 8 MASA (PUNTO COMUN) DISPARO 1 X2 COM 2 (INTERRUPT.) Y2 DISPARO 2 MASA (COMUN) AMSTRAD Il prodotto descritto in questo manuale ed i prodotti da usare con esso sono soggetti ad un continuo processo di sviluppo e miglioramento. Questo manuale viene fornito gratuitamente ed intende solamente assistere il lettore nell'uso dei prodotto. Le informazioni contenute in questo manuale e nella documentazione relativa al prodotto vengono fornite in buona fede dalla AMSTRAD. AMSTRAD NON FORNISCE ALCUNA GARANZIA DI ALCUN TIPO, SIA ESPRESSA CHE IMPLICITA, INCLUSE E NON LIMITATAMENTE ALLE GARANZIE IMPLICITE DI COMMERCIABILITA' 0 DI ADEGUATEZZA A PARTICOLARI FINI. AMSTRAD NON ACCETTA ALCUNA RESPONSABILITA' PER QUALSIASI PERDITA 0 DANNO DERIVANTI DALL'USO DI INFORMAZIONI FORNITE OD OMESSE. Questo manuale può contenere imprecisioni tecniche o errori tipografici. Periodicamente possono essere apportate modifiche alle informazioni qui riportate, queste modifiche verranno incorporate nelle nuove edizioni della documentazione. AMSTRAD può apportare miglioramenti e/o modifiche ai prodotti e ai programmi descritti in questa pubblicazione in qualsiasi momento e senza alcun obbligo di notifica al cliente di tali modifiche. 1 prodotti ai quali si fa qui riferimento non sono stati progettati né è stato previsto l'uso diretto o in connessione per applicazioni pericolose per la vita o per qualsiasi attività nella quale un errore o un malfunzionamento potrebbe procurare danno fisico o ferite a persone e AMSTRAD non autorizza tali usi. Si raccomanda un'accurata lettura di queste istruzioni, degli Accordi di Licenza Software, dei Certificato di Garanzia ed ogni altra documentazione fornita con il prodotto. IMPORTANTE Le clausole e le condizioni contenute nel Certificato di Garanzia dei prodotto devono essere rigorosamente rispettate. ESCLUSIONI DI PERDITE CONSEGUENTI IN OGNI CASO, AMSTRAD NON ACCETTA ALCUNA RESPONSABILITA' PER EVENTUALI PERDITE 0 DANNI CONSEGUENTI 0 DERIVANTI DALL'USO DI QUESTO MANUALE 0 DEL PRODOTTO USATO CON ESSO 0 DA QUALSIASI INFORMAZIONE CONTENUTA OD OMESSA IN QUESTO MANUALE INCLUSE, MA NON LIMITATAMENTE A, PERDITE ECONOMICHE 0 FINANZIARE, DANNI A DISPOSITIVI PERIFERICI 0 A PRODOTTI, PERDITE D'USO, DI PRODUTTIVITA' 0 Di TEMPO. Nulla in questo documento intende escludere o limitare alcun diritto legale dei consumatore. Tutta la corrispondenza relativa al prodotto o a questo manuale va indirizzata a: AMSTRADSPA Via Riccione 14 20156 MILANO (c) Copyright 1990 AMSTRAD SPA Le informazioni qui contenute o il prodotto descritto in questo manuale non possono essere adattati o riprodotti in alcuna forma materiale senza approvazione scritta della AMSTRAD SPA. Pubblicato in lingua originale da AMSTRAD plc, BRENTWOOD UK Edito in lingua italiana da AMSTRAD SPA, MILANO ITALIA Prima edizione 1990 Elenco Componenti GX4000 Console Giochi Cavo TV Manuale d'Uso 2 Manopole per Giochi Carutccia Giochi Alimentatore/Trasformatore CA (puo essere confezionato a parte) Precauzioni e cura del GX4000 Prima di inserire o togliere una cartuccia spegnere sempre l'alimentazione con l'interruttore posto sulla console. Dopo l'uso togliere la cartuccia e scollegare il trasformatore CA dalla rete di alimentazione. Non toccare mai i contatti elettrici delle cartucce e tenerli lontano da polvere o sporcizia. Trattare con ragionevole cura le manopole per giochi. Usare esclusivamente l'alimenta tore/trasforma tore AC di dotazione o l'alimentazione di un monitor Amstrad MM12 o CM14. Non tirare o strattonare la console con le manopole giochi o altri dispostitivi di controllo. Quando si scollega qualsiasi spina dalla console, estrarre la spina soltanto senza tirare il cavo. Non esporre alcun componente a caldo o freddo eccessivi. Non versare liquidi su alcun componente. Nella pulizia esterna usare un batuffolo di cotone imbevuto di semplice acqua. 1 Ingressi, Uscite e Pulsanti Vano Cartuccia Interruttore Alimentazione/Ancoraggio Pulsante Pausa Peritel (SCART) UHF Spia Aliemntazione Presa Stereo Uscita analogica 5 Volt CC 11 Volt CC Commutatore per il Suono Uscita Dispositivi Ausiliari Manopola Giochi 1 Manapola Giochi 2 Collegamento monitor Presa Monitor Amstrad monitor Presa 5 Volt 2 Collegtamento TV Cavo TV (fornito) Usicata 11 Volt UHF Alimentatore/Trasformatore CA Presa SCART (o Peritel, connettore TV alternativo) Invece di usare il cavo TV di dotazione si può acquistare un cavo SCART e connetterlo alle prese SCART della console e del televisore. La presa SCART è indicata anche come Peritel o AudioNideo. Il collegamento SCART può produrre un miglioramento sensìbile delle immagini sullo schermo. Amplificatore/Altoparlanti esterni (Uscita alternativa Suono) La console può essere connessa ad un amplificatore stereofonico e a casse acustiche. Il cavo dell'amplificatore deve essere dotato di spinotto stereo da 3,5 mm e deve essere inserito nella presa stereo dei GX4000. 3 Collegamento delle Manopole Giochi Uscita AUX Uscita Analogica Manopola Giochi 2 Pulsanti fuoco Manopola Giochi 1 Pulsante di direzione Altri dispositivi di controllo Nota: i dispositivi di controllo diversi dalle Manopole Giochi di dotazione funzionano solo con giochi che prevedono specificatamente il loro uso. L'uscita analogica consente il collegamento di un eventuale joystick analogico da usare in alternativa o insieme alle manopole per giochi di dotazione. L'uscita AUX consente il collegamento di pistole luminose o altri dispositivi di controllo da usare in alternativa o insieme alle manopole per giochi di dotazione. 4 Installazione e Uso Alimentazione e Accensione Se si usa un Amstrad CM14 o MM12, inserire la spina del monitor nella presa e accenderlo. Se si usa un televisore, inserire la spina dell'alimentatore (trasformatore AC) e accendere. Caricamento della Cartuccia nella Console Non usare eccessiva forza e accertarsi di non inserire la cartuccia all'inverso. Accensione della Console Usando l'interruttore di alimentazione/ancoraggio si accende la console e si blocca la cartuccia nel suo alloggiamento. NON FORZARE M4I E SPEGNERE SEMPRE LA CONSOLE PRIM4 DI INSERIRE 0 ESTRARRE UNA CARTUCCIA. Regolazione dell'immagine Regolare il video del monitor per ottenere un buona immagine sullo schermo, se invece si usa un televisore sara necessario sintonizzarlo correttamente come segue: scegliere un canale non utilizzato e regolare la sintonia sul televisore fino ad ottenere un'immagine chiara e stabile sullo schermo (il segnale si trova approssima tivamente in corrispondenza del canale 36). Regolazione Sonora Regolare il volume sonoro a piacere. Se il gioco non produce suono, regolare il suono sulla console giochi. Pausa Per sospendere il gioco in corso, premere il pulsante di PAUSA. Per riprenderlo premere di nuovo tale pulsante. Arresto Per arrestare un gioco définítìvamente, spegnere la console usando l'interruttore, quindi rimuovere la cartuccia. NON TENTARE DI RIMUOVERE LA CARTUCCIA PRIMA DI AVER SPENTO LA CONSOLE 5 Soluzioni di Problemi PROBLEMA VERIFICHE E REGOLAZIONI NESSUNA IMMAGINE SUSCHERMO ACCESO Verificare che l'interruttore di alimentazJancoraggio sia su ON. Verificare che la spina dell'alimentatore sia inserita nella presa di corrente. Verificare che la Console sia correttamente collegata alla presa antenna del televisore per mezzo del cavo TV di dotazione. Verificare che la cartuccia sia correttamente inserita nella console. Verificare che il televisore sia sintonizzato correttamente sul canale giusto (Canale 36). IMMAGINE CHE SCORRE O CON BARRE O RIGHE DI DISTURBO IMMAGINE POCO DEFINITA Regolare la sincronia orizzontale e verticale sul televisore o sul monitor fino ad ottenere un'immagine netta e stabile. Verificare che tutti i cavi siano stabilmente connessi. Regolare la sintonia fine ed il contrasto sul televisore. Se il televisore dispone di dispositivo automatico di sintonia, disabilitarlo ed usare la sintonia manuale (ciò non è possibile se, disabilitando la sintonia fine automatica, si perde il colore). Spostare la console lontano dal televisore, potrebbe essere troppo vicina. GIOCO SENZA SONORO Regolare il commutatore SOUND (SUONO) sulla console PROBLEMI DI RICEZIONE DI PROGRAMMI TELEVISIVI Controllare che l'interruttore di alimentazione sulla console sia su OFF e che il cavo TV sia scollegato. Verificare che l'antenna sia correttamente collegata. Regolare il volume e la sintonia fine sul televisore Se si incontrassero ulteriori problemi, si contatti il proprio rivenditore o il nostro Servizio Supporto Clienti. 6 Informazioni Tecniche - Connettori Aux 123456 PIN 1 PIN 2 PIN 3 +5V COMUNE PENNA OPTICA PIN 4 PIN 5 SU GIU’ SINISTRA DESTRA SCORTA PIN 6 PIN 7 PIN 8 PIN 9 FUOCO 2 FUOCO 1 MASSA (GND) PIN 6 Manopole Giochi 1 2 6 4 3 7 5 PIN 1 PIN 2 PIN 3 PIN 4 PIN 5 9 8 FUOCO 2 FUOCO 1 COMUNE COM 2 Nota: sul connettore manopola giochi 2, il pin 9 non e COM 2. Monitor 6 3 5 7 8 2 4 1 PIN 1 PIN 2 PIN 3 PIN 4 SINC VERDE LUMINOSITA’ ROSSO 7 PIN 5 PIN 6 PIN 7 PIN 8 BLU SUONO SX SUONO DX MASSA (GND) Peritel (SCART) 20 18 16 14 12 10 21 19 17 15 13 11 PIN 1 PIN 2 PIN 3 PIN 4 PIN 5 PIN 6 PIN 7 PIN 8 AUDIO DERECHO NO CONECTADO AUDIO IZQUIERDO MASA MASA NO CONECTADO AZUL (CONECTADO ALTO) PIN 9 MASA PIN 10 PIN 11 NO CONECTADO VERDE 8 9 6 7 4 5 2 3 PIN 12 PIN 13 PIN 14 PIN 15 PIN 16 PIN 17 PIN 18 PIN 19 1 NO CONECTADO MASA NO CONECTADO ROJO (CONECTADO ALTO) MASA MASA VIDEO COMPUESTO (SINCRONISMO COMPUESTO EN VERSION FRANCESA) NO CONECTADO PANTALLA PIN 20 PIN 21 SINISTRA Stereo DESTRA SINISTRA MASSA (GND) MASSA (GND) DESTRA PIN 1 PIN 2 PIN 3 8 Analog 7 6 CANALE SINISTRO CANALE DESTRO MASSA (GND) 5 4 3 2 1 15 14 13 12 11 10 9 ANALOG STICK 1 ANALOG STICK 2 PIN 1 PIN 2 PIN 3 PIN 9 PIN 10 PIN 11 GND (POT. COMUNE) FUOCO 1 X2 PIN 12 COM 2 (COMMUTATORI) PIN 13 PIN 14 PIN 15 Y2 FUOCO 2 GND (POT. COMUNE) PIN 4 PIN 5 PIN 6 PIN 7 PIN 8 GND (POT. COMUNE) FUOCO 1 X1 COM1 (COMMUTATORI) +5V Y1 FUOCO 2 GND (POT. COMUNE) 8 AMSTRAD Les produits décrits dans ce manuel peuvent être techniquement améliorés par la suite. Ce manuel est fourni gratuitement et est destiné à faciliter l'utilisation du produit. AMSTRAD ne pourra être tenu pour responsable de toute perte ou dommage qui pourrait résulter de l'utilisation de ces informations, renseignements, des erreurs ou omissions de ce manuel, ainsi que de toutes utilisations impropres du produit. Veuillez lire attentivement ces instructions et toutes autres notes fournies avec le produit, y compris la carte de garantie. IMPORTANT Il est impératif de se conformer aux termes de la carte de garantie fournie avec l'appareil. LIMITATIONS EN AUCUN CAS AMSTRAD NE SM RESPONSABLE MM MU DOMMAGE QUI POURRAIT RÉSULTER DE L'UTILISATION DU MATERIEL, D'UNE DÉFECTUOSITÉ DU PRODUIT OU DE TOUTES INFORMATIONS FOURNIES, Y COMP S MUTE PERTE DE PROFIT, PERTE ECONOMIQUE OU AUTRES CONSEQUENCES DIRECTES OU INDIRECTES. Toute correspondance est à adresser à: AMSTRAD INTERNATIONAL Service consommateurs Tél:69.07.02.60 32, avenue de l'Océanie Bât A Z.A de Courtaboeuf 91940 LES ULIS © Copyright 1990 AMSTRAD plc Ni l'information, ni le produit décrits dans ce manuel, ne peuvent être modifiés ou reproduits totalement ou partiellement, sans l'accord préalable d'AMSTRAD International S.A. Publié par AMSTRAD Traduit pour la France par Isabelle PITARD L'emploi de la, marque ou du nom AMSTRAD sans autorisation préalable est strictement interdit. Contenu du Carton Manuel d'utilisation 2 Manettes de jeux Cartouche de jeux Cable Peritel Adaptateur secteur - (peut etre emballe separement) Entretien de votre GX4000 Coupez toujours l'alimentation de la console avant d’insérer ou d'enlever une cartouche. Après utilisation, enlevez la cartouche et débranchez l'adaptateur de la prise secteur. Ne jamais toucher aux éléments électriques de la cartouche et maintenez la à l'abri de la poussière et de la saleté. Manipulez la manette de jeux avec soin. Votre appareil doit être alimenté uniquement par un adaptateur secteur ou via un moniteur AMSTRAD MM12 ou CM14. Ne pas tirer sur la console avec les manettes ou cordons. Ne pas exposer les éléments à des températures extrêmes. Ne pas renverser de liquides sur les différents éléments du GX4000. Si vous souhaitez nettoyer votre appareil, utilisez un chiffon doux imprégné d'eau uniquement. 1 Caractéristiques Emplacement cartouche Interrupteur M/A Bouton Pause Peritel Voyant d'alimentation Sereo Joystick analogique 5 Volts DC 11 Volts DC Manette de Jeux 1 Manette de Jeux 2 Connexion Moniteur Prise Moniteur Moniteur Amstrad Prise 5 Volts 2 Connexion TV Cable TV (fourni) 11 Volts Adapteur secteur Amplificateur Externe La console peut être connectée à un amplificateur stéréo et à un haut parleur. Le câble d'entrée de votre amplificateur stéréo doit comporter à une extrémité une prise jack 3,5mm, qui doit être insérée dans la prise stéréo du GX4000. 3 Connexion de Manette de Jeux AUX Analogique Manette de Jeux 2 Boutons de tirs Manette de Jeux 1 Bouton de direction Autres Périphériques Remarque : Les périphériques de contrôle autres que les manettes de jeux fournies ne marcheront qu'avec des jeux prévoyant leur exploitation. Analogique: un joystick analogique peut être connecté et utilisé à la place et de la même façon que les manettes de jeux fournies. AUX - un pistolet ou un autre périphérique de contrôle auxiliaire peut être connecté et utilisé à la place et de la même façon que les manettes ou un joystick analogique. 4 Fonctionnement Lancement Branchez et allumez la machine. Si vous utilisez un Amstrad M14 ou un MW12 - branchez et allumez le moniteur. Si vous utilisez votre télévision - branchez l'adaptateur secteur et allumez l'appareil. Charger la cartouche dans la console. Si la cartouche s’insère mal, n’essayez pas de forcer, vérifiez que vous la positionnez dans le bon sens. Allumer la console. Utilisez l'interrupteur M/A qui met sous tension la console et vérouille la cartouche en position. NE FORCEZ JAMAIS - ETEIGNEZ LA CONSOLE AVANT DE CHARGER OU D’ENLEVER UNE CARTOUCHE Régler l'image. Ajustez votre moniteur pour obtenir une image plus nette à l'écran. Si vous utilisez un téléviseur, il vous faudra le régler de la façon suivante: Sélectionnez une chaîne non utilisée de votre télévision et réglez le bouton de réglage fin des chaînes. Si votre télévision possède un bouton rotatif de sélection de programmes, tournez le jusqu'à ce que l’image soit stable (le signal se situe approximativement sur le canal 36). Régler le son. Ajustez le volume si nécessaire Pause. Appuyez sur la touche Pause pour arrêter momentanément le jeu. Appuyez de nouveau sur cette touche pour continuer. Arrêt. Quand vois voulez arrêter un jeu, positionnez l'interrupteur M/A sur OFF, puis enlevez la cartouche. N’ESSAYEZ PAS D’ENLEVER LA CARTOUCHE AVANT D’AVOIR MIS L’APPAREIL HORS TENSION. 5 Résoudre les Problèmes PROBLEMES VERIFICATIONS ET REGLAGES PAS D’IMAGE MAIS L’ECRAN EST ALLUME. Vérifier si l’interrupteur M/A est positionne sur ON. Vérifier si l’adaptateur secteur est connecte au secteur. Vérifier que la console soit correctement connecte à la prise antenne de votre TV en utilisant le câble fourni. Vérifier que la cartouche soit correctement insérée dans la console. Vérifier que votre TV soit positionnée sur le bon canal (canal 36). L’IMAGE DEFILE OU PRESENTE DES BARRES VERTICALES OU HORIZONTALES IMAGE DE MAUVAISE QUALITE Ajusté le bouton de stabilité de votre ou de votre moniteur jusqu’a ce que l’image soit stable. Vérifier que tous les câbles soient correctement connectes. Régler le bouton de réglage fin des chaînes et de contraste de votre TV. Si votre téléviseur est équipe d’un système automatique de réglage fin des chaînes, déconnectez le et utilisez le système manuel (vous ne pourrez pas le faire si votre téléviseur devient noir et blanc quand le système automatique est déconnecte). Eloignez la console du televisieur – il se peut qu’elle soit placée trop près. PAS DE SON Ajusté le volume de télévision et le réglage fin des chaînes. PROBLEMES DE RECEPTION DES PROGRAMMES Vérifier que l’interrupteur de votre console soit sur la position ON et que le câble de la TV ne soit pas déconnecte. Vérifier que l’antenne soit correctement connectée. Si votre problème persiste, consultez votre revendeur ou le service consommateur d’Amstrad. 6 Informations Technique - Connecteurs Aux 123456 BROCHE 1 BROCHE 2 BROCHE 3 +5V COMMUNE LPEN BROCHE 1 BROCHE 2 BROCHE 3 BROCHE 4 BROCHE 5 HAUT BAS GAUCHE DROIT LIBRE BROCHE 4 BROCHE 5 BROCHE 6 TIR 2 TIR 1 MASSE Manettes de Jeux 1 2 6 4 3 9 8 7 5 BROCHE 6 BROCHE 7 BROCHE 8 BROCHE 9 TIR 2 TIR 1 COMMUNE COM 2 Remarque: la BROCHE 9 ne correspond pas au COM 2 du connecteur de la manette de jeu 2. Moniteur 6 3 5 7 8 2 4 1 BROCHE 1 BROCHE 2 BROCHE 3 BROCHE 4 7 SYNC VERT LUM ROUGE BROCHE 5 BROCHE 6 BROCHE 7 BROCHE 8 BLEU VOIE G. VOIE D. MASSE Peritel BROCHE 1 BROCHE 2 BROCHE 3 BROCHE 4 BROCHE 5 BROCHE 6 BROCHE 7 BROCHE 8 BROCHE 9 BROCHE 10 BROCHE 11 20 18 16 14 12 10 21 19 17 15 13 11 8 9 AUDIO DROIT NON CONNECTEE AUDIO GAUCHE MASSE MASSE NON CONNECTEE BLEU COMMUTATION MASSE NON CONNECTEE VERT 6 7 4 5 2 3 1 BROCHE 12 BROCHE 13 BROCHE 14 BROCHE 15 BROCHE 16 BROCHE 17 BROCHE 18 BROCHE 19 BROCHE 21 BROCHE NON CONNECTEE MASSE NON CONNECTEE ROUGE COMMUTATION MASSE MASSE VIDEO COMPOSITE (SYNCHRO COMP. EN VERSION FRANCAISE) NON CONNECTEE ECRAN DROIT Stéréo GAUCHE DROIT MASSE MASSE GAUCHE BROCHE 1 BROCHE 2 BROCHE 3 8 7 CANAL GAUCHE CANAL DROIT MASSE 6 5 4 3 2 1 Analogique 15 14 13 12 11 10 9 JOYSTICK ANALOGIQUE 1 JOYSTICK ANALOGIQUE 2 BROCHE 1 BROCHE 2 BROCHE 3 BROCHE 4 BROCHE 5 BROCHE 6 BROCHE 7 BROCHE 8 BROCHE 9 BROCHE 10 BROCHE 11 BROCHE 12 BROCHE 13 BROCHE 14 BROCHE 15 MASSE FIR 1 X1 COM 1 (COMMUTATEURS) +5V Y1 FIR 2 MASSE 8 MASSE FIR 1 X2 COM 2 (COMMUTATEURS) Y2 FIR 2 MASSE