1
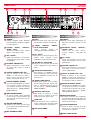
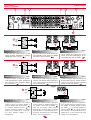
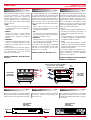
P SW
SERIES
P SW 2 6 0 0
AMPLIFICATORI DI POTENZA
PROFESSIONAL POWER AMPLIFIERS
AMPLIFICADORES DE POTENCIA
P SW 1 8 0 0
MANUALE D’USO • USER’S MANUAL • MANUAL DEL USUARIO
w w w. p r o e l g r o u p . c o m
M A D E I N I TA LY
INDICE
INDEX
INDICE
PSW SERIES
INDICE
Italiano
AVVERTENZE …………………………………… Pag. 3
English
INDICE
Español
SAFETY AND PRECAUTIONS ……… Page 3
ADVERTENCIAS DE SEGURIDAD … PÁG. 3
……………
»
4
GENERAL INFORMATION …………
»
4
INFORMACIONES GENERALES ……
»
4
……………………………………
»
6
PSW SERIES ……………………
»
6
SERIE PSW ………………………
»
6
»
6
- Front panel ……………………
»
6
- Panel delantero ………………
»
6
»
8
INFORMAZIONI GENERALI
PSW SERIES
INDEX
- Pannello frontale
……………………
- Pannello posteriore
…………………
- Modalità di funzionamento
……
»
8
- Rear panel ……………………
»
8
- Panel trasero …………………
»
9
- Operating modes ………………
»
9
- Modos de funcionamiento ……
»
9
……………
»
9
• Modalità “Stereo”
………………
»
9
• “Stereo” mode ………………
»
9
• Modo “Stereo”
• Modalità “Parallel”
………………
»
9
• “Parallel” mode ……………
»
9
• Modo “Parallel” ……………
»
9
• Modo “Bridge”
……………
»
9
10
9
• “Bridge” mode ………………
»
9
- Montaggio Rack …………………………
» 10
- Rack Mounting …………………
»
10
- Montaje en bastidor……………
»
- Circolazione dell’aria …………………
» 10
- Air Flow ………………………
»
10
- Flujo de aire ……………………
»
10
11
• Modalità “Bridge”
………………
»
……
» 11
- General technical data …………
»
11
- Especificaciones técnicas generales »
- Circuito OSC™ ……………………………
» 12
- OSC™ circuit ……………………
»
12
- Circuito OSC™ …………………
»
12
»
12
»
13
- Specifiche tecniche generali
- Schema a blocchi ………………………
» 12
- Block diagram …………………
»
12
- Diagramas en bloques …………
- Dimensioni …………………………………
» 13
- Dimensions ……………………
»
13
- Dimensiones ……………………
- Configurazioni consigliate …………
» 14
- Suggested configurations ……
»
14
- Configuraciones aconsejadas …
»
14
»
14
- Connettori …………………………………
» 14
- Connectors ……………………
»
14
- Conectores ……………………
- Cavi consigliati
» 14
- Suggested cables ………………
»
14
- Cables aconsejados ……………
»
14
»
15
»
15
…………………………
……………
» 15
- Troubleshooting ………………
»
15
- Problemas y soluciones ………
- Danni che richiedono assistenza
» 15
- Damages requiring assistance …
»
15
- Daños que requieren asistencia
- Inconvenienti e rimedi
is a registered trade mark
Tutte le specifiche possono essere variate senza alcuna notifica.
Design and specifications subject to change without notice.
Todas las especificaciones están sujetas a cambio sin previo aviso.
- Oct. 2004 2
AVVERTENZE
SAFETY AND PRECAUTIONS
ADVERTENCIAS DE SEGURIDAD
AVVERTENZE
PSW SERIES
Italiano
SAFETY AND PRECAUTIONS
English
ADVERTENCIAS DE SEGURIDAD
Español
ATTENZIONE
CAUTION
ATENCION
Per evitare rischi di folgorazione non aprire
l’apparecchio. Per prevenire rischi di incendio o di scosse elettriche non esporre l’amplificatore a pioggia o umidità.
To reduce the risk of electric shock do not
open this apparatus.
To prevent fire or shock hazard do not expose the amplifier to rain or moisture.
Para evitar riesgos de elecrocución no abran
el aparato. Para prevenir riesgos de incendios o de descargas eléctricas no expongan
la etapa de potencia a lluvia o humedad.
• ATTENZIONE
Durante l’utilizzo o la manutenzione del prodotto, è necessario adottare alcune precauzioni, onde evitare danneggiamenti alle
strutture meccaniche ed elettroniche.
• CAUTION
When using any electric product, basic precautions should always be taken, including
the following:
• ATENCION
Durante las fases de uso o mantenimiento,
se tienen que tomar unas precauciones para
evitar daños a las estructuras mecánicas y
electrónicas del producto.
Prima di utilizzare il prodotto, leggere le
seguenti istruzioni e conservare il manuale
d’uso per successive consultazioni.
- In presenza di bambini, controllare che il
prodotto non rappresenti un pericolo.
- Posizionare l’apparecchio al riparo da
agenti atmosferici e a distanza di sicurezza dall’acqua e da luoghi ad alto grado di
umidità e accumulo di polvere.
- Conservare il prodotto lontano da fonti di
calore (radiatori, fari, etc.).
- Evitare che qualsiasi sostanza liquida
penetri all’interno del prodotto.
Read the instructions, before using the product and retain them for future reference.
- To reduce the risk close supervision is
necessary when the product is used near
children.
- Protect the apparatus from the atmospheric agents and do not use it near water or
places with high humidity.
- This product should be situated away from
heat sources as radiators or other devices
which produce heat.
- Care should be taken so that objects do
not fall into and liquids are not spilled
inside the product.
Collegare il prodotto ad una presa di alimentazione adeguata facendo uso del cavo in
dotazione, controllando sempre che sia in
buono stato:
Connect the apparatus to a power supply
only with the power cord included:
- Non tirare mai il cavo d’alimentazione.
- Make sure that the power supply has a
ground connection in working order.
- Assicurarsi che l’impianto di alimentazione
sia dotato di una efficiente presa di
terra.
- Non toccare la spina con le mani bagnate
per evitare scosse elettriche.
- In caso di mancato utilizzo del prodotto
per lungo tempo, scollegare il cavo dalla
presa.
- Never pull the power cord.
- Do not touch the power plug with wet
hands. Doing so is a fire and electrical
shock hazard.
- The power supply cord should be unplugged from the outlet when left unused for a
long period of time.
Lean las siguientes instrucciones antes de
utilizar el aparato. Guardar este manual para
consultas sucesivas.
- En presencia de niños, averigüen que el
producto no represente un peligro.
- Protejan el aparato contra los agentes
atmosféricos, el agua y los lugares con alto
grado de humedad.
- Coloquen el aparato lejos de fuentes de
calor (radiadores, focos, etc.).
- Eviten que cualquier sustancia líquida
penetre al interior del aparato.
Conecten el aparato a una línea de alimentación adecuada utilizando el cable de línea
incluido, averiguando siempre que esté en
buen estado:
- Nunca tirar el cable.
- Asegúrense que el punto de alimentación esté
dotado de una eficiente toma de tierra.
- No tocar el enchufe con las manos mojadas para evitar riesgos de descargas eléctricas.
- Desconecten el cable de línea en caso quedase inutilizado durante mucho tiempo.
In case of fault or maintenance this product
should be serviced only by qualified service
personnel when:
En caso de avería o mantenimiento, este aparato tiene que ser inspeccionado por personal
calificado cuando:
- There is a flaw either in the connections or
in the connecting cables.
- Se averigüen defectos en las conexiones o
en los cables de conexión.
- Difetti sulle connessioni o sui cavi di collegamento.
- Liquids have spilled inside the product.
- Penetrazione di sostanze liquide all’interno
del prodotto.
- The product has been dropped or the
enclosure is damaged.
- Sustancias líquidas penetren al interior del
aparato.
In caso di guasto o manutenzione contattare il personale qualificato, in particolare in
presenza di:
- El aparato se caiga y se dañe.
- Caduta o danneggiamento del prodotto.
Non intervenire sul prodotto.
Rivolgersi a un centro di assistenza autorizzato Proel.
Any other servicing should be done by a
qualified technician or by PROEL Service
Department.
3
No intervengan en el producto.
Dirígense a un Centro Asistencia Autorizado
Proel.
INFORMAZIONI GENERALI
GENERAL INFORMATIONS
INFORMACIONES GENERALES
PSW SERIES
INFORMAZIONI GENERALI
Italiano
• DESCRIZIONE
Proel è orgogliosa di presentare la nuova
linea PSW di amplificatori di potenza professionali, frutto di un’intensa e meticolosa
ricerca stilistica e funzionale confluita in
una serie di prodotti di alta qualità ed affidabilità, fondamentali sia per le installazioni fisse che per le applicazioni “on the road”.
Le prestazioni dei nuovi finali di potenza
PSW sono tali da soddisfare una vastissima
gamma di applicazioni: dall’home recording
professionale al tour più impegnativo.
La serie PSW è costituita dal PSW2600,
PSW1800 (con dimensioni di 2 unità rack
standard. Gli amplificatori offrono due canali indipendenti realizzati con dispositivi
bipolari in configurazione classe H; la sezione di alimentazione switching ad alta energia garantisce un ottimo fattore di smorzamento e una riproduzione delle basse frequenze senza eguali.
L’esclusivo circuito OSC™ (Output Sense
Clipping) garantisce sull’uscita dell’amplificatore un segnale non distorto in qualsiasi
condizione del segnale di ingresso.
Nella fase di progetto degli ammpificatori
vengono applicate le norme
EN 60065:1998/EN55013:1990.
• IMBALLO
L’imballo è stato sottoposto a test di integrità secondo la procedura Max/caduta
norma ISTA 1A (47.5 cm.)
Si raccomanda di controllare l’amplificatore
subito dopo l’apertura dell’imballo. In caso
di danni, informare immediatamente il
rivenditore. Conservare quindi l’imballo completo per permetterne l’ispezione.
Proel declina ogni responsabilità per danni
causati dal trasporto.
• SPEDIZIONI E RECLAMI
Le merci sono vendute “franco nostra sede”
e viaggiano sempre a rischio e pericolo del
distributore.
Per eventuali avarie e danni rivolgersi al vettore.
Ogni reclamo per imballi manomessi dovrà
essere inoltrato entro 8 giorni dal ricevimento della merce.
• GARANZIE E RESI
Gli amplificatori PSW2600/PSW1800 sono
tutti provvisti della garanzia di funzionamento e di conformità alle proprie specifiche, come dichiarate dal costruttore.
La garanzia è di 24 mesi dalla data di acquisto.
I difetti rilevati entro il periodo di garanzia,
attribuibili a materiali difettosi o difetti di
costruzione, devono essere tempestivamente
GENERAL INFORMATION
English
• DESCRIPTION
Proel proudly introduces the new PSW professional power amplifiers, the result of a
deep and meticulous stylistic and functional
research merged into a series of high quality
and reliable products, essential devices both
in fixed installations and “on the road”
applications. The powerful performances of
the PSW amplifiers satisfy an exceptionally
wide range of amplification needs: from studio reference monitoring to live touring.
The PSW series consists of the PSW2600, and
The PSW1800 (made in 2 standard rack
units). The power amplifiers feature two
independent channels designed with bipolar devices in class H configuration; the
oversize switching power supply section
grants a superior bass performance and a
high damping factor.
The exclusive OSC™ circuit (Output Sense
Clipping) provides an undistorted output
signal in any input signal.
EN 60065:1998/EN55013:1990 regulations
are applied during the manufacturing of the
PSW amplifiers.
• PACKING
The packing of this product has undergone
an integrity test according to the ISTA 1A
(47.5 cm.) procedure.
It is recommended to inspect the amplifier
after the unpacking.
If any damage is found, notify your dealer
immediately.
Save the complete packing for inspection.
Proel declines every responsibility for damage caused by transport.
• SHIPMENTS AND CLAIMS
The goods are sold “ex works” and always
travel at the risk and danger of the distributor.
Eventual damage will have to be contested
to the freight forwarder.
Every claim for broken packs will have to be
forwarded within 8 days from the reception
of the goods.
• GUARANTEES AND RETURNS
The amplifiers PSW2600/1800 are all provided with a guarantee of operation and
conformity to their own data sheets, as
declared by the manufacturer.
The operation guarantee is for 24 months
after the purchase date.
Defects attributable to defective materials or
construction defects found within the period
of the guarantee on the sold products, must
be reported in a timely manner to the dealer
or distributor, enclosing written evidence of
4
INFORMACIONES GENERALES
Español
• DESCRIPCION
Proel está orgullosa de introducir su nueva
línea PSW de amplificadores de potencia
profesionales, resultado de una intensa y
meticulosa investigación estilística y funcional confluida en una serie de productos
de alta calidad y fiabilidad, fundamentales
tanto para las instalaciones fijas tanto para
las aplicaciones “on the road”. Las prestaciones de los nuevos amplificadores de
potencia PSW son tales como para satisfacer
una gama muy amplia de aplicaciones: del
home recording profesional a la gira más
gravosa.
La serie PSW está constituida por el
PSW2600, y el PSW1800 (con dimensiones
de 2 unidades de bastidor estándar). Los
amplificadores de potencia están caracterizados por dos canales independientes realizados con dispositivos bipolares en configuración clase H; la sección de alimentación
switching de alta energía garantiza un excelente factor de amortiguación y una reproducción sin iguales de las bajas frecuencias.
El exclusivo circuito OSC™ (Output Sense
Clipping) garantiza en la salida del amplificador de potencia una señal sin distorsión
en cualquier condición de la señal de entrada.
En la fase deconstrucción de los amplificadores
de potencia, se aplican las normas EN
60065:1998/EN55013:1990,
• EMBALAJE
El embalaje está sometido a pruebas de
integridad según el procedimiento
Max/caída según norma ISTA 1A (47.5 cm.)
Se recomienda controlar la etapa de potencia inmediatamente después de la abertura
del embalaje. Si se verifican daños, informar
inmediatamente el revendedor. Guardar
entonces el embalaje completo para permitir su inspección.
Proel declina de cualquier responsabilidad
por daños causados por el transporte.
• EXPEDICIONES Y RECLAMOS
La mercancía se vende “franco fábrica” y
viaja siempre por cuenta y riesgo del distribuidor. Eventuales averías y daños tendrán
que ser reclamados al transportador. Cada
reclamo por embalajes dañados tendrá que
ser enviado dentro de 8 días del recibo de la
mercancía.
• GARANTIAS Y RENDIDOS
Las etapas de potencia PSW2600/1800,
poseen la garantía de funcionamiento y de
conformidad a sus propias especificaciones,
como declaradas por el constructor.
La garantía de funcionamiento es de 24
INFORMAZIONI GENERALI
GENERAL INFORMATIONS
INFORMACIONES GENERALES
segnalati al proprio rivenditore o distributore, allegando documentazione relativa alla
data di acquisto e la descrizione del tipo di
difetto riscontrato. Sono esclusi dalla garanzia difetti causati da uso improprio o manomissione.
Proel SpA constata tramite verifica sui resi la
difettosità dichiarata, correlata all’appropriato utilizzo, e l’effettiva validità della
garanzia; provvede quindi alla sostituzione o
riparazione dei prodotti, declinando tuttavia
ogni obbligo di risarcimento per danni diretti o indiretti eventualmente derivanti dalla
difettosità.
• INSTALLAZIONE
L’installazione del prodotto è prevista su
rack 19” (ventilato) (Fig.2) per prodotti ad
uso professionale. Questa unità prevede fori
di ventilazione sul retro. Non bloccare la
ventilazione onde evitare alte temperature
all’interno del rack, che potrebbero provocare guasti pericolosi e incendio.
• LIMITAZIONI D’USO
L’amplificatore è destinato esclusivamente
ad un utilizzo specifico di tipo sonoro:
- collegamento di diffusori passivi e trasformatori di linea a tensione costante;
- segnali di ingresso di tipo audio
(20Hz-20kHz).
• SPIEGAZIONE DEI SIMBOLI
Il simbolo
(Fig.1) indica una connessione elettricamente pericolosa. Per eseguire la
connessione, rivolgersi al personale competente. E’ necessario utilizzare connessioni
originali (vedi sezione “Connettori”) e cavi
rispondenti alle norme vigenti.
PSW SERIES
the purchase date and written description of
the type of defect found. The guarantee
excludes defects caused by improper use or
tampering.
Proel SpA will verify the validity of the guarantee claim through examination of the
defect. Proel SpA will eventually provide for
the replacement or repair of the products
declining, however every obligation of compensation for direct or indirect damage
resolving from the defective state.
• INSTALLATION
The product is adapted for installation in a
properly ventilated, standard professional
19” rack (Fig. 2). This unit features ventilation holes on the rear panel. Do not obstruct
the ventilation holes. Blocked ventilation
can cause damages and fire.
• LIMITATIONS OF USE
The amplifier is destined exclusively to specific audio applications:
- connection of passive loudspeakers and
constant voltage line transformers;
- audio input signals (20Hz-20kHz).
• EXPLANATION OF THE SYMBOLS
This symbol (Fig. 1) indicates a dangerous
electrically live terminal. The connection
must be carried out by qualified personnel
using only original connections (see
“Connectors” section) and cables made in
conformity with regulations in force.
meses después de la fecha de compra.
Los defectos averiguados dentro del período
de garantía sobre los productos vendidos,
atribuibles a materiales defectuosos o defectos de construcción tendrán que ser tempestivamente indicados a su propio revendedor
o distribuidor adjuntando evidencia escrita
de la fecha de compra y descripción del tipo
de defecto averiguado. Se excluyen de la
garantía defectos causados por uso impropio
o manipulación.
Proel SpA comprueba la anomalía declarada
sobre los rendidos, asociada a la utilización
apropiada, y a la efectiva validez de la
garantía; entonces se encarga de la sustitución o reparación de los productos, declinando no obstante de cualquier compromiso
de indemnización contra daños directos o
indirectos en caso de eventual anomalía.
• INSTALACIÓN
La instalación del producto está prevista
sobre bastidor de 19” (ventilado)
(Ilustración 2) para productos de uso profesional. Esta unidad preve orificios de ventilación en la parte trasera. No bloquear la
ventilación para evitar que la temperatura al
interior del bastidor se eleve excesivamente:
se puede incurrir en riesgos de averías peligrosas e incendio.
• LIMITACIONES DE UTILIZACIÓN
La etapa de potencia está destinada exclusivamente para una utilización específica de
tipo sonoro:
- conexión de difusores pasivos y transformadores de línea de voltaje constante;
- señales de salida de tipo audio (20Hz-20kHz).
• EXPLICACIÓN DE LOS SÍMBOLOS
Este símbolo (Ilustración 1) indica un terminal eléctrico activo y peligroso. La conexión
tiene que ser realizada por técnicos especializados utilizando conexiones originales (ver
sección “Conectores”) y cables que responden a las normas vigentes.
Fig.1
Proel declina ogni responsabilità per danni
a terzi causati da mancata manutenzione,
manomissioni, uso improprio o installazione non eseguita secondo le norme di
sicurezza. Gli stessi motivi rappresentano
causa di decadenza dei termini di garanzia.
Proel declines every responsibility for
damages to third parties caused by lack of
maintenance, tampering, improper use or
installation without following the safety
regulations. These motives will also cause
the guarantee expire.
5
Proel declina de todas responsabilidades por
daños a terceros causados por falta de mantenimiento, alteraciones, uso impropio o
instalación no realizada según las normas de
seguridad con referencia al decaimiento de
los términos de garantía.
PANNELLO FRONTALE
FRONT PANEL
PANEL DELANTERO
PSW series
4
3
2
5
6
PANNELLO FRONTALE
7
8
Italiano
1 INTERRUTTORE POWER/ON E
INDICATORE
Premere l’interruttore POWER ON per
accendere o spegnere l’amplificatore.
Il LED blu indica l’avvenuta accensio
ne (punto 3).
9
8
FRONT PANEL
English
1 POWER/ON SWITCH AND INDICATOR
This switch turns the power of the
amplifier ON/OFF. When you press the
switch to turn on the power, the indi
cator will light blue (point 3).
7
6
5
PANEL DELANTERO
2
1
Español
1 INTERRUPTOR POWER/ON E INDICADOR
Este interruptor activa (posición I/POWER
ON) y desactiva el amplificador de potencia. Cuando presionen el interruptor para
activar el amplificador, el indicador (punto
3) se iluminará en azul.
2 VOLUME CONTROL
2 MANOPOLE DEL VOLUME
Queste sono manopole dotate di dentellatura che attenuano i segnali d’ingresso dei
canali A e B contro un range di ∞ / 0dB.
Nel modo BRIDGE viene utilizzata solo la
manopola del canale A.
These are knobs featuring notches
attenuating channels A and B input
signals over a range of ∞ / 0dB. In the
BRIDGE mode, only the channel A control is used.
2 MANDOS DEL VOLUMEN
Se trata de mandos dotados de dentellado
que atenúan las señales de entrada de los
canales A y B en una gama de ∞ / 0dB. En
el modo BRIDGE se utiliza sólo el mando
del canal A.
3 LED INDICATOR
3 INDICATORE LED
Interruttore luminoso di accensione e
spegnimento dell’amplificatore. Se l’interruttore in posizione On non si illumina,
controllare il fusibile all’interno dell’apparecchio. N.B. Quando si sostituisce il fusibile (usarne uno dello stesso tipo), staccare la spina del cavo dalla presa di corrente.
Power amplifier On/Off luminous LED.
If the LED is not lighted while the
switch is in the ON position, please
check the integrity of the mains fuse
inside the apparatus.
N.B. When a mains fuse is replaced
(use one featuring the same characteristics), remove the power plug from
the AC outlet.
4 INDICATORE DI MODALITÀ “BRIDGE”
Il LED acceso indica che tramite l’interruttore posto sul retro, l’amplificatore è in
modalità “BRIDGE”. Segnale ingresso solo
sul canale A.
4 “BRIDGE” MODE INDICATOR
5 INDICATORE LED CLIP
Indicatore LED di colore rosso indica che
il sistema OSC™ (Output Sense Clipping) sè
in funzione o che il segnale in uscita è in
distorsione (nel caso in cui il dispositivo
OSC™ sia stato disinserito tramite l’interruttore posto sul retro).
5 LED CLIP INDICATOR
6 INDICATORE DI SEGNALE A LED
6 BI-COLOUR LED SIGNAL INDICATORS
BICOLORE
Il LED di colore verde indica la presenza di
segnale d’ingresso. Il LED giallo indica il
segnale (-6dB) in ingresso (lavoro normale).
When the LED is on, the power amplifier is in the “BRIDGE” mode using the
rear panel switch. Input signal only on
channel A.
This LED lights up red when the OSC™
(Output Sense Clipping) is operating
or when the output signal is distorting
(in case the OSC™ device has been
previously disconnected using the
switch placed on the rear panel)
The green colour LED indicates the
presence of an input signal. The yellow
colour LED indicates the input signal
of -6dB. The power amplifier is operating normally.
6
3 INDICADOR LED
Interruptor luminoso de activación y
desactivación del amplificador de potencia. Si el interruptor en posición ON no se
ilumina, comprobar la integridad del fusible de alimentación al interior del aparato.
N.B. Cuando se sustituya el fusible (utilizar
uno que tenga las mismas características)
de alimentación, desconectar el enchufe
del cable de línea de la toma de corriente
de CA.
4 INDICADOR DE MODO “BRIDGE”
El LED encendido indica que por medio del
interruptor puesto en la parte trasera, el
amplificador de potencia está funcionando
en el modo “BRIDGE”. Señal de entrada
sólo en el canal A.
5 INDICADOR LED CLIP
Indicador LED de color rojo que indica que
el sistema OSC™ (Output Sense Clipping)
está operando o que la señal en salida está
en distorsión (en caso el dispositivo OSC™
se haya desconectado por medio del interruptor colocado en la parte trasera).
6 INDICADOR DE SEÑAL DE LED BICOLOR
El LED de color verde indica la presencia de
señal en entrada. El LED de color amarillo
indica la señal (-6dB) en entrada (funcionamiento normal).
PANNELLO FRONTALE
FRONTPANEL
PANEL DELANTERO
PANNELLO FRONTALE
PSW series
Italiano
FRONT PANEL
English
7 INDICATORE LED DC-PROT
L’ indicatore rosso segnala che il circuito
di protezione è in funzione. Durante
questo tempo, l’amplificatore sarà discon
nesso dal sistema di altoparlanti, e nessun
suono verrà emesso dagli altoparlanti. Il
sistema di protezione si attiva nelle
seguenti situazioni:
7 LED DC-PROT INDICATOR
This indicator lights up red when the protection circuit is operating. During this
time, the amplifier will be disconnected
from the speakers system and the speakers
will produce no sound. The protection
system activates in the following situations:
• All’accensione per circa 2 secondi
• Allo spegnimento per 2 secondi
• In caso di tensione a corrente continua a
livello delle uscite dell’amplificatore.
• When the amplifier is turned on for approx.
2 seconds
• When the amplifier is turned off, for approx.
2 seconds
• If a DC voltage is detected at the amplifier’s
outputs.
8 INDICATORE LED TEMP
L’indicatore TEMP si accende in caso di
surriscaldamento dell’amplificatore. Fare
riferimento alla sezione Rimedi del presente manuale di istruzioni. Se il LED è
rosso, indica che la temperatura supera i
90° Celsius, e l’amplificatore sarà in
STAND-BY fino ad arrivare a temperatura
normale.
9 PRESE D’ARIA
Questo amplificatore è dotato di ventole di
raffreddamento forzato, grazie alle quali
l’aria viene prelevata dalla parte anteriore
ed espulsa da quella posteriore. Assicurarsi
che queste prese d’aria non siano ostruite.
8 LED TEMP INDICATOR
If the amplifier is overheated, the TEMP
indicator will light up. Please refer to the
Troubleshooting section of this owner’s
manual for indications on how to prevent
amplifier from overheating. The indicator
will light up red if the temperature exceeds
90° Celsius and the power amplifier will be
in STAND-BY until it reaches a normal temperature.
9 AIR INTAKES
This amplifier features forced-air cooling
fans taking in air from the front and expelling it from the rear. Make sure that these
intakes are not obstructed.
7
PANEL DELANTERO
Español
7 Indicador LED DC-PROT
Este indicador se enciende en rojo cuando
el circuito de protección esté funcionando.
Durante este período de tiempo, el amplificador de potencia estará desconectado
del sistema de altavoces, y no se producirá
ningún sonido desde los altavoces. El
sistema de protección se activa en las
siguientes situaciones:
• Al conectar la alimentación del aparato
durante aproximadamente unos 2 segundos.
• Al desconectar la alimentación del aparato
durante unos 2 segundos.
• Si se detecta una tensión de corriente continua (DC) a nivel de las salidas del amplificador
de potencia.
8 Indicador LED TEMP
Si el amplificador de potencia se sobrecalienta, el indicador TEMP estará encendido.
Consultar la sección soluciones de este
manual del usuario para indicaciones sobre
como prevenir el sobrecalentamiento del
amplificador de potencia. El indicador se
encenderá en rojo si la temperatura sobrepasa los 90° Celsius y el amplificador de
potencia se quedará en STAND-BY hasta
llegar a una temperatura normal.
9 Entradas de aire
Este amplificador de potencia está dotado
de ventiladores de refrigeración forzada
que captura el aire en la parte delantera y
lo expulsa desde la parte trasera. Hay que
asegurarse que dichas entradas de aire no
estén atascadas.
PANNELLO POSTERIORE
REAR PANEL
PANEL TRASERO
PSW SERIES
13
10
14
15
16
15
14
10
PUSH
17
12
13
PUSH
11
PANNELLO POSTERIORE
18
11
Italiano
10 INGRESSI
Ingressi (segnale audio) bilanciati
con XLR maschio collegato in parallelo a XLR femmina .
11 PULSANTI “STEREO”, “PARALLEL”,
“BRIDGE”, “GAIN”.
Selettore per le modalità “Stereo”, “Parallel”,
“Bridge” e “Gain”+4dB 40x (32dB)
12 OSC™ ON/OFF
Selettore per disinserire il circuito OSC™
(Output Sense Clipping). Canale A, Canale
B indipendenti.
13 PULSANTE “GROUND LIFT”
Selettore per sollevare il contatto di terra
dal circuito audio. Canale A, Canale B
indipendenti.
14 USCITE DI POTENZA CHA E CHB
Uscite di potenza su due connettori
SPK4MP e su due morsetti a serrare. I
sistemi acustici utilizzati non devono
superare un’impedenza inferiore a 4Ω.
15 USCITE DI POTENZA “BRIDGE”
Uscite di potenza BRIDGE su un connettore e sui morsetti a serrare. Il sistema acustico utilizzato non deve avere un’impedenza inferiore a 8Ω. BRIDGE-CANALE/BBRIDGE-CANALE/A+
16 VENTILAZIONE FORZATA
Gli stadi di potenza vengono raffreddati
con una ventola a velocità variabile. Non
ostruire la presa d’aria frontale e i fori d’uscita posteriori.
17 CAVO D’ALIMENTAZIONE
Collegare il cavo ad una presa che soddisfi le condizioni dell’alimentazione indicate sull’apparecchio.
REAR PANEL
English
10 INPUTS
Balanced inputs (audio signal) with male
XLR connected in parallel to female XLR.
11 “STEREO”, “PARALLEL”, “BRIDGE”,
“GAIN” PUSH BUTTONS.
“Stereo”, “Parallel”, “Bridge” and
“Gain”+4dB 40x (32dB) mode selectors
12 OSC™ ON/OFF
Push button for disconnecting the OSC™
(Output
Sense
Clipping)
system.
Independent for both Channel A and B.
13 “GROUND LIFT” PUSH BUTTON
Selector to lift the ground from the audio
circuit. Independent for both Channel A
and B.
14 CHA AND CHB POWER OUTPUTS
Power output is on 2 SPK4MP connectors
and on 2 binding posts. The nominal impedance of loudspeaker enclosure must not
be less than 4Ω.
15 “BRIDGE” POWER OUTPUTS
BRIDGE power outputs on one connector
and on binding posts. The nominal impedance of loudspeaker enclosure must be
not less than 8Ω. BRIDGE-CHANNEL/BBRIDGE-CHANNEL/A+
16 FORCED-AIR VENTILATION
Power stages are cooled by a variable
speed fan. Do not obstruct the front air
intakes and the rear output screen.
17 POWER CORD
Connect the power cord to a ground connection complying with the power supply
conditions indicated on the apparatus.
18 DATA: SERIES NUMBER
PANEL TRASERO
Español
10 ENTRADAS
Entradas (señal audio) balanceadas con
XLR macho conectado en paralelo con XLR
hembra.
11 PULSADORES “STEREO”, “PARALLEL”,
“BRIDGE”, “GAIN”.
Selector para los modos “Stereo”,
“Parallel”, “Bridge” y “Gain”+4dB 40x
(32dB)
12 OSC™ ON/OFF
Selector para desactivar el circuito OSC™
(Output Sense Clipping). Canal A, Canal B
independientes.
13 PULSADOR “GROUND LIFT”
Selector para desconectar el contacto de
tierra desde el circuito audio. Canal A,
Canal B independientes.
14 SALIDAS DE POTENCIA CHA Y CHB
Salidas de potencia en dos conectores
SPK4MP y en dos bornes para apretar. La
impedancia nominal de los sistemas acústicos utilizados no debe ser inferior a 4Ω.
15 SALIDAS DE POTENCIA “BRIDGE”
Salidas de potencia BRIDGE en un conector
y en los bornes para apretar. La impedancia nominal de los sistemas acústicos utilizados no debe ser inferior a 8Ω. BRIDGECANAL/B- BRIDGE-CANAL/A+
16 VENTILACIÓN FORZADA
Las etapas de potencia están refrigeradas
por un ventilador de velocidad variable. No
obstruyan la entrada de aire delantera y los
orificios de salida traseros.
17 CABLE DE ALIMENTACIÓN
Conectar el cable a una toma de CA que
cumpla con las condiciones de alimentación impresas en el aparato.
18 DATI: NUMERO DI SERIE
18 DATOS: NÚMERO DE SERIE
8
12
MODALITÀ DI FUNZIONAMENTO
OPERATING MODES
MODO DE FUNCIONAMIENTO
PSW SERIES
10B
14
15
15
14
10
PUSH
11
AMPLIFIER
Input
10
MIN-LOAD
4Ω
Output
CHA
STEREO
Input
10B
14
Output
CHB
15
PUSH
PUSH
STEREO MODE
MODALITÀ “STEREO”
“STEREO” MODE
Italiano
• I due canali CHA e CHB lavorano con due
segnali d’ingresso indipendenti. Il pulsante
STEREO deve essere rilasciato.
MODO “STEREO”
English
• The two channels CHA and CHB operate with
two independent input signals. The STEREO
push button must be released.
• Los dos canales CHA y CHB operan con dos
señales de entradas independientes. El pulsador STEREO tiene que ser soltado.
AMPLIFIER
Input
10
Español
MIN-LOAD
4Ω
Output
CHA
PARALLEL
14
Output
CHB
15
PUSH
PUSH
PARALLEL MODE
MODALITÀ “PARALLEL”
“PARALLEL” MODE
Italiano
• Il segnale in ingresso su CHA pilota entrambi i
canali dell’amplificatore, regolati separatamente
dai 2 controlli di volume. Il pulsante “Parallel”
deve essere premuto.
English
• The signal fed in CHA drives the 2 amplifier
channels with different levels regulated by
the 2 volume controls. The “Parallel” switch
must be pushed down.
AMPLIFIER
Input
10
CHA
MODO “PARALLEL”
Español
• La señal en entrada en CHA dirige ambos canales
del amplificador de potencia, regulados separadamente por los 2 controles de volumen. El pulsador
“Parallel” tiene que estar apretado.
MIN-LOAD
8Ω
Output
BRIDGE
15
CHB
+
Output
PUSH
BRIDGE MODE
MODALITÀ “BRIDGE”
Italiano
• L’amplificatore è monofonico, con l’ingresso
su CHA e l’uscita sui morsetti “Bridge”. Il
pulsante “Bridge” deve essere premuto
e il pulsante “Parallel” rilasciato
. Il
carico di potenza è collegato ai morsetti
OUTPUT A (+) e OUTPUT B (+). Il polo positivo della modalità “Bridge” è il +
dell’OUTPUT A.
“BRIDGE” MODE
English
• The amplifier operates in mono. Input signal
on CHA, output on “Bridge” binding posts.
The “Bridge” switch must be pushed
down and the “Parallel” switch must be
released
. The power load is connected
to the OUTPUT A (+) and OUTPUT B (+) binding posts. The positive pole of the “Bridge”
mode is the + of the OUTPUT A.
9
MODO “BRIDGE”
Español
• El amplificador de potencia es monofónico,
con la entrada en CHA y la salida en los bornes “Bridge”. El pulsador “Bridge” se tiene
que apretar
y el pulsador “Parallel” se
tiene que soltar
. La carga de potencia
está conectada a los bornes OUTPUT A (+) y
OUTPUT B (+). El polo positivo del modo
“Bridge” es el + del OUTPUT A.
MONTAGGIO RACK - CIRCOLAZIONE DELL’ARIA
RACK MOUNTING – AIR FLOW
MONTAJE EN BASTIDOR – FLUJO DE AIRE
PSW SERIES
MONTAGGIO RACK
Italiano
Se più amplificatori vengono montati in un rack
con scarsa ventilazione, il calore prodotto
riscalderà molto il loro interno, causando una
riduzione delle prestazioni. In particolare, in
caso di montaggio in rack, la cui parte posteriore non può essere lasciata aperta, seguite
seguenti istruzioni:
• RACK
Lasciate uno spazio di circa 10 cm o più tra
il pannello posteriore del rack e quello dell’amplificatore.
• VENTOLA
Utilizzate una ventola con una aerazione
minima di 1,5m3/min o superiore ed una
pressione statica massima di 5mmH2O o
superiore.
• MONTAGGIO
Installate il kit della ventola nello slot superiore (1) o sul pannello superiore del rack e
installate un pannello fittizio (2) tra due
amplificatori.
Se l’unità è montata in un rack ed è trasportata frequentemente, si raccomanda di supportare il retro dell’unità con un paio di staffe
metalliche, per ciascun lato.
RACK MOUNTING
English
If multiple high-power amp units are mounted
in a poorly ventilated rack, the heat from the
amplifiers will cause the interior of the amp to
become very hot, causing the performance of
the amps to be impaired. If mounting in a rack
whose rear part cannot be left open, please
mount according to the following instructions:
• RACK
Leave a gap of approx. 10 cm or more
between the rear panel of the rack and the
rear panel of the amplifier.
• FAN
Use a fan featuring a minimum ventilation
of 1,5m3/min or more and a maximum static
pressure of 5mmH2O or more.
• MOUNTING
Install the fan kit on the top slot (1) or the
top panel of the rack and install a blanking
panel (2) between two amplifiers.
If the unit is rack mounted and transported
frequently, it is recommended to support the
rear part of the unit with a pair of metal
brackets, one on each side.
EXAMPLE OF AMPLIFIER MOUNTING (FIG. 2)
ESEMPIO DI MONTAGGIO DELL’AMPLIFICATORE (FIG.2)
MONTAJE EN BASTIDOR
Español
Si se montan más amplificadores de potencia en
un bastidor con escasa ventilación, el calor producido por los amplificadores de potencia causará
el calentamiento excesivo del interior de los
amplificadores, causando una disminución notable de su rendimiento. Particularmente, cuando
efectúen el montaje en un bastidor cuya parte
trasera no se puede dejar abierta, háganlo respetando las siguientes instrucciones:
• Bastidor
Dejar un espacio de aproximadamente 10 cm o
más entre el panel trasero del bastidor y el
panel trasero del amplificador de potencia.
• Ventilador
Utilizar un ventilador con una aeración minima
de 1,5m3/min o superior y una presión estática máxima de 5mmH2O o superior.
• Montaje
Instalar el juego de ventiladores en la ranura
superior (1) o en el panel superior del bastidor
e instalar un panel separador (2) entre los dos
amplificadores de potencia.
Si la unidad es apilable y se transporta con frecuencia, recomendamos que la parte trasera de la
unidad se soporte con un par de abrazaderas
metálicas, una en cada lado.
EJEMPLO DE MONTAJE DEL AMPLIFICADOR DE
POTENCIA (ILUSTRACIÓN 2)
Fig.2
Sensore in aria Termico 50°(ON) (OPTIONAL)
Thermal sensor 50° (ON) (OPTIONAL)
Sensor térmico 50°(ON) (OPCIONAL)
RK322VM
RK322VM3
PSW
VISTA FRONTALE
FRONT VIEW
PANEL DELANTERO
RK1L
min.
10 cm
1
VISTA LATERALE
REAR VIEW
PANEL TRASERO
2
PSW
CIRCOLAZIONE DELL’ARIA
Italiano
Questa unità presenta un sistema di raffreddamento forzato nel quale l’aria entra attraverso le
aperture frontali ed esce dalla parte posteriore.
AIR FLOW
English
This unit uses a forced cooling system in which
air comes in through the front opening and
goes out the rear.
VISTA LATERALE
SIDE VIEW
VISTA LATERAL
FLUJO DE AIRE
Español
Esta unidad está caracterizada por un sistema
de refrigeración forzada en el que el aire entra
a través de las aberturas delanteras y sale de la
parte trasera.
VISTA POSTERIORE
REAR VIEW
VISTA TRASERA
PUSH
Uscite d'aria
Prese d'aria
10
SPECIFICHE TECNICHE GENERALI
TECHNICAL DATA
ESPECIFICACIONES TECNICAS
POWER OUTPUT LEVEL (RATED POWER)
Output power (THD<1% 20Hz-20kHz)
Stereo 8+8ohm
Stereo 4+4ohm
Bridge mono 8ohm
Output power (THD<0,1% 20Hz-20kHz)
Stereo 8+8ohm
Stereo 4+4ohm
Bridge mono 8ohm
Distortion (THD+N)
Stereo 4+4ohm
Total harmonic distortion (THD+N) half power
20Hz-20kHz
Frequency response (-1dB)
Input sensitivity
Input impedance
Damping factor
S/N ratio (20Hz-20kHz)
Band pass (half power)
Input connectors
Output connectors
Indicators (LED)
SIGNAL
PEAK
DC PROT
TEMP
BRIDGE
POWER ON
Protections
Power supply
Max power consumption
Dimensions (WxHxD)
Weight
Shipping
Accessories
PSW SERIES
PSW2600
PSW1800
700W rms
1300W rms
2000W rms
500W rms
900W rms
1200W rms
650W rms
1200W rms
1800W rms
400W rms
800W rms
1200W rms
Less than 0,01% THD
Less than 0,01% THD
Less than 0,1%
20Hz- 20kHz
+4dB/40x (32dB)
20kOhm balanced / 10kOhm unbalanced
≥ 500 @ 8Ohm
≤ 104 dB
10Hz - 30kHz (THD+N=1%)
XLR-M and XLR-F
SPK4MP (1+/1-) and Binding posts
Green/Orange
Red
Red
Red
Red
Blue
DC - Thermal - Soft Start - Short Circuit Over Load - OSC Output Sense Clipping
(switchable)
230V AC - 50Hz / 117V AC - 60Hz
16A - 230V / 4Ω
483 x 88,3 x 475mm
12kg /
14Kg / 0,072cbm
Power cord – Owner’s manual
Less than 0,1%
20Hz- 20kHz
+4dB/40x (32dB)
20kOhm balanced / 10kOhm unbalanced
≥ 500 @ 8Ohm
≤ 104 dB
10Hz - 30kHz (THD+N=1%)
XLR-M and XLR-F
SPK4MP (1+/1-) and Binding posts
Green/Orange
Red
Red
Red
Red
Blue
DC - Thermal - Soft Start - Short Circuit Over Load - OSC Output Sense Clipping
(switchable)
230V AC - 50Hz / 117V AC - 60Hz
13,5A 230V / 4Ω
483 x 88,3 x 475mm
11kg
13Kg / 0,072cbm
Power cord – Owner’s manual
All specification subject to change without notice.
11
OSC™ - CONNETTORI
OSC™ - CONNECTORS
OSC™ - CONECTORES
PSW SERIES
OSC™
OSC™
Italiano
• CIRCUITO DI CONTROLLO
DELLA SATURAZIONE
Il circuito OSC™ permette all’amplificatore
di funzionare al limite della saturazione,
senza mai arrivare alla squadratura.
Il circuito controlla, in tempo reale, che la
forma d’onda del segnale sia sempre sinusoidale, sia in presenza di un eccessivo segnale in ingresso, sia in presenza di una tensione di alimentazione variabile rispetto al
valore nominale di 230V AC o 120V AC fino
al 25% in meno. È possibile escludere il circuito OSC™. In tal caso assicurarsi che un
segnale di uscita eccessivamente distorto
non danneggi gli altoparlanti.
English
• OUTPUT SENSE CLIPPING
The OSC™ circuit allows the amplifier to
work within the clipping limit, avoiding the
creation of distortion square waves.
The circuit controls that the signal is always
sinusoidal in real time, either when the
input signal is too high or when the mains
power is variable compared to the 230V AC
or 120V AC nominal values down to a 25%
drop.
It is possible to exclude the OSC™ circuit.
If the OSC™ circuit is excluded, be advised
that the loudspeakers may be damaged by an
excessively distorted output signal.
OSC™
Español
• CIRCUITO DE CONTROL DE RECORTE
El circuito OSC™ permite a la etapa de
potencia de funcionar al límite de recorte sin
llegar nunca a la distorsión.
El circuito controla en tiempo real que la
forma de onda de la señal sea siempre sinusoidal, tanto en presencia de una excesiva
señal en entrada, tanto en presencia de un
voltaje de alimentación variable en relación
con el valor nominal de 230V AC o 120V AC
hasta el 25% menos.
El circuito OSC™ se puede excluir. En este
caso tener cuidado para que una señal de
salida excesivamente distorsionada no dañe
los altavoces.
+4dB
Input
Output
CH
40x (32dB)
OFF
OSC™
+4dB
Input
40x (32dB)
ON
SCHEMA A BLOCCHI
Italiano
Output
CH
OSC™
BLOCK DIAGRAM
English
INPUT
BALANCED/UNBALANCED
AMP
DIAGRAMA DE BLOQUES
Español
POWER AMP
IN
CHA
OUT
CHA
SENSE
LIMITER
THERMAL
PROTECTION
SENSE
LIMITER
OUT
CHB
IN
CHB
INPUT
BALANCED/UNBALANCED
AMP
POWER AMP
SUPPLY
MAINS AC ~
12
DIMENSIONI
DIMENSIONS
DIMENSIONES
PSW SERIES
DIMENSIONI
Italiano
DIMENSIONS
English
DIMENSIONES
Vista dall'alto
Top view
Vista desde arriba
Vista frontale
Front view
Vista delantera
PUSH
PUSH
Vista posteriore
Rear view
Vista trasera
Vista laterale
Side view
Vista lateral
13
Español
CONFIGURAZIONI CONSIGLIATE - CONNETTORI
SUGGESTED CONFIGURATIONS - CONNECTORS
CONFIGURACIONES ACONSEJADAS - CONECTORES
PSW SERIES
CONFIGURAZIONI
CONSIGLIATE
SUGGESTED
CONFIGURATIONS
Italiano
SPEAKER
CONFIGURACIONES
ACONSEJADAS
English
PSW1800
SMARTPLUS series
Español
PSW2600
4 x SMT18SP8
(+2 X SMT15P8 FILTERED OUT)
NEXT series
4 x NEXT15HP8
TPRMARKII series
2 x TPRK118SP8
4 x TPRK153P8
4 x TPRK118SP8
TFLV/TFL series
4 x TFL115SP8
2 x TFL118SP8
2 x TFL215SP4
4 x TFL15P8
2 x TFL152P8
2 x TFL212P8
4 x TFL118SP8
4 x TFL215SP8
2 x TFL218SP4
4 x TFL152P8
4 x TFL212P8
EDGE series
2 x EDGE12CXP
2 x EDGE112SP
2 x EDGE12CXP BI-AMP (HI SECTION + DS026)
2 x EDGE15CXP BI-AMP (HI SECTION + DS026)
2 x EDGE212P (HI SECTION + DS026)
4 x EDGE12CXP
4 x EDGE112SP
2 x EDGE15CXP
2 x EDGE15CXP BI-AMP (LOW SECTION + DS026)
2 x EDGE121SP (LOW SECTION + DS026)
1 x EDGE218SP (LOW SECTION + DS026)
2 x EDGE212P (MID SECTION + DS026)
2-4 x EDGE12CXP BI_AMP (HI SECTION + DS026)
2-4 x EDGE15CXP BI_AMP (HI SECTION + DS026)
2-4 x EDGE212P (HI SECTION + DS026)
2 x AX3210P(HI SECTION + DS026)
2 x AX1121SP (LOW SECTION + DS026)
2 x AX3210P (MID SECTION + DS026)
2-4 x AX3210P (HI SECTION + DS026)
2 x EDGE12CXP BI-AMP (LOW SECTION + DS026)
AXIOM series
CONNETTORI
CONNECTORS
Italiano
English
CONECTORES
Español
XLR balanced (Input Signal Connector)
2-positive / 3-negative / 1-ground
1
XLR unbalanced
2-positive / 3-negative connected to 1-ground
3
2
POWER CONNECTOR
1+ / 1- connected
2+ / 2- not connected
CAVI CONSIGLIATI
Italiano
SUGGESTED CABLES
HPC250
English
1
4
2
5
2
3
6
3
1)Tinned copper 22 AWG = 7 x 0,20mm (0,22mm2)
2)PE ø 1.36mm
3)Tinned copper 24 AWG = 7 x 0,20mm (0,22mm2)
1
4)Conductors: Spiral cotton filter
5)Cable: Tinned copper braid 6x16x0,10 mm > 95%
6)FLEXIBLE PVC 60 shore ø 6.50 mm
CONECTORES
HPC624
1)Bare copper 12 AWG = 80x0,25mm (4.00 mm2)
2)PVC ø 4.00mm
3)FLEXIBLE PVC 60shore ø 11.00 mm
14
Español
INCONVENIENTI E RIMEDI
TROUBLESHOOTING
PROBLEMAS Y SOLUCIONES
INCONVENIENTI E RIMEDI
PSW series
Italiano
Indicatore
L’indicatore CLIP si accende
L’indicatore TEMP si accende
L’indicatore DC PROT si accende
English
PROBLEMAS Y SOLUCIONES
Rimedio
Español
Circuito di protezione
C’è un contatto a livello delle uscite
degli altoparlanti dell’amplificatore,
degli ingressi speaker o nel cablaggio.
Localizzate e rimuovete il contatto
L’impedenza degli altoparlanti collegati è troppo bassa.
Usate uno speaker con impedenza
minima di 4Ω (8Ωnel modo Bridge).
La temperatura delle fessure di raffreddamento ha superato i 90°C
Controllate la ventilazione intorno
all’amplificatore e se necessario,
migliorate la circolazione dell’aria.
Il circuito di protezione termica si
attiva per proteggere i transistor di
potenza.
Un voltaggio c.c. di ±2V o superiore è
stato rilevato nel circuito di output
dell’amplificatore.
Rivolgetevi al vostro rivenditore o a un
centro di assistenza Proel.
Il relay di output si attiva per proteggere il sistema di altoparlanti.
Possible cause
Solution
Protection circuit
Indicator
CLIP indicator lights up
TROUBLESHOOTING
Causa possibile
Il circuito di limitazione OSC™ si attiva per proteggere i transistor di
potenza.
There is a short circuit at the amplifier
loudspeakers outputs, the speaker’s
inputs or in the cabling.
Locate and remove the short circuit.
The impedance of the loudspeakers
connected is too low.
Use a speaker with a minimum impedance of 4Ω (8Ω in the Bridge mode).
The temperature of the cooling slots
has exceeded 90°C
Check the ventilation around the
amplifier and, if necessary, improve
the air flow.
The thermal protection circuit activates to protect the power transistors.
A DC voltage of ±2V or higher has
been detected in the amplifier’s output circuit.
Consult your dealer or Proel service
department.
The output relay activates to protect
the loudspeakers system.
Causa posible
Hay un cortocircuito a nivel de las salidas de los altavoces del amplificador de
potencia, de las entradas de los altavoces o en el cableado del amplificador.
Solución
Circuito de protección.
Localizar y eliminar el cortocircuito.
Indicador TEMP encendido
La impedancia de los altavoces
conectados es demasiado baja.
Utilizar un altavoz con una impedancia
mínima de 4Ω (8Ω en el modo Bridge).
Indicador DC PROT encendido
La temperatura de las ranuras de
refrigeración ha sobrepasado los 90°C
Comprobar la ventilación alrededor del
amplificador de potencia y, si es necesario, mejorar el flujo de aire.
El circuito de protección térmica se
activa para proteger los transistores
de potencia.
Un voltaje c.c. de ±2V o superior se
ha detactado en el circuito de salida
del amplificador de potencia.
Consulte a Su proveedor o a un centro
de asistencia Proel.
El relé de salida se activa para proteger el sistema de altavoces.
Circuito di protezione
TEMP indicator lights up
DC PROT indicator lights up
Indicador
Indicador CLIP encendido
DANNI CHE RICHIEDONO ASSISTENZA
Italiano
DANNI CHE RICHIEDONO ASSISTENZA
Contattare il personale qualificato nei seguenti casi:
• danneggiamento del cavo di alimentazione o della
spina;
• penetrazione di oggetti estranei o rovesciamento
del liquido nell’apparecchio;
• esposizione alla pioggia;
• malfunzionamento dell’apparecchio.
• evidente cambiamento nelle prestazioni;
• caduta o danneggiamento dell’apparecchio.
DAMAGES REQUIRING ASSISTANCE
English
DAMAGES REQUIRING ASSISTANCE
The apparatus must be fixed by qualified personnel
in the following cases:
• the power cord or the plug are damaged;
• foreign objects have fallen into the apparatus or
liquids have been spilled inside it;
• The apparatus have been exposed to rain;
• The apparatus seems not to operate correct or
shows an apparent change in its performance;
• the apparatus has been dropped, or its cabinet
has been damaged.
15
OSC™ limiter circuit activates to protect the power transistors..
El circuito limitador OSC™ se activa
para proteger los transistores de
potencia.
DAÑOS QUE REQUIEREN ASISTENCIA
Español
DAÑOS QUE REQUIEREN ASISTENCIA
El aparato tiene que ser arreglado por técnicos
especializados en los casos siguientes:
• el cable de alimentación o el enchufe están dañados;
• objetos extraños han penetrado al interior o se
han derramado líquidos en el aparato;
• el aparado se ha expuesto a la lluvia;
• el aparato parece no funcionar normalmente o
presenta un evidente cambio en las prestaciones;
• el aparato se ha caído, o su cuerpo resulta dañado.
DICHIARAZIONE DI CONFORMITÀ
Il produttore:
PROEL S.P.A. - Via alla Ruenia, 37/43 - 64027 Sant’Omero (Te) - Italy
Dichiara sotto la propria responsabilità che il prodotto:
AMPLIFICATORE DI POTENZA
Modello:
PSW1800 - PSW2600
è conforme alla Direttiva 89/336/CEE (Compatibilità Elettromagnetica)
e successive modifiche 92/31/CEE e 93/68/CEE, secondo i seguenti standard:
EN 55103-1:, EN 55103-2, EN 55022, EN61000-4-5-6, EN61000-3-3
inoltre, è conforme alla Direttiva 73/23/CEE (Bassa Tensione)
e successive modifiche 93/68/CEE, secondo i seguenti standard:
EN 60065:1998
DECLARATION OF CONFORMITY
The manufacturer:
PROEL S.P.A. - Via alla Ruenia, 37/43 - 64027 Sant’Omero (Te) - Italy
Declares under its own responsability that the product:
POWER AMPLIFIER
Model:
PSW1800 - PSW2600
is in compliance with Directive 89/336/EEC (Electromagnetic Compatibility)
and successive modifications 92/31/EEC and 93/68/EEC, as the following standards:
EN 55103-1:, EN 55103-2, EN 55022, EN61000-4-5-6, EN61000-3-3
it is also in compliance with Directive 73/23/EEC (Low Voltage)
and successive modifications 93/68/EEC, as the following standards:
EN 60065:1998
DECLARACION DE CONFORMIDAD
El productor:
PROEL S.P.A. - Via alla Ruenia, 37/43 - 64027 Sant’Omero (Te) - Italy
Declara bajo su propia responsabilidad que el producto:
ETAPA DE POTENCIA
Modelo:
PSW1800 - PSW2600
está conforme a la directiva 89/336/CEE (Compatibilidad Electromagnética)
y sucesivas modificaciones 92/31/CEE y 93/68/CEE, según los siguientes estándares:
EN 55103-1:, EN 55103-2, EN 55022, EN61000-4-5-6, EN61000-3-3
además, está conforme a la directiva 73/23/CEE (Bajo Voltaje)
y sucesivas modificaciones 93/68/CEE, según los siguientes estándares:
EN 60065:1998
PROEL S.p.A
FOTOCOPIATE QUESTA PAGINA. COMPILATE E RISPEDITE IN BUSTA CHIUSA IL COUPON SOTTO RIPORTATO A:
PROEL S.P.A. - Via alla Ruenia, 37/43 - 64027 Sant’Omero (Te) - Italy - Servizio Assistenza Clienti
OPPURE VIA FAX AL NUMERO: +39 0861 88 78 62
O VIA E-MAIL: [email protected]
PER INFORMAZIONI TECNICHE: dal lunedì al venerdì dalle ore 14.15 alle ore 17.15, al numero: 0861 88 78 62 Fax - 0861 81241 Tel.
Cognome ________________________________________________________ Nome _________________________-_____________________________________
Ditta/Ente____________________________________________________________________________________________________________________________
Indirizzo _____________________________________________________________________________________________________________________________
CAP______________ Città _______________________________________________________________________ Prov. __________________________________
Tel. ____________________________ Fax. ____________________________ E-mail ______________________________________________________________
Prodotto acquistato ____________________________________________________________________________________________________________________
Nome rivenditore __________________________________________________________________________ Data acquisto _______________________________
Si, inseritemi nel vostro database per:
Poter ricevere depliants dei nuovi prodotti
Ricevere l’invito per le demo e la presentazione in anteprima dei nuovi prodotti
Per consenso espresso al trattamento dei dati personali a fini statistici e promozionali della vostra società, presa visione dei diritti di cui all’articolo 13 legge 675/1996.
Data ________________________________ Firma __________________________________________________________________________
PHOTOCOPY THIS PAGE, COMPILE AND SEND IN A SEALED ENVELOPE TO:
PROEL S.P.A. - Via alla Ruenia, 37/43 - 64027 Sant’Omero (Te) - Italy
OTHERWISE FAX TO: +39 0861 88 78 62
OR BY E-MAIL: [email protected]
FOR TECHNICAL INFORMATION: MONDAY TO FRIDAY FROM 2:15 P.M. TO 5:15 P.M. TEL. NR: 0861 88 78 62 FAX - 0861 81241 TEL.
Name ________________________________________________________ Surname _________________________-_____________________________________
Company/Board_______________________________________________________________________________________________________________________
Address _____________________________________________________________________________________________________________________________
ZIP Code/ Post Code______________ Town ______________________________________________________________________ County/State ______________
Phone _________________________ Fax. ____________________________ E-mail ______________________________________________________________
Product _____________________________________________________________________________________________________________________________
Dealer __________________________________________________________________________ Date of purchase _____________________________________
Yes, put my details in your database to:
Receive new product information
Receive invitations for demos and preview presentations of new products
Your personal details are protected by Italian privacy laws article 13 legge 675/1996.
Date ________________________________ Signed __________________________________________________________________________
FOTOCOPIAR ESTA PAGINA, COMPILAR Y RESPEDIR EN SOBRE CERRADO EL COUPÓN ABAJO REPORTADO:
PROEL S.P.A. - Via alla Ruenia, 37/43 - 64027 Sant’Omero (Te) - Italy
O EL FAX AL NÙMERO: +39 0861 88 78 62
O TRAMITE E-MAIL: [email protected]
PARA INFORMACIONES TÉCNICAS: DESDE EL LUNES HASTA EL VIERNES DE 14.15 A 17.15, LLAMAR AL NÚMERO: 0861 88 78 62 FAX 0861 81241 TEL.
Apellido ________________________________________________________ Nombre ______________________________________________________________
Compañia/Institución __________________________________________________________________________________________________________________
Dirección ____________________________________________________________________________________________________________________________
Código postal _______________ Ciudad ___________________________________________________________________________________________________
Tel. ____________________________ Fax. ____________________________ E-mail ______________________________________________________________
Producto _____________________________________________________________________________________________________________________________
Nombre revendedor __________________________________________________________________________ Fecha de compra ___________________________
Si, pueden enserirme en el vuestro data base para:
Poder recibir depliants de nuevos producto
Recibir la invitación para las demostraciones y la precentación en anteprima de los nuevos productos
Vuestros datos personales serán protegidos por la ley italiana art. 13 ley 675/1996.
Fecha ________________________________ Firma __________________________________________________________________________
PROEL S.p.A.
(World Headquarters - Factory)
Via alla Ruenia, 37/43 - 64027 Sant’Omero (Te) - ITALY
Tel: +39 0861 81241 - Fax: +39 0861 887862
E-mail: [email protected]
PROEL International Ltd.
Units 7&8, Windsor Centre
Windsor Grove, West Norwood
London SE27 9LT - UK
Tel.: +44 20 8761 9911
Fax: +44 20 8761 9922
E-mail: [email protected]
www.proelint.co.uk
PROEL USA Inc.
1101 Kessler Suite B
El Paso TX 79907 - USA
Phone: +1 915 591 5848
Fax +1 915 591 5849
E-mail: [email protected]
www.proelusa.com
PROEL FRANCE s.a.r.l
Z.A. La Stée
57560 St. Quirin - FRANCE
Tel.: +33 3 87 0866 84
Fax: +33 3 87 0861 93
E-mail: [email protected]
PROEL GERMANY & AUSTRIA GmbH
Lest 91
4212 Neumarkt - Austria
Tel. +43 7941 69160
Fax +43 7941 69164
E-mail: [email protected]
www.proel.at
PROELUSA PRODUTOS
MUSICAIS LDA
Quinta Casal Raposa-Armazém D
Alto da Venda Nova
2305 - 302 Casais Tomar PORTUGAL
Tel.: +351 249 301722 - +351 249 301728
Fax: +351 249 301754
E-mail: [email protected]
w
w
w
.
p
r
o
e
PROEL KOREA CO. LTD.
176-5 Youngcheon-Ri
Okcheon-Myeon Yangpyeong-Gun
Gyunggi-Do – KOREA
Tel.: +82 2 3442 7098
Fax: +82 31 774 8854
E-mail: [email protected]
www.proelkorea.com
l
g
r
o
u
p
.
c
o
m