1
USA
Operating Instructions
Manuel d’utilisation
Electronic Rice Cooker/Warmer
Cuiseur/Réchaud de riz électronique
Household Use
Utilisation domestique
ࣂΈܔ
Model No.
N° de modèle
ীᇆ
Contents
PRÉCAUTIONS À PRENDRE ... 4
Avant utilisation ............... 8
ૹऱڜ٤ൻਜ ................. 5
ࠌشছ ............................... 10
üʳڜ٤ࣹრࠃႈ ...................................... 10
üʳࠌࣹشრࠃႈ ...................................... 12
፣ྦছ ............................... 13
Before cooking .............. 13
Avant cuisson ................ 13
ü Parts Names and Functions ............... 13
ü Noms des pièces et fonctions ............ 13
Preparations .................. 15
Préparatifs ..................... 15
ᄷໂࠃႈ ........................... 15
the Water Level .................................. 16
niveau de l’eau ................................... 16
üʳຑ൷ࢨࣈೈޢଡຝ։ ........................... 15
üʳࠌࠥۯֽش৫ ...................................... 15
üʳ堚ੑࠀۏᓳᆏֽۯ............................... 16
Cooking Modes ............. 17
Modes de cuisson ......... 17
፣ྦᑓ ڤ........................... 17
ü Attaching or removing each part ........ 15
ü Using the water level scale................. 15
ü Washing Rice and Adjusting
ü Montage ou démontage de chaque pièce ... 15
ü Utilisation de l’échelle associée au niveau de l’eau ...15
ü Lavage du riz et ajustement du
ü Riz blanc et Riz gluant........................ 17
ü Cuisson rapide / Gruau / Riz brun /
Slow Cook / Steam / Cake ................. 18
ü Sushi Rice .......................................... 22
ü Imperial Rice ...................................... 22
ü Beef and Vegetable Soup .................. 23
ü Steamed Pork and Shrimp Dumplings 23
ü Brown Rice ......................................... 24
ü Steaming Vegetables ......................... 24
ü Chocolate Cake .................................. 25
ü Shellfish Soup .................................... 25
Cleaning ........................ 26
ü Parts that need to be cleaned
ଇᢜ ................................... 22
ü ኂۏ................................................. 22
ü 壄ۏ................................................. 22
ü ׄۚᓋလྏ ......................................... 23
ü ֽདྷᓼۚធᓚ堽 .................................. 23
ü ᜋ ۏ.................................................... 24
ü 堚፣ᓋလ ............................................. 24
ü ײڹԺᗶ ......................................... 25
ü ߦྏ................................................. 25
堚ੑ ................................... 26
ü شࠌڻޢ৵ຟᏁ堚ੑऱሿٙ ................ 26
Guide de dépannage ..... 27
ᛶإംᠲൻਜ ................... 27
ü Guide de dépannage / Quand l’afficheur
vous indique ce qui suit ...................... 27
Spécifications ................ 28
Note ............................... 29
ü ᛶإംᠲൻਜʳ˂ʳૉڕՀࢬ ق................. 27
................................... 28
ໂݱᙕ ............................... 29
൞ڶጊംழ
Specifications ................ 28
Memo............................. 29
üʳ֗ۏػᤅ ۏ......................................... 17
üʳݶຒ፣ྦʳ˂ʳ࿕堩ʳ˂ʳᜋۏʳ˂ʳྦʳ˂ʳ፣ʳ˂ʳᗶ... 18
üʳঅᄵ .................................................... 20
üʳࡳྦ堩ࡳழᕴ .................................. 21
nettoyées après utilisation .................. 26
Quand vous
avez des
problèmes
display shows as follows .................... 27
ü Riz pour sushi..................................... 22
ü Riz impérial......................................... 22
ü Soupe au boeuf et aux légumes........... 23
ü Raviolis au porc et aux crevettes à la vapeur ...23
ü Riz brun .............................................. 24
ü Légumes vapeur ................................. 24
ü Gâteau au chocolat ............................ 25
ü Soupe aux fruits de mer ...................... 25
ü Pièces devant être lavées et
When you
have problems
ü Troubleshooting / When the
pour la cuisson du riz ......................... 21
Recettes ........................ 22
Lavage et nettoyage ...... 26
after every use.................................... 26
Troubleshooting ............. 27
ü Maintien au chaud .............................. 20
ü Utilisation et réglage de la minuterie
üʳሿٙټጠ֗פ౨ .................................. 13
ڕ۶ࠌش
Recipes ......................... 22
Cuisson lente / Vapeur /Gâteau ......... 18
How to use
ü Keep Warm ........................................ 20
ü Setting the Timer to Cook Rice .......... 21
Comment utiliser le cuiseur de riz
ü White Rice and Sticky Rice ................ 17
ü Quick Cook / Porridge / Brown Rice /
ࠌشছ
ü Précautions de sécurité ........................ 8
ü Précautions d’utilisation...................... 12
Avant utilisation
ü Safety Precautions ............................... 6
ü Usage Precautions ............................. 12
Before use
IMPORTANT SAFEGUARDS... 3
Before use ....................... 6
ΒᎩ
Table des matières
ü Thank you very much for purchasing this Panasonic product.
ü This product is intended for household use only.
ü In order to correctly use the cooker and ensure your safety, please carefully read these instructions before use.
especially [Safety Precautions] on page 6-7
ü Please keep these operating instructions handy for future use.
ü Merci beaucoup d’avoir acheté un appareil Panasonic.
ü Cet appareil est conçu seulement pour l’utilisation domestique.
ü Pour utiliser correctement le cuiseur et assurer votre sécurité, veuillez lire attentivement ces instructions avant toute utilisation.
et plus particulièrement les [Précautions de sécurité] aux pages 8 et 9.
ü Veuillez garder ces instructions d’utilisation à disposition pour vous y référer ultérieurement.
ü ॺൄტ൞၇ʳPanasonic ขΖ
ü ڼขႛࠎ୮அࠌشΖ
ü Աإᒔࠌشሽࠀᒔঅ൞ऱڜ٤ΔቂشࠌڇছגาᔹᦰڼਐতΖ˴յݶAϰθٍิොCࡘ୷څ
ü ቂലشࠌڼᎅࣔݔঅጥאໂ৵شΖ
SR-DE182-EN_CH_FR .indd 1
3/2/09 4:49:39 PM
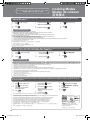
IMPORTANT SAFEGUARDS
When using electrical appliances, basic safety precautions should always be followed, including the
following:
1. Read all instructions.
2. Do not touch hot surfaces. Use handles or knobs.
3. To protect against electrical shock, do not immerse cord, plugs, or appliance in water or other liquid.
4. Close supervision is necessary when any appliance is used by or near children.
5. Unplug from outlet when not in use and before cleaning. Allow to cool before putting on or taking off
parts.
6. Do not operate any appliance with a damaged cord or plug or after the appliance malfunctions or
has been damaged in any manner.
Return appliance to the nearest authorized service facility for examination, repair, or adjustment.
7. The use of accessory attachments not recommended by the appliance manufacturer may cause
injuries.
8. Do not use outdoors.
9. Do not let cord hang over edge of table or counter, or touch hot surfaces.
10. Do not place on or near a hot gas or electric burner, or in a heated oven.
11. Extreme caution must be used when moving an appliance containing hot oil or other hot liquids.
12. Always attach plug to appliance first, then plug cord into the wall outlet. To disconnect, turn any
control to “off”, then remove plug from wall outlet.
13. Do not use appliance for other than intended use.
14. SAVE THESE INSTRUCTIONS.
This product is intended for household use only.
CAUTION :
a. A short power-supply cord (or detachable power-supply cord) is to be provided to reduce the risk
resulting from becoming entangled in or tripping over a longer cord.
b. Longer detachable power-supply cords or extension cords are available and may be used if care is
exercised in their use.
c. If a longer detachable power-supply cord or extension cord is used,
(1) The marked electrical rating of the cord set or extension cord should be at least as great as the
electrical rating of the appliance, and
(2) The cord should be arranged so that it will not drape over the countertop or tabletop where it
can be pulled on by children or tripped over unintentionally.
This appliance has a polarized plug (one blade is wider than the other). To reduce the risk of electric
shock, this plug is intended to fit into a polarized outlet only one way. If the plug does not fit fully into
the outlet, reverse the plug. If it still does not fit, contact a qualified electrician. Do not attempt to modify
the plug in any way.
3
SR-DE182-EN_CH_FR .indd 3
3/2/09 4:49:39 PM
Safety Precautions
Please be sure to follow these Instructions.
Before use
In order to prevent accidents or injury to the user, other people, and damage to property, please follow the
instructions below.
n The rust prevention paper located between the inner pan and the cast heater must be removed before using.
n The following chart indicates the degree of damage caused by wrong operation.
Warning :
Indicates hazard that may cause death or severe injury.
Caution :
Indicates hazard that may cause human injuries or property damage.
n Classification of instructions that need to be strictly followed uses the following symbols to
distinguish the instruction types.
These symbols mean prohibition.
These symbols mean requirement that must be followed.
Warning
Plug in tightly.
(Improper plugging
may cause electrical
shock or fire due to heat
generation.
Do not use a damage plug or warped
outlet.
Do not plug or unplug the
rice cooker with wet hands.
(It may result in electrical
shock.)
Do not use wet hands.
Do not place your hands or
face over or near the steam
vent.
Do not touch.
Do not damage the power cord
or the power plug.
The following is prohibited:
disassembling, bringing
near hot surface, bending,
twisting, pulling, placing
Prohibited heavy objects on top or
tying up in a bundle.
(The damaged power cord could result
in electric shock or fire.)
If the power cord or the power plug is
damaged, consult your nearest retailer
or service center for repair.
Do not insert metal objects
such as pins and needles, or
any other foreign objects in
the exhaust outlets, or any
other portion of the unit.
Especially clips, wires
or any metal objects.
(It may result in
electrocution or
Prohibited malfunction.)
Clean the power plug
regularly.
(A soiled power plug may
cause insufficient insulation
due to the moisture, and
may result in fire.)
Unplug the power plug, and wipe with a
clean cloth.
Do not operate the appliance
with a damaged power cord
or power plug.
(It may result in electrical
shock or fire.)
Prohibited
Make sure the voltage
supplied to the appliance
is the same as your local
supply. (120V AC only)
(It may cause electrical
shock or fire.)
This appliance is not intended for use by persons (including
children) with reduced physical, sensory or mental
capabilities, or lack of experience and knowledge, unless
they have been given supervision or instruction
concerning use of the appliance by a person
responsible for their safety.
(To avoid injuries from burning injuries.)
Children should be supervised to ensure that they do not play with the
Prohibited appliance.
6
SR-DE182-EN_CH_FR .indd 6
3/2/09 4:49:47 PM
Warning
Do not immerse the appliance in water or
other liquid.
Do not attempt to disassemble any of the parts
or repair them by yourself.
(It may result in electrical shock.)
If water leaks into the appliance, please
consult your nearest retailer or service
center.
(It may result in electrical shock or fire.)
The appliance must be repaired only by the
authorized service center.
Do not disassemble.
Caution
The appliance becomes hot when in use,
especially the inner lid
and inner pan.
Do not
touch the
Do not directly touch
inner lid
them with your hands.
Before use
Do not operate the appliance
near water or fire.
and inner
pan.
Prohibited
(It may result in electrical shock or fire.)
Make sure the rice cooker
is completely cool before
touching or cleaning it.
(To avoid burning injuries.)
Be sure to grasp the power
plug itself to disconnect it.
Do not pull the power cord.
Do not touch.
Do not place the appliance on
an unstable surface or on a
carpet, electric carpet, table
cloths (ethylene plastic) or
other object that cannot resist
high temperature.
(It may be overturned
during use and result in
fire.)
Prohibited
Do not substitute the inner
pan with other container.
(Also firmly grasp the
appliance body before
unplugging it.)
(It may result in electrical
shock or electrocution.)
Do not touch the hook button
when the appliance is being
carried or moved.
(If the outer lid is
accidentally open, it may
result in burning injures.)
Do not touch.
Always disconnect the
appliance from the power
supply outlet before taking
the inner pan out or when the
appliance is not in use.
(It may result in higher
temperature and burning
injuries.)
Do not use other than the provided cord
set and do not use the cord set for other
appliances.
(The steam may result in color changes or
deformation of nearby objects.)
Watch out for the steam coming out of the
appliance.
(It may result in electrical
shock.)
Unplug
Prohibited
Do not place the appliance near a wall or
furniture.
Prohibited
(It may result in burning injuries.)
(It may result in electrical shock or fire.)
Prohibited
7
SR-DE182-EN_CH_FR .indd 7
3/2/09 4:49:51 PM
Usage Precautions
Précautions d’utilisation
ࠌࣹشრࠃႈ
Before use
Avant utilisation
ՠΈۯ
Usage Precautions / Précautions d’utilisation / ՠΈٍิො
Avoiding damages to the appliance.
Pour éviter tout dommage à l’appareil.
ᒽѡ๒ᖣྑʫᓍé
●
●
●
●
●
●
●
●
●
●
●
●
●
●
●
Temperature sensor
Capteur de température
Foreign matters ᄵ৫ტᚨᕴ
Corps étrangers
؆ࠐڂ
Do not cover the outer lid with a cloth.
The outer lid may deform, crack or discolor which will result in malfunction.
Do not place the appliance in direct sunlight.
Do not use the inner pan for other applications.
Always keep the surface of the inner pan, cast heater, and temperature
sensor clean and dry.
It may result in malfunction.
Do not use the inner pan directly on open flame, electric burner, or in a
heated oven.
Ne pas recouvrir le couvercle extérieur avec un chiffon.
Le couvercle extérieur peut se déformer, se fendre ou se décolorer, ceci pouvant
Cast heater
entraîner un dysfonctionnement.
Plaque chauffante
Ne pas placer l’appareil sous les rayons directs du soleil.
ሽᑷࣨ
Ne pas utiliser le panier à fond à d’autres fins.
Toujours garder la surface du panier à fond, de la plaque chauffante et du capteur de température propre et sèche.
Ceci peut entraîner un dysfonctionnement.
Ne pas utiliser le panier à fond directement sur une flamme nue, un brûleur électrique, ou dans un four chauffé.
ቂˢϛ͚ႶʖႶ̤؇ͦé
؆።ױ౨᧢ۥ᧢ࢨڴށݮທګਚᎽΖ
ቂˢ؟ϛ˰ʔé
ˀ࠲Έ˗ᓍءյ͠༬é
ۙ˗ݡᓍࡓڸįྑᇋ֝ؼຉܿึᏼወᆹଷਧᐳé
ױທګਚᎽΖ
ቂˢઆ˗ᓍڈોΈ̒بءįྑᙋ̷ᇋᙋʖé
Avoiding damages to the inner pan.
Pour éviter tout dommage au panier à fond.
ᒽѡ๒ᖣ˗ᓍé
●
●
●
●
●
●
●
●
●
●
●
●
●
●
●
●
●
●
Do not leave the rice scoop or any other objects inside the inner pan.
The inner pan should be cleaned immediately after cooking with seasonings or condiments.
Do not use the inner pan as mixing bowl.
Do not use metal utensils that can scratch or crack the inner pan.
The coated surface of the inner pan will gradually wear away, so use with care.
Do not tap or rub the inner surface of the inner pan. Clean only with a sponge.
(Do not use Scotch Brite or scouring pad.)
Ne pas laisser de cuillère à riz ni aucun autre objet dans le panier à fond.
Le panier à fond doit être nettoyé immédiatement après une cuisson contenant des assaisonnements ou des condiments.
Ne pas utiliser le panier à fond comme mélangeur.
Ne pas utiliser d’objets métalliques susceptibles de rayer ou de fissurer le panier à fond.
La surface avec revêtement du panier à fond va s’user progressivement, par conséquent prière de l’utiliser avec
précaution.
Ne pas heurter ou frotter la surface intérieure du panier à fond . Utiliser exclusivement une éponge pour le nettoyage.
(Ne pas utiliser une éponge Scotch Brite® ou un tampon à récurer.)
請ˢઆʢʫή)ъյ̨ٶέΛϛ˗ᓍՎé
̷調䝽֎अ݉ੁͬѯչଢ˗ޥᓍé
ቂˢઆᜧወϛʢʫˁՠΈé
ቂˢՠΈۂᚚወ̤ٶᒽѡ˗ᓍୖ·վଢ଼ൿଢ଼é
˗ᓍڸ͚څตᅟကကᆌᕺቂʯ˼ՠΈé
ቂˢဓͮጷջ˗ᓍՎᅟé෯Έऻ႓ଢޥé
ʻᓮ֎ࠌشઔᗣࠧࢨۍᑥؒΖʼ
12
SR-DE182-EN_CH_FR .indd 12
3/2/09 4:50:00 PM
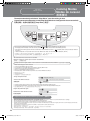
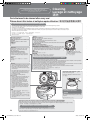
Parts Names and Functions
Noms des pièces et fonctions
ሿٙټጠ֗פ౨
Before cooking
Avant cuisson
Ⴗۯ
Parts Names and Functions
Noms des pièces et fonctions
ྒྷέϐၴ˫̸়
Inner lid
Couvercle intérieur
փ።
Inner pan
Panier à fond
փ
Bouton du loquet
w Pressez le bouton du loquet
pour ouvrir le couvercle
extérieur.
ၲᣂਊၨ
w ਊၲᣂਊၨʿؚၲ؆።Ζ
Handle
Poignée
֫ނ
Before use
Avant utilisation
ՠΈۯ
Hook button
w Press the hook button to open
the outer lid.
Outer lid
Couvercle extérieur
؆።
Cord set
Cordon d’alimentation
ሽᒵ
Control panel
Panneau de commandes
൳ࠫ૿ࣨ
Accessories / Accessoires / ۉέ
Rice scoop (1)
Cuillère à riz (1)
堩Վʳ£®
Measuring cup (1) (Approx. 180ml)
Verre mesureur (1) (env. 180 ml)
ၦࣦۏʳ£®ʳʻપʳ£näʳශ֒ʼʳ
Steaming basket (1)
Panier d’étuvage (1)
፣ᦨʳ£®
When using the rice cooker, insert the power connector as far as it can go into
the inlet at the back of the main body.
Cord set (1)
Cordon d’alimentation (1)
ሽᒵʳ£®
Quand vous utilisez le cuiseur de riz, insérez complètement la fiche de
connexion dans la prise située à l’arrière du boîtier de l’appareil.
ࠌشሽழΔᕣၦലሽᒵᨱ༺Ե᧯৵૿ऱ༺֞Ζ
Power connector
Fiche de connexion
ሽᒵᨱ
13
SR-DE182-EN_CH_FR .indd 13
3/2/09 4:50:03 PM
Before cooking
Avant cuisson
Ⴗۯ
Parts Names and Functions
Noms des pièces et fonctions
ሿٙټጠ֗פ౨
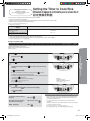
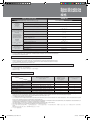
Control Panel / Panneau de commandes / ેտࡓؼ
Timer Key/ Touche de la minuterie / ׇईወݞ
Start Key / Touche de démarrage / ෆּݞ
w For White Rice, Sticky Rice , Porridge and Brown Rice, the timer can be preset between 1 hour and 13 hours (time change in 30 minute steps).
- The timer cannot be used for Quick Cook, Cake, Slow Cook and Steam.
* Keeping the key pressed will make setting faster.
w Pour les modes Riz blanc, Riz gluant , Gruau et Riz brun, la minuterie
peut être pré-réglée entre 1 heure et 13 heures (le temps change par
incrémentations de 30 minutes).
- La minuterie ne peut pas être utilisée pour les modes Cuisson rapide,
Gâteau, Cuisson lente et Vapeur.
* Maintenir la touche pressée accélère le réglage.
w Press it when starting cooking or when completing the
timer setting.
w Pressez cette touche pour lancer la cuisson ou quand
vous avez fini le réglage de la minuterie.
w ၲࡨ፣ྦࢨࡳګݙழᕴࡳழΔਊڼਊၨΖʳ
w ኙ࣍ۏػΕᤅۏΕ࿕堩ࡉᜋۏΔࡳழᕴբቃʳ1ʳ۟ʳ13ʳ՛ழհၴʻழၴ
ޏޓऱၦ৫ਢʳ30ʳ։ᤪʼΖ
- ࡳழᕴլݶ࣍شױຒ፣ྦϜᗶϜྦ֗፣Ζ
* ਊ۰ڼਊၨݶױຒࡳΖ
Cooking Timer Key / Touche de la minuterie liée à
la cuisson / Ⴗׇईወݞ
Menu Select Key / Touche de sélection de menu /
൰శያݞ
w Set cooking time for Cake, Slow Cook or Steam.
* Keeping the key pressed will make setting faster.
w Permet de régler le temps de cuisson pour les modes
Gâteau, Cuisson lente ou Vapeur.
* Le fait de maintenir la touche enfoncée accélérera le
réglage.
w You can select between White Rice, Quick Cook, Sticky Rice,
Porridge, Brown Rice, Cake, Slow Cook and Steam.
w Vous pouvez sélectionner plusieurs modes de cuisson pour
le riz Riz blanc, Cuisson rapide, Riz gluant, Gruau, Riz brun,
Gâteau, Cuisson lente et Vapeur.
w ࡳᗶϜྦࢨ፣ऱழၴΖ
w ൞ڇױᙇᖗۏػΕݶຒ፣ྦΕᤅۏΕ࿕堩ΕᜋۏΕᗶΕ
ྦࡉ፣Ζ
* ਊ۰ڼਊၨݶױຒࡳΖ
Keep Warm/Off Key / Touche de maintien au chaud / Arrêt / ۙຉᘖݞ
wPress this key to abort the malfunction or the unwanted setting from any operation setting modes.
wEach time the key is pressed, it will switch between (Off) and (Keep Warm).
wPressez cette touche pour annuler le dysfonctionnement ou le réglage non désiré pour tous les modes de réglage du fonctionnement.
wChaque fois que cette touche est pressée, il est possible de basculer entre les modes (Off - Arrêt) et (Keep Warm - Maintien au chaud).
wਊڼਊၨխַٚ۶ᖙ܂ࡳᑓڤՀլإᒔऱՠࢨ܂լᏁऱࡳΖ
wޢਊԫڻਊၨΔڇʻOff ᣂຨʼࡉʻKeep Warm অᄵʼၴ֊ངΖ
Information / Information / ཋ৯
The Start, Keep Warm/ Off Key’s upper protruding part is in consideration of the vision impaired.
La partie supérieure de la touche Démarrage, Maintien au chaud/Arrêt (Start, Keep Warm/ Off) est dotée d’une partie en saillie pour les personnes
avec une déficience visuelle.
ၲࡨϜঅᄵ˂ᣂຨਊၨऱՂຝડנຝ։ەᐞࠩီԺԳՓऱլঁΖ
14
SR-DE182-EN_CH_FR .indd 14
3/3/09 4:13:30 PM
Preparations
Préparatifs
ఖො
Attaching or removing each part / Using the water level scale
Montage ou démontage de chaque pièce / Utilisation de l’échelle associée
au niveau de l’eau
ຑ൷ࢨࣈೈޢଡຝ։ʳ˂ʳࠌࠥۯֽش৫
Attaching or removing each part/ Montage ou démontage de chaque
pièce / ોਜӶࡵ௱˝
Inner lid
Attaching the inner lid ( P.26)
Couvercle intérieur
Montage du couvercle intérieur ( P.26)
˗Ⴖ
ຑ൷փ።ʳʻรʳ26ʳʼ
Outer lid
Couvercle extérieur
͚Ⴖ
Handle
Poignée
Ӗ˿
Inner pan
Panier à fond
˗ᓍ
Cord set
Cordon d’alimentation
ྑሉ
How to use
Comment utiliser le cuiseur de riz
ϩъՠΈ
Using the water level scale/Utilisation de l’échelle associée au
niveau de l’eau / ՠΈ̑уչܿ
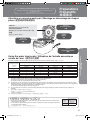
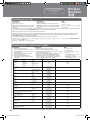
Add water according to the following table./ Ajoutez de l’eau en vous référant au tableau suivant. / ᖕאՀ।ֽףΖ
Rice amount (Cup)
Water level (cup)/ Niveau d’eau (verre mesureur)/ ۯֽۏػʳʻࣦʼ
Quantité de riz (verre
Brown rice- / Riz brun- / ᜋۏ-
Sticky rice- / Riz gluant- / ᤅۏ-
Porridge- / Gruau- / ࿕哥-
SR-DE102
SR-DE102
SR-DE102
SR-DE102
1/2
-
-
-
2
1
1
1
120 ml
4
2
2
2
1 (+90 ml)
-
3
3
3
2 (+60 ml)
-
4
4
-
-
-
5
5
-
-
-
mesureur)
ۏၦʳʻࣦʼ
-
--
-ʳ
ʳ
--
-
-
White rice / Riz blanc / ۏػ
-
Fill water by referencing the water level scale on the side of the inner pan with “CUP”.
For sticky rice, the amount of water specified above is for Ngoo sticky rice.
The amount of water can be adjusted according to kind of rice.
Cooking new-crop rice may result in some bubbles spilling from the steam vent. Please try to reduce water level to overcome this problem.
Remplissez d’eau en vous référant à l’échelle ‘’CUP’’ associée au niveau de l’eau située sur le côté du panier de cuisson. Pour le riz gluant, le
volume d’eau spécifié ci-dessus est utilisé pour le riz gluant Kiew Ngoo.
Le volume d’eau peut être ajusté en fonction du type de riz.
Si vous cuisinez du riz nouveau, il se peut des bulles débordent par la soupape. Essayez de réduire le niveau d’eau pour éliminer ce
problème.
ەփᕻՂᑑʳ“CUP”ʳڗณऱֽࠥۯ৫ֽףΖ
ኙ࣍ᤅۏΔՂ૪ਐࡳऱֽۯᔞ࣍شʳKiew NgooʳᤅۏΖ
ױᖕۏऱጟᣊᓳᆏֽۯΖ
፣ྦᄅᒟױۏ౨ᄎᖄીԫࠄऐःᄨנᏴ֞Ζᓮቫᇢ૾ࠐۯֽ܅ᝩ܍ຍԫംᠲΖ
CAUTION
Précautions
ٍิ
- When using the steaming basket to steam at the same time as cooking white rice, the maximum rice
amount is shown in the table.
- Si vous utilisez le panier d’étuvage durant la cuisson du riz blanc à la vapeur, la quantité maximum de
riz est indiquée dans le tableau.
- ࠌش፣ᦨ፣ྦۏػழʳΔʳ່Օऱۏشၦբ᧩ڇق।խΖ
Model
Modèle
ীᇆ
Max. Amount (Cup)
Quantité de riz (verre
mesureur)
ۏၦʳʻࣦʼ
SR-DE102
2
15
SR-DE182-EN_CH_FR .indd 15
3/2/09 4:50:05 PM
Washing Rice and Adjusting the Water Level
Lavage du riz et ajustement du niveau de l’eau
堚ੑࠀۏᓳᆏֽۯ
Preparations
Préparatifs
ఖො
Washing Rice and Adjusting the Water Level /
Lavage du riz et ajustement du niveau de l’eau / ଢޥУՔቇ̑у
1
Measure rice with the measuring cup provided.
●
Good example
Bon exemple
ߜړᒤࠏ
Please see the specifications on P.28 for the amount of rice that can
be cooked at one time.
Bad example
Mauvais exemple
؈ඓᒤࠏ
Mesurez le riz en utilisant le verre mesureur fourni.
●
Veuillez lire les instructions de la P.28 concernant la quantité de riz
pouvant être préparée en une seule fois.
ՠΈයУغයУé
●
2
ᓮรˁ28ʳᣂ࣍ԫױڻ፣ྦऱۏၦ
Rinse the rice.
●
Wash it thoroughly (Otherwise the rice may burn or smell like rice
bran.)
Rincez le riz
●
Rincez bien le riz (Si vous ne le faites pas, le riz pourrait brûler ou
avoir une odeur de son de riz.)
ଢޥУ
●
ኧࢍ堚ੑʳʻܡঞױۏ౨ᄎᗈᒫΔࠏۏڕᕝΖʼ
Wash the rice quickly with plenty of water,
dispose the water immediately afterwards.
(The rice absorbs water easily at first.)
Lavez le riz rapidement à grande eau et
jetez l’eau immédiatement.
(Le riz absorbe facilement l’eau au début.)
ʳ
3
Adjust water level for the menu of your choice.
●
●
Adjust water level on a flat surface. (Check the left and the right
sides of the water level scale and adjust it.)
Adjust the amount of water according to the softness you prefer.
(The water may boil out while cooking if you put too much in.)
Ajustez le niveau de l’eau en fonction du menu choisi.
●
●
Ajustez le niveau de l’eau sur une surface plate. (Vérifiez les côtés
gauche et droit de l’échelle graduée de l’eau et ajustez.)
Ajustez la quantité d’eau en fonction de la texture que vous préférez.
(L’eau peut déborder durant la cuisson si la quantité d’eau est
excessive.)
شՕၦऱֽݶຒ堚ੑۏʿྥ৵ࠥܛଙֽΖʳ
ʻॺۏൄ୲࣐ଈ٣ֽگܮΖʼ
Repeat step to clean out the
bran until the water is clear.
Répétez l’étape pour faire
disparaître le son de riz jusqu’à
ce que l’eau soit claire.
ૹᓤޡᨏʳʳא堚ੑۏᕝʿऴࠩ
ֽ᧢堚Ζ
Example : When cooking 3 cups of white rice.
Exemple : Si vous préparez 3 verres mesureur de riz blanc.
ࠏ ڕ: ፣ʳ3ʳࣦۏழΖ
Add water up to the
water level scale of 3 cups.
Ajoutez de l’eau jusqu’à la graduation
correspondant à 3 verres mesureur.
ֽ۟ףʳÎʳࣦۏऱֽࠥۯ৫Ζ
Level the rice.
Aplanissez le riz.
ۏނᐿؓΖ
ङዩલያڅ൰శቇ̑уé
●
●
4
ֽؓڇ।૿ᓳᆏֽۯΖʻؐࠟ׳ᢰऱֽࠥۯ৫ၞ۩ᓳᆏΖʼ
ᖕ൞ړऱਫຌ৫ᓳᆏֽۯΖʻૉֽףመڍΔֽױ౨ڇ፣ྦழᄨ
נΖʼ
Make sure the inner lid is properly assembled.
Dry off the water on the outside of the inner pan.
Assurez-vous que le couvercle intérieur sont bien
installés.
Séchez complètement l’eau se trouvant à l’extérieur du
panier à fond.
ᇨۙ˗ႶʶႶϧé
ᚴեփ؆ᕻऱֽΖ
5
Put the inner pan into the main body and close the outer lid.
●
On closing the outer lid, please make sure there is a clicking sound.
Placez le panier à fond dans le boîtier principal du
cuiseur et fermez le couvercle extérieur.
●
Quand vous fermez le couvercle extérieur, assurez-vous que vous
avez entendu le clic de fermeture.
આ˗ᓍ؟ʉᓍᝃՔႶʖ͚Ⴖé
●
6
።Ղ؆።ழΔᓮᒔঅ࿇נዠᜢΖ
Insert the power plug.
Insérez la fiche d’alimentation.
ಎʉྑກಎᏄé
Make sure the inner pan is in direct
contact with the cast heater.
Keep turning it slightly 2-3 times until
it fits.
Assurez-vous que le panier de
cuisson est bien en contact avec la
plaque chauffante.
Continuez à le tourner délicatement 2 à
3 fois jusqu’à ce qu’il soit bien fixé.
ᇨۙ˗ᓍڈોોᙯྑᇋؼé
࿑პඝ᠏ʳÓÎʳڻऴࠩٽᔞַΖ
Power plug
Fiche d’alimentation
ሽᄭ༺ᙰΖ
16
SR-DE182-EN_CH_FR .indd 16
3/2/09 4:50:09 PM
Cooking Modes
Modes de cuisson
Ⴗᆧϸ
White Rice and Sticky Rice
Riz blanc et Riz gluant
֗ۏػᤅۏ
Cooking White Rice and Sticky Rice
Cuisson Riz blanc et Riz gluant
ႷΏУ˫ᙙУ
1
1
Press
to point to
Pressez la touche
ݞ
pour régler sur
2
Cooking “White” rice.
Cuisson du riz “Blanc”.
ႷAΏУCé
ݤϏ
-The “Start” lamp lights.
-Le voyant de démarrage ‘’Start’’ s’allume.
-ˮၲࡨʳ(Start)˰ᗉॽΖ
The display window will look like this when pressing
it to “White Rice/Sticky Rice”.
and setting
L’afficheur présentera cet aspect quand vous presserez la touche
et choisirez le mode “White Rice/Sticky Rice”.
᧩قৠ᧩ڼڕقʳΔʳਊՀࠀലࠡࡳˮ˂ۏػᤅ˰ۏΖ
2
Press
Pressez la touche
ݞ
Light turns on.
Le voyant s’allume.
ᗉॽΖ
Start cooking.
pour lancer la cuisson.
How to use
Comment utiliser le cuiseur de riz
ϩъՠΈ
“ ” is set at White Rice/ Sticky Rice at the beginning.
“ ” est réglé sur White Rice/Sticky Rice au début.
“ ” ෆּईౝׇΏУᙙУé
ෆּႷé
min
●
●
●
3
The rice is ready when the buzzer sounds.
Stir and loosen the rice immediately.
Le riz est prêt quand la sonnerie de la minuterie retentit.
Brassez et aérez le riz immédiatement.
༢ᄧወᛐçʶϧéѯչઆᜧؾé
Rice cooker will switch automatically to Keep Warm mode. There
is no need to keep the rice warm.
Le cuiseur de riz passera automatiquement en mode Maintien au
chaud. Vous n’avez pas besoin de réchauffer le riz.
ሽല۞೯֊ང۟অᄵᑓڤΖྤႊല堩অᄵΖ
If you do not want to warm the rice, press
and remove the
power plug.
Si vous ne voulez pas réchauffer le riz, pressez la touche
et
débranchez la fiche d’alimentation.
ૉ൞լუല堩অᄵΔਊʳ
ࠀࢸൾሽᄭ༺ᙰΖ
After water runs dry, the remaining time to finish will be shown
(13 minutes)
Après disparition de l’eau, le temps de cuisson restant sera
indiqué (13 minutes)
ֽྦե৵ʳʿʳല᧩قޔऱໍ塒ழၴʻ13ʳ։ᤪʼ
Light turns on.
Le voyant s’allume.
ᗉॽΖ
h
17
SR-DE182-EN_CH_FR .indd 17
3/3/09 4:13:40 PM
Quick Cook / Porridge / Brown Rice / Slow Cook / Steam / Cake
Cuisson rapide / Gruau / Riz brun / Cuisson lente / Vapeur / Gâteau
ӊ௦ႷഩᑟУᨠႷፊ
Cooking Modes
Modes de cuisson
Ⴗᆧϸ
Cooking white rice in [Quick Cook] mode. Cuisson du riz blanc en mode [Quick Cook]. / ϛ[Quick Cook]
Aӊ௦ႷCᆧϸႷΏУé
1
Press
Cook].
2
Press
to point to [Quick
1
2
Pressez la touche
pour
régler sur [Quick Cook] .
Pressez la touche
1
ݞ
2
ݞ
ݤϏ [Quick Cook].
Note / Remarque / ඃ
●
●
[Quick Cook] mode can be used only for white rice.
With [Quick Cook] mode rice may be slightly harder than normal and burnt at the bottom.
➞ Rice will be softer if it’s soaked in water prior to cooking.
➞ For better performance, please keep the rice warm for a few minutes after the beeps sound.
*● Timer is not applicable to this mode.
Le mode [Quick Cook] ne peut être utilisé que pour le riz blanc.
● En mode [Quick Cook], le riz peut être légèrement plus dur que normalement et brûlé au fond.
➞ Le riz sera plus mou s’il est trempé dans de l’eau avant sa cuisson.
➞ Pour un meilleur résultat, maintenez le riz au chaud pendant quelques minutes après l’émission du bip de fin de cuisson.
* La minuterie n’est pas utilisable pour ce mode.
● ˮݶຒ፣ྦ˰ᑓڤႛ࣍شױ፣ྦۏػΖ
● ˮݶຒ፣ྦ˰ᑓڤՀऱ堩ױ౨ֺԫ፣ྦऱ堩࿑࿏ΔࢍຝڶᗈᒫΖ
➞ ૉ፣ྦছലۏ௦ԵֽխΔ堩ᄎຌࠄΖ
➞ Աய࣠ࠋޓΔᓮڇቷᏗᜢ৵অᄵ༓։ᤪΖ
* ڼᑓڤՀլᔞࡳشழᕴΖ
Cooking Porridge or Brown Rice with [Porridge / Brown Rice] mode/ Cuisson du gruau ou riz brun en mode [Porridge /
Brown Rice / ϛ[Porridge / Brown Rice] AഩҨУCᆧϸʔഩҨУ
1
2
Press
to point to [Porridge /
Brown Rice].
1
2
Press
Pressez la touche
pour régler sur [Porridge / Riz brun].
Pressez la touche
1
ݞ
2
ݞ
ݤϏ [ഩҨУ].
Note / Remarque / ඃ
[For Porridge Cooking / Pour cuisson du gruau /ᇹ༕ٝE
w
w
w
w
w
w
w
w
w
w
w
w
[For Brown Rice/ Pour Riz brun /ᇹҨૣ] ( →P.24 / →୷ 24 ࡘ )
Opening the outer lid at the time of cooking may increase the condensation of moisture.
The different kinds and amount of rice may lead flour water overflow through the steam vent.
If using too much water, it may cause water overflow.
The long duration of Keep Warm may thicken the porridge.
L’ouverture du couvercle extérieur pendant la cuisson peut accroître la condensation de l’humidité.
Les différents types et volumes de riz peuvent causer un débordement de l’eau de cuisson au niveau de sortie d’échappement de la vapeur
Un volume d’eau excessif peut entraîner un débordement.
Une longue durée du mode Maintien au chaud peut entraîner un épaississement du gruau.
፣ྦழؚၲ؆።ױ౨ᏺףᕩऱֽΖ
լٵጟᣊࡉٝၦऱױۏ౨ᖄીֽൕᏴ֞ᄨנΖ
ૉףԵֽ֜ڍʿױທֽګᄨנΖ
ᥛঅᄵৰ९ழၴᄎࠌ࿕堩᧢ᖺᆈΖ
Slow cook food with [Slow Cook] mode / Cuisson lente d’aliments en mode [Slow Cook] / ϛ[Slow Cook] Aᨠ
C ᆧϸʔᨠ࡛ٶ
1
2
3
Press
to point to [Slow Cook].
Press
to set the cooking
time.
(Keeping the key pressed will
make setting faster.)
Press
1
2
3
Pressez la touche
pour régler sur [Slow Cook].
Pressez la touche
pour régler le
temps de cuisson.
(Maintenir la touche pressée accélère
le réglage.)
Pressez la touche
w The cooking time can be set from 1 hour up to 12 hours in increments of 30 minutes.
w If the remaining time is more than 1 hour, time will be displayed in 30 minutes step. And if the remaining time is
less than 1 hour, time will be displayed in a minute step.
w If the amount of ingredients exceed the maximum water level scale, it may cause water to overflow.
w Le temps de cuisson peut être réglé entre 1 heure et 12 heures par incréments de 30 minutes.
w Si le temps restant dépasse 1 heure, le temps sera affiché en incréments de 30 minutes.
Si le temps restant est inférieur à 1 heure, le temps sera affiché en incréments de minutes.
w Si la quantité des ingrédients dépasse le niveau maximum de l’eau, l’eau peut déborder.
w ፣ྦழၴױൕʳ1ʳ՛ழࡳ۟ʳ12ʳ՛ழʳʿʳڻޢᏺၦʳ30ʳ։ᤪΖ
w ૉໍ塒ழၴڍ塒ʳ1ʳ՛ழʳʿʳࡳழᕴലޢʳ30ʳ։ᤪ᧩قԫڻΖૉໍ塒ழၴ֟塒ʳ1ʳ՛ழʳʿʳࡳழᕴലޢ։ᤪ᧩قԫ
ڻΖ
w ૉګ։ၦ၌መ່Օऱֽࠥۯ৫ʳʿʳױᖄીֽᄨנΖ
1
2
3
ݞ
ݞ
ݤϏ
[Slow Cook] [ᨠ].
ׇႷईéݞфАݞ
ͅӊ௦ׇé
ݞ
h
min
When time is set at 1 hour and 30
minutes.
Quand le temps de cuisson est fixé à 1
heure et 30 minutes.
ழၴࡳʳ1ʳ՛ழࡉʳ30ʳ։ᤪΖ
18
SR-DE182-EN_CH_FR .indd 18
3/4/09 2:39:24 PM
Steaming food with [Steam] mode / Cuisson d’aliments à la vapeur en mode [Steam] / ϛ[Steam] AႷC ᆧϸႷ࡛
ٶ
1
2
3
Press
to point to [Steam].
Press
to set the steaming time.
(Keeping the key pressed will
make setting faster.)
Press
1
Pressez la touche
pour régler
sur [Steam] .
2
3
Pressez la touche
pour régler le
temps de cuisson à la vapeur.
(Maintenir la touche pressée
accélère le réglage.)
1
2
ݞ
ݤϏ [Ⴗ] [Steam].
ݞ
ׇႷईé
min
ݞфАݞͅӊ௦ׇé
3
ݞ
The time is set at 10 minutes
Le temps est fixé à 10 minutes
ழၴࡳʳ10ʳ։ᤪ
Pressez la touche
w Steaming time can be set from 1 minute up to 60 minutes in increments of 1 minute.
w Add water to the inner pan as shown in the table at the right. Therefore, the water will never be dried
out even if the maximum steaming time has been chosen (60 minutes). Place the ingredients into the
steaming basket, and then place the steaming basket into the inner pan.
w In addition to the set steam time, please expect some extra time required for the water to start boiling.
The time shown in the display window will decrease once the water starts boiling.
w After steaming has just finished, the steaming basket will be very hot. Beware of your hand getting
burnt.
w When reaching the preset time or if the water is completely dried out, stop steaming mode, and
automatically switch to Keep Warm.
w Le temps de cuisson à la vapeur peut être réglé entre 1 minute et 60 minutes par incréments de 1 minute.
w Versez de l’eau dans le panier à fond comme indiqué dans le tableau de droite. Il restera donc toujours
de l’eau même si le temps de cuisson à la vapeur a été choisi (60 minutes). Placez les ingrédients dans
le panier d’étuvage puis placez-le dans le panier à fond.
w En plus du temps fixé pour la cuisson à la vapeur, veuillez attendre un peu pour que l’eau commence à
bouillir. Le temps indiqué sur l’afficheur diminuera quand l’eau aura commencé à bouillir.
w Immédiatement après la fin de la cuisson à la vapeur, le panier d’étuvage sera très chaud. Attention à
ne pas brûler vos mains.
w Quand le temps fixé est terminé ou si l’eau a complètement disparu, le mode cuisson à la vapeur
s’arrêtera et passera automatiquement en mode Maintien au chaud.
w ፣ྦழၴױൕʳ1ʳ։ᤪࡳ۟ʳ60ʳ։ᤪΔڻޢᏺॽʳ1ʳ։ᤪΖ
w ׳ڕ।ࢬقΔʳփֽףΖڼڂʳΔʳֽլᄎ፣եΔʳࠌܛᙇᖗ່Օ፣ྦழၴʻ60ʳ։ᤪʼΖലࢬګڶ։࣋Ե፣ᦨΔྥ৵ല
፣ᦨ࣋ԵփΖ
w ೈࡳ፣ྦழၴ؆ʳΔʳᓮᏺףᠰ؆ऱழၴᨃֽྦआΖֽྦआழΔ᧩قৠՂऱழၴല྇֟Ζʳ
w ፣ྦګݙ৵ʳΔʳ፣ᦨৰᗍΖ՛֨֫ᗍ႞Ζ
w ሒࠩቃழၴழࢨֽݙ٤፣եΔʳ፣ᑓڤೖַʳΔʳ۞೯֊ང۟অᄵΖ
Steaming basket
(accessory)
Panier d’étuvage
(accessoire)
Ⴗ
ۉέ
Model
Modèle
Water amount (cup)
Volume d’eau (verres)
ܔ༚
̑යغ
SR-DE102
Baking cake with [Cake] mode / Cuisson d’un gâteau en mode [Cake] / ϛACakeCAፊCᆧϸʔोፊ
1
2
3
Press
to point to [Cake].
Press
to set the cooking
time.
(Keeping the key pressed will
make setting faster.)
Press
1
2
3
Pressez la touche
pour régler sur [Cake].
Pressez la touche
pour régler le temps
de cuisson.
(Maintenir la touche pressée accélère le
réglage.)
Before baking, coat the inner pan with
butter for non-stick baking.
■ The amount of dough (including other
ingredients inside the dough) should not
exceed 500g.
(The cake won’t be baked properly if the
amount exceeds 500g)
■ It’s recommended to stop Keep Warm
immediately after baking is done; otherwise,
the cake will become wet.
■ After baking is done, do not leave it in the
inner pan because cake will become wet.
■ Please wear the gloves while taking out the
inner pan.
■ After baking, some smells and oil stains
may remain in the inner pan. This is normal.
3
ݞ
ݞ
選ያ
[ፊ] [Cake].
ׇႷईéݞфАݞ
ͅӊ௦ׇé
ݞ
Pressez la touche
Baking time can be set from 20 minutes up to 65
minutes in increments of 5 minutes.
Le temps de cuisson peut être réglé entre 20
minutes et 65 minutes par incréments de 5 minutes.
௷ྠழၴױൕʳ20ʳ։ᤪࡳ۟ʳ65ʳ։ᤪΔڻޢ
ᏺၦʳ5ʳ։ᤪΖ
1
2
How to use
Comment utiliser le cuiseur de riz
ϩъՠΈ
3 cups (approx. 540 ml)
3 verres (env. 540 ml)
Îʳࣦʳʻપʳx{äʳශ֒ʼ
min
When time is set at 40 minutes (the remaining time
will countdown in 1 minute steps.)
Quand le temps de cuisson est fixé à 40 minutes
(le temps restant sera décompté par incréments
de 1 minute).
ழၴࡳʳ40ʳ։ᤪழʻໍ塒ழၴאʳ1ʳ։ᤪ
ၦ৫ଙᑇૠழʼΖ
Avant de lancer la cuisson, badigeonnez le
panier à fond de beurre pour éviter un collage
durant la cuisson.
■ Le volume de farine (incluant les autres
ingrédients associés à la farine) ne doit pas
dépasser 500 g. (La cuisson ne sera pas
correcte si le volume dépasse 500 g)
■ Il est recommandé de cesser le maintien au
chaud immédiatement après la cuisson; si vous
ne le faites pas, le gâteau sera humide.
■ Après la cuisson, ne laissez pas le gâteau dans le
panier à fond pour éviter qu’il devienne humide.
■ Mettez des gants de cuisine pour sortir le
panier à fond.
■ Après la cuisson, des odeurs et des taches
d’huile peuvent demeurer dans le panier à fond.
Ceci est normal.
ोۯçϛ˗ᓍตɿᅟ̘ٜˀᓍé
■ ૿ቸၦʻץਔ૿ቸխऱࠡהறʼᚨլ၌መʳ500ʳ
܌Ζʻૉ၌መʳ500ʳ܌Δঞլ౨৾ᅝ௷ྠʼ
■ ৬ᤜ௷ྠޔ৵ࠥܛೖַঅᄵˎܡঞΔᗶᄎ
᧢ᑪΖ
■ ௷ྠޔ৵Δᓮ֎ലࠡఎڇփΔڂᗶᄎ
᧢ᑪΖ
■ ࠷נփழΔᓮᚮ֫Ζ
■ ௷ྠ৵Δ࠺ࡉईױۆ౨ྲྀఎڇփΖຍৰإ
ൄ
19
SR-DE182-EN_CH_FR .indd 19
3/3/09 4:13:59 PM
Cooking Modes
Modes de cuisson
Ⴗᆧϸ
Keep Warm
Maintien au chaud
অᄵ
The mode automatically switches to “Keep Warm” once the cooking is done.
L’appareil passera automatiquement en mode [Keep Warm] (Maintien au chaud) quand la cuisson sera terminée.
Ⴗ഼Ө݉çАᆧϸв˞ಘгAKeep WarmC ۙຉé
h
w Up to 23 hours of elapsed time in Keep Warm mode is displayed. ( 0h is displayed when the elapsed time is less than one hour.)
w The display panel will indicate “U14” after 96 hours, and Keep Warm mode will be turned off automatically. ( P.27)
w Une durée pouvant aller jusqu’à 23 heures sera affichée en mode “Maintien au chaud”. ( 0h est affiché quand le temps restant est inférieur à
une heure.)
w L’afficheur indiquera “U14” après 96 heures et le mode “Maintien au chaud” sera automatiquement désactivé. ( P.27)
w অᄵᑓڤՀق᧩ױ९ሒʳ23ʳ՛ழऱঅᄵழၴΖʻᅝੌຓழၴ֟࣍ԫ՛ழΔ᧩قʳ˃ʳ՛ழΖʼ
w መԱʳ96ʳ՛ழ৵ʳʿʳ᧩ࣨ૿قല᧩قˮU14˰ʳʿʳࠀ۞೯ᣂຨঅᄵᑓڤΖʻรʳ27ʳʼ
Stir and loosen rice as soon as it is cooked.
Brassez et aérez le riz dès que la cuisson est terminée.
፣ྦ৵Δ᧓ࠥمᠾۏ堩Ζ
To keep rice warm in a good condition / Pour conserver le riz au chaud dans de bonnes conditions / ړߜڇऱයٙՀല堩অᄵ
w
w
w
w
w
w
w
w
w
Wash rice thoroughly to remove rice bran.
Loosen rice immediately after it’s cooked.
Do not keep rice scoop inside the inner pan while in the Keep Warm mode.
Lavez bien le riz pour retirer complètement le son de riz.
Aérez le riz immédiatement après la cuisson.
Ne laissez pas la cuillère à riz dans le panier à fond en mode “Maintien au chaud”.
ኧࢍ堚ੑۏװנאۏᕝΖ
፣ྦ৵ࠥܛง࣪堩Ζ
ڇঅᄵᑓڤՀΔᓮ֎ง࣪փऱۏ堩Ζ
Turning off Keep Warm mode.
Press
Arrêt du mode “Maintien au chaud”.
Pressez la touche
ᘖۙຉᆧϸé
ݞ
unplug the power plug
et débranchez la fiche d’alimentation.
،ྑກಎࣚé
w Leaving the power plug on while in “Off” mode would consume approximately 0.5W of power.
w Laisser la fiche d’alimentation connectée en mode “Arrêt” (Off) consommerait approximativement 0,5 W.
w ࣍ˮᣂຨ˰ʳʻOffʼʳᑓڤΔ༺Ղሽᄭ༺ஆലપʳ0.5ʳرऱሽԺΖ
Using the Keep Warm mode again
Press
Réutilisation du mode “Maintien au chaud”.
Pressez la touche
κЏՠΈۙຉᆧϸ
ݞ
Important Information / Informations importantes / ࡍ࠲ཋ৯
w
w
w
w
w
w
w
w
w
It’s recommended not to use Keep Warm mode for longer than 12 hours.
Please use Keep Warm mode only for white rice. Do not warm sticky rice, brown rice or mixed rice to prevent undesired odor or spoilage.
Rice may become smelly, discolor, and dry if too little amount is being kept warm.
Il est recommandé de ne pas utiliser le mode “Maintien au chaud” pendant plus de 12 heures.
Veuillez n’utiliser le mode “Maintien au chaud” que pour le riz blanc. Ne maintenez pas au chaud du riz gluant, du riz brun ou du riz mélangé pour éviter des
odeurs ou de mauvais résultats.
Si la quantité de riz maintenue au chaud est trop faible, le riz peut devenir odorant, décoloré et sec.
৬ᤜࠌشঅᄵᑓڤլ၌መʳ12՛ழΖ
ᓮႛڇ፣ྦۏػழΔࠌشঅᄵᑓڤΖᓮ֎অᄵᤅۏϜᜋࢨۏאۏٽᝩ܍լړऱ࠺ࡉፍᡏΖ
如果將過少量的米飯保溫Δ米飯可能會發出異味、變色和燒乾Ζ
20
SR-DE182-EN_CH_FR .indd 20
3/3/09 4:14:06 PM
Setting the Timer to Cook Rice
Utilisation et réglage de la minuterie pour la cuisson du riz
Setting Timer to Cook Rice
Utilisation et réglage
de la minuterie pour la cuisson du riz
ࡳྦ堩ࡳழᕴ
ׇׇईወ
The timer that you set distinguishes between current time and mealtime.
w Cooking mode that timer is applicable to.
La durée que vous fixez pour la minuterie correspond à la différence entre l’heure actuelle et l’heure du repas.
w Modes de cuisson pour lesquels la minuterie fonctionne.
൞ࡳऱࡳழᕴፖᅝছழၴࡉၞ塊ழၴլٵΖ
w ፣ྦᑓڤऱࡳழᕴᔞ࣍ش
Cooking Modes / Modes de cuisson /
Ⴗᆧϸ
Time Setting Range / Durées de réglage du temps / ईׇᇸూ
White Rice, Sticky Rice
Riz blanc, Riz gluant
ۏػϜᤅۏ
1-13 hours
1-13 heures
1-13 ʳ՛ழΖ
Porridge,Brown Rice / Gruau,Riz brun /
࿕堩Ϝᜋۏ
- Timer is not applicable to Quick Cook, Steam, Slow Cook and Cake mode.
- La minuterie ne peut pas être utilisée pour les modes Cuisson rapide, Vapeur, Cuisson lente et Gâteau.
- ࡳழᕴլᔞشፖݶຒ፣ྦϜ፣Ϝྦࡉᗶᑓڤ
Example / Exemple / գϩ
Set the Timer to finish cooking 8 hours later. / Régler la minuterie pour que la cuisson s’arrête 8 heures plus tard. / આႷׇईወׇ8ʯई݉ҭϿé
Select the cooking mode of your choice.
Sélectionnez le mode de cuisson de votre choix.
ᙇᖗ൞ऱ፣ྦᑓڤΖ
Flashing
Clignotant
ೂᡩ
Press
Pressez la touche
How to use
Comment utiliser le cuiseur de riz
ϩъՠΈ
1
h
ݞ
2
Press
again to set the time to finish cooking.
Pressez de nouveau la touche
cuisson.
ݞ
pour fixer l’heure de fin de la
h
ׇႷҭϿईé
●
The timer will progress in increments of 30 minutes every time
●
Keeping the key pressed will make setting faster.
●
Le temps de la minuterie progressera par incréments de 30 minutes chaque fois
que la touche
●
3
Flashing
Clignotant
ೂᡩ
sera pressé.
●
Maintenir la touche pressée accélère le réglage.
ʿʳࡳழᕴऱᏺၦʳ30ʳ։ᤪΖ
ڻޢਊ
●
ਊ۰ڼਊၨݶױຒࡳΖ
Press
Example:
Set timer to 8 hours
Régler la minuterie à 8 heures
ലࡳழᕴʳˋʳ՛ழ
Light turns on
Le voyant s’allume.
ᗉॽ
Complete setting.
Pressez la touche
ݞ
is pressed.
pour terminer le réglage.
Light turns off
Le voyant s’éteint
ᗉዽ
h
ҭϿׇé
Important Information / Informations importantes / ࡍ࠲ཋ৯
To cancel this function while it’s
operating
Press
Pour désactiver cette fonction
durant son fonctionnement
Pressez la touche
ይіईçषА̸়
ݞ
●
Rice may be slightly soft or overcooked when cooking with preset timer.
When cooking with preset timer, the display doesn’t show the time
left until the cooking is done.
● Le riz peut être un peu mou ou trop cuit en mode cuisson avec la
minuterie.
● Quand vous cuisez avec la minuterie, l’afficheur ne montre pas le temps
restant avant la fin de la cuisson.
● ࠌشቃࡳழᕴྦ堩ழΔۏ堩ױ౨࿑ຌࢨྦ֜ՆΖ
●ʳ ࠌشቃழၴྦ堩ʳʿʳ᧩قᕴլᄎ᧩ໍق塒ழၴऴࠩྦ堩ޔΖ
●
21
SR-DE182-EN_CH_FR .indd 21
3/3/09 4:14:10 PM
Recipes
Recettes
࡛ᗰ
Sushi Rice / Imperial Rice
Riz pour sushi / Riz impérial
ኂۏʳ˂ʳ壄ۏ
Sushi Rice / Riz pour sushi / ࿖͍У
Ingredients
Ingrédients
ਏअ
3 cups short-grain or sushi rice
cup rice wine vinegar
2 1⁄2 tablespoons sugar
1 1⁄2 teaspoons salt
3 tasses de riz à grain court ou de riz pour sushi
tasse de vinaigre de vin de riz
2 1⁄2 cuillers à soupe de sucre
1 1⁄2 cuiller à thé de sel
3ʳࣦศࢨۏኂۏʳ
1⁄2ʳࣦۏᔩʳ
2 1⁄2ʳྏೲᗷʳ
1 1⁄2ʳಁೲᨖ
1⁄2
1⁄2
In a colander, rinse short-grain or sushi rice under cold tap water until the water runs clear, about 1 minute. Add rinsed rice into the inner pan then add
water to level indicator 3 cup. Close the outer lid. Select “White Rice/Sticky Rice” cooking program and press “Start” key.
In a small saucepan over low heat, combine rice wine vinegar, sugar and salt, stir until sugar and salt are dissolved; remove from heat and set aside.
When rice is cooked, place it in a large wooden or non-reactive ceramic bowl and using a rice scoop, thoroughly mix vinegar mixture into rice to season
and prevent it from becoming sticky. Place a cool, dampened towel over rice to cool. Makes 4-5 cups.
En utilisant une passoire, rincez le riz à grain court ou le riz pour sushi sous le robinet d’eau froide jusqu’à ce que l’eau qui s’échappe soit claire, pendant
approximativement 1 minute. Versez le riz rincé dans le panier à fond puis ajoutez de l’eau jusqu’à l’échelle 3 CUP. Fermez le couvercle extérieur.
Sélectionnez le programme “White Rice/Sticky Rice” puis pressez la touche “Start”.
Dans une petite casserole mise à feu doux, mélangez le vinaigre de vin de riz, le sucre et le sel et brassez jusqu’à ce que le sucre et le sel se soient
dissous.Retirez du feu et mettez le mélange de côté.
Quand le riz est cuit, placez-le dans un grand bol en bois ou en céramique non réactive, et en utilisant la cuillère à riz, mélangez bien le mélange à base
de vinaigre avec le riz pour l’assaisonner et éviter qu’il devienne gluant. Placez une serviette humide froide sur le riz pour qu’il refroidisse. Pour 4 à 5
personnes/tasses.
ലศࢨۏኂ࣋ۏԵៀᕴխΔֽܐڇᚊᙰՀ堚ੑપʳ£ʳ։ᤪΔऴֽࠩ᧢堚Ζല堚ੑመऱףۏԵփΔྥ৵ֽ۟ףʳÎʳֽ֒ۯਐۯقᆜΖ።Ղ؆።Ζᙇᖗʳ
“White Rice/Sticky Rice” ፣ྦ࿓ڤΔྥ৵ਊʳ“Start” ਊၨΖʳ
ലۏᔩΕᗷࡉᨖ࣋ٽԵ՛ᗆփΔش՛ף־ᑷ᧓ࢯΔऴࠩᗷࡉᨖዹ֏Ιྥ৵ൕലൕףᑷՂฝၲΔᚶڇலᢰΖʳ
ۏ堩ྦړ৵Δലۏ堩ᇘԵԫଡՕֵᅹࢨլᄎ࿇֘سᚨऱჷᅹխΔྥ৵ش堩ޟലۏᔩٽढፖۏ堩ኧࢍࢯԵ࠺Δࠀַۏ堩᧢֜መយᆈΖۏڇ堩Ղ࣋ԫ
Ⴧᛘܐऱֻդၞ۩ܐথΖ։ګʳ{xʳ֒Ζ
Imperial Rice / Riz impérial / ႆ܈У
Ingredients
2
1
4
4
1
4
cups long-grain rice
tablespoon canola oil
oz. pork loin, diced
shallots
tablespoon grated fresh ginger
oz. medium shrimp, peeled, deveined and
diced into 1⁄2 - inch pieces
1⁄4 teaspoon salt
Pinch of freshly ground black pepper
2 tablespoons soy sauce
2 teaspoons fish sauce
1 tablespoon rice wine vinegar
1 egg, fried and chopped
2 green onions, chopped
2 tablespoons shredded coconut, lightly
toasted
2 limes, cut into quarters
Ingrédients
2
1
4
4
1
4
tasses de riz à grain long
cuiller à soupe d’huile de canola
oz de longe de porc, coupée en dés
échalotes
cuiller à soupe de gingembre frais râpé
oz de crevettes de taille moyenne, décortiquées,
déveinées et coupées en dés (morceaux de 1/2 po)
1⁄4 cuiller à thé de sel
Une pincée de poivre noir fraîchement moulu
2 cuillers à soupe de sauce au soja
2 cuillers à thé de sauce au poisson
1 cuiller à soupe de vinaigre de vin de riz
1 oeuf, frit et coupé en morceaux
2 oignons verts, coupés en morceaux
2 cuillers à soupe de noix de coco râpée et légèrement
grillée
2 limes, coupées en quartiers
ਏअ
2ʳ ࣦ९ศۏʳ
1ʳ ྏೲလતईʳ
4ʳ ఝᓼԭʳ
4ʳ ᓓʳ
1ʳ ྏೲᄁᅷऱᄅធৌ
4ʳ ఝխՕ՛ऱᓚΔଷླྀΕװᆩᆯࠀ֊
ګʳ1⁄2ʳΩ1ʳ՚९ऱ՛
1⁄4ʳ ಁೲᨖ
ʳԫ՛ᐽᄅធऱ႕أ
2ʳ ྏೲ᠕ईʳ
2ʳ ಁೲູʳ
1ʳ ྏೲۏᔩʳ
1ʳ ଡᠪΔᄾړ৵֊ᅷΖʳ
2ʳ ལॹᓓΔ֊ᅷΖʳ
2ʳ ྏೲᄖΔპ௸ʳ
2ʳ ଡॹិΔ֊ګʳ4ʳٝ
Place long-grain rice inside inner pan and add water to level indicator 2 CUP. Close the outer lid. Select “White Rice/Sticky Rice” cooking program and
press “Start” key. When rice is cooked, fluff rice and set aside.
Meanwhile, in a wok or large skillet over medium-high heat, warm canola oil until nearly smoking. Add pork loin and freshly ground black pepper, stirring,
until browned, 4-5 minutes. Add shallots, grated fresh ginger, medium shrimp, salt and freshly ground black pepper, and sauté, stirring, until shrimp are
pink and opaque throughout, 3-4 minutes more. Add soy sauce, fish sauce and rice wine vinegar, and stir to combine. Add rice, egg and green onions and
stir until well mixed. Transfer to a platter, garnish with shredded coconut and lime quarters and serve immediately. Serves 4-6 as a side dish.
Placez le riz à grain long dans le panier à fond puis ajoutez de l’eau jusqu’à l’échelle 2 CUP. Fermez le couvercle extérieur. Sélectionnez le programme
“White Rice/Sticky Rice” puis pressez la touche “Start” . Quand le riz est cuit, aérez le riz et mettez-le de côté.
Entre temps, en utilisant un wok ou une poêle à frire de grande taille mis(e) à feu moyen/fort, chauffez l’huile de canola jusqu’à ce qu’elle commence à
fumer. Ajoutez la longe de porc et le poivre fraîchement moulu en brassant jusqu’à ce que la viande brunisse (approximativement 4 à 5 minutes). Ajoutez
les échalotes, le gingembre frais râpé, les crevettes de taille moyenne, le sel, le poivre noir fraîchement moulu et le faites sauter, et brassez jusqu’à ce
que les crevettes prennent une teinte rosée et deviennent complètement opaques, pendant 3 à 4 minutes supplémentaires. Ajoutez la sauce au soja,
la sauce au poisson et le vinaigre de vin de riz, et remuez pour bien mélanger le tout. Ajoutez le riz, l’oeuf et les oignons verts et remuez jusqu’à ce que
le tout soit bien mélangé. Transférez dans un plat, garnissez avec la noix de coco râpée et les quartiers de lime et servez immédiatement. Pour 4 à 6
personnes comme plat d’accompagnement.
ല९ศ࣋ۏԵփΔֽ۟ףʳÓʳࣦۏऱֽۯਐۯقᆜΖ።Ղ؆።Ζᙇᖗʳ“White Rice/Sticky Rice” ፣ྦ࿓ڤΔྥ৵ਊ“Start” ਊၨΖۏ堩ྦړ৵Δᄁᠾۏ
堩Δྥ৵ᚶڇலᢰΖʳ
ٵழΔലလતईଙԵՕᄾΔشխף־ᑷʿऴࠩݶকᄿΖףԵᄅធऱ႕أΔचપʳ{xʳ։ᤪΔऴࠩचګཝۥΖףԵᓓΕᄁᅷऱᄅធৌΕխՕ՛ऱᓚΕ
ᨖࡉᄅធऱ႕أΔྥ৵٦चપʳÎ{ʳ։ᤪΔऴࠩᓚۚ᧢દլຘࣔΖףԵ᠕ईΕູࡉۏᔩΔྥ৵᧓ࢯٽΖףԵۏΕᠪࡉॹᓓΔ᧓ࢯࢯΖฐԵ
ᒌխΔאᄖࡉॹិׂאףᇘ堸ΔࠥܛױଇشΖ։ګʳ{Èʳٝ܂ॵလΖ
22
SR-DE182-EN_CH_FR .indd 22
3/2/09 4:50:49 PM
Recipes
Beef and Vegetable Soup / Steamed Pork and Shrimp Dumplings
Soupe au boeuf et aux légumes / Raviolis au porc et aux crevettes à la vapeur
ׄۚᓋလྏʳ˂ʳֽདྷᓼۚធᓚ堽
Recipes
࡛ᗰ
Recettes
Recettes
࡛ᗰ
Beef and Vegetable Soup / Soupe au boeuf et aux légumes / ̘Юሟ൰ೣ
Ingredients
Ingrédients
ਏअ
1 lb. boneless beef, cut into 1 inch pieces
1 cup beef broth
1 cup vegetable juice
1⁄2 teaspoon salt
1⁄2 teaspoon coarsely ground pepper
1⁄2 teaspoon dried thyme
1 bay leaf
1 cup diced potatoes
1⁄2 cup chopped cabbage
1⁄2 cup sliced onions
1⁄2 cup rutabaga, 1⁄2 inch pieces
1 carrot, diced
1 stalk celery, sliced
1 livre de boeuf désossé, coupé en morceaux de 1 po
1 tasse de bouillon de boeuf
1 tasse de bouillon de légumes
1⁄2 cuiller à thé de sel
1⁄2 cuiller à thé de poivre grossièrement moulu
1⁄2 cuiller à thé de thym séché
1 feuille de laurier
1 tasse de pommes de terre en dés
1⁄2 tasse de chou coupé en morceaux
1⁄2 tasse d’oignon coupé en lanières
1⁄2 tasse de rutabaga, morceaux de 1/2 po
1 carotte, coupée en dés
1 tige de céleri, coupée en lanières
1ʳᒓྤׄۚΔ֊ګʳ1ʳ՚९ऱ९යʳ
1ʳࣦׄۚྏʳ
1ʳࣦᓋလتʳ
1⁄2ʳಁೲᨖʳ
1⁄2ʳಁೲษᗣأʳ
1⁄2ʳಁೲեߺۍଉʳ
1ʳִׂெᆺʳ
1ʳࣦԭʳ
1⁄2ʳࣦ֊ᅷऱ൴֨လʳ
1⁄2ʳࣦᓓׂʳ
1⁄2ʳࣦᘖဍ៴زΔ1⁄2ʳ՚९ʳ
1ʳଡ᧠ᓑΔ֊ګԭʳ
1ʳལ۫ॗΔ֊ׂګ
Add beef broth, vegetable juice, and boneless beef to the inner pan and close the outer lid. Select “Slow Cook” cooking program and set time to 6 hours.
Press “Start” key. Cook 3 hours. Open the outer lid, then skim and discard any residue that rises to the surface. Add all others ingredients and mix well.
Close the outer lid and cook for another 3 hours. Serves 3.
Versez le bouillon de boeuf, le bouillon de légumes et le boeuf désossé dans le panier à fond puis fermez le couvercle extérieur. Sélectionnez le
programme “Slow Cook” et réglez le temps de cuisson à 6 heures. Pressez la touche “Start”. Laissez cuire pendant 3 heures. Ouvrez le couvercle
extérieur, écumez et retirez tous les résidus remontant et flottant à la surface. Ajoutez tous les autres ingrédients et mélangez bien le tout. Refermez le
couvercle extérieur et laissez cuire pendant encore 3 heures. Pour 3 personnes.
ലׄۚྏΕᓋလྤࡉتׄۚףԵփྥ৵።Ղ؆።Ζᙇᖗ“Slow Cook” ፣ྦ࿓ࠀڤലழၴࡳʳÈʳ՛ழΖਊʳ“Start” ਊၨΖྦʳÎʳ՛ழΖؚၲ؆።Δྥ৵
ኳೈ।૿Ղऱٚ۶௬أΖףԵࠡהறࠀ݁ٽΖ።Ղ؆።Δྥ৵٦ྦʳÎʳ՛ழΖ։ګʳÎʳٝΖ
Steamed Pork and Shrimp Dumplings / Raviolis au porc et aux crevettes à la vapeur / ̑ದቐЮᓦሮᄝ
Ingrédients
ਏअ
2 cups lean ground pork
2 cups raw shrimp, peeled, deveined and
chopped
1 cup minced green onion
1 tablespoon grated fresh ginger
3 tablespoons soy sauce
1 bunch watercress, coarsely chopped
1 1⁄2 teaspoon salt
1 tablespoon vegetable oil
30-40 wonton wrappers
2 tablespoons rice wine vinegar
Freshly ground pepper, to taste
2 tasses de porc maigre haché
2 tasses de crevettes crues décortiquées, déveinées
et coupées en morceaux
1 tasse d’oignon vert émincé
1 cuiller à soupe de gingembre frais râpé
3 cuillers à soupe de sauce au soja
1 bouquet de cresson d’eau grossièrement haché
1 1⁄2 cuiller à thé de sel
1 cuiller à soupe d’huile végétale
30 à 40 raviolis chinois
2 cuillers à soupe de vinaigre de vin de riz
Poivre fraîchement moulu, en fonction du goût
2ʳࣦ壄ᒇᓼۚ塛ʳ
2ʳࣦធᓚʿଷླྀΕװᆩᆯࠀࠬᅷʳ
1ʳࣦॹᓓأʳ
1ʳྏೲᄁᅷऱᄅធৌʳ
3ʳྏೲ᠕ईʳ
1ʳ۫ޔလʿ֊ګษʳ
1 1⁄2ʳಁೲᨖʳ
1ʳྏೲཬढईʳ
30-40ʳଡ堽ؼʳ
2ʳྏೲۏᔩ
ᄅធأʿאᓳ࠺Ζ
To make dumplings, in a large non-reactive ceramic or glass bowl, combine lean ground pork, raw shrimp, green onion, fresh ginger, 1 tablespoon soy
sauce, watercress, salt and ground pepper. Add vegetable oil and blend well. Place 1 tablespoon filling in the center of each wonton wrapper and wrap
according to package instructions. Pinch edges together with fingers or use a potsticker mold to form dumplings.
Add 1 cup water to inner pan, place 6-8 dumplings on steaming basket and place steaming basket inside inner pan. Close the outer lid. Select “Steam”
and cooking program and set time for 10 minutes. Press “Start” key.
Meanwhile, to make the dipping sauce, in a small serving bowl, combine the remaining 2 tablespoons soy sauce and rice wine vinegar. Transfer steamed
dumplings to a platter and serve dipping sauce alongside. Serve 6-8 as an appetizer. Repeat with remaining dumplings.
How to use
Comment utiliser le cuiseur de riz
ϩъՠΈ
Ingredients
Pour préparer les raviolis, utilisez un grand bol en verre ou en céramique non réactive pour bien mélanger le porc maigre haché, les crevettes crues,
l’oignon vert, le gingembre frais, 1 cuiller à soupe de sauce au soja, le cresson d’eau, le sel et le poivre moulu. Ajoutez l’huile végétale et mélangez bien le
tout. Placez 1 cuiller à soupe de garniture au centre de chaque ravioli chinois et roulez en vous basant sur les instructions indiquées sur le paquet. Pincez
les bords avec vos doigts ou utilisez un moule à raviolis chinois pour former les raviolis.
Ajoutez 1 tasse d’eau dans le panier à fond, placez 6 à 8 raviolis dans le panier d’étuvage et placez le panier d’étuvage dans le panier à fond. Fermez le
couvercle extérieur. Sélectionnez le programme “Steam” et réglez le temps de cuisson à 10 minutes. Pressez la touche“Start”.
Entre temps, pour préparer la sauce d’accompagnement, en utilisant un petit bol de service, mélangez les 2 cuillers à soupe restantes de sauce au soja et
de vinaigre de vin de riz. Transférez les raviolis cuits à la vapeur dans un plat et servez avec la sauce d’accompagnement. Pour 6 à 8 personnes comme
entrée. Répétez la même opération pour les raviolis restants.
፹堽Δ壄ᒇᓼۚ塛ΕធᓚΕॹᓓΕᄅធৌΕ£ʳྏೲ᠕ईΕ۫လΕᨖࡉ࣋أԵԫଡլᄎ࿇֘سᚨऱՕჷᅹࢨੲᑿᅹխٽΖףԵཬढईࠀ᧓ࢯ
݁ΖޢڇჇ堽ؼխ؇࣋Եʳ£ʳྏೲ塛Δྥ৵ਊץᇘՂऱᎅࣔץದࠐΖ֫شਐࢨץ堽ᑓലᢰᒴጹګ堽Ζʳ
ڇփխףԵʳ£ʳֽࣦʿലʳÈnʳଡ堽࣋Ե፣ᦨΔྥ৵ല፣ᦨ࣋ԵփΖ።Ղ؆።Ζᙇᖗʳ“Steam” ፣ྦ࿓ࠀڤലழၴࡳʳ£äʳ։ᤪΖਊʳ“Start” ਊၨΖʳ
ٵழΔ፹᧟᠕Δലໍ塒ʳÓʳྏೲ᠕ईࡉۏᔩଙԵ՛ྏᅹխٽΖല፣ړऱ堽ฐԵᒌխΔࠀല᧟᠕ឭڇலᢰΖ։ګʳÈnʳٝ܂ၲષଇढΖໍ塒堽ऱ᧟
᠕Ոڕױऄ੧፹Ζ
23
SR-DE182-EN_CH_FR .indd 23
3/2/09 4:50:49 PM
Recipes
Recettes
࡛ᗰ
Brown Rice / Steaming Vegetables
Riz brun / Légumes vapeur
ᜋۏʳ˂ʳ堚፣ᓋလ
Brown Rice / Riz brun / ᑟУ
Ingredients
Ingrédients
ਏअ
3 cups brown rice
Dark sesame oil, to taste
3 tasses de riz brun
Huile de sésame noir, en fonction de votre goût
3ʳࣦᜋۏ
႕॒ईΔאᓳ࠺
Note: It will take approximately 1 hour to properly
Remarque : La cuisson du riz prend approximativeඃΝݙ٤ྦۏړ堩ՕપᏁʳ1ʳ՛ழΖݺଚ৬
cook the rice. We recommend that you start well
ment 1 heure. Nous vous conseillons de commencer
ᤜ൞ࠃ٣ၲࡨΖ
in advance.
à l’avance.
In a colander, rinse rice under cold tap water until the water runs clear, about 1 minute. Add rinsed rice into the inner pan then add water to level indicator
3 CUP. Close the outer lid. Select “Porridge/Brown Rice” cooking program and press “Start” key.
When rice is cooked, fluff with rice scoop and season with dark sesame oil.
En utilisant une passoire, rincez le riz sous le robinet d’eau froide jusqu’à ce que l’eau qui s’échappe soit claire, pendant approximativement 1 minute.
Versez le riz rincé dans le panier à fond puis ajoutez de l’eau jusqu’à l’échelle 3 CUP. Fermez le couvercle extérieur. Sélectionnez le programme
“Porridge/Brown Rice” puis pressez la touche “Start”.
Quand le riz est cuit, aérez-le en utilisant la cuillère à riz puis assaisonnez avec l’huile de sésame noir.
ല࣋ۏԵៀᕴխΔֽڇᚊᙰՀ堚ੑપ˄ʳ։ᤪΔऴֽࠩ᧢堚Ζല堚ੑመऱףۏԵփΔྥ৵ֽ۟ףʳ3ʳࣦΖ።Ղ؆።Ζᙇᖗʳ“Porridge/Brown Rice”
፣ྦ࿓ڤΔྥ৵ਊʳ“Start” ਊၨΖʳ
ۏ堩ྦړழΔش堩ޟᄁᠾΔࠀش႕॒ईᓳ࠺Ζ
Steaming Vegetables / Légumes vapeur / ଢႷሟ൰
Ingredients
Ingrédients
ਏअ
1.
2.
3.
4.
5.
1.
2.
3.
4.
5.
1.ʳ
2.ʳ
3.ʳ
4.ʳ
5.ʳ
Pour water into the inner pan.
Place the steaming basket inside the inner pan.
Add vegetables (place in a dish if required.)
Close the outer lid.
Select “Steam” cooking program and set
time as in the table below).
6. Stir the vegetables occasionally and
continue cooking until the “Cooking Timer”
is complete.
Versez de l’eau dans le panier à fond.
Placez le panier d’étuvage dans le panier à fond.
Ajoutez les légumes (les placer dans un plat si nécessaire).
Fermez le couvercle extérieur.
Sélectionnez le programme “Steam” puis réglez le temps
de cuisson en vous référant au tableau ci-dessous).
6. Remuez de temps en temps les légumes et continuez
la cuisson jusqu’à ce que le temps de la minuterie de la
cuisson “Cooking Timer” soit arrivé à sa fin.
Vegetable / Légume / ሟ൰
Artichokes
Artichauts
: Globe
: Jerusalem
: Artichauts
: Jérusalem
ˍʳ๓ʳ
ˍʳળሁᐼܐʳ
: Whole
: Peeled, Whole
: entiers
: épluchés, entiers
ˍʳԫᖞଡʳ
ˍʳଷؼΔԫᖞଡ
ཛ嗏偳ʳ
ʳ
Asparagus
Asperge
ᤓ
Beans
: Green Waxed, whole
Haricots
: verts, entiers
လߤʳʳ
ʳ
ˍʳጸᥣߤΔԫᖞଡ
Broccoli
: spears
Brocoli
: tiges
ᄖလʳ
ʳ
ˍʳᑇׂ
Beets
: whole
Betteraves
: entières
กလʳ
ʳ
ˍʳԫᖞଡ
Carrots
: small, whole
Carottes
: petites, entières
᧠ᓑʳ
ʳ
ˍʳ՛Δԫᖞଡ
Cauliflower
: flowerettes
Choux-fleu
: fleurons
क़ᄖလʳʳ
ʳ
ˍʳ՛क़
Corn on the Cob
Maïs en épis
ྦۏدཧ
Peas
: Shelled
Petits pois
: sans cosse
ᓺߤʳʳ
ʳ
ˍʳླྀװ
Potatoes, Sweet Potatoes, quartered
Pommes de terre, patates douces, en quartier
್ርΔᘓΔٝ
Summer Squash, Zucchini
: cut-up
Courge d’été, courgette
: découpée
۫ᆹᤓΔભতذʳʳ ʳ
ˍʳ֊ᅷ
Winter Squash
: pieces
Potiron
: morceaux
ذʳʳ
ʳ
ˍʳ֊ׂ
Acorn Squash
: half
Courge poivrée
: moitié
ذמʳʳ
ʳ
ˍʳתଡ
Spinach
Épinards
ညလ
Frozen Mixed Vegetables
Légumes congelés variés
٧ଯչᙘᓋလ
ലֽଙԵփΖʳ
ല፣ᦨ࣋ԵփΖʳ
ףԵᓋလʳʻ࣠ڕᏁΔ࣋ԵᒌխΖʼʳ
።Ղ؆።Ζʳ
ᙇᖗ“Steam” ፣ྦ࿓ࠀڤਊᅃՀ
।խऱࡳࡳழၴΖʳ
6.ʳ ೝዿ೯ᓋလΔࠀᤉᥛ፣ྦΔऴࠩʳ
“Cooking Timer” ࠩழΖ
Quantity / Quantité / αය
Time (minute) / Durée (en minutes) / ई˝ᙾ
2-4
2-4
30-40
15-20
8 oz. (227 g)
8 onces (227 g)
8 ఝʳ(227 )܌
1 lb. (454 g)
1 livre (454 g)
1 ᒓʳ(454 )܌
1 lb. (454 g)
1 livre (454 g)
1 ᒓʳ(454 )܌
1 lb. (454 g)
1 livre (454 g)
1 ᒓʳ(454 )܌
1 lb. (454 g)
1 livre (454 g)
1 ᒓʳ(454 )܌
1 lb. (454 g)
1 livre (454 g)
1 ᒓʳ(454 )܌
3-6 ears
3-6 épis
3-6
8 oz. (227 g)
8 onces (227 g)
8 ఝʳ(227 )܌
5 oz. (142 g)
5 onces (142 g)
5 ఝʳ(142 )܌
1 lb. (454 g)
1 livre (454 g)
1 ᒓʳ(454 )܌
1 lb. (454 g)
1 livre (454 g)
1 ᒓʳ(454 )܌
1 lb. (454 g)
1 livre (454 g)
1 ᒓʳ(454 )܌
5 oz. (142 g)
5 onces (142 g)
5 ఝʳ(142 )܌
10 oz. (284 g)
10 onces (284 g)
10 ఝʳ(284 )܌
5-10
10-12
5-10
30-35
10-12
12-14
10-13
6-8
20-25
5-10
20-30
17-20
6-8
6-8
24
SR-DE182-EN_CH_FR .indd 24
3/2/09 4:50:50 PM
Recipes
Recettes
࡛ᗰ
Chocolate Cake / Shellfish Soup
Gâteau au chocolat / Soupe aux fruits de mer
ײڹԺᗶʳ˂ʳߦྏ
Chocolate Cake / Gâteau au chocolat / Ѝ͆ʎፊ
Ingredients
Ingrédients
ਏअ
375
2
75
150
375 g de mélange à gâteau au chocolat
2 oeufs
75 g d’eau
150 g de beurre
375ʳ
2
75
150ʳ
g chocolate cake mix
eggs
g water
g butter
ײڹ܌Ժᗶృʳ
ᠪʳ
ֽ܌ʳ
ׄ܌ई
Beat butter until fluffy. Pour chocolate cake mix and slowly add water and eggs. Whisk at low speed for 1 minute, increase speed to medium and continue
to beat about 4 minutes, scrape sides of bowl with rubber spatula and then whisk the mixture quickly for one more minutes.
Coat the inner pan with butter and then pour the mixture Close the outer lid.
Select “Cake” cooking program and set time to 55 minutes. Press “Start” key. After cake is cooked, the system will switch to “Keep Warm” program.
Press “Keep Warm/Off” key to turn this feature off.
Lift the inner pan out of the rice cooker, leave it to cool for 2-3 minutes then turn upside down onto a tray or grill. When cool, it is ready to be served.
Battez le beurre jusqu’à ce qu’il soit devenu mousseur. Versez le mélange spécial pour gâteau au chocolat puis ajoutez lentement l’eau et les oeufs.
Battez à basse vitesse pendant 1 minute, puis à vitesse moyenne et continuez à battre pendant approximativement 4 minutes. Essuyez le bord du bol
avec une spatule en caoutchouc puis battez le mélange rapidement pendant encore une minute.
Badigeonnez le panier à fond de beurre puis versez le mélange. Fermez le couvercle extérieur.
Sélectionnez le programme“Cake” puis réglez le temps de cuisson à 55 minutes. Pressez la touche “Start”. Quand le gâteau aura fini de cuire, l’appareil
passera en mode “Keep Warm”. Pressez la touche “Keep Warm/Off” pour désactiver cette fonction.
Sortez le panier à fond du cuiseur de riz, laissez-le refroidir pendant 2 à 3 minutes, puis renversez son contenu sur un plateau ou une grille. Quand le
contenu a refroidi, il est prêt à être servi.
ലׄईؚ۟ᠾ࿇ΖଙԵײڹԺᗶృࠀᒷኬףԵֽࡉᠪΖኬຒ᧓ࢯʳ£ʳ։ᤪΔྥ৵ףຒ۟խຒʿᤉᥛ᧓ؚપʳ{ʳ։ᤪΔشᖮᓄཧ堚ൿᅹᢰΔྥ৵٦ݶຒ᧓ؚ
ٽढપʳ£ʳ։ᤪΖʳ
ڇփჁԫᐋׄईʿྥ৵ଙԵٽढΖ።Ղ؆።Ζʳ
ᙇᖗ“Cake” ፣ྦ࿓ࠀڤലழၴࡳʳxxʳ։ᤪΖਊ“Start” ਊၨΖᗶړ৵Δߓอല֊ང۟“Keep Warm” ࿓ڤΖਊʳ“Keep Warm/Off” ਊၨΔױᣂຨ
פڼ౨Ζʳ
ലփൕሽխ༼נΔܐথʳÓÎʳ։ᤪΔྥ৵ଙᆜփലᗶଙԵᒌխࢨ௸ਮՂΖܐথ৵ΔࠥܛଇشΖ
How to use
Comment utiliser le cuiseur de riz
ϩъՠΈ
Shellfish Soup / Soupe aux fruits de mer / ࣯Ժೣ
Ingredients
1
1
1
1
1
1
1
1⁄2
4
1⁄2
1⁄2
1
tablespoon oil
onion, diced
green bell pepper, diced
large tomato, peeled, seeded and roughly
chopped
clove garlic, minced
teaspoon dried basil
teaspoon dried oregano
teaspoon fennel seeds, crushed
oz. extra wide noodles
lb. mussels
lb. clams
quart boiling water
Ingrédients
1
1
1
1
cuiller à soupe d’huile
oignon coupé en dés
poivron vert, coupé en dés
grosse tomate, pelée, épépinée et
grossièrement coupée
1 gousse d’ail émincée
1 cuiller à thé de basilic séché
1 cuiller à thé d’origan séché
1⁄2 cuiller à thé de graines de fenouil pilées
4 oz de pâtes extra larges
1⁄2 livre de moules
1⁄2 livre de palourdes
1 pinte d’eau bouillante
ਏअ
1ʳ ྏೲईʳ
1ʳ ᓓΔ֊ګԭʳ
1ʳ ଡॹΔ֊ګԭʳ
1ʳ ଡՕᘓૈʿଷؼΕװતࠀษฃ֊Ⴧʳ
1ʳ ᡰՕ፡Δ֊ᅷʳ
1ʳ ಁೲե᧠೬ʳ
1ʳ ಁೲեׄ۟ʳ
1⁄2ʳ ಁೲ౽ଉતΔᒖᅷʳ
4ʳ ఝᐈ૿ʳ
1⁄2ʳ ᒓࣾʳ
1⁄2ʳ ᒓဦᇑʳ
1ʳ ڏๅआֽ
Start heating frying pan, put oil in the frying pan and add onion, green bell pepper and garlic. Cook until tender.
Add tomato, dried basil, oregano, fennel seeds, and sauté.
Add 1 quart boiling water, mussels and clams, and cook.
Place the cooked ingredients in the inner pan, and close the outer lid.
Select “Porridge/Brown Rice” cooking program and press “Start” key.
After 30 minutes, open the outer lid and add extra wide noodles. Close the outer lid and let stand until beep sounds. Serves 3.
Commencez par faire chauffer la poêle, versez l’huile puis ajoutez l’oignon, le poivron vert et l’ail.
Faites cuire jusqu’à obtention d’une texture tendre.
Ajoutez la tomate, le basilic séché, l’origan séché, les graines de fenouil et faites sauter. Ajoutez 1 pinte d’eau bouillante, les moules et les palourdes et
laissez cuire.
Placez les ingrédients cuits dans le panier à fond puis fermez le couvercle extérieur.
Sélectionnez le programme “Porridge/Brown Rice” puis pressez la touche “Start”.
Après 30 minutes, ouvrez le couvercle extérieur et ajoutez des pâtes extra larges. Fermez le couvercle extérieur et laissez cuire jusqu’à ce que vous
entendiez le bip de la minuterie. Pour 3 personnes.
٣ףᑷᄾΔ࣋ԵईΔྥ৵ףԵᓓΕॹࡉՕ፡ΖྦຌΖʳ
ףԵᘓૈΕե᧠೬Εեׄ۟ࡉ౽ଉતΔྥ৵चΖʳ
ףԵʳ£ʳڏๅआֽΕࣾࡉဦᇑΔྥ৵ֽྦΖʳ
ലྦመऱற࣋ԵփΔྥ৵።Ղ؆።Ζʳ
ᙇᖗ“Porridge/Brown Rice” ፣ྦ࿓ڤΔྥ৵ਊ“Start” ਊၨΖʳ
Îäʳ։ᤪ৵Δؚၲ؆።ΔףԵᐈ૿Ζ።Ղ؆።ᤉᥛ፣ྦΔऴࠩ࿇נቷቷᜢΖ։ګʳÎʳٝΖ
25
SR-DE182-EN_CH_FR .indd 25
3/2/09 4:50:51 PM
Parts that need to be cleaned after every use
Pièces devant être lavées et nettoyées après utilisation
شࠌڻޢ৵ຟᏁ堚ੑऱሿٙ
Cleaning
Lavage et nettoyage
ଢޥ
Parts that need to be cleaned after every use /
Pièces devant être lavées et nettoyées après utilisation / ӶЏՠΈ݉௳ᄕଢྒྷڅޥέ
Important Information / Informations importantes / ࡍ࠲ཋ৯
w
w
w
w
w
w
w
w
w
The Rice Cooker may be still hot soon after cooking. Unplug it and wait for it to cool down before beginning to clean it.
Do not clean with benzine, thinner, polish powder, metal scrubber, or nylon brush.
Please do not use dishwasher.
Le cuiseur de riz peut rester chaud immédiatement après la cuisson. Débranchez-le et attendez qu’il refroidisse avant de commencer à le nettoyer.
Ne nettoyez pas l’appareil en utilisant de l’essence de pétrole, un diluant, une poudre à polir, un tampon à récurer en métal ou une brosse en nylon.
Ne le lavez pas dans un lave-vaisselle.
፣ྦ৵լՆΔሽսྥৰᗍΖ堚ੑছΔࢸൾሽᄭ༺ᙰΔৱࠡܐথΖ
ᓮ֎ࠌشईϜ࿕ᤩᕪϜࢹ٠ృϜ८᥆ࠧࢨ؍ᚊࠧΖ
ቂढࠌشੑᅹᖲΖ
Main body and Outer lid
Wipe with a damp cloth.
Boîtier principal et couvercle extérieur de
l’appareil
Essuyez en utilisant un chiffon humide.
ᓍᝃ͚֝Ⴖ
شᛘؒᚴΖ
Steam vent
Wipe well with a damp cloth. Also, in the
same manner, use a damp cloth to wipe
the rubber packing.
Sortie d’échappement de la vapeur
Essuyez bien en utilisant un chiffon
humide. De la même façon, utilisez aussi
un chiffon humide pour essuyer le joint en
caoutchouc.
ᅈय˲
شᛘؒشԺᚴΖٵشᑌऱֱڤΔࠌشᛘؒ
ᚴᖮᓄΖ
Inner Pan
w Use the dish diluted detergent, sponge and water to
clean it. Dry the external surface of the inner pan.
w Color change or stripe may occur on fluorine
coating, but it is not harmful to health and usage
of this inner pan.
w The collision between the external surface of the
inner pan and the cast heater may show some
scratching marks on the coating depending on
the frequency of usage.
It will not affect the cooking efficiency.
Panier à fond
w Utilisez du détergent pour la vaisselle dilué, une
éponge et de l’eau pour le lavage. Séchez la
surface extérieure du panier à fond.
w Des décolorations ou des bandes peuvent
apparaître sur le revêtement contenant du
fluor, mais ceci ne nuit pas à la salubrité et à
l’utilisation du panier à fond.
w Le contact entre la surface externe du panier
à fond et la plaque chauffante peut laisser des
éraflures sur le revêtement selon la fréquence
d’utilisation. Ceci ne nuit pas à l’efficacité de
cuisson.
Inner lid
■ Remove the inner lid
Get hold of two tabs, then pull them towards you.
■ Attach the inner lid
Insert the protruding part marked with into the locker
on the outer lid slightly tilted.
Press the tabs (both sides) towards the outer lid sides until the click sound is heard.
Couvercle intérieur
■ Retrait du couvercle intérieur
Prenez les deux languettes et tirez-les vers vous.
■ Installation du couvercle intérieur
Insérez la partie protubérante marquée du symbole dans le dispositif de
verrouillage sur le couvercle extérieur en adoptant une approche en angle.
Pressez sur les languettes (sur les deux côtés) vers l’intérieur des côtés du
couvercle extérieur jusqu’à ce que vous entendiez un clic de fermeture.
˗Ⴖ
■ ਜ˗Ⴖ
ਊ۰ࠟଡֱʿཛ൞۞աऱֱࢮٻΖ
■ ો˗Ⴖ
ലᑑڶʳʳऱડנຝ։ႜ༺Ե؆።Ղऱ᠙ڬᇘᆜΖ
ലֱʻࠟೡʼཛ؆።ऱփೡਊᚘʿऴࠩᦫࠩዠᜢΖ
Triangle Mark
Marque en forme
de triangle
Կߡᑑ
Load and Unload tabs of inner lid
Languettes d’installation et de retrait
du couvercle intérieur
ᇘՂϜࣈ࠵փ።ֱ
Important Information / Informations importantes / ࡍ࠲ཋ৯
w
w
w
w
w
w
w
w
w
Wash with diluted detergent for dishes, sponge, and water
Please wash the inner lid immediately after cooking with seasonings. Otherwise flour odour, corruption, or rust may develop.
Remove all the excess water from the inner lid and rubber seal before attaching.
Lavez en utilisant un détergent pour la vaisselle dilué, une éponge et de l’eau
Veuillez laver le couvercle intérieur immédiatement après une cuisson avec des assaisonnements. Si vous ne le faites
pas, une odeur de farine, une altération ou une corrosion peut se développer.
Enlevez toute l’eau en excès sur le couvercle intérieur et le joint en caoutchouc avant de l’installer.
ࠌ࣍شش堚ੑᕴؽऱ堚ᑥᕪϜ௧ጿࡉֽ堚ੑ
ףᓳ࠺றྦ৵Δቂࠥܛ堚ੑփ።Ζܡঞױ౨ڶ࠺Ϝፍᡏࢨس㠩Ζ
ຑ൷ছΔଙൾփ።ࡉᖮᓄഎխڍ塒ऱֽ
˗ᓍ
w ࠌشᕴؽറش堚ᑥᕪΕ௧ጿࡉֽ堚ੑ،Ζ
ലփऱ؆।૿ᚴΖ
w ʳੇჁᐋՂױ౨ᄎנ᧢ࢨۥයెΔ܀ຍኙ
ൈ֗փऱࠌٲڶش୭Ζ
w ီشࠌऱ᙮യ৫ʿփ؆।૿ፖሽᑷࣨၴऱ
ᅸᐳױ౨ᄎᖄીჁᐋՂנࠪฉΖʳຍլᄎᐙ
छྦய࣠Ζ
Upper frame / Cadre supérieur / ʖ́ނ
Wipe with well-wrung cloth.
Essuyez en utilisant un chiffon bien essoré.
ᚳեؒᚴΖ
Important Information
Informations importantes
ࡍ࠲ཋ৯
Do not pour water directly on the upper frame.
Ne versez pas d’eau directement sur le cadre
supérieur.
ᓮ֎ऴ൷ലֽଙڇՂ֭ਮՂΖ
Temperature sensor and Cast heater / Capteur de température et plaque chauffante / ຉܿึᏼወ֝ྑᇋؼ
Wipe with a damp cloth. If an object has become stuck, lightly polish it off using the sand paper (of about #600)
Essuyez en utilisant un chiffon humide. Si un objet s’est coincé, frottez-le légèrement en utilisant du papier de verre (approx. #600)
شᛘؒᚴΖૉढ᧯᧢⊺ʿޥش᎘᎘ᚴൾױܛʳʻપʳ#600ʼΖ
Important Information / Informations importantes / ࡍ࠲ཋ৯
26
If it is used when unclean, rice may be burnt or not be cooked properly.
Si le cuiseur n’a pas été nettoyé, le riz peut être brûlé ou ne pas être cuit correctement.
ૉࠌشழآ堚ᑥΔ堩ױ౨ᗈᒫࢨ፣ྦլᅝΖ
SR-DE182-EN_CH_FR .indd 26
3/2/09 4:50:55 PM
Troubleshooting
Guide de dépannage
ᑊᖆݰ
Troubleshooting / When the display shows as follows
Guide de dépannage / Quand l’afficheur vous indique ce qui suit
ᛶإംᠲൻਜ / ڕՀࢬق
Please check the following items.
Veuillez vérifier les points suivants.
ቂᐔ̤ދʔොé
TroubleshootingGuide de dépannage /
ᑊᖆݰ
Unplugged or pushed “Off”
The
l
l
l
l
l
l
l
l
l
l
l
l
l
l
l
l
l
l
l
l
l
l
l
l
l
l
l
l
l
l
l
a été pressée durant la cuisson.
ਊၨΖ
key was not correctly pressed.
La touche
ਊ
l
l
key while cooking.
L’appareil a été débranché ou la touche
፣ྦழࢸൾሽᄭ༺ᙰࢨਊՀ
l
l
n’a pas été pressée correctement.
l
l
l
l
l
ਊၨլᅝΖ
How to use
Comment utiliser le cuiseur de riz
ϩъՠΈ
The bottom of the inner pan was not smooth.
Le fond du panier à fond n’était pas lisse.
փࢍຝլؓΖ
There were some foreign objects on the outside of the inner pan or on the
temperature sensor.
Il y avait des objets étrangers à l’extérieur du panier à fond ou sur le capteur
de température.
փ؆ࢨᄵ৫ტᚨᕴՂڶฆढΖ
The outer lid was not closed properly.
Le couvercle extérieur n’a pas été correctement fermé.
؆።آ።ړΖ
Cooked rice with oil.
Riz cuit avec de l’huile.
شई፣ྦΖ
Did not stir the rice after cooking finished.
Le riz n’a pas été remué après la fin de la cuisson.
፣ྦ৵آง࣪ۏ堩Ζ
Warmed rice over 12 hrs or too little rice to be warmed.
Le riz a été maintenu au chaud pendant plus de 12 heures ou la quantité de
riz à maintenu au chaud était insuffisante.
অᄵ၌መʳ12ʳ՛ழࢨঅᄵ堩ၦ֜֟Ζ
Warmed rice with rice scoop or other similar rice utensil inside.
Le riz a été maintenu au chaud avec la cuillère à riz ou un autre
ustensile similaire dans le.
ۏ堩ፖ堩ՎࢨᣊۿऱᕴࠠԫದঅᄵΖ
Warmed cold rice.
Du riz froid a été réchauffé.
ᑷܐ堩Ζ
Did not fully clean inner pan.
Le panier à fond n’a pas été bien nettoyé.
آኧࢍ堚ੑփΖ
w Clicking sounds are produced during cooking due to power adjustments.
w An explosive “popping” sound is produced during cooking by burst of vapors between the inner pan and the cast heater.
Sounds were produced during cooking
w Des clics sont produits durant la cuisson en raison de variations du courant.
Des sons ont été produits durant la
w Un bruit d’explosion “pop” est produit durant la cuisson à cause de l’explosion de vapeurs entre le panier à fond et la plaque chauffante.
cuisson.
w ሽԺᓳᆏᖄી፣ྦழ࿇נዠᜢΖ
፣ྦழڶᜢଃ
w փፖሽᑷࣨၴऱֽᏴ࿇ᖄી፣ྦழ࿇נᡨ੦ۿऱˮణణ˰ᜢΖ
The rice at the bottom of the
cooker was terribly burnt.
Le riz au fond du cuiseur a été
très brûlé.
ࢍ堩ྡྷΖ
l
w Unplug or unfit the plug with the socket.
w Appareil débranché ou mauvaise prise utilisée.
w ࢸൾሽᄭ༺ᙰࢨ༺ᙰ༺Ե༺ஆլᅝΖ
Flour water overflowed
De l’eau a débordé
ֽᄨנ
l
Dry rice
Le riz est sec
堩֜ե
Too soft
Riz trop mou
֜ຌ
l
Discolored rice
Le riz est décoloré
堩᧢ۥ
Not cooked (half-cooked)
N’est pas cuit (qu’à moitié cuit) آ
ᑵʻתᑵʼ
l
Did not rinse rice.
Le riz n’a pas été rincé.
آ堚ੑۏΖ
Smelly rice
Le riz dégage une odeur
堩ᣄፊ
Too hard
Riz trop dur
֜࿏
l
Items to be checked
Points à vérifier
ᛀࠃႈ
Amount of rice and water level was wrong.
La quantité de riz et le volume d’eau n’étaient pas corrects.
ֽࠏֺۏᙑᎄΖʳ
During Rice Warming
Durant le réchauffement du riz
অᄵཚၴ
Key functions were disabled.
Les fonctions principales étaient
désactivées.
פ౨ྤயΖ
Rice was
Condition du riz
堩
Problem
Problème
ംᠲ
When the display shows as follows /
Quand l’afficheur vous indique ce qui suit / ϩʔΖ
Display / Afficheur / Ζ
Problems and Troubleshooting / Problèmes et pannes / ᖆႪᑊᖆݰ
Following continuous 96 hours under “keep warm” status, the power supply will automatically cut off. Please press
key first.
Après une utilisation continue pendant 96 heures en mode “Maintien au chaud”, l’alimentation électrique sera automatiquement
coupée. Pressez d’abord la touche
.
ڇʳ“keep warm” ᑓڤՀᥛঅᄵʳÈʳ՛ழΔሽᄭല۞೯ᣂຨΖᓮଈ٣ਊ
ਊၨΖ
Contact the authorized service centers for repair.
Contactez un centre de service agréé pour réparation.
ࠩᦞࣚ೭խ֨ፂଥΖ
27
SR-DE182-EN_CH_FR .indd 27
3/2/09 4:51:00 PM
Specifications
Spécifications
थ
Model No.N° de modèle / ܔ༚
SR-DE102
Rated Voltage ˂ʳTension nominale / ᠰࡳሽᚘʳ
120 V / ٗ ~ 60 Hz / ᎒౿
Power Consumption
(Approx.)
Consommation
(Environ)
פʳʻપʼ
Rice Cookingʳ˂ʳCuisson du riz / ྦۏ堩
600 W / ر
Cake Bakingʳ˂ʳCuisson d’un gâteau / ௷ྠᗶ
620 W / ر
Keep Warmʳ˂ʳMaintien au chaud / অᄵ
52/600 W *1 / * ر1
0.18 ~ 1.0 L / ֒
(1 ~ 5)
Cooking Capacity
White Riceʳ˂ʳRiz blanc / ۏػ
( ) is the amount of rice
that can be cooked at one Quick Cookʳ˂ʳCuisson rapide / ݶຒ፣ྦ
time (Cup)
0.18 ~ 1.0 L / ֒
(1 ~ 5)
Capacité de cuisson
Brown Riceʳ˂ʳRiz brun / ᜋۏ
( ) est la quantité de riz
pouvant être cuite en
une seule fois (verre
mesureur)
0.18 ~ 0.54 L / ֒
(1 ~ 3)
Sticky Riceʳ˂ʳRiz gluant / ᤅۏ
0.18 ~ 0.54 L / ֒
(1 ~ 3)
Porridgeʳ˂ʳGruau / ࿕堩
0.09 ~ 0.18 L / ֒
(1/2 ~ 1)
෪ྦၦ
ʻʳʼʳਢ෪ྦԫڻऱ堩ၦΖ
ʻࣦʼ
0.4 ~ 1.8 L*2 / ֒*2
Slow Cookʳ˂ʳCuisson lente / ྦ
Cakeʳ˂ʳGâteau / ᗶ
Size (Approx.)
Dimensions (Approx.)
؆֡ݮ՚ʻપʼ
500 g / ܌
Widthʳ˂ʳLargeur / ᐈ
251 mm / ශۏ
Lengthʳ˂ʳLongueur / ९
332 mm / ශۏ
Heightʳ˂ʳHauteur /
210 mm / ශۏ
Weight (Approx.)ʳ˂ʳPoids (Approx.) / ૹၦʻપʼʳ
2.8 kg / Տ܌
w When the rice cooker is in “Off” mode, the power consumption is about 0.5 W.
w (*1) In Keep Warm mode, power consumption will fluctuate between indicated value to maintain rice temperature.
w (*2) Reference from water level scale
Please contact dealers or authorized service centers for replacement of control unit or repair
Note: These specifications are subjected to change without prior notice.
w Quand le cuiseur de riz est en mode “Arrêt” (Off) , la consommation de courant est d’approximativement 0,5 W.
w (*1) En mode Maintien au chaud, la consommation variera entre les valeurs indiquées pour garder le riz chaud.
w (*2) Référence à l’échelle associée au niveau de l’eau
Veuillez contacter un revendeur ou un centre de service agréé pour le remplacement ou la réparation de l’unité de contrôle.
Nota: Ces spécifications sont susceptibles d’être modifiées sans préavis.
w ሽ࣍ˮᣂຨ˰ᑓڤழΔሽԺʳ0.5ʳرΖ
w (*1)ʳ࣍অᄵᑓڤΔሽԺڇਐقଖၴं೯Δאঅۏ堩ᄵ৫Ζ
w (*2)ʳࠥۯֽە৫
ቂᜤሿഇࢨᦞࣚ೭խ֨ޓང൳ࠫᕴࢨፂଥΖ
ඃʳ;ޏޓຍࠄΔஏլ༼ছຏवΖ
Approximate time for cooking /
Temps de cuisson approximatif /
፣ྦऱՕીழၴʳ
Using the Keep Warm mode /
Utilisation du mode
Maintien au chaud /
ࠌشˮঅᄵ˰ᑓڤ
Usage of Timer /
Utilisation de la minuterie /
ࡳழᕴऱࠌش
White Rice(*1) / Riz blanc(*1)) / *(ۏػ1)
Approx. 40 min ˂ʳApprox. 40 min / પʳ40ʳ։ᤪΖ
Quick Cook(*2) / Cuisson rapide(*2) / ݶຒ፣ྦ(*2)
Approx. 15 min ˂ʳApprox. 15 min / પʳ15ʳ։ᤪΖ
Sticky Rice(*1) / Riz gluant(*1) / ᤅ*(ۏ1)
Approx. 40 min ˂ʳApprox. 40 min / પʳ40ʳ։ᤪΖ
Porridge(*1) / Gruau(*1) / ࿕堩(*1)
Approx. 60 min ˂ʳApprox. 60 min / પʳ60ʳ։ᤪΖ
Brown Rice(*1) / Riz brun(*1) / ᜋ*(ۏ1)
Approx. 60 min ˂ʳApprox. 60 min / પʳ60ʳ։ᤪΖ
Steam / Vapeur / ፣
Approx 1-60 min / Approx. 1-60 min / પʳ1-60ʳ։ᤪΖ
Slow Cook / Cuisson lente / ྦ
Approx. 1-12 hrs ʳ˂ʳApprox. 1-12 heure(s) / પʳ1-12ʳ՛ழΖ
Cake / Gâteau / ᗶ
Approx 20-65 min ˂ʳApprox. 20-65 min / પʳ20-65ʳ։ᤪΖ
w (*1) Time indicated in the table is used for reference when cooking at 120V, 20ºC room temperature, and average rice amount (half of its maximum capacity).
Cooking time may be changed slightly if different voltage, room temperature, water tempeature, water level, rice amount and quality are applied.
(*2) Quick cook, rice cooked within 15 minutes. (Under Panasonic test method) Rice 1 cup.
w “” indicates modes that are not recommended.
w (*1) Le temps de cuisson indiqué dans le tableau est utilisé comme référence pour une cuisson associée à une tension électrique de 120 V, une température de la pièce
de 20°C et une quantité moyenne de riz (moitié de la capacité maximum).
Le temps de cuisson peut légèrement varier si la tension électrique est différente, si la température de la pièce est différente, si la température de l’eau est différente, si
la quantité d’eau est différente ou si la quantité ou la qualité du riz est différente.
(*2) Cuisson rapide, le riz est cuit en 15 minutes. (méthode testée par Panasonic) Riz 1 verre mesureur.
w Les modes d’utilisation non recommandés sont signalés par la présence du signe “”.
w (*1)ʳ।խ᧩قழၴڇ࣍شሽᚘʳ120ʳٗΔᄵʳ20ʳ᥊ּ৫ൣउՀΔؓ݁ۏၦʳʻ່ۏڍၦऱԫתʼʳ፣ྦழၴऱەΖʳૉሽᚘϜᄵϜֽᄵϜֽۯϜۏၦࡉᔆլٵΔ፣ྦழၴױ
౨᧢ޓΖʳ
ʳ (*2)ʳݶຒ፣ྦழʿழၴڇʳ15ʳ։ᤪփΖʻPanasonic ྒྷᇢֱڤՀʼʳ1ʳࣦۏΖ
w “” ।قլ৬ᤜऱᑓڤΖ
28
SR-DE182-EN_CH_FR .indd 28
3/11/09 12:54:28 PM
Customer Services Directory (United States and Puerto Rico)
Obtain Product Information and Operating Assistance; locate your nearest Dealer or
Servicecenter; purchase Parts and Accessories; or make Customer Service and Literature
requests by visiting our Web Site at:
http://www.panasonic.com/consumersupport
or, contact us via the web at:
http://www.panasonic.com/contactinfo
You may also contact us directly at:
1-800-211-PANA (7262)
Monday-Friday 9 am-9 pm; Saturday-Sunday 10 am-7 pm, EST.
For hearing or speech impaired TTY users, TTY : 1-877-833-8855
Accessory Purchases (United States and Puerto Rico)
Purchase Parts, Accessories and Instruction Books online for all Panasonic
Products by visiting our Web Site at:
http://www.pasc.panasonic.com
or, send your request by E-mail to:
[email protected]
You may also contact us directly at:
1-800-332-5368 (Phone) 1-800-237-9080 (Fax Only) (Monday-Friday 9 am to 8 pm, EST.)
Panasonic Services Company
20421 84th Avenue South,
Kent, WA 98032
(We Accept Visa, MasterCard, Discover Card, American Express, and Personal Checks)
For hearing or speech impaired TTY users, TTY : 1-866-605-1277
Web Site USA : http://panasonic.com
Canada : http://panasonic.ca
SR-DE182-EN_CH_FR .indd 32
RZ19A9641
PHAT0811-0
Printed in Thailand
3/2/09 4:51:04 PM