1
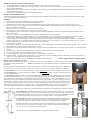
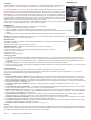
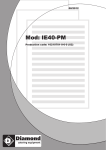
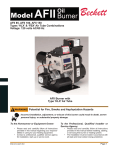
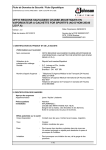
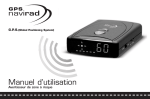
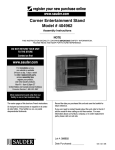
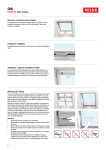
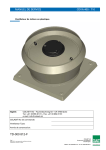
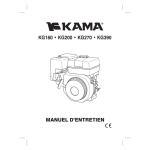
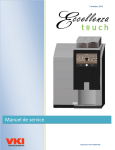
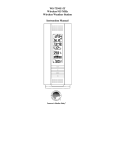
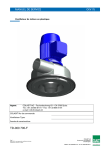
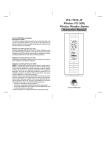
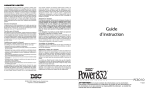
OPERATING INSTRUCTIONS
NOTICE D' UTILISATION POUR MODELES
537RU
737RU
Trim / Cadre 838CH
Thank you very much for purchasing a Burley electric fire. Please spend a couple of minutes reading these
instructions before using the appliance, they are to ensure your safety and convenience.
CAUTION
RISK OF ELECTRIC SHOCK
DO NOT OPEN
NO USER-SERVICEABLE PARTS INSIDE
Felicitations pour votre achat d’un foyer electrique Burley. Lisez attentivement la notice d’utilisation de cet
appareil avant sa mise en marche, cela vous garantira la meilleure sécurité de fonctionnement.
ATTENTION
RISQUE DE CHOCKS ELECTRIQUES
NE PAS DEMONTER LE FOYER
Burley Appliances Ltd, c/o Corporate Center International Inc.
812 Procter Avenue, Ogdensburg, NY 13669, USA.
Toll Free: 1 877 443 4737 Fax: 1 905 655 7610
E-mail [email protected] www.burleyfires.com www.burley.co.uk
IMPORTANT SAFETY INSTRUCTIONS
1.
To disconnect heater, turn controls to off, then remove plug from outlet.
2.
A heater has hot and arcing or sparking parts inside. Do not use it in areas where gasoline, paint, or flammable liquids are used or stored.
3.
Use this heater only as described in this manual. Any other use not recommended by the manufacturer may cause fire, electric shock, or injury
to persons.
4.
Do not use this appliance on an extension lead.
IMPORTANT INSTRUCTIONS
When using electrical appliances, basic precautions should always be followed to reduce the risk of fire, electric shock and injury to persons. These
include the following:
Installation.
1.
Read all the instructions before using this heater.
2.
Do not locate this heater immediately below a socket outlet.
3.
Do not use this heater in the immediate surround of a bath, shower, or swimming pool. Do not allow any contact with water.
4.
Do not cover this heater. Do not locate near curtains etc, they could blow and cover the heater. Do not allow any flammable objects such as
chairs, tables etc to be placed within six feet of the heater. Do not allow anything to restrict the airflow around the heater, there could be a risk
of overheating.
5.
Do not lead the cable in front of the air outlet.
6.
Do not trap the cable. Ensure that the fire is not standing on the cable.
7.
Before use, the appliance must be securely fixed by the method described in the following pages. Until it has been fixed in place, do not leave
it in a location where it could be accidentally knocked over by children or pets etc.
8.
Do not permanently fix the appliance, it will need removing for servicing.
9.
Parts of this heater are hot when in use. To avoid burns, do not touch hot surfaces.
10.
Do not run the cable under a carpet or rug etc. Arrange cable away from traffic areas and where it will not be tripped over.
11.
This appliance must not be used by children or other persons without assistance or supervision if their physical, sensory or mental capabilities
prevent them from using it safely. Children must be supervised to ensure that they do not play with or touch the appliance. Use an approved
fixed fire screen or safety guard if there is any chance that the appliance could be inadvertently touched.
12.
Do not use outdoors.
13.
Do not operate any heater with a damaged cable or plug or after the heater malfunctions, or after it has been dropped or damaged in any manner. Return the appliance to an authorised service agent for examination and repair.
14.
Do not insert or allow foreign objects to enter the appliance as this may cause electric shock, fire, or damage to the appliance.
15.
This is an imitation flame effect electric fire and must not be used as a real fire.
16.
Do not sit or put loads on top of the appliance.
17.
If moving, do not drag the appliance as this could cause damage. Lift the appliance (with help if required), move then lower.
18.
Risk of choking. The pebbles on the fire are real. Do not allow children or pets etc to eat the pebbles due to the risk of choking. Never leave
unsupervised.
19.
Switch off and unplug the appliance when not in use.
Save these instructions
Commissioning your fire / surround
Carefully unpack your electric fire, it will consist of: Electric fire, one spacer already fixed to frame (537 only),
bag of pebbles, a log effect, a fixing kit and a remote handset.
Stone effect surround, surround fixing kit and a remote handset. ( 737 suite only)
The trims have sharp edges. Always wear protective gloves, boots, goggles and clothing when carrying out any fitting or
servicing tasks on this appliance. Ensure all tools are in good repair. If in any doubt, seek assistance.
1. (537 Only) There are two silver transit screws located at the rear of the appliance. These must be removed before installation. See picture right
2. (737 Only) There are four transit bolts at the rear of the surround. These must be removed prior to securing the surround to the wall.
3. (537 only) Position the electric fire following the installation instructions above. For stability you must fix the fire into
position using the fixing kit, this is to ensure that the appliance will not fall forward. Using the wall plug, attach the eyebolt to the wall or back of the fireplace behind the fire. Screw the fixing screws and washers partway into the hole shown
in the diagram. Wrap one end of the wire half way around the left-hand screw and tighten so the wire is trapped between
the washer and the chassis. Now pass the other end of the wire through the eye bolt. Move the fire closer to the eyebolt .
It is not usually necessary to have the wire taut. Thread the wire through one of the two fixing holes in the other side of
the chassis, position the fire, then pull through the wire to take up the slack and thread the wire all the way back through
the other hole. Move the fire back to the required position and check it is secured by tipping the fire forwards so the wire
is supporting the weight. Give it a small tug to ensure that it is secured.
This product also has the option of being hung from a wall using the cut out keys on the rear (→).
The product must be secured to a wall using appropriate wall plugs.
4. (737 Only) The surround must now be secured to the wall with the fitting kit provided. A template for this, is marked out
on the outside of the cardboard box. Use this to locate and fix the brackets to the wall using the large screws and wall plugs
provided. The, lift the surround and hook the brackets on the back of the surround over the
brackets on the wall. This should be done by two adults.
Adhesive
5. (537only) The appliance comes with one removable spacer. If you would like
strips
to use the electric fire freestanding, leave the spacer fixed to the rear of the front
trim. If you have a suitably sized fireplace opening the spacer can be removed to
allow insetting.
6. Fixing stainless steel sides: Remove the backing of the adhesive strips and press the stainless
steel sides firmly to the black trim on the fire. Ensure they are lined up. ONCE IN PLACE,
THEY CANNOT EASILY BE REMOVED.
Right Side
Left Side
7. Place the pebbles on the fibreglass fuel bed. If for any reason you need more pebbles, it is
quite acceptable to use normal pebbles. Alternatively, you may wish to fit the log effect instead.
INS537RU + 737RU Eng French Sept 06
THERMOSTAT
Controls.
There is a main isolation switch on the left hand side of the air outlet grill, under the Burley logo. Control
switches are located at the top right of the appliance under the canopy (refer to picture →).
There are two buttons on the fire, ON/C/H and OFF. There is also a thermostat above the buttons. To switch on
the appliance, make sure the main isolation switch is in the on ’I’ position and press the ON/C/H button. This will
start the flame effect only. To turn on the cold fan, press the ON/C/H button again and turn the thermostat up to
10. To turn on the heater, press the ON/C/H button again and turn the thermostat up to 10. The heater is now on
and controlled by the thermostat. At any time the fire can be turned off using the OFF button. You will then need
to press the ON/C/H button once to reset. These controls are duplicated on the handset provided.
Be vigilant and keep the handset out of reach of children or other potential risks.
Due to the location of the infrared sensor, the remote works best from a position predominantly in front of the
appliance. It should work from a distance of approximately 10 to 12 feet.
THERMOSTAT
The heater is automatically controlled by a thermostat to regulate the room temperature. The easiest way to set the thermostat to
your level of comfort is as follows:
a. Turn the heater on by following the instructions above.
b. Leave the heater running until the room has reached your desired comfortable temperature.
c. Slowly turn the thermostat down until it clicks and the heater fan stops.
d. The heater will now cycle on and off to keep the room at the chosen temperature. Each time the heat is turned on, it
will return the room to this preset temperature and then start cycling on and off. Should you wish to raise or lower the room
temperature, i.e. during particularly cold spells, simply turn the thermostat up or down accordingly.
Note: The thermostat switches the heater fully on or fully off as the room temperature fluctuates. You do not get 30% of the heat when the dial is
turned 30% of the way round and 70% when it is turned 70% of the way round.
MAINTENANCE
WARNING—UNPLUG THE APPLIANCE FROM THE MAINS POWER SUPPLY BEFORE UNDERTAKING
ANY MAINTENANCE.
Wear protective gloves, boots, goggles and clothing.
1) Replacing the lamp - ensure the lamp is left to cool before changing.
a) Remove the pebbles or log bed effect.
b) Lift the two catches, one at each side of the fuel bed (see picture →).
c) Carefully lift off the trim.
d) Replace bulb.
e) Re-assemble fire in reverse order before connecting back to the mains.
2) General cleaning.
a. The fire should only be dusted with a soft, clean, lint-free, dry duster. Do not use any polishes or sprays. Should a panel need cleaning, wipe the
entire panel in question with a clean soft, lint-free cloth, dampened in soapy water. Do not use brasso or abrasive cleaners etc as they could damage
the trim. The brushed steel trim can be cleaned by wiping with a little baby oil on a clean soft cloth.
b. The heater grill at the top should be brushed clean periodically to remove any build up of fluff.
c. Approximately every year or two the blades of the heater fan and the flame effect fan should be gently brushed clean. This should be done by a
qualified electrician.
Trouble shooting guide.
The following instructions should solve any questions or problems which you may have.
To find the cause of an operational fault, if safe to do so, plug the fire into the wall socket, press the ON/C/H button on the fire 3 or 4 times (not the
remote) and turn the thermostat up to 10.
Symptoms.
a) No heat or light. This will almost certainly mean that the wall socket is faulty. Check that the wall socket works by plugging in another electrical
appliance. Is the fire on an extension lead? Heaters must not be used on extension leads as most have their own cut out and are not rated for the
power required.
b) The heat comes on but no light. The lamp may have blown, see (Replacing Lamps). Check that a new lamp works by testing it in a table lamp.
c) Light comes on but no heat. Turn the thermostat up to 10 and press the ON/C/H button on the fire 3 or 4 times. See (Controls).
d) “The thermostat is not working.” The thermostat works by monitoring the room temperature, it is either on or off, you do not get 10% of the heat
on number 1 and 60% on number 6. See (Controls, Thermostat).
e) Plug gets hot. It is nearly always the socket which is at fault. Check the fire in another socket, it will not get as warm. Stop using the socket
immediately and call an electrician. Many house fires are caused by faulty sockets overheating.
f) Flame effect is not working. Check that the fan turns freely and is not being obstructed. Gently brush the blades of the fan to remove any dust and
reassemble. This should be carried out by a qualified electrician.
g) Lamp does not last very long. If the lamp is failing after a short period of time there is not a fault with the fire. It is not possible to predict the life
of a lamp, some burn out more quickly than others.
h) Noise from the fans. Unfortunately there is always some noise from the fans. We do our utmost to reduce this but they will never be silent.
i) Heater cuts out and blows cold. See (cleaning maintenance 2b & 2c).
J) Remote does not work. This means the batteries in the remote are dead and need replacing with new ones.
Guarantee.
Although your guarantee is with the retailer from whom you purchased the fire, should you still have any questions please phone us directly and we
will inform you of your next course of action.
Any fault, other than that caused by abnormal treatment, which occurs within twelve months of the date of purchase, will be corrected without charge.
This does not apply to lamp failures and batteries whose life, regrettably, we can not predict. In the event of complaint, please phone us for guidance,
or contact your retailer. Should a repair be necessary the appliance will need returning to the point of purchase.
Issue 1.0
INS0537 & 737RU English/French
INSTRUCTIONS DE SECURITE IMPORTANTES
1. Avant de débrancher le foyer, appuyez l’interrupteur “Off”et sortez la fiche de la prise de courant.
2. Un chauffage éléctrique chauffe et peut créer des étincelles. N’utilisez pas le foyer dans des éspaces ou se trouvent de l’essence, de la peinture
ou des liquides inflammables.
3. Utilisez ce foyer que comme décrit dans ces consignes. Toute utilisation pas recommander par le fabriquant peut être la cause d’incendie, de
choc électrique et de blessures.
4. N'utilisez pas un cordon de rallonge pour l'alimentation du foyer
INSTRUCTIONS IMPORTANTES
L‘utilisation d’appareils électriques nécessitent toujours des précautions élémentaires pour réduire le risque d’incendie, de choc électrique et de blessures. Ces précautions sont les suivantes:
Installation.
1. Lisez sérieusement toutes les instructions avant d’utiliser cet appareil.
2. Ne placez pas ce foyer juste en dessous d'une prise électrique.
3. N'utilisez pas ce foyer électrique à proximité immédiate d'une baignoire, d'une douche ou d'une piscine. Evitez tout contact avec l'eau.
4. Ne recouvrez pas ce foyer. Ne placez pas le foyer à moins de 2 mètres d’articles combustibles tels que les meubles, les oreillers, la literie, le
papier, les vêtements et les rideaux.
1. Ne faites pas passer le cordon électrique devant l'orifice de sortie d'air.
2. Ne coincez pas le cordon, vérifiez que le foyer ne repose pas sur le cordon.
3. Avant d’utiliser le foyer, fixez le selon les consignes suivantes. Pendant l’installation, assurez vous que personne risque de trébucher, de se cogner ou de se blesser.
4. Ne fixez pas le foyer de manière définitive; il sera peut-être nécessaire de le retirer pour l'entretien.
5. Certaines parties du foyer sont chaudes lorsque celui-ci est en fonctionnement. Pour éviter des brûlures, ne touchez pas les surfaces chaudes.
6. Ne passez pas le câble sous la moquette ou un tapis etc. Placez le foyer de façon à ne pas trébucher sur le cordon électrique.
7. Ce foyer ne doit pas être utiliser par des enfants ou autres personnes sans surveillance, si leur capacitées physiques ou mentales les empêchent de
l’utiliser en toute sécurité. Les enfants doivent être surveiller pour assurer qu’ils ne jouent pas avec ou qu’ils ne touchent pas au foyer. Utilisez
un par-feux approuvé s’il y a le moindre risque que le foyer peut être toucher.
8. Ne pas utiliser à l’exterieur.
9. Ne mettez pas en marche le foyer électrique si une fiche ou un cordon est endommagé, s’il est tombé ou détérioré dans quoi que ce soit. Pour tout
bilan et réparation, ramenez le foyer à un agent de service agrée.
10. N’insérez et ne laissez aucun objet entrer dans le foyer, cela provoquerait inévitablement un choc électrique ou un incendie, ou l’endommagement
du foyer.
11. Les flammes de ce foyer sont une imitation de feu. Ne jamais les utiliser comme un vrai feu de cheminée.
12. Ne vous asseyez pas, ne posez pas de charges lourdes sur le foyer.
13. Si vous devez déplacer le foyer, ne le tirez pas, portez le, avec assistance si necessaire.
14. Risque d’étouffer. Les galets sont des galets naturels. Ne laissez pas les enfants ou animaux les mettre à la bouche. Ne le laissez pas sans surveillance. En cas de doute, utiliser la bûche au lieu des galets.
15. Mettez l’interrupteur du foyer sur "O" et débrancher le quand vous ne l’utilisez pas.
Garder soigneusement ce mode d’emploi.
Installer et mêtre en marche votre foyer.
Déballez précautionneusement votre foyer, il consiste de: Le foyer, un raccord (déjà fixé), 2 panneaux en acier, un sac de galets, une bûche en resine,
kit de fixation et une télécommande.
737RU: Une cheminée en bois peint couleur de pierre, kit de fixation et une télécommande.
Le cadre peut avoir des bords tranchant. Utiliser toujours des gants, soulliers, lunettes et habits de protection pendant n’importe quel travaux sur ce foyer. Assurez vous que vos outils sont en bon état. En cas de doute, demander de l’assistance.
1. (537 Seulement) Il y a 2 vis en inox au dos du foyer. Celle-si doivent être enlever avant l’installation. Voir photo à droite.
2. (737 Seulement) Il y a 4 boulons au dos de la cheminée. Celle-si doivent être enlever avant que la cheminée soit fixé au
mûr. Voir photo à droite.
3. (537 Seulement) Installez le foyer selon les instructions données ci-dessous. Pour une meilleure stabilité du foyer, fixez
le au moyen du kit de fixation joint. Ceci évite qu’il tombent en avant. Il n‘est pas nécessaire de tendre le câble. En utilisant la cheville, fixer le boulon avec anneau dans le mûr ou à l’arriere de la cheminée. Visser partiellement la vis et rondelle dans le trou suivant l’illustration. Embobinez un bout du fil en acier au tour de la vis et serrez la pour que le fil soit
coincer entre la rondelle et le foyer. Pousser le foyer en arriere vers le boulon. Passez le fil en acier par l’anneau au bout
du boulon et puis passez le fil par un des 2 trous sur le coté. Poussez le foyer vers le mûr, tirez sur le fil pour que celui ci
soit tendu et passez le bout du fil par l’autre des 2 trous. Le foyer est maintenant sécurisé. Assurez vous que le foyer et
bien fixé en le tirant doucement en avant et par le haut. Le fil supportera le poid et empêchera le foyer de tomber.
Vous avez aussi la possibilité d’accrocher le foyer directement au mûr en utilisant les trous prefabriqué à l’arriere de l’appareil.
4. (737 Seulement) La cheminée doit être fixer au mûr avec le kit de fixation fournis. Il y a un patron sur
l’extérieur de l’emballage. Utilisez celui-ci pour marquer la position des trous sur le mûr. Percez les trous
et fixez les supports (trous vers le bas) avec les vis et chevilles fournis. Soulevez la cheminée et accrochez
les crochets à l’arriere de la cheminée par dessus les support au mûr. Ceci doit être fait à deux.
Vis et
rondelle
Fil en acier
5. (537 Seulement) Le foyer comprend un raccord arrière amovible pour différentes adaptations. Si
vous adossez le foyer au mur il est préférable de laisser ce raccord fixer au foyer. Si vous insérez le
foyer dans votre cheminée, retirez le raccord arrière de celui ci pour une meilleure adaptation.
Bandes
Adhésives
6. Panneaux décoratifs en acier: Enlever la protection des bandes adhésives. Poser les panneaux sur le
cadre noir du foyer, puis appuyer fort. Attention: assurez vous que les panneaux sont bien alligné.
Une fois poser, ils ne se laissent pas facilement déplacer.
7. Posez la bûche ou les galets simplement sur la "planche" orange translucide.
2 trous
Coté droit
Coté
Gauche
INS537RU + 737RU Eng French Sept 06
Interrupteurs
Tous les interrupteurs sont situés au devant et en haut du foyer. Il a un interrupteur général à gauche de la grille,
sous le logo Burley. Les autres interrupteurs sont situés à droite, juste en-dessous du rabat. ( voir foto => )
THERMOSTAT
Il y a deux interrupteurs, ON/C/H et OFF. Il y a aussi un thermostat devant les interrupteurs. Pour la mise en
fonctionnement du foyer, controlez que l’interrupteur général est bien dans la position ’I’, puis appuyez l’interrupteur ON/C/H une fois, ceci ne commandera que la fonction flammes. Pour mettre en marche l’air froid, appuyez
l’interrupteur ON/C/H une deuxième fois et mettez le thermostat sur 10. Pour mettre en marche le chauffage, appuyez l’interrupteur ON/C/H une troisième fois et mettez le thermostat sur 10. Le chauffage est maintenant régulé par le thermostat. A tout moments le foyer peut être arreter en appuyant l’interrupteur OFF. Apres, vous devez
appuyez l’interupteur ON/C/H une fois pour remettre le foyer à zero. Vous trouverez les mêmes interupteurs sur
la télécommande. Attention la télécommande n’est pas un jeu pour les enfants.
A cause de la position du recepteur infra-rouge, la télécommande fonctionne le mieux à partir d’une position plus ou moin droit
devant le foyer. La distance maximum est de +/- 10 à 12 pieds (3 à 4 metres)
THERMOSTAT
La température est contrôlé par le thermostat. Comment utiliser le thermostat?
a. Allumez le foyer en suivant les instructions ci-desus.
b. Laissez le chauffage et le thermostat fonctionner jusqu’a obtention de la temperature desirée.
c. Quand la température est atteinte, tournez doucement le thermostat jusqu’à ce que vous entendiez un déclic et le chauffage
s’arrête.
d. Le chauffage s’arrêtera et repartira maintenant automatiquement pour garder la pièce à la temperature désirée.
Attention: en fonction de la température qu’il mesure dans la pièce, le thermostat allume ou éteint le radiateur; vous n’obtenez pas 10%
de la chaleur sur le numéro 1 ou 60% sur le numéro 6.
MAINTENANCE
ATTENTION DANGER - COUPEZ L' ALIMENTATION ELECTRIQUE DU FOYER AVANT DE PROCEDER AU
MOINDRE CONTROLE.
Utiliser des gants, soulliers, lunettes et habits de protection.
1) Remplacez la lampe - Attendez le refroidissement de la lampe avant de la remplacer
a) Enlevez la bûche ou les galets.
b) Soulevez les deux loqueteaux, un à chaque coté de la base orange translucide. (Voir photo =>)
c) Soulevez le cadre avec précaution.
d) Echangez la lampe.
e) Remonter le foyer et brancher le.
2) Nettoyage general.
a) Le radiateur doit seulement être dépoussiéré à l'aide d'un chiffon doux, propre et sec. N'utilisez pas de produit lustrant ou de pulvérisateur de
b) lustrage. Si vous voulez nettoyer un panneau, essuyez-le complètement avec un chiffon propre et doux, ou avec de l'eau savonneuse. N’utilisez
pas de produit abrasif car ils risquent d’abîmer le cadre. Les panneaux en inox peuvent être nettoyer en utilisant un peu d’huile de bébé sur un
chiffon doux.
c) La grille de chauffage devra être nettoyée régulièrement, la poussière accumulée risquerait de boucher les orifices
d) Tous les 2 ans environ, les pales des ventilateurs de chauffage et d’effets de flammes devront être époussetés délicatement. Ceci doit être executer
par un éléctricien professionel.
Guide de dépannage.
Les instructions suivantes permettront de résoudre toutes les questions ou problèmes que vous pouvez rencontrer.
Pour trouver la cause d'une anomalie de fonctionnement, branchez le radiateur dans la prise murale, appuyez l’interrupteur ON/C/H 3 ou 4 fois
(n’utilisez pas la télécommande)et remontez le thermostat jusqu'à 10.
Symptômes
a. Le foyer ne chauffe pas ou ne s'allume pas. Dans la plupart des cas, ceci signifie que la prise femelle murale est défectueuse. Vérifiez le fonctionnement de la prise électrique murale en y branchant un autre appareil électrique. Le foyer est-il raccordé à un fil de rallonge? On ne doit pas
utiliser de fil de rallonge sur les foyers, car ces ralonges ont pour la plupart leur propre coupe-circuit et n'ont pas la puissance nominale requise.
b. Le foyer chauffe mais ne s'allume pas. Les lampes sont probablement grillées; voir (Remplacement des lampes). Vérifiez que la nouvelle lampe
fonctionne en la testant sur un autre luminaire.
c. Le radiateur s'allume mais ne chauffe pas. Remontez le thermostat jusqu'à 10 et appuyez l’interrupteur ON/C/H 3 ou 4 fois. Voir
(Commandes).
d. "Le thermostat ne semble pas fonctionner". Le thermostat se déclanchera lorsqu’une température pré déterminée est atteinte. Vous n’obtenez
pas 10% de la chaleur sur le numéro 1 ou 60% sur le numéro 6. Voir (contrôle thermostat )
e. La fiche devient chaude. Dans la plupart des cas, ceci signifie que la prise femelle murale est défectueuse. Branchez le foyer sur une autre prise
murale, et vérifiez que la prise ne chauffe pas. Cessez immédiatement d'utiliser la prise murale, et appelez un électricien. De nombreux incendies
sont provoqués par la surchauffe de prise défectueuse.
f. L'effet de flammes ne fonctionne pas. Vérifiez que le ventilateur n'est pas bloqué et qu'il tourne librement. Brossez délicatement les pales du
ventilateur afin d'enlever la poussière, et remontez-le. Cette opération doit être effectuée par un éléctricien qualifié.
g. Les lampes ne durent pas très longtemps. Si la lampe grille après une courte période, ceci ne signifie pas le foyer est défectueux. Il est impossible de prévoir la durée de vie d'une lampe, certaines grillent plus rapidement que d'autres.
h. Les ventilateurs font du bruit. Malheureusement les ventilateurs font toujours un peu de bruit. Nous nous efforçons de réduire ce bruit, mais les
ventilateurs ne fonctionneront jamais de manière silencieuse.
i. Le radiateur s’éteint et souffle de l’air froid. Voir (Maintenance 2b & 2c).
Garantie
Tous les défauts, en dehors de ceux provoqués par un traitement anormal, se produisant moins de douze mois après la date d'achat, seront réparés gratuitement. Ceci ne s'applique pas aux lampes grillées ou au piles dont malheureusement la durée de vie n’est pas programmable. En cas de réclamation, téléphonez-nous pour obtenir de l'aide, ou prenez contact avec votre revendeur.
Issue 1.0
INS0537 & 737RU English/French