1
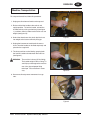
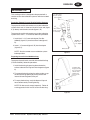
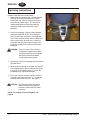
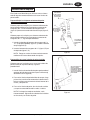
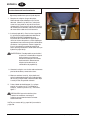
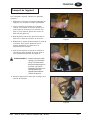
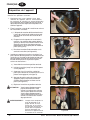
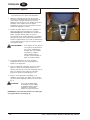
EZ Sand
Operator's Manual
Manual del operador
Manuel de l’utilisateur
READ THIS BOOK
EN
LEA ESTE MANUAL
ES
LISEZ CE MANUEL
FR
English (2 - 11)
Español (12 - 21)
Français (22 - 30)
This book has important information for the use and safe operation of this machine. Failure to read this
book prior to operating or attempting any service or maintenance procedure to your Clarke American
Sanders machine could result in injury to you or to other personnel; damage to the machine or to other
property could occur as well. You must have training in the operation of this machine before using it.
If your operator(s) cannot read this manual, have it explained fully before attempting to operate this
machine.
All directions given in this book are as seen from the operator’s position at the rear of the machine.
For new books write to: Clarke® , 2100 Highway 265, Springdale, Arkansas 72764
Form No. 71158A 12/06
Printed in the U.S.A.
ENGLISH
EN
Contents of this Book
Operator Safety Instructions ........................................................ 3
Introduction and Machine Specifications ..................................... 4
Machine Transportation ............................................................... 5
Machine Set-Up .......................................................................... 6
Operating Instructions ................................................................. 8
Troubleshooting .......................................................................... 9
Sanding Cuts and Sandpaper ................................................... 10
SECTION II Parts and Service Manual
Assembly Drawing #1 ............................................................... 32
Assembly Drawing #2 ............................................................... 33
Assembly Drawing #3 ............................................................... 34
Electrical Schematics ................................................................ 35
-2-
Clarke® American Sanders Operator's Manual (EN) - EZ Sand
ENGLISH
EN
OPERATOR SAFETY INSTRUCTIONS
DANGER means:
Severe bodily injury or death can occur to you or other personnel if the DANGER statements found on this machine or in this Owner's Manual are ignored
or are not adhered to. Read and observe all DANGER statements found in
this Owner's Manual and on your machine.
WARNING means:
Injury can occur to you or to other personnel if the WARNING statements
found on your machine or in this Owner's Manual are ignored or are not
adhered to. Read and observe all WARNING statements found in this Owner's
Manual and on your machine.
CAUTION means:
Damage can occur to the machine or to other property if the CAUTION
statements found on your machine or in this Owner's Manual are ignored or are
not adhered to. Read and observe all CAUTION statements found in this
Owner's Manual and on your machine.
DANGER:
Failure to read the Owner's Manual prior to operating or servicing your Clarke
American Sanders machine could result in injury to you or to other personnel;
damage to the machine or to other property could occur as well. You must have
training in the operation of this machine before using it. If you or your operator(s)
cannot read this manual have it explained fully before attempting to operate
this machine.
DANGER:
Sanding/finishing wood floors can create an explosive or combustible environment.
Do not operate this machine around solvents, thinners, alcohol, fuels, floor finishes,
wood dust or any other flammable materials. Cigarette lighters, pilot lights, electrical sparks and all other sources of ignition should be extinguished or avoided.
Keep work area well ventilated.
DANGER:
Electrocution could occur if the machine is being serviced while the machine is
connected to a power source. Disconnect the power supply before servicing.
DANGER:
Electrocution or fire could occur if the machine is being operated with a damaged
power cord. Keep the power cord clear of the pad. Always lift the cord over the
machine. Do not move the machine by the power cord.
DANGER:
To avoid injury keep hands, feet, and loose clothing away from all moving parts on the
machine. Disconnect the power cord before replacing the pad, changing the abrasive,
or when servicing. Do not operate the machine unless all guards are in place. Never
leave the machine unattended while connected to a power source.
DANGER:
Dust generated from sanding wood floors can spontaneously ignite or explode.
Promptly dispose of any sanding dust in a metal container clear of any combustibles.
Do not dispose in a fire.
WARNING:
This machine should be grounded while in use to protect the operator from electric
shock. This machine is provided with a three-conductor cord and a three-contact
grounding type attachment plug to fit the proper grounding type receptacle. The green
(or green and yellow) conductor in the cord is the grounding wire. Never connect this
wire to anything other than the grounding pin of the attachment plug.
WARNING:
Shock hazard. Do not use the machine if it has been rained on or sprayed with water.
WARNING:
Injury can occur if protective clothing or equipment is not used while sanding. Always
wear safety goggles, protective clothing, and dust mask while sanding.
WARNING:
Any alterations of modifications of this machine could result in damage to the machine
or injury to the operator or other bystanders. Alterations or modifications not
authorized by the manufacturer voids any and all warranties and liabilities.
THIS MACHINE IS INTENDED FOR COMMERCIAL USE ONLY
Clarke® American Sanders Operator's Manual (EN) - EZ Sand
-3-
ENGLISH
EN
Introduction & Machine Specifications
EZ Sand
Model
Code Number
Voltage/Frequency
Amperage (A)
Motors (3)
Pad Size (3)
Power Cable
Orbits Per Minute
Orbit Dia.
Shipping Weight
Noise (dBA)
Vibration (m/s/s)
-4-
07164A
115V/60 Hz
12
1/3 hp each
7" O.D. each
40' 12-3 Ga Gray
Rubber Jacketed
5000 ea. motor
1/4 inch
110 lbs.
74
16
Clarke® American Sanders Operator's Manual (EN) - EZ Sand
ENGLISH
EN
Machine Transportation
To transport the machine, follow this procedure:
1. Unplug machine from wall outlet and wrap cord.
2. Raise and lock the handle to the vertical and
upright position. To lock the handle, unhook the
knurled collar by raising and twisting it (see figure
1), and then allow it to slide into the black cast iron
weight (see figure 1A).
3. Unlock the three levers that attach the black cast
iron weight to the base machine by lifting up.
Figure 1
4. Unplug the interconnect cord from the base machine. Now the handle can be lifted separately and
placed in the cargo hold.
5. The base machine can be lifted by grasping both
the front lift handle and underneath the axle area
(see figure 2).
WARNING:
The machine is heavy (67 lbs./34kg).
The handle weight is 35 lbs./16 kg. To
avoid injury or damage to the machine
use a firm grip and proper lifting
technique. Get assistance if necessary.
Figure 1A
6. Secure machine to prevent movement in cargo
area.
Fgiure 2
Clarke® American Sanders Operator's Manual (EN) - EZ Sand
-5-
ENGLISH
EN
MACHINE SET-UP
To prepare the machine for use follow this procedure:
1. Familiarize yourself with the machine. Read all
danger, warning, and caution statements and the
Operator's and Parts Manual before operating the
machine. If you or the operator are unable to read
English, have this manual fully explained before
attempting to operate this machine.
2. Attach the handle to the base machine by following
these instructions:
a.) The handle label should be pointing towards the
front of the machine and the black iron casting
should drop down into the top of the base
machine securely.
b.) Snap the three latches down to the base
machine. The hooks on the latches should slip
over the keepers that are attached to the base
machine. The latches should require a slight
push to snap them into place (see figure 3).
c.) Plug the interconnect cord into the base machine
(see figure 3A).
3. Install or replace circular pads. The pad should be
replaced if they are ripped or torn or the hook material
is too worn to allow attachment of sandpaper. To
install or replace the pad(s), follow these instructions:
a.) Lock handle in the upright position.
b.) Tilt the machine back until it fully rests on the
handle.
c.) While kneeling and facing the bottom of the
machine, remove the existing pad(s) and then
center new pad(s) over the grip face (see figure
4).
d.) Press the pad(s) against the grip face until the
hooks in the driver have set into the pad (see
figure 4a).
e.) Return machine to the upright position.
CAUTION:
Damage to the grip face on the driver
pad will occur if the machine is operated
without a pad or with a pad that is ripped
or torn. Damage to the grip face of the
pad will occur if the machine is operated
without installing sandpaper.
WARNING:
Never put yourself or let others be in a
position to get injured if the machine
should tip or fall while replacing the pad
or changing abrasive.
Figure 3
Figure 3A
Figure 4
Figure 4A
-6-
Clarke® American Sanders Operator's Manual (EN) - EZ Sand
ENGLISH
EN
MACHINE SET-UP
This sanding machine is designed to be operated with a
remote vacuum dust collection system or with the included
dust bag.
1.5" Hose from
vacuum system
(not included)
D
Preparing Remote Vacuum Dust Collection Systems
To prepare the machine for remote vacuum dust collection
systems that have a 2" hose end, install 2" hose end (figure
5, A) directly over the exhaust tube (figure 5, B).
A
2" Hose from
vacuum system
(not included)
To prepare the machine for remote vacuum dust collection
systems that have a 1 ½" hose end, follow this procedure:
1. Install the 2" x 1½" hose end adaptor (Part No.
30563A) (figure 5, C) over the exhaust tube (figure 5,
B).
2. Insert 1 ½" hose end (figure 5, D) into the adaptor
(figure 5, C).
NOTE: Start the remote vacuum collection system
before operation.
(30563A) 2"
Tube x 1.5"
hose adaptor
B
C
Exhaust Tube
Figure 5
Preparing to use the included dust bag
To prepare the machine for use with the included dust bag
(Part No. 53673A), follow this procedure:
1. Install the dust bag by pressing the end onto the
exhaust tube until the ring locks into the groove (figure
6).
Install the dust
bag by pressing
the end onto the
exhaust tube
until the ring
locks into the
groove.
2. To remove the dust bag from the exhaust tube, pry up
the end of the bag opening to partially release the
internal rib from the groove, then pull.
3. To empty the dust bag, unzip the disposal flap and
force contents out by inverting the bag.
NOTE: For best results, empty frequently. Follow all
warnings posted in this manual and on the dust bag.
Figure 6
Clarke® American Sanders Operator's Manual (EN) - EZ Sand
-7-
ENGLISH
EN
Operating Instructions
Follow this procedure for sanding floors:
1. Move machine to work location. Decide the best
approach to sanding the desired area. When
sanding the area, work so that you are moving
away from the power supply. This will help to
avoid entanglement with the power cord and
reduce the need to move the power cord as
frequently.
2 1
2. Install the sandpaper. Use the same procedure
outlined in MACHINE SETUP for installing the
pad(s), to install the sandpaper. The sandpaper
uses a hook and loop system which is identical to
how the pads attach to the drivers. Center the
sandpaper over the pad and press it against the
pad until the hooks on the pad have set into the
sandpaper.
WARNING:
2
Figure 7
Injury can occur if the machine is
connected to a power source while
installing the pads or the sandpaper.
Disconnect the machine before
installing the pad/sandpaper.
3. Connect the machine to an appropriately fused and
grounded circuit.
4. While holding the handle, reach down and slide the
knurled locking collar up the handle tube and hook
it to the pin in the tube by rotating it. Lower the
handle down to a comfortable position.
5. To run the machine, push the interlock button (1),
and apply pressure to the levers (2). To stop the
machine, release the levers (2). See figure 7.
CAUTION: To prevent damage to the flooring
and to reduce swirling, keep the
machine in motion while the motor
is running.
NOTE: For sanding cuts and sandpaper, see
page 10.
-8-
Clarke® American Sanders Operator's Manual (EN) - EZ Sand
ENGLISH
EN
Troubleshooting
Problem
Motor will not start.
Motor fails to start / runs
sluggish.
Fuse / Circuit Breaker repeatedly
trips.
Handle feels loosely connected
to base machine.
Cause
Action
No power.
Check power supply and connection
Interlock not depressed.
Depress Interlock before activating
control lever.
Defective switch/ Bad connection
Contact an authorized American
Sanders Technology Dealer.
Low voltage from excessive length
or undersized extension cord.
Use a 14 Ga extension cord, not to
exceed 50' length.
Defective start switch.
Contact an authorized American
Sanders Technology Dealer.
Defective motor low voltage
Contact an authorized American
Sanders Technology Dealer.
Low voltage.
Eliminate extension cord.
Locate power source closer to
work site. Have voltage checked by
a qualifed electrician.
Bad connection.
Contact an authorized American
Sanders Technology Dealer.
Defective motor.
Contact an authorized American
Sanders Technology Dealer.
The latches have loosened up.
To tighten latches, loosen the lock
nut, screw in the latch hook and
then tighten the lock nut.
Clarke® American Sanders Operator's Manual (EN) - EZ Sand
-9-
ENGLISH
EN
Sanding Cuts and Sandpaper
Initial Cut
The purpose of the initial cut is to remove old finish and gross imperfections on the floor surface. Use a
course (20-36 grit) grain abrasive.
Final Cuts
The purpose of a finishing cut is to remove the scratches produced during the initial cut. Use a fine (60-80
grit) grain abrasive.
If the surface remains rough after a finishing cut, it may be necessary to use an even finer grain of abrasive
(80-100grit). Care should be taken in selecting the grit size of the abrasive. A very fine grain will close the
pores on a wood floor making admission of a stain difficult.
If glazing or burning should occur the abrasive has dulled and must be replaced.
Grain
Use
Grade
Part #/Qty.
20 grit
For removing gross imperfections and restoring
evenness to old flooring. To remove buildup of
paints and varnishes
54082A
36 grit
For the first sanding of new flooring (maple, oak).
For removing minor imperfections and finishes
from old flooring.
54081A
60 grit
For clean-up from initial cut 36 grit.
54080A
80 grit
For final sanding of certain hardwoods. For
clean-up of cuts (60 grit).
54079A
100 grit
For final sanding of certain hardwoods and
conifers where a smooth surface is desired.
120 grit
-10-
Grado estándar
Standard
Pieza
#/Ctdad
For final sanding of certain hardwoods and
conifers where a smooth surface is desired.
For leveling after initial finish coat.
54078A
53886A
Clarke® American Sanders Operator's Manual (EN) - EZ Sand
ENGLISH
Clarke® American Sanders Operator's Manual (EN) - EZ Sand
EN
- 11 -
ESPAÑOL
ES
LEA ESTE MANUAL
Este manual contiene información importante acerca del uso y la seguridad de la máquina. Si no lee
el manual antes de utilizar su máquina Clarke American Sanders o de intentar realizar los
procedimientos de reparación o mantenimiento de la misma, usted o el resto del personal podrían sufrir
lesiones; asimismo, podrían producirse daños a la máquina o a otras propiedades. Antes de utilizar la
máquina, es necesario recibir la capacitación adecuada en la operación de la misma. Si el operador
de la máquina no sabe leer en español, explíquele el manual exhaustivamente antes de que intente
utilizarla.
Todas las indicaciones incluidas en este manual se ofrecen desde la posición del operador en la parte
posterior de la máquina.
Si desea conseguir nuevos manuales, escriba a: Clarke® , 2100 Highway 265, Springdale, Arkansas 72764.
Índice del manual
Instrucciones de seguridad para el operador ............................ 13
Introducción y especificaciones de la máquina ......................... 14
Transporte de la máquina ......................................................... 15
Instalación de la máquina ......................................................... 16
Instrucciones de funcionamiento ............................................... 18
Resolución de problemas ......................................................... 19
Cortes de lija y papel de lija ...................................................... 20
Sección II Repuestos y manual de servicio
Plano de montaje ...................................................................... 32
Lista de piezas de montaje ........................................................ 33
Plano de montaje ...................................................................... 34
Esquemas eléctricos ................................................................. 35
-12-
Clarke® American Sanders Manual del operador (ES) - EZ Sand
ESPAÑOL
ES
INSTRUCCIONES DE SEGURIDAD PARA EL OPERADOR
PELIGRO significa:
Usted u otras personas pueden estar expuestos a sufrir lesiones personales,
inclusive la muerte si las indicaciones de PELIGRO que se encuentran en esta
máquina o en el manual de instrucciones se ignoran o no se tienen en cuenta.
Lea y respete todas las indicaciones de PELIGRO que se encuentran en el manual
de instrucciones y en la máquina.
ADVERTENCIA significa: Usted u otras personas pueden estar expuestos a sufrir lesiones personales, si
las indicaciones de ADVERTENCIA que se encuentran en esta máquina o en el
manual de instrucciones se ignoran o no se tienen en cuenta. Lea y respete todas
las indicaciones de ADVERTENCIA que se encuentran en el manual de
instrucciones y en la máquina.
PRECAUCIÓN significa: La máquina u otros bienes pueden sufrir daños materiales si las indicaciones de
PRECAUCIÓN que se encuentran en la máquina o en el manual de instrucciones
se ignoran o no se tienen en cuenta. Lea y respete todas las indicaciones de
PRECAUCIÓN que se encuentran en el manual de instrucciones y en la máquina.
PELIGRO:
Si no lee el manual de instrucciones antes de operar, reparar o realizar el mantenimiento de su
máquina Clarke American Sanders, el resultado puede ser que usted o el resto del personal
sufra lesiones. Asimismo, pueden producirse daños a la máquina o a otras propiedades. Antes
de utilizar la máquina, es necesario recibir la capacitación adecuada en la operación de la
misma. Si usted o el operador no saben leer en inglés, haga que otra persona les explique el
manual exhaustivamente antes de intentar utilizar la máquina.
PELIGRO:
El lijado/acabado de pisos de madera puede crear un entorno explosivo. No utilice la máquina
cerca de solventes, diluyentes, alcohol, combustibles, acabados de pisos, polvo de madera u
otros materiales inflamables. Los encendedores, las lámparas indicadoras, las chispas
eléctricas y cualquier otra fuente de ignición deben extinguirse o evitarse. Mantenga el área de
trabajo bien ventilada.
PELIGRO:
Puede producirse una electrocución si se repara o se realiza el mantenimiento de la máquina
mientras se encuentra conectada a una fuente de alimentación. Desconecte la fuente de
alimentación antes de realizar tareas de mantenimiento y reparación.
PELIGRO:
Si la máquina se utiliza con un cable de alimentación dañado podría producirse una electrocución
o un incendio. Mantenga el cable de alimentación separado de la almohadilla. Pase siempre el
cable por encima de la máquina. No utilice el cable de alimentación para mover la máquina.
PELIGRO:
Mantenga las manos, los pies y la vestimenta suelta alejados de todas las partes móviles de la
máquina para evitar lesiones. Desconecte el cable de alimentación antes de reemplazar la
almohadilla, cambiar el abrasivo y realizar mantenimiento o reparaciones. No utilice la máquina
a no ser que todas sus protecciones estén en su lugar. Nunca deje la máquina sin vigilancia
mientras está conectada a una fuente de alimentación.
PELIGRO:
El polvo que se genera al lijar pisos de madera puede encenderse o explotar espontáneamente.
Elimine rápidamente el polvo de lijado en un recipiente de metal que no contenga ningún
combustible. No arroje el polvo al fuego.
ADVERTENCIA: Esta máquina debería estar conectada a tierra para proteger al operador de una eventual
descarga eléctrica. Esta máquina cuenta con un cable conductor y con un enchufe de tres
contactos para que sea compatible con el receptáculo de pared con descarga a tierra. El
conductor verde (o verde y amarillo) del cable es el conductor a tierra. Nunca conecte este cable
a otro lugar que no sea el terminal de tierra del enchufe.
ADVERTENCIA: Riesgo de descargas: No utilice la máquina si ha estado expuesta a la lluvia o ha sido rociada
con agua.
ADVERTENCIA: Si no se utilizan el equipo o la vestimenta de protección adecuados mientras se realizan tareas
de lijado, pueden producirse lesiones. Use anteojos de seguridad, vestimenta de protección y
máscara antipolvo siempre que esté realizando tareas de lijado.
ADVERTENCIA: Cualquier alteración o modificación realizada a esta máquina puede producir daños a la misma
o lesiones al operador o a otras personas que se encuentren en el lugar. Las alteraciones o
modificaciones no autorizadas por el fabricante anulan todas las garantías y responsabilidades.
ESTA MÁQUINA ESTÁ DISEÑADA PARA USO COMERCIAL ÚNICAMENTE
Clarke® American Sanders Manual del operador (ES) - EZ Sand
- 13 -
ESPAÑOL
ES
Introducción y especificaciones de la máquina
Modelo
EZ Sand
Número de código
Voltaje/frecuencia
Intensidad de corriente (A)
Motores (3)
Tamaño de la almohadilla (3)
Cable de alimentación
Giros por minuto
Diámetro de giro
Peso del envío
Ruido (dBA)
Vibración (m/s/s)
-14-
07164A
115V/60 Hz
12
1/3 cv cada uno
7" diámetro exterior cada uno
40' 12-3 Ga gris
con revestimiento de goma
5000 cada motor
1/4 pulg.
110 libras
74
16
Clarke® American Sanders Manual del operador (ES) - EZ Sand
ESPAÑOL
ES
Transporte de la máquina
Para mover la máquina siga este procedimiento:
1. Desenchufe la máquina del tomacorriente de pared
y enrolle el cable.
2. Eleve y bloquee la manija en posición recta y
vertical. Para bloquear la manija, desenganche el
collarín moleteado elevándolo y retorciéndolo
(consulte la figura 1), y luego deje que éste se
deslice dentro de la estructura de hierro colado
negro (consulte la figura 1A).
Figura 1
3. Desbloquee las tres palancas que conectan la
estructura de hierro colado negro a la base de la
máquina elevándola.
4. Desenchufe e interconecte el cable de la base de
la máquina. Ahora la manija puede ser elevada por
separado y puede ser ubicada en la bodega de
carga.
5. La base de la máquina puede ser elevada
tomándola de la manija de elevación delantera y
por debajo del área del eje (consulte la figura 2).
ADVERTENCIA: La máquina es pesada (67 libras/
34 kg). El peso de la manija es de 35
libras/16 kg. Para evitar daños a la
misma o lesiones personales,
sosténgala con firmeza y utilice la
técnica de elevación adecuada. De
ser necesario, solicite ayuda.
Figura 1A
6. Asegure la máquina para evitar movimientos en el
área de carga.
Fgiura 2
Clarke® American Sanders Manual del operador (ES) - EZ Sand
- 15 -
ESPAÑOL
ES
Instalación de la máquina
Si desea preparar la máquina para su uso, siga este
procedimiento:
1. Familiarícese con la máquina. Lea todas las
indicaciones de peligro, advertencia y precaución,
así como el manual de instrucciones y piezas,
antes de utilizar la máquina. Si usted o el operador
de la máquina no pueden leer este manual, haga
que otra persona se lo explique exhaustivamente
antes de intentar utilizarla.
2. Acople la manija a la base de la máquina siguiendo
estas instrucciones:
a.) La etiqueta de la manija debería apuntar hacia
la parte delantera de la máquina y la
estructura de hierro colado negro debería caer
en la parte superior de la base de la máquina
de manera segura.
b.) Encaje los tres seguros a la base de la
máquina. Los ganchos de los seguros
deberían deslizarse sobre los cerrojos que
están acoplados a la base de la máquina. Hay
que empujar levemente los seguros para que
éstos encajen en su lugar (consulte la
figura 3).
c.) Enchufe el cable de interconexión a la base de
la máquina (consulte la figura 3A).
Figura 3
3. Instale o reemplace las almohadillas circulares. La
almohadilla debería ser reemplazada si está rota o
rajada o si el material del gancho está demasiado
desgastado para permitir la colocación del papel de
lija. Para instalar o remplazar la o las almohadillas,
siga estas instrucciones:
a.) Bloquee la manija en posición vertical.
b.) Incline la máquina hacia atrás hasta que esté
completamente apoyada en la manija.
c.) Agáchese y en dirección a la base de la
máquina, extraiga las almohadillas
existentes y luego centre las nuevas
almohadillas sobre la superficie de sujeción
(consulte la figura 4).
d.) Presione la o las almohadillas contra la
superficie de sujeción hasta que los ganchos
del impulsor se hayan fijado a la almohadilla
(consulte la figura 4a).
e.) Vuelva a situar la máquina en posición vertical.
Figura 3A
Figura 4
PRECAUCIÓN:
Si la máquina funciona sin
almohadilla o con una almohadilla que está rota
o rajada, podría dañarse la superficie de
sujeción de la almohadilla del impulsor. Esta
superficie también puede dañarse si la máquina
es operada sin papel de lija.
ADVERTENCIA: Mientras sustituye la
almohadilla o cambia el abrasivo, nunca se
sitúe usted mismo (ni deje que otras personas
lo hagan) en una posición en la que pueda
lesionarse si la máquina se inclina o cae.
-16-
Figura 4A
Clarke® American Sanders Manual del operador (ES) - EZ Sand
ESPAÑOL
ES
Instalación de la máquina
Esta lijadora está diseñada para utilizarse con un sistema
colector de polvo remoto mediante vacío o con la bolsa de
polvo incluida.
MANGUERA DE
1.50" DEL SISTEMA
DE ASPIRACIÓN
(NO INCLUIDO)
D
Preparación de los sistemas colectores de polvo
remotos mediante vacío
Si desea preparar la máquina para sistemas colectores de
polvo remotos mediante vacío que tengan un extremo de
manguera de 2", instale e extremo de manguera de 2"
(figura 5, A) directamante sobre el tubo de escape (figura 5,
B).
A
MANGUERA DE 2"
DEL SISTEMA DE
ASPIRACIÓN (NO
INCLUIDO)
Si desea preparar la máquina para sistemas colectores de
polvo remotos mediante vacío que tengan un extremo de
manguera de 1 ½", siga este procedimiento:
1. Instale el adaptador del extremo de manguera de 2" x
o
1½" (N de pieza 30563A) (figura 5, C) sobre el tubo de
escape (figura 5, B).
2. Inserte el extremo de manguera de 1½" (figura 5, D) en
el adaptador (figura 5, C).
30563A TUBO DE
2" X ADAPTADOR
DE MANGUERA
DE 1.50"
B
C
TUBO DE ESCAPE
Figura 5
NOTA: Ponga en marche el sistema colector remoto
mediante vacío antes de encender la máquina.
Preparación para usar la bolsa de polvo incluida
Si desea preparar la máquina para su uso con la bolsa de
o
polvo incluida (N de pieza 53673A), siga este
procedimiento.
INSTALE LA BOLSA DE
RECOLECCIÓN DE
POLVO PRESIONANDO EL
EXTREMO DEL TUBO DE
ESCAPE HASTA QUE EL
ANILLO ENCAJE DENTRO
DE LA RANURA.
1. Instale la bolsa de recolección de polvo presionando el
extremo del tubo de escape hasta que el anillo encaje
dentro de la ranura (figura 6).
2. Para retirar la bolsa de polvo del tubo de escape, haga
palanca hacia arriba en el extremo de la abertura de la
bolsa para liberar parcialmente el saliente interno de la
ranura, y después tire.
3. Para vaciar la bolsa de polvo, abra la aleta de vaciado
y saque sus contenidos dando la vuelta a la bolsa.
NOTA: Para lograr los mejores resultados, vacíe
frecuentemente. Siga todas las advertencias incluidas
en el manual y en la bolsa de polvo.
Clarke® American Sanders Manual del operador (ES) - EZ Sand
Figura 6
- 17 -
ESPAÑOL
ES
Instrucciones de funcionamiento
Siga este procedimiento para el lijado de pisos:
1. Desplace la máquina al lugar de trabajo.
Seleccione el mejor método para lijar el área
deseada. Mientras lija dicha área, trabaje de
manera tal que usted se aleje de la fuente de
alimentación. Esto ayudará a evitar que el cable
de alimentación se enrede y reduce la necesidad
de mover dicho cable con tanta frecuencia.
2. Instale el papel de lija. Para instalar el papel de
lija, utilice el mismo procedimiento descrito en
INSTALACIÓN DE LA MÁQUINA para la
instalación de la almohadilla. El papel de lija
utiliza un sistema de apertura y cierre rápido que
reproduce el mecanismo con que las almohadillas
se adosan a los impulsores. Centre el papel de
lija en la almohadilla y presiónelo contra ésta
hasta que los ganchos de la almohadilla se hayan
fijado en el papel de lija.
2 1
2
Figura 7
ADVERTENCIA: Puede producirse una lesión si
se instalan la almohadilla o el papel
de lija mientras la máquina se
encuentra conectada a una fuente
de alimentación. Desconecte la
máquina antes de instalar la
almohadilla o el papel de lija.
3. Conecte la máquina a un circuito adecuadamente
provisto de fusibles y conectado a tierra.
4. Mientras sostiene la manija, baje y deslice el
collarín moleteado de cierre hacia arriba del tubo
de la manija y engánchelo al tubo rotándolo. Baje
la manija hasta una posición cómoda.
5. Pulse el botón de interbloqueo (1) y aplique
presión a las palancas (2). Para detener la
máquina, suelte las palancas (2). Consulte la
figura 7.
PRECAUCIÓN: para evitar daños al piso
y reducir los remolinos, mantenga la
máquina en movimiento mientras el motor
esté funcionando.
NOTA: para cortes de lija y papel de lija consulte la
página 20.
-18-
Clarke® American Sanders Manual del operador (ES) - EZ Sand
ESPAÑOL
ES
Resolución de problemas
Problema
El motor no arranca.
El motor no arranca / funciona
El fusible / disyuntor se disparan
repetidas veces.
La manija no está bien conectada
a la base de la máquina.
Causa
Acción
No hay potencia.
Inspeccione la fuente de
alimentación y la conexión
El interbloqueo no está presionado.
Presione el interbloqueo antes de
activar la palanca de control.
Interruptor defectuoso / mala conexión
Póngase en contacto con un
distribuidor autorizado de American
Sanders Technology.
Tensión baja debido a cable
demasiado largo
Use un alargador de calibre 14, que
no sea lento. o demasiado corto.
supere los 50' de longitud.
El interruptor de arranque es defectuoso.
Póngase en contacto con un
distribuidor autorizado de American
Sanders Technology.
Baja tensión del motor defectuosa
Póngase en contacto con un
distribuidor autorizado de American
Sanders Technology.
Baja tensión.
Retire el alargador.
Localice la fuente eléctrica más
cercana al lugar de trabajo. Haga
que la tensión sea inspeccionada
por un electricista calificado.
Conexión defectuosa.
Póngase en contacto con un
distribuidor autorizado de American
Sanders Technology.
El motor es defectuoso.
Póngase en contacto con un
distribuidor autorizado de American
Sanders Technology.
Los seguros se han aflojado.
Para ajustar los seguros, afloje
la tuerca de seguridad, atornille el
gancho del seguro y por último
ajuste la tuerca de seguridad.
Clarke® American Sanders Manual del operador (ES) - EZ Sand
- 19 -
ESPAÑOL
ES
Cortes de lija y papel de lija
Corte inicial
El propósito del corte inicial es sacar el acabado viejo y las imperfecciones mayores de la superficie del piso.
Se debe usar un abrasivo grueso (20-36 granos).
Cortes finales
El propósito de un corte de acabado es eliminar los rayones producidos durante el corte inicial. Utilice un
abrasivo de grano fino (60- 80 granos) .
Si la superficie permanece áspera después de un corte de acabado, puede ser necesario utilizar un abrasivo
de grano aún más fino (80 - 100 granos). Se deberá tener cuidado al seleccionar el tamaño del grano del
abrasivo. Un grano muy fino cerrará los poros sobre el piso de madera dando lugar a problema de manchas.
Si un corte de acabado apareciera inmediatamente glaseado o quemado, aumente el ritmo. Si esto ocurriera
durante un corte final, significa que el abrasivo se ha desafilado y deberá cambiarse.
Uso del
Grado estándar
Pieza #/Ctdad
veteado
20 granos
Para eliminar imperfecciones mayores y restaurar
la uniformidad a los pisos viejos. Para eliminar la
acumulación de pinturas y barnicas.
54082A
36 granos
Para el primer lijado de pisos nuevos (arce, roble).
Para eliminar imperfecciones menores y
acabados de pisos viejos.
54081A
60 granos
Para limpieza desda el corte inicial 36 granos.
54080A
80 granos
Para el lijado final de ciertas maderas duras.
Para limpieza de cortes inciales (50 granos).
54079A
100 granos Para el lijado final de ciertas maderas duras y
confíreras si se desea obtener una superficie lisa.
120 granos Para el lijado final de ciertas maderas duras y
malla
coníferas si se desea obtener una superficie lisa.
Para nivelar después del capas de acabado intial.
-20-
54078A
53886A
Clarke® American Sanders Manual del operador (ES) - EZ Sand
ESPAÑOL
Clarke® American Sanders Manual del operador (ES) - EZ Sand
ES
- 21 -
FRANÇAIS
FR
LISEZ CE MANUEL
Ce Manuel contient des informations importantes concernant l’utilisation et le fonctionnement de cette
machine dans des conditions de sécurité optimales. La non-lecture de ce manuel avant d’utiliser ou
d’entretenir votre machine Clarke American Sanders risque de provoquer un accident ou d’endommager
la machine ou son environnement. Vous devez avoir été formé à l’utilisation de cette machine avant de
l’utiliser. Si l’opérateur n’est pas en mesure de lire ce Manuel, il devra se le faire expliquer entièrement
avant de tenter d’utiliser cette machine.
Toutes les directions données dans ce Manuel le sont par rapport à la position de l’opérateur, à l’arrière
de la machine.
Pour commander un nouveau Manuel, écrivez à : Clarke®, 2100 Highway 265, Springdale, Arkansas 72764.
Contenu de ce manuel
Consignes de sécurité ............................................................... 23
Introduction et spécifications de l'appareil ................................. 24
Transport de l’appareil .............................................................. 25
Préparation de l’appareil ........................................................... 26
Utilisation de l’appareil .............................................................. 28
Dépannage ............................................................................... 29
Ponçage et papier abrasif ......................................................... 30
Section II, manuel de réparation et schémas de pièces
Schéma
Schéma
Schéma
Schéma
-22-
d’assemblage #1 ......................................................... 32
d’assemblage #2 ......................................................... 33
d’assemblage #3 ......................................................... 34
de câblage .................................................................. 35
Clarke® American Sanders Manuel de l’utilisateur (FR) - EZ Sand
FRANÇAIS
FR
CONSIGNES DE SÉCURITÉ
DANGER signifie :
Si une consigne DANGER figurant dans ce manuel d’utilisation ou sur
l’appareil n’est pas respectée ou suivie, des blessures graves, voire
mortelles, peuvent vous arriver ainsi qu’à d’autres personnes. Lisez et
observez toutes les consignes DANGER apparaissant sur l’appareil ou
dans votre manuel d’utilisation.
AVERTISSEMENT signifie :
Si une consigne AVERTISSEMENT figurant dans ce manuel
d’utilisation
ou sur l’appareil n’est pas respectée ou suivie, des blessures peuvent
vous arriver ainsi qu’à d’autres personnes. Lisez et observez toutes les
consignes AVERTISSEMENT apparaissant sur l’appareil ou dans votre
manuel d’utilisation.
ATTENTION signifie :
Si une consigne ATTENTION figurant dans ce manuel d’utilisation ou
sur l’appareil n’est pas respectée ou suivie, vous risquez d’endommager
l’appareil et de causer divers dommages matériels. Lisez et observez
toutes les consignes ATTENTION apparaissant sur l’appareil ou dans
votre manuel d’utilisation.
DANGER :
Si vous ne lisez pas le manuel d’utilisation avant d’utiliser ou réparer votre appareil Clarke,
vous risquez de vous blesser ainsi que d’autres personnes. Vous risquez également
d’endommager l’appareil et de causer divers dommages matériels. Avant d’utiliser cet
appareil, vous devez avoir reçu une formation sur son utilisation. Si un utilisateur est incapable de lire ce manuel, il doit en demander une explication complète avant d’utiliser
l’appareil.
DANGER :
Le ponçage des parquets de bois peut créer un environnement explosif ou com bustible. Ne
pas utiliser cet appareil à proximité de solvants, de diluants, d’alcool, de carburant, de
poussière de bois ou d’autres matériaux inflammables. Les vapeurs et la poussière de bois
produites par le ponçage des parquets peuventcréer un environnement explosif. Les briquets,
les témoins lumineux, les étincelles électriques et toutes les autres sources d’allumage
doivent être éteints. Garder la zone de travail bien aérée.
DANGER :
Une électrocution peut survenir si l’appareil est réparé alors qu’il est raccordé à une
source d’alimentation électrique. Déconnecter l’alimentation électrique avant toute
réparation.
DANGER :
Une électrocution ou incendie peuvent survenir si l’appareil est utilisé avec un cordon
d’alimentation électrique endommagé. Le cordon d’alimentation doit demeurer à bonne
distance du patin de ponçage. Le cordon doit toujours être soulevé au-dessus de l’appareil.
Ne jamais tirer l’appareil par le cordon d’alimentation.
DANGER :
Pour éviter les blessures, il faut toujours garder les mains, les pieds et les vêtements amples
à bonne distance des pièces mobiles de l’appareil. Le cordon d’alimentation doit êtr
débranché avant de remplacer le patin de ponçage ou le papier abrasif, ainsi qu’avant toute
réparation. Ne pas utiliser l’appareil si toutes les protections ne sont pas en place. Ne jamais
laisser l’appareil sans surveillance lorsqu’il est branché à une alimentation électrique.
DANGER :
La poussière produite par le ponçage d’un parquet de bois peut exploser ou
s’enflammer soudainement. Jeter sans délai toute la poussière de ponçage dans un récipient
métallique ne contenant aucun combustible. Ne pas jeter au feu.
AVERTISSEMENT :
En cours d’utilisation, cette machine doit être mise à la terre afin d’éviter tout choc
électrique à l’opérateur. Cette machine est fournie avec un cordon à trois fils et une prise
de branchement de mise à la terre à trois contacts qui se branche sur une prise de terre
appropriée. Le fil vert (ou vert et jaune) du cordon est le fil de terre. Ne branchez jamais
ce fil à autre chose qu’à la broche de mise à la terre de la prise de branchement.
AVERTISSEMENT :
Risque d’électrocution. Ne pas utiliser l’appareil s’il a été exposé à la pluie ou arrosé
avec de l’eau.
AVERTISSEMENT :
Des blessures peuvent survenir si les vêtements et équipements protecteurs
appropriés ne sont pas portés durant le ponçage. Durant une opération de ponçage, il
faut toujours porter des lunettes de sécurité, un masque antipoussières et des
vêtements protecteurs.
AVERTISSEMENT :
Toute modification apportée à cet appareil peut l’endommager et blesser l’opérateur ou
des passants. Les modifications non autorisées par le fabricant annulent toutes les
garanties et responsabilités.
CETTE MACHINE EST DESTINEE A UNE UTILISATION COMMERCIALE UNIQUEMENT
Clarke® American Sanders Manuel de l’utilisateur (FR) - EZ Sand
- 23 -
FRANÇAIS
FR
Introduction et spécifications de l’appareil
Modèle
EZ Sand
Numéro de code
Tension/fréquence
Instensité (A)
Moteurs (3)
Taille du patin
Câble d'alimentation
Tours par minute
Diamètre de rotation
Poids à l'expédition
Bruit (dBA)
Vibrations (m/s/s)
-24-
07164A
115V/60 Hz
12
1/3 hp chacun
7" de diamétre extérieur chacun
40' grosseur 12-3
gaine grise en caoutchouc
5000 pour chaque moteur
1/4 pouces
110 lbs.
74
16
Clarke® American Sanders Manuel de l’utilisateur (FR) - EZ Sand
FRANÇAIS
FR
Transport de l’appareil
Pour transporter l’appareil, exécutez les opérations
suivantes :
1. Débranchez la fiche de branchement électrique de
l’appareil, puis enroulez le cordon d’alimentation.
2. Levez le manche puis bloquez-le en position
verticale. Pour bloquer le manche, décrochez le
collier moleté en le levant et en le tournant (voir
figure 1), puis laissez-le glisser dans le bloc en
fonte noir (voir figure 1A).
3. Déverrouillez les trois leviers qui fixent le bloc en
fonte noir au socle de la machine en les levant.
Figure 1
4. Débranchez le cordon d’interconnexion du socle de
la machine. Vous pouvez désormais lever le
manche séparément et le placer dans le
compartiment de transport.
5. Vous pouvez soulever le socle de la machine en
saisissant les deux poignées de levage avant et
sous l’emplacement de l’axe (voir figure 2).
AVERTISSEMENT : Cette machine est lourde
((34kg). Le manche pèse
16 kg. Pour éviter toute
blessure ou dommage à la
machine, saisissez-le
fermement et utilisez une
technique de levage
adaptée. Demandez de
l’aide si nécessaire.
Figure 1A
6. Attachez l’appareil pour éviter qu’il ne bouge sur le
véhicule de transport.
Fgiure 2
Clarke® American Sanders Manuel de l’utilisateur (FR) - EZ Sand
- 25 -
FRANÇAIS
FR
Préparation de l’appareil
Pour préparer l’appareil avant une utilisation,
exécutez les opérations suivantes :
1. Familiarisez-vous avec l’appareil. Avant toute
utilisation de l’appareil, lisez les avertissements,
les consignes de sécurité et le manuel d’utilisation.
Si un utilisateur est incapable de lire ce manuel, il
doit en demander une explication complète avant
d’utiliser l’appareil.
2. Fixez le manche au socle de la machine en suivant
les instructions suivantes :
a.) L’étiquette du manche doit être orientée vers
l’avant de la machine et le bloc en fonte noir
doit se poser et se fixer dans le socle de la
machine.
Figure 3
b.) Plaquez les trois taquets sur le socle de la
machine. Les crochets des taquets doivent
glisser par dessus les fixations situées sur le
socle de la machine. Vous devez pousser
légèrement sur les taquets pour les mettre en
place (voir figure 3).
c.) Branchez le cordon d’interconnexion sur le
socle de la machine (voir figure 3A).
3. Installez ou remplacez les patins circulaires. Les
patins doivent être remplacés s’ils sont déchirés ou
arrachés ou si le matériau de fixation est trop usé
pour permettre la fixation du papier abrasif. Pour
installer ou remplacer un ou plusieurs patins,
suivez ces instructions :
Figure 3A
a.) Verrouillez le manche en position verticale.
b.) Inclinez la machine jusqu’à ce qu’elle repose
sur les poignées.
c.) A genoux, face à la machine, retirez les
patins puis centrez les nouveaux patins sur le
plateau auto agrippant (voir figure 4).
d.) Appuyez les patins contre le plateau auto
agrippant jusqu’à ce que les crochets du
système d’entraînement se fixent sur les
patins (voir figure 4a).
e.) Replacez la machine en position verticale.
ATTENTION :
Vous risquez d’endommager le
patin d’entraînement si vous
utilisez la machine sans patin ou
avec un patin déchiré ou arraché.
Vous risquez d’endommager la
surface adhésive du patin si vous
utilisez la machine sans installer
de papier abrasif.
AVERTISSEMENT :
-26-
Figure 4
Lorsque vous remplacez le
patin de ponçage ou le
papier abrasif, ne vous
placez pas et ne laissez
pas d’autres personnes se
placer dans une position
pouvant provoquer une
blessure si l’appareil venait
à basculer ou se renverser.
Figure 4A
Clarke® American Sanders Manuel de l’utilisateur (FR) - EZ Sand
FR
FRANÇAIS
Préparation de l’appareil
Cette ponceuse est conçue pour fonctionner équipée d'un
système à distance de collecte des poussières par le vide,
ou du sac à poussières fourni.
TUYEAU DE 3,8cm
DU SYSTEME
D’ASPIRATION
(NON FOURNI)
D
Préparation des systèmes à distance de collecte des
poussières par le vide
Pour préparer la machine à l'utilisation d'un système à
distance de collecte des poussières par le vide ayant une
extrémité de tuyau de 5 cm, monter l'extrémité de tuyau de
5 cm (figure 5, A) directement par-dessus le tuyau
d'évacuation (figure 5, B).
A
TUYAU DE 5 cm
DU SYSTEME
D’ASPIRATION
(NON FOURNI)
Pour préparer la machine à l'utilisation d'un système à
distance de collecte des poussières par le vide ayant une
extrémité de tuyau de 3,80 cm, procéder comme suit:
TUYAU DE 5 cm
(30563A) X
ADAPTATEUR
DE TUYAU
DE 3,8 cm
1. Monter l'adaptateur d'extrémité de tuyau (5 x 3,8 cmPièce no 30563A) (figure 5, C) sur le tuyau d'évacuation
(figure 5, B).
B
2. Introduire l'extrémité de tuyau de 3,80 cm (figure 5, D)
dans l'adaptateur (figure 5, C).
C
TUYAU
D’EVACUATION
Figure 5
NOTE: Faire démarrer le système à distance de
collecte par le vide avant de travailler.
Préparation pour utilisation du sac à poussières fourni
Pour préparer la machine à l'utilisation du sac à poussières
fourni (Pièce no 53673A), procéder comme suit:
INSTALLEZ LE SAC
A POUSSIERES EN
APPUYANT SON
EXTREMITE SUR LE
TUYAU
D’EVACUATION
JUSQU’A CE QUE
L’ANNEAU SE
VERROUILLE DANS
LA RAINURE
1. Installez le sac a poussieres en appuyant son
extremite sur le tuyau d'evacuation jusqu'a ce que
l'anneau se verrouille dans la rainure (figure 6).
2. Pour retirer le sac à poussières du tuyau d'évacuation,
soulvever l'extrémité de l'ouverture du sac pour
partiellement dégager la nervure interne de la rainue,
puis tirer.
3. Pour vider le sac à poussières, ouvrir la fermeture éclair
de la trappe d'évacuation des déchets et expulser le
contenu en retournant le sac.
NOTE: Pour obtenir les meilleurs résultats, vider
fréquemment le sac. Respecter toutes les mises en
garde indiquées dans le présent manuel et sur le sac à
poussières.
Clarke® American Sanders Manuel de l’utilisateur (FR) - EZ Sand
Figure 6
- 27 -
FRANÇAIS
FR
Utilisation de l’appareil
Pour poncer les sols, suivez cette procédure :
1.
Déplacez l’appareil jusqu’au site de ponçage.
Choisissez la meilleure approche pour poncer la
zone à traiter. Lorsque vous poncez une zone,
déplacez-vous de façon à vous éloigner de la prise
électrique. Vous réduirez ainsi les risques
d’emmêler le cordon et vous serez moins souvent
contraint de déplacer le cordon.
2. Installez le papier abrasif. Pour cela, appliquez la
même procédure que celle décrite à la section
PREPARATION DE L’APPAREIL pour installer les
patins. Le papier abrasif utilise un système
d’accrochage et de rotation identique à celui utilisé
pour fixer les patins aux systèmes d’entraînement.
Centrez le papier abrasif sur le patin et maintenez-le
contre le patin jusqu’à ce que les crochets se fixent
sur le papier abrasif.
AVERTISSEMENT :
2 1
2
Figure 7
Vous risquez de vous blesser
si la machine est branchée à
une source d’alimentation
pendant que vous installez
les patins ou le papier
abrasif. Débranchez la
machine avant d’installer le
patin ou le papier abrasif.
3. Connectez l’appareil à un circuit électrique
adéquatement mis à la terre et protégé par un
fusible ou un disjoncteur.
4. Tout en maintenant le manche, saisissez et faites
glisser le collier de verrouillage moleté vers le
manche puis fixez-le à l’encoche aménagée dans le
tube en le faisant tourner. Baissez le manche
jusqu’à une position confortable pour vous.
5. Pousser sur le bouton de verrouillage (1) et
appliquer une pression des mains sur les leviers
(2). Pour arrêter l’appareil, relâchez les leviers (Voir
fig. 7).
ATTENTION :
Pour éviter d’endommager
les parquets et pour réduire
le tourbillonnement, gardez
l’appareil en mouvement
lorsque le moteur fonctionne.
REMARQUE : Pour avoir des conseils sur le ponçage
et le papier abrasif, voir en page 30.
-28-
Clarke® American Sanders Manuel de l’utilisateur (FR) - EZ Sand
FRANÇAIS
FR
Dépannage
Problème
Le moteur ne démarre pas.
Le moteur démarre mal ou
fonctionne trop lentement.
Le fusible ou le disjoncteur saute
très souvent.
Le manche semble être mal fixé
au socle de la machine.
Cause
Solution
Aucune alimentation électrique.
Vérifiez l’alimentation électrique
et les connexions.
Le verrou n’est pas enfoncé.
Enfoncez le verrou avant
d’actionner la manette de commande.
Interrupteur défectueux,
mauvaise connexion.
Contactez un détaillant Clarke agréé.
Tension faible à cause d’une
rallonge trop longue ou trop fine.
Utilisez une rallonge électrique
de grosseur 14 ne dépassant
pas 50 pieds.
Défectuosité du démarreur.
Contactez un détaillant Clarke agréé.
Problème de tension faible
dans le moteur.
Contactez un détaillant Clarke agréé.
Tension trop faible.
Éliminez la rallonge électrique.
Trouvez une source d’alimentation
électrique plus proche du site. Faites
vérifier la tension électrique par un
électricien.
Mauvaise connexion.
Contactez un détaillant Clarke agréé.
Moteur défectueux.
Contactez un détaillant Clarke agréé.
Les taquets ont été décrochés/
Pour serrer les taquets, desserrez
le contre-écrou, vissez le crochet
du taquet puis resserrez le
contre-écrou.
Clarke® American Sanders Manuel de l’utilisateur (FR) - EZ Sand
- 29 -
FRANÇAIS
FR
Ponçage et papier abrasif
Premier passage
Le but du premier passage est d’enlever l’ancienne finition et les plus grosses imperfections. Utilisez un
papier abrasif à gros grains (20-36 grains).
Passages finaux
Le but d’un passage final est d’enlever les rayures produites durant le premier passage. Utilisez un papier
abrasif à petits grains (60-80 grains).
Si la surface demeure rugueuse après un passage final, il pourrait être nécessaire d’utiliser un papier abrasif
à grains plus fins (80-100 grains). La grosseur des grains abrasifs doit être choisie avec soin. Un grain trop
fin risque de refermer les pores du bois, nuisant ainsi à l’absorption ultérieure de la teinture.
Si vous détectez une vitrification ou des traces de brûlure, le papier abrasif s’est émoussé et doit être
remplacé.
Grains
20 grains
36 grains
Pour l’élimination des grosses imperfections et
l’uniformisation d’un vieux parquet. Pour
l’élimination des vieilles couches de peinture et de
vernis.
Pour le premier ponçage d’un parquet neuf (érable,
chêne). Pour l’élimination des petites
imperfections et de la finition des vieux parquets.
54082A
54081A
60 grains
Pour nettoyer après le passage d’un
abrasif à 36 grains.
54080A
80 grains
Pour le ponçage final de certains parquets de
bois franc. Pour nettoyer après le passage d’un
abrasif à 60 grains.
54079A
100 grains
Pour le ponçage final de certains parquets de
bois franc et de bois mou lorsqu’une surface lisse
est désirée.
120 grains
-30-
Qualité
standard
N° de pièce/Qté
Utilisation
Pour le ponçage final de certains parquets de
bois franc et de bois mou lorsqu’une surface lisse
est désirée. Pour le nivellement après l’application
d’une couche de produit de finition.
54078A
53886A
Clarke® American Sanders Manuel de l’utilisateur (FR) - EZ Sand
EZ Sand
Section II
Parts and Service Manual
(71158A)
EZ Sand
Assembly Drawing and Parts List #1 12/06
Ref. #
Part No.
Description
1
2
3
4
5
6
7
8
9
10
11
12
53673A
53676A
61795A
29893A
915028
807305
38734A
61355A
747304
87007A
87700A
53682A
Dust Bag
Adapter, Dust Bag
Ring, Locking Adapter
Dust Fan
Key, 1/8 x 5/8
Retaining Ring
Disc, Sanding
Spacer
Retaining Ring
Washer, Flat, 1/4
Screw, 1/4-20 x 1/2
Pad, Foam Driver
-32-
Qty
Ref. #
Part No.
Description
1
1
1
3
3
6
3
3
3
3
3
3
13
14
15
16
17
18
19
20
21
22
23
24
30771A
902606
80139A
61873A
61841A
59940A
507342
980215
80295A
61744A
962565
70499A
Plug, Sanding Pad
Bearing
Screw, 1/4-20 x 7/8
Weight, Bottom
Cover, Bottom
Wheel, 4" OD
Retaining Ring, 1/2 OD
Washer, Thrust
Washer, Bowed
Axle, Wheel
Screw, 3/8-16 x 1/2
Label, CAS
Qty
Clarke® American Sanders Operator's Manual - EZ Sand
3
6
4
2
1
2
2
2
2
1
3
1
EZ Sand
Assembly Drawing & Parts List #2 12/06
(32, 33, 34)
Ref. #
Part No.
Description
Qty
Ref. #
Part No.
Description
1
2
3
4
5
6
7
8
9
10
11
12
13
14
15
16
17
61846A
962027
53770A
61806A
98472A
81217A
902567
53672A
51176A
80139A
30685A
40958A
61793A
80309A
40957A
912287
80311A
Cover, Motor
Screw, 8-32 x 1/2
Keeper, Latch
Handle, Housing
Screw, 1/4-20 x 5/8
Nut, Lock, 1/4-20
Ball Bearing
Motor, EZ Sand
Ball Bearing
Screw, 1/4-20 x 7/8
Dust Skirt
Adapter, Mounting
Plate, Backing, Skirt
Screw, #6 x 3/8
Terminal Block
Rectifier
Screw, 8-32 x 5/8
1
5
3
1
4
4
3
3
3
12
1
1
1
2
2
1
2*
18
19
20
21
22
23
24
25
26
27
28
29
30
31
32
33
33
85303A
29892A
61847A
80319A
962822
872102
85614A
962798
80310A
40930A
920056
980650
920065
980603
54287A
54288A
54289A
Screw, 8-32 x 3/8
Mainframe
Shroud, Motor
Nut, 10-24, U-Type
Screw, 1/4-20 x 5/8
Nylon Clip
Screw, 8-32 x 3/4
Screw, 10-24 x 1/2
Screw, 6-32 x 1/2
Inlet, Electrical
Nut, Lock, 6-32
Washer, Lock #10
Nut, Lock, 8-32
Washer, Lock, #10 Ext.
Armature
Brush
Brush Springs
Qty
2
1
1
3
3
1
1
3
2
1
2
1
6
1
1
2
2
*NOTE: Second screw is used for attaching ground
wires.
Clarke® American Sanders Operator's Manual - EZ Sand
- 33 -
EZ Sand
Assembly Drawing & Parts List #3 12/06
Ref. #
Part No.
Description
1
2
3
4
5
6
7
8
9
21074A
71157A
61842A
40929A
962027
55721A
61801A
80318A
29895A
Handle, Front
Label, Warning
Handle Weldment
Cord, Interconnect
Screw, 8-32 x 1/2
Latch, Cam
Collar, Handle Lock
Screw, 1/2-13 x 1
Weight, Iron
-34-
Qty
Ref. #
Part No.
Description
1
1
1
1
9
3
1
1
1
10
11
12
13
14
15
16
17
40931A
70175A
80284A
21075A
10687A
80291A
80290A
71156A
Cord, Pigtail
Tag, Warning
Screw, 10-32 x 3/4
Handle, Back
Module, Interlock
Washer, Flat #10
Screw, 10-32 x 3/8
Label, Handle
Qty
1
1
6
1
1
1
2
1
Clarke® American Sanders Operator's Manual - EZ Sand
EZ Sand
Electrical Schematic 12/06
Clarke® American Sanders Operator's Manual - EZ Sand
- 35 -
NOTES
- 36 -
Clarke® American Sanders Operator's Manual - EZ Sand
CLARKE PRODUCT SUPPORT BRANCHES
U. S. A. Locations
CORPO
PRODUCTION FACILITIES
Clarke® , Springdale, Arkansas
2100 Highway 265
Springdale, Arkansas 72764
(479) 750-1000
Customer Service - 1-800-253-0367
Technical Service - 1-800-356-7274
SERVICE FACILITIES
European Locations
PRODUCTION FACILITIES
ALTO Danmark A/S, Aalborg
Blytaekkervej 2
DK-9000 Aalborg
+45 72 18 21 00
ALTO Danmark A/S, Hadsund
Industrikvarteret
DK-9560 Hadsund
+45 72 18 21 00
SALES SUBSIDIARIES
Clarke®, Elk Grove, Illinois 60007
2280 Elmhurst Road
(847) 956-7900
Clarke®, Denver, Colorado 80204
1955 West 13th Ave.
(303) 623-4367
Clarke®, Houston, Texas 77040
7215 North Gessner Road
713-937-7717
ALTO US - Canada, Ontario (Canada)
4080 B Sladeview Crescent Unit 1
Mississauga, Ontario L5L 5Y5
(905) 569 0266
ALTO Overseas Inc., Sydney (Australia)
1B/8 Resolution Drive
Caringbah NSW 2229
+61 2 9524 6122
ALTO Cleaning Systems Asia Pte Ltd., Singapore
No. 17 Link Road
Singapore 619034
+65 268 1006
SERVICE AND SALES FACILITY
American Lincoln® / Clarke, Madison Heights,
Michigan 48071-0158
29815 John R.
(810) 544-6300
American Lincoln® / Clarke, Marietta, Georgia 30066
1455 Canton Road
(770) 973-5225
ALTO Deutschland GmbH, Bellenberg (Germany)
Guido-Oberdorfer-Straße 2-8
89287 Bellenberg
+49 0180 5 37 37 37
ALTO Cleaning Systems (UK) Ltd., Penrith
Gilwilly Industrial Estate
Penrith
Cumbria CA11 9BN
+44 1768 868 995
ALTO France S.A. Strasbourg
B.P. 44, 4 Place d’Ostwald
F-67036 Strasbourg
Cedex 2
+33 3 8828 8400
Clarke®
Clarke American Sanders
A.L. Cook
Customer Service Headquarters and Factory
2100 Highway 265
Springdale, Arkansas 72764
(479) 750-1000
Technical Service
1-800-356-7274
ALTO Nederland B.V.
Postbus 65
3370 AB Hardinxveld-Giessendam
The Netherlands
+31 184 677 200
ALTO Sverige AB, Molndal (Sweden)
Aminogatan 18
Box 4029
S-431 04 Molndal
+46 31 706 73 00
ALTO Norge A/S, Oslo (Norway)
Bjornerudveien 24
N-1266
+47 2275 1770
Clarke® American Sanders U. S. Warranty
This Clarke American Sanders Industrial/Commercial Product is warranted to be free from defects in
materials and workmanship under normal use and service for a period of two years from the date of purchase, when operated and maintained in accordance with Clarke American Sanders's Maintenance and
Operations Instructions.
This warranty is extended only to the original purchaser for use of the product. It does not cover normal
wear parts such as electrical cable, rubber parts, hoses and motor brushes.
If difficulty develops with the product, you should:
(a). Contact the nearest authorized Clarke American Sanders repair location or contact the Clarke American
Sanders Service Operations Department, 2100 Highway 265, Springdale, Arkansas 72764, for the nearest
authorized Clarke American Sanders repair location. Only these locations are authorized to make repairs to
the product under this warranty.
(b). Return the product to the nearest Clarke American Sanders repair location. Transportation charges to
and from the repair location must be prepaid by the purchaser.
(c). Clarke American Sanders will repair the product and or replace any defective parts without charge within
a reasonable time after receipt of the product.
Clarke American Sanders's liability under this warranty is limited to repair of the product and/or replacement of parts and is given to purchaser in lieu of all other remedies, including INCIDENTAL AND CONSEQUENTIAL DAMAGES.
THERE ARE NO EXPRESS WARRANTIES OTHER THAN THOSE SPECIFIED HEREIN. THERE ARE NO
WARRANTIES WHICH EXTEND BEYOND THE DESCRIPTION OF THE FACE HEREOF. NO WARRANTIES,
INCLUDING BUT NOT LIMITED TO WARRANTY OF MECHANTABILITY, SHALL BE IMPLIED. A warranty
registration card is provided with your Clarke American Sanders product. Return the card to assist Clarke
American Sanders in providing the performance you expect from your new floor machine.
Clarke®, 2100 Highway 265, Springdale, Arkansas 72764
Clarke American Sanders reserves the right to make
changes or improvements to its machine without notice.
Always use genuine Clarke American Sanders Parts for repair.
2100 Highway 265
Springdale, Arkansas, 72764