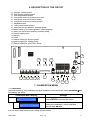
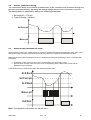
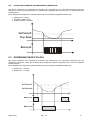
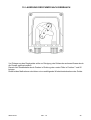
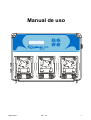
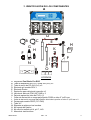
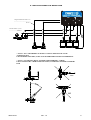
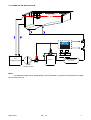
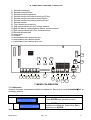
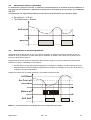
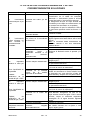
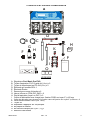
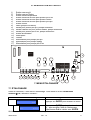
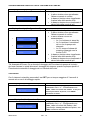
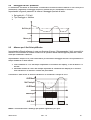
1
Pool Basic Pro Evo pH-/Rx/pH+ - pH/Rx/Flocc 0000137191 Rev. 1.0 INSTRUCTIONS MANUAL EN HANDBUCH DE MANUAL DE INSTALACION ES MANUEL D’INSTALLATION FR MANUALE D’INSTALLAZIONE IT User Manual 000013791 Rev. 1.0 1 CONTENTS 1. GENERAL INTRODUCTION 2. INSTALLATION PRECAUTIONS 3. IDENTIFICATION OF COMPONENTS 4. TECHNICAL SPECIFICATIONS 5. ASSEMBLY INSTRUCTIONS 5.1 APPLICATION EXAMPLE 6. DESCRIPTION OF THE CIRCUIT 7. CALIBRATION MENU 7.1 CALIBRATION 8. PROGRAMMING 9. DOSING METHOD 10. ACTIVATIONS 11. ALARMS 12. PRE-DEFINED CONTROL PARAMETERS 13. LIST OF POSSIBLE ANOMALIES AND RELATIVE SOLUTIONS 14. HANDLING 15. STORING THE PUMP AFTER USE WARNINGS 000013791 Rev. 1.0 2 1. GENERAL INTRODUCTION The Pool Basic Pro EVO control method belongs to a new line of instruments carefully developed by the supplier for the innovative management of pools. This device is easy to use and permits continuous control of the pH. The peristaltic pumps have a 1,5 l/h flow rate for pH regulation and have a pressurised injection flow rate up to 1.5 bar. This easy-to-use instrument does not require special maintenance operations. It is equipped with a self-regulation procedure and automatic control of the electrode’s state. 2. INSTALLATION PRECAUTIONS WARNING!!! Disconnect power before carrying out ANY operation inside the control panel of the Pool Basic Pro EVO device. NON-OBSERVANCE OF THE INSTRUCTIONS CONTAINED IN THE PRESENT MANUAL COULD CAUSE INJURY TO PEOPLE AND/OR DAMAGE TO THE DEVICE. WARNING During installation of the Pool Basic Pro EVO device, proceed as follows: Make sure that the supply voltage coincides with the one indicated on the label on the side of the device. Make sure that the injection pressure is below 1.5 bar. Make sure that the pump’s protective cover is properly latched. Make sure that the suction hose is immersed with the relative foot (PVC hose) in the tank of the product which must be injected and that it is connected to the pump (symbol on cover ▲). After carrying out the checks stated above, tighten the connector nut. Connect one end of the delivery hose (▼ symbol on cover) to the pump and connect the other end to the pool through the injection valve. NOTE: To insert the product which must be injected into the pump when starting for the first time and every time the tank is changed, set the switch to forced running using the button. 000013791 Rev. 1.0 3 3. IDENTIFICATION OF COMPONENTS A D B G F C E L M K H J I N pH P Instructions manual O PH 7 PH 4 H20 KEY A. B. C. D. E. F. G. H. I. J. K. L. M. N. O. P. Pool Basic Pro EVO regulator Suction hose in PVC Crystal 4x6 (4 m) x 2 Delivery hose in PE 4X6 (5 m) x 2 pH Electrode model SPH-1 Redox Electrode Reducer for injection valve x 2 Duckbill valve in FPM (3/8” GAS) x 2 Suction foot (PVC hose) x 2 Tapping double-bolt clamp for fastening PSS3 probe holder onto 2” =50mm hose Tapping double-bolt clamp for fastening injection valve onto 2” =50mm hose x 2 Probe holder model PSS3 (1/2” GAS) Hose 3x7 Labels to be stuck onto the pumps Fixing bracket kit pH 4, pH 7, H2O Buffer solution kit Instruction Manual 000013791 Rev. 1.0 4 4. TECHNICAL SPECIFICATIONS Power supply: 100÷240 Vac 50/60 Hz 30 watt Switch: on side of box Inlet measurements: pH, through BNC o pH scale: 0÷14.0 pH o pH precision: +/-0.1 pH o Redox scale: 0÷1500mV o Redox precision: +/-10 mV Temperature Scale: 0÷100 °C (PT100 sensor) Pump flow rate with transaxle technology: o pH, pH-, pH+: 1.5 l/h (hose 6X10) 1.5 bar o Flocculant: 0.4 l/h (hose 3X7), 1.5 l/h (hose 6X10) 1.5 bar Pump relay PH-, pH: 10 A 250 V (dry contact) Relay for alarm or Redox: 10 A 250 V (dry contact) Relay for PH+, Flocculant: 10 A 250 V (dry contact) Dedicated power for pumps: 240 Vac 10 watt Input signal: 100÷240 Vac Level probe: pH, Redox, Flocculant Install the Pool Basic Pro EVO control device on a hard support (vertical wall) where it can be easily accessed by the operator. Attach the Pool Basic Pro EVO control device using the provided fixing bracket (distance between centre of holes: 95mm. Hole Ø 6). Before carrying out any operation inside the equipment, make sure that the switches are on 0. Unscrew the two screws on the upper part of the equipment by a quarter of a turn and the front side will fold down on the hinges. 000013791 Rev. 1.0 5 5. ASSEMBLY INSTRUCTIONS Max. length of cable: 6m Lunghezza *NOTE 1 massima de cavo: 6 mt * NOTA 1 Maximum pressure *NOTE 1 Pressione Massima: 1,5 bar * NOTA 2 3 4 5 2 6 1 0 7 *NOTE 1: FOR LARGE PUMPS, THE CABLE MUST PASS THROUGH AN AREA OTHER THAN THE POWER SUPPLY ZONE IN ORDER TO PREVENT CURRENT DISTURBANCES. * NOTA 1: IL CAVO DEVE PASSARE IN UNA ZONA DIVERSA DA QUELLA DI ALIMENTAZIONE PER POMPE GROSSE, PER EVITARE DISTURBI DI CORRENTE. *NOTE 2: THE MAX. PRESSURE MUST NOT EXCEED 1.5 BAR. INCREASE THE MAX. HOSE’S LIFETIME, THE PRESSURE MUST NOT EXCEED 1 BAR. * NOTATO 2: LA PRESSIONE NON DEVE ESSERE SUPERIORE A 1,5 BAR. PER AUMENTARE LA DURATA DEL TUBO, LA PRESSIONE NON DEVE SUPERARE 1 BAR. NO NO 000013791 Rev. 1.0 6 5.1 APPLICATION EXAMPLE COMPENSATION TANK FILTER PH HEAT INTERCHANGER RECIRCULATION PUMP Note: The linear distance of the hose between the probe and the point of injection must not be less than 60cm. 000013791 Rev. 1.0 7 6. DESCRIPTION OF THE CIRCUIT 1) Inlet pH measurement 2) Inlet Redox measurement 3) Inlet temperature probe 4) Inlet probe level for product pH-/Flocc 5) Inlet probe level for product Redox 6) Inlet probe level for product pH+/pH 7) Keyboard input 8) Flow (recirculation pump) 9) Relay for pH-/pH product, external pump 10)Alarm relay or for Redox product, external pump 11)Relay for pH+/Flocc product, external pump 12)Power supply input 13)Switch 14)Fuse 15)Power supply for pH-/pH pump 16)Power supply for Redox pump 17)Power supply for pH+/Flocc pump Net µChip Fuse 16 15 14 17 13 pH-/pH Pump RX Pump pH-/Flocc Pump Relay Relay Relay - +- + Input Input Temp Lev Lev Lev pH Rx Probe pH-/pH RX pH+/ Flocc 1 2 3 4 5 6 Input Flow RL pH-/ Alarm RL pH+/ Flocc pH 7 8 F N 12 9 10 11 7. CALIBRATION MENU 7.1 Calibration Before proceeding, the calibration must be enabled. Scroll down the menu AdvancedCal, the display will show: Calibration Menu Display Settings Advanced Cal Off Advanced Cal Full Press ENTER to access the menu. Press ENTER and the + and – keys to modify the calibration. Select Full and confirm with ENTER. Exit the menu and return to the normal system status. 000013791 Rev. 1.0 8 7.1.1 Calibration of pH probe Press CAL B.Solut. Calibration pH Measure Keep the probe in the buffer solution pH 7 Wait B.Solut. Wash the probe Remove the probe from the probe holder Get some water 59s 7pH Press the Cal key for 3 seconds and use it to confirm the pH measurement Quality B.Solut. Press Cal to start calibration with a buffer solution pH 7 7pH 2 H2O 9 The calibration takes 1 minute 10 4pH Wait B.Solut. 59s 7pH 3 4 pH Keep the probe in the buffer solution pH 4 Quality B.Solut. Press Cal to start calibration with a buffer solution pH 4 Probe quality The calibration takes 1 minute 4pH 14 000013791 Wash the probe Probe quality Press CAL B.Solut. 7pH 2 H2O Wash the probe Rev. 1.0 15 Put the probe back in the probe holder and press Cal to finish 9 7.1.2 Calibration of Redox probe To carry out this calibration the Redox measurement must be enabled. Get some water Calibration Rx Measure Keep the probe in the buffer solution 465 mV Wait B.Solut. 59s 465 mV Wash the probe Remove the probe from the probe holder Press the Cal key for 3 seconds and use it to confirm the Rx measurement Quality B.Solut. Press CAL B.Solut. Press Cal to start calibration with a buffer solution 465 mV 465 mV 9 The calibration takes 1 minute 465 mV Probe quality 2 H2O Wash the probe 10 Put the probe back in the probe holder and press Cal to finish 000013791 Rev. 1.0 10 8. PROGRAMMING The programming menu can be accessed by simultaneously pressing the Cal and Set keys for at least 3 seconds. Upon release of the keys the display will show: Language Display Progrma Menu Language EN Settings Press Enter and the + and – keys to change the language: FR, EN, IT, ES, DE The menu will show a different display according to the chosen configuration: Configuration A: pH-/Rx/pH+ Configuration B: pH/Rx/Flocc For further details please see the menu AdvancedConfiguration To prime the pH-/pH pump, press the UP button for at least 3 seconds and release it to stop the operation. To prime the pH+/FLOCC pump repeat the same procedure pressing the DOWN button for at least 3 seconds, for to prime the Redox pump press the UP and DOWN keys together. pH Minus measurement display (A configuration) Progrma Menu pH minus measure Use Enter to access the sub-menus: Setpoint OFA time Alarm Type pH minus measure Setpoint 7.4 pH Press Enter and the + and - keys to modify the Set Point value which ranges from (Set Point pH Plus + 0.4 pH) to 14 pH. pH minus measure OFA Time Off Press Enter and the + and - keys to set the OFA time on OFF or from 1 to 240 min (see Paragraph 9.5). pH minus measure Alarm 8.4pH pH minus measure Type PROP 000013791 Settings Press Enter and the + and - keys to set the alarm ranging from Set Point + 0.1 pH to 14 pH. This alarm is shown on the display. Press Enter and the + and - keys to change the dosing type. PROP (see Paragraph 9.1). ON/OFF (see Paragraph 9.3). OFF (dosing disabled) Rev. 1.0 11 Redox measurement display (A and B configuration) Progrma Menu Rx Measure Rx Measure Setpoint 760mV Rx Measure Sp Type Low Rx Measure OFA Time Off Rx Measure Alr Band 300mV Type Rx Measure PROP Settings Use Enter to access the sub-menus: Setpoint Sp Type OFA time Alr Band Type Press Enter and the + and - keys to change the Set Point value (0÷1500 mV). Press Enter and the + and - keys to change the Set Point type. Low High Press Enter and the + and - keys to set the OFA time to OFF or from 1 to 240 min. (see Paragraph 9.5) Press Enter and the + and - keys to set the band alarm from 100 to 300 mV. Press Enter and the + and - keys to change the dosing type. PROP (see Paragraph 9.2). ON/OFF (see Paragraph 9.4). OFF (dosing disabled) pH Plus measurement display (A configuration) Progrma Menu pH plus measure Use Enter to access the sub-menus: Setpoint OFA time Alarm Type pH plus measure Setpoint 7.0 pH Press Enter and the + and - keys to modify the Set Point value which ranges from 0 pH to (Set Point pH Minus - 0.4 pH). pH plus measure OFA Time Off Press Enter and the + and - keys to set the OFA time to OFF or from 1 to 240 min (see Paragraph 9.5). pH plus measure Alarm 6.0pH Press Enter and the + and - keys to set the alarm ranging from 0 pH to Set Point - 0.1 pH. This alarm is shown on the display. pH plus measure Type PROP 000013791 Settings Press Enter and the + and - keys to change the dosing type. PROP (see Paragraph 9.1). ON/OFF (see Paragraph 9.1). OFF (dosing disabled) Rev. 1.0 12 pH measurement display (B configuration) Progrma Menu pH Measure pH Measure Setpoint 7.4 pH pH Measure Sp Type Acid pH Measure OFA Time Off pH Measure Alr Band 3.0pH Type pH Measure PROP Settings Use Enter to access the sub-menus: Setpoint Dos type OFA time Alr Band Type Press Enter and the + and - keys to change the Set Point value (0÷14 pH) Press Enter and the + and - keys to change the Set Point type. Acid Alkaline Press Enter and the + and - keys to set the OFA time to OFF or from 1 to 240 min. (see Paragraph 9.5) Press Enter and the + and - keys to set the band alarm from 1 to 3 pH. Press Enter and the + and - keys to change the dosing type. PROP (see Paragraph 9.2). ON/OFF (see Paragraph 9.4). OFF (dosing disabled) Flocculant measurement display (B configuration) Progrma Menu Flocculant Flocculant Tube 6x10 000013791 Settings Use Enter to access the sub-menus: Hose Conc. Pump Use Enter to modify the dimensions of the hose (3x7 or 6x10mm) and the system automatically calculates the flow rate with the other hose without changing any parameters (the factory-set hose is 6x10). Flocculant Conc 1.0 cc/m3 Enter the concentration value of the product to be dosed with the 3x7 hose. This value ranges from 1 to 4cc/m3. With the 6x10 hose the range is 1 to 15cc/m3. Flocculant Pump 20 m3/h Enter the value of the system recirculation pump. It ranges from 2 to 100m³/h Rev. 1.0 13 Advanced Display Settings Use Enter to access the sub-menus: Pump config. Relay config Temp. Flow Cal. Password Press Enter to modify the pump configuration: Configuration A: The first pump on the left carries out the pH- function, the pump in the middle the Redox function and the one on the right carries out the pH+ function, (pH/Rx/pH+). Configuration B: The first pump on the left carries out the pH function, the pump in the middle the Redox function and the one on the right carries out the Flocculant function, (pH/Rx/Flocc). Progrma Menu Avdvanced Pump Congig. A: pH-/Rx/pH+ Relay Congig. Rx Pump Avdvanced Temp. 25°C Avdvanced Flow On Avdvanced Cal Full Avdvanced Password **** Press Enter and the + and - keys to modify the outlet relay setting according to the Redox measurement (Rx pump) or according to an alarm condition (Alarm). Press Enter and the + and - keys to set the compensation temperature from 1 to 100°C. If a temperature probe is connected, the menu item will not be displayed as the system will compensate automatically with the value read by the probe itself. Press Enter and the + and - keys to set the flow to OFF or ON. This item enables or disables the Flow inlet (see. Paragraph 10.0). Press Enter and the + and – keys to set the calibration to OFF or enable it to ON (Full) Press Enter to set the system access and modification password. Use the + key to modify the figure and the – key to scroll to the next figure and confirm with Enter Press Esc to exit any menu and confirm the settings by pressing Enter. Display Settings Press the + and – keys to choose Save or Progrma Menu NoSave, i.e. to save the settings or not and Exit Save press Enter to confirm. 000013791 Rev. 1.0 14 DISPLAY VIEW WITH THE SYSTEM ON STAND-BY Stand-by display (Configuration A) Alr 760mV 8.3pH Stand-by display (Configuration B) 1 2 3 Alr 760mV 8.3pH Alr 760mV 1200cc 8.3pH Alr 760mV FLOC 37m 8.3pH Operation The display is divided into 4 parts: On the upper left hand side the alarm is shown, when present. On the lower left hand side the value read by the Rx probe is shown. On the lower right hand side the value read by the pH probe is shown Operation The display is divided into 4 parts: On the upper left hand side the alarm is shown, when present. On the upper right hand side three views are displayed: o The first is the stand-by system o The second shows the cc countdown dosed by the pump o The third is the waiting time until the next dosing with the message FLOC. On the lower left hand side the value read by the Rx probe is shown. On the lower right hand side the value read by the pH probe is shown *If AdvancedFlow=On and during Flocculant dosing, the recirculation pump stops and blocks the system dosing, when the pump restarts, the Flocculant will restart the cc dosing calculated from the start. SHORTCUTS To access the shortcut menu press the SET key for at least 3 seconds when the system is in stand-by. Display Set (Configuration A) pH-= 7.2 pH+= 7.0 Rx= 760 Display Set (Configuration B) pH= 7.2 Rx= 760 Floc= 1.0cc/m3 000013791 Operation The pH- value flashes. It can be modified using the + and – keys and confirmed using Enter. For the pH+ and Rx value, repeat the same procedure, press Enter to confirm and exit. Operation The pH- value flashes. It can be modified using the + and – keys and confirmed using Enter. For the Redox and Flocculant value, repeat the same procedure, press Enter to confirm and exit. Rev. 1.0 15 9. DOSING METHOD The control of the pumps in the pH and Redox scale is carried out through the PWM function. The proportional band is fixed on the values pH0.8 and Redox = 120 mV 9.1 Proportional dosing pH-/pH+ The instrument allows the chemical measurement to be controlled and modified through the pH- and pH+ Set Point automatically; adjusting the dosing through the pH-/pH+ motor controlled in Proportional Time. The dosing below is obtained by setting the following parameters: Set point pH- = 8.10 pH Set point pH += 6.90 pH Proportional Band = 0.80 pH Prop. Band Set Point pHSet Point pH+ Prop. Band Motore pH- Motore pH+ 000013791 Rev. 1.0 16 9.2 pH/Redox proportional dosing The instrument allows the chemical measurement to be controlled and modified through the pH Set Point automatically; adjusting the dosing though the pH motor controlled in Proportional Time. The dosing below is obtained by setting the following parameters: Set point pH = 7.20 pH Type of Dosing = Alkaline Proportional Band = 0.80 pH Set Point pH Prop. Band Motore pH 9.3 ON/OFF pH-/pH+ dosing The instrument allows the chemical measurement to be controlled and modified through the pH- e pH+ Set Point automatically; adjusting the dosing through the pH-/pH+ motors controlled in ON/OFF. The dosing below is obtained by setting the following parameters: Set point pH- = 8.10 pH Set point pH += 6.90 pH Set Point pHSet Point pH+ Motore pH- Motore pH+ 000013791 Rev. 1.0 17 9.4 ON/OFF pH/Redox dosing The instrument allows the chemical measurement to be controlled and modified through the pH Set Point automatically; adjusting the dosing though the pH motor controlled in ON/OFF. The dosing below is obtained by setting the following parameters: Set point pH = 7.20 pH Type of Dosing = Alkaline Set Point pH Motore pH 9.5 Alarm for the pH/Redox Set Point When the alarm band is set, a work window is created. If the allowed limits are exceeded the alarm relay closes and remains closed until the measurement is reset or the enter key is pressed to deactivate the alarm. When the OFA time (Over Feed Alarm) is set, the dosing time of Set Point pH/Redox in time is controlled with two alarms: First alarm at 70% of the time set is seen on the display, the alarm relay closes. Second alarm at 100% of the time set is seen on the display and the alarm relay closes and the pH/Redox motor is blocked. Press the Enter key to eliminate the alarm and initialise the OFA time. ALR Band Set Point pH ALR Band Motore pH ALR Relè Note: The operation is the same for the pH-/pH+. 000013791 Rev. 1.0 18 10. ACTIVATIONS Flow Function Through the recirculation pump. High voltage input 100 ÷ 240 Vac, the dosing system is switched on. High voltage input is off (the recirculation pump is switched off), the dosing system shows FLOW flashing. 11. ALARMS Lev pH-= pH product level probe alarm. Lev pH+= pH product level probe alarm. Lev pH= pH product level probe alarm. Lev Flocc= Flocculant product level probe alarm. OFA pH/Redox= Set Point not reached with the OFA time set* pH/Redox Band= Shown when the value read is outside the SetPoint of +/- the band value set. *At 70% of the time set the system shows and activates the alarm relay, at 100% it blocks the motor. Press the Enter key to reset the alarm. Press the Enter key with the alarm active and its relay is deactivated only remaining shown on the display. 12. PRE-DEFINED CONTROL PARAMETERS To reset default values and settings: Disconnect the device Hold down the + and – keys simultaneously and connect the device Confirm the choice to reset the default parameters Default parameters: Configuration = A (pH-/Rx/pH+) Language = UK Set Point pH- = 7,4 pH; OFF; Alr 8,4 pH; PROP Set Point Rx = 750mV; Low; OFF; Alr Band 300mV; PROP Set Point pH+ = 7,0 pH; OFF; Alr 6,0 pH; PROP Temperature = 25°C Calibration = FULL Flow Input= ON Password = Disabled 000013791 Rev. 1.0 19 13. LIST OF POSSIBLE ANOMALIES AND RELATIVE SOLUTIONS ANOMALY The instrument always indicates pH 7.00 The instrument always indicates a high or continuously unstable value Impossible to calibrate the pH 7 value Error shown on the display Calibration quality of pH probe < 20% CAUSE SOLUTION 1) Check for possible short circuits on the electrode instrument connection cable (between the cable’s core and the external Problem with the cable and/or shielding). connector. 2) Make sure that there are no traces of humidity and/or condensation on the connector of the probe or the device. 3) Make sure that 100 resistance is present between terminals 11 and 12. The electrode’s connection Check the cable. cable is damaged. Place the electrode vertically and shake it There is an air bubble in the slightly until the air bubble rises. N.B.: The electrode must be vertical or electrode’s membrane. tilted by a maximum of 45°. Electrode worn. Replace the electrode. Connection cable too long or too close to an electrical wire: Reduce the distance between the device Disturbance. and the probe. Make sure that the solution used is pH 7. Check the buffer solution pH using an Unsuitable buffer solution. electronic pH-meter. Use a new pH 7 buffer solution and restart calibration. Make sure that the probe’s porous material Problem on probe’s porous is in good condition; wash the electrode material, dirt deposits. using a diluted acid-based solution and dry with a soft cloth. Electrode worn. Replace the electrode. Make sure that the solution used is pH 4. Check the buffer solution pH using an electronic pH-meter. Use a new pH 4 buffer solution and restart calibration. Error shown on the Make sure that the electrode bulb is not display Problem with the electrode damaged. Make sure that it did not become bulb. dry outside of the water. As a last resort, clean the electrode and leave it immersed Calibration quality of in the water for a few hours. pH probe < 20% Electrode worn. Replace the electrode. During the calibration phase, the electrode Slow electrode Electrode electrostatically MUST NOT be dried with a cloth or paper; response charged. let it drip. Impossible to Unsuitable buffer solution. calibrate the pH 4 value 000013791 Rev. 1.0 20 14. HANDLING Hose replacement: Release the cover by pulling the left connector upward. Position the roller at 20 past 10, turning it in the direction of the circular arrow. 000013791 Position the roller at 20 past 10, turning it in the direction of the circular arrow. Insert the left connector into the relative housing and pass the hose under the roller’s guide. Turn the probe holder in the direction of the circular arrow, simultaneously accompanying the hose into the pump’s head, until the right connector is reached. Rev. 1.0 Completely release the left connector, holding it taut towards the outside, and turn the roller in the direction of the circular arrow so that the hose is freed up to the right connector. Arrows indicating the liquid’s direction Position the pump’s cap, according to the direction of the arrows (▲▼) and press its surface hard so that it is properly locked into place. 21 15. STORING THE PUMP AFTER USE When the regulation device must be stored, clean water should be pumped through the hose in order to rinse it. Then position the probe holder at 7h05, turning in the direction indicated by the circular arrow. These two precautions will facilitate the subsequent reactivation of the unit. 000013791 Rev. 1.0 22 WARNINGS PRODUCTS TO BE USED: pH Reduction: product with a sulphuric acid base, easily found on the market. pH Increase: product with an alkaline acid base PRODUCTS NOT RECOMMENDED Do not use hydrochloric acid. Ask the installer about all other products. PROBE WARNINGS Handle the probe with CARE. DO NOT INSERT AN EXCESSIVE AMOUNT of chemical product prior to the probe. Storing the probe: Extract the pH probe from the relative probe holder. Store it in the original bottle filled with tap water. If necessary, close the probe holder using a plug the size of a 5 euro cent coin. Since the pH electrode consists of glass parts, handle it with care. All of our electrodes are tested on the production line before being packaged. Repairs of electrodes are not foreseen by the warranty unless they do not function when they are activated for the first time. Packaging not included. In this case, in order for the probe to be accepted for examination, it absolutely must be sent in the original packaging with the relative bottle filled with water. CAUTION: VAPOURS 2 mt SERBATOIO TANK RESERVOIR TANK 000013791 Rev. 1.0 23 Benutzerhandbuch 0000137191 Rev. 1.0 1 INHALTSVERZEICHNIS 1. ALLGEMEINE BESCHREIBUNG 2. VORSICHTSMASSNAHMEN BEI DER INSTALLATION 3. IDENTIFIKATION DER BESTANDTEILE 4. TECHNISCHE DATEN 5. MONTAGEANWEISUNGEN 5.1 ANBRINGUNGSBEISPIEL 6. KREISLAUFBESCHREIBUNG 7. KALIBRIERUNGSMENÜ 7.1 KALIBRIERUNG 8. PROGRAMMIERUNG 9. DOSIERMETHODE 10. AKTIVIERUNGEN 11. ALARME 12. VOREINGESTELLTE STEUERWERTE 13. MÖGLICHE BETRIEBSSTÖRUNGEN UND ENTSPRECHENDE ABHILFEMASSNAHMEN 14. BESTÜCKUNG 15. LAGERUNG DER PUMPE NACH GEBRAUCH WARNHINWEISE 0000137191 Rev. 1.0 2 1. ALLGEMEINE BESCHREIBUNG Die Regelungsmethode Pool Basic Pro EVO ist Teil der neuen Serie der von der lieferant entwickelten Geräte für die moderne Poolpflege. Das Gerät ist einfach bedienbar und erlaubt eine ständige Kontrolle des pH-Werts und die Dosierung von zwei Produkten. Die Peristaltikpumpen haben eine Durchflussrate von 1,5 l/Std. zur Regelung des pH-Werts und eine Druckeinspritzung bis zu 1,5 bar. Das einfach bedienbare Gerät benötigt keine besondere Wartung. Es ist mit einem Selbstregelungsverfahren und einer automatischen Elektrodenkontrolle ausgestattet. 2. VORSICHTSMASSNAHMEN BEI DER INSTALLATION ACHTUNG !!! Vor JEDEM Eingriff in die Bedientafel muss das Gerät Pool Basic Pro EVO vom Stromnetz ausgeschlossen werden. DIE NICHTBEACHTUNG DER IN DIESEM HANDBUCH ENTHALTENEN ANWEISUNGEN KANN ZU PERSONENSCHÄDEN UND/ODER SCHÄDEN AM GERÄT FÜHREN. ANWENDUNGSHINWEIS Pool Basic Pro EVO wie folgt installieren: Achten Sie darauf, dass die Versorgungsspannung mit der auf dem seitlich angebrachten Geräteschild angegebenen Spannung übereinstimmt. Achten Sie darauf, dass der Einspritzdruck unter 1,5 bar liegt. Achten Sie darauf, dass die Pumpenschutzhaube sachgemäß aufgesetzt ist. Achten Sie darauf, dass der Ansaugschlauch mit dem entsprechenden Anschlussfuß (PVC-Schlauch) im Tank des einzuspritzenden Produkts eingetaucht und an der Pumpe angeschlossen ist (Symbol auf dem Deckel ▲). Nach den o.g. Vorkontrollen wird die Überwurfmutter gesperrt. Die Pumpe mit einem Ende des Druckschlauchs verbinden (Symbol auf dem Deckel ▼) und das andere Ende des Druckschlauchs mittels des Einspritzventils mit dem Pool verbinden. ANM.: Um das einzuspritzende Produkt in die Pumpe zu pressen, bei der ersten Inbetriebnahme und bei jedem Kanisterwechsel, den Schalter über den dafür vorgesehenen Knopf auf Zwangsbetrieb stellen. 0000137191 Rev. 1.0 3 3. IDENTIFIKATION DER BESTANDTEILE A D B G F C E L M K H J I N pH P Instructions manual O PH 7 PH 4 H20 LEGENDE A. B. C. D. E. F. G. H. I. J. K. L. M. N. O. P. Regler Pool Basic Pro EVO Ansaugschlauch aus PVC Crystal 4x6 (4 m) x 2 Druckschlauch aus PE 4X6 (5 m) x 2 pH-Elektrode Modell SPH-1 Rx-Elektrode Reduzierstück für Einspritzventil x 2 Lippenventil aus FPM (3/8” GAS) x 2 Ansaugfuß (PVC-Schlauch) x 2 Doppelschelle für PSS3-Befestigung auf Schlauch 2” =50 mm Doppelschelle für Einspritzventilbefestigung auf Schlauch 2” =50 mm x 2 Sondenhalter Modell PSS3 (1/2” GAS) Schlauch 3x7 An den Pumpen anzubringende Etiketten Set Montagehalterung Set Pufferlösung pH 4, pH 7, H2O Betriebshandbuch 0000137191 Rev. 1.0 4 4. TECHNISCHE DATEN Stromversorgung: 100÷240 Vac 50/60 Hz 30 Watt Schalter: Auf dem Gehäuse Eingangsmessungen: pH, über BNC o pH-Skala: 0÷14,0 pH o Präzision pH: +/- 0,1 pH o Rx-Skala: 0÷1500mV o Präzision Rx: +/-10 mV Temperaturen-Skala: 0÷100 °C (Sensor PT100) Leistung der Pumpen mit Transaxle Technology: o pH, pH-, pH+: 1,5 l/Std. (Schlauch 6X10) 1,5 bar o Flockungsmittel: 0,4 l/Std. (Schlauch 3X7), 1,5 l/Std. (Schlauch 6X10) 1,5 bar Relais Pumpe PH-, pH: 10 A 250 V (Trockenkontakt) Relais für Alarm: 10 A 250 V (Trockenkontakt) Relais für PH+, Flockungsmittel: 10 A 250 V (Trockenkontakt) Dedizierte Stromversorgung für die Pumpen: 240 Vac 10 Watt Eingangssignal: 100÷240 Vac Füllstandssonde: pH, Redox, Flockungsmittel Den Regler Pool Basic Pro EVO auf einen festen Unterbau (senkrechte Wand) installieren, wo es vom Bediener leicht erreichbar ist. Den Regler Pool Basic Pro EVO mit der im Set mitgelieferten Montagehalterung befestigen (Bohrungsabstand: 95 mm. Bohrloch Ø 6). Bevor irgendein Eingriff im Geräteinneren vorgenommen wird, sicherstellen, dass die Schalter auf 0 gestellt sind. Durch Lösen der beiden Schrauben auf der Geräteoberseite um eine viertel Umdrehung kann der Vorderdeckel an den Gelenken umgeklappt werden. 0000137191 Rev. 1.0 5 5. MONTAGEANWEISUNGEN MAX. KABELLÄNGE: 6 m Lunghezza massima de cavo: 6 mt ANMERKUNG 1 * NOTA 1 HÖCHSTDRUCK: 1,5 BAR ANMERKUNG 2 Pressione Massima: 1,5 bar * NOTA 2 3 4 5 2 6 1 0 7 ANMERKUNG 1: DAS KABEL MUSS BEI GROßEN PUMPEN IN EINER ANDEREN ZONE ENTLANG * NOTA 1: IL CAVO DEVE PASSARE IN UNA ZONA DIVERSA DA QUELLA DI ALIMENTAZIONE LAUFEN, ALS DER FÜR DIE EINSPEISUNG, UM STÖRUNGEN ZU VERMEIDEN. PER POMPE GROSSE, PER EVITARE DISTURBI DI CORRENTE. * NOTA 2: LA PRESSIONE MAX. NON DEVE SUPERIORE A 1,5 BAR. DARF DER DRUCK 1,5 ANMERKUNG 2: UM DIE LEBENSDAUER DESESSERE SCHLAUCHES ZU VERLÄNGERN, PER AUMENTARE LA DURATA DEL TUBO, LA PRESSIONE NON DEVE SUPERARE 1 BAR. BAR NICHT ÜBERSCHREITEN. NO NO 0000137191 Rev. 1.0 6 5.1 ANBRINGUNGSBEISPIEL AUSGLEICHSBEHÄLTER FILTER WÄRMETAUSCHER PH UMWÄLZPUMPE Hinweis: Der lineare Leitungsabstand zwischen der Sonde und dem Einspritzpunkt darf nicht unter 60 cm liegen. 0000137191 Rev. 1.0 7 6. KREISLAUFBESCHREIBUNG 1) 2) 3) 4) 5) 6) 7) 8) 9) 10) 11) 12) 13) 14) 15) 16) 17) Eingang pH-Messung Eingang Rx-Messung Eingang Temperatursonde Eingang Füllstandssonde für Produkt pH-/Flocc Eingang Füllstandssonde für Produkt Redox Eingang Füllstandssonde für Produkt pH+/pH Eingang Tastatur Durchfluss (Umwälzpumpe) Relais für Produkt pH-/pH, Außenpumpe. Alarmrelais oder Produkt Redox, Außenpumpe Relais für Produkt pH+/Flocc, Außenpumpe. Stromversorgungseingang Schalter Sicherung Stromversorgung für Pumpe pH-/pH Stromversorgung für Pumpe Redox Stromversorgung für Pumpe pH+/Flocc Net µChip Fuse 15 16 14 17 13 pH-/pH Pump RX Pump pH-/Flocc Pump Relay Relay Relay - +- + Input Input Temp Lev Lev Lev pH Rx Probe pH-/pH RX pH+/ Flocc 1 2 3 4 5 6 Input Flow RL pH-/ Alarm RL pH+/ Flocc pH 7 8 F N 12 9 10 11 7. KALIBRIERUNGSMENÜ 7.1 KALIBRIERUNG Zunächst muss die Kalibrierfunktion aktiviert werden. Bei Zugriff auf das Menü ErweitertCa) wird auf dem Display Folgendes angezeigt: Display Kalibrierungsmenü Erweitert Cal Cal Off Erweitert Full Einstellungen ENTER drücken, um in das Menü zu gelangen. ENTER und die Tasten + und – drücken, um die Kalibrierung zu verändern. Full auswählen und mit ENTER bestätigen. Das Menü verlassen und in den normalen Systemstatus zurückkehren. 0000137191 Rev. 1.0 8 7.1.1 Kalibrierung der pH-Sonde Kalibration pH Messung Die Sonde in die Pufferlösung 7 pH eintauchen Pause B.Solut. Die Sonde spülen Die Sonde aus dem Sondenhalter nehmen Wasser einfüllen 59s 7pH Press CAL B.Solut. Die Taste Cal 3 Sekunden lang gedrückt halten und mit der selben Taste die pH-Messung bestätigen Qualitat B.Solut. Cal drücken, um die Kalibrierung mit einer Pufferlösung 7 pH zu starten 7pH 9 Die Dauer der Kalibrierung beträgt 1 Minute 10 2 H2O Die Sonde spülen Qualität der Sonde Press CAL B.Solut. 7pH 4pH Pause B.Solut. 59s 7pH 3 4 pH Die Sonde in die Pufferlösung 4 pH eintauchen Qualitat B.Solut. Cal drücken, um die Kalibrierung mit einer Pufferlösung 4 pH zu starten 4pH 14 Qualität der Sonde 0000137191 Die Dauer der Kalibrierung beträgt 1 Minute 2 H2O Die Sonde spülen Rev. 1.0 15 Die Sonde wieder in den Sondenhalter einsetzen und Cal drücken, um den Vorgang abzuschließen 9 7.1.2 Kalibrierung der Redox-Sonde Zur Durchführung dieser Kalibrierung muss die Redox-Messung aktiviert werden Wasser einfüllen Kalibration Rx Messung Die Sonde in die Pufferlösung 465 mV eintauchen Pause B.Solut. 59s 465 mV Die Sonde spülen Die Sonde aus dem Sondenhalter nehmen Die Taste Cal 3 Sekunden lang gedrückt halten und mit der selben Taste die Rx-Messung bestätigen Qualitat B.Solut. Press CAL B.Solut. Cal drücken, um die Kalibrierung mit einer Pufferlösung 465 mV zu starten 465 mV 9 Die Dauer der Kalibrierung beträgt 1 Minute 465 mV Qualität der Sonde 2 H2O Die Sonde spülen 10 Die Sonde wieder in den Sondenhalter einsetzen und Cal drücken, um den Vorgang abzuschließen 0000137191 Rev. 1.0 10 8. PROGRAMMIERUNG Durch gleichzeitiges, mindestens 3 Sekunden langes Drücken der Tasten Cal und Set erhält man Zugriff auf das Programmiermenü. Bei Loslassen der Tasten erscheinen folgende Anzeigen auf dem Display: Display Sprache Parameter Sprache Einstellungen Durch Drücken von Enter und der Tasten + und - lässt sich die Sprache verändern: FR, EN, IT, ES, DE DE Das Menü erscheint anders, je nachdem welche Konfiguration ausgewählt wird: Konfiguration A: pH-/Rx/pH+ Konfiguration B: pH/Rx/Flocc Für weiterführende Informationen siehe Menü Avanzato Configurazione (Erweitert Konfiguration) Zum Füllen der Pumpe pH-/pH mindestens 3 Sekunden lang die Taste UP drücken. Bei Loslassen der Taste wird der Vorgang beendet. Zum Füllen der Pumpe pH+/FLOCC denselben Vorgang wie oben durchführen und dieses Mal mindestens 3 Sekunden lang die Taste DOWN drücken, zum Füllen der Redox-Pumpe gleichzeitig die Tasten UP und DOWN drücken. Display pH Minus-Messung (Konfiguration A) Parameter pH minus pH minus Sollwert 7.4 pH pH minus OFA Zeit Off pH minus Alarm 8.4pH pH minus Type 0000137191 PROP Einstellungen Durch Drücken von Enter erhält man Zugriff auf die Untermenüs: Setpoint OFA-Zeit Alarm Art der Dosierung Durch Drücken von Enter und der Tasten + und - wird der Setpoint-Wert verändert, der zwischen (Setpoint pH Plus + 0,4 pH) und 14 pH liegen kann. Durch Drücken von Enter und der Tasten + und - lässt sich die OFA-Zeit einstellen, und zwar auf OFF oder zwischen 1 und 240 Min. (siehe Absatz 9.5). Durch Drücken von Enter und der Tasten + und - lässt sich der Alarm einstellen, der zwischen dem Setpoint + 0,1 pH und 14 pH liegt. Dieser Alarm wird auf dem Display angezeigt. Durch Drücken von Enter und der Tasten + und - lässt sich die Art der Dosierung verändern: PROP (siehe Absatz 9.1) ON/OFF (siehe Absatz 9.3) OFF (Dosierung deaktiviert) Rev. 1.0 11 Display Rx-Messung (Konfiguration A und B) Parameter Rx Messung Durch Drücken von Enter und der Tasten + und - wird der Setpoint-Wert (0÷1500 mV) verändert. Rx Messung Sollwert 760mV Dos. Einstellungen Durch Drücken von Enter erhält man Zugriff auf die Untermenüs: Setpoint Art der Dosierung OFA-Zeit Bandalarm Art der Dosierung Durch Drücken von Enter und der Tasten + und - wird die Art des Setpoints verändert: Niedrig Hoch Durch Drücken von Enter und der Tasten + und - lässt sich die OFA-Zeit einstellen, und zwar auf OFF oder zwischen 1 und 240 Min. (siehe Absatz 9.5) Durch Drücken von Enter und der Tasten + und - lässt sich der Bandalarm zwischen 100 und 300 mV einstellen. Durch Drücken von Enter und der Tasten + und - lässt sich die Art der Dosierung verändern: PROP (siehe Absatz 9.2) ON/OFF (siehe Absatz 9.4) OFF (Dosierung deaktiviert) Rx Messung Niedrig Rx Messung OFA Zeit Off Rx Messung Alr Band 300mV Rx Messung Type PROP Display pH Plus-Messung (Konfiguration A) Parameter pH plus pH plus Sollwert 7.0 pH pH plus OFA Zeit Off pH plus Alarm 6.0pH pH plus Type 0000137191 PROP Einstellungen Durch Drücken von Enter erhält man Zugriff auf die Untermenüs: Setpoint OFA-Zeit Alarm Art der Dosierung Durch Drücken von Enter und der Tasten + und - wird der Setpoint-Wert verändert, der zwischen 0 pH und (Setpoint pH Minus – 0,4 pH) liegen kann. Durch Drücken von Enter und der Tasten + und - lässt sich die OFA-Zeit einstellen, und zwar auf OFF oder zwischen 1 und 240 Min. (siehe Absatz 9.5). Durch Drücken von Enter und der Tasten + und - lässt sich der Alarm einstellen, der zwischen 0 pH und dem Setpoint - 0,1 pH liegt. Dieser Alarm wird auf dem Display angezeigt. Durch Drücken von Enter und der Tasten + und - lässt sich die Art der Dosierung verändern: PROP (siehe Absatz 9.1) ON/OFF (siehe Absatz 9.1) OFF (Dosierung deaktiviert) Rev. 1.0 12 Display pH-Messung (Konfiguration B) Durch Drücken von Enter erhält man Zugriff auf die Untermenüs: Setpoint Art der Dosierung OFA-Zeit Bandalarm Art der Dosierung Parameter pH Messung Durch Drücken von Enter und der Tasten + und - wird der Setpoint-Wert (0÷14 pH) verändert pH Messung Sollwert 7.4 pH Durch Drücken von Enter und der Tasten + und - wird die Art des Setpoints verändert: Säure Alkali-Lösung Durch Drücken von Enter und der Tasten + und - lässt sich die OFA-Zeit einstellen, und zwar auf OFF oder zwischen 1 und 240 Min. (siehe Absatz 9.5) Durch Drücken von Enter und der Tasten + und - lässt sich der Bandalarm zwischen 1 und 3 pH einstellen. Durch Drücken von Enter und der Tasten + und - lässt sich die Art der Dosierung verändern: PROP (siehe Absatz 9.2) ON/OFF (siehe Absatz 9.4) OFF (Dosierung deaktiviert) pH Messung Dos. Saure pH Messung OFA Zeit Off pH Messung Alr Band 3.0pH Misura pH Type Einstellungen PROP Display Flockungsmittel-Messung (Konfiguration B) Parameter Flockungsmittel Flockungsmittel Buis 6x10 0000137191 Einstellungen Durch Drücken von Enter erhält man Zugriff auf die Untermenüs: Schlauch Konzentration Pumpe Durch Drücken von Enter lassen sich die Schlauchmaße (3x7 oder 6x10 mm) verändern, und das System berechnet automatisch die Durchflussrate mit dem anderen Schlauch, ohne irgendeinen Parameter zu verändern (werkseitig ist der Schlauch 6x10 im System installiert) Flockungsmittel Konz 1.0 cc/m3 Den Wert der Konzentration des Produkts eingeben, das dosiert werden soll: Mit dem Schlauch 3x7 liegt der Bereich zwischen 1 und 4 cc/m3, mit dem Schlauch 6x10 liegt der Bereich zwischen 1 und 15 cc/m3 Flockungsmittel Pumpe 20 m3/h Den Wert der Umwälzpumpe der Anlage eingeben. Der Wert kann zwischen 2 und 100 m³/Std. liegen Rev. 1.0 13 Display Erweitertes Menü Parameter Erweitert Konfig.Pumpen A: pH-/Rx/pH+ Relay config Rx Pump Erweitert Temp. 25°C Erweitert Fluss Ein Erweitert Kal Full Erweitert Password **** 0000137191 Einstellungen Durch Drücken von Enter erhält man Zugriff auf die Untermenüs: Konfig. Pumpen Relay config Temp. Durchfluss Cal Passwort Durch Drücken von Enter lässt sich die Konfiguration der Pumpen verändern: Konfiguration A: Die erste Pumpe links führt die Funktion pH- aus, die Pumpe in der Mitte die Redox-Funktion, und die Pumpe rechts die Funktion pH+. (pH/Rx/pH+). Konfiguration B: Die erste Pumpe links führt die Funktion pH aus, die Pumpe in der Mitte die RedoxFunktion, und die Pumpe rechts die Funktion Flockungsmittel. (pH/Rx/Flocc). Durch Drücken von Enter und der Tasten + und - lässt sich die Einstellung des Ausgangsrelais entsprechend der RedoxMessung (RX-Pumpe) oder entsprechend des Auftretens eines Alarms (Alarm) verändern. Durch Drücken der Taste Enter und der Tasten + und - lässt sich die Kompensationstemperatur zwischen 1 und 100 °C einstellen. Ist eine Temperatursonde angeschlossen, wird dieser Menüpunkt nicht angezeigt. Das System kompensiert automatisch mit dem von der Sonde erfassten Wert. Durch Drücken von Enter und der Tasten + und - lässt sich der Durchfluss auf OFF oder auf ON stellen. Dieser Menüpunkt aktiviert oder deaktiviert den Flow-Eingang (siehe Absatz 10.0). Durch Drücken von Enter und der Tasten + und - lässt sich die Kalibrierung auf OFF stellen oder auf ON (Full) aktivieren. Durch Drücken von Enter lässt sich das Passwort für den Zugriff auf das System eingeben. Mit der Taste + wird die Zahl verändert und mit der Taste – gelangt man zur nächsten Zahl. Zum Bestätigen Enter drücken. Rev. 1.0 14 Esc drücken, um die Menüs zu verlassen und die Einstellungen mit Enter bestätigen. Display Einstellungen Mit den Tasten + und - kann JA oder NEIN Menù gewählt werden, d.h. ob die Einstellungen Varlasse Ja gespeichert werden sollen, oder nicht. Zum Bestätigen Enter drücken. DISPLAY-ANZEIGE MIT SYSTEM IM STANDBY Display Standby (Konfiguration A) Alr 760mV 8.3pH Display Standby (Konfiguration B) 1 Alr 760mV 8.3pH 2 Alr 760mV 1200cc 8.3pH 3 Alr 760mV FLOC 37m 8.3pH Funktionsweise Das Display ist in 4 Bereiche unterteilt: Oben links wird der Alarm angezeigt, wenn er vorliegt. Unten links wird der von der Rx-Sonde erfasste Wert angezeigt. Unten rechts wird der von der pH-Sonde erfasste Wert angezeigt. Funktionsweise Das Display ist in 4 Bereiche unterteilt: Oben links wird der Alarm angezeigt, wenn er vorliegt. Oben rechts sind drei Anzeigen zu sehen: o Die 1. mit System im Standby. o Die 2. zeigt den Coutdown der cc an, die von der Pumpe dosiert werden. o Die 3. zeigt die Wartezeit bis zur nächsten Dosierung mit dem Schriftzug FLOC an. Unten links wird der von der Rx-Sonde erfasste Wert angezeigt. Unten rechts wird der von der pH-Sonde erfasste Wert angezeigt. *Sofern AvanzatoFlusso (ErweitertDurchfluss) = On und während der Dosierung des Flockungsmittels die Umwälzpumpe stehen bleiben und demzufolge die Dosierung des Systems blockieren sollte, beginnt die Pumpe, wenn sie wieder gestartet wird, die Dosierung der zu Beginn berechneten cc wieder. SCHNELLTASTEN Mit dem System im Standby gelangt man durch über 3 Sekunden langes Drücken der Taste SET in ein Schnelleinstellmenü: Display Set (Konfiguration A) pH-= 7.2 pH+= 7.0 Rx= 760 Display Set (Konfiguration B) pH= 7.2 Rx= 760 Floc= 1.0cc/m3 0000137191 Funktionsweise Der Wert des pH- blinkt, kann mit + und - verändert und mit Enter bestätigt werden. Danach geht man zum Wert des pH+ über, geht wie zuvor vor, bestätigt mit Enter und verlässt das Menü. Funktionsweise Der Wert des pH blinkt, kann mit + und - verändert und mit Enter bestätigt werden. Danach geht man zum Wert des Flockungsmittels über, geht wie zuvor vor, bestätigt mit Enter und verlässt das Menü. Rev. 1.0 15 9. DOSIERMETHODE Die Kontrolle der Pumpen in der pH- und Redox-Skala erfolgt über di Funktion PWM. Der Proportionalbereich ist auf die Werte pH = 0,8 und Redox = 120 mV eingestellt 9.1 PROPORTIONALE DOSIERUNG PH-/PH+ Das Gerät ermöglicht eine automatische Kontrolle und Veränderung der chemischen Messung über die Setpoints pH- und pH+, indem die Dosierung über die pH-/pH+-Motoren eingestellt wird, die sich auf eine proportionale Zeit einstellen lassen. Durch Einstellen der folgenden Parameter erhält man die nachstehend aufgeführte Dosierung: Setpoint pH- = 8,10 pH Setpoint pH+ = 6,90 pH Proportionalband = 0,80 pH Prop. Band Set Point pHSet Point pH+ Prop. Band Motore pH- Motore pH+ 0000137191 Rev. 1.0 16 9.2 PROPORTIONALE DOSIERUNG PH/REDOX Das Gerät ermöglicht eine automatische Kontrolle und Veränderung der chemischen Messung über den Setpoint pH, indem die Dosierung über den pH/Rx-Motor eingestellt wird, das sich auf eine proportionale Zeit einstellen lässt. Durch Einstellen der folgenden Parameter erhält man die nachstehend aufgeführte Dosierung: Setpoint pH = 7,20 pH Dosierart = Alkali-Lösung Proportionalband = 0,80 pH Set Point pH Prop. Band Motore pH 9.3 DOSIERUNG ON/OFF PH-/PH+ Das Gerät ermöglicht eine automatische Kontrolle und Veränderung der chemischen Messung über die Setpoints pH- und pH+, indem die Dosierung über die pH-/pH+-Motoren eingestellt wird, die sich auf ON/OFF einstellen lassen. Durch Einstellen der folgenden Parameter erhält man die nachstehend aufgeführte Dosierung: Setpoint pH- = 8,10 pH Setpoint pH+ = 6,90 pH Set Point pHSet Point pH+ Motore pH- Motore pH+ 0000137191 Rev. 1.0 17 9.4 DOSIERUNG ON/OFF PH/REDOX Das Gerät ermöglicht eine automatische Kontrolle und Veränderung der chemischen Messung über den Setpoint pH, indem die Dosierung über den pH-Motor eingestellt wird, der sich auf ON/OFF einstellen lässt. Durch Einstellen der folgenden Parameter erhält man die nachstehend aufgeführte Dosierung: Setpoint pH = 7,20 pH Dosierart = Alkali-Lösung Set Point pH Motore pH 9.5 ALARM FÜR SETPOINT PH/REDOX Durch Einstellen des Alarmbands wird ein Arbeitsfenster erstellt. Bei Überschreitung der zulässigen Grenzen schließt das Alarmrelais und bleibt so lange geschlossen, bis der Messwert wiederhergestellt bzw. die Taste Enter zu Deaktivierung des Alarms gedrückt wird. Durch Einstellen der OFA-Zeit (Over Feed Alarm) wird die Dosierung des pH-Setpoints zeitlich gesteuert. In zwei Alarme untergliedert: Der erste Alarm wird bei 70% der eingegebenen Zeit auf dem Display angezeigt, und das Alarmrelais schließt sich. Der zweite Alarm wird bei 100% der eingegebenen Zeit auf dem Display angezeigt, das Alarmrelais schließt sich und der pH-Motor blockiert. Durch Drücken der Taste Enter wird der Alarm beseitigt und die OFA-Zeit initialisiert. ALR Band Set Point pH ALR Band Motore pH ALR Relè Hinweis: Die Funktionsweise in Bezug auf pH-/pH+ ist identisch. 0000137191 Rev. 1.0 18 10. AKTIVIERUNGEN Durchfluss-Funktion Mittels Umwälzpumpe. Hochspannungseingang 100 ÷ 240 Vac, das Dosiersystem ist eingeschaltet. Hochspannungseingang auf Off (die Umwälzpumpe ist ausgeschaltet), das Dosiersystem zeigt den blinkenden Schriftzug FLOW an. 11. ALARME Lev pH- = Alarm Füllstandssonde für Produkt pH. Lev pH+ = Alarm Füllstandssonde für Produkt pH. Lev pH = Alarm Füllstandssonde für Produkt pH. Lev Flocc = Alarm Füllstandssonde für Flockungsmittel. OFA pH/Rx= Setpoint nicht innerhalb der eingestellten OFA-Zeit erreicht* Banda pH/Rx= Wird angezeigt, wenn der erfasste Wert sich außerhalb des Setpoints +/dem Wert des eingestellten Bands befindet. *Bei 70% der eingestellten Zeit zeigt das System den Alarm an und aktiviert das Alarmrelais, bei 100% blockiert es den Motor. Durch Drücken der Taste Enter wird der Alarm beseitigt. Durch Drücken der Taste Enter bei aktivem Alarm wird das entsprechende Alarmrelais deaktiviert, und er bleibt nur auf dem Display angezeigt. 12. VOREINGESTELLTE STEUERWERTE Wiederherstellung der Defaultwerte und -parameter: Das Gerät vom Stromnetz trennen Gleichzeitig die Tasten + und – gedrückt halten und das Gerät wieder an das Stromnetz anschließen Die Auswahl bestätigen, um die Defaultparameter wiederherzustellen Werksparameter: Konfiguration = A (pH-/Rx/pH+) Sprache = UK (Englisch) SetPoint pH- = 7,4 pH; OFF; Alr 8,4 pH; PROP SetPoint Rx = 750mV; Säure; OFF; Alr Band 300mV; PROP SetPoint pH+ = 7,0 pH; OFF; Alr 6,0 pH; PROP Temperatur = 25°C Kalibrierung = FULL Durchflusseingang = ON Passwort = Deaktivieren 0000137191 Rev. 1.0 19 13. MÖGLICHE BETRIEBSSTÖRUNGEN UND ENTSPRECHENDE ABHILFEMASSNAHMEN STÖRUNG URSACHE Das Gerät zeigt immer pH 7,00 an Das Gerät zeigt immer einen hohen oder einen stets unstabilen Wert an Kalibrierung pH-Werts unmöglich des 7 Fehlermeldung dem Display auf Kalibrierqualität der pH-Sonde < 20% Kalibrierung pH-Werts unmöglich des 4 Fehlermeldung dem Display auf Kalibrierqualität der pH-Sonde < 20% Elektrode antwortet langsam 0000137191 ABHILFE 1) Prüfen, ob etwaige Kurzschlüsse im Anschlusskabel zwischen Elektrode Gerät vorliegen (zwischen Kabelkern und Kabelund/oder externer Abschirmung). Verbindungsstörung. 2) Überprüfen, dass keine Feuchtigkeit bzw. Kondenswasser auf dem Sondenverbinder oder auf dem Gerät vorhanden ist. 3) Überprüfen, dass sich der 100 Widerstand zwischen den Klemmen 11 und 12 befindet. Elektrodenanschlusskabel Kabel überprüfen. beschädigt. Die Elektrode senkrecht halten und leicht Luftblase in der schütteln, damit die Luftblase hoch steigt. ANM.: Die Elektrode muss senkrecht bzw. Elektrodenmembran. in einem Neigungswinkel von max. 45° montiert werden. Elektrode verschleißt. Elektrode austauschen. Zu langes Verbindungskabel oder zu nah an einem Den Abstand zwischen Gerät und Sonde Elektrokabel: Störungen. verkürzen. Prüfen, dass die verwendete Lösung einen pH-Wert von 7 hat. Pufferlösung ungeeignet. Den pH-Wert der Pufferlösung mit einem elektronischen pH-Messgerät kontrollieren. Eine neue Pufferlösung mit pH-Wert 7 verwenden und die Kalibrierung wiederholen. Sicherstellen, dass das poröse Schmutzreste im porösen Sondenmaterial in gutem Zustand ist; die Sondenmaterial. Elektrode mit einer verdünnten Säurelösung reinigen und mit einem weichen Tuch abtrocknen. Elektrode verschleißt. Elektrode austauschen. Prüfen, dass die verwendete Lösung einen Pufferlösung ungeeignet. pH-Wert von 4 hat. Den pH-Wert der Pufferlösung mit einem elektronischen pH-Messgerät kontrollieren. Eine neue Pufferlösung mit pH-Wert 4 verwenden und die Kalibrierung wiederholen. Sicherstellen, dass die Elektrodenkugel Problem an der nicht beschädigt ist. Sicherstellen, dass er Elektrodenkugel. nicht außerhalb des Wassers ausgetrocknet ist. Als letzte Möglichkeit, die Elektrode reinigen und einige Stunden im Wasser lassen. Elektrode verschleißt. Elektrode austauschen. Während der Kalibrierung DARF DIE Elektrode elektrostatisch ELEKTRODE NICHT mit einem Tuch oder geladen. Papier abgetrocknet werden; abtropfen lassen. Rev. 1.0 20 14. BESTÜCKUNG Auswechseln des Schlauchs: Den Deckel lösen, in dem der linke Anschluss hochgezogen wird. Die Rolle durch Drehen in Richtung des runden Pfeils in Position 10 und 20 bringen. 0000137191 Die Rolle durch Drehen in Richtung des runden Pfeils in Position 10 und 20 bringen. Den linken Anschluss einsetzen und den Schlauch unter der Rollenschiene entlang einsetzen. Den Sondenhalter in Richtung des runden Pfeils drehen und dabei gleichzeitig den Schlauch bis zum rechten Anschluss in den Pumpenkopf einsetzen. Rev. 1.0 Den linken Anschluss komplett lösen, ihn nach außen hin festhalten und die Rolle in Richtung des runden Pfeils drehen, um den Schlauch bis zum rechten Anschluss zu befreien. Die Pfeile zeigen die Flussrichtung der Flüssigkeit an. Die Pumpenschutzhaube unter Berücksichtigung der Pfeilrichtung (▲▼) aufsetzen und kräftig auf die Oberfläche drücken, so dass sie richtig einrastet. 21 15. LAGERUNG DER PUMPE NACH GEBRAUCH Vor Einlagerung des Regelgeräts sollte zur Reinigung des Schlauchs sauberes Wasser durch die Pumpe gepumpt werden. Danach den Sondenhalter durch Drehen in Richtung des runden Pfeils in Position 7 und 05 bringen. Diese beiden Maßnahmen erleichtern eine nachfolgende Wiederinbetriebnahme des Geräts. 0000137191 Rev. 1.0 22 WARNHINWEISE EMPFOHLENE PRODUKTE: Zur Senkung des pH-Werts: Produkt auf Schwefelsäurebasis (im Handel erhältlich). Zur Steigerung des pH-Werts: Produkt auf alkalischer und saurer Basis NICHT EMPFOHLENE PRODUKTE Keine Chlorwasserstoffsäure verwenden. Hinsichtlich aller anderen Produkte lassen Sie sich von Ihrem Installateur beraten. ANWENDUNGSHINWEISE FÜR DIE SONDE Die Sonde mit VORSICHT handhaben. KEINE ÜBERMÄSSIGEN MENGEN an Chemikalien vor der Sonde einfüllen. Lagerung der Sonde: Die pH-Sonde aus dem entsprechenden Sondenhalter entfernen. In dem mit Leitungswasser gefüllten Flakon aufbewahren. Falls notwendig, den Sondenhalter mit einem 5 Cent großen Verschlussstopfen verschließen. Da die pH-Elektrode aus Glasteilen besteht, muss sie mit Vorsicht gehandhabt werden. Alle unsere Elektroden wurden in der Fertigungslinie vor dem Verpacken getestet. Reparaturen an der Elektrode sind von der Garantie ausgeschlossen. Die Elektrode steht nur unter Garantie, wenn Funktionsstörungen während der ersten Aktivierung auftreten. Die Verpackung ist ausgeschlossen. Wir nehmen die Sonde nur dann zur Beobachtung entgegen, wenn sie in der Originalverpackung und in dem mit Wasser gefüllten Flakon an uns gesendet wird. AUF DÄMPFE ACHTEN 2 mt SERBATOIO TANK RESERVOIR TANK 0000137191 Rev. 1.0 23 Manual de uso 0000137191 Rev. 1.0 1 ÍNDICE 1. INTRODUCCIÓN GENERAL 2. PRECAUCIONES DE INSTALACIÓN 3. IDENTIFICACIÓN DE LOS COMPONENTES 4. DATOS TÉCNICOS 5. INDICACIONES DE MONTAJE 5.1 EJEMPLO DE APLICACIÓN 6. DESCRIPCIÓN DEL CIRCUITO 7. MENÚ CALIBRACIÓN 7.1 CALIBRACIÓN 8. PROGRAMACIÓN 9. MÉTODO DOSIFICACIÓN 10. ACTIVACIONES 11. ALARMAS 12. PARÁMETROS DE CONTROL PREDEFINIDOS 13. LISTA DE LAS POSIBLES ANOMALÍAS Y DE SUS CORRESPONDIENTES SOLUCIONES 14. DESPLAZAMIENTO 15. ALMACENAMIENTO DE LA BOMBA DESPUÉS DEL USO ADVERTENCIAS 0000137191 Rev. 1.0 2 1. INTRODUCCIÓN GENERAL El método de regulación Pool Basic Pro EVO pertenece a una nueva gama de instrumentos cuidadosamente desarrollados por lo provvedor para favorecer una gestión innovadora de las piscinas. Este dispositivo es fácil de utilizar y permite controlar constantemente el pH. Las bombas peristálticas tienen una capacidad de 1,5 l/h para la regulación del pH y una presión de inyección de hasta 1,5 bar. El aparato es realmente fácil de usar y no necesita ninguna operación particular de mantenimiento. Está dotado de un procedimiento de autorregulación y de control automático del estado del electrodo. 2. PRECAUCIONES DE INSTALACIÓN ¡ATENCIÓN! Antes de efectuar CUALQUIER operación en el interior del panel de mando del aparato Pool Basic Pro EVO, desconéctelo de la red de alimentación. LA INOBSERVANCIA DE LAS INSTRUCCIONES QUE SE OFRECEN EN EL PRESENTE MANUAL PUEDE PROVOCAR DAÑOS A PERSONAS Y/O AL APARATO. ADVERTENCIA Para instalar el aparato Pool Basic Pro EVO, siga este procedimiento: Asegúrese de que la tensión de alimentación coincida con la indicada en la placa situada junto al aparato. Asegúrese de que la presión de inyección sea inferior a 1,5 bar. Asegúrese de que la tapa protectora de la bomba esté correctamente enganchada. Asegúrese de que el tubo de aspiración esté sumergido con la pata correspondiente (tubo de PVC) en la tina del producto que desea inyectar y que esté conectado a la bomba (símbolo en la tapa ▲). Después de efectuar los controles mencionados, apriete la tuerca del racor. Conecte un extremo del tubo de envío (símbolo en la tapa ▼) a la bomba y el otro a la piscina por medio de la válvula de inyección. N.B.: Para introducir el producto que desea inyectar en la bomba, durante la primera activación de la misma y cada vez que cambie de depósito, ponga el interruptor en la posición de marcha forzada de la bomba mediante el botón correspondiente. 0000137191 Rev. 1.0 3 3. IDENTIFICACIÓN DE LOS COMPONENTES A D B G F C E L M K H J I N pH P Instructions manual O PH 7 PH 4 H20 LEYENDA A. B. C. D. E. F. G. H. I. Regulador Pool Basic Pro EVO Tubo de aspiración de PVC Crystal 4x6 (4 m) x 2 Tubo de envío de PE 4X6 (5 m) x 2 Electrodo pH modelo SPH-1 Electrodo Redox Reducción para válvula de inyección x2 Válvula de labio de FPM (3/8” GAS) x 2 Pata de aspiración (tubo de PVC) x 2 Collar de derivación en carga para fijación PSS3 en tubo 2” =50 mm J. Collar de derivación en carga para fijación válvula de inyección en tubo 2” =50 mm x 2 K. L. M. N. O. P. Portasonda modelo PSS3 (1/2” GAS) Tubo 3x7 Etiquetas a aplicar en las bombas Kit soporte de fijación Kit solución tampón pH 4, pH 7, H2O Manual de instrucciones 0000137191 Rev. 1.0 4 4. DATOS TÉCNICOS Alimentación: 100÷240 Vca 50/60 Hz 30 W Interruptor: borde caja Medidas entrada: pH, por medio de BNC o Escala pH: 0÷14,0 pH o Precisión pH: +/-0,1 pH o Escala Redox: 0÷1500mV o Precisión Reodx: +/-10 mV Escala temperaturas: 0÷100 °C (sensor PT100) Caudal bombas con tecnología transaxle: o pH, pH-, pH+: 1,5 l/h (tubo 6X10) 1,5 bar o Floculante: 0,4 l/h (tubo 3X7), 1,5 l/h (tubo 6X10) 1,5 bar Relé bomba PH-, pH: 10 A 250 V (Contacto seco) Relé para alarmas o bomba Redox: 10 A 250 V (Contacto seco) Relé para PH+, Floculante: 10 A 250 V (Contacto seco) Alimentación específica para las bombas: 240 Vca10 W Señal entrada: 100÷240 Vca Sonda nivel: pH, Redox, Floculante Instale el regulador Pool Basic Pro EVO sobre un soporte rígido (pared vertical), en un lugar fácilmente accesible para el operador. Fije el regulador Pool Basic Pro EVO mediante el soporte de fijación incluido junto al kit (distancia entre los ejes de perforación del soporte: 95 mm. Orificio Ø 6). Antes de efectuar cualquier operación en la parte interna del aparato, asegúrese de que los interruptores se encuentren en la posición 0. Afloje los dos tornillos de la parte superior del aparato dando un cuarto de vuelta para abrir el lado delantero abatible. 0000137191 Rev. 1.0 5 5. INDICACIONES DE MONTAJE Longitud máxima del cable : 6 m ___________________________ Lunghezza massima de cavo: 6 mt NOTA 1 * NOTA 1 Presión máxima: 1,5 bar ____________________ Pressione Massima: 1,5 bar NOTA 2 * NOTA 2 4 3 5 2 6 1 0 7 * NOTA 1: EL CABLE DEBE PASAR EN UNA ZONA DISTINTA DE LA DE ALIMENTACIÓN * NOTA 1: IL CAVO DEVE PASSARE IN UNA ZONA DIVERSA DA QUELLA DI ALIMENTAZIONE PER POMPE GROSSE, PER EVITARE DISTURBI DI CORRENTE. PARA BOMBAS GRANDES, PARA EVITAR PERTURBACIONES DE CORRIENTE * NOTA 2: LA PRESSIONE MAX. NON DEVE ESSERE SUPERIORE A 1,5 BAR. * NOTA 2: LA PRESIÓN LA MÁXL NODEL DEBE SER A 1,5DEVE BAR.SUPERARE 1 BAR. PER AUMENTARE DURATA TUBO, LASUPERIOR PRESSIONE NON PARA AUMENTAR LA DURACIÓN DEL TUBO, LA PRESIÓN NO DEBE SUPERAR 1 BAR. NO NO 0000137191 Rev. 1.0 6 5.1 EJEMPLO DE APLICACIÓN TINA COMPENSACIÓN FILTRO PH INTERCAMBIADOR DE CALOR BOMBA RECIRCULACIÓN Nota: La distancia lineal de la canalización entre la sonda y el punto de inyección no debe ser inferior a 60 cm. 0000137191 Rev. 1.0 7 6. DESCRIPCIÓN DEL CIRCUITO 1) Entrada medida pH 2) Entrada medida Redox 3) Entrada sonda temperatura 4) Entrada sonda nivel para producto pH-/Flocc 5) Entrada sonda nivel para producto Redox 6) Entrada sonda nivel para producto pH+/pH 7) Entrada teclado 8) Flujo (bomba recirculación) 9) Relé para producto pH-/pH, bomba externa. 10)Relé de alarma o para producto Redox, bomba externa. 11)Relé para producto pH+/Floc, bomba externa. 12)Entrada alimentación 13)Interruptor 14)Fusible 15)Alimentación para bomba pH-/pH 16)Alimentación para bomba Redox 17)Alimentación para bomba pH+/Floc Net µChip Fuse 15 16 14 17 13 pH-/pH Pump RX Pump pH-/Flocc Pump Relay Relay Relay - +- + Input Input Temp Lev Lev Lev pH Rx Probe pH-/pH RX pH+/ Flocc 1 2 3 4 5 6 Input Flow RL pH-/ Alarm RL pH+/ Flocc pH 7 8 F N 12 9 10 11 7. MENÚ CALIBRACIÓN 7.1 Calibración Antes de empezar es necesario habilitar la calibración. Recorrer el menú AvanzadoCal, en el display aparece: Display Menú Calibración Avanzado Cal Off Configuraciones Pulsar ENTER para acceder al menú. Pulsar ENTER y las teclas + y – para modificar la calibración. Seleccionar Full y Cal Full confirmar con ENTER. Salir del menú y regresar al estado normal del sistema. Avanzado 0000137191 Rev. 1.0 8 7.1.1 Calibración sonda pH Coger un poco de agua Calibracion pH Medida Introducir la sonda en la solución tampón de pH 7 Espere B.Solut. 59s 7pH Lavar la sonda Sacar la sonda del portasonda Press CAL B.Solut. Mantener pulsada la tecla Cal durante 3 segundos y confirmar la Medida pH con la misma tecla Calidad B.Solut. Pulsar Cal para activar la calibración con una solución tampón 7 pH 7pH 2 H2O 9 La calibración dura 1 minuto 10 Lavar la sonda Calidad sonda Press CAL B.Solut. 7pH 4pH Espere B.Solut. 59s 7pH 3 4 pH Introducir la sonda en la solución tampón de pH 4 Calidad B.Solut. Pulsar Cal para activar la calibración con una solución tampón de pH 4 4pH 14 Calidad sonda 0000137191 La calibración dura 1 minuto 2 H2O Lavar la sonda Rev. 1.0 15 Volver a poner la sonda en el portasonda y pulsar Cal para terminar 9 7.1.2 Calibración sonda Redox Para poder efectuar esta calibración es necesario habilitar la medida Redox Coger un poco de agua Calibracion Rx Medida Introducir la sonda en la solución tampón 465 mV Espere B.Solut. 59s 465 mV Lavar la sonda Sacar la sonda del portasonda Mantener pulsada la tecla Cal durante 3 segundos y confirmar la Medida Rx con la misma tecla Calidad B.Solut. Press CAL B.Solut. Pulsar Cal para activar la calibración con una solución tampón 465 mV 465 mV 9 La calibración dura 1 minuto 465 mV Calidad sonda 2 H2O Lavar la sonda 10 Volver a poner la sonda en el portasonda y pulsar Cal para terminar 0000137191 Rev. 1.0 10 8. PROGRAMACIÓN Pulsando al mismo tiempo las teclas Cal y Set durante al menos 3 segundos se accede al menú de programación. Al soltar las teclas el display visualiza: Display Idioma Configuraciones Pulsar Enter y las teclas + y – para modificar el idioma. FR, EN, IT, ES, DE Programacion Idioma ES El menú será diferente según la opción de configuración: Configuración A: pH-/Rx/pH+ Configuración B: pH/Rx/Flocc Para más detalles, véase el menú Avanzado Configuración Para cebar la bomba pH-/pH, mantenga pulsada la tecla UP durante al menos 3 segundos; al soltar terminará la operación. Para cebar la bomba pH+/FLOCC siga el procedimiento anterior pulsando la tecla DOWN durante al menos 3 segundos, para cebar la bomba Redox, pulse simultáneamente las teclas UP y DOWN. Display Medida pH Minus (Configuración A) Programacion Medida pH minus Medida pH minus Setpoint 7.4 pH Pulsar Enter y las teclas + y - para modificar el valor del Set point, que puede variar de (Set Point pH Plus + 0,4 pH) a 14 pH. Medida pH minus TiempoOFA Off Pulsar Enter y las teclas + y - para programar el tiempo de OFA de 1 a 240 min. (véase Paragrafo 9.5). Medida pH minus Alarm 8.4pH Medida pH minus Dosif. PROP 0000137191 Configuraciones Con Enter se accede a los submenús: Setpoint Tiempo OFA Alarm Type Pulsar Enter y las teclas + y – para programar la alarma, que varía del Set Point + 0,1 pH a 14 pH; esta alarma aparece visualizada en el display. Pulsar Enter y las teclas + y - para modificar el tipo dosificación. PROP (Véase párrafo 9.1) ON/OFF (Véase párrafo 9.3) OFF (Dosificación inhabilitada) Rev. 1.0 11 Display Medida Redox (Configuración A y B) Programacion Medida Rx Pulsar Enter y las teclas + y - para modificar el valor del Set Point (0÷1500 mV) Medida Rx Setpoint 760mV Pulsar Enter y las teclas + y - para modificar el tipo de Set Point. Bajo Alto Pulsar Enter y las teclas + y – para programar el tiempo de OFA en OFF o de 1 a 240 min. (Véase párrafo 9.5) Pulsar Enter y las teclas + y - para programar la alarma de banda de 100 a 300 mV. Pulsar Enter y las teclas + y – para modificar el tipo de dosificación: PROP (Véase párrafo 9.2) ON/OFF (Véase párrafo 9.4) OFF (Dosificación inhabilitada) Medida Rx Dosif. Bajo Medida Rx TiempoOFA Off Medida Rx Alr Band 300mV Medida Rx Dosif. PROP Display Medida pH Plus (Configuración A) Programacion Medida pH plus Medida pH plus Setpoint 7.0 pH Medida pH plus TiempoOFA Off Medida pH plus Alarm 6.0pH Medida pH plus Dosif. PROP 0000137191 Configuraciones Con Enter se accede a los submenús: Setpoint Dosif. Tiempo OFA Alr Band Type Configuraciones Con Enter se accede a los submenús: Setpoint Tiempo OFA Alarm Type Pulsar Enter y las teclas + y - para modificar el valor del Set Point, que puede variar de 0 pH a (Set Point pH Minus – 0,4 pH). Pulsar Enter y las teclas + y - para programar el tiempo de OFA de 1 a 240 min. (véase párrafo 9.5) Pulsar Enter y las teclas + y – para programar la alarma, que varía de 0 pH al Set Point – 0,1 pH; esta alarma aparece visualizada en el display. Pulsar Enter y las teclas + y - para modificar el tipo dosificación. PROP (Véase párrafo 9.1) ON/OFF (Véase párrafo 9.1) OFF (Dosificación inhabilitada) Rev. 1.0 12 Display Medida pH (Configuración B) Configuraciones Con Enter se accede a los submenús: Setpoint Tipo Dos Tiempo OFA Alr Band Type Programacion Medida pH Pulsar Enter y las teclas + y - para modificar el valor del Set Point (0÷14 pH) Medida pH Setpoint 7.4 pH Pulsar Enter y las teclas + y - para modificar el tipo de Set Point. Ácido Alcalino Pulsar Enter y las teclas + y – para programar el tiempo de OFA en OFF o de 1 a 240 min. (Véase párrafo 9.5) Pulsar Enter y las teclas + y - para programar la alarma de banda de 1 a 3 pH. Medida pH Dosif. Acido Medida pH TiempoOFA Off Medida pH Alr Band 3.0pH Pulsar Enter y las teclas + y – para modificar el tipo de dosificación: PROP (Véase párrafo 9.2) ON/OFF (Véase párrafo 9.4) OFF (Dosificación inhabilitada) Medida pH Dosif. PROP Display Medida Floculante (Configuración B) Programacion Floculante Floculante Tubo 6x10 0000137191 Configuraciones Con Enter se accede a los submenús: Tubo Conc Bomba Con Enter se pueden modificar las dimensiones del tubo (3x7 o 6x10 mm) y automáticamente el sistema calculará el caudal con el tubo distinto sin cambiar ningún parámetro.(de fábrica el sistema lleva instalado el tubo 6x10) Floculante Conc 1.0 cc/m3 Introducir el valor de la concentración de producto que se desea dosificar, con el tubo 3x7 el rango va de 1 a 4 cc/m3, con el tubo 6x10 el rango va de 1 a 15 cc/m3 Floculante Bomba 20 m3/h Introducir el valor de la bomba de recirculación de la instalación; el valor puede variar de 2 a 100 m³/h Rev. 1.0 13 Display Avanzado Programacion Avanzado Config. Bombas A: pH-/Rx/pH+ Relay config Rx Pump Avanzado Temp. 25°C Avanzado Caudal On Avanzado Cal Full Avanzado Password **** 0000137191 Configuraciones Con Enter se accede a los submenús: Config. Bombas Relay config Temp. Flujo Cal Contraseña Con Enter se puede modificar la configuración de las bombas: Configuración A: La primera bomba de la izquierda desempeñará la función pH-, la bomba del centro la función Redox y la de la derecha la función pH+. (pH-/Rx/pH+). Configuración B: La primera bomba de la izquierda desempeñará la función pH-, la bomba del centro la función Redox y la de la derecha la función Floculante. (pH/Rx/Floc). Pulsando Enter y las teclas + y - se puede modificar la programación del relé de salida en función de la medida del Redox (Bomba RX) o en función de si se produce una alarma (Alarm). Pulsar Enter y las teclas + y – para programar la temperatura de compensación de 1 a 100 °C; si hay una sonda de temperatura conectada, este elemento del menú no se visualizará y el sistema compensará automáticamente con el valor leído por la sonda. Pulsar Enter y las teclas + y – para programar el flujo en OFF o en ON: este elemento habilita o inhabilita la entrada Flow (Véase. párrafo 10.0). Pulsar Enter y las teclas + y – para programar la calibración en OFF o habilitarla en ON (Full). Pulsar Enter para programar la password de acceso y modificación del sistema. Con la tecla + se modifica la cifra y con la tecla – se desplaza a la cifra siguiente. Confirmar con Enter Rev. 1.0 14 Pulsar Esc para salir de los distintos menús y confirmar con Enter las programaciones configuradas. Display Configuraciones Con las teclas + y – se puede elegir SÍ o Menù NO, es decir, si guardar o no las Salin SI configuraciones y confirmar con Enter. VISUALIZACIÓN DISPLAY CON EL SISTEMA EN STAND-BY Display Stand-by (Configuración A) Alr 760mV 8.3pH Display Stand-by (Configuración B) Alr 760mV 8.3pH 2 Alr 760mV 1200cc 8.3pH 3 Alr 760mV FLOC 37m 8.3pH 1 Funcionamiento En el display está dividido en 4 partes: Arriba a la izquierda se visualiza la alarma cuando se produce. Abajo a la izquierda se visualiza al valor leído por la sonda de Redox. Abajo a la derecha se visualiza al valor leído por la sonda de pH. Funcionamiento El display está dividido en 4 partes: Arriba a la izquierda se visualiza la alarma cuando se produce. Arriba a la derecha se visualizan tres mensajes: o El 1 con el sistema en stand-by. o El 2 muestra la cuenta atrás de los cc que está dosificando la bomba. o El 3 el tiempo de espera de la próxima dosificación con la indicación FLOC. Abajo a la izquierda se visualiza al valor leído por la sonda de Redox. Abajo a la derecha se visualiza al valor leído por la sonda de pH. *Si AvanzadoFlujo= On y durante la dosificación del Floculante la bomba de recirculación debe detenerse y bloquear la dosificación del sistema, cuando la bomba vuelve a ponerse en marcha el Floculante empieza a dosificar de nuevo los cc calculados desde el principio. TECLAS RÁPIDAS Con el sistema en stand-by, manteniendo pulsada la tecla SET durante más de 3 segundos se accede a un menú de ajuste rápido: Display Set (Configuración A) pH-= 7.2 pH+= 7.0 Rx= 760 Display Set (Configuración B) pH= 7.2 Rx= 760 Floc= 1.0cc/m3 0000137191 Funcionamiento El valor del pH- parpadea: para modificarlo, pulsar + y – y confirmar con Enter; ir al valor del Rx o pH+ con el mismo procedimiento anterior y confirmar y salir con Enter. Funcionamiento El valor del pH parpadea: para modificarlo, pulsar + y – y confirmar con Enter; ir al valor del Rx o Floculante con el mismo procedimiento anterior y confirmar y salir con Enter. Rev. 1.0 15 9. MÉTODO DOSIFICACIÓN El control de las bombas en la escala pH y Redox se realiza mediante función PWM. La banda proporcional está fijada en valores pH= 0,8 y Redox = 120 mV 9.1 Dosificación proporcional pH-/pH+ El instrumento permite controlar y modificar automáticamente la medida química mediante los Puntos de ajuste pH- y pH+, regulando la dosificación mediante los motores del pH- e pH+ en modalidad Tiempo proporcional. Configurando los siguientes parámetros se obtiene la dosificación que aparece abajo: Set point pH = 8,10 pH Set point pH = 6,90 pH Banda proporcional = 0,80 pH Prop. Band Set Point pHSet Point pH+ Prop. Band Motore pH- Motore pH+ 0000137191 Rev. 1.0 16 9.2 Dosificación proporcional pH/Redox El instrumento permite controlar y modificar automáticamente la medida química mediante el Set point pH, regulando la dosificación mediante el motor del pH en modalidad Tiempo proporcional. Configurando los siguientes parámetros se obtiene la dosificación que aparece abajo: Set point pH = 7,20 pH Tipo Dosificación = Alcalina Banda proporcional = 0,80 pH Set Point pH Prop. Band Motore pH 9.3 Dosificación ON/OFF pH-/pH+ El instrumento permite controlar y modificar automáticamente la medida química mediante los Puntos de ajuste pH- y pH+ en automático, regulando la dosificación mediante los motores del pH- e pH+ en modalidad ON/OFF. Configurando los siguientes parámetros se obtiene la dosificación que aparece abajo: Set point pH = 8,10 pH Set point pH = 6,90 pH Set Point pHSet Point pH+ Motore pH- Motore pH+ 0000137191 Rev. 1.0 17 9.4 Dosificación ON/OFF pH/Redox El instrumento permite controlar y modificar automáticamente la medida química mediante el Set point pH en automático, regulando la dosificación mediante el motor del pH en modalidad ON-OFF. Configurando los siguientes parámetros se obtiene la dosificación que aparece abajo: Set point pH = 7,20 pH Tipo Dosificación = Alcalina Set Point pH Motore pH 9.5 Alarma para el Set point pH/Redox Programando la Banda alarma se crea una ventana de trabajo. Al superar los límites permitidos el relé de alarma se cierra y permanece cerrado hasta que se restablece la medida o bien hasta que se pulsa la tecla Enter para desactivar la alarma. Programando el tiempo OFA (over feed Alarm, alarma sobre carga) se controla la dosificación del Set point pH/Redox en tiempo subdividido en dos alarmas: Primera alarma: al 70% del tiempo programado se visualiza en el display y el relé de alarma se cierra. Segunda alarma al 100% del tiempo programado se visualiza en el display; se cierre el relé de alarma y se bloquea el motor del pH/Redox. Pulsando la tecla Enter se elimina la alarma y se inicializa el tiempo de OFA. ALR Band Set Point pH ALR Band Motore pH ALR Relè Nota: El funcionamiento es análogo en lo que respecta al pH-/pH+. 0000137191 Rev. 1.0 18 10. ACTIVACIONES Función Flujo Mediante bomba de recirculación. Entrada de alta tensión 100 ÷ 240 Vca, el sistema de dosificación está encendido. Entrada de alta tensión está en OFF (la bomba de recirculación está apagada), el sistema de dosificación visualiza FLOW parpadeante. 11. ALARMAS Lev pH-= Alarma sonda nivel producto pH Lev pH+= Alarma sonda nivel producto pH Lev pH= Alarma sonda nivel producto pH Lev Floc= Alarma sonda nivel producto floculante OFA pH/Rx= Set point no alcanzado con el tiempo de OFA programado* Banda pH/Rx= Se visualiza cuando el valor leído se encuentra fuera con respecto al Set point de +/- el valor de banda programada. *Al 70% del tiempo programado el sistema visualiza y activa el relé de alarma, al 100% bloquea el motor. Pulsando la tecla Enter se restablece la alarma. Pulsando la tecla Enter con la alarma activa el relé del mismo se desactiva y sigue apareciendo solo en el display. 12. PARÁMETROS DE CONTROL PREDEFINIDOS Para restablecer los valores y los parámetros predefinidos: Desconecte el aparato Mantenga pulsadas las teclas + y - simultáneamente y conecte el aparato Confirme su elección para restablecer los parámetros predefinidos Parámetros de fabrica: Configuración = A (pH-/Rx/pH+) Idioma = UK Set Point pH- = 7,4 pH; OFF; Alr 8,4 pH; PROP Set Point Rx = 750mV; Bajo; OFF; Alr Band 300mV; PROP Set Point pH+= 7,0 pH; OFF; Alr 6,0 pH; PROP Temperaturas = 25°C Calibración = FULL Entrada de caudal = ON Password = Discapacitado 0000137191 Rev. 1.0 19 13. LISTA DE LAS POSIBLES ANOMALÍAS Y DE SUS CORRESPONDIENTES SOLUCIONES ANOMALÍA El instrumento indica siempre el pH 7,00 El instrumento indica siempre un valor elevado o constantemente inestable Es imposible calibrar el valor pH 7 Error visualizado en la pantalla Calidad de calibración de la sonda del pH < 20% CAUSA SOLUCIÓN 1) Controle si se ha producido algún cortocircuito en el cable de conexión electrodo instrumento (entre el núcleo Problema del cable y/o del central del cable y la protección externa). conector 2) Asegúrese de que no haya huellas de humedad y/o de vapor de condensación en el conector de la sonda o en el aparato. 3) Asegúrese de que la resistencia 100 se encuentre presente entre los bornes 11 y 12. Cable de conexión del Examine el cable. electrodo dañado. Ponga el electrodo en posición vertical y Aire ocluso en la membrana agítelo ligeramente hasta hacer salir el aire del electrodo. ocluso. N.B.: El electrodo debe encontrarse en posición vertical o con una inclinación máxima de 45°. Electrodo desgastado. Cambie el electrodo. Cable de conexión demasiado largo o Reduzca la distancia entre el aparato y la demasiado cercano a un sonda. cable eléctrico: perturbaciones. Asegúrese de que la solución utilizada tenga un pH 7. Solución tampón inadecuada. Examine el pH de la solución tampón con un pH-metro electrónico. Utilice una nueva solución tampón con pH 7 e inicie de nuevo la calibración. Asegúrese de que el material poroso de la Problema en el material sonda se encuentre en buen estado; lave poroso de la sonda, el electrodo con una solución a base de depósitos de suciedad. ácido diluido y séquelo con un paño suave. Electrodo desgastado. Cambie el electrodo. Asegúrese de que la solución utilizada Es imposible Solución tampón inadecuada. tenga un pH 4. calibrar el valor pH Examine el pH de la solución tampón con 4 un pH-metro electrónico. Utilice una nueva solución tampón con pH Error visualizado en 4 e inicie de nuevo la calibración. la pantalla Asegúrese de que el bulbo del electrodo no Problema en el bulbo del esté dañado. Asegúrese de que no se electrodo. haya secado fuera del agua. Como último Calidad de recurso, limpie el electrodo dejándolo calibración de la sumergido en el agua durante algunas sonda del pH < 20% horas. Electrodo desgastado. Cambie el electrodo. Durante la fase de calibración, el electrodo Respuesta lenta del Electrodo cargado NO DEBE secarse con un paño o con electrodo electrostáticamente. papel; déjelo gotear. 0000137191 Rev. 1.0 20 14. DESPLAZAMIENTO Sustitución del tubo: Desbloquear la tapa tirando hacia arriba el racor de la izquierda. Colocar el rodilloa las 10 y 20 girando en el sentido de la flecha circular. 0000137191 Colocar el rodillo a las 10 y 20 girando en el sentido de la flecha circular. Introducir el racor de la izquierda en la sede correspondiente y pasar el tubo debajo de la guía del rodillo. Girar el portasonda en el sentido de la flecha circular, acompañando simultáneamente el tubo en la cabeza de la bomba hasta alcanzar el racor de la derecha. Rev. 1.0 Desbloquear completamente el racor de la izquierda manteniéndolo tensado hacia el exterior y girar el rodillo en el sentido de la flecha circular para liberar el tubo hasta el racor de la derecha. Flechas que indican la dirección del líquido. Colocar la tapa de la bomba respetando la dirección de las flechas (▲▼) y presionar con fuerza sobre la superficie para bloquearla correctamente. 21 15. ALMACENAMIENTO DE LA BOMBA DESPUÉS DEL USO Al guardar el dispositivo de regulación, es aconsejable bombear agua limpia para enjuagar el tubo. A continuación, coloque el portasonda a las 7 y 05 haciéndolo girar en la dirección indicada por la flecha circular. Estas dos precauciones facilitarán la sucesiva reactivación del aparato. 0000137191 Rev. 1.0 22 ADVERTENCIAS PRODUCTOS QUE SE DEBEN UTILIZAR: Disminución del pH: Producto a base de ácido sulfúrico, fácil de encontrar en el mercado. Aumento del pH: producto a base de ácido alcalino PRODUCTOS DESACONSEJADOS No utilice ácido clorhídrico. Para todos los demás productos, pida consejo al instalador. ADVERTENCIAS SOBRE LA SONDA Maneje la sonda con PRECAUCIÓN. NO INTRODUZCA UNA CANTIDAD EXCESIVA de producto químico en la parte que precede la sonda. Almacenamiento de la sonda: Extraiga la sonda pH del portasonda correspondiente. Guárdela en el frasco original lleno de agua del grifo. Si es necesario, cierre el portasonda con un tapón del tamaño de una moneda de 5 céntimos de Euro. El electrodo pH se compone de elementos de vidrio, por lo que es necesario manejarlo con cuidado. Todos nuestros electrodos han sido probados en la línea de producción antes del embalaje. La garantía no cubre la reparación de los electrodos salvo en caso de que no funcionen al activarlos por primera vez. El embalaje no está incluido. Para que la sonda pueda ser aceptada y examinada por la empresa, deberá enviarse en su embalaje original junto al frasco correspondiente rellenado de agua. ATENCIÓN A LOS VAPORES 2 mt SERBATOIO TANK RESERVOIR TANK 0000137191 Rev. 1.0 23 Manuel d’utilisation 0000137191 Rev. 1.0 1 SOMMAIRE 1. INTRODUCTION GÉNÉRALE 2. PRÉCAUTIONS POUR L’INSTALLATION 3. IDENTIFICATION DES COMPOSANTS 4. DONNÉES TECHNIQUES 5. INDICATIONS DE MONTAGE 5.1 EXEMPLE D’APPLICATION 6. DESCRIPTION DU CIRCUIT 7. MENU ÉTALONNAGE 7.1 ÉTALONNAGE 8. PROGRAMMATION 9. MÉTHODE DE DOSAGE 10. ACTIVATIONS 11. ALARMES 12. PARAMÈTRES DE CONTRÔLE PAR DÉFAUT 13. LISTE DES ANOMALIES POSSIBLES ET REMÈDES CORRESPONDANTS 14. ENTRETIEN 15. RANGEMENT DE LA POMPE APRÈS L’UTILISATION AVERTISSEMENTS 0000137191 Rev. 1.0 2 1. INTRODUCTION GÉNÉRALE La méthode de réglage Pool Basic Pro EVO appartient à la nouvelle gamme d’instruments développés par fournisseur afin d’assurer une gestion novatrice et précise, des piscines. Ce dispositif permet de contrôler constamment le pH. Les pompes péristaltiques ont un débit de 1,5 l/h pour le réglage du pH et elles ont une capacité d’injection sous pression jusqu’à 1,5 bar. Cet appareil est facile à utiliser et ne nécessite pas d’interventions d’entretien spéciales. Il est doté d’une procédure d’autoréglage et de contrôle automatique de l’état de l’électrode. 2. PRÉCAUTIONS POUR L’INSTALLATION ATTENTION !!! Avant de procéder à TOUTE intervention à l’intérieur du panneau de commande de l’appareil Pool Basic Pro EVO, il faut le débrancher du réseau d’alimentation. LE NON-RESPECT DES INSTRUCTIONS CONTENUES DANS CE MANUEL PEUT PROVOQUER DES DOMMAGES AUX PERSONNES ET/OU À L’APPAREIL. AVERTISSEMENT Pendant l’installation de l’appareil Pool Basic Pro EVO, procéder de la façon suivante : s’assurer que la tension d’alimentation est la même que celle indiquée sur l’étiquette apposée sur le côté de l’appareil ; s’assurer que la pression d’injection est inférieure à 1,5 bar ; s’assurer que la calotte de protection de la pompe est fixée correctement ; s’assurer que le tuyau d’aspiration est immergé avec le crépine correspondant (tuyau en PVC) dans la cuve du produit à injecter et qu’il est raccordé à la pompe (symbole sur le couvercle ▲) ; après avoir exécuté les contrôles précédents, serrer l’écrou du raccord ; raccorder une extrémité du tuyau de refoulement à la pompe (symbole sur le couvercle ▼) et raccorder l’autre extrémité à la piscine au moyen de la vanne d’injection. N.B. : pour introduire le produit à injecter dans la pompe, il faut, lors de la première activation et à chaque changement de bidon, régler l’interrupteur sur la position de marche forcée de la pompe à l’aide du bouton prévu à cet effet. 0000137191 Rev. 1.0 3 3. IDENTIFICATION DES COMPOSANTS A D B G F C E L M K H J I N pH P Instructions manual O PH 7 PH 4 H20 LÉGENDE A. B. C. D. E. F. G. H. I. Régulateur Pool Basic Pro EVO Tuyau d’aspiration PVC Crystal 4x6 (4 m) x 2 Tuyau de refoulement en PE 4X6 (5 m) x 2 Électrode pH modèle SPH-1 Électrode Redox Raccord pour vanne d’injection x2 Vanne à lèvre en FPM (3/8” GAZ) x 2 Pied d’aspiration (tuyau en PVC) x 2 Collier de dérivation sous charge pour fixation PSS3 sur tuyau 2” =50 mm J. Collier de dérivation sous charge pour fixation vanne d’injection sur tuyau 2” =50 mm x 2 K. L. M. N. O. P. Porte-sonde modèle PSS3 (1/2” GAZ) Tuyau 3x7 Étiquettes à appliquer sur les pompes Kit plaque de fixation Kit solutions tampon pH 4, pH 7, H2O Manuel d’instructions 0000137191 Rev. 1.0 4 4. DONNÉES TECHNIQUES Alimentation : 100-240 Vc.a. 50/60 Hz 30 W Interrupteur : bord boîtier Mesures entrée : pH et Redox, au moyen de BNC o Échelle pH : 0-14,0 pH o Précision pH : +/-0,1 pH o Échelle Redox: 0÷1500mV o Précision Redox: +/-10 mV Échelle Températures : 0÷100 °C (capteur PT100) Débit pompes avec technologie Transaxle : o pH, pH-, pH+ 1,5 l/h (tuyau 6X10) 1,5 bar o Floculant : 0,4 l/h (tuyau 3X7), 1,5 l/h (tuyau 6X10) 1,5 bar Relais pompe PH-, pH : 10 A 250 V (Contact sec) Relais pour alarme ou pompe Redox: 10 A 250 V (Contact sec) Relais pompe PH+, Floculant : 10 A 250 V (Contact sec) Alimentation spécifique pour les pompes : 240 Vc.a. 10 W Signal entrée : 100-240 Vc.a. Sonde niveau : pH, Reox, Floculant Installer le régulateur Pool Basic Pro EVO sur un support rigide (mur vertical), dans un lieu facilement accessible pour l’opérateur. Fixer le régulateur Pool Basic Pro EVO au moyen de la plaque de fixation fournie avec le kit (entraxe de perçage de la plaque : 95 mm trou Ø 6). Avant de procéder à toute intervention à l’intérieur de l’appareil, s’assurer que les interrupteurs sont positionnés sur 0. Quand on dévisse d’un quart de tour les deux vis de la partie supérieure de l’appareil, le côté antérieur bascule sur les charnières. 0000137191 Rev. 1.0 5 5. INDICATIONS DE MONTAGE Longueur maximum du de câble : 6 6m. Lunghezza massima cavo: mt * NOTA 1 1 REMARQUE Pression maximum : 1,5 bar. Pressione Massima: 1,5 bar REMARQUE 2 * NOTA 2 4 3 5 2 6 1 0 7 * REMARQUE 1 : SUR LES PLUS GROSSES POMPES, AFIN D’ÉVITER DES PERTURBATIONS INDUITES PAR * NOTA 1: IL CAVO DEVE PASSARE IN UNA ZONA DIVERSA DA QUELLA DI ALIMENTAZIONE LE COURANT, LE CÂBLE DOIT PASSER DANS UNE ZONE ÉLOIGNÉE DES CÂBLES PER POMPE GROSSE, PER EVITARE DISTURBI DI CORRENTE. D’ALIMENTATION. **NOTA 2: LA2PRESSIONE MAX. DEVE SUPERIORE A 1,5 BAR. REMARQUE : LA PRESSION MAX.NON NE DOIT PASESSERE DÉPASSER 1,5 BAR. POUR AUGMENTER LA DURÉE DE VIE DU PER AUMENTARE LAÉGALE DURATA DEL TUBO, ÀLA PRESSIONE NON DEVE SUPERARE 1 BAR. TUYAU, ADOPTER UNE PRESSION OU INFÉRIEURE 1 BAR. NO NO 0000137191 Rev. 1.0 6 5.1 EXEMPLE D’APPLICATION BAC DE COMPENSATION FILTRE PH ÉCHANGEUR DE CHALEUR POMPE DE CIRCULATION Remarque : La distance linéaire de la canalisation entre la sonde et le point d’injection ne doit pas être inférieure à 60 cm. 0000137191 Rev. 1.0 7 6. DESCRIPTION DU CIRCUIT 1) 2) 3) 4) 5) 6) 7) 8) 9) 10) 11) 12) 13) 14) 15) 16) 17) Entrée mesure pH Entrée mesure Redox Entrée sonde température Entrée sonde de Niveau pour produit pH-/Floc Entrée sonde de Niveau pour produit Redox Entrée sonde de Niveau pour produit pH+/pH Entrée clavier Débit (pompe circulation) Relais pour produit pH-/pH, pompe extérieure Relais d’alarme ou pour produit Redox, pompe extérieure Relais pour produit pH+/Floc, pompe extérieure Entrée alimentation Interrupteur Fusible Alimentation pour pompe pH-/pH Alimentation pour pompe Redox Alimentation pour pompe pH+/Floc Net µChip Fuse 15 16 14 17 13 pH-/pH Pump RX Pump pH-/Flocc Pump Relay Relay Relay - +- + Input Input Temp Lev Lev Lev pH Rx Probe pH-/pH RX pH+/ Flocc 1 2 3 4 5 6 Input Flow RL pH-/ Alarm RL pH+/ Flocc pH 7 8 F N 12 9 10 11 7. MENU ÉTALONNAGE 7.1 ÉTALONNAGE Avant de continuer, il faut activer l’étalonnage. Faire défiler le menu Paramètres avancésCal, l’afficheur visualise : Afficheur Menu Étalonnage Programmation Param.Avances Cal Off Appuyer sur ENTER pour accéder au menu. Appuyer sur ENTER, puis sur les touches + et – pour modifier l’état de l’étalonnage. Cal Full Sélectionner Full et valider avec ENTER. Quitter le menu et revenir à l’état normal du système. Avanzato 0000137191 Rev. 1.0 8 7.1.1 Calibrage sonde pH Prélever de l’eau Calibrage Mesure pH Immerger la sonde dans la solution tampon ph 7 Attendre B.Solut. 59 s 7pH Laver la sonde Enlever la sonde du porte-sonde Presse CAL B.Solut. Appuyer sur la touche Cal pendant 3 secondes, puis, toujours avec Cal, valider la Mesure pH Qualite B.Solut. Appuyer sur Cal pour démarrer le calibrage avec une solution tampon pH 7 7pH 9 La durée du calibrage est de 1 minute 2 H2O Laver la sonde Qualité de la sonde Appoyeur sur CAL B.Solut. 4 pH 10 7pH Attendre B.Solut. 59 s 7pH 3 4 pH Immerger la sonde dans la solution tampon ph 4 Qualite B.Solut. Appuyer sur Cal pour démarrer le calibrage avec une solution tampon pH 4 4 pH 14 Qualité de la sonde 0000137191 La durée du calibrage est de 1 minute 2 H2O Laver la sonde Rev. 1.0 15 Remettre en place la sonde sur le porte-sonde et appuyer sur Cal pour terminer la procédure 9 7.1.2 Calibrage sonde Rédox Afin de pouvoir effectuer ce calibrage, il faut activer la mesure potentiel Rédox. Prélever de l’eau Immerger la sonde dans la solution tampon 465 mV Attendre B.Solut. 59 s 465 mV Enlever la sonde du porte-sonde Laver la sonde Calibrage Mesure Rx Appoyeur sur CAL B.Solut. 465 mV Appuyer sur la touche Cal pendant 3 secondes, puis, toujours avec Cal, valider la Mesure Rx Qualite B.Solut. Appuyer sur Cal pour démarrer le calibrage avec une solution tampon 465 mV 465 mV 9 La durée du calibrage est de 1 minute Qualité de la sonde 2 H2O Laver la sonde 10 Remettre en place la sonde sur le porte-sonde et appuyer sur Cal pour terminer la procédure 0000137191 Rev. 1.0 10 8. PROGRAMMATION Pour accéder au menu de programmation, appuyer en même temps sur les touches Cal et Set pendant au moins 3 secondes. Quand on relâche les touches, l’afficheur visualise : Affichage Langue Parametres Langue FR Programmation Appuyer sur Enter, puis sur les touches + et - pour modifier la langue : FR, EN, IT, ES, DE Le menu se présente de manière différente en fonction de la configuration adoptée : Configuration A : pH-/Rx/pH+ Configuration B : pH/Rx/Flocc Pour plus de détails, voir le menu Paramètres avancésConfiguration. Pour amorcer la pompe pH-/pH, appuyer sur la touche Flèche HAUT pendant au moins 3 secondes ; l’opération se termine quand on relâche la touche. La procédure pour amorcer la pompe pH+/FLOC est analogue, mais il faut appuyer cette fois sur la touche Flèche BAS, pendant au moins 3 secondes, pour amorcer la pompe Rédox, appuyer en même temps sur les touches UP et DOWN. Affichage Mesure pH Moins (Configuration A) Parametres Misure pH moins Misure pH moins Consigne 7.4 pH Misure pH moins Temps OFA Off Misure pH moins Alarm 8.4pH Misure pH moins Type PROP 0000137191 Programmation Appuyer sur Enter pour accéder aux sousmenus : Point de consigne Délai OFA Alarme Type Appuyer sur Enter, puis sur les touches + et - pour modifier la valeur du Point de consigne qui peut varier de (Set Point pH Plus + 0,4 pH) à 14 pH. Appuyer sur Enter, puis sur les touches + et - pour programmer le délai de OFA à OFF ou de 1 à 240 min. (voir Paragraphe 9.5). Appuyer sur Enter et sur les touches + et – pour programmer l’alarme, qui varie du Point de consigne + 0,1 pH à 14 pH. Cette alarme est visualisée sur l’afficheur. Appuyer sur Enter, puis sur les touches + et - pour modifier le type de dosage : PROP (voir Paragraphe 9.1). ON / OFF (voir Paragraphe 9.3). OFF (Dosage désactivé) Rev. 1.0 11 Affichage Mesure Rx (Configuration A ou B) Parametres Mode Rx Appuyer sur Enter, puis sur les touches + et - pour modifier la valeur du Point de consigne (0÷1500 mV). Mode Rx Consigne 760mV Appuyer sur Enter, puis sur les touches + et - pour modifier le type de Point de consigne: Basse Haute Appuyer sur Enter, puis sur les touches + et - pour programmer le délai de OFA à OFF ou de 1 à 240 min. (voir paragraphe 9.5). Appuyer sur Enter, puis sur les touches + et - pour programmer l’alarme de plage de 100 à 300 mV. Mode Rx Dosage Basse Mode Rx Temps OFA Off Mode Rx Alr Band 300mV Appuyer sur Enter, puis sur les touches + et - pour modifier le type de dosage : PROP (voir Paragraphe 9.2). ON / OFF (voir Paragraphe 9.4). OFF (Dosage désactivé) Mode Rx Type Programmation Appuyer sur Enter pour accéder aux sousmenus : Point de consigne Type Dos Délai OFA Bande ALR Type PROP Affichage Mesure pH Moins (Configuration A) Parametres Mesure pH plus Mesure pH plus Consigne 7.0 pH Mesure pH plus Temps OFA Off Mesure pH plus Alarm 6.0pH Mesure pH plus Type PROP 0000137191 Programmation Appuyer sur Enter pour accéder aux sousmenus : Point de consigne Délai OFA Alarme Type Appuyer sur Enter, puis sur les touches + et - pour modifier la valeur du Point de consigne qui peut varier de 0 pH à (Set Point pH Moins - 0,4 pH). Appuyer sur Enter, puis sur les touches + et - pour programmer le délai de OFA à OFF ou de 1 à 240 min. (voir Paragraphe 9.5). Appuyer sur Enter et sur les touches + et – pour programmer l’alarme, qui varie de 0 pH au Point de consigne – 0,1 pH. Cette alarme est visualisée sur l’afficheur. Appuyer sur Enter, puis sur les touches + et - pour modifier le type de dosage : PROP (voir Paragraphe 9.1). ON / OFF (voir Paragraphe 9.1). OFF (Dosage désactivé) Rev. 1.0 12 Affichage Mesure pH (Configuration B) Parametres Mode pH Appuyer sur Enter, puis sur les touches + et - pour modifier la valeur du Point de consigne (0÷14 pH). Mode pH Consigne 7.4 pH Appuyer sur Enter, puis sur les touches + et - pour modifier le type de Point de consigne: acide ; alcalin. Appuyer sur Enter, puis sur les touches + et - pour programmer le délai de OFA à OFF ou de 1 à 240 min. (voir paragraphe 9.5). Appuyer sur Enter, puis sur les touches + et - pour programmer l’alarme de plage de 1 à 3 pH. Mode pH Dosage Acide Mode pH Temps OFA Off Mode pH Alr Band 3.0pH Appuyer sur Enter, puis sur les touches + et - pour modifier le type de dosage : PROP (voir Paragraphe 9.2). ON / OFF (voir Paragraphe 9.4). OFF (Dosage désactivé) Mode pH Type PROP Affichage Mesure Floculant (Configuration B) Parametres Floculant Floculant Tube 6x10 0000137191 Programmation Appuyer sur Enter pour accéder aux sousmenus : Point de consigne Type Dos Délai OFA Bande ALR Type Programmation Appuyer sur Enter pour accéder aux sousmenus : Tuyau Conc Pompe Appuyer sur Enter pour modifier les dimensions du tuyau (3x7 ou 6x10 mm) : le système calcule automatiquement le débit avec le tuyau modifié sans qu’il ne faille changer aucun paramètre (un tuyau 6x10 est installé de série). Floculant Conc 1.0 cc/m3 Saisir la valeur de la concentration de produit que l’on veut doser ; avec le tuyau 3x7, la plage va de 1 à 4 cm3/m3, avec le tuyau 6x10, la plage va de 1 à 15 cm3/m3. Floculant Pompe 20 m3/h Saisir la valeur de la pompe de circulation de l’installation ; la valeur peut varier de 2 à 100 m³/h. Rev. 1.0 13 Afficheur Paramètres avancés Parametres Param. avances Conf. Pompes A: pH-/Rx/pH+ Relay config Rx Pump Param. avances Temp. 25°C Avanzato Debit On Avanzato Cal Full Avanzato Password **** 0000137191 Programmation Appuyer sur Enter pour accéder aux sousmenus : Config. Pompes Relay config Temp. Débit Cal Mot de passe Appuyer sur Enter pour modifier la configuration des pompes : Configuration A : la première pompe de gauche exerce la fonction pH-, la pompe au centre exerce la fonction Rédox et la pompe de droite exerce la fonction pH+ (pH-/Rx/pH+). Configuration B : la première pompe de gauche exerce la fonction pH, la pompe au centre exerce la fonction Rédox et la pompe de droite exerce la fonction Floculant (pH-/Rx/Floc). Appuyer sur Enter et sur les touches + et pour modifier la programmation du relais de sortie en fonction de la mesure du potentiel Rédox (Pompe RX) ou en fonction de l’activation d’une alarme (Alarm). Appuyer sur Enter et sur les touches + et – pour programmer la température de compensation, de 1 à 100 °C. Quand une sonde de température est connectée au système, cette option de menu n’est pas affichée et le système effectue la compensation en utilisant la valeur détectée par la sonde. Appuyer sur Enter, puis sur les touches + et - pour programmer le débit soit sur OFF soit sur ON, ce paramètre active / désactive l’entrée Flow (voir Paragraphe 10.0). Appuyer sur Enter, puis sur les touches + et - pour programmer l’étalonnage sur OFF ou le valider sur ON (Full). Appuyer sur Enter pour programmer le mot de passe d’accès et de modification du système. Modifier le chiffre avec la touche +, puis passer au chiffre suivant avec la touche –. Valider avec Enter. Rev. 1.0 14 Pour quitter les menus appuyer sur Esc et valider avec Enter les paramètres réglés. Afficheur Programmation Avec les touches + et –, choisir OUI ou NON, c’est-à-dire s’il faut ou non enregistrer la programmation. Valider avec Enter. Menù Exit Oui AFFICHAGE DE L’AFFICHEUR AVEC LE SYSTEME EN MODE VEILLE Fonctionnement L’affichage est divisé en 4 parties : l’indication de l’alarme est visualisée en haut à gauche, en cas d’activation ; la valeur détectée par la sonde pH est visualisée en bas à gauche. la valeur détectée par la sonde pH est visualisée en bas à droite. Afficheur en Veille (Configuration A) Alr 760mV 8.3pH Fonctionnement L’affichage est divisé en 4 parties : l’indication de l’alarme est visualisée en haut à gauche, en cas d’activation ; trois affichages peuvent apparaître en haut à droite : o le 1, avec le système en veille ; o le 2, avec le compte à rebours des 3 cm dosés par la pompe ; o le 3, avec le temps restant avant le prochain dosage, avec la mention FLOC ; la valeur détectée par la sonde pH est visualisée en bas à gauche. la valeur détectée par la sonde pH est visualisée en bas à droite. Afficheur en Veille (Configuration B) 1 Alr 760mV 8.3pH 2 Alr 760mV 1200cc 8.3pH 3 Alr 760mV FLOC 37m 8.3pH *Si Paramètres avancésDébit=On et que, pendant le dosage du Floculant, la pompe de circulation s’arrête et bloque le dosage du système ; quand la pompe redémarre, le Floculant recommence le dosage des cm3 calculés depuis le début. TOUCHES RAPIDES Quand le système est en mode Veille et que l’on appuie sur la touche SET pendant un temps supérieur à 3 secondes, on accède à un menu de paramétrage rapide : Affichage Paramétrage (Configuration A) pH-= 7.2 pH+= 7.0 Rx= 760 Affichage Paramétrage (Configuration B) pH= 7.2 Rx= 760 Floc= 1.0cc/m3 0000137191 Fonctionnement Quand la valeur de pH- clignote, la modifier avec + et – et valider avec Enter ; se porter sur la valeur de Rx ou pH+, la modifier avec la même procédure puis valider et quitter avec Enter. Fonctionnement Quand la valeur de pH clignote, la modifier avec + et – et valider avec Enter ; se porter sur la valeur du Rx ou Floculant, la modifier avec la même procédure puis valider et quitter avec Enter. Rev. 1.0 15 9. Méthode de dosage Le contrôle des pompes dans l’échelle pH et potentiel Rédox s’effectue au moyen de la fonction PWM. La plage proportionnelle est fixée sur les valeurs pH= 0,8 et potentiel Rédox = 120 mV. 9.1 DOSAGE PROPORTIONNEL PH-/PH+ L’instrument permet de contrôler et de modifier en automatique la mesure chimique par l’intermédiaire du Point de consigne pH- et pH+ en réglant le dosage au moyen du moteur du pH-/pH+ commandé en Temps Proportionnel. En configurant les paramètres suivants, on obtient le dosage illustré ci-après : P. de cons. pH = 8,10 pH P. de cons. pH += 6,90 pH Bande Proportionnelle = 0,80 pH Prop. Band Set Point pHSet Point pH+ Prop. Band Motore pH- Motore pH+ 0000137191 Rev. 1.0 16 9.2 Dosage proportionnel pH/Redox L’instrument permet de contrôler et de modifier en automatique la mesure chimique par l’intermédiaire du Point de consigne pH en réglant le dosage au moyen du moteur du pH commandé en Temps Proportionnel. En configurant les paramètres suivants, on obtient le dosage illustré ci-après : P. de cons. pH = 7,20 pH Type Dosage = Alcalin Bande Proportionnelle = 0,80 pH Set Point pH Prop. Band Motore pH 9.3 Dosage ON/OFF pH-/pH+ L’instrument permet de contrôler et de modifier en automatique la mesure chimique par l’intermédiaire du Point de consigne pH- et pH+ en réglant le dosage au moyen du moteur du pH-/pH+ commandé en ON/OFF. En configurant les paramètres suivants, on obtient le dosage illustré ci-après : P. de cons. pH = 8,10 pH P. de cons. pH += 6,90 pH Set Point pHSet Point pH+ Motore pH- Motore pH+ 0000137191 Rev. 1.0 17 9.4 Dosage ON/OFF pH/Redox L’instrument permet de contrôler et de modifier en automatique la mesure chimique par l’intermédiaire du Point de consigne pH en réglant le dosage au moyen du moteur du pH commandé en ON/OFF. En configurant les paramètres suivants, on obtient le dosage illustré ci-après : P. de cons. pH = 7,20 pH Type Dosage = Alcalin Set Point pH Motore pH 9.5 Alarme pour le Point de consigne pH/Redox En programmant la Bande d’alarme, on crée une fenêtre de fonctionnement. Quand on dépasse les seuils autorisés, le relais d’alarme se ferme et il reste fermé jusqu’au rétablissement de la mesure ou jusqu’à ce que l’on appuie sur la touche enter pour désactiver l’alarme. En configurant le temps OFA (Alarme de surcharge), on contrôle le dosage du Point de consigne pH en un temps partagé en deux alarmes : la première alarme s’affiche à 70% du temps programmé et le relais d’alarme se ferme; la deuxième alarme s’affiche à 100% du temps programmé, le relais d’alarme se ferme et le moteur du pH s’arrête. Quand on appuie sur la touche Enter, l’alarme est désactivée et le temps OFA est réinitialisé. ALR Band Set Point pH ALR Band Motore pH ALR Relè Remarque : En ce qui concerne le pH-/pH+, le fonctionnement est analogue. 0000137191 Rev. 1.0 18 10. ACTIVATIONS Fonction Débit Au moyen de la pompe de circulation. Entrée haute tension à 100 - 240 Vc.a., le système de dosage est activé. Entrée haute tension sur off (la pompe de circulation est arrêtée), le système de dosage affiche FLOW clignotant. 11. ALARMES Niv pH- = Alarme sonde niveau produit pH. Niv pH+ = Alarme sonde niveau produit pH. Niv pH = Alarme sonde niveau produit pH. Niv Floc = Alarme sonde niveau produit floculant. OFA pH/Rx= Le Point de consigne n’a pas été atteint dans le temps de OFA programmé* Plage pH/Rx= Elle s’affiche quand la valeur détectée est en-dehors de la plage Point de consigne +/- valeur de plage programmée. *Quand 70% du temps programmé s’est écoulé, le système affiche et active le relais correspondant, quand 100% du temps programmé s’est écoulé, il arrête le moteur. Appuyer sur la touche Enter pour restaurer l’alarme. Quand on appuie sur la touche Enter alors que l’alarme est activée, le relais correspondant est désactivé, mais il reste visualisé sur l’afficheur. 12. PARAMÈTRES DE CONTRÔLE PAR DÉFAUT Pour restaurer les valeurs et les paramètres par défaut : mettre hors tension l’appareil ; appuyer en même temps sur les touches + et - et les maintenir appuyées, puis remettre sous tension l’appareil ; valider le choix pour restaurer les paramètres par défaut. Paramètres d’usine : Configuration = A (pH-/Rx/pH+) Langue = UK (Inglese) Set Point pH- = 7,4 pH; OFF; Alr 8,4 pH; PROP Set Point Rx =750mV; Basse; OFF; Alr Band 300mV; PROP Set Point pH+ = 7,0 pH; OFF; Alr 6,0 pH; PROP Températures = OFF Calibrage = FULL Entrée Flux = ON Password = Désactive 0000137191 Rev. 1.0 19 13. LISTE DES ANOMALIES POSSIBLES ET REMÈDES CORRESPONDANTS ANOMALIE L’instrument indique toujours pH 7,00 L’instrument indique toujours une valeur élevée ou la mesure est toujours instable. Impossibilité de calibrer la valeur pH 7 Erreur visualisée sur l’afficheur Qualité de l’étalonnage de la sonde du pH < 20% CAUSE SOLUTION 1) Contrôler s’il y a des courts-circuits sur le câble de connexion électrode instrument (entre l’âme centrale du câble et Problème du câble et/ou du le blindage extérieur). connecteur. 2) S’assurer qu’il n’y a pas de traces d’humidité et/ou de condensation sur le connecteur de la sonde ou sur l’appareil. 3) Contrôler que la résistance mesurée entre les bornes 11 et 12 est de 100 . Le câble de connexion de Contrôler le câble. l’électrode est endommagé. Placer l’électrode en position verticale et le Bulle d’air dans la membrane secouer légèrement jusqu’à faire remonter de l’électrode. la bulle d’air. N.B. : L’électrode doit être en position verticale ou être incliné au maximum de 45°. Électrode usée. Remplacer l’électrode. Câble de connexion trop long ou trop proche d’un câble Réduire la distance entre l’appareil et la électrique : perturbations. sonde. S’assurer que la solution utilisée a un pH égal à 7. Solution tampon inadaptée. Contrôler le pH de la solution tampon à l’aide d’un pH-mètre électronique. Utiliser une nouvelle solution tampon avec pH 7 et répéter l’étalonnage. S’assurer que le matériau poreux de la Problème sur le matériau sonde est en bon état ; laver l’électrode poreux de la sonde, dépôts avec une solution à base d’acide dilué et de saletés. essuyer avec un chiffon doux. Électrode usée. Remplacer l’électrode. S’assurer que la solution utilisée a un pH égal à 4. Contrôler le pH de la solution tampon à l’aide d’un pH-mètre électronique. Utiliser une nouvelle solution tampon avec pH 4 et répéter l’étalonnage. Contrôler que le bulbe de l’électrode n’est Problème dans le bulbe de pas endommagé. Contrôler qu’il n’a pas l’électrode. séché en-dehors de l’eau. En dernier ressort, nettoyer l’électrode en la laissant immergée dans l’eau pendant quelques heures. Électrode usée. Remplacer l’électrode. Pendant la phase de calibrage, il NE FAUT Électrode chargée PAS essuyer l’électrode avec un chiffon ou d’électricité statique. avec du papier ; la laisser s’égoutter. Impossibilité de Solution tampon inadaptée. calibrer la valeur pH 4 Erreur visualisée sur l’afficheur Qualité de l’étalonnage de la sonde du pH < 20% Réponse lente de l’électrode. 0000137191 Rev. 1.0 20 14. ENTRETIEN Remplacement du tuyau : 0000137191 Rev. 1.0 21 15. RANGEMENT DE LA POMPE APRÈS L’UTILISATION Quand on range le dispositif de réglage, il est conseillé de pomper de l’eau claire afin de rincer le tuyau. Ensuite, positionner le porte-sonde sur 7h 05, en le tournant dans la direction indiquée par la flèche circulaire. Ces deux précautions faciliteront la réactivation successive de l’appareil. 0000137191 Rev. 1.0 22 AVERTISSEMENTS PRODUITS À UTILISER : Diminution du pH : produit à base d’acide sulfurique, disponible dans le commerce. Augmentation du pH : produit à base d’acide alcalin. PRODUITS DÉCONSEILLÉS Ne pas utiliser de l’acide chlorhydrique. Pour tous les autres produits, se renseigner auprès de l’installateur. AVERTISSEMENTS RELATIFS À LA SONDE Manipuler la sonde avec PRÉCAUTION. NE PAS AJOUTER une quantité excessive de produit chimique en amont de la sonde. Rangement de la sonde : Enlever la sonde pH de son porte-sonde. La ranger dans son flacon rempli d’eau du robinet. Si nécessaire, fermer le porte-sonde avec un bouchon de la grandeur d’une pièce de 5 centimes d’euro. Manipuler l’électrode pH avec précaution, car elle est constituée d’éléments en verre. Toutes nos électrodes sont testées en production avant d’être emballées. Aucune réparation sous garantie n’est prévue pour les électrodes, sauf en cas d’anomalie de fonctionnement lors de la première activation. L’emballage est exclu. Dans le cas susmentionné, afin de pouvoir accepter le retour de la sonde pour le contrôle, celle-ci doit obligatoirement être expédiée dans son emballage d’origine, avec le flacon correspondant rempli d’eau. ATTENTION AUX VAPEURS 2 mt SERBATOIO TANK RESERVOIR TANK 0000137191 Rev. 1.0 23 Manuale d'uso 0000137191 Rev. 1.0 1 INDICE 1. INTRODUZIONE GENERALE 2.PREECAUZIONI DI INSTALLAZIONE 3. IDENTIFICAZIONE DEI COMPONENTI 4. DATI TECNICI 5. INDICAZIONI MONTAGGIO 5.1 ESEMPIO DI APPLICAZIONE 6. DESCRIZIONE DEL CIRCUITO 7. MENU' CALIBRAZIONE 7.1 CALIBRAZIONE 7.1.1 Calibrazione sonda pH 7.1.2 Calibrazione sonda Redox 8. PROGRAMMAZIONE 9. METODO DI DOSAGGIO 10. ATTIVAZIONI 11. ALLARMI 12. PARAMETRI DI CONTROLLO PREDEFINITI 13. ELENCO DELLE POSSIBILI ANOMALIE E RIMEDI RELATIVI 14. MOVIMENTAZIONE 15. STOCCAGGIO DELLA POMPA DOPO L'USO AVVERTENZE 0000137191 Rev. 1.0 2 1. INTRODUZIONE GENERALE Il metodo di regolazione Pool Basic Pro EVO appartiene alla nuova gamma di strumenti sviluppati dal fornitore in modo accurato, per una gestione innovativa delle piscine. Questo dispositivo facile da utilizzare permette di controllare costantemente il pH. Le pompe peristaltiche hanno una portata di 1,5 l/h per la regolazione del pH e hanno una capacità d’iniezione in pressione fino a 1,5 bar. Questo apparecchio di facile utilizzo non necessita di particolari operazioni di manutenzione. E' dotato di una procedura di autoregolazione e di controllo automatico dello stato dell'elettrodo. 2. PRECAUZIONI DI INSTALLAZIONE ATTENZIONE !!! Prima di effettuare QUALSIASI intervento all'interno del pannello di comando dell'apparecchio Pool Basic Pro EVO, scollegarlo dalla rete di alimentazione. IL MANCATO RISPETTO DELLE ISTRUZIONI CONTENUTE NEL PRESENTE MANUALE POTREBBE PROVOCARE DANNI A PERSONE E/O ALL'APPARECCHIO. AVVERTENZA Durante l'installazione dell'apparecchio Pool Basic Pro EVO, procedere come segue: Assicurarsi che la tensione di alimentazione coincida con quella indicata sull'etichetta a lato dell'apparecchio. Assicurarsi che la pressione di iniezione sia inferiore a 1,5 bar. Assicurarsi che la calotta protettiva della pompa sia agganciata correttamente. Assicurarsi che il tubo di aspirazione sia immerso con il piedino relativo (tubo in PVC) nella vasca del prodotto da iniettare e che sia collegato alla pompa (simbolo sul coperchio ▲). In seguito alle verifiche di cui sopra, serrare il dado del raccordo. Collegare alla pompa un'estremità del tubo di mandata (simbolo sul coperchio ▼) e collegare l'altra estremità alla piscina per mezzo della valvola d'iniezione. N.B.: Per inserire il prodotto da iniettare nella pompa, durante la prima attivazione e ad ogni cambio di tanica, regolare l’interruttore in posizione marcia forzata della pompa tramite l'apposito pulsante. 0000137191 Rev. 1.0 3 3. IDENTIFICAZIONE DEI COMPONENTI A D B G F C E L M K H J I N pH P Instructions manual O PH 7 PH 4 H20 LEGENDA A. B. C. D. E. F. G. H. I. Regolatore Pool Basic Pro EVO Tubo di aspirazione in PVC Crystal 4x6 (4 m) x 2 Tubo di mandata in PE 4X6 (5 m) x 2 Elettrodo pH modello SPH-1 Elettrodo Redox Riduzione per valvola di iniezione x2 Valvola a labbro in FPM (3/8” GAS) x 2 Piedino di aspirazione (tubo in PVC) x 2 Collare di derivazione in carico per fissaggio PSS3 su tubo 2” =50 mm J. Collare di derivazione in carico per fissaggio valvola di iniezione su tubo 2” =50 mm x 2 K. L. M. N. O. P. Portasonda modello PSS3 (1/2” GAS) Tubo 3x7 Etichette da applicare sulle pompe Kit staffa di fissaggio Kit soluzione tampone pH 4, pH 7, H2O Manuale d’istruzione 0000137191 Rev. 1.0 4 4. DATI TECNICI Alimentazione: 100÷240 Vac 50/60 Hz 30 watt Interruttore: bordo scatola Misure ingresso: pH e Redox, tramite BNC o Scala pH: 0÷14,0 pH o Precisione pH: +/-0.1 pH o Scala Redox: 0÷1500mV o Precisione Redox: +/-10 mV Scala Temperature: 0÷100 °C (sensore PT100) Portata pompe con transaxle technology: o pH, pH-, pH+, Redox: 1.5 l/h (tubo 6X10) 1.5 bar o Flocculante: 0,4 l/h (tubo 3X7), 1.5 l/h (tubo 6X10) 1.5 bar Relè pompa pH-, pH: 10 A 250 V (Contatto secco) Relè pompa Redox o Allarme: 10 A 250 V (Contatto secco) Relè per pH+, Flocculante: 10 A 250 V (Contatto secco) Alimentazione dedicata per le pompe: 240 Vac 10 watt Segnale ingresso: 100÷240 Vac Sonda livello: pH, Redox, Flocculante Installare il regolatore Pool Basic Pro EVO su un supporto rigido (parete verticale), in un luogo facilmente accessibile per l'operatore. Fissare il regolatore Pool Basic Pro EVO mediante la staffa di fissaggio fornita insieme al kit (interasse di foratura della staffa: 95 mm. Foro Ø 6). Prima di eseguire qualsiasi intervento nella parte interna dell’apparecchio, assicurarsi che gli interruttori siano in posizione 0. Svitando le due viti della parte superiore dell’apparecchio di un quarto di giro, si ribalterà il lato anteriore sulle cerniere 0000137191 Rev. 1.0 5 5. INDICAZIONI DI MONTAGGIO Lunghezza massima de cavo: 6 mt * NOTA 1 Pressione Massima: 1,5 bar * NOTA 2 4 3 5 2 6 1 0 7 * NOTA 1: IL CAVO DEVE PASSARE IN UNA ZONA DIVERSA DA QUELLA DI ALIMENTAZIONE PER POMPE GROSSE, PER EVITARE DISTURBI DI CORRENTE. * NOTA 2: LA PRESSIONE MAX. NON DEVE ESSERE SUPERIORE A 1,5 BAR. PER AUMENTARE LA DURATA DEL TUBO, LA PRESSIONE NON DEVE SUPERARE 1 BAR. NO NO 0000137191 Rev. 1.0 6 5.1 ESEMPIO DI APPLICAZIONE VASCA COMPENSAZIONE FILTRO PH SCAMBIATORE DI CALORE POMPA RICIRCOLO Nota: La distanza lineare della canalizzazione fra la sonda ed il punto d'iniezione non deve essere inferiore a 60 cm. 0000137191 Rev. 1.0 7 6. DESCRIZIONE DEL CIRCUITO 1) Ingresso misura pH 2) Ingresso misura Redox 3) Ingresso sonda temperatura 4) Ingresso sonda Livello per prodotto pH-/Flocc 5) Ingresso sonda Livello per prodotto Redox 6) Ingresso sonda Livello per prodotto pH+/pH 7) Ingresso tastiera 8) Flusso (pompa ricircolo) 9) Relè per prodotto pH-/pH, pompa esterna. 10)Relè d’allarme o per prodotto Redox, pompa esterna. 11)Relè per prodotto pH+/Flocc, pompa esterna. 12)Ingresso alimentazione 13)Interruttore 14)Fusibile 15)Alimentazione per pompa pH-/pH 16)Alimentazione per pompa Redox 17)Alimentazione per pompa pH+/Flocc Net µChip Fuse 15 16 14 17 13 pH-/pH Pump RX Pump pH-/Flocc Pump Relay Relay Relay - +- + Input Input Temp Lev Lev Lev pH Rx Probe pH-/pH RX pH+/ Flocc 1 2 3 4 5 6 Input Flow RL pH-/ Alarm RL pH+/ Flocc pH 7 8 F N 12 9 10 11 7. MENÙ CALIBRAZIONE 7.1 Calibrazione Prima di procedere bisogna abilitare la calibrazione. Scorrere nel menù AvanzatoCal, il display visualizzerà: Display Menù Calibrazione Avanzato Cal Off Avanzato Cal Full Impostazioni Premere ENTER per accedere al menù. Premere ENTER e i tasti + e – per modificare la calibrazione. Selezionare Full e confermare con ENTER. Uscire dal menù e tornare nello stato normale del sistema. 0000137191 Rev. 1.0 8 7.1.1 Calibrazione sonda pH Prendere dell’acqua Calibrazione Misura pH Tenere la sonda nella soluzione tampone 7 pH Attendere B.Solut. 59s 7pH Lavare la sonda Togliere la sonda dal portasonda Premere il tasto Cal per 3 secondi e sempre con lo stesso confermare la Misura pH Qualita B.Solut. Premere CAL B.Solut. Premer Cal per avviare la calibrazione con una soluzione tampone 7 pH 7pH 9 La durata della calibrazione è di 1 minuto 10 2 H2O Lavare la sonda Qualità sonda Premere CAL B.Solut. 7pH 4pH Attendere B.Solut. 59s 7pH 3 4 pH Tenere la sonda nella soluzione tampone 4 pH Qualita B.Solut. Premer Cal per avviare la calibrazione con una soluzione tampone 4 pH 4pH 14 Qualità sonda 0000137191 La durata della calibrazione è di 1 minuto 2 H2O Lavare la sonda Rev. 1.0 15 Rimettere la sonda nel portasonda e premere per Cal per terminare 9 7.1.2 Calibrazione sonda Redox Per poter effettuare questa calibrazione bisogna abilitare la misura Redox Prendere dell’acqua Tenere la sonda nella soluzione tampone 465 mV Attendere B.Solut. 59s 465 mV Togliere la sonda dal portasonda Lavare la sonda Calibrazione Misura Rx Premere CAL B.Solut. 465 mV Premere il tasto Cal per 3 secondi e sempre con lo stesso confermare la Misura Rx Premer Cal per avviare la calibrazione con una soluzione tampone 465 mV Qualita B.Solut. 465 mV 9 La durata della calibrazione è di 1 minuto Qualità sonda 2 H2O Lavare la sonda 10 Rimettere la sonda nel portasonda e premere per Cal per terminare 0000137191 Rev. 1.0 10 8. PROGRAMMAZIONE Premendo contemporaneamente i tasti Cal e Set per almeno 3 secondi, si accede al menù di programmazione. Al rilascio dei tasti il display visualizza: Display Lingua Impostazioni Premendo Enter e i tasti + e - si modifica la lingua: FR, EN, IT, ES, DE Menù Lingua IT Il menù si presenterà differente a seconda della scelta della configurazione: Configurazione A: pH-/Rx/pH+ Configurazione B: pH/Rx/Flocc Per maggiori dettagli vedere il menù Avanzato Configurazione Per adescare la pompa pH-/pH premere il tasto UP per almeno 3 secondi al rilascio terminerà l’operazione, per adescare la pompa pH+/FLOCC eseguire la stessa procedura di prima premendo questa volta il tasto DOWN per almeno 3 secondi e per adescare la pompa Redox premere contemporaneamente i tasti UP e DOWN. Display Misura pH Minus (Configurazione A) Menù Misura pH minus Misura pH minus Setpoint 7.4 pH Premendo Enter e i tasti + e - si modifica il valore del Set Point che può variare da (Set Point pH Plus + 0,4 pH) a 14 pH. Misura pH minus Tempo OFA Off Premendo Enter e i tasti + e - si può impostare il tempo di OFA ad OFF o da 1 a 240 min (Ved. Paragrafo 9.5). Misura pH minus Alarm 8.4pH Misura pH minus Type PROP 0000137191 Impostazioni Con Enter si accede ai sottomenù: Setpoint Tempo OFA Alarm Type Premendo Enter e i tasti + e - si può impostare l’allarme che varia dal Set Point + 0.1 pH a 14 pH, questo allarme viene visualizzato sul display. Premendo Enter e i tasti + e - si modifica il tipo di dosaggio: PROP (Ved. Paragrafo 9.1) ON/OFF (Ved. Paragrafo 9.3) OFF (Dosaggio disabilitato) Rev. 1.0 11 Display Misura Rx (Configurazione A o B) Menù Misura Rx Premendo Enter e i tasti + e - si modifica il valore del Set Point (0÷1500 mV) Misura Rx Setpoint 760mV Premendo Enter e i tasti + e - si modifica il tipo di Set Point: Alto Basso Premendo Enter e i tasti + e - si può impostare il tempo di OFA ad OFF o da 1 a 240 min. (Ved. paragrafo 9.5) Premendo Enter e i tasti + e - si può impostare l’allarme di banda da 100 a 300 mV. Misura Rx Tipo Dos Alto Misura Rx Tempo OFA Off Misura Rx Alr Band 300mV Premendo Enter e i tasti + e - si modifica il tipo di dosaggio: PROP (Ved. Paragrafo 9.2) ON/OFF (Ved. Paragrafo 9.4) OFF (Dosaggio disabilitato) Misura Rx Type PROP Display Misura pH Plus (Configurazione A) Menù Misura pH plus Misura pH plus Setpoint 7.0 pH Misura pH plus Tempo OFA Off Misura pH plus Alarm 6.0pH Misura pH plus Type PROP 0000137191 Impostazioni Con Enter si accede ai sottomenù: Setpoint Tipo Dos Tempo OFA Alr Band Type Impostazioni Con Enter si accede ai sottomenù: Setpoint Tempo OFA Alarm Type Premendo Enter e i tasti + e - si modifica il valore del Set Point che può variare da 0 pH a (Set Point pH Minus – 0,4 pH). Premendo Enter e i tasti + e - si può impostare il tempo di OFA ad OFF o da 1 a 240 min (Ved. Paragrafo 9.5) Premendo Enter e i tasti + e - si può impostare l’allarme che varia da 0 pH al Set Point - 0.1 pH, questo allarme viene visualizzato sul display. Premendo Enter e i tasti + e - si modifica il tipo di dosaggio: PROP (Ved. Paragrafo 9.1) ON/OFF (Ved. Paragrafo 9.1) OFF (Dosaggio disabilitato) Rev. 1.0 12 Display Misura pH (Configurazione B) Menù Misura pH Premendo Enter e i tasti + e - si modifica il valore del Set Point (0÷14 pH) Misura pH Setpoint 7.4 pH Premendo Enter e i tasti + e - si modifica il tipo di Set Point: Acido Alcalino Premendo Enter e i tasti + e - si può impostare il tempo di OFA ad OFF o da 1 a 240 min. (Ved. paragrafo 9.5) Premendo Enter e i tasti + e - si può impostare l’allarme di banda da 1 a 3 pH. Misura pH Tipo Dos Acido Misura pH Tempo OFA Off Misura pH Alr Band 3.0pH Premendo Enter e i tasti + e - si modifica il tipo di dosaggio: PROP (Ved. Paragrafo 9.2) ON/OFF (Ved. Paragrafo 9.4) OFF (Dosaggio disabilitato) Misura pH Type PROP Display Misura Flocculante (Configurazione B) Menù Flocculante Flocculante Tubo 6x10 0000137191 Impostazioni Con Enter si accede ai sottomenù: Setpoint Tipo Dos Tempo OFA Alr Band Type Impostazioni Con Enter si accede ai sottomenù: Tubo Conc Pompa Con Enter si possono modificare le dimensioni del tubo (3x7 o 6x10 mm) e automaticamente il sistema calcolerà la portata con il diverso tubo senza cambiare nessun parametro(di fabbrica il sistema ha installato il tubo 6x10) Flocculante Conc 1.0 cc/m3 Inserire il valore della concentrazione di prodotto che si vuole dosare, con il tubo 3x7 il range va da 1 a 4cc/m3, con il tubo 6x10 il range va da 1 a 15cc/m3 Flocculante Pompa 20 m3/h Immettere il valore della pompa di ricircolo dell’impianto, il valore può variare da 2 a 100 m³/h Rev. 1.0 13 Display Avanzato Menù Avanzato Conf. Pompe A: pH-/Rx/pH+ Config. relè Pompa Rx Avanzato Temp. 25°C Avanzato Flusso On Avanzato Cal Full Avanzato Password **** Impostazioni Con Enter si accede ai sottomenù: Conf. Pompe Config. relè Temp. Flusso Cal Password Con Enter si può modifica re la configurazione delle pompe: Configurazione A: La prima pompa di sinistra svolgerà la funzione pH-, la pompa al centro la funzione Redox e quella di destra svolgerà la funzione pH+. (pH-/Rx/pH+). Configurazione B: La prima pompa di sinistra svolgerà la funzione pH, la pompa al centro la funzione Redox e quella di destra svolgerà la funzione Flocculante. (pH/Rx/Flocc). Premendo Enter e i tasti + e - si può modificare l’impostazione del relè d’uscita in funzione della misura del Redox (Pompa RX) o in funzione del verificarsi di un allarme (Alarm). Premendo Enter e i tasti + e - si può impostare la temperatura di compensazione da 1 a 100 °C, se collegata una sonda di temperatura questa voce di menù non verrà visualizzata, il sistema compenserà automaticamente col valore letto dalla sonda. Premendo Enter e i tasti + e – si può impostare il flusso a OFF oppure ad ON, questa voce abilita o disabilita l’entrata Flow (Ved. Paragrafo 10.0). Premendo Enter e i tasti + e – si può impostare la calibrazione ad OFF oppure abilitarla ad ON (Full). Premendo Enter si può impostare la password di accesso e modifica del sistema. Con il tasto + si modifica la cifra e con il tasto – si scorre alla cifra successiva e confermare con Enter Premere Esc per uscire dai vari menù e confermare con Enter le impostazioni settate. Display Impostazioni Con i tasti + e – posso scegliere SI o NO, Menù cioè se salvare o meno le impostazioni e Salva SI confermare con Enter. 0000137191 Rev. 1.0 14 VISUALIZZAZIONE DISPLAY CON IL SISTEMA IN STAND-BY Funzionamento Display Stand-by (Configurazione A) Alr 760mV 8.3pH Nel display è diviso in 4 parti : In alto a sinistra viene visualizzato l’allarme quando si verifica. In basso a sinistra viene visualizzato il valore letto dalla sonda di Rx. In basso a destra viene visualizzato il valore letto dalla sonda di pH Funzionamento Display Stand-by (Configurazione B) 1 Alr 760mV 8.3pH 2 Alr 760mV 1200cc 8.3pH 3 Alr 760mV FLOC 37m 8.3pH Nel display è diviso in 4 parti : In alto a sinistra viene visualizzato l’allarme quando si verifica. In alto a destra ci sono tre visualizzazioni : o La 1 col sistema in stand-by. o La 2 visualizza il countdown dei cc che la pompa sta dosando. o La 3 il tempo di attesa del prossimo dosaggio con la scritta FLOC. In basso a sinistra viene visualizzato il valore letto dalla sonda di Rx. In basso a destra viene visualizzato il valore letto dalla sonda di pH. *Se AvanzatoFlusso= On e durante il dosaggio del Flocculante la pompa di ricircolo dov’esse fermarsi e quindi bloccare il dosaggio del sistema, quando la pompa ripartirà il Flocculante ricomincerà il dosaggio dei cc calcolati dall’inizio. TASTI RAPIDI Con il sistema in stand-by premendo il tast SET per un tempo maggiore di 3 secondi si accede ad un menù di settaggio rapido: Funzionamento Display Set (Configurazione A) pH-= 7.2 pH+= 7.0 Rx= 760 Il valore del pH- lampeggia, posso modificarlo con + e – ,confermando con Enter, vado sul valore del Redox o del pH+, stessa procedura di prima, con Enter confermo ed esco. Funzionamento Display Set (Configurazione B) pH= 7.2 Rx= 760 Floc= 1.0cc/m3 0000137191 Il valore del pH lampeggia, posso modificarlo con + e – ,confermando con Enter, vado sul valore del Redox o del Flocculante, stessa procedura di prima, con Enter confermo ed esco. Rev. 1.0 15 9. METODO DOSAGGIO Il controllo delle pompe nella scala pH e Redox avviene tramite funzione PWM. La banda proporzionale è fissata su valori pH= 0.8 e Redox = 120 mV 9.1 Dosaggio proporzionale pH-/pH+ Lo strumento consente di controllare e modificare la misura chimica tramite i Set Point pH- e pH+ in automatico; regolando il dosaggio tramite i motori del pH-/pH+ comandati in Tempo Proporzionale. Impostando i seguenti parametri si ottiene il dosaggio riportato di sotto: Set point pH- = 8.10 pH Set point pH += 6.90 pH Banda Proporzionale = 0,80 pH Prop. Band Set Point pHSet Point pH+ Prop. Band Motore pH- Motore pH+ 0000137191 Rev. 1.0 16 9.2 Dosaggio proporzionale pH/Redox Lo strumento consente di controllare e modificare la misura chimica tramite il Set Point pH in automatico; regolando il dosaggio tramite il motore del pH/Redox comandato in Tempo Proporzionale. Impostando i seguenti parametri si ottiene il dosaggio riportato di sotto: Set point pH = 7.20 pH Tipo Dosaggio = Alcalino Banda Proporzionale = 0,80 pH Set Point pH Prop. Band Motore pH 9.3 Dosaggio ON-OFF pH-/pH+ Lo strumento consente di controllare e modificare la misura chimica tramite i Set Point pH- e pH+ in automatico; regolando il dosaggio tramite i motori del pH-/pH+ comandati in ON/OFF. Impostando i seguenti parametri si ottiene il dosaggio riportato di sotto: Set point pH- = 8.10 pH Set point pH += 6.90 pH Set Point pHSet Point pH+ Motore pH- Motore pH+ 0000137191 Rev. 1.0 17 9.4 Dosaggio ON-OFF pH/Redox Lo strumento consente di controllare e modificare la misura chimica tramite il Set Point pH in automatico; regolando il dosaggio tramite il motore del pH comandato in ON/OFF. Impostando i seguenti parametri si ottiene il dosaggio riportato di sotto: Set point pH = 7.20 pH Tipo Dosaggio = Alcalino Set Point pH Motore pH 9.5 Allarme per il Set Point pH/Redox Impostando la Banda allarme si crea una finestra di lavoro. Oltrepassando i limiti consentiti si chiude il relè d’allarme e rimane chiuso fino al ripristino della misura oppure premere il tasto enter per disattivare l’allarme. Impostando il tempo OFA (over feed Alarm) si controlla il dosaggio del Set Point pH/Redox in tempo suddiviso in due allarmi: Primo allarme al 70% del tempo impostato si visualizza sul display, il relè d’allarme si chiude. Secondo allarme al 100% del tempo impostato si visualizza sul display e si chiude il relè d’allarme e si blocca il motore del pH/Redox. Premendo il tasto Enter si elimina l’allarme e si inizializza il tempo di OFA. ALR Band Set Point pH ALR Band Motore pH ALR Relè Nota: Il funzionamento è analogo per quanto riguarda il pH-/pH+. 0000137191 Rev. 1.0 18 10. ATTIVAZIONI Funzione Flusso Tramite pompa di ricircolo. Ingresso ad alta tensione 100 ÷ 240 Vac, il sistema di dosaggio è acceso. Ingresso ad alta tensione è off (la pompa di ricircolo è spenta), il sistema di dosaggio visualizza FLOW lampeggiante. 11. ALLARMI Lev pH-= Allarme sonda livello prodotto pH. Lev pH+= Allarme sonda livello prodotto pH. Lev pH= Allarme sonda livello prodotto pH. Lev Rx= Allarme sonda livello prodotto Rx. Lev Flocc= Allarme sonda livello prodotto flocculante. OFA pH/Rx= Set Point non raggiunto con il tempo di OFA impostato* Banda pH/RX= Si visualizza quando il valore letto è al di fuori rispetto al SetPoint di +/- il valore di banda impostata. *Al 70% del tempo impostato il sistema visualizza e attiva il relè d’allarme, al 100% blocca il motore. Premendo il tasto Enter si ripristina l’allarme. Premendo il tasto Enter con l’allarme attivo il relè dello stesso si disattiva rimanendo visualizzato solo sul display. 12. PARAMETRI DI CONTROLLO PREDEFINITI Per ripristinare i valori e i parametri di default : Scollegare l’apparecchio Rimanere con i tasti + e – premuti contemporaneamente e collegare l’apparecchio Confermare la scelta per ripristinare i parametri di default Parametri default: Configurazione = A (pH-/Rx/pH+) Lingua = UK (Inglese) Set Point pH- = 7,4 pH; OFF; Alr 8,4 pH; PROP Set Point Rx = 750mV; Basso; OFF; Alr Band 300mV; PROP Set Point pH+ = 7,0 pH; OFF; Alr 6,0 pH; PROP Temperatura = 25°C Calibrazione = FULL Ingresso Flusso = ON Password = Disabilitata 0000137191 Rev. 1.0 19 13. ELENCO DELLE POSSIBILI ANOMALIE E RIMEDI RELATIVI ANOMALIA Lo strumento indica sempre il pH 7.00 Lo strumento indica sempre un valore elevato o costantemente instabile Impossibile calibrare il pH 7 valore Errore visualizzato sul display Qualità di taratura della sonda del pH < 20% Impossibile calibrare il pH 4 Qualità di taratura della sonda del pH < 20% 0000137191 SOLUZIONE 1) Verificare eventuali corti circuiti sul cavo di collegamento elettrodo strumento (fra l’anima centrale del cavo e la schermatura Problema del cavo e/o del esterna). connettore. 2) Assicurarsi che non ci siano tracce di umidità e/o di condensa sul connettore della sonda o sull'apparecchio. 3) Assicurarsi che la resistenza 100 sia presente fra i morsetti 11 e 12. Cavo di collegamento Verificare il cavo. dell'elettrodo danneggiato. Mettere l’elettrodo in posizione verticale e Bolla d'aria nella membrana scuoterlo leggermente fino a fare risalire la dell'elettrodo. bolla d'aria. N.B.: L’elettrodo deve trovarsi in posizione verticale o essere inclinato di 45° al massimo. Elettrodo usurato. Sostituire l'elettrodo. Cavo di collegamento troppo lungo o troppo vicino ad un Ridurre la distanza fra l'apparecchio e la cavo elettrico: disturbi. sonda. Assicurarsi che la soluzione utilizzata abbia un pH 7. Soluzione tampone Verificare il pH della soluzione tampone inadeguata. con un pH-metro elettronico. Utilizzare una nuova soluzione tampone con pH 7 e ricominciare la taratura. Assicurarsi che il materiale poroso della Problema sul materiale sonda sia in buono stato; lavare l'elettrodo poroso della sonda, depositi con una soluzione a base di acido diluito e di sporco. asciugare con un panno morbido. Elettrodo usurato. Sostituire l'elettrodo. Assicurarsi che la soluzione utilizzata abbia tampone un pH 4. Verificare il pH della soluzione tampone con un pH-metro elettronico. Utilizzare una nuova soluzione tampone con pH 4 e ricominciare la taratura. Assicurarsi che il bulbo dell’elettrodo non Problema nel bulbo sia danneggiato. Assicurarsi che non si sia dell’elettrodo. asciugato fuori dall'acqua. Come ultima risorsa, pulire l'elettrodo lasciandolo immerso nell'acqua per alcune ore. Elettrodo usurato. Sostituire l'elettrodo. Durante la fase di taratura, l'elettrodo NON Elettrodo caricato DEVE essere asciugato con un panno o elettrostaticamente. con carta; lasciarlo sgocciolare. Soluzione valore inadeguata. Errore visualizzato sul display Risposta dell'elettrodo CAUSA lenta Rev. 1.0 20 14. MOVIMENTAZIONE Sostituzione del tubo: Sbloccare il coperchio tirando in alto il raccordo di sinistra. Posizionare il rullino alle 10 e 20, girandolo nel senso della freccia circolare. 0000137191 Posizionare il rullino alle 10 e 20, girandolo nel senso della freccia circolare. Inserire il raccordo di sinistra nella sede relativa e passare il tubo sotto la guida del rullino. Girare il portasonda nel senso della freccia circolare, accompagnando contemporaneamente il tubo nella testa della pompa, fino a raggiungere il raccordo a destra. Rev. 1.0 Sbloccare completamente il raccordo di sinistra mantenendolo teso verso l'esterno e girare il rullino nel senso della freccia circolare, in modo da liberare il tubo fino al raccordo a destra. Frecce indicanti la direzione del liquido. Posizionare la calotta della pompa rispettando la direzione delle frecce (▲▼) e premere con forza sulla superficie, in modo da bloccarla correttamente. 21 15. STOCCAGGIO DELLA POMPA DOPO L'USO Al momento di riporre il dispositivo di regolazione, si consiglia di pompare l'acqua pulita per sciacquare il tubo. In seguito, posizionare il portasonda alle 7 e 05, girandolo nella direzione indicata dalla freccia circolare. Queste due precauzioni faciliteranno la successiva riattivazione dell'apparecchio. 0000137191 Rev. 1.0 22 AVVERTENZE PRODOTTI DA UTILIZZARE: Diminuzione del pH: prodotto a base di acido solforico, reperibile facilmente in commercio. Aumento del pH: prodotto a base di acido alcalino PRODOTTI SCONSIGLIATI Non utilizzare acido cloridrico. Per tutti gli altri prodotti, farsi consigliare dall'installatore. AVVERTENZE SULLA SONDA Manipolare la sonda con PRECAUZIONE. NON INSERIRE UN APPORTO ECCESSIVO di prodotto chimico a monte della sonda. Stoccaggio della sonda: Estrarre la sonda pH dal relativo portasonda. Stoccarla nel flacone originale riempito d'acqua di acquedotto. Se necessario, chiudere il portasonda con un tappo grande come una moneta di 5 centesimi di euro. Siccome l'elettrodo pH è composto di elementi in vetro, manipolarlo con cura. Tutti i nostri elettrodi sono testati nella linea di produzione, prima di essere imballati. Non sono previste riparazioni in garanzia degli elettrodi, se non in caso di mancato funzionamento alla prima attivazione. L'imballaggio è escluso. In questo caso, affinché la sonda possa essere accettata per essere osservata, dovrà pervenirci obbligatoriamente dentro l'imballaggio originale, provvista del relativo flacone riempito d'acqua. ATTENZIONE AI VAPORI 2 mt SERBATOIO TANK RESERVOIR TANK 0000137191 Rev. 1.0 23